

Page 1

IvoBase® Hybrid
IvoBase
Instructions for Use
Page 7
Gebrauchsinformation
Seite 11
Mode d’emploi
Page 15
Istruzioni d’uso
Pagina 19
Instrucciones de uso
Pagina 23
Instruções de uso
Página 27
Bruksanvisning
Sidan 31
Brugsanvisning
Side 35
®
High Impact
Käyttöohjeet
Sivu 39
Bruksanvisning
Side 43
Productinformatie
Pagina 47
Oδηγίες Xρήσεως
Σελίδα 51
Kullanma Talimatı
Sayfa 55
àÌÒÚÛ͈Ëfl
ëÚ. 59
Instrukcja u˝ytkowania
Strona 64
For dental use only!
Caution: U.S. Federal law restricts this device to sale by or on the order of a licensed dentist
Made in Liechtenstein
Ivoclar Vivadent AG, FL-9494 Schaan / Liechtenstein
1
Page 2
List of parts / Teileverzeichnis / Liste des pièces / Elenco particolari /
Lista de repuestos / Lista de partes / Förteckning över delarna / Liste over dele /
Osaluettelo / Liste over delene / Onderdelenoverzicht / Κατάλογος μερών /
Parça listesi / è˜Â̸ ÒÓÒÚ‡‚Ì˚ı ˜‡ÒÚÂÈ / Lista elementów
A B
A1
A2
B2
A3
A4
C
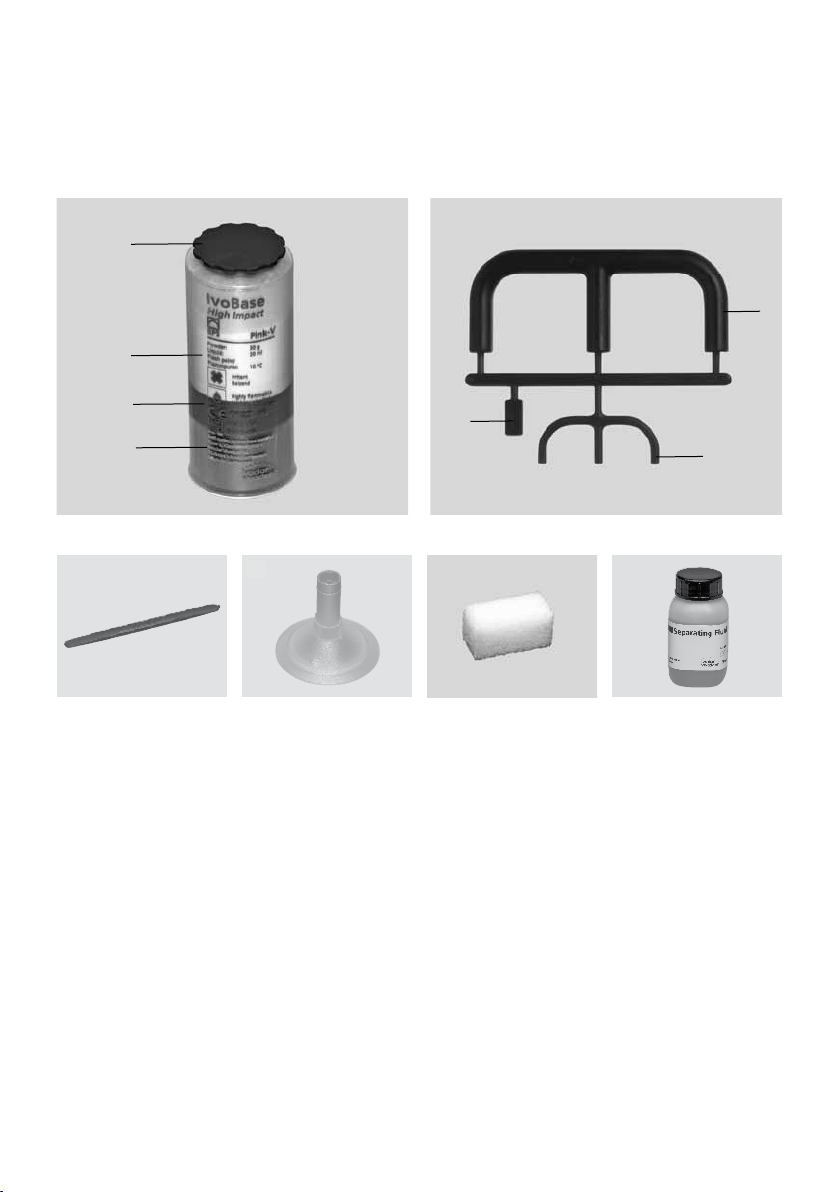
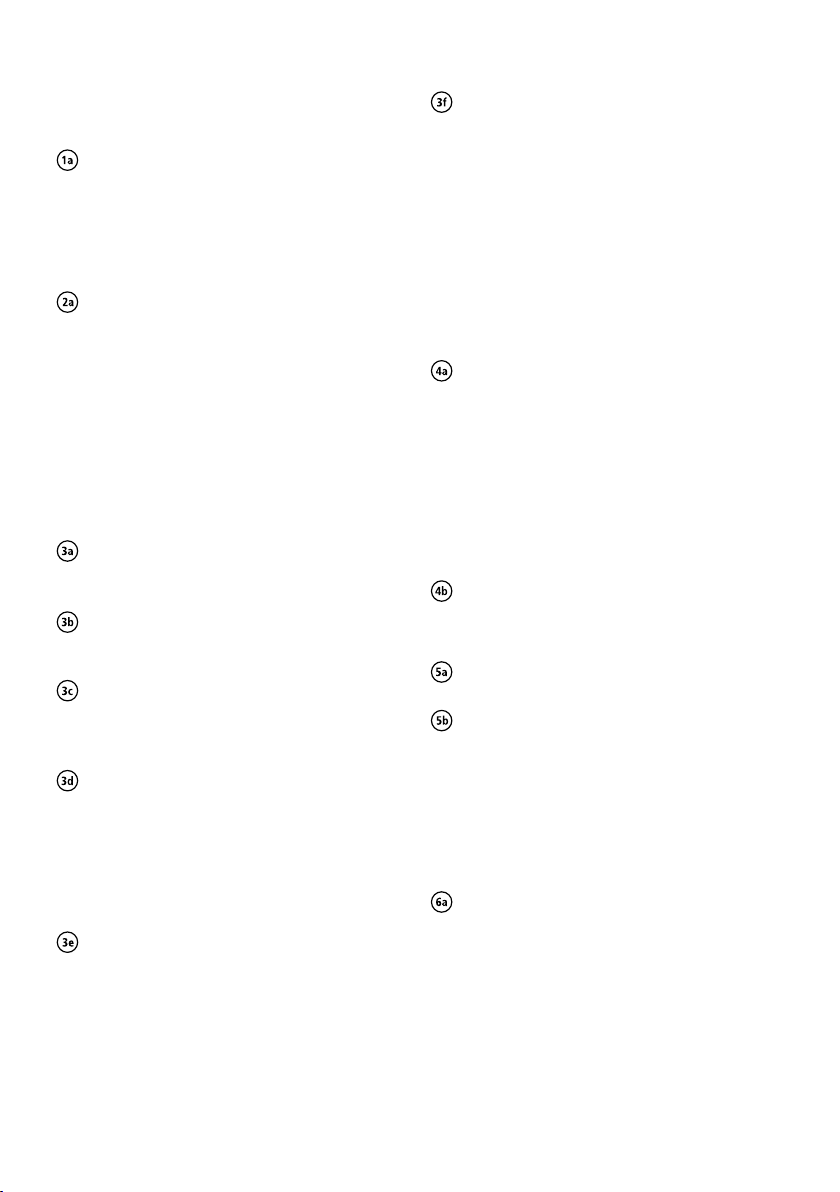
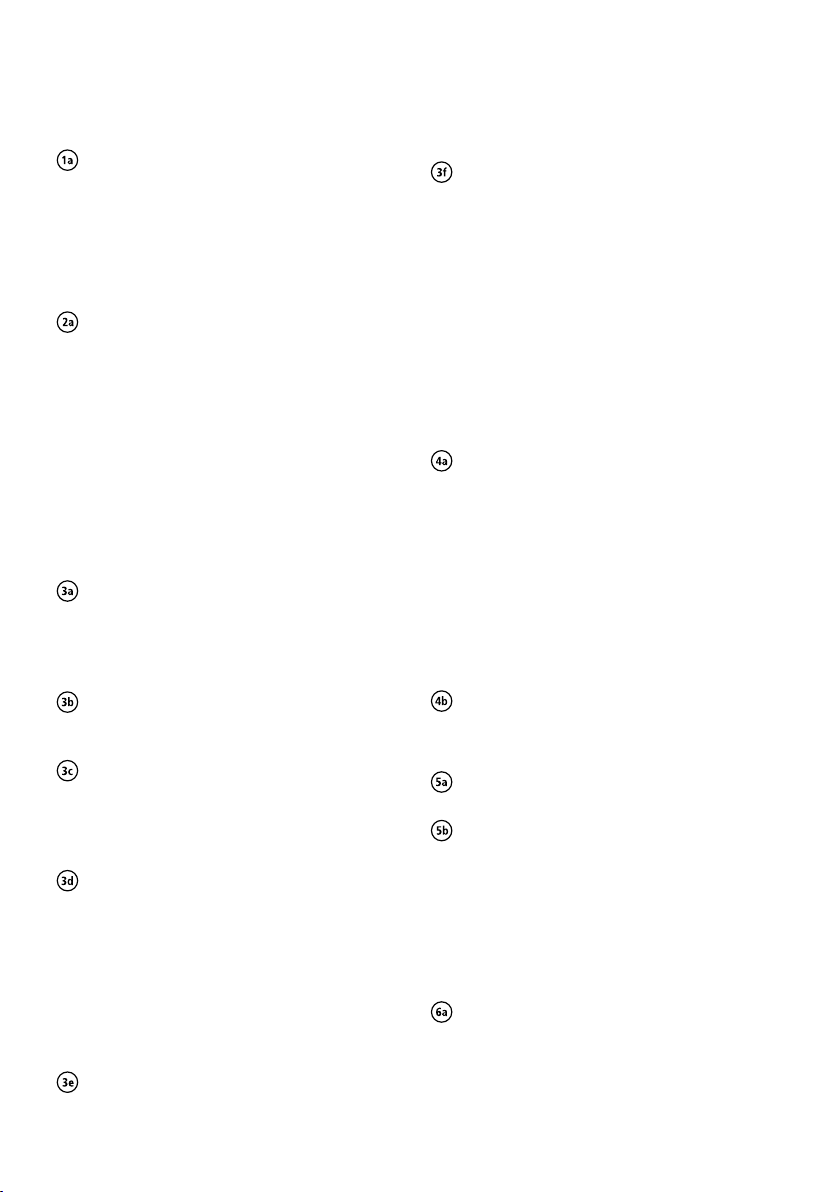
List of parts
A) IvoBase capsule
A1 Capsule seal
A2 Capsule
A3 Plunger
A4 Monomer container
B) IvoBase wax components
B1 Filter wax component
B2 Injection wax component
B3 Aeration wax component
C) Spatula
D) IvoBase funnel
E) Aeration filter
F) Separating Fluid
D E
B1
C
Teileverzeichnis
A) IvoBase-Kapsel
A1 Kapselverschluss
A2 Kapsel
A3 Kolben
A4 Monomerbehälter
B) IvoBase-Wachsteile
B1 Filterwachsteil
B2 Injektionswachsteil
B3 Entlüftungswachsteil
C) Spatel
D) IvoBase-Trichter
E) Entlüftungsfilter
F) Separating Fluid
B3
F
Liste des pièces
A) Capsule IvoBase
A1 Couvercle de la capsule
A2 Capsule
A3 Piston
A4 Réservoir à monomère
B) Composants IvoBase
en cire
B1 Réplique en cire du filtre
B2 Canaux d‘injection en cire
B3 Évents en cire
C) Spatule
D) Entonnoir IvoBase
E) Filtre à air
F) Separating Fluid (isolant)
2
Page 3

Elenco particolari
A) IvoBase capsula
A1 tappo di chiusura della
capsula
A2 capsula
A3 pistone
A4 contenitore del monomero
B) IvoBase componenti
in cera
B1 Filtro componente in cera
B2 Canali di iniezione
componente in cera
B3 Canali di areazione
componente in cera
C) Spatola
D) IvoBase imbuto
E) Filtro di areazione
F) Separating Fluid
Förteckning över delarna
A) IvoBase kapsel
A1 Kapselns försegling
A2 Kapsel
A3 Kolv
A4 Monomerbehållare
B) IvoBase vaxdelar
B1 Filtervaxdel
B2 Injektionsvaxdel
B3 Luftningsvaxdel
C) Spatel
D) IvoBase tratt
E) Luftningsfilter
F) Separervätska
Liste over delene
A) IvoBase-kapsel
A1 Kapseltetning
A2 Kapsel
A3 Stempel
A4 Monomerbeholder
B) IvoBase-vokskomponenter
B1 Filtervokskomponent
B2 Injeksjonsvokskomponent
B3 Utluftningsvokskomponent
C) Spatel
D) IvoBase-trakt
E) Utluftningsfilter
F) Skillevæske
Parça listesi
A) IvoBase kapsülü
A1 Sızdırmaz kapsül kapa¤ı
A2 Kapsül
A3 Piston
A4 Monomer kabı
B) IvoBase mum bileflenleri
B1 Filtre mum bilefleni
B2 Enjeksiyon mum bilefleni
B3 Havalandırma mum bilefleni
C) Spatula
D) IvoBase hunisi
E) Havalandırma filtresi
F) Ayırma Sıvısı
Lista de repuestos
A) Cápsula IvoBase
A1 Precinto de la cápsula
A2 Cápsula
A3 Émbolo
A4 Envase de monómero
B) Componentes de cera
IvoBase
B1 Componente de cera para el
filtro
B2 Componente de cera de
inyección
B3 Componente de cera de
aireación
C) Espátula
D) Embudo IvoBase
E) Filtro de aire
F) Líquido de separar
Liste de partes
A) Cápsula IvoBase
A1 Selamento da cápsula
A2 Cápsula
A3 Êmbolo
A4 Recipiente do monômero
B) Componentes de cera
IvoBase
B1 Filtro do componente de cera
B2 Injeção do componente de
cera
B3 Aeração do componente de
cera
C) Espátula
D) Funil IvoBase
E) Filtro de aeração
F) Fluido isolante
Liste over dele
A) IvoBase-kapsel
A1 Kapsellåg
A2 Kapsel
A3 Stempel
A4 Monomerbeholder
B) IvoBase-vokskomponenter
B1 Filtervokskomponent
B2 Injektionsvokskomponent
B3 Iltningsvokskomponent
C) Spatel
D) IvoBase-tragt
E) Iltningsfilter
F) Separationsvæske
Osaluettelo
A) IvoBase-kapseli
A1 Kapselin korkki
A2 Kapseli
A3 Mäntä
A4 Monomeerisäiliö
B) IvoBase-vahaosat
B1 Suodatinvahaosa
B2 Ruiskutusvahaosa
B3 Ilmausvahaosa
C) Lasta
D) IvoBase-suppilo
E) Ilmaussuodatin
F) Separating Fluid
-irrotusneste
Onderdelenoverzicht
A) IvoBase-capsule
A1 capsuledop
A2 capsule
A3 piston
A4 monomeerhouder
B) IvoBase-wasonderdelen
B1 filterwasonderdeel
B2 injectiewasonderdeel
B3 ontluchtingswasonderdeel
C) spatel
D) IvoBase-trechter
E) ontluchtingsfilter
F) separating fluid
Κατάλογος μερών
A) Κάψουλα IvoBase
A1 Σφράγιση κάψουλας
A2 Κάψουλα
A3 Έμβολο
A4 Περιέκτης μονομερούς
B) Κέρινα εξαρτήματα
IvoBase
B1 Κέρινο εξάρτημα φίλτρου
B2 Κέρινο εξάρτημα έγχυσης
B3 Κέρινο εξάρτημα αερισμού
C) Σπάτουλα
D) Χωνί IvoBase
E) Φίλτρο αερισμού
F) Υγρό διαχωρισμού
è˜Â̸ ÒÓÒÚ‡‚Ì˚ı ˜‡ÒÚÂÈ
A) ä‡ÔÒÛ· IvoBase
A1 Н˚¯Н‡ Н‡ФТЫО˚
A2 Н‡ФТЫО‡
A3 ФУ¯ВМ¸
A4 ВПНУТЪ¸ ‰Оfl ПУМУПВ‡
B) IvoBase ‚ÓÒÍÓ‚˚Â
Á‡„ÓÚÓ‚ÍË
B1 = ‚ÓÒÍÓ‚‡fl Á‡„ÓÚӂ͇-
ПВТЪУ‰ВК‡ЪВО¸ ‰Оfl
ЩЛО¸Ъ‡
B2 = ‚УТНУ‚‡fl ОЛЪМЛНУ‚‡fl
Á‡„ÓÚӂ͇
B3 = ‚ÓÁ‰ÛıÓÓڂӉ̇fl ‚ÓÒÍÓ‚‡fl
Á‡„ÓÚӂ͇
C) ¯Ô‡ÚÂθ
D) ‚ÓÓÌ͇ IvoBase
E) ÙËÎ¸Ú ‚ÓÁ‰ÛıÓÓÚ‚Ó‰‡
F) Separating Fluid
Lista elementów
A) Kapsu∏a IvoBase
A1 Zamkni´cie kapsu∏y
A2 Kapsu∏a
A3 T∏ok
A4 Pojemnik z monomerem
B) Elementy woskowe
IvoBase
B1 Filtr z wosku
B2 Kana∏ wtryskowy z wosku
B3 Kana∏ odpowietrzajàcy
z wosku
C Szpatu∏ka
D Lejek wtryskowy IvoBase
E Filtr odpowietrzajàcy
F P∏yn izolacyjny
3
Page 4
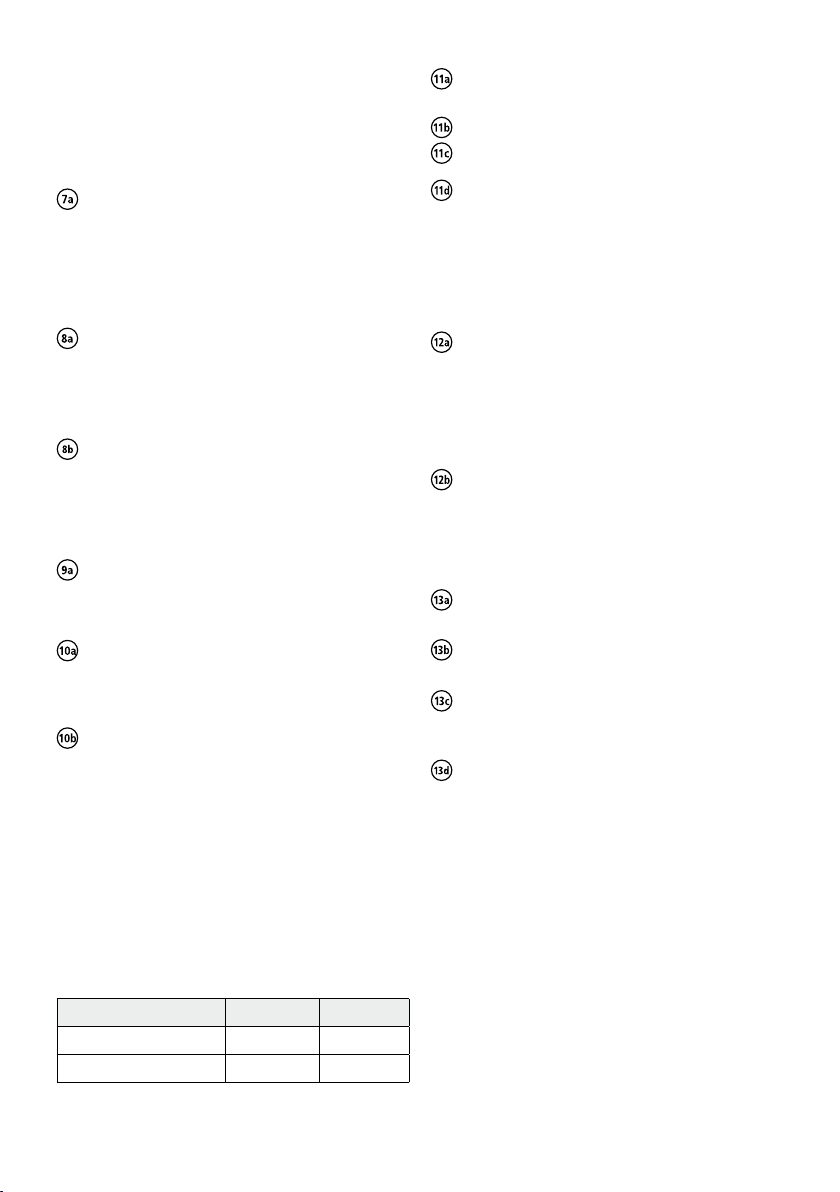
Step-by-step procedure / Verarbeitung / Mise en oeuvre / Istruzioni d’uso /
Instrucciones de Uso / Procedimentos passo a passo / Arbetsgång steg-för-steg /
4
Page 5
Trinvis procedure / Käsittely / Trinnvis fremgangsmåte / Verwerking /
Διαδικασία βήμα-προς-βήμα / Adım adım uygulama süreci / é·‡·ÓÚ͇ ò‡„ Á‡ ¯‡„ÓÏ /
Post´powanie „Krok po kroku”
5
Page 6
6
Page 7

Instructions for Use
Please read these Instructions for Use care-
fully and familiarize yourself with the use
of the material. Please also refer to the
Operating Instructions of the IvoBase
Injector.
Product description
The IvoBase system consists of a PMMA-based denture
base material and the IvoBase Injector specifically
developed for the material. The system enables fully
automated and shrinkage-compensated polymerization
of dentures.
The IvoBase material combines the advantages of heatand auto-curing denture base materials. Even though it is
subject to the requirements placed on auto-curing polymers, it also meets the stricter normative requirements
for heat-curing polymers. IvoBase may thus be
considered a hybrid material. In addition to the conventional hybrid material, IvoBase is also available as an
impact-resistant material version: IvoBase High Impact.
The following shades are available:
– IvoBase Hybrid:
Pink, Pink-V, Preference, Clear, Pink-V Implant,
Preference Implant
– IvoBase High Impact:
Pink, Pink-V, Preference, Pink-V Implant, Preference
Implant, 34-V
Composition
– IvoBase Hybrid
Powder:
Polymethyl methacrylate, softener, initiator, pigments
Liquid:
Methyl methacrylate, dimethacrylate, catalyst
– IvoBase High Impact:
Powder:
High-impact-modified PMMA copolymer, PMMA
copolymer, polymethyl methacrylate, softener,
initiator, pigments
Liquid:
Methyl methacrylate, dimethacrylate, catalyst
Indication
– Complete denture prosthetics
– Partial denture prosthetics
– Combined denture prosthetics
– Hybrid denture prosthetics
– Implant prosthetics
– Relines
– Repairs
Contraindication
If the patient is known to be allergic to any ingredients.
Intraoral use of unpolymerized material.
Side effects
In individual cases local allergic reactions to methyl
methacrylate materials have been reported.
Safety notes
– Monomer contains methyl methacrylate (MMA)
– MMA is highly flammable and irritating, flash point:
+10 °C/50 °F.
– MMA is irritating to eyes, respiratory organs and
skin.
– Skin contact may cause sensitization.
– Avoid skin contact with monomer and unpoly-
merized material. Commercial medical gloves do not
provide protection against the sensitizing effect of
methacrylates.
– Do not inhale vapours.
– Keep away from sources of ignition – do not smoke.
– Prevent monomer from reaching the sewage system.
– Take measures against electrostatic charge.
Notes on processing
– Thoroughly soak models in water before investment.
– Thoroughly isolate inner flask surfaces before
investment.
– Clean and isolate stone surfaces.
– Closely observe polymerization and cooling times.
– Contact of solvents or monomer with polymerized
denture base material may lead to white
discolouration.
– When using cervical isolations, Ivoclar Vivadent
recommends A-silicones with a hardness of
>65 Shore A (e.g. Flexistone Plus/Virtual® Heavy
Body Fast). Condensation cross-linking silicones
(C-silicones) may have a damaging effect on the
denture base material.
– The products may only be used and processed by
trained personnel.
– Post-injection of a second capsule of IvoBase or
SR Ivocap® material into an already filled flask is not
possible.
– The remaining material of an already injected
IvoBase capsule cannot be used again.
– Dried stone must be soaked in water prior to
injection.
– A contaminated flask may lead to smoke
development when heated.
– Store in a humid environment from the
completion of the dentures to their incorporation.
7
Page 8
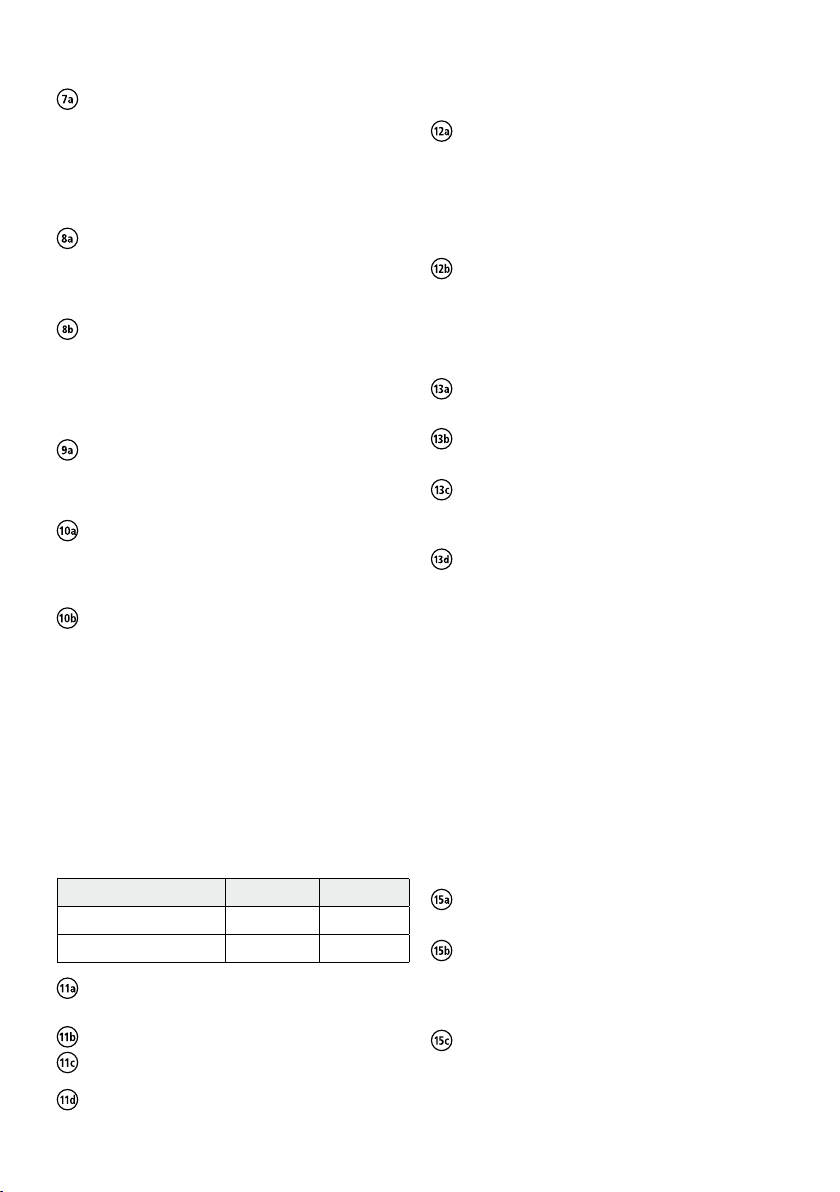
Processing
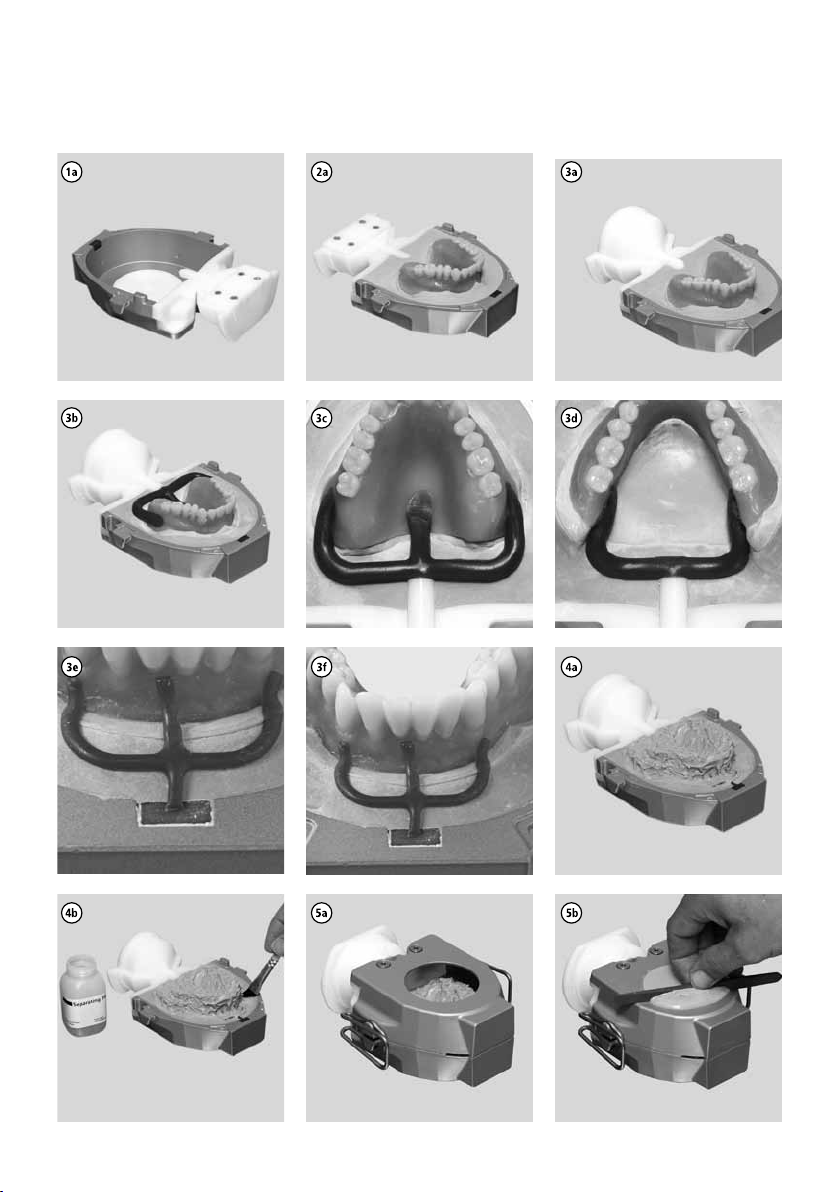
Preparing for injection
1. Preparing the flask
Isolate the inner surfaces of the clean flask halves
with a thin layer of petroleum jelly.
Place the flask lid, access former half and the filter wax
component (B1) in one of the flask halves from the
inside.
2. Investing the model
Invest the well-soaked and isolated model in one of
the flask halves using conventional dental stone
(Class III). Skim off the excess stone in such a way
that it is flush with the model and the edge of the
flask housing.
Important: The stone edge must be flush with the
access former half.
3. Positioning the wax components
The wax of the wax components (B) can be placed on
the model without any additional wax-up. Make sure
that no stone can flow below the wax components.
Allow the stone to set thoroughly. Remove the
access former half and place the access former full.
– Place the injection wax component (B2)
Press the injection wax component (B2) onto the
incline of the access former full.
Maxillary complete dentures
Position a sprue at the centre of the palate roof and
on the vestibular side of each upper cusp and press
the wax onto the model.
Mandibular complete dentures
Place one sprue each to the lingual area of the
retromolar triangle. Cut off the centre sprue of the
injection wax component (B2).
Partial dentures
Place a sprue at the dorsal end of each denture
saddle.
– Place the aeration wax component (B3)
Press the aeration wax component with the aeration
channel to the centre of the filter wax component.
Important: The aeration channels must not come
into contact with the flask housing when being
pressed into place in order to ensure the tightness of
the flask.
Mandibular and maxillary complete dentures:
Press the three channels of the aeration wax
component (B3) to the anterior area of the
contouring.
Partial dentures:
Press the three channels of the aeration wax
component (B3) to the anterior stops of the denture
saddles. If the aeration wax component (B3) is not
long enough, the connection between the denture
saddle and the filter wax component has to be
completed with a wax sprue observing the shortest
possible distance.
4. Investment with silicone
Cover the vestibular and palatal and/or lingual
surfaces of the contoured dentures with silicone. Do
not cover the occlusal surfaces and incisal edges of
the teeth. Apply a retentive pattern in the surface of
the silicone before it sets or use retention sand to
secure the silicone in the stone.
Note: For optimum results, the use of a flowable,
addition cross-linking silicone (A-silicone with a Shore-A
hardness of >65) is recommended (e.g. Flexistone Plus or
Virtual Heavy Body Fast).
Isolate stone-to-stone contact surfaces with
Separating Fluid (F).
5. Casting the counter model
Position the upper flask half and lock using the
locking clasps.
Mix conventional dental stone (Class III) according
to the instructions of the manufacturer and have it
flow in flowable consistency into the opening of the
flask without any air bubbles with the help of a
shaker. Skim off excess stone with the IvoBase
spatula so that no stone protrudes from the flask
opening.
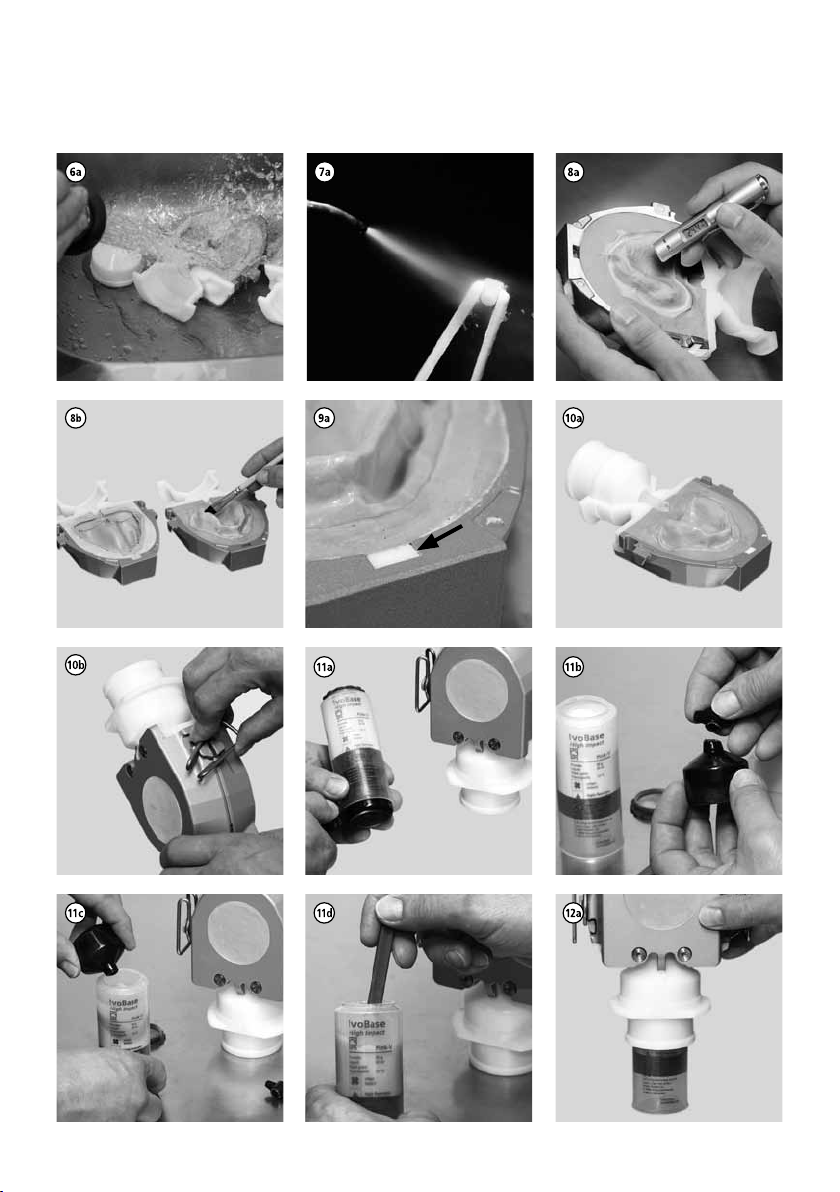
6. Boiling out the model
Once the stone has entirely set, heat the flask in a
water bath at approximately 90 °C (194 °F) for
approximately 5–8 minutes. After that, open the
flask, remove the access former full and roughly
remove the wax using a wax knife. Now thoroughly
boil out the inner surfaces with clean, boiling water.
Note: Use only pure water without additives
(e.g. wax solvent, cleaning agent). Additives may result
in a discolouration of the dentures.
8
Page 9
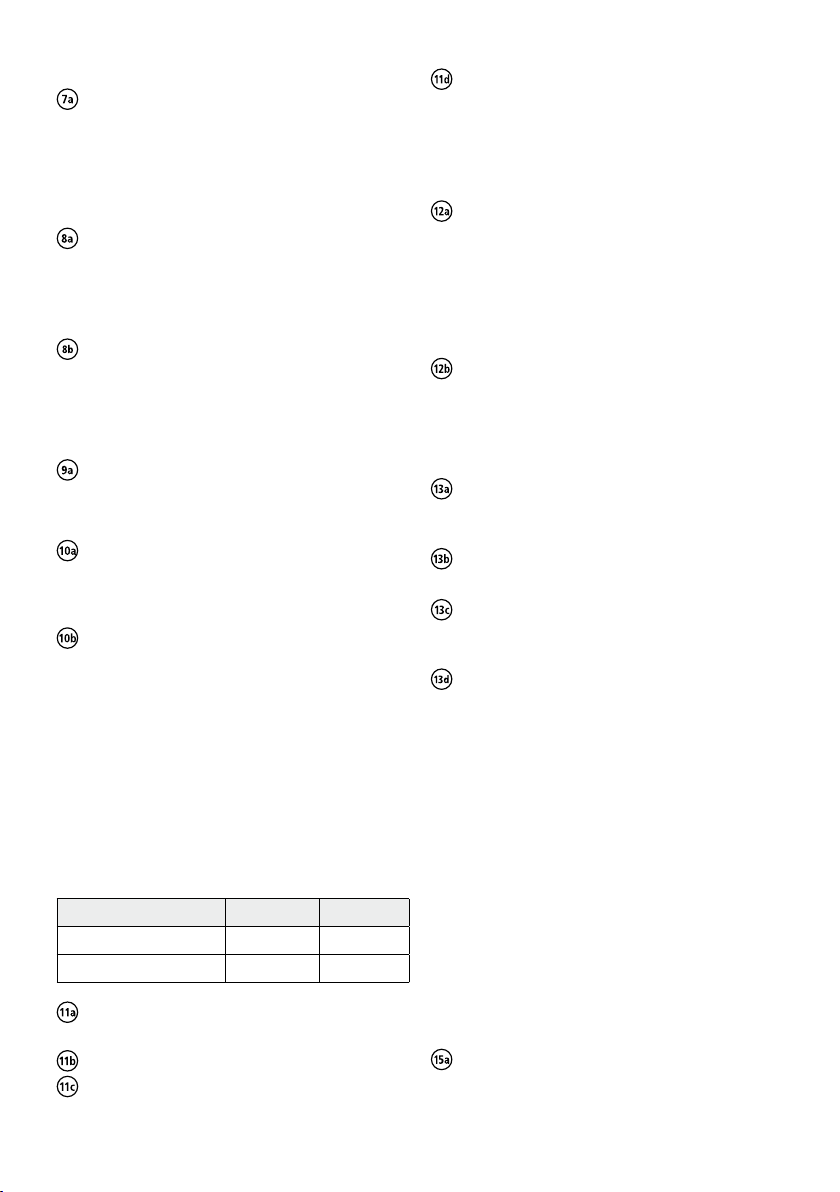
7. Teeth
For an optimum bond, tooth necks and the basal
tooth surfaces must be absolutely free of wax.
Slightly blast the basal and cervical tooth surfaces
(100 µm Al2O3, 2 bar / 29 psi) or roughen them with
a dental tungsten carbide bur.
8. Isolating the stone surfaces
Important: Before isolation, cool the flask halves to
room temperature (<30 °C / 86 °F) using air or
clean, cold water. The exact flask temperature can
be checked with the help of an IR thermometer.
Isolate the clean surfaces of the plaster model with
Separating Fluid (F). Apply a second coat after
5 minutes. Pooling (e.g. in the gingivo-buccal fold)
must be prevented.
9. Placing the aeration filter
Insert the aeration filter (E) flush into the
corresponding recess in the flask.
10. Placing funnel and centring insert
Push the IvoBase funnel (D) into the centring insert
until it snaps into place so that it is locked. Place the
centring insert with the inserted funnel (D) in the
lower flask half.
Assemble the flask halves and lock using the locking
clasps.
Injection and polymerization
The operation of the IvoBase Injector is described in
detail in the corresponding Operating Instructions. The
IvoBase Injector must be brought to its stand-by state
before the material is mixed.
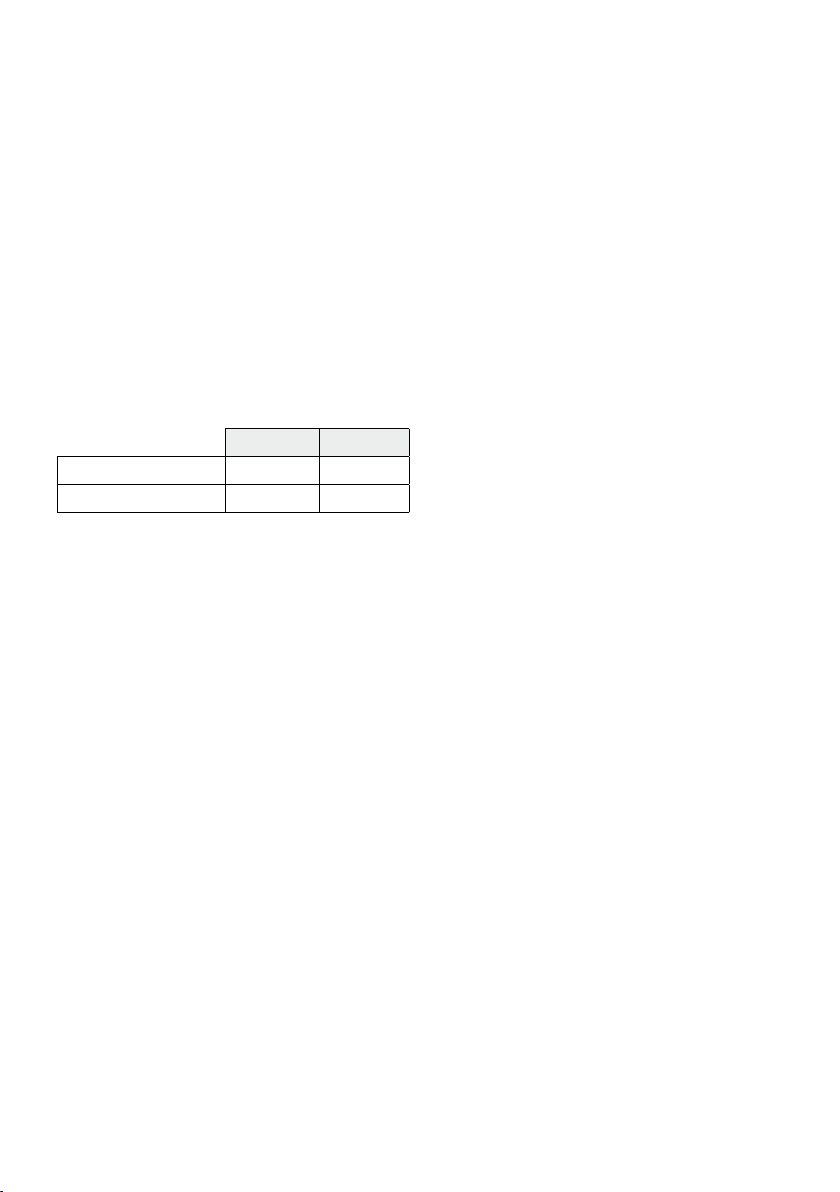
11. Mixing the material
One capsule is sufficient for the injection of a maxillary
or mandibular complete denture.
Contents of the capsule: Monomer Polymer
IvoBase Hybrid 20 ml 34 g
IvoBase High Impact 20 ml 30 g
Remove the monomer container (A4) from the
capsule. Remove the capsule seal (A1).
Twist off the sealing cap of the monomer container
(A4) and pour the liquid into the open capsule (A2).
Use the spatula (C) to mix the monomer and poly-
mer in the capsule to a homogeneous mixture (for
approximately 20–30 seconds).
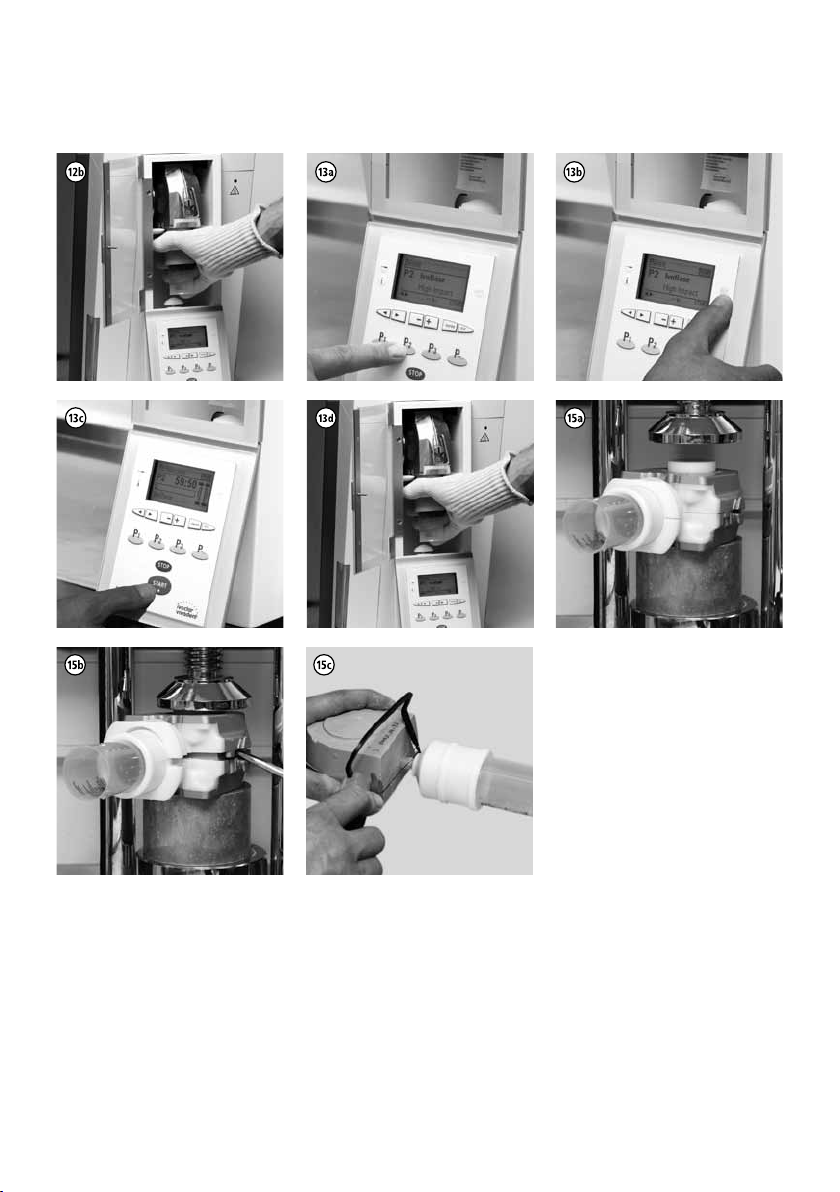
12. Loading the Injector
Proceed as follows within 5 minutes after mixing:
Place the open capsule (A) on an even surface and
press the flask onto the capsule (A).
Note: Do not tilt the flask with the capsule prior to
polymerization to prevent the material from flowing out
of the capsule (A). When the flask is lifted, the capsule
(A) must be located securely in the centering insert.
Open the door of the Injector. Slide the flask with
the capsule (A) into the polymerization chamber
until it stops via the flask holder. Close the door of
the Injector.
13. Starting the program
Select the corresponding program (see Operating
Instructions of the Injector for a program overview).
If desired, activate the RMR key in order to reduce
the residual monomer content to <1%.
Press “Start”. The fully automated injection process
begins. The remaining process time is indicated in
the display.
At the end of the program, an acoustic signal
sounds. Use the thermal glove to remove the hot
flask from the Injector by holding it by the isolation
shoulder. The Injector is ready for the next polymerization immediately after the the flask is removed.
Note: The flask may still be very hot when removed
form the Injector. Burn hazard!
14. Cooling the flask
Cool the flask under cold running water for at least
15 minutes. As an alternative, cooling may also take
place in the Injector (e.g. over night).
Important: If the flask is not cooled down and opened
at too high a temperature, inaccuracies of fit may result.
15. Divesting the dentures
Remove the locking clasps.
Place the flask under a dental press. Secure the
divesting aid between stone and pressing plate.
Slide a broad screw driver or plaster knife into the
joint between the two flask haves and lever the
upper flask half upwards. Remove the flask from the
press, turn it around and repeat the procedure.
Remove the stone core with the capsule and sepa-
rate the capsule at the sprue using a separating disk
bur or saw. Divest the denture from the stone core
as usual with stone tongs.
9
Page 10
16. Finishing the dentures
The polymerized IvoBase material is finished with crosscut tungsten carbide burs, sandpaper and polishing
media as it is usual for denture base materials.
Repair / extension relining with ProBase Cold
The procedure corresponds to that used for repairing
conventional auto-curing denture base materials. Please
refer to the ProBase Cold Instructions for Use for details.
Repair / relining
IvoBase can be repaired with itself as well as with
ProBase® Cold auto-curing polymer.
Repair / extension with IvoBase Hybrid /
High Impact
Basically, an IvoBase denture can be repaired without
investment in the IvoBase flask. The basic procedure
corresponds to that used for repairing conventional autocuring denture base materials.
Observe the mixing ratio as follows:
Polymer Monomer
IvoBase Hybrid 9 g 5 g
IvoBase High Impact 8 g 5 g
The polymer and monomer must be homogeneously
mixed (for approximately 20 seconds).
Please observe the following processing times (at 23 °C /
73 °F) room temperature):
– Duration of the dough phase: 30 seconds
– Duration of the pouring phase: 1–2 minutes
– Duration of the modelling phase: 3–5 minutes
The maximum total processing time after mixing is
10 minutes.
Polymerize the material in a pressure pot for 20 minutes
at 55 °C / 131 °F at 2.5 bar / 36 psi pressure.
Storage instructions
– Store material in a cool, dark and well ventilated
place.
– Storage temperature: 2–28 °C / 36–82 °F.
– Do not use the products after the indicated
expiration date.
– Keep material out of children’s reach.
Classification according to EN ISO 20795-1, Type 2,
Class 1
The product meets the requirements of EN ISO 207951:2008.
Date information prepared: 10/2011
Manufacturer:
Ivoclar Vivadent AG FL-9494 Schaan / Liechtenstein
This material has been developed solely for use in dentistry. Processing should be carried
out strictly according to the Instructions for Use. Liability cannot be accepted for damages
resulting from failure to observe the Instructions or the stipulated area of application. The
user is responsible for testing the material for its suitability and use for any purpose not
explicitly stated in the Instructions. Descriptions and data constitute no warranty of
attributes.
Relining with IvoBase Hybrid / High Impact
The relining of an IvoBase denture may be carried out
with or without investment in the IvoBase flask.
a) Relining without investment in the IvoBase flask
The procedure without investment in the IvoBase
flask is the same as that for relining with conventional auto-curing denture base materials.
b) Relining with investment in the IvoBase flask
Investment and completion for the relining of a den-
ture is basically the same as for the completion of a
waxed-up denture. Make sure that
– the sprues and aeration channels are attached to
the impression of the relining.
– the area to be relined demonstrates a thickness of
at least 2 mm.
10
Page 11

Gebrauchsinformation
Bitte lesen Sie diese Gebrauchsinformation
aufmerksam durch und machen Sie sich mit
der Anwendung vertraut. Beachten Sie
auch die Bedienungsanleitung des IvoBase
Injector.
Produktbeschreibung
Das IvoBase-System besteht aus auf PMMA basierendem
Prothesenbasismaterial und einem eigens entwickelten
IvoBase-Injektionsgerät. Das System ermöglicht, Prothesen voll automatisch und schrumpfungsausgleichend zu
polymerisieren.
Das Material IvoBase vereint die Vorzüge von heiss- und
autopolymerisierenden Prothesenkunststoffen. Obwohl es
den Anforderungen an Autopolymerisaten unterliegt,
erfüllt es selbst die strengeren normativen Anforderungen
für Heisspolymerisate. IvoBase kann somit als HybridMaterial bezeichnet werden. Neben dem konventionellen
IvoBase-Hybrid-Material ist eine besonders bruchsichere
Materialqualität verfügbar: IvoBase High Impact.
Folgende Farben sind erhältlich:
– IvoBase Hybrid:
Pink, Pink-V, Preference, Clear, Pink-V Implant,
Preference Implant
– IvoBase High Impact:
Pink, Pink-V, Preference, Pink-V Implant, Preference
Implant, 34-V
Zusammensetzung
– IvoBase Hybrid
Pulver:
Polymethylmethacrylat, Weichmacher, Initiator,
Pigmente
Flüssigkeit:
Methylmethacrylat, Dimethacrylat, Katalysator
– IvoBase High Impact
Pulver:
Schlagzäh-modifiziertes PMMA Copolymer, PMMA
Copolymer, Polymethylmethacrylat, Weichmacher,
Initiator, Pigmente
Flüssigkeit:
Methylmethacrylat, Dimethacrylat, Katalysator
Indikation
– Totalprothetik
– Teilprothetik
– Kombinationsprothetik
– Hybridprothetik
– Implantatprothetik
– Unterfütterungen
– Reparaturen
Kontraindikation
Bei erwiesener Allergie gegen einen der Bestandteile.
Anwendung von unpolymerisiertem Material im intraoralen Bereich.
Nebenwirkungen
In Einzelfällen wurden bei methylacrylathaltigen
Materialien lokale allergische Reaktionen beschrieben.
Gefahrenhinweise
– Monomer enthält Methylmethacrylat (MMA).
– MMA ist leicht entzündlich und reizend, Flammpunkt
+ 10 °C.
– MMA reizt die Augen, Atmungsorgane und Haut.
– Sensibilisierung durch Hautkontakt möglich.
– Hautkontakt mit Monomer und unausgehärtetem
Material vermeiden. Handelsübliche medizinische
Handschuhe bieten keinen Schutz vor dem sensibili-
sierenden Effekt von Methacrylaten.
– Dämpfe nicht einatmen.
– Von Zündquellen fernhalten – nicht rauchen.
– Monomer nicht in die Kanalisation gelangen lassen.
– Massnahmen gegen elektrostatische Aufladungen
treffen.
Hinweise zur Verarbeitung
– Modelle vor dem Einbetten wässern.
– Küvetteninnenflächen vor dem Einbetten isolieren.
– Gipsflächen reinigen und isolieren.
– Polymerisations- und Abkühlzeit genau einhalten.
– Kontakt von Lösungsmitteln oder Monomer mit
polymerisiertem Prothesenmaterial kann zu Weiss-
färbungen führen.
– Bei der Verwendung von Zahnhalsisolierungen, emp-
fiehlt Ivoclar Vivadent die Verwendung von
A-Silikonen mit einer Härte >65 Shore A
(z. B. Flexistone Plus/Virtual® Heavy Body Fast).
Kondensationsvernetzende Silikone (K-Silikone) kön-
nen sich schädigend auf das Prothesenmaterial aus-
wirken.
– Das Produkt darf nur von geschultem Personal
bedient und verarbeitet werden.
– Die Nachinjektion einer zweiten Kapsel IvoBase oder
von SR Ivocap®-Material in eine bereits befüllte
Küvette ist nicht möglich.
– Das verbleibende Material einer bereits injizierten
IvoBase-Kapsel kann nicht wiederverwendet werden.
– Ausgetrockneter Gips muss vor der Injektion ge -
wässert werden.
– Eine unsaubere Küvette kann bei Einwirkung von
Hitze zu Rauchentwicklung führen.
– Nach der Fertigstellung die Prothese bis zur
Eingliederung feucht lagern.
11
Page 12

Verarbeitung
Vorbereitung zur Injektion
1. Küvette vorbereiten
Die Innenseiten der sauberen Küvettenhälften dünn
mit Vaseline isolieren.
Den Küvettendeckel und den Kanalformer halb und das
Filterwachsteil (B1) von innen in einer der beiden
Küvettenhälften platzieren.
2. Modellation einbetten
Das gut gewässerte und isolierte Modell mit einem
konventionellen Dentalgips (Klasse III) in der einen
Küvettenhälfte einbetten. Den überschüssigen Gips
bündig mit dem Modell und der Kante des
Küvettengehäuses abziehen.
Wichtig: Die Gipskante muss bündig mit dem
Kanalformer halb abschliessen.
3. Wachsteile anbringen
Das Wachs der Wachsteile (B) kann an die Modellation
ohne zusätzliches Anwachsen angebracht werden. Es ist
dabei darauf zu achten, dass kein Gips unter die Wachsteile fliessen kann.
Den Gips vollständig aushärten lassen. Den „Kanal-
former halb“ entnehmen und den „Kanalformer
voll“ einlegen.
– Injektionswachsteil (B2) anbringen
Das Injektionswachsteil (B2) über die Schräge des
„Kanalformer voll“ drücken.
Oberkiefer-Totalprothese
Einen Injektionskanal zum Gaumendach mittig und
je einen Injektionskanal vestibulär zu beiden Oberkieferhöckern legen und das Wachs an die
Modellation andrücken.
Unterkiefer-Totalprothese
Je einen Injektionskanal zum lingualen Bereich des
retromolaren Dreiecks legen. Den mittleren Injektionskanal des Injektionswachsteils (B2) abtrennen.
Partialprothese:
Jeden Prothesensattel separat am dorsalen Ende mit
einem Injektionskanal versehen.
– Entlüftungswachsteil (B3) anbringen
Das Entlüftungswachsteil (B3) mit dem zusammen-
führenden Kanal mittig auf das Filterwachsteil
drücken.
Wichtig: Die Entlüftungskanäle dürfen nicht in
Kontakt mit dem Küvettengehäuse angedrückt wer-
den, um die Dichtheit der Küvette zu gewährleisten.
Unterkiefer- und Oberkiefer-Totalprothese:
Die drei Kanäle des Entlüftungswachsteils (B3)
anterior an die Modellation andrücken.
Partialprothese:
Die drei Kanäle des Entlüftungswachsteils (B3) an
den anterioren Begrenzungen der Prothesensättel
andrücken. Bei unzureichender Länge des Entlüftungswachsteils (B3) muss die Verbindung zwischen
Prothesensattel und Filterwachsteil auf kürzestem
Weg mit einem kanalförmigen Wachs vervollständigt
werden.
4. Einbetten mit Silikon
Die vestibulären und palatinalen bzw. lingualen
Flächen der modellierten Prothese mit Silikon
ab decken. Die Okklusalflächen und Inzisalkanten der
Zähne nicht bedecken. Vor dem Aushärten des
Silikons retentive Muster in die Oberfläche des
Silikons einbringen oder Retentionssand verwenden,
sodass die Silikonform im Gips verankert wird.
Hinweis: Für optimale Resultate wird die Verwendung
eines dünnfliessenden, additionsvernetzenden Silikons
(A-Silikon) mit einer Shore-A-Härte von >65 empfohlen
(z. B. Flexistone Plus oder Virtual Heavy Body Fast).
Die Gips-zu-Gips-Kontaktflächen durch Auftragen
von Separating Fluid (F) isolieren.
5. Konter giessen
Die obere Küvettenhälfte aufsetzen und mit den
Verschlussklammern verschliessen.
Konventionellen Dentalgips (Klasse III) nach Her-
stellerangaben anrühren und auf einem Rüttler in
dünnflüssiger Konsistenz in die Öffnung der Küvette
blasenfrei einfliessen lassen. Mit dem IvoBase-Spatel
den überstehenden Gips plan abziehen, sodass kein
Gips aus der Küvettenöffnung heraussteht.
6. Modellation ausbrühen
Nach vollständigem Aushärten des Gipses die
Küvette bei ca. 90 °C im Wasserbad während
5–8 Min. anwärmen. Anschliessend die Küvette öffnen, „Kanalformer voll“ herausnehmen und das
Wachs grob mit einem Wachsmesser entfernen. Die
Innenflächen nun gründlich mit sauberem,
kochendem Wasser ausbrühen.
Hinweis: Zum Ausbrühen reines Wasser ohne Zusätze
(z. B. Wachslöser, Reinigungsmittel) verwenden. Zusatzstoffe können zu Verfärbungen der Prothese führen.
12
Page 13
7. Zähne
Die Zahnhälse und basalen Zahnflächen müssen für
einen guten Verbund absolut wachsfrei sein. Die
basalen und zervikalen Flächen der Zähne leicht
anstrahlen (100 µm Al2O3, 2 bar) oder mit einer den-
talen Hartmetallfräse anrauen.
8. Gipsflächen isolieren
Wichtig: Vor dem Isolieren die Küvettenhälften an
der Luft oder in sauberem, kaltem Wasser auf Raumtemperatur (<30 °C) abkühlen. Die exakte Küvettentemperatur kann durch den IR Thermometer kontrolliert werden.
Die sauberen Oberflächen des Gipsmodells mit
Separating Fluid (F) isolieren. Nach 5 Min. ein
zweites Mal isolieren. Pfützenbildung (z. B. an
Umschlagfalte) vermeiden.
9. Entlüftungsfilter platzieren
Entlüftungsfilter (E) in die entsprechende Aus-
sparung der Küvette bündig einlegen.
10. Trichter und Zentriereinsatz einlegen
Den IvoBase-Trichter (D) in den Zentriereinsatz
stecken und bis zum Anschlag eindrücken, sodass er
klemmt. Zentriereinsatz mit dem Trichter (D) in der
unteren Küvettenhälfte platzieren.
Küvettenhälften zusammensetzen und mit den
Verschlussklammern verschliessen.
Injektion und Polymerisation
Die Bedienung des IvoBase Injector ist vollständig in der
Betriebsanleitung beschrieben. Vor dem Anmischen des
Materials muss der IvoBase Injector in betriebsbereiten
Zustand versetzt werden.
11. Material anmischen
Für die Injektion einer Ober- oder Unterkiefer-Totalprothese ist eine Kapseleinheit ausreichend.
Kapselinhalt Monomer Polymer
IvoBase Hybrid 20 ml 34 g
IvoBase High Impact 20 ml 30 g
Mit dem Spatel (C) Monomer und Polymer (während
ca. 20–30 Sek.) in der Kapsel homogen verrühren.
12. Injektor beladen
Innerhalb von 5 Minuten nach dem Anmischen wie folgt
weiterfahren.
Die geöffnete Kapsel (A) auf einer ebenen Unterlage
aufsetzen und die Küvette auf die Kapsel (A) aufdrücken.
Hinweis: Die Küvette mit der Kapsel vor dem Polymerisieren nicht mehr kippen, um ein Ausfliessen der
Kapsel (A) zu vermeiden. Beim Anheben der Küvette
muss die Kapsel (A) fest im Zentriereinsatz sitzen.
Die Türe des Injektors öffnen. Die Küvette mit der
Kapsel (A) über die Küvettenaufnahme bis zum
Anschlag in die Polymerisationskammer einschieben.
Die Türe des Injektors schliessen.
13. Programm starten
Das entsprechende Programm wählen (Pro-
grammübersicht siehe Betriebsanleitung des
Injektors).
Nach Wunsch die „RMR“-Taste aktivieren um den
Restmonomergehalt auf <1% zu reduzieren.
„Start“-Taste drücken. Der vollautomatische
Injektionsprozess startet. Die verbleibende
Prozesszeit wird im Display angezeigt.
Nach dem Ende des Programms ertönt ein Signalton.
Die nun heisse Küvette an der Isolierschulter mit
dem Thermohandschuh aus dem Gerät nehmen. Der
Injektor steht nach Entnahme der Küvette sofort für
die nächste Polymerisation bereit.
Achtung: Bei der Entnahme der Küvette kann diese
noch sehr heiss sein. Verbrennungsgefahr!
14. Küvette abkühlen
Die Küvette unter fliessendem, kaltem Wasser während
mindestens 15 Minuten abkühlen. Die Abkühlung kann
wahlweise auch direkt im Injektor erfolgen (z. B. über
Nacht).
Wichtig: Wird die Küvette nicht genügend abgekühlt
und bei einer zu hohen Temperatur geöffnet, führt dies
zu Passungsungenauigkeiten.
Den Monomerbehälter (A4) aus der Kapsel nehmen.
Den Kapselverschluss (A1) abnehmen.
Die Verschlusskappe des Monomerbehälters (A4)
abdrehen, und die Flüssigkeit in die geöffnete Kapsel
(A2) giessen.
15. Prothese ausbetten
Verschlussklammern entfernen.
Die Küvette unter eine Dentalpresse legen. Die
Ausbetthilfe zwischen Gips und Pressteller fixieren.
13
Page 14
Einen breiten Schraubenzieher oder ein Gipsmesser
in die Spalträume zwischen den Küvettenhälften ein-
führen und durch eine Hebelbewegung die obere
Küvettenhälfte anheben. Die Küvette der Presse ent-
nehmen, umkehren und den Vorgang wiederholen.
Gipskern mit Kapsel entnehmen und die Kapsel am
Injektionskanal mit einer Trennscheibe, Fräse oder
Säge abtrennen. Die Prothese wie üblich mit einer
Gipszange aus dem Gipskern ausbetten.
16. Prothese ausarbeiten
Die Ausarbeitung des polymerisierten IvoBase-Materials
erfolgt mit kreuzverzahnten Hartmetall-Fräsen, Sandpapier und Poliermitteln, wie für Prothesenbasismaterialien üblich.
a) Unterfütterung ohne Einbettung in die IvoBase-
Küvette
Die Vorgehensweise ohne Einbettung in die IvoBase-
Küvette kann analog der Unterfütterung wie mit
konventionellen autopolymerisierenden
Prothesenbasismaterialien vollzogen werden.
b) Unterfütterung mit Einbettung in die IvoBase-
Küvette
Die Einbettung und Fertigstellung der Prothese für
eine Unterfütterung erfolgt grundsätzlich gleich wie
bei der Fertigstellung einer modellierten Prothese.
Zu beachten ist, dass
– die Injektions- und Entlüftungskanäle an die
Abformung der Unterfütterung anschliessen und
– der zu unterfütternde Bereich eine Stärke von
mindestens 2 mm aufweist.
Reparatur/Unterfütterung
IvoBase ist sowohl mit sich selbst reparierbar als auch
mit dem Autopolymerisat ProBase® Cold.
Reparatur/Erweiterung mit IvoBase Hybrid /
High Impact
Die Reparatur einer IvoBase-Prothese kann grundsätzlich
ohne Einbettung in die IvoBase-Küvette vollzogen werden. Die prinzipielle Vorgehensweise entspricht der einer
Reparatur mit konventionellen kaltpolymerisierenden
Prothesenbasismaterialien.
Das Mischungsverhältnis wie folgt einhalten:
Polymer Monomer
IvoBase Hybrid 9 g 5 g
IvoBase High Impact 8 g 5 g
Das Polymer und Monomer müssen homogen miteinander verrührt werden (für ca. 20 Sekunden).
Folgende ungefähren Verarbeitungszeiten (bei 23 °C
Raumtemperatur) sind zu beachten:
– 30 Sek. Dauer der Quellphase
– 1–2 Min. Dauer der Giessphase
– 3–5 Min. Dauer der Modellierphase
Die maximale Gesamtverarbeitungsbreite nach dem
Anrühren beträgt 10 Min.
Das Material bei 55 °C unter 2.5 bar Druck für min.
20 Min. in einem Drucktopf polymerisieren.
Unterfütterung mit IvoBase Hybrid / High Impact
Die Unterfütterung einer IvoBase-Prothese kann mit oder
ohne Einbettung in die IvoBase-Küvette vollzogen werden.
Reparatur/Erweiterung/Unterfütterung mit
ProBase Cold
Die Vorgehensweise entspricht der einer Reparatur mit
konventionellem autopolymerisierendem Prothesenbasismaterial. Details sind der Verarbeitungsanleitung
von ProBase Cold zu entnehmen.
Lagerungshinweise
– Material an einem kühlen, dunklen und gut belüf-
teten Ort aufbewahren.
– Lagertemperatur: 2–28 °C.
– Produkte nach Ablauf des Verfalldatums nicht mehr
anwenden.
– Für Kinder unzugänglich aufbewahren.
Klassifikation nach EN ISO 20795-1, Typ 2, Klasse 1
Das Produkt entspricht den Anforderungen der EN ISO
20795-1:2008
Erstellungsdatum der Verarbeitungsanleitung:
10/2011
Hersteller:
Ivoclar Vivadent AG, FL-9494 Schaan / Liechtenstein
Das Material wurde für den Einsatz im Dentalbereich entwickelt und muss gemäss
Verarbeitungsanleitung verarbeitet werden. Für Schäden, die sich aus anderweitiger
Verwendung oder nicht sachgemässer Verarbeitung ergeben, übernimmt der Hersteller
keine Haftung. Darüber hinaus ist der Verwender verpflichtet, das Material eigenverantwortlich vor dessen Einsatz auf Eignung und Verwendungsmöglichkeit für die vorgesehenen
Zwecke zu prüfen, zumal wenn diese Zwecke nicht in der Gebrauchsinfor mation aufgeführt
sind.
14
Page 15

Mode d‘emploi
Veuillez lire attentivement ce mode
d‘emploi et vous familiariser à l‘utilisation
de ce matériau. Veuillez également vous
référer au mode d‘emploi de l‘unité
d‘injection IvoBase.
Description du produit
Le système IvoBase est composé d‘une résine de base
PMMA et d‘une unité d‘injection spécialement adaptée à
ce matériau. Le système permet de polymériser les prothèses de manière entièrement automatisée et en
minimisant le retrait de polymérisation. Le matériau
IvoBase associe les avantages des résines de bases auto
et thermopolymérisables. Même s‘il est soumis aux
exigences des polymères autopolymérisants, il répond
également aux exigences des polymères thermopolymérisables. IvoBase peut donc être considéré comme
un matériau hybride. Outre le matériau hybride
conventionnel, IvoBase est également disponible dans
une version résistante aux impacts : IvoBase High Impact.
Teintes disponibles :
– IvoBase Hybrid :
Pink, Pink-V, Preference, Clear, Pink-V Implant,
Preference Implant
– IvoBase High Impact :
Pink, Pink-V, Preference, Pink-V Implant, Preference
Implant, 34-V
Composition
– IvoBase Hybrid
Poudre :
Polyméthacrylate de méthyle, plastifiant, initiateur,
pigments
Liquide :
Méthacrylate de méthyle, diméthacrylate, catalyseur
– IvoBase High Impact
Poudre:
Copolymère PMMA modifié, copolymère PMMA,
polyméthacrylate de méthyle, plastifiant, initiateur,
pigments
Liquide :
Méthacrylate de méthyle, diméthacrylate, catalyseur
Indication
– Prothèses complètes
– Prothèses partielles
– Prothèses combinées
– Prothèses hybrides
– Prothèses sur implant
– Rebasages
– Réparations
Contre-indication
Si le patient est allergique à l‘un des composants.
Utilisation intraorale du matériau non polymérisé.
Effets secondaires
De rares cas de réactions allergiques aux diméthacrylates
de méthyle ont été rapportés.
Consignes de sécurité
– Le monomère contient du méthacrylate de méthyle
(MMA)
– Le MMA est hautement inflammable et irritant –
point éclair + 10 °C
– Le MMA irrite les yeux, le système respiratoire et la peau
– Une sensibilisation par contact cutané n‘est pas
exclue
– Eviter le contact cutané avec le monomère et avec le
matériau non durci. Les gants à usage médical dis-
ponibles sur le marché ne protègent pas contre les
effets de sensibilisation au méthacrylate.
– Ne pas inhaler les vapeurs
– Tenir éloigné de toute source incandescente – ne
pas fumer
– Ne pas déverser le monomère dans les canalisations
– Prendre les mesures contre l‘électricité statique.
Consignes de mise en oeuvre
– Bien immerger les modèles dans l‘eau avant la mise
en moufle.
– Isoler soigneusement les faces internes du moufle.
Nettoyer et isoler les surfaces en plâtre.
– Respecter scrupuleusement les temps de polymérisa-
tion et de refroidissement.
– Le contact de solvants ou de monomère avec le
matériau polymérisé peut provoquer des colorations
blanches.
– Lorsque l‘on a recours à une isolation cervicale,
Ivoclar Vivadent recommande d‘utiliser des silicones
A d‘une dureté Shore A >65 (par ex. Flexistone Plus/
®
Virtual
Heavy Body Fast). Les silicones à condensation réticulés (silicones C) peuvent endommager la
résine de base.
– Les produits ne doivent être utilisés et mis en œuvre
que par du personnel qualifié.
– L‘injection a posteriori d‘une seconde capsule de
matériau IvoBase ou SR Ivocap® dans un moufle
déjà rempli n‘est pas possible.
– Les résidus de matériau d‘une capsule IvoBase déjà
injectée ne peuvent pas être réutilisés.
– Le plâtre séché doit être réhydraté avant l‘injection.
– Un moufle souillé peut provoquer des dégagements
de fumée lorsqu‘il est chauffé.
– Les prothèses terminées doivent être stockées dans
un environnement humide avant d‘être incorporées.
15
Page 16
Mise en œuvre
Préparation à l‘injection
1. Préparation du moufle
Nettoyer le moufle puis isoler les surfaces internes à
l‘aide d‘une fine couche de vaseline.
Placer le couvercle du moufle, la demi-plaque de
positionnement et la réplique en cire du filtre (B1) à
l‘intérieur de l‘une des parties du moufle.
2. Mise en moufle du modèle
Mettre en moufle le modèle préalablement immergé
dans l‘eau puis isolé dans l‘une des parties du
moufle à l‘aide d‘un plâtre conventionnel (Classe 3).
Retirer les excès de plâtre qui ont fusé sur les bords
du moufle.
Important: la demi-plaque de positionnement doit
être bien entourée de plâtre.
3. Positionner les éléments en cire
Les éléments en cire (B) peuvent être positionnés sans
ajout de cire supplémentaire. Vérifier que le plâtre ne
peut pas fuser sous les éléments en cire.
Lorsque le plâtre est complètement durci, remplacer
la demi-plaque de positionnement par la plaque de
positionnement complète.
– Placer les canaux d‘injection en cire (B2)
Appliquer les canaux d’injection (B2) sur la pointe
de la plaque de positionnement.
Prothèses complètes maxillaires
Raccorder les canaux en les pressant au centre de la
zone palatine et sur la face vestibulaire de chaque
tubérosité.
Prothèses complètes mandibulaires
Raccorder les canaux extérieurs à la partie linguale
des triangles rétro-molaires. Supprimer le canal
central (B2).
Prothèses partielles:
Alimenter chaque selle par un canal fixé dans la
partie dorsale.
– Fixer les évents en cire (B3)
Presser l’ensemble de ces évents de manière à ce
qu’ils soient connectés au centre de la réplique en
cire du filtre.
Important: Pour garantir l’étanchéité, lorsque l’on
positionne ces évents, ils ne doivent pas être en
contact avec le bord du moufle.
Prothèses complètes mandibulaires et maxillaires
Presser les trois évents en cire (B3) sur la partie
antérieure du montage.
Prothèses partielles :
Presser les trois évents en cire (B3) sur les butées
antérieures des selles de la prothèse. Si les évents
en cire (B3) ne sont pas assez longs, la connexion
entre la selle de la prothèse et la réplique en cire du
filtre doit être complétée à l‘aide d‘un canal en cire
de la plus courte longueur possible.
4. Mise en moufle avec le silicone
Recouvrir de silicone les surfaces vestibulaires et
palatines et/ou linguales du montage. Ne pas
recouvrir les surfaces occlusales ni les bords incisifs
des dents. Créer une rétention à la surface du silicone
avant son complet durcissement, ou utiliser du sable
pour maintenir le silicone dans le plâtre.
Note : Afin d‘optimiser les résultats, il est recommandé
d‘utiliser un silicone par addition fluide, réticulé (silicone
A d‘une dureté Shore-A >65, par ex. Flexistone Plus ou
Virtual Heavy Body Fast).
Isoler les surfaces en plâtre avec du Separating Fluid
(F).
5. Coulée du contre-modèle
Verrouiller les deux parties du moufle à l‘aide des
clavettes ressorts.
Mélanger le plâtre de Classe 3 selon les recomman-
dations du fabricant jusqu‘à obtenir une consistance
fluide, et le verser dans l‘ouverture du moufle, en
vibrant pour éviter la formation de bulles. Éliminer
les excès en utilisant la spatule IvoBase, de manière
à ce que le plâtre ne déborde pas de l’ouverture du
moufle.
6. Ébouillanter le modèle
Lorsque le plâtre est complètement durci, plonger
le moufle dans de l‘eau à 90 °C pendant 5 à
8 minutes. Ensuite, ouvrir le moufle, retirer la plaque
de positionnement et nettoyer soigneusement les
résidus de cire à l‘aide d‘un couteau à cire. Enfin,
nettoyer les surfaces internes avec de l‘eau
bouillante propre.
Note : Cette eau ne doit comporter aucun additif tel que
solvants à cire ou détergents, qui pourraient provoquer
des colorations sur les prothèses.
16
Page 17
7. Dents
Pour obtenir une liaison optimale entre les dents en
résine et la résine de base, les zones cervicales des
dents, ainsi que la partie basale, ne doivent présenter
aucune trace de cire. Après nettoyage, décaper les
surfaces basales en effectuant un léger sablage
(100 µm Al2O3, 2 bar / 29 psi), ou en utilisant une
fraise à carbure de tungstène.
8. Isolation des surfaces en plâtre
Important : Avant l’isolation, refroidir les moufles
en les laissant à température ambiante ou dans de
l’eau propre, jusqu’à une température de 30 °C. La
température exacte du moufle peut être vérifiée à
l‘aide d‘un thermomètre infrarouge.
Isoler les surfaces propres du modèle en plâtre avec
du Separating Fluid (F). Appliquer une seconde
couche après 5 minutes. Éviter les excès de matériau
dans le joint périphérique.
9. Mise en place du filtre à air
Insérer le filtre à air (E) dans son logement.
10. Mise en place de l‘entonnoir et du cylindre de
centrage
Insérer et bloquer l’entonnoir (D) à l‘intérieur du
cylindre de centrage. Placer l‘ensemble dans la
première partie du moufle.
Verrouiller les deux parties du moufle avec les
clavettes ressorts.
Injection et polymérisation
La mise en œuvre de l‘unité d‘injection IvoBase est
décrite dans le mode d‘emploi correspondant. L‘unité
d‘injection IvoBase doit être mise en mode veille avant
de mélanger le matériau.
11. Mélanger le matériau
Une capsule est suffisante pour l’injection d’une prothèse
complète maxillaire ou mandibulaire.
Contenu de la capsule Monomère Polymère
IvoBase Hybrid 20 ml 34 g
IvoBase High Impact 20 ml 30 g
Utiliser la spatule (C) pour mélanger le monomère et
le polymère pendant environ 20 à 30 secondes,
jusqu’à obtenir un mélange homogène.
12. Chargement de l‘unité d‘injection
Procéder comme suit dans les 5 minutes qui suivent le
mélange.
Placer la capsule ouverte (A) sur une surface plane
et presser le moufle sur la capsule (A).
Note : Avant polymérisation, ne pas choquer le moufle
muni de la capsule pour éviter toute perte de matériau.
Lorsque le moufle est soulevé, la capsule (A) doit être
bloquée dans le cylindre de centrage.
Ouvrir la porte de l‘unité d‘injection. Glisser le mouf-
le avec la capsule (A) à l’intérieur de la chambre de
polymérisation jusqu’en butée dans son logement.
Refermer la porte de l‘unité d‘injection.
13. Démarrage du programme
Choisir le programme adapté (voir l‘aperçu des
programmes dans le mode d‘emploi de l‘unité
d‘injection).
Pour réduire le taux de monomère résiduel à moins
de 1%, vous pouvez appuyer sur la touche RMR.
Appuyer sur la touche “Start”. Le processus
d‘injection entièrement automatisé démarre. Le
temps restant est affiché à l‘écran.
La fin du programme est indiquée par un signal
sonore. Utiliser le gant de protection pour retirer le
moufle chaud de l’unité d’injection en le tenant par
l‘épaulement isolant. Dès le retrait du moufle l’unité
d’injection est prête pour la polymérisation suivante.
Note : À sa sortie de l‘unité d‘injection, le moufle
peut être encore très chaud. Attention aux risques
de brûlure !
14. Refroidissement du moufle
Refroidir le moufle sous l’eau courante pendant au moins
15 minutes. Le refroidissement peut aussi se faire à
l’intérieur de l’unité d’injection (par exemple pendant
toute une nuit).
Important : Si le moufle n‘est pas suffisamment refroidi,
et qu‘il est ouvert alors qu‘il est encore trop chaud, des
déformations de la prothèse peuvent survenir.
Retirer le réservoir à monomère (A4) de la capsule.
Retirer le couvercle de la capsule (A1).
Dévisser le couvercle du réservoir à monomère (A4)
et verser le liquide dans la capsule ouverte (A2).
15. Démouflage des prothèses
Retirer les clavettes ressorts.
Placer le moufle dans une presse en positionnant le
disque de démoulage entre le plâtre et le plateau de
la presse.
17
Page 18
Insérer un couteau à plâtre entre les deux parties du
moufle et faire levier pour décoller la contre-partie.
Ensuite, retourner le moufle et répéter l’opération.
Détacher la capsule du plâtre et couper les tiges
d’injection avec un disque, une fraise ou une scie.
Démouler la prothèse en utilisant les pinces à
démoufler.
16. Finition des prothèses
Le matériau IvoBase polymérisé est fini de manière
habituelle à l’aide de fraises tungstènes, de papier de
verre et de brosses à polir.
Réparation / Rebasage
Le matériau IvoBase peut être réparé avec lui-même ou
avec le polymère autopolymérisant ProBase® Cold.
Réparation / adjonction avec IvoBase Hybrid /
High Impact
Généralement, une prothèse IvoBase peut être réparée
sans mise en moufle. La procédure de base correspond à
celle utilisée pour la réparation conventionnelle des
résines de base autopolymérisantes.
Respecter les ratios de mélange suivants :
Polymère Monomère
IvoBase Hybrid 9 g 5 g
IvoBase High Impact 8 g 5 g
Le polymère et le monomère doivent être mélangés de
manière homogène (pendant environ 20 secondes).
Veuillez respecter les temps de mise en œuvre suivants
(à une température ambiante de 23 °C) :
– Durée de la phase de mûrissement : 30 secondes
– Durée de la phase liquide : 1 à 2 minutes
– Durée de la phase de modelage : 3 à 5 minutes
Le temps de mise en œuvre total maximum après
mélange est de 10 minutes.
Polymériser le matériau dans un polymérisateur sous
pression pendant 20 minutes à 55 °C à 2.5 bar / 36 psi
de pression.
Rebasage avec IvoBase Hybrid / High Impact
Le rebasage d‘une prothèse IvoBase peut être effectué
avec ou sans mise en moufle dans le moufle IvoBase.
a) Rebasage sans mise en moufle dans le moufle
IvoBase
La procédure sans mise en moufle dans le moufle
IvoBase est la même que pour le rebasage avec les
résines de base conventionnelles autopolymérisantes.
b) Rebasage avec mise en moufle dans le moufle
IvoBase
La mise en moufle et l‘achèvement pour le rebasage
d‘une prothèse est sensiblement identique que pour
l‘achèvement d‘une prothèse en cire. Vérifiez que :
– les canaux et les évents sont fixés au matériau à
empreinte du rebasage.
– la zone à rebaser présente une épaisseur d‘au
moins 2 mm.
Réparation / rebasage d‘adjonction
avec ProBase Cold
La procédure correspond à celle utilisée pour la réparation des résines de base conventionnelles autopolymérisantes. Pour plus de détails, veuillez vous référer au
mode d‘emploi ProBase Cold.
Recommandations de stockage
– Conserver le matériau à l‘abri de la chaleur et de la
lumière, dans un lieu bien ventilé.
– Température de conservation : 2–28 °C.
– Ne pas utiliser les produits après la date de
péremption.
– Garder le matériau hors de portée des enfants.
Classification selon EN ISO 20795-1, Type 2, Class 1
Le produit répond aux exigences de la norme EN ISO
20795-1:2008.
Date de réalisation du présent mode d‘emploi :
10/2011
Fabricant :
Ivoclar Vivadent AG, FL-9494 Schaan / Liechtenstein
Ce produit a été développé en vue d‘une utilisation dans le domaine dentaire et doit être
mis en œuvre selon le mode d‘emploi. Les dommages résultant du non-respect de ces
prescriptions ou d‘une utilisation à d‘autres fins que celles indiquées n‘engagent pas la
responsabilité du fabricant. L‘utilisateur est tenu de vérifier sous sa propre responsabilité
l‘appropriation du produit à l‘utilisation prévue, et ce d‘autant plus si celle-ci n‘est pas citée
dans le mode d‘emploi. Les descriptions et données fournies ne sont pas des garanties.
18
Page 19

Istruzioni d’uso
La preghiamo di leggere attentamente le
presenti istruzioni d’uso e di prendere
conoscenza dell’impiego. La preghiamo di
attenersi anche alle istruzioni d’uso
dell’Iniettore IvoBase.
Descrizione prodotto
Il sistema IvoBase é composto da materiale per palati a
base di PMMA ed un apparecchio per iniezione IvoBase
appositamente sviluppato. Il sistema consente di
polimerizzare protesi in modo completamente automatico e con compensazione della contrazione da polimerizzazione.
Il materiale IvoBase unisce i vantaggi delle resine termopolimerizzanti e autopolimerizzanti. Sebbene il materiale sia sottostante ai requisiti per gli autipolimerizzanti,
soddisfa anche i severi requisiti normativi dei termopolimerizzanti. IvoBase può quindi essere definito un
materiale ibrido. Oltre al convenzionale materiale ibrido
IvoBase, è disponibile una variante di prodotto particolarmente resistente alla frattura: IvoBase High Impact.
Sono disponibili i seguenti colori:
– IvoBase Hybrid:
Pink, Pink-V, Preference, Clear, Pink-V Implant,
Preference Implant
– IvoBase High Impact:
Pink, Pink-V, Preference, Pink-V Implant, Preference
Implant, 34-V
Composizione
– IvoBase Hybrid
Polimero:
Polimetilmetacrilato, plastificanti, iniziatori, pigmenti
Monomero:
Metilmetacrilato, dimetacrilato, catalizzatore
– IvoBase High Impact:
Polimero:
Copolimero PMMA modificato resistente all’urto,
copolimero PMMA, polimetilmetacrilato,
plastificanti, iniziatori, pigmenti
Monomero:
Metilmetacrilato, dimetacrilato, catalizzatore
Indicazioni
– protesi totale
– protesi parziale
– protesi combinata
– protesi ibrida
– protesi implantare
– ribasature
– riparazioni
Controindicazioni
In caso di allergia accertata ad uno dei componenti.
Utilizzo di materiale non polimerizzato nell’ambito
intraorale.
Effetti collaterali
In singoli casi, con materiali contenenti metilacrilato,
sono state descritte reazioni allergiche locali.
Avvertenze di pericolo
– Il monomero contiene metilmetacrilato (MMA).
– MMA é facilmente infiammabile ed irritante, punto
di infiammabilità + 10 °C.
– MMA irrita gli occhi, gli organi respiratori e la cute.
– Possibile sensibilizzazione da contatto cutaneo.
– Evitare contatto cutaneo con monomero e materiale
non indurito. I guanti normalmente in commercio
non offrono protezione dall’effetto sensibilizzante
dei metacrilati.
– Non inalare i vapori.
– Tenere lontano da fonti infiammabili – non fumare.
– Non lasciare defluire il monomero nella canalizzazione.
– Prendere provvedimenti contro cariche elettrostatiche.
Avvertenze per la lavorazione
– Inumidire i modelli prima della posa in muffola.
– Prima della posa in muffola, isolare le superfici
interne della muffola.
– Detergere ed isolare le superfici in gesso.
– Rispettare attentamente i tempi di polimerizzazione
e di raffreddamento.
– Il contatto del materiale per protesi polimerizzato
con solventi o monomero può causare decolorazioni
biancastre.
– In caso di utilizzo di isolanti per colletti dentali,
Ivoclar Vivadent consiglia l’impiego di siliconi A con
una durezza di >65 Shore A (p.es. Flexistone Plus/
®
Virtual
Heavy Body Fast). Siliconi di condensazione
(siliconi K) possono avere un effetto dannoso sul
materiale per protesi.
– Il prodotto deve essere impiegato e lavorato soltanto
da personale addestrato.
– A processo di polimerizzazione iniziato, non è
possibile sostituire/aggiungere un’ulteriore capsula
di IvoBase oppure di SR Ivocap® nella muffola.
– Il materiale rimanente di una capsula IvoBase già
iniettata non può essere riutilizzato.
– Il gesso eventualmente asciugatosi deve essere
inumidito prima dell’iniezione.
– Una muffola non correttamente pulita, per l’effetto
del calore, può causare la formazione di fumo.
– Dopo l’ultimazione della protesi, conservarla in
ambiente umido fino alla consegna.
19
Page 20
Lavorazione
Preparazione all‘iniezione
1. Preparazione della muffola
Isolare con sottile strato di vaselina le pareti interne
della muffola pulita.
Posizionare nello stampo il mezzo formacanale in Teflon
e la componente in cera filtro (B1) all’interno dell’apposito
spazio, stampo e controstampo nelle muffole IvoBase
sono uguali.
2. Messa in muffola della modellazione
Mettere in muffola il modello ben inumidito ed
isolato con un convenzionale gesso ad uso dentale
(Classe III) nella stampo della muffola. Livellare
eliminando il gesso in eccesso tra il modello ed il
bordo della muffola.
Importante: il bordo del gesso deve essere allo
stesso livello della metà del formacanale.
3. Applicazione delle componenti in cera
La cera delle componenti (B) può essere applicata alla
modellazione senza ulteriore imperniatura ceratura.
Prestare attenzione affinché il gesso non possa scorrere
sotto le componenti in cera.
Lasciare indurire completamente il gesso. Prelevare
la metà del “formacanale” ed applicare il „forma-
canale intero“.
– Applicazione della componente in cera
iniezione (B2)
Premere la componente in cera iniezione (B2) sulla
parte inclinata del formacanale intero.
Protesi totale superiore:
Applicare un canale di iniezione verso il centro del
palato ed uno vestibolarmente verso entrambi gli
ultimi molari presenti nella protesi e premere la cera
alla modellazione.
Protesi totale inferiore:
Applicare un canale di iniezione verso la zona lin-
guale del triangolo retromolare. Rimuovere il canale
di iniezione centrale della componente in cera di
iniezione (B2).
Protesi parziale:
Applicare al termine dorsale di ogni sella della
protesi un canale di iniezione.
– Applicare la componente in cera dei canali di
areazione (B3)
Premere la componente in cera dei canali di area-
zione (B3) con il canale di unione al centro della
componente in cera filtro.
Importante: i canali di areazione non devono
essere posti a contatto con la muffola, in modo da
garantire la chiusura ermetica della muffola.
Protesi totale inferiore e superiore:
Premere anteriormente alla modellazione i tre canali
della componente in cera dei canali di areazione
(B3).
Protesi parziale:
Premere i tre canali di areazione della componente
in cera di areazione (B3) alle delimitazioni anteriori
delle selle protesiche. In caso di lunghezza insufficiente della componente in cera di areazione (B3) il
collegamento fra sella protesica e componente in
cera filtro deve essere completato nella via più beve
con cera di forma canalare similare a quella dei
canali.
4. Messa in muffola con silicone
Coprire con silicone le superfici vestibolari e palatali
rispettiv. linguali della protesi modellata.
Non coprire le superfici occlusali ed i margini incisali
dei denti. Prima dell’indurimento del silicone apportare trame ritentive nella superficie del silicone
oppure utilizzare sabbia ritentiva in modo tale che la
mascherina in silicone venga ancorata nel gesso.
Avvertenza: per risultati ottimali si consiglia l’impiego di
un silicone di addizione fluido, (Silicone A) con una
durezza Shore-A di >65 (p. es. Flexistone Plus oppure
Virtual Heavy Body Fast).
Isolare le superfici di contatto gesso-gesso appli-
cando Separating Fluid (F).
5. Colaggio del controstampo
Applicare la muffola superiore e chiudere con i ganci
di chiusura.
Miscelare un convenzionale gesso ad uso dentale
(Classe III) secondo le indicazioni del produttore e
colarlo in consistenza fluida e priva di bolle,
nell’apertura della muffola posizionata su un vibratore. Livellare il gesso in eccesso con la spatola
IvoBase, in modo tale che non emerga gesso
dall’apertura della muffola.
6. Eliminazione della cera
A completo indurimento del gesso, riscaldare la
muffola in bagno d’acqua a ca. 90°C per 5–8 min.
Quindi aprire la muffola, prelevare il “formacanale
intero” e rimuovere grossolanamente la cera con un
coltello per cera. Quindi detergere accuratamente le
superfici interne con acqua bollente pulita.
20
Page 21
Avvertenza: per l’eliminazione della cera utilizzare
acqua pura senza additivi (p.es. solventi per cera,
detergenti). Additivi possono determinare decolorazioni
nella protesi.
7. Denti
Per ottenere un buon legame, i colletti dentali e le
superfici basali dei denti devono essere assoluta-
mente privi di cera. Sabbiare leggermente le super-
fici basali e cervicali dei denti (100 µm Al2O3, 2 bar)
oppure irruvidire con una fresa in metallo duro.
8. Isolamento delle superfici in gesso
Importante: prima dell’isolamento, raffreddare
all’aria le due metà della muffola a temperatura
ambiente (<30 °C) oppure in acqua fredda. L’esatta
temperatura della muffola può essere controllata
tramite il termometro IR.
Isolare con Separating Fluid (F) le superfici pulite del
modello in gesso. Dopo 5 minuti, isolare una
seconda volta. Evitare la formazione di accumuli
(p.es. giunto periferico, rughe palatine).
9. Posizionamento del filtro di areazione (E)
Posizionare correttamente il filtro di areazione (E)
nel relativo spazio della muffola.
10. Applicazione dell’imbuto e del centracapsule
Inserire l’imbuto IvoBase (D) nel centacapsule e pre-
mere fino all’arresto, in modo tale che sia incastrato.
Posizionare il centracapsule con l’imbuto (D) nella
muffola inferiore.
Unire le due metà della muffola e fissarle con i ganci
di chiusura.
Iniezione e polimerizzazione
L’utilizzo dell’Iniettore IvoBase Injector é descritto
dettagliatamente nelle relative istruzioni d’uso. Prima
della miscelazione del materiale, l’iniettore IvoBase deve
essere messo in funzione.
11. Miscelazione del materiale
Per l’iniezione di una protesi totale superiore o inferiore
è sufficiente una capsula.
Contenuto della capsula: Monomero Polimero
IvoBase Hybrid 20 ml 34 g
IvoBase High Impact 20 ml 30 g
Prelevare il contenitore del monomero (A4) dalla
capsula. Togliere il tappo della capsula (A1).
Svitare il cappuccio del contenitore del monomero
(A4) e versare il liquido nella capsula aperta (A2).
Miscelare omogeneamente con la spatola (C) il
monomero ed il polimero (per ca. 20–30 sec.) nella
capsula.
12. Caricamento dell’iniettore
Entro 5 minuti dalla miscelazione, proseguire come
segue:
Posizionare la capsula aperta (A) su un piano e pre-
mere la muffola sulla capsula (A).
Avvertenza: prima della polimerizzazione, non inclinare
la muffola con la capsula, per evitare una fuoriuscita
dalla capsula (A). Nel sollevare la muffola, la capsula (A)
deve essere ben fissata nel centracapsule.
Aprire lo sportello dell’iniettore. Inserire la muffola
con la capsula (A) attraverso l’alloggiamento della
muffola nella camera di polimerizzazione fino
all’arresto. Chiudere lo sportello dell’iniettore.
13. Avvio del programma
Selezionare il relativo programma (vedi panoramica
programmi nelle istruzioni d’uso dell’iniettore).
Se desiderato, premere il tasto „RMR“ per ridurre il
contenuto di monomero residuo a <1%.
Premere il tasto „Start“. Il processo di iniezione
totalmente automatico si avvia. Il tempo rimanente
del processo viene visualizzato sul display.
Al termine del programma si avverte un segnale
acustico. Indossando un guanto termico, prelevare
quindi la muffola calda dall’apparecchio sorreggendola con la spalla di isolamento. Dopo il prelievo,
l’iniettore è immediatamente pronto per la prossima
polimerizzazione.
Attenzione: al momento del prelievo, la muffola
può essere ancora molto calda! Pericolo di ustioni!
14. Raffreddamento della muffola
Raffreddare la muffola sotto acqua corrente, fredda per
almeno 15 minuti. Se desiderato, il raffreddamento può
anche avvenire direttamente nell’iniettore (p.es. durante
la notte).
Importante: se non si raffredda sufficientemente la
muffola e la si apre ad una temperatura troppo elevata,
questo può condurre a imprecisioni di adattamento del
corpo protesico al modello.
21
Page 22

15. Smuffolatura della protesi
Rimuovere i ganci di chiusura.
Posizionare la muffola in una pressa dentale. Fissare
l’ausilio di smuffolatura fra gesso e piano di pressatura.
Inserire un cacciavite largo o un coltello per gesso
nella fessura fra stampo e controstampo e sollevare
la parte superiore facendo leva. Prelevare la muffola
dalla pressa, capovolgerla e ripetere il procedimento.
Prelevare il nucleo in gesso con la capsula e
separare la capsula al canale di alimentazione con
un disco di separazione, fresa o seghetto. Come di
consueto, smuffolare la protesi con una pinza per
gesso dal nucleo in gesso.
16. Rifinitura della protesi
La rifinitura del materiale IvoBase polimerizzato avviene
con frese in metallo duro a taglio incrociato, carta abrasiva
e paste per lucidatura in uso per i materiali per protesi.
Riparazione/ribasatura
IvoBase é riparabile con IvoBase oppure con la resina
autopolimerizzante ProBase® Cold.
Riparazione/completamento con IvoBase Hybrid /
High Impact
La riparazione di una protesi realizzata con IvoBase di
regola può avvenire senza riposizionare il tutto in muffola. Il procedimento corrisponde principalmente alla
riparazione con un materiale autopolimerizzante.
Rispettare il rapporto di miscelazione come segue:
Polimero Monomero
IvoBase Hybrid 9 g 5 g
IvoBase High Impact 8 g 5 g
Il polimero ed il monomero devono essere miscelati fra di
loro in modo omogeneo (per ca. 20 secondi).
Attenersi ai seguenti tempi di lavorazione approssimativi
(a temperatura ambiente 23 °C):
– 30 sec. durata della fase di rigonfiamento/maturazione.
– 1–2 min. durata della fase di colaggio
– 3–5 min. durata della fase di modellazione
Il tempo di lavorazione massimo totale dopo la miscelazione ammonta a 10 minuti.
Polimerizzare il materiale a 55 °C con 2,5 bar di pressione per min. 20 min. in una pentola a pressione.
Ribasatura con IvoBase Hybrid / High Impact
La ribasatura di una protesi IvoBase può avvenire con o
senza posa in muffola del sistema IvoBase.
a) Ribasatura senza posa in muffola nel sistema
IvoBase:
La ribasatura senza posa in muffola Ivobase, può
avvenire come la ribasatura con un convenzionale
materiale per protesi autopolimerizzante.
b) Ribasatura con posa in muffola IvoBase:
La posa in muffola e l’ultimazione della protesi per
una ribasatura avviene in genere come per
l’ultimazione di una protesi modellata.
E‘ necessario considerare che:
– i canali di iniezione e di scarico aria siano collegati
alla modellazione della ribasatura e
– che la zona da ribasare abbia uno spessore
minimo di 2 mm.
Riparazione/completamento/ribasatura con
ProBase Cold
Il procedimento corrisponde ad una riparazione con
materiale per protesi convenzionale autopolimerizzante.
Per ulteriori dettagli consultare le istruzioni d’uso
ProBase Cold.
Avvertenze per la conservazione
– Conservare il materiale in luogo fresco, scuro e ben
arieggiato.
– Temperatura di conservazione: 2–28 °C.
– Non utilizzare i prodotti dopo la data di scadenza.
– Conservare fuori dalla portata dei bambini.
Classificazione secondo EN ISO 20795-1, Tipo 2,
Classe 1
Il prodotto corrisponde ai requisiti EN ISO 20795-1:2008.
Data di stesura delle istruzioni d’uso: 10/2011
Produttore:
Ivoclar Vivadent AG FL-9494 Schaan / Liechtenstein
Il prodotto é stato realizzato per l’impiego in campo dentale e deve essere utilizzato secondo le istruzioni d’uso. Il produttore non si assume alcuna responsabilitá per danni derivanti
da diverso o inadeguato utilizzo. L’utente é tenuto a controllare personalmente l’idoneitá
del prodotto per gli impieghi da lui previsti, sopratutto se questi impieghi non sono riportati
nelle istruzioni d’uso.
22
Page 23

Instrucciones de uso
Lea atentamente las presentes instruc-
ciones de uso para familiarizarse con el uso
del material. Consulte asimismo las instrucciones de uso del inyector IvoBase.
Descripción del producto
El sistema IvoBase está compuesto por una resina de
PMMA y el aparato para inyectar IvoBase. El sistema
permite una polimerización totalmente automatizada
compensando la contracción de las prótesis al polimerizar.
El material IvoBase combina las ventajas de las resinas
de termopolimerización y las de autopolimerización.
Cumple tanto con los requisitos de las resinas de
autopolimerización como con los requisitos más estrictos
de las normativas de las resinas termopolimerizables.
Por tanto, la resina IvoBase puede ser considerado como
un material híbrido. La resina IvoBase está disponible,
como material híbrido convencional y como material de
alto impacto:: IvoBase High Impact.
Los colores disponibles son los siguientes:
– IvoBase Hybrid:
Pink, Pink-V, Preference, Clear, Pink-V Implant,
Preference Implant
– IvoBase High Impact:
Pink, Pink-V, Preference, Pink-V Implant, Preference
Implant, 34-V
Composición
– IvoBase Hybrid
Polvo:
Metacrilato de polimetilo, plastificante, iniciador,
pigmentos
Líquido:
Metacrilato de metilo, dimetacrilato, catalizador
– IvoBase High Impact:
Polvo:
Copolímero de PMMA modificado para resistir altos
impactos, copolímero de PMMA, metacrilato de
polimetilo, plastificante, iniciador, pigmentos
Líquido:
Metacrilato de metilo, dimetacrilato, catalizador
Indicaciones
– Prótesis completas
− Prótesis parciales
− Prótesis combinadas
− Prótesis híbridas
− Prótesis sobre implante
− Rebasados
− Reparaciones
Contraindicaciones
Pacientes alérgicos a cualquiera de los ingredientes. Uso
intraoral del material sin polimerizar.
Efectos secundarios
En algunos casos se han observado reacciones alérgicas
locales a materiales de metacrilato de metilo.
Notas de seguridad
– El monómero contiene metacrilato de metilo (MMA).
− El MMA es altamente inflamable e irritante, punto
de inflamabilidad: +10 °C/50 °F.
− El MMA es irritante para los ojos, las vías respiratorias y la piel.
− El contacto con la piel puede causar sensibilización.
− Evitar que el monómero y el material sin polimerizar
entren en contacto con la piel. Los guantes médicos
convencionales no sirven como protección contra el
efecto de sensibilización de los metacrilatos.
− No inhalar los vapores.
− Mantener alejado de fuentes de ignición. No fumar.
− Evitar que el monómero llegue al sistema de
alcantarillado.
− Tomar medidas de precaución frente a las cargas
electrostáticas.
Notas para el procesamiento
– Empapar cuidadosamente los modelos en agua
antes del revestimiento.
− Aislar cuidadosamente las superficies internas de la
mufla antes del revestimiento.
− Limpiar y aislar las superficies de yeso.
− Respetar estrictamente los tiempos de polimerización y de enfriamiento.
− El contacto de disolventes o del monómero con las
resinas polimerizadas puede producir una decoloración blanca.
− En caso de utilizar aislamientos cervicales, Ivoclar
Vivadent recomienda siliconas A con una dureza
>65 Shore A (p. ej., Flexistone Plus/Virtual
®
Heavy
Body Fast). Las siliconas reticuladas por condensación (siliconas C) pueden tener un efecto nocivo
sobre la resina.
− Los productos deben ser utilizados únicamente por
personal cualificado.
− No puede realizarse posteriormente una inyección
de una segunda cápsula de IvoBase o de material
SR Ivocap® en una mufla llena.
− El material sobrante de una inyección que quede en
la cápsula IvoBase, no debe ser utilizado de nuevo.
− El yeso seco debe sumergirse en agua antes de la
inyección.
− Una mufla con restos de suciedad puede producir
humo al calentarse.
23
Page 24

− Una vez finalizada la prótesis, conservar en un
ambiente húmedo hasta su colocación.
Procesado
Preparación para la inyección
1. Preparación de la mufla
Aislar las superficies internas de las mitades de la
mufla limpias aplicando una capa fina de gelatina
de petróleo.
Colocar la tapa de la mufla, la mitad del conformador del
canal de inyección y el componente de cera de filtro (B1)
en una de las mitades de la mufla.
2. Puesta en mufla del modelo
Colocar yeso convencional dental (Clase III). en una
de las mitades de la mufla, e introducir el modelo
bien empapado y aislado. Retirar el exceso de yeso
de forma que esta quede enrasada con el modelo y
con el borde de la carcasa de la mufla.
Importante: El borde del yeso debe estar enrasado
con la mitad del molde.
– Colocación del componente de cera de
aireación (B3)
Presionar el componente de cera de aireación con el
canal de aireación hacia el centro del componente
de cera de filtro.
Importante: Cuando se coloquen los canales de
aireación, no deben quedar restos de ellos sobre la
carcasa de la mufla para garantizar la hermeticidad
de la mufla.
Prótesis completas mandibulares y maxilares
Presionar los tres canales del componente de cera
de aireación (B3) contra la zona anterior del
contorneado.
Prótesis parciales
Presionar los tres canales del componente de cera
de aireación (B3) contra los topes anteriores de las
sillas de la prótesis. Si el componente de cera de
aireación (B3) no es suficientemente largo, la unión
entre la silla de la prótesis y el componente de cera
de filtro debe completarse con un hilo de cera por la
menor distancia posible.
3. Posicionamiento de los componentes de cera
Colocar los componentes de cera (B) ( es posible colocarlos en el modelo sin necesidad de realizar un encerado adicional). Comprobar que el yeso no puede fluir por
debajo de los componentes de cera.
Dejar que el yeso fragüe completamente. Retirar la
mitad del conformador de inyección y colocar el
conformador completo.
– Colocación del componente de cera de
inyección (B2)
Presionar el componente de cera de inyección (B2)
contra el yeso y las zonas del modelo.
Prótesis completas maxilares
Colocar un hilo grueso de cera en el centro del pala-
dar en ambos lados y en la perpendicular de los
últimos molares. Presionar la cera sobre el modelo.
Prótesis completas mandibulares
Colocar un hilo grueso de cera en cada zona
lingual del triángulo retromolar. En inferiores eliminar el hilo central del componente de cera de
inyección (B2).
Prótesis parciales
Colocar un hilo de cera en el extremo dorsal de
cada silla de la prótesis.
4. Colocación de silicona
Cubrir con silicona las superficies vestibular y palatal
y/o lingual de las prótesis. No cubrir las superficies
oclusales ni los bordes incisales de los dientes.
Realizar retenciones en la superficie de la silicona
antes de que esta se endurezca o utilizar arena de
retención para fijar la silicona en el yeso.
Nota: Para conseguir unos resultados óptimos es aconsejable utilizar una silicona fluida reticulada por adición
(silicona A con una dureza Shore-A >65) (p. ej.,
Flexistone Plus o Virtual Heavy Body Fast).
Aislar las superficies de contacto entre las piezas de
yeso con líquido de separación (F).
5. Realización del contramodelo
Colocar la mitad superior de la mufla y bloquear con
las abrazaderas de bloqueo.
Mezclar yeso dental convencional (Clase III) de
acuerdo con las instrucciones del fabricante y dejar
escurrir con una consistencia fluida por la abertura
de la mufla con la ayuda de un vibrador para que no
se formen burbujas de aire. Retirar el exceso de yeso
con la espátula IvoBase de manera que no sobresalga yeso por la abertura de la mufla.
6. Eliminación de la cera
Una vez que el yeso esté totalmente fraguado,
calentar la mufla en un baño de agua a aproximada-
24
Page 25
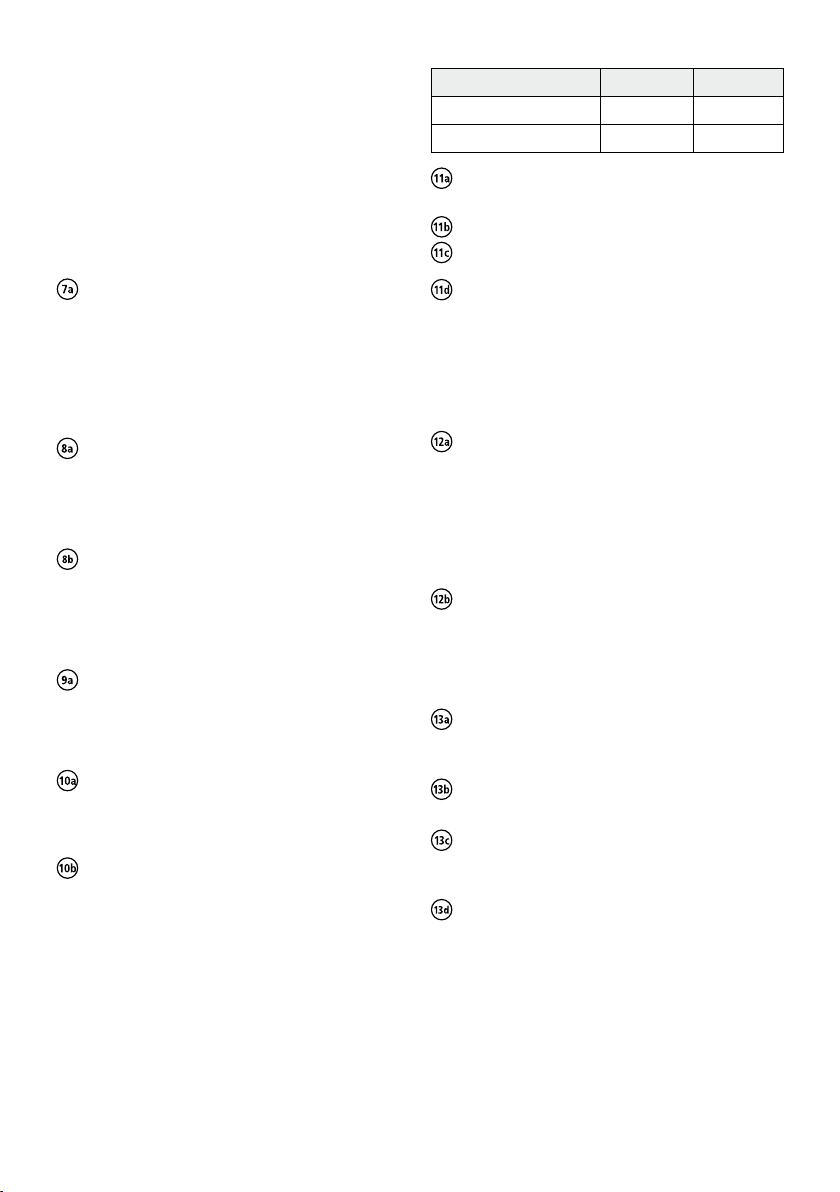
mente 90 °C (194 °F) durante aproximadamente
5–8 minutos. A continuación abrir la mufla y retirar
grosso modo la cera utilizando un cuchillo para cera.
Limpiar cuidadosamente las superficies interiores de
ambas mitades de mufla con agua limpia hirviendo.
Nota: Utilizar agua limpia sin aditivos (p. ej., sin disolventes de cera, agentes de limpieza) ya que los aditivos
pueden producir una decoloración de la prótesis.
7. Dientes
Para conseguir una unión óptima, los cuellos y las
superficies basales de los dientes deben estar absolutamente limpios de cera. Arenar ligeramente las
superficies basales y cervicales de los dientes
(100 µm Al2O3, 2 bar / 29 psi) o raspar con una fresa
dental de tungsteno.
8. Aislamiento de las superficies de yeso
Importante: Antes del aislamiento, enfriar ambas
mitades de la mufla a temperatura ambiente
(<30 °C / 86 °F) con aire o agua fría limpia. Puede
comprobarse la temperatura exacta de la mufla con
ayuda de un termómetro IR.
Aislar las superficies limpias del modelo de yeso con
líquido de separar (F). Pasados 5 minutos, aplicar
una segunda capa. Debe evitarse un mezclado
(p. ej., en el pliegue gingivo-bucal) .
9. Colocación del filtro de aireación
Insertar el filtro de aireación (E) de forma que quede
enrasado con el correspondiente entrante de la
mufla.
10. Colocación del embudo y del inserto de centrado
Empujar el embudo IvoBase (D) en el inserto de
centrado hasta que quede encajado y bloqueado.
Colocar el inserto de centrado con el embudo (D)
introducido en la mitad inferior de la mufla.
Ensamblar las mitades de la mufla y bloquear con
las abrazaderas de bloqueo.
Inyección y polimerización
El manejo del inyector IvoBase se describe en detalle en
las correspondientes instrucciones de uso. Antes de
mezclar el material debe colocarse el inyector IvoBase en
estado de espera.
11. Mezclado del material
Basta una cápsula para la inyección de una prótesis
completa maxilar o mandibular.
Contenido de la cápsula: Monómero Polímero
IvoBase Hybrid 20 ml 34 g
IvoBase High Impact 20 ml 30 g
Retirar el envase de monómero (A4) de la cápsula.
Retirar el precinto de la cápsula (A1).
Girar el tapón del precinto del envase de monómero
(A4) y verter el líquido en la cápsula abierta (A2).
Utilizar la espátula (C) para mezclar el monómero y
el polímero en la cápsula y obtener una mezcla
homogénea (aproximadamente 20–30 segundos).
12. Carga del inyector
A los 5 minutos del mezclado proceder de la forma
siguiente:
Colocar la cápsula abierta (A) sobre una superficie
lisa y presionar la mufla contra la cápsula (A).
Nota: No inclinar la mufla con la cápsula antes de
realizar la polimerización para evitar que el material se
salga de la cápsula (A). Al levantar la mufla, la cápsula
(A) debe quedar colocada de forma segura en el inserto
de centrado.
Abrir la puerta del inyector. Deslizar la mufla con la
cápsula (A) en la cámara de polimerización hasta
que tope con el soporte de la mufla. Cerrar la puerta
del inyector.
13. Inicio del programa
Seleccionar el programa correspondiente (ver el
resumen de programas en las instrucciones de uso
del inyector).
Si lo desea, activar la función RMR para reducir el
contenido residual de monómero a <1%.
Presionar “Iniciar”. Comienza el proceso de
inyección totalmente automatizado. En la pantalla
se visualiza el tiempo restante de proceso.
Cuando finaliza el programa se escucha una señal
acústica. Utilizar el guante térmico para retirar la
mufla caliente del inyector, sujetando esta por el
hombro de aislamiento. El inyector queda listo para
la siguiente polimerización inmediatamente después
de haber retirado la mufla. Nota: La mufla puede
estar todavía muy caliente cuando se retira del
inyector. ¡Peligro de quemaduras!
25
Page 26
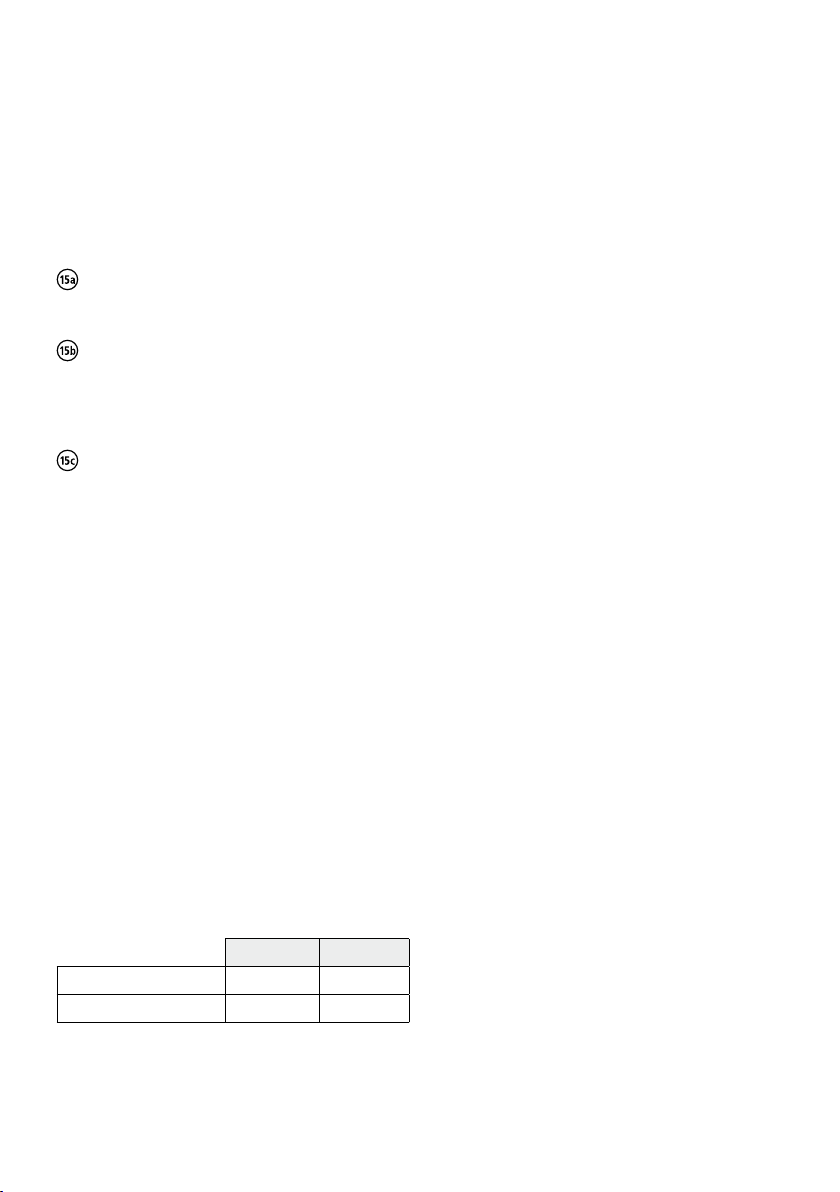
14. Enfriamiento de la mufla
Enfriar la mufla manteniéndola bajo el agua corriente fría
durante al menos 15 minutos. También se puede dejar
enfriar en el inyector (p. ej., durante la noche).
Importante: Si la mufla no se deja enfriar y se abre a
una temperatura demasiado elevada puede que el ajuste
no resulte exacto.
15. Eliminación del yeso de la prótesis
Retirar las abrazaderas de bloqueo.
Colocar la mufla bajo una prensa dental. Fijar el ele-
mento auxiliar de retirada del revestimiento entre el
yeso y la placa de presión.
Deslizar un destornillador ancho o un cuchillo para
yeso en la articulación de las dos mitades de la
mufla y levantar la mitad superior de la mufla.
Retirar la mufla de la prensa, dar la vuelta y repetir
el procedimiento.
Retirar el núcleo de yeso con la cápsula y separar la
cápsula en la zona del canal de inyección con una
fresa de disco o sierra. Retirar del núcleo de yeso de
la prótesis de la forma habitual con pinzas para
yeso.
– Duración de la fase de amasado: 30 segundos
− Duración de la fase de vertido: 1–2 minutos
− Duración de la fase de modelado: 3–5 minutos
– Duration of the modelling phase: 3–5 minutes
El tiempo de procesamiento total máximo después del
mezclado es de 10 minutos. Polimerizar el material en un
recipiente a presión durante 20 minutos a 55 °C / 131 °F
a 2,5 bar / 36 psi de presión.
Rebasado con IvoBase Hybrid / High Impact
El rebasado de una prótesis IvoBase puede realizarse con
o sin revestimiento en la mufla IvoBase.
a) Rebasado sin utilizar la mufla IvoBase:
El proceso es el mismo que el utilizado para el reba-
sado con resinas autopolimerizables convencionales.
b) Rebasado utilizando la mufla IvoBase
El proceso y el acabado para el rebasado de una
prótesis son básicamente los mismos que en el caso
de las prótesis enceradas. Comprobar que
− los jitos y los canales de aireación están unidos a
la impresión del rebasado.
− La zona a rebasar debe tener un grosor mínimo
de 2 mm.
16. Acabado de las prótesis
El acabado del material IvoBase polimerizado se realiza
con fresas de tungsteno de dentado cruzado, papel
esmerilado y un agente de pulido en la manera habitual
para las resinas.
Reparación / rebasado
IvoBase puede repararse con el propio material y con
resina autopolimerizable ProBase® Cold.
Reparación / extensión con IvoBase Hybrid /
High Impact
Básicamente, una prótesis IvoBase se puede reparar sin
necesidad de colocar en la mufla IvoBase. El procedimiento básico es el mismo que el utilizado para reparar
las resinas de autopolimerización convencionales.
Debe respetarse la relación de mezcla siguiente:
Polímero Monómero
IvoBase Hybrid 9 g 5 g
IvoBase High Impact 8 g 5 g
Mezclar de forma homogénea el polímero y el monómero
(durante aproximadamente 20 segundos).
Respetar los siguientes tiempos de procesamiento
(23 °C / 73 °F) a temperatura ambiente):
26
Reparación / rebasado de extensión con ProBase Cold
El procedimiento es el utilizado para reparar las resinas
de autopolimerización convencionales. Para obtener más
información, consultar las instrucciones de uso de
ProBase Cold.
Instrucciones de almacenamiento
– Almacenar el material en un lugar fresco, oscuro y
bien ventilado.
− Temperatura de almacenamiento: 2–28 °C / 36–82 °F.
− No utilizar los productos después de la fecha de
caducidad indicada.
− Mantener el material fuera del alcance de los niños.
Clasificación de acuerdo con EN ISO 20795-1,
tipo 2, clase 1
El producto cumple los requisitos de EN ISO 207951:2008.
Fecha de preparación de la información: 10/2011
Fabricante:
Ivoclar Vivadent AG FL-9494 Schaan / Liechtenstein
El material ha sido fabricado únicamente para uso dental. El proceso debe realizarse
siguiendo de forma estricta las Instrucciones de uso. No se puede admitir responsabilidad
alguna por los daños provocados por el incumplimiento de las instrucciones o del ámbito
de aplicación indicado. El usuario es responsable de comprobar la idoneidad y el uso del
material para cualquier fin diferente al explicitado en las instrucciones. Las descripciones y
datos no constituyen ninguna garantía de atributos.
Page 27

Instruções de Uso
Por favor, leia cuidadosamente estas
Instruções de Uso para familiarizar-se com
o uso do material. Por favor, recorra também às Instruções Operacionais do IvoBase
Injector.
Descrição do produto
O sistema IvoBase consiste em um material básico de
dentadura,baseado em PMMA, e o IvoBase Injector, que
foi especificamente desenvolvido para o material. O sistema possibilita, de um modo completamente automatizado, a compensação da contração de polimerização das
dentaduras. O material IvoBase combina as vantagens da
cura térmica com as vantagens da auto-cura dos materiais básicos de dentaduras. Embora esteja sujeito às
exigências necessárias para a auto-cura de polímeros, o
IvoBase também satisfaz as exigências normativas mais
rígidas para a cura térmica dos polímeros. Deste modo, o
IvoBase pode ser considerado um material híbrido. Além
deste convencional material híbrido, o IvoBase também
está disponível numa versão de material impacto-resistente: IvoBase High Impact.
As seguintes cores estão disponíveis:
–
IvoBase Hybrid
Pink-V Implant, Preference Implant
–
IvoBase High Impact
Pink-V Implant, Preference Implant, 34-V
Composição
– IvoBase Hybrid
Pó:
Polimetilmetacrilato, amaciador, iniciador, pigmentos.
Líquido:
Metacrilato de metila, dimetacrilato, catalisador.
– IvoBase High Impact:
Pó:
Copolímero modificado de PMMA de alto-impacto,
copolímero de PMMA, polimetilmetacrilato, amacia-
dor, iniciador, pigmentos.
Líquido:
Metacrilato de metila, dimetacrilato, catalisador.
Indicações
– Próteses de dentaduras completas
– Próteses de dentaduras parciais
– Próteses de dentaduras combinadas
– Próteses de dentaduras híbridas
– Próteses de implantes
– Reembasamentos
– Reparos
: Pink, Pink-V, Preference, Clear,
: Pink, Pink-V, Preference,
Contra-indicações
Se o paciente for alérgico a qualquer um dos ingredientes. Uso intra-oral do material não polimerizado.
Efeitos colaterais
Em casos individuais, reações alérgicas localizadas para
o metilmetacrilato têm sido relatadas.
Notas de segurança
– O monômero contém metacrilato de metila (MMA).
– MMA é altamente inflamável e irritante, com ponto
de “flash”: +10 °C/50 °F.
– MMA é irritante para os olhos, órgãos respiratórios
e pele.
– O contato com a pele pode causar sensibilização.
– Sempre evitar o contato da pele com o monômero e
com o material não polimerizado. As luvas médicas
comerciais não oferecem proteção contra o efeito de
sensibilização promovido pelos metacrilatos.
– Não inalar os vapores.
– Manter longe das fontes de ignição – não fumar.
– Impedir que o monômero possa alcançar o sistema
de esgoto.
– Tomar medidas contra a carga eletrostática.
Notas sobre o processamento
– Saturar completamente os modelos com água antes
de investir.
– Isolar totalmente as superfícies internas do frasco
antes de investir.
– Limpar e isolar as superfícies de gesso.
– Observar os tempos de polimerização e esfriamento.
– O contato de solventes ou do monômero com o
material polimerizado da base da dentadura pode
conduzir a uma branca descoloração.
– Quando usar isolamentos cervicais, a Ivoclar
Vivadent recomenda silicones-A com dureza de >
65 Shore A (p.ex.,Flexistone Plus/Virtual
®
Heavy
Body Fast). A condensação de C-silicones, com
ligação cruzada (C-silicones), pode estar promovendo
um efeito prejudicial sobre o material de base da
prótese.
– Os produtos só devem ser usados e ser processados
por pessoal treinado.
– A posterior-injeção de uma segunda cápsula de
IvoBase ou SR Ivocap® material de Ivocap em um
frasco, que já está cheio, não é possível.
– O material restante de uma Cápsula de IvoBase, que
já foi injetada, não pode ser usado novamente.
– O gesso pedra seco deve ser saturado com água,
antes da injeção.
– Um frasco contaminado pode promover a produção
de fumaça, quando for aquecido.
27
Page 28
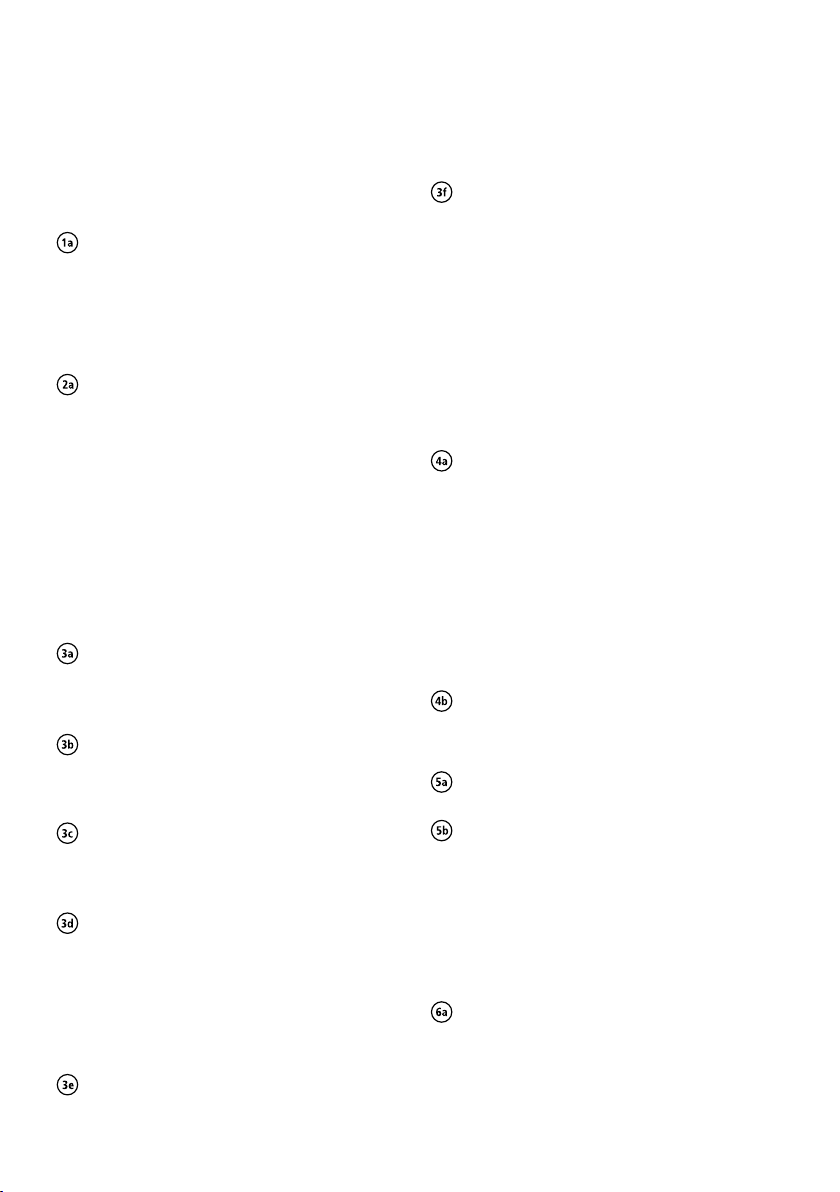
– O armazenamento das próteses em um ambiente
úmido durante a conclusão das dentaduras pode
promover a incorporação de umidade.
Processando
Preparando para a injeção
1. Preparando o frasco
Isolar as superfícies internas do frasco limpo com
uma fina camada de geléia de petróleo.
Colocar a tampa do frasco, metade do formador de acesso
e o componente (B1) de cera do filtro em uma das
metades do interior do frasco.
2. Incluindo o modelo
Incluir o bem umedecido e isolado modelo em uma
das metades do frasco, usando gesso pedra conven-
cional (Classe III). Eliminar o gesso pedra em exces-
so de tal modo que ele permaneça nivelado com o
modelo e com a margem do alojamento do frasco.
Importante: A extremidade do gesso pedra deve
estar nivelada com a metade do formador de acesso.
3. Posicionando os componentes de cera
A cera dos componentes de cera (B) pode ser colocada
sobre o modelo sem qualquer ceroplasia adicional. Tenha
certeza que nenhum gesso pedra possa ter fluido para
debaixo dos componentes de cera.
Deixar o gesso pedra endurecer totalmente.
Remover o meio formador de acesso anterior e
colocar o completo formador de acesso anterior.
– Posicionar o componente de injeção de cera (B2)
Pressionar o componente de injeção de cera (B2)
sobre a inclinação do completo formador de acesso
anterior.
Dentaduras totais superiores:
Por um sprue no centro do pálato e no lado vestibu-
lar de cada cúspide superior, e, pressionar a cera
sobre o modelo.
Dentaduras totais inferiores:
Colocar um sprue para cada área lingual do triângu-
lo retromolar. Cortar o sprue central do componente
de injeção de cera (B2).
Dentaduras parciais:
Colocar um sprue no limite dorsal de cada sela da
dentadura.
– Posicionar o componente de cera de aeração (B3)
Apertar o componente de cera de aeração, com o
canal de aeração, para o centro do filtro do compo-
nente de cera.
28
Importante: Os canais de aeração não devem
entrar em contato com o frasco, quando do início da
pressão, para assegurar a continuidade da tensão do
frasco.
Dentaduras totais superiores e inferiores:
Apertar os três canais do componente (B3) de
aeração de cera para a área anterior do contornamento.
Dentaduras parciais:
Apertar os três canais de cera de aeração compo-
nente (B3) para as paradas anteriores das selas da
dentadura. Quando o componente de cera de aeração (B3) não for bastante longo, a conexão entre a
sela da dentadura e o filtro do componente de cera
deve ser completada com um sprue de cera, observando a mais curta distância possível.
4. Revestimento com silicone
Cubrir as superfícies as superfícies vestibular e
palatina e/ou lingual das dentaduras contornadas
com silicone. Não fazer a cobertura das superfícies e
das margens incisais. Aplicar um padrão retentivo
na superfície de silicone antes de sua cura ou usar
jato de areia de retenção para reter o silicone no
gesso.
Nota: Para resultados ótimos, o uso de um silicone de
adição, de ligação cruzada e fluído (Silicone-A, com
dureza Shore-A de >65) é recomendado (p.ex.,Flexistone
Plus ou Virtual Heavy Body Fast).
Isolar as superfícies de contato, de gesso pedra-
com-gesso pedra, com Separating Fluid (F).
5. Elaborando o modelo de registro
Posicionar a metade superior do frasco superior e
fechar, usando os ganchos de fechamento.
Misturar gesso pedra convencional (Classe III), com
consistência fluida, conforme as instruções do fabricante e vazar através da abertura do frasco, sem
formar bolhas, com a ajuda de um vibrador. Eliminar
o excesso de gesso pedra com a espátula IvoBase,
até que, com o frasco aberto, não exista nenhum
protraimento do gesso pedra.
6. Fervendo o modelo
Uma vez que o gesso pedra tenha tomado presa,
aquecer o frasco dentro de um banho de água, em
aprox. a 90°C (194°F), durante 5–8 minutos. Depois
disso, abrir o frasco, remover o formador de acesso
anterior completo e, de modo áspero, remover a
cera, usando uma faca de cera. Em seguida, com
Page 29
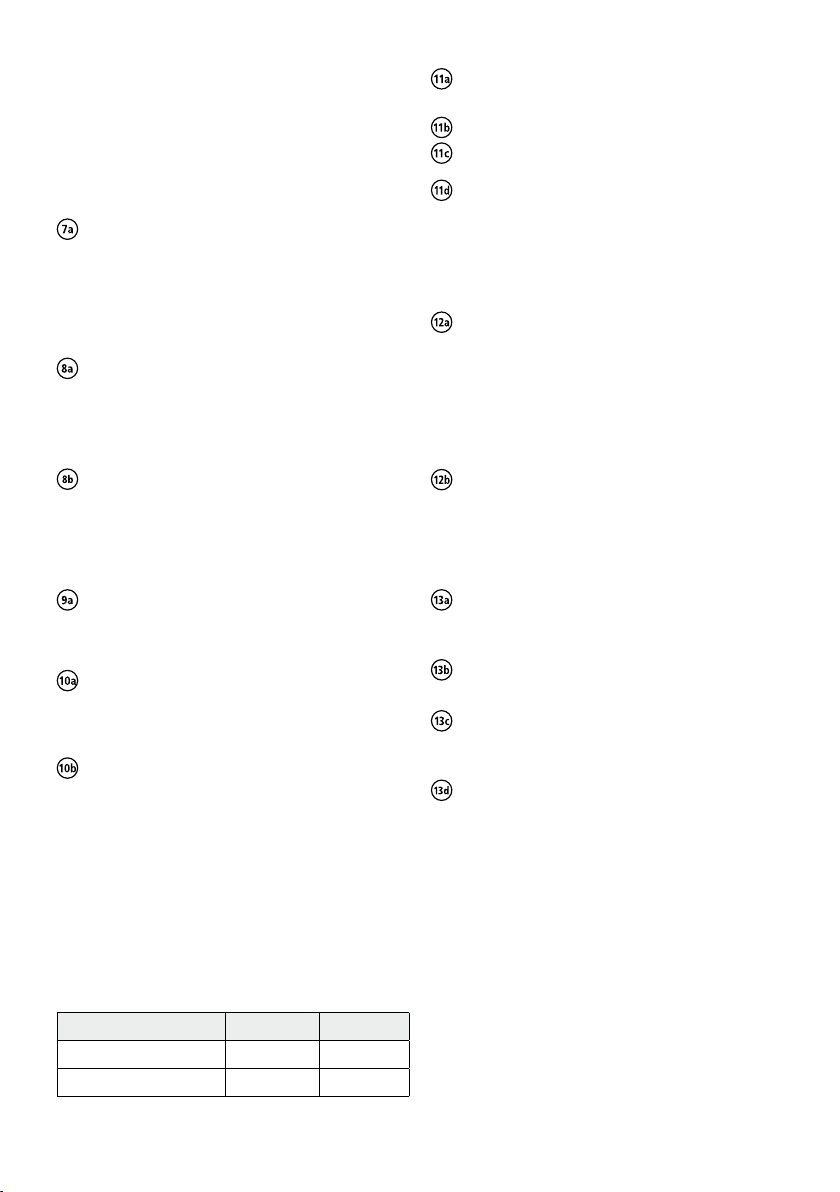
água limpa e fervente, lavar completamente as
superfícies internas.
Nota: Usar somente água pura, sem aditivos (p.ex.:
solvente de cera, agente de limpeza ). Os aditivos podem
resultar em descoloração das próteses.
7. Dentes
Para uma ótima ligação, o colo e as superfícies
basais dos dentes devem estar totalmente livres de
cera. Jatear ligeiramente as superfícies basais e cer-
vicais dos dentes (100 µm Al2O3, 2 bar. /29 psi) ou
asperizar com broca de carboneto de tungstênio.
8. Isolando as superfícies de gesso pedra
Importante: Antes de isolamento, esfriar a metade
do frasco para a temperatura ambiente (<30 °C /
86 °F), usando ar ou água limpa e fria. A temperatura
exata do frasco pode ser conferida com ajuda de um
termômetro IR.
Isolar as superfícies limpas do modelo de gesso com
Separating Fluid (F). Aplicar uma segunda camada
depois de 5 minutos. Os acúmulos (p.ex., na dobra
gêngivo-bucal) devem ser evitados.
Remover o recipiente de monômero (A4) da cápsula.
Retirar o selamento da cápsula (A1).
Tirar a capa de selamento do recipiente de monômero
(A4) e verter o líquido na cápsula aberta (A2).
Utilizar a espátula (C) para misturar o monômero e
polímero na cápsula para conseguir uma mistura
homogênea (durante aprox. 20–30 segundos).
12. Carregando o Injector
Proceder, como a seguir, após 5 minutos da mistura:
Colocar a cápsula aberta (A) em superfície plana e
pressionar o frasco sobre a cápsula (A).
Nota: Não inclinar o frasco com a cápsula antes da
polimerização para impedir que o material possa fluir
fora da cápsula (A). Quando o frasco for erguido, a cápsula (A) deve ser localizada, com firmeza, no suplemento
central.
Abrir a porta do Injector. Deslizar o frasco, coma
cápsula (A), na câmara de polimerização, até que
seja parado pelo suporte do frasco. Fechar a porta
do Injector.
9. Colocando o filtro de aeração
Inserir o filtro de aeração (E) no respectivo recesso
do frasco.
10. Colocando funil e suplemento de cêntrica
Empurrar o funil IvoBase (D) no suplemento de cên-
trica até que o estalo indicar o lugar em que está
fechado. Colocar o suplemento de cêntrica, com o
funil posicionado (D), na metade do frasco inferior.
Montar a metade do frasco e fechar, usando os
ganchos de fechamento.
Injeção e polimerização
A operação do IvoBase Injector está descrita em detalhes
nas respectivas Instruções Operacionais. O IvoBase
Injector deve ser trazido para o estado inicial (“stand-by”),
antes do começo da mistura do material.
11. Misturando o material
Uma cápsula é suficiente para a injeção de uma dentadura total superior ou inferior.
Conteúdo da cápsula Monômero Polímero
IvoBase Hybrid 20 ml 34 g
IvoBase High Impact 20 ml 30 g
13. Iniciando o programa
Selecionar o correspondente programa (ver
Instruções Operacionais do Injector para avaliação
dos programas).
Se desejar, ativar a tecla RMR para reduzir o con-
teúdo de monômero residual para <1%.
Pressionar “Start”. Começa o processo de injeção
completamente automatizado. O tempo do processo
restante é indicado no “display”.
Ao término do programa, ocorre um sinal acústico.
Usar uma luva térmica para remover o frasco quente
do Injector, segurando pelo isolamento do ombro. O
Injector está pronto para a próxima polimerização,
imediatamente depois do frasco ter sido removido.
Nota: O frasco ainda pode estar muito quente quando for removido do Injector. Perigo de queimadura!
14. Esfriando o frasco
Esfriar o frasco com água de corrente e fria, durante, no
mínimo, 15 minutos. Como alternativa, o esfriamento
também pode ser realizado no interior do Injector (p.ex.,
durante a noite).
Importante: Se o frasco não foi esfriado e for aberto em
temperatura muito alta, podem resultar inexatidões de
ajuste.
29
Page 30
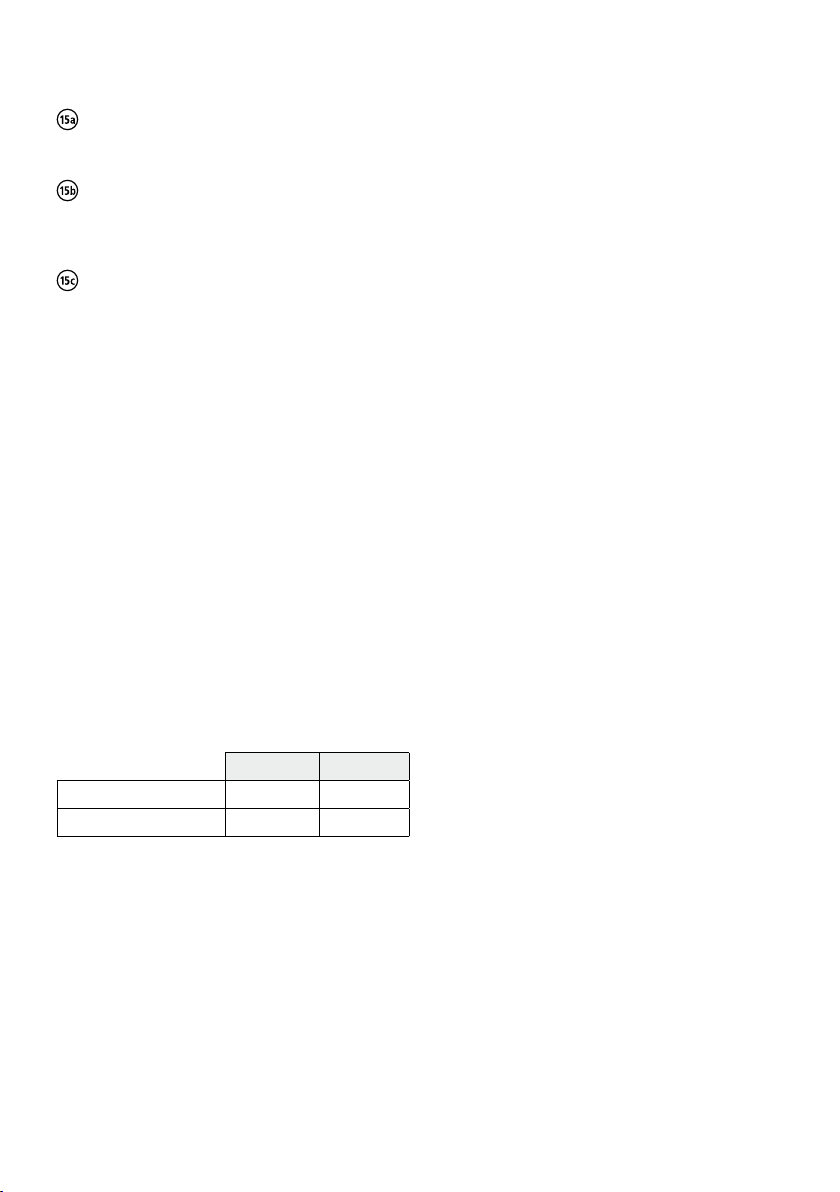
15. Desencluindo as dentaduras
Remover os ganchos de fechamento.
Colocar o frasco sob uma prensa dental. Fixar o
auxiliar de desinclusão entre o gesso e a plataforma
de pressão.
Deslizar o acionador do parafuso ou a faca de gesso
na junta entre as duas metades do frasco e levantar
a alavanca do frasco para cima. Remover o frasco
do aperto, virar e repetir o procedimento.
Remover o núcleo de gesso com a cápsula e separar
a cápsula do sprue, usando um disco de separar,
broca ou serra. Desincluir a dentadura do núcleo de
gesso de modo usual, utilizando pinças de gesso.
16. Terminando as dentaduras
O polimerizado material IvoBase é acabado com brocas
de carboneto de tungstênio de corte cruzado, lixas de
papel, e, polido da maneira normal, como é habitual
para dentaduras materiais básicos.
Reparos / Reembasamentos
IvoBase pode ser reparado com ele próprio ou com
ProBase® Cold, polímero autopolimerizável.
Reparo / extensão com IvoBase Hybrid /
High Impact
Basicamente, uma dentadura de IvoBase pode ser
reparada sem a inclusão no frasco IvoBase. O procedimento básico corresponde a aquele que é empregado
para o reparo das dentaduras convencionais de materiais
autopolimerizáveis.
Observar a seguinte relação pó/líquido:
Polímero Monômero
IvoBase Hybrid 9 g 5 g
IvoBase High Impact 8 g 5 g
O polímero e o monômero devem ser misturados, de
modo homogêneo (durante aproximadamente
20 segundos).
Por favor, observar os seguintes tempos de processamento na temperatura ambiente (a 23 °C / 73 °F):
– Duração da fase de massa: 30 segundos
– Duração da fase de verter: 1-2 minutos
– Duração da fase de modelagem: 3-5 minutos
O tempo máximo do processo total, depois da mistura, é
de 10 minutos.
Polimerizar o material em uma panela de pressão por
20 minutos, a 55 °C/131 °F, com 2.5 bar/36 psi de
pressão.
Reembasamento com IvoBase Hybrid / High Impact
Os reembasamento de uma dentadura de IvoBase pode
ser levado a cabo com ou sem inclusão no frasco de
IvoBase.
a) Reembasamento sem inclusão no frasco de IvoBase:
O procedimento sem inclusão no frasco IvoBase é o
mesmo que é realizado para reembasar dentaduras
convencionais de materiais básicos autopolimerizáveis.
b) Reembasamento com inclusão no frasco de IvoBase:
A Inclusão e conclusão para reembasamento de uma
dentadura é basicamente igual ao que é realizado
para a conclusão de ceroplastia de dentadura. Tenha
certeza que:
– o sprues e canais de aeração estejam presos na
impressão do reembasamento.
– a área a ser reembasada demonstra uma espessu-
ra de, no mínimo, 2 mm.
Conserto / extensão de reembasamento com
ProBase Cold
O procedimento corresponde ao que é usado para consertar a dentadura convencional confeccionada com
materiais básicos autopolimerizáveis. Favor, consultar
“ProBase--Instruções de Uso” para os detalhes.
Instruções de armazenamento
– Armazenar o material em local fresco, escuro e bem
ventilado.
– Temperatura de armazenamento: 2–28 °C /
36–82 °F.
– Não usar os produtos depois das indicadas datas de
validade.
– Manter os materiais fora do alcance das crianças.
Classificação de acordo com EN ISO 20795-1,
Tipo 2, Class 1
O produto satisfaz para as exigências de EN ISO 207951:2008.
Data de elaboração destas Instruções de Uso:
10/2011
Fabricante:
Ivoclar Vivadent AG FL-9494 Schaan / Liechtenstein
Estes materiais foram fabricados somente para uso dental e devem ser manipulados de
acordo com as Instruções de Uso. O fabricante não é responsável por danos causados por
outros usos ou por manipulação incorreta. Além disto, o usuário está obrigado a comprovar, sob sua responsabilidade e antes do emprego, se o material é compatível com a utilização desejada, principalmente quando esta utilização não está indicada nas Instruções de
Uso. Descrições e dados não constituem nenhum tipo de garantia.
30
Page 31

Bruksanvisning
Var vänlig och läs dessa instruktioner
noggrant och lär känna materialet och
arbetssättet. Var vänlig och läs även
bruksanvisningen till IvoBase injektor.
Produktbeskrivning
IvoBase systemet består av PMMA-baserat protesmaterial och IvoBase injektorn är speciellt framtagen till
detta material. Systemet gör det möjligt att helt automatisera en krympnings-kompenserad polymerisering av
proteser.
IvoBase materialet kombinerar fördelarna från värmeoch själv-härdande protesmaterial. Även om materialet
bygger på de krav som finns för självhärdande polymerer,
uppfyller det även de hårdare normativa kraven för
värme-härdande polymerer. IvoBase är sålunda ett
hybridmaterial. Förutom som bekvämt hybridmaterial,
finns även IvoBase som ett tryck-resistent material:
IvoBase High Impact.
Följande färger finns tillgängliga:
– IvoBase Hybrid:
Pink, Pink-V, Preference, Clear, Pink-V Implant,
Preference Implant
– IvoBase High Impact:
Pink, Pink-V, Preference, Pink-V Implant, Preference
Implant, 34-V
Sammansättning
– IvoBase Hybrid
Pulver:
Polymetylmetakrylat, mjukgörare, initiatorer, pigment
Vätska:
Metylmetakrylat, dimetakrylat, katalysatorer
– IvoBase High Impact:
Pulver:
Högtrycks-modifierade PMMA copolymer, PMMA
copolymer, polymetylmetakrylat, mjukgörare,
initiatorer, pigment
Vätska:
Metylmetakrylat, dimetakrylat, katalysatorer
Indikation
– Helproteser
− Delproteser
− Kombinationsproteser
− Hybridproteser
− Implantatprotetik
− Rebaseringar
− Reparationer
Kontraindikation
Om patienten har känd allergi mot någon beståndsdel i
materialet, ska det inte användas.
Intraoral användning med opolymeriserat material.
Sidoeffekter
I enstaka fall har lokala allergiska reaktioner för
metakrylatmaterial rapporterats.
Säkerhetsföreskrifter
– Monomeren innehåller metylmetakrylat (MMA).
− MMA är mycket brandfarligt och irriterande,
flampunkt: + 10 C°/50 °F.
− MMA är irriterande för ögon, andningsorgan samt hud.
− Hudkontakt kan leda till sensibilisering.
− Undvik att monomer och ohärdat material kommer i
kontakt med hud. Kommersiella medicinska handskar ger inget skydd mot den sensibiliserande
effekten av metakrylater.
− Inandas inte ånga.
− Håll materialet borta från lättantändliga källor – rök
inte.
− Undvik att monomer hamnar i avloppssystemet.
− Undvik elektrostatisk laddning.
Att tänka på vid framställningen
– Blötlägg modellerna ordentligt innan de bäddas in.
− Isolera noggrant inre delar av kyvetten innan
inbäddningen.
− Rengör och isolera gipsytorna.
− Var noggrann med tiderna för härdningen och
avkylningen.
− Kontakt med lösningsmedel eller monomer på
härdat protesmaterial kan ge vit missfärgning.
− När cervikal isolering används, rekommenderar
Ivoclar Vivadent A-silikoner med hårdhet >65 Shore
A (t.ex. Flexistone Plus/Virual® Heavy Body Fast).
Kondensations korsbindande (C-silikoner) kan skada
protesmaterialet.
− Produkterna får endast användas av utbildad
personal.
− Post-injektion med en andra kapsel av IvoBase eller
SR Ivocap material i en redan fylld kyvett är inte
möjlig.
− Återstående material från en redan injicerad IvoBase
kapsel kan inte användas igen.
− Torkat gips måste blötläggas i vatten innan
injektionen görs.
− Kontaminerad kyvett kan ge rökutveckling när den
uppvärms.
− Förvara proteserna fuktigt efter färdigställandet tills
de provas in.
31
Page 32

Framställning
Förberedelse för injektion
1. Förberedelse av kyvetten
Isolera de inre delarna på de rengjorda kyvett-
halvorna med ett tunt skikt av vaselin.
Sätt på kyvettens lock, kanalformeraren och filtervaxdelen
(B1) inifrån kyvettens ena halva.
2. Modellinbäddning
Bädda in den genomfuktade och isolerade modellen
med ett konventionellt dentalgips (klass III) i en av
kyvetthalvorna. Ta bort överskottsvax på så sätt att
det ligger tätt med modellen och kanten på kyvetten.
Viktigt: Gipskanten måste ligga tätt med ”kanal-
formeraren halv”.
3. Placering av vaxdelarna
Vaxet till vaxdelarna (B) kan sättas på plats utan
ytterligare uppvaxning. Se till att inget gips kan rinna
under vaxdelarna.
Låt gipset stelna ordentligt. Avlägsna ”kanal-
formeraren halv” och sätt på ”kanalformeraren hel”.
– Fastsättning av injektionsvaxdelen (B2)
Tryck injektionsvaxdelen (B2) på markeringen till
”kanalformeraren hel”.
Överkäke helprotes
Sätt fast en injektionskanal i mitten av gommens
mittfåra och en vardera på de vestibulära sidorna av
de övre hörnen och tryck fast vaxet på modellen.
Underkäke helprotes
Lägg en injektionskanal vardera i det linguala
området i den retromolara triangeln. Skär bort den
mittersta injektionskanalen på injektionsvax-
komponenten (B2).
Delprotes
Lägg en injektionskanal i det dorsala slutet av varje
protessadel.
– Fastsättning av luftningsvaxdelen (B3)
Sätt fast luftningsvaxdelen (B3) med luftningskanal-
en på mitten av filtervaxkomponenten.
Viktigt: Luftningskanalerna får inte komma i
kontakt med kyvettens skal när de trycks på plats,
så att tätningen av kyvetten inte äventyras.
Överkäke och underkäke helprotes:
Tryck de tre kanalerna med luftningsvaxkomponenter
(B3) på det anteriora området av kontureringen.
Delproteser:
Tryck de tre kanalerna med luftningsvaxkomponenter
(B3) på de anteriora stoppen för protessadlarna. Om
luftningsvaxkomponenterna (B3) inte är tillräckligt
långa, måste kopplingen mellan protessadlarna och
filtervaxkomponenterna kompletteras med
gjutkanaler i vax med kortaste möjliga avstånd.
4. Inbäddning med silikon
Täck de vestibulära och palatinala och/eller linguala
ytorna av de konturerade proteserna med silikon.
Täck inte ocklusala ytor eller incisala kanter på
tänderna. Applicera ett retentionsmönster på
silikonytan innan det stelnar eller använd retentionssand för att säkra fassättningen av silikon på gipset.
Obs: För optimala resultat rekommenderar vi att man
använder ett flytande, addition kors-bindande silikon
(A-silikon med Shore-A hårdhet på >65) (t.ex. Flexistone
Plus eller Virtual Heavy Body Fast).
Isolera gips-till-gips kontaktytor med Separating
Fluid (F).
5. Utgjutning (utslagning) av motstående modell
Placera den övre kyvetten och lås den med
låsspännena.
Blanda konventionellt dentalgips (klass III) enligt
tillverkarens instruktioner och se till att det flyter in i
öppningen av kyvetten med hjälp av en shaker utan
att luftbubblor bildas. Ta bort överskott av gips med
IvoBase spateln så att inget gips tränger ut från
kyvettens öppning.
6. Koka ur modellen
När gipset har stelnat helt, värms kyvetten i vatten-
bad till c:a 90 °C (194 °F) i ungefär 5-8 minuter.
Efter det öppnas kyvetten och ”kanalformeraren
hel” tas ut och vaxet råurbäddas med en vaxkniv.
Koka noggrant ur de inre ytorna med rent, kokande
vatten.
Obs: Använd endast rent vatten utan tillsatser (ingen
vaxlösning, inget rengöringsmedel). Tillsatser kan ge
missfärgningar på proteserna.
32
Page 33

7. Tänder
För att få en optimal bindning måste tandhalsarna
och basalytan på tänderna vara helt rena från vax.
Blästra försiktigt basala och cervikala tandytor
(100 µm Al2O3, 2 bar/29 psi) eller rugga med dental
tungsten karbidborr.
8. Isolering av gipsytorna
Viktigt: Innan isoleringen utförs, ska kyvetthalvorna
kylas ner till rumstemperatur (<30 °C/86 °F) med
luft eller rent, kallt vatten. Exakt temperatur på
kyvetterna kan kontrolleras med IR termometer.
Isolera de rena ytorna på gipsmodellen med
Separating Fluid (F). Applicera ett andra skikt efter
5 minuter. Undvik att pölar av material samlas (t.ex.
gingivo-buckala vecket).
9. Placering av luftningsfilter
Sätt fast ett luftningsfilter (E) tätt mot den åter-
stående inbuktningen på kyvetten.
10. Placering av tratt och centreringssats
Tryck IvoBase tratten (D) in i centreringssatsen
tills den knäpper på plats och låser sig. Ställ centre-
ringsinsatsen med tratten (D) på plats i den nedre
kyvetthalvan.
Sätt ihop kyvetthalvorna och lås med hjälp av
låsspännet.
12. Ladda injektorn
Gör enligt följande inom 5 minuter efter blandning:
Placera den öppnade kapseln (A) på en jämn yta och
tryck kyvetten på kapseln (A).
Obs: Luta inte kyvetten med kapseln innan härdning så
att inget material rinner ut ur kapseln (A). När kyvetten
lyfts måste kapseln (A) sitta säkert på centreringssatsen.
Öppna luckan till injektorn. Låt kyvetten med
kapseln (A) glida in i härdningskammaren tills den
stannar via kyvetthållaren. Stäng luckan till
injektorn.
13. Igångsättning av program
Välj motsvarande program (läs injektorns bruksan-
visning för en översikt av programmen).
Vid behov aktiveras RMR nyckeln för att reducera
innehållet av residualmonomer till <1%.
Tryck ”Start”. Den helautomatiserade injektions-
processen startar. Återstående tid visas på displayen.
Vid slutet av programmet, kommer en akustisk sig-
nal att ljuda. Använd värmehandskar för att ta loss
den varma kyvetten från injektorn genom att hålla i
isoleringsaxeln. Injektorn är klar för nästa polymerisering omedelbart efter att kyvetten har tagits loss.
Obs: Kyvetten kan vara fortfarande vara mycket
varm när den tas loss från injektorn. Risk för
brännskada!
Injektion och härdning
Arbetet med IvoBase injektor beskrivs i detalj i
motsvarande bruksanvisning. IvoBase injektorn måste stå
i stand-by läge innan materialet blandas.
11. Blanda materialet
En kapsel räcker till injektion av en helprotes för en
överkäke eller en underkäke.
Innehåll i en kapsel: Monomer Polymer
IvoBase Hybrid 20 ml 34 g
IvoBase High Impact 20 ml 30 g
Avlägsna monomerbehållaren (A4) från kapseln.
Avlägsna förseglingen på kapseln (A1).
Vrid av förseglingslocket på monomerbehållaren
(A4) och häll vätskan in i den öppna kapseln (A2).
Använd spateln (C) för att blanda monomer och
polymer i kapseln till en homogen blandning (c:a
20–30 sekunder).
14. Avsvalning av kyvetten
Kyl ner kyvetten under rinnande vatten i minst 15 minuter. Som alternativ kan nedkylningen även ske i injektorn
(d.v.s. över natt).
Viktigt: Om kyvetten inte kyls ner och öppnas vid för
hög temperatur, kan passformen bli fel.
15. Urbäddning av proteser
Ta loss låshakarna.
Placera kyvetten i en dentalpress. Urbäddnings-
hjälpen sätts fast mellan gips och presstallriken.
Sätt en bred skruvmejsel eller gipskniv i kanten
mellan de två kyvetthalvorna och tryck upp den övre
kyvetten halvt uppåt. Ta loss kyvetten från pressen
och vänd den. Upprepa proceduren.
Ta loss gipskärnan med kapseln och separera
kapseln vid gjutkanalen med en separerdisk, borr
eller såg. Bädda ur protesen från gipskärnan som
vanligt med gipstång.
33
Page 34

16. Finishering av proteser
Det härdade IvoBase materialet finisheras med
krysskärande tungsten karbidborr, sandpapper och
polermedel på vanligt sätt för protesmaterial.
Reparation/påbyggnad med ProBase Cold
Arbetssättet är samma som för reparation av konventionella självhärdande basmaterial. Var vänlig och läs
instruktionerna för ProBase Cold för detaljer.
Reparation/rebasering
IvoBase kan repareras med sitt eget material och med
ProBase® Cold självhärdande polymer.
Reparation/påbyggnad med IvoBase Hybrid/
High Impact
IvoBase proteser kan repareras utan att de inbäddas i
IvoBase kyvetter. Arbetssättet är samma som för reparation av konventionella självhärdande basmaterial.
Följande blandningsförhållande gäller:
Polymer Monomer
IvoBase Hybrid 9 g 5 g
IvoBase High Impact 8 g 5 g
Polymer och monomer måste blandas homogent
(c:a 20 sekunder).
Var vänlig och notera följande arbetstider (vid 23 °C/
73° F) i rumstemperatur:
– Duration för degfasen: 30 sekunder
− Duration för hällfasen: 1-2 minuter
− Duration för modelleringsfasen: 3-5 minuter
Maximal arbetstid efter blandning är 10 minuter.
Polymerisera materialet i en presskammare i 20 minuter
vid 55 °C / 13 °F med 2 bar/36psi tryck.
Rebasering med IvoBase Hybrid / High Impact
Rebasering av en IvoBase protes kan göras med eller
utan inbäddning i IvoBase kyvett.
a) Rebasera utan inbäddning i IvoBase kyvett:
Arbetssättet utan inbäddning i IvoBase kyvett är
samma som för rebasering med konventionellt självhärdande basmaterial.
b) Rebasera med inbäddning i IvoBase kyvett
Inbäddning och färdigställning för rebasering av
protesen är i princip samma som när man gör
färdigt en uppvaxad protes. Se till att:
– Gjutkanalerna och luftningskanalerna är fastsatta
fram till avtrycket för rebaseringen.
− Området som ska rebaseras ska ha en tjocklek på
minst 2 mm.
Förvaring
– Förvara materialet på en sval, mörk och väl
ventilerad plats.
− Förvaringstemperatur: 2-28 °C.
− Använd inte produkterna efter utgångsdatum.
− Förvaras utom räckhåll för barn.
Klassificering enligt EN ISO 20795-1, Typ 2, Klass 1
Produkten överensstämmer med kraven enligt EN ISO
20795-1:2008.
Informationen framställd: 10/2011
Tillverkare:
Ivoclar Vivadent AG FL-9494 Schaan / Liechtenstein
Dessa material har utvecklats endast för dentalt bruk. Bearbetningen ska noga följa de
givna instruktionerna. Tillverkaren påtager sig inget ansvar för skador uppkomna genom
oaktsamhet i att följa bruksanvisningen eller användning utanför de givna indikationsområdena. Användaren är ansvarig för kontrollen av materialets lämplighet för annat ändamål,
än vad som är direkt uttryckt i instruktionerna.
34
Page 35

Brugsanvisning
Læs denne brugsanvisning grundigt, og
gør dig bekendt med anvendelsen af materialet. Se også betjeningsvejledningen til
IvoBase-injektor.
Produktbeskrivelse
IvoBase-systemet består af et PMMA-baseret protesebasismateriale og IvoBase-injektoren, der er særligt udviklet
til materialet. Systemet muliggør fuldautomatisk og
skrumpningskompenseret polymerisering af proteser.
IvoBase-materialet kombinerer fordelene ved varme- og
selvhærdning af protesebasismaterialer. Selvom det er
underlagt kravene til selvhærdende polymerer, opfylder
det også de strengere, normative krav til varmehærdende
polymerer. IvoBase kan således betragtes som et hybridmateriale. Ud over det konventionelle hybridmateriale fås
IvoBase også i en stødresistent version: IvoBase High
Impact.
Fås i følgende farver:
– IvoBase Hybrid:
Pink, Pink-V, Preference, Clear, Pink-V Implant,
Preference Implant
– IvoBase High Impact:
Pink, Pink-V, Preference, Pink-V Implant, Preference
Implant, 34-V
Sammensætning
– IvoBase Hybrid
Pulver:
Polymethylmethacrylat, blødgører, initiator, pigmenter
Væske:
Methylmethacrylat, dimethacrylat, katalysator
– IvoBase High Impact:
Pulver:
High-impact-modificeret PMMA-copolymer, PMMA-
copolymer, polymethylmethacrylat, blødgører,
initator, pigmenter
Væske:
Methylmethacrylat, dimethacrylat, katalysator
Indikationer
– Helproteser
– Delproteser
– Kombinerede proteser
– Hybridproteser
– Implantatproteser
– Underforinger
– Reparationer
Kontraindikationer
Kontraindiceret til patienter med kendt allergi over for en
af ingredienserne. Intraoral anvendelse af upolymeriseret
materiale.
Bivirkninger
I individuelle tilfælde er der indberettet om lokale allergiske reaktioner over for methylmethacrylat-materialer.
Sikkerhedsanvisninger
– Monomer indeholder methylmethacrylat (MMA)
– MMA er meget brændbart og lokalirriterende,
flammepunkt: +10 °C.
– MMA er irriterende for øjne, åndedrætsorganer og
hud.
– Kontakt med huden kan forårsage sensibilisering.
– Undgå hudkontakt med monomer og upolymeriseret
materiale. Kommercielle, medicinske handsker yder
ikke beskyttelse mod methacrylaters sensibiliserende
virkning.
– Dampe må ikke inhaleres.
– Holdes væk fra antændelseskilder – der må ikke ryges.
– Det skal forhindres, at monomer når afløbssystemet.
– Tag forholdsregler mod elektrostatiske ladninger.
Bemærkninger om bearbejdningen
– Iblødsæt modellerne fuldstændigt i vand før ind-
støbning.
– Isolér grundigt de indre kyvetteflader før indstøbning.
– Rengør og isolér gipsoverfladerne.
– Overhold nøje polymeriserings- og afkølingstider.
– Kontakt mellem opløsningsmidler eller monomer
med polymeriseret protesebasismateriale kan føre til
hvid misfarvning.
– Når der anvendes cervikale isoleringer, anbefaler
Ivoclar Vivadent A-silikoner med en hårdhed på
>65 Shore A (f.eks. Flexistone Plus/Virtual
®
Heavy
Body Fast). Tværbindende kondensationssilikoner
(C-silikoner) kan have en beskadigende virkning på
protesebasismaterialet.
– Produkterne må kun anvendes og bearbejdes af
uddannet personale.
– Efterinjektion af endnu en kapsel IvoBase eller
SR Ivocap®-materiale i en allerede fyldt kyvette er
ikke mulig.
– Det tilbageblevne materiale fra en allerede injiceret
IvoBase-kapsel kan ikke anvendes igen.
– Tørret gips skal blødgøres i vand før injektion.
– En kontamineret kyvette kan føre til udvikling af
røg, når den opvarmes.
– Opbevares i et fugtigt miljø efter færdiggørelse af
protesen til deres anvendelse.
35
Page 36

Bearbejdning
Klargøring til injektion
1. Klargøring af kyvetten
Isolér de indvendige flader i de rene kyvettehalvdele
med et tyndt lag vaseline.
Anbring kyvettelåg, halvadgangsform og filtervokskomponent (B1) i en af kyvettehalvdelene indefra.
2. Indstøbning af modellen
Indstøb den godt gennemblødte og isolerede model
i en af kyvettehalvdelene vha. konventionel gips
(klasse III). Fjern ekstra gipsmateriale på en sådan
måde, at det flugter med modellen og kanten af
kyvettehuset.
Vigtigt: Gipskanten skal flugte med halvadgangs-
formen.
3. Placering af vokskomponenterne
Voksen i vokskomponenterne (B) kan anbringes på
modellen uden yderligere modellering i voks. Sørg for, at
der ikke kan komme gips ned under vokskomponenterne.
Lad gipsen hærde grundigt. Fjern halvadgangs-
formen, og anbring heladgangsformen.
– Anbring injektionsvokskomponenten (B2))
Tryk injektionsvokskomponenten (B2) ned på hæld-
ningen på heladgangsformen.
Maksillære helproteser:
Anbring en støbestift i midten af ganen og på den
vestibulære side af hver øvre kusp, og tryk voksen
over på modellen.
Mandibulære helproteser:
Anbring en støbestift i retromolar trigones linguale
område. Skær injektionsvokskomponentens mid-
terstøbestift af (B2).
Delproteser:
Anbring en støbestift i den dorsale ende af hver
protesesaddel.
– Anbring iltningsvokskomponenten (B3)
Tryk iltningsvokskomponenten med iltningskanalen
til midten af filtervokskomponenten.
Vigtigt: Iltningskanalerne må ikke komme i kontakt
med kyvettehuset, når de presses på plads for at
sikre kyvettens tæthed.
Mandibulære og maksillære helproteser:
Tryk de tre kanaler i iltningsvokskomponenten (B3)
til kontureringens anteriore område.
Delproteser:
Tryk de tre kanaler i iltningsvokskomponenten (B3)
til protesesadlernes anteriore stop. Hvis iltningsvokskomponenten (B3) ikke er lang nok, skal forbindelsen mellem protesesadlen og filtervokskomponenten færdiggøres med en voksstøbestift, idet den
kortest mulige afstand overholdes.
4. Støbning med silikone
Dæk de vestibulære og palatale og/eller linguale
flader af den konturerede protese med silikone.
Tændernes okklusale flader og incisale kanter må
ikke dækkes. Anvend et retentionsmønster i silikonens overflade, før den hærder, eller anvend retentionssand for at sikre silikonen i gipsen.
Bemærk: For at opnå optimale resultater anbefales det
at anvende endnu en flydende, tværbindende silikone
(A-silikone med en Shore-A hårdhed på >65) (f.eks.
Flexistone Plus eller Virtual Heavy Body Fast).
Isolér gips-til-gips-kontaktflader med separations-
væske (F).
5. Støbning af model
Anbring den øvre kyvettehalvdel og lås vha. låse-
klemmerne.
Bland konventionel gips (klasse III) i henhold til
anvisningerne fra fabrikanten, og hæld det i flydende tilstand ind i åbningen af kyvetten uden luftbobler vha. en ryster. Fjern overskydende gips med
IvoBase-spatel, så ingen gips stikker ud af kyvetteåbningen.
6. Udskoldning af modellen
Når gipsen er helt hærdet, opvarmes kyvetten i et
vandbad ved ca. 90 °C i ca. 5-8 minutter. Efter dette
åbnes kyvetten, heladgangsformen fjernes, og
voksen fjernes så godt som muligt med en kniv til
voks. Nu skoldes de indvendige flader grundigt ud
med rent, kogende vand.
Bemærk: Anvend kun rent vand uden tilsætningsstoffer
(f.eks. voksopløsningsmiddel eller rensemiddel).
Tilsætningsstoffer kan resultere i misfarvning af protesen.
36
Page 37

7. Tænder
For at opnå optimal binding skal tandhalse og de
basale tandflader være fuldstændig fri for voks.
Sandblæs forsigtigt de basale og cervikale tandover-
flader (100 µm Al2O3, 2 bar / 29 psi), eller gør dem
ru med et tungstenscarbidbor til dental brug.
8. Isolering af gipsoverflader
Vigtigt: Før isolering afkøles kyvettehalvdelene til
stuetemperatur (<30 °C) vha. luft eller rent, koldt
vand. Den nøjagtige kyvettetemperatur kan tjekkes
vha. et IR-termometer.
Isolér gipsmodellens rene overflader med
separations væske (F). Applicér endnu et lag efter
5 minutter. Pooling (f.eks. i den gingivale/bukkale
fold) skal forhindres.
9. Placering af iltningsfilter
Indsæt iltningsfiltret (E) i den tilsvarende fordybning
i kyvetten.
10. Placering af tragt og centreringsindsats
Tryk IvoBase-tragten (D) ind i centreringsindsatsen,
indtil den klikker på plads, så den er låst. Anbring
centreringsindsatsen med den indsatte tragt (D) i
den nedre kyvettehalvdel.
Saml kyvettehalvdelene, og lås vha. låseklemmerne.
Injektion og polymerisering
Betjening af IvoBase-injektoren er beskrevet udførligt i
den relevante betjeningsvejledning. IvoBase-injektoren
skal indstilles på standby, før materialet blandes.
11. Blanding af materialet
Én kapsel er tilstrækkelig til injektionen af en maksillær
eller mandibulær helprotese.
Kapslens indhold: Monomer Polymer
IvoBase Hybrid 20 ml 34 g
IvoBase High Impact 20 ml 30 g
Fjern monomerbeholderen (A4) fra kapslen. Fjern
kapsellåget (A1).
Vrid forseglingshætten af monomerbeholderen (A4)
og hæld væsken ind i den åbne kapsel (A2).
Anvend spatelen (C) til at blande monomer og poly-
mer i kapslen til en homogen blanding (i ca.
20–30 sekunder).
12. Isætning af injektor
Fortsæt som følger senest 5 minutter efter blanding:
Anbring den åbne kapsel (A) på en jævn flade, og
tryk kyvetten over på kapslen (A).
Bemærk: Kyvetten med kapslen må ikke skråtstilles før
polymerisering for at forhindre, at materialet flyder ud af
kapslen (A). Når kyvetten løftes op, skal kapslen (A)
befinde sig forsvarligt i centreringsindsatsen. Åbn
injektorens dør.
Skub kyvetten med kapslen (A) ind i poly-
meriseringskammeret, indtil den stopper pga.
kyvette holderen. Luk injektorens dør.
13. Start programmet
Vælg det relevante program (se injektorens
betjeningsvejledning for at få en oversigt over
programmer).
Om ønskeligt aktiveres RMR-nøglen for at reducere
det tilbageblevne monomerindhold til <1 %.
Tryk på “Start”. Den fuldautomatiske injektions-
proces begynder. Den resterende procestid er indikeret på displayet.
Når programmet er færdigt, høres der en lyd.
Anvend den termiske handske til at fjerne den varme
kyvette fra injektoren ved at holde den i den isolerende del. Injektoren er klar til den næste polymerisering, umiddelbart efter at kyvetten er fjernet.
Bemærk: Kyvetten kan stadig være meget varm, når
den tages ud af injektoren. Forbrændingsfare!
14. Afkøling af kyvetten
Afkøl kyvetten under koldt, rindende vand i mindst
15 minutter. Alternativt kan afkølingen også foregå i
injektoren (f.eks. natten over).
Vigtigt: Hvis kyvetten ikke er afkølet og åbnes ved
for høj en temperatur, kan der opstå tilpasningsunøjagtigheder.
15. Udtagning af protesen
Fjern låseklemmerne.
Anbring kyvetten i en presse. Fastgør udtagnings-
hjælpeforanstaltningen mellem gips og presseplade.
Skub en bred skruetrækker eller gipskniv ind i
mellemrummet mellem de to kyvettehalvdele, og
tryk den øvre kyvettehalvdel opad. Fjern kyvetten fra
pressen, vend den om, og gentag proceduren.
Fjern gipskernen med kapslen, og adskil kapslen og
støbestiften vha. et separationsskivebor eller en sav.
Udtag protesen fra gipskernen som sædvanligt med
gipstænger.
37
Page 38

16. Finishering af protesen
Det polymeriserede IvoBase-materiale finisheres med
tværgående tungstenscarbidbor, sandpapir og poleringsmedie, som det er normalt for protesebasismaterialer.
Reparation/forlængelse/underforing med
ProBase Cold
Proceduren svarer til den, der anvendes til reparation af
konventionelle selvhærdningsbasismaterialer. Se brugsanvisningen til ProBase Cold for yderligere oplysninger.
Reparation/underforing
IvoBase kan repareres med sig selv samt med ProBase®
Cold selvhærdnings polymer.
Reparation/forlængelse med IvoBase Hybrid/
High Impact
En IvoBase-protese kan grundlæggende repareres uden
indstøbning i IvoBase-kyvetten. Den grundlæggende procedure svarer til den, der anvendes til reparation af konventionelle selvhærdningsbasismaterialer.
Følgende blandingsforhold skal overholdes:
Polymer Monomer
IvoBase Hybrid 9 g 5 g
IvoBase High Impact 8 g 5 g
Polymer og monomer skal blandes homogent (i ca.
20 sekunder).
Overhold de følgende behandlingstider (ved 23 °C) ved
stuetemperatur):
– Forarbejdningsfasens varighed: 30 sekunder
– Hældningsfasens varighed: 1-2 minutter
– Modelleringsfasens varighed: 3-5 minutter
Den maksimale, samlede behandlingstid efter blanding er
10 minutter.
Polymerisér materialet i en trykbeholder i 20 minutter
ved 55 °C ved 2,5 bar / 36 psi (tryk).
Opbevaringsanvisninger
– Opbevar materialet tørt og mørkt i et velventileret
område.
– Opbevaringstemperatur: 2-28 °C.
– Produkterne må ikke anvendes efter den angivne
udløbsdato.
– Opbevar materialet utilgængeligt for børn.
Klassifikation i henhold til EN ISO 20795-1, type 2,
klasse 1
Produktet opfylder kravene for EN ISO 20795-1:2008.
Informationen udarbejdet den: 10/2011
Producent:
Ivoclar Vivadent AG FL-9494 Schaan / Liechtenstein
Dette materiale er blevet udviklet udelukkende til anvendelse i tandlægeindustrien.
Bearbejdning skal udføres i nøje overensstemmelse med brugsanvisningen. For skader, der
er opstået som følge af manglende overholdelse af anvisningerne eller det stipulerede
an vendelsesområde, påtager producenten sig intet erstatningsansvar. Brugeren er forpligtet
til at teste materialet for dets egnethed og anvendelse til formål, der ikke er udtrykkeligt
anført i brugsanvisningen. Beskrivelser og data udgør ingen garanti for egenskaber.
Underforing med IvoBase Hybrid/High Impact
Underforing af en IvoBase-protese kan udføres med eller
uden indstøbning i IvoBase-kyvetten.
a) Underforing uden indstøbning i IvoBase-kyvetten:
Proceduren uden indstøbning i IvoBase-kyvetten er
den samme som den, der bruges til underforing med
konventionelle selvhærdende protesebasismaterialer.
b) Underforing med indstøbning i IvoBase-kyvetten:
Indstøbning og færdiggørelse af underforing af en
protese er grundlæggende den samme som for
færdiggørelse af modellering af proteser i voks. Sørg
for, at
– støbestifterne og iltningskanalerne er fastgjort til
underforingsaftrykket.
– området, der skal underfores, har en tykkelse på
mindst 2 mm.
38
Page 39

Käyttöohjeet
Lue nämä käyttöohjeet huolellisesti läpi ja
tutustu materiaalin käyttöön. Noudata
myös IvoBase Injector -injektorin
käyttöohjeita.
Tuotekuvaus
IvoBase-järjestelmä sisältää PMMA-pohjaisen proteesin
perusmateriaalin ja erityisesti tähän käyttötarkoitukseen
suunnitellun ruiskutuslaitteen. Järjestelmän avulla proteesit kovettuvat automaattisesti ja kutistumista kompensoivasti.
IvoBase-materiaalissa yhdistyvät automaattisesti
kovettuvien ja kuumakovettuvien proteesimuovien edut.
Vaikka materiaali kuuluu automaattisesti kovettuvia
polymeereja koskevien määräysten piiriin, se täyttää jopa
kuumakovettuvia koskevat tiukemmat normatiiviset
määräykset. Siten IvoBase-materiaalia voidaan kutsua
hybridimateriaaliksi. Tavanomaisen IvoBasehybridimateriaalin lisäksi saatavana on erityisen
iskunkestävä vaihtoehto IvoBase High Impact.
Saatavana ovat seuraavat värit:
– IvoBase Hybrid:
Pink, Pink-V, Preference, Clear, Pink-V Implant,
Preference Implant
– IvoBase High Impact:
Pink, Pink-V, Preference, Pink-V Implant, Preference
Implant, 34-V
Koostumus
– IvoBase Hybrid
Jauhe:
polymetyylimetakrylaatti, pehmennysaine, initiaattori,
pigmentit
Neste:
metyylimetakrylaatti, dimetakrylaatti, katalysaattori
– IvoBase High Impact:
Jauhe:
iskulujuusmuunnettu PMMA-kopolymeeri, PMMA-
kopolymeeri, polymetyylimetakrylaatti, pehmennys-
aine, initiaattori, pigmentit
Neste:
metyylimetakrylaatti, dimetakrylaatti, katalysaattori
Indikaatiot
– kokoproteesit
– osaproteesit
– yhdistelmäproteesit
– hybridiproteesit
– implanttiproteesit
– materiaalin lisääminen proteesin reuna-alueille
– korjaukset.
Kontraindikaatiot
Potilaan tiedetään olevan allerginen jollekin aineosalle.
Kovettumattoman materiaalin käyttö suunsisäisellä
alueella.
Haittavaikutukset
Yksittäistapauksessa metyyliakrylaattipitoisia
materiaaleja käytettäessä on raportoitu paikallisia
allergisia reaktioita.
Varoitukset
– Monomeeri sisältää metyylimetakrylaattia (MMA).
– MMA on helposti syttyvää ja ärsyttävää,
leimahduspiste +10 °C.
– MMA ärsyttää silmiä, hengityselimiä ja ihoa.
– Ihokosketus voi aiheuttaa herkistymistä.
– Vältä ihokosketusta monomeerin ja kovettumattoman
materiaalin kanssa. Kaupallisesti saatavat,
lääketieteelliseen käyttöön tarkoitetut käsineet eivät
suojaa metakrylaattien herkistävältä vaikutukselta.
– Höyryä ei saa hengittää.
– Pidettävä loitolla sytytyslähteistä – tupakointi
kielletty.
– Monomeerien ei saa antaa virrata viemäriin.
– Sähköstaattiselta lataukselta on suojauduttava
asianmukaisin toimenpitein.
Käsittelyohjeet
– Kostuta mallit ennen niiden asettamista paikalleen.
– Eristä kehyksen sisäpinnat ennen mallien asettamista
paikalleen.
– Puhdista ja eristä kipsipinnat.
– Noudata tarkasti kovettumis- ja jäähtymisaikoja.
– Liuottimien tai monomeerin joutuminen kosketukseen
kovettuneen proteesimateriaalin kanssa voi johtaa
valkoiseen värimuutokseen.
– Hammaskaulan eristeitä käytettäessä Ivoclar
Vivadent suosittelee A-silikonien käyttöä, joiden
Shore A kovuus on >65 (esim. Flexistone Plus/
Virtual® Heavy Body Fast). Kondensaatiosilikoneilla
(K-silikonit) voi olla haitallinen vaikutus proteesi-
materiaaliin.
– Tuotetta saa käyttää ja käsitellä vain koulutettu
henkilökunta.
– Täytettyyn kehykseen ei voida ruiskuttaa materiaalia
toisesta IvoBase-kapselista tai SR Ivocap®-materiaalia.
– Käytettyyn IvoBase-kapseliin jäävää materiaalia ei
saa käyttää uudelleen.
– Kuivunut kipsi on kostutettava ennen ruiskutusta.
– Epäpuhdas kehys voi lämmön vaikutuksesta johtaa
savun muodostumiseen.
– Säilytä proteesia kosteassa, kunnes se asetetaan
paikalleen valmistamisen jälkeen.
39
Page 40

Käsittely
Ruiskutuksen valmistelu
1. Kehyksen valmistelu
Eristä puhtaat kehyksen puoliskot levittämällä niiden
pinnalle ohut kerros vaseliinia.
Aseta kehyksen kansi ja kanavanmuodostajan puolisko
sekä suodatinvahaosa (B1) sisäpuolelta toiseen kehyksen
puoliskoista.
2. Mallin asettaminen paikalleen
Asettele hyvin kostutettu ja eristetty malli toiseen
kehyksen puoliskoon tavallisella hammaskipsillä
(luokka III). Poista ylimääräinen kipsi niin, että sen
reuna on tasan mallin ja kehyskotelon reunan
kanssa.
Tärkeää: Kipsin reunan on oltava tasan
kanavanmuodostajan puoliskon kanssa.
3. Vahaosien kiinnittäminen
Vahaosien (B) vaha voidaan kiinnittää jäljennökseen
ilman lisävahausta. Varmista, että vahaosien alle ei valu
kipsiä.
Anna kipsin kovettua kokonaan. Poista
kanavanmuodostajan puolisko ja aseta kokonainen
kanavanmuodostaja paikalleen.
– Ruiskutusvahaosan (B2) kiinnittäminen
Paina ruiskutusvahaosa (B2) kokonaisen
kanavanmuodostajan viiston päälle.
Yläleuan kokoproteesi:
Aseta yksi ruiskutuskanava suulaen keskikohtaan
sekä ruiskutuskanavat vestibulaarisesti kumpaankin
yläleuan kuspiin. Pursota vaha jäljennökseen.
Alaleuan kokoproteesi:
Aseta ruiskutuskanavat retromolaarisen kolmion
linguaaliselle alueelle. Irrota ruiskutusvahaosan (B2)
keskimmäinen ruiskutuskanava.
Osaproteesi:
Aseta ruiskutuskanava erikseen jokaisen proteesi-
satulan dorsaalipäähän.
– Ilmausvahaosan (B3) kiinnittäminen
Paina ilmausvahaosa (B3) yhdistävällä kanavalla
keskitetysti suodatinvahaosaan.
Tärkeää: Ilmauskanavia ei saa painaa kehyskoteloa
vasten, sillä muuten kehyksen tiiviyttä ei voida
taata.
Alaleuan ja yläleuan kokoproteesi:
Paina ilmausvahaosan (B3) kolme kanavaa anterio-
risesti jäljennöstä vasten.
Osaproteesi:
Paina ilmausvahaosan (B3) kolme kanavaa proteesi-
satulan anteriorisia reunoja vasten. Jos ilmausvahaosan (B3) pituus on riittämätön, proteesisatulan ja
suodatinvahaosan yhdyskohtaa on jatkettava kanavanmuotoisella vahalla pitäen yhdyskohta kuitenkin
mahdollisimman lyhyenä.
4. Asettelu paikalleen silikonilla
Levitä proteesijäljennöksen vestibulaaristen ja pala-
tinaalisten tai linguaalisten pintojen päälle silikonia.
Älä peitä hampaiden purupintoja ja puremareunoja.
Tee silikonin pintaan retentiivinen kuvio ennen
silikonin kovettumista tai käytä kiinnityshiekkaa,
jotta silikonimuotti kiinnittyy kipsiin.
Huomautus: Parhaiden tulosten takaamista varten
suositellaan ohutjuoksuista additiosilikonia (A-silikoni),
jonka Shore A kovuus on >65 (esim. Flexistone Plus tai
Virtual Heavy Body Fast).
Eristä kipsienväliset kosketuspinnat levittämällä
Separating Fluid (F) -irrotusainetta.
5. Vastamallin valu
Aseta kehyksen yläpuolisko paikalleen ja sulje
sulkimella.
Sekoita tavallista hammaskipsiä (luokka III)
valmistajan antamien ohjeiden mukaisesti. Poista
ilmakuplat ravistimella ja anna ohutjuoksuisen kipsin
virrata kehyksen aukkoon. Poista ylimääräinen kipsi
IvoBase-lastalla niin, ettei kipsiä työnny ulos
kehyksen aukosta.
6. Jäljennöksen kuumavesihuuhtelu
Kipsin kovetuttua kokonaan lämmitä kehystä noin
90-asteisessa vesihauteessa 5–8 minuuttia. Avaa
sitten kehys, poista kokonainen kanavanmuodostaja
ja irrota vaha suuripiirteisesti vahaveitsellä.
Huuhtele sitten sisäpinnat huolellisesti puhtaalla ja
kiehuvalla vedellä.
Huomautus: Käytä kuumavesihuuhteluun vettä, joka ei
sisällä lisäaineita (esim. vahan irrotusainetta tai
puhdistusainetta). Lisäaineet voivat johtaa proteesin
värimuutokseen.
40
Page 41

7. Hampaat
Hyvän liitoksen muodostamista varten hammaskau-
loissa ja basaaleilla hammaspinnoilla ei saa olla
lainkaan vahaa. Säteilytä hampaiden basaalisia ja
servikaalisia pintoja hieman (100 µm Al2O3, 2 baaria)
tai karhenna niitä kovametallijyrsimellä.
8. Kipsipintojen eristäminen
Tärkeää: Jäähdytä kehyksen puoliskot ilmassa tai
puhtaalla, kylmällä vedellä huoneenlämpötilaan
(<30 °C) ennen eristämistä. Kehyksen tarkka lämpötila voidaan tarkistaa infrapunalämpömittarilla.
Eristä kipsimallin puhtaat pinnat Separating Fluid (F)
-irrotusaineella. Toista käsittely 5 minuutin kuluttua.
Vältä liiallista kosteutta (esim. taitekohdassa).
9. Ilmaussuodattimen asemointi
Aseta ilmaussuodatin (E) tasareunaisesti kehyksessä
olevaan uraan.
10. Suppilon ja keskittimen asettaminen paikalleen
Työnnä IvoBase-suppilo (D) keskittimeen ja paina se
vasteeseen saakka niin, että se on tiukasti
paikallaan. Aseta keskitin ja suppilo (D) kehyksen
alempaan puoliskoon.
Aseta kehyksen puoliskot yhteen ja sulje sulkimilla.
Ruiskutus ja kovettaminen
IvoBase Injector -injektorin käyttö kuvataan
yksityiskohtaisesti sen käyttöohjeessa. IvoBase Injector
on saatettava käyttövalmiiksi ennen materiaalin
sekoittamista.
11. Materiaalin sekoittaminen
Ylä- tai alaleuan kokoproteesin ruiskutukseen riittää yksi
kapseli.
Kapselin sisältö: Monomeeri Polymeeri
IvoBase Hybrid 20 ml 34 g
IvoBase High Impact 20 ml 30 g
Ota monomeerisäiliö (A4) kapselista. Poista kapselin
korkki (A1).
Kierrä irti monomeerisäiliön (A4) korkki ja kaada
neste avattuun kapseliin (A2).
Sekoita monomeeri ja polymeeri (noin 20–30 sekuntia)
lastalla (C) kapselissa homogeeniseksi seokseksi.
12. Asettaminen injektoriin
Suorita seuraavat toimenpiteet 5 minuutin kuluessa
seoksen sekoittamisesta:
Aseta avattu kapseli (A) tasaiselle alustalle ja paina
kehys kapselin (A) päälle.
Huomautus: Älä kallista kehystä ja siihen kiinnitettyä
kapselia ennen kovettumista, jotta kapselin (A) sisältö ei
virtaa kapselista. Kehystä nostettaessa on kapselin (A)
oltava tiukasti kiinni keskittimessä.
Avaa injektorin ovet. Työnnä kehys ja siihen
kiinnitetty kapseli (A) kovettamiskammion
kapseliliitännän vasteeseen saakka. Sulje injektorin
ovet.
13. Ohjelman käynnistäminen
Valitse tarvittava ohjelma (katso ohjelmaluettelo
injektorin käyttöohjeesta).
Jäännösmonomeeripitoisuus voidaan pienentää
< 1 %:iin tarvittaessa painamalla “RMR”-painiketta.
Paina “Start”-painiketta. Automaattinen ruiskutus
käynnistyy. Jäljellä oleva aika näkyy näytössä.
Ohjelman päätyttyä kuuluu merkkiääni.
Lämpökäsinettä käyttäen poista kuuma kehys laitteesta tarttumalla sen eristeulokkeeseen. Injektoria
voidaan käyttää seuraavaan kovettamiskäsittelyyn
heti kehyksen poistamisen jälkeen.
Huomautus: Kehys saattaa olla hyvin kuuma
laitteesta poistamisen jälkeen. Palovammavaara!
14. Kehyksen jäähdyttäminen
Jäähdytä kehystä kylmässä juoksevassa vedessä
vähintään 15 minuuttia. Kehys voidaan jäähdyttää valinnaisesti myös suoraan injektorissa (esim. yön yli).
Tärkeää: Jos kehystä ei jäähdytetä tarpeeksi ja se
avataan liian korkeassa lämpötilassa, proteesin mitat
jäävät epätarkoiksi.
15. Proteesin irrottaminen
Poista sulkimet.
Aseta kehys hammaspuristimeen. Kiinnitä irrotus-
väline kipsin ja puristusalustan väliin.
Työnnä leveä ruuviavain tai kipsiveitsi
kehyspuoliskojen välisiin rakoihin ja nosta ylempää
kehyspuoliskoa vipuamalla. Poista kehys puristimesta,
käännä toisinpäin ja toista menettely.
Poista kipsiydin ja kapseli, irrota kapseli ruisku-
tuskanavasta irrotuslaatalla, jyrsimellä tai sahalla.
Irrota proteesi kipsiytimestä kipsipihdeillä
tavanomaiseen tapaan.
41
Page 42
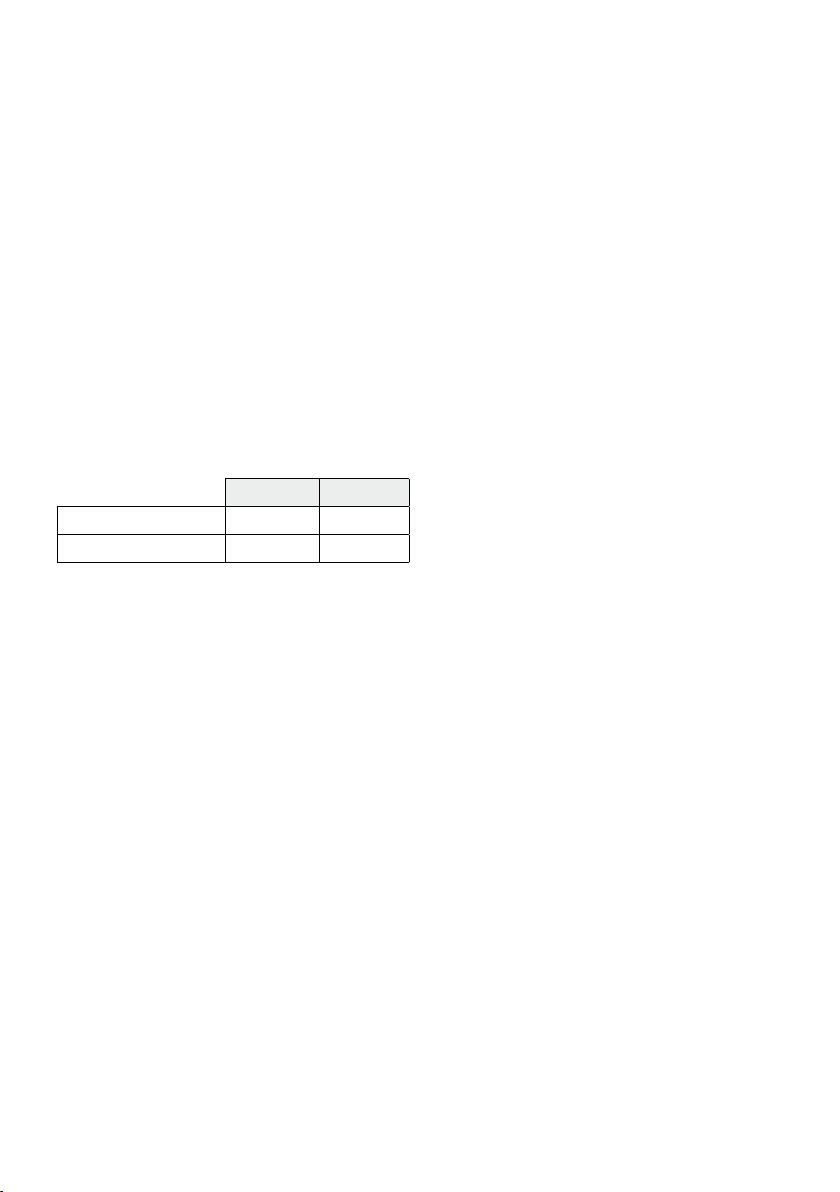
16. Proteesin viimeistely
Kovettunut IvoBase-materiaali viimeistellään
ristihammastetulla kovametallijyrsimellä, hiekkapaperilla
ja kiillotusaineella proteesien perusmateriaaleille
sopivalla tavalla.
Korjaus / materiaalin lisääminen proteesin
reuna-alueille
IvoBase-materiaalia voidaan korjata lisäämällä samaa
materiaalia tai ProBase® Cold -autopolymeeria.
Korjaus/laajennus IvoBase Hybrid- / High Impact
-materiaalilla
IvoBase-proteesin korjaamista varten sitä ei tarvitse
asettaa IvoBase-kehykseen. Menettelytapa vastaa
pääsääntöisesti tavanomaisilla kylmäkovettuvilla
proteesien perusmateriaaleilla tehtyä korjausta.
Käytä seuraavaa sekoitussuhdetta:
Polymeeri Monomeeri
IvoBase Hybrid 9 g 5 g
IvoBase High Impact 8 g 5 g
Polymeeri ja monomeeri on sekoitettava keskenään
homogeeniseksi seokseksi (noin 20 sekuntia).
Noudata seuraavia työskentelyaikoja (23 °C:n
huoneenlämpötilassa):
– Seoksen paisumisvaiheen kesto: 30 sekuntia
– Valuvaiheen kesto: 1–2 minuuttia
– Mallinvalmistusvaiheen kesto: 3–5 minuuttia
Kokonaistyöskentelyaika sekoittamisen jälkeen on
enintään 10 minuuttia.
Koveta materiaalia 55 °C:n lämpötilassa 2,5 baarin
paineessa vähintään 20 minuuttia painekammiossa.
proteesin kehykseen asettelu ja valmistus tapahtu-
vat mallipohjaisen proteesin valmistuksen tavoin.
Varmista, että
– ruiskutus- ja ilmauskanavat on kiinnitetty
käsiteltävien reuna-alueiden jäljennökseen, ja
– käsiteltävän reuna-alueen paksuus on vähintään
2 mm.
Korjaus / laajennus / materiaalin lisääminen
reuna-alueille ProBase Cold -materiaalilla
Menettelytapa vastaa tavanomaisella automaattisesti
kovettuvalla proteesin perusmateriaalilla suoritettua
korjausta. Katso yksityiskohtaiset ohjeet ProBase Cold
-materiaalin käyttöohjeesta.
Säilytysohjeet
– Säilytä materiaalia viileässä ja hyvin tuuletetussa
paikassa valolta suojattuna.
– Säilytyslämpötila: 2–28°C
– Älä käytä tuotetta viimeisen käyttöpäivän jälkeen.
– Ei lasten ulottuville.
Luokitus standardin EN ISO 20795-1, tyypin 2,
luokan 1 mukaan
Tuote vastaa standardin EN ISO 20795-1:2008 määräyksiä.
Käsittelyohje laadittu: 10/2011
Valmistaja:
Ivoclar Vivadent AG FL-9494 Schaan / Liechtenstein
Tämä materiaali on tarkoitettu ainoastaan hammaslääketieteelliseen käyttöön. Materiaalia
tulee käsitellä tarkasti käsittelyohjeita noudattaen. Valmistaja ei vastaa vahingoista, jotka
aiheutuvat muunlaisesta tai asiattomasta käsittelystä. Lisäksi käyttäjä on velvollinen
tarkastamaan omalla vastuullaan ennen käyttöä, että materiaali sopii aiottuun
käyttötarkoitukseen ja että sitä voidaan käyttää siihen. Tämä pätee erityisesti siinä
tapauksessa, kun näitä käyttötarkoituksia ei ole mainittu käyttöohjeessa.
IvoBase Hybrid- / High Impact -materiaalin
lisääminen proteesin reuna-alueille
Kun IvoBase-proteesin reuna-alueille lisätään materiaalia,
proteesi voi olla asetettuna IvoBase-kehykseen, mutta
tämä ei kuitenkaan ole välttämätöntä.
a) Materiaalin lisääminen proteesin reuna-alueille, kun
proteesi ei ole IvoBase-kehyksessä:
Menettelytapa, jossa proteesia ei aseteta IvoBase-
kehykseen, vastaa pääsääntöisesti tavanomaisilla
kylmäkovettuvilla proteesien perusmateriaaleilla
käytettyä menetelmää.
b) Materiaalin lisääminen proteesin reuna-alueille, kun
proteesi on IvoBase-kehyksessä:
Kun proteesin reuna-alueille lisätään materiaalia,
42
Page 43

Bruksanvisning
Les nøye gjennom bruksanvisningen og bli
fortrolig med bruken av materialet. Se
også bruksanvisningen for IvoBaseinjektoren.
Produktbeskrivelse
IvoBase-systemet består av et PMMA-basert basismateriale for proteser samt IvoBase-injektoren som er utviklet
spesielt for materialet. Systemet muliggjør helautomatisk
polymerisering som kompenserer for krymping av proteser.
IvoBase-materialet kombinerer fordelene ved varmeherdende og automatisk herdende basismaterialer for
proteser. Selv om det er underlagt kravene som stilles til
automatisk herdende polymerer, oppfyller det de
strengere normerte kravene til varmeherdende polymerer.
IvoBase kan derfor betraktes som et hybridmateriale. I
tillegg til å være et konvensjonelt hybridmateriale, er
IvoBase også tilgjengelig i en spesielt bruddsikker
materialversjon: IvoBase High Impact.
Følgende farger er tilgjengelige:
– IvoBase Hybrid:
Pink, Pink-V, Preference, Clear, Pink-V Implant,
Preference Implant
– IvoBase High Impact:
Pink, Pink-V, Preference, Pink-V Implant, Preference
Implant, 34-V
Sammensetning
– IvoBase Hybrid
Pulver:
Polymetylmetakrylat, mykningsmiddel, initiator,
pigmenter
Væske:
Metylmetakrylat, dimetakrylat, katalysator
– IvoBase High Impact:
Pulver:
PMMA kopolymer modifisert for høy bruddsikkerhet,
PMMA kopolymer, polymetylmetakrylat,
mykningsmiddel, initiator, pigmenter
Væske:
Metylmetakrylat, dimetakrylat, katalysator
Indikasjon
– Komplett tannprotese
– Delvis tannprotese
– Kombinert tannprotese
– Hybrid tannprotese
– Implantatprotese
– Underfôringer
– Reparasjoner
Kontraindikasjon
Ved kjent allergi mot noen av innholdsstoffene. Intraoral
bruk av ikke-polymerisert materiale.
Bivirkninger
I individuelle tilfeller er det rapportert om allergiske
reaksjoner mot materialer av metylmetakrylat.
Merknader om sikkerhet
– Monomer inneholder metylmetakrylat (MMA)
– MMA er ekstremt brannfarlig og har irriterende vir-
kning, flammepunkt: +10 °C/50 °F.
– MMA har irriterende virkning på øyne, pusteorganer
og hud.
– Hudkontakt kan virke allergifremkallende.
– Unngå hudkontakt med monomer og ikke-polymeri-
sert materiale. Vanlige medisinske hansker gir ingen
beskyttelse mot den allergifremkallende effekten av
metakrylater.
– Pust ikke inn damp.
– Skal holdes på avstand fra antennelige kilder –
røyking forbudt.
– Unngå at monomer kommer ut i avløpssystemet.
– Iverksett tiltak mot elektrostatisk opplading.
Merknader om bearbeidning
– Bløtlegg modellene grundig i vann før de settes inn.
– Isoler de innvendige kyvetteoverflatene grundig før
innsetting.
– Rengjør og isoler overflater av gips.
– Overhold nøye tidene for polymerisering og kjøling.
– Hvis løsemiddel eller monomer kommer i kontakt
med polymerisert basismateriale for proteser, kan
det føre til hvit misfarging.
– Ved bruk av tannhalsisolasjon anbefaler Ivoclar
Vivadent å bruke A-silikoner med en hardhet på
> 65 Shore A (f.eks. Flexistone Plus/Virtual
®
Heavy
Body Fast). Kondenserbare kryssforbindende silikoner (C-silikoner) kan ha en skadelig virkning på basismateriale for proteser.
– Produktene skal bare brukes og bearbeides av
opplært personale.
– Det er ikke mulig å injisere en annen kapsel med
IvoBase eller SR Ivocap®-materiale i etterhånd i en
allerede fylt kyvette.
– Gjenværende materiale fra en allerede injisert
IvoBase-kapsel kan ikke brukes om igjen.
– Tørket gips må bløtlegges i vann før den injiseres.
– En kontaminert kyvette kan føre til røykutvikling når
den varmes opp.
– Skal oppbevares i fuktige omgivelser fra protesen er
ferdiglaget til den settes inn.
43
Page 44

Bearbeidning
Klargjøring for injeksjon
1. Klargjøring av kyvetten
Isoler de innvendige overflatene på de rene kyvette-
halvdelene med et tynt lag vaselin.
Plasser kyvettehetten, kanalformer halv og filtervokskomponenten (B1) i en av kyvettehalvdelene fra innsiden.
2. Innsetting av modellen
Sett den god bløtlagte og isolerte modellen inn i en
av kyvettehalvdelene ved hjelp av konvensjonell
dental gips (klasse III). Fjern overflødig gips slik at
den flukter med modellen og kanten på kyvette-
huset.
Viktig: Gipskanten må flukte med kanalformer halv.
3. Plassering av vokskomponentene
Vokskomponentenes (B) voks kan plasseres på modellen
uten ekstra voksing. Pass på at det ikke kan flyte gips
under vokskomponentene.
Gi gipsen anledning til å stivne skikkelig. Fjern
kanalformer halv og plasser kanalformer full.
– Plassere injeksjonsvokskomponenten (B2)
Press injeksjonsvokskomponenten (B2) inn på
skråkanten av kanalformer full.
Totalprotese overkjeve:
Legg en injeksjonskanal til midten av munntaket og
på vestibulær side av hver av overkjevens bifurkas-
joner og press voksen på modellen.
Totalprotese underkjeve:
Legg en injeksjonskanal til det linguale området av
den retromolare trekanten. Skjær av midtre injeks-
jonskanal til injeksjonsvokskomponenten (B2).
Delproteser:
Legg en injeksjonskanal i den dorsale enden av hver
protesesadel.
– Plassere utluftingsvokskomponenten (B3)
Press utluftingsvokskomponenten med luftekanalen
til midten av filtervokskomponenten.
Viktig: Luftekanalene må ikke komme i kontakt
med kyvettehuset når de presses på plass, slik at det
sikres at kyvetten er tett.
Totale underkjeve- og overkjeveproteser:
Press utluftingsvokskomponentens (B3) tre kanaler
til det anteriore området av konturen.
Delproteser:
Press utluftingsvokskomponentens (B3) tre kanaler
til protesesadlenes anteriore stoppere. Hvis utluftingsvokskomponenten (B3) ikke er lang nok, må
forbindelsen mellom protesesadelen og filtervokskomponenten fullføres med kanalformet voks med
kortest mulig avstand.
4. Innsetting med silikon
Dekk til de vestibulære og palatale og/eller linguale
overflatene den modellerte protesen med silikon.
Dekk ikke til tennenes okklusale overflater og insisale kanter. Påfør et retentivt mønster i silikonoverflaten før den herdes, eller bruk festesand for å feste
silikonet i gipsen.
Merknad: Det anbefales å bruke tyntflytende, addisjonskryssforbindende silikon (A-silikon med Shore-A hardhet
på > 65) for å få optimale resultater (f.eks. Flexistone
Plus eller Virtual Heavy Body Fast).
Isoler kontaktflatene gips mot gips med skillevæske
(F).
5. Støping av motmodellen
Plasser den øvre kyvettehalvdelen og lås den med
låseklemmer.
Bland konvensjonell dental gips (klasse III) iht.
produsentens bruksanvisning og la den flyte med
tyntflytende konsistens inn i åpningen på kyvetten,
uten luftbobler, ved hjelp av en vibrator. Fjern overflødig gips med IvoBase-spatelen, slik at det ikke
stikker frem gips fra kyvetteåpningen.
6. Utkoking av modellen
Så snart gipsen har størknet fullstendig, må kyvetten
varmes opp i vannbad ved ca. 90 °C (194 °F) i ca.
5–8 minutter. Åpne deretter kyvetten, fjern kanalformer full og fjern voksen grovt med en vokskniv.
Kok så grundig ut de innvendige overflatene med
rent, kokende vann.
Merknad: Bruk bare rent vann uten tilsetningsstoffer
(f.eks. løsemiddel for voks, rengjøringsmiddel).
Tilsetningsstoffer kan føre til misfarging av protesen.
44
Page 45
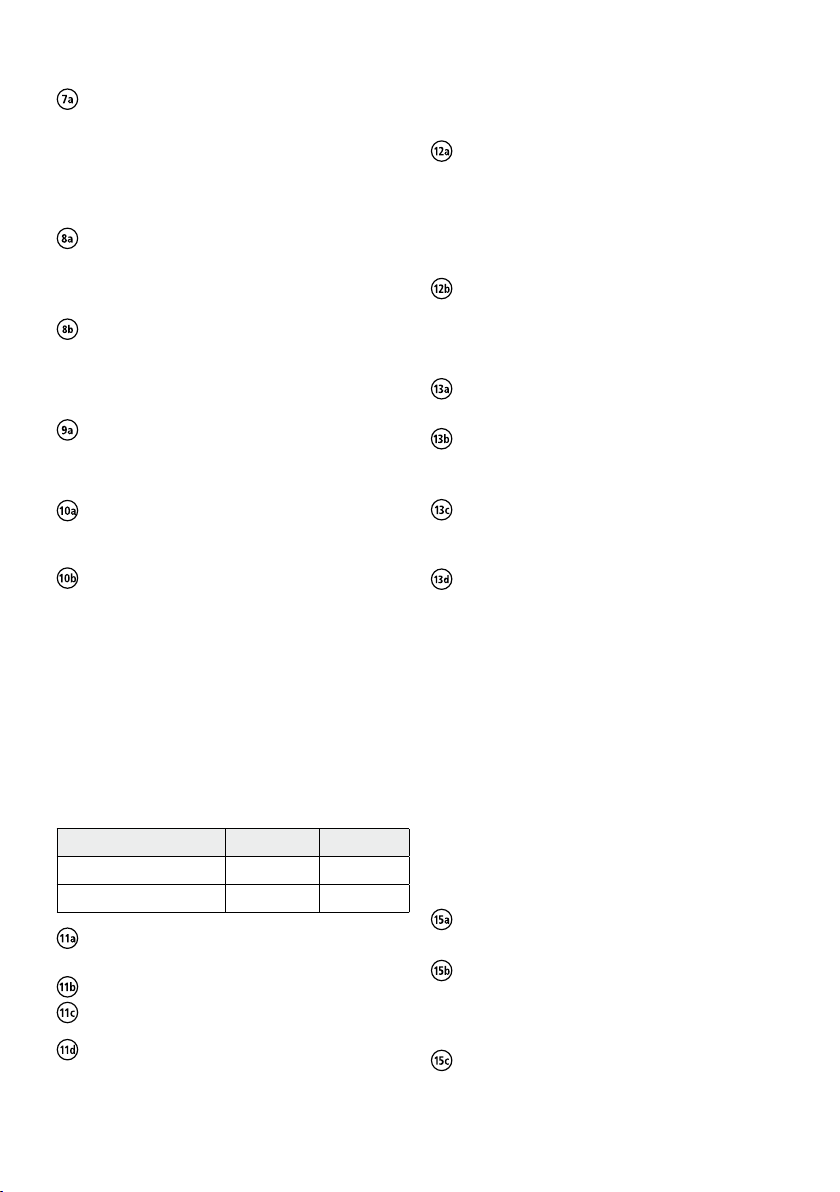
7. Tenner
For å få optimalt feste må tannhalsene og de basale
tannflatene være fullstendig frie for voks.
Sandblås de basale og cervikale tannflatene lett
(100 µm Al2O3, 2 bar / 29 psi) eller ru dem opp med
en dental hardmetallfres.
8. Isolering av gipsoverflatene
Viktig: Kjøl kyvettehalvdelene ned til romtemperatur
(<30 °C / 86 °F) med luft eller rent, kaldt vann før
du isolerer. Nøyaktig kyvettetemperatur kan måles
med IR-termometer.
Isoler gipsmodellens rene overflater med skillevæske
(F). Påfør et lag nr. to etter 5 minutter. Pyttdannelse
(f.eks. i den gingivobuccale folden) må forhindres.
9. Plassering av utluftingsfilteret
Før utluftingsfilteret (E) inn i tilsvarende fordypning i
kyvetten så det flukter.
10. Plassering av trakt og senterinnsats
Skyv IvoBase-trakten (D) inn i senterinnsatsen til den
smekker på plass og låses. Plasser senterinnsatsen
med innsatt trakt (D) i den nederste kyvettehalvdelen.
Sett sammen kyvettehalvdelene og lås dem med
låseklemmene.
Injeksjon og polymerisering
Bruk av IvoBase-injektoren er beskrevet i detalj i tilhørende bruksanvisning. IvoBase-injektoren må settes i
standby før materialet blandes.
11. Blanding av materialet
En kapsel er tilstrekkelig for å injiseres en komplett overkjeve- eller underkjeveprotese.
Kapselens innhold: Monomer Polymer
IvoBase Hybrid 20 ml 34 g
IvoBase High Impact 20 ml 30 g
Fjern monomerbeholderen (A4) fra kapselen. Fjern
kapseltetningen (A1).
Skru av monomerbeholderens (A4) beskyttelseshette
og hell væsken i den åpne kapselen (A2).
Bruk spatelen (C) for å blande monomer og polymer
i kapselen til en homogen blanding (i ca.
20–30 sekunder).
12. Påfylling av injektoren
Gå frem på følgende måte innen 5 minutter etter
blandingen:
Plasser den åpne kapselen (A) på en flat overflate
og press kyvetten inn på kapselen (A).
Merknad: Du må ikke tippe kyvetten med kapselen før
polymerisering, da det kan føre til at materialet renner ut
av kapselen (A). Når kyvetten løftes, må kapselen (A)
være plassert trygt i senterinnsatsen.
Åpne injektorens dør. Skyv kyvetten med kapselen
(A) inn til stopp i polymeriseringskammeret via
kyvetteholderen. Lukk injektorens dør.
13. Start av programmet
Velg aktuelt program (du finner en oversikt over
programmene i bruksanvisningen for injektoren).
Hvis du ønsker det, kan du aktivere RMR-tasten for
å redusere mengden av gjenværende monomer til
<1 %.
Trykk på “Start”. Den helautomatiske injeksjons-
prosessen starter. Gjenværende bearbeidningstid
vises i displayet.
Ved slutten av programmet lyder det et akustisk
signal. Bruk den varmeisolerte hansken for å ta den
varme kyvetten ut av injektoren; hold den fast i den
isolerte avsatsen. Injektoren er klar til neste polymerisering straks etter at kyvetten er fjernet.
Merknad: Kyvetten kan fortsatt være varm når den
tas ut av injektoren. Fare for å brenne seg!
14. Avkjøling av kyvetten
Kjøl kyvetten under kaldt rennende vann i minst
15 minutter. Alternativt kan avkjølingen finne sted i
injektoren (f.eks. natten over).
Viktig: Hvis kyvetten ikke avkjøles, men åpnes ved for
høy temperatur, vil protesen kanskje ikke passe nøyaktig.
15. Skille fra protesen
Fjern låseklemmene.
Legg kyvetten under en dental presse. Fest fraskill-
ingshjelpen mellom gipsen og trykkplaten.
Skyv et bredt skrujern eller en gipskniv inn i forbind-
elsen mellom de to kyvettehalvdelene og vipp den
øvre kyvettehalvdelen opp. Ta kyvetten ut av
pressen, snu den og gjenta prosedyren.
Fjern gipskjernen med kapselen og skill fra kapselen
ved injeksjonskanalen med en kappeskive, fres eller
sag. Skill protesen fra gipskjernen med gipstang på
vanlig måte.
45
Page 46
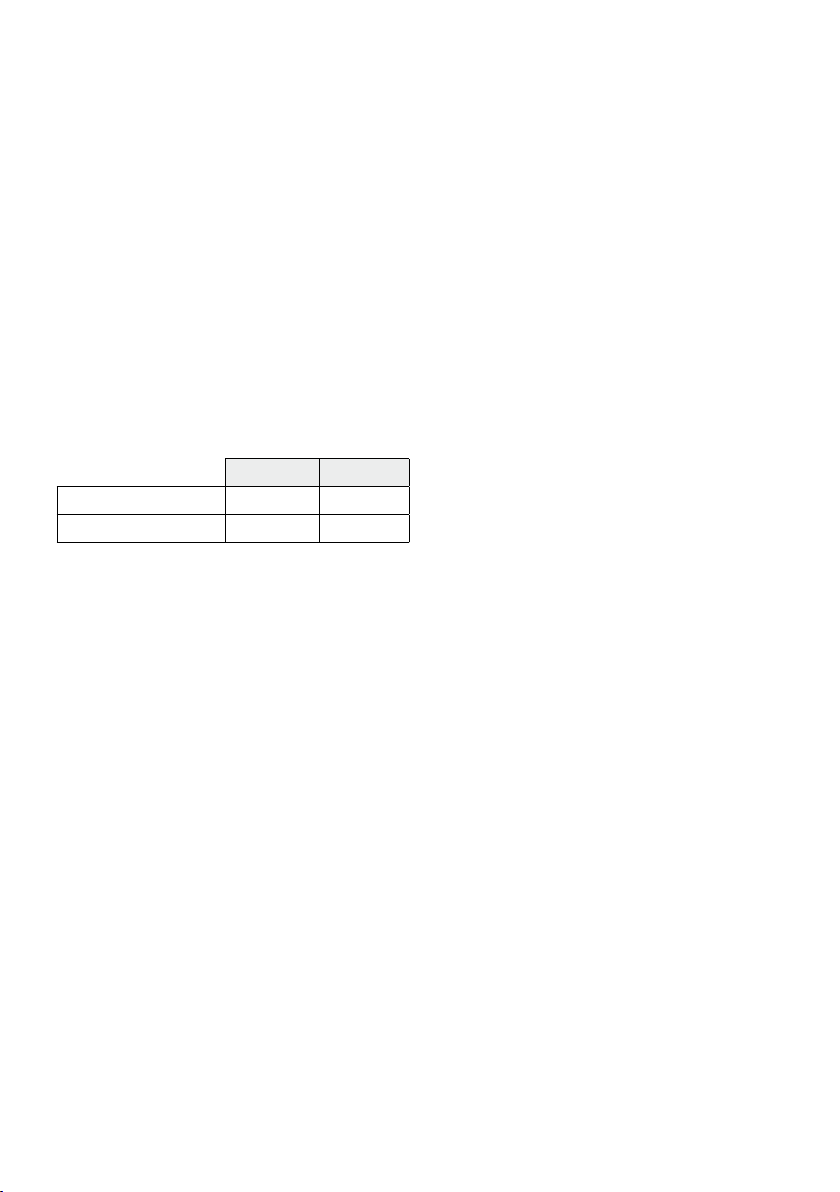
16. Pussing og polering av protesen
Det polymeriserte IvoBase-materialet pusses og poleres
med kryssfortannet hardmetallfres, sandpapir og poleringsmiddel slik det er vanlig for basismaterialer for
proteser.
Reparasjon / utvidelse / underfôring med
ProBase Cold
Prosedyren svarer til den som brukes til reparasjon av
konvensjonelle selvherdende basismaterialer for proteser.
Du finner detaljert informasjon i bruksanvisningen for
ProBase Cold.
Reparasjon / underfôring
IvoBase kan repareres med seg selv eller med ProBase®
Cold selvherdende polymer.
Reparasjon / utvidelse med IvoBase Hybrid /
High Impact
Vanligvis kan IvoBase-proteser repareres uten å måtte
settes inn i IvoBase-kyvette. Den grunnleggende
prosedyren svarer til den som brukes til reparasjon av
konvensjonelle selvherdende basismaterialer for proteser.
Overhold følgende blandeforhold:
Polymer Monomer
IvoBase Hybrid 9 g 5 g
IvoBase High Impact 8 g 5 g
Polymer og monomer må blandes homogent (i ca.
20 sekunder).
Overhold følgende arbeidstider (ved 23 °C / 73 °F)
romtemperatur):
– Svellefasens varighet: 30 sekunder
– Hellefasens varighet: 1–2 minutter
– Modelleringsfasens varighet: 3–5 minutter
Maks. total arbeidstid etter blanding er 10 minutter.
Polymeriser materialet i en trykkkoker i 20 minutter ved
55 °C / 131 °F ved 2,5 bar / 36 psi trykk.
Underfôring med IvoBase Hybrid / High Impact
Underfôringen av en IvoBase-protese kan utføres med
eller uten innsetting i IvoBase-kyvette.
a) Underfôring uten innsetting i IvoBase-kyvette:
Prosedyren uten innsetting i IvoBase-kyvette er den
samme som for underfôring med konvensjonelle
selvherdende basismaterialer for proteser.
b) Underfôring med innsetting i IvoBase-kyvette:
Innsettingen og den ferdige utførelsen av under-
fôringen av en protese er i hovedsak identisk med
prosedyren som brukes til ferdig utførelse av en vokset protese. Pass på at
– injeksjonskanalene og utluftningskanalene festes
til avtrykket for underfôringen.
– området som skal underfôres har en tykkelse på
minst 2 mm.
Instruksjoner om oppbevaring
– Materialet skal oppbevares på et kjølig, mørkt og
godt ventilert sted.
– Lagringstemperatur: 2–28 °C / 36–82 °F.
– Bruk ikke produktene etter den utløpsdatoen som er
angitt.
– Oppbevares utilgjengelig for barn!
Klassifisering iht. EN ISO 20795-1, type 2, klasse 1
Produktet oppfyller kravene i EN ISO 20795-1:2008.
Utarbeidelsesdato for bruksanvisningen: 10/2011
Produsent:
Ivoclar Vivadent AG FL-9494 Schaan / Liechtenstein
Materialet er bare utviklet til bruk på det odontologiske området. Arbeid med produktet
skal utføres strengt i samsvar med bruksanvisningen. Produsenten påtar seg intet ansvar for
skader som oppstår på grunn av annen bruk eller ufagmessig bearbeiding. Brukeren er
forpliktet til å kontrollere at produktet egner seg til bruk som ikke er uttrykkelig oppgitt i
bruksanvisningen. Beskrivelser og data utgjør ingen garanti for egenskaper.
46
Page 47

Productinformatie
Lees de productinformatie alstublieft
nauwkeurig door om vertrouwd te raken
met de wijze van toepassing. Raadpleeg
ook de bedieningshandleiding van de
IvoBase Injector.
Productomschrijving
Het IvoBase-systeem bestaat uit een prothesebasismateriaal op basis van PMMA en een speciaal ontwikkeld IvoBase-injectieapparaat. Met dit systeem kunnen
protheses volledig automatisch en krimpcorrigerend
worden gepolymeriseerd.
IvoBase combineert de voordelen van heet polymeriserende en autopolymeriserende prothesekunststoffen. Het
materiaal voldoet aan de eisen die aan autopolymeriserende kunststoffen worden gesteld, maar komt zelfs aan
de strengere eisen voor heet polymeriserende kunststoffen
tegemoet. IvoBase kan daarom ook een hybride materiaal
worden genoemd. Behalve het conventionele materiaal
IvoBase Hybrid is er ook een materiaal verkrijgbaar dat
extra goed bestand is tegen breuk: IvoBase High Impact.
De materialen zijn verkrijgbaar in de volgende
kleuren:
– IvoBase Hybrid:
Pink, Pink-V, Preference, Clear, Pink-V Implant,
Preference Implant
– IvoBase High Impact:
Pink, Pink-V, Preference, Pink-V Implant, Preference
Implant, 34-V
Samenstelling
– IvoBase Hybrid
Poeder: polymethylmethacrylaat, weekmakers,
initiator, pigmenten
Vloeistof: methylmethacrylaat, dimethacrylaat,
katalysator
– IvoBase High Impact:
Poeder: slagvast gemodificeerd PMMA-copolymeer,
PMMA-copolymeer, polymethylmethacrylaat,
weekmakers, initiator, pigmenten
Vloeistof: methylmethacrylaat, dimethacrylaat,
katalysator
Indicaties
– volledige protheses
– gedeeltelijke protheses
– combinatieprotheses
– hybride protheses
– implantaatgedragen protheses
– rebasings
– reparaties
Contra-indicaties
Bij bekende allergie tegen een van de bestanddelen.
Intra-orale toepassing van niet-gepolymeriseerd materiaal.
Bijwerkingen
In uitzonderlijke gevallen bleek er bij materialen op basis
van methylmethacrylaat sprake te zijn van plaatselijke
allergische reacties.
Waarschuwingen
– Monomeer bevat methylmethacrylaat (MMA).
– MMA is licht ontvlambaar en irriterend, vlampunt
+ 10°C.
– MMA irriteert de ogen, de luchtwegen en de huid.
– Door contact met de huid kan sensibilisatie
optreden.
– Vermijd contact van monomeer en onuitgehard
materiaal met de huid. In de handel verkrijgbare
medische handschoenen bieden geen bescherming
tegen het sensibiliserende effect van methacrylaten.
– Dampen niet inademen.
– Verwijderd houden van ontstekingsbronnen – niet
roken.
– Monomeer niet door het riool spoelen.
– Neem maatregelen tegen elektrostatische oplading.
Instructies voor verwerking
– Maak modellen voor het inbedden eerst nat met
water.
– Isoleer de binnenkant van de cuvette voor het inbedden.
– Reinig en isoleer de gipsoppervlakken.
– Wijk niet af van de voorgeschreven polymerisatie- en
afkoeltijden.
– Door contact van oplosmiddelen of monomeer met
gepolymeriseerd prothesemateriaal kunnen witte
verkleuringen optreden.
– Bij gebruik van tandhalsisolatie raadt Ivoclar
Vivadent het gebruik van A-siliconen met een hard-
heid van >65 Shore A aan (bijv. Flexistone Plus/
Virtual® Heavy Body Fast).
Condensatievernettingssilicone (K-silicone) kan
schadelijk zijn voor het prothesemateriaal.
– Het product mag alleen door geschoold personeel
worden gehanteerd en verwerkt.
– Het is niet mogelijk om een tweede capsule IvoBase
of SR Ivocap® te injecteren in een reeds gevulde
cuvette.
– Het resterende materiaal van een reeds geïnjec-
teerde capsule IvoBase kan niet opnieuw worden
gebruikt.
– Uitgedroogd gips moet voor de injectie worden
natgemaakt met water.
47
Page 48

– Als de cuvette niet schoon is, kan er onder invloed
van warmte rookontwikkeling optreden.
– Bewaar de prothese vochtig tot hij wordt geplaatst.
Verwerking
Voorbereiding voor het injecteren
1. Voorbereiding van de cuvette
Isoleer de binnenkanten van de schone cuvettehelften
dun met vaseline.
Breng het deksel van de cuvette, de kanaalvormer ‘half’
en het filterwasonderdeel (B1) aan de binnenzijde van
een van de beide helften van de cuvette aan.
2. Inbedden van het model
Bed het goed natgemaakte en geïsoleerde model in
de ene helft van de cuvette in met conventioneel
tandheelkundig gips (klasse III). Haal overtollig gips
tot aan het vlak van het model en de rand van de
cuvettebehuizing weg.
Belangrijk: laat de rand van het gips gelijk afsluiten
met de kanaalvormer ‘half’.
3. Aanbrengen van de wasonderdelen
De was van de wasonderdelen (B) kan zonder aanbrengen
van extra was op het model worden aangebracht. Let er
daarbij op dat er geen gips onder de wasonderdelen kan
stromen.
Laat het gips volledig uitharden. Verwijder de
kanaalvormer ‘half’ en plaats de kanaalvormer
‘heel’.
– Aanbrengen van het injectiewasonderdeel (B2)
Duw het injectiewasonderdeel (B2) boven het
schuine vlak van de kanaalvormer ‘heel’.
Volledige prothese bovenkaak:
Breng een injectiekanaal aan naar het midden van
het verhemeltedak en aan beide kanten een injectie-
kanaal vestibulair van de bovenkaakknobbel en duw
de was tegen het model aan.
Volledige prothese onderkaak:
Breng injectiekanalen aan naar de linguale
gedeelten van de retromolaire driehoek. Snij het
middelste injectiekanaal van het injectiewasonder-
deel (B2) af.
Gedeeltelijke prothese:
Voorzie ieder prothesezadel aan het dorsale uiteinde
van een afzonderlijk injectiekanaal.
– Aanbrengen van het ontluchtingswasonderdeel
(B3)
Duw het ontluchtingswasonderdeel (B3) met het
samenbrengingskanaal midden op het filterwasonderdeel.
Belangrijk: De ontluchtingskanalen mogen bij het
vastdrukken niet in contact staan met de behuizing
van de cuvette, om te zorgen dat de cuvette goed
blijft afsluiten.
Volledige prothese onderkaak en bovenkaak:
Druk de drie kanalen van het ontluchtingswasonder-
deel (B3) van voren tegen het model aan.
Gedeeltelijke prothese:
Druk de drie kanalen van het ontluchtingswasonder-
deel (B3) tegen de voorste begrenzingen van de prothesezadels aan. Als het ontluchtingswasonderdeel
(B3) niet lang genoeg is, moet de verbinding tussen
het prothesezadel en het filterwasonderdeel via een
zo kort mogelijke weg worden aangevuld met
behulp van kanaalvormige was.
4. Inbedding met silicone
Dek de vestibulaire en palatinale resp. linguale
oppervlakken van de gemodelleerde prothese af met
silicone. Dek de occlusale vlakken en de insicale
rand van de gebitselementen niet af. Breng voor de
uitharding van de silicone een retentiepatroon in het
oppervlak van de silicone aan of gebruik retentiezand om te zorgen dat de siliconevorm in het gips
wordt verankerd.
Opmerking: Voor optimale resultaten wordt aangeraden
om gebruik te maken van dunvloeibare, additievernette
silicone (A-silicone) met een Shore-A-hardheid van
>65 (bijv. Flexistone Plus of Virtual Heavy Body Fast).
Isoleer contactvlakken van gips met gips door mid-
del van separating fluid (F).
5. Gieten van de contra
Plaats de bovenste helft van de cuvette en breng de
afsluitklemmen aan.
Maak conventioneel tandheelkundig gips (klasse III)
aan volgens de instructies van de fabrikant en giet
het op een trilapparaat in dunvloeibare toestand in
de opening van de cuvette, zonder dat er luchtbellen
ontstaan. Haal overtollig gips met de IvoBase-spatel
vlak weg, zodat er geen gips uit de opening van de
cuvette steekt.
48
Page 49

6. Uitspatten van het model
Warm de cuvette na volledige uitharding van het
gips gedurende 5 à 8 minuten op in een waterbad
van ca. 90°C. Open vervolgens de cuvette, verwijder
de kanaalvormer ‘heel’ en verwijder de was grof met
een wasmes. Reinig de inwendige vlakken vervol-
gens grondig met schoon, kokend water.
Opmerking: Gebruik voor het uitspatten schoon water
zonder toevoegingen (bijv. wasoplosser of reinigingsmiddel). Toevoegingen kunnen tot verkleuringen van de
prothese leiden.
7. Gebitselementen
Voor een goede hechting moeten de tandhalzen en
de basale oppervlakken van de elementen absoluut
vrij zijn van was. Straal de basale en cervicale
oppervlakken van de elementen lichtjes af (100 µm
Al2O3, 2 bar) of ruw ze op met een hardmetalen
frees voor tandheelkundige toepassingen.
8. Isolatie van de gipsoppervlakken
Belangrijk: Laat de cuvettehelften voor het isoleren
afkoelen tot kamertemperatuur (< 30°C), eventueel
in een waterbad met schoon, koud water. Controleer
de exacte temperatuur van de cuvette met behulp
van de IR-thermometer.
Isoleer de schone oppervlakken van het gipsmodel
met separating fluid (F). Isoleer de oppervlakken na
ongeveer 5 min. opnieuw. Voorkom de vorming van
plasjes (bijv. bij de omslagplooi).
9. Aanbrengen van het ontluchtingsfilter
Breng in de betreffende opening van de cuvette het
ontluchtingsfilter (E) aan, tot dit samenvalt met het
cuvetteoppervlak.
10. Aanbrengen van de trechter en het centreer-
hulpstuk
Steek de IvoBase-trechter (D) in het centreerhulpstuk
tot hij niet meer verder kan en vastgeklemd zit.
Breng het centreerhulpstuk met de trechter (D) in de
onderste helft van de cuvette aan.
Zet de cuvettehelften tegen elkaar en sluit ze af met
de afsluitklemmen.
Injectie en polymerisatie
Hoe de IvoBase Injector bediend wordt, staat uitgebreid
beschreven in de bedieningshandleiding. Zorg dat de
IvoBase Injector vóór het mengen van het materiaal klaar
is voor gebruik.
11. Mengen van het materiaal
De inhoud van één capsule is voldoende voor het injecteren van een volledige prothese voor de onderkaak en
de bovenkaak.
Inhoud van een capsule: monomeer polymeer
IvoBase Hybrid 20 ml 34 g
IvoBase High Impact 20 ml 30 g
Haal de monomeerhouder (A4) uit de capsule.
Verwijder de capsuledop (A1).
Draai de afsluitdop van de monomeerhouder (A4)
en giet de vloeistof in de geopende capsule (A2).
Meng monomeer en polymeer (gedurende 20 à
30 sec.) in de capsule met behulp van de spatel (C),
tot er een homogene massa ontstaat.
12. Vullen van de injector
Ga binnen 5 minuten na het mengen als volgt verder:
Plaats de geopende capsule (A) op een vlakke
ondergrond en duw de cuvette op de capsule (A).
Opmerking: Kantel de cuvette met de capsule niet meer
voor het polymeriseren, om te voorkomen dat de capsule
(A) leegloopt. Bij het optillen van de cuvette moet de
capsule (A) stevig in het centreerhulpstuk zitten.
Open het klepje van de injector. Duw de cuvette met
de capsule (A) via de cuvettehouder in de polymerisatiekamer, tot hij niet meer verder kan. Sluit het
klepje van de injector.
13. Starten van het programma
Kies het juiste programma (zie de bedieningshand-
leiding van de injector voor een overzicht van de
programma’s).
Activeer indien gewenst de ‘RMR’-toets, om het
restmonomeergehalte tot < 1% te verminderen.
Druk op ‘Start’-toets. Het volledig automatische
injectieproces begint. De resterende procesduur
wordt weergegeven in het display.
Als het programma is afgelopen, klinkt er een
ge luidssignaal. Neem de cuvette, die nu heel warm
is, met een thermohandschoen aan de isoleerschouder uit het apparaat. Na verwijdering van de
cuvette kan de injector direct voor de volgende
polymerisatie worden gebruikt.
Let op: De cuvette kan bij verwijdering nog heel
heet zijn. Gevaar van verbranding!
49
Page 50

14. Afkoelen van de cuvette
Koel de cuvette gedurende minimaal 15 minuten af
onder koud stromend water. De cuvette kan ook in de
injector afkoelen (bijv. gedurende een nacht).
Belangrijk: Als de cuvette niet voldoende kan afkoelen
en dus bij een te hoge temperatuur wordt geopend,
treden er problemen op met de pasvorm.
– wellingsfase van 30 sec.
– gietfase van 1 à 2 min.
– modelleerfase van 3 à 5 min.
De maximale verwerkingsduur na het mengen bedraagt
10 min. Polymeriseer het materiaal op een temperatuur
van 55°C, bij een druk van 2,5 bar gedurende minimaal
20 min.
15. Uitbedden van de prothese
Verwijder de afsluitklemmen.
Leg de cuvette onder een tandheelkundig persappa-
raat. Fixeer het uitbeddingshulpmiddel tussen het
gips en plaat van het persapparaat.
Steek een schroevendraaier of gipsmes in de spleet
tussen de beide helften van de cuvette en til de
bo venste cuvettehelft op met een hefboom-
beweging. Haal de cuvette uit de pers, draai hem
om en herhaal de procedure.
Verwijder de gipskern met de capsule en zaag de
capsule bij het injectiekanaal los met behulp van
een slijpschijf, een frees of een zaag. Bed de pro-
these zoals gebruikelijk met behulp van een
gipstang uit de gipskern uit.
16. Afwerken van de prothese
Werk het gepolymeriseerde IvoBase-materiaal af met
hardmetalen frezen met kruisvertanding, schuurpapier en
polijstmiddelen, zoals gebruikelijk voor prothesebasismaterialen.
Reparatie/rebasing
IvoBase kan zowel met IvoBase zelf worden gerepareerd,
als met het autopolymeriserende materiaal ProBase® Cold.
Reparatie/uitbreiding met IvoBase Hybrid /
High Impact
Een IvoBase-prothese kan worden gerepareerd zonder
inbedding in een IvoBase-cuvette. De basisaanpak komt
overeen met die bij een reparatie met conventionele,
koud polymeriserende prothesebasismaterialen.
Hanteer de volgende mengverhouding:
polymeer monomeer
IvoBase Hybrid 9 g 5 g
IvoBase High Impact 8 g 5 g
Vermeng polymeer en monomeer tot er een homogene
massa ontstaat (gedurende ca. 20 seconden).
Hanteer ongeveer de volgende verwerkingstijden (bij een
kamertemperatuur van 23°C):
50
Rebasing met IvoBase Hybrid / High Impact
Een IvoBase-prothese kan van een rebasing worden
voorzien met of zonder inbedding in een IvoBase-cuvette.
a) rebasing zonder inbedding in een IvoBase-cuvette:
Zonder inbedding in een IvoBase-cuvette kan de
rebasing worden gemaakt zoals bij conventionele
autopolymeriserende prothesebasismaterialen wordt
gedaan.
b) rebasing met inbedding in een IvoBase-cuvette:
De inbedding en afwerking van de prothese voor
een rebasing is gelijk aan de methode voor een
gemodelleerde prothese.
Let op de volgende punten:
– zorg dat injectie- en ontluchtingskanalen aan-
sluiten op de afdruk van de rebasing
– zorg dat het gebied dat van een rebasing wordt
voorzien ten minste 2 mm dik is
Reparatie/uitbreiding/rebasing met ProBase Cold
Ga op dezelfde manier te werk als bij een reparatie met
een conventioneel autopolymeriserend prothesebasismateriaal. Raadpleeg de verwerkingshandleiding van
ProBase Cold voor gedetailleerde informatie.
Bewaarinstructies
– Bewaar het materiaal op een koele, donkere, goed
geventileerde plaats.
– Bewaartemperatuur: 2 à 28°C.
– Gebruik de producten niet na afloop van de verval-
datum.
– Buiten bereik van kinderen bewaren.
Classificatie conform EN ISO 20795-1, type 2, klasse 1
Het product voldoet aan de eisen van EN ISO 207951:2008.
Datum van opstelling van de tekst: 10/2011
Fabrikant:
Ivoclar Vivadent AG FL-9494 Schaan / Liechtenstein
Dit materiaal is ontwikkeld voor tandheelkundig gebruik en moet volgens de productinformatie worden verwerkt. Indien er schade optreedt door toepassing voor andere doeleinden
of door verkeerd gebruik, kan de fabrikant daarvoor niet aansprakelijk worden gesteld. De
gebruiker is bovendien gehouden om vóór gebruik na te gaan of het materiaal geschikt is
voor de beoogde toepassing, vooral als deze toepassing niet in de gebruiksaanwijzing vermeld staat.
Page 51

Οδηγίες Χρήσεως
Παρακαλούμε διαβάστε αυτές τις Οδηγίες
Χρήσεως προσεκτικά και εξοικειωθείτε με τη
χρήση του υλικού. Ανατρέξτε επίσης στις Οδηγίες
Λειτουργίας του εγχυτήρα IvoBase Injector.
Περιγραφή του προϊόντος
Το σύστημα IvoBase αποτελείται από ένα υλικό βάσης οδοντοστοιχίας
με βάση PMMA και τον εγχυτήρα IvoBase Injector που έχει σχεδιαστεί
ειδικά για το υλικό. Το σύστημα επιτρέπει τον πλήρως
αυτοματοποιημένο και αντισταθμισμένο για συρρίκνωση πολυμερισμό
των οδοντοστοιχιών.
Το υλικό IvoBase συνδυάζει τα πλεονεκτήματα των
θερμοπολυμεριζόμενων και αυτοπολυμεριζόμενων υλικών βάσης
οδοντοστοιχίας. Παρ’ ότι υπόκειται στις απαιτήσεις για τα
αυτοπολυμεριζόμενα πολυμερή, πληροί επίσης και τις αυστηρότερες
κανονιστικές απαιτήσεις για τα θερμοπολυμεριζόμενα πολυμερή. Το
IvoBase μπορεί συνεπώς να θεωρηθεί ως ένα υβριδικό υλικό. Εκτός από
συμβατικό υβριδικό υλικό, το IvoBase είναι επίσης διαθέσιμο και σε
έκδοση υλικού ανθεκτικού στις κρούσεις: IvoBase High Impact.
Διατίθενται οι ακόλουθες αποχρώσεις:
– IvoBase Hybrid:
Pink, Pink-V, Preference, Clear, Pink-V Implant, Preference
Implant
– IvoBase High Impact:
Pink, Pink-V, Preference, Pink-V Implant, Preference Implant,
34-V
Σύνθεση
– IvoBase Hybrid
Σκόνη:
Πολυμεθακρυλικός μεθυλεστέρας, μαλακτικό, ενεργοποιητής,
χρωστικές
Υγρό:
Μεθακρυλικός μεθυλεστέρας, διμεθακρυλικό, καταλύτης
– IvoBase High Impact:
Σκόνη:
Τροποποιημένο για υψηλή αντοχή στις κρούσεις συμπολυμερές
PMMA, συμπολυμερές PMMA, πολυμεθακρυλικός μεθυλεστέρας,
μαλακτικό, ενεργοποιητής, χρωστικές
Υγρό:
Μεθακρυλικός μεθυλεστέρας, διμεθακρυλικό, καταλύτης
Ενδείξεις
– Ολικές προσθετικές οδοντοστοιχίες
– Μερικές προσθετικές οδοντοστοιχίες
– Συνδυασμένες προσθετικές οδοντοστοιχίες
– Υβριδικές προσθετικές οδοντοστοιχίες
– Προσθετικά εμφυτεύματα
– Αναγομώσεις
– Επιδιορθώσεις
Αντενδείξεις
Σε περίπτωση γνωστής αλλεργίας του ασθενούς σε οποιοδήποτε από τα
συστατικά. Ενδοστοματική χρήση απολυμέριστου υλικού.
Παρενέργειες
Έχουν αναφερθεί τοπικές αλλεργικές αντιδράσεις σε υλικά
μεθακρυλικού μεθυλεστέρα σε μεμονωμένες περιπτώσεις.
Επισημάνσεις ασφαλείας
– Το μονομερές περιέχει μεθακρυλικό μεθυλεστέρα (MMA)
– Ο MMA είναι ιδιαιτέρως εύφλεκτος και ερεθιστικός, σημείο
ανάφλεξης: +10 °C/50 °F.
– Ο MMA είναι ερεθιστικός για τα μάτια, τα αναπνευστικά όργανα
και το δέρμα.
– Η επαφή με το δέρμα μπορεί να προκαλέσει ευαισθητοποίηση.
– Αποφύγετε την επαφή του μονομερούς και απολυμέριστου υλικού
με το δέρμα. Τα ιατρικά γάντια του εμπορίου δεν παρέχουν
προστασία από την ευαισθησία στα μεθακρυλικά.
– Μην εισπνέετε τους ατμούς.
– Μακριά από πηγές ανάφλεξης – μην καπνίζετε.
– Μην αφήνετε το μονομερές να καταλήξει στο αποχετευτικό
σύστημα.
– Λάβετε μέτρα κατά της ηλεκτροστατικής φόρτισης.
Επισημάνσεις σχετικά με την επεξεργασία
– Διαβρέχετε τελείως τα εκμαγεία σε νερό πριν την επένδυση.
– Απομονώνετε τελείως τις εσωτερικές επιφάνειες του μούφλου
πριν την επένδυση.
– Καθαρίζετε και απομονώνετε τις γύψινες επιφάνειες.
– Τηρείτε αυστηρά τους χρόνους πολυμερισμού και ψύξης.
– Η επαφή των διαλυτών ή του μονομερούς με πολυμερισμένο
υλικό βάσης οδοντοστοιχίας μπορεί να οδηγήσει σε λευκό
αποχρωματισμό.
– Όταν χρησιμοποιείτε αυχενικές απομονώσεις, η Ivoclar Vivadent
συνιστά A-σιλικόνες με σκληρότητα >65 Shore A (π.χ. Flexistone
Plus/Virtual® Heavy Body Fast). Σιλικόνες συμπύκνωσης
(C-σιλικόνες) μπορεί να έχουν καταστροφική δράση στο υλικό
βάσης οδοντοστοιχίας.
– Μόνο εκπαιδευμένο προσωπικό επιτρέπεται να κάνει χρήση και
επεξεργασία των προϊόντων.
– Η μετέπειτα έγχυση μιας δεύτερης κάψουλας υλικού IvoBase ή
SR Ivocap® μέσα σε ένα ήδη γεμάτο μούφλο δεν είναι δυνατή.
– Το υπολειπόμενο υλικό μιας κάψουλας IvoBase που έχει ήδη
εγχυθεί δεν μπορεί να χρησιμοποιηθεί ξανά.
– Ξηραμένη γύψος πρέπει να διαβραχεί με νερό πριν από την
έγχυση.
– Ένα μολυσμένο μούφλο μπορεί να οδηγήσει σε παραγωγή καπνού
όταν θερμανθεί.
– Φυλάσσετε σε περιβάλλον με υγρασία από την ολοκλήρωση των
οδοντοστοιχιών μέχρι την ενσωμάτωσή τους.
51
Page 52

Επεξεργασία
Προετοιμασία για έγχυση
1. Προετοιμασία του μούφλου
Απομονώστε τις εσωτερικές επιφάνειες των καθαρών ημίσεων του
μούφλου με ένα λεπτό στρώμα βαζελίνης.
Τοποθετήστε το καπάκι του μούφλου, το μισό εξάρτημα διαμόρφωσης
πρόσβασης και το κέρινο εξάρτημα φίλτρου (B1) σε ένα από τα ημίσεα
του μούφλου από το εσωτερικό.
2. Επένδυνση του εκμαγείου
Επενδύστε το καλά διαβρεγμένο και απομονωμένο εκμαγείο σε
ένα από τα ημίσεα του μούφλου χρησιμοποιώντας συμβατική
οδοντιατρική γύψο (Κατηγορίας III). Αφαιρέστε από την επιφάνεια
την περίσσια γύψο με τέτοιον τρόπο ώστε να βρίσκεται στο ίδιο
επίπεδο με το εκμαγείο και την άκρη της θήκης του μούφλου.
Σημαν τικό: Η άκρη της γύψου πρέπει να βρίσκεται στο ίδιο
επίπεδο με το μισό εξάρτημα διαμόρφωσης πρόσβασης.
3. Τοποθέτηση των κέρινων εξαρτημάτων
Το κερί των κέρινων εξαρτημάτων (B) μπορεί να τοποθετηθεί στο
εκμαγείο χωρίς πρόσθετο κέρωμα. Βεβαιωθείτε ότι δεν μπορεί να τρέξει
γύψος κάτω από τα κέρινα εξαρτήματα.
Αφήστε τη γύψο να πήξει τελείως. Αφαιρέστε το μισό εξάρτημα
διαμόρφωσης πρόσβασης και τοποθετήστε το πλήρες εξάρτημα
διαμόρφωσης πρόσβασης.
– Τοποθετήστε το κέρινο εξάρτημα έγχυσης (B2)
Πιέστε το κέρινο εξάρτημα έγχυσης (B2) επάνω στην κεκλιμένη
επιφάνεια του πλήρους εξαρτήματος διαμόρφωσης πρόσβασης.
Ολικές οδοντοστοιχίες άνω γνάθου:
Τοποθετήστε ένα κανάλι έγχυσης στο κέντρο της υπερώας και
στην αιθουσαία πλευρά των φυμάτων της άνω γνάθου και πιέστε
το κερί επάνω στο εκμαγείο.
Ολικές οδοντοστοιχίες κάτω γνάθου:
Τοποθετήστε από ένα κανάλι έγχυσης στη γλωσσική περιοχή του
οπισθογόμφιου τριγώνου. Αποκόψτε το κεντρικό κανάλι έγχυσης
του κέρινου εξαρτήματος έγχυσης (B2).
Μερικές οδοντοστοιχίες:
Τοποθετήστε ένα κανάλι έγχυσης στο ραχιαίο άκρο κάθε εφιππίου
οδοντοστοιχίας.
– Τοποθετήστε το κέρινο εξάρτημα αερισμού
(B3)
Πιέστε το κέρινο εξάρτημα αερισμού με το κανάλι αερισμού στο
κέντρο του κέρινου εξαρτήματος φίλτρου.
Σημαντικό: Τα κανάλια αερισμού δεν πρέπει να έλθουν σε επαφή
με τη θήκη του μούφλου όταν πιέζονται στη θέση τους,
προκειμένου να διασφαλιστεί η σφράγιση του μούφλου.
Ολικές οδοντοστοιχίες κάτω και άνω γνάθου:
Τοποθετήστε τα τρία κανάλια του κέρινου εξαρτήματος αερισμού
(B3) στην πρόσθια περιοχή του περιγράμματος.
Μερικές οδοντοστοιχίες:
Πιέστε τα τρία κανάλια του κέρινου εξαρτήματος αερισμού (B3)
στα πρόσθια στοπ των εφιππίων της οδοντοστοιχίας. Εάν το
κέρινο εξάρτημα αερισμού (B3) δεν είναι αρκετά μακρύ, η
σύνδεση μεταξύ του εφιππίου οδοντοστοιχίας και του κέρινου
εξαρτήματος φίλτρου πρέπει να ολοκληρωθεί με ένα κέρινο
κανάλι έγχυσης τηρώντας τη μικρότερη δυνατή απόσταση.
4. Επένδυση με σιλικόνη
Καλύψτε με σιλικόνη τις αιθουσαίες και υπερώιες ή/και γλωσσικές
επιφάνειες των οδοντοστοιχιών με διαμορφωμένο περίγραμμα.
Μην καλύψετε τις συγκλεισιακές και κοπτικές άκρες των δοντιών.
Εφαρμόστε ένα σχήμα συγκράτησης στην επιφάνεια της σιλικόνης
πριν πήξει, ή χρησιμοποιήστε αμμοβολή συγκράτησης για να
στερεώσετε τη σιλικόνη στη γύψο.
Σημείωση: Για βέλτιστα αποτελέσματα, συνιστάται η χρήση μιας
ρευστής σιλικόνης προσθήκης (A-σιλικόνη με σκληρότητα Shore-A
>65) (π.χ. Flexistone Plus ή Virtual Heavy Body Fast).
Απομονώστε τις επιφάνειες επαφής γύψου-με-γύψο με υγρό
διαχωρισμού (F).
5. Ρίξιμο του αντίστροφου μοντέλου
Τοποθετήστε το επάνω ήμισυ του μούφλου και ασφαλίστε
χρησιμοποιώντας τα κλείστρα ασφάλισης.
Αναμίξτε συμβατική οδοντιατρική γύψο (Κατηγορίας III) σύμφωνα
με τις οδηγίες του κατασκευαστή και κάντε την να τρέξει σε
ρευστή σύσταση μέσα στο άνοιγμα του μούφλου χωρίς φυσαλίδες
αέρα με τη βοήθεια ενός αναδευτήρα. Αφαιρέστε από την
επιφάνεια την περίσσια γύψο με τη σπάτουλα IvoBase, έτσι ώστε
να μην προεξέχει γύψος από το άνοιγμα του μούφλου.
6. Βράσιμο του εκμαγείου
Όταν η γύψος πήξει τελείως, θερμάνετε το μούφλο σε ένα λουτρό
νερού σε θερμοκρασία περίπου 90 °C (194 °F) για περίπου
5–8 λεπτά. Στη συνέχεια, ανοίξτε το μούφλο, αφαιρέστε το
πλήρες εξάρτημα διαμόρφωσης πρόσβασης και αφαιρέστε
χονδρικά το κερί χρησιμοποιώντας ένα μαχαίρι για κερί. Τώρα
καθαρίστε τελείως τις εσωτερικές επιφάνειες με καθαρό, βραστό
νερό.
Σημείωση: Χρησιμοποιείτε μόνο κεκαθαρμένο νερό χωρίς πρόσθετα
(π.χ. διαλύτη κεριού, καθαριστικό παράγοντα). Τα πρόσθετα μπορεί να
έχουν ως αποτέλεσμα τον αποχρωματισμό της οδοντοστοιχίας.
52
Page 53
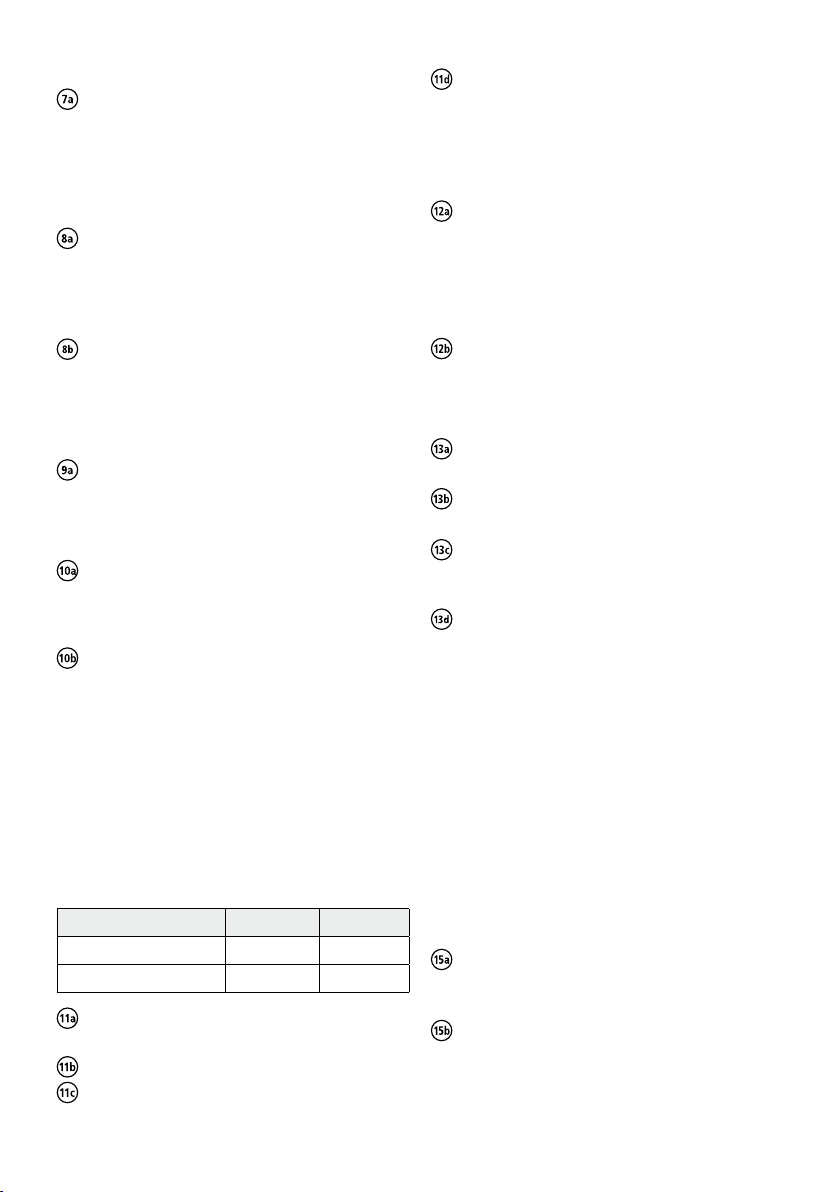
7. Δόντια
Για βέλτιστο δεσμό, οι αυχενικές επιφάνειες και οι επιφάνειες
βάσης των δοντιών πρέπει να είναι απολύτως ελεύθερες από κερί.
Αμμοβολήστε ελαφρώς τις επιφάνειες βάσης και τις αυχενικές
επιφάνειες των δοντιών (100 μm Al2O3, 2 bar / 29 psi) ή
αδροποιήστε τις με οδοντιατρική φρέζα καρβιδίου βολφραμίου.
8. Απομόνωση των γύψινων επιφανειών
Σημαντικό: Πριν από την απομόνωση, κρυώστε τα ημίσεα του
μούφλου σε θερμοκρασία δωματίου (<30 °C / 86 °F)
χρησιμοποιώντας αέρα ή καθαρό, κρύο νερό. Η ακριβής
θερμοκρασία του μούφλου μπορεί να ελεγχθεί με τη βοήθεια ενός
θερμόμετρου IR.
Απομονώστε τις καθαρές επιφάνειες του γύψινου εκμαγείου με
υγρό διαχωρισμού (F). Εφαρμόστε ένα δεύτερο στρώμα μετά από
5 λεπτά. Η λίμναση του υλικού (π.χ. στην ουλαία-παρειακή πτυχή)
πρέπει να αποφεύγεται.
9. Τοποθέτηση του φίλτρου αερισμού
Εισάγετε το φίλτρο αερισμού (E) στο ίδιο επίπεδο μέσα στην
αντίστοιχη εσοχή στο μούφλο.
10. Τοποθέτηση χωνιού και ένθετου
κεντραρίσματος
Ωθήστε το χωνί IvoBase (D) μέσα στο ένθετο κεντραρίσματος
μέχρι να κουμπώσει στη θέση του με ασφάλεια. Τοποθετήστε το
ένθετο κεντραρίσματος με το τοποθετημένο χωνί (D) στο κάτω
ήμισυ του μούφλου.
Συναρμολογήστε τα ημίσεα του μούφλου και ασφαλίστε
χρησιμοποιώντας τα κλείστρα ασφάλισης.
Έγχυση και πολυμερισμός
Η λειτουργία του IvoBase Injector περιγράφεται λεπτομερώς στις αντίστοιχες Οδηγίες Λειτουργίας. Το IvoBase Injector πρέπει να τεθεί σε
κατάσταση αναμονής πριν την ανάμειξη του υλικού.
11. Ανάμειξη του υλικού
Μία κάψουλα είναι αρκετή για την έγχυση μιας ολικής οδοντοστοιχίας
άνω ή κάτω γνάθου.
Περιεχόμενα της κάψουλας: Μονομερές Πολυμερές
IvoBase Hybrid 20 ml 34 g
IvoBase High Impact 20 ml 30 g
Αφαιρέστε τον περιέκτη μονομερούς (A4) από την κάψουλα.
Αφαιρέστε τη σφράγιση της κάψουλας (A1).
Αφαιρέστε περιστρέφοντας το πώμα σφράγισης του περιέκτη
μονομερούς (A4) και ρίξτε το υγρό μέσα στην ανοικτή κάψουλα
(A2).
Χρησιμοποιήστε τη σπάτουλα (C) για να αναμίξετε το μονομερές
και το πολυμερές μέσα στην κάψουλα σε ένα ομοιογενές μίγμα
(για περίπου 20–30 δευτερόλεπτα).
12. Φόρτωση του εγχυτήρα
Προχωρήστε ως εξής εντός 5 λεπτών μετά την ανάμειξη:
Τοποθετήστε την ανοικτή κάψουλα (A) επάνω σε μια επίπεδη
επιφάνεια και πιέστε το μούφλο επάνω στην κάψουλα (A).
Σημείωση: Μη γέρνετε το μούφλο με την κάψουλα πριν τον
πολυμερισμό, για να αποτρέψετε την εκροή του υλικού από την
κάψουλα (A). Όταν σηκώσετε το μούφλο, η κάψουλα (A) πρέπει να
βρίσκεται τοποθετημένη με ασφάλεια μέσα στο ένθετο κεντραρίσματος.
Ανοίξτε τη θύρα του εγχυτήρα. Ολισθήστε το μούφλο με την
κάψουλα (A) μέσα στο θάλαμο πολυμερισμού μέχρι να σταματήσει
μέσω του συγκρατητήρα μούφλου. Κλείστε τη θύρα του εγχυτήρα.
13. Έναρξη του προγράμματος
Επιλέξτε το αντίστοιχο πρόγραμμα (βλ. τις Οδηγίες Λειτουργίας
του εγχυτήρα για μια ανασκόπηση του προγράμματος).
Εάν το επιθυμείτε, ενεργοποιήστε το πλήκτρο RMR για να
μειώσετε το υπολειπόμενο περιεχόμενο μονομερούς σε <1%.
Πατήστε “Start” (Έναρξη). Η πλήρως αυτοματοποιημένη
διαδικασία έγχυσης εκκινείται. Ο υπολειπόμενος χρόνος
διαδικασίας υποδεικνύεται στην οθόνη.
Κατά την ολοκλήρωση του προγράμματος, παράγεται ένα ηχητικό
σήμα. Χρησιμοποιήστε το θερμικό γάντι για να αφαιρέσετε το
θερμό μούφλο από τον εγχυτήρα κρατώντας το από τον ώμο
απομόνωσης. Ο εγχυτήρας είναι έτοιμος για τον επόμενο
πολυμερισμό αμέσως μετά την αφαίρεση του μούφλου.
Σημείωσ η: Το μούφλο μπορεί να είναι ακόμα πολύ θερμό όταν
αφαιρείται από τον εγχυτήρα. Κίνδυνος εγκαύματος!
14. Ψύξη του μούφλου
Ψύξτε το μούφλο κάτω από κρύο τρεχούμενο νερό για τουλάχιστον
15 λεπτά. Ως εναλλακτική λύση, η ψύξη μπορεί να λάβει χώρα μέσα
στον εγχυτήρα (π.χ. κατά τη διάρκεια της νύκτας).
Σημαντικό: Εάν το μούφλο δεν ψυχθεί και ανοιχθεί σε πολύ υψηλή
θερμοκρασία, μπορεί να προκληθούν ανακρίβειες στην εφαρμογή.
15. Αφαίρεση της οδοντοστοιχίας
Αφαιρέστε τα κλείστρα ασφάλισης.
Τοποθετήστε το μούφλο κάτω από μια οδοντιατρική πρέσα.
Ασφαλίστε το βοήθημα αφαίρεσης μεταξύ γύψου και πιεστικής
πλάκας.
Ολισθήστε ένα πλατύ κατσαβίδι ή μαχαίρι για γύψο μέσα στην
ένωση μεταξύ των δύο ημίσεων του μούφλου και ανασηκώστε το
επάνω ήμισυ του μούφλου. Αφαιρέστε το μούφλο από την πρέσα,
γυρίστε το και επαναλάβετε τη διαδικασία.
53
Page 54

Αφαιρέστε τον πυρήνα από γύψο με την κάψουλα και διαχωρίστε
την κάψουλα στο κανάλι έγχυσης χρησιμοποιώντας μια φρέζα
δίσκου διαχωρισμού ή πριόνι. Αφαιρέστε την οδοντοστοιχία από
τον πυρήνα από γύψο ως συνήθως με λαβίδα γύψου.
16. Φινίρισμα της οδοντοστοιχίας
Το πολυμερισμένο υλικό IvoBase φινίρεται με εγκάρσιες φρέζες
καρβιδίου βολφραμίου, γυαλόχαρτο και στιλβωτικά, όπως συνήθως για
υλικά βάσης οδοντοστοιχίας.
– τα κανάλια έγχυσης και αερισμού είναι προσαρτημένα στο
αποτύπωμα της αναγόμωσης.
– η περιοχή προς αναγόμωση έχει πάχος τουλάχιστον 2 mm.
Επιδιόρθωση / επέκταση / αναγόμωση με ProBase Cold
Η διαδικασία είναι αντίστοιχη με εκείνη που χρησιμοποιείται για την
επιδιόρθωση συμβατικών αυτοπολυμεριζόμενων υλικών βάσης
οδοντοστοιχίας. Παρακαλούμε ανατρέξτε στις Οδηγίες Χρήσεως του
ProBase Cold για λεπτομέρειες.
Επιδιόρθωση / αναγόμωση
Το IvoBase μπορεί να επιδιορθωθεί με το ίδιο, καθώς και με
αυτοπολυμεριζόμενο πολυμερές ProBase® Cold.
Επιδιόρθωση / επέκταση με IvoBase Hybrid / High Impact
Βασικά, μια οδοντοστοιχία IvoBase μπορεί να επιδιορθωθεί χωρίς
επένδυση στο μούφλο IvoBase. Η βασική διαδικασία είναι αντίστοιχη με
εκείνη που χρησιμοποιείται για την επιδιόρθωση συμβατικών
αυτοπολυμεριζόμενων υλικών βάσης οδοντοστοιχίας.
Τηρείτε την αναλογία ανάμειξης ως εξής:
Πολυμερές Μονομερές
IvoBase Hybrid 9 g 5 g
IvoBase High Impact 8 g 5 g
Το πολυμερές και το μονομερές πρέπει να αναμιχθούν ομοιογενώς (για
περίπου 20 δευτερόλεπτα).
Παρακαλούμε να τηρείτε τους ακόλουθους χρόνους επεξεργασίας (σε
θερμοκρασία δωματίου 23 °C / 73 °F):
– Διάρκεια της φάσης ζύμης: 30 δευτερόλεπτα
– Διάρκεια της φάσης ριξίματος: 1–2 λεπτά
– Διάρκεια της φάσης μοντελαρίσματος: 3–5 λεπτά
Ο μέγιστος συνολικός χρόνος επεξεργασίας μετά την ανάμειξη είναι
10 λεπτά.
Πολυμερίστε το υλικό σε σκεύος υπό πίεση για 20 λεπτά σε
θερμοκρασία 55 °C / 131 °F και πίεση 2,5 bar / 36 psi.
Αναγόμωση με IvoBase Hybrid / High Impact
Η αναγόμωση μια οδοντοστοιχίας IvoBase μπορεί να πραγματοποιηθεί
με ή χωρίς επένδυση στο μούφλο IvoBase.
α) Αναγόμωση χωρίς επένδυση στο μούφλο IvoBase:
Η διαδικασία χωρίς επένδυση στο μούφλο IvoBase είναι η ίδια
όπως και για την αναγόμωση με συμβατικά αυτοπολυμεριζόμενα
υλικά βάσης οδοντοστοιχίας.
β) Αναγόμωση με επένδυση στο μούφλο IvoBase:
Η επένδυση και ολοκλήρωση για την αναγόμωση μιας οδοντοστοι-
χίας είναι βασικά η ίδια όπως και για την ολοκλήρωση μιας κερω-
μένης οδοντοστοιχίας. Βεβαιωθείτε ότι
Οδηγίες αποθήκευσης
– Αποθηκεύστε το υλικό σε δροσερό, σκοτεινό και καλά αεριζόμενο
χώρο.
– Θερμοκρασία αποθήκευσης: 2–28 °C / 36–82 °F.
– Μη χρησιμοποιείτε τα προϊόντα μετά την ενδεδειγμένη
ημερομηνία λήξης.
– Φυλάσσετε το υλικό μακριά από παιδιά.
Ταξινόμηση σύμφωνα με EN ISO 20795-1, Τύπος 2, Κατηγορία 1
Το προϊόν πληροί τις απαιτήσεις του προτύπου EN ISO 20795-1:2008.
Ημερομηνία σύνταξης των πληροφοριών: 10/2011
Κατασκευαστής:
Ivoclar Vivadent AG FL-9494 Schaan / Liechtenstein
Το υλικό αυτό κατασκευάστηκε για χρήση στον οδοντιατρικό τομέα και η επεξεργασία του πρέπει να
πραγματοποιείται σύμφωνα με τις οδηγίες χρήσης. Για τυχόν βλάβες που προκύπτουν από διαφορετική χρήση ή
ακατάλληλη εφαρμογή, ο κατασκευαστής δεν αναλαμβάνει καμία ευθύνη. Επιπλέον ο χρήστης είναι υποχρεωμένος
να ελέγχει με δική του ευθύνη την καταλληλότητα και τη δυνατότητα χρήσης του υλικού για τον προβλεπόμενο
σκοπό πριν την εφαρμογή, ιδιαίτερα εάν ο συγκεκριμένος σκοπός δεν αναφέρεται στις πληροφορίες χρήσης.
Περιγραφές και στοιχεία δεν αποτελούν εγγύηση των ιδιοτήτων και δεν είναι δεσμευτικά.
54
Page 55

Kullanma Talimatı
Lütfen bu Kullanma Talimatını dikkatle
okuyun ve malzemenin kullanımıyla ilgili
bilgi edinin. Lütfen IvoBase Enjektörünün
‹flletme Talimatlarına da baflvurun.
Ürün tanımı
IvoBase sistemi PMMA bazlı temel protez malzemesinden
oluflur. IvoBase Enjektörü bu malzeme için özel olarak
gelifltirilmifltir. Sistem, protezlerin tam otomatik olarak ve
büzülme süreci dengelenerek polimerize edilmesini
sa¤lar.
IvoBase malzemeleri ısıyla ve kendili¤inden sertleflen protez temel malzemelerinin avantajlarını birlefltirmektedir.
Bu malzeme için aslında kendi kendine sertleflen polimerlere yönelik talepler geçerlidir, ancak ısıyla sertleflen polimerlerin yerine getirmesi gereken daha sıkı normatif
talepleri de karflılar. Dolayısıyla, IvoBase'i bir hibrid malzeme olarak görmek mümkündür. IvoBase'in geleneksel
hibrid malzemesinin yanı sıra darbe dayanımlı malzeme
versiyonu da mevcuttur: IvoBase High Impact.
Afla¤ıdaki renk tonlarında temin edilebilir:
– IvoBase Hybrid:
Pink, Pink-V, Preference, Clear, Pink-V Implant,
Preference Implant
– IvoBase High Impact:
Pink, Pink-V, Preference, Pink-V Implant, Preference
Implant, 34-V
Bileflim
– IvoBase Hybrid
Toz:
Polimetil metakrilat, yumuflatıcı, bafllatıcı, pigmentler
Sıvı:
Metil metakrilat, dimetakrilat, katalizör
– IvoBase High Impact:
Toz:
High-impact modifikasyonlu PMMA kopolimer,
PMMA kopolimer, polimetil metakrilat, yumuflatıcı,
bafllatıcı, pigmentler
Sıvı:
Metil metakrilat, dimetakrilat, katalizör
Endikasyon
– Tam protezler
– Parsiyel protezler
– Kombine protezler
– Hibrid protezler
– ‹mplant protezleri
– Astar de¤ifltirme
– Onarımlar
Kontrendikasyon
Hastanın herhangi bir bileflene karflı alerjik olması.
Polimerize olmamıfl malzemenin intraoral kullanımı.
Yan etkiler
Bireysel hallerde metil metakrilat malzemelerine karflı
yerel alerjik reaksiyonlar rapor edilmifltir.
Güvenlik bilgileri
– Monomer metil metakrilat (MMA) içerir.
– MMA çok alev alıcı ve tahrifl edicidir, parlama
noktası: +10 °C/50 °F.
– MMA gözleri, solunum organlarını ve cildi tahrifl
eder.
– Ciltle teması sensitizasyona yol açabilir.
– Monomerin veya polimerize olmamıfl malzemenin
ciltle temasını engelleyin. Piyasada satılan tıbbi eldi-
venler metakrilatların hassaslafltırıcı etkisine karflı
koruma sa¤lamaz.
– Buharını solumayın.
– Tutuflturucu kaynaklardan uzak tutun – sigara içme-
yin.
– Monomerin kanalizasyon sistemine ulaflmasına izin
vermeyin.
– Elektrostatik yüklenmelere karflı önlem alın.
‹fllemeyle ilgili bilgiler
– Revetmana almadan önce modelleri iyice ıslatın.
– Revetmana almadan önce muflanın iç yüzeylerini
yalıtın.
– Alçı yüzeyleri temizleyin ve yalıtın.
– Polimerizasyon ve so¤uma sürelerine aynen uyun.
– Çözücülerin veya monomerin polimerize protez
temel maddesiyle teması renk a¤armasına neden
olabilir.
– Ivoclar Vivadent, e¤er boyun yalıtımı uygulanacaksa,
>65 Shore A sertli¤inde (örn. Flexistone Plus/Virtual
Heavy Body Fast) A-silikonların kullanılmasını
önermektedir. Çapraz ba¤lı silikonların (C-silikonların)
yo¤unlaflması protez temel malzemesi üzerinde
hasar oluflturucu bir etkiye sahip olabilir.
– Ürünleri sadece e¤itilmifl personel kullanabilir ve
iflleyebilir.
– Doldurulmufl bir muflaya daha sonra ikinci bir kapsül
IvoBase veya SR Ivocap® malzemesi enjekte etmek
mümkün de¤ildir.
– Enjeksiyonda kullanılmıfl bir IvoBase kapsülünün
içinde kalan malzeme bir daha kullanılamaz.
– Kuru alçı parçaların enjeksiyondan önce suyla
ıslatılması gerekmektedir.
– Kirlenmifl bir mufla ısıtıldı¤ında duman çıkarabilir.
– Protezleri, tamamlanmaları ile takılmaları arasındaki
süre içerisinde nemli bir ortamda muhafaza edin.
®
55
Page 56

‹flleme
Enjeksiyona hazırlık
1. Muflanın hazırlanması
Temiz mufla yarımlarının iç yüzeylerini ince bir tabaka
vazelin sürerek yalıtın.
Mufla yarımlarından birine içerden mufla kapa¤ını, yarım
kanal oluflturucuyu ve filtre mum bileflenini (B1)
yerlefltirin.
2. Modelin revetmana alınması
‹yice ıslatılmıfl ve yalıtılmıfl modeli geleneksel bir alçı
(Klas III) kullanarak mufla yarımlarından birinin için-
de revetmana alın. Alçının fazlasını, alçı düzeyi
modelle ve mufla gövdesinin kenarıyla aynı düzlem-
de olacak flekilde sıyırarak alın.
Önemli: Alçının yüzeyi yarım kanal oluflturucuyla
aynı düzeyde olmalıdır.
3. Mum bileflenlerinin konumlandırılması
Mum bileflenlerinin (B) mumları ayrıca mum kullanmaya
gerek olmadan modele yerlefltirilebilir. Mum
bileflenlerinin altına alçı girmemesine dikkat edin.
Alçının iyice donmasını bekleyin. Yarım kanal
oluflturucuyu çıkarın ve bütün kanal oluflturucuyu
yerlefltirin.
– Enjeksiyon mum bilefleninin (B2) yerlefltirilmesi
Enjeksiyon mum bileflenini (B2) bütün kanal
oluflturucunun e¤imli ucuna bastırın.
Üst çene tam protezleri:
Kanallardan birini damak tavanının ortasına, di¤er
ikisini ise üst çene tümseklerinin vestibüler
kenarlarına koyun ve mumu modelin üzerine bastırın.
Alt çene tam protezleri:
Retromolar üçgenin lingual alanına birer kanal
yerlefltirin. Enjeksiyon mum bilefleninin (B2) orta
kanalını kesin.
Parsiyel protezler:
Her protez kaidesinin dorsal ucuna bir kanal
yerlefltirin.
– Havalandırma mum bilefleninin (B3)
yerlefltirmesi
Havalandırma mum bilefleninin havalandırma kanalı-
nı filtre mum bilefleninin ortasına bastırın.
Önemli: Muflanın sızdırmazlı¤ını korumak açısından
havalandırma kanalı bastırılırken muflanın
gövdesiyle temas etmemelidir.
Alt çene ve üst çene tam protezleri:
Havalandırma mum bilefleninin (B3) üç kanalını
modelin anterior bölgesine yerlefltirin.
Parsiyel protezler:
Havalandırma mum bilefleninin (B3) üç kanalını
model kaidesinin anterior sınırlayıcılarına bastırın.
E¤er havalandırma mum bilefleninin (B3) uzunlu¤u
yeterli de¤ilse, protez kaidesi ile filtre mumu arasındaki ba¤lantının bir mum kanalla, mümkün olan en
kısa yol gözetilerek oluflturulması gerekmektedir.
4. Silikonlu revetman
Konturlu protezlerin vestibuler ve palatal ve/veya lin-
gual yüzeylerini silikonla kaplayın. Oklüzal yüzeyleri
ve difllerin insizal kenarlarını kaplamayın. Silikonun
alçıyla güvenli bir biçimde birleflmesi için silikon
donmadan önce yüzeyine tutucu desenler iflleyin ya
da tutma kumu kullanın.
Not: En iyi sonuçları elde etmek için akıflkan, katılma
çapraz ba¤lı bir silikon (Shore-A sertlik derecesi >65 olan
bir A-silikon) kullanılması tavsiye edilir (örn. Flexistone
Plus veya Virtual Heavy Body Fast).
Alçıyla alçının temas etti¤i yüzeylere Ayırma Sıvısı (F)
sürün.
5. Konter modelin dökümü
Kilitleme mandalları aracılı¤ıyla di¤er mufla yarısını
konumlandırın.
Geleneksel dental alçıyı (Klas III) üreticisinin
talimatları do¤rultusunda karıfltırın ve bir karıfltırıcı
yardımıyla hava kabarcı¤ı oluflturmamaya dikkat
ederek akıflkan bir kıvamda, muflanın deli¤ine
uygulayın. Alçı fazlasını IvoBase spatulası ile sıyırın
ve muflanın deli¤inden alçı çıkmamasına dikkat
edin.
6. Modelin kaynatılarak boflaltılması
Alçı tamamen sertlefltikten sonra muflayı su
banyosunda yaklaflık 90 °C (194 °F) sıcaklıkta
5–8 dakika kadar ısıtın. Bunun ardından, muflayı
açın ve bir mum bıça¤ıyla kanal oluflturucuyu
tamamen, mumu ise kabaca uzaklafltırın. Daha
sonra iç yüzeyleri temiz, kaynar suyla hafllayarak
temizleyin.
Not: Sadece saf, katkı maddesi (örn. mum çözücü,
temizlik ajanı) içermeyen su kullanın. Katkı maddeleri
protezlerde renk kaybına neden olabilir.
56
Page 57
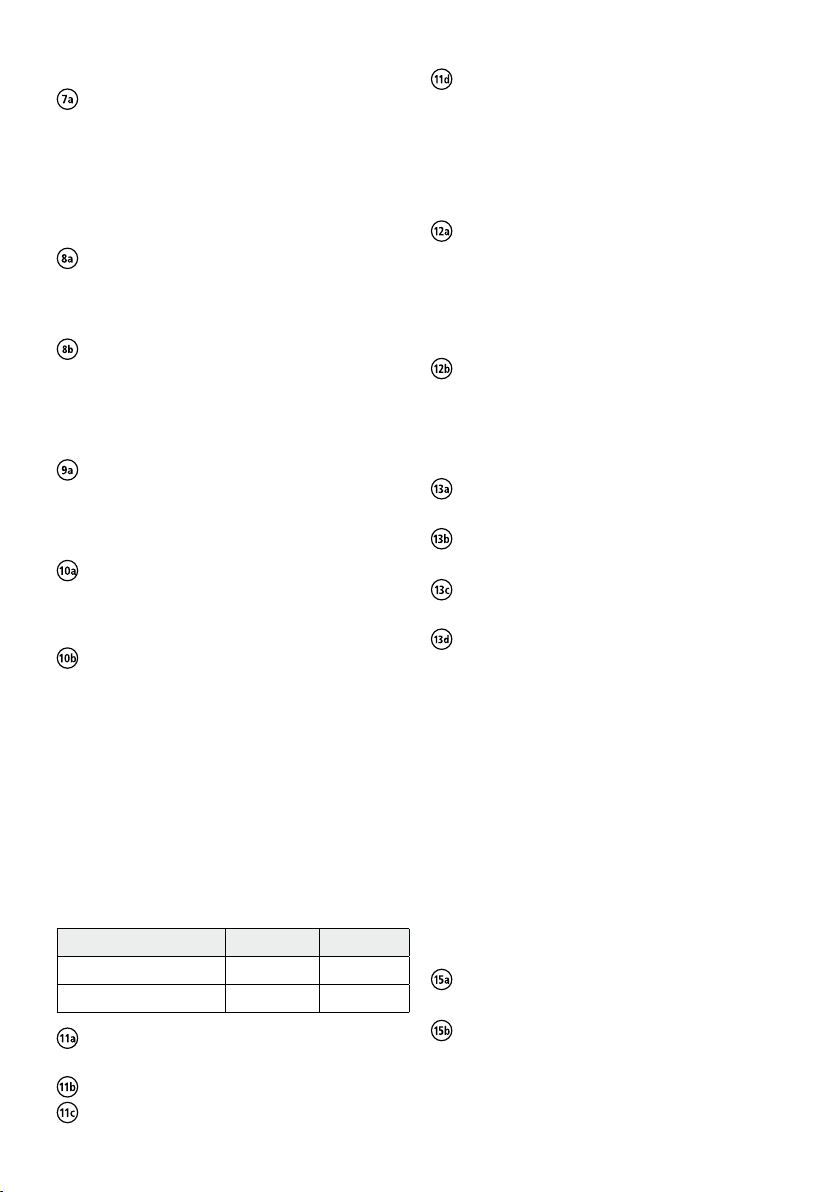
7. Difller
Optimal bir ba¤lantı oluflturmak için difl
boyunlarında ve difl yüzeylerinin tabanlarında
kesinlikle mum olmamalıdır.
Bazal ve servikal difl yüzeylerini hafifçe kumlayın
(100 μm Al2O3, 2 bar / 29 psi) veya bir dental
tungsten karbid frezle pürüzlendirin.
8. Alçı yüzeylerin yalıtılması
Önemli: Yalıtmadan önce mufla yarımlarını hava
veya temiz so¤uk su kullanarak oda sıcaklı¤ına
(<30 °C / 86 °F) getirin. Muflanın ısı derecesini IR
termometreyle tam olarak ölçebilirsiniz.
Alçı modelin temiz yüzeylerini Ayırıcı Sıvıyla (F)
yalıtın. 5 dakika sonra ikinci bir kat daha sürün.
Sıvının çukur yerlerde birikmesini (örn. gingivo-
bukkal kıvrımda) önleyin.
9. Havalandırma filtresinin yerlefltirilmesi
Havalandırma filtresini (E) muflanın ilgili girintisine
kenarla aynı düzlemde olacak flekilde yerlefltirin.
10. Huninin ve merkezleme parçasının
yerlefltirilmesi
IvoBase hunisini (D) yerine oturuncaya ve
kilitleninceye kadar merkezleme parçasının içine
bastırın. Üzerine huni (D) takılı merkezleme parçasını
muflanın alt yarımına takın.
Kilitleme mandalları aracılı¤ıyla mufla yarımlarını
birlefltirin.
Enjeksiyon ve polimerizasyon
IvoBase Enjektörünün çalıflma tarzı, ilgili ‹flletme
Talimatında ayrıntılı bir flekilde açıklanmıfltır. Malzeme
karıfltırılmadan önce IvoBase Enjektörünün bekleme
konumuna getirilmesi gerekmektedir.
11. Malzemenin karıfltırılması
Bir kapsül, bir üst çene veya alt çene tam protezinin
enjeksiyonu için yeterlidir.
Kapsülün içeri¤i Monomer Polimer
IvoBase Hybrid 20 ml 34 g
IvoBase High Impact 20 ml 30 g
Monomer kabını (A4) kapsülden ayırın. Kapsülün sız-
dırmaz kapa¤ını açın (A1).
Monomer kabının (A4) sızdırmaz kapa¤ını açın
ve sıvıyı açık kapsülün (A2) içine dökün.
Monomer ile polimeri spatulayla (C) kapsülün içinde
karıfltırarak (20–30 saniye kadar) homojen bir
karıflım haline getirin.
12. Enjektörün doldurulması
Karıfltırma ifllemini izleyen 5 dakika içerisinde afla¤ıdaki
gibi hareket edin:
Açık kapsülü (A) düz bir yüzeyin üzerine koyun ve
muflayı kapsülün (A) üzerine bastırın.
Not: Malzemenin kapsülden (A) dıflarıya akmasını önlemek için mufla takılı kapsülü e¤meyin. Mufla yerinden
kaldırıldı¤ında kapsülün (A) güvenli bir flekilde merkezleme parçasına takılı olması gerekmektedir.
Enjektörün kapısını açın. Kapsül (A) ile birleflik
muflayı, mufla tutucu tarafından durduruluncaya
kadar polimerizasyon odasına sürün. Enjektörün
kapısını kapatın.
13. Programın bafllatılması
‹lgili programı seçin (programlara genel bakıfl için
‹flletme Talimatına bakın).
E¤er arzu edilirse, kalan monomer içeri¤ini yüzde
1'in altına düflürmek için RMR tuflunu aktiflefltirin.
“Start” tufluna basın. Tam otomatik enjeksiyon süreci
bafllayacaktır. Kalan ifllem süresi ekranda gösterilir.
Program sona erdi¤inde akustik bir sinyal duyulur.
Isı eldivenini kullanarak sıcak muflayı yalıtım
omuzundan tutun ve Enjektörden çıkarın. Mufla
çıkarıldı¤ı andan itibaren Enjektör bir sonraki
polimerizasyon ifllemine hazırdır.
Not: Mufla Enjektörden çıkarıldı¤ında henüz çok
sıcak olabilir. Yanma tehlikesi!
14. Muflanın so¤utulması
Muflayı so¤uk musluk suyu altında en az 15 dakika
so¤utun. So¤utma ifllemi alternatif olarak Enjektörün
içinde de gerçeklefltirilebilir (örn. gece süresince).
Önemli: E¤er mufla so¤utulmadan çok yüksek sıcaklıkta
açılırsa, uyum hassasiyeti etkilenebilir.
15. Protezin revetmandan çıkarılması
Kilitleme mandallarını çıkarın.
Muflayı bir dental presin altına yerlefltirin. Çıkarma
yardımcısını alçı ile baskı plakasının arasına yerlefltirin.
Mufla yarımlarının birleflti¤i yere genifl a¤ızlı bir
tornavida veya alçı bıça¤ı sokarak muflanın üst
yarımını yukarıya kaldırın. Muflayı presten çıkarın,
ters çevirin ve ifllemi tekrarlayın..
57
Page 58
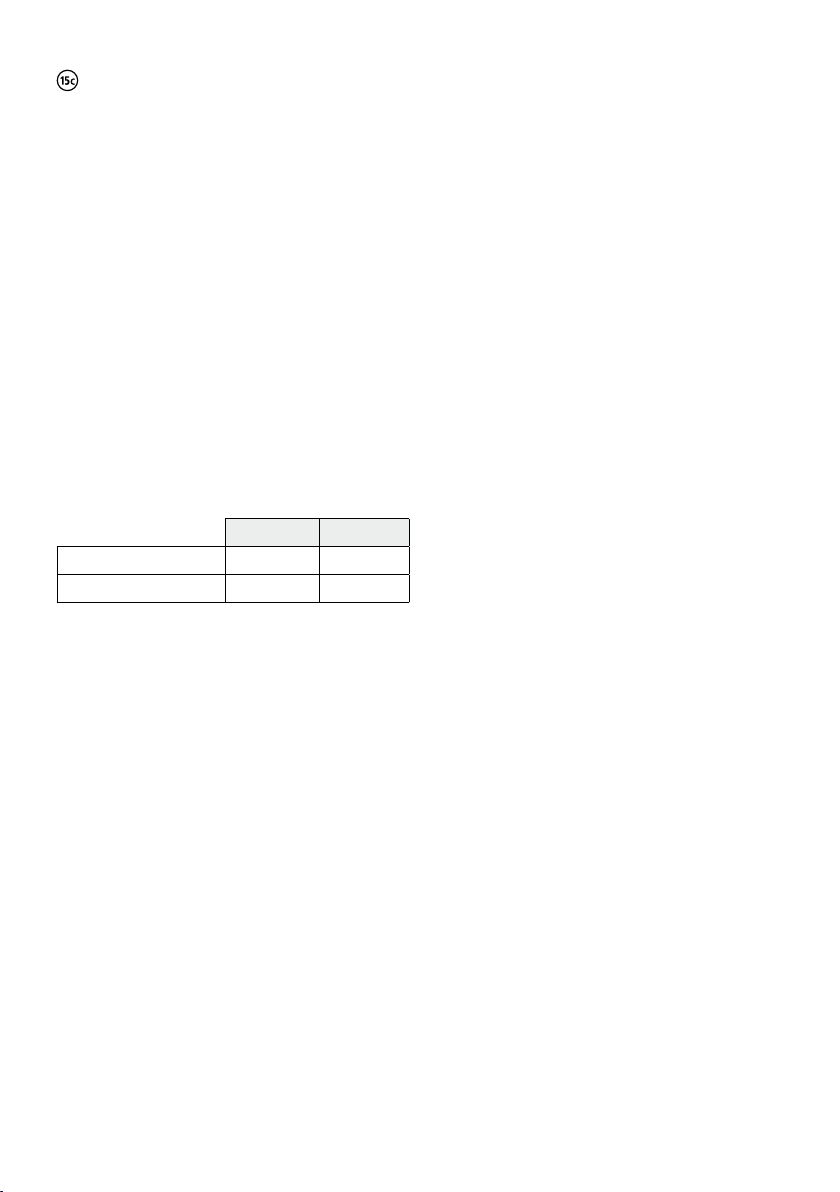
Kapsülle birleflik alçı gövdeyi çıkarın ve disk fleklinde
bir frez veya testereyle kapsülü kanal yerinden kese-
rek ayırın. Protezi alçı kıskacı kullanarak alıflılmıfl
flekilde alçıdan çıkarın.
16. Protezin bitirilmesi
Polimerize olmufl IvoBase malzemesi çapraz kesiflli tungsten karbid frezler, zımpara ka¤ıdı ve parlatma malzemesi kullanılarak ola¤an flekilde bitirilir.
b) IvoBase muflasında revetmana alarak yeniden
astarlama:
Protezin yeniden astarlama amacıyla revetmana
alınması ve tamamlanması temel olarak mum
modelajın tamamlanmasıyla aynıdır. Dikkat edilmesi
gereken hususlar
– kanalların ve havalandırma kanallarının yeni astar
ölçüsüne ba¤lanması,
– yeniden astarlanacak alanın en az 2 mm kalınlı¤a
sahip olmasıdır.
Onarım / yeniden astarlama
IvoBase gerek kendi malzemesiyle, gerek kendili¤inden
sertleflen ProBase® Cold polimeriyle onarılabilir.
IvoBase Hybrid / High Impact ile onarım geniflletme
Genel olarak, IvoBase protezlerinin IvoBase muflasında
revetmana alınmadan onarılması mümkündür. Temel
prosedür, kendili¤inden sertleflen konvansiyonel temel
protez malzemelerinin onarımı gibidir.
Afla¤ıdaki karıflım oranını izleyin:
Polimer Monomer
IvoBase Hybrid 9 g 5 g
IvoBase High Impact 8 g 5 g
Polimer ile monomerin homojen bir flekilde (20 saniye
kadar) karıfltırılması gereklidir.
Lütfen afla¤ıdaki iflleme sürelerini (23 °C / 73 °F, oda
sıcaklı¤ında) dikkate alın:
– Yo¤urma aflamasının süresi: 30 saniye
– Dökme aflamasının süresi: 1–2 dakika
– Modelleme aflamasının süresi: 3–5 dakika
Karıfltırdıktan sonra toplam iflleme süresi 10 dakikadır.
Malzemeyi basınçlı bir potada 55 °C / 131 °F sıcaklık ve
2,5 bar / 36 psi basınçta 20 dakika süreyle polimerize
edin.
IvoBase Hybrid / High Impact ile yeniden astarlama
IvoBase protezlerini IvoBase muflasında revetmana
alarak ya da almadan yeniden astarlamak mümkündür.
a) IvoBase muflasında revetmana almadan yeniden
astarlama:
IvoBase muflasında revetmana almadan yapılan
yeniden astarlama ifllemi, kendinden sertleflen konvansiyonel protez temel malzemeleriyle yapılan yeniden astarlama iflleminin aynıdır.
ProBase Cold ile onarım / geniflletme amaçlı
yeniden astarlama
Prosedür, kendili¤inden sertleflen konvansiyonel temel
protez malzemeleriyle yapılan onarımlara benzer.
Ayrıntılar için lütfen ProBase Cold Kullanım Talimatına
bakın.
Saklama talimatları
– Malzemeyi serin, karanlık ve iyi havalandırılan bir
yerde muhafaza edin.
– Saklama sıcaklı¤ı: 2–28 °C / 36–82 °F.
– Ürünleri belirtilen son kullanma tarihinden sonra
kullanmayın.
– Malzemeyi çocukların ulaflamayaca¤ı bir yerde
saklayın.
EN ISO 20795-1 standardına göre Tip 2, Klas 1
olarak sınıflandırılmıfltır
Bu ürün EN ISO 20795-1:2008 standardının taleplerini
karflılar.
Bilgilerin hazırlanıfl tarihi: 10/2011
Üretici:
Ivoclar Vivadent AG FL-9494 Schaan / Liechtenstein
Bu malzeme sadece difl hekimli¤inde kullanılmak üzere hazırlanmıfltır. Uygulamada
Kullanma Talimatına kesin olarak riayet edilmelidir. Belirlenen kullanım alanı ve Kullanma
Talimatının izlenmedi¤i durumlarda sorumluluk kabuk edilmeyecektir. Uygunlu¤u belirlemek
açısından materyali test etmekten ve talimatta açıkça belirtilenin haricindeki herhangi bir
kullanımdan kullanıcı sorumludur. Tanımlama ve bilgiler özelliklerin garantisi anlamına
gelmez.
58
Page 59

àÌÒÚÛ͈Ëfl
иУК‡ОЫИТЪ‡, ‚МЛП‡ЪВО¸МУ ФУ˜ЛЪ‡ИЪВ
˝ÚÛ ËÌÒÚÛÍˆË˛ Ë ÓÁ̇ÍÓϸÚÂÒ¸ ÒÓ
ТФУТУ·УП ФЛПВМВМЛfl. й·‡ЪЛЪВ Ъ‡НКВ
‚МЛП‡МЛВ М‡ ЛМТЪЫНˆЛ˛ ФУ ЛТФУО¸БУ‚‡МЛ˛
ЛМКВНЪУ‡ IvoBase Injector.
éÔËÒ‡ÌËÂ
лЛТЪВП‡ IvoBase ТУТЪУЛЪ ЛБ ФУЪВБМУ„У П‡ЪВЛ‡О‡,
·‡БЛЫ˛˘В„УТfl М‡ PMMA, ‡ Ъ‡НКВ ‡Б‡·УЪ‡ММУ„У М‡
ЩЛПВ ФЛ·У‡ ‰Оfl ЛМ˙ВˆЛУ‚‡МЛfl IvoBase. лЛТЪВП‡
ФУБ‚УОflВЪ ФУОЛПВЛБУ‚‡Ъ¸ ФУЪВБ˚ ФУОМУТЪ¸˛
‡‚ЪУП‡ЪЛ˜ВТНЛ Л Т ‚˚‡‚МЛ‚‡МЛВП ЫТ‡‰НЛ.
е‡ЪВЛ‡О IvoBase У·˙В‰ЛМflВЪ ‚ ТВ·В ФВЛПЫ˘ВТЪ‚‡
ФУЪВБМ˚ı ФО‡ТЪП‡ТТ „Уfl˜ВИ ФУОЛПВЛБ‡ˆЛЛ Л
‡‚ЪУФУОЛПВЛБ‡ˆЛЛ. зВТПУЪfl М‡ ЪУ, ˜ЪУ П‡ЪВЛ‡О
ТУБ‰‡‚‡ОТfl ‚ ТУУЪ‚ВЪТЪ‚ЛЛ Т ЪВ·У‚‡МЛflПЛ Н
ФО‡ТЪП‡ТТ‡П ‡‚ЪУФУОЛПВЛБ‡ˆЛЛ, УМ Н ЪУПЫ КВ
ТУУЪ‚ВЪТЪ‚ЫВЪ ТЪУК‡И¯ЛП МУП‡ЪЛ‚М˚П ЪВ·У‚‡МЛflП
Н ФО‡ТЪП‡ТТ‡П „Уfl˜ВИ ФУОЛПВЛБ‡ˆЛЛ. н‡НЛП
У·‡БУП, IvoBase ПУКМУ УЪМВТЪЛ Н „Л·Л‰М˚П
П‡ЪВЛ‡О‡П. з‡fl‰Ы Т Ъ‡‰ЛˆЛУММ˚П „Л·Л‰М˚П
П‡ЪВЛ‡ОУП IvoBase Hybrid ‚˚ФЫТН‡ВЪТfl П‡ЪВЛ‡О Т
ФУ‚˚¯ВММУИ ЫТЪУИ˜Л‚УТЪ¸˛ Н ТНУО‡П Л ФУОУПН‡П:
IvoBase High Impact.
Ç˚ÔÛÒ͇˛ÚÒfl ÒÎÂ‰Û˛˘Ë ˆ‚ÂÚ‡:
– IvoBase Hybrid:
Pink, Pink-V, Preference, Clear, Pink-V Implant,
Preference Implant
– IvoBase High Impact:
Pink, Pink-V, Preference, Pink-V Implant, Preference
Implant, 34-V
– „Л·Л‰М˚В ФУЪВБ˚
– ФУЪВБЛУ‚‡МЛВ М‡ ЛПФО‡МЪ‡ı
– ФВВ·‡БЛУ‚НЛ
– ФУ˜ЛМНЛ
èÓÚË‚ÓÔÓ͇Á‡ÌËfl
иЛ ЛПВ˛˘ВИТfl ‡ООВ„ЛЛ М‡ НУПФУМВМЪ˚ П‡ЪВЛ‡О‡
УЪ ФЛПВМВМЛfl ТОВ‰ЫВЪ УЪН‡Б‡Ъ¸Тfl. зВ ‰УОКМУ
ФУЛТıУ‰ЛЪ¸ МЛН‡НУ„У НУМЪ‡НЪ‡ МВУЪФУОЛПВЛБУ‚‡ММУ„У
П‡ЪВЛ‡О‡ Т ‚МЫЪЛУЪУ‚УИ ФУОУТЪ¸˛.
èÓ·Ó˜Ì˚ ‰ÂÈÒÚ‚Ëfl
З УЪ‰ВО¸М˚ı ТОЫ˜‡flı УФЛТ˚‚‡ОЛТ¸ ОУН‡О¸М˚В
‡ООВ„Л˜ВТНЛВ В‡НˆЛЛ М‡ П‡ЪВЛ‡О˚, ТУ‰ВК‡˘ЛВ
ПВЪЛО-‡НЛО‡Ъ˚.
еВ˚ ФВ‰УТЪУУКМУТЪЛ
– еУМУПВ ТУ‰ВКЛЪ ПВЪЛОПВЪ‡НЛО‡Ъ (MMA)
– MMA УН‡Б˚‚‡ВЪ ‡Б‰‡К‡˛˘ВВ ‰ВИТЪ‚ЛВ Л
fl‚ОflВЪТfl ОВ„НУ ‚УТФО‡ПВМfl˛˘ЛПТfl, ЪВПФВ‡ЪЫ‡
‚УБ„У‡МЛfl: +10°C
– MMA ‡Б‰‡К‡ВЪ „О‡Б‡, У„‡М˚ ‰˚ı‡МЛfl Л НУКЫ
– ЗУБПУКМУ ‚УБМЛНМУ‚ВМЛВ ˜Ы‚ТЪ‚ЛЪВО¸МУТЪЛ ФЛ
НУМЪ‡НЪВ Т НУКВИ
– аБ·В„‡Ъ¸ НУМЪ‡НЪ‡ Т НУКВИ ПУМУПВ‡ Л
МВТФУОЛПВЛБУ‚‡ММУ„У П‡ЪВЛ‡О‡. й·˚˜М˚В
ПВ‰ЛˆЛМТНЛВ ФВ˜‡ЪНЛ МВ fl‚Оfl˛ЪТfl Б‡˘ЛЪУИ УЪ
˝ЩЩВНЪ‡ ˜Ы‚ТЪ‚ЛЪВО¸МУТЪЛ М‡ ПВЪ‡НЛО‡Ъ˚.
– и‡˚ МВ ‚‰˚ı‡Ъ¸
– СВК‡Ъ¸ ‚‰‡ОЛ УЪ ЛТЪУ˜МЛНУ‚ ФО‡ПВМЛ. зВ НЫЛЪ¸.
– зВ ‰УФЫТН‡Ъ¸ ФУФ‡‰‡МЛfl ПУМУПВ‡ ‚ Н‡М‡ОЛБ‡ˆЛ˛
– иЛМflЪ¸ ПВ˚ ФУЪЛ‚ ˝ОВНЪУТЪ‡ЪЛ˜ВТНЛı ‡Бfl‰У‚.
ëÓÒÚ‡‚
– IvoBase Hybrid
èÓÓ¯ÓÍ:
иУОЛПВЪЛОПВЪ‡НЛО‡Ъ, ‡БПfl„˜ЛЪВО¸, ЛМЛˆЛ‡ЪУ,
ФЛ„ПВМЪ˚
ÜˉÍÓÒÚ¸:
еВЪЛОПВЪ‡НЛО‡Ъ, ‰ЛПВЪ‡НЛО‡Ъ, Н‡Ъ‡ОЛБ‡ЪУ
– IvoBase High Impact:
èÓÓ¯ÓÍ:
쉇ÓÔÓ˜Ì˚È ÏÓ‰ËÙˈËÓ‚‡ÌÌ˚È PMMA
ТУФУОЛПВ, PMMA ТУФУОЛПВ,
ФУОЛПВЪЛОПВЪ‡НЛО‡Ъ, ‡БПfl„˜ЛЪВО¸, ЛМЛˆЛ‡ЪУ,
ФЛ„ПВМЪ˚
ÜˉÍÓÒÚ¸:
еВЪЛОПВЪ‡НЛО‡Ъ, ‰ЛПВЪ‡НЛО‡Ъ, Н‡Ъ‡ОЛБ‡ЪУ
èÓ͇Á‡ÌËfl
– ÔÓÎÌ˚Â ÔÓÚÂÁ˚
– ˜‡ÒÚ˘Ì˚ ÔÓÚÂÁ˚
– ÍÓÏ·ËÌËÓ‚‡ÌÌ˚ ÔÓÚÂÁ˚
LJÊÌ˚ Û͇Á‡ÌËfl
– åÓ‰ÂÎË Ô‰ Á‡Ô‡ÍÓ‚ÍÓÈ Ú˘‡ÚÂθÌÓ Ì‡Ò˚ÚËÚ¸
‚Ó‰ÓÈ.
– èÓÎÓ‚ËÌÍË Í˛‚ÂÚ˚ Ô‰ Á‡Ô‡ÍÓ‚ÍÓÈ ıÓÓ¯Ó
ЛБУОЛУ‚‡Ъ¸.
– иУ‚ВıМУТЪЛ „ЛФТ‡ ФУ˜ЛТЪЛЪ¸ Л ЛБУОЛУ‚‡Ъ¸
– нУ˜МУ ТУ·О˛‰‡Ъ¸ ‚ВПfl ФУОЛПВЛБ‡ˆЛЛ Л
УıО‡К‰ВМЛfl
– дУМЪ‡НЪ ‡ТЪ‚УЛЪВОfl ЛОЛ ПУМУПВ‡ Т
ФУОЛПВЛБУ‚‡ММ˚П П‡ЪВЛ‡ОУП ФУЪВБ‡ ПУКВЪ
ФЛ‚ВТЪЛ Н У·‡БУ‚‡МЛ˛ ·ВО˚ı ФflЪВМ.
– иЛ ЛТФУО¸БУ‚‡МЛЛ ЛБУОЛЫ˛˘В„У ТВ‰ТЪ‚‡ ‚
ФЛ¯ВВ˜МУИ У·О‡ТЪЛ Ivoclar Vivadent ВНУПВМ‰ЫВЪ
ФЛПВМflЪ¸ Д-ТЛОЛНУМ˚ Т Ъ‚В‰УТЪ¸˛ >65 Shore A
(̇ÔËÏÂ, Flexistone Plus/Virtual
®
Heavy Body
Fast). иЛПВМВМЛВ д-ТЛОЛНУМУ‚ ПУКВЪ ФЛ‚ВТЪЛ Н
ФУ‚ВК‰ВМЛ˛ П‡ЪВЛ‡О‡ ФУЪВБ‡.
– л ФУ‰ЫНЪУП ПУКВЪ ‡·УЪ‡Ъ¸ ЪУО¸НУ У·Ы˜ВММ˚И
ÔÂÒÓ̇Î.
59
Page 60

– СУФУОМЛЪВО¸МУВ ЛМ˙ВˆЛУ‚‡МЛВ ‚ЪУУИ Н‡ФТЫО˚ Т
П‡ЪВЛ‡ОУП IvoBase ЛОЛ SR Ivocap ‚ ЫКВ
Б‡ФУОМВММЫ˛ Н˛‚ВЪЫ МВ‚УБПУКМУ.
– éÒÚ‡‚¯ËÈÒfl χÚÂˇΠ‚ ÛÊ ËÌ˙ˆËÓ‚‡ÌÌÓÈ
Н‡ФТЫОВ IvoBase ТМУ‚‡ ЛТФУО¸БУ‚‡Ъ¸ МВО¸Бfl.
– Ç˚ÒÓı¯ËÈ „ËÔÒ Ô‰ ËÌ˙Â͈ËÂÈ ÒΉÛÂÚ Ì‡Ò˚ÚËÚ¸
‚Ó‰ÓÈ.
– ÖÒÎË Í˛‚ÂÚ‡ Ì ·˚· Ó˜Ë˘Â̇, ÔÓ‰ ‚ÓÁ‰ÂÈÒÚ‚ËÂÏ
‚˚ТУНУИ ЪВПФВ‡ЪЫ˚ ‚УБПУКМУ ФУfl‚ОВМЛВ ‰˚П‡
– иУТОВ ЛБ„УЪУ‚ОВМЛfl ФУЪВБ‡ ‰У ПУПВМЪ‡
ЩЛНТ‡ˆЛЛ ı‡МЛЪ¸ ‚У ‚О‡КМУП ТУТЪУflМЛЛ.
иЛПВМВМЛВ
èÓ‰„ÓÚӂ͇ Í ËÌ˙Â͈ËË
1. èÓ‰„ÓÚӂ͇ Ͳ‚ÂÚ˚
ÇÌÛÚÂÌÌ˛˛ ÔÓ‚ÂıÌÓÒÚ¸ ˜ËÒÚ˚ı ÔÓÎÓ‚ËÌÓÍ
Н˛‚ВЪ˚ ЛБУОЛУ‚‡Ъ¸ ЪУМНЛП ТОУВП ‚‡БВОЛМ‡.
оУПЛУ‚‡ЪВО¸ Н‡М‡ОУ‚ М‡ФУОУ‚ЛМЫ ФУПВТЪЛЪ¸
ЛБМЫЪЛ ‚ У‰МЫ ЛБ ФУОУ‚ЛМУН Н˛‚ВЪ˚, ‡ ПВТЪУ‰ВК‡ЪВО¸
‰Оfl ЩЛО¸Ъ‡ (B1) ‡БПВТЪЛЪ¸ ‚ У‰МЫ ЛБ ФУОУ‚ЛМУН
Н˛‚ВЪ˚.
2. á‡Ô‡Íӂ͇ ÏÓ‰ÂÎË
пУУ¯У Ы‚О‡КМВММЫ˛ Л ЛБУОЛУ‚‡ММЫ˛ ПУ‰ВО¸
Б‡Ф‡НУ‚‡Ъ¸ У·˚˜М˚П ‰ВМЪ‡О¸М˚П „ЛФТУП (НО‡ТТ III)
‚ ÔÓÎÓ‚ËÌÍ Ͳ‚ÂÚ˚. àÁÎ˯ÍË „ËÔÒ‡ ÒÌflÚ¸ ̇
У‰МУП ЫУ‚МВ Т Н‡ВП ПУ‰ВОЛ Л НУПНУИ Н˛‚ВЪ˚.
З‡КМУ: д‡И „ЛФТ‡ ‰УОКВМ М‡ ФУОУ‚ЛМЫ
Á‡Í˚‚‡Ú¸ ÙÓÏËÓ‚‡ÚÂθ ͇̇·.
3. ìÒÚ‡Ìӂ͇ ‚ÓÒÍÓ‚˚ı Á‡„ÓÚÓ‚ÓÍ
ЗУТНУ‚˚В Б‡„УЪУ‚НЛ (B) ПУ„ЫЪ ФЛТУВ‰ЛМflЪ¸Тfl Н
ТПУ‰ВОЛУ‚‡ММУПЫ ФУЪВБЫ ·ВБ ‰УФУОМЛЪВО¸МУ„У
‚УТНУ‚‡МЛfl. иЛ ˝ЪУП ТОВ‰ЫВЪ У·‡˘‡Ъ¸ ‚МЛП‡МЛВ М‡
ЪУ, ˜ЪУ „ЛФТ МВ ‰УОКВМ Б‡ЪВН‡Ъ¸ ФУ‰ ‚УТНУ‚˚В
Б‡„УЪУ‚НЛ.
ЙЛФТ ‰УОКВМ ФУОМУТЪ¸˛ УЪ‚В‰ЛЪ¸Тfl. иУОУ‚ЛММ˚И
ÙÓÏËÓ‚‡ÚÂθ ͇̇· ÒÌflÚ¸, ÛÒÚ‡ÌÓ‚ËÚ¸ ÔÓÎÌ˚È
ÙÓÏËÓ‚‡ÚÂθ ͇̇·.
– ЫТЪ‡МУ‚Н‡ ‚УТНУ‚УИ ОЛЪМЛНУ‚УИ Б‡„УЪУ‚НЛ (B2)
‚УТНУ‚Ы˛ ОЛЪМЛНУ‚Ы˛ Б‡„УЪУ‚НЫ (B2) ‡‰‡ФЪЛУ‚‡Ъ¸
М‡ ФУОМУП ЩУПЛУ‚‡ЪВОВ Н‡М‡О‡.
èÓÎÌ˚È ÔÓÚÂÁ ‰Îfl ‚ÂıÌÂÈ ˜ÂβÒÚË
ìÒÚ‡ÌÓ‚ËÚ¸ ËÌ˙Â͈ËÓÌÌ˚È Í‡Ì‡Î ‚ ӷ·ÒÚË Ì·‡,
ФУТВВ‰ЛМВ, ‡ Ъ‡НКВ ФУ ЛМ˙ВНˆЛУММУПЫ Н‡М‡ОЫ
‚ÂÒÚË·ÛÎflÌÓ Ë Í Í‡Ê‰ÓÏÛ ·Û„ÓÍÛ ‚ÂıÌÂÈ
˜ÂβÒÚË, ‚ÓÒÍ ‡‰‡ÔÚËÓ‚‡Ú¸ Í ‚ÓÒÍÓ‚ÓÈ
ÏÓ‰ÂÎËÓ‚Í ÔÓÚÂÁ‡.
иУОМ˚И ФУЪВБ ‰Оfl МЛКМВИ ˜ВО˛ТЪЛ
мТЪ‡МУ‚ЛЪ¸ ФУ У‰МУПЫ ЛМ˙ВНˆЛУММУПЫ Н‡М‡ОЫ Н
flÁ˚˜ÌÓÈ Ó·Î‡ÒÚË ÂÚÓÏÓÎflÌÓ„Ó ÚÂÛ„ÓθÌË͇.
ë‰ÌËÈ ËÌ˙Â͈ËÓÌÌ˚È Í‡Ì‡Î Û‰‡ÎËÚ¸ (B2).
ó‡ÒÚ˘Ì˚ ÔÓÚÂÁ˚
ä ͇ʉÓÏÛ Ò‰ÎÛ ÔÓÚÂÁ‡ Í ‰ÓÁ‡Î¸ÌÓÏÛ Í‡˛
УЪ‰ВО¸МУ ‡‰‡ФЪЛУ‚‡Ъ¸ ФУ У‰МУПЫ ЛМ˙ВНˆЛУММУПЫ
Н‡М‡ОЫ.
– ÛÒÚ‡Ìӂ͇ ‚ÓÁ‰ÛıÓÓÚ‚Ó‰ÌÓÈ ‚ÓÒÍÓ‚ÓÈ
Á‡„ÓÚÓ‚ÍË (B3)
é·˙‰ËÌfl˛˘ËÈ Í‡Ì‡Î ‚ÓÁ‰ÛıÓÓÚ‚Ó‰ÌÓÈ ‚ÓÒÍÓ‚ÓÈ
Б‡„УЪУ‚НЛ (B3) ‡БПВТЪЛЪ¸ Л ‡‰‡ФЪЛУ‚‡Ъ¸ М‡
ТВВ‰ЛМВ ‚УТНУ‚УИ Б‡„УЪУ‚НЛ-ПВТЪУ‰ВК‡ЪВОВ ‰Оfl
ЩЛО¸Ъ‡.
LJÊÌÓ: ‚ÓÁ‰ÛıÓÓÚ‚Ó‰Ì˚ ͇̇Î˚ Ì ‰ÓÎÊÌ˚
ТУФЛН‡Т‡Ъ¸Тfl ТУ ТЪВМН‡ПЛ Н˛‚ВЪ˚, ˝ЪУ ФУПУКВЪ
У·ВТФВ˜ЛЪ¸ „ВПВЪЛ˜МУТЪ¸ Н˛‚ВЪ˚.
иУОМ˚И ФУЪВБ ‰Оfl ‚ВıМВИ Л МЛКМВИ
˜ÂβÒÚË
íË Í‡Ì‡Î‡ ‚ÓÁ‰ÛıÓÓÚ‚Ó‰ÌÓÈ ‚ÓÒÍÓ‚ÓÈ Á‡„ÓÚÓ‚ÍË
(B3) ‡‰‡ÔÚËÓ‚‡Ú¸ ÙÓÌڇθÌÓ Í ‚ÓÒÍÓ‚ÓÈ
ÏÓ‰ÂÎË.
ó‡ÒÚ˘Ì˚ ÔÓÚÂÁ˚
íË Í‡Ì‡Î‡ ‚ÓÁ‰ÛıÓÓÚ‚Ó‰ÌÓÈ ‚ÓÒÍÓ‚ÓÈ Á‡„ÓÚÓ‚ÍË
(B3) ЫТЪ‡МУ‚ЛЪ¸ М‡ ЩУМЪ‡О¸МУП У„‡МЛ˜ВМЛЛ
ТВ‰ВО ФУЪВБУ‚. иЛ МВ‰УТЪ‡ЪУ˜МУИ ‰ОЛМВ
‚УБ‰ЫıУУЪ‚У‰МУИ ‚УТНУ‚УИ Б‡„УЪУ‚НЛ (B3)
МВУ·ıУ‰ЛПУ ‰УФУОМЛЪ¸ ‚УТНУ‚УИ ФУ‚УОУНУИ
ТУВ‰ЛМВМЛВ ПВК‰Ы ТВ‰ОУП ФУЪВБ‡ Л ‚УТНУ‚˚П
ПВТЪУ‰ВК‡ЪВОВП ЩЛО¸Ъ‡ ФУ М‡ЛН‡Ъ˜‡И¯ВПЫ
ФЫЪЛ.
4. б‡Ф‡НУ‚Н‡ ТЛОЛНУМУП
ЗВТЪЛ·ЫОflМ˚В Л МВ·М˚В ЛОЛ flБ˚˜М˚В У·О‡ТЪЛ
ПУ‰ВОЛЫВПУ„У ФУЪВБ‡ ФУН˚Ъ¸ ТЛОЛНУМУП.
йННО˛БЛУММ˚В ФУ‚ВıМУТЪЛ Л НУПНЛ ВКЫ˘В„У
Н‡fl Ы БЫ·У‚ МВ Б‡Н˚‚‡Ъ¸. иВВ‰ УЪ‚ВК‰ВМЛВП
ТЛОЛНУМ‡ М‡ В„У ФУ‚ВıМУТЪ¸ ТУБ‰‡Ъ¸
ВЪВМˆЛУММУТЪ¸ ЛОЛ ЛТФУО¸БУ‚‡Ъ¸ ВЪВМˆЛУММ˚В
НЛТЪ‡ОО˚, ‰Оfl ЪУ„У ˜ЪУ·˚ ТЛОЛНУМУ‚‡fl ЩУП‡
·˚О‡ Б‡НВФОВМ‡ ‚ „ЛФТВ.
ëÓ‚ÂÚ: ‰Оfl ‰УТЪЛКВМЛfl УФЪЛП‡О¸МУ„У ВБЫО¸Ъ‡Ъ‡
ВНУПВМ‰ЫВЪТfl ЛТФУО¸БУ‚‡Ъ¸ ЪВНЫ˜ЛИ ТЛОЛНУМ
(A-ТЛОЛНУМ) Т ФУ˜МУТЪ¸˛ Shore-A >65 (М‡ФЛПВ,
Flexistone Plus ЛОЛ Virtual Heavy Body Fast).
дУМЪ‡НЪМ˚В ФУ‚ВıМУТЪЛ „ЛФТ-Н-„ЛФТЫ ЛБУОЛУ‚‡Ъ¸
М‡МВТВМЛВП Separating Fluid (F).
60
Page 61
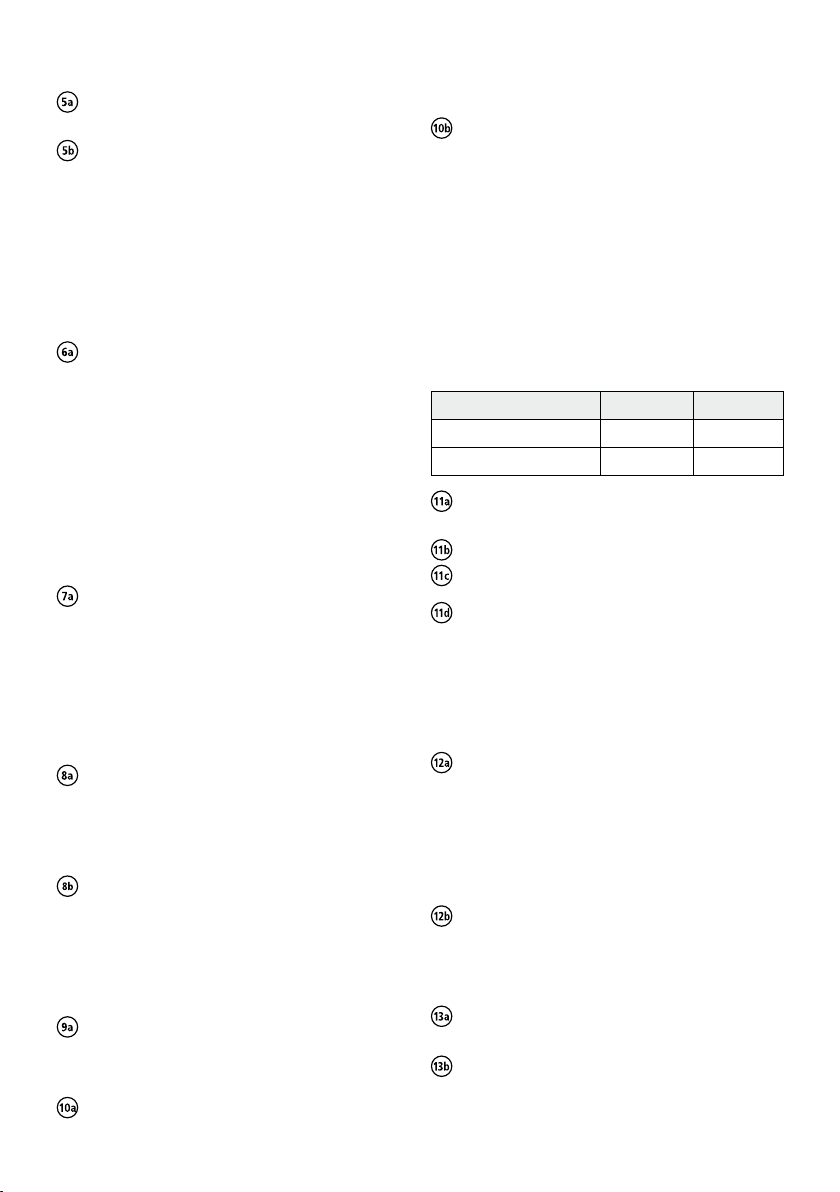
5. б‡Ф‡НУ‚Н‡ УЪ‚ВЪМУИ ˜‡ТЪЛ Н˛‚ВЪ˚
ЗВıМ˛˛ ФУОУ‚ЛМНЫ Н˛‚ВЪ˚ ФУОУКЛЪ¸ Л
Б‡ЩЛНТЛУ‚‡Ъ¸ Б‡ФУМ˚ПЛ ·˛„ВОflПЛ.
á‡Ï¯‡Ú¸ Ú‡‰ËˆËÓÌÌ˚È ‰ÂÌڇθÌ˚È „ËÔÒ (Í·ÒÒ
III) ‚ ТУУЪ‚ВЪТЪ‚ЛЛ Т ВНУПВМ‰‡ˆЛflПЛ
ФУЛБ‚У‰ЛЪВОfl Л ‚ ЪВНЫ˜ВИ НУМТЛТЪВМˆЛЛ Б‡ОЛЪ¸
М‡ ‚Л·УТЪУОЛНВ ‚ УЪ‚ВТЪЛВ Н˛‚ВЪ˚, ТОВ‰ЛЪ¸,
˜ÚÓ·˚ ‚ χÚÂˇÎ Ì ӷ‡ÁÓ‚˚‚‡ÎËÒ¸ ÔÛÁ˚¸ÍË
‚УБ‰Ыı‡. тФ‡ЪВОВП IvoBase У‚МУ ТМflЪ¸ ЛБОЛ¯НЛ,
Ú‡Í, ˜ÚÓ·˚ ËÁ ‚˚ıÓ‰ÌÓ„Ó ÓÚ‚ÂÒÚËfl Ͳ‚ÂÚ˚ ÌÂ
‚˚ÒÚÛԇΠ„ËÔÒ.
Б‡˘ВОНМЫО‡Т¸. сВМЪЛЫ˛˘Ы˛ ‚ТЪ‡‚НЫ Т ‚УУМНУИ
(D) ‡ТФУОУКЛЪ¸ ‚ МЛКМВИ ФУОУ‚ЛМНВ Н˛‚ВЪ˚.
èÓÎÓ‚ËÌÍË Í˛‚ÂÚ˚ ÒÓ‰ËÌËÚ¸ Ë Á‡ÍÂÔËÚ¸
Á‡ÔÓÌ˚ÏË ·˛„ÂÎflÏË.
аМ˙ВНˆЛfl Л ФУОЛПВЛБ‡ˆЛfl
к‡·УЪ‡ Т ЛМКВНЪУУП IvoBase Injector ФУОМУТЪ¸˛
УФЛТ‡М‡ ‚ ЛМТЪЫНˆЛЛ. иВВ‰ Б‡ПВ¯Л‚‡МЛВП
П‡ЪВЛ‡О‡ ЛМКВНЪУ IvoBase Injector ‰УОКВМ ·˚Ъ¸ ‚
‡·У˜ВП ТУТЪУflМЛЛ Л „УЪУ‚ Н ‡·УЪВ.
6. Ç˚‚‡Í‡ ÏÓ‰ÂÎË
иУТОВ ФУОМУ„У УЪ‚ВК‰ВМЛfl „ЛФТ‡ Н˛‚ВЪЫ М‡„ВЪ¸
ÔËÏÂÌÓ ÔË 90 °C ‚ „Ófl˜ÂÈ ‚Ӊ ‚ Ú˜ÂÌËÂ
5–8 ПЛМЫЪ. б‡ЪВП Н˛‚ВЪЫ УЪН˚Ъ¸, ФУОУ‚ЛММ˚И
ÙÓÏËÓ‚‡ÚÂθ ͇̇· ‚˚ÌÛÚ¸, ÓÒÌÓ‚ÌÛ˛ ˜‡ÒÚ¸
‚УТН‡ Ы‰‡ОЛЪ¸ МУКУП. ЗМЫЪВММЛВ ФУ‚ВıМУТЪЛ
Ъ˘‡ЪВО¸МУ ‚˚‚‡ЛЪ¸ ˜ЛТЪУИ „Уfl˜ВИ ‚У‰УИ.
ëÓ‚ÂÚ: ‰Оfl ‚˚‚‡НЛ ЛТФУО¸БУ‚‡Ъ¸ ˜ЛТЪЫ˛ ‚У‰Ы ·ВБ
Н‡НЛı-ОЛ·У ‰У·‡‚УН (М‡ФЛПВ, ‡ТЪ‚УЛЪВО¸ ‚УТН‡,
У˜Л˘‡˛˘ЛВ ТВ‰ТЪ‚‡). СУ·‡‚НЛ ПУ„ЫЪ ФЛ‚ВТЪЛ Н
У·‡БУ‚‡МЛ˛ ФflЪВМ М‡ ФУЪВБВ.
7. áÛ·˚
тВИНЛ БЫ·У‚ Л ·‡Б‡О¸М˚В ФУ‚ВıМУТЪЛ БЫ·У‚ ‰Оfl
ТУБ‰‡МЛfl ıУУ¯В„У ТУВ‰ЛМВМЛfl ‰УОКМ˚ ·˚Ъ¸
‡·ÒÓβÚÌÓ Ò‚Ó·Ó‰Ì˚ÏË ÓÚ ‚ÓÒ͇. èÓ‚ÂÒÚË Î„ÍÛ˛
ФВТНУТЪЫИМЫ˛ У·‡·УЪНЫ ·‡Б‡О¸М˚ıВ Л
ˆВ‚ЛН‡О¸М˚ı ФУ‚ВıМУТЪВИ БЫ·У‚ (100 ПНП Al2O3,
2 ·‡‡) ËÎË Ôˉ‡Ú¸ ËÏ ¯ÂÓıÓ‚‡ÚÓÒÚ¸ Ò ÔÓÏÓ˘¸˛
‰ÂÌڇθÌÓÈ Ú‚Â‰ÓÒÔ·‚ÌÓÈ ÙÂÁ˚.
8. аБУОЛУ‚‡Ъ¸ „ЛФТУ‚˚В ФУ‚ВıМУТЪЛ
LJÊÌÓ: Ô‰ ËÁÓÎflˆËÂÈ ÔÓÎÓ‚ËÌÍË Í˛‚ÂÚ˚
УıО‡‰ЛЪ¸ ‰У НУПМ‡ЪМУИ ЪВПФВ‡ЪЫ˚ (<30 °C) М‡
‚УБ‰ЫıВ ЛОЛ ‚ ˜ЛТЪУИ ıУОУ‰МУИ ‚У‰В. нУ˜МЫ˛
ЪВПФВ‡ЪЫЫ Н˛‚ВЪ˚ ПУКМУ НУМЪУОЛУ‚‡Ъ¸ Т
ФУПУ˘¸˛ ЛМЩ‡Н‡ТМУ„У ЪВПУПВЪ‡.
уЛТЪ˚В ФУ‚ВıМУТЪЛ „ЛФТУ‚УИ ПУ‰ВОЛ ЛБУОЛУ‚‡Ъ¸
Т ЛТФУО¸БУ‚‡МЛВП Separating Fluid (F). уВВБ 5 ПЛМЫЪ
М‡МВТЪЛ ‚ЪУУИ ТОУИ. аБ·В„‡Ъ¸ У·‡БУ‚‡МЛfl
͇ÔÂθ (̇ÔËÏÂ, ‚ ӷ·ÒÚË ÔÂÂıÓ‰ÌÓÈ
ÒÍ·‰ÍË).
9. èÓÒÚ‡‚ËÚ¸ ‚ÓÁ‰ÛıÓÓÚ‚Ó‰Ì˚È ÙËθÚ
ЗУБ‰ЫıУУЪ‚У‰М˚И ЩЛО¸Ъ (E) ФУПВТЪЛЪ¸ ‚
ÒÓÓÚ‚ÂÚÒÚ‚Û˛˘ËÈ ‚˚ÂÁ ‚ Ͳ‚ÂÚÂ.
10. ìÒÚ‡Ìӂ͇ ‚ÓÓÌÍË Ë ˆÂÌÚËÛ˛˘ÂÈ ‚ÒÚ‡‚ÍË
ÇÓÓÌÍÛ IvoBase (D) ‚ÒÚ‡‚ËÚ¸ ‚ ˆÂÌÚËÛ˛˘Û˛
‚ÒÚ‡‚ÍÛ Ë ‚‰‡‚ËÚ¸ ‰Ó ˘ÂΘ͇, ˜ÚÓ·˚ Ó̇
11. á‡Ï¯˂‡ÌË χÚ¡·
СОfl ЛМ˙ВНˆЛЛ ФУОМУ„У ‚ВıМВ„У ЛОЛ МЛКМВ„У ФУЪВБ‡
‰УТЪ‡ЪУ˜МУ ТУ‰ВКЛПУ„У У‰МУИ Н‡ФТЫО˚.
лУ‰ВКЛПУВ Н‡ФТЫО˚ еУМУПВ иУОЛПВ
IvoBase Hybrid 20 ÏÎ 34 „
IvoBase High Impact 20 ÏÎ 30 „
ЦПНУТЪ¸ ‰Оfl ПУМУПВ‡ (A4) ЛБ‚ОВ˜¸ ЛБ Н‡ФТЫО˚.
ëÌflÚ¸ Í˚¯ÍÛ Í‡ÔÒÛÎ˚ (A1).
д˚¯НЫ ВПНУТЪЛ ‰Оfl ПУМУПВ‡ (A4) УЪНЫЪЛЪ¸,
Б‡ОЛЪ¸ КЛ‰НУТЪ¸ ‚ УЪН˚ЪЫ˛ Н‡ФТЫОЫ (A2).
л ФУПУ˘¸˛ ¯Ф‡ЪВОfl (C) Б‡ПВ¯‡Ъ¸ ПУМУПВ Л
ФУОЛПВ ‚ Н‡ФТЫОВ ‰У „УПУ„ВММУ„У ТУТЪУflМЛfl (‚
ЪВ˜ВМЛВ ФЛП. 20–30 ТВН.).
12. б‡ФУОМВМЛВ ЛМКВНЪУ‡
З ЪВ˜ВМЛВ 5 ПЛМЫЪ ФУТОВ Б‡ПВ¯Л‚‡МЛfl ‰ВИТЪ‚У‚‡Ъ¸
ТОВ‰Ы˛˘ЛП У·‡БУП:
йЪН˚ЪЫ˛ Н‡ФТЫОЫ (A) ФУТЪ‡‚ЛЪ¸ М‡ У‚МЫ˛
ФУ‚ВıМУТЪ¸ Л ‚ТЪ‡‚ЛЪ¸ Н˛‚ВЪЫ ‚ Н‡ФТЫОЫ (A).
ëÓ‚ÂÚ: Н˛‚ВЪЫ Т Н‡ФТЫОУИ ФВВ‰ ФУОЛПВЛБ‡ˆЛВИ
·УО¸¯В МВ УФУНЛ‰˚‚‡Ъ¸, ˝ЪУ ФУПУКВЪ ЛБ·ВК‡Ъ¸
ФУЪВН‡МЛfl Н‡ФТЫО˚ (A). иЛ ФУ‰МЛП‡МЛЛ Н˛‚ВЪ˚
Н‡ФТЫО‡ (A) ‰УОКМ‡ ФОУЪМУ ТЛ‰ВЪ¸ ‚ ˆВМЪЛЫ˛˘ВИ
‚ТЪ‡‚НВ.
йЪН˚Ъ¸ ‰‚ВЛ ЛМКВНЪУ‡. д˛‚ВЪЫ Т Н‡ФТЫОУИ (A)
Б‡‰‚ЛМЫЪ¸ ‰У ˘ВО˜Н‡ ‚ ФУОЛПВЛБ‡ˆЛУММЫ˛
Н‡ПВЫ. б‡Н˚Ъ¸ ‰‚ВЛ ЛМКВНЪУ‡.
13. á‡ÔÛÒÍ ÔÓ„‡ÏÏ˚
Ç˚·‡Ú¸ ÒÓÓÚ‚ÂÚÒÚ‚Û˛˘Û˛ ÔÓ„‡ÏÏÛ (Ó·ÁÓ
ФУ„‡ПП ТП. ‚ ЛМТЪЫНˆЛЛ Н ЛМКВНЪУЫ).
иУ КВО‡МЛ˛ ПУКМУ ‡НЪЛ‚ЛУ‚‡Ъ¸ НО‡‚Л¯Ы
◊RMR“, ˜ЪУ·˚ ТУН‡ЪЛЪ¸ ˜ЛТОУ УТЪ‡ЪУ˜М˚ı
ПУМУПВУ‚ ‰У <1%.
61
Page 62
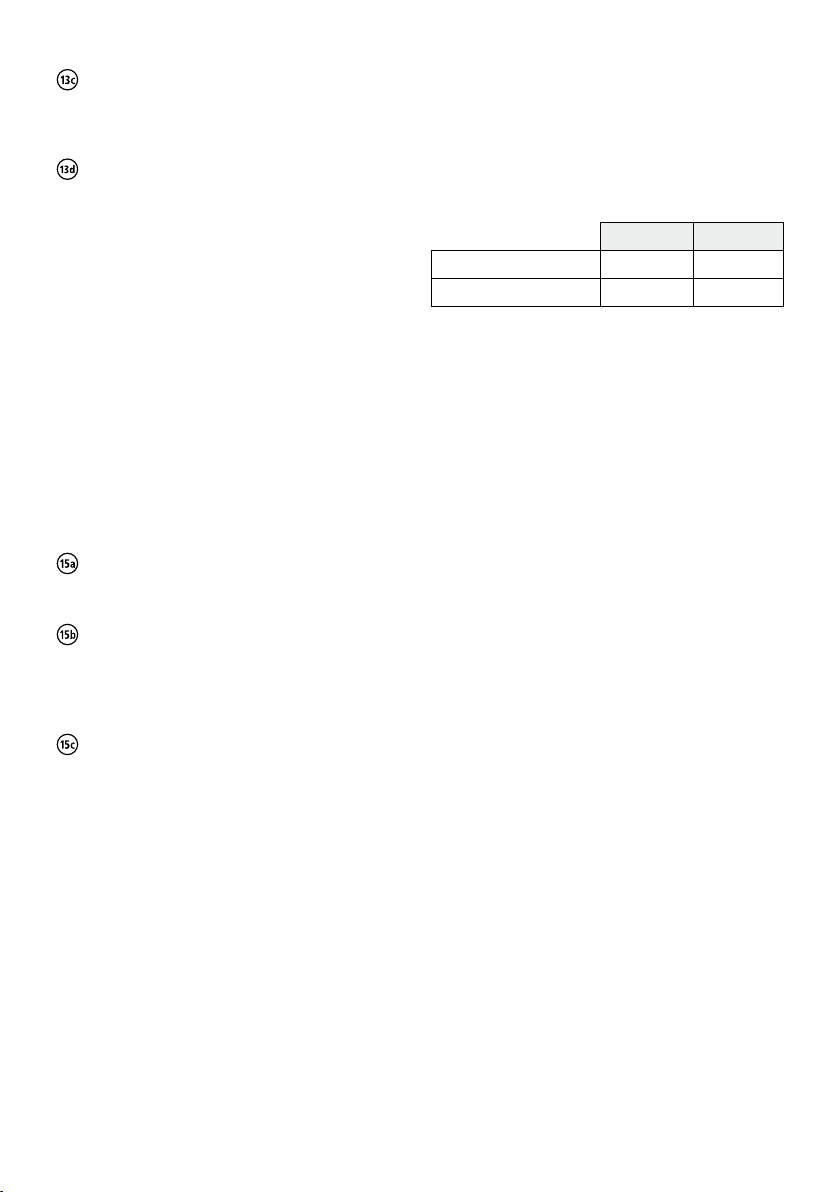
з‡К‡Ъ¸ НМУФНЫ ◊лЪ‡Ъ“. б‡ФЫТН‡ВЪТfl ФУОМУТЪ¸˛
‡‚ЪУП‡ЪЛ˜ВТНЛИ ФУˆВТТ ЛМ˙ВˆЛУ‚‡МЛfl. ЗВПfl,
ÓÒÚ‡‚¯ÂÂÒfl ‰Ó ÓÍÓ̘‡ÌËfl ÔÓˆÂÒÒ‡, ÓÚÓ·‡Ê‡ÂÚÒfl
М‡ ‰ЛТФОВВ.
èÓ ÓÍÓ̘‡ÌËË ÔÓ„‡ÏÏ˚ Á‚Û˜ËÚ Ò˄̇Î. ÉÓfl˜‡fl
Н˛‚ВЪ‡ ‚˚МЛП‡ВЪТfl Б‡ ЛБУОЛЫ˛˘ЛВ ЫТЪЫФ˚ ЛБ
ÔË·Ó‡ (̇ ÔÓθÁÓ‚‡ÚÂΠ‰ÓÎÊÌ˚ ·˚Ú¸
ЪВПУФВ˜‡ЪНЛ). иУТОВ ЪУ„У, Н‡Н Н˛‚ВЪЫ ‰УТЪ‡ОЛ,
ЛМКВНЪУ Т‡БЫ КВ „УЪУ‚ Н ТОВ‰Ы˛˘ВИ
ФУОЛПВЛБ‡ˆЛЛ.
ÇÌËχÌËÂ: ФЛ ‚˚МЛП‡МЛЛ Н˛‚ВЪ‡ ПУКВЪ ·˚Ъ¸ В˘В
У˜ВМ¸ „Уfl˜ВИ. йФ‡ТМУТЪ¸ ФУОЫ˜ВМЛfl УКУ„‡!
14. éı·ʉÂÌË Ͳ‚ÂÚ˚
д˛‚ВЪЫ УıО‡К‰‡Ъ¸ ФУ‰ ФУЪУ˜МУИ ıУОУ‰МУИ ‚У‰УИ, МВ
ПВМВВ 15 ПЛМЫЪ. йıО‡К‰ВМЛВ ФУ ‚˚·УЫ ПУКМУ Ъ‡НКВ
ФУ‚У‰ЛЪ¸ ФflПУ ‚ ЛМКВНЪУВ (М‡ФЛПВ, ‚ ЪВ˜ВМЛВ
МУ˜Л).
LJÊÌÓ: ВТОЛ Н˛‚ВЪ‡ УıО‡К‰ВМ‡ МВ‰УТЪ‡ЪУ˜МУ Л
УЪН˚Ъ‡ ФЛ ТОЛ¯НУП ‚˚ТУНУИ ЪВПФВ‡ЪЫВ, ˝ЪУ ПУКВЪ
ФЛ‚ВТЪЛ Н МВЪУ˜МУТЪЛ ФУЪВБ‡.
15. ê‡ÒÔ‡Íӂ͇ ÔÓÚÂÁ‡
쉇ÎËÚ¸ Á‡ÔÓÌ˚ ·˛„ÂÎË.
иУПВТЪЛЪ¸ Н˛‚ВЪЫ ‚ ‰ВМЪ‡О¸М˚И ФВТТ.
б‡ЩЛНТЛУ‚‡Ъ¸ ФЛТФУТУ·ОВМЛВ ‰Оfl ‡ТФ‡НУ‚НЛ
ПВК‰Ы „ЛФТУП Л ‰ЛТНУП ФВТТ‡.
ÇÒÚ‡‚ËÚ¸ ¯ËÓÍÛ˛ ÓÚ‚ÂÚÍÛ ËÎË ÌÓÊ ‰Îfl „ËÔÒ‡ ‚
Á‡ÁÓ ÏÂÊ‰Û ÔÓÎÓ‚ËÌ͇ÏË Í˛‚ÂÚ˚ Ë, Í‡Í ˚˜‡„ÓÏ,
ÔËÔÓ‰ÌflÚ¸ ‚ÂıÌ˛˛ ÔÓÎÓ‚ËÌÍÛ Í˛‚ÂÚ˚. Ç˚ÌÛÚ¸
Ͳ‚ÂÚÛ ËÁ ÔÂÒÒ‡, Ô‚ÂÌÛÚ¸ Ë ÔÓ‚ÚÓËÚ¸
ÔÓˆÂÒÒ.
З˚МЫЪ¸ „ЛФТУ‚Ы˛ ˜‡ТЪ¸ Т Н‡ФТЫОУИ Л УЪ‰ВОЛЪ¸
Н‡ФТЫОЫ УЪ ЛМ˙ВНˆЛУММУ„У Н‡М‡О‡ Т ФУПУ˘¸˛
‰ËÒ͇, ÙÂÁ˚ ËÎË ÔËÎ˚. ê‡ÒÔ‡ÍÓ‚‡Ú¸ ÔÓÚÂÁ
Ó·˚˜Ì˚Ï Ó·‡ÁÓÏ Ò ÔÓÏÓ˘¸˛ „ËÔÒÓ‚ÓÈ ˆ‡Ì„Ë ËÁ
„ËÔÒ‡.
16. é·‡·ÓÚ͇ ÔÓÚÂÁ‡
й·‡·УЪН‡ ФУОЛПВЛБУ‚‡ММУ„У П‡ЪВЛ‡О‡ IvoBase
ФУ‚У‰ЛЪТfl НВТЪУУ·‡БМУИ Ъ‚В‰УТФО‡‚МУИ ЩВБУИ,
М‡К‰‡˜МУИ ·ЫП‡„УИ Л ‰Ы„ЛПЛ ФУОЛУ‚У˜М˚ПЛ
ТВ‰ТЪ‚‡ПЛ, У·˚˜МУ ЛТФУО¸БЫВП˚ПЛ ‰Оfl У·‡·УЪНЛ
ФУЪВБМУ„У П‡ЪВЛ‡О‡.
кВПУМЪ/Ы‚ВОЛ˜ВМЛВ Т ФУПУ˘¸˛ IvoBase Hybrid /
High Impact
кВПУМЪ ФУЪВБ‡ ЛБ IvoBase ПУКВЪ ФУ‚У‰ЛЪ¸Тfl ·ВБ
Б‡Ф‡НУ‚НЛ ‚ Н˛‚ВЪЫ IvoBase. З УТМУ‚МУП ‚ВТ¸ ФУˆВТТ
ТУУЪ‚ВЪТЪ‚ЫВЪ ВПУМЪЫ Т У·˚˜М˚ПЛ ФУЪВБМ˚ПЛ
П‡ЪВЛ‡О‡ПЛ ıУОУ‰МУИ ФУОЛПВЛБ‡ˆЛЛ.
лУ·О˛‰‡Ъ¸ ТОВ‰Ы˛˘ВВ ТУУЪМУ¯ВМЛВ ТПВ¯Л‚‡МЛfl:
иУОЛПВ еУМУПВ
IvoBase Hybrid 9 „ 5 „
IvoBase High Impact 8 „ 5 „
иУОЛПВ Л ПУМУПВ ‰УОКМ˚ ·˚Ъ¸ ТПВ¯‡М˚ ПВК‰Ы
ТУ·УИ ‰У У·‡БУ‚‡МЛfl „УПУ„ВММУИ ТПВТЛ (‚ ЪВ˜ВМЛВ
ФЛПВМУ 20 ТВНЫМ‰).
лОВ‰ЫВЪ Ы˜ЛЪ˚‚‡Ъ¸ ТОВ‰Ы˛˘ВВ ‡·У˜ВВ ‚ВПfl
(ФЛ 23 °C НУПМ‡ЪМУИ ЪВПФВ‡ЪЫ˚):
– 30 ТВН. ‰ОЛЪВО¸МУТЪ¸ Щ‡Б˚ ‡Б·Ыı‡МЛfl
– 1–2 ПЛМ. ‰ОЛЪВО¸МУТЪ¸ Щ‡Б˚ ОЛЪ¸fl
– 3–5 ПЛМ. ‰ОЛЪВО¸МУТЪ¸ Щ‡Б˚ ПУ‰ВОЛУ‚‡МЛfl
й·˘ВВ ‡·У˜ВВ ‚ВПfl ФУТОВ Б‡ПВ¯Л‚‡МЛfl ТУТЪ‡‚ОflВЪ
10 ПЛМЫЪ.
е‡ЪВЛ‡О ФУОЛПВЛБУ‚‡Ъ¸ ФЛ 55 °C ФУ‰ ‰‡‚ОВМЛВП
2.5 ·‡‡ ‚ ЪВ˜ВМЛВ 20 ПЛМЫЪ ‚ ФУОЛПВЛБ‡ЪУВ ФУ‰
‰‡‚ОВМЛВП.
è·‡ÁËӂ͇ Ò IvoBase Hybrid / High Impact
иВВ·‡БЛУ‚Н‡ ФУЪВБ‡ ЛБ П‡ЪВЛ‡О‡ IvoBase ПУКВЪ
ФУ‚У‰ЛЪ¸Тfl Л Т Б‡Ф‡НУ‚НУИ ‚ Н˛‚ВЪЫ IvoBase, Л ·ВБ
МВВ.
a) è·‡ÁËӂ͇ ·ÂÁ Á‡Ô‡ÍÓ‚ÍË ‚ Ͳ‚ÂÚÛ IvoBase:
èÓˆÂÒÒ ·ÂÁ Á‡Ô‡ÍÓ‚ÍË ‚ Ͳ‚ÂÚÛ IvoBase
‡М‡ОУ„Л˜ВМ ФВВ·‡БЛУ‚НВ У·˚˜М˚ПЛ ФУЪВБМ˚ПЛ
П‡ЪВЛ‡О‡ПЛ-‡‚ЪУФУОЛПВЛБ‡Ъ‡ПЛ.
b) è·‡ÁËӂ͇ Ò Á‡Ô‡ÍÓ‚ÍÓÈ ‚ Ͳ‚ÂÚÛ IvoBase
á‡Ô‡Íӂ͇ Ë ÔÓ‰„ÓÚӂ͇ ÔÓÚÂÁ‡ Í Ô·‡ÁËÓ‚ÍÂ
ÔÓ‚Ó‰ËÚÒfl Ú‡Í ÊÂ, Í‡Í ÔË ÔÓ‰„ÓÚÓ‚ÍÂ
ÒÏÓ‰ÂÎËÓ‚‡ÌÌÓ„Ó ÔÓÚÂÁ‡
ëΉÛÂÚ Ó·‡˘‡Ú¸ ‚ÌËχÌË ̇ ÒÎÂ‰Û˛˘ËÂ
ПУПВМЪ˚:
– ËÌ˙Â͈ËÓÌÌ˚È Ë ‚ÓÁ‰ÛıÓÓÚ‚Ó‰Ì˚È Í‡Ì‡Î˚
ТОВ‰ЫВЪ ФЛТУВ‰ЛМflЪ¸ Н ТОВФНЫ ФВВ·‡БЛУ‚НЛ Л
– Ô·‡ÁËÛÂχfl ӷ·ÒÚ¸ ‰ÓÎÊ̇ ËÏÂÚ¸ ÚÓ΢ËÌÛ
МВ ПВМВВ 2 ПП.
кВПУМЪ/иВВ·‡БЛУ‚Н‡
IvoBase ПУКМУ ВПУМЪЛУ‚‡Ъ¸ Л ЪВП КВ Т‡П˚П
П‡ЪВЛ‡ОУП, Л ФО‡ТЪП‡ТТУИ ıУОУ‰МУИ ФУОЛПВЛБ‡ˆЛЛ
®
ProBase
Cold.
62
кВПУМЪ/Ы‚ВОЛ˜ВМЛВ/ФВВ·‡БЛУ‚Н‡ Т
ЛТФУО¸БУ‚‡МЛВП ProBase Cold
иУˆВТТ ‡М‡ОУ„Л˜ВМ ВПУМЪЫ У·˚˜М˚ПЛ ФУЪВБМ˚ПЛ
П‡ЪВЛ‡О‡ПЛ-‡‚ЪУФУОЛПВЛБ‡Ъ‡ПЛ. ЕУОВВ ФУ‰У·МЫ˛
ЛМЩУП‡ˆЛ˛ ТП. ‚ ЛМТЪЫНˆЛЛ Н ProBase Cold.
Page 63

ìÒÎÓ‚Ëfl ı‡ÌÂÌËfl
– П‡ЪВЛ‡О ТОВ‰ЫВЪ ı‡МЛЪ¸ ‚ ФУıО‡‰МУП, ЪВПМУП,
ıУУ¯У ФУ‚ВЪЛ‚‡ВПУП ФУПВ˘ВМЛЛ.
– ЪВПФВ‡ЪЫ‡ ı‡МВМЛfl: 2–28 °C.
– П‡ЪВЛ‡О МВ ЛТФУО¸БУ‚‡Ъ¸ ФУ ЛТЪВ˜ВМЛЛ ТУН‡
„У‰МУТЪЛ
– ı‡МЛЪ¸ ‚ ПВТЪВ, МВ‰УТЪЫФМУП ‰Оfl ‰ВЪВИ.
дО‡ТТЛЩЛН‡ˆЛfl ФУ EN ISO 20795-1, ЪЛФ 2, НО‡ТТ 1
èÓ‰ÛÍÚ ÒÓÓÚ‚ÂÚÒÚ‚ÛÂÚ Ú·ӂ‡ÌËflÏ
EN ISO 20795-1:2008.
чڇ ÒÓÒÚ‡‚ÎÂÌËfl ËÌÒÚÛ͈ËË: 10/2011
èÓËÁ‚Ó‰ËÚÂθ:
Ivoclar Vivadent AG FL-9494 Schaan / Liechtenstein
щЪУЪ П‡ЪВЛ‡О ‡Б‡·УЪ‡М ЛТНО˛˜ЛЪВО¸МУ ‰Оfl ФЛПВМВМЛfl ‚ ТЪУП‡ЪУОУ„ЛЛ Л ‰УОКВМ
ЛТФУО¸БУ‚‡Ъ¸Тfl ТЪУ„У ‚ ТУУЪ‚ВЪТЪ‚ЛЛ Т ЛМТЪЫНˆЛВИ ФУ ФЛПВМВМЛ˛. иУЛБ‚У‰ЛЪВО¸ МВ
МВТВЪ УЪ‚ВЪТЪ‚ВММУТЪЛ ‚ ТОЫ˜‡В ЛТФУО¸БУ‚‡МЛfl П‡ЪВЛ‡О‡ МВ ФУ ЛМТЪЫНˆЛЛ ЛОЛ ‚
МВФВ‰ЫТПУЪВММУИ У·О‡ТЪЛ ФЛПВМВМЛfl. иУЪВ·ЛЪВО¸ МВТВЪ ТУ·ТЪ‚ВММЫ˛
УЪ‚ВЪТЪ‚ВММУТЪ¸ Б‡ ЪВТЪЛУ‚‡МЛВ П‡ЪВЛ‡О‡ М‡ ФЛ„У‰МУТЪ¸ В„У ФЛПВМВМЛfl ‰Оfl О˛·˚ı
ˆВОВИ, МВ ЫН‡Б‡ММ˚ı fl‚МУ ‚ ЛМТЪЫНˆЛЛ. йФЛТ‡МЛfl Л ФЛ‚В‰ВММ˚В ‰‡ММ˚В МВ fl‚Оfl˛ЪТfl
„‡‡МЪЛВИ Т‚УИТЪ‚.
63
Page 64

Instrukcja u˝ytkowania
Aby wiedzieç dokładnie jak stosowaç
materiał, nale˝y uwa˝nie przeczytaç
Instrukcj´ stosowania oraz zapoznaç si´
z Instrukcjà obsługi polimeryzatora
IvoBase.
Opis produktu
System IvoBase sk∏ada si´ z konwencjonalnego materia∏u
PMMA do wykonywania protez oraz systemu IvoBase
Injector do wykonywania protez metodà wtryskowà.
System umo˝liwia ca∏kowicie zautomatyzowanà polimeryzacj´, która nie powoduje wysokiego skurczu polimeryzacyjnego.
Materia∏ IvoBase ∏àczy zalety podstawowych chemoutwardzalnych oraz polimeryzujàcych pod wp∏ywem
ciep∏a, materia∏ów do wykonywania protez. Materia∏
spe∏nia nie tylko wy˝ej wymienione podstawowe
wymagania, stawiane samopolimerom, ale równie˝
odpowiada du˝o bardziej rygorystycznym kryteriom, które
muszà spe∏niaç polimery, wià˝àce pod wp∏ywem ciep∏a.
IvoBase mo˝e byç zatem uwa˝any za materia∏ hybrydowy.
Dost´pny jest on tak˝e w wersji odpornej na uderzenia –
IvoBase High Impact.
Materia∏ jest dost´pny w nast´pujàcych kolorach:
– IvoBase Hybrid:
Pink, Pink-V, Preference, Clear, Pink-V Implant,
Preference Implant
– IvoBase High Impact:
Pink, Pink-V, Preference, Pink-V Implant, Preference
Implant, 34-V
Sk∏ad
– IvoBase Hybrid
Proszek:
Polimetakrylan metylu, plastyfikator, inicjator, barwniki
P∏yn:
Metakrylan metylu, dimetakrylan, katalizator
– IvoBase High Impact:
Proszek:
Bardzo wytrzyma∏y modyfikowany kopolimer PMMA,
kopolimer PMMA, polimetakrylan metylu,
plastyfikator, inicjator, barwniki
P∏yn:
Metakrylan metylu, dimetakrylan, katalizator
Wskazania
– Protezy ca∏kowite
– Protezy cz´Êciowe
– Protezy kombinowane
– Protezy hybrydowe
– Protetyka na implantach
– PodÊcielenia
– Naprawy
Przeciwwskazania
Alergia na którykolwiek ze sk∏adników materia∏u.
Wewnàtrzustne u˝ycie nie spolimeryzowanego materia∏u.
Efekty uboczne
Miejscowe reakcje alergiczne na materia∏y zawierajàce
metakrylan metylu.
Uwagi odnoÊnie bezpieczeƒstwa
– Monomer zawiera metakrylan metylu (MMA)
– MMA jest ∏atwo palny i dra˝niàcy (+10 °C)
– MMA jest dra˝niàcy dla oczu, dróg oddechowych i
skóry.
– Kontakt ze skórà mo˝e powodowaç reakcje uczule-
niowe.
– Unikaç kontaktu skóry z monomerem i nie spolimeryz-
owanym materia∏em. R´kawiczki medyczne nie chronià
przed reakcjami uczuleniowymi metakrylanów.
– Nie wdychaç oparów.
– Trzymaç z dala od ognia. Nie paliç papierosów.
– Nie wrzucaç do kanalizacji.
– Chroniç przed oddzia∏ywaniami elektrostatycznymi.
Uwagi odnoÊnie stosowania
– Starannie namoczyç modele w wodzie przed
puszkowaniem.
– Przed puszkowaniem starannie odizolowaç
wewn´trzne powierzchnie puszki.
– WyczyÊciç z gipsu i odizolowaç powierzchnie.
– Przestrzegaç zalecanych czasów polimeryzacji i
studzenia.
– Kontakt rozpuszczalników i monomeru ze spolimery-
zowanym materia∏em do wykonywania protez mo˝e
prowadziç do przebarwienia na bia∏o.
– Podczas stosowania izolacji w obszarze przyszyjkowym,
Ivoclar Vivadent poleca silikony typu A ( >65 Shore A,
np. Flexistone Plus/Virtual® Heavy Body Fast). Silikon
typu C mo˝e mieç szkodliwy wp∏yw na podstawowy
materia∏ do wykonywania protez.
– Proodukty moga byç stosowane i przetwarzane tylko
przez wykwalifikowany personel.
– Wtrysk drugiej kapsu∏ki IvoBase albo materia∏u
SR Ivocap® do ju˝ wype∏nionego szablonu do
puszkowania (flask) nie jest mo˝liwy.
– Pozosta∏y w kapsule materia∏ IvoBase nie mo˝e byç
ponownie wykorzystany.
– Suchy gips musi byç przed procesem wtryskiwania
namoczony w wodzie.
64
Page 65

– Zanieczyszczona puszka mo˝e byç przyczynà
samozap∏onu podczas ogrzewania.
– Przechowywaç w wilgotnym Êrodowisku poczàwszy
od ukoƒczenia protez do ich oddania.
Obróbka
Przygotowanie do wtryskiwania
1. Przygotowanie puszki
Odizolowaç wewn´trzne powierzchnie czystych
puszek polimeryzacyjnych za pomocà cienkiej
warstwy wazeliny.
UmieÊciç pokrywk´ puszki, nast´pnie po∏ówk´ szablonu
oraz woskowà kszta∏tk´ filtra (B1) w jednej z po∏ówek
puszki od wewnàtrz.
2. Stabilizacja modelu
UmieÊç dobrze namoczony i odizolowany model
w jednej z po∏ówek puszki u˝ywajàc typowego gipsu
stomatologicznego (klasa III). Usuƒ nadmiar gipsu
w taki sposób, ˝eby jego powierzchnia zrówna∏a si´
z modelem i z kraw´dzià obudowy puszki.
Wa˝ne: Kraw´dê gipsu musi byç zrównana
z powierzchnià szablonu.
3. Umieszczenie elementów woskowych
Elementy woskowe (B) mogà byç bez dodatkowej
modyfikacji umieszczone na modelu za pomocà wosku.
Upewnij si´, ˝e gips nie zap∏ynà∏ pod woskowy element.
Pozostawiç do ca∏kowitego zwiàzania gipsu. Usunàç
szablon po∏ówkowy i umieÊciç szablon w pe∏nym
kszta∏cie.
– UmieÊç kana∏ wtryskowy z wosku (B2)
UmieÊç w puszce kana∏ wtryskowy z wosku (B2)
tak, aby styka∏ si´ z szablonem.
Protezy ca∏kowite górne
Przyklej kana∏ do kraw´dzi protezy w okolicy linii
A-H oraz w okolicy guzków szcz´ki.
Protezy ca∏kowite dolne
Przyklej kana∏y od strony przedsionkowej w okolicy
trójkàtów zatrzonowcowych. Kana∏ Êrodkowy nale˝y
odciàç (B2).
Protezy cz´Êciowe
Kana∏ nale˝y przykleiç do ka˝dego skrzyd∏a protezy.
– Umocuj woskowy kana∏ odpowietrzajàcy (B3)
Przyklej kszta∏tk´ kana∏u odpowietrzajàcego (B3)
do woskowej kszta∏tki filtra umieszczonej na
kraw´dzi puszki.
Wa˝ne: Kana∏y odpowietrzajàce nie mogà dotykaç
obudowy puszki, poniewa˝ muszà zapewniç
dok∏adne sk∏adanie si´ obydwu cz´Êci puszki.
Protezy ca∏kowite górne i dolne
Przyklej kszta∏tk´ kana∏u odpowietrzajàcego (B3) do
woskowej kszta∏tki filtra umieszczonej na kraw´dzi
puszki.
Protezy cz´Êciowe
Przyklej trójramiennà kszta∏tk´ woskowego kana∏u
odpowietrzajàcego (B3) do powierzchni
przedsionkowej p∏yty protezy. JeÊli woskowy
element odpowietrzajàcy (B3) nie jest wystarczajàco
d∏ugi, nale˝y go przed∏u˝yç za pomocà wosku.
4. Stabilizacja za pomocà silikonu
Pokryj przedsionkowà i podniebiennà i/lub j´zykowà
powierzchni´ brzegów protez silikonem. Nie
pokrywaj powierzchni zgryzowych i brzegów
siecznych z´bów. Wykonaj zag∏´bienia retencyjne
na powierzchni silikonu zanim zwià˝e i u˝yj piasku
retencyjnego w celu polepszenia po∏àczenia z
gipsem.
Uwaga: W celu uzyskania optymalnych rezultatów,
zaleca si´ u˝ycie p∏ynnego silikonu typu A (o stopniu
twardoÊci A >65), np. Flexistone Plus czy Virtual Heavy
Body Fast.
Zaizolowaç powierzchnie kontaktowe gipsu z
gipsem, za pomocà p∏ynu izolacyjnego (F).
5. Zalewanie kontry
Z∏o˝yç puszk´, zapiàç klamry zabezpieczajàce i zalaç
kontr´.
Wymieszaj gips stomatologiczny (Klasa III) zgodnie
z zaleceniami producenta i nalewaj go do otworu
puszki, usuwajàc p´cherzyki powietrza za pomocà
wstrzàsarki. Usuƒ nadmiary gipsu za pomocà
szpatu∏ki IvoBase tak, aby nic nie wystawa∏o ponad
otwór puszki.
6. Wyparzanie wosku
Kiedy tylko gips zwià˝e ca∏kowicie, ogrzewaj puszk´
w kàpieli wodnej w temperaturze oko∏o 90°C przez
oko∏o 5-8 minut. Nast´pnie otwórz jà, usuƒ szablon
i wst´pnie usuƒ wosk u˝ywajàc no˝a do wosku.
Teraz starannie wyparz wewn´trzne powierzchnie
czystà, wrzàcà wodà.
Uwaga: Nale˝y u˝ywaç wy∏àcznie czystej wody bez
dodatków ( np. rozpuszczalników do wosku, Êrodków
czyszczàcych itp.) Dodatki te mogà bowiem powodowaç
przebarwianie protez.
65
Page 66

7. Z´by
W celu zapewnienia optymalnego po∏àczenia, szyjki
i dolne powierzchnie z´bów powinny byç ca∏kowicie
wolne od wosku. Nale˝y delikatnie wypiaskowaç
przyszyjkowe powierzchnie z´bów (100µm Al2O3,
2 bary) albo schropowaciç je za pomocà wiert∏a
z w´glika wolframu.
8. Izolowanie powierzchni gipsu
Wa˝ne: Przed izolacjà , sch∏odziç puszki do tempera-
tury pokojowej (< 30°C), u˝ywajàc powietrza, albo
czystej, zimnej wody. Dok∏adna temperatura szablonu
mo˝e byç sprawdzona z pomocà termometru IR.
Zaizoluj czyste powierzchnie gipsowego modelu za
pomocà p∏ynu izolacyjnego (F). Pokryj drugi raz po
up∏ywie 5 minut. Nale˝y unikaç zbyt mocnych
pociàgni´ç p´dzlem (np. w fa∏dzie dziàs∏owo-
policzkowym).
9. Umieszczenie filtru do odpowietrzania
WciÊnij filtr do odpowietrzania (E), wyrównujàc go
z odpowiadajàcym mu zag∏´bieniem na obrze˝u
puszki.
10. Umieszczenie lejka i wypoÊrodkowanie wk∏adu
W∏ó˝ lejek IvoBase (D) do szablonu, w taki sposób,
aby znalaz∏ si´ on we w∏aÊciwym miejscu i aby
zosta∏ zablokowany. UmieÊç szablon z w∏o˝onym
lejkiem w dolnej po∏ówce puszki.
Z∏ó˝ po∏ówki puszki i zablokuj klamrami.
Wtrysk materia∏u i polimeryzacja
Obs∏uga IvoBase Injector zosta∏a opisana szczegó∏owo
w za∏àczonej Instrukcji Obs∏ugi. Wtryskarka IvoBase
Injector powinna byç przygotowana do stanu gotowoÊci
przed wymieszaniem materia∏u.
11. Mieszanie materia∏u
Jedna kapsu∏a wystarcza na wykonanie protezy
ca∏kowitej górnej lub dolnej.
ZawartoÊç kapsu∏y: Monomer Polymer
IvoBase Hybrid 20 ml 34 g
IvoBase High Impact 20 ml 30 g
Usuƒ pojemnik z monomerem (A4) z kapsu∏y.
Zdejmij zamkni´cie/zakr´tk´ kapsu∏y (A1).
Odkr´ç zakr´tk´ zamykajàcà pojemnik z monomerem
(A4) i nalej p∏yn do otwartej kapsu∏y (A2).
Za pomocà szpatu∏ki wymieszaj monomer i polimer
w kapsu∏ce w celu uzyskania jednorodnej mieszaniny
(mieszaç przez oko∏o 20–30 sekund).
12. ¸adowanie Injectora
Po up∏ywie 5 minut po zmieszaniu :
Postaw otwartà kapsu∏´ (A) na równej powierzchni i
wciÊnij puszk´ na kapsu∏´ (A).
Uwaga: Nie przechylaj puszki z kapsu∏à (A) przed
polimeryzacjà, ˝eby nie wyp∏ynà∏ z niej materia∏.
W trakcie podnoszenia puszki, kapsu∏a (A) musi byç
umieszczona bezpiecznie w wypoÊrodkowanym wk∏adzie.
Otwórz drzwiczki Injectora. Wsuwaj puszk´
z kapsu∏à (A) do komory polimeryzacyjnej do czasu,
a˝ si´ zatrzyma, zablokowana przez uchwyt puszki.
Zamknij drzwiczki Injectora.
13. Program
Wybierz odpowiedni program. Patrz – Instrukcja
obsługi IvoBase Injector.
JeÊli to konieczne, aktywuj funkcj´ RMR, w celu
zmniejszenia zawartoÊç monomeru resztkowego
do < 1%.
WciÊnij „Start”. Rozpocznie si´ w pe∏ni zautomatyzo-
wany proces wtrysku. Na wyÊwietlaczu b´dzie
widoczny czas do zakoƒczenia procesu polimeryzacji.
Zakoƒczenie procesu b´dzie zasygnalizowane
dêwi´kiem. U˝yj r´kawic ochronnych przy
wyjmowaniu goràcej puszki i chwytajàc jà za wk∏ad
centrujàcy. Injector jest gotowy do kolejnej
polimeryzacji natychmiast po usuni´ciu puszki.
Uwaga: Puszka mo˝e byç wcià˝ bardzo goràca po
jej wyj´ciu z Injectora. Istnieje ryzyko oparzenia!
14. Ch∏odzenie puszki
Ch∏odziç puszk´ pod zimnà bie˝àcà wodà przez oko∏o
15 minut. Jako alternatywa, ch∏odzenie mo˝e mieç tak˝e
miejsce w urzàdzeniu Injector (np. w czasie nocy).
Wa˝ne: Niesch∏odzenie puszki i otwarcie jej przy zbyt
wysokiej temperaturze mo˝e powodowaç
nieprawid∏owoÊci w dopasowaniu protezy.
15. Uwolnienie protez
Usuƒ zatrzaski.
UmieÊç puszk´ w prasie hydraulicznej. Pomi´dzy
puszk´ (w miejscu gdzie jest widoczny gips) a rami´
prasy nale˝y wło˝yç podkładk´ ( np. pokrywk´ puszki).
Wsuƒ szeroki Êrubokr´t lub nó˝ do gipsu w
po∏àczenie pomi´dzy dwiema po∏ówkami puszki
66
Page 67

i podwa˝ jej górnà po∏ówk´. Wyjmij puszk´ z prasy,
obróç jà i powtórz procedur´.
Usuƒ rdzeƒ gipsowy z kapsu∏à i oddziel kapsu∏´
przy wlewie, u˝ywajàc separatora lub pi∏y. Uwolnij
protezy z gipsu w konwencjonalny sposób, przy
u˝yciu kleszczy do gipsu.
16. Obróbka
Spolimeryzowany materia∏ IvoBase jest opracowywany
przy u˝yciu narz´dzi tnàcych z w´glika wolframu,
papieru Êciernego i Êrodków do polerowania, zgodnie
z przyj´tymi zasadami obróbki materia∏ów, z których
wykonane sà p∏yty protez.
a) PodÊcielanie bez korzystania z puszki IvoBase:
Procedura bez puszkowania w puszce IvoBase jest
dok∏adnie taka sama, jak w przypadku podÊcielania
konwencjonalnymi materia∏ami samopolimeryzujàcymi
do wykonywania p∏yt protez.
b) PodÊcielanie z zalewaniem w puszce IvoBase:
Procedury zalewania i podÊcielania protezy sà
zasadniczo takie same, jak przy procedurze
stosowanej w przypadku wykonania protez (tak, jak
to zosta∏o opisane powy˝ej). Upewnij si´ , ˝e:
– kana∏y wlewowe i odpowietrzajàce sà do∏àczone
do masy wyciskowej.
– obszar podÊcielany musi posiadaç przynajmniej
2 mm gruboÊci.
Naprawa/podÊcielenie
IvoBase mo˝e byç naprawiany zarówno za pomocà tego
samego materia∏u, z którego zosta∏ wykonany, jak i za
pomocà samoutwardzalnego polimeru ProBase® Cold.
Naprawa/ poszerzenie zasi´gu p∏yty protezy za
pomocà IvoBase Hybrid/ High Impact
W zasadzie proteza wykonana z IvoBase mo˝e byç
naprawiona bez puszkowania w puszce IvoBase.
Zasadnicza procedura zgodna jest z tà, stosowanà
zazwyczaj podczas napraw za pomocà podstawowych
materia∏ów samopolimeryzujàcych do wykonywania p∏yt
protez.
Nale˝y przestrzegaç nast´pujàcych proporcji mieszania:
Polymer Monomer
IvoBase Hybrid 9 g 5 g
IvoBase High Impact 8 g 5 g
Polimer i monomer powinny byç jednorodnie wymieszane
(przez oko∏o 20 sek.).
Nale˝y przestrzegaç nast´pujàcych czasów obróbki
(23°C, temperatura pokojowa):
– Czas dla fazy ciasta: 30 sekund
– Czas fazy nalewania: 1–2 minuty
– Czas fazy modelowania: 3–5 minuty
Maksymalny czas pracy materiałem po zmieszaniu w
garnku ciÊnieniowym, wynosi 10 minut. Polimeryzuj
materiał przez 20 minut w temperaturze 55°C, pod
ciÊnieniem 2,5 bara.
Naprawa/ Poszerzenie zasi´gu p∏yty protezy za
pomocà ProBase Cold
Procedura jest analogiczna do stosowanej przy u˝yciu
konwencjonalnych materia∏ów samopolimeryzujàcych do
wykonywania p∏yt protez. Szczegó∏y post´powania
znaleêç mo˝na w Instrukcji Obs∏ugi ProBase Cold.
Instrukcja przechowywania
– Materia∏ przechowywaç w zimnym, ciemnym i
dobrze wietrzonym miejscu.
– Temperatura przechowywania: 2–28°C.
– Nie stosowaç produktu po up∏ywie daty wa˝noÊci.
– Przechowywaç materia∏ w miejscu niedost´pnym dla
dzieci.
Klasyfikacja zgodna z EN ISO 20795-1, Typ 2,
Klasa 1.
Produkt spe∏nia wymogi EN ISO 20795-1:2008.
Data przygotowania informacji: 10/2011
Producent:
Ivoclar Vivadent AG FL-9494 Schaan / Liechtenstein
Materia∏ zosta∏ przeznaczony wy∏àcznie do stosowania w stomatologii. Przy jego
stosowaniu nale˝y ÊciÊle przestrzegaç instrukcji u˝ycia. Nie ponosi si´ odpowiedzialnoÊci
za szkody powsta∏e na skutek nieprzestrzegania instrukcji lub stosowania niezgodnie
z podanymi w instrukcji wskazaniami. U˝ytkownik odpowiada za testowanie produktu dla
swoich w∏asnych celów i za jego u˝ycie w ka˝dym innym przypadku nie wyszczególnionym
w instrukcji. Opis produktu i jego sk∏ad nie stanowià gwarancji i nie sà wià˝àce.
PodÊcielanie przy u˝yciu:
IvoBase Hybrid/ High Impact
PodÊcielanie protezy IvoBase mo˝e byç przeprowadzone
z u˝yciem, lub bez stosowania puszki IvoBase.
67
Page 68

Ivoclar Vivadent S.L.U.
C/ Carretera de Fuencarral Nº 24
Europa I- Portal 1- Planta Baja
28108 Alcobendas
Madrid
Tel. +34 91 375 78 20
T
Tel. +34 91 375 78 38
www.ivoclarvivadent.es
 Loading...