

Indesit K6E52/GR, K6E55/GR Installation And Use Manual

K6E52/GR
K6E55/GR
Cooker
Installation and use
КпхжЯнб
ЕгкбфЬуфбуз кбй чсЮуз

Cooker with electric multifunction oven and electric hob
Instructions for installation and use 3
КпхжЯнб ме рплхлейфпхсгйкь цпэснп кбй злекфсйкЮ
ерйцЬнейб
ПдзгЯет егкбфЬуфбузт кбй чсЮузт 12

3
Important
1 This appliance is intended for non-professional use
within the home.
2 Before using your appliance, read the instructions in
this owner’s manual carefully since you will find all
the instructions you require to ensure safe installation,
use and maintenance. Always keep this owner’s
manual close to hand since you may need to refer to
it in the future.
3 When you have removed the packing, check that the
appliance is not damaged. If you have any doubts, do not
use the appliance, contact your nearest Ariston Service
Centre. Never leave the packing components (plastic bags,
foamed polystyrene, nails, etc.) within the reach of children
since they are a source of potential danger.
4 The appliance must be installed only by a qualified person
in compliance with the instructions provided. The
manufacturer declines all responsibility for improper
installation which may harm persons and animals and
damage property.
5 The electrical safety of this appliance can only be
guaranteed if the cooker is correctly and efficiently
earthed, in compliance with regulations on electrical safety.
Always ensure that the earthing is efficient; if you have
any doubts call in a qualified technician to check the
system. The manufacturer declines all responsibility for
damage resulting from a system which has not been
earthed.
6 Before plugging the appliance into the mains, check that
the specifications indicated on the date plate correspond
to those of the electrical mains of your home.
7 Check that the electrical capacity of the system and
sockets will support the maximum power of the appliance,
as indicated on the data plate. If you have any doubts,
call in a qualified technician.
8 An omnipolar switch with a contact opening of at least 3
mm or more, is required for the installation.
9 If the socket and appliance plug are not compatible, have
the socket replaced with a suitable model by a qualified
technician. The latter, in particular, will also have to ensure
that the cross section of the socket cables are suitable
for the power absorbed by the appliance. The use of
adapters, multiple sockets and/or extensions, is not
recommended. If their use cannot be avoided, remember
to use only single or multiple adapters and extensions
which comply with current safety regulations. In these
cases, never exceed the maximum current capacity
indicated on the single adapter or extension and the
maximum power indicated on the multiple adapter.
10 Do not leave the appliance plugged in if it is not in use.
Switch off the main switch when you are not using the
appliance.
11 The openings and slots used for ventilation and
dispersion of heat on the rear and below the control
panel must never be covered.
12 The user must not replace the supply cable of this
appliance. Always call an after-sales service centre
authorised by the manufacturer in the event of cable
damage or replacement.
13 This appliance must be used for the purpose for which
it was expressly designed. Any other use (e.g. heating
rooms) is considered to be improper and
consequently dangerous. The manufacturer declines
all responsibility for damage resulting from improper
and irresponsible use.
14 A number of fundamental rules must be followed when
using electrical appliances. The following are of particular
importance:
• do not touch the appliance when your hands or feet
are wet
• do not use the appliance barefoot
• do not use extensions, but if these are necessary
caution must be exercised.
• never pull the power supply cable or the appliance to
unplug the appliance plug from the mains.
• never leave the appliance exposed to atmospheric
agents (rain, sun etc.)
• do not allow children or persons who are not familiar
with the appliance to use it, without supervision.
15 Always unplug the hob from the mains or switch off the
main switch before cleaning or carrying out maintenance
operations.
16 If you are no longer using an appliance of this type,
remember to make it unserviceable by unplugging the
appliance from the mains and cutting the supply cable.
Also make all potentially dangerous parts of the appliance
safe, above all for children who could mistake it for a toy.
17 Do not forget that the cooking zone stays hot for at least
half an hour after it has been turned off. Take care not to
inadvertently place pans or items on the hot zone.
18 Do not turn the cooking zones on if there is any aluminium
foil or plastic material on the hob.
19 Do not get too close to the hot hob.
20 When using small electric appliances near the hob, keep
the power supply cable away from the hot parts.
21 Make sure you turn the handles of pots and pans inwards
to avoid knocking them over accidentally.
22 Never leave a cooking zone on without a pan on it, as the
zone would heat up almost immediately, causing damage
to the heating elements.
23 Remember to keep children away from the appliance
when you use the grill or oven, since these parts
become very hot. Keep children well away.
24 Make sure the knobs are in the ”•”/”
o
” position when the
appliance is not in use.
25 If the cooker is placed on a pedestal, take the necessary
precautions to prevent the same from sliding off the
pedestal itself.
26 The appliance should not be operated by people (including
children) with reduced physical, sensory or mental
capacities, by inexperienced individuals or by anyone who
is not familiar with the product. These individuals should,
at the very least, be supervised by someone who assumes
responsibility for their safety or receive preliminary
instructions relating to the operation of the appliance.
27 Do not let children play with the appliance.
To maintain the EFFICIENCY and SAFETY of this appliance, we recommend:
• call only the Service Centers authorized by the manufacturer
• always use original Spare Parts
4
Installation Instructions
The following instructions should be read by a qualified
technician to ensure that the appliance is installed,
regulated and technically serviced correctly in compliance
with current regulations.
Important: The power supply to the appliance must be
cut off before any adjustments or maintenance work is
done on it.
Positioning
The cooker is manufactured with type X degree protection
against overheating.
Levelling Your Appliance (only on certain models)
4 support feet which are adjusted using screws are located
in the lower part of the cooker. These level off the oven
when necessary. It is essential that the cooker be standing
level.
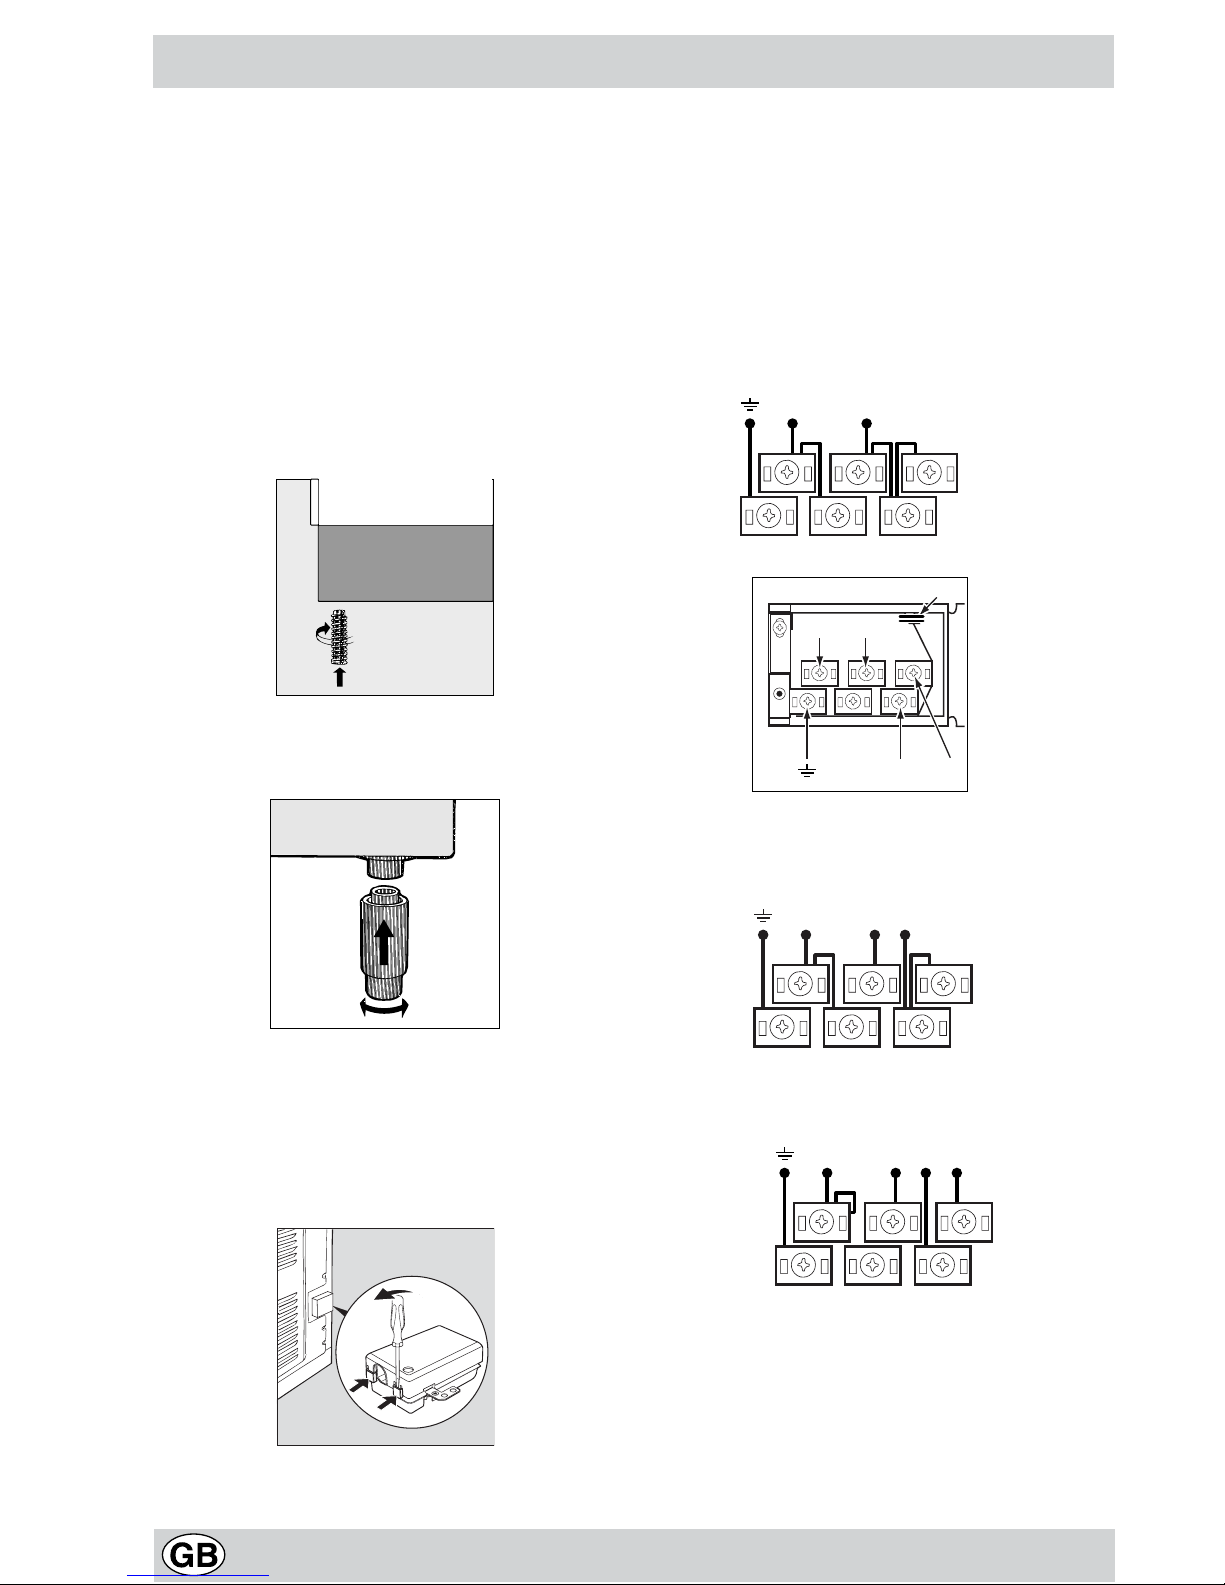
Mounting the legs (only on certain models)
Press-fit legs are supplied which fit under the base of your
cooker.
Fitting on a Power Supply Cable
Opening the terminal board:
• Using a screwdriver, prise on the side tabs of the
terminal board cover;
• Pull open the cover of the terminal board.
To install the cable, proceed as follows:
• unscrew the wire clamp screw and the contact screws
Note: the jumpers are factory-set for a single-phase
230V connection (Fig. A).
• to make the electrical connections illustrated in fig. C
and fig. D, use the two jumpers housed in the box (fig.
B - reference “P”)
• fasten the supply cable in place with the clamp and
close the cover of the terminal board.
Connecting the supply cable to the mains
Install a standardised plug corresponding to the load
indicated on the data plate. When connecting the cable
directly to the mains, install an omnipolar circuit-breaker
with a minimum contact opening of 3 mm between the
appliance and the mains. The omnipolar circuit breaker
should be sized according to the load and should comply
with current regulations (the green-yellow earth wire should
not be interrupted by the circuit breaker). The supply cable
should be positioned so that it does not reach a tempera-
Fig. A
NL2L3
L1
P
Fig. B
NL
230V ~
1
3
2
4
5
H05RR-F/ 3x4 CEI-UNEL 35363
H05VV-F/ 3x4 CEI-UNEL 35746
NL3L1L2
400V 3N~
H05RR-F 5x2.5 CEI-UNEL 35363
1
3
2
4
5
NL2L1
400V 2N~
H05RR-F 4x4 CEI-UNEL 35363
1
3
2
4
5
H05VV-F 4x4 CEI-UNEL 357 46
H05VV-F 5x2.5 CEI-UNEL 35746
Fig. C
Fig. D
5
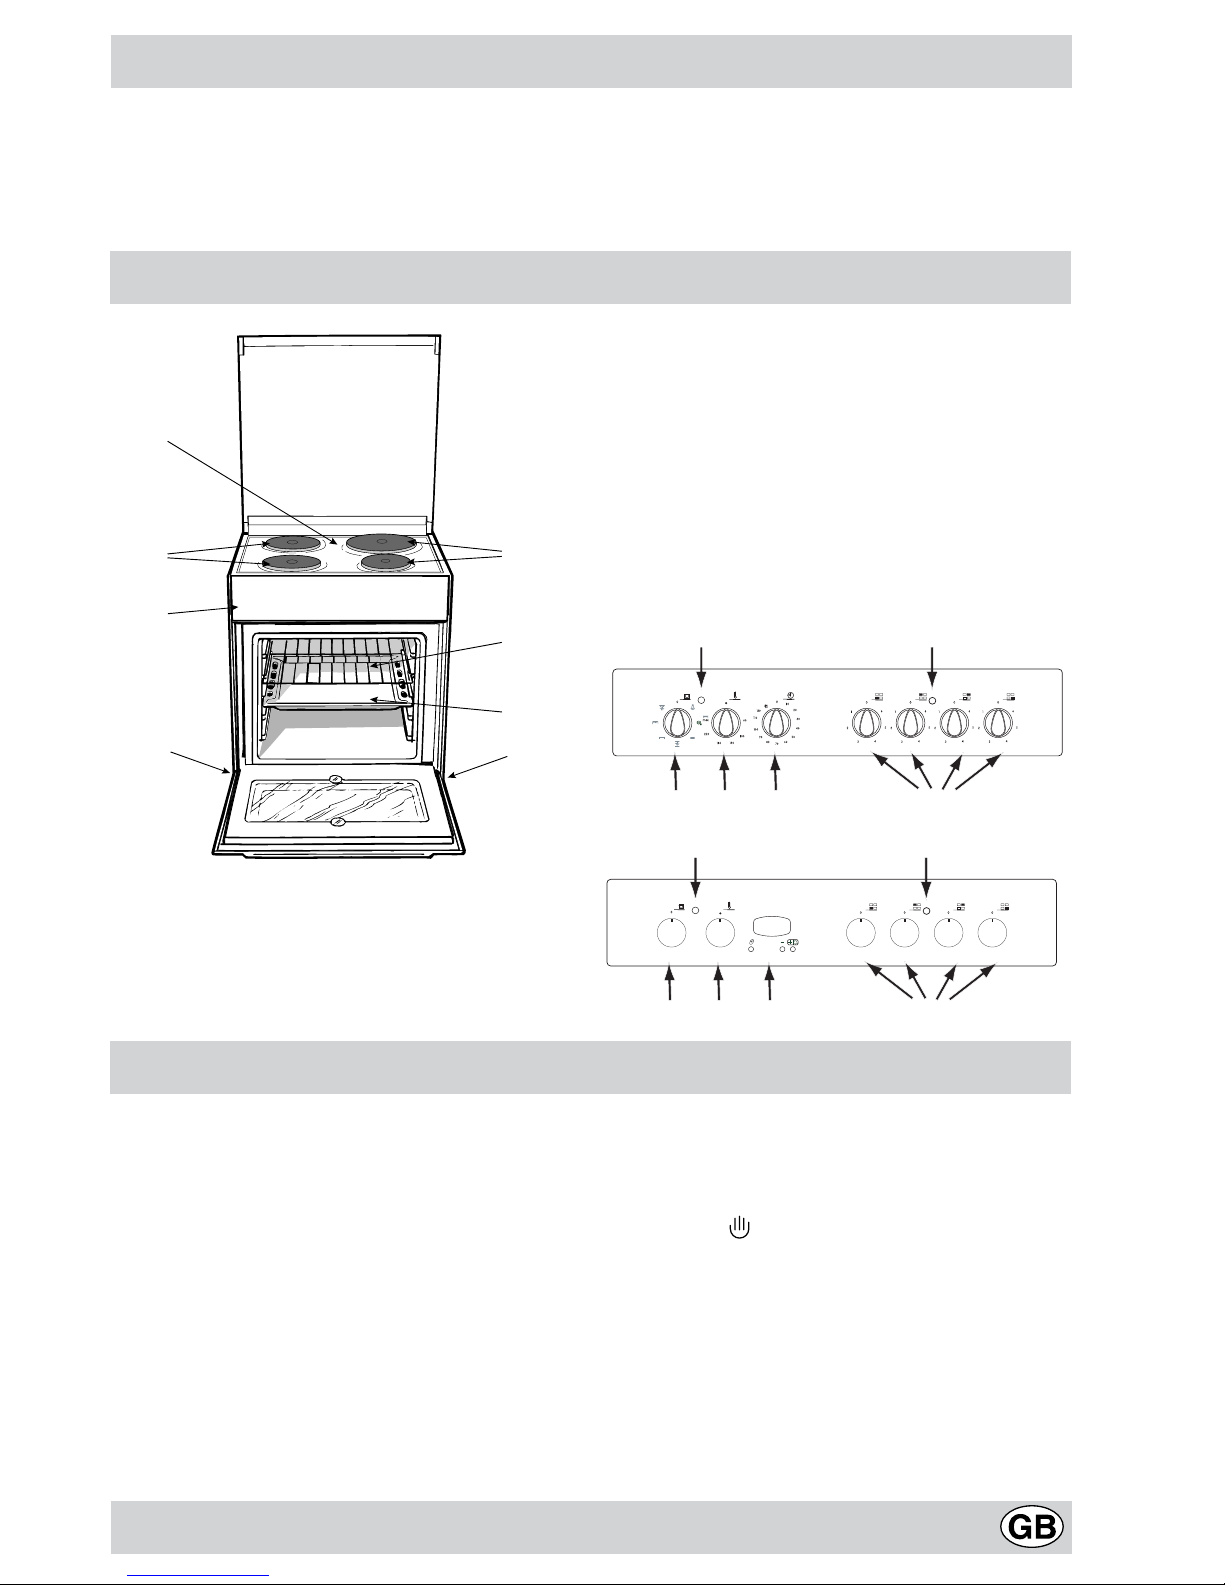
Cooker with Multifunction Oven
B
C
F
D
E
B
A
F
ture of more than 50°C with respect to the room temperature, anywhere along its length.
Before making the connection, check that:
• the limiter valve and the home system can support the
appliance load (see data plate);
• the mains are properly earthed in compliance with
current directives and regulations;
• there is easy access to the socket and omnipolar circuit
breaker, once the hob has been installed.
A Hob surface
B Electric hotplate
C Control Panel
D Oven Rack
E Dripping Pan or Baking Sheet
F Adjustable Feet
H Electric hotplate indicator light
L Selector Knob
M Thermostat Knob
N Electric hotplate control knobs
O Thermostat Light
P Electronic timer
S Cooking Control Timer Knob
N
O
L M S
H
How To Use Your Appliance
The various functions featured with the oven are controlled
using the knobs and buttons on the control panel.
Notice: The first time you use your appliance, we recommend that you set the thermostat to the highest setting and
leave the oven on for about half an hour with nothing in it,
with the oven door shut. Then, open the oven door and let
the room air. The odour that is often detected during this
initial use is due to the evaporation of substances used to
protect the oven during storage and until it is installed.
Attention: Only use the bottom shelf of the oven when using
the rotisserie to cook (where present). For all other types of
cooking, never use the bottom shelf and never place anything
on the bottom of the oven when it is in operation because
this could damage the enamel. Always place your cookware
(dishes, aluminium foil, etc. etc.) on the grate provided with
the appliance inserted especially along the oven guides.
Attention: to use the oven in manual mode without the
cooking control timer, match the indicator on the control
panel with the
symbol on the timer knob.
Door lock device
Some models are equipped with a “door lock” device situated
between the control panel and the oven door. To open the
door, push down device “A” indicated in the figure.
N
O
L M P
H

6
ing temperatures are the same. A maximum of 2 racks
can be used at the same time, following the instructions in
the section entitled: “Cooking On More Than One Rack”.
This fan assisted mode is particularly recommended for
dishes requiring a gratin finish or for those requiring considerably prolonged cooking times, such as for example:
lasagne, pasta bakes, roast chicken and potatoes, etc…
Moreover, the excellent heat distribution makes it possible to use lower temperatures when cooking roasts. This
results in less loss of juices, meat which is more tender
and a decrease in the loss of weight for the roast. The fan
assisted mode is especially suited for cooking fish, which
can be prepared with the addition of a limited amount of
condiments, thus maintaining their flavour and appearance.
Desserts: the fan assisted mode is also perfect for baking
leavened cakes.
Moreover, this mode can also be used to thaw quickly
white or red meat and bread by setting the temperature to
80 °C. To thaw more delicate foods, set the thermostat to
60°C or use only the cold air circulation feature by setting
the thermostat to 0°C.
“Top” oven
Position of thermostat knob “M”: Between 60°C and Max.
The top heating element comes on.
This mode can be used to brown food at the end of cooking.
Grill
Position of thermostat knob “M”: Max
The top heating element and the turnspit come on.
The extremely high and direct temperature of the grill makes
it possible to brown the surface of meats and roasts while
locking in the juices to keep them tender. The grill is also
highly recommended for dishes that require a high
temperature on the surface: such as beef steaks, veal, rib
steak, filets, hamburgers etc...
Use the “grill” mode with the oven door shut.
Some grilling examples are included in the “Practical Cooking
Advice” paragraph.
Fan Assisted Grill
Position of thermostat knob “M”: between 60°C and 200°C.
The top central heating element and the fan come on. This
combination of features increases the effectiveness of the
unidirectional thermal radiation of the heating elements
through forced circulation of the air throughout the oven.
This helps prevent food from burning on the surface, allowing the heat to penetrate right into the food. Excellent
results are achieved with kebabs made with meats and
vegetables, sausages, ribs, lamb chops, chicken in a spicy
sauce, quail, pork chops, etc.
All “gratin” cooking must be done with the oven door shut.
This mode is also ideal for cooking fish steaks, like swordfish, tuna, grouper, stuffed cuttlefish etc.
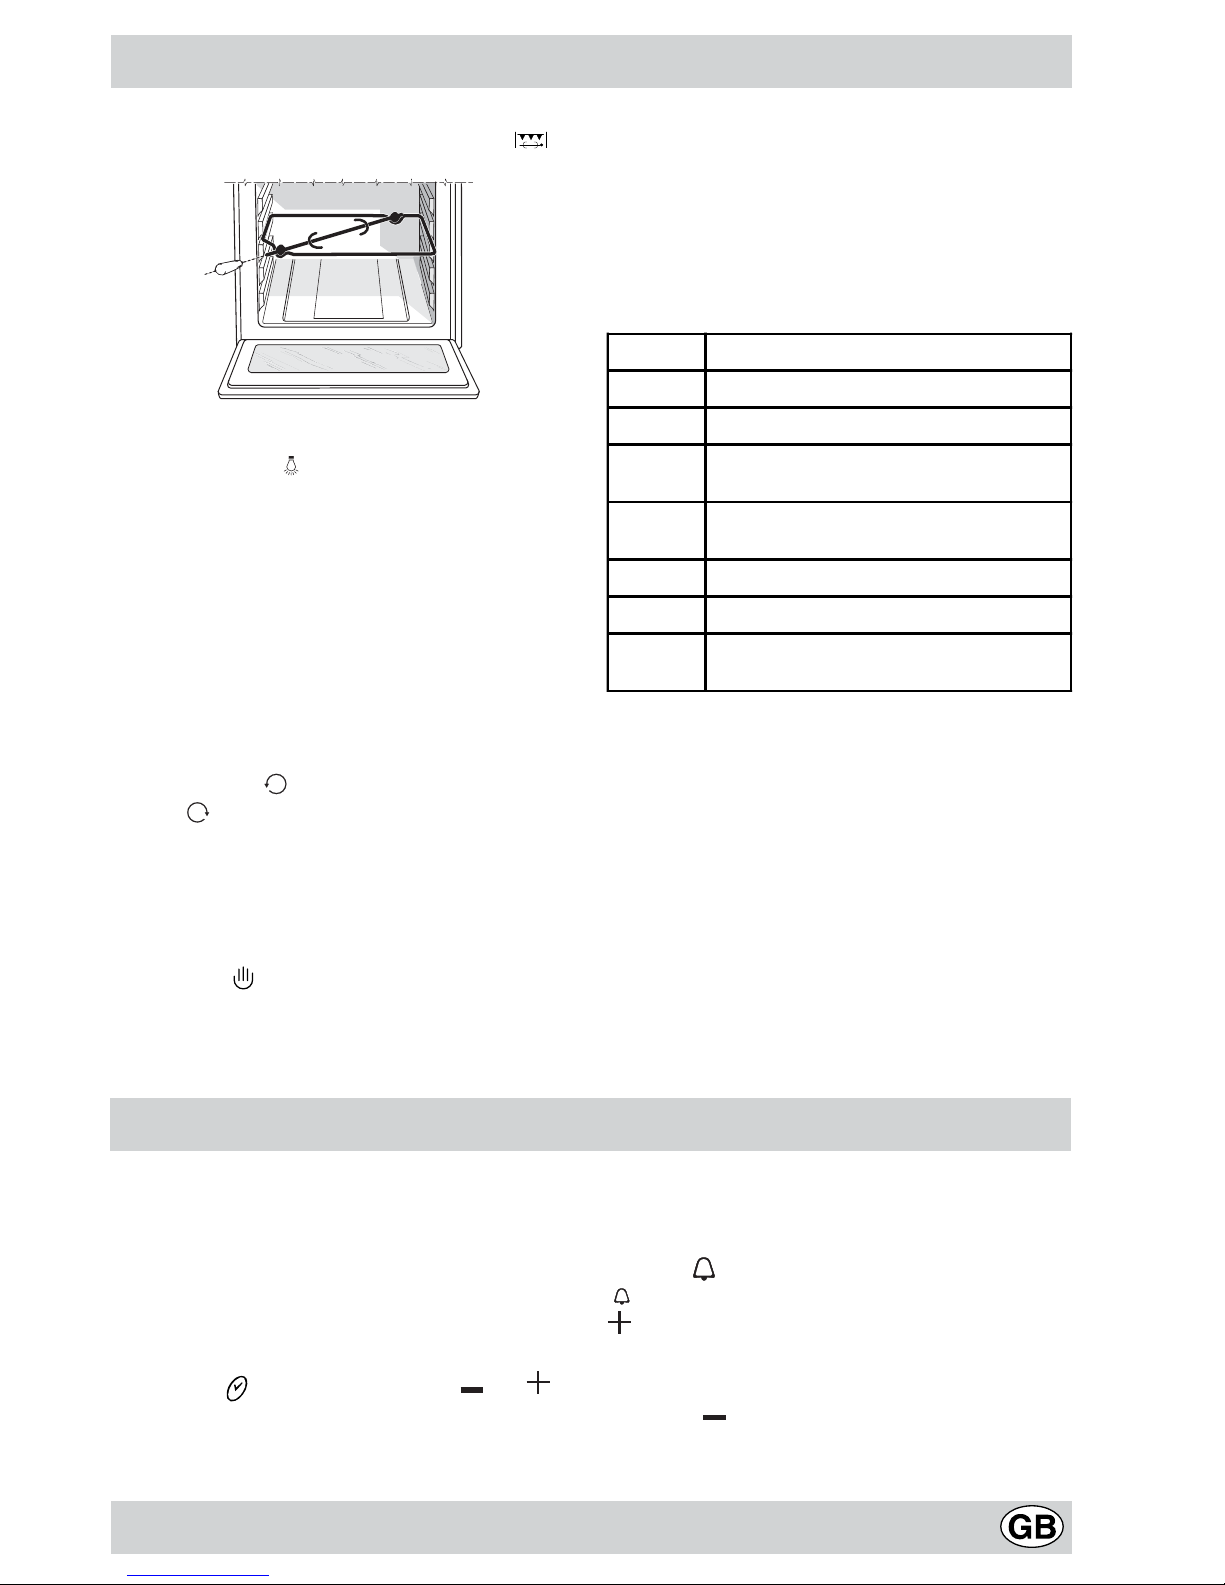
The turnspit
To start the turnspit, proceed as follows:
a) place the oven tray on the 1st rack;
b) insert the special turnspit support on the 3rd rack and
position the spit by inserting it through the special hole
into the turnspit at the back of the oven;
A
The Oven Control Knobs
This multi-function oven combines the advantages of traditional convection ovens with those of the more modern
fan assisted models in a single appliance.
It is an extremely versatile appliance that allows you to
choose easily and safely between 5 different cooking
modes. The various features offered by the oven are selected by means of selector knob “L” and thermostat “M”
situated on the control panel.
“Defrosting” Mode
Position of thermostat knob “M”: any
The fan located on the bottom of the oven makes the air
circulate at room temperature around the food. This is
recommended for the defrosting of all types of food, but in
particular for delicate types of food which do not require
heat, such as for example: ice cream cakes, cream or
custard desserts, fruit cakes. By using the fan, the
defrosting time is approximately halved. In the case of
meat, fish and bread, it is possible to accelerate the
process using the “multi-cooking” mode and setting the
temperature to 80° - 100°C.
Convection Mode
Position of thermostat knob “M”: between 60°C and Max.
On this setting, the top and bottom heating elements come
on. This is the classic, traditional type of oven which has
been perfected, with exceptional heat distribution and reduced energy consumption. The convection oven is still
unequalled when it comes to cooking dishes made up of
several ingredients, e.g. cabbage with ribs, Spanish style
cod, Ancona style stockfish, tender veal strips with rice,
etc. Excellent results are achieved when preparing veal
or beef-based dishes as well (braised meats, stew, goulash, wild game, ham etc.) which need to cook slowly and
require basting or the addition of liquid. It nonetheless remains the best system for baking cakes as well as fruit
and cooking using covered casserole dishes for oven baking. When cooking in convection mode, only use one dripping pan or cooking rack at a time, otherwise the heat
distribution will be uneven. Using the different rack heights
available, you can balance the amount of heat between
the top and the bottom of the oven. Select from among
the various rack heights based on whether the dish needs
more or less heat from the top.
Fan Assisted Mode
Position of thermostat knob “M”: Between 60°C and Max.
The heating elements, as well as the fan, will come on.
Since the heat remains constant and uniform throughout
the oven, the air cooks and browns food uniformly over its
entire surface. With this mode, you can also cook various
dishes at the same time, as long as their respective cook-
7
c) start the turnspit using knob “L” to select setting .
The oven light
Set knob “L” to the
symbol to turn it on. It lights the
oven and stays on when any of the electrical heating elements in the oven come on.
Thermostat Light (O)
This light indicates that the oven is heating. When it turns
off, the temperature inside the oven has reached the setting made with the thermostat knob. At this point, the light
will turn on and off as the oven maintains the temperature
at a constant level.
Cooking Control Timer Knob
Some models are equipped with a timer program to control
when the oven shuts off during cooking. To use this feature,
you must wind the "S" knob one full turn in the counter-
clockwise direction
; Then, turn the knob in the clockwise
direction
, to set the time by matching up the indicator
on the control panel with the number of minutes on the
knob.
At the end of the programmed length of time, the timer will
sound and automatically turn off the oven.
Attention: to use the oven in manual mode without the
cooking control timer, match the indicator on the control
panel with the
symbol on the timer knob.
When the oven is not in use, the cooking control timer can
be used like a normal timer.
The control knobs for the hob electric hotplates (N)
The cookers can be fitted with normal and rapid electric
hotplates in a variety of combinations (the rapid hotplates
can be distinguished from the rest by the red boss in the
centre of the same). To avoid any heat loss and damage to
the hotplates, we advise you to use pans with a flat bottom,
with a diameter which matches that of the hotplate itself. The
table contains the different settings indicated on the knobs
and the use for which the hotplates are recommended.
Setting Normal or Fast Plate
0
Off
1
Cooking vegetables, fish
2
Cooking potatoes (using steam) soups,
chickpeas, beans.
3
Continuing the cooking of large quantities
of food, minestrone
4
For roasting (average)
5
For roasting (above average)
6
For browning and reaching a boil in a
short time.
Before using the hotplates for the first time, you should
heat them at maximum temperature for approximately 4
minutes, without any pans. During this initial stage, their
protective coating hardens and reaches its maximum
resistance.
Electric hotplate indicator light (H)
This light comes on when any of the electrical hotplates on a
hob which features electric hotplates have been turned on.
Cooling ventilation
In order to cool down the exterior of the appliance, some
models are equipped with a cooling fan which comes on
automatically when the oven is hot.
When the fan is on, a normal flow of air can be heard exiting
between the oven door and the control panel.
Note: When cooking is done, the fan stays on until the
oven cools down sufficiently.
Electronic timer
The electronic timer displays the time and the timer
function with countdown.
Note: all the functions are operative approximately 7
seconds after they are stet.
How to reset the clock
After the appliance has been connected to the power
supply, or when the power has gone out, the clock display
will automatically reset to 0:00 and begin to blink. 0 00
• Press the
button, and then use the and
buttons to set the correct time. To move the time
forward quickly, keep the buttons pressed.
Whenever the time must be reset, follow this same
procedure.
Timer Feature
Press the
button to access this function. The symbol
"
" will appear on the display. Each time you press button
, the time will increase by 10 seconds until 99 minutes
and 50 seconds. If you continue to press it, the time will
increase from minute to minute up to a maximum of 10
hours.
Use button
to go backwards.
After setting the desired time, start the countdown. When
the time has elapsed, the buzzer will sound, and it can be
interrupted by pressing any of the buttons.
8
You can display the time by pressing button
, and symbol
"
" indicates the timer function has been set. After
approximately 7 seconds, the display automatically goes
back to indicating the timer.
To cancel a previous setting
Press button
up until 0 • 00.
Adjusting the buzzer volume
After selecting and confirming the clock settings, use the
button to adjust the volume of the alarm buzzer.
The oven offers a wide range of alternatives which allow
you to cook any type of food in the best possible way. With
time you will learn to make the best use of this versatile
cooking appliance and the following directions are only a
guideline which may be varied according to your own personal experience.
Preheating
If the oven must be preheated (this is generally the case
when cooking leavened foods), the “fan assisted” mode
can be used to reach the desired temperature as quickly
as possible in order to save on energy.
Once the food has been placed in the oven, the most
appropriate cooking mode can then be selected.
Cooking on More Than One Rack
If you have to cook on more than one rack at the same
time, use only the “fan assisted mode”
which is the
only one that is appropriate for this type of cooking.
• The oven is fitted with 5 racks. During fan assisted
cooking, use two of the three central racks; the lowest
and highest racks receive the hot air directly and
therefore delicate foodstuffs could be burnt on these
racks.
• As a general rule, use the 2nd and 4th rack from the
bottom, placing the foodstuffs that require greater heat
on the 2nd rack from the bottom. For example, when
cooking meat roasts together with other food, place
the roast on the 2nd rack from the bottom and the more
delicate food on the 4th rack from the bottom.
• When cooking foodstuffs that require differing times
and temperatures, set a temperature that is somewhere
between the two temperatures required, place the more
delicate food on the 4th rack from the bottom and take
the food requiring less time out of the oven first.
• Use the dripping pan on the lower rack and the grid on
the upper;
Using the Grill
This multi-function oven offers you 2 different grilling
modes.
Use the “grill” mode
with the oven door shut, placing
the food under the centre of the grill (situated on the 3rd
or 4th rack from the bottom).
To catch any fat and/or grease that may drip from the rack,
place the dripping pan provided on the first rack from the
bottom.
When using this mode, we recommend you set the energy level to the highest setting, even though lower levels
can be set, simply by adjusting the thermostat knob to the
desired level.
In models fitted with a rotisserie
, you can use the spit
kit provided when using the “grill” mode. In this case, cook
Practical Cooking Advice
with the oven door shut, placing the spit kit on the third
oven rack from the bottom and the dripping pan on the
bottom rack to collect any sauce and /or dripping fat.
Setting
, “fan assisted grill”,only with the oven door
shut, is extremely useful for grilling foods rapidly, as the
distribution of heat makes it possible not only to brown
the surface, but also to cook the bottom part.
Moreover, it can also be used for browning foods at the
end of the cooking process, such as adding that gratin
finish to pasta bakes, for example.
When using this mode, place the grid on the 2nd or 3rd
oven rack from the bottom (see cooking table) then, to
prevent fat and grease from dripping onto the bottom of
the oven and thus smoke from forming, place a drippingpan on the 1st rack from the bottom.
Important: always use the grill with the oven door shut.
This will allow you both to obtain excellent results and to
save on energy (approximately 10%).
When using this mode, we advise you to set the thermostat
to 200°C, as it is the most efficient way to use the grill,
which is based on the use of infrared rays. However, this
does not mean you cannot use lower temperatures, simply
by adjusting the thermostat knob to the desired temperature.
Therefore the best results when using the grill modes
are obtained by placing the grid on the lower racks
(see cooking table) then, to prevent fat and grease
from dripping onto the bottom of the oven and smoke
from forming, place a dripping-pan on the 1st oven
rack from the bottom.
Baking Cakes
When baking cakes, always place them in a preheated
oven. Make sure you wait until the oven has been
preheated thoroughly (the red light “O” will turn off). Do
not open the oven door during baking to prevent the cake
from dropping. In general:
Pastry is too dry
Increase the temperature by 10°C and reduce the
cooking time.
Pastry dropped
Use less liquid or lower the temperature by 10°C.
Pastry is too dark on top
Place it on a lower rack, lower the temperature, and
increase the cooking time.
 Loading...