


HP Compaq Deskpro I 3-25i, Compaq Deskpro I 3-33i, Compaq Deskpro I 3-33is, Compaq Deskpro I 4-25is, Compaq Deskpro I 4-33i Troubleshooting
...Quick Troubleshooting Guide
Compaq Deskpro Family of Personal Computers
Compaq Deskpro Workstations
Compaq Professional Workstations
Compaq Armada Notebooks
Compaq Prosignia Notebooks
Notice
The information in this guide is subject to change without notice.
COMPAQ COMPUTER CORPORATION SHALL NOT BE LIABLE FOR TECHNICAL OR EDITORIAL ERRORS OR OMISSIONS CONTAINED HEREIN; NOR FOR INCIDENTAL OR CONSEQUENTIAL DAMAGES RESULTING FROM THE FURNISHING, PERFORMANCE, OR USE OF THIS MATERIAL.
This guide contains information protected by copyright. No part of this guide may be photocopied or reproduced in any form without prior written consent from Compaq Computer Corporation.
2000 Compaq Computer Corporation. All rights reserved. Printed in the U.S.A.
COMPAQ, the Compaq Logo, and Deskpro Registered in the U. S. Patent and Trademark Office. PREMIER•SOUND is a trademark of Compaq Computer Corporation.
Microsoft, MS-DOS, Windows, Windows NT, and other names of Microsoft products referenced herein are trademarks or registered trademarks of Microsoft Corporation.
Intel and Pentium are registered trademarks of Intel Corporation. Celeron and MMX are trademarks of Intel Corporation.
Product names mentioned herein may be trademarks and/or registered trademarks of their respective companies.
The software described in this guide is furnished under a license agreement or nondisclosure agreement. The software may be used or copied only in accordance with the terms of the agreement.
Quick Troubleshooting Guide
Compaq Deskpro Family of Personal Computers
Compaq Deskpro Workstations
Compaq Professional Workstations
Compaq Armada Notebooks
Compaq Prosignia Notebooks
Second Edition (July 2000)
Part Number 120205-002
Compaq Computer Corporation
Printer's Mark

CONTENTS
chapter 1
General Service Information
Troubleshooting Procedures .................................................................................................... |
1-1 |
Tools Required - Desktop Computers and Workstations......................................................... |
1-1 |
Tools Required - Notebooks .................................................................................................... |
1-1 |
Protecting Yourself and the Computer..................................................................................... |
1-1 |
Clearing CMOS ....................................................................................................................... |
1-2 |
Customer Responsibilities........................................................................................................ |
1-2 |
POST Power-On Sequence ...................................................................................................... |
1-3 |
Compaq Drive Protection System............................................................................................ |
1-3 |
Accessing DPS Through Compaq Diagnostics for Windows ............................................ |
1-4 |
Compaq Configuration Record Utility..................................................................................... |
1-4 |
chapter 2
Troubleshooting Flowcharts for Desktop Computers
1. |
Initial Troubleshooting......................................................................................................... |
2-2 |
|
2. |
No Power, Part 1.................................................................................................................. |
2-3 |
|
3. |
No Power, Part 2.................................................................................................................. |
2-4 |
|
4. |
No Power, Part 3.................................................................................................................. |
2-5 |
|
5. |
No Video, Part 1 .................................................................................................................. |
2-6 |
|
6. |
No Video, Part 2 .................................................................................................................. |
2-7 |
|
7. |
No Video, Part 3 .................................................................................................................. |
2-8 |
|
8. |
Error Messages Part 1 .......................................................................................................... |
2-9 |
|
9. |
Error Messages, Part 2 ....................................................................................................... |
2-10 |
|
10. |
Error Messages, Part 3 ..................................................................................................... |
2-11 |
|
11. |
No O/S Loading ............................................................................................................... |
2-12 |
|
12. |
No O/S Loading from Hard Drive, Part 1........................................................................ |
2-13 |
|
13. |
No O/S Loading from Hard Drive, Part 2........................................................................ |
2-14 |
|
14. |
No O/S Loading from Hard Drive, Part 3........................................................................ |
2-15 |
|
15. |
No O/S Loading from Diskette Drive .............................................................................. |
2-16 |
|
16. |
No O/S Loading from CD-ROM Drive ........................................................................... |
2-17 |
|
17. |
No O/S Loading from Network ....................................................................................... |
2-18 |
|
18. |
Non-Functioning Device.................................................................................................. |
2-19 |
|
chapter 3
Troubleshooting Flowcharts for Portable Computers
1. |
Initial Troubleshooting......................................................................................................... |
3-2 |
2. |
No Power, Part 1.................................................................................................................. |
3-3 |
3. |
No Power, Part 2.................................................................................................................. |
3-4 |
4. |
No Power, Part 3.................................................................................................................. |
3-5 |
5. |
No Power, Part 4.................................................................................................................. |
3-6 |
6. |
No Video, Part 1 .................................................................................................................. |
3-7 |
7. |
No Video, Part 2 .................................................................................................................. |
3-8 |
8. |
Non-Functioning Docking Station....................................................................................... |
3-9 |
9. |
No O/S Loading ................................................................................................................. |
3-10 |
10. No O/S Loading from Hard Drive, Part 1........................................................................ |
3-11 |
|
Quick Troubleshooting Guide |
iii |

11. |
No O/S Loading from Hard Drive, Part 2........................................................................ |
3-12 |
12. |
No O/S Loading from Hard Drive, Part 3........................................................................ |
3-13 |
13. |
No O/S Loading from Diskette Drive .............................................................................. |
3-14 |
14. No O/S Loading from CD-ROM or DVD-ROM Drive ................................................... |
3-15 |
|
15. |
No Audio, Part 1 .............................................................................................................. |
3-16 |
16. |
No Audio, Part 2 .............................................................................................................. |
3-17 |
17. |
Non-Functioning Device.................................................................................................. |
3-18 |
18. |
Non-Functioning Pointing Device or Keyboard .............................................................. |
3-19 |
19. |
No Network or Modem Connection................................................................................. |
3-20 |
appendix A |
|
|
Further Troubleshooting ................................................................................................................... |
A-1 |
|
appendix B |
|
|
POST Error Messages - Numbered ................................................................................................. |
B-1 |
|
appendix C |
|
|
Post Error Messages - Not Numbered ............................................................................................ |
C-1 |
|
iv Quick Troubleshooting Guide

chapter 1
GENERAL SERVICE INFORMATION
The information in this book was prepared for the Compaq Deskpro 2000 Series of Personal Computers with MMX technologies and later models as well as Compaq Deskpro Workstations, Compaq Professional Workstations, Compaq Armada Notebooks, and Compaq Prosignia Notebooks.
Not all features are available on all Compaq products.
Troubleshooting Procedures
The flowcharts listed in Chapters 2 and 3 use the building-block concept, where flowchart 1 is the first flowchart to which you should refer. If, during the debug process, you find yourself in a bind, refer back to flowchart 1 to determine which potential problems you can rule out.
Tools Required - Desktop Computers and Workstations
TTorx T-15 and flat-blade screwdrivers
TLoopback plugs
TWrite-protected bootable diskette
TAnti-static wrist strap
Tools Required - Notebooks
TMagnetic flat-blade screwdriver, Torx T-8, and T-10 screwdrivers
T3/16-inch and 7-mm hex sockets or nut drivers
TSecurity wrench
TLoopback plugs
TWrite-protected bootable diskette
TAnti-static wrist strap
Protecting Yourself and the Computer
TTurn the computer off before disconnecting or installing any cables.
TWhen the computer is connected to an AC power source there is always voltage applied to the system board. You must disconnect the power cord from the power source before opening the computer to prevent system board or component damage.
TFor personal safety and to ensure that the computer does not overheat, Compaq recommends that you install the computer cover or access panel before turning on the computer.
Quick Troubleshooting Guide |
1-1 |

TThe screws used in the computer are of different thread sizes and lengths; using the wrong screw in an application may damage the unit.
TAll data stored on a hard drive is lost when the drive is formatted.
Clearing CMOS
This procedure does not apply to portable computers.
1.Turn off the computer and any peripheral devices that are connected to it.
2.Disconnect the power cord from the electrical outlet and then from the computer.
CAUTION: The cooling fan is off only when the computer is turned off and the power cable has been disconnected. The cooling fan is always on in all other instances, such as when the computer is “On,” in “Standby,” or “Suspend” mode.
CAUTION: When the computer is connected to an AC power source there is always voltage applied to the system board. You must disconnect the power cord from the power source before opening the computer to prevent system board or component damage.
3.Remove the computer cover.
4.Reset the computer by one of the following methods depending on the model.
TIf the system board has a CMOS reset button, press the button and then release it to reset the CMOS.
TIf the system board uses jumpers, remove the E50 jumper from pins 1 and 2 for 60 seconds; then replace the jumper.
Customer Responsibilities
Check the service contract and verify that the customer has taken care of these items:
TInstalling the operating system.
TProviding and running all virus check programs.
TRunning Diagnostics on the hard drive.
TReloading the operating system as required.
TCopying over the operating system files as required.
TReformatting the hard drive as required.
1-2 General Service Information

POST Power-On Sequence
When a Compaq Personal Computer or workstation is turned on, the computer reads its first instructions from memory. It finds the instructions from the power-on restart vector addressed in ROM and begins executing those instructions. The instructions begin with a series of ROMresident diagnostic tests called the Power-On Self-Test (POST) to determine if the computer is operational and ready to accept an operating system. The normal checking procedure for POST includes:
1.BIOS memory is tested and initialized (the first 128K of RAM is not displayed). If the system does not pass the first memory check, an immediate error message is displayed and the initialization process stops. The cause of a failure at this stage might be a problem with the ROM, the system board, the CPU, or memory.
2.The system board and bus devices are quick-tested to determine if the interrupt controllers, DMA controllers, keyboard controller, video display controller, interval timers, diskette drive controller, serial and parallel port controller, and fixed disk controller are all properly installed and are functioning properly.
3.The remaining memory is tested and the count displayed on the monitor only when starting the machine from the off mode. You should verify that the memory displayed corresponds with the memory installed in the computer.
4.The keyboard, drives, and their controllers are initialized and tested. Test results are shown via the LEDs on the keyboard and computer case.
5.CMOS memory is checked for configuration, time, and date. If the CMOS memory parameters do not match the actual system configuration, a "162-System Options" error or a “System CMOS” error will be displayed with instructions for restarting the computer.
6.The speaker will sound two short beeps or will display the Compaq splash screen when the POST has been successfully completed. Refer to the POST error messages when error messages are displayed on the screen or when beep patterns are sounded.
Compaq Drive Protection System
The Compaq Drive Protection System (DPS) is a diagnostic tool built into the hard drives installed in select Compaq Deskpro computers and workstations. DPS is designed to help diagnose problems that might result in unwarranted hard drive replacement.
When Compaq Deskpro Computers and workstations are built, each installed hard drive is tested using DPS and a permanent record of key information is written onto the drive. Each time DPS is run, test results are written to the hard drive. This information may be used to help diagnose the hard drive and the computer system.
Running DPS will not affect any programs or data stored on the hard drive. The test resides in the hard drive firmware and can be executed even if the computer will not boot to an operating system. The time required to execute the test depends on the manufacturer and size of the hard drive; in most cases, the test will take approximately 2 minutes per gigabyte.
DPS should be used when you suspect a hard drive problem. If the computer reports a SMART Hard Drive Detect Imminent Failure message, there is no need to run DPS; instead, back up the information on the hard drive and replace the hard drive.
Quick Troubleshooting Guide |
1-3 |

Accessing DPS Through Compaq Diagnostics for Windows
To access DPS through Compaq Diagnostics for Windows, perform the following steps:
1.Turn on the computer and select My Computer→Control Panel→Compaq Diagnostics.
A choice of five possible headings appears in the Diagnostics screen: Overview, Test, Status, Log, and Error.
2.Select Test→Type of Test
A choice of three tests appear: Quick Test, Complete Test, and Custom Test.
3.Select Custom Test.
A choice of two test modes is offered: Interactive Mode and Unattended Mode.
4.Select Interactive Test→Storage→Hard Drives.
5.Select the specific drive(s) to be tested→Drive Protection System Test→Begin Testing.
When the test has been completed, one of three messages will be displayed for each of the drives tested:
TTest Succeeded. Completion Code 0.
TTest Aborted. Completion Code 1 or 2.
TTest Failed. Drive Replacement Recommended. Completion Code 3 through 14.
If the test failed, the completion code should be recorded for help in diagnosing the computer problem.
Compaq Configuration Record Utility
Compaq Configuration Record Utility is an online information-gathering tool similar to other Compaq management tools that run on computers. It gathers critical hardware and software information from various sources to give a complete view of the computer. Configuration Record Utility delivers comprehensive configuration capture, provides a means for automatically identifying and comparing configuration changes, and has the ability to maintain a computer configuration history. The information can be saved as a history of multiple sessions.
This utility was developed to allow resolution of problems without taking the computer off-line and to assist in maximizing computer availability. The information obtained by the utility is useful in troubleshooting computer problems, and streamlines the service process by enabling quick and easy identification of computer configurations, which is the first step in resolving service cases.
The Compaq Configuration Record Utility is accessed via an icon in the Control Panel. When running the utility, information is automatically gathered on such items as the operating system version number, operating system parameters, and the operating system startup files. The utility then combines this information with information on the hardware configuration to deliver a comprehensive view of the computer.
1-4 General Service Information

chapter 2
TROUBLESHOOTING FLOWCHARTS FOR DESKTOP
COMPUTERS
1.Initial Troubleshooting, 2-2
2.No Power, Part 1, 2-3
3.No Power, Part 2, 2-4
4.No Power, Part 3. 2-5
5.No Video, Part 1, 2-6
6.No Video, Part 2, 2-7
7.No Video, Part 3, 2-8
8.Error Messages, Part 1, 2-9
9.Error Messages, Part 2, 2-10
10.Error Messages, Part 3, 2-11
11.No O/S Loading, 2-12
12.No O/S Loading from Hard Drive, Part 1, 2-13
13.No O/S Loading from Hard Drive, Part 2, 2-14
14.No O/S Loading from Hard Drive, Part 3, 2-15
15.No O/S Loading from Diskette Drive, 2-16
16.No O/S Loading from CD-ROM Drive , 2-17
17.No O/S Loading from Network, 2-18
18.Non-Functioning Device, 2-19
Quick Troubleshooting Guide |
2-1 |
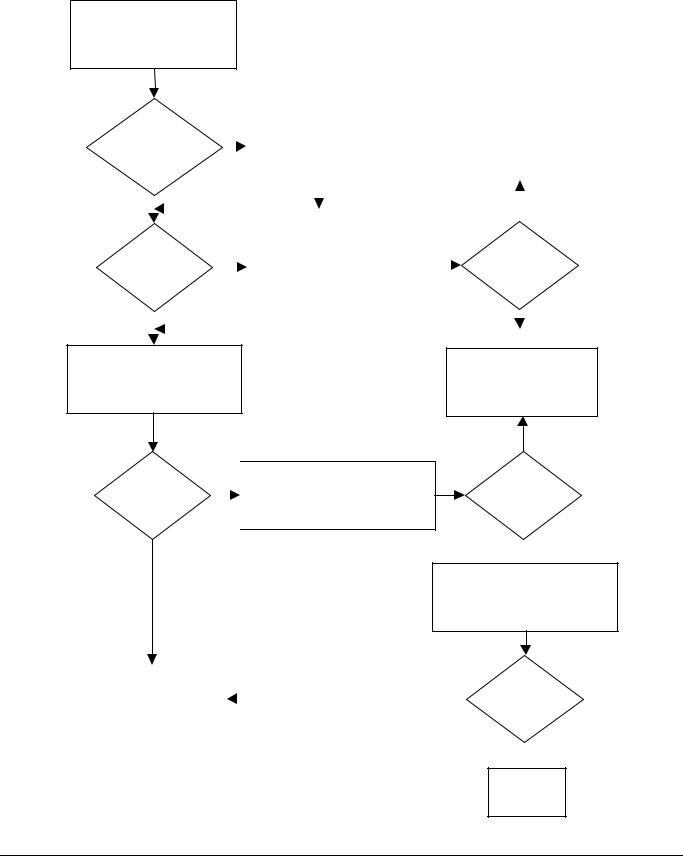
1. Initial Troubleshooting
Begin
Troubleshooting
115/230V |
N |
Set voltage to |
|
115V or 230V |
|
||
|
|
||
set right? |
|
|
|
|
as required |
|
|
|
|
|
|
|
|
|
|
Y |
|
|
|
|
|
|
|
|
|||
|
|
|
|
|
|
Is there |
N |
Go to Page 2-3, |
|||
|
|||||
power? |
|
No Power |
|||
|
|
|
|
|
|
|
|
|
|||
Y |
|
|
|
|
|
|
|
|
|||
|
|
|
|
|
|
Is there |
N |
Go to Page 2-6, |
|||
|
|||||
video? |
|
No Video |
|||
|
|
|
|
|
|
|
|
|
|||
Y |
|
|
|
|
|
|
|
|
|||
|
|
|
|
|
|
Beeps, |
Y |
Go to Page 2-9, |
|||
|
|||||
LEDs, or error |
|
||||
|
Error Messages |
||||
messages? |
|
||||
|
|
||||
N |
|
|
|
|
|
|
|
N |
|
||
|
|
||||
Is the O/S |
|
||||
Go to Page 2-12, |
|||||
|
|||||
loading? |
|
No O/S Loading |
|||
|
|
|
|
|
|
Y |
|
|
|
|
|
|
|
|
|||
|
|
|
|
|
|
All drives |
N |
Go to Page 2-19, |
|||
|
Non-Functioning |
||||
working? |
|
||||
|
Device |
||||
|
|
|
|
||
|
|
|
|||
Y |
|
|
|
|
|
New |
|
|
|||
Y |
Run |
||||
options or |
|||||
Compaq Configuration |
|||||
|
|||||
software |
|
||||
|
Utility, see Chapter 1 |
||||
added? |
|
||||
|
|
||||
N |
|
|
|
|
|
|
|
|
|
||
End |
|
|
|||
2-2 Troubleshooting Flowcharts for Desktop Computers

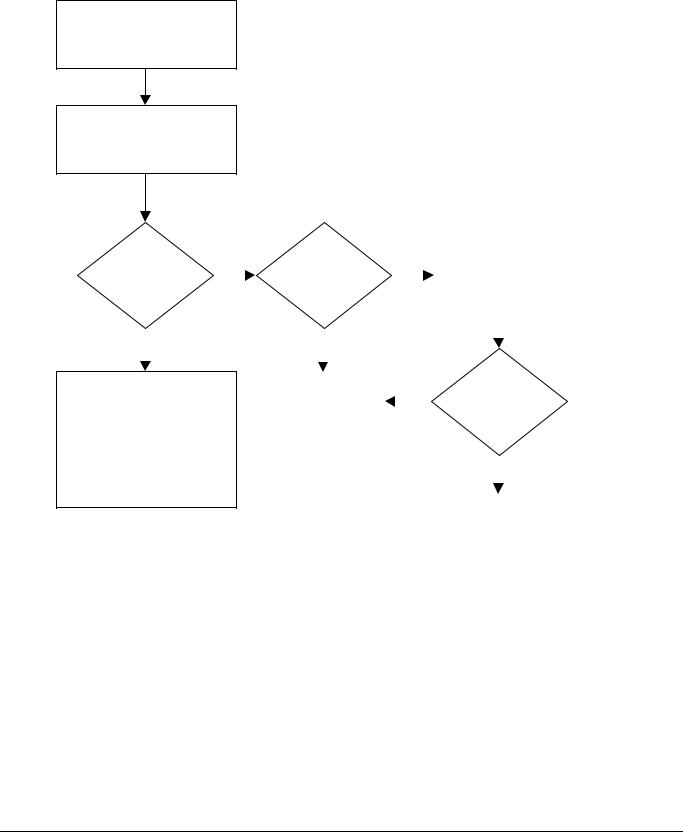
2. No Power, Part 1
No Power (Power LED is off)
Power cord
N Turn computer off.
connected?
 Plug power cord into
  computer and power outlet.
Y |
|
|
|
|
|
|
|
Y |
|
|
|
|
|
|
|
||
Using power |
Ensure power strip or |
|
|||
|
|
|
|||
strip or UPS? |
|
|
UPS is turned on. |
|
|
|
|
|
|
|
|
N
Active
N Turn computer off.
outlet?
 Plug power cord into
  different active wall outlet.
Y
Turn off power, disconnect power cord, and open the computer.
Go to Page 2-4,
No Power, Part 2
Restart computer and return to start of this chart.
Caution: Power is continuous to the system board and power supply even when the power switch is turned off. To prevent damage to the unit, disconnect the power cord from the power source or the unit before beginning disassembly procedures.
Quick Troubleshooting Guide |
2-3 |
3. No Power, Part 2
Continued from Page 2-3,
No Power, Part 1
Caution: Power is continuous to the system board and power supply even when the power switch is turned off. To prevent damage to the unit, disconnect the power cord from the power source or the unit before beginning disassembly procedures.
Power supply |
N |
Plug power connector |
|
|
|
|
|||||
connected to |
|
|
|
|
Replace power supply. |
||||||
|
|
|
into system board. |
|
|||||||
system board? |
|
|
|
|
|
|
|
||||
Y |
|
|
|
|
|
|
|
|
|
|
|
|
|
|
|
|
|
|
|
|
|
N |
|
|
|
|
|
|
|
|
|
|
|
||
|
|
|
|
|
|
|
|
|
|
||
System |
Y |
|
|
|
|
|
|||||
|
|
|
|
|
|
||||||
|
|
|
|
|
|
||||||
|
|
|
|
|
|
|
5V Aux LED on? |
||||
board have 5V |
|
|
|
Plug in power cord. |
|
|
|||||
|
|
|
|
|
|||||||
|
|
|
|
||||||||
Aux LED? |
|
|
|
|
|
|
|
|
|
||
|
|
|
|
|
|
|
|
|
|
|
|
|
|
|
|
|
|
|
|
|
|
|
|
N |
|
|
|
|
|
|
|
|
|
|
Y |
|
|
|
|
|
|
|
|
|
|
||
|
|
|
|
|
|
|
|
|
|
|
|
1. Press power button on.
2. Check for fan rotation. Replace power supply.
3. Press power button off.
N
|
|
N |
|
1. |
Unplug power to all drives. |
Does |
fan spin? |
|
2. |
Remove all installed cards. |
|
|
|
||||
|
|||||
|
|
|
|
3. |
Press power button on. |
|
|
|
|||
|
|
|
|
|
|
Y
Does fan spin?
 Y
Y
1.Add drives back one-at- a-time to find faulty drive.
2.Add cards back one-at- a-time to find faulty card.
Go to Page 2-5, |
|
N |
|
|
|
Power on? |
|
No Power, Part 3 |
|
|
|
|
|
|
|
|
|
|
|
 Y
Y
Done
2-4 Troubleshooting Flowcharts for Desktop Computers

4. No Power, Part 3
Continued from page 2-4,
No Power, Part 2
Drive power |
N |
|
Reseat drive power and |
||||||
and data cables |
|
|
data cable connectors. |
||||||
|
|
||||||||
connected? |
|
|
|||||||
|
|
|
|
|
|||||
|
|
|
|
|
|
|
|
||
Y |
|
|
|
|
|
|
|
|
|
|
|
|
|
|
|
|
|
|
|
|
|
|
|
|
|
|
|
|
|
|
|
|
|
|
|
|
|||
Loose |
Y |
|
Reseat loose components |
||||||
or damaged |
|
|
and replace damaged |
||||||
|
|
|
|||||||
components? |
|
|
items in the computer. |
||||||
N |
|
|
|
|
|
|
|||
|
|
|
|
|
|
||||
|
|
|
|
|
|
|
|
||
|
|
|
|
|
|
||||
|
|
|
|
|
|
|
|
|
|
Reinstall cover and |
|
|
|
|
|
|
|
||
restart computer. |
|
|
|
|
|
|
|
||
|
|
|
|
|
|
|
|
|
|
Caution: Power is continuous to the system board and the power supply even when the power switch is turned off. To prevent damage to the unit, disconnect the power cord from the power source or the unit before beginning disassembly procedures.
|
|
|
|
N |
|
Replace |
|
|
|
|
|
Y |
|
|
Power LED on? |
|
|
|
Power LED on? |
Done |
|||||||||
|
|
|
|
|
|
|||||||||
|
|
power switch. |
|
|
|
|
||||||||
|
|
|
|
|
|
|
|
|
|
|
|
|
|
|
|
|
|
|
|
|
|
|
|
|
|
|
|
|
|
|
|
|
|
|
|
|
|
|
|
|
|
|
|
|
|
|
|
|
|
|
|
|
|
|
|
|
|
|
|
|
Y |
|
|
|
|
|
|
|
N |
|
|
|
|
|
|
|
|
|
|
|
|
|
|
||||||
|
|
|
|
|
|
|
|
|
|
|
|
|
|
|
|
|
|
|
|
|
|
|
|
|
|
|
|
|
|
|
|
|
|
|
|
|
|
|
|
|
|
|||
|
Done |
|
|
|
|
|
|
Replace |
|
|
|
|
||
|
|
|
|
|
|
|
|
|
system board. |
|
|
|
|
|
|
|
|
|
|
|
|
|
|
|
|
|
|
|
|
Quick Troubleshooting Guide |
2-5 |

5. No Video, Part 1
Caution: Power is continuous to the system board and power supply even
No video when the power switch is turned off. To prevent damage to the unit, disconnect the power cord from the power source or the unit before beginning disassembly procedures.
Beeps or
flashing CPU Y or keyboard
lights?
N |
|
|
Y |
||
|
|||||
Monitor LED |
|||||
|
|||||
on? |
|
||||
|
|
||||
N |
|
|
|||
|
|
|
|
|
|
Monitor Y plugged in and 
turned on?
N
Plug in and turn on monitor, then return to Page 2-2,
Initial Troubleshooting.
Go to Page 2-9,
 Error Messages,
Part 1
LED color? |
Green |
|
Contrast and |
N |
Turn contrast and |
|||||||||
|
|
|
|
|
brightness |
|
|
|
|
|||||
(note 1) |
|
|
|
|
|
|
|
|
|
brightness up. |
||||
|
|
|
|
|
turned up? |
|
|
|
||||||
|
|
|
|
|
|
|
|
|
|
|
||||
|
|
|
|
|
|
|
|
|
|
|
|
|
|
|
|
|
|
|
|
|
|
|
|
|
|
|
|
|
|
Amber |
|
|
|
|
|
|
Y |
|
|
|
|
|
|
|
|
|
|
|
|
|
|
|
|
|
|
|
|||
|
|
|
|
|
|
|
|
|
|
|
|
|
|
|
Video |
Y |
|
|
|
|
|
|
|
|
|
||||
|
|
|
|
|
|
|
|
|
||||||
|
Go to Page 2-7, |
|
|
|
|
|
|
|||||||
adapter |
|
|
|
|
|
|
|
|||||||
|
|
|
|
|
|
|
|
|
|
|
||||
connected? |
|
|
|
|
|
No Video, Part 2 |
|
|
|
|
|
|
||
(note 2) |
|
|
|
|
|
|
|
|
|
|
|
|
|
|
|
|
|
|
|
|
|
|
|
|
|
|
|
|
|
N |
|
|
|
|
|
Plug in, turn on, and |
|
|
|
|
||||
|
|
|
|
|
|
return to Page 2-2, |
|
|
|
|
||||
|
|
|
|
|
|
|
|
|
|
|||||
|
|
|
|
Initial Troubleshooting. |
|
|
|
|
||||||
|
|
|
|
|
|
|
|
|
|
|
|
|
|
|
Reconnect |
|
|
Y |
|
|
|
Video OK? |
Done |
|||
monitor (note 3). |
|
|
|
||
|
|
|
|
|
|
|
|
|
|
|
|
|
|
|
|
|
|
N

 Replace monitor.
Notes:
1.Older monitors do not support the amber LED.
2.If more than one adapter is installed, monitor must be connected to primary controller.
3.Turn off and unplug computer before reconnecting cables.
2-6 Troubleshooting Flowcharts for Desktop Computers

6. No Video, Part 2
Continued from Page 2-6,
No Video, Part 1
Turn off power, disconnect power cord, and open the computer.
Reseat processor, riser board, video card, and memory, then clear CMOS.
Replace cover and power cord, then restart computer.
Video OK, |
N |
computer |
|
|
|
starts? |
|
Caution: Power is continuous to the system board and power supply even when the power switch is turned off. To prevent damage to the unit, disconnect the power cord from the power source or the unit before beginning disassembly procedures.
|
N |
|
Y |
|
F1 |
|
Message |
|
“System |
||
Same |
|
“System option |
|
|
option |
symptoms? |
|
|
|||
not set”? |
|
|
not set” |
||
|
|
|
|
||
|
|
|
|
|
routine |
|
|
|
|
|
|
Y |
|
|
|
|
|
Y |
|
N |
||
|
|
|
|
|
|
|
|
|
|
|
|
|
|
|
|
|
|
|
|
|
|
Done |
|
|
|
|
|
|
|
|
||
|
|
|
|
|
|
|
|
Notes: |
||
|
|
|
|
|
|
|
|
|||
|
|
|
|
|
|
|
|
1. |
System boards without a piezo speaker, or chassis |
|
Turn off computer and disconnect |
|
|
||||||||
|
|
|
without an internal speaker require an external |
|||||||
power. Replace components in |
|
|
|
speaker. |
||||||
system one at a time starting with |
|
|
2. |
Some power supplies require a load greater than |
||||||
hard drive. Test system after each |
|
|
|
the system board alone to function properly. When |
||||||
replacement for video or beeps. |
|
|
|
disconnecting drives, disconnect the data cables |
||||||
|
|
|
|
|
|
|
|
|
but leave the power cables attached. |
|
|
|
|
|
|
|
|
|
|
||
|
|
|
|
|
|
3. |
Remove auxiliary video card if integrated video. |
|||
|
|
|
|
|
|
4. |
Remove cache module on Deskpro 2000 models |
|||
|
|
|
|
|
|
|||||
|
|
Go to Page 2-8, |
|
|
|
|
(if installed). |
|||
|
|
No Video, Part 3 |
|
|
|
|
|
|
||
|
|
|
|
|
|
|
|
|
|
|
Quick Troubleshooting Guide |
2-7 |
7. No Video, Part 3
Continued from Page 2-7,
No Video, Part 2
Restart computer.
Caution: Power is continuous to the system board and power supply even when the power switch is turned off. To prevent damage to the unit, disconnect the power cord from the power source or the unit before beginning disassembly procedures.
See codes |
N |
||
or flashing |
|||
|
|||
lights or hear |
|
||
beeps? |
|
||
|
|
||
Y |
|
|
|
|
|
|
|
Turn off computer and disconnect power. Replace components in system one at a time starting with hard drive. Test system after each replacement for video or beeps.
Integrated |
|
N |
|
Replace |
||||||
|
|
|
|
|
||||||
video? |
|
|
|
|
|
video card. |
||||
|
|
|
|
|
|
|
|
|
|
|
|
|
|
|
|
|
|
|
|
||
Y |
|
|
|
|
|
|
|
|
|
|
|
|
|
N |
|||||||
|
|
|
|
|||||||
|
|
|
|
|||||||
Replace |
|
|
||||||||
|
|
|
|
|
|
Video OK? |
||||
|
|
|
|
|
||||||
system board. |
|
|
|
|
|
|
|
|
|
|
|
|
|
|
|
|
|
|
|
|
|
|
|
|
|
|
|
|
|
|
||
|
|
|
|
|
|
|
|
Y |
|
|
|
|
|
|
|
|
|
|
|
|
|
|
|
|
|
|
|
|
|
Done |
|
|
|
|
|
|
|
|
|
|
|
|
|
2-8 Troubleshooting Flowcharts for Desktop Computers

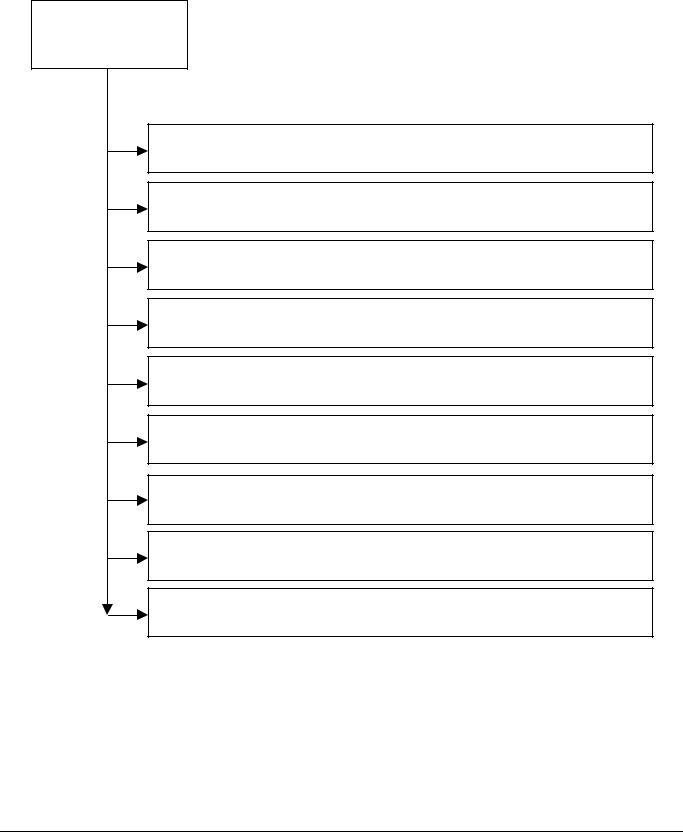
8. Error Messages, Part 1
Beeps,
CPU or Keyboard Lights, or POST error messages.
Caution: Power is continuous to the system board and power supply even when the power switch is turned off. To prevent damage to the unit, disconnect the power cord from the power source or the unit before beginning disassembly procedures.
Power LED has no color showing. Computer is off.
Power LED glows green. Computer is on.
Power LED blinks green 1x/second. Normal suspend mode.
Power LED glows red. CPU not installed/fetching code.
Power LED blinks red 4x/second. CPU thermal shutdown.
Power LED blinks red 1x/two or more seconds. Power supply crow bar.
Power and hard drive LEDs glow red. Riser board not seated.
Num Lock LED flashing green. Memory error.
Caps Lock LED flashing green. No video.
Scroll Lock LED flashing green. System board failure, prior to video.
Audible. 1L 3S. System ROM is bad; system is running in FailSafe Boot Block Mode.
Audible. 2S. Power-ON successful.
Continued on Page 2-10, Error Messages, Part 2.
Notes: Short (S) and long (L) beeps will only be heard if the system has a speaker.
LEDs will only function on PS/2 keyboards, not USB.
Quick Troubleshooting Guide |
2-9 |

9. Error Messages, Part 2
Continued from Page 2-9,
Error Messages, Part 1
Caution: Power is continuous to the system board and power supply even when the power switch is turned off. To prevent damage to the unit, disconnect the power cord from the power source or the unit before beginning disassembly procedures.
1S 2L. Num Lock blinking. System memory not present or incompatible.
Unplug, open computer, and check memory modules. Ensure memory modules are correct type and that they match in size and speed.
1L 2S. Cap Lock blinking. Video controller not present or incorrectly initialized. Ensure monitor is plugged in. Unplug, open computer, and check video card. Reseat card and ensure it is in the proper expansion slot.
1L 3S. All keyboard LEDs blinking. ROM Failure. Create ROMPaq diskette and reload ROM. Download ROMPaq from Compaq website at www.compaq.com.
2L 1S. Scroll Lock blinking. System HW failure prior to video. Unplug, open computer, and check for physical damage. Ensure all cables and cards are seated. Look for burn marks or smoke.
No beeps. HD and Power LED blinking. Riser not detected. Unplug, open computer, and check and reseat riser board.
Continued on Page 2-11, Error Messages, Part 3.
Notes: Short (S) and long (L) beeps will only be heard if the system has a speaker.
LEDs will only function on PS/2 keyboards, not USB.
2-10 Troubleshooting Flowcharts for Desktop Computers
10. Error Messages, Part 3
Continued from Page 2-10,
Error Messages, Part 2
Caution: Power is continuous to the system board and power supply even when the power switch is turned off. To prevent damage to the unit, disconnect the power cord from the power source or the unit before beginning disassembly procedures.
Error 162, 2S Beeps. System Option not set. Select F1. If error occurs after reboot, unplug and open computer and check CMOS jumper setting.
Error 163. Time & Date Not Set. Set time and date in F10 or boot to O/S and set time and date. If error occurs after reboot, unplug and open computer, then check CMOS setting.
Error 2xx. Memory Error. See Appendix B for specific definitions. Unplug, open computer, and reseat memory modules. Ensure modules are correct type and that they match in size and speed.
Error 30x. Keyboard Error. See Appendix B for specific definitions. Do not type on keyboard before POST. Ensure keyboard connected to proper connector.
Error 6xx. Floppy Error. See Appendix B for specific definitions. Unplug, open computer, check diskette drive, and check and reseat power and data cables.
Error 91x. Misc. Connection Error. See Appendix B for specific definitions. Unplug, open computer, and check hood lock coil, thermal sensor pigtail, and riser for good connection.
Error 178x. Fixed Disk Error. See Appendix B for specific definitions. Unplug, open computer, check hard drive, and check and reseat power and data cables.
Error 1800. Thermal Alert. System overheating. Let computer cool off. Ensure processor has heatsink installed and that speed setting on system board is correct. Remove obstructions to air vents.
All other POST error messages - refer to Appendix B for definitions and solutions.
Notes: Short (S) and long (L) beeps will only be heard if the system has a speaker.
LEDs will only function on PS/2 keyboards, not USB.
x = Numbers 1 - 9
Quick Troubleshooting Guide |
2-11 |
11. No O/S Loading
O/S not loading from:
CD-ROM drive, go to Page 2-17
Diskette drive, go to Page 2-16
Hard drive, go to Page 2-13
Network,
go to Page 2-18
Factory recommended booting priority
1.CD-ROM drive
2.Diskette drive
3.Hard drive
4.Network
NOTE: Before beginning, always check drive jumpers, cable connections, cable ends, and drives for bent or damaged pins.
2-12 Troubleshooting Flowcharts for Desktop Computers
12. No O/S Loading from Hard Drive, Part 1
O/S not loading from hard drive
Non-
System Disk
Message?
Y
Boot from
CD?
Y
Remove CD and
reboot.
Boot from hard drive?
Y
Done
|
N |
|
|
|
|
Go to Page 2-14, |
||||
|
|
|
|
|
|
No O/S Loading from |
||||
|
|
|
|
|
|
|||||
|
|
|
|
|
|
|
Hard Drive, Part 2 |
|||
|
|
|
|
|
|
|
|
|
|
|
|
|
|
|
|
|
|
Go to Page 2-16, |
|||
|
|
|
|
|
|
No O/S Loading from |
||||
|
|
|
|
|
|
|
Diskette Drive |
|||
|
N |
|
|
|
|
N |
|
|
|
|
|
|
|
|
|
|
|
||||
|
|
|
|
|
|
|
|
|
|
|
|
|
|
|
|
|
|
Boot from |
|||
|
|
|
|
|
|
|
diskette? |
|||
|
|
|
|
|
|
|
|
|
||
|
|
|
|
|
|
|
Y |
|
|
|
|
|
|
|
|
|
|
||||
|
|
|
|
|
|
|
|
|
||
|
|
|
|
|
|
|
Remove diskette |
|
||
|
|
|
|
|
|
|
and reboot. |
|
||
|
|
|
|
|
|
|
|
|
|
|
|
|
|
|
|
|
|
|
|
|
|
N |
N |
|
|
Boot from |
|
|
|
|
|
hard drive? |
|
Boot from |
N |
||||
|
|
|
|
||
network? |
|
|
|
|
|
|
|
|
|
||
Y |
|
|
Go to Page 2-18, |
||
|
|||||
|
|
No O/S Loading |
|||
|
|
|
from Network |
||
|
|
|
|
|
|
|
|
|
|
|
|
Change boot priority through Computer Setup and reboot.
Boot from |
N |
|||||
|
|
|
|
|||
hard drive? |
|
|
|
|
||
|
|
|
|
|
|
|
|
|
|
|
|
|
|
Y |
|
|
|
Go to |
||
|
|
|
Page 2-19, |
|||
|
|
|
|
|||
|
|
|
|
Non-Functioning |
||
|
|
|
|
|||
Done |
|
|
Device |
|||
|
|
|
|
|
||
|
|
|
|
|
|
|
Factory Recommended Booting Priority
1.CD-ROM drive if bootable drive
2.Diskette drive
3.Hard drive
Y |
4. Network |
|
NOTE: Before beginning, always check drive jumpers, Done cable connections, cable ends and drives for bent or
damaged pins.
Quick Troubleshooting Guide |
2-13 |

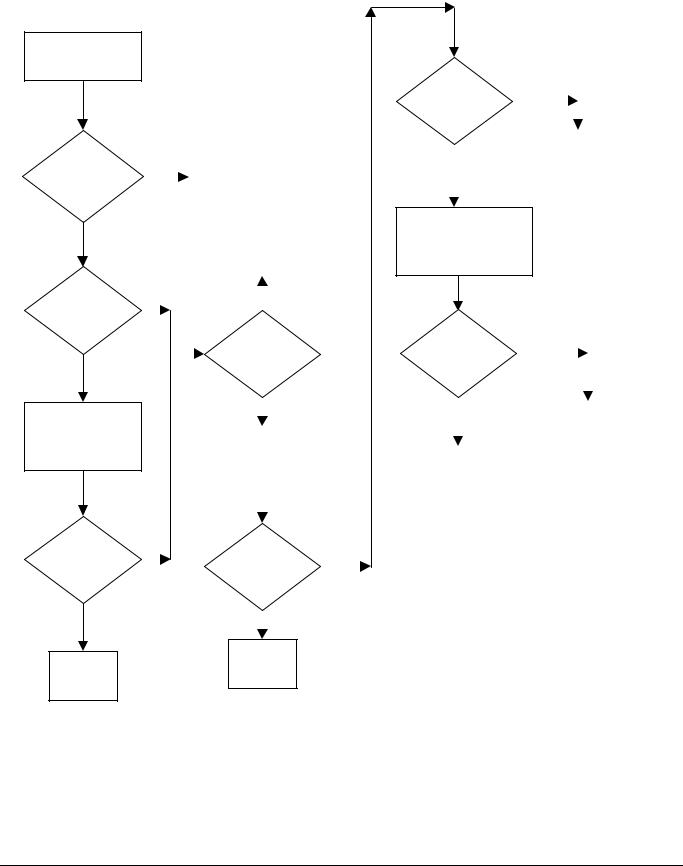
13. No O/S Loading from Hard Drive, Part 2
|
|
|
|
|
|
|
|
|
|
|
|
|
|
|
|
|
|
|
|
Continued from |
|
|
|
|
|
|
|
|
|
Page 2-13 |
|
|
|
|
|
Access |
|||
No O/S Loading |
|
|
|
|
|
||||
|
|
|
|
|
hard drive? |
||||
from |
|
|
|
|
|
||||
|
|
|
|
|
|
|
|
||
Hard Drive, Part 1 |
|
|
|
|
|
|
|
|
|
|
|
N |
|
|
|
N |
|
||
|
|
|
|
||||||
|
|
|
|
|
|
|
|
||
CD or |
|
|
|
|
|
|
|||
|
|
|
|
|
|
||||
Replace hard drive. |
|
|
Run FDISK |
||||||
diskette in |
|
|
|
|
|||||
|
|
|
|
|
|
|
|||
drive? |
|
|
|
|
|
|
|
|
|
|
|
|
|
|
|
|
|
||
|
|
|
|
|
|
|
|
|
|
Y |
|
|
|
|
|
|
|
|
|
|
|
|
|
|
|
|
|
|
|
|
|
|
|
|
|
|
|
|
|
|
|
|
|
|
|
|
Hard drive |
||
|
|
|
|
|
|
|
partition? |
||
Remove diskette |
|
|
|
|
|||||
|
|
|
|
|
Y |
|
|||
|
|
|
|
|
|
||||
and reboot. |
|
|
|
|
|
|
|||
|
|
|
|
|
|
|
|
|
|
|
|
|
|
|
|
|
|
|
|
|
|
|
|
|
|
|
|
|
|
Y
Go to Page 2-15,
No O/S Loading from Hard Drive, Part 3
N
Create partition, then format hard drive to bootable C:\ prompt.
|
|
|
|
|
|
|
|
|
|
|
|
|
|
|
|
|
|
|
|
|
|
|
|
|
|
|
|
|
|
|
|
|
|
|
|
|
|
|
|
|
|
|
Y |
|
N |
|
|
||||||||||
Boot from |
|
Y |
|
|
|
|
|
|
|
|
|
|
|
Hard drive |
|
|
|
|
||||||||||
|
|
|
|
|
Done |
|
|
|
|
|
|
formatted? |
|
|
|
|
|
|
||||||||||
hard drive? |
|
|
|
|
|
|
|
|
|
|
|
|
|
|
||||||||||||||
|
|
|
|
|
|
|
|
|
|
|
|
|
|
|
|
|
|
|
|
|
|
|
|
|
|
|
||
|
|
|
|
|
|
|
|
|
|
|
|
|
|
|
|
|
|
|
|
|
|
|
|
|
|
|
|
|
|
|
|
|
|
|
|
|
|
|
|
|
|
|
|
|
|
|
|
|
|
|
|
|
|
|
|
|
|
N |
|
|
|
|
|
|
|
|
|
|
|
|
|
|
|
|
|
|
Format hard drive |
|
|
|
|
|||||
|
|
|
|
|
|
|
|
|
|
|
|
|
|
|
|
|
|
|
|
|
|
|||||||
|
|
|
|
|
|
|
|
|
|
|
|
|
|
|
|
|
|
and bring to a |
|
|
|
|
||||||
|
|
|
|
|
|
|
|
|
|
|
|
|
|
|
|
|
|
|
|
|
|
|
||||||
|
|
|
|
|
|
|
|
|
|
|
|
|
|
|
|
|
|
|
bootable C:\ prompt. |
|
|
|
|
|||||
Boot |
|
Y |
|
|
|
|
|
|
||||||||||||||||||||
|
|
|
|
|
|
|
|
|
|
|
|
|
|
|
|
|
||||||||||||
|
|
|
|
|
|
|
|
|
|
|
|
|
|
|
|
|
||||||||||||
|
|
|
|
|
|
|
|
|
|
|
|
|
|
|
|
|
||||||||||||
from diskette |
|
|
|
|
|
|
|
|
Y |
Computer |
|
|
|
|
|
Load O/S using |
|
|||||||||||
|
|
|
|
|
|
|
|
|
|
|
|
|
||||||||||||||||
drive? |
|
|
|
|
|
|
|
|
|
|
|
|
|
|||||||||||||||
|
|
|
|
|
|
|
|
|
|
|
|
|
|
|
|
Restore CD if |
|
|||||||||||
|
|
|
|
|
|
|
|
|
|
|
|
|
boot? |
|
|
|
|
|
|
|||||||||
|
|
|
|
|
|
|
|
|
|
|
|
|
|
|
|
applicable (see note). |
|
|||||||||||
|
|
|
|
|
|
|
|
|
|
|
|
|
|
|
|
|
|
|
|
|
|
|
||||||
N |
|
|
|
|
|
|
|
|
|
|
|
|
N |
|
|
|
|
|
|
|
|
|
|
|
|
|
|
|
|
|
|
|
|
|
Done |
|
|
|
|
|
|
|
|
|
|
|
|
|
|
|
|
|
|||||
|
|
|
|
|
|
|
|
|
|
|
|
|
|
|
|
|
|
|
|
|
||||||||
|
|
|
|
|
|
|
|
|
|
|
|
|
|
|
Note: Refer to the “Customer |
|||||||||||||
|
|
|
|
|
|
|
|
|
|
|
||||||||||||||||||
|
|
|
|
|
|
|
|
|
|
|
|
|
|
|
|
|
|
|||||||||||
Go to Page 2-16, |
|
|
|
|
|
|
|
|
|
|
|
Go to Page 2-15, |
|
|||||||||||||||
No O/S Loading |
|
|
|
|
|
|
|
|
|
|
|
No O/S Loading |
|
Responsibilities” section of this |
||||||||||||||
from |
|
|
|
|
|
|
|
|
|
|
|
from |
|
document and the customer |
||||||||||||||
Diskette Drive |
|
|
|
|
|
|
|
|
|
|
|
Hard Drive, Part 3 |
|
service contract. |
||||||||||||||
2-14 Troubleshooting Flowcharts for Desktop Computers
 Loading...