


HP Pavilion 716n, Pavilion a230n, Pavilion a250n, Pavilion a255c, Pavilion a257c Creative Guide
...
hp pavilion home pc
Creating DVDs and CDs
With Your DVD Writer/CD Writer Drive

The information in this document is subject to change without notice.
Hewlett-Packard® Company makes no warranty of any kind with regard to this material, including, but not limited to, the implied warranties of merchantability and fitness for a particular purpose.
HP shall not be liable for errors contained herein or for incidental or consequential damages in connection with the furnishing, performance, or use of this material. THE WARRANTY TERMS CONTAINED IN THIS STATEMENT, EXCEPT TO THE EXTENT LAWFULLY PERMITTED, DO NOT EXCLUDE, RESTRICT OR MODIFY AND ARE IN ADDITION TO ANY MANDATORY STATUTORY RIGHTS APPLICABLE TO THE SALE OF THIS PRODUCT OR SERVICE TO YOU.
HP assumes no responsibility for the use or reliability of its software on equipment that is not furnished by HP.
This document contains proprietary information that is protected by copyright. All rights are reserved. No part of this document may be photocopied, reproduced, or translated to another language without the prior written consent of HP.
Hewlett-Packard Company
Home Products Division
P.O. Box 4010
Cupertino, CA 95015-4010
USA
© 2003 Hewlett-Packard Development Company, L.P. All rights reserved.
Hewlett-Packard is a registered trademark of Hewlett-Packard Company in the United States of America and other countries/regions.
Other brand or product names are trademarks of their respective holders.

Table of Contents
Creating DVDs and CDs......................... |
1 |
DVD Writer/CD Writer Drive Features..................... |
1 |
Creating DVDs and CDs with RecordNow ............... |
2 |
Creating a Music CD from Other CDs ................. |
2 |
Creating a Music CD from Audio Files................. |
3 |
Storing Files on a DVD or CD ............................. |
5 |
Copying a DVD or CD....................................... |
7 |
Erasing a DVD or CD ........................................ |
8 |
Removing Files from a Recorded Data Disc .......... |
8 |
Creating DVD Movies.......................................... |
10 |
Creating a Quick DVD Movie............................... |
10 |
Creating a Custom DVD Movie............................. |
12 |
Requirements for Capturing Video..................... |
12 |
Capturing Video with ShowBiz ......................... |
13 |
Editing Video Files in ShowBiz.......................... |
15 |
Recording a DVD Movie with Showbiz DVD....... |
17 |
Editing Recorded DVDs with Showbiz DVD............ |
18 |
Playing Your Recorded DVD Movie ....................... |
19 |
Playing Your DVD in |
|
InterVideo WinDVD......................................... |
19 |
Playing Your DVD in Windows Media Player ..... |
20 |
About Recording Video Files ................................ |
20 |
Erasing Recorded Video Files ............................... |
21 |
Recording VHS Video Files onto DVDs .................. |
21 |
Setting Automatic Recording Options .................... |
21 |
Compatibility Information..................................... |
23 |
Disc Quick Reference .......................................... |
24 |
Software Quick Reference.................................... |
29 |
DVD Writer User’s Guide |
iii |

Troubleshooting .................................................. |
34 |
My recording failed ........................................ |
34 |
I can’t add files to my music CD ....................... |
34 |
I can’t add data files to my DVD ....................... |
35 |
My music CD won’t play in my stereo ............... |
35 |
The titles of my music tracks don’t appear |
|
on my CD ...................................................... |
35 |
I get an error message when I try to |
|
capture video files........................................... |
36 |
My PC doesn’t recognize my digital |
|
camcorder when I try to capture video files........ |
36 |
My movie won’t play on my DVD player ........... |
36 |
Which discs are compatible with my |
|
DVD and CD players? ..................................... |
36 |
More Information................................................ |
37 |
iv |
Creating DVDs and CDs |

Creating DVDs and CDs
Your PC includes the DVD Writer/CD Writer, which is a DVD and CD rewriteable optical drive. This guide tells you about the optical drive features and tells you how to create audio, data, and video DVDs and CDs.
Important: HP supports lawful use of technology and does not endorse or encourage the use of our products for purposes other than those permitted by national copyright law.
DVD Writer/CD Writer Drive
Features
The DVD Writer/CD Writer is a multipurpose rewriteable optical drive that can read audio, data, and video files and can record them (burn) to both CDs and DVDs.
This DVD Writer/CD Writer drive enables you to:
■Create custom audio, data, and video files that can be recorded onto DVDs or CDs.
■Create DVDs and VCDs that can be played on most DVD-ROM drives and some home DVD players.
■Create music CDs.
DVD Writer User’s Guide |
1 |

■Record directly to a DVD or CD from a digital or an analog video source, such as a digital video camera, a TV tuner, or a VCR.
Note: Your PC must have an analog capture card to capture video from an analog device such as
aVCR.
■Store, edit, and preserve video files from various video sources.
■Store large amounts of data.
■Play DVD movies and music CDs.
■Read data DVDs and CDs.
Note: Burn is an industry term used to describe the recording of information to a DVD or CD. Optical recording uses a laser beam to place information onto the disc, thus the term ”burning.”
2 |
Creating DVDs and CDs |
Creating DVDs and CDs with RecordNow
Creating a Music CD from
Other CDs
1Click Start, choose All Programs, CD (DVD) Recorder, if it is present,
RecordNow, and then click RecordNow.
2Click Make a Music Disc.
3Select Make a Music Disc from other CDs.
4Insert a music CD, and then click Next.
5Select the tracks you want to record, and then click Add.
6Click the Finish button when you have added all the audio files to your music CD project.
7When prompted, insert a blank CD-R or CD-RW disc, and then click Next.
Note: If you want to play your music CD in your home or car stereo, use a CD-R disc. CD-RW discs won’t play in some stereos.
8Click OK. It is best not to use the PC while recording.
9Click Done when recording is complete.
Click Help and then select RecordNow Help for more information about recording music CDs with the RecordNow program.
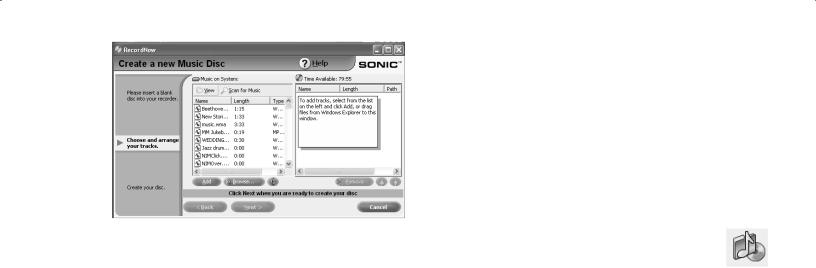
Creating a Music CD from Audio Files
1Click Start, choose All Programs, CD (DVD) Recorder, if it is present,
RecordNow, and then click RecordNow.
2Click Make a Music Disc.
3Select one of these options:
■Make a Music Disc from Audio Files
Create a music disc from WAV, WMA, or MP3 files on your hard disk drive
Or
■Make a Disc for an MP3 Player
Create a disc specifically for MP3 players
4Insert a blank CD-R or CD-RW disc into the drive you want to record to, and then click Next.
DVD Writer User’s Guide |
3 |

5Click Scan for Music to have RecordNow search your hard disk drive for all music files. These files appear in the Music on System window, and can be used to create your music CDs.
Note: RecordNow scans for all audio files, even the sounds from your operating system. If you don’t want to include these sounds, you can select an option to scan for files of a certain length, or you can just delete the unwanted files.
6After you scan for music files, select a file in the Music on System window and then click Add.
Or
Click the Browse button, locate your music file, and then click Add.
7Click Next when all of your music files have been added.
8Click OK. It is best not to use the PC while recording.
9Click Done when recording is complete.
4 |
Creating DVDs and CDs |
Click Help and then select RecordNow Help for more information about recording music CDs with the RecordNow program.
About creating a music CD
Important: HP supports lawful use of technology and does not endorse or encourage the use of our products for purposes other than those permitted by national copyright law.
When recording music files, it is important to note that:
■In order to play your music CD in a home or car stereo, it needs to be recorded as a music CD in CD Audio (CDA) format, not as a data CD.
■You must record all music files in one recording session because RecordNow closes the CD after recording is complete. Music files can be recorded repeatedly on a rewriteable (CD-RW) disc, but all previously recorded music files must be erased first.

■As you add music files in the recording session, RecordNow calculates and displays the amount of recording time available to record additional music files.
■You can’t record song titles unless you make an exact copy of a music CD in your collection.
■If you try to record more than a standard CD can hold, RecordNow displays a message warning you that it may not fit on your disc.
Storing Files on a DVD or CD
Unlike music CDs, data DVDs and CDs can be recorded in multiple sessions.
1Click Start, choose All Programs, CD (DVD) Recorder, if it is present,
RecordNow, and then click RecordNow.
2Click Make a Data Disc.
3Insert a blank or appendable CD-R, CD-RW, DVD+R, or DVD+RW disc into your drive, and then click Next.
■If the disc is full, insert a blank or another appendable disc. If the disc has data recorded on it, files with the same name are recorded over (updated) and any new files are added.
Or
■If you are appending a disc, click Yes.
Or
■If you are erasing a rewriteable disc, click Erase.
4To name your disc, select Volume Label, and then type your name over it. RecordNow will assign a name based on the recording date if you don’t type in a name.
DVD Writer User’s Guide |
5 |
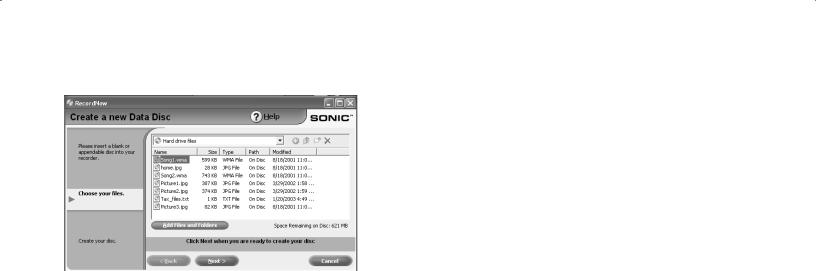
5Add your data files to the file selection window:
■Click the Add Files and Folders button, select your file, and then click Add. Repeat this step until all files are added.
Or
6 |
Creating DVDs and CDs |
■Drag your file from your desktop or from anywhere in Windows Explorer into the file selection window. Repeat this step until all files are added.
Note: You can rename your files in the file selection window by selecting and typing over the current name. This does not affect the original files on your hard disk drive.
6Click Next when all of your files have been added.
7Click OK to begin recording your files to disc.
8Click Done when recording is complete.
Click Help, and then click RecordNow Help for more information about recording data files with the RecordNow program.
About storing data files on disc
When storing data files on a disc, it is important to note that:
■You can add new data files to a CD-R and a DVD+R in a later recording session, until the disc is full. With DVD+R discs, you need to select the correct setting in RecordNow to record files in a later session. To do this, insert your recorded DVD, open RecordNow, click the Options button, select the Advanced tab, and then select the recording option
you want.
■When you record files that have the same name as previously recorded files, RecordNow updates the file and the previous version is overwritten.
■RecordNow allows you to change file names and titles of files you want to record and files that were previously recorded.
■As you select data files to record to your disc, RecordNow calculates and displays the amount of recording space available on your disc.
Copying a DVD or CD
Important: HP supports lawful use of technology and does not endorse or encourage the use of our products for purposes other than those permitted by national copyright law.
RecordNow allows you to make a copy of a music or data disc from your collection. You can’t copy commercial DVDs because they are protected by copyright laws and are encoded to prevent illegal duplication.
To make a copy of a music or data disc from your collection:
1Click Start, choose All Programs, CD (DVD) Recorder, if it is present,
RecordNow, and then click RecordNow.
DVD Writer User’s Guide |
7 |

2Select Make an Exact Copy.
3Insert the CD or DVD you want to copy.
4If you have more than one optical drive, click the Change button, select the drive you want to write to, and then click Next.
5Insert a blank DVD or CD into the drive, and then click OK.
6Click OK, and then click Done when the recording is complete.
Erasing a DVD or CD
RecordNow can erase all types of files from rewriteable DVDs and CDs, leaving almost all the disc space available for new recordings.
1Click Start, choose All Programs, CD (DVD) Recorder, if it is present,
RecordNow, and then click RecordNow.
2Insert the DVD+RW or CD-RW you want to erase.
8 |
Creating DVDs and CDs |
3Click the Erase button.
4Click Yes.
Removing Files from a Recorded Data Disc
RecordNow can’t erase files from recordable (record once) DVDs or CDs, but files that have been previously recorded can be removed.
When you remove a recorded file from a data DVD+R or CD-R, the disc space is lost and can’t be used for new recordings.
To remove data files from a recorded DVD or CD:
1Click Start, choose All Programs, CD (DVD) Recorder, if it is present,
RecordNow, and then click RecordNow.
2Click Make a Data Disc.
3Click Yes.
4Insert the disc you want to remove files from, and then click Next.

5Click Yes.
6Select the file you want to remove and then click the Remove icon. You must have at least one file on your data disc to re-record it.
7Click Yes.
8Click Next to re-record your data disc.
9Click Done when the recording is complete.
About removing files in RecordNow
When removing files in RecordNow, it is important to note:
■When you remove a recorded file from a data DVD+R or CD-R, the disc space is lost and can’t be used for new recordings.
■You can’t remove music files from previously recorded music CDs but you can remove music files from the File Selection window in RecordNow during the creation process.
■You must use a blank CD to create a music CD.
■If you delete files from the file selection window in RecordNow before the disc is recorded, available disc space is not affected. If you delete a file from a CD-R or DVD+R after the disc is recorded, available disc space is lost.
DVD Writer User’s Guide |
9 |
 Loading...