

Page 1
start
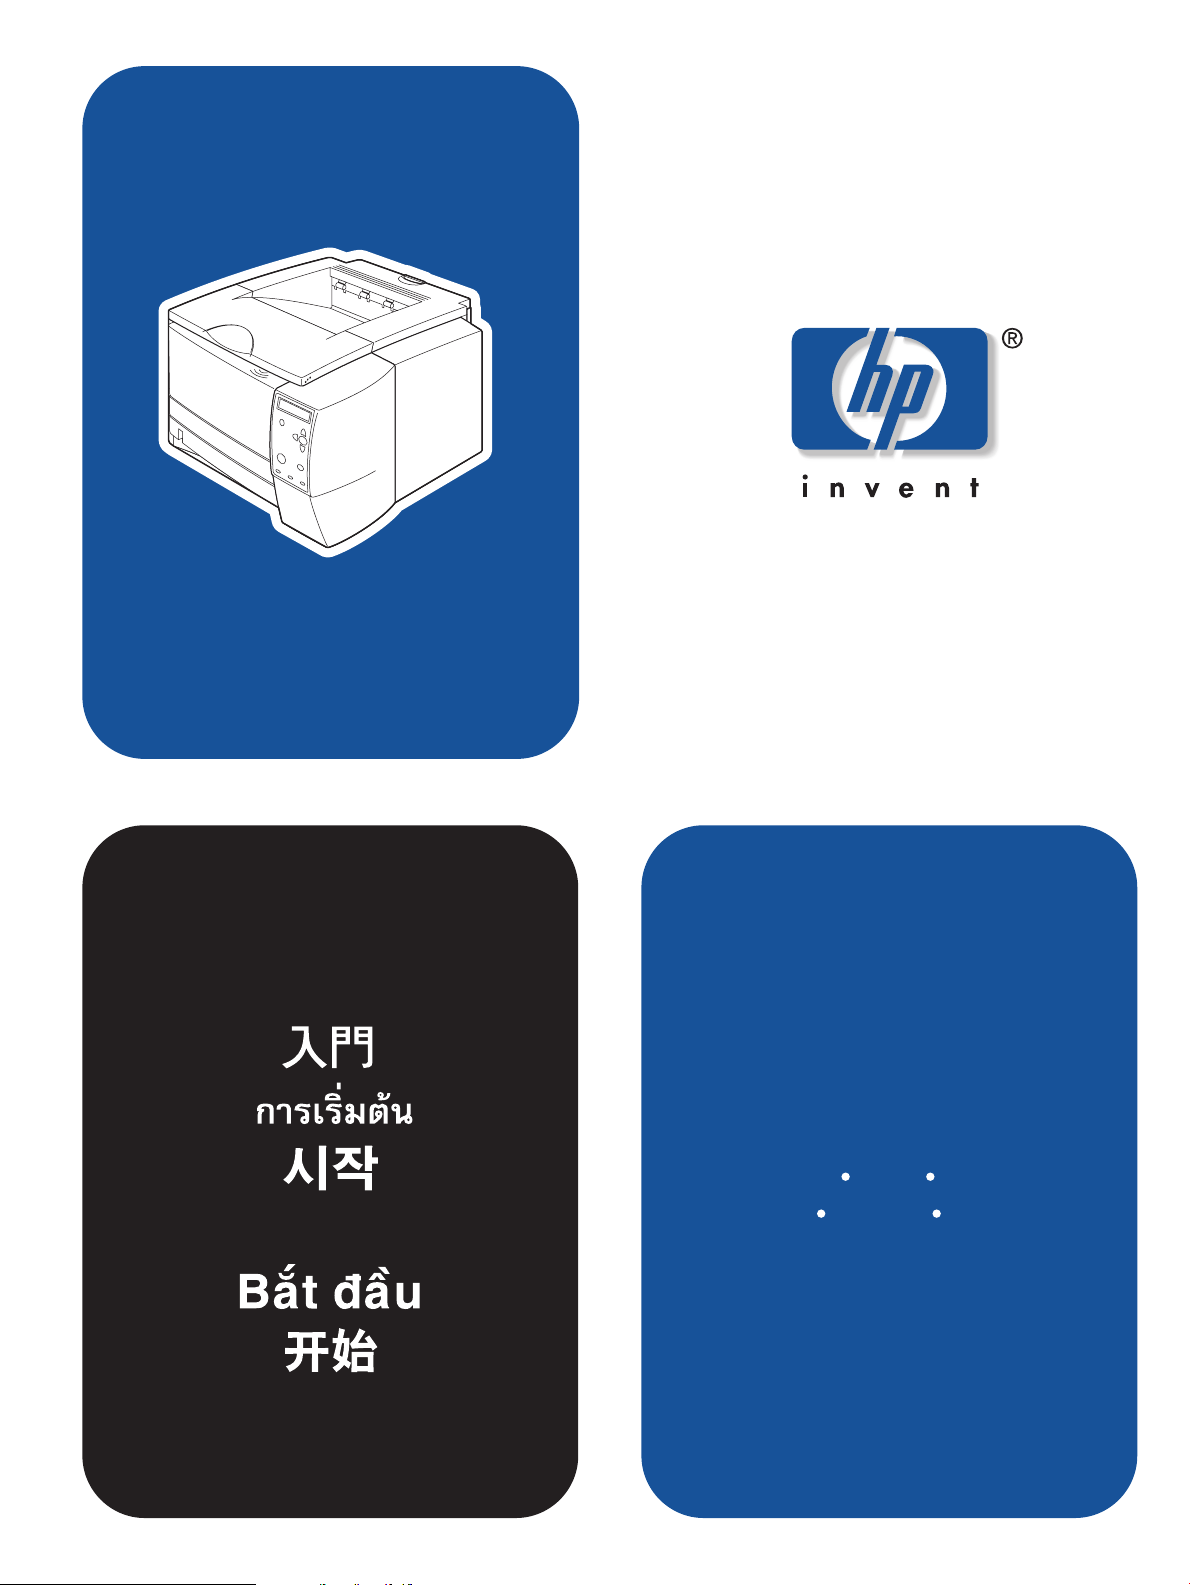
hp LaserJet 2300
Panduan
2300L
2300n 2300dn 2300dtn
2300 2300d
Page 2
Copyright and license
© Copyright Hewlett-Packard Company 2002
All Rights Reserved. Reproduction, adaptation, or translation without prior
written permission is prohibited, except as allowed under the copyright laws.
Part number: Q2472-90906
Edition 1, 10/2002
A user of the Hewlett-Packard printer associated with this guide is grant ed a
license to (a) print hard copies of this guide for personal, internal, or
company use subject to the restriction not to sell, resell or otherwise
distribute the hard copies; and (b) place an electronic copy of this guide on a
network server provided access to the electronic copy is limited to personal,
internal users of the Hewlett-Packard printer associated with this guide.
FCC regulations
This equipment has been tested and found to comply with the limits for a
Class B digital device, pursuant to Part 15 of the FCC rules. These limits are
designed to provide reasonable protection against harmful interference in a
residential installation. This equipment generates, uses, and can radiate
radio frequency energy. If this equipment is not installed and used in
accordance with the instructions, it might cause harmful interference to radio
communications. Howe ver, there is no guarantee that interference will not
occur in a particular installation. If this equipment does cause harmful
interference to radio or television reception, which can be determined by
turning the equipment off and on, the user is encouraged to try to correct the
interference by one or more of the following measures:
• Reorient or relocate the receiving antenna.
• Increase separation between equipment and receiver.
• Connect equipment to an outlet on a circuit different from that to which the
receiver is located.
• Consult your dealer or an experienced radio/TV technician.
Any changes or modifications to the printer that are not expressly approved
by HP could void the user’s authority to operate this equipment. Use of a
shielded interface cable is required to comply with the Class B limits of Part
15 of FCC rules.
For more regulatory information, see the HP LaserJet 2300 series pr inter
use
guide on the printer CD-ROM.
Warranty
The information contained in this document is subject to change without
notice.
Hewlett-Packard makes no warranty of any kind with respect to this
information. HEWLETT-PACKARD SPECIFICALLY DISCLAIMS THE
IMPLIED WARRANTY OF MERCHANTABILITY AND FITNESS FOR A
PARTICULAR PURPOSE.
Hewlett-Packard shall not be liable for any direct, indirect, incidental,
consequential, or other damage alleged in connection with the furnishing or
use of this information.
Trademark credits
Microsoft and Windows are U.S. registered trademarks of Microsoft
Corporation.
All other products mentioned herein may be trademarks or registered
trademarks of their respective owners.
1
Page 3
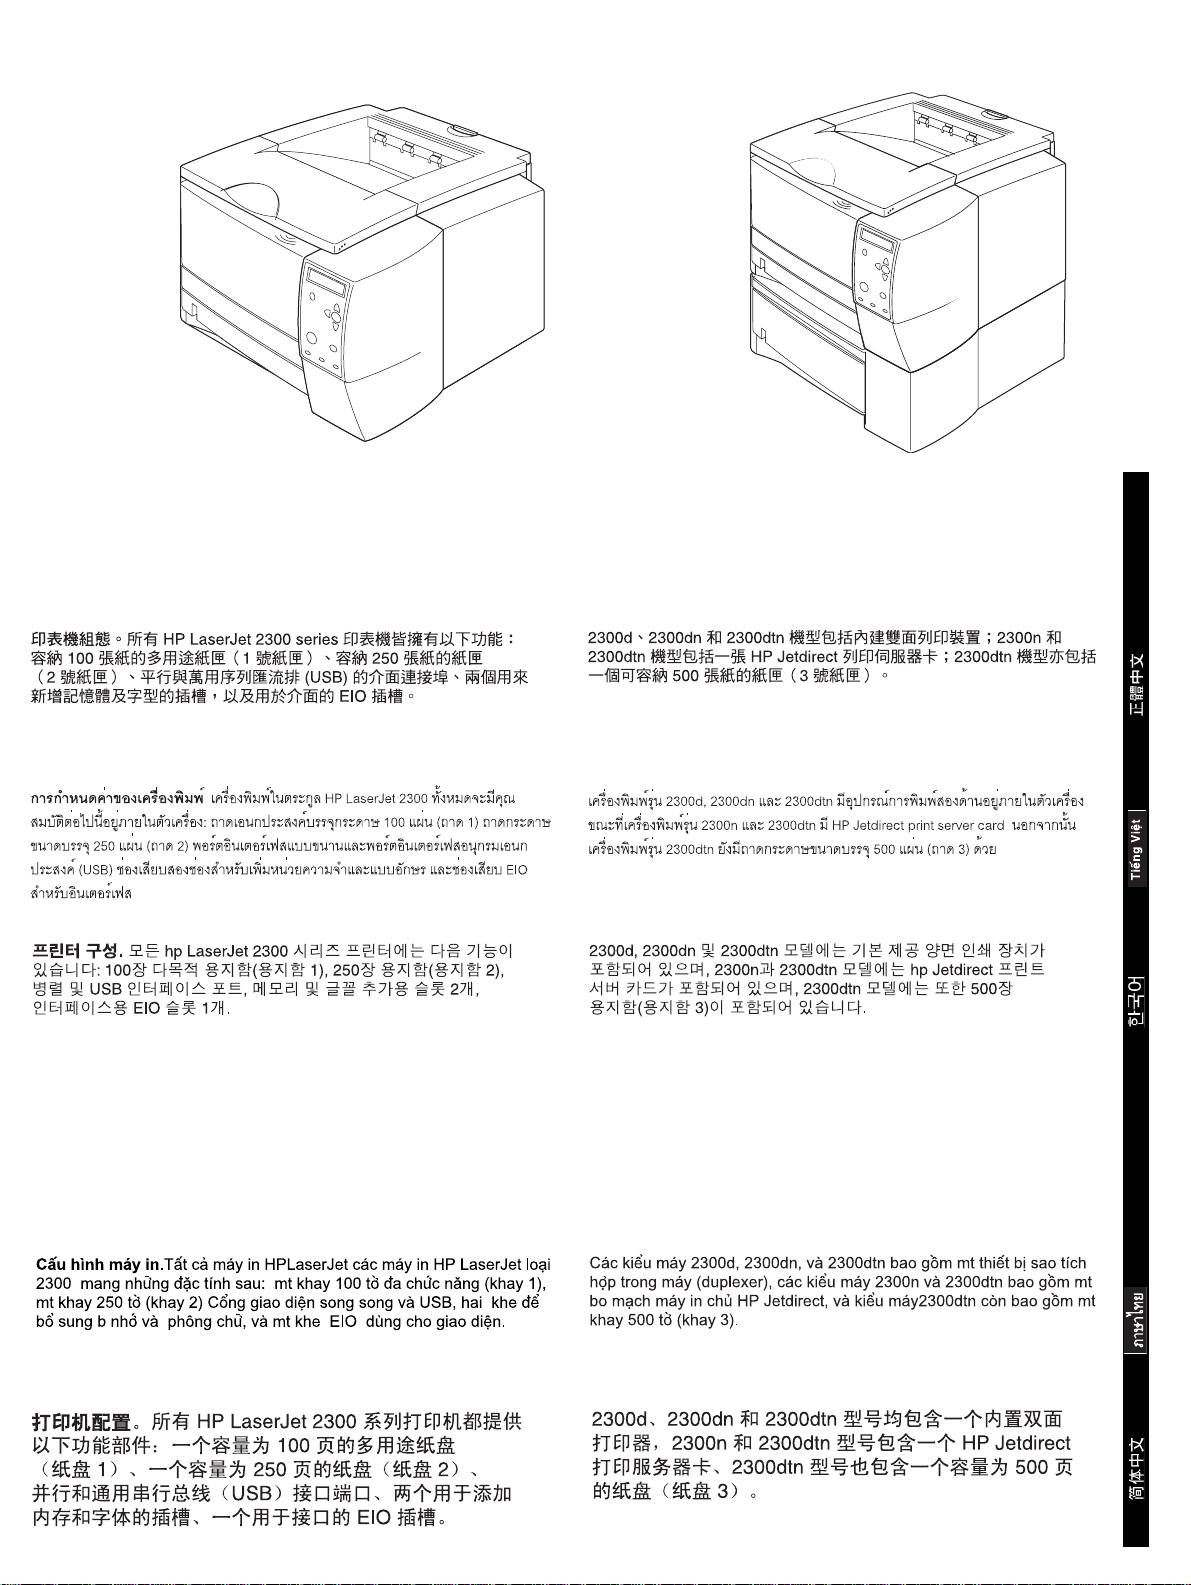
HP LaserJet 2300L
HP LaserJet 2300
HP LaserJet 2300d
HP LaserJet 2300n
HP LaserJet 2300dn
HP LaserJet 2300dtn
Printer configurat ions. All HP LaserJet 2300 series printers come with
the following features: a 100-sheet multipurpose tray (tray 1), a 250-sheet
tray (tray 2), parallel and universal serial bus (USB) interface ports, two
slots for adding memory and fonts, and an EIO slot for interface.
The 2300d, 2300dn, and 2300dtn models include a built-in duplexer, the
2300n and 2300dtn models include an HP Jetdirect print server card, and
the 2300dtn model also includes a 500-sheet tray (tray 3).
English
Konfigura s i pr inter. Semua printer HP LaserJet 2300 series dilengkapi
sejumlah fitur berikut: baki serba-guna berkapasitas 100-lembar (baki 1),
baki 250-lembar (baki 2), port antarmuka paralel dan universal serial bus
(USB), dua slot untuk menambah memori dan jenis huruf, serta slot EIO
untuk antarmuka.
Model 2300d, 2300dn, dan 2300dtn menyertakan built-in duplexer, model
2300n dan 2300dtn menyertakan kartu server cetak HP Jetdirect, dan
model 2300dtn menyertakan juga baki berkapasit as 500-lembar (baki 3).
Bahasa Indonesia
2
Page 4
1
638.0 mm
(25.2 in)
1500.0 mm (59.1 in)
407.0 mm
(16.1 in)
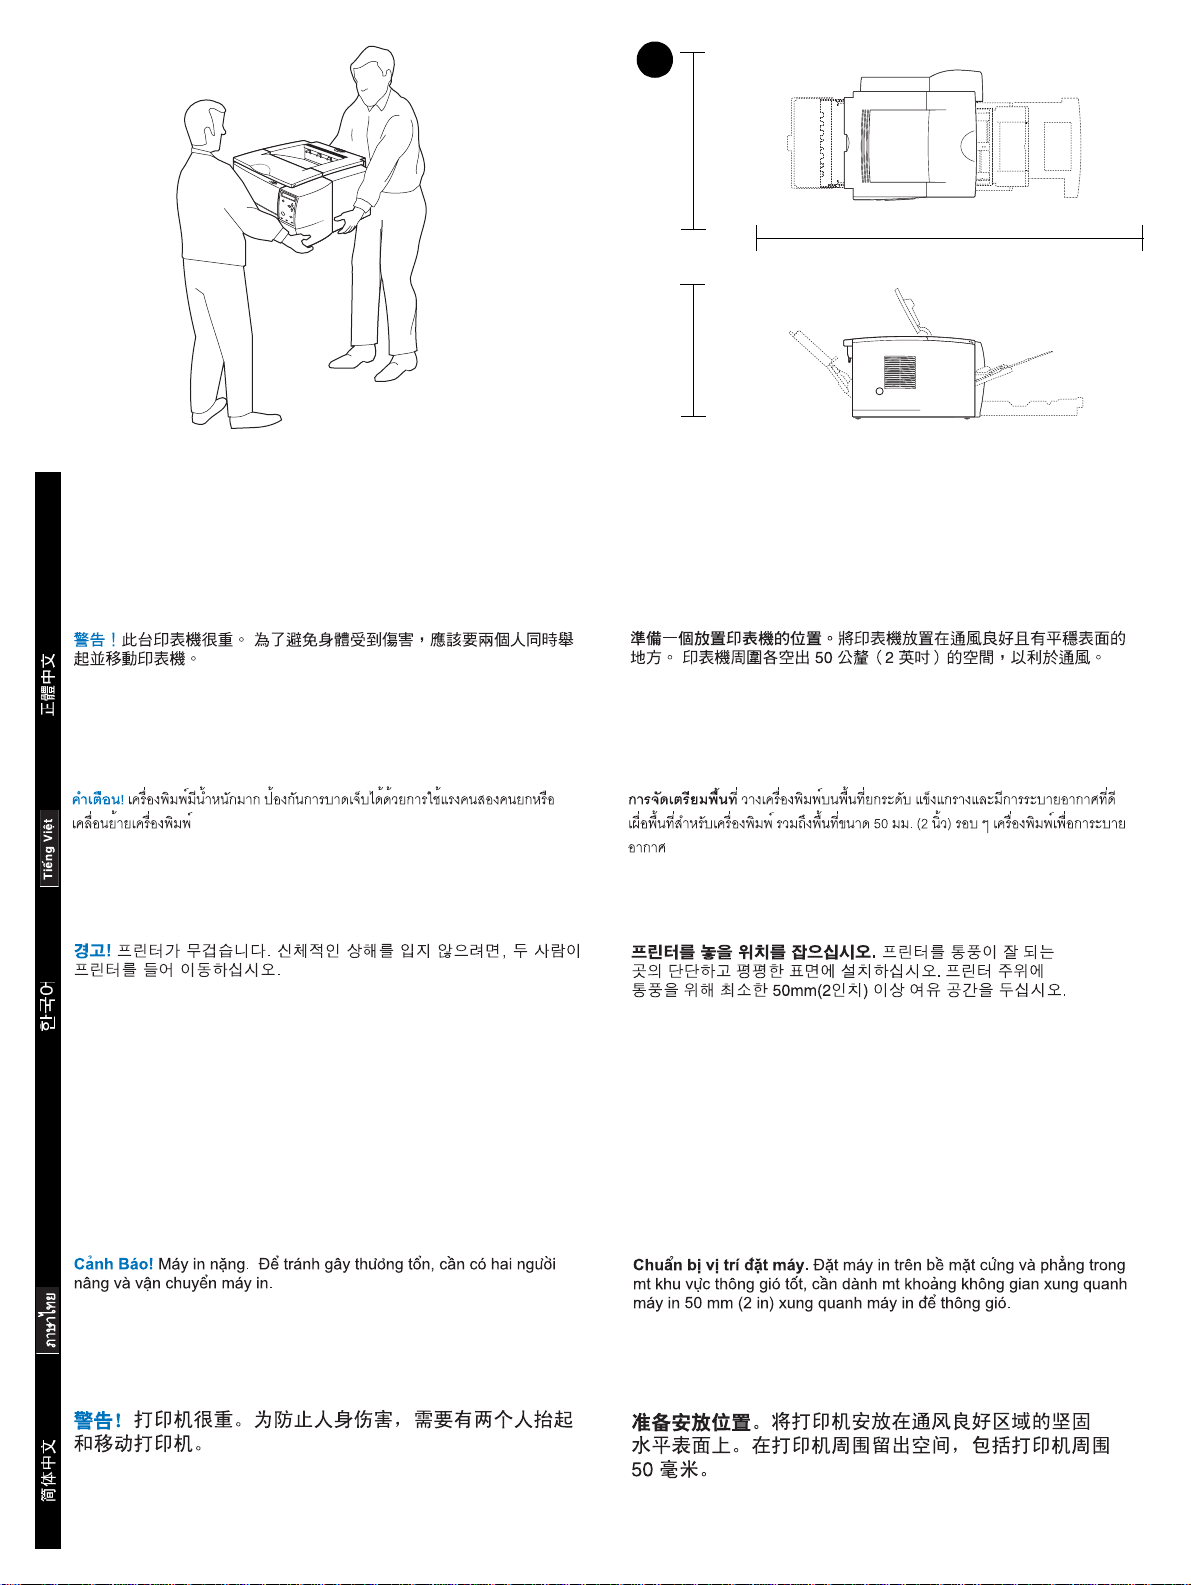
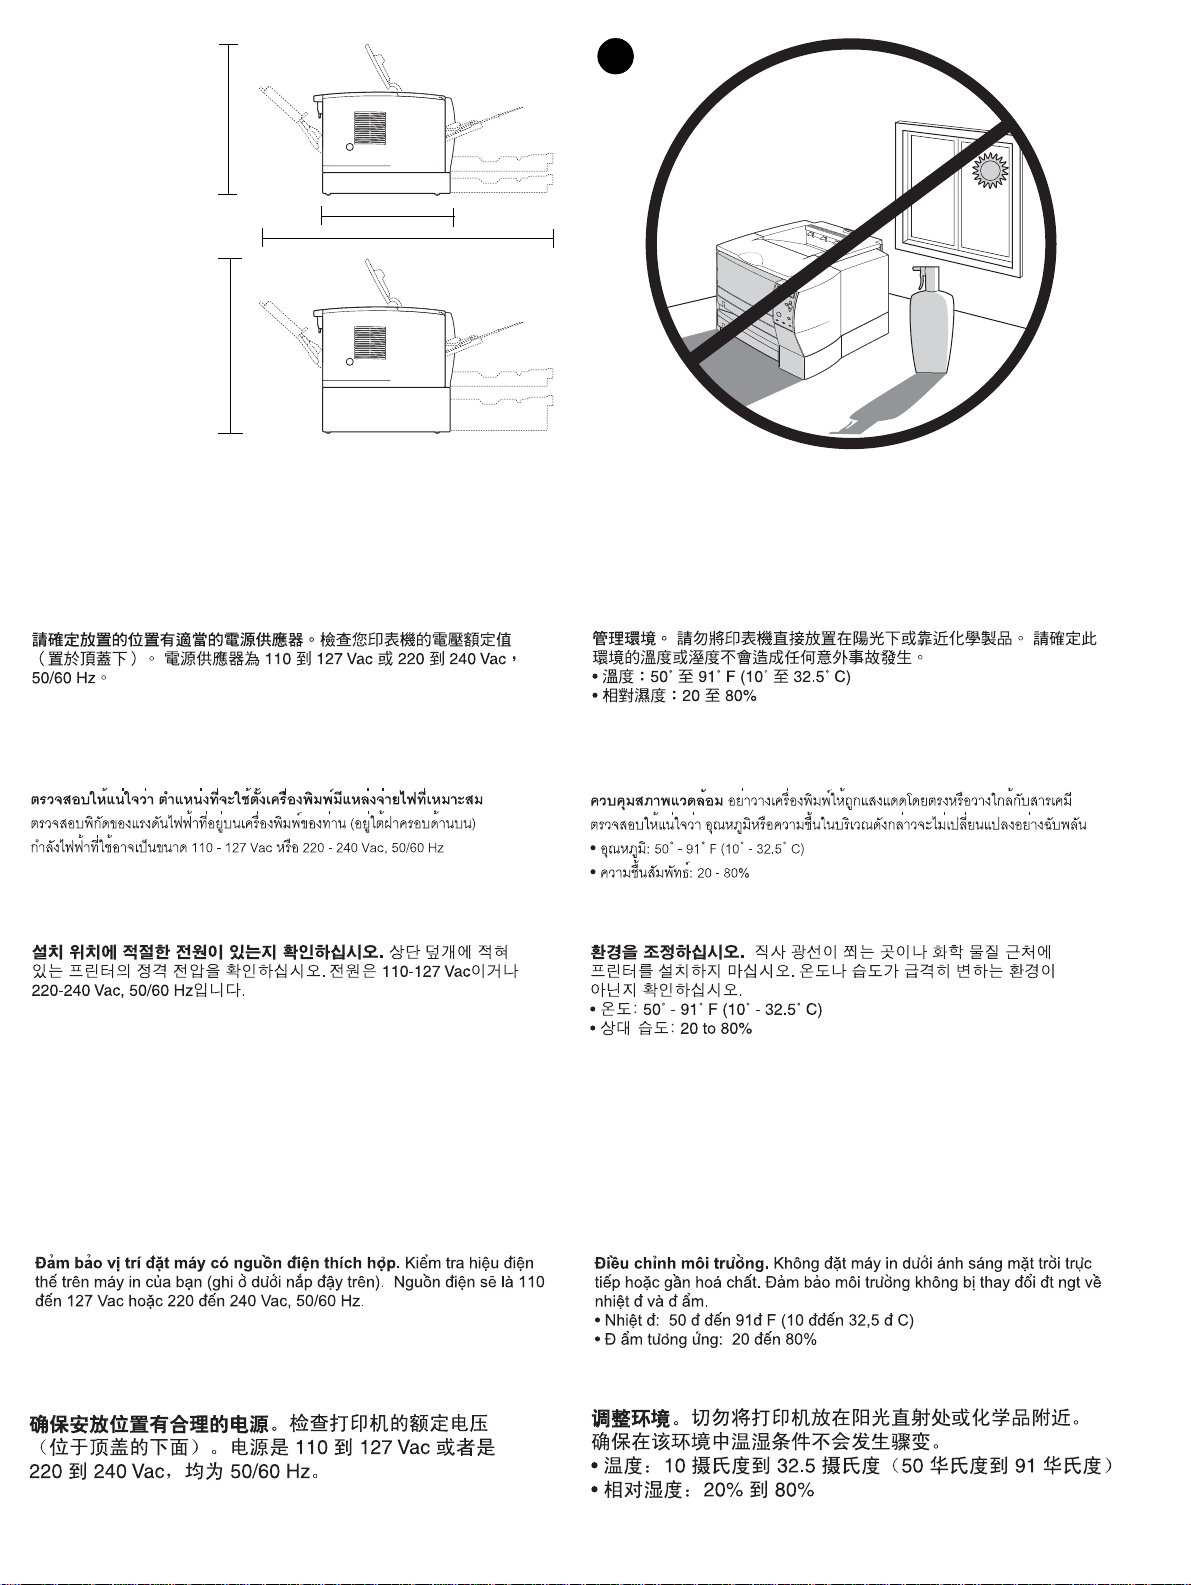
WARNING! The printer is heavy. To prevent physical injur y, two people
should lift and move the printer.
English
Prepare the location. Place the printer on a sturdy, level surface in a
well-ventilated area. Allow space around the printer, including 50 mm
(2 inches) of space around the printer for ventilation.
PERINGATAN! Printer ini berat. Untuk mengangkat dan memindahkan
pencetak sebaiknya dilakukan oleh dua orang agar terhindar dari cedera.
Bahasa Indonesia
Siapkan lokasi. T empatkan printer pada permukaan yang kokoh dan rata
di area yang berventilasi baik. Kosongkan ruang di sekitar printer,
termasuk 50 mm (2 inci) jarak di sekitar printer untuk ventilasi.
Page 5
HP LaserJet 2300L
HP LaserJet 2300
HP LaserJet 2300
HP LaserJet 2300n
HP LaserJet 2300dn
(with optional
250-sheet tray)
HP LaserJet 2300dtn
(with 500-sheet tray)
2
487.4 mm (19.2 in)
450.3 mm (17.8 in)
836.0 mm (32.9 in)
543.4 mm (21.4 in)
Make sure that the location has an adequate power supply. Check the
voltage rating on your printer (located under the top cover). The power
supply will be either 110 to 127 Vac or 220 to 240 Vac, 50/60 Hz.
Regulate the environment. Do not place the printer in direct sunlight or
near chemicals. Make sure that the environment does not experience
abrupt changes in temperature or humidity.
• Temperature: 50° to 91° F (10° to 32.5° C)
• Relative humidity: 20 to 80%
Pastikan lokasi itu memiliki pasokan listrik yang memadai. Cek
klasifikasi tegangan pada printer Anda (terletak di balik penutup atas).
Pasokan listrik yaitu salah satu, 110 hingga 127 Vac atau 220 hingga
240 Vac, 50/60 Hz.
Atur keadaan ruangan. Jangan menempatkan printer di tempat yang
langsung terkena sinar matahari atau dekat bahan kimia. Pastikan bahwa
lingkungan tidak mengalami perubahan suhu atau kelembaban yang
mendadak.
• Suhu: 50° hingga 91° F (10° hingga 32.5° C)
• Kelembaban relatif: 20 hingga 80%
4
Page 6
3
1
2
4
1
5
3
4
5
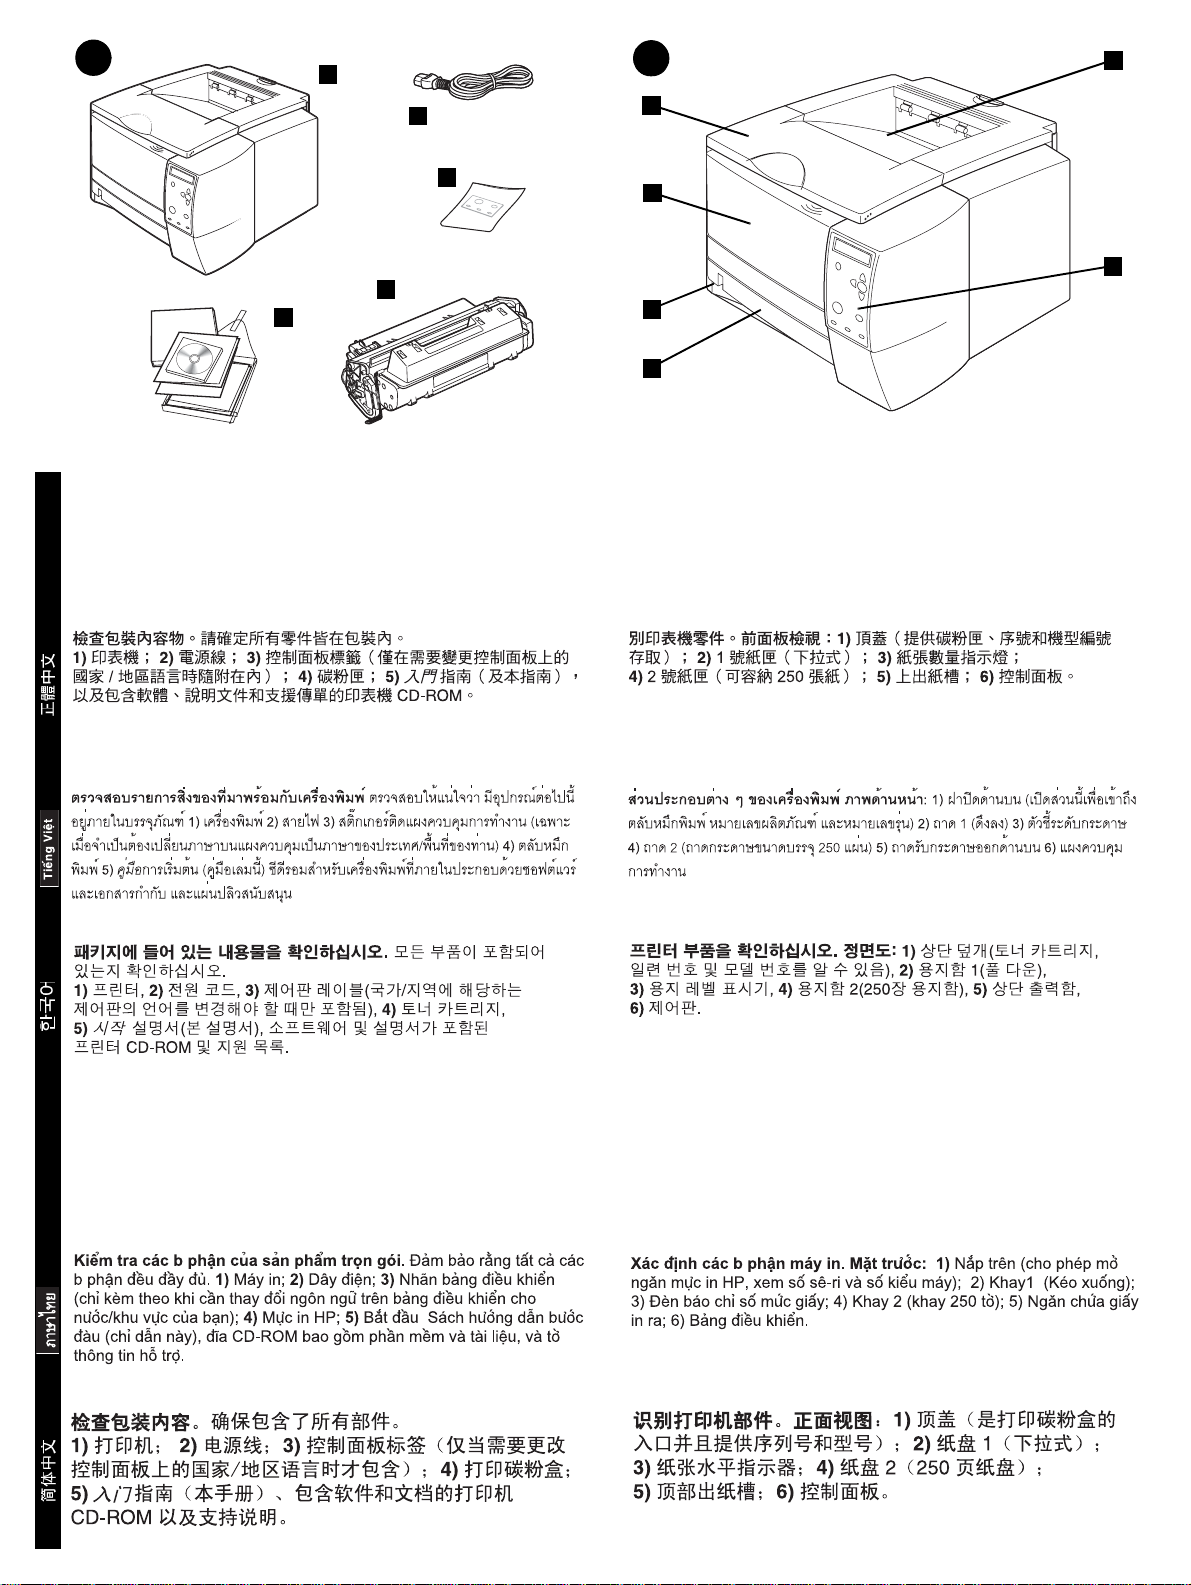
Check the package contents. Make sure that all the parts are included.
1) Printer; 2) Power cord ; 3) Control panel label (included only when
needed to change the language on the control panel for your
start
country/region); 4) Print cartridge; 5)
CD-ROM containing software and documentation, and support flyer.
English
guide (this guide), printer
2
6
3
4
Identify printer parts. Front view: 1)Top cover (provides access to the
print cartridge, serial number, and model number); 2) Tray 1 (pull-down);
3) Paper level indicator; 4) Tray 2 (250-sheet tray); 5) Top output bin;
6) Control panel.
Periksa isi kemasan. Pastikan semua bagian ada di dalamnya.
1) Printer; 2) Kabel listrik; 3) Label panel kendali (hanya disertakan bila
perlu mengubah bahasa pada panel kendali untuk negara/kawasan
Anda); 4) Kartrid cetak; 5)
CD-ROM printer berisi perangkat lunak dan dokumentasi, serta selebaran
pendukung.
Bahasa Indonesia
panduan
untuk memulai (panduan ini),
Kenali bagian-bagian printer. Tampak Muka: 1) Tutup atas (memberi
akses ke kartrid cetak, nomor seri, dan nomor model); 2) Baki 1 (tarik-ke
bawah); 3) Indikator level kertas; 4) Baki 2 (baki 250-lembar);
5) Wadah keluaran atas; 6) Panel kendali.
Page 7

5
7
8
10
Back view: 7) Extension tray for rear output bin; 8) Rear output bin,
9) Power switch; 10) Power connector. Note: The 2300dtn model also
includes tray 3 (500-sheet tray), located under tray 2.
1
5
2
3
6
7
4
8
9
9 10 11
Understand the control panel. 1) Graphical display; 2) H
ACK
3) (B
button); 7) (D
(S
ELECT
light; 10) D
button); 4)P
light; 11) A
ATA
AUSE/RESUME
button; 8) C
OWN
TTENTION
button; 5) (UP button); 6)
ANCEL JOB
button; 9) R
light.
ELP
button;
EADY
Tampak belakang: 7) Baki sambungan untuk wadah keluaran belakang;
8) Wadah keluaran belakang, 9) S akelar daya; 10) Konektor day a.
Catatan: Model 2300dtn menyertakan juga baki 3 (baki 500-lembar),
terletak di bawah baki 2.
Memahami panel kendali. 1) Tampilan grafik; 2) T
(Bantuan); 3) (T
)/R
EDA
(J
(Lanjutkan); 5) (T
ESUME
Select (Pilih); 7) (T
Cetak); 9) L
Ready (Siap); 10) L
AMPU
Back/Kembali); 4) T
OMBOL
Down (Bawah); 8) T
OMBOL
UP (Atas)); 6) (T
OMBOL
Data; 11) L
AMPU
(Perhatian).
6
OMBOL
OMBOL PAUSE
Cancel Job (Batal
OMBOL
AMPU
Help
OMBOL
Attention
Page 8
6
1
2
3
7
2
3
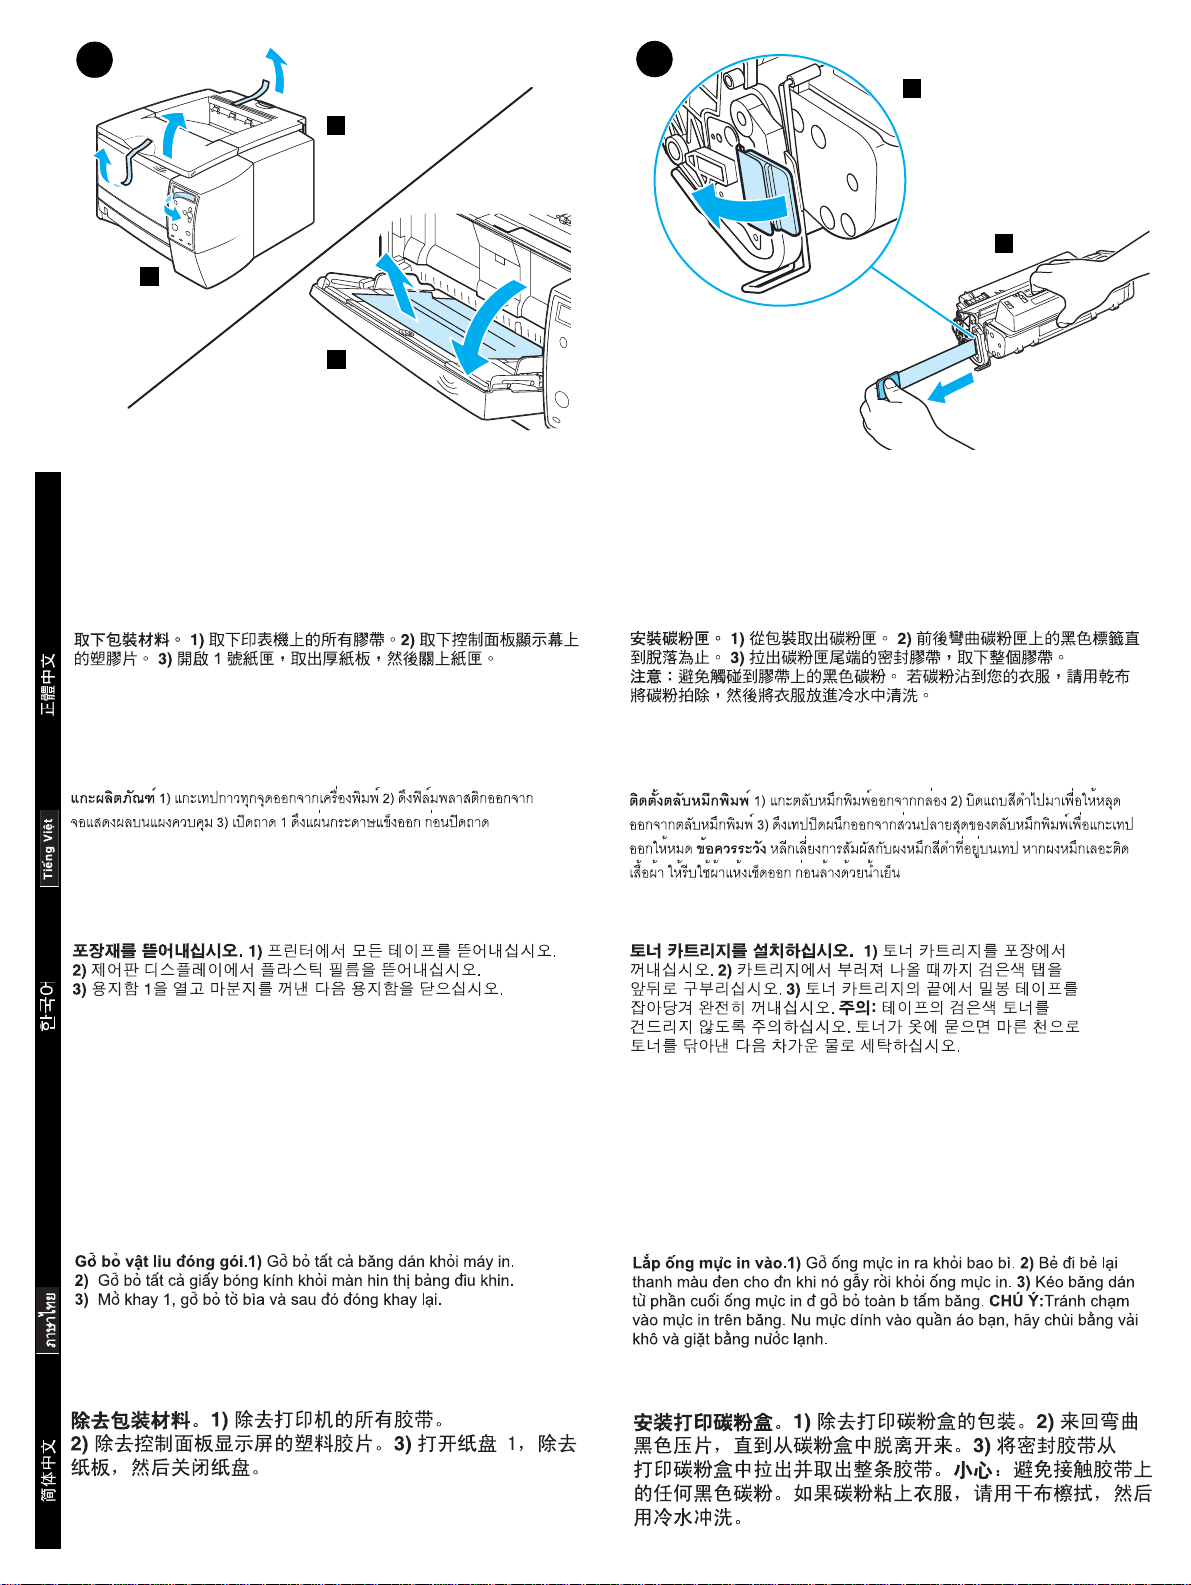
Remove the packing materials. 1) Remove all tape from the printer.
2) Remove the plastic film from the control panel display. 3) Open tray 1,
remove the cardboard sheet, and then close the tray.
English
Install the print cartridge. 1) Remove the print cartridge from its
packaging. 2) Flex the black tab back and for th until it breaks away from
the cartridge. 3) Pull the sealing tape from the end of the print cartridge to
remove the entire length of tape. CAUTI ON: Avoid touching any black
toner on the tape. If toner gets on your clothing, wipe it off with a dry cloth
and wash the clothing in cold water.
Bongkar kemasan. 1) Lepaskan pita yang merekat dari printer.
2) Lepaskan film plastik dari layar panel kendali. 3) Buka baki 1, lepaskan
lembar karton, kemudian tutup bakinya.
Bahasa Indonesia
Instal kartrid cetak. 1) Lepaskan kartrid cetak dari kemasannya. 2) Tekuk
bolak-balik tab hitam sampai terlepas dari kartrid. 3) T arik pita perekat dari
ujung kartrid cetak untuk melepaskan seluruh pita yang merekat.
AWAS: Jangan sampai menyentuh toner hitam manapun pada pita. Jika
baju Anda terkena toner, lap dengan kain kering dan cuci baju dalam air
dingin.
Page 9

6
8
5
6
4) Open the top cover of the printer. 5) Position the print cartridge with the
arrow on top of the cartridge pointing into the printer and slide the
cartridge into the printer as far as it can go. 6) Close the top cover.
1
Install optional accessories. If you have purchased separate
accessories, use the separate installation instructions or the printer
guide to install them. Make sure that the printer is turned off first.
1) Memor y or font DIMMs; 2) Jetdirect print server; 3) 250-sheet tray;
4) 500-sheet tray . Note: Either tray is available as an accessory.
3
42
use
4) Buka penutup atas printer. 5) Posisikan kartrid cetak dengan panah di
bagian atas kartrid mengarah ke dalam printer dan sorong kartrid ke
dalam printer sejauh mungkin sampai berhenti. 6) Tutup kembali bagian
atas.
Instal aksesori opsional. Jika Anda telah membeli sejumlah aksesori
tersendiri, gunakan petunjuk penginstalan terpisah atau
penggunaan printer untuk menginstalnya. Pastikan bahwa printer sudah
dimatikan dulu. 1) Memori atau font DIMMs; 2) Server printer Jetdirect;
3) Baki 250-lembar ; 4) Baki 500-lembar. Catatan: Baki dapat disertakan
atau sebagai aksesori.
8
panduan
Page 10

9
8
Load the 250-sheet tray. (For information about loading the 500-sheet
tray, see the
completely out of the printer.
English
use
guide on the printer CD-ROM.) 1) Pull the 250-sheet tray
2) Locate the plastic piece that is holding down the lift plate. Turn it
counter-clockwise and lift up to remove.
Pasangkan baki 250-lembar. (Untuk informasi mengenai pemasangan
baki 500-lembar, lihat
1) T arik baki 250-lembar sampai keluar seluruhnya dari printer.
Bahasa Indonesia
panduan
penggunaan pada CD-ROM printer.)
2) Cari potongan plastik yang menahan plat ungkit (lift plate) ke bawah.
Putar berlawanan dengan arah jarum jam dan angkat untuk
melepaskannya.
Page 11

3) Move the side width guides outward to match the paper size that you
want.
4) On the rear paper length guide, press on the blue tab and adjust it so
that the pointer matches the paper size that you want.
3) Gerakkan pemandu lebar sisi ke arah luar untuk mencocokkan ukuran
kertas yang Anda inginkan.
4) Pada pemandu panjang kertas bagian belakang, tekan tab warna biru
dan sesuaikan tab sehingga penunjuk cocok dengan ukuran kertas yang
Anda inginkan.
10
Page 12

5
6
5) Add the media and make sure that it is flat in the tray at all four corners.
Keep the media below the height tabs on the sides and rear of the tray.
6) Push down on the metal paper lift plate to lock it in place.
English
7) Slide the tray back into the printer.
5) Tambahkan media dan pastikan keempat ujungnya terletak rata dalam
baki. Usahakan agar media terletak di bawah tab ketinggian pada sisi dan
bagian belakang baki. 6) Dorong ke bawah plat logam ungkitan kertas
untuk menahan media dalam tempatnya.
Bahasa Indonesia
7) Sorong kembali baki ke dalam printer.
Page 13

10
Attach the power cord. 1) Locate the power switch on the side of the
printer and make sure that the printer is turned off (out).
2) Connect the power cord to the printer and a grounded power strip or an
AC outlet. CAUTION: To pre vent damage to the printer, use only the
power cord that is provided with the product.
Pasang kabel listrik. 1) Cari sakelar daya pada sisi printer dan pastikan
bahwa printer sudah dimatikan (out).
2) Hubungkan kabel listrik ke printer dan strip daya yang memiliki
grounding atau stopkontak listrik PLN (Terminal keluaran AC).
AWAS: Untuk mencegah kerusakan pada printer, gunakan hanya kabel
listrik yang disediakan dengan produk.
12
Page 14

11
12
1
2
Install the control panel label (ONLY if needed for your
country/region). 1) Peal the backing off of the back of the control panel
label for the language. 2) Place the label over the bottom part of the
control panel.
English
Turn the printer power on. Turn the power switch to the on (in) position
and wait a short while for the printer to warm up. The printer is ready when
the R
printer automatically set your language, go to step 14. If you need to
change the language for your country/region, go to step 13.
EADY
light is on
and
appears on the control panel display. If the
Ready
Instal label panel kendali (HANYA jika diperlukan untuk
negara/kawasan Anda). 1) Lepaskan penahan bagian belakang label
panel kendali untuk label bahasa. 2) Lekatkan label pada bagian bawah
panel kendali.
Bahasa Indonesia
Hidupkan printer. Putar sakelar daya ke posisi on/hidup (in) dan tunggu
beberapa saat sementara printer melakukan pemanasan. Printer sudah
siap bila lampu R
layar panel kendali. Jika printer secara otomatis diatur ke bahasa Anda,
lanjutkan ke langkah 14. Jika Anda perlu mengubahnya ke bahasa
negara/kawasan Anda, lanjutkan ke langkah 13.
(Siap) sudah hidup
EADY
dan
(Siap) muncul pada
Ready
Page 15

13
13
Change the control panel language (ONLY if needed for your
country/region). 1) Turn the power off. 2) Press and hold down both the
button) until all three of the lights on the
power switch and (S
control panel come on (R
buttons. You will see
ELECT
, D
EADY
ATA
SELECT LANGUAGE
, and A
TTENTION
). 3) Release the
on the control panel display.
4) Press (S
button). 5)Wait until the languages appear on the
ELECT
control panel display. This could take up to 2 minutes. 6)Use (U
button) and (D
press (S
ELECT
button) to scroll to the language that you want and
OWN
button) to select it.
P
Ubah bahasa panel kendali (HANYA jika diperlukan untuk
negara/kawasan Anda). 1) Mematikan daya. 2) Tekan dan tahan ke
bawah kedua sakelar daya dan (tombol S
(S
lampu pada panel kendali menyala (R
(P
ERHATIAN
LANGUAGE
)). 3) Lepaskan tombol-tombol. Anda akan melihat
(PILIH BAHASA) pada layar panel kendali.
EADY
/Pilih) sampai ketiga
ELECT
), D
ATA
, dan A
IAP
TTENTION
SELECT
4) Tekan (tombol S
/Pilih). 5) Tunggu sampai bahasa muncul
ELECT
pada layar panel kendali. Ini dapat berlangsung hingga 2 menit.
6) Gunakan (tombol U
bergeser ke bahasa yang Anda inginkan dan tekan (tombol
S
/Pilih) untuk memilihnya.
ELECT
/Atas) dan (tombol D
P
14
/Bawah) untuk
OWN
Page 16

14
Adjust the brightness of the control panel display (ONLY if the
display is too light or too dark). 1) Press (S
(U
press (S
ELECT
(S
English
button) and (D
P
button). 3) Scroll to
ELECT
button).
button) to scroll to
OWN
SYSTEM SETUP
button). 2) Use
ELECT
CONFIGURE DEVICE
and press
and
4) Scroll to
(U
DISPLAY BRIGHTNESS
button) and (D
P
and press (S
OWN
button) to select it.
ELECT
, and press (S
button). 5) Use
ELECT
button) to scroll to the setting that you want
Sesuaikan kecerahan layar panel kendali (HANYA jika layar terlalu
terang atau terlalu gelap). 1) Tekan (tombol S
2) Gunakan (tombol U
bergeser ke
(tombol S
CONFIGURE DEVI CE
ELECT
dan tekan (tombol S
/Atas) dan (tombol D
P
(KONFIGURASIKAN PIRANTI) dan tekan
/Pilih). 3) Geser ke
/Pilih).
ELECT
SYSTEM SETUP
/pilih).
ELECT
/Bawah) untuk
OWN
(ATUR SISTEM)
Bahasa Indonesia
4) Geser ke
(tombol S
D
OWN
tekan (tombol S
DISPLAY BRIGHTN ESS
/Pilih). 5) Gunakan (tombol UP /Atas) dan (tombol
ELECT
/Bawah) untuk bergeser ke pengaturan yang Anda inginkan dan
/Pilih) untuk memilihnya.
ELECT
(KECERAHAN LAYAR) dan tekan
Page 17

15
Test the printer. To verify that the printer is operating correctly, print a
configuration page. 1) Press (S
and (D
button). 3) Use (U
CONFIGURATION
button) to scroll to
OWN
button) and (D
P
and press (S
button). 2) Use (UP button)
ELECT
INFORMATION
button).
ELECT
and press (S
button) to scroll to
OWN
ELECT
PRINT
Note: If the configuration page does not print, make sure that there are no
messages (other than
light is on, and that no other lights are on or blinking. Make sure that paper
) on the control panel display, that the R
Ready
is loaded and that the paper tray is properly adjusted. Make sure that the
print cartridge is installed correctly.
EADY
Lakukan uji-coba printer. Unt uk memverifikasi bahwa printer bekerja
dengan benar, cetak halaman konfigurasi. 1) Tekan (tombol S
/Atas) dan (tombol D
/pilih). 2) Gunakan (tombol U
untuk bergeser ke
S
/Pilih). 3) Gunakan (tombol UP /Atas) dan (tombol D
ELECT
INFORMATION
/Bawah) untuk bergeser ke
KONFIGURASI) dan tekan (tombol S
P
(INFORMASI) dan tekan (tombol
PRINT CONFIGURA TION
ELECT
(CETAK
/Pilih).
OWN
ELECT
/Bawah)
OWN
Catatan: Jika halaman konfigurasi tidak tercetak, pastikan tidak ada
pesan lain (selain
) pada layar panel kendali, lampu R
Ready
dan tidak ada lampu lain yang menyala atau berkedip-kedip. Pastikan
kertas sudah dimuatkan dan baki kertas disesuaikan sebagaimana
mestinya. Pastikan kartrid cetak sudah diinstal dengan benar.
16
EADY
menyala,
Page 18

16
Choose ONE of these installations.
printing system software for direct connection,
printing system software for a network,
printing system software after the parallel or USB cable has been
connected,
English
direct or network connection,
go to step 18.
To install Macintosh printing system software for
go to step 19.
To install Microsoft® Windows®
go to step 16
go to step 17.
To install Windows
. To install
Install Windows printing system software for direct connection.
1) Insert the printer CD-ROM into the CD-ROM drive. 2) When prompted,
click Install Printer. Note: If the welcome screen does not open, click
Start, click Run, type “X:setup” (where “X” is the letter of the CD-ROM
drive), and click OK.
Pilih SATU dari instalasi-in stal asi berikut.
lunak sistem pencetakan Microsoft® Windows® untuk hubungan
langsung,
sistem pencetakan jaringan,
perangkat lunak sistem pencetakan Windows setelah kabel paralel atau
USB dihubungkan,
lunak sistem pencetakan Macintosh, hubungan langsung atau
jaringan,
Bahasa Indonesia
lanjutkan ke langkah 16
lanjutkan ke langkah 17.
lanjutkan ke langkah 18.
lanjutkan ke langkah 19.
. Untuk menginstal perangkat lunak
Untuk menginstal perangkat
Untuk menginstal
Untuk menginstal perangkat
Instal perangkat lunak sistem pencetakan Windows untuk hubungan
langsung. 1) Masukkan CD-ROM printer ke dalam drive CD-ROM.
2) Bila diarahkan, klik Install Printer Catatan: Jika layar sambutan tidak
membuka, klik Start, klik Run, ketik “X:setup” (“X” adalah huruf untuk
drive CD-ROM), dan klik OK.
Page 19

Parallel
port
17
USB port
3) Follow the instructions. Note: When prompted, connect the cable
between printer and computer. (Parallel and USB cables are not included.
Use an IEEE 1284-compatible parallel cable or a standard 2-meter USB
cable.) 4) Click Finish. 5) Restart the computer. 6) Go to ste p 20.
Install printing system software for a network. (The 2300n, 2300dn,
and 2300dtn include an HP Jetdirect print server card for network
connection. For information about HP Jetdirect print servers, see the
Jetdirect Print Server Administrator’s Guide
1) Connect a twisted-pair network cable between the printer port and an
active network port.
on the printer CD-ROM.)
HP
3) Ikuti petunjuk. Catatan: Bila diarahkan, hubungkan kabel antara printer
dan komputer. (Kabel Paralel dan USB tidak disertakan. Gunakan kabel
paralel IEEE 1284-compatible atau kabel USB standar 2-meter.)
4) Klik Finish (Selesai) 5) Hidupkan kembali komputer. 6) Lanjutkan ke
langkah 20.
Menginstal perangkat sistem pencetakan untuk jaringan.
(Model 2300n, 2300dn, dan 2300dtn menyertakan kartu server cetak
HP Jetdirect untuk hubungan jaringan. Untuk informasi mengenai server
cetak HP Jetdirect, lihat
pada CD-ROM printer.) 1) Hubungkan kabel jaringan pasangan-terpilin
antara port printer dan port jaringan aktif.
Panduan Administrator Server Cetak HP Jetdirect
HP Jetdirect
18
Page 20

2) Verify that the HP Jetdirect print server is configured correctly for the
network by printing a configuration page (see step 14). On the second
page, locate the printer IP address (you might need this address to
complete network installation).
English
Note: If an IP address does not appear on the page, you might need to
verify or set the printer IP address. At the control panel, press (S
button) and use the following path to reach the TCP/IP options:
,
DEVICE
I/O, EIO 1 JETDIRECT MENU, TCP/IP
, and then
MANUAL SETTINGS
ELECT
CONFIGURE
.
2) Verifikasikan bahwa server cetak HP Jetdirect dikonfigurasikan secara
benar untuk jaringan dengan mencetak halaman konfigurasi (lihat
langkah 14). Pada halaman kedua, cari alamat IP printer (Anda mungkin
memerlukan alamat ini untuk menuntaskan instalasi jaringan).
Bahasa Indonesia
Catatan: Jika alamat IP tidak muncul pada halaman, mungkin Anda perlu
memverifikasi atau mencantumkan alamat IP printer. Pada panel kendali,
Pilih) dan gunakan tapakan (path) berikut untuk
tekan tombol (S
mencapai opsi TCP/IP:
, dan kemudian
TCP/IP
ELECT
CONFIGURE DEVICE, I/O, EIO 1 JETDIRECT MENU
MANUAL SETTING S
.
,
Page 21

18
3) Insert the printer CD-ROM in the CD-ROM drive and follow the
instructions. 4) Click Finish. 5) Restart the computer. 6) Go to step 20.
Install Windows printing system software after the parallel or USB
cable has been connected. If you have already connected a cable, the
New Hardware Found dialog box appears when you turn on the
computer. For Windows 95, 98, or Me: 1) In th e New Hardware Found
box, click Search CD-ROM drive. 2) Click Next and follow the
instructions. 3) Go to step 20.
3) Masukkan CD-ROM printer ke dalam drive CD-ROM dan ikuti petunjuk.
4) Click Finish (Selesai) 5) Anjak ulang komputer. 6) Lanjutkan ke
langkah 20.
Instal perangkat lunak sistem pencetakan Windows setelah kabel
paralel atau USB dihubungkan. Jika Anda sudah menghubungkan
kabel, kotak dialog New Hardware Found (Ditemukan Perangkat Keras
Baru) muncul ketika Anda menghidupkan komputer. Untuk Windows 95,
98, atau Me: 1) Dalam kotak New Hardware Found , klik Search
CD-ROM drive(Cari drive CD-ROM). 2) Klik Next (Berikut) dan ikuti
petunjuk. 3) Lanjutkan ke langkah 20.
20
Page 22

19
USB
port
Network
port
For Windows 2000 or XP: 1) In the New Hardware Found dialog box,
click Search. 2) On the Locate Driver Files screen, select the Specify a
Location check box, clear all other check boxes, and click Next. 3) Type
“X:\2000XP” (where “X” is the letter of the CD-ROM drive). 4) Click Next
and follow the instructions. 5) Click Finish. 6) Select a language and
English
follow the instructions. 7) Go to step 20.
Install Macintosh printing system software for direct or network
connection. (The 2300n, 2300dn, and 2300dtn include an HP Jetdirect
print server card for network connection.) 1) Fo r ne twork: Connect a
network cable between the printer port and an active network port. For
direct: Connect a 2-meter USB cable between the printer and computer.
Untuk Windows 2000 atau XP: 1) Dalam kotak New Hardware Found ,
klik Search (Cari). 2) Pada layar Locate Driver Files, (Cari Arsip Driver)
pilih kotak periksa Specify a Location (Tentukan Lokasi), hilangkan
semua kotak periksa lainnya , dan klik Next. 3) Ketik “X:\2000XP”
(“X” adalah huruf drive CD-ROM ). 4) Klik Next (Berikut) dan ikuti
petunjuk. 5) Klik Finish(Selesai) 6) Pilih bahasa dan ikuti petunjuk.
7) Lanjutkan ke langkah 20.
Bahasa Indonesia
Instal perangkat lunak sistem pencetakan Macintosh untuk
hubungan langsung atau jaringan. (Model 2300n, 2300dn, dan
2300dtn menyertakan kartu server cetak HP Jetdirect untuk hubungan
jaringan. 1) Untuk jaringan: Hubungkan kabel jaringan antara port printer
dan port jaringan aktif. Untuk hubungan langsung: Hubungkan kabel
USB 2-meter antara printer dan komputer.
Page 23

2) Insert the printer CD-ROM in the CD-ROM drive and follow the
instructions. 3) Double-click the installer icon for the language and follow
the instructions. 4) To set up the Macintosh computer to use the printer,
open the appropriate utility. For Ma c OS X: From HD/
Applications/Utilities/Print Center , start the Print Center , click Add Printer,
select the connection type (and Zone, if for AppleTalk),
select the printer, and click Add. For Mac OS 8.6 to 9.2.x: From
HD/Applications/Utilities, open the Desktop Printer Utility, double-click the
connection type, click Change, select the printer (and Zone, if for
AppleTalk), click Auto Setup, and click Create. 5) Go to step 20.
2) Masukkan CD-ROM printer ke dalam drive CD-ROM dan ikuti petunjuk.
3) Klik dua kali ikon penginstal untuk bahasa dan ikuti petunjuk. 4) Untuk
membuat komputer Macintosh agar dapat menggunakan printer, buka
utiliti yang sesuai. Untuk Mac OS X: Dari HD/Applications/Utilities/Print
Center, mulai dengan Print Center (Pusat Cetak), klik Add Printer
(Tambah Printer), pilih jenis hubungan (dan Zone untuk Apple Talk),
pilih printer, dan klik Add (Tambah). Untuk Mac OS 8.6 to 9.2.x:
Dari HD/Applications/Utilities, buka Desktop Printer Utility,klik dua kali
jenis hubungan, klik Change (Ubah), pilih printer (dan Zone, untuk
AppleTalk), klik Auto Setup (Tata Otomatis), dan klik Create (Buat).
5) Lanjutkan ke langkah 20.
22
Page 24

20
21
Test the software installation. Print a page from any software program
to make sure that the software is correctly installed. Note: If installation
fails, reinstall the software. If this fails, check the installation notes and
Readme files on the printer CD-ROM or the flyer that came in the printer
box, or go to http://www.hp.com/support/lj2300 for help.
English
Register your printer. Register your printer today at
http://www.register.hp.com. This is the quickest and easiest way for you to
join our select group of HP owners who can register to receive:
• technical support updates and enhanced support options
• ideas and ways to use your new HP printer
• news on emerging technologies
Lakukan uji coba instalasi perangkat lunak. Cetak halaman dari
program perangkat lunak manapun untuk memastikan bahwa perangkat
lunak diinstal dengan benar. Catatan: Jika instalasi gagal, instal ulang
perangkat lunaknya. Jika ini juga gagal, periksa catatan instalasi dan
Readme files pada CD-ROM printer atau flyer yang disertakan dalam
kotak printer, atau kunjungi http://www.hp.com/support/lj2300 untuk
bantuan.
Bahasa Indonesia
Daftarkan printer Anda. Daftarkan printer Anda hari ini pada
http://www.register.hp.com. Ini adalah cara tercepat dan termudah bagi
Anda untuk bergabung dengan grup para pemilik HP kami yang
mendaftar untuk menerima:
• update dukungan teknis dan opsi dukungan yang diperluas
• berbagai gagasan dan cara untuk menggunakan printer HP Anda yang baru
• berita mengenai berbagai teknologi yang muncul
Page 25

Congratulations. Your printer is ready to use. For inf ormation about using
the printer and troubleshooting, see these sources: 1) The
the printer CD-ROM; 2) The following URL:
http://www.hp.com/suppo rt/lj2300; 3) HP Customer S upport (see the
support flyer that came in the printer box).
use
guide on
Selamat. Printer Anda siap digunakan. Untuk informasi mengenai
penggunaan printer dan menyelesaikan masalah, lihat sumber-sumber
ini: 1) Panduan
http://www.hp.com/suppo rt/lj2300; 3) Dukungan Pelanggan HP (lihat flyer
dukungan yang disertakan dalam kotak printer).
peng
gunaan pada CD-ROM printer ; 2) URL berikut:
24
Page 26

printed on
recycled paper
printed on
recycled paper
copyright 2002
Hewlett-Packard Company
printed in Singapore
printed in Singapore
www.hp.com/support/lj2300
©
*Q2472 *
*Q2472 *
-90906
-90906
Q2472-90906
 Loading...