


 Loading...
Ignite-UX Administration Guide
HP-UX 11i
Abstract
This guide describes installing, configuring, and using Ignite-UX to install and recover HP-UX. It is intended for administrators with in-depth knowledge of HP-UX operating system concepts, commands, and configuration; HP computer hardware and software; upgrading software, applying patches, and troubleshooting problems; and knowledge of TCP/IP networking concepts and network configuration.
HP Part Number: 762791-001
Published: March 2014
Edition: 41

© Copyright 1999, 2014 Hewlett-Packard Development Company, L.P.
Confidential computer software. Valid license from HP required for possession, use or copying. Consistent with FAR 12.211 and 12.212, Commercial Computer Software, Computer Software Documentation, and Technical Data for Commercial Items are licensed to the U.S. Government under vendor's standard commercial license.
The information contained herein is subject to change without notice. The only warranties for HP products and services are set forth in the express warranty statements accompanying such products and services. Nothing herein should be construed as constituting an additional warranty. HP shall not be liable for technical or editorial errors or omissions contained herein.
Acknowledgements
Intel® Itanium® Logo, Intel, Intel Inside and Itanium are trademarks or registered trademarks of Intel Corporation or its subsidiaries in the United States and other countries.
Microsoft® and Windows® are U.S. registered trademarks of Microsoft Corporation.
Java® is a US trademark of Sun Microsystems, Inc.
UNIX® is a registered trademark of The Open Group.
Revision History
Table 1 Revision History
Document Manufacturing Part |
Operating Systems Supported |
Edition No. |
Publication Date |
Number |
|
|
|
762791-001 |
HP-UX 11i v1, 11i v2, 11i v3 |
41 |
March 2014 |
B3921-90080 |
HP-UX 11i v1, 11i v2, 11i v3 |
40 |
November 2013 |
B3921-90079 |
HP-UX 11i v1, 11i v2, 11i v3 |
39 |
October 2013 |
B3921-90077 |
HP-UX 11i v1, 11i v2, 11i v3 |
38 |
March 2013 |
B3921-90073 |
HP-UX 11i v1, 11i v2, 11i v3 |
38 |
March 2013 |
B3921-90070 |
HP-UX 11i v1, 11i v2, 11i v3 |
38 |
March 2012 |
B3921-90066 |
HP-UX 11i v1, 11i v2, 11i v3 |
37 |
September 2011 |
B3921-90050 |
HP-UX 11i v1, 11i v2, 11i v3 |
36 |
March 2011 |
B3921-90032 |
HP-UX 11i v1, 11i v2, 11i v3 |
35 |
September 2010 |
B3921-90006 |
HP-UX 11i v1, 11i v2, 11i v3 |
34 |
March 2010 |
5992-6584 |
HP-UX 11i v1, 11i v2, 11i v3 |
33 |
September 2009 |
5992-5309 |
HP-UX 11i v1, 11i v2, 11i v3 |
32 |
November 2008 |
5992-4731 |
HP-UX 11i v1, 11i v2, 11i v3 |
31 |
September 2008 |
5992-3336 |
HP-UX 11i v1, 11i v2, 11i v3 |
30 |
March 2008 |
5992-1959 |
HP-UX 11i v1, 11i v2, 11i v3 |
29 |
December 2007 |
5992-0602 |
HP-UX 11i v1, 11i v2, 11i v3 |
28 |
September 2007 |
5991-7999 |
HP-UX 11.00, 11i v1, 11i v2, 11i v3 |
27 |
June 2007 |
5991-6440 |
HP-UX 11.00, 11i v1, 11i v2, 11i v3 |
26 |
February 2007 |
B2355-91049 |
HP-UX 11.00, 11i v1, 11i v2 |
25 |
December 2006 |
B2355-90997 |
HP-UX 11.00, 11i v1, 11i v2 |
24 |
September 2006 |
B2355-90970 |
HP-UX 11.00, 11i v1, 11i v2 |
23 |
June 2006 |
B2355-90959 |
HP-UX 11.00, 11i v1, 11i v2 |
22 |
March 2006 |
B2355-90941 |
HP-UX 11.00, 11i v1, 11i v2 |
21 |
December 2005 |
B2355-90893 |
HP-UX 11.00, 11i v1, 11i v1.6, 11i v2 |
20 |
September 2005 |

 Table 1 Revision History (continued)
Document Manufacturing Part |
Operating Systems Supported |
Edition No. |
Publication Date |
Number |
|
|
|
B2355-90875 |
HP-UX 11.00, 11i v1, 11i v1.6, 11i v2 |
19 |
June 2005 |
B2355-90872 |
HP-UX 11.00, 11i v1, 11i v1.6, 11i v2 |
18 |
December 2004 |
B2355-90849 |
HP-UX 11.00, 11i v1, 11i v1.6, 11i v2 |
17 |
September 2004 |
B2355-90837 |
HP-UX 11.00, 11i v1, 11i v1.6, 11i v2 |
16 |
June 2004 |
B2355-90834 |
HP-UX 11.00, 11i v1, 11i v1.6, 11i v2 |
15 |
March 2004 |
B2355-90831 |
HP-UX 11.00, 11i v1, 11i v1.6, 11i v2 |
14 |
December 2003 |
B2355-90788 |
HP-UX 11.00, 11i v1, 11i v1.6, 11i v2 |
13 |
September 2003 |
B2355-90829 |
HP-UX 11.00, 11i v1, 11i v1.6 |
12 |
September 2003 |
B2355-90810 |
HP-UX 11.00, 11i v1, 11i v1.5, 11i v1.6 |
11 |
June 2003 |
B2355-90772 |
HP-UX 10.x, 11.00, 11i v1 , 11i v1.5, 11i v1.6 |
10 |
March 2003 |
B2355-90767 |
HP-UX 10.x, 11.00, 11i v1, 11i v1.5, 11i v1.6 |
9 |
December 2002 |
B2355-90770 |
HP-UX 10.x, 11.00, 11i v1, 11i v1.5, 11i v1.6 |
8 |
October 2002 |
B2355-90765 |
HP-UX 10.x, 11.00, 11i v1, 11i v1.5, 11i v1.6 |
7 |
September 2002 |
B2355-90758 |
HP-UX 10.x, 11.00, 11i v1, 11i v1.5 |
6 |
September 2002 |
B2355-90750 |
HP-UX 10.x, 11.00, 11i v1, 11i v1.5 |
5 |
June 2002 |
B2355-90749 |
HP-UX 10.x, 11.00, 11i v1, 11i v1.5 |
4 |
March 2002 |
B2355-90738 |
HP-UX 10.x, 11.00, 11i v1, 11i v1.5 |
3 |
June 2001 |
B2355-90704 |
HP-UX 10.x, 11.00, 11i v1 |
2 |
December 2000 |
B2355-90677 |
HP-UX 10.x, 11.00, 11i v1 |
1 |
March 1999 |

Contents |
|
HP secure development lifecycle.................................................................... |
10 |
1 Ignite-UX overview.................................................................................... |
11 |
Ignite-UX features................................................................................................................... |
11 |
Getting the Ignite-UX software ................................................................................................. |
13 |
Ignite-UX commands and manpages......................................................................................... |
14 |
Introduction to the Ignite-UX GUI............................................................................................... |
15 |
How Ignite works.................................................................................................................... |
18 |
The Ignite-UX install environment.......................................................................................... |
19 |
Boot sources...................................................................................................................... |
19 |
Installation versus recovery.................................................................................................. |
19 |
Network booting and IP addresses....................................................................................... |
19 |
Phases of operation............................................................................................................ |
20 |
Startup........................................................................................................................ |
20 |
Phase 1....................................................................................................................... |
21 |
Phase 2....................................................................................................................... |
21 |
Phase 3....................................................................................................................... |
22 |
Ignite-UX server requirements................................................................................................... |
22 |
Supported peripherals ............................................................................................................ |
24 |
Disks and other I/O........................................................................................................... |
24 |
Firmware.......................................................................................................................... |
24 |
Disk arrays........................................................................................................................ |
24 |
Client terminals.................................................................................................................. |
24 |
2 Making configuration decisions for Ignite servers.......................................... |
25 |
Boot and install client from media............................................................................................. |
25 |
Simple network solutions.......................................................................................................... |
25 |
Alternate boot with network server installation............................................................................ |
27 |
Complex networks.................................................................................................................. |
28 |
Diagnosing network boot issues................................................................................................ |
28 |
HP-UX diagnosing and debugging....................................................................................... |
29 |
Simple network debugging............................................................................................. |
29 |
Logging to syslog.log..................................................................................................... |
29 |
Using bootpquery......................................................................................................... |
29 |
RDP diagnosing and debugging.......................................................................................... |
30 |
3 Simple network: creating a server for registered clients.................................. |
31 |
Configuring the Ignite-UX server for PA-RISC clients..................................................................... |
31 |
Launch Ignite-UX................................................................................................................ |
31 |
Launch the server setup wizard............................................................................................ |
32 |
Register the PA-RISC clients with the server............................................................................. |
34 |
Skip DHCP setup............................................................................................................... |
35 |
Go to the software setup section.......................................................................................... |
35 |
Configuring the Ignite-UX server for Itanium-based clients............................................................. |
35 |
Register the Itanium-based clients with the server.................................................................... |
35 |
Use the server setup wizard to proceed to software depot setup............................................... |
36 |
Setting up software from OE depots.......................................................................................... |
36 |
More server setup options........................................................................................................ |
37 |
Configuring server options.................................................................................................. |
37 |
Configuring session options................................................................................................. |
39 |
Setting up additional software on the server............................................................................... |
41 |
SD software...................................................................................................................... |
41 |
Non-SD software............................................................................................................... |
41 |
4Contents
4 Simple network: creating a server for anonymous clients................................ |
43 |
Overview of anonymous clients................................................................................................. |
43 |
Configuring an Ignite server to boot anonymous PA-RISC clients.................................................... |
43 |
Using the server setup wizard.............................................................................................. |
43 |
Editing the instl_boottab file................................................................................................ |
43 |
Configuring an Ignite server to boot anonymous Itanium-based clients........................................... |
44 |
Working with DHCP........................................................................................................... |
44 |
Understanding PXE booting of Itanium-based systems......................................................... |
44 |
Ignite-UX server and boot helper setup for DHCP............................................................... |
44 |
Isolating Ignite-UX from noncontrollable DHCP servers ....................................................... |
46 |
5 Complex networks: challenges and solutions................................................ |
48 |
How to use this chapter........................................................................................................... |
48 |
Complex network challenges.................................................................................................... |
48 |
Multiple subnets................................................................................................................. |
49 |
Remote systems.................................................................................................................. |
49 |
Multiple boot servers.......................................................................................................... |
50 |
Avoiding complex network issues.............................................................................................. |
50 |
An Ignite-UX server for each subnet...................................................................................... |
51 |
A Multi-capable server for each subnet................................................................................. |
51 |
Extend the local subnet....................................................................................................... |
51 |
Using virtual LANs properly for Ignite-UX.............................................................................. |
51 |
Complex network solutions....................................................................................................... |
52 |
Automating HP-UX OS version selection................................................................................ |
52 |
Limit network response by system class.................................................................................. |
53 |
Directed boot.................................................................................................................... |
53 |
Server selection................................................................................................................. |
53 |
Limit network boot response by network interface address....................................................... |
53 |
Control network boot via response timing.............................................................................. |
54 |
Install remote clients through a network router........................................................................ |
54 |
Multiple NICs attach the Ignite server to multiple subnets........................................................ |
55 |
Getting the client the correct networking information.......................................................... |
55 |
Having the client contact the correct server....................................................................... |
55 |
Ignite-UX bootp boot helper................................................................................................ |
56 |
HP-UX DHCP PXE Next server boot helper for integrity systems............................................ |
57 |
Configuring a Next server boot helper for Integrity systems............................................ |
57 |
Forwarding boot requests via bootp relay......................................................................... |
58 |
Multi-capable subnet boot server.......................................................................................... |
60 |
Non-HP-UX Next server boot helper................................................................................. |
60 |
Non-HP-UX bootp boot helper......................................................................................... |
60 |
6 Complex networks: multi-capable servers..................................................... |
61 |
Configuring an RDP server for specific MAC addresses................................................................ |
61 |
Configuring an RDP server to delay PXE response....................................................................... |
61 |
Configuring an RDP server to initiate HP-UX installation................................................................ |
62 |
Setting up RDP MenuOptions via Windows commands........................................................... |
62 |
Setting up RDP MenuOptions via interactive UI...................................................................... |
63 |
Using an RDP MenuOption for HP-UX................................................................................... |
66 |
Linux DHCP PXE Next server boot helper for HP-UX installation..................................................... |
66 |
Configuring an HP-UX server to support Linux boot and installation............................................... |
67 |
RedHat installation from an HP-UX server.............................................................................. |
69 |
SuSE installation from an HP-UX server.................................................................................. |
70 |
Configuring an HP-UX server to support Windows installation....................................................... |
70 |
7 Managing I/O for installation and recovery................................................. |
71 |
Introducing multipathing.......................................................................................................... |
71 |
Contents 5
Agile view concepts................................................................................................................ |
71 |
Practical considerations........................................................................................................... |
73 |
System installation configuration........................................................................................... |
73 |
Support for >2 TB boot disk................................................................................................ |
77 |
Identifying devices for other tasks......................................................................................... |
78 |
Important characteristics of the agile view............................................................................. |
78 |
Recovery and the agile view.................................................................................................... |
80 |
Legacy DSFs and device matching....................................................................................... |
80 |
Persistent DSFs and device matching..................................................................................... |
80 |
Controlling the I/O configuration process.................................................................................. |
81 |
Agile view questions and answers............................................................................................. |
82 |
8 Security................................................................................................... |
84 |
Ignite-UX server ports.............................................................................................................. |
84 |
Modifying a Bastille-hardened system to operate with Ignite-UX.................................................... |
89 |
Enabling Ignite-UX server requirements................................................................................. |
90 |
Enabling Ignite-UX client requirements.................................................................................. |
91 |
Configuring Ignite to replace TFTP with NFS............................................................................... |
92 |
Overview.......................................................................................................................... |
92 |
Procedure......................................................................................................................... |
92 |
9 Booting and installing HP-UX from the server using the client console............... |
95 |
Preparing the client for installation ........................................................................................... |
95 |
Making boot decisions when using the client console.................................................................. |
96 |
Boot using the network....................................................................................................... |
96 |
Boot using media............................................................................................................... |
97 |
Using bootsys on the client console........................................................................................... |
98 |
Booting PA-RISC clients from the console ................................................................................... |
99 |
Booting Itanium-based clients using the network........................................................................ |
100 |
Direct boot profiles for Itanium-based systems........................................................................... |
102 |
The dbprofile command.................................................................................................... |
103 |
The lanboot command...................................................................................................... |
104 |
Installing HP-UX from the client console.................................................................................... |
105 |
Managing speed and duplexing of LAN interfaces executing network boots................................. |
108 |
Examples........................................................................................................................ |
108 |
10 Booting and installing HP-UX on clients using the server............................. |
110 |
Methods of installing client systems......................................................................................... |
110 |
Installation using bootsys....................................................................................................... |
110 |
Installation using the Ignite-UX GUI......................................................................................... |
112 |
Prepare the client for installation........................................................................................ |
112 |
Starting Ignite-UX............................................................................................................. |
112 |
Adding clients................................................................................................................. |
112 |
Booting a client............................................................................................................... |
113 |
Configuring the installation.................................................................................................... |
116 |
New installation.............................................................................................................. |
116 |
Initializing the installation............................................................................................. |
117 |
The client installation configuration interface................................................................... |
117 |
Basic tab............................................................................................................... |
118 |
Software tab ......................................................................................................... |
125 |
System tab ............................................................................................................ |
130 |
File System tab ...................................................................................................... |
137 |
Advanced tab........................................................................................................ |
144 |
Repeat an installation....................................................................................................... |
145 |
Executing the installation....................................................................................................... |
146 |
Viewing and printing a manifest ............................................................................................ |
149 |
6Contents
11 Golden images..................................................................................... |
151 |
Advantages of golden images................................................................................................ |
151 |
Creating a golden image...................................................................................................... |
151 |
Installing the HP-UX operating system ................................................................................. |
152 |
Installing critical patches onto the operating system.............................................................. |
152 |
Installing optional software................................................................................................ |
153 |
Customizing the system .................................................................................................... |
153 |
Creating the golden archive.............................................................................................. |
153 |
Configuring the Ignite-UX server to recognize the golden image.................................................. |
154 |
Creating and using golden images using GUI and CLI.............................................................. |
157 |
Creating golden image using GUI..................................................................................... |
157 |
Creation of a golden image using CLI................................................................................ |
159 |
Examples on using make_golden_image script:.................................................................... |
159 |
Enabling the client................................................................................................................ |
159 |
Installing the golden image on the client.................................................................................. |
160 |
12 Customizing your installation.................................................................. |
161 |
Using configuration files........................................................................................................ |
161 |
Classes of configuration files............................................................................................. |
161 |
Combining configuration files using INDEX entries................................................................ |
164 |
Example configuration files................................................................................................ |
166 |
Customizations based on the client hardware....................................................................... |
168 |
Customizations based on user selection............................................................................... |
169 |
Avoid archiving patch files .................................................................................................... |
170 |
Debugging configuration files................................................................................................. |
171 |
Using post-installation scripts.................................................................................................. |
171 |
How the installation functions............................................................................................ |
172 |
Adding a post-installation script......................................................................................... |
172 |
13 Automating installations......................................................................... |
174 |
Starting a non-interactive installation with bootsys..................................................................... |
174 |
Using a saved configuration................................................................................................... |
174 |
Specifying defaults in the config.local file................................................................................. |
175 |
Setting defaults with instl_adm................................................................................................ |
175 |
Using the per-client configuration file....................................................................................... |
175 |
Scheduling installations......................................................................................................... |
177 |
Setting installation parameters dynamically.............................................................................. |
177 |
Checking modified files for errors....................................................................................... |
179 |
14 Creating your own boot and installation media......................................... |
180 |
Why use custom boot and installation media?.......................................................................... |
180 |
Building PA-RISC boot and installation tape.............................................................................. |
180 |
Possible tape contents....................................................................................................... |
180 |
Logical interchange format........................................................................................... |
181 |
Archives and depots.................................................................................................... |
182 |
Creating and modifying an archive configuration file for tape................................................ |
182 |
Creating and Modifying a Serial Depot and its Configuration file for tape............................... |
183 |
PA-RISC installation tape creation example.......................................................................... |
183 |
Assumptions............................................................................................................... |
183 |
Example PA-RISC installation tape creation..................................................................... |
184 |
Creating a boot CD/DVD or an installation DVD...................................................................... |
185 |
Assumptions.................................................................................................................... |
185 |
File and ISO image size considerations............................................................................... |
185 |
Boot and archive-based CD/DVDs..................................................................................... |
185 |
Boot CD/DVD examples.............................................................................................. |
186 |
Create HP-UX 11i v3 bootable CD/DVD media for two-step media recovery................... |
186 |
Contents 7
Create HP-UX 11i v2 bootable media on USB DVD drive for two-step media recovery...... |
186 |
Installation archive-based DVD examples........................................................................ |
186 |
Put an Itanium-based HP-UX 11i v3 golden archive on a DVD....................................... |
186 |
Put a PA-RISC HP-UX 11i v2 golden archive on a DVD.................................................. |
187 |
Put two HP-UX 11i v2 golden archives, one Itanium-based and one PA-RISC, on a DVD.... |
187 |
Create a recovery DVD........................................................................................... |
187 |
Create an HP-UX 11i v2 Itanium-based recovery DVD using an existing network recovery |
|
image................................................................................................................... |
187 |
Error messages........................................................................................................... |
187 |
No DVD available.................................................................................................. |
187 |
No DVD special files............................................................................................... |
188 |
Missing -c argument on HP-UX 11i v2 USB DVD drive.................................................. |
188 |
Depot-based DVDs........................................................................................................... |
188 |
HP-UX 11i v2 Depot-based installation DVDs................................................................... |
188 |
HP-UX 11i v3 Depot-based installation DVDs................................................................... |
190 |
15 Recovery.............................................................................................. |
191 |
Overview............................................................................................................................ |
191 |
System recovery.................................................................................................................... |
191 |
System recovery tools....................................................................................................... |
192 |
Recovery tool comparison............................................................................................ |
192 |
Considerations when using Veritas Volume Manager from Symantec.................................. |
193 |
Recovery image contents.................................................................................................. |
193 |
Recovery image configuration policies................................................................................ |
194 |
Reconciling client and server Ignite-UX versions for recovery.................................................. |
194 |
Recovery image creation process....................................................................................... |
195 |
Examining recovery image contents............................................................................... |
197 |
Verifying recovery image results.................................................................................... |
199 |
Creating and using recovery tapes..................................................................................... |
201 |
Recovery tape creation examples.................................................................................. |
201 |
Tape recovery for PA-RISC systems................................................................................. |
202 |
Tape recovery for Itanium-based systems........................................................................ |
203 |
Tape recovery for Integrity Blade systems........................................................................ |
208 |
Creating and using network recovery images...................................................................... |
209 |
Adding clients for recovery .......................................................................................... |
210 |
Examples of network recovery image creation................................................................. |
212 |
Recovering using the network for PA-RISC clients.............................................................. |
212 |
Recovering using the network for Itanium-based clients..................................................... |
213 |
Retaining recovery images................................................................................................ |
214 |
Making recovery configuration file additions....................................................................... |
216 |
Using the recovery config.local file................................................................................ |
216 |
Adding a depot.......................................................................................................... |
216 |
Selecting file systems during recovery................................................................................. |
217 |
Tape recovery with no tape boot support — two-step media recovery..................................... |
217 |
Notes on cloning systems.................................................................................................. |
219 |
Cloning a system using make_net_recovery.................................................................... |
220 |
System recovery questions and answers.............................................................................. |
221 |
16 Support and other resources................................................................... |
224 |
Contacting HP...................................................................................................................... |
224 |
Before you contact HP...................................................................................................... |
224 |
HP contact information..................................................................................................... |
224 |
Documentation feedback.................................................................................................. |
224 |
Related information............................................................................................................... |
224 |
Documents...................................................................................................................... |
224 |
Websites........................................................................................................................ |
225 |
8Contents
Typographic conventions....................................................................................................... |
226 |
17 Documentation feedback....................................................................... |
227 |
A Troubleshooting .................................................................................... |
228 |
Errors and warnings.............................................................................................................. |
228 |
Ignite-UX server problems ..................................................................................................... |
228 |
Installing systems with Ignite-UX.............................................................................................. |
228 |
Installing from media............................................................................................................. |
233 |
Installing from golden images................................................................................................. |
233 |
Common network booting errors............................................................................................. |
234 |
Creation of archive............................................................................................................... |
235 |
B Configuring DHCP services ..................................................................... |
236 |
Overview of DHCP services .................................................................................................. |
236 |
DHCP usage examples.......................................................................................................... |
237 |
Manage clients that will use DHCP during and after installation............................................. |
237 |
Manage clients with temporary IP addresses during installation.............................................. |
237 |
Using bootptab as an alternative to DHCP .............................................................................. |
238 |
Background information on DHCP design ........................................................................... |
238 |
C LIF volume contents................................................................................. |
239 |
A Description of the files in the LIF volume................................................................................ |
239 |
D Using Integrated Lights Out Virtual Media with Ignite-UX............................. |
242 |
E Expert recovery...................................................................................... |
249 |
Expert recovery preparation................................................................................................... |
249 |
The Expert recovery procedure............................................................................................... |
249 |
F Terminal keyboard shortcuts..................................................................... |
255 |
Basic keyboard shortcuts........................................................................................................ |
255 |
Advanced keyboard navigation.............................................................................................. |
255 |
HP terminals.................................................................................................................... |
255 |
vt100 terminals................................................................................................................ |
256 |
Glossary.................................................................................................. |
258 |
Index....................................................................................................... |
267 |
Contents 9

HP secure development lifecycle
Starting with HP-UX 11i v3 March 2013 update release, HP secure development lifecycle provides the ability to authenticate HP-UX software. Software delivered through this release has been digitally signed using HP's private key. You can now verify the authenticity of the software before installing the products, delivered through this release.
To verify the software signatures in signed depot, the following products must be installed on your system:
•B.11.31.1303 or later version of SD (Software Distributor)
•A.01.01.07 or later version of HP-UX Whitelisting (WhiteListInf)
To verify the signatures, run: /usr/sbin/swsign -v –s <depot_path>. For more information, see Software Distributor documentation at http://www.hp.com/go/sd-docs.
NOTE: Ignite-UX software delivered with HP-UX 11i v3 March 2014 release or later supports verification of the software signatures in signed depot or media, during cold installation.
For more information, see Ignite-UX documentation at http://www.hp.com/go/ignite-ux-docs.
10
1 Ignite-UX overview
Welcome to Ignite-UX!
This chapter contains information for new and experienced users alike.
Introductory information:
•“Ignite-UX features” (page 11)
•“Getting the Ignite-UX software ” (page 13)
•“Ignite-UX commands and manpages” (page 14)
•“Introduction to the Ignite-UX GUI” (page 15) Details about Ignite-UX:
•“How Ignite works” (page 18)
•“Ignite-UX server requirements” (page 22)
•“Supported peripherals ” (page 24)
Ignite-UX features
Client and server control
The installation sessions for multiple targets can be controlled from a single Ignite-UX server in a true client/server model. A GUI is provided to run on the server and manage multiple simultaneous client installation sessions. Alternatively, a single installation session can be controlled from the client machine. A single Ignite-UX installation server can serve multiple releases of HP-UX for different clients.
Easy-to-use GUI
The Ignite-UX GUI uses tabs and dialog boxes for task navigation. The Ignite-UX GUI only runs on an Ignite-UX server.
Terminal User Interface
Ignite-UX uses a terminal user interface (TUI) with keyboard navigation when run from a client. Ignite may also be run in TUI mode from the server.
Command Line Interface
Commands that power Ignite-UX can be executed directly from the operating system's command shell on an Ignite-UX server or client. For the list of commands, see “Ignite-UX commands and manpages” (page 14).
Multi-sourced installations
Installations can use multiple Software Distributor (SD) depots in a single installation session. For example, you can install your base OS from one SD depot, a set of patches from another SD depot, and the applications you want from a third SD depot; all in one session.
Multiple archive formats
Ignite-UX supports tar, cpio, and pax format archives. (To use the pax format with 11i v2, you must have the PAX-Enh™ product installed. The pax format is not available for 11i v1.) Tools are provided to help you create a golden image if you wish to install from an archive. You can use one archive along with one or more depots containing patches or additional software.
Ignite-UX features 11
One-step installation
Once you configure a system with a common configuration you want replicated to other systems, use Ignite-UX to either manually or automatically install each client system. This common configuration can include any supported HP-UX 11i operating system, and you can add any required patches and applications.
Custom installations
It is easy to create a system that is ready to go as soon as the installation session completes. Many of the tasks that are typically done as separate steps after an installation have been incorporated into the installation process. Ignite-UX allows you to specify kernel parameters you want set and user-supplied scripts you would like to run as part of the session. In addition, the host and networking information normally supplied at first boot can be specified at install time.
Golden images
A system that has been installed and tuned may be used to create an image. That image may be used as a custom configuration that may be applied in installations to other systems.
Automated installations
Set up a configuration and then install it on a client with no further user interaction. This is possible for both the initial installation and the reinstallation cases.
Create a system manifest
Scan a system and produce a report detailing what hardware is present, how the disks are used, what kernel modifications have been made, and what software has been installed. This report can be customized to meet your needs.
Create custom installation media
Construct your own customized, bootable installation media. An example script, make_media_install, is provided that can help you create bootable media (tapes, CDs, and DVDs) with or without golden archives and SD depots. The example script can be found at /opt/ ignite/data/scripts/examples/make_media_install.
System recovery
Ignite-UX provides consistent, reliable recovery in the event of catastrophic hardware or software failure by creating recovery images on tape (with client access to a tape drive) or on any Ignite-UX server in your environment (with client access to the network).
Support for multiple architectures
Ignite-UX supports both the Precision Architecture Reduced Instruction Set Computing (PA-RISC) and the Intel®Itanium® (Itanium®-based) hardware architectures.
Support for HP Servicecontrol manager
Ignite-UX supports installing HP-UX clients in the HP Servicecontrol Manager environment. For details, see the HP Servicecontrol Manager 3.0 User's Guide.
Support for new hardware
Each new release of the Ignite-UX product supports the new hardware included in the corresponding release of HP-UX.
12 Ignite-UX overview

Getting the Ignite-UX software
Ignite-UX is available in standard SD (Software Distributor) depot format from OE and AR media, and from the HP Software Depot Website.
Any Ignite-UX bundle is safe to install at any time. None of the filesets in Ignite-UX bundles will cause a reboot to occur.
•OE and AR Media
Ignite-UX released on OE or AR media can only be installed on a server running the HP-UX version supported by the OE or AR media.
This Ignite-UX is the complete product. (The Ignite complete product is capable of installing and recovering all supported versions of HP-UX.)
If you require a version of Ignite-UX that can be installed onto any supported version of HP-UX, read the next section about downloading Ignite-UX from the HP Software Depot Website.
•HP Software Depot Website
Follow this link for Ignite-UX on HP Software Depot: http://www.hp.com/go/ ignite-ux-download
The Ignite-UX depots available at Software Depot contain the latest Ignite-UX version and can be installed on servers running any supported version of HP-UX.
•Support for Installation and Recovery of all Supported HP-UX Operating System Versions
Each Ignite-UX bundle contains the Ignite-UX tools, plus the data files required to install and recover the particular HP-UX operating systems indicated by the bundle name.
See the figure below for a list of available bundles and the HP-UX versions the bundles can install and recover.
Figure 1 Ignite-UX bundles available in the Ignite-UX product
|
|
HP-UX versions the bundle |
|||
Depot Name |
Bundle Name |
can install/recover on client |
|||
|
|
|
|
||
|
|
11iv1 |
11iv2 |
11iv3 |
|
|
|
|
|
|
|
Ignite-UX-11-ALL_C.7x.xx.depot |
IGNITE |
|
|
|
|
(Complete Ignite-UX product) |
|
|
|
||
|
|
|
|
|
|
|
|
|
|
|
|
Ignite-UX-11-11_C.7x.xx_ |
Ignite-UX-11-11 |
|
|
|
|
HP_-UX_B.11.11_32+64.depot |
|
|
|
||
|
|
|
|
|
|
Ignite-UX-11-23_C.7x.xx_
Ignite-UX-11-23
HP_-UX_B.11.11_32+64.depot
Ignite-UX-11-31_C.7x.xx_
HP_-UX_B.11.11_32+64.depot Ignite-UX-11-31
NOTE: As of Ignite-UX version C.7.1, the name of the Ignite-UX complete product bundle that installs all supported versions of HP-UX has changed from B5725AA to IGNITE.
Each bundle can be installed on a server running any version of HP-UX. For example, Ignite-UX-11-23 can be installed on a server running HP-UX 11i v1 (B.11.11). You can install one or more of the individual Ignite-UX-11-xx bundles onto your system.
HP recommends you install the complete Ignite-UX product (IGNITE) unless you want to block the use of a specific version of HP-UX, increase the download speed from the Software Depot website, or conserve disk space on the server.
As a best practice, do not swremove Ignite-UX before updating to a new version. Doing so will cause some files to be reset, including the INDEX file, thus you will lose any customizations.
Getting the Ignite-UX software 13

IMPORTANT: Installing individual bundles instead of the complete product might cause problems for Ignite-UX if the complete product was installed previously. See the Installing and Updating Ignite-UX white paper if you are unsure of what to install to upgrade Ignite-UX. Links to the Ignite-UX white papers are found at http://www.hp.com/go/ignite-ux-docs.
Ignite-UX commands and manpages
The manual pages (manpages) associated with Ignite-UX commands are in the /opt/ignite/ share/doc/ directory, are available in the HP-UX Reference at http://www.hp.com/go/ ignite-ux-docs, and are listed in Table 2 according to the directory the commands are in.
Table 2 Ignite-UX command manpages
Ignite-UX Command Manpages Commands in /opt/ignite/bin : add_new_client(1M)
auto_adm(1M) auto_adm(4)
bootsys(1M) check_net_recovery(1M)
check_tape_recovery(1M)
copy_boot_tape(1M) ignite(5)
instl_adm(1M) instl_adm(4)
instl_dbg(1M) make_boot_tape(1M) make_bundles(1M) make_config(1M) make_depots(1M) make_ipf_tape(1M) make_medialif(1M) make_net_recovery(1M) make_tape_recovery(1M) manage_index(1M) print_manifest(1M) save_config(1M)
Commands in /opt/ignite/lbin:
ansitape(1M) ansitape(5)
 Description
Add a client to an Ignite-UX server without requiring a client boot from the Ignite-UX server.
Manage logical interchange format (LIF) AUTO configuration files. Description of auto_adm file formats
 Reboot and install systems using Ignite-UX.
Compare the files on a running system with a recovery archive made with make_net_recovery.
Compare the files on a running system with a recovery archive made with make_tape_recovery.
 Replicate a PA-RISC boot tape.
Configure, install, and recover HP-UX systems.
Manage Ignite-UX configuration files.
Description of configuration file syntax.
 Parse and debug a client's configuration files.
Create a boot tape for a PA-RISC system.
 Create Software Distributor (SD) bundles in a depot.
Generate a configuration file for software in an SD depot.
 Create SD depots from SD bundles for use by Ignite-UX.
Create a bootable ANSI labeled tape for Itanium-based systems.
 Create bootable Ignite-UX LIFmedia image file.
Create recovery images and store them on a network system.
 Create recovery images and store them on tape.
Manage Ignite-UX INDEX files without directly editing them.
 Print a system manifest.
Create hardware configuration file.
Read and write magnetic tapes conforming to the ANSI standard for magnetic tape labelling.
Description of ANSI-labeled tape format.
14 Ignite-UX overview
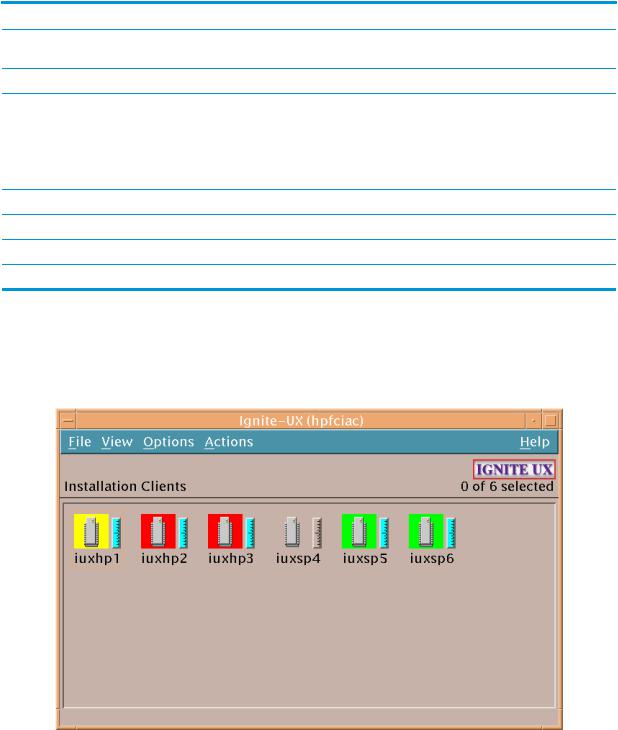
Table 2 Ignite-UX command manpages (continued)
Ignite-UX Command Manpages |
Description |
archive_impact(1M) |
Calculate the per file system disk space for tar, cpio, and tar archives, |
|
and create the impacts statements for use in configuration files. |
instl_bootd(1M) |
Boot protocol server for Ignite-UX clients. |
instl_combine(1M) |
Combine a LIF volume and file system for use on CD/DVD. This |
|
command is used to construct custom, bootable, installation media. |
|
An example script, /opt/ignite/data/scripts/examples/ |
|
make_media_install, is provided that can help you create |
|
bootable media (PA-RISC tapes, CDs, and DVDs) with or without |
|
golden archives and/or SD depots included. |
pkg_rec_depot(1M) |
Create a depot containing Ignite-UX recovery filesets. |
setup_server(1M) |
Perform some administration tasks for an Ignite-UX server. |
Commands in /opt/ignite/data/scripts: |
|
make_sys_image(1M) |
Create an archive of a client. |
Introduction to the Ignite-UX GUI
The Ignite-UX GUI workspace provides access to all management tasks using the menu bar and context-sensitive menus.
Figure 2 Ignite-UX GUI
The Ignite-UX GUI workspace graphically represents clients as icons labeled with the clients’ hostnames. You can:
•Click a client icon to select it for further actions.
•Double-click the client icon to display the Client Status dialog box.
•Right-click to activate the Actions menu. You must select the client before right-clicking; any selections made from the Actions menu apply to the selected client.
For more information about these actions, see Chapter 10: “Booting and installing HP-UX on clients using the server” (page 110), or click Help.
Introduction to the Ignite-UX GUI 15

Each client’s installation status is indicated by the colored border around its icon, and the installation gauge shows the relative progress:
•Green: The operating system is completely installed, booted, and running with no errors or warnings.
•Yellow: A warning condition exists and must be investigated.
•Red: An error condition is present. The operating system is partially installed, or the installation has stopped.
•No color: Installation has not yet started or the client has been stopped.
Client icons are shown for all booted clients and those that can be used as recovery systems. These systems are known to Ignite-UX by their existence in the /var/opt/ignite/clients file.
File menu
The File menu contains basic Ignite-UX functionality:
•Search - Find clients that match a text string.
•Print - To print a listing of systems, the display must be set with View->By Properties
•Exit - Quit Ignite-UX.
View menu
Use the View menu to customize the Ignite-UX GUI display:
•Columns - Choose which client attributes to display in which column. These selections are apparent only when the object list is displayed by properties.
•Filter - View a subset of clients by selected criteria.
•Sort - Orders the displayed clients by sort criteria.
•By Name and Icon - Displays clients graphically.
•By Properties - Displays clients in a text format rather than in the default graphical representation.
TIP: Using the By Properties view and sorting the list makes it easier to scan for clients that have finished installing. For example, to view the clients by the percentage of completion, select View->Sort->% Complete: Descending. The list of clients will then appear with the clients closest to completion first, as shown in Figure 3.
16 Ignite-UX overview
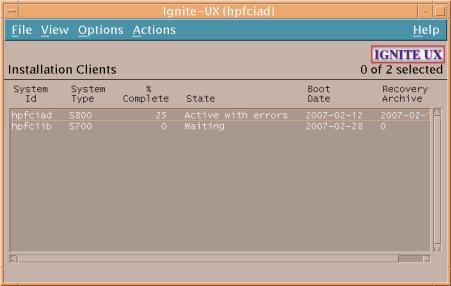
Figure 3 Ignite-UX GUI by properties view
•Save View as Default - Saves the current Ignite-UX GUI View settings.
Options menu
Use the Options menu to set server configuration variables and to control the refresh rate of the Ignite-UX display.
•Server Configuration - Identify and set up your installation server. The selections here are covered in detail in “More server setup options” (page 37).
•Change Refresh Interval - Select how frequently you want the client display updated.
•Refresh List - Update the client display immediately.
Actions menu
To view available actions for a client, select its icon, then select the Actions menu. The actions displayed are dependent on the status of the client, so all actions may not be available. You can use the following actions to manage clients:
•View Install History... - Lists details of all successfully installed clients.
•Boot Client... - Boots the selected client. If no client is selected, one will be prompted for.
•Add New Client for Recovery... - Selects a client to be recovered. For more information, see “Adding clients for recovery ” (page 210).
•Run Tutorial/Server Setup... - Displays the Welcome dialog box. From there, you can run the Tutorial and Demo, or click Server Setup... to launch the Server Setup Wizard.
•Client Status... - The status of the selected client is polled and displayed, as in Figure 4 (page 18).
Introduction to the Ignite-UX GUI 17

Figure 4 Client status dialog box
•Install Client - Starts the HP-UX installation process for the selected client. This process is explained in Chapter 10: “Booting and installing HP-UX on clients using the server” (page 110).
•Stop Install... - Stops the installation process on the selected client. After stopping an install, you can reboot or halt the client.
•Create Network Recovery Archive - Creates a network recovery image using the make_net_recovery command. See Chapter 15: “Recovery” (page 191) for more information.
•Create Tape Recovery Archive - Creates a recovery image using the make_tape_recovery command. See Chapter 15: “Recovery” (page 191) for more information.
•Move to History... - Saves critical files for the client, adds them to the history file, and removes the client. The client installation must successfully complete for the configuration to be moved to the history file.
•Remove Client... - Deletes the selected client configuration. All client data, except for the recovery image, is removed. Recovery information in the client’s directories will be removed.
•View Hardware... - Lists the hardware associated with the selected client.
•View/Print Manifest... - Allows you to view and print the manifest for the selected client. The manifest file details the client’s installation and is available on the client and Ignite-UX server after the installation. For more information, see “Viewing and printing a manifest ” (page 149).
•Change Icon Name... - Launches a dialog box for renaming the selected icon.
How Ignite works
When deciding the best way to use Ignite in your data center, it might be useful to understand the structure of Ignite – how it gets started on the client and the functional steps it performs. This section
18 Ignite-UX overview
describes the major components of Ignite and where they come from. Ignite installation and recovery is described in terms of phases, with each phase described in detail.
The Ignite-UX install environment
HP-UX installation and recovery is accomplished using the Ignite-UX install environment.
The Ignite install environment is a small subset of the HP-UX operating system that allows HP-UX to install itself onto a system. During the initial phases of installation and recovery, the install environment runs in client memory without any disk-based storage. A memory-based RAM disk holds the initial root file system needed for HP-UX operation. While operating with a memory-based root disk file system, file system space is very limited. On smaller memory systems, memory for the HP-UX kernel and processes might also be limited. Command libraries and other files must be loaded and removed as needed. (Increasing the size of the memory-based root disk to make more space would result in insufficient memory being available for the processes that accomplish installation and recovery.) Once the correct disks are identified, volumes and file systems are created. The install environment then switches to a disk-based file system. When that is completed, some of the RAM disk space is freed.
The Ignite install environment consists of:
•[W|V|I]INSTALL – The HP-UX install kernel, which is statically linked and includes a wide variety of I/O and other modules so it is able to run on all supported systems.
•[W|V|I]INSTALLFS – The initial HP-UX install file system, which is copied into the root RAM disk during boot. The first 8 KB can contain Ignite-UX configuration content.
•INSTCMDS or INSTCMDSIA, SYSCMDS or SYSCMDSIA, and RECCMDS or RECCMDSIA –
Archives of commands, libraries, and other files needed to accomplish installation and recovery, but are not needed to initially get the install environment running. These are loaded as needed during installation and recovery.
The Ignite-UX install kernel and install file system are loaded into system memory by the standard HP-UX boot loader or virtual system boot loader software. Note that there are a number of boot sources where the Ignite install environment may reside. Also, the details of booting vary according to your Ignite data center configuration.
Boot sources
Ignite always retrieves the install kernel and install file system from the boot source. By default, Ignite retrieves INSTCMDS[IA], SYSCMDS[IA], and RECCMDS[IA] from that same boot source, but can get these command archives from a different source if requested to. Ignite can determine the boot source by querying the HP-UX kernel.
Ignite can switch its source for command archives and depots if configuration information in the install file system instructs it to, or if instructed to by the Ignite user interface.
Ignite will operate in the same manner, regardless of the boot source.
Installation versus recovery
Ignite internally uses the same approach, regardless of whether you are performing an installation or recovery. The terms “installation” and “recovery” are valuable to describe intended use, but Ignite's internal operation make it possible to blur the distinction between the two, such as when you use golden images.
This design is quite powerful, and allows Ignite to handle significant system differences during recovery by adapting as needed and regressing to more install-like behavior if required.
Network booting and IP addresses
When a system boots HP-UX from an Ignite-UX server, it needs an IP address to get the operating system kernel. This first IP address is not necessarily the same IP address the system will be assigned
How Ignite works 19
for networking when its kernel is up and running. The mechanisms for distributing the first and second IP addresses are sometimes different.
PA-RISC Systems
When a PA-RISC system boots from an Ignite-UX server, the first IP address request is answered by the instl_bootd daemon. This communication uses ports 1067 and 1068. The file /etc/ opt/ignite/instl_boottab is referenced to assign the first IP address to the booting system whether it is registered or anonymous.
After HP-UX is running on a PA-RISC system, it requests a second IP address for networking. This request is answered by bootpd using ports 67 and 68. The /etc/bootptab file is referenced for registered clients; DHCP services are used for anonymous clients.
Itanium-Based Systems
When an Itanium-based system boots from an Ignite-UX server, the first IP address request is answered by the bootpd daemon. This communication uses ports 67 and 68. The file /etc/ bootptab is referenced to assign the first IP address to a registered booting system. If the system is not registered, and you are running HP-UX 11i v2 or HP-UX 11i v3 on the Ignite-UX server, DHCP is used to assign the booting IP address.
When Itanium-based systems request a second IP address for networking, it uses the same daemon, file and ports described above. Configuring DHCP for booting is separate from configuring DHCP for assigning network IP addresses. See “Configuring an Ignite server to boot anonymous Itanium-based clients” (page 44) for information about how to configure DHCP for assigning first (boot) and second (networking) IP addresses without conflict.
Phases of operation
Ignite uses the sequence of high-level phases outlined below to accomplish installation and recovery. Depending on configuration information, some steps within these phases might be skipped. At a very high level, Ignite operates in four phases:
•Startup – The install environment is loaded from the boot source to the client memory. Ignite runs in client memory. The operation is configured and launched. If the installation or recovery is interactive, the user interface is run to create a configuration.
•Phase 1 – Storage is set up and Ignite moves to the client disk.
•Phase 2 – HP-UX archives and depot software are installed. The HP-UX kernel is built. A reboot is required to start the final HP-UX kernel and make the new file system the root file system.
•Phase 3 – Software is configured. The system is now fully installed or recovered after a reboot or halt.
Startup
Ignite-UX software is started and the Ignite user interface is run to select, create, or modify the configuration that will be used to control installation or recovery. The result of this phase is a detailed system configuration to be used for installation or recovery. Processing for this phase is done on a RAM file system.
1.The install kernel and install file system are loaded from the boot source to the client memory via boot loader functionality. The HP-UX install kernel is started.
2.The Ignite software is started by the install kernel as an application process running on the install file system.
3.Additional RAM file systems are created to allow enough file system space for loading system setup content.
4.If the system has SAS disks, the I/O configuration is modified as needed to make the mapping between bays and HW paths consistent. This aids consistent installation and recovery.
20 Ignite-UX overview
(Improved agile device selection and recovery has eliminated the need for this feature and might result in this step being removed in the future.)
5.Configuration content from the install file system is loaded to determine if the Ignite TUI should be started and if special inventory control is needed. (The Ignite TUI is started by default.)
6.A system I/O inventory is performed. This identifies devices where HP-UX may be installed, and identifies devices and networks used to accomplish installation. Install file system configuration and boot loader option content may be used to control inventory. The boot source is also determined.
7.Unless configuration information directs otherwise, the Ignite TUI is launched on the client.
•The operation to be performed is set. (Advanced Install is the default operation.)
•Networking configuration information is determined, if the installation requires the network.
•The complete set of Ignite configuration files is read and parsed. Note that changing the Configuration or Environment will result in rereading and parsing config content, since these changes generally result in changes to the set of config files.
•System, software, file system, and other configuration changes are gathered via the interface.
•When Go! is selected from the user interface, the requested installation or recovery is launched.
•Configuration sanity checking is performed. If there are problems, you are returned to the TUI.
•The modified configuration is saved to control installation or recovery processing.
8.If the TUI was not selected to launch, sanity checking is done on the selected config.
Phase 1
Storage is set up and Ignite relocates to the new disk file system. The result of this phase is the install or recovery functionality running on what appears to be a normal disk-based file system, and if recovery, an I/O configuration that appears to be restored. Some aspects of the configuration cannot be fully restored until reboot. Processing for this phase is done on a RAM file system.
1.During a recovery, the original I/O configuration is restored if I/O instance data is present in the config. Some aspects of the configuration might be instantly changed. Some aspects are temporarily changed and will be finalized during reboot. If the current system is different, some aspects of the I/O configuration will be impossible to restore.
2.Create disk partitions if needed (Integrity systems only).
3.Create volume manager volumes as needed.
4.Create and mount file systems.
5.Determine software sources and selections.
6.Run pre-config control scripts.
7.Set boot path.
8.Set up and enable swap space.
9.Save final volume configuration data to disk file system.
10.Set locale.
11.Move needed content from RAM file system to disk file system. Load the complete set of commands, libraries, and other files required to accomplish installation and recovery from Ignite command archives to the new disk file system (SYSCMDS or SYSCMDSIA).
12.Change the root directory to the disk file system with chroot.
Phase 2
File content is installed or restored. The result of this phase is the final disk file system and content. Some cleanup and processing that must be done after system reboot is still required. For the HP-UX
How Ignite works 21
install kernel, the RAM file system is still the root disk. For the commands in this phase, the new disk file systems is the root file system. A reboot is required to change the HP-UX kernel root disk from the RAM disk to the final disk.
1.Release RAM disk space to accommodate software installation and kernel build processes to be done later.
2.Load the archive if indicated in the config (for recovery and golden image installation).
3.Update mnttab so it appears to be correct during installation and kernel build.
4.Create device special files.
5.If needed, rename device files to make the I/O configuration appear fully restored.
6.Update bootconf.
7.Change I/O configuration files to match final instance config using ioinit and ioscan -M.
8.Load depot-based software if indicated in the configuration.
9.Save configuration so it is available for reuse.
10.Build final system kernel.
11.Set up the inittab file so final Ignite-UX processing will be done after reboot.
12.Reboot system.
Phase 3
Software is configured and final installation or recovery cleanup is done. The result of this phase is a fully installed or recovered system, ready for use after reboot. If configuration has been deferred, the system will be set up to run FIRST-BOOT set_parms on initial boot so you may choose the hostname, IP address, and other settings. Processing for this phase is done using the final disk-based file system.
1.Update the AUTO boot file.
2.Configure software.
3.Configure final networking.
4.Generate a system manifest.
5.Save the installation information for deferred configuration.
6.Perform final cleanup.
7.Reboot or halt system.
Ignite-UX server requirements
Hardware requirements
An Ignite-UX server supporting boot, installation and recovery for clients requires the following hardware:
•Computer: An HP 9000 (PA-RISC) system running HP-UX 11i v1, HP-UX 11i v2, or HP-UX 11i v3; or an Itanium®-based system running HP-UX 11i v2 or HP-UX 11i v3 is required.
•Memory: Client installation and recovery performance is typically limited by network throughput. Normally, no special consideration for system memory is needed.
•DVD drive: A DVD device is recommended to simplify copying HP-UX release depots directly from installation media to the Ignite-UX server.
•Tape device: As part of your overall disaster recovery plan, you must consider how the Ignite-UX server itself would be recovered. A tape drive allows the Ignite-UX server to use tape media to save the server’s own recovery archive. Note that depots, saved client recovery archives, and other client-specific content typically should not be included in the recovery archive saved to tape. This client content must be saved using backup software. Not all systems support tape boot and so require two-step media recovery. See “Tape recovery with no tape boot support
22 Ignite-UX overview
— two-step media recovery” (page 217) and the Ignite-UX Installation Booting white paper available at http://www.hp.com/go/ignite-ux-docs for more information.
•Network interface: One or more network adapters to support network boot and installation is required. A network adapter directly connected to each supported subnet is preferred. Note that multiple simultaneous network installations and recovery operations can create significant network traffic.
•Disk space: An Ignite-UX server might need considerable disk space.
◦Ignite-UX servers must have at least 2 GB of free disk space available in /opt/ignite to support installation of all HP-UX releases (B.11.11, B.11.23, and B.11.31).
To save space, you can support only those HP-UX releases you plan to install or recover.
◦Ignite-UX servers might require significant space in /var/opt/ignite to support clients’ systems, store software depots, and save recovery archives. Default HP-UX file system sizes are unlikely to be sufficient for an Ignite-UX server. You must consider the number of client systems you intend to support and the maximum number of recovery archives to be saved for each client.
The size of a recovery archive depends on the content being saved. A recovery archive will normally include at least a full set of HP-UX operating system software.
◦File system space is needed to hold depots required for installation. You must consider how many different OS releases the server might need to support. Note that you might also want to support different OE versions of each HP-UX revision on your Ignite server, such as the HP-UX 11i v2 September 2004 OE release and the 11i v2 September 2006 OE release, or the 11i v3 Base OE (BOE) and the 11i v3 Virtual Server OE (VSE-OE) of a particular release. Space will also be needed to store additional application and patch depots.
◦If you use golden images, file system space is needed to hold them. Consider the size and number of images you will require.
◦See the HP-UX Installation and Update Guide available from http://www.hp.com/ go/hpux-core-docs-11iv3 for a detailed description of the disk space required for all Operating Environments for your version of HP-UX.
Other considerations
An Ignite-UX server might also require software, utilities, and configuration:
•Use of TFTP: Ignite-UX transfers some files using TFTP. A list of the minimum directories needed for file transfer is kept in the /etc/inetd.conf file. You might need to add directories to the list if you place configuration scripts in nonstandard locations.
For example, the Ignite server must have the following entry in its /etc/inetd.conf file.
tftp dgram udp wait root /usr/lbin/tftpd\ tftpd /opt/ignite /var/opt/ignite
If you are using HP Serviceguard clusters or systems with multiple IP addresses on a LAN interface, use the -s option with tftp and install the patch PHNE_28762 11.11.
•Use of ssh: With Ignite-UX version C.6.8 and later, bootsys can use ssh, and ignite can use ssh for make_[tape|net]_recovery. With Ignite-UX version C.7.1 and later, the ignite command can use ssh when calling bootsys. To use ssh, it must be available on the Ignite server and on the client, and you must have an existing public/private key pair.
•Optional use of an X11 display server: An X11 display server allows you to use the GUI to configure and start Ignite. Your Ignite-UX server can use an X server to display the Ignite GUI, or you can redirect the display to another X terminal by entering the following command:
Ignite-UX server requirements 23
export DISPLAY=system_name:0.0
If DISPLAY is not set on the server, the Ignite TUI will run.
•Software: Get Ignite-UX and any software depots you plan to distribute to clients from the product media (CD or DVD). Ignite-UX can also be downloaded from the web; see “Getting the Ignite-UX software ” (page 13) for more information.
•Client access to server: There are multiple methods of having clients contact the Ignite server, each suited to a different environment. See Chapter 2 (page 25) for more details.
Supported peripherals
Disks and other I/O
If a disk device is visible, it does not mean it is supported for installation. It is important to verify that the disk is supported by the system, the host bus adaptor (HBA) Shell and is accessible from the system console.
Computer system hardware documentation must be consulted for supported I/O configurations. See the HP Support Center http://www.hp.com/go/hpsc for HP computer system hardware documentation.
VxVM support is provided for a specific set of devices. The list of supported devices must be consulted – see http://www.hp.com/go/hpux-LVM-VxVM-docs . Look for the section Support Matrixes, and the document entitled Device Support Information for Veritas Products on HP-UX.
LVM supports all the devices HP-UX supports. See the HP-UX Supported Mass Storage Devices Matrix for a table of I/O devices supported for each version of HP-UX.
Firmware
At times you might need new firmware to support a new device or HBA. Ensure that the client’s firmware supports the devices and HBAs to be used for boot and root. For example, after the HP9000 rp8400 system was first released, firmware changes enabled the system to boot from disks connected to Ultra 160 HBAs. Check the Installation and Update Guide for your HP-UX release, available at http://www.hp.com/go/hpux-core-docs-11iv3, for instructions on finding firmware information.
Additionally, firmware support for Fibre Channel, tape devices, and LAN cards might vary. In some cases, devices are supported for data use, but device boot is not supported.
Disk arrays
You can install disk arrays using HP-UX, but Ignite-UX does not directly support configuring an array. The disk array must be configured first; see your array documentation for configuration instructions. In some cases, system firmware may be used to set up disk arrays. The Ignite-UX install environment contains tools that are also used to help configure disk arrays. To use these tools in the install environment, you will need to use the expert recovery functionality to start an install environment shell. It might also be necessary to load files that are not normally included in the install environment by using the Ignite-UX loadfile command. When array configuration is complete, it is necessary to reboot the system in order to use the newly configured disk LUNs during install.
Client terminals
The Ignite-UX client-side operating system installation tools support VT100 and Wyse 60 terminals, compatible terminal emulators, and all HP terminals. Additional information regarding how to navigate within the Ignite-UX GUI with the keyboard is found in Appendix F (page 255).
24 Ignite-UX overview

2 Making configuration decisions for Ignite servers
Ignite is flexible when configuring networking options and even allows options that don't require networking. Also, you can switch to a source other than the boot source for install content. These features allow you to choose from a variety of installation and recovery solutions.
Below are installation solutions, starting with the most simple and progressing to those more complex. This chapter finishes with network booting debugging techniques.
Boot and install client from media
These options do not require a network:
•Cold install or update a single system directly from media kit DVDs
You can use the HP-UX 11i media kit DVDs with Ignite-UX to cold install or update a system. For more information, see the HP-UX Installation and Update Guide for your version of HP-UX, available at http://www.hp.com/go/hpux-core-docs-11iv3.
•Cold install from custom media
This option assumes you have already created custom installation media. Custom installation media can be a tape or DVD with either a golden image or a recovery image on it. All installation media are bootable. After you boot from media, choose Media only installation as a Source Location Option from the Ignite-UX User Interface and Media Options screen. For more information, see Chapter 14 (page 180).
•Recovery from tape
This option assumes you have already created a recovery tape. For more information, see “Creating and using recovery tapes” (page 201).
Simple network solutions
These solutions use a single Ignite server that supports network boot, installation, and recovery. The Ignite server and the client systems must be on the same subnet, and no other boot or installation servers can be on that subnet.
Questions you will have to answer when configuring a simple network are:
•Are my clients PA-RISC or Itanium-based?
•Do I want to network boot all my clients?
•Do I want my clients to have their MAC addresses registered with the server to always boot to the same assigned IP address (registered clients), or do I want an available IP address assigned to them when they boot (anonymous clients) ?
•Do I want the booting IP address to be the same IP address used for networking after installation is complete?
•Do I have DHCP running on my subnet?
Decision trees for Ignite-UX server configuration follow. Do not treat them as strictly yes-or-no exercises. Your environment may require choosing multiple methods from the decision trees, and although you may be able to use an option, you might reject it because it is not the best answer for your environment. Also, keep in mind that these decision trees cover booting, so only the initial IP address is affected. For more information, see “Network booting and IP addresses” (page 19).
A decision tree for network booting PA-RISC systems is shown in Figure 5. A decision tree for network booting Itanium-based systems is shown in Figure 6 (page 27). The decision trees assume the network boot clients are on the same subnet as the Ignite-UX server, and that you will always use the install option to the boot console handler (BCH) boot command for PA-RISC systems.
Boot and install client from media 25

Further, the decision tree for network booting Itanium-based systems assumes there is only one DHCP server on your subnet configured to answer boot requests, and that it is running HP-UX.
If you want to boot a system without using the network and your Ignite-UX server, see the decision tree shown in Figure 34 (page 98).
NOTE: A lot of clients can only be booted using their built-in LAN interfaces. Other LAN interfaces might not be supported for boot. For more information about LAN interface boot support, consult the hardware documentation for the system or the add-in LAN card.
Use the following decision tree when configuring an Ignite-UX server for PA-RISC clients:
Figure 5 Decision Tree When Configuring a Server for Booting PA-RISC Systems
PA-RISC
Network |
NO |
See the decision tree |
|
booting |
|
for booting stand alone |
|
|
|||
support ? |
|
systems |
|
|
YES |
|
|
|
|
|
|
|
|
|
|
Registered |
NO |
Configure |
||
instl_boottab |
||||
clients ? |
|
|
||
|
|
for anonymous clients |
||
|
|
|
||
|
|
|
|
|
YES
Configure instl_boottab
for registered clients
Configure instl_boottab for registered clients - To network boot registered PA-RISC clients, the server uses the instl_bootd daemon to answer boot requests, and has clients’ IP addresses and LAN addresses registered in /etc/opt/ignite/instl_boottab. The process of configuring an Ignite-UX server for registered PA-RISC clients is described in “Configuring the Ignite-UX server for PA-RISC clients” (page 31). See the Ignite-UX Quick Start Guide available at http:// www.hp.com/go/ignite-ux-docs if you are new to HP-UX.
Configure instl_boottab for anonymous clients - Network booting anonymous PA-RISC clients is similar to booting registered PA-RISC clients; the difference is that some IPs in the /etc/opt/ ignite/instl_boottab file are not associated with any clients’ MAC addresses, and so may be assigned to clients as requests come in. See “Configuring an Ignite server to boot anonymous PA-RISC clients” (page 43) for more information.
See the decision tree for booting stand alone systems - This decision tree can be found in Figure 34.
Use the decision tree below when configuring an Ignite-UX server for Itanium-based clients.
26 Making configuration decisions for Ignite servers

Figure 6 Decision Tree When Configuring a Server for Booting Itanium-Based Systems
Configure individual entries in bootptab — To network boot registered Itanium-based clients, the server uses the bootpd daemon to answer boot requests, and has clients’ IP addresses and LAN addresses registered in /etc/bootptab. One drawback to this option is that you must configure an entry for every system that needs to boot. The advantage of this method is that it works on all versions of HP-UX. See “Configuring the Ignite-UX server for Itanium-based clients” (page 35) for details. See the Ignite-UX Quick Start Guide available at http://www.hp.com/go/ignite-ux-docs if you are new to HP-UX.
Configure a DHCP device group for anonymous clients - Configuring an Ignite-UX server to boot anonymous Itanium-based clients requires sophisticated considerations; see “Configuring an Ignite server to boot anonymous Itanium-based clients” (page 44). This option is only available for Ignite servers running HP-UX 11i v2 and later.
See the decision tree for booting stand alone systems - This decision tree can be found in Figure 34.
Alternate boot with network server installation
A simple way to avoid boot issues in complex network configurations is to avoid network boot. Network installation may be started via non-network boot. The Ignite install environment may be
Alternate boot with network server installation |
27 |
booted from a source local to the client system. Regardless of how Ignite-UX is started, it has the same network capabilities once it is running.
•Use bootsys to boot a system already running HP-UX
If the client system is already running HP-UX, the Ignite-UX bootsys command may be used to copy the install kernel and install file system to the client system's HP-UX file system. After reboot, the HP-UX boot loader can boot for installation using that copied content. Ignite config content in the install file system may be used to cause Ignite to automatically switch to use the master Ignite server. Because the initial install environment is copied from the Ignite server, you can be confident the Ignite versions of the initial boot content and software on the Ignite server have the same versions. See “Using bootsys on the client console” (page 98).
•Use DVD media to boot a system for network installation
Ignite supports booting for network installation using standard HP installation media or custom boot media. The version of the Ignite on the media must match the version of Ignite running on the master Ignite server. The simplest way to ensure the versions match is to use make_media_install on the Ignite server to create custom boot media. This custom boot media may be constructed to include [W|V|I]INSTALLFS config content, which automatically switches to using the Ignite server on startup. Standard HP-UX installation media may also be used to boot the system, as long as the Ignite version on the media matches the master server Ignite version. Standard HP-UX media config content cannot be modified to automatically switch to your Ignite server. See “Creating a boot CD/DVD or an installation DVD” (page 185) and “Tape recovery with no tape boot support — two-step media recovery” (page 217).
•Use vMedia USB DVD to boot a system for network installation
Many Integrity systems support Integrated Lights Out (iLO) Virtual Media (vMedia). This feature must be enabled using a license key. Once enabled, a DVD device or an ISO DVD image on a remote system, such as a PC, may be used. In either case, the client system will appear to have a local USB DVD device.
For more information, see Appendix D (page 242) and the HP Integrity iLO 2 MP Operations Guide available at http://www.hp.com/go/hpsc.
•Boot your Integrity system from a USB memory stick device
It is possible to configure your Integrity system and a USB flash drive in order to boot HP-UX directly from a memory stick device. Once the system is booted to the HP-UX Ignite-UX install environment, you can perform a variety of installation or recovery actions. See the Ignite-UX USB Memory Stick Boot white paper, available at http://www.hp.com/go/ignite-ux-docs, for more information.
Complex networks
Setting up an Ignite server on a simple network assumes there is a single subnet with only one Ignite server that supports network boot and installation. Often, real network environments are significantly more complex. Configuring an Ignite server to operate correctly while avoiding interference with other boot and installation servers on the network requires special consideration.
For a detailed discussion, see Chapter 5 (page 48).
Diagnosing network boot issues
When configuring a network, sometimes boot and installation will not work at all or will not work as expected. Especially when configuring a complex network, you can expect to spend time diagnosing and resolving issues due to the complexity of the network and interactions between servers. You may also expect problems to occur in the future as the complex network changes.
This section includes suggested tools and techniques for diagnosing problems.
28 Making configuration decisions for Ignite servers

HP-UX diagnosing and debugging
Simple network debugging
If network boot is used on a local subnet and the Ignite-UX server is not found, check these items:
•Verify the client is on the same subnet as the Ignite-UX server or boot helper.
•Investigate instl_bootd errors in /var/adm/syslog/syslog.log.
•In the /var/adm/inetd.sec file, ensure the service instl_boots exists, and that the IP address 0.0.0.0 is allowed. (Normally, all addresses are allowed via 0.0.0.0.) The entry must look like:
instl_boots allow 0.0.0.0
•If /etc/services comes from NIS, make sure the NIS server has instl_boot* entries.
Logging to syslog.log
The bootpd and tftpd daemons have the ability to log requests and responses. The /etc/ inetd.conf file may be modified to enable logging. The bootpd -d option and tftpd -l option control logging. For example:
#tftp dgram udp wait root /usr/lbin/tftpd tftpd \ -l /opt/ignite /var/opt/ignite
#bootps dgram udp wait root /usr/lbin/bootpd bootpd -d 9
The daemons log to the HP-UX syslog file located at /var/adm/syslog/syslog.log.
NOTE: Logging should normally be disabled since it can consume a significant amount of disk space.
If the boot configuration includes multiple boot servers (for bootp relay, for example) it is often useful to enable logging on all servers.
Using bootpquery
To save time when configuring an HP-UX system boot, the bootpquery command may be used to simulate a network boot request by requesting bootpd to indicate how it would respond to boot requests for a specific MAC address. This is normally much faster and simpler than attempting to boot using a real client system.
To use bootpquery, add the ba option to the appropriate entries in the /etc/bootptab file. Without this option, bootpd will send responses only to the client system making the boot request. The ba option requests the response be broadcast on the subnet, so any system is able to see the response, including the system where you are using bootpquery. For more information, see bootpquery(1M).
NOTE: The ba option must be removed once testing is completed.
The bootpquery output includes valuable debug information:
# bootpquery 0011855F549E
Received BOOTREPLY from hpignite.xyzco.com (10.1.1.11)
Hardware Address: |
00:11:85:5f:54:9e |
Hardware Type: |
Ethernet |
IP Address: |
10.1.1.110 |
Boot file: |
/opt/ignite/boot/nbp.efi |
RFC 1048 Vendor Information: |
|
Subnet Mask: |
255.255.255.0 |
Gateway: |
10.1.1.1 |
Bootfile Size: |
24576 512 byte blocks |
Diagnosing network boot issues 29
Domain |
Name Server: |
10.1.1.1 |
Host Name: |
hpuxsys1 |
|
Domain |
Name: |
xyzco.com |
RDP diagnosing and debugging
An RDP server can be configured to log PXE boot and TFTP activity. The PXE Configuration Utility may be used to control logging. Logging must be disabled when you are finished diagnosing and debugging.
30 Making configuration decisions for Ignite servers
Loading...