


 Loading...
User Guide
© Copyright 2019 HP Development Company,
L.P.
Bluetooth is a trademark owned by its proprietor and used by HP Inc. under license. DisplayPort™ and the DisplayPort™ logo are trademarks owned by the Video Electronics Standards Association (VESA®) in the United States and other countries. Intel, Celeron, Pentium, and Thunderbolt are trademarks of Intel Corporation or its subsidiaries in the U.S. and/or other countries. Lync, Office 365, Skype, and Windows are either registered trademarks or trademarks of Microsoft Corporation in the United States and/or other countries.
The information contained herein is subject to change without notice. The only warranties for HP products and services are set forth in the express warranty statements accompanying such products and services. Nothing herein should be construed as constituting an additional warranty. HP shall not be liable for technical or editorial errors or omissions contained herein.
First Edition: July 2019
Document Part Number: L66149-001
Product notice
This user guide describes features that are common to most models. Some features may not be available on your computer.
Not all features are available in all editions or versions of Windows. Systems may require upgraded and/or separately purchased hardware, drivers, software or BIOS update to take full advantage of Windows functionality. Windows 10 is automatically updated, which is always enabled. ISP fees may apply and additional requirements may apply over time for updates. See http://www.microsoft.com.
To access the latest user guides, go to http://www.hp.com/support, and follow the instructions to find your product. Then select
User Guides.
Software terms
By installing, copying, downloading, or otherwise using any software product preinstalled on this computer, you agree to be bound by the terms of the HP End User License Agreement (EULA). If you do not accept these license terms, your sole remedy is to return the entire unused product (hardware and software) within 14 days for a full refund subject to the refund policy of your seller.
For any further information or to request a full refund of the price of the computer, please contact your seller.

Safety warning notice
 WARNING! To reduce the possibility of heat-related injuries or of overheating the computer, do not place the computer directly on your lap or obstruct the computer air vents. Use the computer only on a hard, at surface. Do not allow another hard surface, such as an adjoining optional printer, or a soft surface, such as pillows or rugs or clothing, to block air ow. Also, do not allow the AC adapter to come into contact with the skin or a soft surface, such as pillows or rugs or clothing, during operation. The computer and the AC adapter comply with the user-accessible surface temperature limits defined by applicable safety standards.
iii
iv Safety warning notice

Processor configur tion setting (select products only)
 IMPORTANT: Select computer products are configured with an Intel® Pentium® N35xx/N37xx series or a Celeron® N28xx/N29xx/N30xx/N31xx series processor and a Windows® operating system. If your computer is configured as described, do not change the processor configur tion setting in msconfig.exe from 4 or 2 processors to 1 processor. If you do so, your computer will not restart. You will have to perform a factory reset to restore the original settings.
v
vi Processor configuration setting (select products only)

Table of contents
1 Getting started ............................................................................................................................................. |
1 |
Finding information ............................................................................................................................................... |
2 |
2 Components .................................................................................................................................................. |
3 |
Locating hardware ................................................................................................................................................. |
3 |
Locating software .................................................................................................................................................. |
3 |
Right ....................................................................................................................................................................... |
4 |
Left ......................................................................................................................................................................... |
5 |
Display .................................................................................................................................................................... |
6 |
Top .......................................................................................................................................................................... |
7 |
Bottom ................................................................................................................................................................... |
9 |
Rear ........................................................................................................................................................................ |
9 |
Using the kickstand ............................................................................................................................................. |
11 |
Keyboard area (select products only) .................................................................................................................. |
12 |
Connecting the keyboard .................................................................................................................. |
12 |
Removing the keyboard .................................................................................................................... |
13 |
Connecting the leather folio keyboard ............................................................................................. |
12 |
Removing the leather folio keyboard ............................................................................................... |
15 |
Adjusting the leather folio keyboard ................................................................................................ |
15 |
Touchpad settings ............................................................................................................................. |
16 |
Lights ................................................................................................................................................. |
17 |
Special keys ....................................................................................................................................... |
18 |
Action keys ........................................................................................................................................ |
19 |
Hot keys (select products only) ......................................................................................................... |
21 |
Labels ................................................................................................................................................................... |
21 |
Inserting a nano SIM card (select products only) ................................................................................................ |
22 |
3 Network connections ................................................................................................................................... |
24 |
Connecting to a wireless network ....................................................................................................................... |
24 |
Using the wireless controls ............................................................................................................... |
24 |
Wireless button ............................................................................................................... |
24 |
Operating system controls ............................................................................................. |
24 |
Connecting to a WLAN ....................................................................................................................... |
25 |
Using HP Mobile Broadband (select products only) .......................................................................... |
25 |
Using GPS (select products only) ...................................................................................................... |
26 |
Using Bluetooth wireless devices (select products only) ................................................................. |
26 |
vii
Connecting Bluetooth devices ........................................................................................ |
26 |
Using NFC to share information (select products only) .................................................................... |
26 |
Sharing ............................................................................................................................ |
27 |
Connecting to a wired network ............................................................................................................................ |
27 |
Connecting to a local area network (LAN) (select products only) .................................................... |
27 |
Using HP LAN-Wireless Protection (select products only) ................................................................ |
28 |
Turning on and customizing HP LAN-Wireless Protection ............................................. |
28 |
Using HP MAC Address Pass Through to identify your computer on a network (select products only) ............. |
29 |
Customizing MAC Address Pass Through .......................................................................................... |
29 |
4 Navigating the screen .................................................................................................................................. |
30 |
Using touchpad and touch screen gestures ........................................................................................................ |
30 |
Tap ..................................................................................................................................................... |
30 |
Two-finger pinch zoom ..................................................................................................................... |
31 |
Two-finger slide (touchpad and precision touchpad) ....................................................................... |
31 |
Two-finger tap (touchpad and precision touchpad) ......................................................................... |
31 |
Three-finger tap (touchpad and precision touchpad) ...................................................................... |
32 |
our-finger tap (touchpad and precision touchpad) ........................................................................ |
32 |
Three-finger swipe (touchpad and precision touchpad) .................................................................. |
33 |
our-finger swipe (precision touchpad) ............................................................................................ |
33 |
One-finger slide (touch screen) ......................................................................................................... |
34 |
Using an optional keyboard or mouse ................................................................................................................. |
34 |
Using an on-screen keyboard (select products only) .......................................................................................... |
34 |
5 Entertainment features ............................................................................................................................... |
35 |
Using a camera (select products only) ................................................................................................................ |
35 |
Using audio .......................................................................................................................................................... |
35 |
Connecting speakers ......................................................................................................................... |
35 |
Connecting headphones .................................................................................................................... |
35 |
Connecting headsets ......................................................................................................................... |
36 |
Using sound settings ......................................................................................................................... |
36 |
Using video .......................................................................................................................................................... |
36 |
Connecting a DisplayPort device using a USB Type-C cable (select products only) ......................... |
37 |
Connecting a Thunderbolt device using a USB Type-C cable (select products only) ....................... |
38 |
Discovering and connecting wired displays using MultiStream Transport ...................................... |
39 |
Connect displays to computers with Intel graphics (with an optional hub) ................... |
39 |
Connect displays to computers with Intel graphics (with a built-in hub) ...................... |
39 |
Discovering and connecting to Miracast-compatible wireless displays (select products only) ...... |
40 |
Discovering and connecting to Intel WiDi certified displays (select Intel products only) ................ |
40 |
Using data transfer .............................................................................................................................................. |
40 |
Connecting devices to a USB Type-C port (select products only) ..................................................... |
41 |
viii
6 Managing power .......................................................................................................................................... |
42 |
Using Sleep and Hibernation ............................................................................................................................... |
42 |
Initiating and exiting Sleep ............................................................................................................... |
42 |
Initiating and exiting Hibernation (select products only) ................................................................. |
43 |
Shutting down (turning off) the computer .......................................................................................................... |
43 |
Using the Power icon and Power Options ............................................................................................................ |
44 |
Running on battery power ................................................................................................................................... |
44 |
Using HP Fast Charge (select products only) .................................................................................... |
44 |
Displaying battery charge ................................................................................................................. |
45 |
Finding battery information in HP Support Assistant (select products only) .................................. |
45 |
Conserving battery power ................................................................................................................. |
45 |
Identifying low battery levels ........................................................................................................... |
45 |
Resolving a low battery level ............................................................................................................ |
46 |
Resolving a low battery level when external power is available ................................... |
46 |
Resolving a low battery level when no power source is available ................................. |
46 |
Resolving a low battery level when the computer cannot exit Hibernation .................. |
46 |
Factory-sealed battery ...................................................................................................................... |
46 |
Running on external power ................................................................................................................................. |
46 |
7 Security ...................................................................................................................................................... |
48 |
Protecting the computer ..................................................................................................................................... |
48 |
Using passwords .................................................................................................................................................. |
48 |
Setting passwords in Windows ......................................................................................................... |
49 |
Setting passwords in Computer Setup ............................................................................................. |
49 |
Managing a BIOS administrator password ........................................................................................ |
50 |
Entering a BIOS administrator password ....................................................................... |
51 |
Using DriveLock Security Options ..................................................................................................... |
51 |
Selecting Automatic DriveLock (select products only) ................................................... |
52 |
Enabling Automatic DriveLock ..................................................................... |
52 |
Disabling Automatic DriveLock .................................................................... |
52 |
Entering an Automatic DriveLock password ................................................ |
53 |
Selecting manual DriveLock ........................................................................................... |
53 |
Setting a DriveLock master password ......................................................... |
53 |
Enabling DriveLock and setting a DriveLock user password ......................................... |
54 |
Disabling DriveLock ........................................................................................................ |
55 |
Entering a DriveLock password ...................................................................................... |
55 |
Changing a DriveLock password ..................................................................................... |
55 |
Windows Hello (select products only) ................................................................................................................. |
56 |
Using antivirus software ...................................................................................................................................... |
56 |
Using firewall software ........................................................................................................................................ |
56 |
ix
Installing software updates ................................................................................................................................. |
57 |
Using HP Client Security (select products only) .................................................................................................. |
57 |
Using HP Device as a Service (select products only) ........................................................................................... |
57 |
Using an optional security cable (select products only) ..................................................................................... |
57 |
Using a fingerprint reader (select products only) ............................................................................................... |
57 |
Locating the fingerprint reader ......................................................................................................... |
58 |
8 Maintenance ............................................................................................................................................... |
59 |
Improving performance ....................................................................................................................................... |
59 |
Using Disk Defragmenter .................................................................................................................. |
59 |
Using Disk Cleanup ............................................................................................................................ |
59 |
Using HP 3D DriveGuard (select products only) ................................................................................ |
60 |
Identifying HP 3D DriveGuard status .............................................................................. |
60 |
Updating programs and drivers .......................................................................................................................... |
60 |
Cleaning your computer ...................................................................................................................................... |
60 |
Cleaning procedures .......................................................................................................................... |
61 |
Cleaning the display ........................................................................................................ |
61 |
Cleaning the sides or cover ............................................................................................. |
61 |
Cleaning the touchpad, keyboard, or mouse (select products only) ............................. |
61 |
Traveling with or shipping your computer .......................................................................................................... |
61 |
9 Backing up, restoring, and recovering ........................................................................................................... |
63 |
Backing up information and creating recovery media ........................................................................................ |
63 |
Using Windows tools ......................................................................................................................... |
63 |
Using the HP Cloud Recovery Download Tool to create recovery media (select products only) ..... |
63 |
Restoring and recovery ........................................................................................................................................ |
64 |
Restoring, resetting, and refreshing using Windows tools .............................................................. |
64 |
Recovering using HP Recovery media ............................................................................................... |
64 |
Changing the computer boot order ................................................................................................... |
64 |
Using HP Sure Recover (select products only) .................................................................................. |
65 |
10 Computer Setup (BIOS), TPM, and HP Sure Start ............................................................................................ |
66 |
Using Computer Setup ......................................................................................................................................... |
66 |
Starting Computer Setup .................................................................................................................. |
66 |
Navigating and selecting in Computer Setup ................................................................................... |
66 |
Restoring factory settings in Computer Setup ................................................................................. |
66 |
Updating the BIOS ............................................................................................................................. |
67 |
Determining the BIOS version ......................................................................................... |
67 |
Downloading a BIOS update ........................................................................................... |
67 |
Changing the boot order using the f9 prompt .................................................................................. |
68 |
x
TPM BIOS settings (select products only) ........................................................................................................... |
68 |
Using HP Sure Start (select products only) ......................................................................................................... |
69 |
11 Using HP PC Hardware Diagnostics .............................................................................................................. |
70 |
Using HP PC Hardware Diagnostics Windows (select products only) ................................................................. |
70 |
Downloading HP PC Hardware Diagnostics Windows ....................................................................... |
70 |
Downloading the latest HP PC Hardware Diagnostics Windows version ....................... |
71 |
Downloading HP Hardware Diagnostics Windows by product name or number |
|
(select products only) ..................................................................................................... |
71 |
Installing HP PC Hardware Diagnostics Windows ............................................................................. |
71 |
Using HP PC Hardware Diagnostics UEFI ............................................................................................................. |
71 |
Starting HP PC Hardware Diagnostics UEFI ....................................................................................... |
72 |
Downloading HP PC Hardware Diagnostics UEFI to a USB ash drive .............................................. |
72 |
Downloading the latest HP PC Hardware Diagnostics UEFI version .............................. |
72 |
Downloading HP PC Hardware Diagnostics UEFI by product name or number |
|
(select products only) ..................................................................................................... |
72 |
Using Remote HP PC Hardware Diagnostics UEFI settings (select products only) ............................................. |
73 |
Downloading Remote HP PC Hardware Diagnostics UEFI ................................................................. |
73 |
Downloading the latest Remote HP PC Hardware Diagnostics UEFI version ................. |
73 |
Downloading Remote HP PC Hardware Diagnostics UEFI by product name or |
|
number ............................................................................................................................ |
73 |
Customizing Remote HP PC Hardware Diagnostics UEFI settings .................................................... |
73 |
12 Specific tions ............................................................................................................................................ |
75 |
Input power .......................................................................................................................................................... |
75 |
Operating environment ....................................................................................................................................... |
76 |
13 Electrostatic discharge ............................................................................................................................... |
77 |
14 Accessibility .............................................................................................................................................. |
78 |
HP and accessibility ............................................................................................................................................. |
78 |
Finding the technology tools you need ............................................................................................ |
78 |
The HP commitment ......................................................................................................................... |
78 |
International Association of Accessibility Professionals (IAAP) ....................................................... |
78 |
Finding the best assistive technology .............................................................................................. |
79 |
Assessing your needs ..................................................................................................... |
79 |
Accessibility for HP products .......................................................................................... |
79 |
Standards and legislation .................................................................................................................................... |
80 |
Standards .......................................................................................................................................... |
80 |
Mandate 376 – EN 301 549 ............................................................................................ |
80 |
Web Content Accessibility Guidelines (WCAG) ................................................................ |
80 |
xi
Legislation and regulations .............................................................................................................. |
80 |
Useful accessibility resources and links .............................................................................................................. |
82 |
Organizations .................................................................................................................................... |
82 |
Educational institutions .................................................................................................................... |
82 |
Other disability resources ................................................................................................................. |
82 |
HP links .............................................................................................................................................. |
82 |
Contacting support .............................................................................................................................................. |
83 |
Index ............................................................................................................................................................. |
84 |
xii

1Getting started
After you set up and register the computer, HP recommends the following steps to get the most out of your smart investment:
TIP: To quickly return to the computer Start screen from an open app or the Windows desktop, press the Windows key  on your keyboard. Pressing the Windows key again returns you to the previous screen.
●Connect to the Internet—Set up your wired or wireless network so that you can connect to the Internet. For more information, see Network connections on page 24.
●Update your antivirus software—Protect your computer from damage caused by viruses. The software is preinstalled on the computer. For more information, see Using antivirus software on page 56.
●Get to know your computer—Learn about your computer features. See Components on page 3 and Navigating the screen on page 30 for additional information.
●Find installed software—Access a list of the software preinstalled on the computer: Select the Start button.
‒ or –
|
Right-click the Start button, and then select Apps and Features. |
● |
Back up your hard drive—Create recovery discs or a recovery USB ash drive to back up your hard drive. |
|
See Backing up, restoring, and recovering on page 63. |
1

Finding information
To locate resources that provide product details, how-to information, and more, use this table.
Table 1-1 Additional information
Resource |
Contents |
||
|
|
|
|
Setup Instructions |
● |
Overview of computer setup and features |
|
|
|
|
|
HP support |
● |
Online chat with an HP technician |
|
For HP support, go to http://www.hp.com/support, and |
● |
Support telephone numbers |
|
follow the instructions to find your product. |
● |
Replacement parts videos (select products only) |
|
|
|||
|
● |
Maintenance and service guides |
|
|
● |
HP service center locations |
|
|
|
|
|
Safety & Comfort Guide |
● |
Proper workstation setup |
|
To access this guide: |
● |
Guidelines for posture and work habits that increase your comfort |
|
▲ Type HP Documentation in the taskbar search |
|
and decrease your risk of injury |
|
● |
Electrical and mechanical safety information |
||
box, and then select HP Documentation. |
|||
‒ or –
▲Go to http://www.hp.com/ergo.
IMPORTANT: You must be connected to the Internet to access the latest version of the user guide.
Regulatory, Safety, and Environmental Notices |
● |
Important regulatory notices, including information about proper |
To access this document: |
|
battery disposal, if needed. |
|
|
▲Type HP Documentation in the taskbar search box, and then select HP Documentation.
Limited Warranty* |
● |
Specific warranty information about this computer |
To access this document:
▲Type HP Documentation in the taskbar search box, and then select HP Documentation.
‒ or –
▲Go to http://www.hp.com/go/orderdocuments.
IMPORTANT: You must be connected to the Internet to access the latest version of the user guide.
*You can find your HP Limited Warranty located with the user guides on your product and/or on the CD or DVD provided in the box. In some countries or regions, HP might provide a printed warranty in the box. For countries or regions where the warranty is not provided in printed format, you can request a copy from http://www.hp.com/go/orderdocuments. For products purchased in Asia Pacific, you can write to HP at POD, PO Box 161, Kitchener Road Post Office, Singapore 912006. Include your product name, and your name, phone number, and postal address.
2Chapter 1 Getting started

2Components
Your computer features top-rated components. This chapter provides details about your components, where they are located, and how they work.
 NOTE: Actual computer color, features, feature locations, and icon labels may vary from the images depicted.
Locating hardware
To find out what hardware is installed on your computer:
▲Type device manager in the taskbar search box, and then select the Device Manager app.
A list displays all the devices installed on your computer.
For information about system hardware components and the system BIOS version number, press fn+esc (select products only).
Locating software
To find out what software is installed on your computer:
▲Right-click the Start button, and then select Apps and Features.
Locating hardware |
3 |

Right
Table 2-1 Right-side components and their descriptions
Component |
|
Description |
|
|
|
|
|
(1) |
Nano SIM card slot (select products only) |
Supports a wireless subscriber identity module (SIM) card. |
|
|
|
NOTE: The nano SIM card slot is located under the kickstand. |
|
|
|
|
|
(2) |
USB Type-C power connector and |
Connect AC adapters that have a USB Type-C connector, |
|
|
Thunderbolt™ ports with HP Sleep and Charge |
supplying power to the computer and, if needed, charging the |
|
|
(2) |
computer battery. |
|
|
|
– and – |
|
|
|
Even when the computer is off, connect and charge most USB |
|
|
|
devices that have a Type-C connector, such as a cell phone, |
|
|
|
camera, activity tracker, or smartwatch, and provide high-speed |
|
|
|
data transfer. |
|
|
|
– and – |
|
|
|
Connect display devices that have a USB Type-C connector, |
|
|
|
providing DisplayPort™ output. |
|
|
|
NOTE: Your computer may also support a Thunderbolt |
|
|
|
docking station. |
|
|
|
NOTE: Cables and/or adapters (purchased separately) may be |
|
|
|
required. |
|
|
|
|
|
(3) |
USB Type-C power connector port, SuperSpeed |
Connects an AC adapter that has a USB Type-C connector, |
|
|
port, and DisplayPort connector |
supplying power to the computer and, if needed, charging the |
|
|
|
computer battery. |
|
|
|
– and – |
|
|
|
Connects a USB device that has a Type-C connector, such as a |
|
|
|
cell phone, camera, activity tracker, or smartwatch, and |
|
|
|
provides high-speed data transfer. |
|
|
|
– and – |
|
|
|
Connects a display device that has a USB Type-C connector, |
|
|
|
providing DisplayPort output. |
|
|
|
NOTE: Cables and/or adapters (purchased separately) may be |
|
|
|
required. |
|
|
|
|
|
(4) |
Battery light |
When AC power is connected: |
|
|
|
● |
White: The battery charge is greater than 90 percent. |
|
|
● |
Amber: The battery charge is from 0 to 90 percent. |
|
|
● |
Off The battery is not charging. |
4Chapter 2 Components

Table 2-1 Right-side components and their descriptions (continued)
Component |
Description |
|
|
|
|
|
When AC power is disconnected (battery not charging): |
|
|
● |
Blinking amber: The battery has reached a low battery |
|
|
level. When the battery has reached a critical battery level, |
|
|
the battery light begins blinking rapidly. |
|
● |
Off The battery is not charging. |
|
|
|
Left
Table 2-2 Left-side components and their descriptions
Component |
|
Description |
|
|
|
(1) |
Audio-out (headphone)/Audio-in (microphone) |
Connects optional powered stereo speakers, headphones, |
|
combo jack |
earbuds, a headset, or a television audio cable. Also connects an |
|
|
optional headset microphone. This jack does not support |
|
|
optional standalone microphones. |
|
|
WARNING! To reduce the risk of personal injury, adjust the |
|
|
volume before putting on headphones, earbuds, or a headset. |
|
|
For additional safety information, see the Regulatory, Safety, |
|
|
and Environmental Notices. |
|
|
To access this guide: |
|
|
▲ Type HP Documentation in the taskbar search box, |
|
|
and then select HP Documentation. |
|
|
NOTE: When a device is connected to the jack, the computer |
|
|
speakers are disabled. |
|
|
|
(2) |
Volume buttons |
Control speaker volume on the computer. |
|
|
|
(3) |
Nano security cable slot |
Attaches an optional security cable to the computer. |
|
|
NOTE: The security cable is designed to act as a deterrent, but |
|
|
it may not prevent the computer from being mishandled or |
|
|
stolen. |
|
|
|
Left 5

Display
Table 2-3 Display components and their descriptions
Component |
|
Description |
|
|
|
(1) |
Speakers (2) |
Produce sound. |
|
|
|
(2) |
WWAN antennas (select products only)* |
Send and receive wireless signals to communicate with wireless |
|
|
wide area networks (WWANs). |
|
|
|
(3) |
WLAN antennas* |
Send and receive wireless signals to communicate with wireless |
|
|
local area networks (WLANs). |
|
|
|
(4) |
Ambient light sensor |
Adjusts the brightness of the display, depending on the ambient |
|
|
light. |
|
|
|
(5) |
Camera light(s) |
On: One or more cameras are in use. |
|
|
|
(6) |
Camera(s) |
Allow(s) you to video chat, record video, and record still images. |
|
|
To use your camera, see Using a camera (select products only) |
|
|
on page 35. Some cameras also allow a facial recognition |
|
|
logon to Windows, instead of a password logon. For more |
|
|
information, see Windows Hello (select products only) |
|
|
on page 56. |
|
|
NOTE: Camera functions vary depending on the camera |
|
|
hardware and software installed on your product. |
|
|
|
(7) |
Magnetic pen attachment area |
Holds an optional pen. Place the pen tip up (facing the top of |
|
|
the computer) for optimal magnetic attachment. |
NOTE: For more information about the pen, see the documentation provided with the pen.
*The antennas are not visible from the outside of the computer. For optimal transmission, keep the areas immediately around the antennas free from obstructions.
For wireless regulatory notices, see the section of the Regulatory, Safety, and Environmental Notices that applies to your country or region.
6Chapter 2 Components
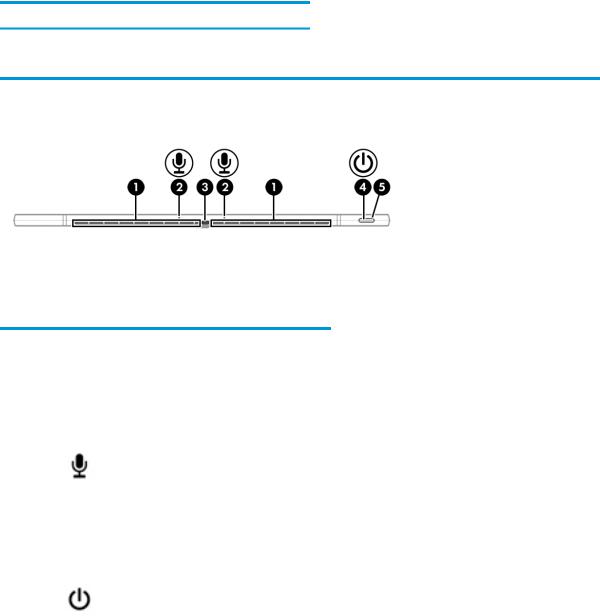
Table 2-3 Display components and their descriptions (continued)
Component |
Description |
To access this guide:
▲ Type HP Documentation in the taskbar search box, and then select HP Documentation.
Top
Table 2-4 Top components and their descriptions
Component |
|
Description |
|
|
|
|
|
(1) |
Vents (2) |
Enable air ow to cool internal components. |
|
|
|
NOTE: The computer fan starts up automatically to cool |
|
|
|
internal components and prevent overheating. It is normal |
|
|
|
for the internal fan to cycle on and off during routine |
|
|
|
operation. |
|
|
|
|
|
(2) |
Internal microphones (2) |
Record sound. |
|
|
|
|
|
(3) |
Camera privacy cover |
Controls the front and rear facing cameras simultaneously. |
|
|
|
When facing the display side with the front-facing camera: |
|
|
|
● |
To reveal the camera, slide the cover to the left. |
|
|
● |
To conceal the camera, slide the cover to the right. |
|
|
|
|
(4) |
Power button |
● |
When the computer is off, press the button to turn on |
|
|
|
the computer. |
|
|
● |
When the computer is on, press the button brie y to |
|
|
|
initiate Sleep. |
|
|
● |
When the computer is in the Sleep state, press the |
|
|
|
button brie y to exit Sleep (select products only). |
|
|
● |
When the computer is in Hibernation, press the |
|
|
|
button brie y to exit Hibernation. |
CAUTION: Pressing and holding down the power button results in the loss of unsaved information.
If the computer has stopped responding and shutdown procedures are ineffective, press and hold the power button for at least 5 seconds to turn off the computer.
To learn more about your power settings, see your power options.
Top 7

Table 2-4 Top components and their descriptions (continued)
Component |
Description |
▲ Right-click the Power meter icon  and then select Power Options.
(5) |
Power light |
● |
On: The computer is on. |
● Blinking (select products only): The computer is in the Sleep state, a power-saving state. The computer shuts off power to the display and other unneeded components.
● Off Depending on your computer model, the computer is off, in Hibernation, or in Sleep. Hibernation is the power-saving state that uses the least amount of power.
8Chapter 2 Components
Bottom
Table 2-5 Bottom components and their descriptions
Component |
|
Description |
|
|
|
(1) |
Alignment connectors (2) |
Connect to the alignment connectors on the keyboard |
|
|
(select products only). |
|
|
|
(2) |
Keyboard connector |
Connects the computer to the keyboard (select products |
|
|
only). |
|
|
|
Rear
Table 2-6 Rear components and their descriptions
Component |
|
Description |
|
|
|
(1) |
Rear internal microphone |
Records sound. |
|
|
|
(2) |
Rear camera |
Allows you to video chat, record video, and record still |
|
|
images. To use your camera, see Using a camera |
Bottom 9

Table 2-6 Rear components and their descriptions (continued)
Component |
|
Description |
|
|
|
|
|
(select products only) on page 35. Some cameras |
|
|
also allow a facial recognition logon to Windows, |
|
|
instead of a password logon. For more information, |
|
|
see Windows Hello (select products only) |
|
|
on page 56. |
|
|
NOTE: Camera functions vary depending on the |
|
|
camera hardware and software installed on your |
|
|
product. |
|
|
|
(3) |
Fingerprint reader (select products only) |
Allows a fingerprint logon to Windows, instead of a |
|
|
password logon. |
|
|
▲ Touch your finger to the fingerprint reader. See |
|
|
Windows Hello (select products only) |
|
|
on page 56 for details. |
|
|
IMPORTANT: To prevent fingerprint logon |
|
|
issues, make sure when you register your |
|
|
fingerprint that all sides of your finger are |
|
|
registered by the fingerprint reader. |
|
|
IMPORTANT: To verify that your computer has |
|
|
a fingerprint reader, type Sign-in options |
|
|
in the taskbar search box and follow the on- |
|
|
screen instructions. If Fingerprint reader is |
|
|
listed as an option, then your computer includes |
|
|
a fingerprint reader. |
|
|
|
(4) |
Kickstand |
Changes the angle for the display. |
|
|
|
10 Chapter 2 Components
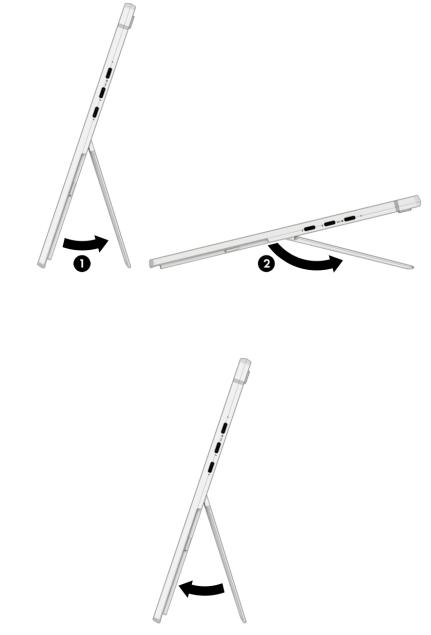
Using the kickstand
To change the angle for the display, follow these steps:
1.Hold the computer with top edge up. (The speakers are on top.)
2.Slide the kickstand away from the computer and position the kickstand at the appropriate angle. The kickstand will hold at a midway point (1) of about 52° or at full stopping point (2) of about 165°.
To close the kickstand, push the kickstand against the bottom of the computer until it is ush with the bottom.
Using the kickstand 11

Keyboard area (select products only)
 NOTE: Your keyboard may look slightly different from the illustrations in this section.
Connecting the keyboard
▲To connect the keyboard, lower the computer onto the keyboard until the connectors click into place.
12 Chapter 2 Components

Removing the keyboard
▲To remove the computer from the keyboard, pull the computer away from the back of the keyboard.
Keyboard area (select products only) 13

Connecting the leather folio keyboard
▲To connect the leather folio keyboard, lower the computer onto the keyboard (1) until the connectors click into place, and then attach the keyboard cover to the back of the computer (2) fitting the camera in the keyboard cutout.
14 Chapter 2 Components

Removing the leather folio keyboard
▲To remove the computer from the leather folio keyboard, pull the computer away from the keyboard (1), remove the back of the keyboard cover (2), and then lift the computer away from the keyboard (3).
Adjusting the leather folio keyboard
To change the angle of the display using the leather folio keyboard, follow these steps.
Keyboard area (select products only) 15

Touchpad settings
To adjust touchpad settings and gestures, or to turn off the touchpad:
1.Type touchpad settings in the taskbar search box, and then press enter.
2.Choose a setting.
To turn on the touchpad:
1.Type touchpad settings in the taskbar search box, and then press enter.
2.Using an external mouse, click the Touchpad button.
– or –
▲Press the Tab key repeatedly until the pointer rests on the Touchpad button. Then press the spacebar to select the button.
Table 2-7 Touchpad components and their descriptions
Component |
|
Description |
|
|
|
(1) |
Touchpad zone |
Reads your finger gestures to move the pointer or activate items |
|
|
on the screen. |
|
|
NOTE: For more information, see Using touchpad and touch |
|
|
screen gestures on page 30. |
|
|
|
(2) |
Left touchpad button |
Functions like the left button on an external mouse. |
|
|
|
(3) |
Right touchpad button |
Functions like the right button on an external mouse. |
|
|
|
16 Chapter 2 Components

Lights
Table 2-8 Lights and their descriptions
Component |
|
Description |
|
|
|
|
|
(1) |
Caps lock light |
On: Caps lock is on, which switches the key input to all capital |
|
|
|
letters. |
|
|
|
|
|
(2) |
Fn lock light |
On: The fn key is locked. For more information, see Hot keys |
|
|
|
(select products only) on page 21. |
|
|
|
|
|
(3) |
Mute light |
● |
On: Computer sound is off. |
|
|
● |
Off Computer sound is on. |
|
|
|
|
(4) |
Microphone mute light |
● |
On: Microphone is off. |
|
|
● |
Off Microphone is on. |
|
|
|
|
(5) |
Num lk light |
On: Num lock is on. |
|
|
|
|
|
(6) |
Wireless light |
On: An integrated wireless device, such as a wireless local area |
|
|
|
network (WLAN) device and/or a Bluetooth® device, is on. |
|
|
|
NOTE: On some models, the wireless light is amber when all |
|
|
|
wireless devices are off. |
|
|
|
|
|
(7) |
Sharing or presenting light |
On: Sharing is on. |
|
|
|
|
|
(8) |
Call answer light |
On: Call answer is on. |
|
|
|
|
|
(9) |
Call end light |
On: Call end is on. |
|
|
|
|
|
Keyboard area (select products only) 17
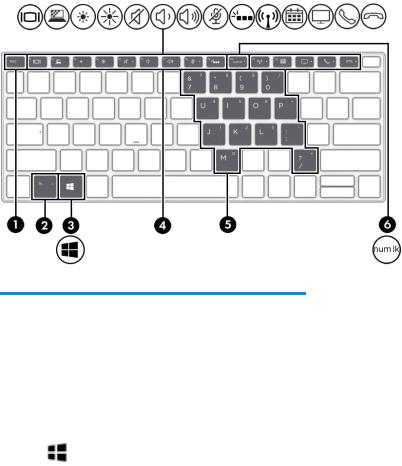
Special keys
Table 2-9 Special keys and their descriptions
Component |
|
Description |
|
|
|
(1) |
esc key |
Displays system information when pressed in combination with |
|
|
the fn key. |
|
|
|
(2) |
fn key |
Executes frequently used system functions when pressed in |
|
|
combination with another key. Such key combinations are called |
|
|
hot keys. |
|
|
See Hot keys (select products only) on page 21. |
|
|
|
(3) |
Windows key |
Opens the Start menu. |
|
|
NOTE: Pressing the Windows key again will close the Start |
|
|
menu. |
|
|
|
(4) |
Action keys |
Execute frequently used system functions. |
|
|
See Action keys on page 19. |
|
|
|
(5) |
Embedded numeric keypad |
A numeric keypad superimposed over the keyboard alphabet |
|
|
keys. When num lk is pressed, the keypad can be used like an |
|
|
external numeric keypad. Each key on the keypad performs the |
|
|
function indicated by the icon in the upper-right corner of the |
|
|
key. |
|
|
NOTE: If the keypad function is active when the computer is |
|
|
turned off, that function is reinstated when the computer is |
|
|
turned back on. |
|
|
|
(6) |
num lk key |
Turns the embedded numeric keypad on and off. |
|
|
|
18 Chapter 2 Components
Loading...