

Page 1
Read these instructions carefully...
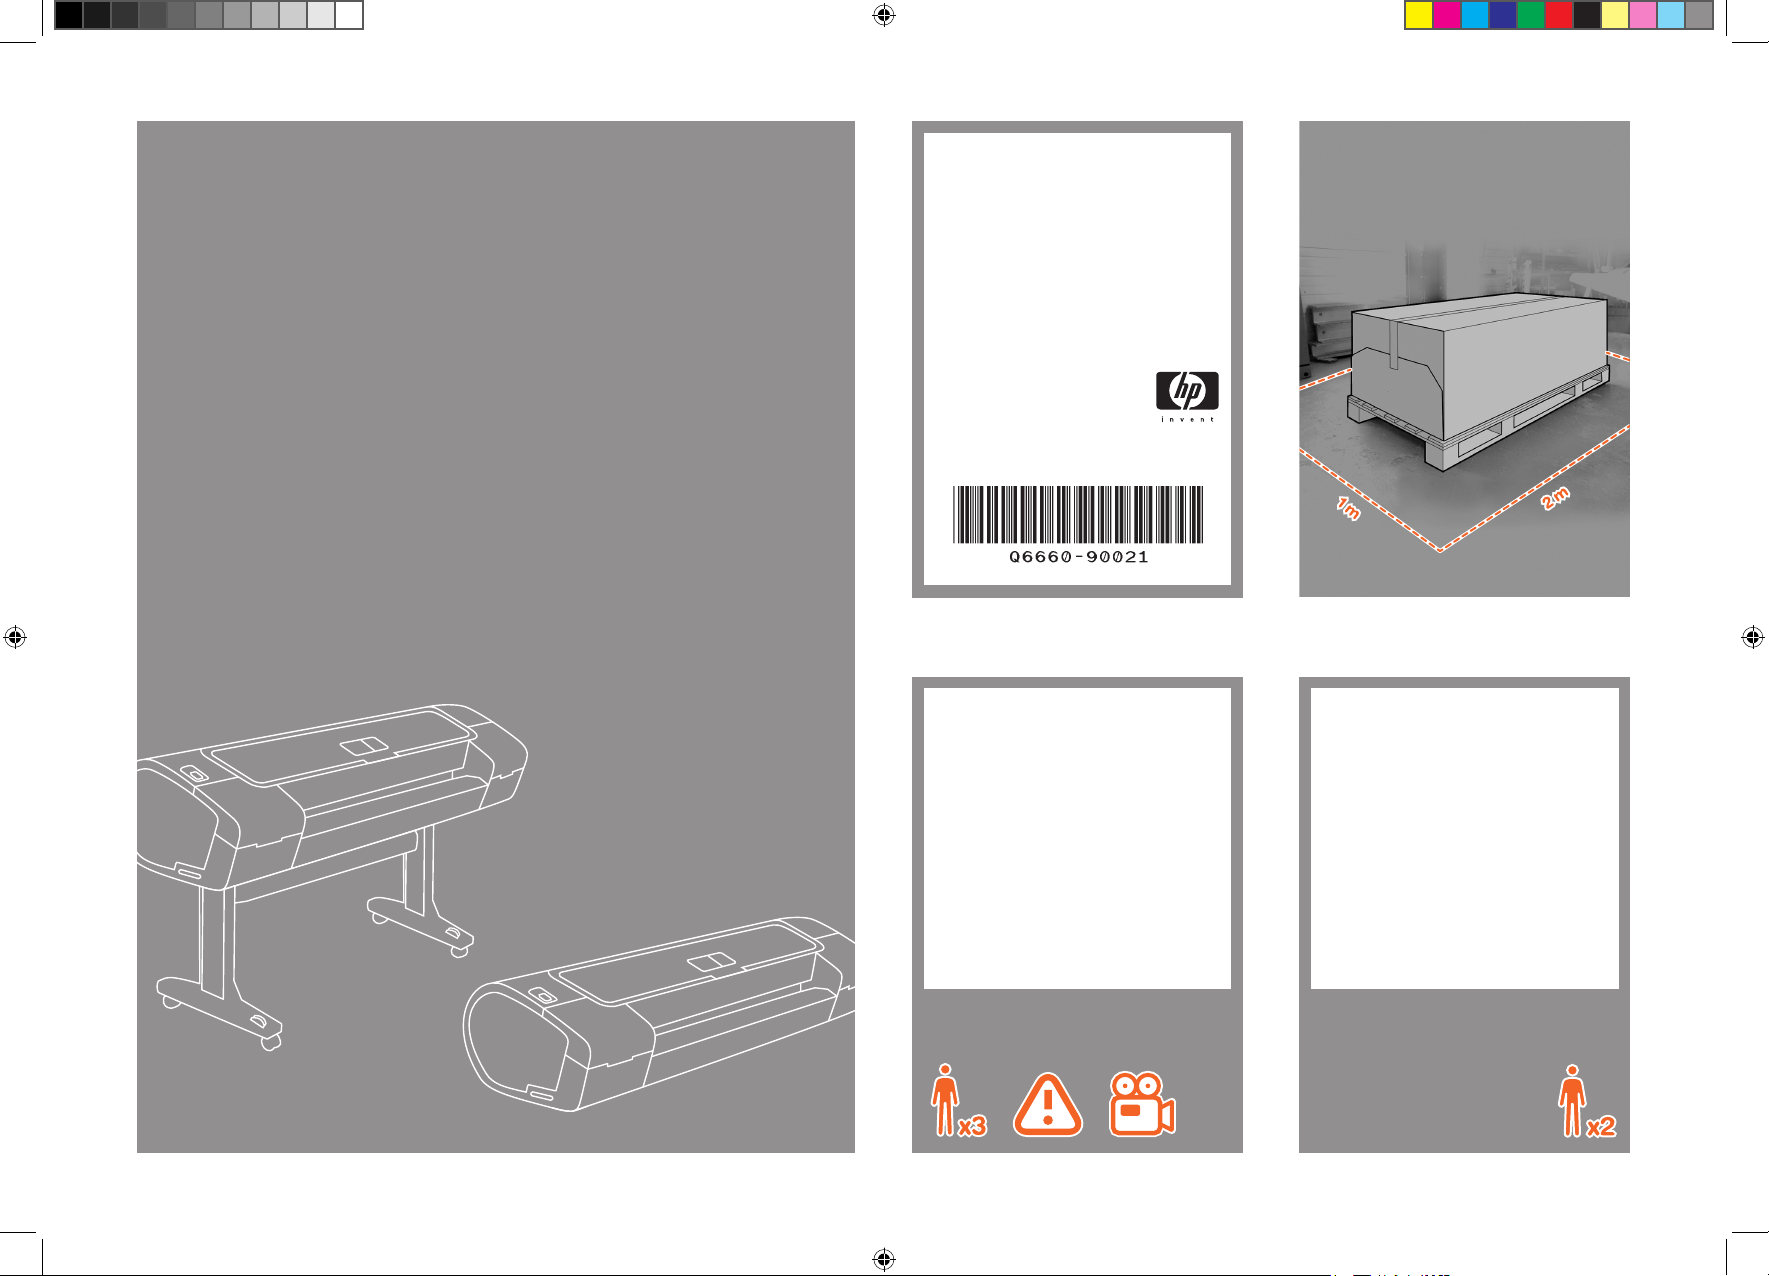
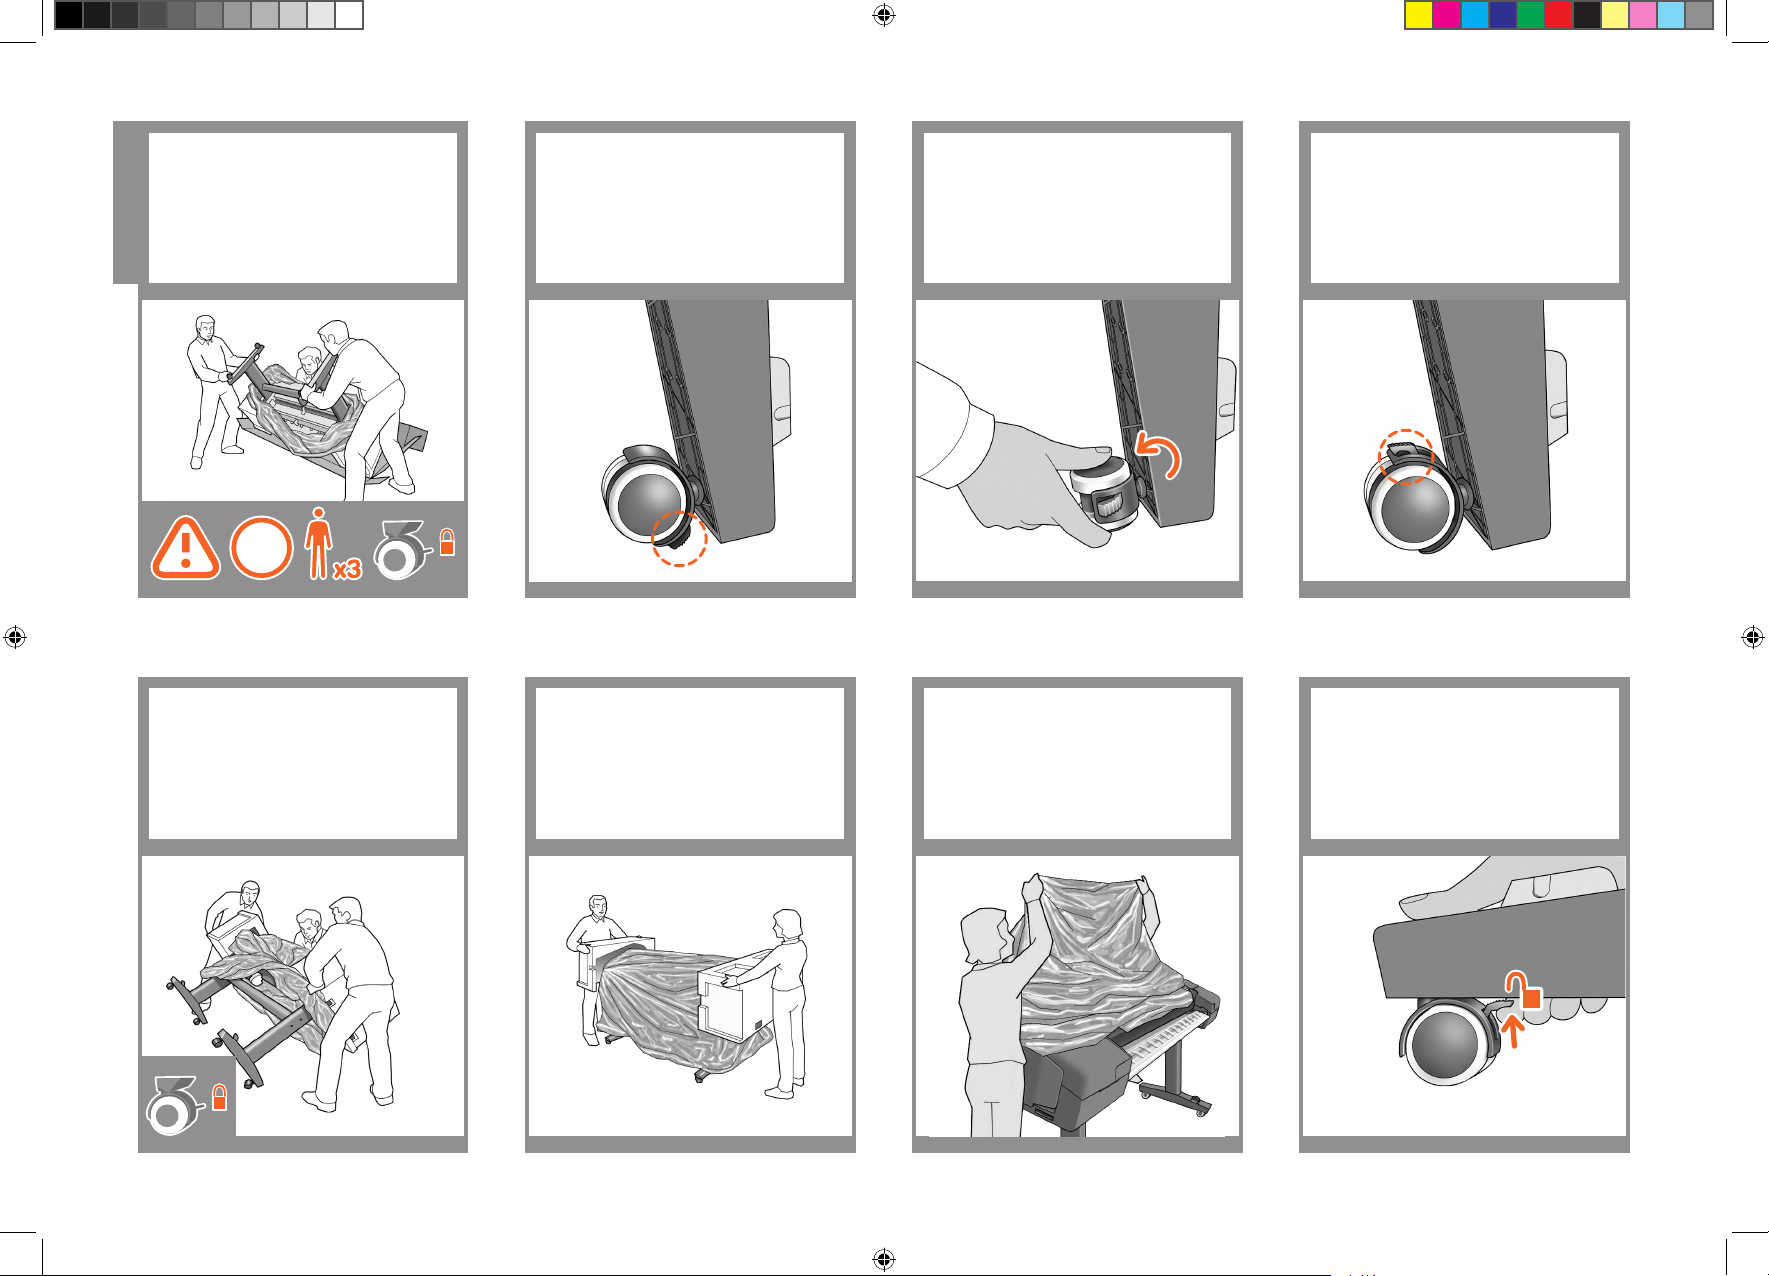
What you will need for this
procedure
• Because the printer is heavy, you may
need three people to unpack it. When
more than one person is needed, this
symbol is displayed.
• To assemble the printer you will need at
least 1 x 2 m (40 x 80 in) of empty floor
space.
*Whenever you see this icon, you can find
an animation illustrating the procedure on
the HP Start-Up Kit DVD.
Printer working area
Before you start unpacking, consider where
you are going to put the assembled printer.
You should allow some clear space on all
sides of the printer box. The recommended
clearances are shown in the illustration
above.
Note: If your printer is 24-in without
stand, remove the printer box
and the accessories box, place
the printer on a table and remove
the desiccant bag from below the
printer. Then go to step 32.
HP Designjet
Z2100, Z3200 and
Z3200ps
Photo Printer Series
Assembly Instructions
© 2008 Hewlett-Packard Company
Inkjet Commercial Division
Avenida Graells 501 · 08174
Sant Cugat del Vallès
Barcelona · Spain
All rights reserved
Printed in Germany · Imprimé en Allemagne · Stampato in Germania
1 2
*
1.2 set up troja Asia NEW.indd 1 26/06/2008 11:16:04 AM
Page 2
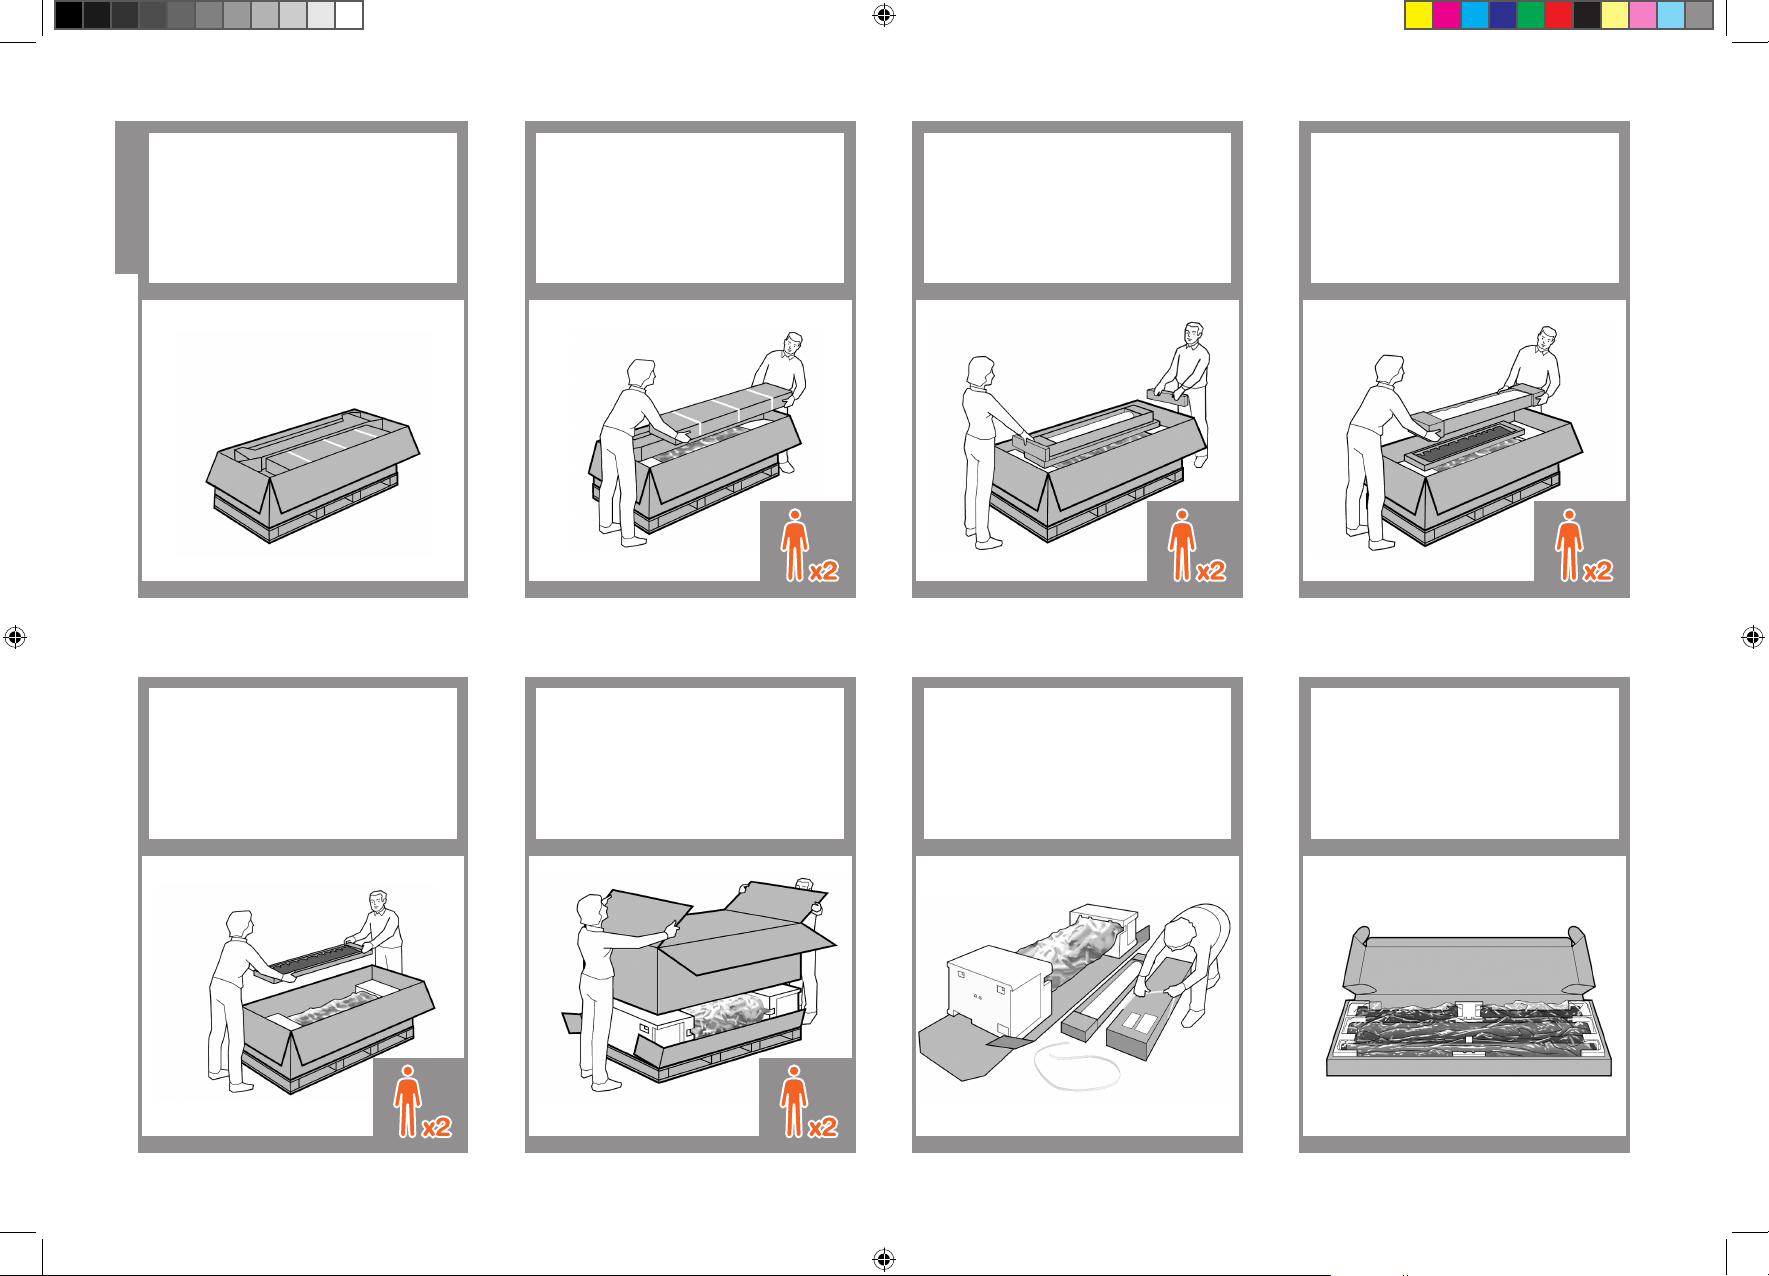
Remove the accessories from the printer box.
You will find the documentation and software for your printer on top of the printer.
Remove the stand box, which is the largest
one. To do so you may need two people,
one at each end.
Lift up the sides and top of the printer box,
and remove them from the printer.
Remove the pieces of cardboard.
Cut and remove the straps around the
stand box.
Remove the roll of paper.
Remove the rear tray from the printer.
Note: If you don’t find the tray
in the box, it may already be
installed.
3 4 5 6
7 8 9
Unpack the printer
10
Open the stand box.
1.2 set up troja Asia NEW.indd 2 26/06/2008 11:16:04 AM
Page 3
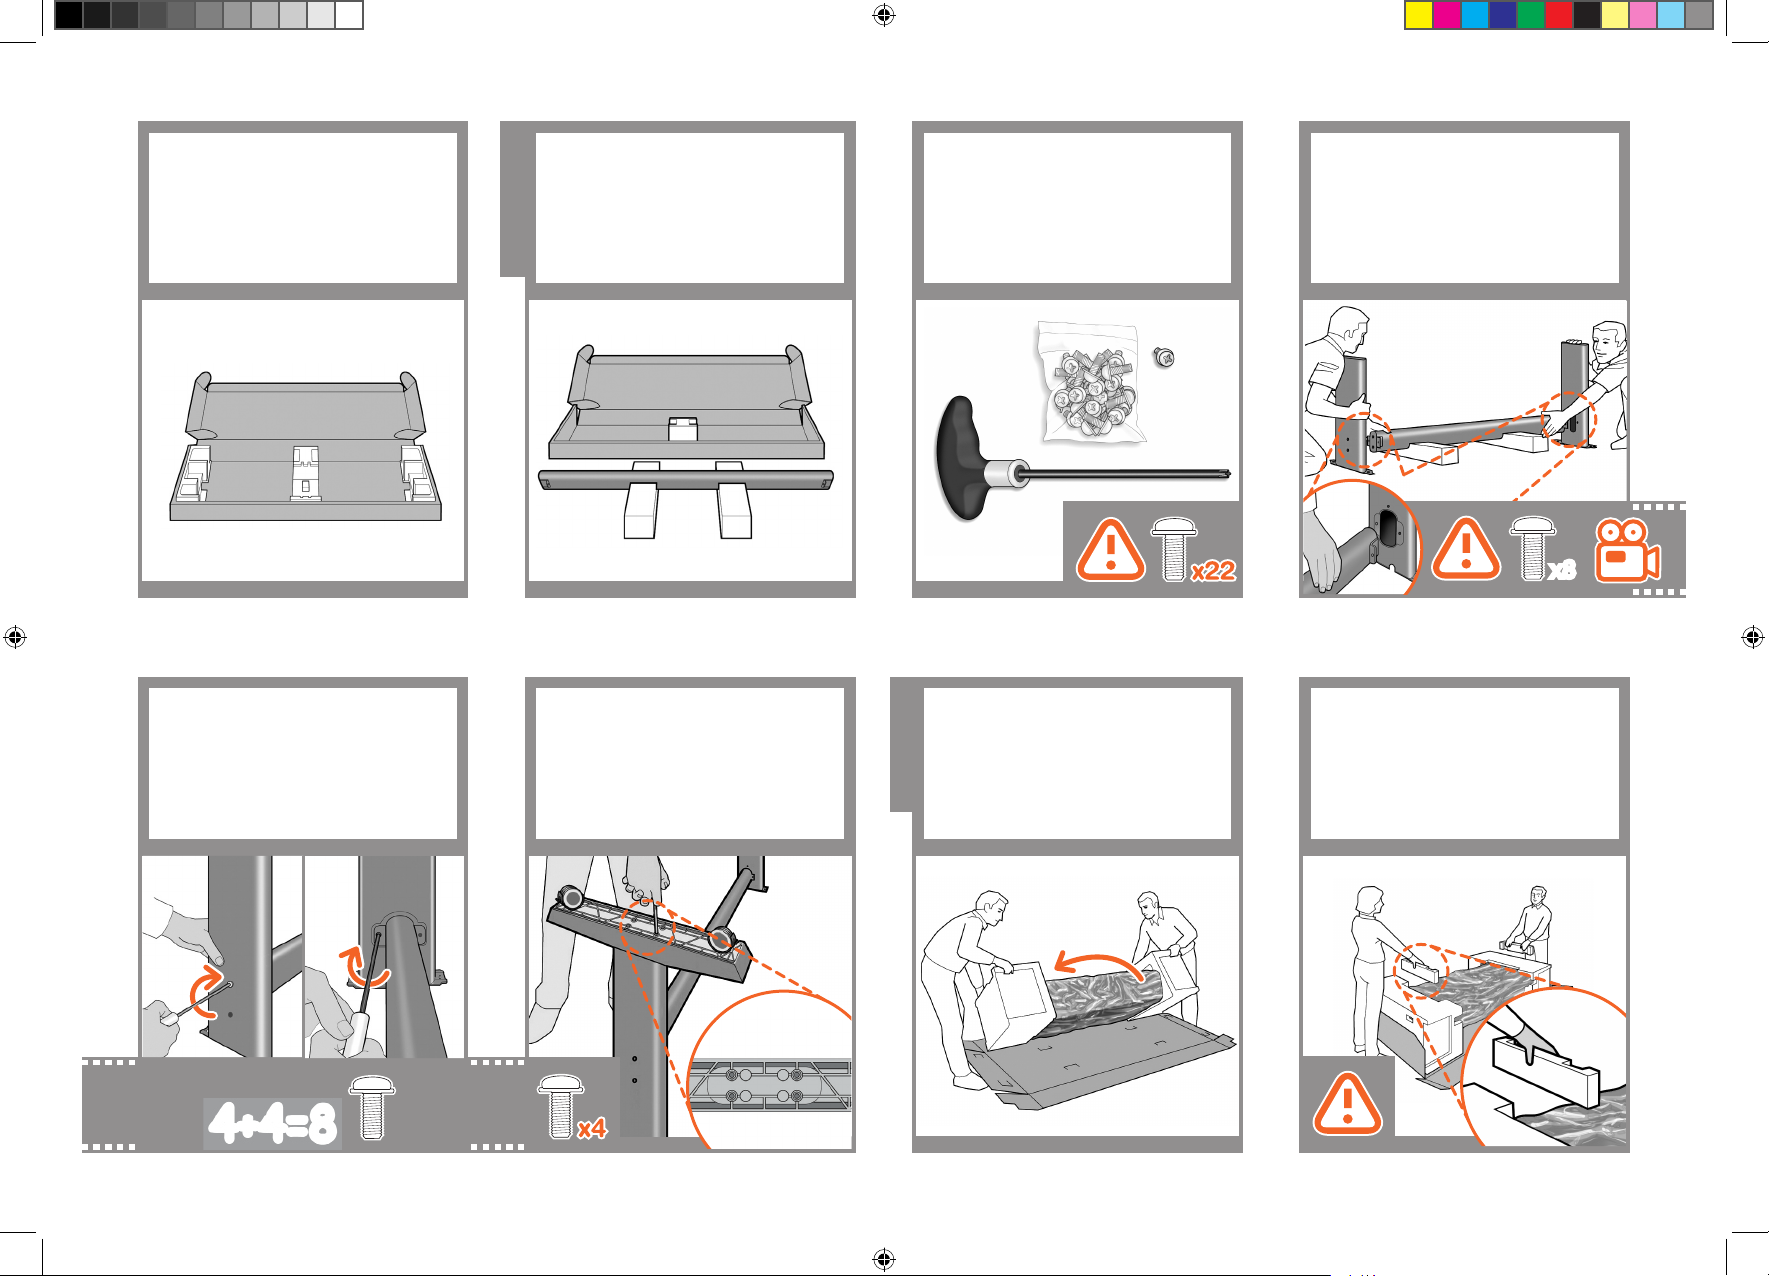
Remove the cross-brace and the two
pieces of packaging material from each
end of the stand box.
Place the two pieces of packaging
material on the floor, spaced 40 cm apart,
and place the cross-brace on top of them.
A screwdriver and 22 screws are
provided in the stand box: 16 screws to
assemble the stand, 4 to attach it to the
printer, and 2 are spare.
Do not try to remove the washers from
the screws.
Note: All the screws are for the stand. The
basket does not need screws.
11 12 13
Assemble the stand
Attach a foot to each leg, using four
screws in each foot. First fit all four screws
loosely, then tighten them up.
16
Make sure you have used 4 screws
in each leg.
15
Attach the stand
Return to the main body of the printer,
carefully turn the printer upside down in
order to attach the legs.
17
14
Attach each leg of the stand to the crossbrace, using two screws on the outside
of the leg and then two on the inside.
First fit all four screws loosely, then tighten
up the screws on the outside of the leg,
followed by the screws on the inside.
Remove the small flaps from each of the
foam end pieces.
Do not remove the foam end
pieces.
18
x8x8
4+4=8
1.2 set up troja Asia NEW.indd 3 26/06/2008 11:16:05 AM
Page 4
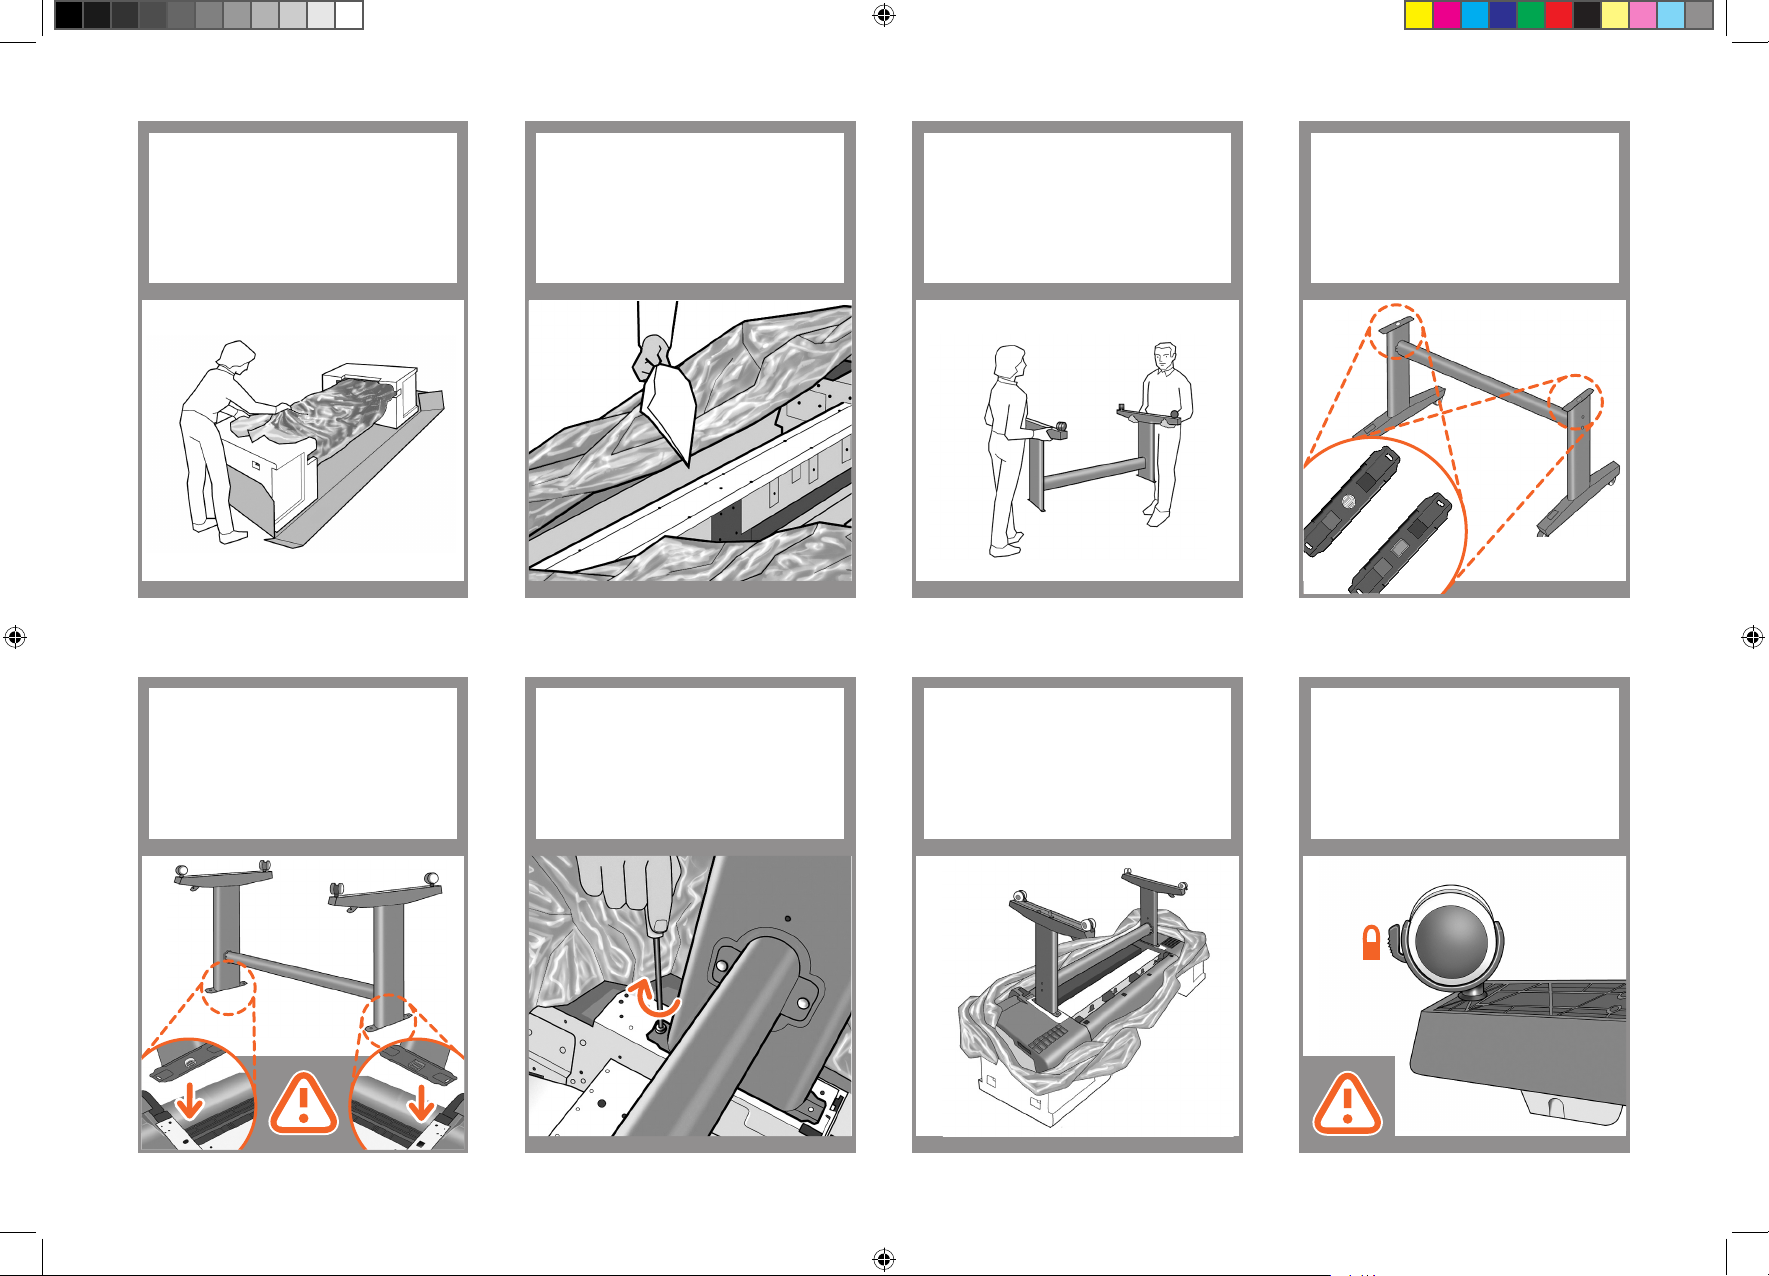
Remove the orange tape from the
transparent covering that protects
the printer.
Open the transparent covering and remove
the desiccant bag from the top
of the printer.
Lift the stand, keeping it upside down.
19 20 21
There is a round yellow button protruding
from the top of one stand leg, and a
square green button protruding from the
top of the other leg. Each button fits into a
hole in the printer.
22
Place the stand on the printer slowly and
carefully, so that the colored buttons on
the legs fit into the corresponding holes
in the printer.
Notice that the printer body is
upside down.
23
When the legs are correctly located on the
printer, attach them to the printer using two
screws for each leg.
Check that you have used a total of twenty
screws, and that all have been tightened.
You should have two screws left over,
which are spare.
24 25
Check that the wheels on the stand are
locked.
26
1.2 set up troja Asia NEW.indd 4 26/06/2008 11:16:06 AM
Page 5
Turning the printer over is done in two
stages. For the first stage, hold the printer
by its feet and rotate the feet until they
touch the floor.
The printer weighs 60 kg (132 lb) (24“
model) or 80 kg (167 lb) (44” model).
Now hold the printer by the foam end
pieces and by the center rear, and
continue to rotate it until it stands on its
feet, all four wheels in contact with the
floor.
Remove the foam end pieces. Remove the transparent covering from the
printer.
Note: If your printer is 24-in
without stand, go to step 41.
27
31 32 33
Turn the printer over
44:80kg
24:60kg
28 29
If the full weight of the printer rests on
the wheel lock, it may break.
If necessary, rotate the wheel.
30
The lock on each wheel should be facing
inwards (away from the floor).
Unlock the brake lever on each of the four
wheels by lifting the lever.
34
1.2 set up troja Asia NEW.indd 5 26/06/2008 11:16:06 AM
Page 6

Rest the basket’s rear tube on the supports
that you have just fitted to each leg of the
stand.
The basket is now complete. Remove the orange tape from the printer
window.
39 40 41
Attach the basket’s front tube to the two
short tubes on each foot.
38
Fit the two short tubes to the printer’s feet,
one on the front of each foot. Each tube
should click into place.
37
Prepare the printer
Lay out the components of the basket.
35
Fit the basket supports to the stand legs,
one to each leg.
36
Attach the basket
Open the window (printer’s top cover).
42
1.2 set up troja Asia NEW.indd 6 26/06/2008 11:16:07 AM
Page 7

43 44
Beside the front panel, you will see a
cardboard support attached to the printer
with tape. Remove the tape.
Turn the cardboard support 90° to the
right.
Part of the stopper may fall off while you
are removing it; in this case, remove both
parts. The stopper will not be needed
again; you can discard it.
47
Move to the rear of the printer and fit the
rear tray to the printer.
Note: The rear tray may already
be assembled (as in step 50). If
so, please remove the orange
tape from the rear tray and go to
step 51.
48
45 46
Inside the right-hand side of the printer,
you will see an orange carriage
stopper.
Release the stopper by lifting the lever
wrapped with light blue paper, then
remove the stopper from the printer.
Lift the cardboard support up and out of
the printer. It will not be needed again;
you can discard it.
Slide it in and then down.
49
Push up the back of the tray into its closed
position.
50
1.2 set up troja Asia NEW.indd 7 26/06/2008 11:16:08 AM
Page 8

Connect the power cable to the printer’s
power socket.
Switch on power to the printer using the
switch just above the power socket.
Remove the plastic film covering the
window and the plastic film covering the
front panel (LCD display).
51 52 53
Install the ink cartridges
Connect a USB cable to the appropriate
socket on the rear right of the printer, and
secure the cable with the clip provided, to
prevent accidental unplugging.
On the front panel, the HP logo appears.
Please wait a while. You will then be
prompted to select the language of the
printer.
54
57
Shake each ink cartridge for about
10 seconds before unwrapping it.
Open the cover on the right-hand side of
the printer.
56
Then the printer checks for the presence of
ink cartridges. On finding none, it prompts
you to install the ink cartridges.
55
Insert the ink cartridges one by one. Each
cartridge is marked with its own color, and
should be inserted only into the slot of the
same color. Avoid touching pins, leads or
circuits.
58
1.2 set up troja Asia NEW.indd 8 26/06/2008 11:16:08 AM
Page 9

The cartridges must be inserted the right
way around: the ink outlet in the cartridge
should meet the ink inlet in the slot. Push
the cartridge into the slot until it clicks
into place. The printer beeps whenever a
cartridge is successfully inserted.
Open the window and grasp the blue
handle of the printhead cover.
59 60
61
62
When you have inserted the correct
cartridges into the right-hand side of the
printer, open the cover on the left-hand
side and insert the other cartridges there.
Install the printheads
When you have inserted all of the ink
cartridges correctly, the printer must prepare the ink system for its first use. It will
do this immediately if you press the OK
key, or after a 60-second pause if you do
not press the OK key. When the ink system
is ready, the front panel will prompt you to
open the window.
The front panel prompts you to remove the
setup printheads and press the OK key
when you have finished.
65
Pull the blue handle towards you as far as
it will go.
63
Lift the handle up to open the printhead
co ver.
The front panel prompts you for the next
step: removing the printheads. Do not
press OK until you have removed all the
printheads.
64
Remove and discard all orange setup
printheads.You may need to use force to
extract each printhead.
The setup printheads contain ink, which
could leak out. Avoid touching pins, leads
or circuits.
66
1.2 set up troja Asia NEW.indd 9 26/06/2008 11:16:09 AM
Page 10

Press the OK key on the front panel when
you have removed all of the setup printheads. The front panel then prompts you to
install the new printheads.
Shake each new printhead before
unwrapping it. This will reduce the time
the printer takes to check the printheads
later.
After shaking, unwrap each printhead. Remove all orange parts.
67 68 69 70
Pull the blue handle towards you as far
as it will go, picking up the latch in the
process.
73
Insert the printheads one by one. Each
printhead is marked with its own colors,
and should be inserted only into the
correct slot marked with the same colors.
Insert the printheads with the blue handle
towards you.
71
Push each printhead into the slot until it
clicks into place. The front panel tells you
whether the printhead has been inserted
correctly.
72
Push the handle down on top of the
printhead cover.
The printer checks and prepares the new
printheads, which may take 30 to 40
minutes depending on the condition of the
printheads and of the environment.
Close the window.
74
1.2 set up troja Asia NEW.indd 10 26/06/2008 11:16:10 AM
Page 11

While the printer is preparing the
printheads, you could spend the time
installing the printer software on your
computer.
Be sure to follow the software
installation instructions. Connecting your
printer before installing the software can
lead to printer errors.
75
Remove the spindle by lifting out first the
right-hand end, then the left.
78
Once the printhead check has finished the
printer will be ready to load paper for the
printhead alignment.
76
Load a roll of paper
When the front panel prompts you to load
paper for printhead alignment, go to the
rear of the printer, and remove the orange
stoppers from each end of the spindle and
the orange tape.
77
Replace the spindle into the printer, left end
first, with the fixed stop on the left and the
blue removable stop on the right.
81
If the blue removable stop is on the
spindle, remove it.
Put the roll onto the spindle, making
sure to put it on the right way round: the
leading edge of the paper should go into
the printer from the top of the roll.
Add the removable stop to the spindle to
keep the roll in place.
Push the removable stop towards the roll
as far as it will go.
No gap should be left between
stop and paper.
8 0 79
Feed the leading edge of the paper into
the printer until the printer takes hold of it.
Then move to the front of the printer.
82
Align the printheads
1.2 set up troja Asia NEW.indd 11 26/06/2008 11:16:11 AM
Page 12

The front panel will display a series of
messages showing the progress of the
printhead alignment. There is no need to
take any action until the alignment has
finished, when you will see the message
shown below. Press the OK key.
84
The front panel will ask whether you are
loading roll or sheet paper. The printer will
proceed to align the printheads. This process involves printing, and therefore needs
to use some paper.
83
You can now, or at some later time, colorcalibrate the paper type that you intend
to use in the printer. Color calibration is
recommended for accurate color printing.
It can be started from the Printer Utility
program installed as part of your printer
software, or from the front panel’s Image
Quality Maintenance menu.
85 86
1- View ink levels
2- View loaded paper
3- Unload paper
4- Form feed and cut
5- Back
6- Menu
7- Power
8- cancel
9- OK
1
2
4
3
5
6
7
89
1.2 set up troja Asia NEW.indd 12 26/06/2008 11:16:11 AM
Page 13

1. Setting up and connecting your
printer: Mac OS X
Network connection (Bonjour)
1. Make sure that the printer is on and connected to
a working Ethernet network, and that all computers in
the network are on and connected (including hubs and
routers).
2. Go to your printer’s front panel, use the Menu key if
necessary to find the main menu, and select the icon.
If you have a Z2100 select ‘Fast Ethernet’
followed by ‘View configuration’ and if you
have a Z3200 or Z3200ps select ‘Gigabit
Ethernet’ followed by ‘View configuration’. Note the
mDNS service name of your printer.
3. Insert the HP Start-Up Kit CD into your CD drive, open
the CD icon on your screen and look for the ‘Mac OS X
HP Designjet Installer’ icon that matches your operating
system.
4. Double-click the appropriate icon to launch the
installer, and then follow the on-screen instructions.
Note: if you have an HP Designjet Z2100 or Z3200
we recommend that you select ‘Easy Install’ to install all
elements.
If you have an HP Designjet Z3200ps we recommend
that you select ‘Easy Install’ to install the PostScript driver
and the HP Printer Utility. If you wish to install the PCL3
raster driver, select ‘Custom Install’.
5. Follow the on-screen instructions that take you
through the driver installation until you see the HP
Printer Setup Assistant.
6. In the HP Printer Setup Assistant, click ’Continue’.
7. In the list of printers that appears, select a line that
contains the mDNS service name of your printer (which
you noted in step 2) in the Printer Name column, and
‘Bonjour’ in the Connection Type column. Scroll sideways if necessary to see the Connection Type column.
• If your printer appears in the list, click ’Continue’
and go to step 8. If you have an HP Designjet 3200ps,
scroll sideways to see the Printer Driver column (PostScript or PCL3 Raster).
• If your printer does not appear in the list, go to
step 10.
8. The following screen displays information about your
printer’s installation, where the name of the printer can
be modified. Make your changes if necessary and click
’Continue’.
9. Your printer is now connected. Select ’Create new
queue’ to connect another printer to the network, or
’Quit’ to close the application.
10. Select ’My printer is not on the list’ and click
’Continue’.
11. Select the connection type.
12. Follow the on-screen instructions that help you to
connect your printer to the network, and select ’Quit’ to
close the assistant window.
USB connection
1. Do not connect the computer to the printer yet. You
must first install the printer driver software on the computer, as follows.
2. Insert the HP Start-Up Kit CD into your CD drive, open
the CD icon on your screen and look for the ‘Mac OS X
HP Designjet Installer’ icon that matches your operating
system.
Setting up and connecting your printer
Mac OS
1.2 set up troja Asia NEW.indd 13 26/06/2008 11:16:12 AM
Page 14

3. Double-click the appropriate icon to launch the
installer, and then follow the on-screen instructions.
Note: if you have an HP Designjet Z2100 or Z3200
we recommend that you select ‘Easy Install’ to install all
elements.
If you have an HP Designjet Z3200ps we recommend
that you select ‘Easy Install’ to install the PostScript driver
and the HP Printer Utility. If you wish to install the PCL3
raster driver, select ‘Custom Install’.
4. Follow the on-screen instructions that take you through
the driver installation until you see the HP Printer Setup
Assistant.
5. Connect your computer to the printer using a USB
cable. Ensure that the printer is switched on.
6. In the HP Printer Setup Assistant, click ’Continue’.
7. In the list of printers that appears, select the entry that
uses the connection type ’USB’ and click ‘Continue’. If
you have an HP Designjet Z3200ps, scroll sideways to
see the Printer Driver column (PostScript or PCL3 Raster).
9. Your printer is now connected. Select ’Create new
queue’ to connect another printer, or ’Quit’ to close the
application.
8. The following screen displays information about your
printer’s installation, where the name of the printer can
be modified. Make your changes if necessary and click
’Continue’.
1.2 set up troja Asia NEW.indd 14 26/06/2008 11:16:13 AM
Page 15

1. Setting up and connecting your
printer: Windows
Network connection
A network connection is the best way to share
your printer with your team.
1. Make sure that the printer and the computer are both
connected to the network.
2. Make a note of the printer’s IP address, shown on the
front panel’s Ready page. If you don’t see the Ready
page on the front panel, press the Menu key once or
twice until you see it.
3. Insert the HP Start-Up Kit CD into your CD drive. If the
CD does not autorun, run the Setup.exe program in the
root folder of the CD.
4. Choose the next step depending on the model of your
printer:
a) (HP Designjet Z2100) Click Install.
b) (HP Designjet Z3200/Z3200ps) Click Express
Network Install.
5. Follow the instructions on your screen to set up the
printer. The following notes will help you to understand
the screens and make appropriate choices:
• (HP Designjet Z2100 only) When asked how the
printer is connected, choose ‘Wired Networking’.’
• Wait for the installer to detect the printers
connected to the network. The following screen appears
during this process:
• Select your printer from the list. If you have more than
one HP Designjet Z2100/Z3200/Z3200ps printer connected to the network, use the IP address that you noted
earlier to confirm that you have selected the correct
printer.
• Click the Next button to install the selected printer.
• (HP Designjet Z2100 only) When the network
settings of the selected printer are displayed, check that
they are correct.
USB connection
A direct USB connection may be faster than a
network connection, but the cable is limited
in length and it is more difficult to share the
printer.
1. Do not connect the computer to the printer yet.
You must first install the printer driver software on the
computer, as follows.
2. Insert the HP Start-Up Kit CD into your CD drive. If the
CD does not autorun, run the Setup.exe program in the
root folder of the CD.
3. Choose the next step depending on the model of your
printer:
c) (HP Designjet Z2100) Click Install.
d) (HP Designjet Z3200/Z3200ps) Click Custom
Install. You may see a message warning that the
installer will have to communicate through the Win
dows Firewall to search for printers on the network.
As you intend to set up a USB connection, select
Continue installation without searching the network
and click Next.
4. Follow the instructions on your screen to set up the
printer. The following notes will help you to understand
the screens and make appropriate choices:
• When asked how the printer is connected, select:
a) (HP Designjet Z2100) ‘Connected directly to this
computer’
b) (HP Designjet Z3200/Z3200ps) ‘USB cable’.
• Connect the printer when the following screen
appears:
• Wait for the installation to finish.
Setting up and connecting your printer
Windows
1.2 set up troja Asia NEW.indd 15 26/06/2008 11:16:14 AM
Page 16

HP Color Center and Accessories
HP Color Center provides in one place the main facilities
you will need for color management. You can create accurate color prints by using the Color Center to calibrate
the printer, create and install custom ICC color profiles,
and manage the numerous paper types available for
your printer.
To access HP Color Center from Windows click on this
icon which you will have on the desktop.
To access HP Color Center from Mac OS click on this
icon which you will find on the dock.
Optionally, HP also offers tailored solutions for graphic
designers and professinal photographers specifically
developed to satisfy the most demanding requirements.
HP Color Center
HP Accessories
EFI Designer Edition
HP Advanced Proling Solution
HP Advanced Profiling Solution
HP and X-Rite Inc. have worked together to
develop the HP Advanced Profiling Solution, powered by
X-Rite Inc. technology, which takes advantage of
the built-in HP Embedded Spectrophotometer to provide a
revolutionary end-to-end calibrated ICC color workflow.
The HP Advanced Profiling Solution, tailored for HP
printers, offers a powerful and automated, yet costeffective color management system, providing a fully
streamlined workflow that enables you to save time,
money and the hassle of off-line measurement devices.
Together, X-Rite Inc. and HP provide a new experience to
designers, photographers and other creative
professionals, who can generate proofs and photo-quality
prints accurately and consistently.
The Advanced Profiling Solution includes:
• The HP Colorimeter monitor calibrator, with which
you can accurately calibrate and profile all of your
monitors: LCD, CRT and laptops.
• An ICC profiling and editing software application
providing additional features and functionality
beyond those included in the HP Color Center.
Using the Advanced Profiling Solution, you can:
• See matching colors on your screen and printed
paper.
• Generate color profiles for all your paper types, in
RGB (for Z2100 and Z3200 HP Drivers) and RGB or
CMYK if you are using RIP Software.
• Edit your color profiles visually for maximum
control.
• Perform all operations easily using a step-by-step
software interface—no extra manuals needed.
The HP Advanced Profiling Solution is an optional
accessory if you have an HP Designjet Z2100 or Z3200
Photo Printer; it is supplied in the box if you have an HP
Designjet Z3200ps Photo Printer. It is fully supported
by HP, so you do not need to deal with various support
organizations from different companies.
Key Features
The HP Advanced Profiling Solution lets you take
control of your color:
• Calibrate and profile all of your monitors: LCD,
CRT and laptops.
• Automated RGB profiling with HP software drivers
to ensure accurate printing (photos,designs, etc.).
• Automated RGB and CMYK profiling when your
Designjet Z Photo printer is driven by a Raster Image
Processor (RIP) for accurate digital prints and proofs.
• Easily and visually edit your profiles for ultimate
color control.
Powered by
EFI Designer Edition
Only for HP Designjet Z2100
The EFI Designer Edition for HP Raster Image Processor,
tailored for HP printers, offers a powerful, yet
cost-effective digital proofing system that allows full
control over digital proofing needs and saves hassle,
time and money. Together, EFI and HP enable designers,
photographers and other creative professionals to easily
generate proof quality prints with sharp detail, color
accuracy and smooth tonal transitions.
EFI Designer Edition comprises an intuitive, easy-to-use
interface and an Adobe PostScript 3 engine (Adobe
CPSI). It offers PDF/X support, a nesting function and
selectable RIP resolutions. The Adobe CPSI Interpreter
supports in-RIP separation, overprinting, and handling of
2-byte fonts via a font-download facility.
• Advanced proofing capabilities. EFI Designer
Edition produces accurate color proofs at the
creation stage, allowing designers to find and fix
costly errors early, save time and accurately
simulate final press output.
• Seamless integration with other applications.
With Adobe Configurable PostScript 3, EFI
Designer Edition integrates effortlessly with other
illustration, photo and layout applications.
• Accurate color. The solution includes several key
features for advanced color management in RGB,
grayscale or CMYK workflows. Its Ugra/FOGRA
Media Wedge 2.0/2.2 allows users to achieve
correct color, while Spot Color Editor supports an
unlimited number of spot colors and libraries for
PANTONE, HKS and Toyo.
• Extended profile options. The flexible EFI Designer
Edition includes reference profiles for selected
printing methods, such as offset or newspaper, and
paper profiles for EFI and printer manufacturers’
paper types. If users prefer to use their own
profiles, Profile Connector enables them to integrate
them into the workflow.
EFI Designer Edition for HP is an optional accessory for
your printer.
The product numbers are:
Q6643/4D XL for HP Designjet Z2100
The information contained herein is subject to change whitout notice.
1.2 set up troja Asia NEW.indd 16 26/06/2008 11:16:14 AM
 Loading...