

Page 1

HP Designjet Z3100ps GP
Photo Printer
Quick Reference Guide
Page 2

HP Designjet Z3100ps GP Photo Printer
Quick reference guide
Page 3

Legal notices
The information contained herein is subject to
change without notice.
The only warranties for HP Products and services
are set forth in the express warranty statement
accompanying such products and services.
Nothing herein should be construed as constituting
an additional warranty. HP shall not be liable for
technical or editorial errors or omissions contained
herein.
Trademarks
Adobe®, Adobe Photoshop®, and Adobe®
PostScript® 3™ are trademarks of Adobe Systems
Incorporated.
Corel® is a trademark or registered trademark of
Corel Corporation or Corel Corporation Limited.
Energy Star® is a U.S. registered mark of the
United States Environmental Protection Agency.
Microsoft® and Windows® are U.S. registered
trademarks of Microsoft Corporation.
Page 4

Table of contents
1 Introduction
2 Personalizing the printer
3 Paper handling
4 Printing
Safety precautions .................................................................................. 1
HP Start-Up Kit ....................................................................................... 1
The front panel ...................................................................................... 2
Printer software ...................................................................................... 3
Turn printer on and off ............................................................................ 5
Access HP Easy Printer Care (Windows) or HP Printer Utility (Mac OS) ......... 6
Access the Embedded Web Server ........................................................... 7
Choose which spindle to use ................................................................... 9
Load a roll onto the spindle ................................................................... 10
Load a roll into the printer ..................................................................... 12
Easy loading procedure ....................................................... 12
Paper menu procedure ......................................................... 16
Unload a roll ....................................................................................... 17
Unload paper key procedure with paper on the roll ................. 17
Paper menu procedure with paper on the roll .......................... 18
Roll out of paper procedure .................................................. 18
Load a single sheet ............................................................................... 18
Easy loading procedure ....................................................... 19
Paper menu procedure ......................................................... 20
Unload a single sheet ........................................................................... 22
Unload paper key procedure ................................................ 22
Paper menu procedure ......................................................... 23
Select print quality ................................................................................ 25
Select paper size ................................................................................. 26
Custom paper sizes ............................................................. 26
Select margins options .......................................................................... 27
Print with shortcuts ................................................................................ 27
Preview a print .................................................................................... 29
5 Color management
6 Maintaining the printer
ENWW iii
Color calibration .................................................................................. 31
Clean the exterior of the printer ............................................................. 33
Maintain the ink cartridges .................................................................... 33
Update the firmware ............................................................................. 33
Page 5

7 Accessories
How to order supplies and accessories ................................................... 35
Order ink supplies ............................................................... 35
Order paper ....................................................................... 36
Non-recommended paper types ............................ 37
Order accessories ............................................................... 37
8 Troubleshooting paper issues
The paper has jammed ......................................................................... 39
9 Troubleshooting print-quality issues
General advice .................................................................................... 43
Horizontal lines across the image (banding) ............................................ 44
The whole image is blurry or grainy ....................................................... 45
Colors are inaccurate ........................................................................... 46
Color accuracy using EPS or PDF images in page layout
applications ........................................................................ 47
The image is clipped ............................................................................ 47
10 Front-panel error messages
11 HP Customer Care
Contact HP Support .............................................................................. 53
Telephone numbers .............................................................. 53
Index .................................................................................................... 57
iv ENWW
Page 6

1
Introduction
Safety precautions
The following precautions ensure the proper use of the printer and prevent the printer
from being damaged. Follow these precautions at all times.
Use the power supply voltage specified on the nameplate. Avoid overloading
●
the printer's electrical outlet with multiple devices.
Ensure the printer is well-grounded. Failure to ground the printer may result in
●
electrical shock, fire, and susceptibility to electromagnetic interference.
Do not disassemble or repair the printer yourself. Contact your local HP Service
●
Representative for service, see
Use only the electrical cord supplied by HP with the printer. Do not damage,
●
cut, or repair the power cord. A damaged power cord has risk of fire and
electric shock. Replace a damaged power cord with an HP-approved power
cord.
Do not allow metal or liquids (except those used in HP Cleaning Kits) to touch
●
the internal parts of the printer. Doing so may cause fire, electric shock, or other
serious hazards.
Power OFF the printer and unplug the power cable from the power outlet in any
●
of the following cases:
When placing your hands inside the printer
●
If there is smoke or an unusual smell coming from the printer
●
If the printer is making an unusual noise not heard during normal operation
●
A piece of metal or a liquid (not part of cleaning and maintenance routines)
●
touches internal parts of the printer
During an electrical (thunder/lightning) storm
●
During a power failure.
●
HP Start-Up Kit
The HP Start-Up Kit is the CD or DVD that comes with your printer; it contains the
printer's software and documentation, including introductory multimedia tutorials to
help you to get a good first print.
Introduction
Contact HP Support on page 53.
ENWW
NOTE: The HP Start-Up Kit is provided on CD in Japan, and on DVD
elsewhere in the world. The rest of this guide refers to the DVD version only.
Safety precautions
1
Page 7
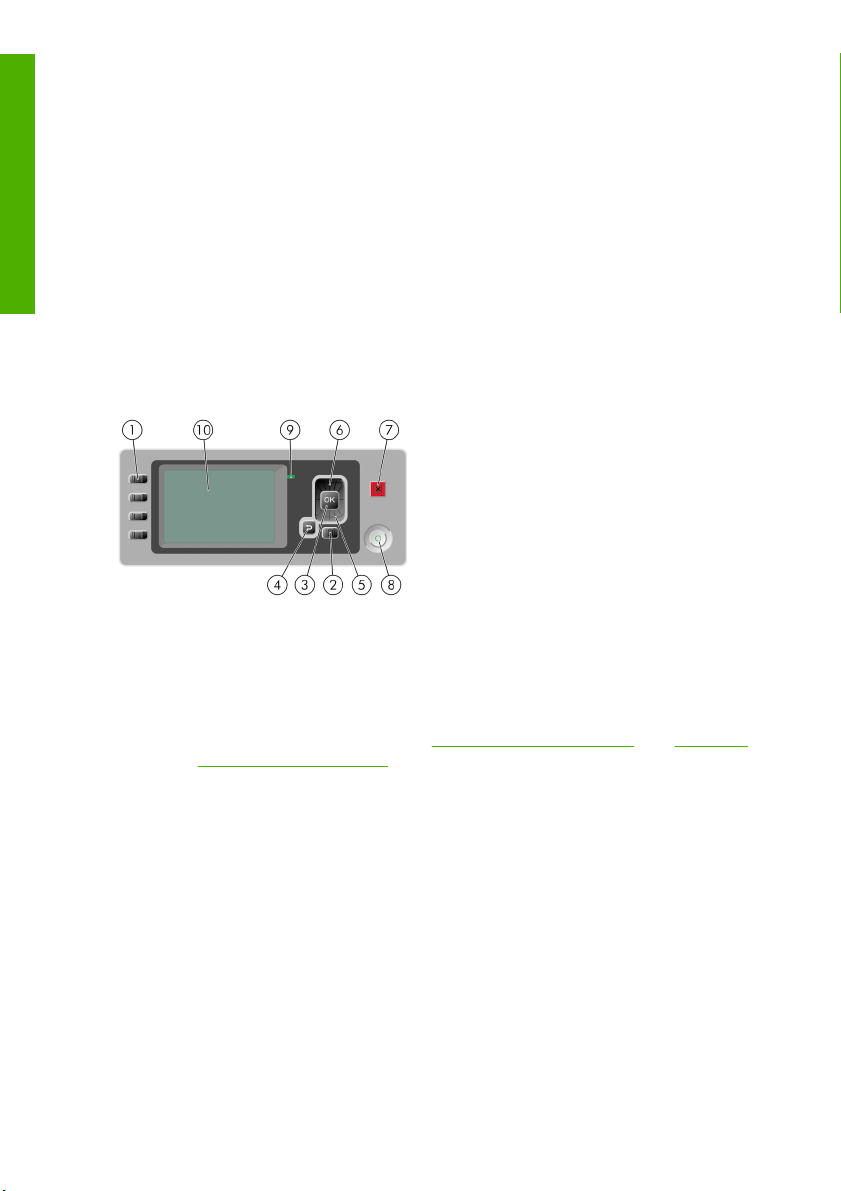
The front panel
Introduction
Your printer's front panel is located on the front of the printer, in the center. It has the
following important functions:
●
●
●
●
●
●
The front panel has the following components:
1.
2. Menu key - Press to return to the main menu of the front-panel display. If you are
3. OK key - To confirm an action while in a procedure or interaction. To enter in
4. Back key - To go to the previous step in a procedure or interaction. To go to the
5. Down key - To go down in a menu or option, or to decrease a value, for example
Assists you in troubleshooting issues
Is used to perform certain procedures, such as cutting and unloading paper
Displays helpful animations to guide you through procedures
Displays up-to-date information about the status of the printer such as, the ink
cartridges, the printheads, the paper, and the print jobs
Displays warning and error messages, when appropriate, along with audio
alerts to call attention to a warning or message
Can be used to change the values of printer settings and thus change the
operation of the printer. However, settings in the front panel are overridden by
settings in the printer drivers, see Using your printer on DVD
Direct access keys:
First key: View ink levels, see Using your printer on DVD
●
Second key: View loaded paper, see Using your printer on DVD
●
Third key: Unload paper, see
●
single sheet on page 22
Fourth key: Form feed and cut, see Using your printer on DVD
●
already on the main menu it displays the status screen.
a submenu in the menu. To select a value when given an option.
upper level, or leave the option in the menu, or when given an option.
when configuring the front-panel display contrast or the IP address.
Unload a roll on page 17 and Unload a
2 Chapter 1 Introduction ENWW
Page 8

6. Up key - To go up in a menu or option, or to increase a value, for example when
configuring the front-panel display contrast or the IP address.
7. Cancel key - To abort a procedure or interaction.
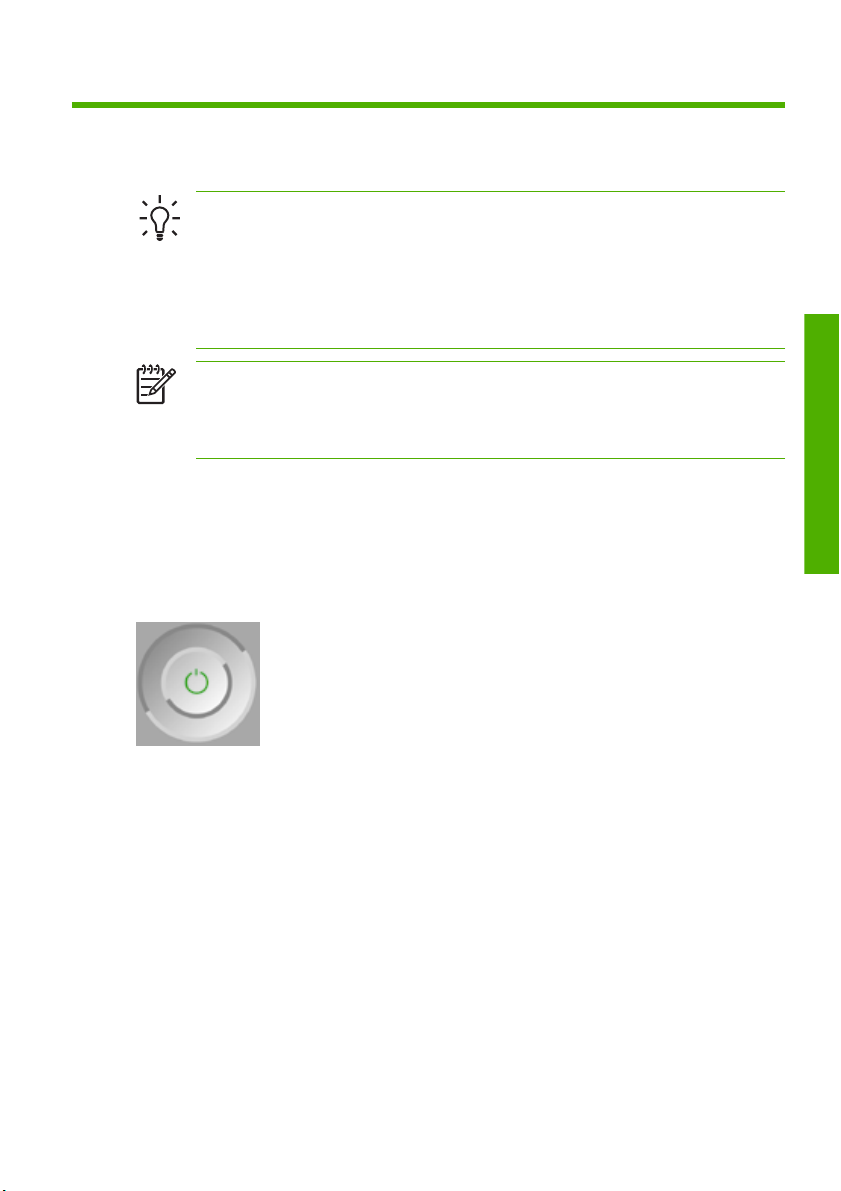
8. Power key - To turn the printer off or on, it also has a light to indicate the printer's
status. If the power key light is off the device is off. If the power key light is
blinking green, the device is starting up. If the power key light is green on, the
device is on. If the power key light is amber on, the device is in standby. If the
power key light is blinking amber, the device needs attention.
9. LED light - Indicates the printer's status. If the LED light is solid green, the device
is ready. If it is flashing green, the device is busy. If it is solid amber, there is a
system error. If it is flashing amber, the printer needs attention.
10. Front-panel display - Displays errors, warnings, and information on using your
printer.
To highlight an item in the front-panel display, press the Up or Down key until the
item is highlighted.
To select an item in the front-panel display, first highlight it and then press the OK
key.
When this guide shows a series of front-panel display items like this: Item1 >
Item2 > Item3, it means that you should select Item1, then select Item2, then
select Item3.
Information about specific uses of the front panel can be found throughout this guide.
Printer software
The following software is provided with your printer:
The PCL3 raster driver
●
The RTL and HP-GL/2 driver for Windows
●
The PostScript driver
●
The HP Easy Printer Care (Windows) or HP Printer Utility (Mac OS), see
●
HP Easy Printer Care (Windows) or HP Printer Utility (Mac OS) on page 6,
allows you to:
Manage the printer including color with the HP Color Center
●
Manage the job queue, see Using your printer on DVD
●
View the status of the ink cartridges, the printheads, and the paper
●
View job accounting information, see Using your printer on DVD
●
Update the printer's firmware, see
●
Access the HP Knowledge Center
●
Change various printer settings (in the Settings tab)
●
Perform calibrations and troubleshooting
●
Introduction
Access
Update the firmware on page 33
ENWW
Printer software
3
Page 9

The Embedded Web Server, runs in the printer and enables you to use a Web
Introduction
●
browser on any computer to check ink levels and printer status, see
Access the
Embedded Web Server on page 7.
Advanced Profiling Solution included on separate DVD, to be installed after
●
other HP software (drivers and printer utilities).
4 Chapter 1 Introduction ENWW
Page 10
2
Personalizing the printer
Turn printer on and off
TIP: The printer is Energy Star compliant and can be left powered on
without wasting energy. Leaving it on improves response time and overall
system reliability. When the printer has not been used for a certain period of
time (30 minutes by default), it saves power by going into sleep mode.
However, any interaction with the printer's front-panel display returns it to
active mode, and it can resume printing immediately. To change the sleep
mode time, see Using your printer on DVD.
NOTE: In sleep mode, the printer performs maintenance service to the
printheads from time to time. This avoids long preparation times after long
idle periods. Therefore, it is strongly recommended to leave the printer
powered on or in sleep mode to avoid wasting ink and time.
The printer has three levels of power consumption.
Plugged in: the power cord is plugged into the back of the printer
●
Switched on: the switch at the back of the printer is in the on position
●
Powered on: the Power key on the front panel shows a green light
●
If you wish to turn the printer on or off or reset the printer, the normal and
recommended method is to use the Power key on the front panel.
Personal settings
ENWW
However, if you plan to store the printer indefinitely or the Power key does not seem
to work, you are recommended to power it off using the Power key, and then also
switch off the power switch at the rear.
Turn printer on and off
5
Page 11
Personal settings
To turn it back on, use the power switch at the rear.
When the printer is powered back on, it takes about three minutes to initialize and
check and prepare the printheads. Preparing the printheads takes about one minute
and 15 seconds. However, if the printer has been off for six weeks or more, preparing
the printheads could take up to 55 minutes.
Access HP Easy Printer Care (Windows) or HP Printer
Utility (Mac OS)
HP Easy Printer Care (Windows) or HP Printer Utility (Mac OS) enables you to
manage your printer from a computer with a USB connection or TCP/IP.
Under Windows, start HP Easy Printer Care from your desktop shortcut or
●
from Start > All Programs > Hewlett-Packard > HP Easy Printer
Care > Start HP Easy Printer Care. This launches HP Easy Printer Care
showing the printers installed.
Under Mac OS, launch the Mac Printer Utility by selecting STARTUP_DISK
●
> Library > Printers > hp > Utilities > HP Printer Utility. This launches
the HP Printer Selector where you need to add your printer by clicking More
Printers.
Select your printer and click Launch Utility. This launches the HP Printer Utility.
6 Chapter 2 Personalizing the printer ENWW
Page 12
If you have followed these instructions but failed to get through to HP Easy Printer
Care (Windows) or HP Printer Utility (Mac OS), see Using your printer on DVD.
Access the Embedded Web Server
The Embedded Web Server enables you to manage your printer remotely using an
ordinary Web browser running on any computer.
NOTE: To use the Embedded Web Server, you must have a TCP/IP
connection to your printer.
The following browsers are known to be compatible with the Embedded Web Server:
Internet Explorer 5.5 or later, for Windows
●
Internet Explorer 5.1 or later, for Mac OS X
●
Netscape Navigator 6.01 or later
●
Mozilla 1.5 or later
●
Mozilla Firefox 1.0 or later
●
Safari
●
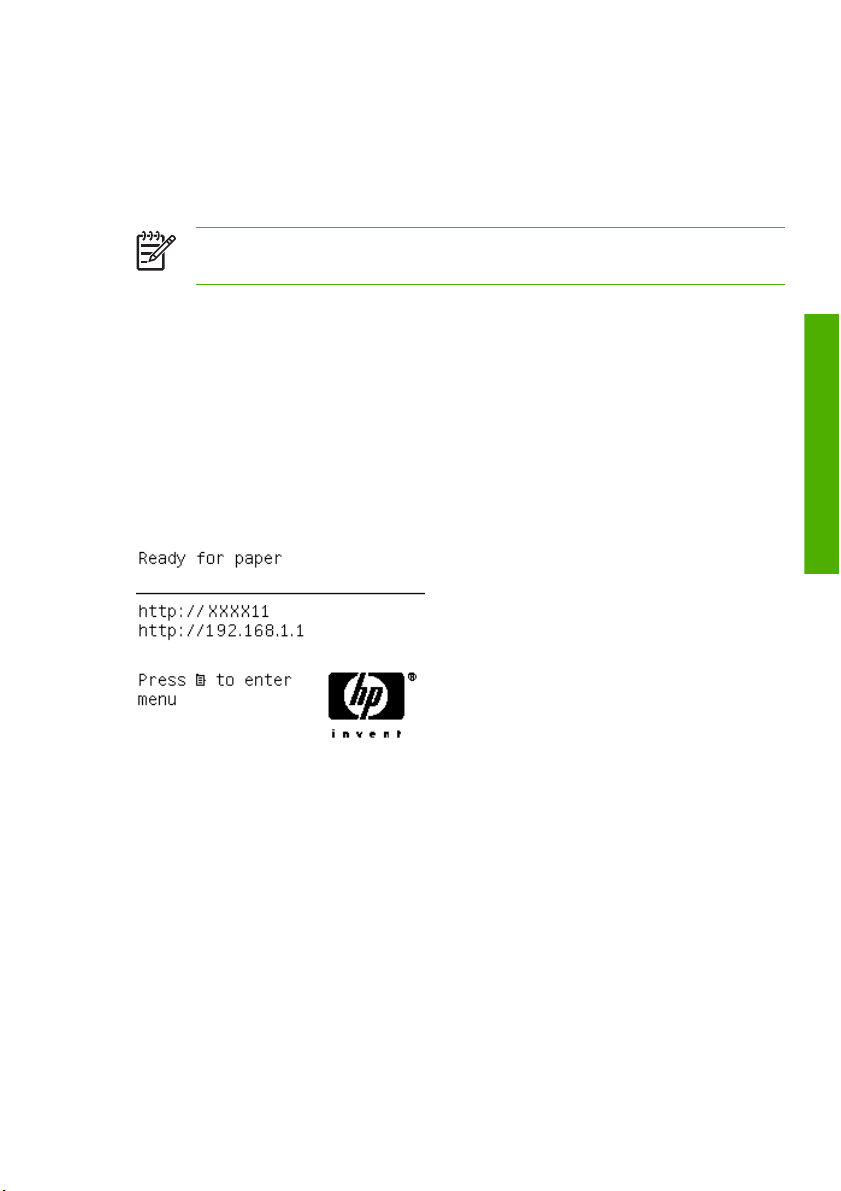
To access the Embedded Web Server on any computer, open your Web browser
and give the address of your printer. You can find out the address of your printer
(starting with http:) from the front-panel display, by looking at the status screen.
Personal settings
ENWW
If you have followed these instructions but failed to get through to the Embedded Web
Server, see Using your printer on DVD.
Access the Embedded Web Server
7
Page 13

Personal settings
8 Chapter 2 Personalizing the printer ENWW
Page 14

3
Paper handling
Choose which spindle to use
Ensure you use the correct spindle. The illustrations in the Load a roll onto the
spindle on page 10 procedure and the Load a roll into the printer on page 12
procedure show the black spindle. You must use the gray spindle if you are loading
the following categories and types of rolled papers wider than 36 in (91.5 cm).
Paper category Paper type
Bond and Coated Paper Plain Paper
Bond and Coated Paper Bright White Bond Paper
Bond and Coated Paper Coated Paper
Technical Paper Natural Tracing Paper
Technical Paper Translucent Bond
Technical Paper Vellum
TIP: If you are a regular user of different paper types, you can change rolls
more quickly if you preload rolls of different paper types on different spindles.
Extra spindles are available for purchase, see
Accessories on page 35.
ENWW
Choose which spindle to use
Paper handling
9
Page 15
Load a roll onto the spindle
CAUTION: Ensure the sheet tray is closed.
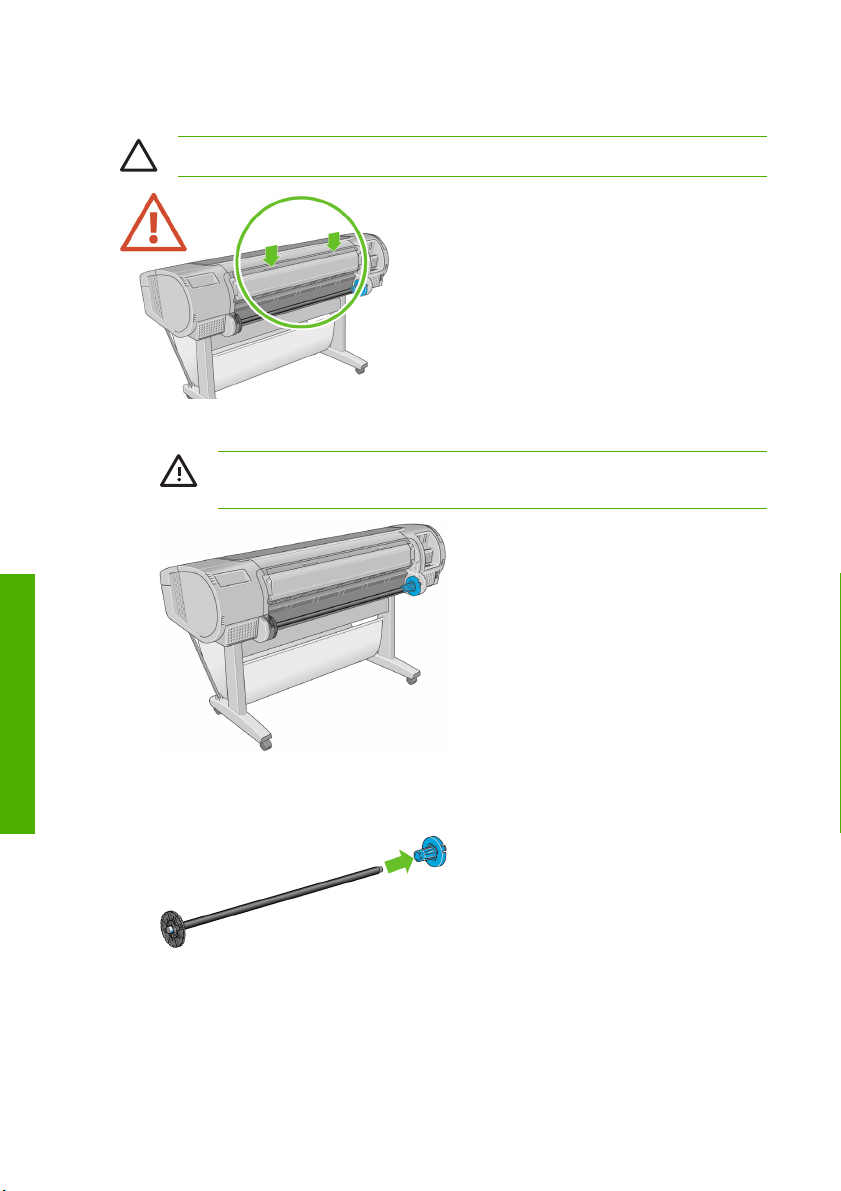
1. Remove the right-hand end of the spindle from the printer, then the other end.
WARNING! Do not insert your fingers into the spindle supports
during the removal process.
Paper handling
2. The spindle has a stop at each end to keep the roll in position. The blue stop
can be removed to mount a new roll; it slides along the spindle to hold rolls of
different widths. Remove the blue paper stop from the end of the spindle.
10 Chapter 3 Paper handling ENWW
Page 16
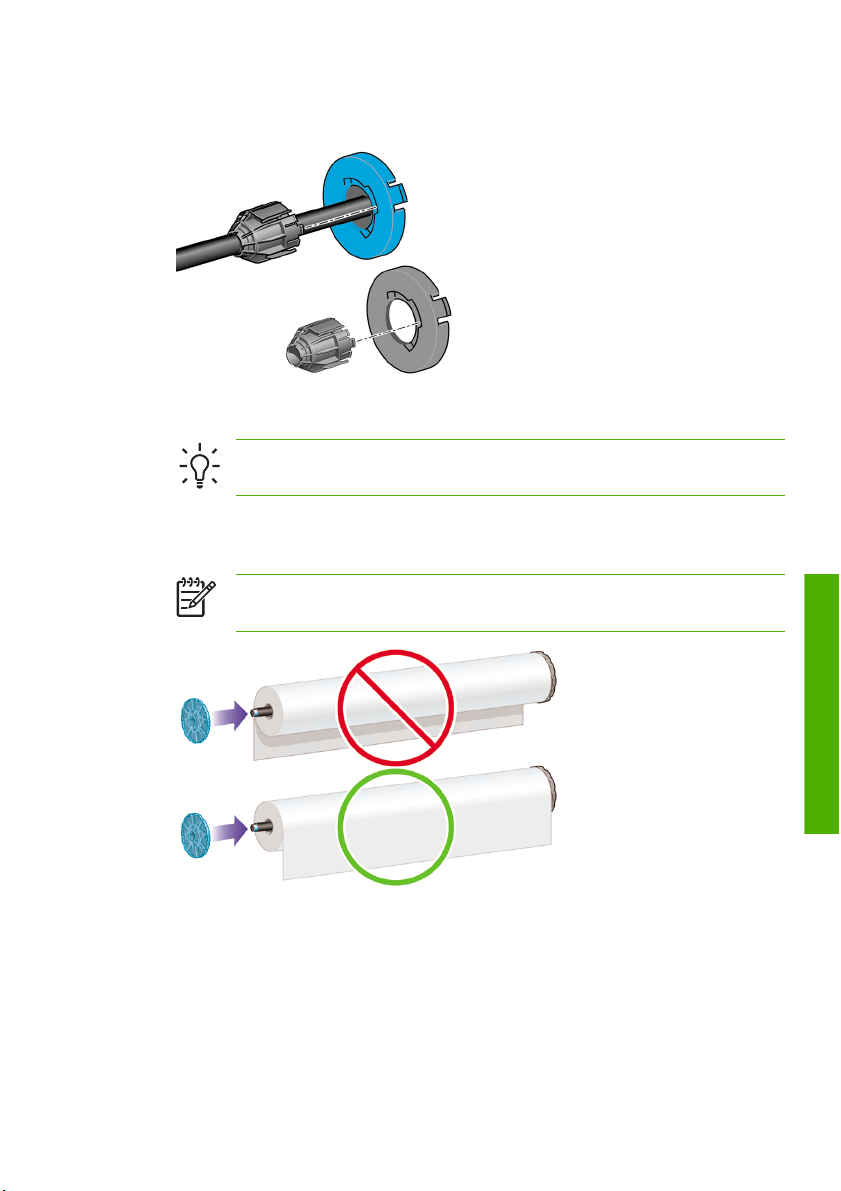
3. If your roll has a three-inch cardboard core, ensure that the core adaptors
supplied with the printer have been installed.
4. If the roll is long; rest the spindle horizontally on a table and load the roll on
the table.
TIP: You may need two people to handle a large roll.
5. Slide the new roll onto the spindle. Make sure the paper type is oriented as
shown. If it is not, remove the roll, turn it 180 degrees and slide it back on to
the spindle. There are labels on the spindle showing the correct orientation.
NOTE: From the back of the printer, the blue stopper is inserted into
the right-side holder.
ENWW
Ensure both ends of the roll are as close to the spindle stops as possible.
Load a roll onto the spindle
Paper handling
11
Page 17
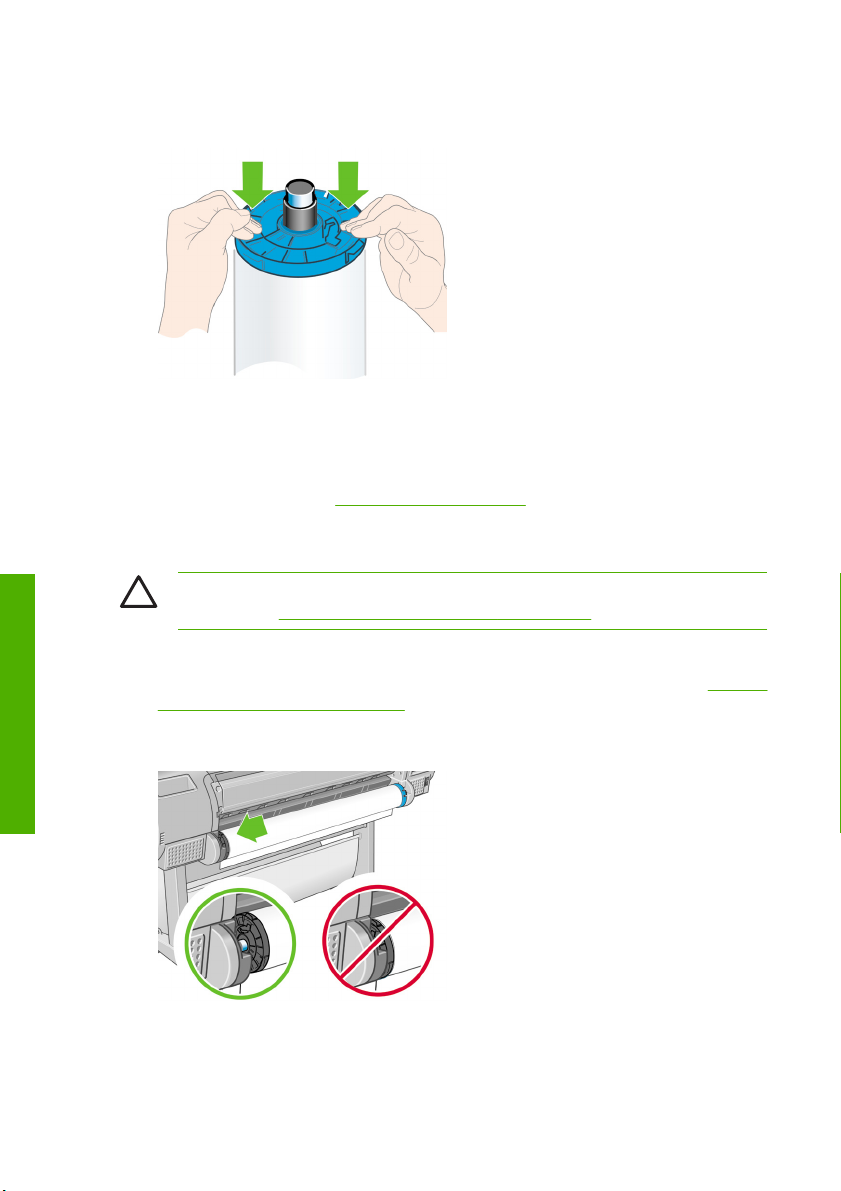
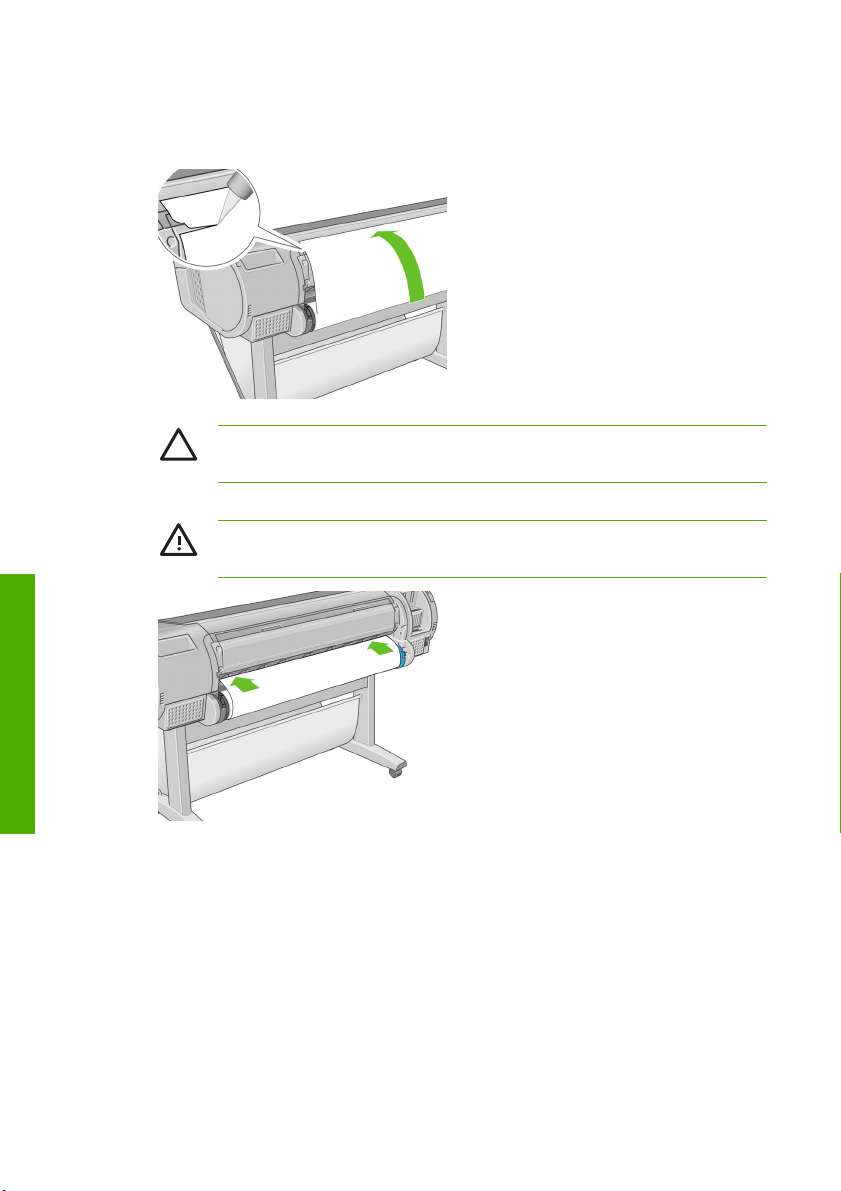
6. Put the blue paper stop on to the open end of the spindle, and push it towards
the end of the roll.
7. Ensure the blue paper stop is pushed in as far as it goes; until both ends are
against the stoppers.
If you are a regular user of different paper types, you can change rolls more quickly
if you preload rolls of different paper types on different spindles. Extra spindles are
available for purchase, see
Load a roll into the printer
There are two ways to load a roll. The easy loading procedure is recommended.
CAUTION: To start these procedures you must have a roll loaded on the
Paper handling
spindle. See
Easy loading procedure
1. Check that you are using the correct spindle for your type of paper, see Choose
which spindle to use on page 9.
2. Standing behind the printer, rest the spindle's black end on the left side roll
holder. Do not put the end completely into the roll holder.
Load a roll onto the spindle on page 10.
Accessories on page 35.
12 Chapter 3 Paper handling ENWW
Page 18
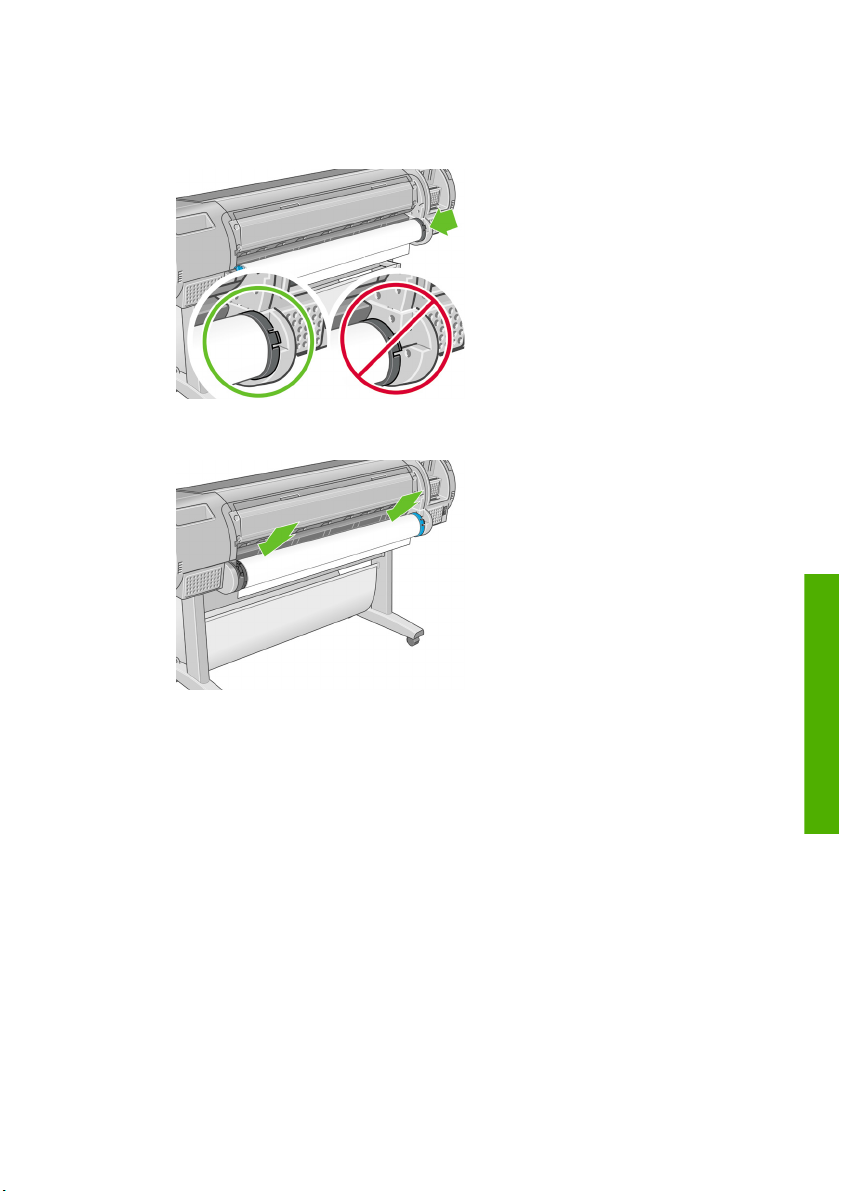
3. Rest the blue end of the spindle on the right side roll holder. If you are loading
the gray spindle, ensure the rounded side of the spindle top is resting on the roll
holder.
With both hands, push the spindle into both roll holders at the same time. The
4.
spindle snaps into place.
ENWW
Load a roll into the printer
Paper handling
13
Page 19
Paper handling
5. If the edge of the roll is torn (sometimes due to tape used to hold end of the roll)
or not straight, pull paper slightly beyond the cutting groove and use a cutter to
cut a straight edge.
CAUTION: Cut the paper as straight as possible, as uneven paper
does not load correctly.
6. Insert the edge of the paper into the feeder.
WARNING! Do not push your fingers inside the printer's paper path,
the results may be painful.
14 Chapter 3 Paper handling ENWW
Page 20
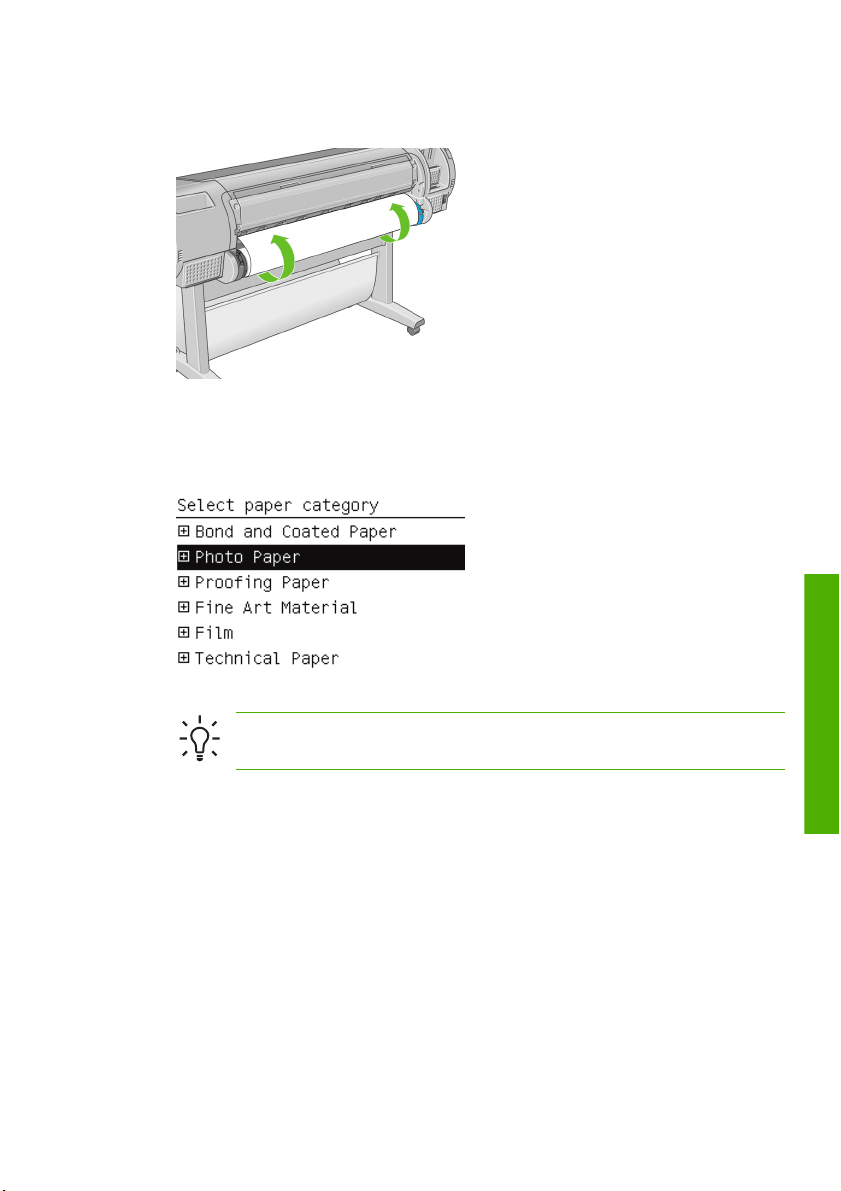
7. Roll the spindle into the feeder until you feel resistance. The printer detects the
paper and feeds it automatically into the printer.
8. Once the paper is fed into the printer, the front-panel display asks if you are
loading a roll or a sheet. Select Roll with the Up and Down keys and press
OK.
9. Select your paper category and type.
ENWW
TIP: If you have loaded a paper type whose name does not appear
in the paper list, see Using your printer on DVD.
10. The printer checks the alignment and measures the width.
11. Look at the front panel; you may find some instructions there.
12. When the roll is aligned, the front panel displays the Ready message and the
printer is ready to print. If the roll is not aligned, follow the instructions on the
front-panel display.
Load a roll into the printer
15
Paper handling
Page 21

13. If the paper is loose on the roll, lightly rewind from the end of the spindle until
tight.
NOTE: If you have an unexpected issue at any stage of the paper loading
process, see Using your printer on DVD.
TIP: When prints fall into the basket, they can be torn or get ink marks from
other prints. To avoid this, catch your prints as they are cut from the roll and
do not stack prints in the basket or turn off the automatic cutter, see Using
your printer on DVD, and use the Form feed and cut key to release your print.
Paper menu procedure
Paper handling
As an alternative you can use the paper menu to start the paper loading process.
1. Follow steps one through five of the
2. Press the Menu key to return to the main menu, select the Paper menu icon
Easy loading procedure on page 12.
.
3. Select Paper load.
4. Select Load roll.
16 Chapter 3 Paper handling ENWW
Page 22

5. Select your paper category and type.
6. Continue with step six of the easy loading process, skipping steps eight and
nine.
TIP: When prints fall into the basket, they can be torn or get ink marks from
other prints. To avoid this, catch your prints as they are cut from the roll and
do not stack prints in the basket or turn off the automatic cutter, see Using
your printer on DVD, and use the Form feed and cut key to release your print.
Unload a roll
Before unloading a roll, check whether there is paper on the roll or if the roll is out
of paper, and follow the appropriate procedure as described below.
CAUTION: Do not touch the paper while the printer is printing, as it causes
image quality defects.
TIP: If you have loaded a paper type whose name does not appear
in the paper list, see Using your printer on DVD.
Unload paper key procedure with paper on the roll
If there is paper on the roll, use the following procedure.
1. Press the Unload paper key on the front panel.
2. When prompted by the front-panel display, lift the blue lever on the left.
3. When prompted by the front-panel display, lightly rewind the paper from the
end of the spindle until removed from the printer.
4. When prompted by the front-panel display, lower the blue lever.
ENWW
Unload a roll
Paper handling
17
Page 23

Paper menu procedure with paper on the roll
If there is paper on the roll, you can also start the process from the paper menu in
the front panel's main menu.
1. Press the Menu key to return to the main menu, select the Paper menu icon
.
2. Select Unload paper.
3. Continue from step two of the Unload paper key process.
Roll out of paper procedure
If the end of the paper is no longer attached to the roll use the following procedure.
1. If you have already started the unload process, press the Cancel key on the front
panel to cancel that procedure.
2. Lift the blue lever on the left. If the front panel displays a warning about the lever,
Paper handling
ignore it.
3. Pull out the paper from the printer. Pull from wherever the paper is accessible;
the back of the printer is recommended.
4. Lower the blue lever.
5. If the front panel displays a warning message, press the OK key to clear it.
Load a single sheet
There are two ways to load a sheet. The easy loading procedure is recommended.
CAUTION: Any loaded roll or sheet must be unloaded before loading a
sheet, see
on page 22.
CAUTION: For sheets thicker than 0.5mm, you must have space behind
the printer equal to the length of the sheet.
18 Chapter 3 Paper handling ENWW
Unload a roll on page 17, and Unload a single sheet
Page 24

Easy loading procedure
1. Standing in front of the printer, open the sheet tray. If the sheet is long, extend
the right extension. If the sheet is also wide extend the left extension.
TIP: If the tray is difficult to open, try opening from behind the printer.
NOTE: The extensions are seven cm and snap in place.
Insert the sheet into the feeder. Load your sheet aligned with the load line and
2.
insert until the paper cannot continue, with thicker sheets you feel resistance.
The printer detects the sheet in three seconds. A countdown begins on the frontpanel display.
ENWW
WARNING! Do not to push your fingers inside the printer's paper
path.
3. After the countdown, the paper feeds into the printer. Guide the sheet into the
printer; this is especially important with thicker papers.
4. The front-panel display asks if you are loading a roll or a sheet. Select Sheet
with the Up and Down keys.
Load a single sheet
Paper handling
19
Page 25

Paper handling
5. Enter your paper category and type.
TIP: If you have loaded a paper type whose name does not appear
in the paper list, see Using your printer on DVD.
6. The printer checks the alignment and measures the sheet.
NOTE: Depending on the length of the sheet, it feeds out the front of
the printer.
7. If the paper has been loaded successfully, the front panel displays the Ready
message and the printer ready to print. If the paper is not straight, follow the
instructions on the front-panel display.
NOTE: When correctly loaded, the sheet is in the back of the printer.
NOTE: If you have an unexpected problem at any stage of the paper
loading process, see Using your printer on DVD.
Paper menu procedure
As an alternative you can use the paper menu to start the paper loading process
1. Perform step one of the easy loading procedure.
20 Chapter 3 Paper handling ENWW
Page 26

2. Press the Menu key to return to the main menu and select the Paper menu icon
.
3. Select Paper load.
4. Select Load sheet.
ENWW
Load a single sheet
Paper handling
21
Page 27

5. Select your paper category and type.
TIP: If you have loaded a paper type whose name does not appear
in the paper list, see Using your printer on DVD.
6. Continue with step two of the easy loading procedure, skipping steps four and
five.
Unload a single sheet
To unload a sheet without printing, use the Unload paper key or the paper menu
procedure.
NOTE: To unload a single sheet after printing, you can simply pull the sheet
free from the front of the printer.
Paper handling
CAUTION: Do not touch the paper while the printer is printing, as it causes
image quality defects.
Unload paper key procedure
1. Press the Unload paper key on the front panel.
The sheet unloads out the front of the printer, either catch it manually or allow
2.
it to fall in the basket.
22 Chapter 3 Paper handling ENWW
Page 28

Paper menu procedure
You can also unload a sheet from the paper menu.
1. Press the Menu key to return to the main menu and select the Paper menu icon
.
2. Select Unload paper. The sheet unloads out of the front of the printer, either
catch it manually or allow it to fall in the basket.
ENWW
Unload a single sheet
Paper handling
23
Page 29

Paper handling
24 Chapter 3 Paper handling ENWW
Page 30

4
Printing
Select print quality
The printer has various print-quality options because best-quality printing requires
some loss of speed, while fast printing implies some reduction in print quality.
Therefore, the standard print-quality selector is a slider that allows you to choose
between quality and speed.
Alternatively, you can select from the custom options: Best, Normal, and Fast.
There are also three supplementary custom options that may have an effect on print
quality: Maximum detail, More passes, and Gloss enhancer. See Using
your printer on DVD.
NOTE: In the Windows driver dialog, the rendering resolution for your job
is displayed in the Custom Print Quality Options dialog box. In the Mac OS
Print dialog, it is displayed in the Summary panel.
You can select print-quality options in the following ways:
In the Windows driver dialog: go to the Paper/Quality tab and look
●
at the Print Quality section. If you select Standard Options, you will see a
simple slider with which you can select speed or quality. If you select Custom
Options, you will see the more specific options described above.
In the Mac OS Print dialog (PostScript driver): go to the Image
●
Quality panel. If you select Standard quality options, you will see a simple
slider with which you can select speed or quality. If you select Custom quality
options, you will see the more specific options described above.
In the Mac OS Print dialog (PCL driver): go to the Paper Type/
●
Quality panel and select Paper. If you select Standard quality options, you
will see a simple slider with which you can select speed or quality. If you
select Custom quality options, you will see the more specific options described
above.
On the Embedded Web Server's Submit Job page: select Basic
●
settings > Print quality. If you then select Standard options, you can
choose between Speed and Quality. If you select Custom options, you will
see the more specific options described above.
●
Using the front panel: select the Setup menu icon
preferences > Print quality.
, then Printing
ENWW
NOTE: If you have set the print quality from your computer, that
overrides the print-quality setting in the front panel.
Select print quality
Printing
25
Page 31

Select paper size
The paper size can be specified in the following ways.
In the Windows driver dialog: select the Paper/Quality tab, then
●
Document Size.
In the Mac OS Page Setup dialog: select your printer in the Format
●
for popup menu, then Paper Size.
On the Embedded Web Server's Submit Job page: select Advanced
●
settings > Paper > Page size > Standard.
●
Using the front panel: select the Setup menu icon
preferences > Paper > Select paper size.
Custom paper sizes
To choose a non-standard paper size not shown in the list of paper sizes:
Under Windows, there are two different ways:
●
●
●
Under Mac OS X 10.4: select Paper Size > Manage Custom Sizes in
●
Printing
the Page Setup dialog.
Under Mac OS X 10.2 or 10.3: select Settings > Custom Paper
●
Size from the Page Setup dialog.
On the Embedded Web Server's Submit Job page: select Advanced
●
settings > Paper > Page size > Custom.
NOTE: You cannot change the print quality of pages that the printer is
already receiving or has already received (even if they have not started to
print yet).
NOTE: The paper size specified here should be the paper size in which
the document was created. It is possible to rescale the document to a different
size for printing. See Using your printer on DVD.
, then Printing
NOTE: If you have set the paper size from your computer, that
overrides the paper size setting in the front panel.
In the driver dialog, select Custom from the paper size list in the Paper/
Quality tab, then specify the paper dimensions, then click Save to save
your new paper size. To see your new custom size in the list of custom
sizes, you need to exit the printer properties, then reenter them and use
the More button.
From the Start menu, select Printers and Faxes, then from the File
menu select Server Properties. In the Forms tab, check the Create a
new form box, specify the name and dimensions of the new form, then
click Save Form.
26 Chapter 4 Printing ENWW
Page 32

Select margins options
By default, the printer leaves a 5 mm margin between the edges of your image and
the edges of the paper (17 mm at the foot of a sheet of paper). However, you can
change this behavior in several ways.
In the Windows driver dialog: select the Paper/Quality tab and then
●
the Layout button.
In the Mac OS Print dialog (PostScript driver): select the Finishing
●
panel and then Layout.
In the Mac OS Print dialog (PCL driver): select the Paper Type/
●
Quality panel and then Layout.
On the Embedded Web Server's Submit Job page: select Advanced
●
settings > Paper > Layout/Margins.
You will then see at least some of the following options.
NOTE: Under Mac OS, the available margins options depend on the
paper size selected in the Page Setup dialog. For instance, for borderless
printing you must select a paper size name that includes the words “no
margins”.
Standard. Your image will be printed on a page of the size you have selected,
●
with a narrow margin between the edges of the image and the edges of the
paper. The image should be small enough to fit between the margins.
Oversize. Your image will be printed on a page slightly larger than the size
●
you have selected. If you cut off the margins, you will be left with a page of the
size you selected, with no margins remaining between your image and the
edges of the paper.
Clip Contents By Margins. Your image will be printed on a page of the size
●
you have selected, with a narrow margin between the edges of the image and
the edges of the paper. In this case, if the image is the same size as the page,
the printer assumes that the extreme edges of the image are either white or
unimportant, and do not need to be printed. This may be useful when your
image already contains a border.
Borderless. Your image will be printed on a page of the size you have
●
selected, with no margins. The image is slightly enlarged to ensure that no
margin is left between the edges of the image and the edges of the paper. If
you select Automatically by Printer, this enlargement is done
automatically. If you select Manually in Application, you must select a
custom page size slightly larger than the page on which you intend to print. See
also Using your printer on DVD.
Print with shortcuts
The printer driver provides many options that can be set to different values when
printing a particular job. A printing shortcut stores the values of all these options that
Printing
ENWW
Select margins options
27
Page 33

are appropriate for a particular kind of job, so that you can set them all with a single
click. Some settings (such as paper size, paper source, and orientation) may be
overridden by the values provided by your application.
To use a shortcut, select the Printing Shortcuts tab in the Windows driver dialog.
NOTE: Shortcuts are available only under Windows.
You can see a list of available shortcuts; select the one that matches the kind of job
you want to print.
The driver options are now adjusted to suit your job. You can either print immediately,
or examine the settings to check that you agree with them. If you like, you can select
a shortcut and then change some of its settings manually.
TIP: Check at least the settings that you can see in the Printing
Shortcuts tab: the document size, orientation, etc.
The Factory Defaults shortcut contains the printer's default settings. When you click
on it, it sets all options to their default values.
Printing shortcuts can be customized to your particular needs. To create your own
shortcut:
1. Select the shortcut that comes closest to satisfying your requirements.
Printing
2. Change any value in the Printing Shortcuts tab and/or other tabs.
3. Save the new printing shortcut.
If you decide later that you no longer want a shortcut, you can delete it.
28 Chapter 4 Printing ENWW
Page 34

Preview a print
Previewing a print on the screen allows you to check the layout of the print before
printing, which may help you to avoid wasting paper and ink on a bad print.
To preview a print under Windows, you have the following options:
●
Use your application's print preview option.
●
Check the Show preview before printing option, which you can find
●
in the driver's Printing Shortcuts tab, Paper/Quality tab, and
Features tab. The preview is shown before printing; you can check the
print settings and the layout of the image, and then click Print to proceed
with printing or Cancel to cancel the job.
ENWW
To preview a print under Mac OS, you have the following options:
●
Use your application's print preview option.
●
Click the Preview button at the bottom of the Print dialog box. This is the
●
basic print preview provided by Mac OS.
If you are using the PostScript driver, check the Show print preview
●
option, which you can find in the driver's Printing dialog, in the
Finishing panel.
Preview a print
Printing
29
Page 35

If you are using the PCL driver, click the PDF button at the bottom of the
●
Print dialog box, then click HP Print Preview. This provides a preview
with more features, such as the ability to change paper size, paper type,
and print quality, and to rotate the image. See below:
NOTE: HP Print Preview is not available if you are using Adobe
InDesign, Adobe Illustrator, Adobe Reader, or Apple Aperture.
To preview a print using the Embedded Web Server, select Basic settings
●
> Hold for preview.
Printing
30 Chapter 4 Printing ENWW
Page 36

5
Color management
Color calibration
Color calibration enables your printer to produce consistent colors with the particular
printheads, inks, and paper type that you are using, and under your particular
environmental conditions. After color calibration, you can expect to get identical
prints from any two different printers situated in different geographical locations.
Calibration should be done in any of the following circumstances:
Whenever a printhead is replaced
●
Whenever a new paper type is introduced that has not yet been calibrated with
●
the current set of printheads
Whenever a certain amount of printing has been done since the last calibration
●
Whenever the printer has been turned off for a long period of time
●
Whenever the environmental conditions (temperature and humidity) change
●
significantly
The printer driver usually reminds you with an alert whenever you need to perform
color calibration, unless you have disabled the alerts. However, there will be no alert
if the environmental conditions change.
You can check the color calibration status of the currently loaded paper at any time
by pressing the View loaded paper key on the front panel. The status may be one of
the following:
PENDING: the paper has not been calibrated.
●
NOTE: Whenever you update the printer's firmware, the color
calibration status of all papers is reset to PENDING. See
firmware on page 33.
Color management
Update the
ENWW
OBSOLETE: the paper has been calibrated, but the calibration is now out of
●
date for one of the reasons mentioned above, and should be repeated.
OK: the paper has been calibrated, and the calibration is up to date.
●
N/A: this paper cannot be calibrated.
●
NOTE: Color calibration cannot be performed on plain paper, nor on
any kind of transparent material.
You can also check the color calibration status by using HP Easy Printer Care
(Windows) or HP Printer Utility (Mac OS).
You should calibrate a paper type before creating its color profile; however, you can
later recalibrate without needing to recreate the color profile.
Color calibration
31
Page 37

Color management
You can start color calibration in the following ways:
From the printer driver alert that recommends calibration.
●
From the HP Color Center: select Calibrate Your Printer.
●
●
From the front panel: select the Image Quality Maintenance menu icon
then Calibrate color.
The calibration process is fully automatic and can be performed unattended after you
have loaded paper of the type you wish to calibrate—which should be A4, Letter, or
any larger size.
The process takes about 8–10 minutes and consists of the following steps.
1. A calibration chart is printed, which contains patches of each ink used in your
printer.
,
2. The chart is allowed to dry for a period of time that depends on the paper type,
so that the colors have time to stabilize.
3. The chart is scanned and measured using the HP Embedded Spectrophotometer.
4. From the measurements made by the spectrophotometer, the printer calculates
the necessary correction factors to apply for consistent color printing on that
paper type. It also calculates the maximum amount of each ink that can be
applied to the paper.
32 Chapter 5 Color management ENWW
Page 38

6
Maintaining the printer
Clean the exterior of the printer
Clean the outside of the printer and all other parts of the printer that you regularly
touch as part of normal operation with a damp sponge or a soft cloth and a mild
household cleaner such as non-abrasive liquid soap.
WARNING! To avoid an electric shock, make sure that the printer is turned
off and unplugged before you clean it. Do not let water get inside the printer.
CAUTION: Do not use abrasive cleaners on the printer.
Maintain the ink cartridges
During the normal lifetime of a cartridge, no specific maintenance is required.
However, in order to maintain the best print quality, replace a cartridge when it
reaches its expiration date. The printer's front panel notifies you when any cartridge
reaches its expiration date.
You can also check a cartridge's expiration date at any time: see Using your
printer on DVD.
Update the firmware
The printer's various functions are controlled by software that resides in the printer,
otherwise known as firmware.
From time to time firmware updates will be available from Hewlett-Packard. These
updates increase the printer's functionality and enhance its features.
Firmware updates can be downloaded from the Internet and installed in your printer
in the following ways; you can choose whichever you find most convenient.
Using HP Easy Printer Care under Windows, select your printer, the Support
●
tab, and then Firmware Update.
Using HP Printer Utility under Mac OS, select Support and then Firmware
●
Update.
Using your printer's Embedded Web Server, select the Setup tab and then
●
Firmware update.
In each case, follow the instructions on your screen to download the firmware file
and store it on your hard disk. Then select the downloaded file and click Update.
Maintaining the printer
ENWW
Clean the exterior of the printer
33
Page 39

If you experience very slow progress while uploading the firmware file to the printer,
the reason could be that you are using a proxy server. In that case, try bypassing the
proxy server and accessing the Embedded Web Server directly.
In Internet Explorer 6 for Windows, go to Tools > Internet Options >
●
Connections > LAN Settings, and check the Bypass proxy server for
local addresses box. Alternatively, for more precise control, click the
Advanced button and add the printer's IP address to the list of exceptions, for
which the proxy server is not used.
In Safari for Mac OS, go to Safari > Preferences > Advanced and click
●
the Proxies: Change Settings button. Add the printer's IP address or its
Maintaining the printer
domain name to the list of exceptions, for which the proxy server is not used.
The firmware includes a set of the most commonly used paper profiles. Extra paper
profiles can be downloaded separately; see Using your printer on DVD.
34 Chapter 6 Maintaining the printer ENWW
Page 40

7
Accessories
How to order supplies and accessories
There are two alternative ways to order supplies or accessories for your printer:
Visit
●
●
The rest of this chapter lists the available supplies and accessories, and their part
numbers.
Order ink supplies
The following ink supplies can be ordered for your printer.
Table 7-1 Ink cartridges
Cartridge Part number
HP 70 Matte Black 130 ml Ink Cartridge C9448A
HP 70 Photo Black 130 ml Ink Cartridge C9449A
HP 70 Gray 130 ml Ink Cartridge C9450A
HP 70 Light Gray 130 ml Ink Cartridge C9451A
HP 70 Magenta 130 ml Ink Cartridge C9453A
HP 70 Yellow 130 ml Ink Cartridge C9454A
HP 70 Light Magenta 130 ml Ink Cartridge C9455A
HP 70 Red 130 ml Ink Cartridge C9456A
HP 70 Green 130 ml Ink Cartridge C9457A
HP 70 Blue 130 ml Ink Cartridge C9458A
HP 70 Gloss Enhancer 130 ml Ink Cartridge C9459A
HP 70 Light Cyan 130 ml Ink Cartridge C9390A
HP 70 Matte Black 130 ml Ink Cartridge Twin Pack CB339A
HP 70 Photo Black 130 ml Ink Cartridge Twin Pack CB340A
HP 70 Gray 130 ml Ink Cartridge Twin Pack CB341A
HP 70 Light Gray 130 ml Ink Cartridge Twin Pack CB342A
HP 70 Magenta 130 ml Ink Cartridge Twin Pack CB344A
http://www.hp.com/go/designjetz3100_order/ on the Web.
Contact HP Support (see
Contact HP Support on page 53).
Accessories
ENWW
How to order supplies and accessories
35
Page 41

Table 7-1 Ink cartridges (continued)
Cartridge Part number
HP 70 Yellow 130 ml Ink Cartridge Twin Pack CB345A
HP 70 Light Magenta 130 ml Ink Cartridge Twin Pack CB346A
HP 70 Red 130 ml Ink Cartridge Twin Pack CB347A
HP 70 Green 130 ml Ink Cartridge Twin Pack CB348A
HP 70 Blue 130 ml Ink Cartridge Twin Pack CB349A
HP 70 Gloss Enhancer 130 ml Ink Cartridge Twin Pack CB350A
HP 70 Light Cyan 130 ml Ink Cartridge Twin Pack CB351A
Table 7-2 Printheads
Printhead Part number
HP 70 Light Magenta & Light Cyan Printhead C9405A
HP 70 Magenta & Yellow Printhead C9406A
HP 70 Photo Black & Light Gray Printhead C9407A
HP 70 Blue & Green Printhead C9408A
HP 70 Matte Black & Red Printhead C9409A
Accessories
HP 70 Gloss Enhancer & Gray Printhead C9410A
Order paper
The following paper categories are currently available for use with your printer.
HP Photographic Paper
●
HP Fine Art Printing Material
●
HP Proofing Paper
●
HP Banner and Sign Material
●
HP Backlit Material
●
HP Self-Adhesive Material and Laminate
●
HP Bond and Coated Paper
●
Specific paper types are likely to change over the course of time. For full details and
the latest information, see
36 Chapter 7 Accessories ENWW
http://www.hp.com/go/designjet/supplies/.
Page 42

Non-recommended paper types
In many cases, paper types that HP does not support may nevertheless be compatible
with your printer. However, the following paper types are unlikely to give satisfactory
results:
Photo paper that swells
●
Brochure paper
●
Order accessories
The following accessories can be ordered for your printer.
Name Product number
HP Designjet Z2100/Z3100 24 inch Stand Q6663A
HP Designjet Z2100/Z3100 24 inch Spindle Q6700A
HP Designjet Z2100/Z3100 44 inch Spindle for Graphics Q6699A
HP Designjet Z2100/Z3100 44 inch Spindle for Technical Q6698A
EFI Designjet Edition 5.1 for HP XL International Q6643D
EFI Designjet Edition 5.1 for HP XL Japan Q6644D
HP Jetdirect 625n Gigabit Ethernet Print Server J7960A, J7960G
HP Jetdirect 635n IPv6/IPsec Print Server J7961A, J7961G
ENWW
How to order supplies and accessories
Accessories
37
Page 43

Accessories
38 Chapter 7 Accessories ENWW
Page 44

8
Troubleshooting paper issues
The paper has jammed
When a paper jam occurs, you normally see the Possible paper jam message in
the front-panel display.
1. Power off the printer at the front panel and also switch it off at the rear.
2. Open the window.
3. Try to move the printhead carriage out of the way.
ENWW
The paper has jammed
Paper issues
39
Page 45

4. Lift the blue lever as far up as it goes.
5. Carefully remove any of the jammed paper that you can lift up and out from the
top of the printer.
6. Standing behind the printer, rewind the roll or pull the cut sheet from the printer.
If you cannot see the paper, return to the front of the printer and remove it from
the output tray.
CAUTION: Do not move the paper sideways, as it could damage the
printer.
Paper issues
40 Chapter 8 Troubleshooting paper issues ENWW
Page 46

7. Carefully remove all small pieces of paper.
8. Lower the blue lever.
9. Close transparent window.
ENWW
The paper has jammed
Paper issues
41
Page 47

10. Switch on the printer.
11. Reload the roll, or load a new sheet. See Load a roll into the printer
on page 12 or Load a single sheet on page 18.
NOTE: If you find that there is still some paper causing an obstruction within
the printer, restart the procedure and carefully remove all pieces of paper.
Paper issues
42 Chapter 8 Troubleshooting paper issues ENWW
Page 48

9
Troubleshooting print-quality issues
General advice
When you have any print-quality problem:
To achieve the best performance from your printer, use only genuine
●
manufacturer's supplies and accessories, whose reliability and performance
have been thoroughly tested to give trouble-free performance and best-quality
prints. For details of recommended papers, see
Make sure that the paper type selected in the front panel is the same as the
●
paper type loaded into the printer. To check this, use the View loaded paper
key on the front panel. At the same time, check that the paper type has been
calibrated. Also make sure that the paper type selected in your software is the
same as the paper type loaded into the printer.
CAUTION: If you have the wrong paper type selected, you could
experience poor print quality and incorrect colors, and perhaps even
damage to the printheads.
Check that you are using the most appropriate print-quality settings for your
●
purposes (see
you have moved the print-quality slider to the 'Speed' end of the scale, or set
the custom quality level to Fast.
Check that your environmental conditions (temperature, humidity) are in the
●
recommended range. See Using your printer on DVD.
Check that your ink cartridges and printheads have not passed their expiration
●
dates: see
Avoid touching the paper while printing is in progress.
●
Print-quality issues
Order paper on page 36.
Printing on page 25). You are likely to see lower print quality if
Maintain the ink cartridges on page 33.
ENWW
General advice
43
Page 49

Print-quality issues
Horizontal lines across the image (banding)
If your printed image suffers from added horizontal lines as shown (the color may
vary):
1. Check that the paper type you have loaded corresponds to the paper type
selected in the front panel and in your software. To check on the front panel,
use the View loaded paper key.
2. Check that you are using appropriate print-quality settings for your purposes
Printing on page 25). In some cases, you can overcome a print-quality
(see
problem merely by selecting a higher print-quality level. For instance, if you have
set the Print Quality slider to Speed, try setting it to Quality; if you have
already set it to Quality, try selecting custom options and then More
Passes. If you change the print-quality settings, you may wish to reprint your
job at this point in case the problem has been solved.
3. Print the Image Diagnostics Print. See Using your printer on DVD.
4. If the printheads are working correctly, go to the front panel and press the View
loaded paper key to see the paper advance calibration status. If the status is
RECOMMENDED, you should perform paper advance calibration: see Using
your printer on DVD.
If the problem persists despite all the above actions, contact your customer service
representative for further support.
44 Chapter 9 Troubleshooting print-quality issues ENWW
Page 50

The whole image is blurry or grainy
1. Check that the paper type you have loaded corresponds to the paper type
selected in the front panel and in your software. To check on the front panel,
use the View loaded paper key.
2. Check that you are printing on the correct side of the paper.
Check that you are using appropriate print-quality settings (see
3.
on page 25). In some cases, you can overcome a print-quality problem merely
by selecting a higher print-quality level. For instance, if you have set the Print
Quality slider to Speed, try setting it to Quality; if you have already set it
to Quality, try selecting custom options and then More Passes. If you change
the print-quality settings, you may wish to reprint your job at this point in case
the problem has been solved.
If you are using gloss enhancer, you can reduce grain by turning it off. Select
4.
the custom print quality options, and set Gloss Enhancer to Off.
5. Try aligning the printheads. See Using your printer on DVD. After alignment,
you may wish to reprint your job in case the problem has been solved.
6. Go to the front panel and press the View loaded paper key to see the paper
advance calibration status. If the status is RECOMMENDED, you should perform
paper advance calibration: see Using your printer on DVD.
If the problem persists despite all the above actions, contact your customer service
representative for further support.
Print-quality issues
Printing
ENWW
The whole image is blurry or grainy
45
Page 51

Print-quality issues
Colors are inaccurate
If the colors of your print do not match your expectations, try the following:
1. Check that the paper type you have loaded corresponds to the paper type
selected in the front panel and in your software. To check on the front panel,
use the View loaded paper key. At the same time, check the color calibration
status. If the status is PENDING or OBSOLETE, you should perform color
calibration: see
you may wish to reprint your job in case the problem has been solved.
2. Check that you are printing on the correct side of the paper.
3. Check that you are using appropriate print-quality settings (see
on page 25). If you have selected the Speed or Fast options, you may not get
the most accurate colors. If you change the print-quality settings, you may wish
to reprint your job at this point in case the problem has been solved.
If you are using Application Color Management, check that the color profile you
4.
are using corresponds to the selected paper type and print-quality settings. If
you have doubts about which color settings to use, see
on page 31. If you need to create a color profile, see Using your printer on
DVD.
5. If you try to do color management in your application and also in the printer,
your results will be wrong. You should manage colors in the application or in
the printer, but not in both.
6. If the problem consists of color differences between your print and your monitor,
please follow the instructions in the “How to calibrate your monitor” section of
the HP Color Center. At this point, you may wish to reprint your job in case the
problem has been solved.
Print the Image Diagnostics Print. See Using your printer on DVD.
7.
If the problem persists despite all the above actions, contact your customer service
representative for further support.
Color calibration on page 31. If you have made any changes,
Printing
Color management
46 Chapter 9 Troubleshooting print-quality issues ENWW
Page 52

Color accuracy using EPS or PDF images in page layout
applications
Page layout applications such as Adobe InDesign and QuarkXPress do not support
color management of EPS, PDF, or grayscale files.
If you have to use such files, try to ensure that the EPS, PDF, or grayscale images are
already in the same color space that you intend to use later on in Adobe InDesign
or QuarkXPress. For instance, if your final goal is to print the job in a press that follows
the SWOP standard, convert the image into SWOP when you create it.
The image is clipped
Clipping normally indicates a discrepancy between the actual printable area on the
loaded paper and the printable area as understood by your software. You can often
identify this kind of problem before printing by previewing your print (see
print on page 29).
Check the actual printable area for the paper size you have loaded.
●
printable area = paper size – margins
Check what your software understands to be the printable area (which it may
●
call "printing area" or "imageable area"). For example, some software
applications assume standard printable areas that are larger than those used
in this printer.
If you have defined a custom page size with very narrow margins, the printer
●
may impose its own minimal margins, clipping your image slightly. You may
want to consider using a larger paper size, or borderless printing (see
margins options on page 27).
If your image contains its own margins, you may be able to print it successfully
●
by using the Clip Contents by Margins option (see
options on page 27).
If you are trying to print a very long image on a roll, check that your software
●
is capable of printing an image of that size.
You may have asked to rotate the page from portrait to landscape on a paper
●
size that is not wide enough.
If necessary, reduce the size of the image or document in your software
●
application, so it fits between the margins.
There is another possible explanation for a clipped image. Some applications, such
as Adobe Photoshop, Adobe Illustrator, and CorelDRAW, use an internal 16-bit
coordinate system which means that they cannot handle an image of more than
32,768 pixels. If you try to print an image larger than this from these applications,
Select margins
Print-quality issues
Preview a
Select
ENWW
The image is clipped
47
Page 53

Print-quality issues
the bottom of the image will be clipped. To print the whole image, try these
suggestions:
Try using the PostScript printer driver to print your job, if you have not already
●
tried it.
Reduce the resolution so that the whole image requires fewer than 32,768
●
pixels. The PCL and HP-GL/2 drivers for Windows include an option called 16bit App. Compatibility, which can be used to reduce the resolution of such
images automatically. You can find this option in the Advanced tab, under
Document Options > Printer Features.
Save the file in another format, such as TIFF or EPS, and open it with another
●
application.
Use a RIP to print the file.
●
48 Chapter 9 Troubleshooting print-quality issues ENWW
Page 54

10
Front-panel error messages
Occasionally you may see one of the following messages appear on the front-panel
display. If so, please follow the advice in the Recommendation column.
If you see an error message that does not appear here, and you feel in doubt about
the correct response, contact HP Support. See
Table 10-1 Text messages
Message Recommendation
Contact HP Support on page 53.
[Color] cartridge has expired Replace the cartridge. See Using your printer on
[Color] cartridge is missing Insert a cartridge of the correct color. See Using
[Color] cartridge is out of ink Replace the cartridge. See Using your printer on
[Color] printhead #[n] error: not present Insert the correct printhead. See Using your printer
[Color] printhead #[n] error: please remove Remove the incorrect printhead and insert a new
[Color] printhead #[n] error: replace Remove the non-functional printhead and insert a
[Color] printhead #[n] error: reseat Remove and reinsert the same printhead, or try
[Color] printhead #[n] out of warranty The printhead's warranty has ended, because of the
[Color] printhead #[n] warranty warning The printhead's warranty may be invalidated by the
IO error Restart the printer. If the problem persists, contact
IO warning Try again; if the problem persists, contact HP
Paper advance calibration pending Perform paper advance calibration. See Using your
DVD.
your printer on DVD.
DVD.
on DVD.
printhead of the correct type (color and number).
See Using your printer on DVD.
new printhead. See Using your printer on DVD.
cleaning the electrical connections. If necessary,
insert a new printhead. See Using your printer on
DVD.
length of time it has been in operation or because
of the volume of ink used. See Legal Information.
use of the wrong kind of ink. See Legal
Information.
HP Support. See
on page 53.
Support. See
printer on DVD.
Contact HP Support
Contact HP Support on page 53.
Front-panel errors
ENWW 49
Page 55

Front-panel errors
Table 10-1 Text messages (continued)
Message Recommendation
Paper too small to print paper advance calibration Unload paper and load larger paper.
Paper too small to scan paper advance calibration Unload paper and load larger paper.
PDL Error: Ink system not ready Clean the printheads. See Using your printer on
PDL Error: Job clipped The image is too large for the paper or for the
PDL Error: memory full Restart the printer and try resending the job; if
PDL Error: out of paper Load more paper.
PDL Error: parsing error The print job is unintelligible to the printer. Try to
PDL Error: print mode error The paper type or print quality specified for the job
PDL Error: printing error Try sending the job again.
PDL Error: virtual memory full Restart the printer and try resending the job; if
Printhead alignment error: paper too small Unload paper and load larger paper.
Replace [color] cartridge Replace the cartridge. See Using your printer on
Reseat [color] cartridge Remove and reinsert the same cartridge. See Using
Update: failed. Invalid file Make sure that you have selected the correct
DVD.
printer. Load larger paper if possible, or reduce the
image size.
necessary, reduce the complexity of the job.
recreate and resend it. Check your cable
connections.
are incorrect. Change the loaded paper type or the
print settings.
necessary, reduce the complexity of the job.
DVD.
your printer on DVD.
firmware update file. Then try again to perform the
update.
Table 10-2 Numerical error codes
Error code Recommendation
01.0, 01.1, 01.2 Restart the printer. If the problem persists, contact HP Support. See Contact HP
21, 21.1, 22.0, 22.1,
22.2, 22.3, 24
50 Chapter 10 Front-panel error messages ENWW
Support on page 53.
Restart the printer. If the problem persists, contact HP Support. See Contact HP
Support on page 53.
Page 56

Table 10-2 Numerical error codes (continued)
Error code Recommendation
52:01 The printer needs internal cleaning. See Using your printer on DVD. If the
61:01 The file format is wrong and the printer cannot process the job. Check the
62, 63, 64, 65, 67 Update your printer's firmware. See Update the firmware on page 33.
74.1 Try the firmware update again. Do not try to use your computer while the update
79 Restart the printer. If the problem persists, contact HP Support. See Contact HP
94, 94.1 Restart color calibration. See Color calibration on page 31.
problem persists, contact HP Support. See
graphic language setting of your printer (see Using your printer on DVD). If you
are sending PostScript from Mac OS over a USB connection, select ASCII
encoding in both the driver and the application. Check for the latest firmware
and driver releases.
is in progress. If the problem persists, contact HP Support. See
Support on page 53.
Support on page 53.
Contact HP Support on page 53.
Contact HP
Front-panel errors
ENWW 51
Page 57

Front-panel errors
52 Chapter 10 Front-panel error messages ENWW
Page 58

11
HP Customer Care
Contact HP Support
HP Support is available to you by telephone. What to do before you call:
Review the troubleshooting suggestions in this guide.
●
Review the relevant driver documentation.
●
If you have installed third-party software drivers and RIPs, see their
●
documentation.
If you call one of the Hewlett-Packard offices, please have the following
●
information available to help us answer your questions more quickly:
The printer you are using (the product number and the serial number, found
●
on the label at the back of the printer)
If there is an error code on the front panel, note it down; see
●
error messages on page 49
The printer's Service ID: at the front panel, select the Information menu icon
●
, then View printer information
The computer you are using
●
Any special equipment or software you are using (for example, spoolers,
●
networks, switch-boxes, modems, or special software drivers)
The cable you are using (by part number) and where you purchased it
●
The type of interface used on your printer (USB or network)
●
The software name and version you are currently using
●
If possible, print out the following reports; you may be asked to fax them
●
to the support center helping you: Configuration, Usage Report, and “all
pages above” from Service Information (see Using your printer on DVD)
Telephone numbers
An up-to-date list of HP Support telephone numbers is available on the Web: please
http://welcome.hp.com/country/us/en/wwcontact_us.html. If you have no
visit
access to the Web, try one of the numbers below.
Algeria: 213 17 63 80
●
Argentina: 0 800 777 HP INVENT, local 5411 4778 8380
●
Australia: 13 10 47
●
Austria: 0810 00 10 00
●
Bahrain: 800 171
●
Belgium: (0) 78 600 600
●
Bolivia: 0 800 1110, local 54 11 4708 1600
●
Front-panel
HP Customer Care
ENWW
Contact HP Support
53
Page 59

HP Customer Care
Brazil: 0800 157 751, local 55 11 3747 7799
●
Canada: 1 800 HP INVENT
●
Caribbean: 1 800 711 2884
●
Central America: 1 800 711 2884
●
Chile: 800 HP INVENT, 123 800 360 999
●
China: 800 810 59 59, 10 6564 59 59
●
Colombia: 01 8000 51 HP INVENT, local 571 606 9191
●
Czech Republic: 420 261 307 310
●
Denmark: 70 11 77 00
●
Ecuador: 999 119, 1 800 225 528
●
Egypt: 202 532 5222
●
Finland: 0203 53232
●
France: 08 26 10 49 49
●
Germany: 0180 52 58 143
●
Greece: 210 6073603, 801 11 22 55 47
●
Guadaloupe: 0800 99 00 11, 877 219 8791
●
Guatemala: 1 800 999 5105, 1 800 711 2884
●
Hong Kong: 852 3002 8555
●
Hungary: 06 1 382 1111
●
India: 1 600 112 267
●
Indonesia: 350 3408
●
Ireland: 1 890 946500
●
Israel: 09 830 4848
●
Italy: 02 3859 1212
●
Jamaica: 0 800 711 2884
●
Japan: software 0120 014121, hardware 0120 742594
●
Korea: 82 1588 3003
●
Luxembourg: 27 303 303
●
Malaysia: 1 800 80 5405
●
Martinique: 0 800 99 00, 877 219 8671
●
Mexico: 01 800 472 6684, local 5258 9922
●
Middle East: 4 366 2020
●
Morocco: 2240 4747
●
Netherlands: 0900 1170 000
●
New Zealand: 09 365 9805
●
54 Chapter 11 HP Customer Care ENWW
Page 60

Norway: 800 62 800
●
Paraguay: 00 811 800, 800 711 2884
●
Panama: 001 800 711 2884
●
Peru: 0 800 10111
●
Philippines: 632 888 6100
●
Poland: 22 566 6000
●
Portugal: 213 164 164
●
Puerto Rico: 1 800 652 6672
●
RSA: 27 11 258 9301, local 086 000 1030
●
Romania: 40 21 315 4442
●
Russia: 095 797 3520, 812 3467 997
●
Saudi Arabia: 6272 5300
●
Slovakia: 2 50222444
●
South Africa: 0800 001 030
●
Spain: 902 010 333
●
Sweden: 077 130 30 00
●
Switzerland: 0848 80 20 20
●
Taiwan: 886 2 872 28000
●
Thailand: 0 2353 9000
●
Tunisia: 71 89 12 22
●
Turkey: 216 444 71 71
●
UAE: 800 4520, 04 366 2020
●
Ukraine: 44 4903520
●
United Kingdom: 0870 842 2339
●
United States: 1 800 HP INVENT
●
Uruguay: 54 11 4708 1600
●
Venezuela: 0 800 HP INVENT, local 58 212 278 8000
●
Vietnam: 84 8 823 45 30
●
West Africa (French): 351 213 17 63 80
●
HP Customer Care
ENWW
Contact HP Support
55
Page 61

HP Customer Care
56 Chapter 11 HP Customer Care ENWW
Page 62

Index
A
accessories
order 37
C
calibration
color 31
clean the printer 33
clipped image 47
color
calibration 31
inaccurate 46
core adaptors 11
E
Embedded Web Server
access 7
error messages, front panel 49
F
firmware update 33
front panel 2
front panel option
calibrate color 32
load roll 16
load sheet 20
print quality 25
select paper size 26
unload paper 18, 23
view printer information 53
G
graininess 45
H
HP Start-Up Kit CD/DVD 1
HP Support 53
I
image problems
clipped image 47
ink cartridge
maintenance 33
order 35
L
load paper
choose spindle 9
roll into the printer 12
roll into the printer easy load 12
roll into the printer with paper menu 16
roll onto the spindle 10
sheet 18
sheet easy load 19
sheet with paper menu 20
M
margins 27
O
order
accessories 37
ink cartridges 35
paper 36
printheads 36
P
page size 26
paper
jammed 39
size 26
types (HP) 36
power
on/off 5
preview a print 29
print preview 29
print quality
select 25
print with shortcuts 27
print-quality problems
banding 44
general 43
graininess 45
horizontal lines 44
printer software 3
Printer Utility
access 6
printhead
order 36
ENWW
Index
57
Page 63

R
roll paper
choose spindle 9
load into the printer 12
load onto the spindle 10
unload 17
S
safety precautions 1
sheet paper
load 18
unload 22
shortcuts 27
software 3
spindle
choose spindle 9
support services
HP Support 53
T
telephone numbers 53
U
unload paper
roll out of paper 18
roll out of the printer 17
roll out of the printer with paper menu 18
roll out of the printer with Unload paper key 17
sheet 22
sheet with paper menu 23
sheet with Unload paper key 22
58 Index ENWW
Page 64

Printed on chlorine free paper
Q6660-90001
© 2007 Hewlett-Packard Development Company, L.P.
Printed in XXXXXX Imprimé en XXXXXX Stampato in XXXXXX
www.hp.com
hc
 Loading...