


HP Compaq Presario S4000NX, Compaq Presario S4010CL, Compaq Presario S4010CL-B, Compaq Presario S4010OM, Compaq Presario S4010OM-B Getting Started Guide
...b
Getting Started
Compaq Presario
S and 8000 Series Computer
This guide helps you get acquainted with the features of your computer and provides solutions to problems.
Connection locations and system components may vary.
The information in this document is subject to change without notice.
Hewlett-Packard® Company makes no warranty of any kind with regard to this material, including, but not limited to, the implied warranties of merchantability and fitness for a particular purpose.
HP shall not be liable for errors contained herein or for incidental or consequential damages in connection with the furnishing, performance, or use of this material.
HP assumes no responsibility for the use or reliability of its software on equipment that is not furnished by HP.
This document contains proprietary information that is protected by copyright. All rights are reserved. No part of this document may be photocopied, reproduced, or translated to another language without the prior written consent of HP.
Hewlett-Packard Company P.O. Box 4010
Cupertino, CA 95015-4010 USA
© 2000, 2003 Hewlett-Packard Company. All rights reserved.
Hewlett-Packard is a registered trademark of Hewlett-Packard Company in the United States of America and other countries/regions.
This product incorporates copyright protection technology that is protected by method claims of certain U.S. patents and other intellectual property rights owned by Macrovision Corporation and other rights owners. Use of this copyright protection technology must be authorized by Macrovision Corporation, and is intended for home and other limited viewing uses only unless otherwise authorized by Macrovision Corporation. Reverse engineering or disassembly is prohibited. Apparatus Claims of U.S. Patent Nos. 4,631,603, 4,577,216, 4,819,098, and 4,907,093 licensed for limited viewing uses only.
Other brand or product names are trademarks of their respective holders.
WARNING: Text set off in this manner indicates that failure to follow directions could result in bodily harm or loss of life.
CAUTION: Text set off in this manner indicates that failure to follow directions could result in damage to equipment or loss of information.
Text set off in this manner represents a note with additional information relating to a topic.

1 Setting Up the PC
Turning On the PC for the First Time . . . . . 1–2 Registering with Compaq . . . . . . . . . . . . 1–2 Recovery CDs . . . . . . . . . . . . . . . . . . . . 1–3 Working in Comfort . . . . . . . . . . . . . . . . 1–3
2 Getting Information and Updates
Warranty and Support Guide . . . . . . . . . 2–2
3 Using the PC
Using the Diskette (Floppy) Drive . . . . . . . 3–2
Using the Hard Disk Drive. . . . . . . . . . . . 3–3
Contents
Using a CD or DVD Drive . . . . . . . . . . . 3–5 Using a Combo Drive . . . . . . . . . . . . . . 3–6
Inserting and Removing
a CD or DVD Disc . . . . . . . . . . . . . . 3–7 Playing Music . . . . . . . . . . . . . . . . . 3–8 Playing a Movie . . . . . . . . . . . . . . . 3–8 Playing Video CDs . . . . . . . . . . . . . 3–9 Recording with the CD-RW Drive. . . 3–11 Recording with the
DVD Writer Drive . . . . . . . . . . . . . 3–17 Maintaining the CD
or DVD Drive . . . . . . . . . . . . . . . . 3–17
Getting Started |
v |

Using Speakers . . . . . . . . . . . . . . . . . . 3–18 Using Multi-Channel
Audio Speakers . . . . . . . . . . . . . . . 3–19 Connecting the PC to a Television . . . . . 3–24 Connecting to a TV Set . . . . . . . . . . 3–24 Viewing the PC Image on TV . . . . . . 3–26 Disabling the TV Option . . . . . . . . . 3–27 Disconnecting the TV. . . . . . . . . . . . 3–28 Using the Mouse . . . . . . . . . . . . . . . . . 3–29
Switching Mouse Button
Functions . . . . . . . . . . . . . . . . . . . . 3–31 Scrolling with the Mouse . . . . . . . . . 3–31 Panning with the Mouse . . . . . . . . . 3–32 Using the Compaq Keyboards. . . . . . . . 3–32 Using the Internet Buttons. . . . . . . . . 3–36 Customizing the Internet Buttons . . . . 3–39 Modifying Monitor Display Properties. . . 3–40 Turning Off the PC . . . . . . . . . . . . . . . . 3–41 Printing. . . . . . . . . . . . . . . . . . . . . . . . 3–41
Saving Energy . . . . . . . . . . . . . . . . . . 3–42 Standby Mode . . . . . . . . . . . . . . . 3–43 Hibernation Mode . . . . . . . . . . . . . 3–44 Setting Automatic Standby or
Hibernation Mode . . . . . . . . . . . . . 3–45
4 Using the Internet
The Basics . . . . . . . . . . . . . . . . . . . . . . 4–1
What Is the Internet? . . . . . . . . . . . . 4–2
What Is a Hyperlink? . . . . . . . . . . . . 4–2
Web Browsers . . . . . . . . . . . . . . . . 4–3
E-mail . . . . . . . . . . . . . . . . . . . . . . . . . 4–3
Restricting Internet Content. . . . . . . . . . . 4–5
5 Maintaining the PC
Routine Maintenance Guidelines . . . . . . 5–1
Preventive Maintenance. . . . . . . . . . . . . 5–2
Uninstalling Programs . . . . . . . . . . . 5–2
Removing Desktop Icons. . . . . . . . . . 5–3
vi |
Getting Started |

Cleaning Up the Hard Disk Drive . . . . 5–4
Emptying the Recycle Bin. . . . . . . . . . 5–5
Scanning the Hard Disk Drive . . . . . . 5–5
Defragmenting the Drive . . . . . . . . . . 5–6
Virus Protection . . . . . . . . . . . . . . . . . . . 5–7
6Using Application Recovery and System Recovery
Using System Restore . . . . . . . . . . . . . . . 6–2
Application Recovery . . . . . . . . . . . . . . . 6–3
System Recovery . . . . . . . . . . . . . . . . . . 6–4
Using Compaq Recovery CD Creator . . . . 6–7
System Recovery Using Recovery CDs . . . 6–8
7 Finding Help & Support
Integrated Help Tool. . . . . . . . . . . . . . . . 7–2 Preparing to Ship the PC. . . . . . . . . . . . . 7–2 Solving Minor Problems . . . . . . . . . . . . . 7–3
8 Upgrading the PC
Preparing the PC . . . . . . . . . . . . . . . . . 8–2 Removing or Upgrading a Drive . . . . . . . 8–5 Locating Drive Positions . . . . . . . . . . 8–6 Removing a Drive . . . . . . . . . . . . . . 8–7 Replacing or Adding a Drive . . . . . 8–12 Upgrading or Replacing Memory . . . . . 8–17 Removing a Memory Module . . . . . 8–17
Replacing or Adding a
Memory Module . . . . . . . . . . . . . . 8–19 Removing or Installing an
Expansion Card . . . . . . . . . . . . . . . . . 8–21 Reassembling the PC. . . . . . . . . . . . . . 8–26
Index
Getting Started |
vii |

viii |
Getting Started |

1
Follow the steps shown in the Quick Setup guide to set up the PC. Read the topics in this section describing how to turn on the PC for the first time, and finish the registration process.
Setting Up the PC
After registering, install any software programs that came on CDs or DVDs included in the PC box (select models only).
Getting Started |
1–1 |

Setting Up the PC
Turning On the
PC for the First Time
1.Press the Power button on the monitor.
2.Press the Power button on the front of the PC.
3.Click an option to select your language (if applicable for your model). Click OK, and then confirm your selection by clicking Yes.
Wait while the PC makes preparations. (It may take up to 30 minutes to set up the language on the PC.)
4.Set up Microsoft® Windows® by following the onscreen instructions.
Registering with Compaq
As part of the initial setup in some countries/regions, you are prompted to register the PC with Compaq (select models only). It’s important to register so that you can be notified of changes and updates to the Compaq Presario.
To register, either:
■Follow the onscreen instructions during the initial setup and register as soon as you have a modem connection.
Or
■If you did not register during the initial setup of your PC, double-click the registration icon on your desktop, and follow the onscreen instructions.
1–2 |
Getting Started |
Setting Up the PC
Recovery CDs
Make recovery CDs for your PC now, before a need occurs. If the hard disk drive is ever damaged, or you have to replace it, you must use recovery CDs that you create to reinstall the operating system and software. Refer to “Using Compaq Recovery CD Creator” on page 6–7.
Working in Comfort
After assembling your PC, but before you begin using it, make sure the PC and your work area are properly set up to maintain your comfort and productivity. Refer to the Safety and Comfort Guide for important ergonomic information. To view this information either:
■Click Start, All Programs, Compaq, Compaq pc tools, and then click Safety and Comfort Guide.
Or
■Type http://www.compaq.com/ergo/ into your Web Browser address box, and then press Enter on the keyboard.
Getting Started |
1–3 |

Setting Up the PC
1–4 |
Getting Started |

2
Getting Information and Updates
Use this guide as your first point of reference, and then refer to the following documents:
■Quick Setup guide
■Warranty and Support Guide
The Compaq Web site provides answers to PC support questions. You can also press the Internet Help G button on your keyboard to access the built-in Help and Support Center.
Getting Started |
2–1 |

Getting Information and Updates
When requesting PC support, include the following information in your inquiry. Write it down now for your future reference. (The serial number is on a label attached to the chassis of your PC.)
Product Name: _____________________________
Model Name: ______________________________
Serial Number: _____________________________
Date of Purchase: ___________________________
Warranty and
Support Guide
The Warranty and Support Guide describes the Compaq commitment to repair or replace parts during the PC’s warranty period and lists important Compaq telephone numbers.
2–2 |
Getting Started |

3
Using the PC
The operation of your PC is controlled by two kinds of software:
■The Microsoft Windows operating system, which governs the interaction of the PC’s hardware, peripherals, and software applications.
■Software applications, such as Microsoft Works, which perform specific functions.
Information about using applications and Microsoft Windows is in the printed manuals and online Help. For Microsoft Windows, you can also press the Internet Help G button on your keyboard to access the built-in Help and Support Center.
For additional details, see Chapter 8, “Upgrading the PC.”
Getting Started |
3–1 |
Using the PC
Using the Diskette (Floppy)
Drive
The diskette drive (select models only) uses a 3.5" diskette (or floppy disk) to store files. A diskette can hold up to 1.44 MB of data. Once information is copied onto a diskette, it remains until you delete or overwrite it.
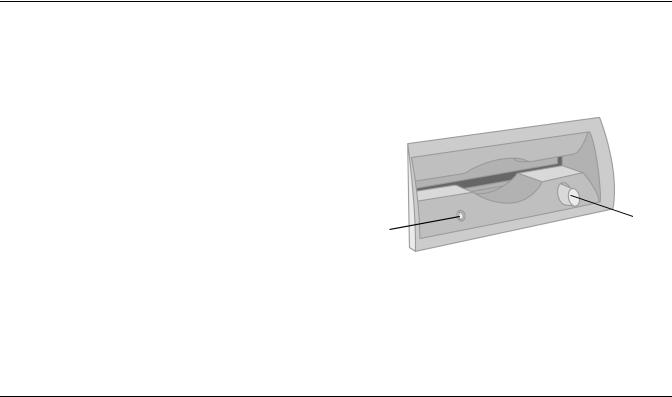
■To insert a diskette, hold it with the label facing up and the arrow on the diskette pointing toward the drive; then gently push the diskette into the drive.
 1
1
2
Inserting and removing a diskette
3–2 |
Getting Started |

Using the PC
■To remove a diskette, press the Eject button 1 on the diskette drive.
CAUTION: Wait until the diskette drive activity is complete (the activity light 2 stops glowing) before removing a diskette. Removing a diskette when the drive is reading from or writing to the diskette
can damage the diskette or the information stored on it.
Remove the diskette from the drive prior to shutting down Microsoft Windows.
Using the Hard Disk Drive
As you create and save files, download information from the Internet, install applications, or receive e-mail messages and attachments, your hard disk drive storage space diminishes. The amount of information you can store on your PC’s hard disk drive depends on the size of the drive.
The PC comes with a hard disk drive that is preloaded with software programs and a partition within the hard disk drive that takes up a certain amount of space on the hard disk drive.
The system recovery image is in a partition area of the hard disk drive; this disk space is not available for your use.
Getting Started |
3–3 |

Using the PC
The partition:
■Houses a backup version of the operating system and the programs included with the PC.
■Takes up about 5 GB of hard disk drive space, reducing the total amount of space available for your use.
To check the available space:
1.Click the Start button.
2.Click My Computer.
3.Click the hard disk drive you are checking, usually labeled (C:).
The amount of free space is listed in the Details area.
To learn how to perform maintenance tasks for the hard disk drive, such as uninstalling unneeded programs or defragmenting the hard disk drive, go to “Preventive Maintenance” on page 5–2.
3–4 |
Getting Started |

Using the PC
Using a CD or DVD Drive
Your PC may have one or two optical drives, depending on the model you purchased.
Comparison of Drives and Actions
Allows you to |
CD-ROM |
CD-RW |
DVD-ROM |
DVD+RW/+R |
Play CDs, CD-Rs, and CD-RWs |
• |
• |
• |
• |
|
|
|
|
|
Write/Re-write music or data onto |
|
• |
|
• |
a CD |
|
|
|
|
|
|
|
|
|
Play DVDs |
|
|
• |
• |
|
|
|
|
|
Create DVDs |
|
|
|
• |
|
|
|
|
|
DVD-ROM and DVD+RW/+R drives take longer to begin playback than CD drives because they must determine the type of media being played.
A DVD+R disc is compatible with more DVD set-top players than a DVD+RW disc.
Getting Started |
3–5 |

Using the PC
Using a Combo Drive
Some PCs have a combination drive (known as a combo drive), which combines the functions of two drives into one. These drives feature either a DVD+RW/+R drive and a CD-RW drive, or a DVD-ROM and a CD-RW drive.
If you insert:
■A software program CD, it is available for use.
■A music CD, a window opens for the program that plays CDs. See “Playing Music”
on page 3–8.
■A DVD movie, the Video window and InterVideo WinDVD Player control panel open. See “Playing a Movie” on page 3–8.
■A blank CD-R or CD-RW disc, use RecordNow CD/DVD Writer to copy audio or data files.
■A blank DVD, a program opens for you to use to record to the disc. See “Recording with the DVD Writer Drive” on page 3–17.
3–6 |
Getting Started |

Using the PC
Inserting and Removing a CD or DVD Disc
Your PC must be turned on before you can insert or remove a CD or DVD disc.
1. Press the Load/Eject button.
Inserting a CD or DVD disc
2.Carefully lift the disc from the disc case. Hold the disc by the edges and the center hole only, to avoid touching the surface.
3.Place the disc, label side facing up, into the round area of the tray. Be sure that the disc lies flat in the tray.
4.Press the Load/Eject button.
To remove the disc, press the
Load/Eject button to open the drive.
Getting Started |
3–7 |

Using the PC
Playing Music
1.Insert a CD or DVD disc.
2.Wait for the disc to start playing. If the disc does not play automatically, follow the onscreen instructions.
3.When you are finished listening, press the Load/Eject button to open the drive tray.
Playing a Movie
You can play a DVD movie only in a DVD-ROM or DVD+RW/+R drive.
1. Insert a DVD disc.
For best performance, close all other programs before playing a DVD movie.
2.Wait for the DVD to start playing automatically. If it does not, follow these steps.
a.Click the Start button on your Windows desktop.
b.Choose All Programs, InterVideo WinDVD Player, and then InterVideo WinDVD 4.
c.Click the Play button to start the movie.
3.Press the Load/Eject button to eject the DVD from the drive when you are finished.
3–8 |
Getting Started |

Using the PC
Playing Video CDs
VCDs (video compact discs) can be played in a PC that has a CD or DVD drive by using InterVideo WinDVD or Windows Media Player programs.
The InterVideo WinDVD program is included only with PC models that have a DVD drive.
To play the VCD with InterVideo WinDVD:
1.Insert the VCD into your CD or DVD drive.
2.Click Start.
3.Choose All Programs, InterVideo WinDVD Player, and then click
InterVideo WinDVD 4. The VCD Player control panel opens, and the VCD starts to play.
If the VCD is dual-language, see “Playing Dual-Language Video CDs” on page 3–10 to select a specific language.
To play a VCD with Windows Media Player:
1.Insert the VCD into your CD or DVD drive.
2.Click Start.
3.Choose All Programs, and then click
Windows Media Player.
4.Click the File menu, and then click Open.
5.Click the drop-down arrow next to the Look In window, and then select the drive that has the VCD.
6.Double-click the MPEGAV folder. If nothing appears in the folder, select All files from the Files of type drop-down list.
Getting Started |
3–9 |

Using the PC
7.Select the file, and then click Open. Your VCD begins playing.
If the VCD is dual-language, see “Playing Dual-Language Video CDs” on page 3–10 to select a specific language.
Playing Dual-Language Video CDs
If you have a dual-language VCD, you must select the language you want to hear, or both languages play at the same time.
To select a language:
1.Start the VCD as described in “Playing Video CDs” on page 3–9.
2.Double-click the Volume icon on the taskbar.
3.Under Volume Control Balance, move the slider bar all the way to the right or to the left, depending on the language you want to hear.
4.Close the Volume Control window.
If you change the Volume Control Balance setting on your PC to hear a specific language on a VCD, sound comes from either the left or right channel (speaker). After the VCD is finished, to hear sound from both speakers again, double-click the Volume icon on the taskbar and then move the Balance slider bar back to the center.
3–10 |
Getting Started |

Using the PC
Recording with the CD-RW Drive
Compaq provides CD burning software (select models only) to assist you with creating CDs.
Uses of the CD-RW Drive
You can create |
To |
|
|
An audio CD |
Create personal music CDs with your favorite music tracks and MP3/WMA files. |
|
|
A data CD |
Store data from files or folders on your hard disk drive or write files directly to a CD-R |
|
and CD-RW. |
|
|
A copy of a CD |
Create a copy of a CD or a backup of data files. |
|
|
Jewel case inserts and |
Make custom jewel case inserts and CD labels to indicate the title and contents of a |
labels |
CD (labels are sold separately). |
|
|
It is recommended that you use a CD-R disc if you are going to play it in a CD player, CD-ROM, DVD-ROM, or DVD+RW/+R drive. CD-R discs are compatible with more players than are CD-RW discs.
Getting Started |
3–11 |

Using the PC
Creating a Music CD
RecordNow CD/DVD Writer (available on select models) creates closed session music CDs. This means that you must record all music files for a disc in one recording session. Music files can be recorded repeatedly on a rewriteable CD-RW, but all previously recorded files must first be erased. To erase a recorded CD-RW disc, insert the disc, open RecordNow CD/DVD Writer, and then click the Erase button. CD-R discs cannot be erased.
1.Click Start, choose All Programs, RecordNow CD/DVD Writer, and then click RecordNow.
2.Click Make a Music Disc.
3.Select an option:
Make a Music Disc from Audio Files — Creates a music disc from MP3, WMA, or WAV files on your hard disk drive. Continue with step 7.
Make a Music Disc from other CDs — Create a new music disc from tracks taken from your music disc collection. Continue with step 4.
Make a Disc for an MP3
Player — Create a disc specifically for MP3 players. Follow the onscreen instructions.
4.Insert a music CD, and click Next.
5.Select the music tracks to record, and then click Add.
3–12 |
Getting Started |
Using the PC
6.Click Finish when you have added all the audio files to your music CD project.
7.Insert a blank CD-R or CD-RW disc, and then click Next.
If you are recording music files from another CD, follow the onscreen instructions to finish recording; otherwise, continue with step 8.
8.Select music files from the Music on System window or use the Browse button, and then click Add.
9.Click Next to record the files.
Creating a Data CD
You can record data to blank or appendable CD-R or CD-RW discs in different ways: With RecordNow CD/DVD Writer or using the DLA (drive letter access) program.
The DLA program is not preinstalled on your PC, but you can get it from the Hewlett-Packard Web site; see “Installing DLA software” on page 3–14.
1.Click Start, choose All Programs, RecordNow CD/DVD Writer, and then click RecordNow.
2.Click Make a Data Disc.
Getting Started |
3–13 |

Using the PC
3.Insert a blank or appendable CD-R or CD-RW disc into the drive, and then click Next.
4.Click Add Files and Folders.
5.Select the files you want to record, and then click Add. Repeat this step until you are finished adding files.
6.Click Next, and then click OK.
7.Click Done when the recording is finished.
Installing DLA software
The Drive Letter Access (DLA) software is not preinstalled on your PC.
DLA allows you to use your CD Writer drive or DVD Writer drive (on select models only) as you would a diskette drive, by copying files to disc or by using a drag-and-drop method.
To get and install the DLA program:
1.Go to the Web site: http://www.hp.com/cposupport
Click Choose your language and country/region to select the appropriate language, if necessary.
2.Type your PC model number into the Search box.
3.Click drivers and downloads for your model. Click applications, if it is present.
4.Choose DLA, and then follow the onscreen instructions to download and install the program.
3–14 |
Getting Started |

Using the PC
Recording with DLA
Format a blank CD or DVD before copying files directly to the disc. If you don’t, a message appears telling you to format the disc or telling you that your drive is not accessible.
1.Press the Eject button on the drive, and insert the blank disc.
2.Click Start, and then click My Computer.
3.Right-click the drive icon, and select Format.
4.Under Volume Label, type in the title of the disc.
5.Under Format type, select Full or Quick (erase). You must select the quick format for all CD-R or DVD+R discs. You must select the full format for a CD-RW or DVD+RW disc the first time you format it.
Full format can take up to 45 minutes. Quick format usually takes less than a minute.
6.Click Start to format the disc.
7.Click Yes to the message that all files on the disc will be erased.
8.Click OK.
Getting Started |
3–15 |

Using the PC
When the disc formatting is complete, you can copy your files directly to the disc in My Computer by:
■Dragging a file from a Windows Explorer window to your drive icon.
Or
■Selecting Save As from within some programs, and then saving the file to your drive.
Or
■Right-clicking a file, selecting Send To, and then selecting your drive.
After you record your files, if you want to read the DLA-formatted disc on most other CD-ROM drives, you must make the disc compatible: Insert your disc into your drive, right-click the DVD Writer drive icon or the CD Writer drive icon, and then select
Make Compatible.
The Make Compatible feature in DLA makes uncompressed CD-R and DVD+R discs readable by most read-only CD or DVD drives, even if DLA is not installed in the PC. When you make a disc compatible, DLA closes the session on your disc. This means:
■With a DVD+R, you are not able to add data to the disc.
■With a CD-R, you are able to add more data in another recording session, but you need to select Make Compatible again after you add the files.
3–16 |
Getting Started |
 Loading...