


HP Compaq Presario S3000NX, Compaq Presario S3010CL, Compaq Presario S3030RK, Compaq Presario S3030US, Compaq Presario S3040SE Installation Manual
...Installing the Wireless Keyboard and Mouse Set
— Lea Esto Primero —
Instalación del set de teclado y ratón inalámbricos
Installation de la souris et du clavier sans fil


Installing the Wireless
Keyboard and Mouse Set
The wireless keyboard and mouse set consists of a receiver (D) that plugs into the computer, a wireless keyboard (K), and a wireless mouse (M).
Note: This wireless set is compatible with your model PC and not intended for use with other computers.
D |
English |
|
|
K |
|
|
|
M |
|
Note: You can replace the batteries in the mouse and keyboard without turning off the computer. The computer must be on to change the ID setting on the three units.
Installing the Wireless Keyboard and Mouse Set |
1 |
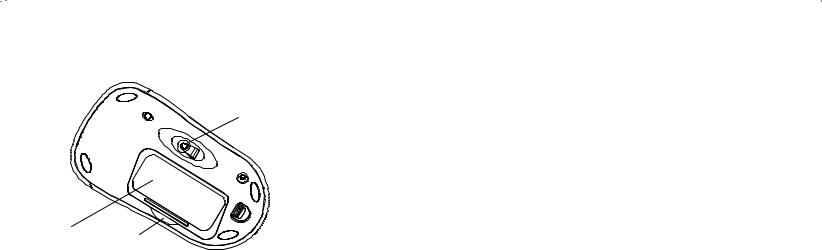
Getting the Mouse Ready
M3
M2 M1
Note: Do not use rechargeable batteries in the mouse. Alkaline batteries are recommended.
2 |
Installing the Wireless Keyboard and Mouse Set |
Install the two AA alkaline batteries (provided) in the wireless mouse:
1Push in at M1 and lift the battery cover (M2) from the bottom of the mouse.
2Insert the batteries into the compartment. Note the battery images on the inside of the compartment, and make sure batteries are placed in the correct direction.
3Replace the cover.
Note: The red light (M3) turns on when the batteries are installed correctly.
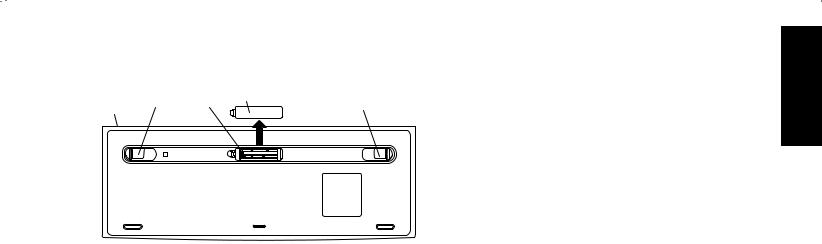
Getting the Keyboard Ready
K K3 K2 K1 |
K3 |
Note: Do not use rechargeable batteries in the keyboard. Alkaline batteries are recommended.
Install the two AA alkaline batteries (provided) in the wireless keyboard:
1Place the keyboard (K) upside down with the battery compartment (K2) away from you as shown in the illustration.
2Remove the cover (K1) from the bottom of the keyboard.
3Insert a battery into the compartment (K2) and slide the battery to the right. Insert the second battery. Note the battery images on the inside of the compartment, and make sure batteries are placed in the correct direction.
4Replace the cover.
5Adjust the keyboard height by lifting the adjustment legs (K3).
English
Installing the Wireless Keyboard and Mouse Set |
3 |
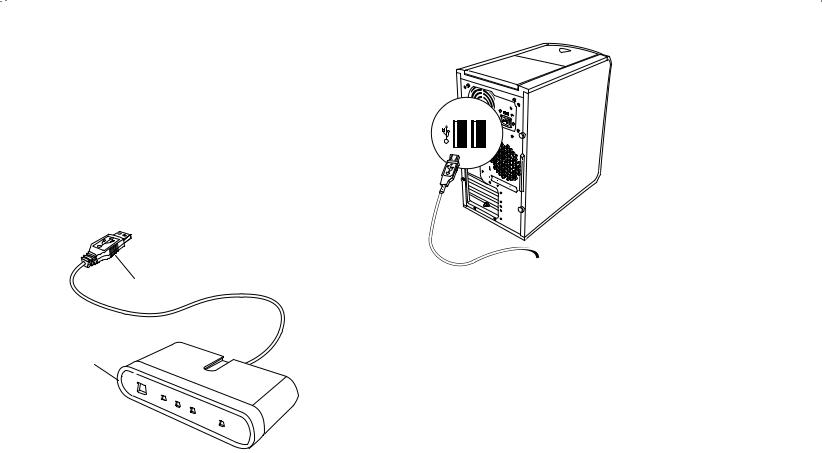
Getting the Receiver Ready
The receiver (D) must be placed flat on a surface and positioned properly to avoid interference from other electrical equipment.
1Turn off your computer.
2Connect the receiver cable (D1) to a USB connector on the front or the back of the computer.
D1
D
3Set the receiver flat on a surface and follow these guidelines:
■A: Minimum 20 cm (8 inches) clearance between the receiver and other electronic devices.
■B: Maximum 1.5 m (59 inches) distance between the receiver and wireless mouse or wireless keyboard.
4 |
Installing the Wireless Keyboard and Mouse Set |

■ |
C: Minimum 20 cm (8 inches) clearance between the receiver and the monitor. |
English |
||||||
■ |
Place no electronic device between the receiver and wireless mouse or wireless keyboard. |
|||||||
|
||||||||
|
|
|
|
|
|
|
|
|
|
|
|
|
|
|
|
|
|
|
|
|
|
|
|
|
|
|
|
|
|
|
|
|
|
|
|
|
|
|
|
|
|
|
|
|
|
|
|
|
|
|
|
|
|
|
|
|
|
|
|
|
|
|
|
|
|
|
|
|
|
|
|
|
|
|
|
|
|
|
|
|
C  A
A
B
B
Note: This is one example of the setup. Other setup positions are also possible.
Warning: To avoid causing interference, keep the receiver at least 20 cm (8 inches) away from the monitor.
Installing the Wireless Keyboard and Mouse Set |
5 |

Setting Up the Wireless Set
The mouse and keyboard have 255 IDs that are randomly selected when you press the ID button. This helps protect against interference from other wireless devices in the same area.
Important: The word CONNECT is the label for the ID button on the bottom of the mouse and keyboard. To press the ID button, use a blunt pointed object, like the tip of a ballpoint pen.
Important: Whenever you want to set the IDs of both the keyboard and the mouse, you must first set the receiver ID and mouse ID and then set the receiver ID and keyboard ID, as described in this procedure.
1 Turn on the computer.
Important: If the ID button is pressed more than one time during the setup, you must start over with step 2.
2On the front of the receiver (D), press the ID button (E) once.
The blue activity light (J) on the receiver starts flashing and continues flashing until the next step is completed or until 30 seconds pass.
D E F G H J
Important: If 30 seconds pass before you complete step 3, you must repeat steps 2 and 3 to set the mouse ID. If the ID button is pressed more than one time during the mouse setup (step 3), you must start over with step 2 and set the receiver ID.
6 |
Installing the Wireless Keyboard and Mouse Set |

3On the bottom of the mouse, press the
ID button (N) once with a blunt pointed object.
The mouse sends a new ID and flashes the mouse sensor light (M3) three times. The receiver flashes the blue activity light (J) three times and then stops to show it has accepted the new ID for the mouse.
N
M3
Note: At this time, when you move the mouse across a surface, the blue activity light (J) on the receiver will go on and off indicating the mouse and the receiver are working together.
Important: The mouse goes into a sleep or suspend mode after 20 minutes of inactivity. Click a button on the mouse to wake it. (Moving the mouse does not wake it.)
4On the front of the receiver, press the ID button (E) once.
The activity light (J) on the receiver starts flashing and continues flashing until the next step is completed or until 30 seconds pass.
D E F G H J
Important: If 30 seconds pass before you complete step 5, you must repeat steps 4 and 5 to set the keyboard ID. If the ID
button is pressed more than one time during the keyboard setup (step 5), you must start over with step 4 and set the receiver ID.
English
Installing the Wireless Keyboard and Mouse Set |
7 |
5On the bottom of the keyboard, press the
ID button (L) once with a blunt pointed object.
The keyboard sends a new ID, and the blue activity light (J) on the receiver flashes three times and then stops to show it has accepted the new ID for the keyboard.
K L
Note: At this time, when you press a key on the keyboard or adjust the keyboard volume knob, the blue activity light (J) on the receiver goes on and off indicating the keyboard and the receiver are working together.
8 |
Installing the Wireless Keyboard and Mouse Set |
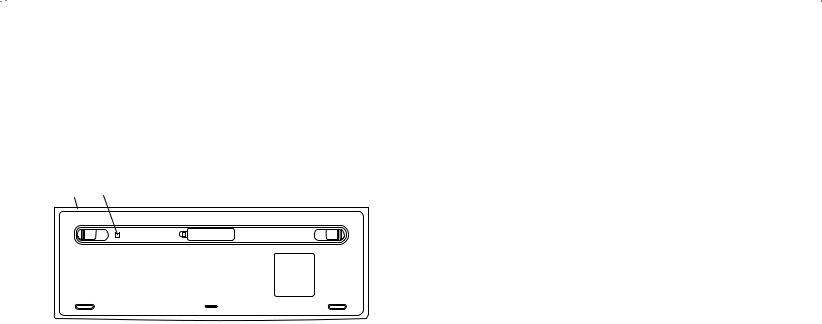
Note: After the receiver, mouse, and keyboard are working, you can separately reset the ID button for the mouse (N) or the keyboard (L) after pressing the receiver ID button (E).
Resetting ID Buttons When
Replacing Batteries
When the batteries are replaced in the mouse or the keyboard, reset the ID buttons on the receiver and the unit. You must press the receiver ID button first and then press the mouse or the keyboard ID button. Refer to the steps in the section “Setting Up the Wireless Set.”
Note: You can replace the batteries in the mouse and keyboard without turning off the computer. The computer must be on when you change the ID setting on the three units.
Using the Wireless Set
The lights on the receiver (D) indicate:
■Receiver activity (J)
The blue light flashes when you move or click the mouse or press any key on the keyboard.
■Number lock on (F)
■Caps lock on (G)
■Scroll lock on (H)
The receiver ID button (E) is on the front of the receiver.
D E F G H J
Use the receiver on a nonmetallic surface for better reception.
The optical mouse uses a light to sense movement. Use the optical mouse on an opaque surface; the optical mouse cannot work on a glass, translucent, or reflective surface.
Important: The mouse goes into a sleep or suspend mode after 20 minutes of inactivity. Click a button on the mouse to wake it. (Moving the mouse does not wake it.)
You may notice that the mouse moves the cursor on the screen twice as fast as a standard mouse does. The mouse moves the cursor at 800 dots per inch (dpi) while a standard mouse moves the cursor at 400 dpi. Change the cursor movement speed by using the mouse properties in the Control Panel.
English
Installing the Wireless Keyboard and Mouse Set |
9 |

Low Battery Icons |
Troubleshooting |
The computer displays a keyboard icon or a mouse icon in the upper-right corner of the screen to indicate low batteries in that unit.
Note: The Low Battery icon appears 5 times each hour until the batteries are changed. If you use a mouse pad, choose a light-colored one, not a dark one, to conserve battery power.
10 |
Installing the Wireless Keyboard and Mouse Set |
If the wireless mouse or keyboard does not work, do the following:
■Check that the receiver cables go to the USB connector on the front or the back of the computer.
■Click a button on the mouse and move it, or press any key on the keyboard to see if the blue activity light on the receiver flashes. If it doesn’t flash, reset the unit:
Press the receiver ID button once, and then press the mouse ID button once.
Or
Press the receiver ID button once, and then press the keyboard ID button once.
■Make sure that the batteries are correctly installed in the mouse and keyboard.
 Loading...