


HP Compaq Presario SR1005T, Compaq Presario SR1010T, Compaq Presario SR1010V-2, Compaq Presario SR1010Z, Compaq Presario SR1200NX Getting Started Guide
...Getting Started Guide
The information in this document is subject to change without notice.
Hewlett-Packard Company makes no warranty of any kind with regard to this material, including, but not limited to, the implied warranties of merchantability and fitness for a particular purpose.
HP shall not be liable for errors contained herein or for incidental or consequential damages in connection with the furnishing, performance, or use of this material.
THE WARRANTY TERMS CONTAINED IN THIS STATEMENT, EXCEPT TO THE EXTENT LAWFULLY PERMITTED, DO NOT EXCLUDE, RESTRICT OR MODIFY AND ARE IN ADDITION TO ANY MANDATORY STATUTORY RIGHTS APPLICABLE TO THE SALE OF THIS PRODUCT OR SERVICE TO YOU.
HP assumes no responsibility for the use or reliability of its software on equipment that is not furnished by HP.
This document contains proprietary information that is protected by copyright. All rights are reserved. No part of this document may be photocopied, reproduced, or translated to another language without the prior written consent of HP.
Hewlett-Packard Company
P.O. Box 4010
Cupertino, CA 95015-4010
USA
© 2000, 2003, 2004 Hewlett-Packard Development Company, L.P. All rights reserved.
This product incorporates copyright protection technology that is protected by method claims of certain U.S. patents and other intellectual property rights owned by Macrovision Corporation and other rights owners. Use of this copyright protection technology must be authorized by Macrovision Corporation, and
is intended for home and other limited viewing uses only unless otherwise authorized by Macrovision Corporation. Reverse engineering or disassembly is prohibited. Apparatus Claims of U.S. Patent Nos. 4,631,603, 4,577,216, 4,819,098, and 4,907,093 licensed for limited viewing uses only.
HP supports lawful use of technology and does not endorse or encourage the use of our products for purposes other than those permitted by copyright law.

Table of Contents
Finding Answers to Commonly Asked Questions ............................ |
1 |
Setting Up Your PC ......................................................................... |
3 |
Putting Your PC Together................................................................................ |
3 |
Setting up for safety and comfort ................................................................ |
3 |
Connecting to the PC ................................................................................ |
4 |
Turning on Your PC for the First Time ............................................................... |
5 |
Setting Up and Connecting to Your Internet Account ......................................... |
5 |
Installing Software and Hardware Devices....................................................... |
6 |
Transferring your old PC information and files to your new PC ....................... |
7 |
Making recovery discs .............................................................................. |
7 |
Registering Your PC ...................................................................................... |
7 |
Using Desktop Icons...................................................................................... |
8 |
Using Compaq Organize software ............................................................. |
8 |
Using PC Help & Tools .............................................................................. |
9 |
Using the Keyboard ..................................................................... |
11 |
Using the Internet Keyboards ....................................................................... |
11 |
Using the Standard Keyboard ...................................................................... |
13 |
Using the Wireless Keyboard Set.................................................................. |
14 |
Identifying Special Keyboard Buttons ............................................................ |
15 |
Customizing the keyboard buttons ............................................................ |
19 |
Table of Contents iii

Getting Help................................................................................. |
21 |
Recovering from Software Problems.............................................................. |
21 |
Using the Onscreen Help and Support Center................................................ |
21 |
Using Instant Support .................................................................................. |
22 |
Using Compaq Connections ........................................................................ |
22 |
Getting messages ................................................................................... |
22 |
Turning off messages............................................................................... |
23 |
Re-enabling messages ............................................................................. |
23 |
Finding Online Guides ................................................................................ |
23 |
Finding Web Sites about your PC ................................................................. |
24 |
Finding More Help ..................................................................................... |
24 |
Using the HP Personal Media Drive .............................................. |
25 |
Connecting the Drive .................................................................................. |
26 |
Inserting the Drive....................................................................................... |
27 |
Locating the Drive and Assigning a Drive Letter.............................................. |
28 |
Using the Drive .......................................................................................... |
28 |
Disconnecting the Drive............................................................................... |
30 |
Working with Sound, Pictures, and Video .................................... |
31 |
Using Speakers .......................................................................................... |
31 |
Setting up 3-connector sound ................................................................... |
32 |
Configuring multichannel audio output for the DVD player........................... |
33 |
Setting up 6-connector sound ................................................................... |
34 |
Using the Sound Effect Manager (6-connector) ........................................... |
37 |
Working with Digital Images........................................................................ |
39 |
Introducing the memory card reader ......................................................... |
39 |
Using a TV as a Monitor ............................................................................. |
41 |
Identifying cables you may need .............................................................. |
41 |
Connecting to a TV set ............................................................................ |
41 |
Viewing the PC image on your TV screen .................................................. |
42 |
Disabling the TV option ........................................................................... |
44 |
Disconnecting the TV............................................................................... |
46 |
Playing CDs and DVDs.................................................................. |
47 |
Playing Music CDs with iTunes ..................................................................... |
47 |
Playing CDs and DVDs with Windows Media Player ...................................... |
48 |
Playing DVD Movies with InterVideo WinDVD ............................................... |
48 |
Using country/region codes .................................................................... |
49 |
Playing Video CDs (VCD) with InterVideo WinDVD ........................................ |
50 |
Playing Video CDs (VCD) with Windows Media Player 9................................ |
50 |
iv Getting Started Guide

Creating (Burning) CDs and DVDs ................................................. |
51 |
Creating (Burning) Music CDs with iTunes...................................................... |
52 |
Creating (Burning) Music CDs with Windows Media Player............................. |
52 |
Creating (Burning) Data CDs Using Windows XP ........................................... |
53 |
Creating (Burning) CDs with RecordNow! ..................................................... |
53 |
Creating Music CDs with RecordNow! .......................................................... |
54 |
Creating CDs to Play in Your Car or Home CD Players with RecordNow!.......... |
54 |
Creating CDs to Play on Your PC.................................................................. |
55 |
Creating a Music CD .................................................................................. |
56 |
Storing Files on a DVD or CD....................................................................... |
56 |
Storing Data Files on Disc............................................................................ |
58 |
Copying a DVD or CD ................................................................................ |
58 |
Erasing a DVD or CD.................................................................................. |
59 |
Removing Files in RecordNow!..................................................................... |
59 |
Removing Files from a Recorded Data Disc .................................................... |
59 |
Archiving Files on a DVD or CD ................................................................... |
60 |
Creating an Image File................................................................................ |
60 |
Saving an Image ........................................................................................ |
60 |
Burning an Image ....................................................................................... |
61 |
Recording Video Files ................................................................................. |
61 |
Using Disc Labels........................................................................................ |
61 |
Creating Recovery CDs/DVDs for the PC....................................................... |
61 |
Setting Automatic Recording Options ............................................................ |
62 |
Using Compatibility Information ................................................................... |
63 |
Identifying Compatible File Formats .............................................................. |
64 |
Using the Disc Quick Reference Tables .......................................................... |
64 |
Using double-layer DVD+R discs............................................................... |
64 |
Using DVD+R discs ................................................................................. |
64 |
Using DVD+RW discs.............................................................................. |
64 |
Using CD-R discs .................................................................................... |
65 |
Using CD-RW discs................................................................................. |
65 |
Using the Software Quick Reference Table..................................................... |
68 |
Table of Contents v

Creating DVD Movies.................................................................... |
71 |
Getting Started........................................................................................... |
71 |
Using the Preview Window.......................................................................... |
72 |
Using the Media Library.............................................................................. |
72 |
Using the Storyboard .................................................................................. |
72 |
Identifying Requirements for Capturing Video ................................................ |
72 |
Capturing Digital Camcorder Video.............................................................. |
73 |
Capturing Web Camera Video .................................................................... |
73 |
Capturing Analog Video ............................................................................. |
74 |
Capturing a Still Image ............................................................................... |
74 |
Editing Video Files in WinDVD Creator ......................................................... |
74 |
Adding Images .......................................................................................... |
75 |
Adding Audio Effects .................................................................................. |
76 |
Adding Transition Effects ............................................................................. |
76 |
Adding Title Effects ..................................................................................... |
76 |
Adding Video Filters ................................................................................... |
76 |
Adding a Menu.......................................................................................... |
77 |
Making a Movie......................................................................................... |
77 |
Recording VHS Video Files Direct to DVD...................................................... |
78 |
Converting Recorded TV to MPEG-2 Format (Europe only)............................... |
78 |
Troubleshooting............................................................................ |
79 |
Index ........................................................................................... |
91 |
vi Getting Started Guide

Finding Answers to Commonly Asked Questions
In this Getting Started Guide, you can find answers to questions about the following topics:
•Turning on the PC, page 5
•Registering your PC, page 7
•Transferring information to your new PC, page 7
•Using desktop icons, page 8
•Customizing special buttons on the keyboard, page 19
•Connecting to the Internet, page 5
•Connecting to a TV, page 41
•Getting digital pictures onto your PC, page 39
•Playing a music CD, page 47
•Watching a DVD movie, page 48
•Creating a CD, page 51
•Creating a DVD, page 71
•Finding help if something doesn’t work, page 79
NOTE: This guide contains details on options that may not be included with your PC. Your PC may look different from the illustrations in this guide. The monitor and the speakers may be sold separately. Speakers may be included with the monitor (select models only).
Finding Answers to Commonly Asked Questions 1

2 Getting Started Guide

Setting Up Your PC
WARNING: Please read ”Safety Information” in the Warranty and Support Guide before installing and connecting your PC to the electrical power system.
Putting Your PC Together
Follow the steps on the quick setup poster to set up your PC.
Look in the PC box for printed details or updates regarding your model PC.
When placing your PC, consider an ergonomic arrangement of the PC and your work area to maintain your comfort and productivity. Refer to ”Setting up for safety and comfort” on page 3.
WARNING: The power supply is pre-set for the country/region in which you purchased your PC. If you move, please check the voltage requirements before plugging your PC into an AC power outlet.
Setting up for safety and comfort
After assembling your PC, but before you begin using it, arrange the PC and your work area to maintain your comfort and productivity. Refer to the Safety & Comfort Guide for important ergonomic information.
WARNING: To reduce the risk of serious injury, read the Safety & Comfort Guide. It describes proper workstation setup, posture, and health and work habits for computer users. It also provides important electrical and mechanical safety information.
Setting Up Your PC 3
Your PC features and connector positions may vary.
4 Getting Started Guide
To view the Safety & Comfort Guide:
•Click Start, choose All Programs, choose PC Help & Tools, and then click
Safety & Comfort Guide.
Or
•Type http://www.compaq.com/ergo/
into your Web browser address box, and then press Enter on the keyboard.
Connecting to the PC
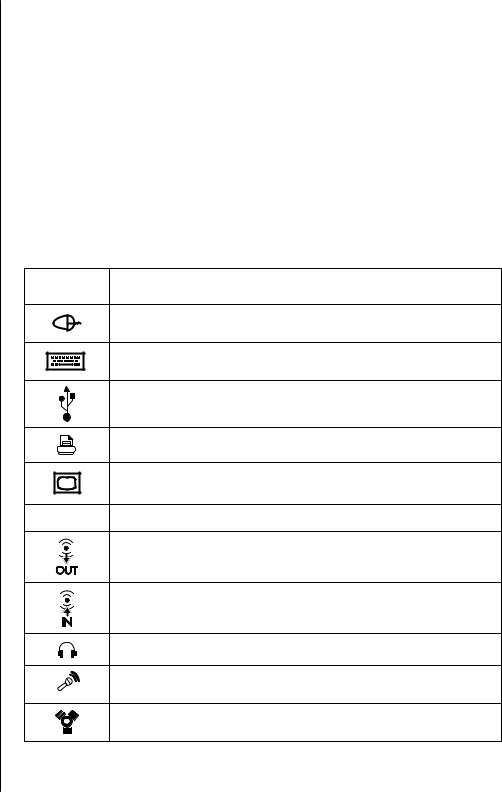
Connect your main hardware devices like the monitor, keyboard, and mouse at the back of the PC. Other peripheral devices like a printer, scanner, camera, or other equipment also plug into connectors on the back of your computer. Some PC models also have connectors on the front of the PC.
Connector |
|
symbol |
Description |
|
Mouse (PS/2) |
|
Keyboard (PS/2) |
|
Universal Serial Bus (USB) for mouse, keyboard, digital cameras, or |
|
other devices with USB connectors |
|
Printer (parallel) |
|
Monitor |
serial |
Serial port for some digital cameras or other serial devices |
|
Audio Line Out (powered speakers) |
|
Audio Line In |
|
Headphones |
|
Microphone |
|
FireWire® (IEEE 1394) for video cameras or other devices with very fast |
|
transfer rates |
Turning on Your PC for the First Time
After you have completed the steps on the quick setup poster, you are ready to turn on your PC.
1Press the Power button on the monitor.
2Press the On button on the front of the PC.
3Turn on the speakers, if they are present.
4Click an option to select your language (if applicable for your model). Click OK and then confirm your selection by clicking Yes. Wait until the PC makes preparations. (It may take up to 30 minutes to set up the language on the PC.)
5Set up Microsoft® Windows® by following the onscreen instructions.
6Double-click the large Internet Access icon on your desktop, if it is present. Wait until the PC displays the Easy Internet Sign-up window, and then follow the onscreen instructions.
7Register your PC; see ”Registering Your PC” on page 7.
Setting Up and Connecting to Your Internet Account
Before you can connect to the Internet, you must sign up with an Internet Service Provider (ISP). Compaq has made arrangements with leading ISPs to help you sign up for Internet service using Easy Internet Sign-up (available on select models only).
NOTE: However, you may choose any other ISP of your choice, or transfer your existing ISP account to this PC.
Use Easy Internet Sign-up to sign up for a new or an existing ISP account. The software programs for available ISPs are part of your PC. If you decide to subscribe to high-speed broadband (cable or DSL), contact your ISP for any specific software and hardware you may need.
1Make sure the modem or other Internet access cable is connected.
NOTE: Easy Internet Sign-up finds and obtains updated information about services by connecting to the Internet. The PC uses either the PC modem connected to an active telephone service line or an active broadband (cable or DSL) connection.
2Choose an ISP using Easy Internet Sign-up. To open Easy Internet Sign-up: a Double-click the Easy Internet Sign-up icon on the desktop.
Or
Click Start on the taskbar, choose All Programs, choose
Online Services, and then click Easy Internet Sign-up. b Follow the onscreen instructions.
Setting Up Your PC 5

NOTE: The folder called Online Services includes icons for accessing various online services, but they may not be present in all countries/regions.
3Connect to your ISP and the Internet. Use one of these methods:
•Double-click the ISP-provided icon on the desktop.
Or
•Press the Connect (or Internet) button on the keyboard (select models only).
Or
•If your PC is always connected to your ISP, open your browser program, such as Internet Explorer: Click Start, choose All Programs, choose
Online Services, and click Internet Explorer.
NOTE: If you are using MSN or AOL and have questions, contact the ISP directly.
Installing Software and Hardware Devices
After you turn on the PC the first time, you can install any software programs that came on CDs or DVDs included in the PC box (select models only).
You may wish to install additional software programs or hardware devices on your PC. Before installation, make a restore point using the Microsoft System Restore program; refer to ”Recovering from Software Problems” in the Warranty and Support Guide. Restart the PC after installation.
Choose software that is compatible with your PC — check the operating system, memory, and other requirements listed for the new software for compatibility with your PC.
NOTE: Only use original licensed software. Installing copied software may be illegal or may infect your PC with a virus.
Install the new software according to the directions provided by the software manufacturer. Check the manufacturer’s documentation or customer service information for help if you need it.
6 Getting Started Guide

Transferring your old PC information and files to your new PC
See the built-in Microsoft Windows Help and Support Center; search for transfer wizard, and select the overview article, Files and Settings Transfer Wizard overview. This information describes a Microsoft solution for moving your files onto your new PC.
Or, as an alternative, double-click the PC Tune Up & Repair icon (select models only) in the Help and Support Center and review the products and services offered under Backup Data.
Making recovery discs
Now is a good time to make your recovery discs. Refer to the Warranty and Support Guide for instructions and more information.
Registering Your PC
Registration is quick and easy, and it offers you access to subscriptions and notifications such as:
•E-mail updates containing notifications about product enhancements, the most recent support alerts, and driver updates specific to the products you own.
•The HP newsgram, our monthly online magazine packed full of product news, support tips, project ideas, and much more. Visit http://subscription.support.hp.com
NOTE: You can view your PC product number, model number, and serial number, by pressing the Ctrl, Alt, and S keys on the keyboard at the same time.
To register your PC:
•Click the Register with Compaq icon on the desktop. When you use the desktop icon, the PC automatically fills in the PC product number, model number, and serial number for you.
Or
• Go to http://register.hp.com
Setting Up Your PC 7

Using Desktop Icons
The desktop has shortcut icons that make it easy to find the things you need.
Icon |
Opens |
Use it to |
|
|
|
|
Help and Support (select |
View onscreen Help information |
|
models only) |
about your PC. |
|
|
|
|
Easy Internet Sign-up |
Set up a new or an existing Internet |
|
|
account. |
|
|
|
|
Software Repair Wizard |
Repair software problems with |
|
(select models only) |
programs, printers, or peripherals |
|
|
that stop working, or resolve erratic |
|
|
PC behavior; repair options include |
|
|
using Application or System |
|
|
Recovery. |
|
|
|
|
Register with Compaq |
Register both your Compaq PC and |
|
|
all your HP products. |
|
|
|
|
Compaq Organize (select |
Organize your PC shortcuts and your |
|
models only) |
favorite Internet destination links. |
|
|
|
Using Compaq Organize software
Compaq Organize software (select models only) is a desktop tool you use to organize both your PC shortcuts and your favorite Internet destination links. You use it to organize the important things you do on the PC and the Internet, and to arrange them the way you want. Compaq Organize makes all your information available with just a few mouse clicks.
Compaq Organize looks like a window with multiple category frames. Each category has links to Internet destinations or shortcuts to software programs or files on your PC. Use the player area for viewing pictures, for listening to your MP3 music files stored on your computer, or for watching video clips. For searching, there is a search bar at the top of Compaq Organize where you can select the search engine you want to use.
To open Compaq Organize:
Double-click the desktop icon.
Or
1Click Start on the taskbar.
2Choose All Programs.
3Click Compaq Organize.
8 Getting Started Guide

Using PC Help & Tools
The PC Help & Tools folder (select models only) in the All Programs menu contains special utilities for PC owners. This folder also contains any onscreen guides included with your PC.
To see the items in the PC Help & Tools folder:
1Click Start on the taskbar.
2Choose All Programs.
3Choose PC Help & Tools.
4Click an item to view it or use it.
NOTE: If there are no guide titles listed in PC Help & Tools, your PC has no onscreen guides.
Setting Up Your PC 9

10 Getting Started Guide

Using the Keyboard
Your keyboard has an arrangement of standard keys, indicator lights, and special buttons (select models only). Locate your keyboard among the following illustrations, and read the feature list for it. Your keyboard may vary from the illustrations.
Using the Internet Keyboards
Internet keyboards may connect directly to your PC or may be wireless. (See ”Using the Wireless Keyboard Set” on page 14 for a description of the wireless set.)
Some keyboards do not have the Internet buttons shown here at the top of the keyboard, and some use a different layout on the top right.
Find your keyboard among the following illustrations to read about its features.
Using the Keyboard 11
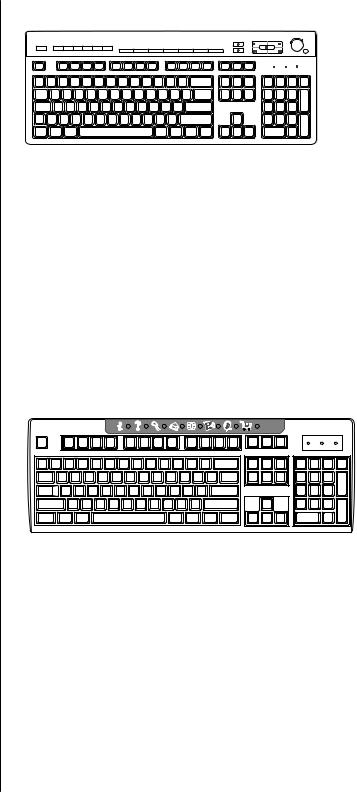
Internet keyboard 1
This keyboard enables you to:
•Adjust speaker volume.
•Connect to the Internet (if you have an established Internet account).
•Search for information on the Internet.
•Place the PC into standby mode to save power.
•Start, pause, and stop playing a CD or DVD; skip to the previous or next track; record; and eject the disc tray (for two drives).
•Mute speaker sound.
•Customize the buttons to open programs and connect to Internet Web sites.
•Get support information.
•Find a file or program on the hard disk drive.
Internet keyboard 2
This keyboard enables you to:
•Connect to the Internet (if you have an established Internet account).
•Search for information on the Internet.
•Customize the buttons to open programs and connect to Internet Web sites.
•Get support information.
12 Getting Started Guide

LEDs, light emitting diodes, are lights used to indicate status.
AThe lights (LEDs) turn on to indicate (left to right) the number lock on, the capitals lock on, and the scroll lock on.
BThe plus (+) and minus (–) buttons adjust the speaker volume.
CThe moon icon
button  places the PC into standby mode or wakes the PC from standby mode.
Internet keyboard 3
This keyboard enables you to:
•Adjust speaker volume.
•Customize the buttons to open programs and connect to Internet Web sites.
•Search for information on the Internet.
•Find a file or program on the hard disk drive.
•Open a calculator.
•Place the PC into standby mode to save power.
•Connect to the Internet (if you have an established Internet account).
•Mute speaker sound.
•Get support information.
Using the Standard Keyboard
This keyboard enables you to:
•Adjust speaker volume.
•Place the PC into standby mode to save power.
Using the Keyboard 13

AWireless receiver
BWireless keyboard
CWireless mouse
ANumber lock on
BCapitals lock on
CScroll lock on
DReceiver activity
Using the Wireless Keyboard Set
A wireless keyboard (B) uses a receiver/transmitter unit (A), instead of a connector cable, to communicate with your PC. The wireless keyboard, mouse (C), and receiver set is available with select models only.
A light (D) on the receiver indicates receiver activity.
14 Getting Started Guide
Identifying Special Keyboard Buttons
There are special buttons (select models only) at the top of the keyboard. (Some models have some of these special buttons on the left side of the main keys.) These buttons operate a CD or DVD player, connect you to the Internet, or provide quick access to specific functions.
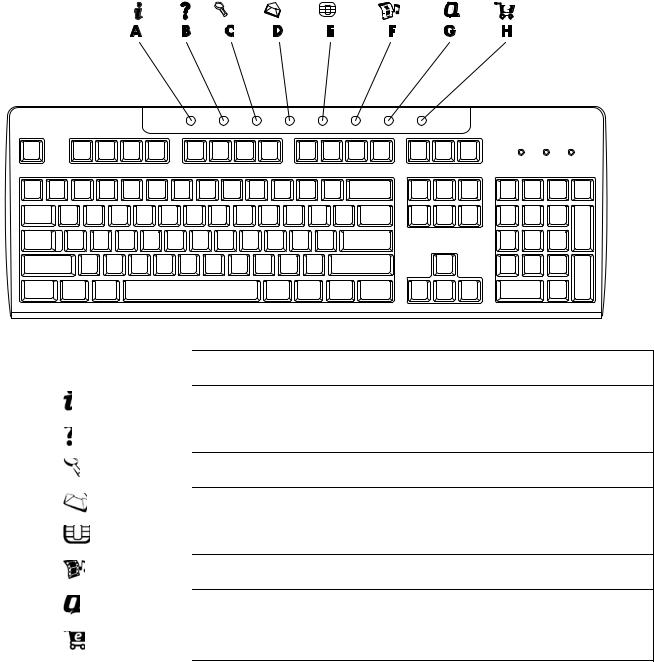
Internet keyboard 1
NOTE: The number, location, and labeling of buttons vary by keyboard model.
Figure |
|
|
|
key |
Icon |
Feature |
Description |
A |
|
Standby |
Puts PC into power-saving mode (screen is blank but PC is still on). To |
|
|
|
make screen reappear, press the Esc key, or press standby again. May |
|
|
|
take 10–30 seconds before screen reappears. |
B |
|
User |
Switches between the PC users. |
C |
Compaq |
Compaq |
Links to Compaq Web site. |
D |
|
Help |
Opens the Help and Support Center. |
E |
|
My Pictures |
Opens an imaging software program. Can be reconfigured. |
F |
|
Music |
Starts iTunes or Windows Media Player. Can be reconfigured. |
G |
|
Video |
Opens video software program. Can be reconfigured. |
Using the Keyboard 15
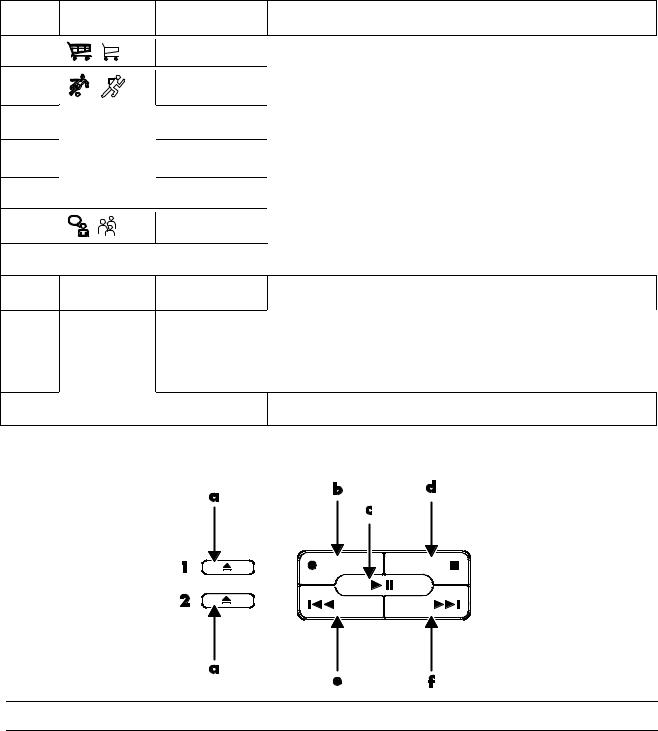
Figure |
|
|
|
key |
Icon |
Feature |
Description |
H |
|
Shopping |
|
K |
|
Sports |
|
M |
|
Finance |
|
N |
|
Connect |
Goes to popular Web sites. Can be reconfigured to open a site or |
|
|
|
software program. |
P |
|
Search |
|
R |
|
Chat |
|
S |
|
|
|
T |
See figure |
Media controls |
Operates CD or DVD player. |
|
following table |
(CD/DVD/MP3) |
|
V |
|
Volume control |
Volume knob: Increases speaker volume when turned clockwise and |
|
|
(Volume knob or |
decreases volume when turned counterclockwise. It can be turned |
|
|
Volume Up and |
indefinitely, even after maximum sound has been reached. |
|
|
Volume Down |
Volume Up and Down buttons: Press the Volume Up button to |
|
|
buttons) |
increase volume and the Volume Down button to decrease volume. |
W |
|
Mute |
Turns speaker sound on and off. |
Media control keys
a Open and close disc tray(s)
bRecord
cPlay or pause
d Stop
e Skip to the previous track
f Skip to the next track
NOTE: The number, location, and labeling of buttons vary by keyboard model.
16 Getting Started Guide
Internet keyboard 2
Figure |
|
|
Key |
Icon |
Feature |
|
|
|
A |
|
Internet |
|
||
|
|
|
B |
|
Help |
|
||
|
|
|
C |
|
Search |
|
||
|
|
|
D |
|
|
|
||
|
|
|
E |
|
Offers |
|
||
|
|
|
F |
|
Entertainment |
|
||
|
|
|
G |
|
My Presario |
|
||
|
|
|
H |
|
Shopping |
|
||
|
|
|
Using the Keyboard 17

Internet keyboard 3
Figure |
|
|
|
key |
Icon |
Feature |
Description |
A |
|
Standby |
Puts PC into power-saving mode (screen is blank but PC is still on). To |
|
|
|
make screen reappear, press the Esc key, or press standby again. May |
|
|
|
take 10–30 seconds before screen reappears. |
B |
|
Connect |
Goes to a Web site. Can be reconfigured to open a site or software |
|
|
|
program. |
C |
|
Search |
Opens a Web site that helps you locate information on the Internet. |
|
|
|
Can be reconfigured to open a site or software program. |
D |
|
Starts your e-mail program. Can be reconfigured to open a site or |
|
|
|
|
software program. |
E |
|
Compaq |
Links to Compaq Web site. |
F |
|
Help |
Opens the Help and Support Center. |
G |
|
Calculator |
Opens the calculator. Can be reconfigured. |
H |
|
Volume |
Adjusts volume. |
K |
|
Mute |
Mutes sound. |
18 Getting Started Guide

Customizing the keyboard buttons
You can customize some of the special buttons on the keyboard (select models only) to open different programs or files, or to connect to favorite Web sites:
1Click Start on the taskbar.
2Choose Control Panel.
3Click Printers and Other Hardware, if it is present.
4Double-click Keyboard.
5On the Buttons tab, double-click the button you want to change.
6For the Button configuration, click the down-arrow to the right of the list and choose the button capability, such as Simple web page with label.
7Enter a display label and the address information. For a Web page, enter the URL.
8Click OK.
9On the Buttons tab, click Apply.
10Repeat steps 5 through 9 for each button you want to customize.
11Click OK to finish.
NOTE: Clicking the Restore Defaults button on the Button tab restores all of the Internet buttons to the factory settings.
Using the Keyboard 19

20 Getting Started Guide

Getting Help
Recovering from Software Problems
The PC uses the operating system and installed software programs during normal operation. If your PC works improperly or stops because of the software, you may be able to repair it by restarting the PC, using System Restore, or using other methods including the system recovery programs.
You need recovery discs (CDs or DVDs) for some repairs that use the Compaq Application Recovery program or the Compaq System Recovery programs. Now is a good time to make your recovery discs.
For instructions on making recovery discs, repairing and recovering your software, and more information, refer to the Warranty and Support Guide that came with your PC.
Using the Onscreen Help and
Support Center
Information about your PC is in the onscreen Help and Support Center (select models only). Here you can find links to driver updates, access to technical support options, and information about commonly asked questions.
To open the Help and Support Center:
1Press the Help button (select models only) on your keyboard.
Or
Click Start on the taskbar and choose Help and Support.
2Click Presario PC help.
Getting Help 21

Using Instant Support
When you need assistance to solve a PC-related problem, use Instant Support (select models only). With Instant Support you can run tests or submit a problem for help over the Internet. When you submit a problem, you communicate over the Internet with a Support analyst who works with you on solving the problem.
To start Instant Support:
1Click Start on the taskbar.
2Click Help and Support.
3Click Connect to Customer Support.
4Click Start a New Request.
5Follow the onscreen instructions to run a test or submit a problem. (Your PC must be connected to the Internet to submit a request.)
Using Compaq Connections
Compaq Connections (select models only) is an Internet-based service that brings you important information for your PC:
•Product notices
•System updates
•Tips
•Special offers for your PC
Messages arrive while you’re connected to the Internet and may display an alert or a notice on your desktop. View messages as they arrive or read them later.
Most Support updates delivered by Compaq Connections messages are also available to you through the Support Web site under the information for your PC model.
Getting messages
After you view or close a message, it will not automatically display again.
To read a previously received message, open Compaq Connections:
1Click Start on the taskbar.
2Choose All Programs.
3Choose PC Help & Tools.
4Choose Compaq Connections.
5Click Compaq Connections again.
Compaq Connections opens and lists the message titles. To read a message, double-click the message title in the window. You can close this window, and Compaq Connections remains active.
22 Getting Started Guide

Turning off messages
NOTE: You cannot receive Compaq Connections messages, including important Support messages that may be critical to the operation of your PC, while the service is off.
To turn off the Compaq Connections Service:
1Click Start on the taskbar.
2Choose All Programs.
3Choose PC Help & Tools.
4Choose Compaq Connections.
5Click Disable Compaq Connections. The service is turned off until you re-enable it.
Re-enabling messages
When you re-enable the Compaq Connections Service, the service runs whenever you are connected to the Internet, and you automatically receive messages as they become available.
To turn on the service:
Double-click the Re-enable Compaq Connections icon on the desktop.
Or
1Click Start on the taskbar.
2Choose All Programs.
3Choose PC Help & Tools.
4Choose Compaq Connections.
5Click Re-enable Compaq Connections.
Finding Online Guides
You can find online guides and information for your PC.
To view online manuals for your PC, go to the Support Web address listed in
the Warranty and Support Guide and search for your product name and number. The product number is on the lower front of the PC chassis or is inside the CD storage area.
NOTE: Online manuals are associated with specific PC model numbers. Some models do not have online manuals.
Getting Help 23

Finding Web Sites about your PC
Use the Web site addresses listed in the Warranty and Support Guide for:
•Information about your PC.
•Your technical support needs.
Type these Web site addresses into the address box of your Internet browser, and then press the Enter key on your keyboard.
Finding More Help
If you need additional help, see the Warranty and Support Guide that came with your PC.
24 Getting Started Guide
 Loading...