


 Loading...
HP Compaq Mini CQ10-610CA PC, Compaq Mini CQ10-688NR PC, Compaq Mini CQ10-689NR PC Getting Started Guide
HP Mini and Compaq Mini
Getting Started
© Copyright 2010 Hewlett-Packard
Development Company, L.P.
Bluetooth is a trademark owned by its proprietor and used by Hewlett-Packard Company under license. Microsoft and Windows are U.S. registered trademarks of Microsoft Corporation. SD Logo is a trademark of its proprietor.
The information contained herein is subject to change without notice. The only warranties for HP products and services are set forth in the express warranty statements accompanying such products and services. Nothing herein should be construed as constituting an additional warranty. HP shall not be liable for technical or editorial errors or omissions contained herein.
First Edition: November 2010
Document Part Number: 634053-001
Product notice
This guide describes features that are common to most models. Some features may not be available on your computer.
Software terms
By installing, copying, downloading, or otherwise using any software product preinstalled on this computer, you agree to be bound by the terms of the HP End User License Agreement (EULA). If you do not accept these license terms, your sole remedy is to return the entire unused product (hardware and software) within 14 days for a refund subject to the refund policy of your place of purchase.
For any further information or for requesting a full refund of the computer, please contact your local point of sale (the seller).

Safety warning notice
WARNING! To reduce the possibility of heat-related injuries or of overheating the computer, do not place the computer directly on your lap or obstruct the computer air vents. Use the computer only on a hard, flat surface. Do not allow another hard surface, such as an adjoining optional printer, or a soft surface, such as pillows or rugs or clothing, to block airflow. Also, do not allow the AC adapter to come into contact with the skin or a soft surface, such as pillows or rugs or clothing, during operation. The computer and the AC adapter comply with the user-accessible surface temperature limits defined by the International Standard for Safety of Information Technology Equipment (IEC 60950).
iii
iv Safety warning notice

Table of contents
1 Welcome |
|
Finding information ............................................................................................................................... |
2 |
2 Getting to know your computer |
|
Top ....................................................................................................................................................... |
4 |
TouchPad ............................................................................................................................ |
4 |
Lights ................................................................................................................................... |
5 |
Keys ..................................................................................................................................... |
6 |
Front ..................................................................................................................................................... |
6 |
Right side ............................................................................................................................................. |
7 |
Left side ................................................................................................................................................ |
9 |
Display ................................................................................................................................................ |
10 |
Bottom ................................................................................................................................................ |
11 |
3 HP QuickWeb (select models only) |
|
Enabling HP QuickWeb ...................................................................................................................... |
13 |
Starting HP QuickWeb ....................................................................................................................... |
13 |
Identifying the QuickWeb LaunchBar ................................................................................................. |
14 |
Identifying the QuickWeb control icons .............................................................................. |
14 |
Identifying the QuickWeb LaunchBar icons ....................................................................... |
14 |
Identifying the QuickWeb notification icons ....................................................................... |
15 |
Configuring the network ..................................................................................................................... |
16 |
Starting Microsoft Windows ................................................................................................................ |
17 |
Turning HP QuickWeb on and off ....................................................................................................... |
17 |
4 Networking |
|
Using an Internet service provider (ISP) ............................................................................................ |
18 |
Connecting to a wireless network ....................................................................................................... |
19 |
Connecting to an existing WLAN ....................................................................................... |
19 |
Setting up a new WLAN network ....................................................................................... |
19 |
Configuring a wireless router ............................................................................ |
20 |
Protecting your WLAN ....................................................................................... |
20 |
v
5 Keyboard and pointing devices |
|
Using the keyboard ............................................................................................................................ |
21 |
Identifying the hotkey ......................................................................................................... |
21 |
Identifying the action keys ................................................................................................. |
21 |
Using keypads ................................................................................................................... |
22 |
Using pointing devices ....................................................................................................................... |
23 |
Setting pointing device preferences ................................................................................... |
23 |
Using the TouchPad .......................................................................................................... |
23 |
Navigating ......................................................................................................... |
24 |
Selecting ........................................................................................................... |
25 |
Using TouchPad gestures ................................................................................. |
25 |
Scrolling ............................................................................................ |
26 |
Pinching/Zooming ............................................................................. |
26 |
Rotating ............................................................................................ |
27 |
6 Maintenance |
|
Replacing the battery ......................................................................................................................... |
29 |
Inserting the battery ........................................................................................................... |
29 |
Removing the battery ......................................................................................................... |
30 |
Removing or replacing the vanity cover ............................................................................................. |
31 |
Removing the vanity cover ................................................................................................ |
31 |
Replacing the vanity cover ................................................................................................. |
31 |
Replacing the hard drive .................................................................................................................... |
33 |
Removing the hard drive .................................................................................................... |
33 |
Installing a hard drive ......................................................................................................... |
33 |
Replacing the memory module ........................................................................................................... |
34 |
Updating programs and drivers .......................................................................................................... |
37 |
Routine care ....................................................................................................................................... |
37 |
Cleaning the display .......................................................................................................... |
37 |
Cleaning the TouchPad and keyboard .............................................................................. |
37 |
7 Backup and recovery |
|
Recovery discs ................................................................................................................................... |
38 |
Performing a system recovery ............................................................................................................ |
39 |
Recovering using the dedicated recovery partition (select models only) ........................... |
39 |
Recovering using the recovery discs ................................................................................. |
41 |
Backing up your information ............................................................................................................... |
41 |
Using Windows Backup and Restore ................................................................................ |
41 |
Using system restore points .............................................................................................. |
42 |
When to create restore points ........................................................................... |
42 |
Create a system restore point ........................................................................... |
42 |
Restore to a previous date and time ................................................................. |
42 |
vi
8 |
Customer support |
|
|
Contacting customer support ............................................................................................................. |
43 |
|
Labels ................................................................................................................................................. |
44 |
9 |
Specifications |
|
|
Input power ......................................................................................................................................... |
45 |
|
Operating environment ....................................................................................................................... |
46 |
Index ................................................................................................................................................................... |
47 |
|
vii
viii

1 Welcome
●Finding information
After you set up and register the computer, it is important to take the following steps:
●Set up HP QuickWeb (select models only)—Immediately access your music, digital photos, and the Web without launching your main operating system. For more information, refer to
HP QuickWeb (select models only) on page 12.
●Connect to the Internet—Set up your wired or wireless network so that you can connect to the Internet. For more information, refer to Networking on page 18.
●Update your antivirus software—Protect your computer from damage caused by viruses. The software is preinstalled on the computer and includes a limited subscription for free updates. For more information, refer to the HP Notebook Reference Guide. For instructions on accessing this guide, refer to Finding information on page 2.
●Get to know your computer—Learn about your computer features. Refer to Getting to know your computer on page 4 and Keyboard and pointing devices on page 21 for additional information.
●Create recovery discs—Recover the operating system and software to factory settings in case of system instability or failure. For instructions, refer to Backup and recovery on page 38.
●Find installed software—Access a list of the software preinstalled on the computer. Select Start > All Programs. For details about using the software included with the computer, refer to the software manufacturer's instructions, which may be provided with the software or on the manufacturer's Web site.
1

Finding information
The computer comes with several resources to help you perform various tasks.
Resources |
For information about |
||
|
|
||
Quick Setup poster |
● How to set up the computer |
||
|
● Help to identify computer components |
||
|
|
|
|
HP Notebook Reference Guide |
● |
Power management features |
|
To access this guide, select Start > Help and |
● How to maximize battery life |
||
Support > User Guides. |
● How to use the multimedia features of the computer |
||
|
|||
|
● How to protect the computer |
||
|
● How to care for the computer |
||
|
● How to update the software |
||
|
|
|
|
Help and Support |
● |
Operating system information |
|
To access Help and Support, select Start > Help and |
● Software, driver, and BIOS updates |
||
Support. |
● |
Troubleshooting tools |
|
NOTE: For countryor region-specific support, go to |
|||
● How to access technical support |
|||
http://www.hp.com/support, select your country or |
|||
region, and follow the on-screen instructions. |
|
|
|
|
|
||
Regulatory, Safety and Environmental Notices |
● Regulatory and safety information |
||
To access the notices, select Start > Help and |
● |
Battery disposal information |
|
Support > User Guides. |
|
|
|
|
|
||
Safety & Comfort Guide |
● Proper workstation setup, posture, health, and work habits |
||
To access this guide: |
● Electrical and mechanical safety information |
||
Select Start > Help and Support > User Guides. |
|
|
|
– or – |
|
|
|
Go to http://www.hp.com/ergo. |
|
|
|
|
|
||
Worldwide Telephone Numbers booklet |
HP support telephone numbers |
||
This booklet is provided with your computer. |
|
|
|
|
|
|
|
HP Web site |
● |
Support information |
|
To access this Web site, go to http://www.hp.com/ |
● Ordering parts and finding additional help |
||
support. |
● Software, driver, and BIOS (Setup Utility) updates |
||
|
|||
● Accessories available for the device
2 Chapter 1 Welcome
Resources |
For information about |
|
|
Limited Warranty* |
Warranty information |
To access the warranty: |
|
Select Start > Help and Support > HP Warranty. |
|
– or – |
|
Go to http://www.hp.com/go/orderdocuments. |
|
*You can find the expressly provided HP Limited Warranty applicable to your product in the start menu on your PC and/or in the CD/DVD provided in the box. For some countries/regions a printed HP Limited Warranty is provided in the box. In countries/ regions where the warranty is not provided in printed format, you may request a printed copy from http://www.hp.com/go/ orderdocuments or write to HP at: Hewlett Packard, MS POD, 11311 Chinden Blvd, Boise, ID 83714, USA; Hewlett Packard, POD, Via G. Di Vittorio, 9, 20063, Cernusco s/Naviglio (MI), Italy; Hewlett Packard, POD, P.O. Box 200, Alexandra Post Office, Singapore 911507. Please include your product name, warranty period (found on your serial number label), name and postal address.
Finding information |
3 |

2 Getting to know your computer
●Top
●Front
●Right side
●Left side
●Display
●Bottom
Top
TouchPad
Component |
Description |
|
|
|
|
(1) |
TouchPad zone |
Moves the pointer and selects or activates items on the screen. |
|
|
|
(2) |
TouchPad button |
Functions like the left and right buttons on an external mouse. |
|
|
|
4 |
Chapter 2 Getting to know your computer |
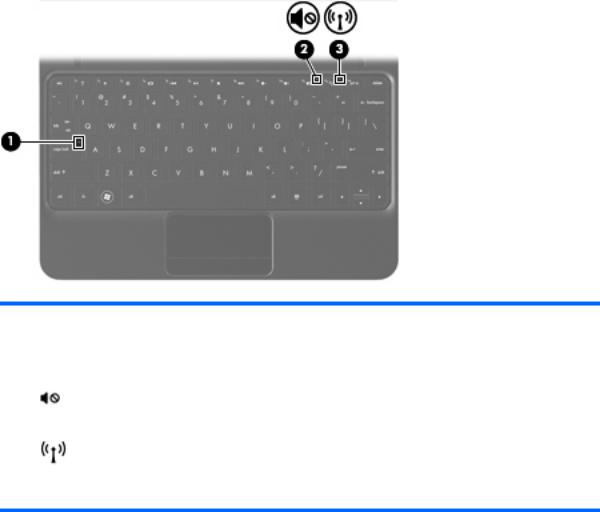
Lights
Component |
|
Description |
|
|
|
(1) |
Caps lock light |
● White: Caps lock is on. |
|
|
● Off: Caps lock is off. |
|
|
|
(2) |
Mute light |
● Amber: Computer sound is off. |
|
|
● Off: Computer sound is on. |
|
|
|
(3) |
Wireless light |
● White: An integrated wireless device, such as a wireless |
|
|
local area network (WLAN) device and/or a Bluetooth® |
|
|
device, is on. |
● Amber: All wireless devices are off.
Top 5

Keys
Component |
|
Description |
|
|
|
(1) |
esc key |
Displays system information when pressed in combination |
|
|
with the fn key. |
|
|
|
(2) |
fn key |
Executes frequently used system functions when pressed in |
|
|
combination with a function key, the num lk key, or the esc |
|
|
key. |
|
|
|
(3) |
Windows® logo key |
Displays the Windows Start menu. |
|
|
|
(4) |
Windows applications key |
Displays a shortcut menu for items beneath the pointer. |
|
|
|
(5) |
Action keys |
Execute frequently used system functions. |
|
|
|
Front
Component |
Description |
|
|
Speakers (2) |
Produce sound. |
|
|
6 |
Chapter 2 Getting to know your computer |
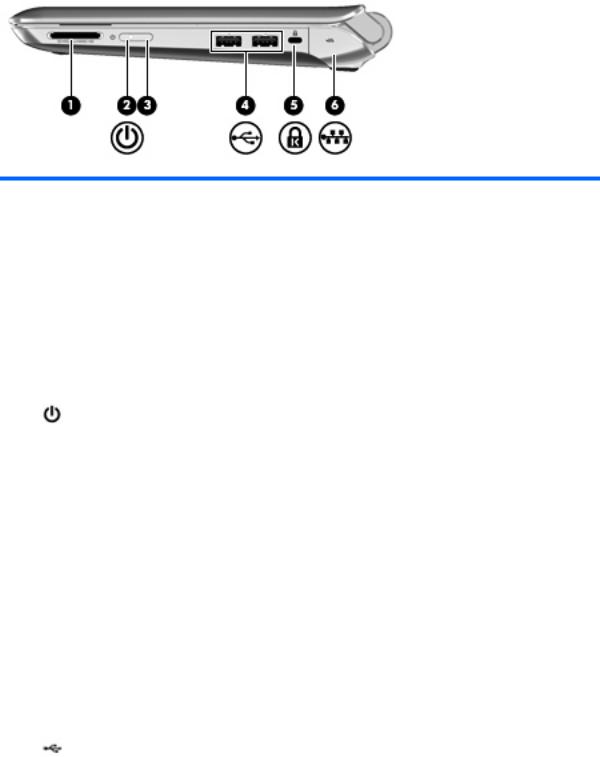
Right side
Component |
|
Description |
|
|
|
|
|
(1) |
Digital Media Slot |
Supports the following digital card formats: |
|
|
|
● |
Memory Stick |
|
|
● |
Memory Stick Pro |
|
|
● |
MultiMediaCard |
|
|
● Secure Digital (SD) Card |
|
|
|
● Secure Digital High Capacity (SDHC) Memory Card |
|
|
|
● Secure Digital Extended Capacity (SDxC) Memory |
|
|
|
|
Card |
|
|
|
|
(2) |
Power light |
● White: The computer is on. |
|
|
|
● Blinking white: The computer is in the Sleep state. |
|
|
|
● Off: The computer is off or in Hibernation. |
|
|
|
|
|
(3) |
Power switch |
● When the computer is off, slide the switch to turn on the |
|
|
|
|
computer. |
|
|
● When the computer is on, slide the switch briefly to |
|
|
|
|
initiate Sleep. |
|
|
● When the computer is in the Sleep state, slide the |
|
|
|
|
switch briefly to exit Sleep. |
|
|
● When the computer is in Hibernation, slide the switch |
|
|
|
|
briefly to exit Hibernation. |
|
|
If the computer has stopped responding and Windows |
|
|
|
shutdown procedures are ineffective, slide and hold the |
|
|
|
power switch for at least 5 seconds to turn off the computer. |
|
|
|
To learn more about your power settings, select Start > |
|
|
|
Control Panel > System and Security > Power Options, |
|
|
|
or refer to the HP Notebook Reference Guide. |
|
|
|
|
|
(4) |
USB ports (2) |
Connect optional USB devices. |
|
|
|
|
|
Right side |
7 |

Component |
|
Description |
|
|
|
(5) |
Security cable slot |
Attaches an optional security cable to the computer. |
|
|
NOTE: The security cable is designed to act as a deterrent, |
|
|
but it may not prevent the computer from being mishandled |
|
|
or stolen. |
|
|
|
(6) |
RJ-45 (network) jack and cover |
Connects a network cable. |
|
|
|
8 |
Chapter 2 Getting to know your computer |
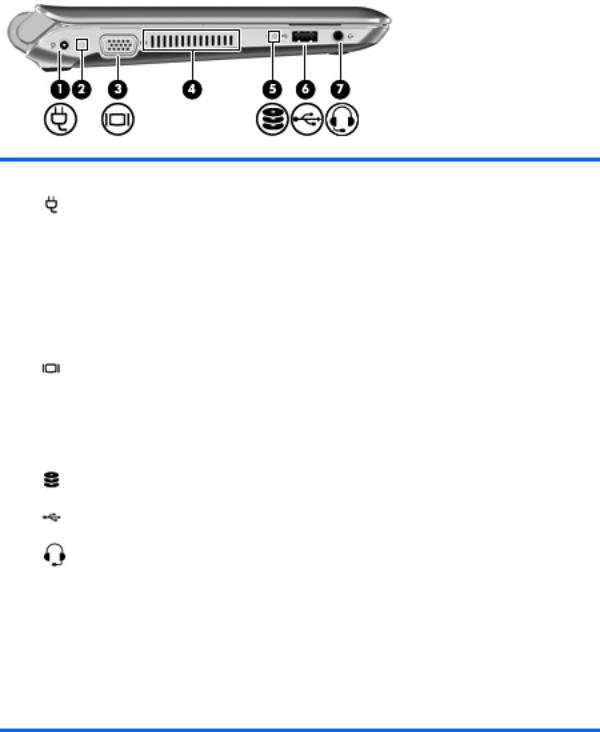
Left side
Component |
|
Description |
|
|
|
|
|
(1) |
Power connector |
Connects an AC adapter. |
|
|
|
|
|
(2) |
AC/battery light |
● |
Off: The computer is running on battery power. |
|
|
● |
Blinking amber: The battery has reached a low or critical |
|
|
|
battery level or there is a battery error. |
|
|
● |
Amber: A battery is charging. |
|
|
● |
White: The computer is connected to external power |
|
|
|
and the battery is fully charged. |
|
|
|
|
(3) |
External monitor port |
Connects an external VGA monitor or projector. |
|
|
|
|
|
(4) |
Vent |
Enables airflow to cool internal components. |
|
|
|
NOTE: The computer fan starts up automatically to cool |
|
|
|
internal components and prevent overheating. It is normal for |
|
|
|
the internal fan to cycle on and off during routine operation. |
|
|
|
|
|
(5) |
Drive light |
● |
Blinking white: The hard drive is being accessed. |
|
|
|
|
(6) |
USB port |
Connects an optional USB device. |
|
|
|
|
|
(7) |
Audio-out (headphone) jack/Audio-in |
Connects optional powered stereo speakers, headphones, |
|
|
(microphone) jack |
earbuds, a headset, or television audio. Also connects an |
|
|
|
optional headset microphone. |
|
WARNING! To reduce the risk of personal injury, adjust the volume before putting on headphones, earbuds, or a headset. For additional safety information, refer to the
Regulatory, Safety and Environmental Notices.
NOTE: When a device is connected to the jack, the computer speakers are disabled.
NOTE: The audio component must have a 4-conductor connector.
Left side |
9 |

Display
Component |
Description |
|
|
|
|
(1) |
WLAN antennas (2)* |
Send and receive wireless signals to communicate with wireless |
|
|
local area networks (WLAN). |
|
|
|
(2) |
WWAN antennas (2)* (select models only) |
Send and receive wireless signals to communicate with wireless |
|
|
wide-area networks (WWAN). |
|
|
|
(3) |
Internal microphone |
Records sound. |
|
|
|
(4) |
Webcam |
Records video and captures still photographs. |
|
|
To use the webcam, select Start > All Programs > HP > |
|
|
HP MediaSmart > HP MediaSmart Webcam. |
|
|
|
(5) |
Webcam light |
On: The webcam is in use. |
*The antennas are not visible from the outside of the computer. For optimal transmission, keep the areas immediately around the antennas free from obstructions. To see wireless regulatory notices, refer to the section of the Regulatory, Safety and Environmental Notices that applies to your country or region. These notices are located in Help and Support.
10 Chapter 2 Getting to know your computer
Loading...