


ARTXF 109

GB
1
Contents
Installation, 2-3
Unpacking and levelling
Connecting the electricity and water supplies
The first wash cycle
Technical data
Description of the washing machine
and starting a wash cycle, 4-5
Control panel
Indicator lights
How to open and shut the drum
Starting a wash cycle
Wash cycles, 6
Table of wash cycles
Personalisation, 7
Setting the temperature
Setting the spin speed
Functions
Detergents and laundry, 8
Detergent dispenser drawer
Bleach cycle
Preparing the laundry
Garments requiring special care
Load balancing system
Precautions and tips, 9
General safety
Disposal
Saving energy and respecting the environment
Care and maintenance, 10
Cutting off the water or electricity supply
Cleaning the washing machine
Caring for your appliance door and drum
Cleaning the pump
Checking the water inlet hose
How to clean the detergent dispenser
Troubleshooting, 11
Service, 12
ARTXF 109
Instructions for use
WASHING MACHINE
English,1
GB
РУССКИЙ, 13
CIS
Polski,25
PL
Magyar,37
HU
2
GB
Installation
!Keep this instruction manual in a safe place for
future reference. Should the appliance be sold,
transferred or moved, make sure the instruction
manual accompanies the washing machine to inform
the new owner as to its operation and features.
!Read these instructions carefully: they contain vital
information on installation, use and safety.
Unpacking and levelling
Unpacking
1. Unpack the
washing machine.
2. Check whether the
washing machine has
been damaged during
transport. If this is the
case, do not install it
and contact your
retailer.
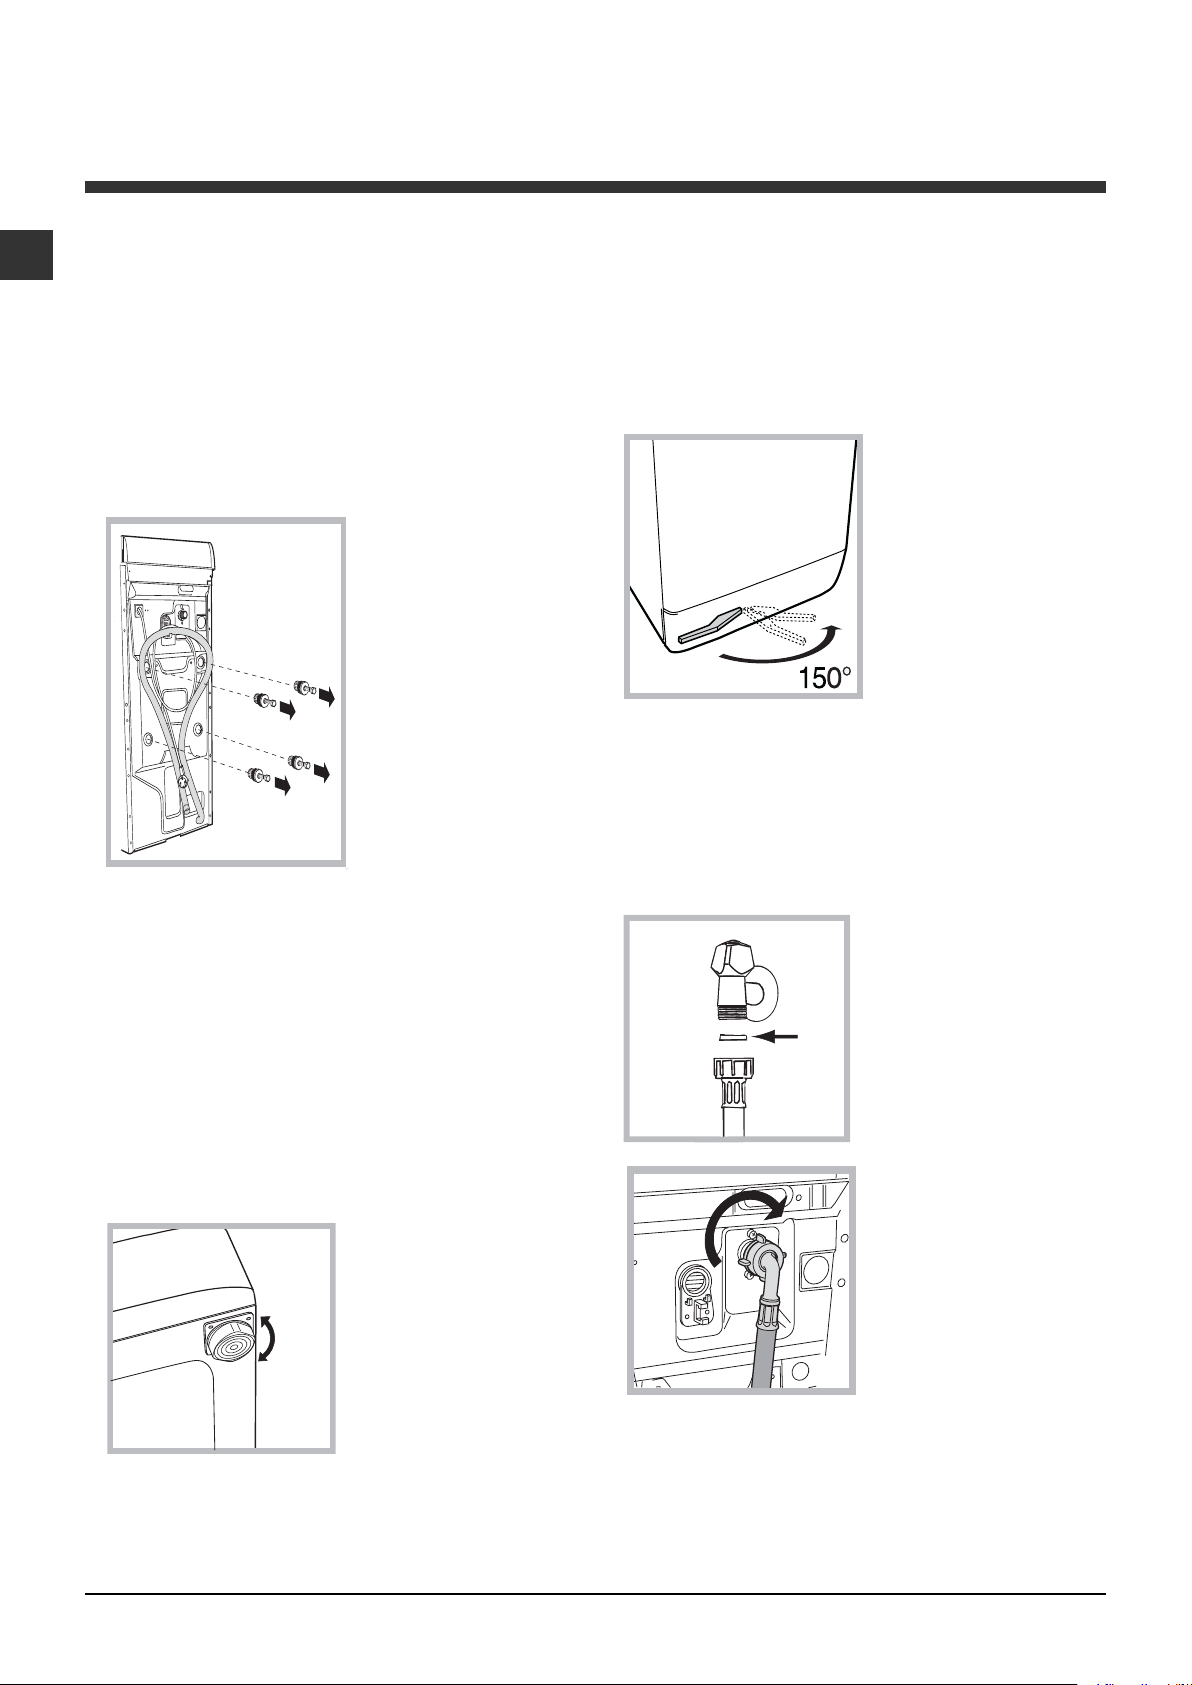
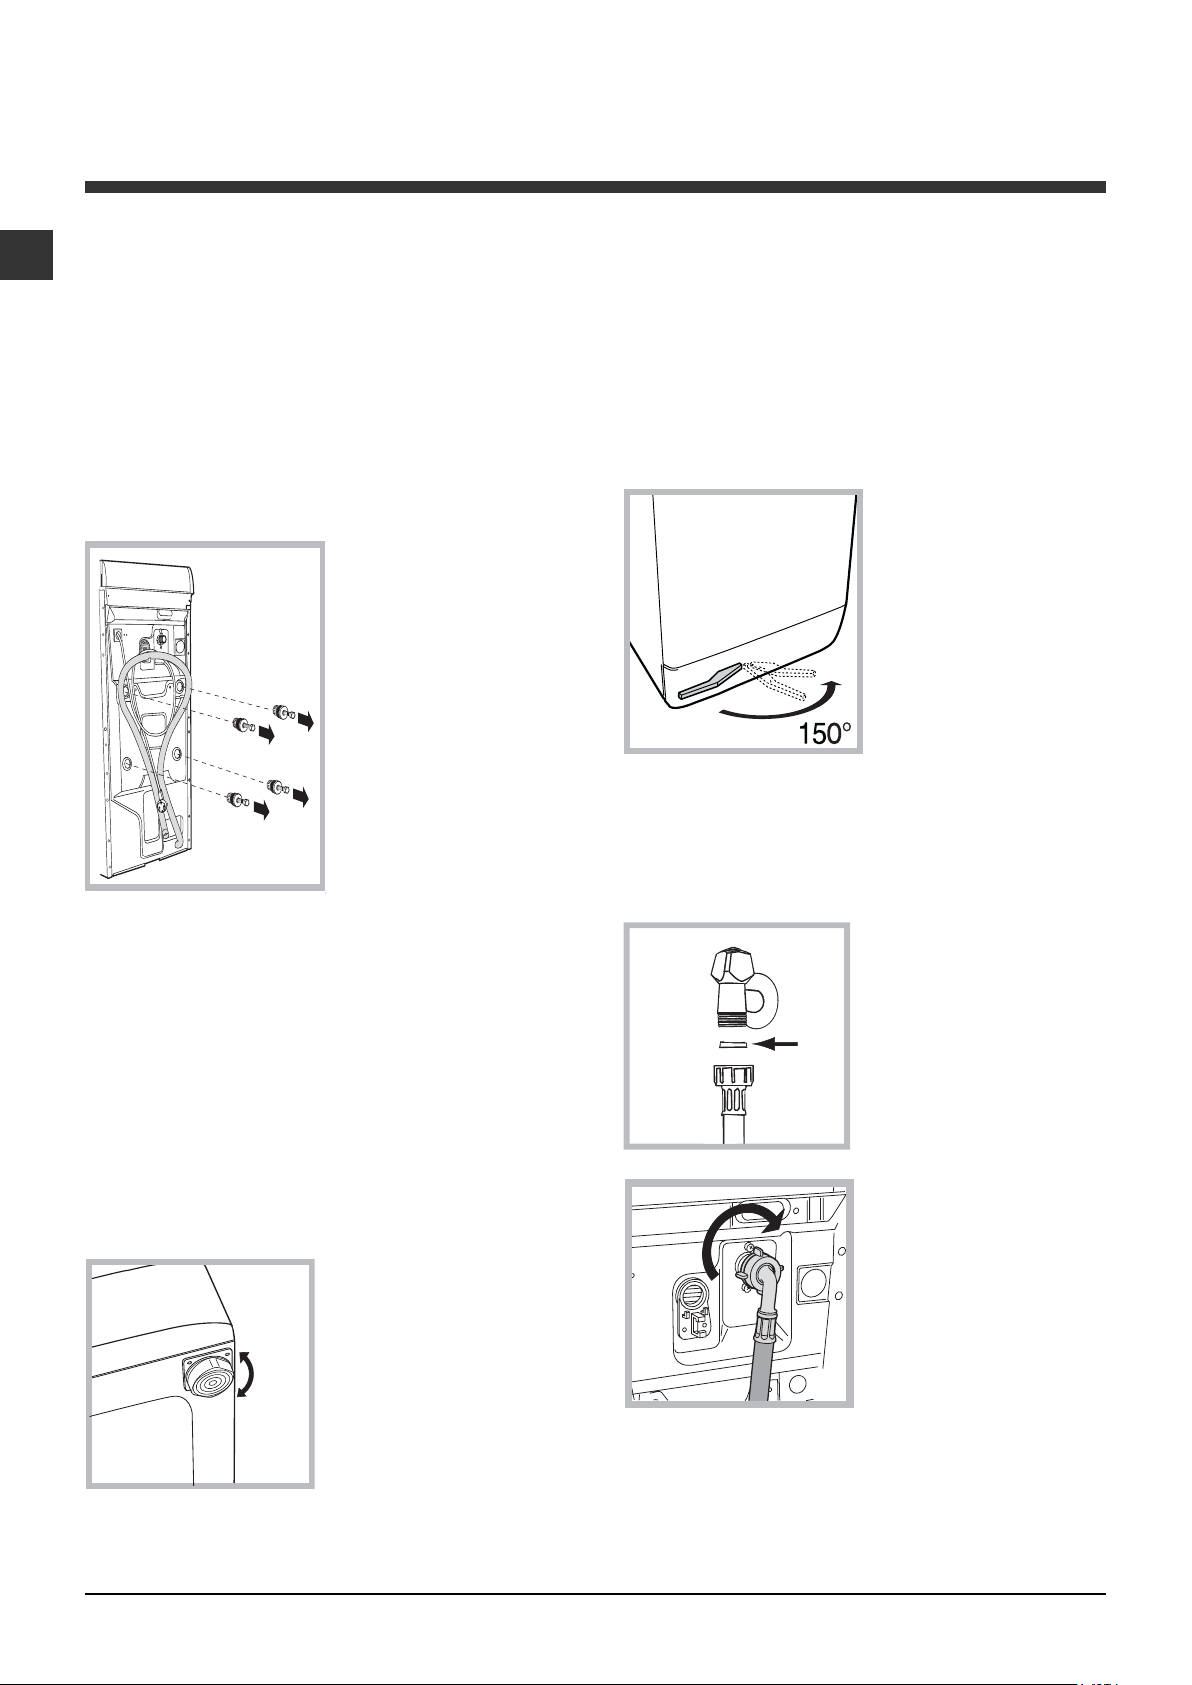
3. Remove the four
protective screws and
the rubber washer
with the respective
spacer, situated on
the rear of the
appliance (see figure).
4. Seal the gaps using the plastic plugs provided.
5. Keep all the parts: you will need them again if
the washing machine needs to be moved to
another location.
Warning: Warning:
Warning: Warning:
Warning: should the screws be re-used, make sure
you fasten the shorter ones at the top.
!Packaging materials are not children's toys.
Levelling
Your machine may make a considerable amount of
noise if the two front feet have not been adjusted
correctly.
1. Install the washing
machine on a flat
sturdy floor, without
resting it up against
walls, furniture cabinets
or other.
2. If the floor is not
perfectly level, com-
pensate for any
unevenness by
tightening or loosening
the adjustable front feet (see figure); the angle of
inclination, measured according to the worktop,
must not exceed 2°.
Levelling your appliance correctly will provide it with
stability and avoid any vibrations, noise and shifting
during operation. If it is placed on a fitted or loose
carpet, adjust the feet in such a way as to allow
enough room for ventilation beneath the washing
machine.
Putting your appliance in place and moving it.
If your washing
machine is equipped
with a special set of
retractable wheels you
can easy move it. To
lower the wheels and
thus move the
appliance effortlessly,
just pull the lever,
situated on the left-
hand side beneath the
base. Once the
appliance is in the required position, put the lever
back in place. The washing machine is now firmly in
place (see figure).
Electric and water connections
Connecting the water inlet hose
1. Insert seal A into the
end of the inlet hose and
screw the latter onto a
cold water tap with a 3/4
gas threaded mouth (see
figure).
Before making the
connection, allow the
water to run freely until it
is perfectly clear.
2. Connect the other
end of the water inlet
hose to the washing
machine, screwing it
onto the appliance's
cold water inlet, situated
on the top right-hand
side on the rear of the
appliance (see figure).
3. Make sure there are no kinks or bends in the hose.
! The water pressure at the tap must be within the
values indicated in the Technical details table
(on the next page).
! If the water inlet hose is not long enough, contact
a specialist store or an authorised serviceman.
A
GB
3
Technical data
Model
ARTXF 109
Dimensions
width 40 cm
height 85 cm
depth 60 cm
Capacity
from 1 to 6 kg
Electrical
connections
please refer to th e t ech ni cal dat a
plate fix ed t o t h e mach in e
Wa ter connections
maximu m pres su re 1 MPa (1 0 bar)
mini mu m pr es s u r e 0.0 5 MPa ( 0 .5 bar )
drum capacity 42 litres
Spin sp e ed
up to 1000 rotations per minute
Energy rated
programmes
according to
regulation
EN 60456
programme 7; temperature 60°C;
using a load of 6 kg.
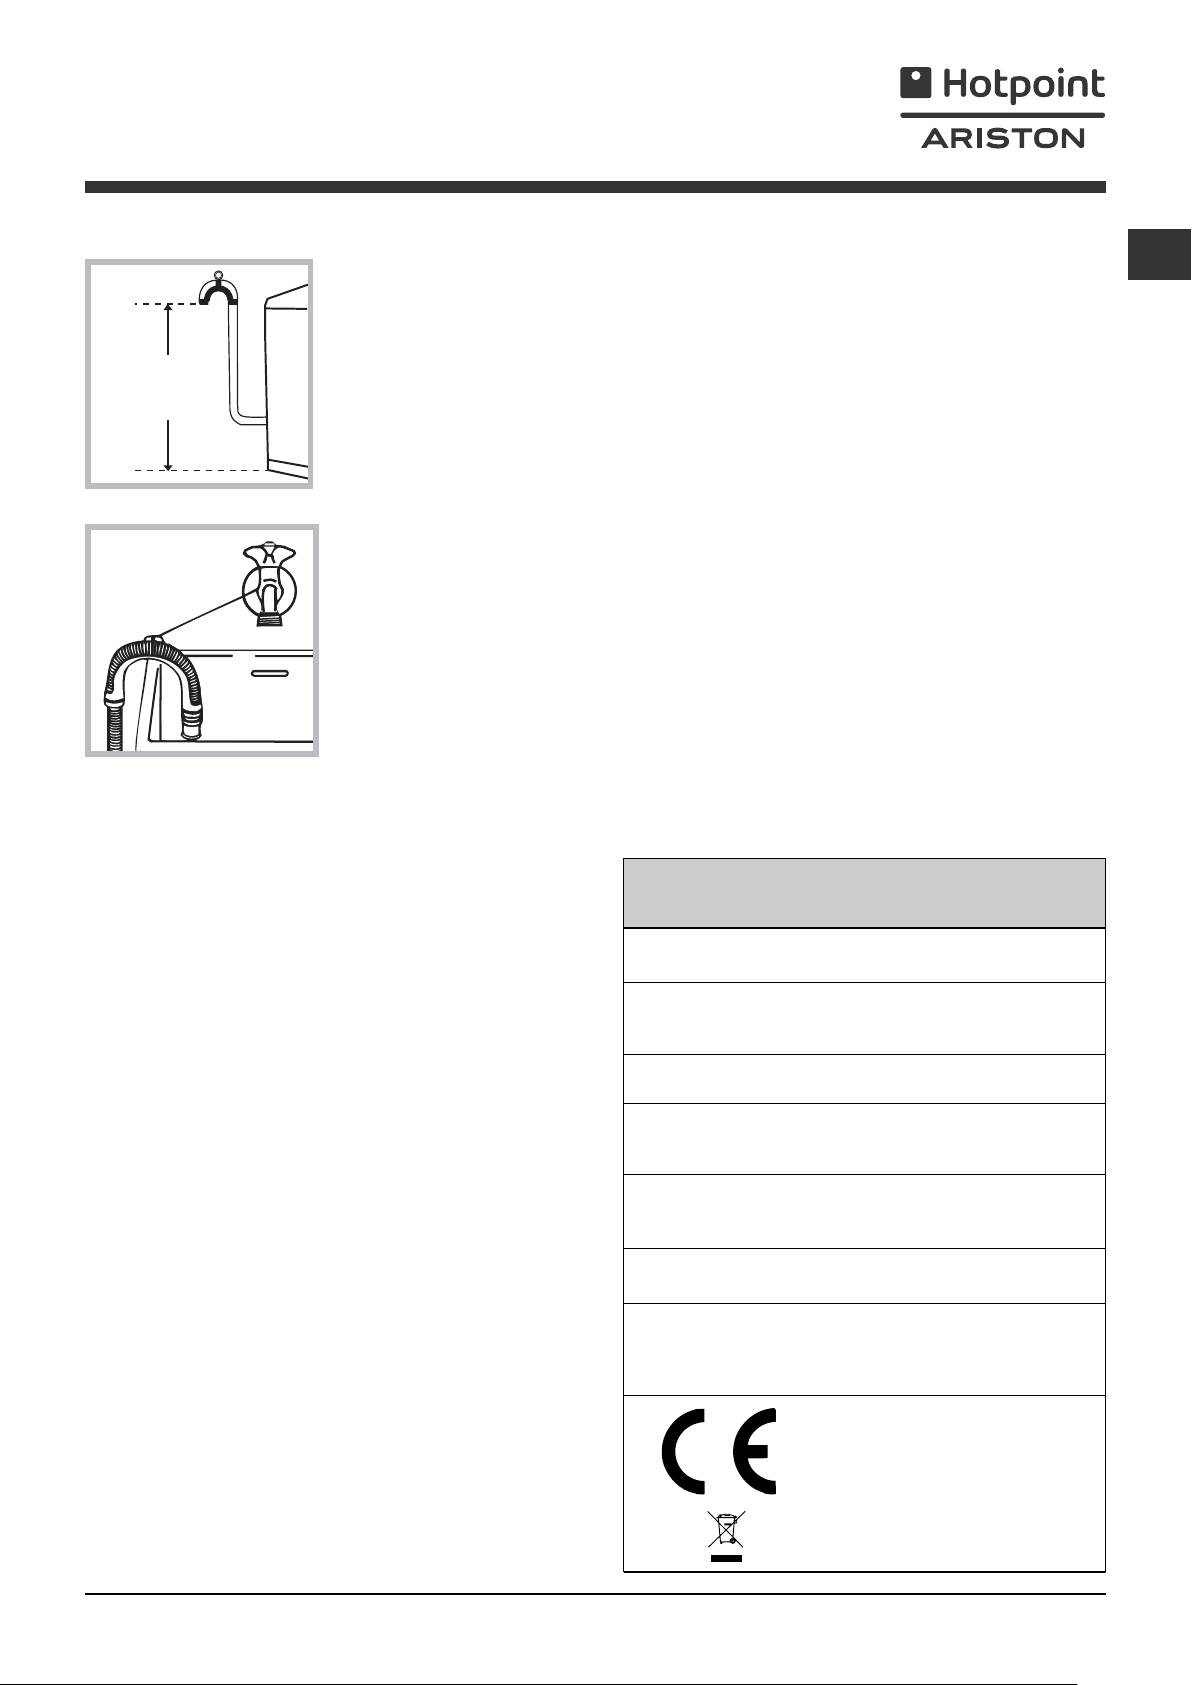
Thi s app lian ce co nfo rms t o t he
following EC Directives:
- 89/336/EEC dated 03/05/89
(Electromagnetic Compatibility) and
subsequent modifications
- 2002/96/EC
- 2006/95/EC (Low Voltage)
FP
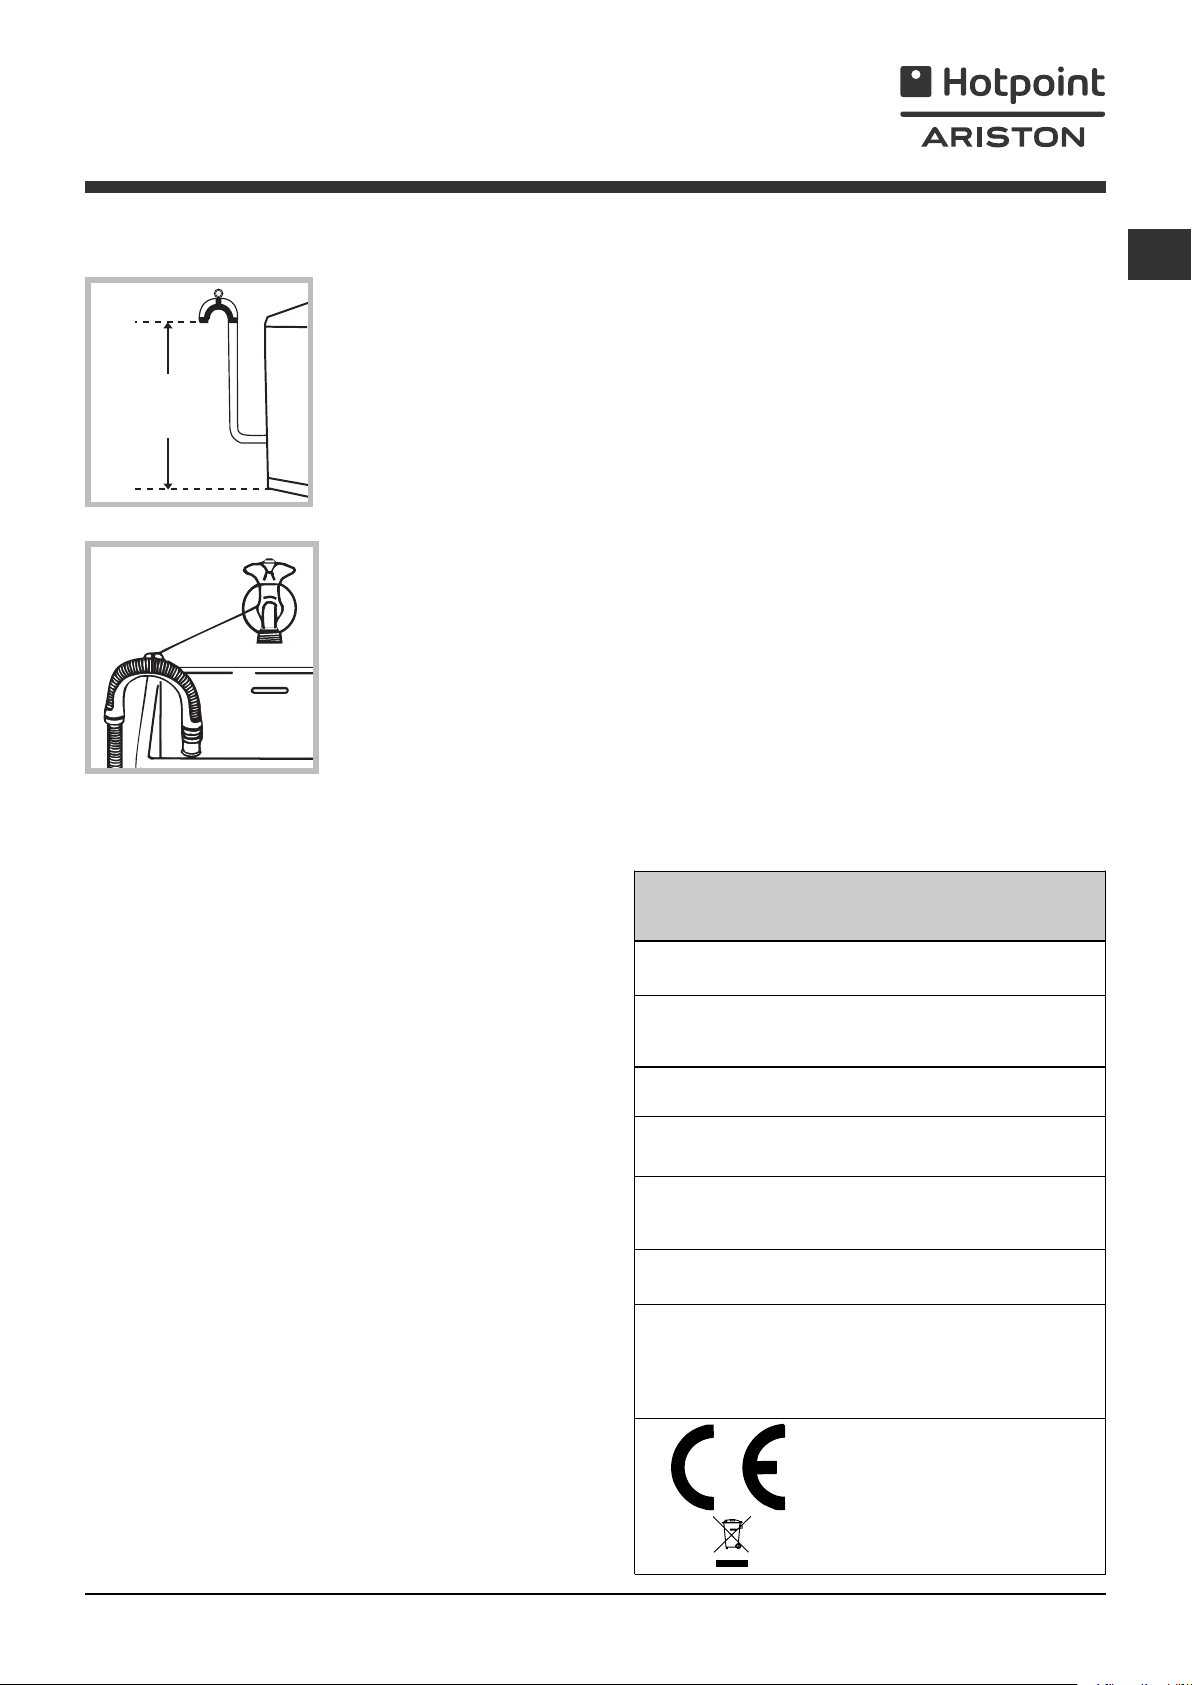
Connecting the drain hose
Connect the drain hose,
without bending it, to a
drainage duct or a wall
drain located at a height
between 65 and 100 cm
from the floor;
alternatively, rest it on
the side of a washbasin
or bathtub, fastening the
duct supplied to the tap
(see figure). The free end
of the hose should not
be underwater.
! We advise against the use of hose extensions; if it is
absolutely necessary, the extension must have the
same diameter as the original hose and must not
exceed 150 cm in length.
Electrical connections
Before plugging the appliance into the electricity
socket, make sure that:
• the socket is earthed and complies with all
applicable laws;
• the socket is able to withstand the maximum power
load of the appliance as indicated in the Technical
data table (see opposite);
• the power supply voltage falls within the values
indicated in the Technical data table (see opposite);
• the socket is compatible with the plug of the
washing machine. If this is not the case, replace
the socket or the plug.
! The washing machine must not be installed
outdoors, even in covered areas. It is extremely
dangerous to leave the appliance exposed to rain,
storms and other weather conditions.
! When the washing machine has been installed, the
electricity socket must be within easy reach.
! Do not use extension cords or multiple sockets.
! The cable should not be bent or compressed.
! The power supply cable must only be replaced by
authorised technicians.
Warning! The company shall not be held responsible
in the event that these regulations are not respected.
The first wash cycle
Once the appliance has been installed, and before
you use it for the first time, run a wash cycle with
detergent and no laundry, using the wash cycle 2.
4
GB
Wash
Rinse
Spin
Drain
End of wash cycle
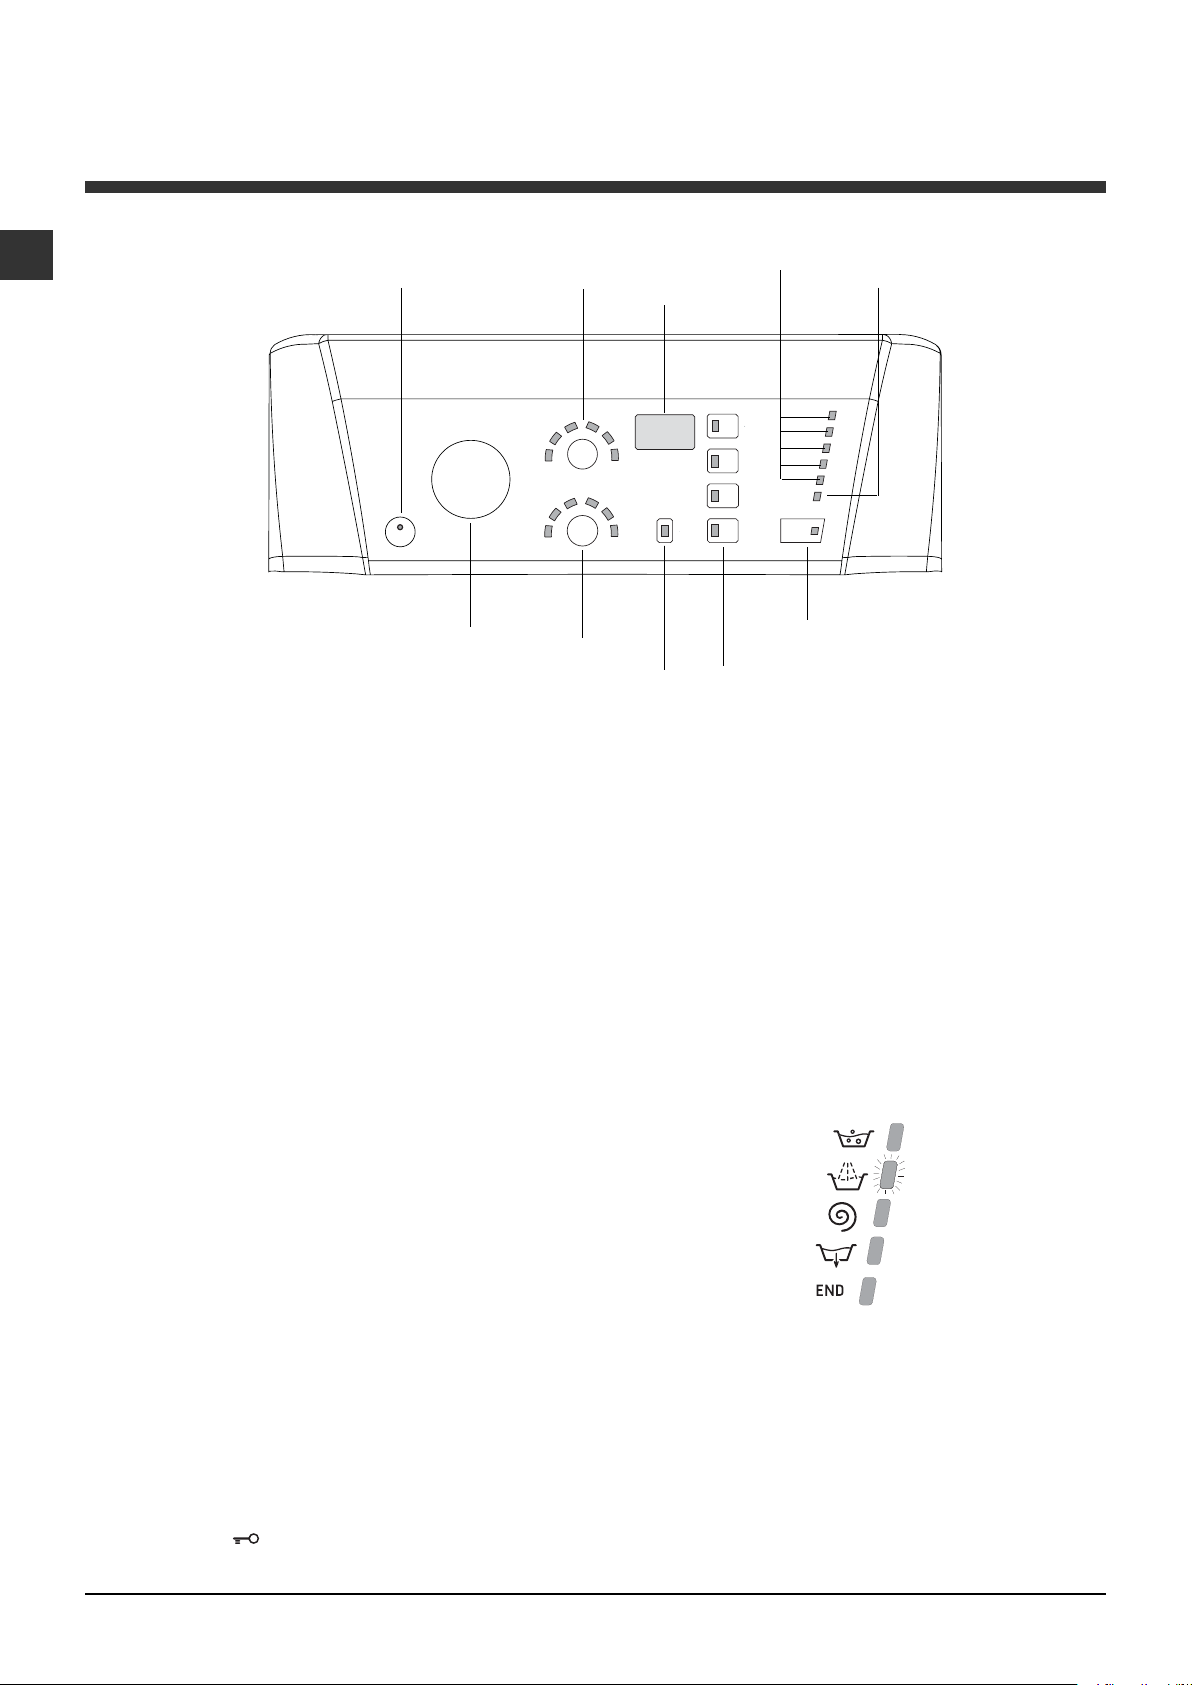
Description of the washing machine
and starting a wash cycle
TEMPERATURE
button
WASH CYCLE
PROGRESS
FUNCTION
buttons
with indicator lights
ON/OFF
button with indicator light
SPIN
SPEED
button
LID LOCKED
indicator light
START/PAUSE
button with indicator light
Control panel
WASH CYCLE
knob
DISPLAY
CONTROL P ANEL LOCK
button with indicator light
ON/OFF button with indicator light: switches the
machine on and off. If the indicator light is illuminated,
this indicates that the machine is switched on.
WASH CYCLE knob: programmes the wash cycles.
During the wash cycle, the knob does not move.
SPIN SPEED button: sets the spin speed or exclude
the spin cycle completely (see “Personalisation”).
TEMPERATURE button: sets the temperature or the
cold wash cycle (see “Personalisation”).
DISPLA Y: indicates the time remaining for the selected
wash cycle and, if a delayed start has been programmed,
the time remaining until the start of the wash cycle.
CONTROL PANEL LOCK button with indicator light:
activates or deactivates the control panel lock.
FUNCTION buttons with indicator light: used to
select the available functions. The indicator light
corresponding to the selected function will remain lit.
WASH CYCLE PROGRESS
indicator light
s: used to
monitor the progress of the wash cycle. The illuminated
indicator light shows which phase is in progress.
DOOR LOCKED indicator light: indicates whether
the door may be opened or not (see next page).
START/PAUSE button with indicator light: starts or
temporarily interrupts the wash cycles.
N.B. To pause the wash cycle in progress, press this
button; the corresponding indicator light will flash
orange, while the indicator light for the current wash
cycle phase will remain lit in a fixed manner. If the
DOOR LOCKED
indicator light is switched off, the
door may be opened.
To start the wash cycle from the point at which it was
interrupted, press this button again.
Indicator lights
The indicator lights provide important information.
This is what they can tell you:
Wash cycle phase indicator lights
As the WASH CYCLE knob is rotated, the indicator
lights illuminate, indicating the stages which will be
performed by the machine in accordance with the
selected wash cycle.
Once the desired wash cycle has been selected and has
begun, the indicator lights switch on one by one to
indicate which phase of the cycle is currently in progress.
Function buttons and corresponding indicator lights
When a function is selected, the corresponding
indicator light will illuminate.
If the selected function is not compatible with the
programmed wash cycle, the corresponding indicator
light will flash, a sound signal will be emitted and the
function will not be activated. If a function which is
incompatible with another function selected
previously, only the most recent selection will remain
active.
GB
5
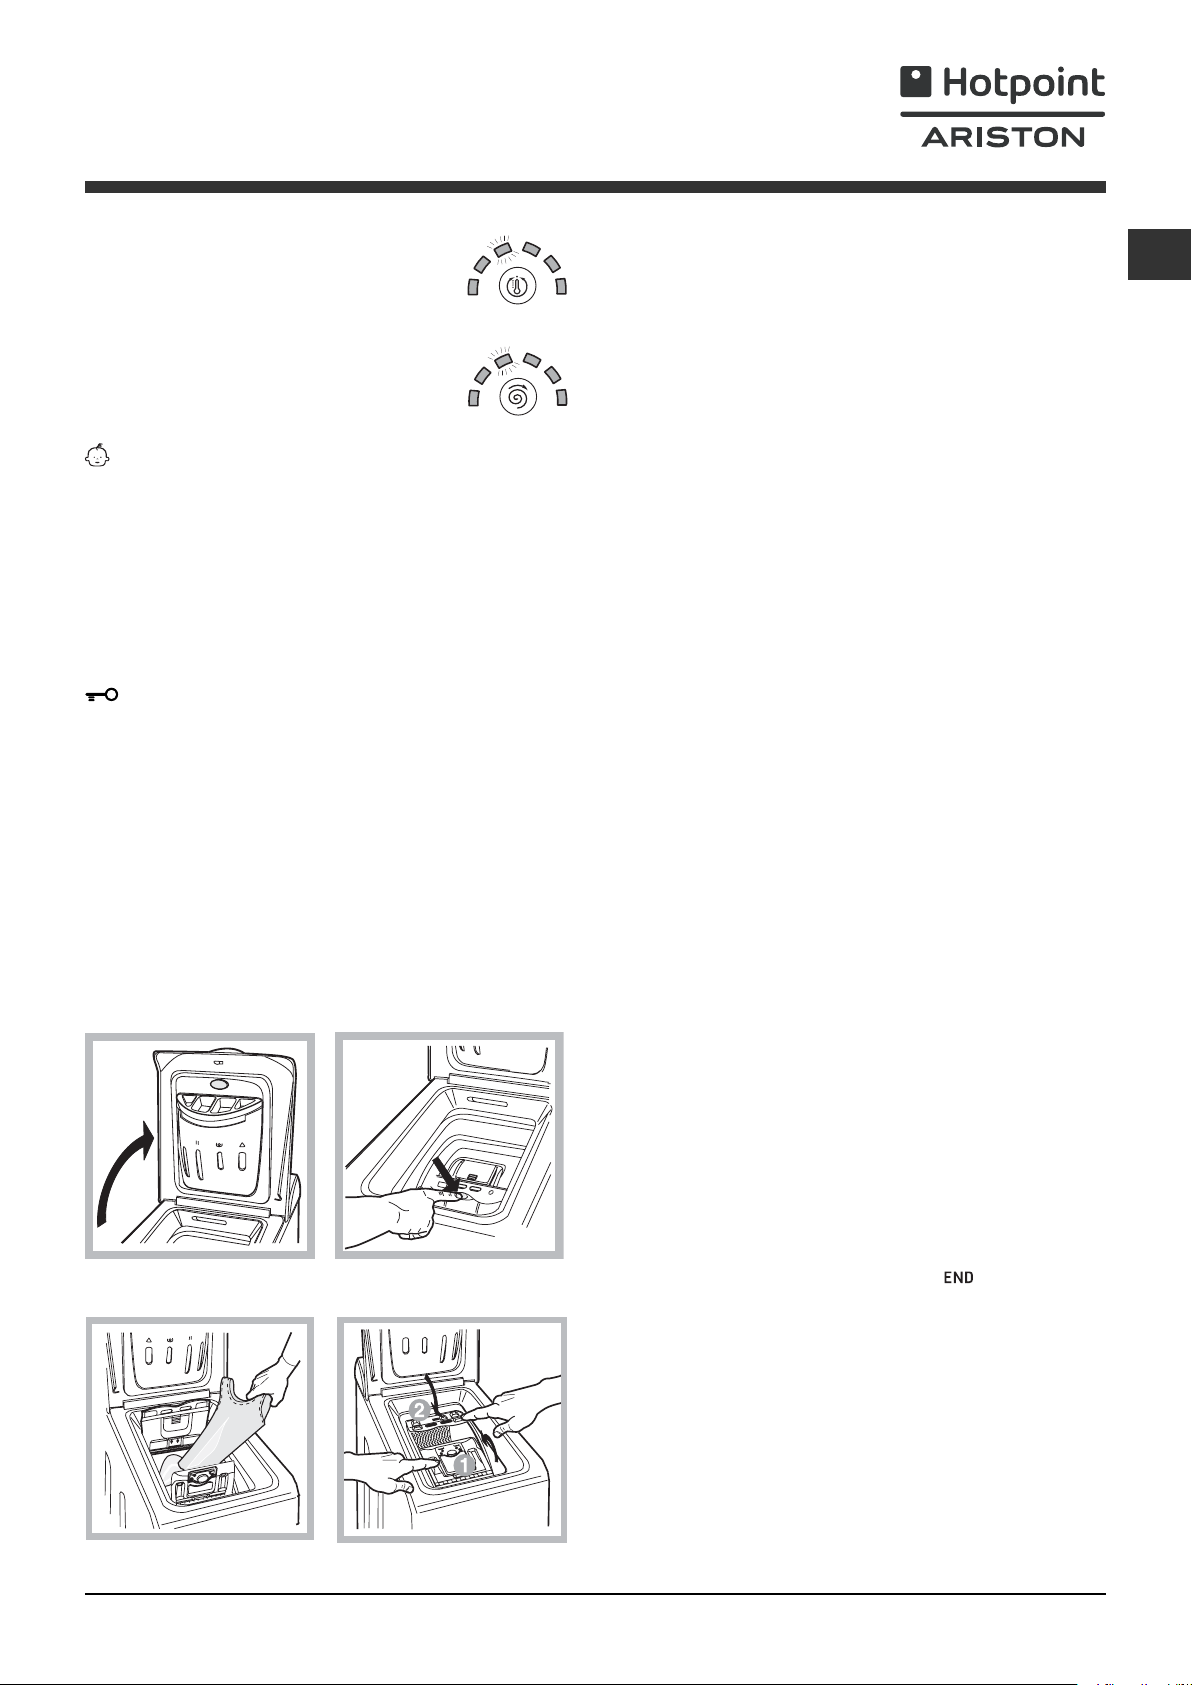
Fig. 1
Fig. 2
Fig. 3
Fig. 4
A) Opening (Fig. 1):
Lift the external lid and open it completely .
B) Opening the drum (Soft opening):
With one finger, push the button indicated in fig. 2
and the drum will open delicately.
C) Loading the washing machine (Fig. 3).
D) Shutting (Fig. 4):
- close the drum fully by first shutting the front
door followed by the rear one;
- then ensure the hooks on the front door are
perfectly housed within the seat of the rear door;
- after the hooks have clicked into position, press
both doors lightly downwards to make sure they
do not come loose;
- finally shut the external lid.
E) Drum End Stop (Fig. 2):
Once the wash cycle has been completed, the drum will
position itself with doors facing upward for ease pf opening.
Starting a wash cycle
1. Switch the washing machine on by pressing the
ON/OFF button. All indicator lights will switch on for a
few seconds, then they will switch off and the START/
PAUSE indicator light will pulse.
2. Load the laundry, close the door and the lid.
3. Set the WASH CYCLE knob to the desired
programme.
4. Set the washing temperature (see
“Personalisation”).
5. Set the spin speed (see “Personalisation”).
6. Measure out the detergent and washing additives
(see “Detergents and laundry”).
7. Select the desired functions.
8. Start the wash cycle by pressing the START/
PAUSE button and the corresponding indicator light
will remain lit in a fixed manner, in green.
To cancel the set wash cycle, pause the machine by
pressing the START/PAUSE button and select a new
cycle.
9. At the end of the wash cycle the
indicator light
will switch on. The LID LOCKED indicator light will
switch off, indicating that the door may be opened.
Take out your laundry and leave the appliance door
ajar to make sure the drum dries completely.
Switch the washing machine off by pressing the ON/
OFF button.
Temperature indicator light
When a temperature value is selected,
the corresponding indicator light will
illuminate.
Spin indicator light
When a spin value is selected, the
corresponding indicator light will illuminate.
Control panel lock indicator light
To activate the control panel lock, press and hold the
button for approximately 2 seconds. When the
indicator light is illuminated, the control panel is
locked. This means it is possible to prevent wash
cycles from being modified accidentally, especially
where there are children in the home.
To deactivate the control panel lock, press and hold
the button for approximately 2 seconds.
Lid locked indicator light
If this indicator light is on, the appliance door is locked to
prevent it from being opened accidentally; to avoid any
damage, wait for the indicator light to switch off (it will take
about three minutes) before you open the appliance door.
N.B. If the DELAY TIMER function is activated, the door
cannot be opened; pause the machine by pressing the
START/PAUSE button if you wish to open it.
! If the START/PAUSE indicator light (orange) flashes
rapidly at the same time as the function indicator
light, this indicates a problem has occurred (see
“Troubleshooting”).
How to open and to close the drum
6
GB
Wash cycles
The information contained in the table is intended as a guide only .
For all T est Institutes:
1) T est wash cycle in compliance with regulation EN 60456: set wash cycle 7 with a temperature of 60°C.
2) Long wash cycle for cottons: set wash cycle 2 with a temperature of 40°C.
3) Short wash cycle for cottons: set wash cycle 3 with a temperature of 40°C.
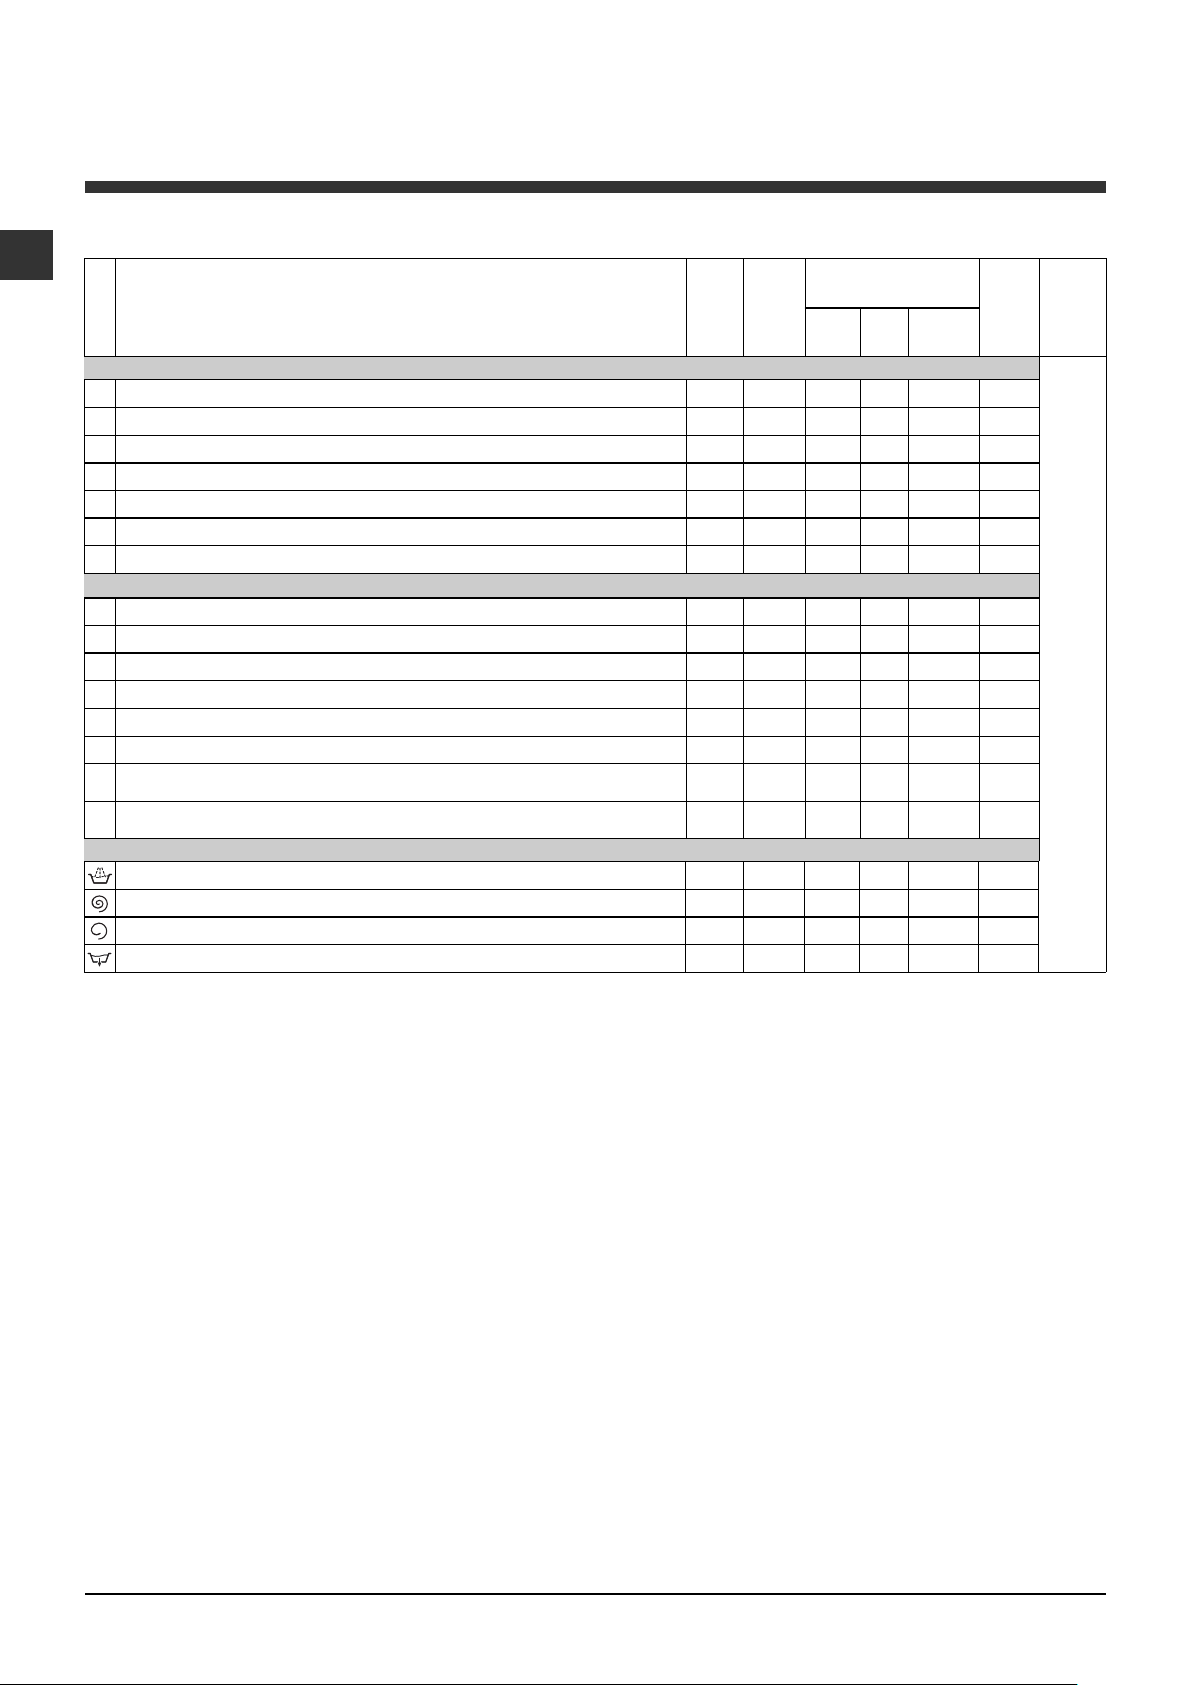
Wash cycles
Table of wash cycles
Description of the wash cycle
Max
.
temp.
(°C)
Max.
speed
(rpm)
Detergents
Max.
load
(kg)
Cycle
duration
Bleach Wash
Fabric
softener
Specia l cycles
7
Sanitizing cycle 90°: Extremely s oil ed whi tes.
90° 1000
zz z
6
7
Sanitizing cycle 90° (1): Heavily s o iled whit es and r esistant colo urs .
60° 1000 -
zz
6
8
Goodnigt cycle: Lightl y soiled deli cat e colours .
40° 800 -
zz
4
9
Baby cycle: Heavily soiled delicate colours.
40° 800 -
zz
2
10
Shirts
40° 600 -
zz
2
11
Silk/Curtains: For g ar ments in silk and viscose, lin gerie.
30° 0 -
zz
1
12
Wool: For w ool, cashmere, etc.
40° 600 -
zz
1
Everyday wash cycles (Daily)
1
Cotton + Prewash 90°: Extremely soiled wh ites.
90° 1000 -
zz
6
2
Cotton: Heavily so iled whites an d r esis tant colours.
60° 1000
zz z
6
2
Cotton (2): Heavily soiled whites and delicate colours.
40° 1000
zz z
6
3
Coloured Cottons (3): Lightl y soiled wh i tes and deli cate colo urs .
40° 1000
zz z
6
4
Synthetics re si stents: Heavi ly soiled resis tant colours .
60° 800 -
zz
2,5
4
Synthetics deli c a te s: Lightly soiled resistant colours.
40° 800 -
zz
2,5
5
Mix 30': To refresh lightly soiled garments quickly (not su itable for wool,
silk and clothes which require washing by hand).
30° 800 -
zz
3
6
Mix 15': To refresh lightly soiled garments quickly (not su itable for wool,
silk and clothes which require washing by hand).
30° 800 -
zz
1,5
Partials wash c ycles
Rinse - 1000
z
-
z
6
Spin - 1000 -- - 6
Light spin - 800 -- - 2,5
Drain no spin - 0 -- - 6
Specials wash cycles
Sanitizing cycle (wash cycle 7). A high-temperature hygienic wash cycle (over 60°C) which requires the use of bleach.
Pour the bleach, the detergent and the additives into the relevant compartments (see paragraph entitled
“Detergent dispenser drawer”).
Goodnigt cycle (wash cycle 8). This is a silent cycle which can be run at night, when the electricity prices are lower. The
wash cycle is designed for cottons and synthetics. At the end of the cycle the machine stops while there is still water in
the drum; to spin and drain the laundry press the START/PAUSE button; alternatively the machine will perform the spin
cycle and drain the water automatically after 8 hours.
Baby cycle (wash cycle 9). This wash cycle can be used to remove the soiling typically caused by babies, while ensuring
that all detergent is removed from nappies in order to prevent the delicate skin of babies from suffering allergies. The
cycle has been designed to reduce the amount of bacteria by using a greater quantity of water and optimising the effect
of special disinfecting additives added to the detergent.
Mix 30’ (wash cycle 5) this wash cycle was designed to wash lightly soiled garments quickly: it lasts just 30 minutes and
therefore saves both energy and time. By selecting this wash cycle (5 at 30°C), it is possible to wash different fabrics
together (except for wool and silk items), with a maximum load of 3 kg.
Mix 15’(wash cycle 6) this wash cycle was designed to wash lightly soiled garments quickly: it lasts just 15 minutes and
therefore saves both energy and time. By selecting this wash cycle (6 at 30°C), it is possible to wash different fabrics
together (except for wool and silk items), with a maximum load of 1.5 kg.
The duration of the wash cycles can be checked on the display .

GB
7
Setting the temperature
By pressing the TEMPERATURE button to set the wash temperature (see Table of wash cycles).
The temperature may be lowered, or even set to a cold wash (
).
The washing machine will automatically prevent you from selecting a temperature which is higher than the
maximum value set for each wash cycle.
Setting the spin speed
By pressing the SPIN SPEED button to set the spin speed for the selected wash cycle.
The maximum spin speeds available for each wash cycle are as follows:
Wash cycles Maximum spin speed
Cottons 1000 rpm
Synthetics 800 rpm
Wool 600 rpm
Silk drain only
The spin speed may be lowered, or the spin cycle can be excluded altogether by selecting the symbol
.
The washing machine will automatically prevent you from selecting a spin speed which is higher than the
maximum speed set for each wash cycle.
Functions
The various wash functions available with this washing machine will help to achieve the desired results, every time.
To activate the functions:
1. Press the button corresponding to the desired function;
2. the function is enabled when the corresponding indicator light is illuminated.
Note: If the indicator light flashes rapidly, this signals that this particular function may not be selected in
conjunction with the selected wash cycle.
Delay timer
To set a delayed start for the selected wash cycle, press the button repeatedly until the desired delay time is
displayed (this may be between 1 hour and 24 hours).
To disable the function press the button until the text
is displayed.
N.B. Once you have pressed the START/PAUSE button, the delay time may only be decreased if you wish to modify it.
! This option is enabled with all programmes.
Super Wash
Because a greater quantity of water is used in the initial phase of the cycle, and because of the increased cycle
duration, this function offers a high-performance wash.
! This function may not be used in conjunction with wash cycles 5, 6, 7, 11, 12,
, , , .
Extra rinse
By selecting this function, the efficiency of the rinse is increased and optimal detergent removal is guaranteed. It is
particularly useful for sensitive skin.
! This function may not be used in conjunction with wash cycles 5, 6,
, , .
Easy iron
By selecting this function, the wash and spin cycles will be modified in order to reduce the formation of creases. At
the end of the cycle the washing machine will perform slow rotations of the drum.
For the 4, 8, 11 wash cycle, the machine will end the cycle while the laundry is soaking, the EASY IRON and
START/PAUSE indicator lights will flash (orange) and the RINSE phase will remain lit in a fixed manner. To drain the
water so that the laundry may be removed, press the START/PAUSE button or the EASY IRON button.
!
This function may not be used in conjunction with wash cycles 5, 6, 7, 8, 9, 12, , , .
Personalisation

8
GB
Detergents and laundry
Detergent dispenser drawer
Good washing results also depend on the correct
dose of detergent: adding too much detergent won't
necessarily make for a more efficient wash, and may
in fact cause build up on the interior of your appliance
and even pollute the environment.
Open up the detergent
dispenser and pour in
the detergent and fabric
softener, as follows.
compartment 1: Detergent for pre-wash
compartment 2: Detergent for the wash cycle
(powder or liquid)
It is recommended that you place liquid detergent
directly into the compartment using the appropriate
dosing cup.
compartment 3: Additives (softener, etc.)
When pouring the softener in compartment 3, avoid
exceeding the "max" level indicated.
The softener is added automatically into the machine
during the last wash. At the end of the wash
programme, some water will be left in compartment
3. This is used for the inlet of denser fabric softeners
into the machine, i.e. to dilute the more concentrated
softeners. Should more than a normal amount of
water remain in compartment 3, this means the
emptying device is blocked. For cleaning instructions,
see “Care and maintenance”.
compartment 4: Bleach
Bleach cycle
Bleaching may only be performed in conjunction with
wash cycles 2, 3, 7,
.
Pour the bleach into compartment 4; pour the
detergent and softener into the corresponding
compartments, then select one of the
abovementioned wash cycles.
This option is recommended only for very soiled
cotton garments.
Preparing the laundry
• Divide the laundry according to:
- the type of fabric/the symbol on the label
- the colours: separate coloured garments from
whites.
• Empty all garment pockets and check the buttons.
• Do not exceed the listed values, which refer to the
weight of the laundry when dry:
Durable fabrics: max. 6 kg
Synthetic fabrics: max. 2,5 kg
Delicate fabrics: max. 2 kg
Wool: max. 1 kg
How much does your laundry weigh?
1 sheet 400-500 g
1 pillow case 150-200 g
1 tablecloth 400-500 g
1 bathrobe 900-1200 g
1 towel 150-250 g
Garments requiring special care
Shirts: use special wash cycle 10 to wash shirts in
various fabrics and colours.
It guarantees maximum care is taken of the garments
and minimises the formation of creases.
Silk: use special wash cycle 11 to wash all silk
garments. We recommend the use of special
detergent which has been designed to wash delicate
clothes.
Curtains:
fold curtains and place them in a pillow
case or mesh bag. Use wash cycle 11.
Wool: Hotpoint/Ariston is the only washing machine
manufacturer to have been awarded the prestigious
Woolmark Platinum Care endorsement (M.0508) by
the Woolmark Company, which means that all
woollen garments may be washed in the washing
machine, even those which state “hand wash only”
on the label. Wash cycle 12 therefore offers
complete peace of mind when washing woollen
garments in the washing machine (max. load 1 kg)
and guarantees optimal performance.
Load balancing system
Before every spin cycle, to avoid excessive vibrations
and to distribute the load in a uniform manner, the drum
rotates continuously at a speed which is slightly greater
than the washing rotation speed. If, after several at-
tempts, the load is not balanced correctly, the machine
spins at a reduced spin speed. If the load is excessively
unbalanced, the washing machine performs the distri-
bution process instead of spinning. To encourage im-
proved load distribution and balance, we recommend
small and large garments are mixed in the load.

GB
9
Precautions and tips
! This washing machine was designed and
constructed in accordance with international safety
regulations. The following information is provided for
safety reasons and must therefore be read carefully.
General safety
• This appliance was designed for domestic use only.
• The washing machine must only be used by adults,
in accordance with the instructions provided in this
manual.
• Do not touch the machine when barefoot or with
wet or damp hands or feet.
• Do not pull on the power supply cable when
unplugging the appliance from the electricity
socket. Hold the plug and pull.
• Do not touch the drained water as it may reach
extremely high temperatures.
• Never force the porthole door. This could damage
the safety lock mechanism designed to prevent
accidental opening.
• If the appliance breaks down, do not under any
circumstances access the internal mechanisms in
an attempt to repair it yourself.
• Always keep children well away from the appliance
while it is operating.
• If the appliance has to be moved, work in a group
of two or three people and handle it with the utmost
care. Never try to do this alone, because the
appliance is very heavy.
• Before loading laundry into the washing machine,
make sure the drum is empty.
Disposal
• Disposing of the packaging materials: observe local
regulations so that the packaging may be re-used.
• The European Directive 2002/96/EC on Waste
Electrical and Electronic Equipment, requires that
old household electrical appliances must not be
disposed of in the normal unsorted municipal waste
stream. Old appliances must be collected
separately in order to optimise the recovery and
recycling of the materials they contain and reduce
the impact on human health and the environment.
The crossed out "wheeled bin" symbol on the
product reminds you of your obligation, that when
you dispose of the appliance it must be separately
collected.
Consumers should contact their local authority or
retailer for information concerning the correct
disposal of their old appliance.
Saving energy and respecting the
environment
Saving on detergent, water, energy and time
• To avoid wasting resources, the washing machine
should be used with a full load. A full load instead
of two half loads allows you to save up to 50% on
energy.
• The pre-wash cycle is only necessary on
extremely soiled garments. Avoiding it will save on
detergent, time, water and between 5 and 15%
energy.
• Treating stains with a stain remover or leaving
them to soak before washing will cut down the
need to wash them at high temperatures. A
programme at 60°C instead of 90°C or one at
40°C instead of 60°C will save up to 50% on
energy.
• Use the correct quantity of detergent depending
on the water hardness, how soiled the garments
are and the amount of laundry you have, to avoid
wastage and to protect the environment: despite
being biodegradable, detergents do contain
ingredients that alter the natural balance of the
environment. In addition, avoid using fabric
softener as much as possible.
• If you use your washing machine from late in the
afternoon until the early hours of the morning, you
will help reduce the electricity board's peak load.
The “Delay Timer” option helps to organise your
wash cycles accordingly.
• If your laundry has to be dried in a tumble dryer,
select a high spin speed. Having the least water
possible in your laundry will save you time and
energy in the drying process.
10
GB
Care and maintenance
Cutting off the water or electricity
supply
• Tur n off the water tap after every wash. This will
limit the wear of your appliance's water system
and also prevent leaks.
• Unplug your appliance when cleaning it and during
all maintenance operations.
Cleaning your appliance
The exterior and rubber parts of your appliance can
be cleaned with a soft cloth soaked in lukewarm
soapy water. Do not use solvents or abrasives.
Caring for your appliance door and
drum
• Always leave the appliance door ajar to prevent
unpleasant odours from forming.
Cleaning the pump
The washing machine is fitted with a self-cleaning
pump that does not require any maintenance.
Sometimes, small items (such as coins or buttons)
may fall into the pre-chamber that protects the
pump, situated in the lower part of the same.
! Make sure the wash cycle has ended and unplug
the appliance.
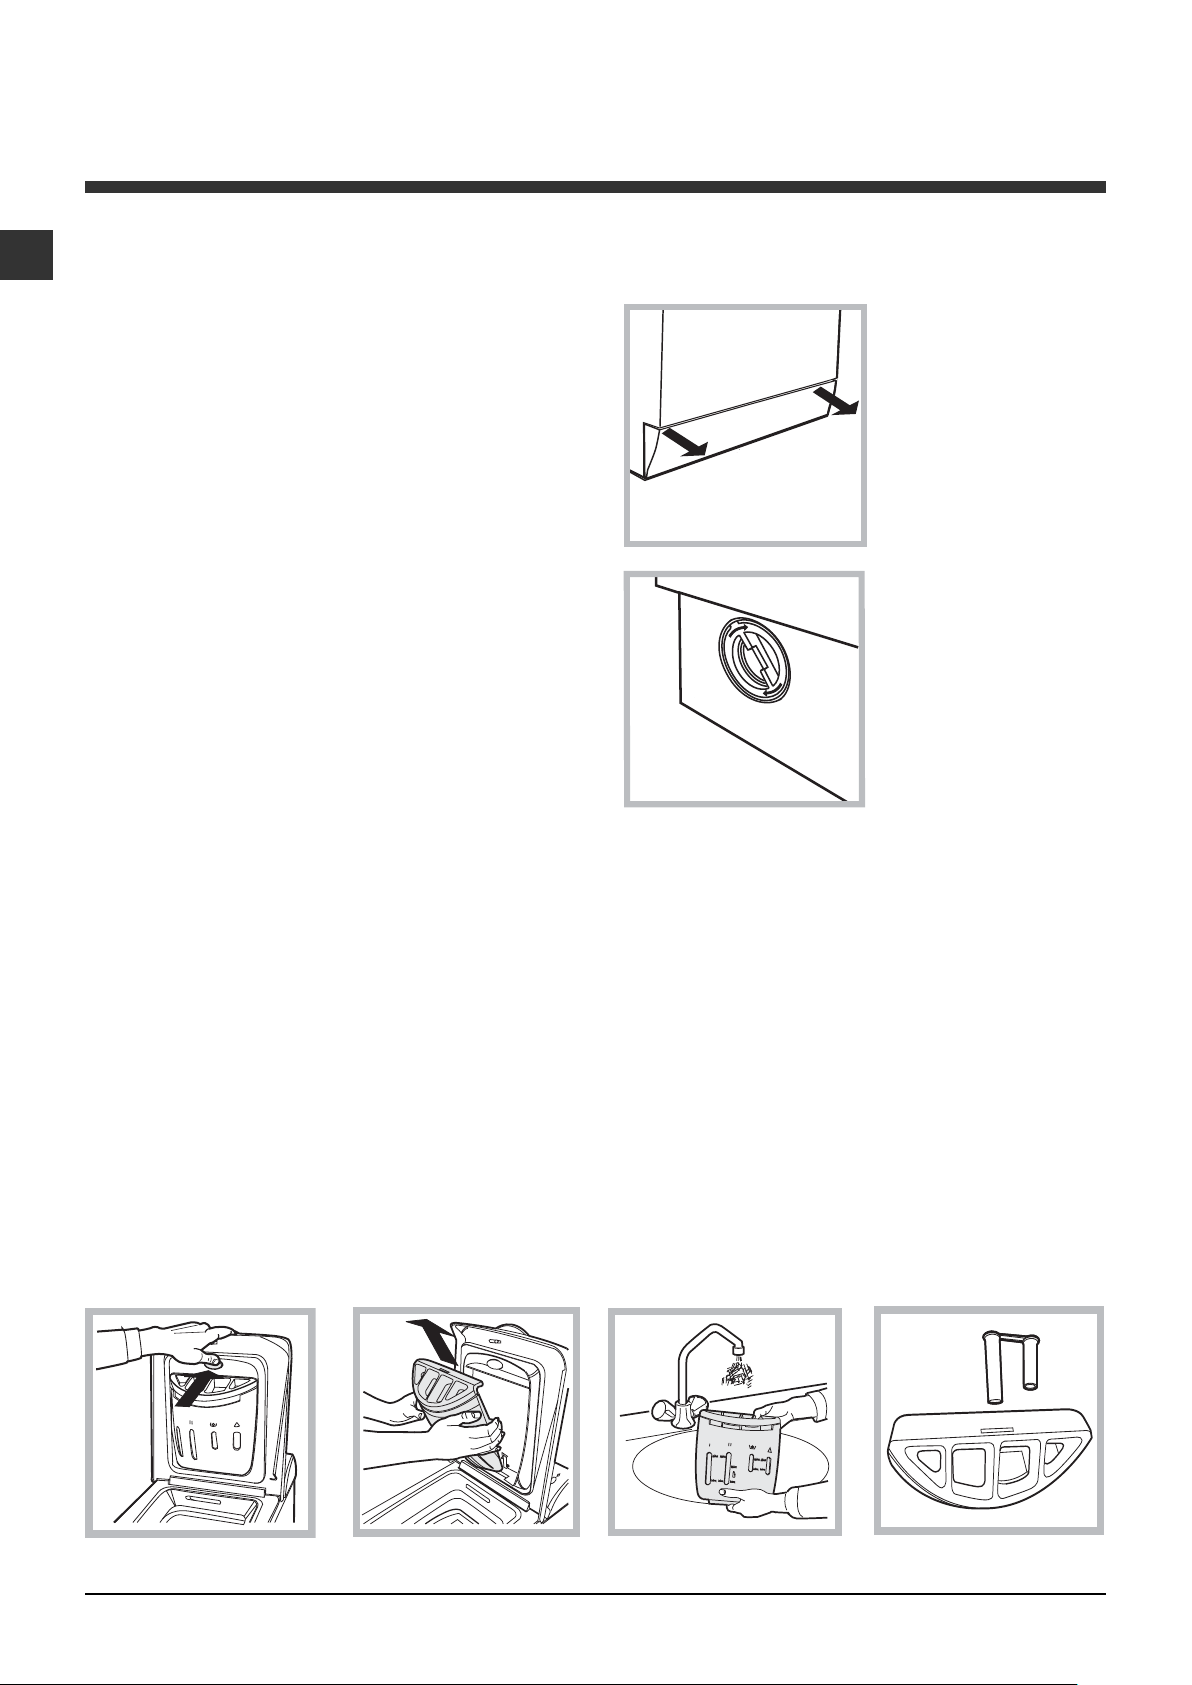
How to clean the detergent dispenser
Cleaning:
Then clean the dispenser under a tap (fig. 3) using an
old toothbrush and, once the pair of siphons inserted in
the top of compartments 1 and 2 (fig. 4) have been pulled
out, check whether the same are not clogged and then
rinse them.
Reassembly:
Do not forget to reinsert the
pair of siphons into the spe-
cial housings and then to
replace the dispenser into
its seat, clicking it into place
(fig. 4, 2 and 1).
Disassembly:
Press lightly on the large
button on the front of the
detergent dispenser and
pull it upwards (fig. 1, 2).
To recover any objects that have fallen into the pre-
chamber:
1. remove the plinth at
the bottom on the front
side of the washing
machine by pulling from
the side with your
hands (see figure);
2. unscrew the lid
rotating it anticlock-
wise (see figure): a little
water may trickle out.
This is perfectly normal;
3. clean the interior
thoroughly;
4. screw the lid back on;
5. reposition the panel,
making sure the hooks
are securely in place
before you push it onto
the appliance.
Checking the water inlet hose
Check the water inlet hose at least once a year. If
you see any cracks, replace it immediately: during the
wash cycles, water pressure is very strong and a
cracked hose could easily split open.
!!
!!
!
Never use hoses that have already been used.
Fig. 1 Fig. 2
Fig. 3
Fig. 4

GB
11
Troubleshooting
Your washing machine could fail to work. Before contacting the Technical Assistance Centre (see “Assistance”),
make sure that the problem cannot be not solved easily using the following list.
Problem:
The washing machine does not
switch on.
The wash cycle does not start.
The washing machine does not
take in water (the indicator light
for the first wash cycle stage
flashes rapidly).
The washing machine
continuously takes in and drains
water.
The washing machine does not
drain or spin.
The washing machine vibrates a
lot during the spin cycle.
The washing machine leaks.
The START/PAUSE indicator light
(orange) and the function
indicator lights flash rapidly.
There is too much foam.
Possible causes / Solutions:
• The appliance is not plugged into the socket fully, or is not making contact.
• There is no power in the house.
• The appliance Lid is not shut properly.
• The ON/OFF button has not been pressed.
• The START/PAUSE button has not been pressed.
• The water tap has not been opened.
• A delayed start has been set (see “Personalisation”).
• The water inlet hose is not connected to the tap.
• The hose is bent.
• The water tap has not been opened.
• There is no water supply in the house.
• The pressure is too low.
• The START/PAUSE button has not been pressed.
• The drain hose is not fitted at a height between 65 and 100 cm from
the floor (see “Installation”).
• The free end of the hose is under water (see “Installation”).
• The wall drainage system is not fitted with a breather pipe.
If the problem persists even after these checks, turn off the water tap,
switch the appliance off and contact the Assistance Service. If the
dwelling is on one of the upper floors of a building, there may be problems
relating to water drainage, causing the washing machine to fill with water
and drain continuously. Special anti-draining valves are available in shops
and help to avoid this inconvenience.
• The wash cycle does not include draining: some wash cycles require
the drain phase to be started manually.
• The EASY IRON function has been activated: To complete the wash
cycle, press the START/PAUSE button (“Personalisation”).
• The drain hose is bent (see “Installation”).
• The drainage duct is clogged.
• The drum was not unlocked correctly during installation (see “Installation”).
• The washing machine is not level (see “Installation”).
• The washing machine is trapped between cabinets and walls (see “Installation”).
• The water inlet hose is not screwed on properly (see “Installation”).
• The detergent dispenser drawer is blocked (for cleaning instructions, see
“Care and maintenance”).
• The drain hose is not fixed properly (see “Installation”).
• Switch off the machine and unplug it, wait for approximately 1 minute
and then switch it back on again.
If the problem persists, contact the Technical Assistance Service.
• The detergent is not suitable for machine washing (it should display the
text “for washing machines” or “hand and machine wash”, or the like).
• Too much detergent was used.

12
GB
Service
Before calling for Assistance:
• Check whether you can solve the problem alone (see “Troubleshooting”);
• Restart the programme to check whether the problem has been solved;
• If this is not the case, contact an authorised Technical Assistance Centre using the telephone number
provided on the guarantee certificate.
! Always request the assistance of authorised technicians.
Have the following information to hand:
• the type of problem;
• the appliance model (Mod.);
• the serial number (S/N).
This information can be found on the data plate situated on the rear of the washing machine.

CIS
13
Русский
CIS
ARTXF 109
Содержание
Установка, 14-15
Распаковка и нивелировка
Подключение к водопроводу и электричеству
Первый цикл стирки
Технические характеристики
Описание стиральной машины и
порядка запуска программы, 16-17
Панель управления
Индикаторы
Как открыть и закрыть барабан
Порядок запуска программы
Программы, 18
Таблица программ
Персонализированные настройки, 19
Регулировка температуры
Выбор скорости отжима
Дополнительные функции
Моющие средства и типы белья, 20
Распределитель моющих средств
Отбеливание
Подготовка белья
Изделия, требующие деликатной стирки
Система балансировки белья
Предосторожности и рекомендации, 21
Общие требования к безопасности
Утилизация
Экономия энергии и охрана окружающей среды
Техническое обслуживание и уход, 22
Отключение воды и электричества
Уход за стиральной машиной
ход за дверцей машины и барабаном
Чистка насоса
Проверка заливного шланга
Как чистить распределитель моющих средств
Поиск неисправностей и методы их
устранения, 23
Сервисное обслуживание, 24
Руководство по
эксплуатации
СТИРАЛЬНАЯ МАШИНА
14
CIS
Установка
! Сохраните данное руководство. Оно должно быть
в комплекте со стиральной машиной в случае
продажи, передачи оборудования или при
переезде на новую квартиру, чтобы новый
владелец оборудования мог ознакомиться с
правилами его функционирования и обслуживания.
!
Внимательно прочитайте руководство: в нем
содержатся важные сведения по установке и
безопасной эксплуатации стиральной машины.
Распаковка и выравнивание
Распаковка
1. Распакуйте
стиральную машину.
2. Убедитесь, что
оборудование не было
повреждено во время
транспортировки. При
обнаружении поврежде-
ний – не подключайте
машину – свяжитесь с
поставщиком
немедленно.
3. Удалите четыре
транспортировочных
винта и резиновые
пробки с
прокладками,
расположенные в задней части стиральной
машины (см. рис.).
4. Закройте отверстия прилагающимися
пластиковыми заглушками.
5. Сохраняйте все детали: они Вам понадобятся
при последующей транспортировке стиральной
машины.
болты, резиновые шайбы и большую металличес-
кую поперечную планку. Закройте образовавшиеся
отверстия пластмассовыми заглушками.
! Не разрешайте детям играть с упаковочными
материалами.
Выравнивание
1. Установите стиральную
машину на ровном и
прочном полу, так чтобы
она не касалась стен,
мебели и прочих
предметов.
2. После установки
машины на место
отрегулируйте ее
устойчивое положение
путем вращения передних ножек (см. рис.). Для
этого сначала ослабьте контргайку, после завер-
шения регулировки контргайку затяните. После
установки машины на место проверьте по уровню
A
горизонтальность верхней крышки корпуса,
отклонение горизонтали должно быть не более 2°.
Правильное выравнивание оборудования поможет
избежать шума, вибраций и смещений во время
работы машины.
Если стиральная машина стоит на полу, покрытом
ковром, убедитесь, что ее основание возвышает-
ся над ковром. В противном случае вентиляция
будет затруднена или вовсе невозможна.
Установка машины на место и перемещение
Ваша стиральная
машина может быть
оснащена специальны-
ми убирающимися ко-
лесами для облегчения
ее перемещения.
Чтобы опустить колеса
и передвинуть обору-
дование, просто потя-
ните за рычаг,
расположенный слева
под основанием маши-
ны. После установки
оборудования в требуемое положение верните
рычаг в исходное поло.
Подключение к водопроводной и
электрической сети
Подсоединение заливного шланга
1. Вставь те прокладку А в
конец заливного шланга
и наверните его на
вывод водопровода
холодной воды с резьбо-
вым отверстием 3/4
дюйма (см. рис.).
Перед подсоединением
откройте водопроводный
кран и дайте стечь
грязной воде.
2. Подсоедините залив-
ной шланг к стиральной
машине, навинтив его
на водоприемник,
расположенный в
задней верхней части
справа (см. рис.).
3.Убедитесь, что шланг
не перекручен и не
пережат.
! Давление воды должно быть в пределах значе-
ний, указанных в таблице Технических характери-
стик (см. с. 15).
! Если длина водопроводного шланга окажется
недостаточной, обратитесь в Авторизованный
Сервисный центр.
CIS
15
FP
Техничесêие хараêтеристиêи
Модел ь ARTXF 1 09
Размеры
ши р и н а 40 см
высота 85 см
ãлóбина 60 см
Заãрóзêа 1 - 6 êã
Элеêтричесêие
параметры
cмотрите паспортнóю табличêó с
техничесêими хараêтеристиêами на
машине
Гидравличесêие
параметры
max давл ение 1 Мп а (10 бар)
min давление 0,05 Мпа (0,5 бар)
объем барабана 42 л
Сêорость отжима до 1000 об/мин
Kонтрольные
проãраммы
соãласно нормативó
EN 60456
проãрамма 7; температ
óра 60°С;
при заãрóзêе до 6 êã.
Машина соответствóет следóющим
Диреêтивам Европейс êоãо
Эêономичесêоãо сообществ а:
- 89/336 /ЕЕС от 03.05.89 (элеêтро-
маãнитной совместимости) и
последóющие модифиêации
- 2002/96/CE
- 2006/95/CE (низêоãо напряжения)
Подсоединение сливного шланга
Повесьте загнутый конец
сливного шланга на край
раковины, ванны, или
поместите в
специальный вывод
канализации. Шланг не
должен перегибаться.
Верхняя точка сливного
шланга должна нахо-
диться на высоте 65-100
см от пола. Расположе-
ние сливного шланга
должно обеспечивать
разрыв струи при сливе
(конец шланга не
должен быть опущен в
воду).
В случае крепления на
край ванной или ракови-
ны, шланг вешается с
помощью направляющей
(входит в комплект
поставки), которая
крепится к крану (рис.).
! Не рекомендуется применение удлинителей для
сливного шланга, при необходимости допускается
его наращивание шлангом такого же диаметра и
длиной не более 150 см.
Подсоединение к электросети
Внимание! Оборудование обязательно должно быть
заземлено!
1. Машина подключается к электрической сети при по-
мощи двухполюсной розетки с заземляющим контактом
(розетка не поставляется с машиной). Фазный провод
должен быть подключен через автомат защиты сети, рас-
считанный на максимальный ток (ток срабатывания) 16
А, и имеющий время срабатывания не более 0,1 с.
2. При наличии вблизи от предполагаемого места уста-
новки машины розетки с заземляющим контактом,
имеющей трехпроводную подводку кабеля с медными
жилами сечением не менее 1,5 кв. мм (или алюминие-
выми жилами сечением не менее 2,5 кв. мм), доработка
электросети не производится. При отсутствии указанной
розетки и проводки следует провести их монтаж.
3. Прокладка заземления отдельным проводом не
допускается.
4. Для доработки электрической сети рекомендуется
применять провод типа ППВ 3х1,5 380 ГОСТ 6223-79.
Допускается применение других марок кабеля, обеспе-
чивающих пожаро- и электробезопасность при эксплуа-
тации машины.
Перед включением машины в сеть убедитесь, что:
z розетка и проводка соответствуют требованиям, изло-
женным в данном разделе инструкции;
z напряжение и частота тока сети соответствуют данным
машины;
z розетка и вилка одного типа;
z розетка заземлена в соответствии с нормами безо-
пасности, описанными в данном разделе инструкции
(допускается организация заземления рабочим ну-
лем, при условии, что защитная линия не имеет раз-
рыва и подключена напрямую в обвод каких-либо
приборов (например, электрического счетчика).
Если вилка не подходит к розетке, ее следует заменить
на новую, соответствующую розетке, или заменить пита-
ющий кабель. Замена кабеля должна производиться
только квалифицированным персоналом.
Запрещается использование переходников, двойных и
более розеток и удлинителей (они создают опасность
возгорания). Если Вы считаете их использование необ-
ходимым, применяйте один единственный удлинитель,
удовлетворяющий требованиям безопасности.
Оборудование, подключенное с нарушением требова-
ний безопасности бытовых приборов большой
мощности, изложенных в данной инструкции, являет-
ся потенциально опасным.
Производитель не несет ответственности за ущерб
здоровью и собственности, если он вызван
несоблюдением указанных норм установки.
Первый цикл стирки
По завершении установки, перед началом эксплуатации
необходимо произвести один цикл стирки со
стиральным порошком, но без белья, по программе 2.
 Loading...