


Instructions for installation and use
WASHING MACHINE
EN HU RO
English,1 Magyar,13 Română,25
Contents |
EN |
|
Installation, 2-3
Unpacking and levelling
Connecting the electricity and water supplies
Technical data
|
|
PL |
|
CZ |
|
SK |
|
|
|
||
|
|
|
|
|
|
|
|
Polski,49 |
Česky,61 |
||
Slovensky,37 |
|||||
Care and maintenance, 4
Cutting off the water and electricity supplies Cleaning the machine
Cleaning the detergent dispenser drawer Caring for your appliance drum Cleaning the pump
Checking the water inlet hose
AQUALTIS
AQS73D 29
Precautions and advice, 5
General safety Disposal
Opening the porthole door manually
Description of the machine, 6-7
Touch control panel
Running a wash cycle, 8
Wash cycles and options, 9
Table of wash cycles Wash options
Detergents and laundry, 10
Detergent
Preparing the laundry Washing recommendations Load balancing system
Trouble shooting, 11
Assistance, 12
1
Installation
EN |
! This instruction manual should be kept in a |
|
safe place for future reference. If the washing |
||
|
||
|
machine is sold, given away or moved, please |
|
|
ensure the manual is kept with the machine, |
|
|
so that the new owner may benefit from the |
|
|
advice contained within it. |
|
|
! Read these instructions carefully: they |
|
|
contain vital information relating to the safe |
|
|
installation and operation of the appliance. |
|
|
! Inside the pack containing this manual, you |
|
|
will also find the guarantee and all the details |
|
|
necessary for installation. |
|
|
Unpacking and levelling |
|
|
Unpacking |
|
|
1. Once you have removed all the packaging |
|
|
from the washing machine, make sure it has |
|
|
not been damaged during transportation. |
|
|
If it has been damaged, contact the retailer |
|
|
and do not proceed any further with the |
|
|
installation process. |
|
|
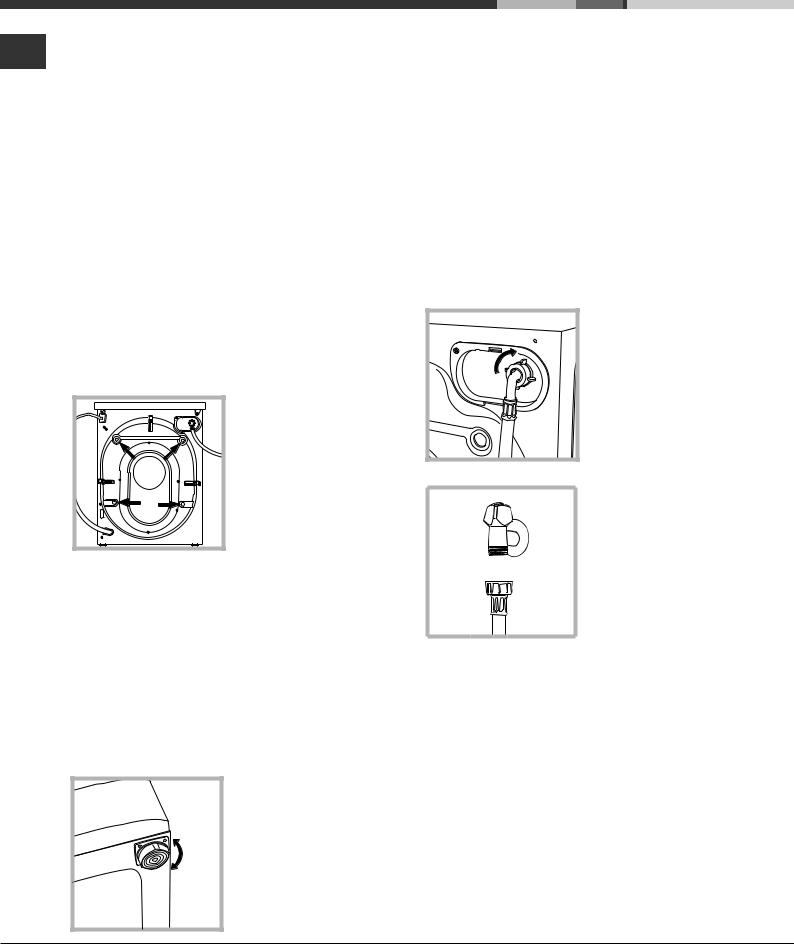
2. Remove the 4 |
|
|
protective screws |
|
|
(used during |
|
|
transportation) and |
|
|
the corresponding |
|
|
spacer, located on |
|
|
the rear part of the |
|
|
appliance (see figure). |
3.Close off the holes using the plastic plugs supplied in the pack.
4.Keep all the parts in a safe place; they will be needed again if the washing machine is moved to another location, to prevent the inside of the appliance being damaged.
! Packaging materials should not be used as toys for children.
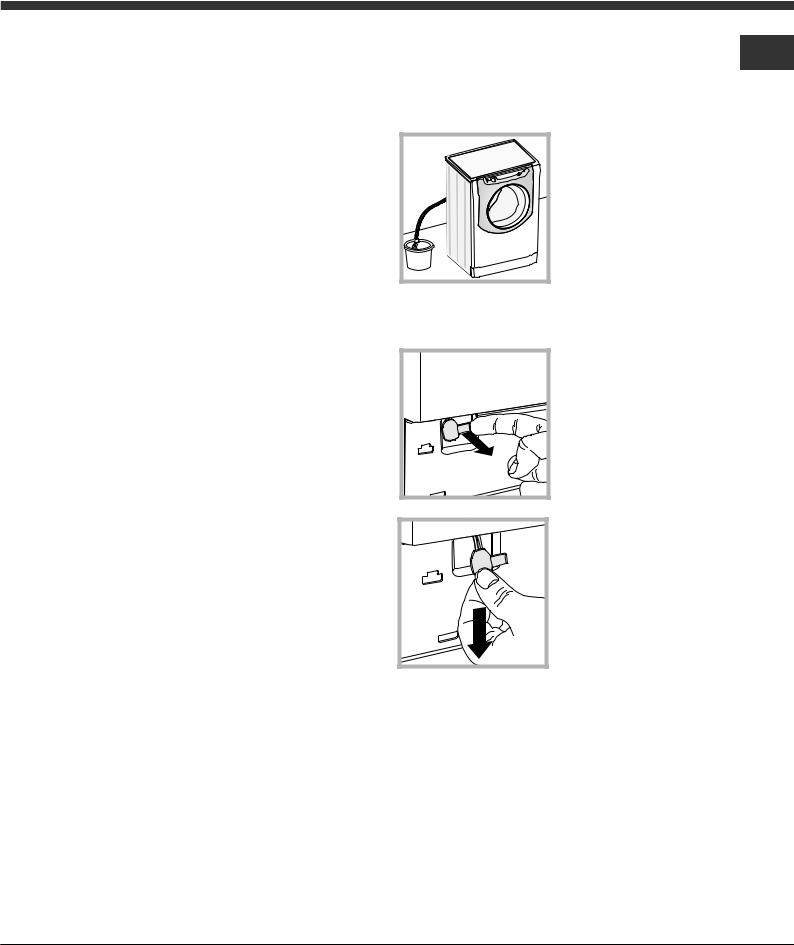
Levelling
1. Place the washing machine on a flat sturdy floor, without resting it up against walls or cabinets.
2. If the floor is uneven, the front feet of the machine may be adjusted until it reaches a horizontal position (the angle of inclination must not exceed 2 degrees).
!If the appliance is levelled correctly, it will be more stable and much less likely to cause vibrations and noise while it is operating, particularly during the spin cycle.
!If it is placed on carpet or a rug, adjust the feet in such a way as to allow a sufficient ventilation space underneath the washing machine.
Connecting the electricity and water supplies
Connecting the water inlet hose
! Before connecting the inlet hose to the water supply, run the water until it is perfectly clear.
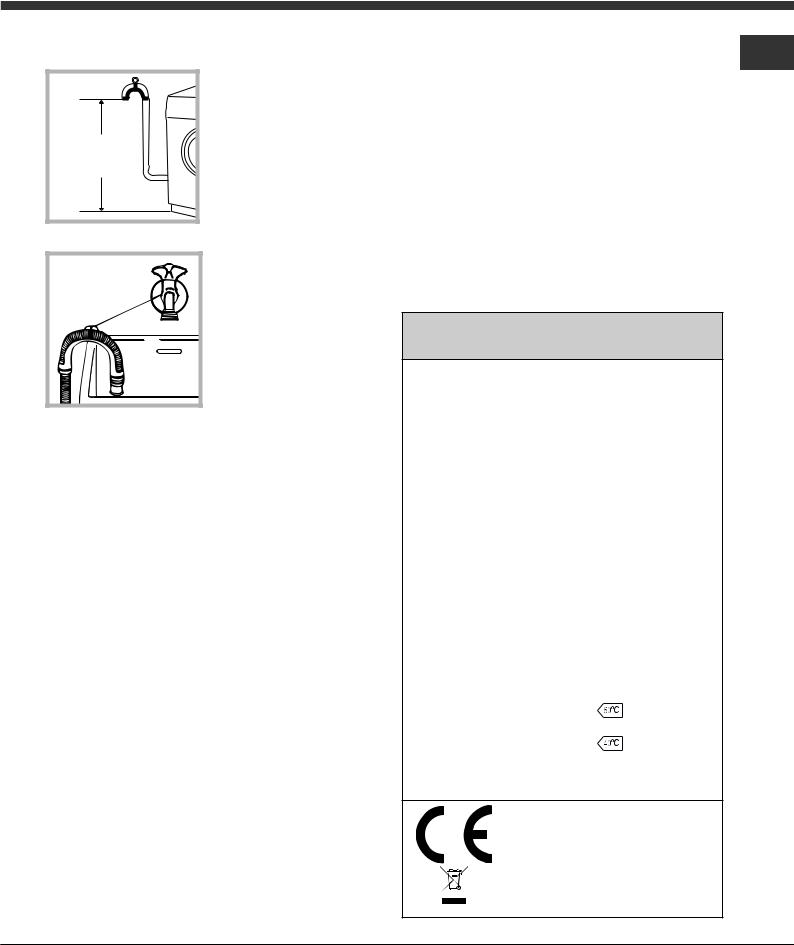
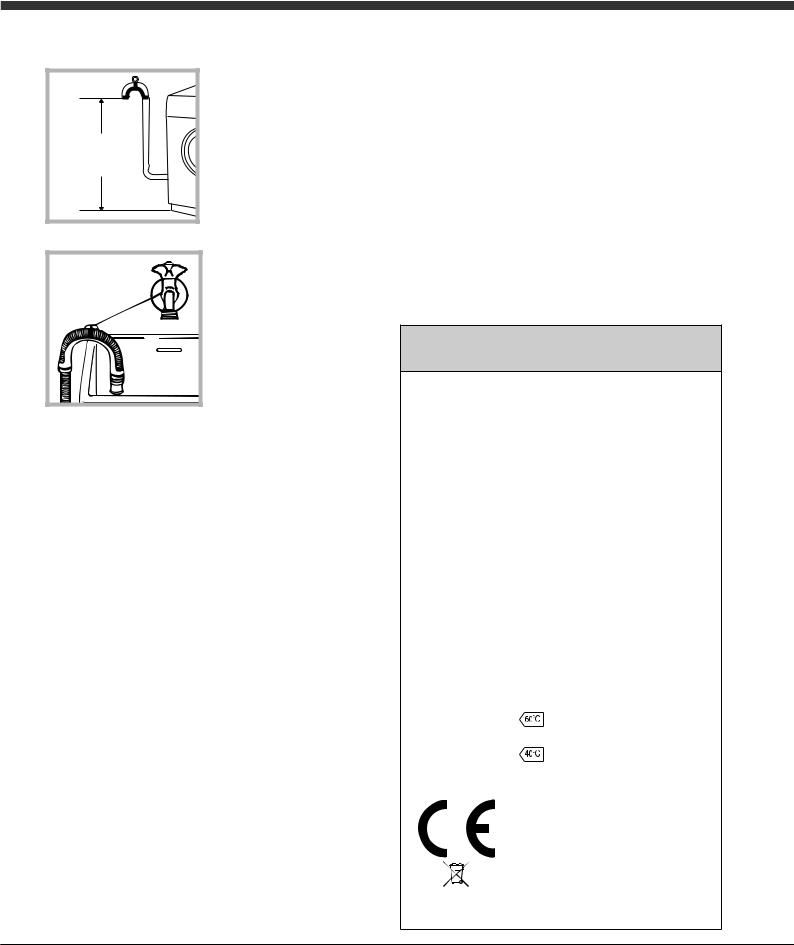
1. Connect the inlet hose to the machine by screwing it onto the cold water inlet of the appliance, which is situated on the top right-hand side of the rear part of the appliance (see figure).
2. Connect the inlet hose by screwing it to a cold water tap using a 3/4 gas threaded connection (see figure).
3. Make sure that the hose is not folded over or bent.
! The water pressure at the tap must fall within the values indicated in the Technical data table
(see next page).
!If the inlet hose is not long enough, contact a specialised shop or an authorised technician.
!Never use second-hand or old inlet hoses; use the products supplied with the machine.
2
Connecting the drain hose
65 - 100 cm |
Connect the drain hose to drain duct piping or a wall drain located between 65 and 100 cm above the floor, making sure it is not bent at all.
Alternatively, rest the drain hose on the side of a washbasin or bathtub, fastening the duct supplied to the tap (see figure).
The free end of the hose should not be underwater.
! We advise against the use of hose extensions; if it is absolutely necessary, the extension must have the same diameter as the original hose and must not exceed 150 cm in length.
Electrical connections
Before plugging the appliance into the electricity socket, make sure that:
•the socket is earthed and complies with all applicable laws;
•the socket is able to withstand the maximum power load of the appliance as indicated in the Technical data table (see opposite);
•the power supply voltage falls within the values indicated in the Technical data table
(see opposite);
•the socket is compatible with the plug of the appliance. If this is not the case, have the socket or the plug replaced.
! The machine must not be installed outdoors, even in covered areas. It is extremely dangerous to leave the appliance exposed to rain, storms and other weather conditions.
! The mains socket must remain within easy
reach after the washing machine has been EN installed.
!Do not use extension cords or multiple sockets.
!The cable should not be bent or compressed.
!The power supply cable and plug must only be replaced by authorised technicians.
Warning! The company shall not be held responsible in the event that these regulations are not respected.
Technical data
Model |
AQS73D 29 |
|
|
|
|
|
|
Dimen- |
width 59.5 cm |
|
|
height 85 cm |
|
||
sions |
|
||
depth 44,5 cm |
|
||
|
|
||
Capacity |
from 1 to 7 kg |
|
|
|
|
|
|
Electrical |
please refer to the technical |
||
connec- |
|||
data plate fixed to the machine |
|||
tions |
|||
|
|
||
|
maximum pressure |
||
Water con- |
1 MPa (10 bar) |
|
|
minimum pressure |
|||
nections |
0.05 MPa (0.5 bar) |
||
|
drum capacity 48 litres |
||
Spin speed |
up to 1200 rotations per |
||
minute |
|
||
Test wash |
|
|
|
cycles in |
|
|
|
accordan- |
Programme |
; |
|
ce with |
Cotton standard 60°C. |
||
directives |
Programme |
; |
|
1061/2010 |
Cotton standard 40°C. |
||
and |
|
|
|
1015/2010 |
|
|
|
This appliance conforms to the following EC Directives: - 2004/108/EC (Electromagnetic Compatibility)
- 2006/95/EC (Low Voltage) - 2002/96/EC
3
Care and maintenance
|
Cutting off the water and |
|
EN |
||
electricity supplies |
||
|
||
|
• Turn off the water tap after every wash cycle. |
|
|
This will limit wear on the hydraulic system in |
|
|
the machine and help to prevent leaks. |
|
|
• Unplug the appliance when cleaning it and |
|
|
during all maintenance work. |
|
|
Cleaning the machine |
|
|
The outer parts and rubber components of the |
|
|
appliance can be cleaned using a soft cloth |
|
|
soaked in lukewarm soapy water. Do not use |
|
|
solvents or abrasives. |
|
|
Cleaning the detergent dispenser |
|
|
drawer |
1 |
1 |
2 |
2 |
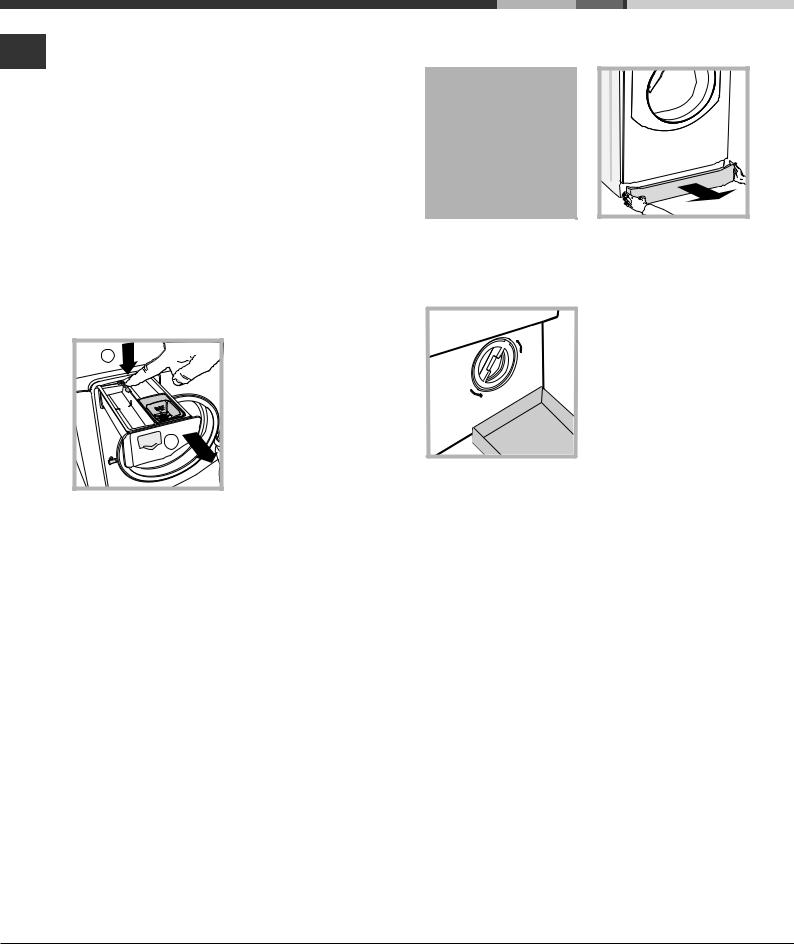
To remove the drawer, press lever (1) and pull the drawer outwards (2)
(see figure).
Wash it under running water; this procedure should be repeated frequently.
Caring for your appliance drum
•Always leave the door ajar to prevent unpleasant odours from forming.
Cleaning the pump
The washing machine is fitted with a selfcleaning pump which does not require any maintenance. Sometimes, small items (such as coins or buttons) may fall into the protective pre-chamber at the base of the pump.
! Make sure the wash cycle has finished and unplug the appliance.
To access the pre-chamber:
1. take off the cover panel on the front of the machine by first pressing it in the centre and then pushing downwards on both sides until you can remove it (see figures);
2. position a container so that it will collect the water which flows out (approximately 1.5 l)
(see figure);
3. unscrew the lid by rotating it in an anticlockwise direction (see figure);
4.clean the inside thoroughly;
5.screw the lid back on;
6.reposition the panel, making sure the hooks are securely in place before you push it onto the appliance.
Checking the water inlet hose
Check the inlet hose at least once a year. If there are any cracks, it should be replaced immediately: during the wash cycles, water pressure is very strong and a cracked hose could easily split open.
4
Precautions and tips
! The machine was designed and constructed in accordance with international safety regulations. The following information is provided for safety reasons and must therefore be read carefully.
General safety
• This appliance was designed for domestic use only.
• This appliance can be used by children aged from 8 years and above and persons with reduced physical, sensory or mental capabilities or lack of experience and knowledge if they have been given supervision or instruction concerning use of the appliance in a safe way and understand the hazards involved. Children shall not play with the appliance. Cleaning and user maintenance shall not be made by children without supervision.
•Do not touch the machine when barefoot or with wet or damp hands or feet.
•Do not pull on the power supply cable when unplugging the appliance from the electricity socket. Hold the plug and pull.
•Do not touch the drained water as it may reach extremely high temperatures.
•Never force the porthole door. This could damage the safety lock mechanism designed to prevent accidental opening.
•If the appliance breaks down, do not under any circumstances access the internal mechanisms in an attempt to repair it yourself.
•Always keep children well away from the appliance while it is operating.
•If it must be moved, proceed with the help of two or three people and handle it with the utmost care. Never try to do this alone, because the appliance is very heavy.
•Before loading laundry into the washing machine, make sure the drum is empty.
Disposal
•Disposing of the packaging materials: observe local regulations so that the packaging may be re-used.
•The European Directive 2002/96/EC relating to Waste Electrical and Electronic Equipment (WEEE) states that household appliances should not be disposed of using the normal solid urban waste cycle. Exhausted appliances should be collected separately in order to
optimise the cost of re-using and recycling the materials inside the machine, while preventing potential damage to the atmosphere and to public health.
The crossed-out dustbin is marked on all products to remind the owner of their obligations regarding separated waste collection.
For more information relating to the correct disposal of household appliances, owners should contact their local authorities or appliance dealer.
Opening the porthole door manually |
EN |
|
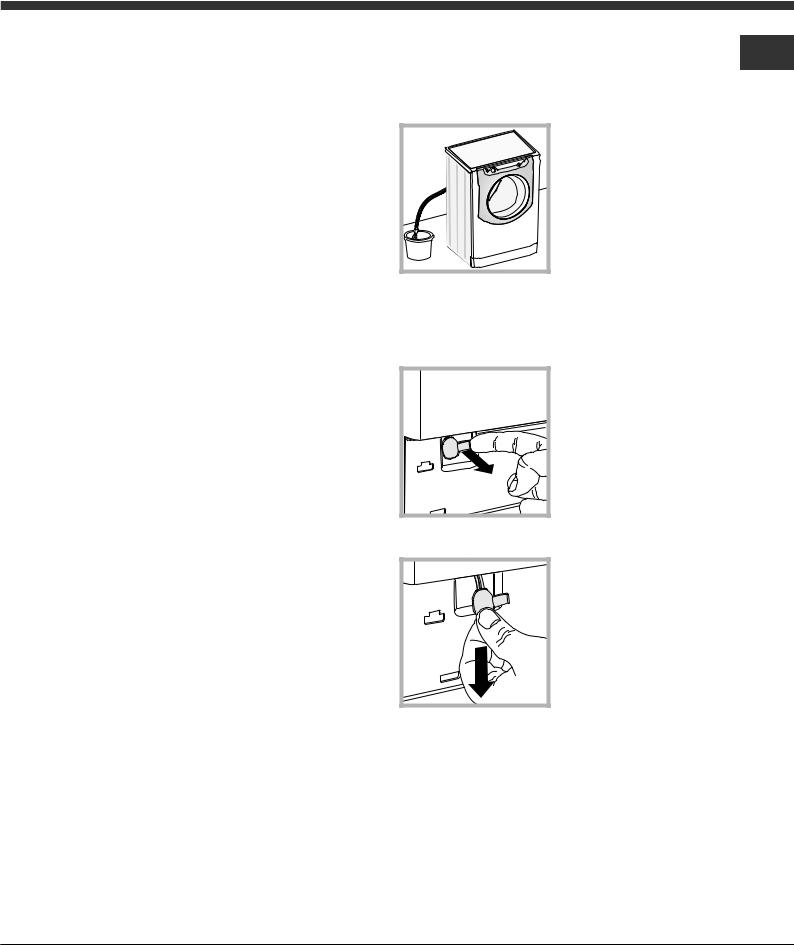
In the event that it is not possible to open the porthole door due to a powercut, and if you wish to remove the laundry, proceed as follows:
1. remove the plug from the electrical socket.
2. make sure the water level inside the machine is lower than the door opening; if
it is not, remove excess water using the drain hose, collecting it in a bucket as indicated in the figure.
3. remove the cover panel on the lower front part of the washing machine (see overleaf).
4. pull outwards using the tab as indicated in the figure, until the plastic tie-rod is freed from its stop position; pull downwards until you hear a “click”, which indicates that the door is now unlocked.
5. open the door; if this is still not possible repeat the procedure.
6. reposition the panel, making sure the hooks are securely in place before you push it onto the appliance.
5

Description of the machine
EN
PORTHOLE DOOR
PORTHOLE DOOR
HANDLE
KICK STRIP
PORTHOLE DOOR
Always use the handle to open the porthole door (see figure).
DETERGENT DISPENSER DRAWER
|
|
|
The detergent dispenser |
|
|
|
drawer is located inside |
|
|
|
the machine and can be |
|
|
|
accessed by opening the |
|
|
|
door. |
|
|
|
For more information on |
|
|
|
detergent measures, please |
|
|
|
refer to the chapter entitled |
|
|
|
“Detergents and laundry”. |
|
A |
|
1. pre-wash compartment: |
|
3 |
use powder detergent. |
|
|
|
! Before pouring in the |
|
|
|
|
|
|
|
1 |
detergent, make sure that |
B |
|
2 |
extra compartment 3 has |
|
been removed. |
||
|
|
|
2. main wash compartment: |
|
|
|
If liquid detergent is used, |
|
|
|
it is recommended that the |
|
|
|
removable plastic partition A |
(supplied) be used for proper dosage.If powder detergent is used, place the partition into slot B.
CONTROL
PANEL
3. extra compartment: Bleach
! The use of extra compartment 3 excludes the prewash function.
 washing additives compartment: for fabric softener or liquid additives. We recommend that the maximum level indicated by the grille is not exceeded, and that concentrated fabric softeners are diluted.
TOUCH CONTROL PANEL
To adjust the settings, gently press the icon inside the sensitive (touch control) area as illustrated in the figure.
Standby mode
This washing machine, in compliance with new energy saving regulations, is fitted with an automatic standby system which is enabled after about 30 minutes if no activity is detected. Press the ON-OFF  button briefly and wait for the machine to start up again.
Consumption in off-mode: 0,5 W Consumption in Left-on: 0,5 W
6

|
|
|
|
|
|
|
|
|
|
|
|
|
Touch control panel |
|
|
|
|
START/PAUSE button |
|
||||||
|
|
|
|
EN |
||||||||
|
|
|
|
|
|
SPIN |
with indicator light |
WASH |
||||
|
|
|
|
|
|
|
|
|
|
|||
WASH CYCLE |
|
|
|
M1 |
button |
ECO |
|
CYCLE |
|
|||
|
|
|
|
|
||||||||
SELECTOR knob |
M2 |
TEMPERATURE |
|
|
PHASE |
|
||||||
|
|
|
indicator light |
|
|
|||||||
|
|
|
|
|
button |
|
|
icons |
|
|||
|
|
|
|
|
|
|
|
|
||||
|
|
|
|
|
|
|
|
|
|
|
||
|
|
|
|
|
|
|
|
|
|
|
|
|
|
|
|
|
|
|
|
|
|
|
|
|
|
|
|
|
|
|
|
|
|
|
|
|
|
|
|
|
|
|
|
|
|
|
|
|
|
|
|
|
|
|
|
|
|
|
|
|
|
|
|
|
DISPLAY
|
|
|
|
|
|
|
|
CONTROL PANEL LOCK |
|
|
|
|
|
|
|
|
|
|
|
|
|
|
|
|
|
|
Button with ON/OFF |
|
|
|
OPTION |
|
|
|
|
M3 |
|
DELAYED START |
button with indicator light |
|||||
|
buttons |
|||||||
indicator light |
|
|||||||
|
|
|
|
button |
|
|||
|
|
|
|
|
|
|||
|
|
|
|
|
|
|
LOCK indicator light |
|
Button with  ON/OFF indicator light: press this briefly to switch the machine on or off. The green indicator light indicates that the machine is switched on. To switch off the washing machine during the wash cycle, press and hold the button for approximately 3 seconds; if the button is pressed briefly or accidentally the machine will not switch off. If the machine is switched off during a wash cycle, this wash cycle will be cancelled.
WASH CYCLE SELECTOR knob: may be turned in either direction. To select the most suitable wash cycle, please refer to the “Table of wash cycles”.
The knob will not move during the wash cycle.
M1-M2-M3 buttons: press and hold one of the buttons to store a cycle with your own set preferences in the memory of the machine. To recall a previously-stored cycle, press the corresponding button.
TEMPERATURE  button: press to modify or exclude the temperature setting; the value selected will appear on the display above (see “Running a wash cycle”).
SPIN CYCLE  button: press to modify or exclude the spin cycle; the value selected will appear on the display above (see “Running a wash cycle”).
DELAYED START  button: press to set a delayed start for the selected wash cycle; the set delay time will appear on the display above (see “Running a wash cycle”).
OPTION buttons: press to select the available options. The indicator light corresponding to the selected option will remain lit (see “Running a wash cycle”).
WASH CYCLE PHASE icons: these illuminate to indicate the progress of the wash cycle (Wash  – Rinse
  – Spin
  – Drain
  ). The text
 lights up when the cycle is complete.
START/PAUSE button with indicator light: when the green indicator light flashes slowly, press the button to start a wash cycle. Once the cycle has begun the indicator light will remain lit in a fixed manner. To pause the wash cycle, press the button again; the indicator light will flash in an orange colour. If
the “LOCK”  indicator light is switched off, the door may be opened. To start the wash cycle from the point at which it was interrupted, press the button again.
LOCK  indicator light: indicates that the porthole door is locked. To open the door, pause the wash cycle (see “Running a wash cycle”).
CONTROL PANEL LOCK  button with indicator light: to activate or deactivate the control panel lock, press and hold the button for approximately 2 seconds. when the indicator light is illuminated, the control panel is locked (apart from the ON/OFF button). This means it is possible to prevent wash cycles from being modified accidentally, especially where there are children in the home.
ECO indicator light: the
 icon lights up when, after altering the washing parameters, an energy saving of at least 10% is made. Furthermore, before the machine enters “Standby” mode, the icon will light up for a few seconds; when the machine is switched off the estimated energy saving will be around the 80% mark.
CHANGE LANGUAGEsThe first time the machine is switched on, the first language will flash on the display. The “ “, “OK” and “V” symbols will appear on the display, in line with the 3 buttons on the right-hand side. The languages change automatically every 3”; alternatively, they can be changed by pressing the buttons next to the “
 “ and “V” symbols. Use the “OK” button to confirm the language, which will be set after 2”. If no buttons are pressed, the automatic language change will begin again after 30”.
To change the language, switch the machine on and off again; in the 30” time period after it has been switched off, press and hold the temperature 
 +spin
+spin
+delayed  start buttons simultaneously for 5’’. A short sound alert will be emitted and the set language will flash on the display. Press the buttons next to the “
 “ and “V” symbols to change the language. Use the button next to the “OK” symbol to confirm the language, which will be set after 2”. If no buttons are pressed, the language set previously will be displayed after 30”. Switch on the machine.
7
Running a wash cycle
WARNING: before you use the washing machine for the EN first time, run a wash cycle with detergent and no laundry,
using the 90° cottons cycle without pre-wash.
1.SWITCH THE MACHINE ON. Press the  button. All the indicator lights will illuminate for 1 second and the text AQUALTIS will appear on the display; the indicator
light corresponding to the  button will then remain lit in a constant manner and the START/PAUSE indicator light will flash.
2.SELECT THE PROGRAMME. Turn the PROGRAMME KNOB left or right, until the required programme has been selected; the name of the programme will appear on the display. A temperature and spin speed is set for each programme; these may be adjusted. The cycle duration will also appear on the display.
3.LOAD THE LAUNDRY. Open the porthole door. Load the laundry, making sure you do not exceed the maximum load value indicated in the table of wash cycles on the following page.
4.MEASURE OUT THE DETERGENT. Pull out the detergent dispenser drawer and pour the detergent into the relevant compartments as described in “Description of the machine”.
5.CLOSE THE PORTHOLE DOOR.
6.CUSTOMISE THE WASH CYCLE. Use the relevant buttons on the control panel:
 Modify the temperature and/or spin speed.
The machine automatically displays the maximum temperature and spin speed values set for the selected cycle, or the most recently-used settings if they are compatible with the selected cycle. The temperature can be decreased by pressing the 
 button, until the cold wash “OFF” setting is reached. The spin speed may be progressively reduced by pressing the
  button, until it is completely excluded “OFF”. If these buttons are pressed again, the maximum values are restored.
! Exception: if the  programme is selected, the temperature can be increased up to a value of 90°C.


 Setting a delayed start.
To set a delayed start for the selected cycle, press the corresponding button repeatedly until the required delay period has been reached. During the setting procedure, the delay period and the text “Starts in:” will be displayed, along with the flashing  symbol. After the delayed start has been set, the

 symbol will remain fixed on the display, which will also indicate the duration of the selected cycle with the text “Ends in:” and the cycle duration. Press the DELAYED START button just once to display the delay time set previously.
After the countdown has begun, the display will show the text “Starts in:” and the delay period. Once the set delay time has elapsed, the machine will begin its cycle and the display will show “Ends in:” and the time remaining until the end of the cycle.
To remove the delayed start option, press the button until the display shows the text OFF; the 

 symbol will disappear.


 Modify the cycle settings.
•Press the button to activate the option; the name of the option will then appear on the display and the corresponding indicator light will illuminate.
•Press the button again to deactivate the option; the name of the option will then appear on the display followed by the text OFF, and the corresponding indicator light will switch off.
!If the selected option is not compatible with the selected wash cycle, this incompatibility will be signalled by the flashing of the indicator light and a sound alert (3 beeps); the option will not be activated.
!If the selected option is not compatible with another option that has been selected previously, the indicator light corresponding to the first option selected will flash and only the second option will be activated; the indicator light corresponding to the button will remain lit in a constant manner.
!The options may affect the recommended load value and/
or the duration of the cycle.
7.START THE PROGRAMME. Press the START/PAUSE button. The corresponding indicator light remains lit in a
fixed manner and the porthole door locks (the  LOCK indicator light illuminates). The icons corresponding to the wash cycle phases will light up during the cycle to indicate which phase is currently in progress.
To change a wash cycle once it has already started, pause the washing machine by pressing the START/ PAUSE button; then select the desired cycle and press the START/PAUSE button again.
To open the door during a wash cycle, press the START/
PAUSE button; if the LOCK  indicator light is switched off you may open the door. Press the START/PAUSE button again to restart the wash cycle from the point at which it was interrupted.
8.THE END OF THE WASH CYCLE. This is indicated by the illuminated text END. The porthole door may be opened immediately. If the START/PAUSE indicator light is flashing, press the button to end the cycle. Open the door, unload the laundry and switch off the machine.
! If you wish to cancel a cycle which has already begun, press and hold the  button until the cycle stops and the machine switches off.
8
Wash cycles and options
Table of wash cycles
Icon |
|
|
|
Detergent and additives |
(kg)loadMax. |
Residual dampness% |
conEnergykWhsumption |
waterTotallt |
duraCycletion |
|||
|
Max. |
Max. |
Prewash |
Wash |
Bleach |
Fabric softener |
||||||
|
|
|
|
|
|
|
|
|
|
|
||
|
Description of the wash cycle |
temp. |
speed |
|
|
|
|
|
|
|
|
|
|
|
(°C) |
(rpm) |
|
|
|
|
|
|
|
|
|
|
|
|
|
|
|
|
|
|
|
|
|
|
|
Synthetics Resistant |
60° |
800 |
|
|
|
|
3,5 |
49 |
0,87 |
42 |
90’ |
|
Synthetics Resistant (4) |
40° |
800 |
|
|
|
|
3,5 |
49 |
0,56 |
42 |
85’ |
|
Whites |
60° |
1200 |
|
|
- |
|
4 |
- |
- |
- |
190’ |
|
|
|
|
|
|
|
|
|
|
|
|
|
|
Coloureds |
40° |
1200 |
|
|
|
|
4 |
53 |
0,90 |
73 |
95’ |
|
Darks |
30° |
800 |
- |
|
- |
|
4 |
- |
- |
- |
80’ |
|
|
|
|
|
|
|
|
|
|
|
|
|
|
Shirts |
40° |
600 |
- |
|
|
|
2 |
- |
- |
- |
85’ |
|
Quilted Jacket: to wash clothes padded with goose down (such as |
30° |
1000 |
- |
|
- |
|
1,5 |
- |
- |
- |
130’ |
|
puffa jackets) or cushions. |
|||||||||||
|
|
|
|
|
|
|
|
|
|
|
|
|
|
Bed&Bath for bedlinen and towels. |
60° |
1200 |
|
|
|
|
7 |
- |
- |
- |
135’ |
|
|
|
|
|
|
|
|
|
|
|
|
|
|
Rinse |
- |
1200 |
- |
- |
|
|
7 |
- |
- |
- |
49’ |
|
|
|
|
|
|
|
|
|
|
|
|
|
|
Spin and Pump out |
- |
1200 |
- |
- |
- |
- |
7 |
- |
- |
- |
16’ |
|
|
|
|
|
|
|
|
|
|
|
|
|
|
Anti Allergy |
60° |
1200 |
- |
|
- |
|
4 |
- |
- |
- |
200’ |
|
|
|
|
|
|
|
|
|
|
|
|
|
|
Ultradelicates |
30° |
0 |
- |
|
- |
|
1 |
- |
- |
- |
75’ |
|
|
|
|
|
|
|
|
|
|
|
|
|
|
Wool: for wool, cashmere, etc. |
40° |
800 |
- |
|
- |
|
1,5 |
- |
- |
- |
80’ |
|
|
|
|
|
|
|
|
|
|
|
|
|
|
Mix 30': to refresh lightly soiled garments quickly (not suitable for |
30° |
800 |
- |
|
- |
|
3 |
71 |
0,19 |
39 |
30’ |
|
wool, silk and clothes which require washing by hand). |
|||||||||||
|
|
|
|
|
|
|
|
|
|
|
|
|
|
Cotton Standard 60°C (1): heavily soiled whites and resistant colours. |
60° |
1200 |
(3) |
|
|
|
7 |
53 |
1,00 |
52,5 |
185’ |
|
(Max. 90°) |
|||||||||||
|
Cotton Standard 40°C (2): lightly soiled whites and delicate colours. |
40° |
1200 |
- |
|
|
|
7 |
53 |
1,09 |
92 |
170’ |
|
|
|
|
|
|
|
|
|
|
|
|
|
|
Cotton Standard 20°C: lightly soiled whites and delicate colours. |
20° |
1200 |
- |
|
|
|
7 |
- |
- |
- |
175’ |
|
|
|
|
|
|
|
|
|
|
|
|
|
The length of cycle shown on the display or in this booklet is an estimation only and is calculated assuming standard working conditions. The actual duration can vary according to factors such as water temperature and pressure, the amount of detergent used, the amount and type of load inserted, load balancing and any wash options selected.
Note: 10 minutes after the START, the machine will recalculate the time remaining until the end of the wash cycle on the basis of the load inside it; this value will then be shown on the display.
1) Test wash cycle in compliance with directive 1061/2010: set wash cycle  with a temperature of 60°C.
This cycle is designed for cotton loads with a normal soil level and is the most efficient in terms of both electricity and water consumption; it should be used for garments which can be washed at 60°C. The actual washing temperature may differ from the indicated value.
2) Test wash cycle in compliance with directive 1061/2010: set wash cycle  with a temperature of 40°C.
This cycle is designed for cotton loads with a normal soil level and is the most efficient in terms of both electricity and water consumption; it should be used for garments which can be washed at 40°C. The actual washing temperature may differ from the indicated value.
3) At 60 °C the “Prewash” function cannot be selected.
For all Test Institutes: |
|
|
2) |
Long wash cycle for cottons: set wash cycle |
with a temperature of 40°C. |
4) |
Long wash cycle for synthetics: set wash cycle |
with a temperature of 40°C. |
Wash options
 Super Wash
3 |
1 |
2 |
This option offers a highperformance wash due to the greater quantity of water used in the initial phase of the cycle, and due to the increased wash cycle duration, is particularly useful for the removal of stubborn stains. It can be used with or without bleach. If you desire bleaching, insert the extra tray compartment (3) into compartment 1. When pouring in the bleach, be careful not to exceed the “max” level marked on the central pivot (see
figure). To bleach laundry without carrying out a full wash cycle, pour the bleach into the extra compartment 3, select the “Rinse” cycle  and activate the “Super Wash” option

 .
.
! It cannot be used in conjunction with 
 ,
,  , ,
, ,  , ,
, ,
 ,
,  ,
,  .
.
 Extra rinse
By selecting this option, the efficiency of the rinse is increased and optimal residual detergent removal is guaranteed. It is particularly useful for skin which is sensitive to detergents. We recommend this option is used with a full load of washing, or when a large amount of detergent is required.
! It cannot be used in conjunction with  ,
,  ,
,  ,
,  ,
,  .
.
 Easy Iron
By selecting this option, the wash and spin cycles will be modified in order to reduce the formation of creases.
At the end of the cycle the washing machine drum will rotate slowly; the “Easy Iron” and START/PAUSE indicator lights will flash. To end the cycle press the START/PAUSE button or the “Easy Iron” button.
! It cannot be used in conjunction with  ,
,  ,
,  ,
,  ,
,  ,
,  .
.
 Prewash
If this function is selected, the pre-wash cycle will run; this is useful for removing stubborn stains.
N.B.: put the detergent in the relevant compartment.
! It cannot be used in conjunction with , |
, , , , |
||
, , , , |
(60°), |
, . |
|
EN
9
Detergents and laundry
EN |
Detergent |
|
The type and quantity of detergent required depend on |
||
|
||
|
the type of fabric you are washing (cotton, wool, silk, |
|
|
etc.), as well as its colour, the washing temperature, the |
|
|
level of soiling and the hardness of the water in the area. |
|
|
Measuring out the detergent carefully will avoid wastage |
|
|
and help to protect the environment: although they are |
|
|
biodegradable, detergents still contain ingredients which |
|
|
alter the balance of nature. |
|
|
We recommend the following: |
|
|
• use powder detergents for white cotton garments and |
|
|
pre-washing. |
|
|
• use liquid detergents for delicate cotton garments and |
|
|
for all low-temperature wash cycles. |
|
|
• use gentle liquid detergents for wool and silk |
|
|
garments. |
|
|
The detergent should be poured into the relevant |
|
|
compartment - or the dispenser placed directly inside the |
|
|
drum - before the wash cycle begins. In the latter case, it will |
|
|
not be possible to select the Cottons with pre-wash cycle. |
|
|
! Use powder detergent for white cotton garments, for |
|
|
pre-washing, and for washing at temperatures over 60°C |
|
|
! Follow the instructions given on the detergent packaging. |
|
|
! Do not use hand washing detergents because these |
|
|
create too much foam. |
Preparing the laundry
•Shake out the garments before loading them into the machine.
•Divide the laundry according fabric type (symbol on the washing instruction label) and colour, making sure you separate the coloured garments from the white ones;
•Empty all pockets and check the buttons;
•Do not exceed the values listed in the “Table of wash cycles”, which refer to the weight of the laundry when dry.
How much does your laundry weigh?
1 sheet |
400-500 g |
1 pillowcase |
150-200 g |
1 tablecloth |
400-500 g |
1 bathrobe |
900-1200 g |
1 towel |
150-250 g |
1 pair of jeans |
400-500 g |
1 shirt |
150-200 g |
Washing recommendations
Whites: use this cycle  to wash white clothes. The programme is designed to maintain the brightness of white clothes over time.
Coloureds: use this cycle  to wash bright coloured clothes. The programme is designed to maintain bright colours over time.
Darks: Use cycle  to wash dark-coloured garments. This programme is designed to maintain dark colours over time. We recommend using a liquid detergent for the best results when washing dark-coloured garments. Shirts: use the special
  wash cycle to wash shirts in different fabrics and colours to guarantee they receive the best possible care.
Quilted Jacket: to wash quilted jacket, cushions or clothes padded with goose down (the weight of which
should not exceed 1,5 kg), use the special |
wash cycle. |
|
Bedlinen and towels: use programme |
to wash bed |
|
linen and towels in one single cycle: it optimises softener |
||
performance and helps you save time and energy. We |
||
recommend the use of powder detergent |
|
|
Anti Allergy: use programme |
to remove major allergens |
|
such as pollen, mites, cat’s and dog’s hair. |
|
|
Ultradelicates: use programme |
to wash very delicate |
|
garments having strasses or sequins.
We recommend turning the garments inside out before washing and placing small items into the special bag for washing delicates. Use liquid detergent on delicate garments for best results.
To wash Silk garments and Curtains select cycle  and then option
  (in this case it will also be possible to enable the “Extra Rinse” option); the machine will end the cycle while the laundry is soaking and the
  indicator light will flash. To drain the water so that the laundry may be removed, press the START/PAUSE button or the
  button.
Wool: the wool wash cycle on this Hotpoint-Ariston machine has been tested and approved by The Woolmark Company for washing wool garments labelled as hand washable provided that the garments are washed according to the instructions on the garment label and those issued by the manufacturer of this washing machine. Hotpoint-Ariston is the first washing machine brand to be approved by The Woolmark Company for Apparel CarePlatinum for its washing performance and consumption of energy and water. 


In UK, Eire, Hong Kong and India the Woolmark trade mark is a Certification trade mark.
Cotton Standard 20°C: ideal for heavily soiled cotton loads. The effective performance levels achieved at cold temperatures, which are comparable to washing at 40°, are guaranteed by a mechanical action which operates at varying speed, with repeated and frequent peaks.
Load balancing system
Before every spin cycle, to avoid excessive vibrations before every spin and to distribute the load in a uniform manner, the drum rotates continuously at a speed which is slightly greater than the washing rotation speed. If, after several attempts, the load is not balanced correctly, the machine spins at a reduced spin speed. If the load is excessively unbalanced, the washing machine performs the distribution process instead of spinning. To encourage improved load distribution and balance, we recommend small and large garments are mixed in the load.
10
Trouble shooting
Your washing machine could occasionally fail to work. Before contacting the Technical Assistance Centre (see “Assistance”), |
EN |
make sure that the problem cannot be solved easily using the following list. |
Problem:
The washing machine does not switch on.
Possible causes / Solutions:
•The appliance is not plugged into the socket fully, or not enough to make contact.
•There is no power in the house.
The wash cycle does not start.
•The door is not closed properly.
•The START/PAUSE button has not been pressed.
•The water tap has not been opened.
•A delayed start has been set.
The washing machine does not fill with water.
The washing machine door remains locked.
The machine continuously fills with water and drains.
•The water inlet hose is not connected to the tap.
•The hose is bent.
•The water tap has not been opened.
•There is no water supply in the house.
•The pressure is too low.
•The START/PAUSE button has not been pressed.
•If you have selected the  function, at the end of the cycle the washing machine drum will rotate slowly; to end the cycle press the START/PAUSE button or the
  button.
•The drain hose is not fitted at a height between 65 and 100 cm from the floor (see “Installation”).
•The free end of the hose is under water (see “Installation”).
•If the dwelling is on one of the upper floors of a building, there may be problems relating to water drainage, causing the washing machine to fill with water and drain continuously. Special anti-draining valves are available in shops and help to prevent this inconvenience.
•The wall drainage system is not fitted with a breather pipe.
The washing machine does not drain or spin.
•The wash cycle does not include draining: Some wash cycles require the drain phase to be started manually (see “Wash cycles and options”).
•The “Easy iron” option is enabled: to complete the wash cycle, press the START/PAUSE button (“Wash cycles and options”).
•The drain hose is bent (see Installation).
•The drainage duct is clogged.
The machine vibrates a lot during the spin cycle.
The washing machine leaks.
•The drum was not unlocked correctly during installation (see “Installation”).
•The machine is not level (see “Installation” ).
•The machine is trapped between cabinets and walls (see “Installation”).
•The load is unbalanced (see “Detergents and laundry”).
•The water inlet hose is not screwed on properly (see “Installation”).
•The detergent dispenser is blocked (to clean it, see “Care and maintenance”).
•The drain hose is not fixed in place properly (see “Installation”).
The icons corresponding to the “Phase in progress” flash rapidly at the same time as the ON/OFF indicator light.
There is too much foam.
•Switch off the machine and unplug it, wait for approximately 1 minute and then switch it back on again. If the problem persists, contact the Technical Assistance Service.
•The detergent is not suitable for machine washing (it should display the text “for washing machines” or “hand and machine wash”, or the like).
•Too much detergent was used.
The washing machine door |
• Perform the manual unlocking procedure (see “Precautions and tips”). |
remains locked. |
|
! Note: to exit “Demo mode”, switch machine off, press and hold the two “START/PAUSE” 
 and “ON/OFF”
  buttons simultaneously for 3 seconds.
11

Assistance
|
|
|
|
|
|
|
|
Before calling for Assistance: |
|
||||
EN |
|
|||||
• Check whether you can solve the problem by yourself (see “Trouble shooting”); |
|
|||||
|
|
|||||
|
• Restart the wash cycle to check whether the problem has been solved; |
|
||||
|
|
|||||
|
• If it has not, contact the Authorised Technical Assistance Service. |
|
||||
|
! If the washing machine has been installed or used incorrectly, you will have to pay for the call-out service. |
|
||||
|
! Always request the assistance of authorised technicians. |
|
||||
Please have the following information to hand:
•the type of problem;
•the appliance model (Mod.);
•the serial number (S/N).
The above information can be found on the data plate located on the appliance itself.
12

Beépítési és használati |
|
utasítás |
MOSÓGÉP |
|
HU
Magyar
Összefoglalás |
|
HU |
|
|
|
Üzembe helyezés, 14–15
Kicsomagolás és vízszintbe állítás Vízés elektromos csatlakozás Műszaki adatok
Karbantartás és ápolás, 16
A víz elzárása és az elektromos áram kikapcsolása A készülék tisztítása
A mosószer-adagoló fiók tisztítása A dob tisztítása
A szivattyú tisztítása
A vízbevezető cső ellenőrzése
AQUALTIS
AQS73D 29
Óvintézkedések és tanácsok, 17
Általános biztonság Hulladékelhelyezés Az ajtó kézi nyitása
A készülék leírása, 18–19
Érintőgombos kezelőpanel
A mosási ciklusok végrehajtása, 20
Programok és opciók, 21
Programtáblázat
Opciók
Mosószerek és mosandók, 22
Mosószer
A mosandó ruhák előkészítése Mosási tanácsok
A bepakolt ruhák kiegyensúlyozására szolgáló rendszer
Rendellenességek és elhárításuk, 23
Szerviz, 24
13
Üzembe helyezés
HU |
! E kézikönyv megőrzése azért fontos, hogy |
|||||||||||
|
bármikor elővehesse, és megnézhesse. |
|||||||||||
|
A készülék eladása, továbbadása, vagy |
|||||||||||
|
költöztetése esetén figyeljen arra, hogy a |
|||||||||||
|
kézikönyv a mosógéppel maradjon. |
|||||||||||
|
! Figyelmesen olvassa el az utasításokat: |
|||||||||||
|
fontos információkat tartalmaznak az üzembe |
|||||||||||
|
helyezésről, a használatról és a biztonságról. |
|||||||||||
|
! A garancia mellett az üzembehelyezéshez |
|||||||||||
|
szükséges eszközök is a kézikönyvet |
|||||||||||
|
tartalmazó csomagban találhatók. |
|||||||||||
|
Kicsomagolás és vízszintbe állítás |
|||||||||||
|
Kicsomagolás |
|||||||||||
|
1. A mosógép kicsomagolása után |
|||||||||||
|
ellenőrizze, hogy az nem szenvedett-e |
|||||||||||
|
sérülést a szállítás során. |
|||||||||||
|
Ha a készüléken sérülést talál, |
|||||||||||
|
ne csatlakoztassa, és forduljon a |
|||||||||||
|
viszonteladóhoz. |
|||||||||||
|
|
|
|
|
|
|
|
|
|
|
|
|
|
|
|
|
|
|
|
|
|
|
|
|
|
|
|
|
|
|
|
|
|
|
|
|
|
|
|
|
|
|
|
|
|
|
|
|
|
|
|
|
|
|
|
|
|
|
|
|
|
|
|
|
|
|
|
|
|
|
|
|
|
|
|
|
|
3. A furatokat zárja le a csomagban található műanyag dugókkal!
4. Őrizzen meg minden darabot, mert a mosógép esetleges elszállításakor a készülék belső károsodásának
megelőzése érdekében szükség lesz azok visszaszerelésére.
! A csomagolóanyag nem gyermekjáték!
Vízszintbe állítás
1. A mosógépet sík és kemény padlóra állítsa, úgy, hogy ne érjen falhoz, vagy bútorhoz!
!A pontos szintezés stabilitást nyújt és megakadályozza a főképp a centrifugálási fázisban jelentkező rezgések és zaj keletkezését.
!Amennyiben a készüléket szőnyegpadlón vagy szőnyegen helyezi el, a lábakat úgy állítsa be, hogy a mosógép alatt elegendő hely maradjon a szellőzésre!
Vízés elektromos csatlakozás
A vízbevezető cső csatlakoztatása
! A vízbevezető cső hálózatba való bekötése előtt folyassa ki a vizet, míg az áttetszővé nem válik.
1. A vízbevezető cső
csatlakoztatásához
csavarozza a csövet
a készülék hátoldalán
jobbra fent található vízbemeneti csonkra
(lásd ábra).
2. A vízbevezető cső csatlakoztatásához csavarozza fel a csövet egy 3/4”-
os külső menettel rendelkező hidegvízcsapra (lásd ábra).
3. Ügyeljen arra, hogy a csövön ne legyen törés vagy szűkület.
!A csap víznyomásának a műszaki adatok táblázatában szereplő határértékek között kell lennie (lásd a szemben lévő oldalt).
!Amennyiben a vízbevezető cső nem elég hosszú, forduljon szaküzlethez vagy engedéllyel rendelkező szakemberhez.
!Sohase szereljen fel használt, vagy öreg vízbevezető csövet, hanem a készülékhez mellékelt csöveket használja.
14
A leeresztőcső csatlakoztatása |
||
|
|
A leeresztőcsövet |
|
|
csatlakoztassa |
|
|
lefolyóhoz vagy |
|
|
a padlótól 65 és |
65 |
- 100 cm |
100 cm közötti |
magasságban lévő |
||
|
|
fali lefolyószifonhoz, |
|
|
vigyázva arra, |
|
|
nehogy megtörje! |
|
|
A leeresztőcsövet |
|
|
a mosdó vagy |
|
|
a kád szélére is |
|
|
akaszthatja úgy, |
|
|
hogy a tartozékok |
|
|
között lévő vezetőt a |
|
|
csaphoz erősíti (lásd |
|
|
ábra). |
|
|
A leeresztőcső |
|
|
szabad végének |
merülnie. |
nem szabad vízbe |
|
|
||
! Toldások használata nem javasolt. Amennyiben feltétlenül szükséges, a toldás átmérője egyezzen meg az eredeti csőével, és semmiképpen se legyen 150 cm-nél hosszabb.
Elektromos csatlakoztatás
Mielőtt a csatlakozódugót az aljzatba dugná, bizonyosodjon meg az alábbiakról:
•Az aljzat földelése megfelel a törvény által előírtnak.
•Az aljzat képes elviselni a készülék műszaki adatait tartalmazó táblázatban megadott maximális teljesítményfelvételt (lásdszemben).
•A hálózat feszültsége a műszaki adatokat tartalmazó táblázatban szereplő értékek közé esik (lásd szemben).
•Az aljzat kompatíbilis a készülék csatlakozódugójával. Ellenkező esetben cseréltesse ki az aljzatot vagy a csatlakozódugót.
! A készülék nem állítható fel nyílt téren, még akkor sem, ha a tér tetővel van fedve, mert nagyon a készüléket esőnek vagy zivataroknak kitenni nagyon veszélyes.
! A csatlakozódugónak a készülék helyére |
HU |
állítása után is könnyen hozzáférhetőnek kell |
|
maradnia. |
|
!Ne használjon hosszabbítót vagy elosztót.
!A kábel ne legyen se megtörve, se összenyomva.
!A hálózati kábelt, valamint a csatlakozódugót csak engedéllyel rendelkező szakember cserélheti.
Figyelem! A fenti előírások figyelmen kívül hagyása esetén a gyártó elhárít minden felelősséget.
Mûszaki adatok
Modell |
AQS73D 29 |
|||
|
|
|
|
|
|
|
|
szélesség 59,5 cm |
|
Méretek |
magasság 85 cm |
|||
|
|
|
mélység 44,5 cm |
|
Ruhatöltet: |
1-tõl 7 kg-ig |
|||
|
|
|
|
|
Elektromos |
lásd a készüléken talál- |
|||
ható, muszaki jellemzoket |
||||
csatlakozás |
tartalmazó adattáblát! |
|||
|
|
|
maximális nyomás |
|
Vízcsatla- |
1 MPa (10 bar) |
|||
minimális nyomás |
||||
kozások |
||||
0,05 MPa (0,5 bar) |
||||
|
|
|
||
|
|
|
dob ûrtartalma 48 lite |
|
Centrifuga |
|
|||
fordulat- |
1200 fordulat/perc-ig |
|||
szám |
|
|||
Az1061/2010 |
|
|||
és 1015/2010 |
program; |
|||
rendeletek |
pamut normál 60°C. |
|||
szerinti viz- |
program; |
|||
sgálati pro- |
pamut normál 40°C. |
|||
gramok |
|
|||
|
|
|
Ezaberendezésmegfelela |
|
|
|
|
következõUniósElõírásoknak: |
|
|
|
|
- 2004/108/CE elõírás |
|
|
|
|
(Elektromágneses össze- |
|
|
|
|
férhetõség) |
|
|
|
|
- 2002/96/CE |
|
|
|
|
- 2006/95/CE (Alacsony |
|
|
|
|
feszültség |
|
15
Karbantartás és ápolás
HU |
A víz elzárása és az elektromos |
áram kikapcsolása |
•Minden mosás után zárja el a vízcsapot. Így kíméli a készülék vízrendszerét, és megszünteti a vízszivárgás kockázatát.
•A készülék tisztítása vagy karbantartása esetén húzza ki a hálózati csatlakozódugót az aljzatból!
A készülék tisztítása
A külső részeket és a gumi részeket langyos szappanos vizes ronggyal tisztíthatja. Ne használjon oldószert vagy súrolószert!
A mosószer-adagoló fiók tisztítása
1 |
A fiók kiszedéséhez |
nyomja meg a kart (1) |
|
1 |
és húzza ki a fiókot (2) |
(lásd ábra). |
|
2 |
Mossa ki folyó víz alatt! |
|
Ezt a tisztítást gyakran |
2 |
el kell végezni. |
A dob tisztítása |
|
•Az ajtót a kellemetlen szagok keletkezésének megakadályozása érdekében mindig hagyja résnyire nyitva!
A szivattyú tisztítása
A készülék öntisztító szivattyúval van felszerelve, melynek nincs szüksége tisztítási és karbantartási műveletekre. Előfordulhat azonban, hogy apró tárgyak (aprópénz, gomb) esnek a szivattyú alsó részén található szivattyúvédő előkamrába.
! Győződjön meg róla, hogy a mosási ciklus véget ért, és húzza ki a csatlakozódugót.
Az előkamra eléréséhez tegye a következőket:
1. távolítsa el a burkolópanelt a készülék elejéről úgy, hogy középre nyomja, majd a két oldalról lefelé húzza, és kiveszi (lásd ábrák).
2. A kifolyó víz összegyűjtéséhez toljon egy edényt (körülbelül 1,5 literes) a készülékhez (lásd ábra).
3. Órairánnyal ellentétesen forgatva csavarja le a fedelet (lásd ábra).
4.Gondosan tisztítsa ki az üreg belsejét.
5.Csavarja vissza a fedelet.
6.Szerelje vissza a panelt – mielőtt a gép felé nyomná, győződjön meg arról, hogy a horgok a hozzájuk tartozó furatokba illeszkednek.
A vízbevezető cső ellenőrzése
Évente legalább egyszer ellenőrizze a gumicsövet! Ha repedezett vagy hasadozott, ki kell cserélni – a mosás során a nagy nyomás hirtelen szakadást okozhat.
16
Óvintézkedések és tanácsok
! A készüléket a nemzetközi biztonsági szabványoknak megfelelően tervezték és gyártották. Ezeket a figyelmeztetéseket biztonsági okokból írjuk le, és figyelmesen el kell olvasni őket
Általános biztonság
• Ez a készülék háztartási használatra lett tervezve.
• Ezt a készüléket a 8 éves kort betöltött gyermekek, valamint a testileg, érzékszervileg vagy szellemileg korlátozott, nem hozzáértő, illetve a terméket nem ismerő személyek csak megfelelő felügyelet mellett, vagy a készülék biztonságos használatával kapcsolatos alapvető utasítások és a kapcsolódó veszélyek ismeretében használhatják. A gyerekek nem játszhatnak a készülékkel. A karbantartási és tisztítási munkálatokat felügyelet nélkül hagyott gyerekek nem végezhetik.
•Ne érjen a géphez mezítláb, illetve vizes vagy nedves kézzel vagy lábbal!
•A dugót sohase a tápkábel, hanem a dugó meghúzásával húzza ki az aljzatból!
•Ne nyúljon a leeresztett vízbe, mert forró lehet!
•Semmiképpen ne feszegesse az ajtót: megsérülhet a véletlen nyitást megakadályozó biztonsági retesz.
•Hiba esetén semmiképpen se nyúljon a gép belső részeihez, és ne próbálja megjavítani!
•Mindig ügyeljen arra, hogy gyermekek ne mehessenek a működő gép közelébe.
•Amennyiben a készüléket át kell helyezni, azt két vagy három személy végezze, maximális odafigyeléssel! Soha ne próbálja meg a készüléket egyedül elmozdítani, mert az nagyon nehéz.
•A mosandó berakása előtt ellenőrizze, hogy a forgódob üres-e.
Hulladékelhelyezés
•A csomagolóanyag megsemmisítése: tartsa be a helyi előírásokat, így a csomagolás újrahasznosítható.
•Az Európai Parlament és Tanács, elektromos és elektronikus berendezések hulladékairól (WEEE) szóló 2002/96/EK irányelve előírja, hogy e hulladékok nem kezelhetők háztartási hulladékként. A forgalomból kivont berendezéseket, az azokat alkotó anyagok hatékonyabb visszanyerése, illetve újrahasznosítása, valamint az emberi egészség és a környezet védelme érdekében szelektíven kell gyűjteni. Az összes terméken megtalálható áthúzott szemetes szimbólum a szelektív gyűjtési kötelezettségre emlékeztet.
A tulajdonosok, háztartási készülékük forgalomból történő helyes kivonásával kapcsolatban, további információért a megfelelő közszolgálathoz, illetve a forgalmazóhoz is fordulhatnak.
Az ajtó kézi nyitása |
HU |
Amennyiben ki akarja teregetni a mosott ruhaneműt, de áramhiány miatt nem tudja kinyitni a mosógép ajtaját, tegye a következőket:
1. Húzza ki a dugót az aljzatból.
2. Győződjön meg arról, hogy a készülékben maradt víz szintje az ajtószint alatt van – ellenkező esetben a leeresztőcsövön keresztül eressze le a fölösleges vizet egy vödörbe, ahogy azt az ábra is mutatja.
3. Távolítsa el a burkolópanelt a mosógép elejéről (lásd |
következő oldal). |
4. Az ábrán látható fülecske |
kihúzásával szabadítsa ki |
a műanyag húzókát; húzza |
lefelé egészen addig, míg |
meg nem hallja az ajtó |
kinyitását jelző kattanást. |
5. Nyissa ki az ajtót; amennyiben ez nem sikerülne, ismételje meg a fenti lépéseket.
6. Szerelje vissza a panelt – mielőtt a gép felé nyomná, győződjön meg arról, hogy a horgok a hozzájuk tartozó furatokba illeszkednek.
17
A készülék leírása |
|
|
|||
HU |
|
|
KEZELŐPANEL |
||
|
|
AJTÓ |
|
|
|
|
|
AJTÓFOGANTYÚ |
|
|
|
|
|
LÁBAZAT |
|
|
|
|
|
ÁLLÍTHATÓ LÁBAK |
|
||
AJTÓ |
|
Az ajtó kinyitásához mindig |
3. Berakható rekesz: Fehérítőszer |
|
|
|
|
|
|||
|
|
a megfelelő fogantyút |
! A 3-as berakható rekesz használata kizárja az |
||
|
|
használja (lásd ábra). |
előmosást. |
|
|
|
|
|
Adalékanyagos rekesz: öblítőhöz és folyékony |
||
|
|
|
adalékokhoz. Kérjük, sohase töltse túl a rácson jelzett |
||
|
|
|
szintet, és az öblítőkoncentrátumokat mindig hígítsa föl! |
||
|
|
|
Érintőgombos kezelőpanel |
|
|
|
|
|
A beállítások módosításához |
||
|
|
|
az ábra szerint enyhén |
||
|
|
|
nyomja meg az érintőgomb |
||
MOSÓSZER-ADAGOLÓ FIÓK |
területén található |
||||
szimbólumot. |
|||||
|
|
A mosószer-adagoló fiók |
|||
|
|
|
|
||
|
|
a készülék belsejében |
|
|
|
|
|
található, és az ajtó |
|
|
|
|
|
kinyitásával érhető el. |
|
|
|
|
|
A mosószerek adagolásához |
|
|
|
|
|
lásd a „Mosószerek és |
|
|
|
|
|
mosandók” fejezetet. |
Készenléti üzemmód |
|
|
|
|
|
|
||
|
|
|
Ez a mosógép – az energiatakarékosságra vonatkozó |
||
|
|
|
legújabb előírásoknak megfelelően – automatikus |
||
|
|
|
kikapcsolási (készenléti) rendszerrel van ellátva, mely a |
||
|
|
1. Mosószeres rekesz |
használat 30 percnyi szüneteltetése esetén bekapcsol. |
||
A |
|
Nyomja meg röviden a ON/OFF |
gombot, és várjon, |
||
3 |
előmosáshoz: használjon |
||||
|
amíg a készülék újrabekapcsol. |
|
|||
|
|
mosóport! |
|
||
|
1 |
Fogyasztás off üzemmódban: 0,5 W |
|||
|
! A mosószer betöltése előtt |
||||
|
Fogyasztás bekapcsolva hagyott üzemmódban: 0,5 W |
||||
|
|
győződjön meg arról, hogy a |
|||
B |
2 |
|
|
||
3-as berakható rekesz nincs |
|
|
|||
|
|
ebben a rekeszben. |
|
|
|
|
|
2. Mosószeres rekesz |
|
|
|
|
|
mosáshoz: Ha folyékony |
|
|
|
|
|
mosószert használ, a |
|
|
|
|
|
megfelelő adagolás |
|
|
|
érdekében tanácsos az A elválasztólapot használni. Ha |
|
|
|||
mosóport használ, tegye az elválasztólapot a B térbe. |
|
|
|||
18

|
|
|
|
|
|
|
|
|
|
|
|
|
Érintőgombos kezelőpanel |
CENTRIFUGA gomb |
START/PAUSE |
|
|||||||||
HU |
||||||||||||
jelzőlámpás gomb |
||||||||||||
PROGRAMOK |
|
M2 |
|
M1 |
HŐMÉRSÉKLET gomb |
|
ECO |
MOSÁSI FÁZIS |
|
|||
|
|
|
|
|||||||||
|
|
|
|
|||||||||
tekerőgomb |
|
|
|
|
|
|
|
jelzőlámpá |
szimbólumok |
|
||
|
|
|
|
|
|
|
|
|
||||
|
|
|
|
|
|
|
|
|
|
|
|
|
|
|
|
|
|
|
|
|
|
|
|
|
|
|
|
|
|
|
|
|
|
|
|
|
|
|
|
|
|
|
|
|
|
|
|
|
|
|
|
|
|
|
|
|
|
|
|
|
|
|
|
|
Kijelző
|
|
|
|
|
|
|
|
|
|
|
|
|
|
|
|
|
|
|
|
|
|
|
|
|
|
|
|
|
|
|
|
|
ON/OFF jelzőlámpás |
|
|
|
OPCIÓK |
|
|
|
|
|
GYEREKZÁR |
|
|
KÉSLELTETETT |
|
|
||||||
|
|
|
gombok |
|
|
jelzőlámpás gomb |
||||
gomb |
M3 |
|
LOCK |
|||||||
|
|
INDÍTÁS gomb |
|
|||||||
|
|
|
|
|
lámpa |
|
||||
|
|
|
|
|
|
|
|
|
||
ON/OFF jelzőlámpás gomb  : a készülék bevagy kikapcsolásához nyomja meg röviden ezt a gombot. A készülék bekapcsolását zöld jelzőlámpa jelzi. A mosógép mosás közben történő leállításához hosszan, kb. 3 másodpercig tartsa lenyomva a nyomógombot – a gomb rövid, vagy véletlen megnyomása nem kapcsolja le a készüléket. A mosógép mosás közben történő leállítása magát a mosást is nullázza.
PROGRAMOK tekerőgomb: a tekerőgomb mindkét irányban elforgatható. A helyes program beállításához lásd „Programtáblázat”. A mosás során a tekerőgomb nem mozdul.
M1-M2-M3 nyomógombok: az egyéni igényeknek megfelelően beállított program memorizálásához tartsa lenyomva a gombok egyikét! A korábban memorizált programokat a hozzájuk tartozó nyomógombok, megnyomásával lehet előhívni.
HŐMÉRSÉKLET gomb 
 : a hőmérséklet-beállítások megváltoztatásához nyomja meg ezt a gombot – a kiválasztott érték megjelenik a fenti kijelzőn (lásd „A mosási ciklusok végrehajtása”).
CENTRIFUGA gomb : a centrifugabeállítások megváltoztatásához nyomja meg a gombot – a kiválasztott érték megjelenik a fenti kijelzőn (lásd „A mosási ciklusok végrehajtása”).
KÉSLELTETETT INDÍTÁS gomb  : a kiválasztott program késleltetett indításának beállításához nyomja meg ezt a gombot – a kiválasztott érték megjelenik a fenti kijelzőn (lásd „A mosási ciklusok végrehajtása”).
OPCIÓK jelzőlámpás gombok: az alkalmazható opciók kiválasztásához nyomja meg ezt a gombot. A kiválasztott opcióhoz tartozó jelzőlámpa kigyullad (lásd „A mosási ciklusok végrehajtása”).
MOSÁSI FÁZIS ikonok: kigyulladásukkal jelzik, hogy éppen
hol tart a ciklus (Mosás |
- Öblítés |
- Centrifugá |
- |
Szivattyúzás  ).A
).A
 felirat a ciklus legvégén gyullad csak ki.
START/PAUSE jelzőlámpás gomb: ha a zöld jelzőlámpa lassan villog, a mosás indításához nyomja meg a gombot. A ciklus elindításával a jelzőlámpa állandó fénnyel kezd világítani. A mosás szüneteltetéséhez ismételten nyomja meg a gombot; a jelzőlámpa narancssárga fénnyel kezd el villogni. Amennyiben az „LOCK”  lámpa világít, kinyithatja
az ajtót. Hogy a mosást a készülék onnan folytassa, ahol azt ön korábban megszakította, nyomja meg ismét a gombot.
LOCK lámpa  : jelzi, hogy az ajtó zárva van. Az ajtó kinyitásához a ciklust szüneteltetni kell (lásd
„A mosási ciklusok végrehajtása”).
GYEREKZÁR jelzőlámpás gomb  : a kezelőpanel gombjainak lezárásához, illetve aktiválásához tartsa a gombot
kb. 2 másodpercig lenyomva. Ha a lámpa világít, az azt jelenti, hogy a gyerekzár be van kapcsolva (a ON/OFF gomb kivételével). Ez a funkció megakadályozza a programok
véletlen átállítását, főképp, ha gyerekek is vannak a lakásban.
ECO jelzőlámpa: a
 szimbólum akkor gyullad ki, ha a mosási paraméterek megváltoztatásával 10%-nál nagyobb az elektromosenergia-megtakarítás; Ezenkívül, mielőtt a készülék készenléti üzemmódra kapcsolna, a szimbólum néhány másodpercre bekapcsol; kikapcsolt készüléknél a becsült energiamegtakarítás nagyjából 80%-os.
NYELV MÓDOSÍTÁSA
A készülék első bekapcsolásakor a kijelzőn az első nyelv jelenik meg villogva. A kijelzőtől jobbra található 3 nyomógombnak megfelelően a kijelzőn megjelenik az „ ”, „OK” és a „V” szimbólum. A nyelv 3 másodpercenként automatikusan átkapcsol, illetve az „
 ” és „V” szimbólumok melletti gombok megnyomásával kézileg is átkapcsolható. Az „OK” gombbal a nyelvválasztás jóváhagyható, mely 2 másodperc után folyamatos fénnyel jelenik meg. Amennyiben30másodpercen keresztülnemnyommegsemmilyengombot,anyelvek automatikusléptetéseújrakezdődik.
A nyelvválasztást csak a készülék kikapcsolt
állapotában lehet módosítani.
A nyelv módosításához beés ki kell kapcsolni a berendezést, a kikapcsolás utáni 30 mp alatt 5
másodpercig egyszerre nyomja le a hőmérséklet 
 , a centrifugálás és a késleltetett indítás

 gombokat; a hangjelzésen kívül a kijelzőn villogva megjelenik a beállított nyelv neve is. Az „
 ” és „V” szimbólumok melletti
nyomógombok megnyomásával a nyelv átkapcsolható. Az „OK” szimbólum melletti nyomógombbal a nyelvválasztás jóváhagyható, mely 2 másodperc után folyamatos fénnyel jelenik meg. Amennyiben 30 másodpercen keresztül nem nyom meg semmilyen gombot, a korábban beállított nyelv jelenik meg. Kapcsoljuk be a gépet.
19

A mosási ciklusok végrehajtása
MEGJEGYZÉS: a mosógép első használatakor végezzen HU el egy üres mosást 90°C-os pamutprogrammal, előmosás
nélkül, mosószer használatával.
1.A KÉSZÜLÉK BEKAPCSOLÁSA. Nyomja meg a
 gombot! Az összes lámpa felvillan 1 másodpercre és a kijelzőn az AQUALTIS felirat jelenik meg; a
  nyomógomb lámpája égve marad, míg az START/ PAUSE lámpa villogni kezd.
2.VÁLASSZA KI A PROGRAMOT. A kívánt program kiválasztásához forgassa a PROGRAMOK tekerőgombot jobbra vagy balra; minden programhoz tartozik egy hőmérséklet-, egy centrifugasebesség-, valamint egy mosásiintenzitás-érték, melyek mind megváltoztathatók. A kijelzőn megjelenik a ciklusidő.
3.PAKOLJA BE A MOSANDÓ RUHÁKAT. Nyissa ki az ajtót! Tegye be a mosandó ruhákat, ügyelve arra, hogy ne lépje túl a következő oldalon található programtáblázatban feltüntetett, illetve a kijelzőn megjelenő ruhatöltet-mennyiséget.
4.ADAGOLJA BE A MOSÓSZERT. Vegye ki a fiókot és az „A készülék leírása” című fejezet szerint öntse a mosószert a megfelelő rekeszekbe.
5.ZÁRJA BE AZ AJTÓT.
6.VÉGEZZE EL A MOSÁSI CIKLUS EGYÉNI BEÁLLÍTÁSÁT. A beállítást a kezelőpanel megfelelő gombjaival végezheti el.


 A hőmérséklet és/vagy a centrifugasebesség megváltoztatása.
A készülék automatikusan kijelzi az elindított programhoz tartozó legmagasabb hőmérsékletet és centrifugasebességet, vagy a legutóbb kiválasztottakat, amennyiben azok kompatíbilisek a kiválasztott programmal. A 
 gomb nyomogatásával a
hőmérséklet fokozatosan csökkenthető egészen a hideg mosásig (OFF). A gomb nyomogatásával a centrifugasebesség fokozatosan csökkenthető egészen annak megállításáig (OFF). A gomb legalsó értéken történő megnyomásával visszatérhet a maximális értékekhez.
! Kivétel: a  program kiválasztása esetén a hőmérséklet egészen 90°C-ig növelhető.
 Késleltetett indítás beállítása.
A kiválasztott program késleltetett indításához nyomogassa a vonatkozó gombot, míg a késleltetés kívánt értéke meg nem jelenik! A beállítás közben
akijelző a késleltetés idejét, a „Késleltet:” és a
villogó  szimbólumot fogja mutatni. A késleltetett indítás beállítását követően a kijelzőn állandó fénnyel megjelenik a
  szimbólum, majd a kijelző visszatér
a„Prg vége:” felirat és azt követő, beállított ciklusidő feltüntetéséhez. A KÉSLELTETETT INDÍTÁS gomb megnyomását követően a kijelzőn megjelenik a korábban beállított becsült maradékidő.
Az indítást követően a kijelzőn megjelenik a „Késleltet:” felirat és a késleltetés értéke. A beállított késleltetési idő leteltekor a készülék elindul, és a
kijelzőn megjelenik a „Prg vége:” felirat és a ciklus végéig hátra lévő maradékidő.
A késleltetett indítás törléséhez nyomogassa a gombot mindaddig, míg a kijelzőn meg nem jelenik az OFF felirat; a  szimbólum eltűnik.


 A program tulajdonságainak módosítása.
• Az opció aktiválásához nyomja meg a gombot; a kijelzőn megjelenik az opció neve, a nyomógombhoz tartozó lámpa pedig kigyullad.
• Az opció kikapcsolásához ismét nyomja meg a gombot; a kijelzőn megjelenik az opció neve, majd az OFF felirat, a lámpa pedig kikapcsol.
!Ha a kiválasztott opció a beállított programmal nem fér össze, a lámpa villogni kezd, a készülék hangjelzést bocsát ki (3 sípszó), az opció pedig nem lesz bekapcsolva.
!Ha a kiválasztott opció egy korábban beállított programmal nem fér össze, az elsőként kiválasztott opció lámpája villogni kezd, és csak a második opció lesz bekapcsolva, az ennek gombjához tartozó lámpa folyamatosan világít.
!Az opciók megváltoztathatják az ajánlott ruhatöltetmennyiséget és/vagy a programidőt.
7.INDÍTSA EL A PROGRAMOT. Nyomja meg az START/PAUSE gombot. A vonatkozó lámpa
folyamatosan ég és az ajtó bezár (az LOCK  lámpa ég). A ciklus során az aktuális fázis jelzésére mindig az éppen folyamatban lévő mosási fázis szimbóluma világít.
A programok menet közbeni módosításához az START/PAUSE gombbal állítsa a mosógépet szüneteltetésre; majd válassza ki a kívánt ciklust, és ismét nyomja meg az START/PAUSE gombot.
Az ajtó menet közbeni kinyitásához nyomja meg az START/PAUSE gombot.
Amennyiben az LOCK  lámpa kialudt, kinyithatja az ajtót. Hogy a mosást a készülék onnan folytassa, ahol azt ön korábban megszakította, ismét nyomja meg az START/PAUSE gombot.
8.A PROGRAM VÉGE.Ezt a világító END felirat jelzi. Az ajtó azonnal kinyitható. Amennyiben villogna az START/PAUSE gomb lámpája, a ciklus befejezéséhez nyomja meg a gombot. Nyissa ki az ajtót, szedje ki a mosott holmit, és kapcsolja ki a készüléket.
! Amennyiben nullázni szeretne egy már elindított programot, tartsa mindaddig lenyomva a  gombot, míg a program meg nem szakad, és a készülék ki nem kapcsol.
20
Programok és opciók
Programtáblázat
Szimbólum |
|
|
Max. |
Mosószerek és |
Max.töltet (kg) |
Maradék nedvességtartalom% |
EnergiafogyasztáskWh |
Összesvíz lt |
Programidő |
|||
|
|
Előmosás |
Mosás |
Fehérítőszer |
Öblítő |
|||||||
|
|
perc) |
||||||||||
|
|
|
se- |
|
adalékok |
|
|
|
|
|
|
|
|
Szimbólum Programleírás |
Max. hőm |
bes- |
|
|
|
|
|
|
|
|
|
|
(°C) |
ség |
|
|
|
|
|
|
|
|
|
|
|
|
|
(ford./ |
|
|
|
|
|
|
|
|
|
|
|
|
|
|
|
|
|
|
|
|
|
|
|
MŰSZÁLAS Makacs foltok |
60° |
800 |
|
|
|
|
3,5 |
49 |
0,87 |
42 |
90’ |
|
MŰSZÁLAS Makacs foltok (4) |
40° |
800 |
|
|
|
|
3,5 |
49 |
0,56 |
42 |
85’ |
|
FEHÉR |
60° |
1200 |
|
|
- |
|
4 |
- |
- |
- |
190’ |
|
SZÍNES |
40° |
1200 |
|
|
|
|
4 |
53 |
0,90 |
73 |
95’ |
|
SÖTÉT |
30° |
800 |
- |
|
- |
|
4 |
- |
- |
- |
80’ |
|
ING PROGRAM |
40° |
600 |
- |
|
|
|
2 |
- |
- |
- |
85’ |
|
ANORÁK |
30° |
1000 |
- |
|
- |
|
1,5 |
- |
- |
- |
130’ |
|
|
|
|
|
|
|
|
|
|
|
|
|
|
ÁGYNEMŰ: ágyneműkhöz és törölközőkhöz |
60° |
1200 |
|
|
|
|
7 |
- |
- |
- |
135’ |
|
ÖBLÍTÉS |
- |
1200 |
- |
- |
|
|
7 |
- |
- |
- |
49’ |
|
|
|
|
|
|
|
|
|
|
|
|
|
|
CENTRIFUGA és SZIVATTYÚZÁS |
- |
1200 |
- |
- |
- |
- |
7 |
- |
- |
- |
16’ |
|
|
|
|
|
|
|
|
|
|
|
|
|
|
ANTIALLERGÉN |
60° |
1200 |
- |
|
- |
|
4 |
- |
- |
- |
200’ |
|
ULTRA KÉNYES |
30° |
0 |
- |
|
- |
|
1 |
- |
- |
- |
75’ |
|
GYAPJÚ Platinum Care: gyapjú, kasmír stb. ruhaneműk mosásához. |
40° |
800 |
- |
|
- |
|
1,5 |
- |
- |
- |
80’ |
|
MIX 30': az erősen szennyezett ruhadarabok gyors átöblítésére (nem |
30° |
800 |
- |
|
- |
|
3 |
71 |
0,19 |
39 |
30’ |
|
javasolt gyapjú, selyem és kézzel mosandó ruhaneműkhöz). |
|||||||||||
|
|
|
|
|
|
|
|
|
|
|
|
|
|
PAMUT NORMÁL 60°C (1): erősen szennyezett fehér és magasabb |
60° |
1200 |
(3) |
|
|
|
7 |
53 |
1,00 |
52,5 |
185’ |
|
hőmérsékleten mosható színes ruhák. |
(Max. 90°) |
||||||||||
|
PAMUT NORMÁL 40°C (2): erősen szennyezett fehér és magasabb |
40° |
1200 |
- |
|
|
|
7 |
53 |
1,09 |
92 |
170’ |
|
hőmérsékleten mosható színes ruhák. |
|||||||||||
|
|
|
|
|
|
|
|
|
|
|
|
|
|
PAMUT NORMÁL 20°C: erősen szennyezett fehér és magasabb |
20° |
1200 |
- |
|
|
|
7 |
- |
- |
- |
175’ |
|
hőmérsékleten mosható színes ruhák. |
|||||||||||
|
|
|
|
|
|
|
|
|
|
|
|
|
A kijelzőn megjelenő vagy a kézikönyben feltüntetett ciklusidők szokásos körülmények alapján becsült értékek. A tényleges időt számos tényező befolyásolhatja – pl. a bemeneti víznyomás, a környezeti hőmérséklet, a mosószer mennyisége, a ruhatöltet mennyisége és típusa, a ruhatöltet kiegyensúlyozása, a kiválasztott további opciók.
Megjegyzés: Nagyjából 10 perccel az indítás után a készülék a ruhatöltet-mennyiség alapján újraszámítja, és megjeleníti a program végéig hátralévő időt.
1) Az 1061/2010/EU rendelet szerinti vizsgálati programok: állítsa be a 
 -os programot 60 °C-ra.
Ez a ciklus egy adag, nem különösebben koszos pamut ruhadarabok mosására alkalmas, és ez a leghatékonyabb a vízés energiafogyasztás |
|
szempontjából is. 60 °C-on mosható termékekhez. A mosás tényleges hőmérséklete eltérhet a megjelölt értéktől. |
|
2) Az 1061/2010/EU rendelet szerinti vizsgálati programok: állítsa be a |
-os programot 40 °C-ra. |
Ez a ciklus egy adag, nem különösebben koszos pamut ruhadarabok mosására alkalmas, és ez a leghatékonyabb a vízés energiafogyasztás szempontjából is. 40 °C-on mosható termékekhez. A mosás tényleges hőmérséklete eltérhet a megjelölt értéktől.
3) 60°C-os hőmérsékleten az “Előmosás” funkció nem elérhető.
A viszgálószervek számára: |
-os programot 40 °C-ra. |
2) Hosszú pamut program: állítsa be a |
|
4) Hosszú műszálas program: állítsa be a |
-es programot 40 °C-ra. |
Opciók
 Szuper Mosás
|
A ciklus kezdetén felhasznált |
|||||||
3 |
nagy mennyiségű víznek, |
|
||||||
valamint a hosszabb |
|
|
||||||
|
|
|
||||||
1 |
mosásidőnek köszönhetően |
|||||||
a szupermosás opció nagy |
||||||||
|
||||||||
2 |
mosóhatást biztosít. |
|
|
|||||
|
Használható fehérítőszerrel |
|||||||
|
vagy anélkül. Amennyiben |
|||||||
|
fehéríteni is szeretne, tegye |
|||||||
|
be a 3-as berakható tartályt az |
|||||||
|
1-es rekeszbe. A fehérítőszer |
|||||||
|
betöltése közben vigyázzon |
|||||||
arra, hogy az a központi csapon jelzett „max” szintet ne lépje |
||||||||
túl (lásd ábra). |
|
|
|
|
|
|
|
|
Amennyiben csak fehérítést szeretne végezni, teljes |
||||||||
mosást nem, töltse be a fehérítőt a 3-as berakható |
|
|
||||||
rekeszbe, állítsa be az “Öblítés” programot |
|
, és kapcsolja |
||||||
be a “Szuper Mosás” opciót . |
, |
, |
, |
, |
, |
, |
||
! Ez a funkció nem használható a |
||||||||
, . |
|
|
|
|
|
|
|
|
 Extra Öblítés
Ezen opció alkalmazásával nő az öblítés, valamint a mosószermaradvány-eltávolítás hatékonysága. Használata a mosószerekre különösen érzékeny bőrű embereknél ajánlott. Tanácsos ezt az opciót maximális ruhatöltetmennyiséggel, illetve emelt mosószeradaggal használni.
! Ez a funkció nem használható a  ,
,  ,
,  ,
,  ,
,  .
.
 Vasaláskönnyítés
Ez az opció a gyűrődések keletkezésének csökkentése érdekében a megfelelő időben módosítja a mosási beállításokat és a centrifugasebességet. A ciklus végén a mosott holmik lassan forognak a dobban; a „Vasaláskönnyítés” lámpa, valamint az START/PAUSE
lámpa villog. A ciklus leállításához nyomja meg az START/ PAUSE gombot, vagy a „Vasaláskönnyítés” gombot!
! Ez a funkció nem használható a  ,
,  ,
,  ,
,  ,
,  ,
,  .
.
 Előmosás
Ha ezt a funkciót kiválasztja, a készülék előmosást is fog végezni, mely makacs foltok eltávolítása esetén hasznos. Megjegyzés: Töltse a mosószert a megfelelő rekeszbe.
! Ez a funkció nem használható a  ,
,  , , ,
, , ,  , , ,
, , ,
 ,
,  ,
,  (60°),
  ,
,  .
.
HU
21
Mosószerek és mosandók
|
Mosószer |
HU |
|
|
A mosószer kiválasztása és adagolt mennyisége a szövet |
|
típusának (pamut, gyapjú, selyem...), színének, a mosási |
|
hőmérsékletnek, a szennyezettség mértékének, valamint |
|
a víz keménységének a függvénye. |
|
A mosószer megfelelő adagolása megakadályozza a |
|
pazarlást és kíméli a környezetet: még, ha biológiailag |
|
lebomló fajtájúk is, a mosószerek olyan összetevőket |
|
tartalmaznak, amelyek megváltoztatják a természet |
|
egyensúlyát. |
|
A következőket tanácsoljuk: |
|
• A pamutból készült ruhaneműkhöz, valamint az |
|
előmosáshoz használjon mosóport. |
|
• A kényesebb pamut ruhadarabokhoz, valamint az |
|
összes alacsony hőmérsékletű programhoz használjon |
|
folyékony mosószert. |
|
• A gyapjú és selyem ruhadarabokhoz használjon |
|
kímélő folyékony mosószert. |
|
A mosószert a mosás elindítása előtt be kell tölteni a |
|
megfelelő rekeszbe, vagy az adagolótégelybe, melyet |
|
utána közvetlenül be kell helyezni a dobba. Ebben az |
|
esetben viszont ne válassza ki a Pamut előmosással |
|
programot! |
|
! Fehér színű pamut ruhadarabokhoz, előmosáshoz és |
|
60 °C-nál magasabb hőmérsékleten történő mosásokhoz |
|
mosóport használjon. |
|
! Kövesse a mosópor csomagolásán feltüntetett |
|
utasításokat. |
|
! Ne használjon kézi mosószert, mert túlzottan sok hab |
|
képződik. |
A mosandó ruhák előkészítése
•A berámolás hajtsa jól ki a ruhadarabokat.
•A mosandót szövettípusuk (a ruhanemű címkéjén található szimbólum), illetve színük szerint válogassa szét, különösen odafigyelve arra, hogy a színes holmikat elválassza a fehérektől.
•Ürítse ki a zsebeket, és vizsgálja meg a gombokat.
•Ne lépje túl a mosandók száraz tömegére vonatkozóan a “Programtáblázat” megadott értékeket.
Milyen nehezek a mosandó ruhák?
1 lepedő |
400–500 g |
1 párnahuzat |
150–200 g |
1 asztalterítő |
400–500 g |
1 fürdőköpeny |
900–1200 g |
1 törölköző |
150–250 g |
1 farmernadrág |
400–500 g |
1 ing |
150–200 g |
Mosási tanácsok
FEHÉR: ezt a ciklust  fehér anyagok mosásához használja. A program a fehér szín.
SZÍNES: a  ciklust világos színű anyagok mosásához használja. A program a színek élénkségének megtartására lett kifejlesztve.
SÖTÉT: a sötét anyagok mosásához használja a  programot. A program sötét színű ruhadarabok
színének megtartására lett kifejlesztve. A jobb mosási eredmény érdekében – lehetőleg sötét ruhadarabok mosásához való – folyékony mosószer használatát javasoljuk.
ING PROGRAM: a különböző szövetű és színű ingek mosásához, maximális védelmük érdekében használja a megfelelő  programot.
ANORÁK: libatollal bélelt holmik, mint például (1,5 kgnál könnyebb) széldzsekik, illetve párnák mosásához használja a megfelelő  programot.
ÁGYNEMŰ: Az ágyneműk és törölközők egyetlen
ciklus alatti mosásához használja a  programot. Ez a program optimalizálja az öblítőszer adagolását, valamint időt és energiát takarít meg önnek. Folyékony mosószer használatát javasoljuk.
ANTIALLERGÉN: használja a  programot, hogy az elsődleges allergének (pl. pollenek, atkák, macskaés
kutyaszőr) el legyenek távolítva.
ULTRA KÉNYES: A nagyon kényes – pl. flitterekkel,
csillogókkal ellátott – anyagok mosásához használja a programot.
A mosás előtt tanácsos kifordítani a ruhadarabokat, és a kisebb holmikat a kényes anyagok mosására szolgáló megfelelő mosózsákba rakni.
A jobb mosási eredmény érdekében kényes anyagokhoz való folyékony mosószer használatát javasoljuk.
A selyem ruhadarabokhoz és függönyökhöz válassza
aciklust, és kapcsolja be a  opciót (ebben az esetben az „Extra öblítés” opció is bekapcsolható);
aciklus a mosandó ruhák öblítésével végződik, a
 jelzőlámpa pedig villogni kezd. Az öblítővíz leeresztéséhez és a mosott holmik kiszedéséhez meg
kell nyomni az START/PAUSE gombot, vagy a 
gombot.
Gyapjú: ezen Hotpoint-Ariston mosógép gyapjú” mosási ciklusát a Woolmark Company tesztelte és engedélyezte “kézzel mosható” gyapjú ruhaneműk mosásához, amennyiben a mosást a ruhanemű címkéjén feltűntetett és a háztartási gép gyártója által előírt útmutatásoknak megfelelően hajtja végre. Hotpoint-Ariston az első mosógép márka, mely megszerezte a Woolmark Company Woolmark Apparel Care - Platinum igazolását a mosási teljesítményéért és a gazdaságos vízés energiafogyasztásáért. 
Pamut Normál 20°C – Ideális a szennyezett pamut töltetekhez. A 40 C-os mosáséhoz mérhető, akár hideg mosás mellett is elérhető jó teljesítményt egy
rendszeres időközönként ismétlődő sebességcsúcsokkal jellemezhető, változó sebességű mechanikus mozgás biztosítja.
A bepakolt ruhák kiegyensúlyozására szolgáló rendszer
A túlzott zajhatás megelőzésére, valamint a mosandók egyenletes eloszlása érdekében a forgódob a centrifugafázis előtt a mosási centrifugasebességnél kicsit nagyobb sebességre kapcsol. Amennyiben a töltet kiegyensúlyozására irányuló próbálkozások nem vezetnek eredményre, a készülék az elméleti centrifugasebességnél lassabb centrifugálásra kapcsol. Jelentős kiegyensúlyozatlanság esetén a mosógép, centrifugálás
előtt megpróbálja a töltetet megfelelően eloszlatni. A töltet megfelelő eloszlásának biztosítása érdekében ajánlatos a nagy ruhaneműket a kicsikkel összekeverni.
22
 Loading...