


7OFTR 850 RU /HA 7OFTR 851 RU/HA OT 857 CO RFH OT 857 O RFH
OT 857 CA RFH
OT 857 A RFH
 Қазақша
Пайдалану нұсқаулығы
ПЕШ
Мазмұны
Пайдалану нұсқаулығы,1 Ескертулер,3 Көмек,4
Құрылғы сипаттамасы,5 Құрылғы сипаттамасы,6 Орнату,22 Қосу және пайдалану,25
Тағам дайындау режимдері,25 Сақтандырулар мен кеңестер,28 Күтім және пайдалану,28
 English
Operating Instructions
OVEN Contents
Operating Instructions,1
Warnings,2
Assistance,3
Description of the appliance,4
Description of the appliance,5
Installation,6
Start-up and use,8
Modes,8
Precautions and tips,11
Maintenance and care,11
 Русскии
Руководство по эксплуатации
ДУХОВОЙ ШКАФСодержание
Руководство по эксплуатации,1 Предупреждения,2 Сервисное обслуживание,3 Описание изделия,4 Описание изделия,5 Установка,13 Включение и эксплуатация,16 Программы,16
Предосторожности и рекомендации,19 Техническое обслуживание и уход,20

Warnings
WARNING: The appliance and its accessible parts become hot during use. Care should be taken to avoid touching heating elements. Children less than 8 years of age shall be kept away unless continuously supervised. This appliance can be used by children aged from 8 years and above and persons with reduced physical, sensory or mental capabilities or lack of experience and knowledge if they have been given supervision or instruction concerning use of the appliance in a safe way and understand the hazards involved. Children shall not play with the appliance. Cleaning and user maintenance shall not be made by children without supervision.
Do not use harsh abrasive cleaners or sharp metal scrapers to clean the oven door glass since they can scratch the surface, which may result in shattering of the glass.
Never use steam cleaners or pressure cleaners on the appliance.
WARNING: Ensure that the appliance is switched off before replacing the lamp to avoid the possibility of electric shock.
! When you place the rack inside, make sure that the stop is directed upwards and in the back of the cavity.
Предупреждения
ВНИМАНИЕ: Данное изделие и его доступные комплектующие сильно нагреваютсявпроцессеэксплуатации. Будьте осторожны и не касайтесь нагревательных элементов.
Не разрешайте детям младше 8 лет приближатьсякизделиюбезконтроля. Данное изделие может быть использовано детьми старше 8 лет и лицамисограниченнымифизическими, сенсорными или умственными способностямиилибезопытаизнания оправилахиспользованияизделияпри условии надлежащего контроля или обучениябезопасномуиспользованию изделия с учетом соответствующих рисков. Не разрешайте детям играть с изделием. Не разрешайте детям осуществлять чистку и уход за изделием без контроля взрослых.
Неиспользуйтеабразивныевещества или режущие металлические скребки длячисткистекляннойдверцыдухового шкафа, так как они могут поцарапать поверхность, что может привести к разбиванию стекла.
Никогда не используйте паровые чистящие агрегаты или агрегаты под высоким давлением для чистки изделия.
ВНИМАНИЕ:Проверьте,чтобыизделие было выключено, перед заменой лампочки во избежание возможных ударов током.
! При установке решетки проверить, чтобы фиксатор был повернут вверх с задней стороны выемки.
2

Ескертулер
ЕСКЕРТУ: Құрылғы мен оның қол жететінбөліктеріжұмыскезіндеқызуы мүмкін.
Қыздыруэлементтерінетимеугеназар аударыңыз.
8-ге толмаған балаларға үздіксіз бақылау болмаса, құрылғыдан аулақ ұстау керек. Бұл құрылғыны қауіпсіз түрде қолдану бойынша кеңес не нұсқау берілген және ықтимал қауіп- қатерлердітүсінетінжағдайда,оны8-ге толғанбалалармендене,сезінунемесе ой қабілеті төмен немесе тәжірибесі менбіліміжеткіліксізадамдарқолдана алады.Балаларғақұрылғыменойнауға болмайды. Балаларға бақылаусыз құрылғынытазалауғажәнеоғанқызмет көрсетуге болмайды.
Пешесігініңшынысынтазалауүшінқатты ысқыш тазалағыштарды немесе өткір метал ысқыщтарды пайдаланбаңыз, себебі олар шыныны сызып, оның шағылуына әкелуі мүмкін.
Құрылғыда ешқашан бу тазартқышты немесешаңсорғыштыпайдаланбаңыз.
ЕСКЕРТУ:Тоқсоғумүмкіндігініңалдын алу үшін шамды ауыстырмас бұрын құрылғы өшірілгеніне көз жеткізіңіз.
!Тартпаныішкесалғанкездешектегіш жоғарықарап,қуыстыңартқыжағында тұрғанына көз жеткізіңіз.
3
Assistance
! Never use the services of an unauthorised technician.
Please have the following information to hand:
•The type of problem encountered.
•The appliance model (Mod.).
•The serial number (S/N).
The latter two pieces of information can be found on the data plate located on the appliance.
Сервисное обслуживание
! Никогда не обращайтесь к неуполномоченным техникам.
При обращении в Центр Технического Обслуживания необходимо сообщить:
•Тип неисправности;
•Модель изделия (Мод.)
•Номер тех. паспорта (серийный №)
Эти данные вы найдете на паспортной табличке, расположенной на изделии.
Көмек
Ескерту:
Құрылғы кез келген дұрыс жұмыс істемеуін анықтайтын автоматты диагностикалық жүйе арқылы реттеледі. Дұрыс жұмыс істемеу хабарлардың төмендегі түрімен бейнеленеді: “F” сандардың алдында келеді.
Дұрыс жұмыс істемеген кезде техникалық қолдау көрсету орталығына хабарласыңыз.
!Рұқсатыжоқадамныңқызметінешқашанқабылдамаңыз.
Келесі мәліметтерді оңай жерде ұстаңыз:
•Туындаған проблема түрі.
•Құрылғының моделі (Мод.).
•Сериялық нөмірі (С/н).
Кейінірекмәліметтердіңекібөлігінқұрылғыныңдеректер тақтасынан көре аласыз.
4
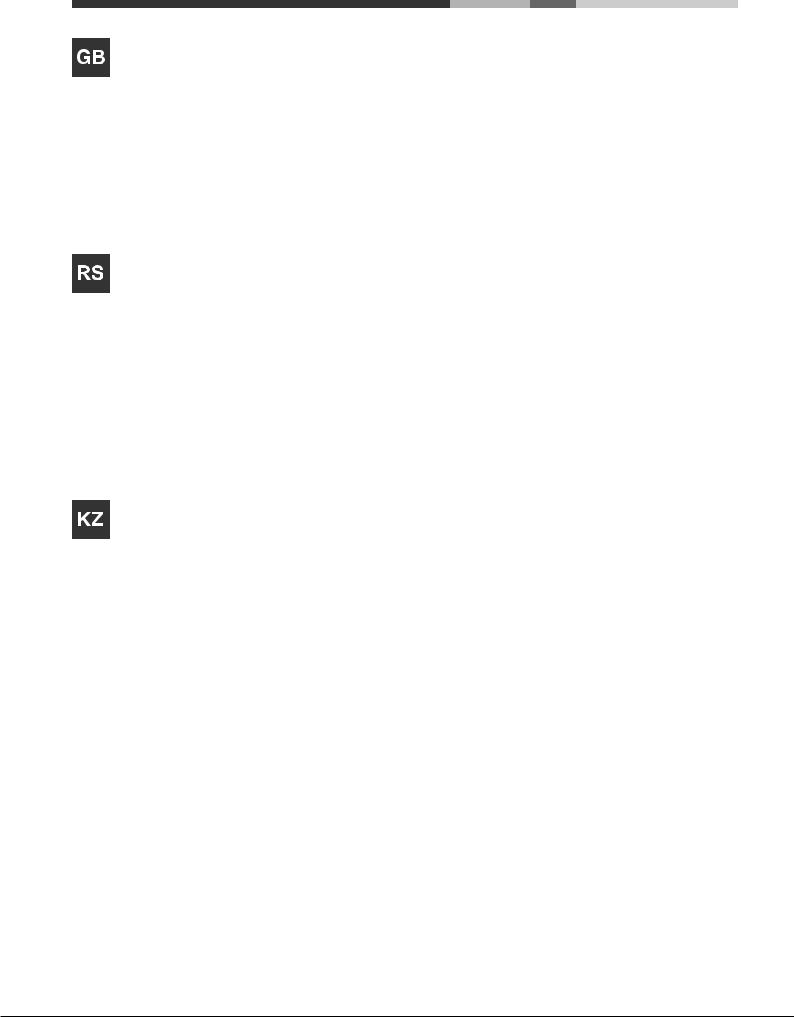
Description of the appliance Құрылғы сипаттамасы
Overall view |
Жалпы шолу |
|||
1. |
POSITION 1 |
1 |
ПОЗИЦИЯ 1 |
|
2. |
POSITION 2 |
2 |
ПОЗИЦИЯ 2 |
|
3. |
POSITION 3 |
3 |
ПОЗИЦИЯ 3 |
|
4. |
POSITION 4 |
4 |
ПОЗИЦИЯ 4 |
|
5. |
POSITION 5 |
5 |
ПОЗИЦИЯ 5 |
|
6. |
GUIDES for the sliding racks |
6 |
Сырғымалы серелерге арналған СЫРRЫТПАЛАР |
|
7. |
DRIPPING PAN |
7 |
ТАБА |
|
8. |
GRILL |
8 |
ГРИЛЬ |
|
9. |
Control panel |
9 |
Басқару тaқтaы |
|
|
|
|
|
|
|
|
|
|
|
Описание изделия
Общии вид
1.ПОЛОЖЕНИЕ 1
2.ПОЛОЖЕНИЕ 2
3.ПОЛОЖЕНИЕ 3
4.ПОЛОЖЕНИЕ 4
5.ПОЛОЖЕНИЕ 5
6.ВЫДВИЖНЫЕ НАПРАВЛЯЮЩИЕ уровней
7.ПРОТИВЕНЬ
8.РЕШЕТКА
9.Панель управления
9 |
6 |
8 |
5 |
|
4 |
7 |
3 |
|
2 |
|
1 |
5

Description of the appliance Құрылғы сипаттамасы
Control panel |
Басқару тaқтaы |
|||
1. |
SELECTOR Knob |
1 |
РЕТТЕУ тұтқacы |
|
2. |
ANALOGUE PROGRAMMER knob |
2 |
АНАЛОГТЫҚ бағдарламалаушы тұтқасы |
|
3. |
THERMOSTAT Knob |
3 |
ТЕРМОСТАТ тұтқacы |
|
4. |
Indicator light THERMOSTAT |
4 |
ПЕШ ИНДИКАТОРЫ |
|
|
|
|
|
|
|
|
|
|
|
Описание изделия
Панель управления
1.Рукоятка ПЕРЕКЛЮЧАТЕЛЯ
2.Рукоятка АНАЛОГОВОГО ПРОГРАММЕРА
3.Рукоятка ТЕРМОРЕГУЛЯТОРА
4.Индикатор ТЕРМОРЕГУЛЯТОРА
1 |
2 |
3 |
9
12
 9
9
6
3
4
6
Installation
!Please keep this instruction booklet in a safe place for future reference. If the appliance is sold, given away or moved, please make sure the booklet is also passed on to the new owners so that they may benefit from the advice contained within it.
!Please read this instruction manual carefully: it contains important information concerning the safe operation, installation and maintenance of the appliance.
Positioning
!Do not let children play with the packaging material; it should be disposed of in accordance with local separated waste collection standards (see Precautions and tips).
!Theappliancemustbeinstalledbyaqualifiedprofessional in accordance with the instructions provided. Incorrect installation may damage property or cause harm to people or animals.
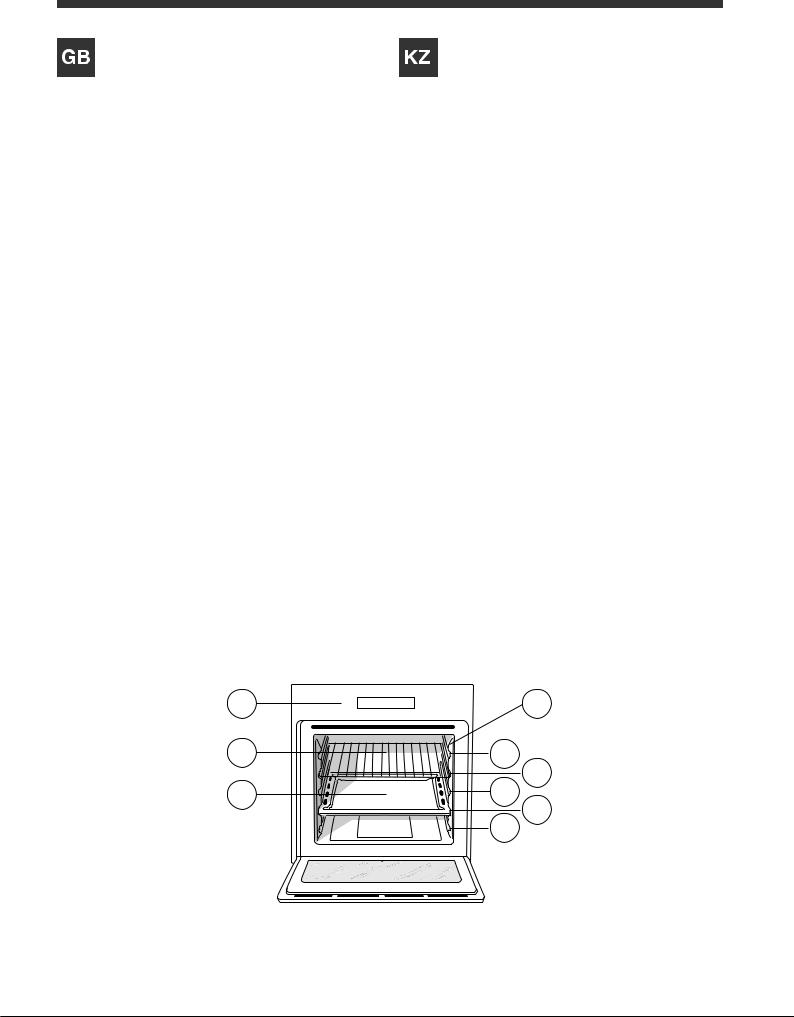
Built-in appliances
Use an appropriate cabinet to ensure that the appliance operates properly:
•The panels adjacent to the oven must be made of heatresistant material.
•Cabinets with a veneer exterior must be assembled with glues which can withstand temperatures of up to 100°C.
•To install the oven under the counter (see diagram) or in a kitchen unit, the cabinet must have the following dimensions:
|
|
|
. |
|
23 mm. |
|
.min |
mm.595 |
mm.567 |
mm |
|
585-575mm. |
|||
|
|
|
547 |
|
|
558 |
mm. |
|
|
|
|
595 |
|
5 mm. |
|
mm. |
. |
|
|
|
mm |
|
|
|
|
545 |
|
|
. |
|
|
|
mm |
|
|
25 |
|
|
|
! The appliance must not come into contact with electrical parts once it has been installed.
The indications for consumption given on the data plate have been calculated for this type of installation.
Ventilation
To ensure adequate ventilation, the back panel of the GB cabinet must be removed. It is advisable to install the oven
so that it rests on two strips of wood, or on a completely flat surface with an opening of at least 45 x 560 mm (see diagrams).
. |
45 |
mm. |
mm |
|
|
560 |
|
|
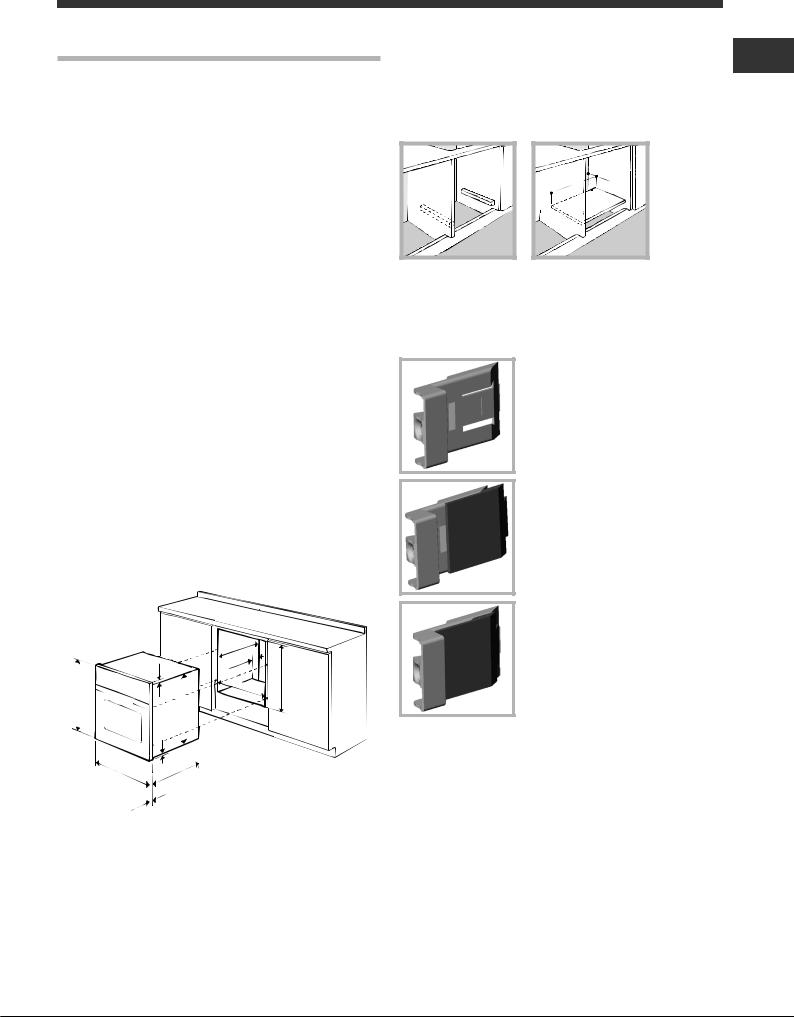
Centring and fixing
Position the 4 tabs on the side of the oven, in line with the
4 holes on the outer frame. Adjust the tabs according to the thickness of the cabinet side panel, as shown below:*
20mmthick:takeofftheremovable part of the tab
(see diagram);
18 mm thick: use the first groove, which has already been set in the factory
(see diagram);
16 mm thick: use the second groove (see diagram).
Secure the appliance to the cabinet by opening the oven door and putting 4 screws into the 4 holes on the outer frame.
! All parts which ensure the safe operation of the appliance must not be removable without the aid of a tool.
Centring and fixing*
1.Position brackets “A” against oven support “B”.
2.Position tabs “C” against brackets “A”. If the thickness of the cabinet side panel:
•is 16 mm thick: place the tab so that the number 16 written on it is facing you;
•is 18 mm thick: place the tab so that the part without any text is facing you;
* Only available in certain models.
7
 RU/HA User Manual")
• is 20 mm thick: do not fit the tab.
GB 3. Fix the brackets and tabs onto the edge of the cabinet side panel using screws “D”.
4.Fix the oven to the cabinet using the screws and plastic washers “E”.
|
16 |
D C |
|
|
16 |
|
|
D |
C |
A |
E |
|
16 |
D C |
E |
|
16 |
||
|
|
B |
|
Electrical connection
Ovens equipped with a three-pole power supply cable are designed to operate with alternating current at the voltage and frequency indicated on the data plate located on the appliance (see below).
Fitting the power supply cable
L |
N
1.Open the terminal board by inserting a screwdriver into the side tabs of the cover. Use the screwdriver as a lever by pushing it down to open the cover (see diagram).
2.Install the power supply cable by loosening the cable clamp screw and the three wire contact screws
L-N- .
.
Connect the wires to the corresponding terminals: the Blue wire to the terminal marked (N), the Brown wire to the terminal marked (L) and the Yellow/Green wire
to the terminal marked 
(see diagram).
3.Secure the cable by fastening the clamp screw.
4.Close the cover of the terminal board.
Connecting the supply cable to the mains
Install a standardised plug corresponding to the load indicated on the data plate (see side).
The appliance must be directly connected to the mains using an omnipolar circuit-breaker with a minimum contact opening of 3 mm installed between the appliance and the mains, suitable for the load indicated and complying with current electrical regulations (the earthing wire must not be interrupted by the circuit-breaker). The supply cable must not come into contact with surfaces with temperatures higher than 50°C.
! The installer must ensure that the correct electrical connection has been made and that it is compliant with safety regulations.
Before connecting to the power supply, make sure that:
•The appliance is earthed and the plug is compliant with the law.
•The socket can withstand the maximum power of the appliance, which is indicated on the data plate (see below).
•The voltage must be in the range between the values indicated on the data plate (see below).
•The socket is compatible with the plug of the appliance.
If the socket is incompatible with the plug, ask an authorised technician to replace it. Do not use extension
cords or multiple sockets.
!Once the appliance has been installed, the power supply cable and the electrical socket must be easily accessible.
!The cable must not be bent or compressed.
!The cable must be checked regularly and replaced by authorised technicians only (see Assistance).
!The manufacturer declines any liability should these safety measures not be observed.
APPLIANCE SPECIFICATIONS
Dimensions* |
width 43.5 cm |
|
height 32,4 cm |
||
|
depth 41.5 cm |
|
Volume* |
59 l |
|
Dimensions** |
width 45.5 cm |
|
height 32,4 cm |
||
|
depth 41.5 cm |
|
Volume** |
62 l |
|
Electrical |
voltage: 220 - 240 V~ 50/60 Hz |
|
or 50 Hz (see data plate) |
||
connections |
maximum power absorbed |
|
|
2800 W |
|
|
Directive 2002/40/EC on the label of |
|
|
electric ovens. Standard EN 50304 |
|
ENERGY |
Energy consumption for Natural |
|
convection – heating mode: |
||
LABEL |
Traditional mode |
|
|
Declared energy consumption for |
|
|
Forced convection Class – heating |
|
|
mode: |
Baking |
|
This appliance conforms to the |
|
|
following European Economic |
|
|
Community directives: 2006/95/EEC |
|
|
dated 12/12/06 (Low Voltage) and |
|
|
subsequent amendments – |
|
|
2004/108/EEC dated 03/05/89 |
|
|
(Electromagnetic Compatibility) and |
|
|
subsequent amendments - |
|
|
93/68/EEC dated 22/07/93 and |
|
|
subsequent amendments. |
|
|
2012/19/EC and subsequent |
|
|
amendments. |
|
-1275/2008 standby/off mode
*Only for models with drawn rails.
**Only for models with wire rails.
8

Start-up and use
pull (2). |
WARNING! The oven is provided with a stop system to extract the racks and prevent them from coming out of the oven (1).
As shown in the drawing, to extract them completely, simply lift the racks, holding them on the front part, and
! Thefirsttimeyouuseyourappliance,heattheemptyoven with its door closed at its maximum temperature for at least half an hour. Make sure that the room is well ventilated before switching the oven off and opening the oven door. The appliance may emit a slightly unpleasant odour caused by protective substances used during the manufacturing process burning away.
Setting the time
Press the PROGRAMMER knob and turn it in an anticlockwise direction to set the correct time.
|
|
|
! The clock can only be set |
|
|
|
|
|
|
12 |
if the oven is connected |
|
|
to the electricity mains. In |
|
|
|
|
|
|
|
|
case of a power failure, the |
9 |
9 |
3 |
PROGRAMMER will stop: |
the correct time will need to |
|||
|
|
|
be reset once the power has |
|
|
|
returned. |
|
|
6 |
|
|
|
|
|
Starting the oven
1.Select the desired cooking mode by turning the SELECTOR knob.
2.Select the desired temperature with the THERMOSTAT knob. See the Cooking advice table for cooking modes and the suggested cooking temperatures (see Cooking Modes).
3.When lit, the THERMOSTAT indicator light indicates that the oven is heating up to the temperature set.
4.You may do the following during cooking:
-change the cooking mode by turning the SELECTOR knob.
-change the temperature by turning the THERMOSTAT knob.
-stop cooking by turning the SELECTOR knob to the “0” position.
!Never put objects directly on the oven bottom to avoid damaging the enamel coating.
!Always place cookware on the rack(s) provided.
Cooling ventilation
In order to cool down the external temperature of the oven, GB some models are fitted with a cooling fan that blows out air between the control panel and the oven door.
! Once the cooking has been completed, the cooling fan remains on until the oven has cooled down sufficiently.
Oven light
It goes on when selecting with the SELECTOR knob. It stays on when a cooking mode is selected.
Modes
! A temperature value can be set for all cooking modes between 60°C and Max, except for
•BARBECUE (recommended: set only to MAX power level);
•GRATIN (recommended: do not exceed 200°C).
TRADITIONAL OVEN mode
When using this traditional cooking mode, it is best to use one cooking rack only; if more than one rack is used, the heat will be distributed unevenly.
BAKING mode
This mode is ideal for baking and cooking temperature sensitive foods such as cakes that need to rise and to prepare certain tartlets on 3 shelves simultaneously.
FAST COOKING mode
This mode is especially recommended for cooking pre- packedfoodquickly(frozenorpre-cooked).Thebestresults are obtained if you use one cooking rack only.
MULTI-COOKING mode
Since the heat remains constant throughout the oven, the air cooks and browns food uniformly. A maximum of two racks may be used at the same time.
 PIZZA mode
This combination heats the oven rapidly by producing a considerable amount of heat, particularly from the bottom element. If you use more than one rack simultaneously, switch the position of the dishes halfway through the cooking process.
BARBECUE mode
The high and direct temperature of the grill is recommended for dishes that require a high temperature on the surface. Always cook in this mode with the oven door closed.
9

GB |
GRATIN mode |
|
|
|
This combination of features increases the effectiveness of |
|
|
|
the unidirectional thermal radiation of the heating elements |
|
through forced circulation of the air throughout the oven. |
|
This helps prevent food from burning on the surface, |
|
allowing the heat to penetrate right into the food. Always |
|
cook in this mode with the oven door closed. |
Rotisserie spit*
To operate the rotisserie function (see diagram)
proceed as follows:
1. Place the dripping pan in
position 1.
2. Place the rotisserie support in position 3 and insert the spit in the hole
provided on the back panel of the oven.
3. Start the rotisserie function by selecting the  or
or  modes;
Planning your cooking
Programming cooking time with immediate start
1.Turn the PROGRAMMER knob in an anticlockwise direction until the desired cooking time is displayed.
2.Pull the PROGRAMMER knob and turn it in an anticlockwise direction until the marker corresponds with the current time.A click will indicate the end of the programming phase.
3.Select the desired cooking mode using the SELECTOR knob. The oven switches on immediately and remains on for the entire duration of the set cooking time.
4.When the set time has elapsed, a buzzer will sound. To stop the cooking process, turn the PROGRAMMER knob in ananticlockwisedirectionuntilthesymbol“ ”isdisplayed.
5.Turn the SELECTOR knob to the “0” position.
•For example: it is 9:00 a.m. and a time of 1 hour and
15 minutes is programmed. The programme will stop automatically at 10:15 a.m.
Programming a delayed cooking time
1.Turn the PROGRAMMER knob in an anticlockwise direction until the desired cooking time is displayed.
2.Pull the PROGRAMMER knob and turn it in an anticlockwise direction until the marker corresponds with the desired cooking start time.
3.Select the desired cooking mode using the SELECTOR knob. The oven will switch on at the set cooking start time and will remain on for the entire duration of the set cooking time.
4.When the set time has elapsed, a buzzer will sound. To stop the cooking process, turn the PROGRAMMER knob in ananticlockwisedirectionuntilthesymbol“ ”isdisplayed.
5.Turn the SELECTOR knob to the “0” position.
* Only available in certain models.
•For example: it is 9:00 a.m., a time of 1 hour and 15 minutes is programmed and the start time is set to 11:00 a.m.Theprogrammewillstartautomaticallyat11:00and will end at 12:15.
! To cancel programming, turn the PROGRAMMER knob anticlockwise until the symbol “ ” is displayed.
Practical cooking advice
!Do not place racks in position 1 and 5 during fan-assisted cooking. Excessive direct heat can burn temperature sensitive foods.
!In the BARBECUE and GRATIN cooking modes, particularly when using the rotisserie, place the dripping pan inposition2tocollectcookingresidues(fatand/orgrease).
MULTI-COOKING
•Useposition2and4,placingthefoodthatrequiresmore heat on 2.
•Place the dripping pan on the bottom and the rack on top.
BARBECUE
•Insert the rack in position 3 or 4. Place the food in the centre of the rack.
•We recommend that you set the maximum power level.
The top heating element is regulated by a thermostat and may not always be on.
PIZZA MODE
•Use a light aluminium pizza pan. Place it on the rack provided.
For a crispy crust, do not use the dripping pan (prevents crust from forming by extending cooking time).
•If the pizza has a lot of toppings, we recommend adding the mozzarella cheese on top of the pizza halfway through the cooking process.
10
 Loading...