


7OFK 637J RU/HA 7OFK 637J X RU/HA 7OFK 637J C RU/HA 7OFK 637J CX RU/HA 7OFK 638J RU/HA 7OFK 638J X RU/HA
 English
Operating Instructions
OVEN |
Contents |
|
Operating Instructions,1
Warnings,2
Assistance,3
Description of the appliance,4
Description of the appliance,5
Installation,6
Start-up and use,8
The electronic programmer*,8
Modes,9
Precautions and tips,11
Maintenance and care,11
 Русскии
Руководствопоэксплуатации
ДУХОВОЙШКАФ |
Содержание |
|
Руководство по эксплуатации,1 Запобіжні заходи,2 Сервисное обслуживание,3 Описание изделия,4 Описание изделия,5 Установка,13 Включение и эксплуатация,15
Электронный таймер программирования выпечки*,15 Программы,16 Предосторожности и рекомендации,18
Техническое обслуживание и уход,18

Warnings
WARNING: The appliance and its accessible parts become hot during use. Care should be taken to avoidtouchingheatingelements.Childrenlessthan8 years of age shall be kept away unless continuously supervised. This appliance can be used by children aged from 8 years and above and persons with reduced physical, sensory or mental capabilities or lack of experience and knowledge if they have been given supervision or instruction concerning use of the appliance in a safe way and understand the hazards involved. Children shall not play with the appliance. Cleaning and user maintenance shall not be made by children without supervision.
Do not use harsh abrasive cleaners or sharp metal scrapers to clean the oven door glass since they can scratch the surface, which may result in shattering of the glass.
Never use steam cleaners or pressure cleaners on the appliance.
WARNING: Ensure that the appliance is switched off before replacing the lamp to avoid the possibility of electric shock.
! When you place the rack inside, make sure that the stop is directed upwards and in the back of the cavity.
Запобіжнізаходи
ВНИМАНИЕ: Данное изделие и его доступные комплектующиесильнонагреваютсявпроцессе эксплуатации.
Будьтеосторожныинекасайтесьнагревательных элементов.
Неразрешайтедетяммладше8летприближаться к изделию без контроля.
Данное изделие может быть использовано детьмистарше8летилицамисограниченными физическими, сенсорными или умственными способностями или без опыта и знания о правилах использования изделия при условии надлежащего контроля или обучения безопасному использованию изделия с учетом соответствующих рисков. Не разрешайте детям играть с изделием. Не разрешайте детям осуществлять чистку и уход за изделием без контроля взрослых.
Не используйте абразивные вещества или режущие металлические скребки для чистки стеклянной дверцы духового шкафа, так как они могут поцарапать поверхность, что может привести к разбиванию стекла.
Никогда не используйте паровые чистящие агрегаты или агрегаты под высоким давлением для чистки изделия.
ВНИМАНИЕ: Проверьте, чтобы изделие было выключено, перед заменой лампочки во избежание возможных ударов током.
! При установке решетки проверить, чтобы фиксатор был повернут вверх с задней стороны выемки.
2

Assistance
! Never use the services of an unauthorised technician.
Please have the following information to hand:
•The type of problem encountered.
•The appliance model (Mod.).
•The serial number (S/N).
The latter two pieces of information can be found on the data plate located on the appliance.
Сервисноеобслуживание
! Никогда не обращайтесь к неуполномоченным техникам.
При обращении в Центр Технического Обслуживания необходимо сообщить:
•Тип неисправности;
•сообщение, показываемое на дисплее ТЕМПЕРАТУРЫ
•Модель изделия (Мод.)
•Номер тех. паспорта (серийный №)
Эти данные вы найдете на паспортной табличке, расположенной на изделии.
3
|
|
|
|
|
|
|
|
|
|
|
|
|
|
|
|
|
|
|
|
|
|
|
|
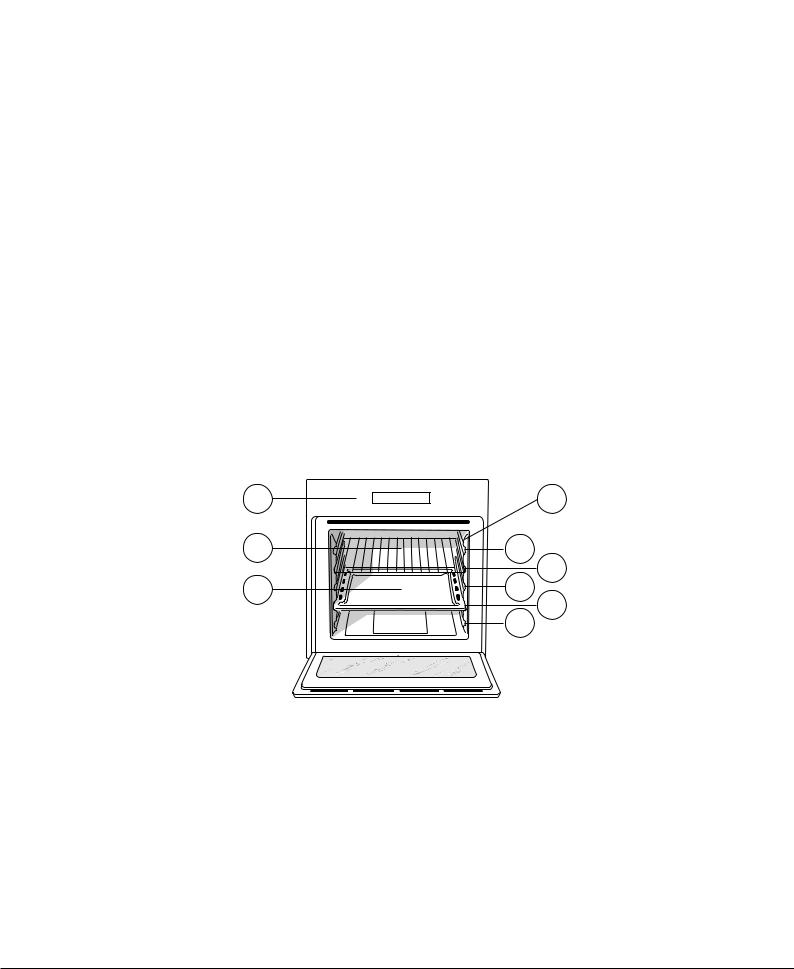
Description of the appliance |
Описаниеизделия |
||||||
Overall view |
Общиивид |
||||||
1 |
POSITION 1 |
1 |
ПОЛОЖЕНИЕ1 |
||||
2 |
POSITION 2 |
2 |
ПОЛОЖЕНИЕ2 |
||||
3 |
POSITION 3 |
3 |
ПОЛОЖЕНИЕ3 |
||||
4 |
POSITION 4 |
4 |
ПОЛОЖЕНИЕ4 |
||||
5 |
POSITION 5 |
5 |
ПОЛОЖЕНИЕ5 |
||||
6 |
GUIDES for the sliding racks |
6 |
ВЫДВИЖНЫЕНАПРАВЛЯЮЩИЕуровней |
||||
7 |
DRIPPING PAN |
7 |
ПРОТИВЕНЬ |
||||
8 |
GRILL |
8 |
РЕШЕТКА |
||||
9 |
Control panel |
9 |
Панельуправления |
||||
9 |
6 |
8 |
5 |
|
4 |
7 |
3 |
|
2 |
|
1 |
4

|
|
|
|
|
|
|
|
|
|
|
|
|
|
|
|
|
|
Description of the appliance |
Описаниеизделия |
||||
Control panel |
Панельуправления |
||||
1 |
SELECTOR knob |
1 |
РукояткаПРОГРАММЫ |
||
2 |
THERMOSTAT indicator light |
2 |
ИндикаторТЕРМОСТАТА |
||
3 |
THERMOSTAT knob |
3 |
РегуляторТЕРМОСТАТА |
||
4 |
ELECTRONIC programmer |
4 |
ЭЛЕКТРОННЫЙпрограммер |
||
1 |
2 |
3 |
4
5

GB Installation
!Please keep this instruction booklet in a safe place for future reference. If the appliance is sold, given away or moved, please make sure the booklet is also passed on to the new owners so that they may benefit from the advice contained within it.
!Please read this instruction manual carefully: it contains important information concerning the safe operation, installation and maintenance of the appliance.
Positioning
!Do not let children play with the packaging material; it should be disposed of in accordance with local separated waste collection standards (see Precautions and tips).
!The appliance must be installed by a qualified professional in accordance with the instructions provided. Incorrect installation may damage property or cause harm to people or animals.
Built-in appliances
Use an appropriate cabinet to ensure that the appliance operates properly:
•The panels adjacent to the oven must be made of heat-resistant material.
•Cabinets with a veneer exterior must be assembled with glues which can withstand temperatures of up to 100°C.
•To install the oven under the counter (see diagram) or in a kitchen unit, the cabinet must have the following dimensions:
|
|
|
. |
|
|
|
|
|
|
mm |
|
|
|
|
20 mm. |
|
550 . |
|
|
|
mm.590 |
mm.570 |
min |
|
585-575mm. |
||
560 |
. |
|||||
|
|
|
|
|||
|
|
|
mm |
|
||
|
|
|
|
|
595 |
mm. |
|
. |
|
mm |
||
|
|
550 |
. |
|
|
mm |
|
|
|
|
.* |
|
|
20,5 mm |
|
|
|
22,5 |
|
! The appliance must not come into contact with electrical parts once it has been installed.
The indications for consumption given on the data plate have been calculated for this type of installation.
Ventilation
To ensure adequate ventilation, the back panel of the cabinet must be removed. It is advisable to install the oven so that it rests on two strips of wood, or on a completely flat surface with an opening of at least 45 x 560 mm (see diagrams).
. |
45 |
mm. |
mm |
|
|
560 |
|
|
Centringandfixing
Secure the appliance to the cabinet:
•Open the oven door.
•Remove the 2 rubber plugs covering the fixing holes on the perimeter frame.
•Fix the oven to the cabinet using the 2 wood screws.
•Replace the rubber plugs.
! All parts which ensure the safe operation of the appliance must not be removable without the aid of a tool.
Electrical connection
Ovens equipped with a three-pole power supply cable are designed to operate with alternating current at the voltage and frequency indicated on the data plate located on the appliance (see below).
Fitting the power supply cable
L |
N
1.Open the terminal board by inserting a screwdriver into the side tabsofthecover.Usethescrewdriver as a lever by pushing it down to open the cover (see diagram).
2.Install the power supply cable by loosening the cable clamp screw and the three wire contact screws
L-N- .
.
Connect the wires to the corresponding terminals: the Blue wire to the terminal marked (N), the Brown wire to the terminal marked
(L) and the Yellow/Green wire to the terminal marked  (see diagram).
3.Secure the cable by fastening the clamp screw.
4.Close the cover of the terminal board.
Connecting the supply cable to the mains
Install a standardised plug corresponding to the load indicated on the data plate (see table).
The appliance must be directly connected to the mains using an omnipolar switch with a minimum contact opening of 3 mm installed between the appliance and the mains. The switch must be suitable for the charge indicated and must comply with current electrical regulations (the earthing wire must not be interrupted by the switch). The supply cable must be positioned so that it does not come into contact with temperatures higher than 50°C at any point (the back panel of the oven, for example).
6
 Loading...