


7OFK 1039EL PX RU/HA 7OFK1039ELSPX RU/HA
 English
Operating Instructions
OVEN
Contents
Operating Instructions,1 Warnings,2 Assistance,4
Description of the appliance,5 Description of the appliance,6 Installation,7
Start-up and use,9 Modes,10
Precautions and tips,15 Maintenance and care,15 Troubleshooting,18
 Русскии
Руководство по эксплуатации
ДУХОВОЙ ШКАФ
Содержание
Руководство по эксплуатации,1 Предупреждения,2 Сервисное обслуживание,4 Описание изделия,5 Описание изделия,6 Установка,19 Включение и эксплуатация,21 Программы,23
Предосторожности и рекомендации,27 Техническое обслуживание и уход,28 Неисправности и методы их устранения,31

Warnings
WARNING: The appliance and its accessible parts become hot during use. Care should be taken to avoid touching heating elements. Children less than 8 years of age shall be kept away unless continuously supervised. This appliance can be used by children aged from 8 years and above and persons with reduced physical, sensory or mental capabilities or lack of experience and knowledge if they have been given supervision or instruction concerning use of the appliance in a safe way and understand the hazards involved. Children shall not play with the appliance. Cleaning and user maintenance shall not be made by children without supervision.
Do not use harsh abrasive cleaners or sharp metal scrapers to clean the oven door glass since they can scratch the surface, which may result in shattering of the glass.
Before initiating the automatic cleaning cycle:
•clean the oven door;
•remove large or coarse food residues from the inside of the oven using a damp sponge. Do not use detergents;
•remove all accessories and the sliding rack kit (where present);
•do not place tea towels
Keep children away from the appliance during the automatic cleaning cycle as surfaces may become very hot.
Never use steam cleaners or pressure cleaners on the appliance.
WARNING: Ensure that the appliance is switched off before replacing the lamp to avoid the possibility of electric shock.
! When you place the rack inside, make sure that the stop is directed upwards and in the back of the cavity.
Предупреждения
ВНИМАНИЕ: Данное изделие и его доступные комплектующие сильно нагреваютсявпроцессеэксплуатации. Будьте осторожны и не касайтесь нагревательных элементов.
Не разрешайте детям младше 8 лет приближатьсякизделиюбезконтроля. Данное изделие может быть использовано детьми старше 8 лет и лицамисограниченнымифизическими, сенсорными или умственными способностямиилибезопытаизнания оправилахиспользованияизделияпри условии надлежащего контроля или обучениябезопасномуиспользованию изделия с учетом соответствующих рисков. Не разрешайте детям играть с изделием. Не разрешайте детям осуществлять чистку и уход за изделием без контроля взрослых.
Неиспользуйтеабразивныевещества или режущие металлические скребки длячисткистекляннойдверцыдухового шкафа, так как они могут поцарапать поверхность, что может привести к разбиванию стекла.
Подготовка к автоматической чистке:
•протрите дверцу духовки
•влажной губкой удалите из духовки наиболее крупные загрязнения. Не используйте моющие средства;
•выньте все съемные детали и комплектвыдвижныхнаправляющих (если имеется);
•не вешайте тряпки или кухонные полотенцанаручкудверцыдухового шкафа.
2

В процессе пиролитической чистки поверхности могут сильно нагреться: не разрешайте детям приближаться к духовому шкафу.
Никогда не используйте паровые чистящие агрегаты или агрегаты под высокимдавлениемдлячисткиизделия.
ВНИМАНИЕ:Проверьте,чтобыизделие было выключено, перед заменой лампочки во избежание возможных ударов током.
! При установке решетки проверить, чтобы фиксатор был повернут вверх с задней стороны выемки.
3

Assistance
Warning:
The appliance is fitted with an automatic diagnostic system which detects any malfunctions. Malfunctions are signalled through messages of the following type: “F—” followed by numbers.
Call for technical assistance in the event of a malfunction.
Before calling for Assistance:
•Check whether you can fix the problem yourself.
•Restarttheprogrammetocheckwhetherthemalfunction has disappeared.
•If it has not, contact theAuthorisedTechnicalAssistance
Service.
! Never use the services of an unauthorised technician.
Please have the following information to hand:
•The type of problem encountered.
•The message shown on the TEMPERATURE display.
•The appliance model (Mod.).
•The serial number (S/N).
The latter two pieces of information can be found on the data plate located on the appliance.
•Номер тех. паспорта (серийный №)
Эти данные вы найдете на паспортной табличке, расположенной на изделии.
Сервисное обслуживание
Внимание:
Изделие оснащено системой автоматической диагностики, позволяющей выявить возможные неисправности. Неисправности показываются на дисплее посредством следующих сообщений: “F—” с последующими цифрами.
В этом случае необходимо вызвать техника из центра сервисного обслуживания.
Перед тем как обратиться в Центр Технического обслуживания:
•Проверьте, можно ли устранить неисправность самостоятельно;
•Вновь запустите программу для проверки исправности машины;
•В противном случае обратитесь в уполномоченный Центр Технического обслуживания.
! Никогда не обращайтесь к неуполномоченным техникам.
При обращении в Центр Технического Обслуживания необходимо сообщить:
•Тип неисправности;
•сообщение, показываемое на дисплее ТЕМПЕРАТУРЫ
•Модель изделия (Мод.)
4

|
|
|
|
|
|
|
|
|
|
|
|
|
|
|
|
|
|
Description of the appliance |
Описание изделия |
||||
Overall view |
Общии вид |
||||
1 |
POSITION 1 |
1 |
ПОЛОЖЕНИЕ 1 |
||
2 |
POSITION 2 |
2 |
ПОЛОЖЕНИЕ 2 |
||
3 |
POSITION 3 |
3 |
ПОЛОЖЕНИЕ 3 |
||
4 |
POSITION 4 |
4 |
ПОЛОЖЕНИЕ 4 |
||
5 |
POSITION 5 |
5 |
ПОЛОЖЕНИЕ 5 |
||
6 |
GUIDES for the sliding racks |
6 |
ВЫДВИЖНЫЕ НАПРАВЛЯЮЩИЕ уровней |
||
7 |
DRIPPING PAN |
7 |
ПРОТИВЕНЬ |
||
8 |
GRILL |
8 |
РЕШЕТКА |
||
9 |
Control panel |
9 |
Панель управления |
||
9 |
6 |
8 |
5 |
|
4 |
7 |
3 |
|
2 |
|
1 |
5

|
|
|
|
|
|
|
|
|
|
|
|
|
|
|
|
|
|
|
|
|
|
|
|
|
|
|
|
|
|
Description of the appliance |
Описание изделия |
||||||||
Control panel |
Панель управления |
||||||||
1. MANUAL COOKING MODE Icons |
1. |
Символы ПРОГРАММ РУЧНОГО РЕЖИМА |
|||||||
2. |
FAST CLEAN selector |
2. |
Выбор FAST CLEAN |
||||||
3. |
TEMPERATURE display |
3. |
Дисплей ТЕМПЕРАТУРЫ |
||||||
4. |
TEMPERATURE icon |
4. |
Символ ТЕМПЕРАТУРА |
||||||
5. |
DURATION icon |
5. |
Символ ПРОДОЛЖИТЕЛЬНОСТЬ |
||||||
6. |
TIME display |
6. |
Дисплей ВРЕМЯ |
||||||
7. |
END OF COOKING Icon |
7. |
Символ КОНЕЦ ПРИГОТОВЛЕНИЯ |
||||||
8. CONTROL PANEL LOCK icon |
8. |
Символ БЛОКИРОВКА УПРАВЛЕНИЙ |
|||||||
9. |
START / STOP |
9. |
ПУСК / ОСТАНОВКА |
||||||
10. |
LIGHT icon |
10. |
Символ ОСВЕЩЕНИЕ |
||||||
11. CLOCK icon |
11. |
Символ ЧАСЫ |
|||||||
12. |
MINUTE MINDER Icon |
12. |
Символ ТАЙМЕР |
||||||
13. |
TIME / TEMPERATURE ADJUSTMENT Icons |
13. |
СимволыНАСТРОЙКИВРЕМЕНИ/ТЕМПЕРАТУРЫ |
||||||
14. |
PREHEATING / RESIDUAL HEAT icons |
14. |
Символы НАГРЕВ / ОСТАТОЧНОЕ ТЕПЛО |
||||||
15. |
DOOR LOCK indicator |
15. |
Индикатор ДВЕРЦА ЗАБЛОКИРОВАНА |
||||||
16. |
AUTOMATIC/ECO COOKING MODE icons |
16. |
Символы АВТОМАТИЧЕСКИХ/ECO ПРОГРАММ |
||||||
17. |
CONTROL PANEL POWER BUTTON |
17. |
ВКЛЮЧЕНИЕ ПАНЕЛИ УПРАВЛЕНИЯ |
||||||
1 |
2 |
3 |
4 |
5 |
6 |
7 |
8 |
17 |
16 |
15 |
14 |
13 |
12 |
11 |
10 |
9 |
6

Installation
!Please keep this instruction booklet in a safe place for future reference. If the appliance is sold, given away or moved, please make sure the booklet is also passed on to the new owners so that they may benefit from the advice contained within it.
!Please read this instruction manual carefully: it contains important information concerning the safe operation, installation and maintenance of the appliance.
Positioning
!Do not let children play with the packaging material; it should be disposed of in accordance with local separated waste collection standards (see Precautions and tips).
!Theappliancemustbeinstalledbya qualifiedprofessional in accordance with the instructions provided. Incorrect installation may damage property or cause harm to people or animals.
Built-in appliances
Use an appropriate cabinet to ensure that the appliance operates properly:
•the panels adjacent to the oven must be made of heatresistant material.
•cabinets with a veneer exterior must be assembled with glues which can withstand temperatures of up to 100°C.
•to install the oven under the counter (see diagram) or in a kitchen unit, the cabinet must have the following dimensions:
|
|
|
. |
|
|
|
|
|
|
mm |
|
|
|
|
20 mm. |
|
550 . |
|
|
|
mm.590 |
mm.570 |
min |
|
585-575mm. |
||
560 |
. |
|||||
|
|
|
|
|||
|
|
|
mm |
|
||
|
|
|
|
|
595 |
mm. |
|
. |
|
mm |
||
|
|
550 |
. |
|
|
mm |
|
|
|
|
.* |
|
|
20,5 mm |
|
|
|
22,5 |
|
! The appliance must not come into contact with electrical parts once it has been installed.
The indications for consumption given on the data plate have been calculated for this type of installation.
Ventilation
To ensure adequate ventilation, the back panel of the cabinet must be removed. It is advisable to install the oven so that it rests on two strips of wood, or on a completely flat surface with an opening of at least 45 x 560 mm (see diagrams).
|
|
GB |
mm |
45 |
mm. |
. |
|
|
560 |
|
|
Centring and fixing
Secure the appliance to the cabinet:
•Open the oven door.
•slideoutthesidegasketsatthetopuntilthe2fixingholes are exposed;
•Fix the oven to the cabinet using the 2 wood screws.
•reposition the 2 gaskets.
! All parts which ensure the safe operation of the appliance must not be removable without the aid of a tool.
Electrical connection
Ovens equipped with a three-pole power supply cable are designed to operate with alternating current at the voltage and frequency indicated on the data plate located on the appliance (see below).
Fitting the power supply cable
L |
N
1.Open the terminal board by inserting a screwdriver into the side tabs of the cover. Use the screwdriver as a lever by pushing it down to open the cover (see diagram).
2.Install the power supply cable by loosening the cable clamp screw and the three wire contact screws
L-N- .
.
Connect the wires to the corresponding terminals: the Blue wire to the terminal marked (N), the Brown wire to the terminal marked (L) and the Yellow/Green wire
to the terminal marked  (see diagram).
3.Secure the cable by fastening the clamp screw.
4.Close the cover of the terminal board.
7
Connecting the supply cable to the mains
GB Install a standardised plug corresponding to the load indicated on the data plate (see table).
The appliance must be directly connected to the mains using an omnipolar switch with a minimum contact opening of 3 mm installed between the appliance and the mains. The switch must be suitable for the charge indicated and must comply with current electrical regulations (the earthing wire must not be interrupted by the switch). The supply cable must be positioned so that it does not come into contact with temperatures higher than 50°C at any point (the back panel of the oven, for example).
! The installer must ensure that the correct electrical connection has been performed and that it is fully compliant with safety regulations.
Before connecting the appliance to the power supply, make sure that
•the appliance is earthed and the plug is compliant with the law.
•the socket can withstand the maximum power of the appliance, which is indicated on the data plate.
•the voltage is in the range between the values indicated on the data plate.
•the socket is compatible with the plug of the appliance.
If the socket is incompatible with the plug, ask an authorised technician to replace it. Do not use extension cords or multiple sockets.
!Once the appliance has been installed, the power supply cable and the electrical socket must be easily accessible.
!The cable must not be bent or compressed.
!The cable must be checked regularly and replaced by authorised technicians only (see Assistance).
!The manufacturer declines any liability should these safety measures not be observed.
APPLIANCE SPECIFICATIONS
Dimensions* |
width 43.5 cm |
height 32,4 cm |
|
|
depth 41.5 cm |
Volume* |
59 l |
Dimensions** |
width 45.5 cm |
height 32,4 cm |
|
|
depth 41.5 cm |
Volume** |
62 l |
Electrical |
voltage: 220 - 240 V~ 50/60 Hz or |
50 Hz (see data plate) |
|
connections |
maximum power absorbed |
|
2800 W |
|
Directive 2002/40/EC on the label |
|
of electric ovens. Standard EN 50304 |
ENERGY |
Declared energy consumption |
LABEL |
for Forced convection Class – |
|
heating mode: |
|
ECO. |
|
This appliance conforms to the following |
|
European Economic Community |
|
directives: |
|
- 2006/95/EEC dated 12/12/06 (Low |
|
Voltage) and subsequent amendments. |
|
- 2004/108/EEC dated 03/05/89 |
|
(Electromagnetic Compatibility) and |
|
subsequent amendments. |
|
- 93/68/EEC dated 22/07/93 and |
|
subsequent amendments. |
-2012/19/EC and subsequent amendments.
-1275/2008 standby/off mode.
*Only for models with drawn rails.
**Only for models with wire rails.
8
Start-up and use
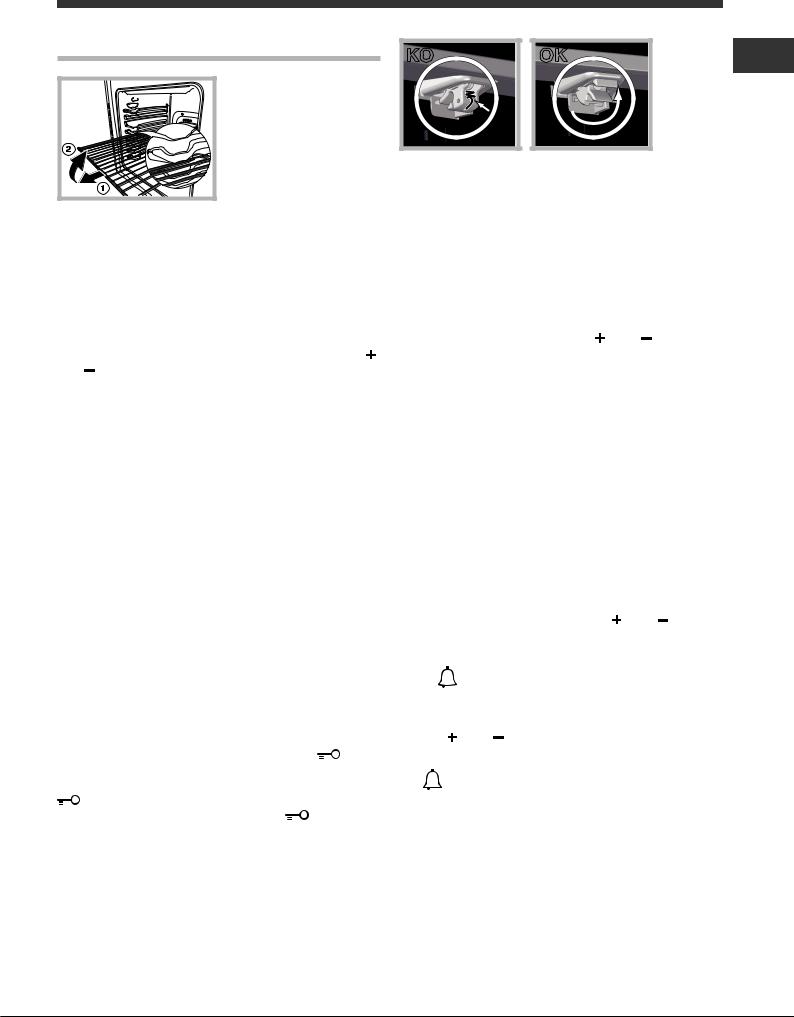
pull (2). |
WARNING! The oven is provided with a stop system to extract the racks and prevent them from coming out of the oven (1).
As shown in the drawing, to extract them completely, simply lift the racks, holding them on the front part, and
!Thefirsttimeyouuseyourappliance,heattheemptyovenwith its door closed at its maximum temperature for at least half an hour. Make sure that the room is well ventilated before switching the oven off and opening the oven door.The appliance may emit a slightly unpleasant odour caused by protective substances used during the manufacturing process burning away.
!To make the setting process easier, press and hold the “ ” and “ ” buttons to scroll through the numbers on the display rapidly.
!Each setting will automatically be stored in the appliance memory after 10 seconds.
!The touch controls cannot be activated if the user is wearing gloves.
!In order to optimise the cooking performance, when starting the selected function, product settings will be applied that could cause a delayed start of the fan and heating elements
Some models are equipped with a system of hinges which allows the door to close slowly, without the user having to follow the movement through with his/her hand. To use the system correctly, before closing the door:
•Open the door fully.
•Do not force the closing movement manually.
Control panel lock
! The control panel can be locked while the oven is off, once cooking has started or finished and during programming.
To lock the oven controls, press and hold the button for at least 2 seconds. A buzzer will sound and the
TEMPERATUREdisplayshowsthekeysymbol“O—n”.The icon will light up to indicate lock activation.
To deactivate the lock, press and hold the |
button again |
for at least 2 seconds. |
|
! When cleaning the appliance, the door lock may be closed accidentally (there is an exposed spring). If this happens, reopen it by turning the door lock upwards (see figure).
KO |
OK |
GB |
Setting the clock
! The clock can only be set when the oven is switched off. If
the oven is in standby mode, pressing the button once will display the current time setting. Press it again to set the time.
After connection to the power supply network or after a
blackout, the button and the digits on the TIME display will flash for 10 seconds.
To set the clock:
1.Press the button.
2.Adjust the hour figure using the “ ” and “ ” buttons.
3.Once you have reached the correct hour value, press
the button.
4. Repeat the above process to set the minutes.
If a blackout occurs, it will be necessary to reset the clock.
If the icon flashes on the display, this indicates that the clock has not been set correctly.
Setting the minute minder
! The minute minder may be set regardless of whether the oven is switched on or off. It does not switch the oven on or off.
When the set time has elapsed, the timer emits a buzzer that will automatically stop after 30 seconds or when any active button on the control panel is pressed.
To adjust the timer proceed as follows:
1.Press button .
.
2.Set the desired time using buttons “ ” and “ ”.
3.Once you have reached the desired value, press the button again.
The lit |
symbol will remind you that the minute minder |
is on. |
|
To cancel the minute minder, press the  button and use the “ ” and “ ” buttons to set the time to 00:00. Press
button again.
The icon will switch off to indicate that the minute minder has been disabled.
Starting the oven
1.Switch the control panel on by pressing the button. The appliance buzzer sounds three times (ascending) and all buttons light up in sequence.
2.Press the button corresponding to the desired cooking mode. The TEMPERATURE display shows:
- the temperature associated with the mode, if programming manually;
- “Auto”, if programming is automatic.
9
The TIME display shows:
GB - the current time, if programming manually;
- the duration, if programming is automatic.
3.Press the  button to begin cooking.
4.The oven will begin its preheating phase, the preheating indicators will light up as the temperature rises.
5.Whenthepreheatingprocesshasfinished,abuzzersounds and all the preheating indicator lights show that this stage has been completed: the food can then be placed in the oven.
6.During cooking it is always possible to:
- change the temperature by pressing the  button,
followed by the “ ” and “ ” buttons (manual modes only);
-set the duration of a cooking mode (see Cooking Modes);
-press the  button to stop cooking. In this case the appliance stores the temperature modified previously in its memory (manual modes only);
-switch off the oven by pressing the  buttonfor3seconds. 7. If a blackout occurs while the oven is already in operation, an automatic system within the appliance will reactivate the cooking mode from the point at which it was interrupted, provided that the temperature has not dropped below a certain level. Programmed cooking modes which have not yet started will not be restored and must be reprogrammed (for example: a cooking mode has been programmed to start at 20:30.At 19:30 a blackout occurs. When the power supply is restored, the mode will have to be reprogrammed).
!There is no preheating stage for the GRILL mode.
!Never put objects directly on the bottom of the oven; this will prevent the enamel coating from being damaged.
!Always place cookware on the rack(s) provided.
Cooling ventilation
In order to cool down the external temperature of the oven, a cooling fan blows a stream of air between the control panel and the oven door, as well as towards the bottom of the oven door. At the beginning of the FAST CLEAN mode, the cooling fan operates at low speed.
! Once cooking has been completed, the cooling fan continues to operate until the oven has cooled down sufficiently.
Oven light
The light comes on when the oven door is opened or when a cooking mode starts. When models featuring LED INSIDE technology begin cooking, the LEDs on the door light up for improved illumination of all cooking levels.
The  button can be used to switch on the light at any time.
Residual heat indicators
The appliance is fitted with a residual heat indicator. When the oven is off, the “residual heat” bar on the display lights up to indicate high temperatures inside the oven cavity. The individual segments of the bar switch off one by one as the temperature inside the oven falls.
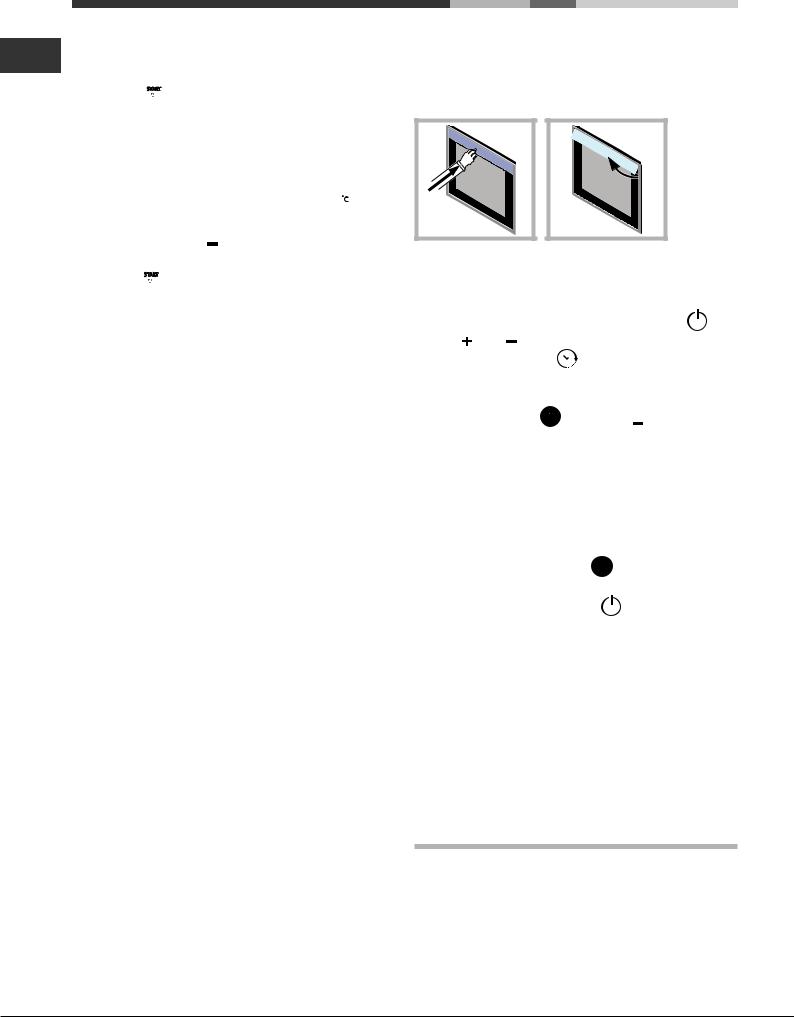
Concealed handle
Some models have a concealed handle built into the oven door.
Simply press lightly and the push/push opening will improve your grip when opening and closing the oven. When you have finished using it, close it again by applying light pressure.
Demo mode
The oven can operate in the DEMO mode: all heating elements are deactivated, and the controls remain operative.
To activate DEMO mode, press and release button , then buttons “ ” and “ ” simultaneously for 6 seconds, and then
press and release button .
A buzzer sounds and the TEMPERATURE display shows
“dEon”. To deactivate DEMO mode, when the oven is off
press and hold button  and button “ ” simultaneously for 3 seconds. A buzzer sounds and the “dEoF” message disappears from the display.
Restoring the factory settings
The oven factory settings can be restored to reset all selections made by the user (clock and customised durations). To carry out a reset, switch off the oven, then press and hold the button corresponding to the first manual
cooking mode (top left) and the  button simultaneously for 6 seconds. Once the restore procedure is complete, a
buzzerwillsound.Thefirsttimethe button is pressed, the ovenwillbehaveasifitisbeingswitchedonforthefirsttime.
Standby
This product complies with the requirements of the latest European Directive on the limitation of power consumption of the standby mode. If no buttons are pressed for 30 minutes and the control panel/door lock has not been activated, the appliance automatically reverts to standby mode. Standby mode is indicated by the high luminosity “Clock button” light. As soon as interaction with the machine resumes, the system’s operating mode is restored.
Modes
!In order to guarantee wonderfully soft and crunchy foodstuffs, the oven releases – in the form of water vapour - the humidity naturally withheld in the food itself. In this way, optimal cooking results can be achieved for all types of food.
!Every time the oven is switched on, it suggests the first manual cooking mode.
10
 Loading...