


Manual de Uso y Mantenimiento Manual de Utilização e Manutenção Use and Maintenance Manual Manual d'Emploi et Entretien Bedienungsanleitung und pilegehinweise
UN-DW655FI
Code: 0120504090A
Safety Is a Good Habit to Get Into
NOTICE
Carefully read the instructions contained in this manual, as they provide important information which is essential to safe and proper installation, use and maintenance of the appliance.
This appliance complies with the following EEC
directives:
-73/23/EEC of 19 February 1973 (Low Voltage) and subse quent modifications;
-89/336/EEC of 3 May 1989 (Electromagnetic Compatibility) and subsequent modifications.
-Carefully dispose of the packing material.
-After removing the packing, check to make sure that the appliance is not damaged. If in doubt, contact a qualified professional.
-The dishwasher must only be used by adults for the washing of household dishes and cooking utensils.
-The appliance is not intended for use by young children or inform persons without supervision.
-Young children should be supervised to ensure that they do not play with the appliance.
-Keep detergents out of the reach of children, who must also be kept away from the dishwasher when it is open.
-This appliance cannot be installed outdoors, not even if the area in which it is installed is covered by a roof; it is also very dangerous to leave it exposed to the rain and elements.
-Do not touch the heating element during or after a wash cycle.
-Do not lean or sit on the door when it is open as this could over turn the dishwasher.
-If the appliance malfunctions, turn off water supply to the appliance and disconnect the plug from the wall socket. Then, consult the section entitled, "Troubleshooting". If you cannot solve the problem, contact a service centre.
-Only specialised personnel are authorised to make repairs.
-Appliances which are no longer being used must be made inoperable by cutting the power supply cord and removing the door lock.
-If the supply cord is damaged, it must be replaced by a special cord or assembly available from the manufacturer or its service agent.
-After installation, the power plug must be accessible.
-Fundamental rules to follow when using the appliance:
*Never touch the dishwasher when barefoot or with wet hands or feet;
*We discourage the use of extension cords and multiple sockets;
*During installation, the power supply cord must not be excessively or dangerously bent or flattened;
*If the appliance is not operating properly or maintenance must
be performed, disconnect the appliance from the power supply.
To maintain the EFFICIENCY and SAFETY of this appliance,we recommend:
-call only the Service Centers authorized by the manufacturer.
-always use original Spare Parts
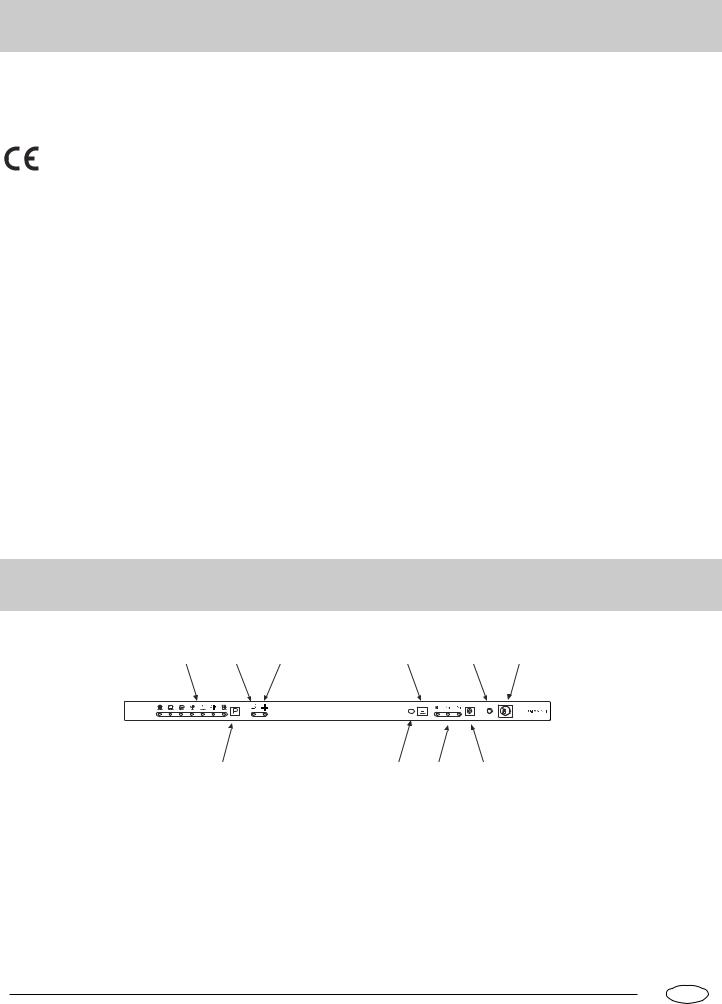
Close-up View (control panel)
F E D
G
AON-OFF button
BON-OFF light
C"HALF LOAD" button
DLow rinse aid indicator light
ELow salt indicator light
C B A
H I J
FCycle indicator light
GCycle select button
H"HALF LOAD" indicator light
IDelay indicator light
JDelay select button
.1.
GB
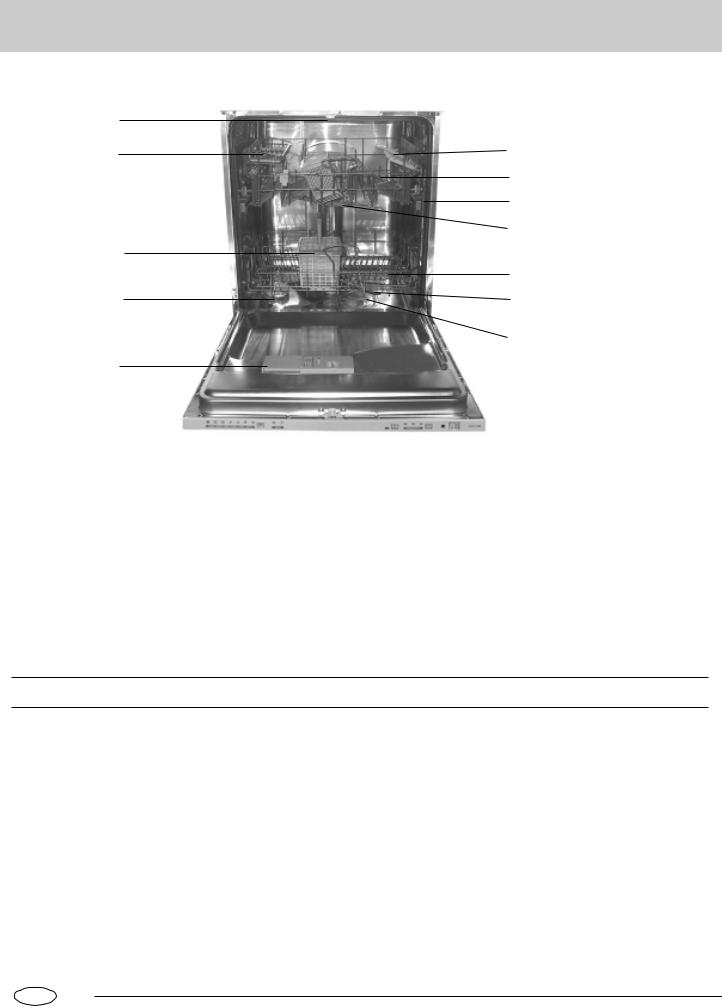
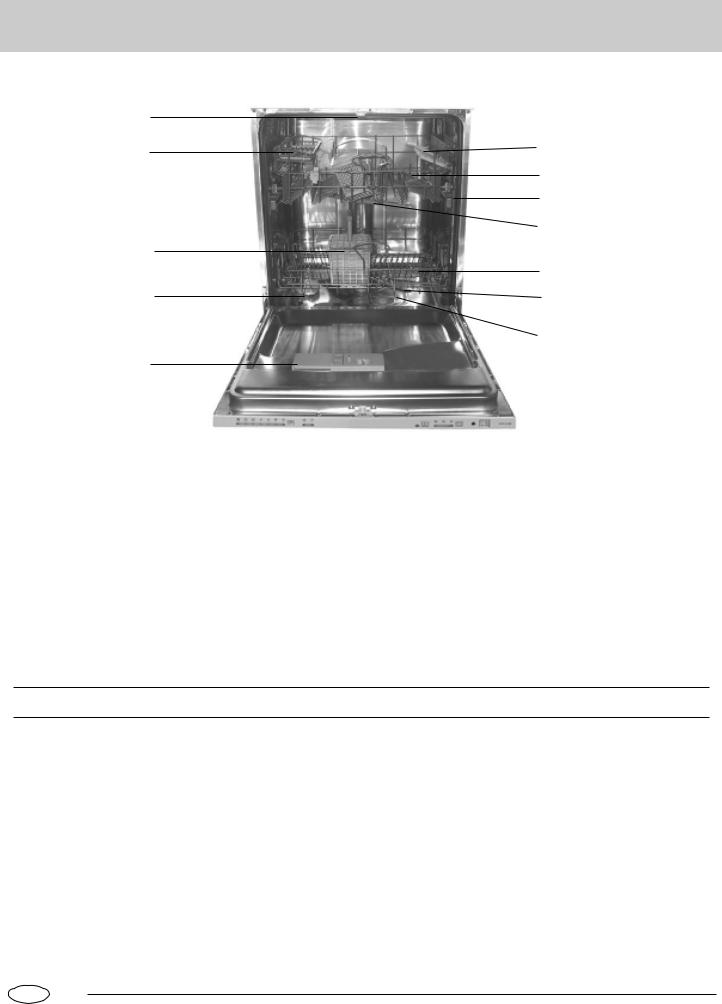
Close-up View (Interior)
M
L
K
J
I
ACup Rack
BUpper Rack
CRack Height Adjustor
DTop Spray Arm
ELower Rack
FBottom Spray Arm
A
B
C
D
E
F
G
G Washing Filter
IDetergent and Rinse Aid Dispenser
JSalt Container Cap
KSilverware basket
LKnife rack
MThird Sprayer
Technical characteristics
Width |
60 cm |
|
|
Depth |
58 cm |
|
|
Height |
82 cm |
|
|
Capacity |
12 standard place settings |
|
|
Mains water pressure |
0.03-0.6MPa |
|
|
Power voltage |
220-240V~ 50Hz |
|
|
Total absorber power |
2150W |
|
|
.2.
GB

Salt
Salt
The hardness of the water varies from place to place. If hard water is used in the dishwasher, deposits will form on the dishes and utensils.
The appliance is equipped with a special softener that uses a salt specifically designed to eliminate lime and minerals from the water.
Loading the Salt into the Softener
Always use salt intended for use with dishwashers.
The salt container is located beneath the lower rack and should be filled as follows:
-Remove the lower rack and then unscrew and remove the cap from the salt container;
-If you are filling the container for the first time, fill it with water;
-Place the end of the funnel (supplied) into the hole and introduce about 2 kg of salt. It is normal for a small amount of water to come out of the salt container.
-Carefully screw the cap back on.
The salt container must be filled when the "low salt" indicator light (located on the control panel), comes on.
To prevent the formation of rust, load the salt just be-
fore beginning a wash cycle.
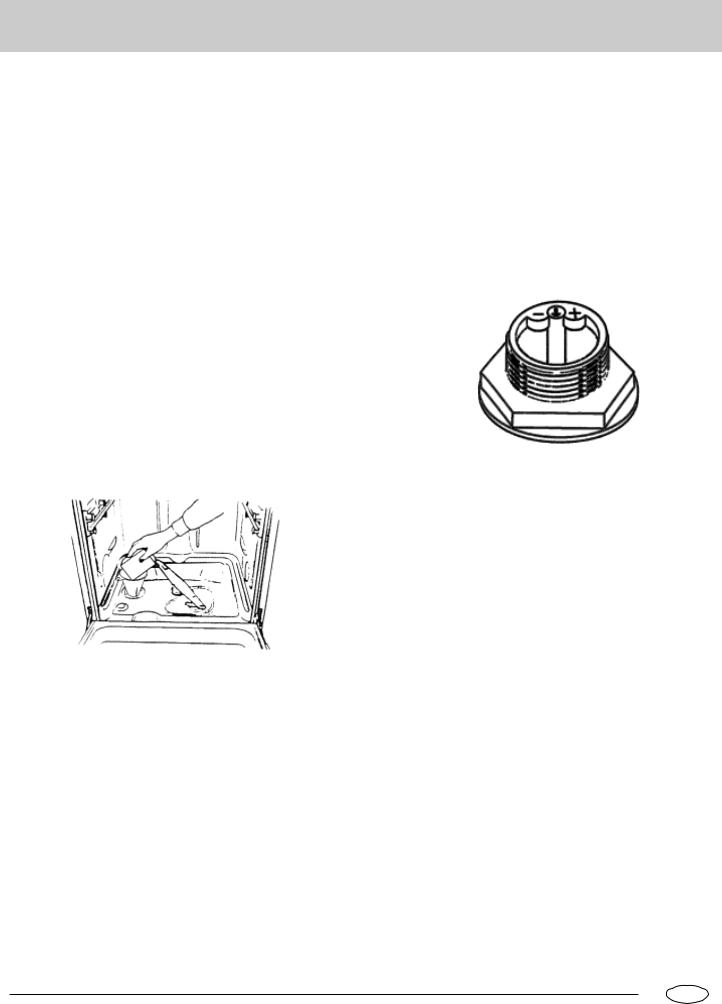
Adjusting Salt Consumption
The dishwasher is designed to allow for adjusting the amount of salt consumed based on the hardness of the water used. This is intended to optimize and customize the level of salt consumption so that it remains at a minimum.
To adjust salt consumption, proceed as follows:
-Unscrew the cap from the salt container;
-There is a ring on the container with an arrow on it (see figure to the side),
-If necessary, rotate the ring in an anticlockwise direction from the "-" setting towards the "+" sign, based on the hardness of the water being used.
It is recommended that adjustments be made in accordance with the following schema:
Water Hardness |
|
|
|
|
||
|
|
|
|
|
|
|
|
|
|
|
Selector |
Salt |
Autonomy |
Level |
Clarke |
ºdH |
|
c o n s u m p t i o n |
||
mmol/l |
(cycles/2kg) |
|||||
|
degrees |
|
|
position |
(Grams/cycle) |
|
|
|
|
|
|
|
|
1 |
0 14 |
M NT |
M NIT |
L |
M |
L |
|
|
|
|
|
|
|
2 |
NQ PS |
NU QQ |
NIU QIQ |
=?J? |
OM |
SM |
|
|
|
|
|
|
|
3 |
PS TN |
QR UV |
QIR UIV |
jba |
QM |
QM |
|
|
|
|
|
|
|
4 |
[TN |
[UV |
[UIV |
?H? |
SM |
OR |
|
|
|
|
|
|
|
.3.
GB

Detergent and Rinse Aid
Detergent
Detergent specifically intended for use with dishwashers must be used. The dispenser must be refilled before the start of each wash cycle following the instructions provided in the "Wash Cycle Table." The detergent dispenser is located on the inside panel the door.
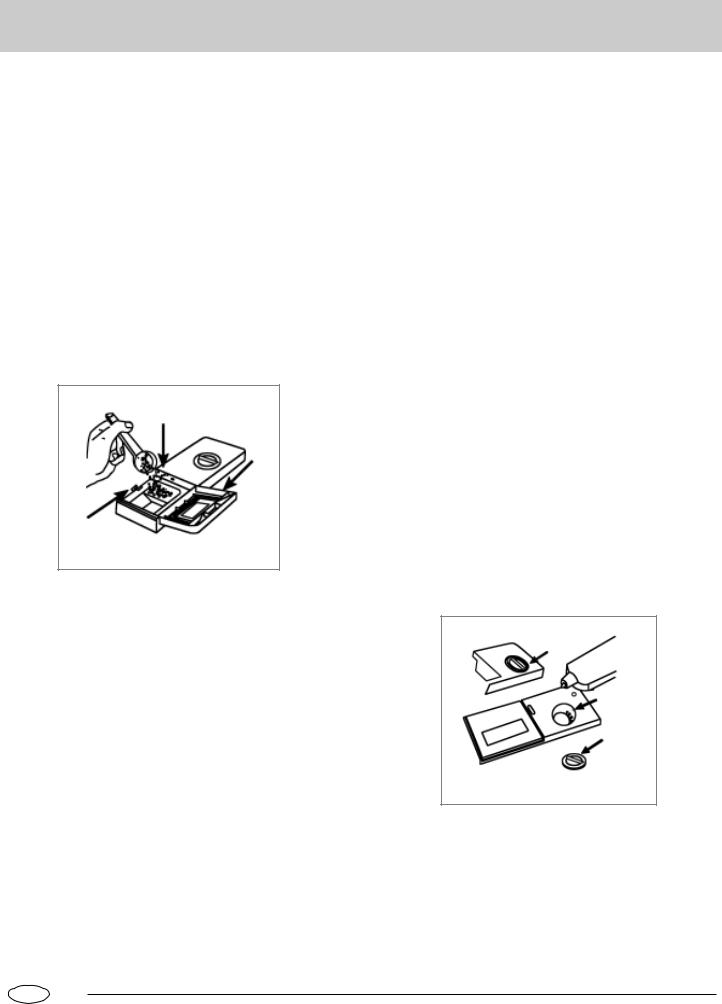
Loading the detergent
To open the "A" cover on the dispenser, press the "B" button. The detergent for the wash cycle should be poured into the "C" compartment.
After the detergent has been placed in the dispenser, close the cover and press down until it clicks in place.
C
A
B
Notice: To facilitate closing the cover, remove any excess detergent on the edges of the dispenser.
Rinse Aid
This product makes dishes sparkle and helps them to dry without spotting. The dispenser is located on the inside panel of the door and should be filled after every 80 wash cycles (or when the "low rinse aid" indicator light comes on for those models with this feature).
Loading the Rinse Aid
Regardless of the type of detergent dispenser installed on your appliance, you must proceed as indicated below when loading the rinse aid.
To open the dispenser, turn the "C" cap in an anti-clockwise direction and then pour in the rinse aid, making sure not to overfill. The amount of rinse aid used for each cycle can be regulated by turning the "F" dose adjustor, located beneath the "C" cap, with a screwdriver. There are 6 different settings; the normal dosage setting is 3.
Important
Proper dosage of the rinse aid improves drying.
If drops of water remain on the dishes or spotting occurs, the dosage adjustor should be turned to a higher setting. If the dishes have white streaks, turn the dosage adjustor to a lower setting.
C
F
C
.4.
GB
Loading the Dishwasher
Before placing the dishes in the dishwasher, remove larger food particles to prevent the filter from becoming clogged, which results in reduced performance.
If the pots and pans have baked-on food that is extremely hard to remove, we recommend that they are soaked before washed. This will eliminate the need for extra wash cycles.
Pull out the rack to load the dishwasher.
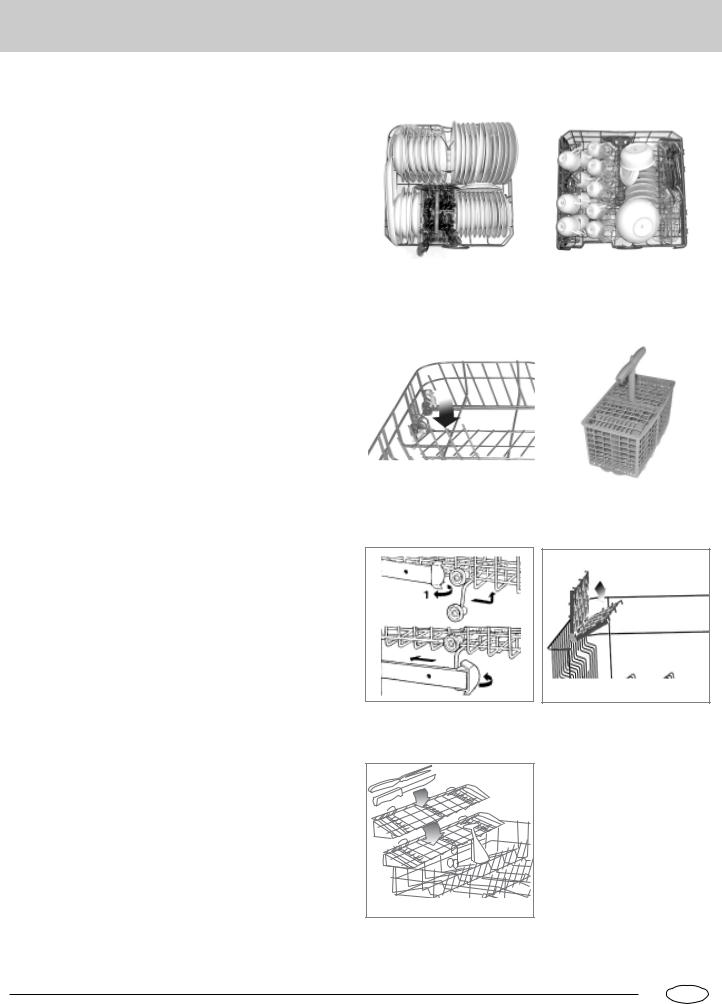
How to use the lower rack
We recommend that you place the most difficult to clean items on the bottom rack: pots, pans, lids, serving dishes and bowls, as shown in the figure to the right.
It is preferable to place serving dishes and lids on the sides of the racks in order to avoid blocking the rotation of the top spray arm.
-Pots, serving bowls, etc. must always be placed face down.
-Deep pots should be slanted to allow the water to flow out.
-The lower rack features fold down tine rows (see fig.A) so that larger or more pots and pans can be loaded.
-The silverware basket can be doubled (see fig.B) so that only one section may be used when the silverware load is light. This also makes space for additional pots and pans and it can also be placed in the upper rack.
-Silverware should be placed in the silverware basket with the handles at the bottom; if the rack has side baskets, the spoons should be located individually into the appropriate slots. Especially long utensils should be placed in the horizontal position at the front of the upper rack.
How to use the upper rack
The upper rack is designed to hold more delicate and lighter dishware, such as glasses, cups and saucers, plates, small bowls and shallow pans (as long as they are not too dirty).
-Position the dishes and cookware so that they do not get moved by the spray of water.
The upper rack can be adjusted for height by using the knobs located on both sides of the rack itself (see fig.C).
Adjust the upper basket to the higher level and you have more space to accommodate those taller pans and trays in the bottom
basket.
Shelf
Lean tall glasses and those with long stems against the shelf-not against other items to be washed.
Place glasses, cups and small bowls on the additional cup rack. The additional cup rack can be swivelled in or out as required(see fig.D).
Knife rack
The knife rack clips onto the side of the top basket, giving you the freedom to wash your large sharp knives separately and out of harm’s way (see fig.E).
Lower Rack |
|
Upper Rack |
|
|
|
Load for 12 Standard Settings
fig.A |
|
fig.B |
2
3
4
C |
fig.D |
fig.E |
.5.
GB

Starting the Appliance
Starting a wash cycle
After having completed all of the installation steps in the preceding paragraphs, turn on the water to the unit, partially open the door of the dishwasher, and press the ON-OFF button "A" located on the control panel. The "B" indicator light will come on. At this point, the appliance is on and ready to be programmed.
Setting and Starting a wash Cycle
Choose the desired cycle by pressing the cycle selection button "G". Each time it is pressed, one of the cycle indicator lights "F" will come on in succession.
Choose the wash cycle you feel is most appropriate for the type of dishes that need washing (consult the wash cycle table contained in this manual, especially when first using the appliance). Close the door and after a few seconds, a short acoustic signal will sound indicating that the wash cycle has begun and cannot be modified. If necessary, read the paragraph entitled, "Cancelling or modifying a cycle while underway". The end of the cycle will be signalled by a double acoustic sound, and the indicator light "F" will begin to blink.
Cancelling or modifying a cycle while underway...
Premise: A cycle that is underway can only be modified if it has only been running for a short time.
Otherwise, the detergent may have already been used, and the appliance may have already drained the wash water. If this is the case, the detergent dispenser must be refilled (see the paragraph entitled, "Loading the Detergent").
To change the cycle currently underway, open the door, press the "G" programming button and hold it in for about 5 seconds. Once the cycle has been cancelled, the dishwasher will emit a short acoustic sound and the relative indicator light will turn off. To set a new wash cycle, follow the instructions contained in the paragraph entitled, "Setting and Starting a Wash Cycle."
If you forget to load some of the dishes...
The wash cycle can be interrupted by opening the door carefully (in order to avoid being sprayed by hot water). When the door is closed again, the cycle will automatically restart at the point where it left off.
At the end of the wash cycle...
The end of the cycle will be indicated by a double acoustical signal and the blinking of the "F" indicator light. Open the door, turn off the appliance using the ON/OFF switch and turn off the water supply to the unit. Wait a few minutes before removing the dishes so as to avoid handling them while still hot (when they are more susceptible to breakage) and to get better drying results.
Setting The Start Delay Time
Open the door of the dishwasher partially. If the "J" button is pressed (see, Close-up View" Control Panel"). The start time for the wash cycle can be delayed for 2,4 or 6 hours.
Each time the button is pressed, the "I" light will come on indicating the length of the delay.
After selecting the delay time, the wash cycle can be set, as explained in "Starting a wash cycle..." There will be a short acoustic signal, and at this point the delay period will begin to count down. During this period the delay indicator light (I) will blink. At the end of the delay time, the indicator will stop blinking and the cycle will start.
NOTE:
a)During the delay period, none of the settings can be modified. If necessary, they can be cancelled by pressing cycle selector "G" for about 5 seconds.
b)If the power to the appliance goes off or the door is opened during the delay period, the clock will stop the countdown. It will start again when the power has come back on, or when the door has been closed.
Wash Cycle Adjustment Buttons
1/2 Load Button
This button (see" Close-up View-Control Panel", letter "C") makes it possible to wash dishes using only the upper rack if there are not enough dishes for a full load, This will allow you to save on water and electrical energy.
It cannot be used with the heavy duty wash cycles.
.6.
GB

Wash Cycle Table
|
Cycle |
|
Cycle |
|
Description of |
|
Detergent |
|
Rinse Aid |
|
|
|
|
|
|
||||||
|
|
Selection |
|
|
|
|||||
|
|
|
Cycle |
|
|
|||||
|
|
|
|
|
|
|
|
|
||
|
|
|
Information |
|
|
|
|
|
|
|
|
|
|
|
|
|
|
|
|
|
|
|
|
|
|
|
|
|
|
|
|
|
|
|
|
Very dirty dishes, |
|
Pre-wash with hot water. |
|
|
|
|
|
|
|
|
pots and pans. (Not |
|
Extended wash at 70 K |
|
|
|
|
|
|
|
|
to be used with deli- |
|
Rinse with cold water. |
|
30g |
|
|
|
|
|
|
cate items) |
|
Rinse with hot waterK |
|
|
|
|
|
|
Heavy Duty |
|
|
|
Drying. |
|
|
|
|
|
|
|
|
|
|
|
|
|
|
|
|
|
|
|
|
|
|
|
|
|
|
|
|
|
|
|
|
The second prewash use cold water. |
|
|
|
|
|
|
|
|
Normal dirty dishes, |
|
Extended wash at 50 . |
|
|
|
|
|
|
|
|
pots and pans. Stan- |
|
Rinse with cold water. |
|
30g |
|
|
|
|
Normal Wash |
|
dard daily cycle. |
|
Rinse with hot water. |
|
|
|
|
|
|
|
|
|
Drying. |
|
|
|
|
|
|
|
(IEC-EN50242) |
|
|
|
|
|
|
|
|
|
|
|
|
|
|
|
|
|
|
|
|
|
|
|
|
|
|
|
|
|
|
|
|
|
|
Normal dirty dishes, |
|
Pre-wash with cold water. |
|
|
|
|
|
|
|
|
|
Extended wash at 50 K |
|
|
|
|
|
|
|
|
|
pots and pans without |
|
|
|
|
|
|
|
|
|
|
|
Rinse with cold water. |
|
30g |
|
|
||
|
|
|
dried on residue. |
|
|
|
||||
|
|
|
|
Rinse with hot waterK |
|
|
|
|
|
|
|
|
|
|
|
|
|
|
|
|
|
|
Light Wash |
|
|
|
Drying. |
|
|
|
|
|
|
|
|
|
|
|
|
|
|
|
|
|
|
|
Economic, fast cycle to |
|
Wash at 50 . |
|
|
|
|
|
|
|
|
be used for items which |
|
|
|
|
|
|
|
|
|
|
|
Rinse with warm water. |
|
|
|
|
|
|
|
|
|
are sensitive to higher. |
|
|
15g |
|
|
||
|
|
|
|
Hot rinse. |
|
|
||||
|
|
|
Run immediately after |
|
|
|
|
|
|
|
|
Glassware |
|
|
Drying. |
|
|
|
|
|
|
|
|
dishes are used. |
|
|
|
|
|
|
||
|
|
|
|
|
|
|
|
|
|
|
|
|
|
|
|
|
|
|
|
|
|
|
|
|
Economic, fast cycle to |
|
|
|
|
|
|
|
|
|
|
be used to on not very |
|
Short wash at 40 . |
|
|
|
|
|
|
|
|
dirty dishes right after |
|
|
15g |
|
|
|
|
|
|
|
|
Cold rinse. |
|
|
|
|
||
|
|
|
they are used. No dry- |
|
|
|
|
|
||
|
|
|
|
|
|
|
|
|
|
|
|
Rapid Wash |
|
ing cycle. |
|
|
|
|
|
|
|
|
|
|
|
|
|
|
|
|
|
|
|
|
|
|
|
|
|
|
|
|
|
|
|
|
Pre-wash of dishes, |
|
|
|
|
|
|
|
|
|
|
pots and pans while |
|
Short cold wash to prevent |
|
|
|
|
|
|
|
|
waiting for the load to |
|
food residue from drying on |
|
|
|
|
|
|
Soak |
|
be completed after the |
|
the dishes . |
|
|
|
|
|
|
|
subsequent meal. |
|
|
|
|
|
|
|
|
|
|
|
|
|
|
|
|
|
|
|
|
|
|
|
|
|
|
|
|
|
|
|
|
|
The cycle of heat wash- |
|
Heat washing. |
|
|
|
|
|
|
|
|
ing and dry tableware. |
|
|
|
|
|
||
|
|
|
|
|
|
|
|
|
|
|
|
Heat wash |
|
|
|
|
|
|
|
|
|
|
|
|
|
|
|
|
|
|
|
|
|
|
|
|
|
|
|
|
|
|
|
.7.
GB
Energy Saving Tips
-It is important to try and run the dishwasher when it is fully loaded in order to save on energy. In order to prevent odors from forming and food from caking onto the dishes, you can run the soak cycle.
-Choose the right wash cycle: the choice of cycle depends on the type of dishware, cookware and utensils being washed and how dirty they are.
-Use the right amount of detergent: if you use too much detergent, the result will not be cleaner dishes, but, rather, a greater negative impact on the environment.
-There is no advantage in rinsing dishes, cookware and utensils before placing them in the dishwasher.
How to keep Your Dishwasher in Shape
After Every Wash
After every wash, turn off the water supply to the appliance and leave the door slightly ajar so that moisture and odors are not trapped inside.
Remove the plug
Before cleaning or performing maintenance, always remove the plug from the socket. Do not run risks.
No solvents or Abrasive Cleaning Products
To clean the exterior and rubber parts of the dishwasher, do not use solvents or abrasive cleaning products. Rather, use only a cloth and warm soapy water.
To remove spots or stains from the surface of the interior, use a cloth dampened with water and a little while vinegar, or cleaning product made specifically for dishwashers.
When You Go on Holiday
When you go on holiday, it is recommended that you run a wash cycle with the dishwasher empty and then remove the plug from the socket, turn off the water supply and leave the door of the appliance slightly ajar. This will help the seals last longer and prevent odors from forming within the appliance.
Moving the Appliance
If the appliance must be moved, try to keep it in a vertical position. If absolutely necessary, it can be positioned on its back.
Seals
One of the factors that cause odors to form in the dishwasher is food that remains trapped in the seals. Periodic cleaning with a damp sponge will prevent this from occurring.
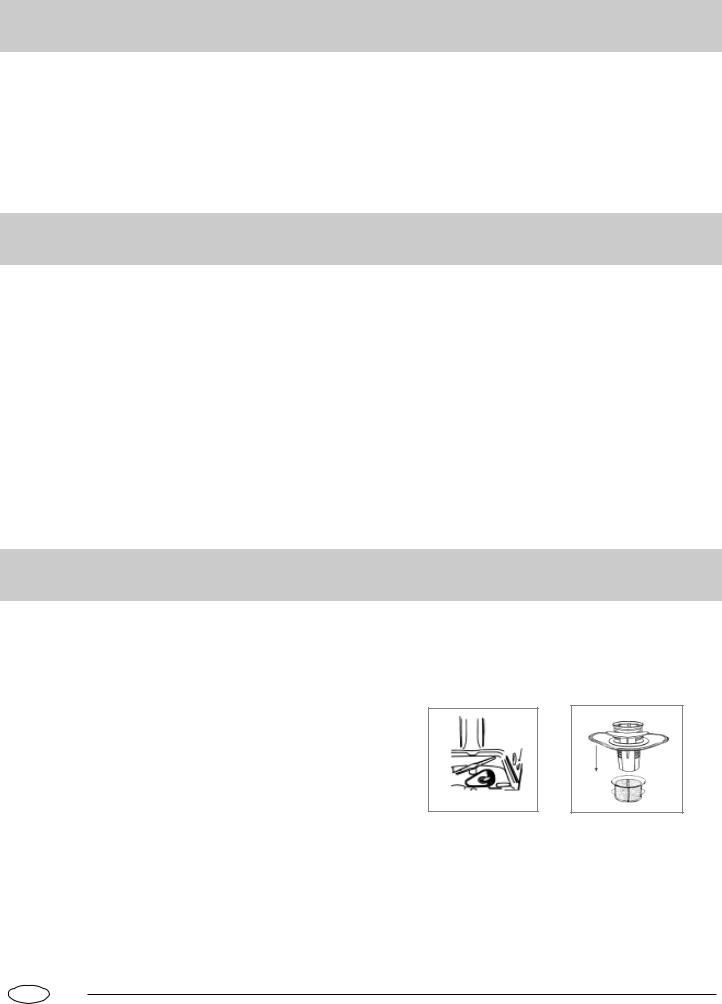
Cleaning and Special Maintenance
Filter Assembly
For best performance and results, the filter assembly must be cleaned.
The filter efficiently removes food particles from the wash water, allowing it to be recirculated during the cycle. For this reason, it is a good idea to remove the larger food particles trapped in the filter after each wash cycle by rinsing the "A" semi-circular filter and cup under running water. To remove the filter assembly, pull on the cup handle in an upward direction. The entire filter assembly (made up of the "A" semicircular filter and the "B" fine filter) should be cleaned at least once a month. To clean the filter and the fine filter, use a cleaning brush. Then, reassemble the filter parts as shown in the figures below and inset the entire assembly in the dishwasher, positioning in its seat and pressing downward.
The dishwasher must never be used without the filters. Improper replacement of the filters may reduce performance of the appliance and damage dishes and utensils.
Cleaning the Spray Arms
It may happen that food particles become encrusted on the sprayer arms and block the hole (see "Close up view [interior]" , letters D-F ). Check the sprayer arms periodically and clean them when needed.
A
B
Cleaning the Water Inlet Filter
Periodically clean the water inlet filter located on the outlet of the water supply tap.
After turning off the water tap, unscrew the end of the water supply hose, remove the filter and clean it carefully under running water. Then, return the filter to its place and tighten the water supply hose back into position.
.8.
GB

Troubleshooting
It may occur that the dishwasher does not function or does not function properly. Before calling for assistance, Iet us see what can be done first: have you forgotten to press one of the buttons or to perform an essential operation?
The Dishwasher Does Not Start
Have you checked whether:
-the plug is pushed into the socket correctly;
-the power is on in the house;
-the door is closed properly;
-the ON-OFF switch is on "ON";
-the water supply is turned on.
The Dishwasher Does Not Load Water
Have you checked whether:
-the water is turned on and the hose is connected properly;
-the water supply to the house is on and has sufficient pressure;
-the water supply hose is crimped or bent;
-the filter for the water supply hose is clogged.
The Dishes Are Not Clean
Have you checked whether:
-the water is turned on and the hose is connected properly;
-the water supply to the house is on and has sufficient pressure;
-the water supply hose is crimped or bent;
-the filter for the water supply hose is clogged.
The Dishwasher Does Not Drain
Have you checked whether:
- the drain hose is crimped or bent.
Lime Deposits or a White Film Form on the Dishes
Have you checked whether:
-the lid to the salt container is closed properly;
-the rinse aid dosage is correct.
Error Messages
The dishwasher is equipped with a safety system that is able to detect operating problems and malfunctions. These malfunctions are signalled by the rapid blinking of one of the "F" program LEDs. Only in the case where the indicator light for the soak cycle (see table for cycles) blinks rapidly should you cancel the cycle as described in the section entitled, "Changing a Cycle while Underway." Then check to make sure that there is water in the mains and that the tap is turned on. If the message continues, call for technical assistance, indicating which message appeared.
If any of the other indicator lights begins to blink rapidly, turn off the appliance and call for technical assistance, indicating which light began to blink.
If, despite all these checks, the dishwasher still does not function and/or the problem persists, contact the nearest authorised service centre and provide them with the following information:
-the nature of the problem;
-the model type number (Mod...) And the
serial number (S/N...), which are indicated on the plate located on the side of the inner part of the door.
Never call on unauthorised technicians and refuse to allow
parts to be installed that are not original spare parts.
.9.
GB
Installation
Positioning the Appliance
Positioning the appliance in the desired location. The back should rest against the wall behind it, and the sides, along the adjacent cabinets or wall. The dishwasher is equipped with water supply and drain hoses that can be positioned to the right or the left to facilitate proper installation.
Levelling the Appliance
Once the appliance is positioned, adjust the feet (screwing them in or out) to adjust the dishwasher, making it level. In any case, the appliance should not be inclined more than 2˚. If the appliance is level, it will help ensure proper performance.
Cold Water Connection
Connect the cold water supply hose to a threaded 3/4 (gas) connector, making sure that it is fastened tightly in place (see fig. 1).
If the water pipes are new or have not been used for an extended period of time, let the water run to make sure that the water is clear and free of impurities. If this precaution is not taken, there is a risk that the water inlet can get blocked and damage the appliance.
Hot Water Connection
The water supply to the appliance can also be connected to the house's hot water line (centralised system, heating system), as long as it does not exceed a temperature of 60 .
In this case,the wash cycle time will be shortened by about 15 minutes and the wash efficiency slightly reduced.
The connection must be made to the hot water line following the same procedures as those for the connection to the cold water line.
fig.1
Drain Hose Connection
Insert the drain hose into a drain pipe with a minimum diameter of 4cm, Or let it run into the sink, making sure to avoid bending or crimping it. Use the special plastic support that comes with the appliance (see fig.2). The free end of the hose must be at a height between 40 and 100 cm and must not be immersed in water.
MAX 100
MIN 40
fig.2
Attention:
The special plastic hose support must be solidly fastened to the wall to prevent the drain hose from moving and allowing water to spill outside the drain.
Electrical Connection
After making sure that the voltage and frequency values for the current in the home correspond to those on the rating plate (located on the stainless steel inner door of the appliance) and that the electrical system is correct for the maximum voltage on the rating plate, insert the plug into an electrical socket which is earthed properly (the earthing of the appliance is a safety requirement mandated by law).
If the electrical socket to which the appliance must be connected is not appropriate for the plug, replace the plug, rather than using adaptors or the like as they could cause overheating and burns.
Caution:
The dishwasher plug must be accessible even when the appliance is installed as a built-in unit so that maintenance can be done safety.
.10.
GB

La sécurité est une habitude qu'il est bon de cultiver
AVIS
Nous vous invitons à lire attentivement les instructions contenues dans ce manuel car elles vous fourniront des informations importantes pour installer, utiliser et entretenir votre appareil de façon correcte et en toute sécurité.
Cet appareil est conforme aux directives CEE :
-73/23/EEC du 19 février 1973 (Basse tension) et modifications successives ;
-89/336/EEC du 3 mai 1989 (Compatibilité électromagnétique) et modifications successives.
-Déballez l'appareil avec soin.
-Ensuite, assurez-vous qu'il n'a pas été endommagé pendant le transport. En cas de doute, adressez-vous à un professionnel qualifié.
-Le lave-vaisselle doit être utilisé exclusivement par des adultes, pour laver de la vaisselle et des ustensiles de cuisson.
-Cet appareil n'est pas conçu pour être utilisé par des enfants ou des personnes handicapées sans qu'une surveillance soit assurée.
-Il est recommandé de tenir les jeunes enfants sous contrôle afin d'éviter qu'ils ne jouent avec le lave-vaisselle.
-Conservez les détergents hors de portée des enfants. Tenez les enfants à l'écart du lave-vaisselle lorsque celui-ci est ouvert.
-Cet appareil ne peut être installé en extérieur, même si la zone est protégée par un toit. Il est également très dangereux de l'exposer à la pluie et aux éléments atmosphériques.
-Ne touchez en aucun cas la résistance pendant ou après un cycle de lavage.
-Ne vous appuyez pas et ne vous asseyez jamais sur la porte du lave-vaisselle car l'appareil pourrait basculer.
-Si le lave-vaisselle ne fonctionne pas, fermez le robinet d'arrivée d'eau et débranchez l'appareil. Puis, consultez le chapitre intitulé "Diagnostic rapide". Si ne pouvez résoudre le problème par vousmême, adressez-vous à un Service Après-vente.
-Les réparations doivent être réalisées exclusivement par du per sonnel spécialisé.
-Pour la mise au rebut, rendez les appareils inutilisables en sectionnant le câble d'alimentation et en démontant le verrou de la porte.-
-Si le cordon d'alimentation est endommagé, il doit être remplacé par un cable spécial ou de montage disponible auprès du fabricant ou du Servvice Après-vente.
-La prise du secteur doit toujours être accessible, même après que l'appareil a été installé.
-Règles essentielles qu'il convient d'observer au moment d'utiliser l'appareil :
*Ne touchez jamais le lave-vaisselle lorsque vous êtes pieds nus ou lorsque vos mains ou vos pieds sont mouillés ;
*L'utilisation de rallonges et de prises multiples est à proscrire ;
*Au cours de l'installation, assurez-vous que le cordon d'alimentation n'est pas plié ou écrasé de façon excessive, ce qui pourrait être dangereux ;
*Si l'appareil ne fonctionne pas correctement ou si l'entretien doit
être effectué, débranchez l'appareil.
Afin de garantir l'EFFICACITÉ et la SÉCURITÉ de l'appareil, nous vous conseillons :
-de toujours vous adresser à un Service Après-vente agréé par le fabricant. - always use original Spare Parts
Premier plan (bandeau de commande)
F E D C B A
|
G |
H |
I |
J |
A |
Bouton ON-OFF |
|
F |
Voyant programmes |
B |
Voyant ON-OFF |
|
G |
Bouton sélection programmes |
C |
Bouton "Half Load" |
|
H |
Voyant "HALF LOAD" |
D Voyant manque de produit de rinçage |
|
I |
Voyant délai |
|
E |
Voyant manque de produit de sel |
|
J |
Bouton sélection départ différé |
|
|
.11. |
|
|
FR
Premier plan de l'intérieur
M
L A B
C
D
K
E J F
G
I
ASupport de Tasse
BPanier supérieur
CRéglage de la hauteur du panier
DBras d'aspersion supérieur
EPanier inférieur
FBras d'aspersion inférieur
G Filtre de lavage
IDistributeur de détergent et de liquide de rinçage
JBouchon du réservoir à sel
KPanier d'argenterie
LEtagère à couteaux
MTroisième bras d'aspersion
Caractéristiques techniques
Largeur |
60 cm |
|
|
Profondeur |
58 cm |
|
|
Hauteur |
82 cm |
|
|
Capacité |
12 couverts standard |
|
|
Pression de l'eau dans les conduits |
0.03-0.6MPa |
|
|
|
|
Tension d'alimentation |
220-240V~ 50Hz |
|
|
Puissance absorbée totale |
2150W |
|
|
.12.
FR
S e l
Sel |
Réglage de la quantité de sel |
|||
Le degré de dureté de l'eau varie d'un endroit à l'autre. Si l'eau |
Le lave-vaisselle est conçu de manière à ce que puissiez régler |
|||
qui alimente votre lave-vaisselle est dure, des dépôts se formeront |
la quantité de sel nécessaire, en fonction du degré de dureté de |
|||
sur la vaisselle et sur les ustensiles de cuisson. |
l'eau de votre habitation. Ceci, afin de permettre d'optimaliser et |
|||
Cet appareil est équipé d'un système d'adoucissement spécial |
d'adapter la quantité de sel utilisée lors de chaque lavage en |
|||
qui utilise un sel spécialement conçu pour éliminer le calcaire et |
limitant celle-ci au minimum. Adressez-vous à votre société lo- |
|||
les minéraux présents dans l'eau. |
cale de distribution de l'eau pour connaître la classe de dureté |
|||
|
de votre zone. |
|||
Comment remplir l'adoucisseur |
Pour régler la quantité de sel nécessaire, procédez de la façon |
|||
suivante : |
||||
Utilisez exclusivement du sel spécial pour lave-vaisselle. Le |
||||
|
|
|
||
distributeur de sel est situé en dessous du panier inférieur et doit |
|
|
|
|
être rempli de la manière suivante : |
|
|
|
|
|
|
|
||
- Dégagez le panier inférieur, puis dévissez le bouchon du |
|
|
|
|
distributeur de sel et retirez-le ; |
|
|
|
|
- Si vous remplissez le distributeur de sel pour la première fois, |
|
|
|
|
remplissez-le d'eau ; |
|
|
|
|
- Placez l'extrémité de l'entonnoir (fourni) dans l'orifice et versez |
|
|
|
|
2 kg de sel environ. Il est normal qu'une petite quantité d'eau |
|
|
|
|
s'échappe du distributeur de sel. |
|
|
|
|
- Revissez soigneusement le bouchon. |
|
|
|
|
|
|
|
|
|
|
|
|
- Dévissez le bouchon du distributeur de sel; |
|
|
||||||
|
|
|
- Le distributeur de sel est doté d'une bague sur laquelle figure |
||||||||
|
|
|
une flèche (voir la figure ci-contre). |
|
|
|
|||||
|
|
|
- Au besoin, tournez la bague dans le sens inverse des aiguilles |
||||||||
|
|
|
d'une montre, de la position |
"-" vers le signe "+", en fonction du |
|||||||
|
|
|
degré de dureté de l'eau. |
|
|
|
|
|
|||
|
|
|
Si consiglia di effettuare le regolazioni in base al seguente |
||||||||
|
|
|
schema: |
|
|
|
|
|
|
|
|
|
|
|
|
|
|
|
|
|
|
||
|
|
|
|
|
|
|
|
|
|
|
|
|
|
|
Durété de l'eau |
|
|
|
|
|
|
||
|
|
|
|
|
|
|
|
|
|
|
|
Remplissez le distributeur de sel uniquement lorsque le voyant |
|
|
|
|
Position |
Consommation |
Autonomie |
|
|||
Niveau |
|
|
|
sel |
|
||||||
de "niveau de sel" (situé sur le bandeau de commande) est |
ºfH |
ºdH |
mmol/l |
|
|||||||
sélécteur |
(grammes/cycle) |
(cycles/2kg.) |
|
||||||||
|
|
|
|
|
|||||||
allumé. |
|
|
|
|
|
|
|
|
|
||
|
|
|
|
|
|
|
|
|
|||
Afin d'éviter la formation de rouille, remplissez le distributeur de |
1 |
0 10 |
M NT |
M NIT |
|
L |
M |
L |
|
||
sel juste avant de lancer un cycle de lavage. |
|
|
|
|
|
|
|
|
|
||
2 |
NM OR |
NU QQ |
NIU QIQ |
|
=?J? |
OM |
SM |
|
|||
|
|
|
|
|
|||||||
|
|
|
|
|
|
|
|
|
|
|
|
|
|
|
3 |
OR RM |
QR UV |
QIR UIV |
|
MED |
QM |
QM |
|
|
|
|
|
|
|
|
|
|
|
|
|
|
|
|
4 |
[RM |
[UV |
[UIV |
|
?H? |
SM |
OR |
|
|
|
|
|
|
|
|
|
|
|
|
|
.13.
FR
Détergent et liquide de rinçage
Détergent
Utilisez exclusivement un détergent spécial pour lave-vaisselle. Remplissez le distributeur de détergent avant de lancer un nouveau cycle de lavage, en respectant les instructions fournies dans le "Tableau des cycles de lavage." Le distributeur de détergent est situé sur la paroi intérieure de la porte.
Comment remplir le distributeur de détergent
Pour ouvrir le couvercle "A" du distributeur, appuyez sur la touche "B". Versez le détergent destiné au cycle de lavage dans le compartiment "C".
Dès que vous avez rempli le distributeur de détergent, refermez le couvercle et appuyez jusqu'à ce que vous entendiez un déclic.
Liquide de rinçage
Ce produit permet de faire briller votre vaisselle et facilite le séchage sans laisser de traces. Le distributeur de liquide de rinçage est situé sur la paroi intérieure de la porte. Remplissezle au bout de 80 lavages (ou lorsque le voyant de niveau de liquide de rinçage s'allume - sur les modèles qui en sont équipés).
Comment remplir le distributeur de liquide de rinçage
Pour ouvrir le distributeur de liquide de rinçage, tournez le couvercle "C" dans le sens inverse des aiguilles d'une montre et remplissez le distributeur en veillant à ne pas faire déborder le liquide. Vous pouvez régler la quantité de liquide de rinçage nécessaire en tournant la vis de réglage "F", située en dessous du couvercle "C", à l'aide d'un tournevis. Il existe 6 positions de réglage ; la position 3 correspond à la quantité normale.
C
A
B
Avertissement :
Afin de pouvoir refermer aisément le couvercle, nettoyez les bords de celui-ci en éliminant toute trace de détergent.
Remarque importante
Une quantité de liquide de rinçage correctement dosée améliore le séchage. Si vous constatez des gouttes d'eau ou des taches sur votre vaisselle, il convient de régler le dosage sur une position supérieure.
Si les assiettes présentes des striures blanches, réglez le dosage sur une position inférieure.
C
F
C
.14.
FR

Comment remplir votre lave-vaisselle
Avant de ranger la vaisselle dans votre lave-vaisselle, éliminez tous les résidus d'aliments pour éviter que le filtre ne se bouche, ce qui compromettrait les résultats de lavage.
Si des aliments carbonisés et par conséquent très difficiles à détacher sont présents dans le fond de vos cocottes et casseroles, faites-les tremper avant de les laver au lave-vaisselle. Ceci permettra de ne pas effectuer de cycles de lavage supplémentaires. Tirez le panier vers vous afin de faciliter le chargement de la vaisselle.
Comment utiliser le panier inférieur
Nous vous conseillons de ranger les articles nécessitant un lavage plus puissant sur le panier inférieur : cocottes, casseroles, couvercles, plats de service et saladiers, comme représenté dans la figure de droite.
Il est recommandé de ranger les plats de service et les couvercles sur les côtés du panier afin de ne pas entraver la rotation du bras d'aspersion supérieur.
-Rangez toujours les cocottes, saladiers, etc. en les retournant.
-Rangez les cocottes profondes en les inclinant pour permettre à l'eau de s'écouler.
-Les particularités de support inférieures replient des rangées de dent (voir la fig.A) sont pour que plus grand ou plus de vaissailles puissent être chargé.
-Le panier à couverts peut être réduit de moitié (voir la fig.B), ce qui permet de n'utiliser qu'une des deux sections lorsque la quantité de couverts est peu importante. Dans ce cas, vous disposez de plus d'espace pour ranger des cocottes ou des casseroles supplémentaires. Vous pouvez également placer le panier à couverts dans le panier supérieur.
-Rangez les couverts dans le panier à couverts en positionnant le manche vers le bas; si le panier dispose de paniers latéraux, disposez chaque cuillère dans les fentes prévues à cet effet. Les ustensiles particulièrement longs doivent être rangés à l'horizontal, dans la partie avant du panier supérieur.
Comment utiliser le panier supérieur
Le panier supérieur est conçu pour recevoir de la vaisselle plus fragile et légère telle que verres, tasses à café et à thé, saucières, de même que des assiettes, de petits bols et des casseroles peu profondes (si elles ne sont pas trop sales).
- Installez la vaisselle et les ustensiles de cuisson de façon à ce qu'ils ne puissent être déplacés par le jet d'eau.
Le panier supérieur peut être réglé en hauteur (voir la fig.C). Ajustez le panier supérieur à un niveau plus haut et vous aurez plus d'espace pour charger des casseroles et plats plus grands dans le panier.
L'étagère
Appuyez les verres hauts et les verres à pied contre le bord de l'étagère, pas contre la vaisselle.
Les verres, les tasses et les grands bols se rangent sur l'étagère du haut. Vous pouvez faire basculer l'étagère dans les deux sens (voir la fig.D).
Etagère à couteaux
Les agrafes de support de couteau sur le côté du panier supérieur vous permet de laver les grands couteaux pointus séparément et pour éviter de faire du mal aux gens (voir la fig.E).
Panier inférieur |
|
Panier supérieur |
|
|
|
|
|
|
Capacité pour 12 couverts standard
fig.A |
|
fig.B |
2
3
4
fig.C |
fig.D |
fig.E |
.15.
FR
 Loading...