Page 1

GSK983M Milling CNC System
User Manual
(Volume I: Specifications and Programming)
Page 2

This user manual describes all items concerning the operation of the
system in detail as much as possible. However, it is impractical to give
particular descriptions of all unnecessary and/or unavailable works of the
system due to the length limit of the manual, specific operations of the
product and other causes. Therefore, the operations not specified herein
may be considered impractical or unavailable.
This user manual is the property of GSK CNC Equipment Co., Ltd. All
rights are reserved. It is against the law for any organization or individual
to publish or reprint this manual without the express written permission
of GSK and the latter reserves the right to ascertain their legal liability.
I
Page 3

Company Profile
GSK, GSK CNC Equipment Co,. Ltd, is the largest CNC system production and
marketing enterprise in China at present. It is the Numerical Control industrial
base of South China, and the undertaking enterprise of the national 863 main
project Industrialization Support Technology for Medium Numerical Control
System. It is also one of the 20 basic equipment manufacture enterprises in
Guangdong province. It has been taking up the research and development,
design and the manufacture of machine CNC system (CNC device, drive unit and
servo motor) in recent 10 years. Now it has developed into a large high-tech
enterprise integrated with technology, education, industry and trade by enhancing
the popularization and trade of CNC machine tools. There are more than 1400
staffs in this company that involves 4 doctors, more than 50 graduate students
and 500 engineers; more than 50 among these staffs are qualified with senior
engineer post titles. The high performance-cost ratio products of GSK are
popularized in China and Southeast Asia. And the market occupation of GSK’s
product dominates the first and the turnout and sale ranks the top for successive
7 years in domestic market for the same product from the year 2000 to 2006,
which makes GSK the largest CNC manufacture base throughout China.
Field technical support services
Field support services are available when you encounter a problem insolvable
through telephone. GSK CNC Equipment Co. Ltd will designate a technical
support engineer to your place to solve technical problems for you.
Chinese version of all technical documents in Chinese and English
languages is regarded as final.
II
Page 4

Foreword
Dear user,
We are really grateful for your patronage and purchase of GSK983M milling CNC
system made by GSK CNC Equipment Co., Ltd.
This manual consists of two volumes. Volume I mainly describes the
specifications and programming of the system while Volume II operations, all
codes, parameters, I/O interfaces and other appendices.
This system can only be operated by authorized and qualified personnel as
!
improper operations may cause accidents. Please carefully read this user
manual before usage.
All specifications and designs herein are subject to change without further
notice.
We are full of heartfelt gratitude to you for supporting us in the use of GSK’ s
products.
III
Page 5

CONTENTS
1. GENERAL....................................................................................................................................1
1.1 Overview............................................................................................................................................1
1.2 Introduction to the Manual.............................................................................................................1
2. SPECIFICATIONS........................................................................................................................2
3. PROGRAMMING........................................................................................................................13
3.1 What Is Programming?.................................................................................................................13
3.2 Program Make-up ..........................................................................................................................13
3.2.1 Block........................................................................................................................................................14
3.2.2 Program word........................................................................................................................................14
3.2.3 Input format............................................................................................................................................16
3.2.4 Decimal programming .........................................................................................................................18
3.2.5 Maximum instruction value.................................................................................................................19
3.2.6 Program number...................................................................................................................................20
3.2.7 Sequence number ................................................................................................................................21
3.2.8 To skip over an optional block............................................................................................................21
3.3 Dimension Word............................................................................................................................23
3.3.1 Controllable axis ...................................................................................................................................23
3.3.2 Set unit....................................................................................................................................................25
3.3.2.1 Minimum set unit and minimum travel unit..............................................................................25
3.3.2.2 Input unit×10 ..................................................................................................................................26
3.3.3 Maximum travel.....................................................................................................................................26
3.3.4 Program origin and coordinate system............................................................................................26
3.3.5 Coordinate system and origin of processing ..................................................................................27
3.3.6 Workpiece coordinate system............................................................................................................27
3.3.7 Reference (position) point ..................................................................................................................28
3.3.8 Absolute value instruction and incremental value instruction .....................................................29
3.4 Feed Function (F function) ..........................................................................................................30
3.4.1 Rapid traverse (positioning) function ...............................................................................................30
3.4.2 Cutting feedrate ....................................................................................................................................30
3.4.3 To reduce feedrate to 1/10..................................................................................................................31
3.4.4 Synchronous feed (feed per rotation) ..............................................................................................31
3.4.5 F1 digit feed ...........................................................................................................................................32
3.4.6 Automatic acceleration and deceleration ........................................................................................33
3.4.7 Automatic angle adjustment...............................................................................................................34
3.4.7.1 Automatic adjustment of inner angle........................................................................................34
3.4.7.2 Switch of inner arc cutting feedrate ..........................................................................................37
3.5 Preparation Function (G function)..............................................................................................38
3.5.1 Selection of planes (G17, G18, G19)...............................................................................................40
3.5.2 Positioning (G00)..................................................................................................................................41
IV
Page 6

3.5.3 Unidirectional positioning (G60) ........................................................................................................42
3.5.4 Linear interpolation (G01)...................................................................................................................42
3.5.5 Arc interpolation (G02, G03) ..............................................................................................................44
3.5.5.1 Arc interpolation without any additional axis ...........................................................................44
3.5.5.2 Arc interpolation with an additional axis...................................................................................48
3.5.6 Sine-curve interpolation ......................................................................................................................48
3.5.7 Thread cutting (G33)............................................................................................................................49
3.5.8 Automatic return to reference point (reference positions G27~G30) ......................................51
3.5.8.1 Check of return to reference point (G27).................................................................................51
3.5.8.2 Automatic return to reference point (G28)...............................................................................52
3.5.8.3 Automatic return from reference point (G29)..........................................................................53
3.5.8.4 Return to the 2nd, 3rd or 4th reference point (G30) .............................................................55
3.5.9 Dwell (G04) ............................................................................................................................................55
3.5.10 Accurate stop detection (G09).........................................................................................................56
3.5.11 Accurate stop detecting mode (G61) and cutting mode (G64) ................................................56
3.5.12 Coordinate system setting (G92)....................................................................................................56
3.5.13 Workpiece coordinate system (G54~G59) .................................................................................57
3.5.14 To change workpiece coordinate system by program instruction ...........................................59
3.5.15 Automatic setting of a coordinate system .....................................................................................59
3.5.16 To switch between Inch and metric systems (G20, G21)..........................................................59
3.5.17 Storage travel limit (G22, G23) .......................................................................................................60
3.5.18 Skip function (G31) ............................................................................................................................63
3.6 Compensation................................................................................................................................65
3.6.1 Tool length compensation (G43, G44, G49)...................................................................................65
3.6.2 Tool offset (G45~G48) .......................................................................................................................67
3.6.3 Tool radius compensation (G40~G42) ...........................................................................................74
3.6.3.1 Tool radius compensation function............................................................................................74
3.6.3.2 Offset (D codes) ............................................................................................................................74
3.6.3.3 Offset vector...................................................................................................................................75
3.6.3.4 Plane selection and vector..........................................................................................................75
3.6.3.5 G40, G41 and G42 .......................................................................................................................75
3.6.3.6 Details about tool radius compensation C...............................................................................77
3.6.4 D and H functions ...............................................................................................................................109
3.6.5 External tool offset..............................................................................................................................110
3.6.6 To input offset through program (G10)...........................................................................................110
3.6.7 Zooming function (G50, G51) ..........................................................................................................110
3.7 Cycle Machining Function .........................................................................................................113
3.7.1 External moving function ..................................................................................................................113
3.7.2 Fixed cycles (G73, G74, G76 and G80~G89)............................................................................114
3.7.2.1 Repeating a fixed cycle .............................................................................................................126
3.7.3 Specifying an origin and Point R in a fixed cycle (G98, G99)...................................................132
3.8 Spindle Function (S function), Tool Function (T function), Miscellaneous
Function (M function) and Secondary Miscellaneous Function (B function)
.........................133
3.8.1 Spindle function (S function) ............................................................................................................134
3.8.1.1 S 2 digits .......................................................................................................................................134
V
Page 7

3.8.1.2 S 4 digits .......................................................................................................................................134
3.8.2 Constant surface speed control ......................................................................................................134
3.8.2.1 Instructed methods .....................................................................................................................135
3.8.2.2 Spindle speed ..............................................................................................................................135
3.8.2.3 Restraint of maximum rotational speed of spindle ..............................................................135
3.8.2.4 Rapid traverse (positioning) (G00)..........................................................................................136
3.8.3 Tool function (T function)...................................................................................................................137
3.8.4 Miscellaneous function (M function)...............................................................................................137
3.8.5 Secondary miscellaneous function (B function) ..........................................................................138
3.9 Subprogram......................................................................................................................................138
3.9.1 Creation of a subprogram.................................................................................................................139
3.9.2 Execution of a subprogram ..............................................................................................................139
3.9.3 Special methods of application........................................................................................................140
3.10 User Macro .....................................................................................................................................142
3.10.1 General...............................................................................................................................................142
3.10.2 Variables.............................................................................................................................................144
3.10.2.1 Indication of a variable ............................................................................................................144
3.10.2.2 Introduction of variables..........................................................................................................144
3.10.2.3 Undefined variables .................................................................................................................145
3.10.2.4 Display and setting of variable...............................................................................................146
3.10.3 Types of variables ............................................................................................................................146
3.10.3.1 Local variables # 1~# 33 .......................................................................................................147
3.10.3.2 Common variables #100~ #149 , #500~ #509 .............................................................147
3.10.3.3 System variables (for user Macro B)....................................................................................147
3.10.4 Operation instructions .....................................................................................................................160
3.10.4.1 Definition and substitution of variable ..................................................................................160
3.10.4.2 Additive operation.....................................................................................................................160
3.10.4.3 Multiply operation (Macro B option) .....................................................................................160
3.10.4.4 Function (Macro B option) ......................................................................................................160
3.10.4.5 Hybrid operation........................................................................................................................161
3.10.4.6 Changing operational order using [ ].................................................................................162
3.10.4.7 Accuracy .....................................................................................................................................162
3.10.4.8 Cautions regarding deterioration of precision ....................................................................162
3.10.5 Control instruction ............................................................................................................................163
3.10.5.1 Branch (GOTO).........................................................................................................................163
3.10.5.2 Repeat (how to select Macro B)............................................................................................165
3.10.6 Creation and storage of user macro body ..................................................................................169
3.10.6.1 Creation of user macro body..................................................................................................169
3.10.6.2 Storage of user macro body...................................................................................................170
3.10.6.3 Macro statement and NC statement ....................................................................................170
3.10.7 Macro call instruction.......................................................................................................................173
3.10.7.1 Simple calling ............................................................................................................................173
3.10.7.2 Modal calling..............................................................................................................................180
3.10.7.3 Multiple calling...........................................................................................................................181
3.10.7.4 Multiple modal calling ..............................................................................................................181
3.10.7.5 Calling a macro with G codes................................................................................................182
VI
Page 8

3.10.7.6 Calling a subprogram with an M code .................................................................................183
3.10.7.7 Calling macros with M codes .................................................................................................184
3.10.7.8 Calling a subprogram with a T code.....................................................................................185
3.10.7.9 The position of the decimal point of an independent variable........................................185
3.10.7.10 The difference between M98 (calling a subprogram) and G65 (calling a
macro body) ...............................................................................................................................................186
3.10.7.11 The nesting and local variables of user macro ................................................................186
3.10.8 The relationship with other functions ...........................................................................................187
3.10.9 Special codes and words used in user programs.....................................................................189
3.10.10 Restrictions......................................................................................................................................190
3.10.11 Descriptions for P/S alarm ...........................................................................................................191
3.10.12 Examples of user macros ............................................................................................................191
3.10.12.1 Groove machining ..................................................................................................................191
3.10.13 External output instructions .........................................................................................................193
3.10.13.1 OPEN instruction: POPEN...................................................................................................194
3.10.13.2 Data output instruction BPRNT DPRNT ...........................................................................194
3.10.13.3 Close instruction PCLOS......................................................................................................195
3.10.13.4 Necessary settings for using the function.........................................................................195
3.10.13.5 Cautions ...................................................................................................................................195
3.10.14 Macro interruption function (Macro B).......................................................................................196
3.11 Tool Life Management...............................................................................................................196
3.11.1 Setting of tool groups.......................................................................................................................196
3.11.2 Setting in machining processes ....................................................................................................198
3.11.3 Performance of tool life administration ........................................................................................200
3.11.3.1 Tool life calculation....................................................................................................................200
3.11.3.2 Tool change signal and tool change reset signal...............................................................200
3.11.3.3 New tool selection signal.........................................................................................................201
3.11.3.4 Tool skip signal ..........................................................................................................................201
3.11.4 The display and input of tool data.................................................................................................201
3.11.4.1 The display and modification of tool group number ..........................................................201
3.11.4.2 The display of tool life data during the execution of machine program ........................201
3.11.4.3 Presetting tool life counter ......................................................................................................202
3.11.5 Other cautions ...................................................................................................................................203
3.12 The Indexing Function of Indexing Worktable.....................................................................203
3.12.1 Instructing methods .........................................................................................................................203
3.12.1.1 Input unit.....................................................................................................................................203
3.12.1.2 Absolute / incremental instruction .........................................................................................203
3.12.1.3 Concurrently controlled axes .................................................................................................204
3.12.2 Minimum travel unit: 0.001 degree/pulse....................................................................................204
3.12.3 Feedrate .............................................................................................................................................204
3.12.4 The clamping and release of indexing worktable......................................................................204
3.12.5 Jog/step/handwheel.........................................................................................................................205
3.12.6 Other cautions...................................................................................................................................205
VII
Page 9

GSK983M Milling CNC System Operation Manual (Volume I: Specifications and Programming)
1. GENERAL
1.1 Overview
As a high-accuracy and high-performance closed-loop CNC system with firmware, GSK983M
milling CNC system (hereinafter called “System”) was newly developed and launched by GSK
CNC Equipment Co., Ltd. to satisfy the demands of NC market and intended for CNC milling
machine and processing center. By employing a high-speed microprocessor, a general large scale
integrated circuit (LSI), a semiconductor memory and up-to-date storage elements, the reliability
as well as performance-to-price ratio of its control circuit are greatly improved, thereby facilitating
the reliability, functions/ performance to price ratio to a large extent.
With a widely applicable advanced servo, GSK983M milling CNC system uses a high-duty pulse
encoder as its detecting element, thereby composing a closed-loop CNC system.
This operating manual describes all available functions of the system. However, a real unit may not
necessarily be provided with all the optional functions. Should the specifications of the control panel
and operating mode of the machine change, the instruction manual supplied with the machine by the
manufacturer shall be referred to.
1.2 Introduction to the Manual
The functions of a NC machine system are not only dependent on its NC, but also on its mechanical
part. That is to say, its heavy current circuit, servo system, NC and mechanical operation panel
jointly determines its performance. The manual only gives a general account from the angle of NC as
it is difficult to describe all the functions of an NC machine and programming and operating
procedures in detail. As for a specific NC machine, please refer to the instruction manual supplied
with the machine by the manufacturer. The contents of the machine instruction manual are more
important than those herein.
The performance of a NC machine system is jointly determined by its NC system, mechanical
structure, heavy current control and servo system including its mechanical operation panel. The
operating manual only describes GSK983M CNC system. To know the performance, programming
and operating instructions of the entire NC machine system further, please refer to the machine
instruction manual supplied by the manufacturer.
The operating manual describes all matters in detail as much as possible. However, the listing of all
matters is unnecessary and impossible as this will complicate the contents of the manual. Therefore,
the functions that are not described in this manual may be considered impractical.
The functions that are not described in this manual may be deemed unavailable so far.
Some items are specifically explained in Note sections. Therefore, if any explanation is not available
in the current Note section, it is advisable to skip over it, thoroughly read the manual and then return
to the part.
1
Page 10

GSK983M Milling CNC System Operation Manual (Volume I: Specifications and Programming)
2. SPECIFICATIONS
Serial
No.
Designation Descriptions
1 Controllable axes
2
3
Number of concurrently
controllable axes
Incremental system
Standard: 3 axes, namely axes X, Y and Z
(4 or 5 axes are also available upon customer’s request. The
th
address of the 4
That the 4
th
The address of the 5
or C. It is possible to specify whether the 5
axis can be selected from A, B, C, U, V or W.
axis is linear or rotary may be set by parameters.
th
axis can be designated as U, V, W, A, B
th
axis is linear or
rotary by parameters.)
Standard: 3, axis 3, link,
(The following configurations are also available upon customer’s
request: 4, axis 3, link; 4, axis 4, link; 5, axis 3, link; and 5, axis 4
and link.)
Min. set increment 0.001mm 0.0001 inch 0.001°
Min entered increment 0.001mm 0.0001 inch 0.001°
The minimal increment entered in accordance with parameter
setting metric system may be 0.01mm.
4 Bit detecting device Pulse encoder
±99999.999 mm
5 Max. instruction value
±9999.9999 inch
±99999.999°
6 Input format
7
Decimal point
programming
Changeable block, character and address formats are
employed.
It is possible to enter numerical values including a decimal point.
The addresses that may include a decimal point are X, Y, Z, A,
B, C, U, V, W, I, J, K, Q, R and F.
Axial speed can be up to 24,000m/min or 960 inch/min. In
8 Rapid traverse
addition, rapid traverse speed may be changed to FO,25,50 or
100% using rapid traverse override (optional).
Feedrate can be set within the following ranges: 1 mm/min~
15,000mm/min and 0.01inch/min ~ 600.00 inch/min. It is
possible to set the upper speed limit of cutting feed by
parameters. A feedrate may be selected from 0 to 200% by
setting the override of feedrate to 10% as a step. The unit of
9
Miscellaneous function
(Bit M2)
feedrate may be changed to 0.01 mm/min, 0.001 mm/min or
0.001 inch/min according to parameter setting.
2
Page 11

GSK983M Milling CNC System Operation Manual (Volume I: Specifications and Programming)
Both manual rapid traverse and automatic rapid traverse are
performed in linear acceleration/deceleration mode so as to
reduce positioning time.
10
Automatic
acceleration/deceleration
G codes may be used to select absolute or Incremental
11
Absolute/incremental
value instruction
programming.
G90: Absolute programming
G91: Incremental programming
When the instruction value for subsequent axes of G92 is used
to establish a coordinate system, the actual position of cutting
tool will become the instruction value for the coordinate system.
12
Coordinate system
setting (G92)
All axes individually move to the end point rapidly and
13 Positioning (G00)
decelerate until stop through instruction G00, and the machine
performs positioning (whether the machine reaches the
instructed position) detection by parameters setting.
14
Linear interpolation
(G01)
Linear interpolation may be conducted at the feedrate specified
by F codes using instruction G01.
When executing a block, the unit reads the next one in buffer
register in advance. In this way the intermittence of the NC
15 Buffer register
instruction operation caused by the time required for reading
may be avoided. While inputting data in buffer register, BUF will
appear on the lower right of LCD screen.
The operation of the next block can be delayed before execution
16 Dwell (G04)
using instruction G04. The delay time must be specified with
address P or X.
17
Accurate stop detection
(G09)
The block of instruction G09 decelerates and performs
positioning detection by the end of the block.
If G61 is instructed, the travel instructions following G61
decelerate from doubtful points of all blocks and continue to
execute the next block when it is positioned.
If G64 is instructed, the travel instructions following G64 rather
than positioning instruction do not decelerate but execute the
18
Accurate stop detecting
mode/cutting mode
(G61, G64)
following blocks. As a rule, they are applicable for cutting mode.
The instructions of M2 with 2 digits following may be used to
control the ON/OFF signal on machine side. Only one M code
can be instructed in one block.
19
Miscellaneous function
(Bit M2)
In dry running mode, feedrate becomes Jog (JOG) feedrate.
The rapid traverse speed keeps constant and rapid traverse
20 Dry run
override (option) is still valid in rapid traverse instruction (G00).
However, the dry running of instruction is available when it is set
to rapid traverse (positioning) according to parameters.
3
Page 12

GSK983M Milling CNC System Operation Manual (Volume I: Specifications and Programming)
It is possible for all axes to individually disable the feed of an
instructed axis. If any instructed axis in interlocked during
21 Interlock
traveling, all axes of the machine will decelerate until stop. Once
the interlock signal is cancelled, the machine will accelerate and
restart.
22 Single block A block instruction can be executed each time.
The block preceded by a “/” (slash) code may be ignored by
turning on the OPTIONAL BLOCK SKTP switch on the machine
side.
23
To skip over an optional
block
The switch may be used to reverse the program instructions of
24 External mirroring
axes X and the 4
to set mirroring with the MDI/LCD panel or the switch on the
machine side.
It is possible to determine whether to add the traveling amount
through the manual traveling tool to absolute coordinates by
switching the manual absolute value switch on the machine
side.
25
Manual Absolute Value
ON/OFF
Manual Absolute Value switch ON: To add; OFF: Not to add.
26 To lock auxiliary function
BCD code signal and strobe signal of M, S, T and B are sent to
the machine side.
The machine keeps still. However, position display is still valid
27 To lock the machine
as the machine is moving and machine locking is also valid even
in the execution of a block.
th
axis as well as the travel of MDI. It is possible
28
To cancel the instruction
for axis Z
The function is only equivalent to Z-axis locking. It is to be used
when NC program is checked by drawing a picture with a pen.
The function is used to temporarily stop the feed of all axes that
29 To feedrate feed
can be restarted by pressing Cycle Start button. Before the
restart of feed, it is possible to insert manual operation in
manual mode.
30 To cancel override
The function is used to fix the cutting feedrate at 100%
depending on the signals from the machine side.
By pressing the Emergent stop button all feed instructions stops
31 Emergent stop
(interrupt immediately) and the machine stops running at the
same time.
The function is used to reset NC from the outside of NC. The
signal stops all feed instruction and the machine decelerates
until stop by reset. Additionally, the Reset button on MDI/LCD
outputs reset signals to the machine side during emergent stop
32
External reset, reset
signal
and external reset.
4
Page 13

GSK983M Milling CNC System Operation Manual (Volume I: Specifications and Programming)
The moving parts of the machine receives arriving signal when
33 Overtravel
they come to the end of travel. Then the movement of axis
decelerates until stop and overtravel warning is displayed at the
same time.
When the power supply is switched on, NC gives the signal in
34 NC Ready signal
controllable state. It stops sending signals to the machine side
once the power supply is cut off or the control unit overheats.
When the servo system is ready, the signal is sent to the
35 Servo Ready signal
machine side. For the axis to be braked, it is locked when the
signal has not been given off. LCD displays NO READY in the
absence of the signal.
36 NC warning signal The signal is sent out when NC is in warning state.
NC outputs the signal when the motion order ends up. If the
functions of M, S, T or B and motion instruction are active in a
block, the signal is given after the completion of the execution of
traveling instruction and the functions of M, S, T or B can be
37
Distribution Completed
signal
executed.
38 Cycle Operation signal NC gives the signal in cycle operation.
39
40
Cycle Operation Start
Indicator signal
Feed Hold Indicator
signal
NC sends out the signal at the start of cycle operation.
NC outputs the signal when it is in holding state through feed
hold.
(1) JOG feed: For JOG feedrate, the rotary switch may be used
for 24-step switching. The ratio of 24-step is geometric
progression.
41 Manual continuous feed
(2) Manual rapid traverse: Rapid traverse may also be achieved
by manual means. Rapid traverse override may be used for
the rapid traverse speed set by parameters. Rapid traverse
override is an optional function.
Manual continuous feed is available for 2 axes at one time.
Since the following increments may exert positioning control,
42 Incremental feed
manual positioning can be performed efficiently. Incremental
feed is available for 2 axes at one time (incremental feed
amount).
43
44
Sequence number
searching
Program number
searching
It is possible to search the sequence numbers in the currently
selected program with the MDI/LCD panel.
It is possible to search the program numbers of 4 digits following
O with the MDI/LCD panel.
5
Page 14

GSK983M Milling CNC System Operation Manual (Volume I: Specifications and Programming)
It is this function that compensates the lost amount of movement
45 Clearance compensation
of the machine. The amount of compensation is set in the
minimum amount of movement within 0 ~ 255 by parameters.
The function disables the display, setting and editing of the
46 Program key locking
program with a program number of 9000~9899 by means of
key locking.
(1) Ambient temperature
0℃~45 for operation and ℃ -20℃~55 for storage and ℃
shipment.
(2) Relative humidity
≤90%(without condensation), ≤95%(40 )℃
47
Environmental
conditions
(3) Vibration
Less than 0.5G for operation and 1G for storage and
shipment
(4) Ambient air
To install an NC in an environment with high density of dust,
machining fluid and organic solvent, contact the
manufacturer.
(1) Servo system
48 Self-diagnostics
(2) NC
(3) Status display
a. To give an alarm when the error of the error register
goes beyond the setting in halted state.
b. To give an alarm when the value of the error register
goes beyond the maximum setting.
c. To give an alarm in case of malfunction of positioning
detection system.
d. To give an alarm when the drift voltage is excessive.
e. To give an alarm in case of malfunction of speed control
unit.
a. To give an alarm in case of malfunction of the memory.
b. To give an alarm in case of malfunction of ROM and
RAM.
c. To give an alarm in case of malfunction of the
microprocessor.
a. To display the status of NC on LCD.
b. To display the status of I/O on LCD.
49
S function/T function
(BCD2 bit)
Once the instructions of 2 digits following S and T are instructed,
the code signal of BCD2 bit may be sent out while codes S and
T ad other codes are individually output. They are reserved until
the following S and T are instructed.
6
Page 15

GSK983M Milling CNC System Operation Manual (Volume I: Specifications and Programming)
The binary 12-bit or analog voltage corresponding to the speed
of principal axis is output to the machine side. The analog
voltage is up to ±10V, 2mA and the speed (r/min) of principal
axis is directly specified by S4 Bit. The speed of principal axis
may be regulated in the following range depending on the
contact signal on the machine side: 50, 60, 70, 80, 90, 100, 110
50
S4 Bit (binary 12-bit
output)
A/S4 Bit (analog output)
A
and 120%.
When the speed (r/min) of principal axis is directly specified, the
voltage for the current speed of principal axis is output by the
presently selected gear numbers 1 to 4.The switching of gear is
performed in a heavy-current circuit, resulting that the signal of
GRA or GRB is input in NC side. As the judging message for
switching gears on the heavy-current side, NC outputs the
51
S4 Bit (binary 12-bit
output)
A/S4 Bit (analog output)
B
higher 2 bits or lower 2 bits of S4 bit in BCD codes.
A position coder is installed on the principal axis. It is possible to
perform thread cutting using the pulse synchronous speed of the
position coder.
52
Thread cutting
/synchronous feeding
To achieve the feed that is in step with the rotation of the
principal axis, a device that may generate pulse voltage of which
53 Position coder
frequency is proportional to the number of revolutions of the
principal axis and generates 1024 pulses in each rotation shall
be directly connected.
Generally surface speed is instructed with B codes. In this way
54
Constant surface speed
control
the principal axis accordingly changes when the position of the
tool changes so that its surface cutting speed is always equal to
the linear speed set by S codes.
Address B is followed by three digits. Once it is instructed, a
BCD three-bit code signal will be sent out to position the index
table.
55
Second auxiliary function
(B3 bit)
Addresses S and T are followed by a 2-digit instruction. Once
they are instructed, the code signal of BCD2 bit will likely to be
56 T-function (BCD4 bit)
sent out and other codes of the addresses S and T are
individually sent out and held until the next S and T are
instructed.
ISO codes (ISO840) and EIA codes (EIA RS-244-A) can be
57 Code standards
used for program code. The identification of ISO codes and EIA
codes may be performed automatically.
7
Page 16

GSK983M Milling CNC System Operation Manual (Volume I: Specifications and Programming)
The automatic or manual rapid traverse speed can be set in 4
58 Rapid traverse override
levels, i.e. FO, 25, 50 and 100% and FO is likely to be set to a
specific speed by parameters.
Return to reference point A consists the following procedures:
59
Return to reference point
A
(1) Manual return to the reference point;
(2) Examination of the return to the reference point (G27);
(3) Automatic return to the reference point (G28).
60
61
62
63
Return to reference point
B
Return to the 3
rd
and 4th
reference points
Storage travel limits 1
and 2
Memory type pitch error
compensation
Besides the functions of returning to reference point A, the
return to reference point B also includes the return to the 2
nd
reference point (G30).
It is possible to set the 3
their distances from the 1
rd
and 4th reference points by setting
st
reference point and return to these
reference points.
For storage travel limit 1, the area beyond those set by
parameters are exclusion areas. For storage travel limit 2, the
inside or outside of the area specified by parameters or
programs are exclusion areas. The validity or invalidity of
storage travel limit 2 is set by G codes.
G22: Valid G23: Invalid
The function is designed to compensate the pitch error caused
by the mechanical wear of the feed screw so as to maximize
processing accuracy and mechanical life. Compensation data is
saved in memory, thereby omitting the compensation
mechanism such as the stop and the relevant setting
operations.
64
65
The selection of a
workpiece coordinate
system
Tool offset (G45~G48)
It is possible to preset one of the 6 workpiece coordinate
systems using six G codes, i.e. G54~G59 and subsequent
programming can be made in the selected coordinate system.
Tools can be offset using instructions G45~G48. Tool offset
refers to the side-play mount corresponding to a move
instruction’s elongation or reduction of an instruction of D or H
codes in axial direction. D or H codes may instruct 1~32 and
the maximum offset shall be ±999.999mm or ±99.999 inches.
G45: To increase the set value;
G46: To reduce the set value;
G47: To increase the set value by twice;
G48: To reduce the set value by twice.
8
Page 17
GSK983M Milling CNC System Operation Manual (Volume I: Specifications and Programming)
To manually return to a reference point, parameters must be
66
Automatic setting of a
coordinate system
preset to establish a coordinate system, namely automatic
execution is similar to the condition that the instruction G92 is
used at the reference point.
Tool length offset (tool length compensation) is possible in the
67
Tool length offset (G43,
G44, G49)
direction of the axis Z using instructions G43 and G44. The
offset number must be selected within 01~32 using H codes.
The offset shall fall within ±999.999mm or ±99.999 inches.
Tool radius compensation is possible using instructions G40~
G42. The offset number must be specified within 01~32 using
D codes. The offset shall fall within ±999.999mm or ±99.999
inches. Cutter compensation B is unavailable for a tool of a
medial angle less than 90°.
68
Tool radius
compensation B, C
(G40~G42)
Cutter compensation 0 can be used for the tool of a medial
angle less than 90°.
Manually position the standard tool to the fixed point of the
machine tool. Then manually position the machine tool to be
measured to the same mechanical point. The length
compensation of the tool will be input as offset once z INPUT
69
Tool length
measurement
is pressed.
70
71
72
73
Tool life management
function
Additional offset memory A The numbers of tool offset and tool radius compensation may be
Additional offset memory B The numbers of tool offset and tool radius compensation may be
Additional offset memory
C
74 F1- bit feed
Divide the tools in the cutting tool room into several groups and
specify service life for each group of cutting tools. Accumulate
the tool processing time or processing number that serves as
the evaluation standard for tool life whenever a tool in the
groups is used. The next cutting tool in the predetermined
sequence is automatically selected in the same group when the
tool reaches its service life.
increased to 64.
increased to 99.
The number of cutter compensation is increased to 200.
Once the number of F followed by one digit of 1~9 is instructed,
the feedrate corresponding to the number will be set. The
instruction FO is a rapid traverse speed. The feedrate of the
currently selected number can be increased or reduced by
turning the manual pulse generator when the machine side
gives a speed-changing signal.
9
Page 18

GSK983M Milling CNC System Operation Manual (Volume I: Specifications and Programming)
75
76
77
78
79
External moving function
(G80, G81)
Fixed cycle A (G80, G81,
G82, G84, G85, G86 and
G89)
Fixed cycle B (G73,
G74, G76,
G80~G89)
Switch between Inch and
metric systems (G20,
G21)
Arc interpolation (G02,
G03)
Instruction G81 is used to output external movement signals
after the positioning of X and Y axes and G80 to cancel it.
It is possible to perform 6 fixed cycles including drilling cycle,
tapping cycle and boring cycle.
It is possible to perform 12 fixed cycles including gun drilling
cycle, finish boring cycle, tapping cycle and reverse-tapping
cycle.
Input in Inch or metric system can be selected by switching G
codes.
G20: Input in Inch system G21: Input in metric system
Using G02 (or G03) may achieve any arc interpolation within
0~360° with the feedrate of F code instruction.
G02: Clockwise (CW) G03: Counterclockwise (CCW)
When an axis in the arc plane does not move (the axis is
80 Sine-curve interpolation
considered as an imaginary axis) in the spiral-curve
interpolation instruction, the other 2 axes may be used for
sine-curve interpolation.
81
The arc interpolation
using arc radius R for
programming
In arc interpolation, directly specifying radius with radius value R
rather than I, J and K simplifies programming. An arc over or
below 180° can be instructed.
The mechanical vibration at the end of travel can be minimized
82 External deceleration
and the range of effective travel maximized through the function.
External deceleration is not applicable for an additional axis.
The function is used to input any program number among 1~31
for NC from the outside such as machine side and to select
these programs from the memory of NC.
83
External workpiece
number search A
The function is used to transmit the following data from the
outside such as machine side:
84 External data input
(1) External workpiece number search C;
(2) External cutter compensation C;
(3) External warning message;
(4) External operation information.
85
Automatic acceleration/
deceleration of cutting
feed
Cutting feed and manual continuous feed can be set by
parameters to make power type acceleration/ deceleration in
8ms~4000ms time constant.
10
Page 19

GSK983M Milling CNC System Operation Manual (Volume I: Specifications and Programming)
9 switches for skipping over selected blocks can be set on
machine side by adding a digit (1~9) after the switching
instruction”/” of a block. When a switch n for skipping over
selected blocks is enabled, the blocks with “/n” will be skipped
86
Additional skipping over
selected blocks
over.
th
When G31 is followed by X, Y, Z, the 4
or 5th axis instruction as
same as G01, it is possible to make line interpolation. If skip
87 Skip function (G31)
signal is input from the outside during the execution of the
instruction, the remaining part of the instruction stops executing
and the blocks that follow will be executed.
88 Program restart
89 Unidirectional positioning
90
Addition of the number of
storable programs
91 Zoom
92
93
Insertion of a manual
tray
Automatic angle
adjustment
When the sequence number to be restarted is specified, the
program will restarts from here.
Positioning can only be performed in one direction in order to
eliminate clearance and achieve accurate positioning.
96 programs can be added to the standard programs to reach
191 programs in total.
The tool path instructed in a program can be zoomed in a range
of 0.001~99.999x.
The tool movement overlapping an automatic running instruction
can be done only with the pulses of the manual pulse generator
without processing interruption.
When cutting the inner side of an angle in tool radius
compensation mode, adjustment can be automatically added in
the set area for processing at low speed.
The function is used to set the angle of the positive direction of
axis X on the dial gauge of the operation panel of the machine
and to make Jog feed in the set direction. In the XY plane, this
function is only valid for the increment of 5° spacing within 0°~
94
Manual feed at any
angle
360° range.
Once the block with the same sequence number as the preset
95
Sequence number
comparison stop
one appears in the execution of a program, a single block will be
in stop status when the execution of the program ends. The
function is used to check a program.
96 Indication of running time
The NC automatic running time can be indicated on LCD in
seconds, minutes and hours.
The ON/OFF can be controlled by using the settings on
97 Menu switch
MDI/LCD rather than the switches on the operation panel on the
machine
11
Page 20

GSK983M Milling CNC System Operation Manual (Volume I: Specifications and Programming)
98
User macros
A and B
These are the intrinsic functions available for manufacturer and
user and types A and B are provided due to functional limits.
99 Graphic display The tracks of cutting tools are traced out on LCD.
The manual pulse generator on the operation panel can be used
to perform Jog feed of the machine. The manual pulse
100 Manual pulse generator
generator sends out 100 pulses each turn. The travel of each
pulse can be switched between 1x, 10x and 100x depending on
the signals on the machine side.
PLC MODELS A and B are available.
101 PLC
Quantity of input
points
Quantity of output
points
Program step
PLC MODEL-A PLC MODEL-B
192 points 192 points
128 points 128 points
Up to 2,000
steps
Up to 5,000 steps
12
Page 21
GSK983M Milling CNC System Operation Manual (Volume I: Specifications and Programming)
3. PROGRAMMING
3.1 What Is Programming?
NC processing machine operates by developed programs. To process a part on the NC machine,
the route and other processing conditions of cutting feed shall be included in the program. The
program is called “part program”.
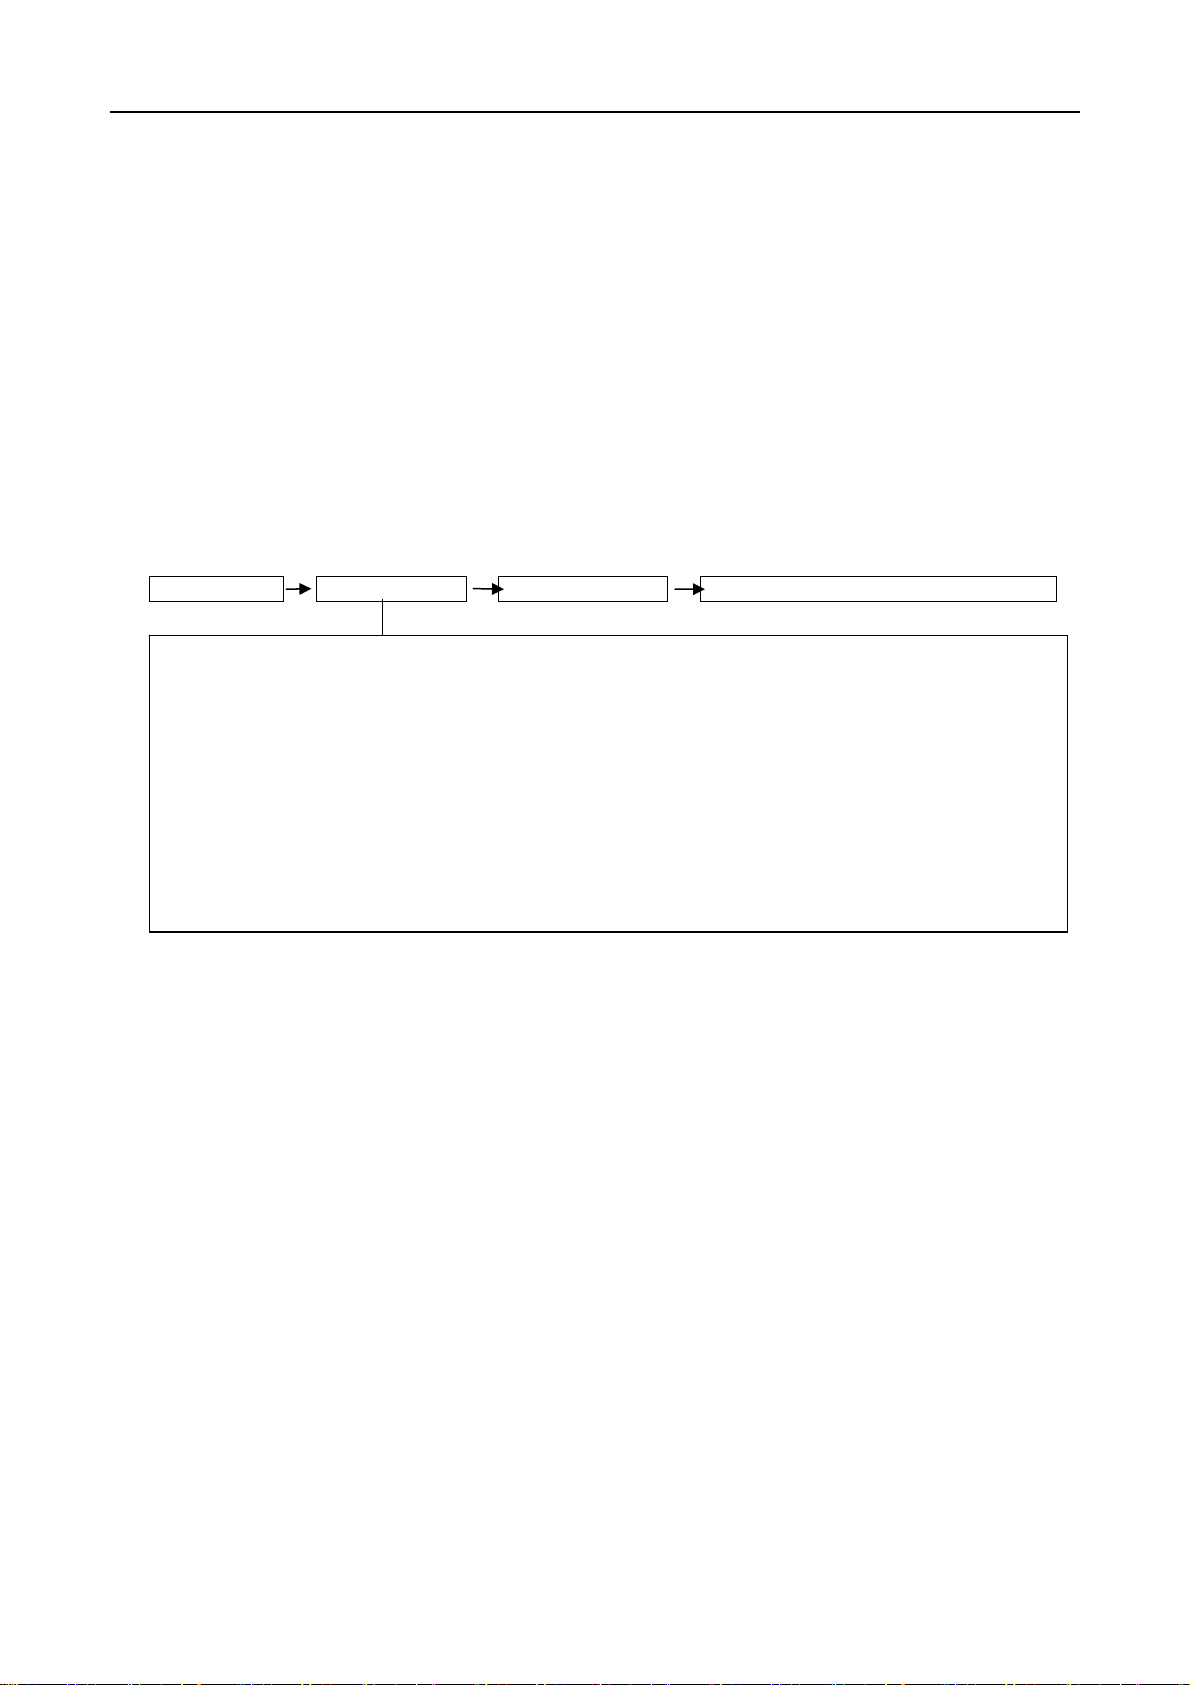
The following diagram indicates the processes from preparation of detail drawing to NC’s
execution of the processing program.
Detail drawing Processing plan Part programming NC’s execution of processing program
(1) Determine the NC processing range and select an NC machine to be used.
(2) Determine the assembling method of the workblank on the machine and select a
Part program is an NC instruction for controlling feed route and the auxiliary movement of a
machine written according to the rules for NC. The instructions are usually written in a program list.
necessary clamping device and a tool.
(3) Determine the cutting sequence (process type, home point of the cutting tool, the cut
depths of rough cutting and finish cutting and route of cutting feed).
(4) Select a cutting tool and a tool clamping device and determine the mounting position on
the machine.
(5) Set cutting conditions (spindle rotating speed, feed speed and whether to use cooling
fluid, etc).
This chapter will describe how to develop a part program.
3.2 Program Make-up
A program consists of main program and subprogram. As a rule, NC moves by the instructions of a
main program. When the main program gives an instruction to switch to a subprogram, NC moves
by the subprogram.
When there is an instruction to return to a main program in a subprogram, NC will return to the
main program and continue to move by the instructions of the main program.
NC memory can store 95 main programs and subprograms in total. When one of the main
programs is selected, NC machine can move by its instructions.
13
Page 22

GSK983M Milling CNC System Operation Manual (Volume I: Specifications and Programming)
Main program Subprogram
[Instruction to switch to a subprogram]
Instruction 1
Instruction 2
┊
┊
┊
┊
Instruction n
Instruction n+1
┊
┊
┊
┊
┊
Instruction 1
Instruction 2
┊
┊
┊
┊
┊
┊
┊
┊
┊
┊
┊
[Instruction to return to a main program]
Note: The number of programs that can be stored will be increased to 191 if the function
“Addition of the number of storable programs” (Optional) is selected.
Refer to Chapter 4: Operations for the storage method of program.
3.2.1 Block
A program is composed of a number of instructions. Each instruction unit in a program is called a
block. Blocks are distinguished from each other by end code. As described below, end-of-block
code is indicated with a “;”.
For example:
XXXX;
XXXX;
XXXX;
Note 1: The maximum number of characters a block is not limited in.
Note 2: End-of-block code: CR for EIA codes and LF for ISO codes.
3.2.2 Program word
The elements composing a block are program words. The program word below consists of an
address and a subsequent figure. A “+” and a “ –“ can also be added before the figure.
X - 1000
Address Figure
Program word
An address is indicated with a letter among A~Z. An address determines the meaning of its
subsequent figure. The addresses that can be used in an NC and their meanings are as follows.
An address may have different meanings depending on different instructions of preparation
14
Page 23

GSK983M Milling CNC System Operation Manual (Volume I: Specifications and Programming)
Sequenc No.
eed
u
c
o
Sp
d
e
u
c
o
oo
u
c
o
function in a program.
Name Address Meaning
Program No. : (ISO) /O (EIA) Program number
Sequence No. N Sequence number
Preparatory
function
G Instructed move mode (linear, arc, etc)
X, Y, Z Move instruction of coordinate axis
A, B, C, U, V, W Move instruction of additional axis
Coordinate word
R Arc radius
I, J, K Coordinates of arc center
Feed function F Designation of feedrate
Spindle function S Designation of spindle rotational speed
Tool function T Designation of tool number and tool offset number
Auxiliary
function
M Designation of ON/OFF control on machine side
B Worktable indexing, etc.
Offset No. H, D Designation of offset number
Dwell P, X Designation of dwell time
Designation of
program No.
P Designation of subprogram number
Designation of
sequence No.
Number of
repetition
P
L Numbers of repetition of subprogram and fixed cycles
Designation of sequence number: Program is repeatedly
executed at this sequence number.
Parameter P, Q, R Parameters of fixed cycle
For example, these program words may compose the following block.
; N— G— X— Y— F— S— T— M— ;
Preparatory function
Coordinate No.
F
in
f
n
ti
n
l
f
n
ti
T
l f
n
ti
n
n
15
Miscellaneous
Page 24
GSK983M Milling CNC System Operation Manual (Volume I: Specifications and Programming)
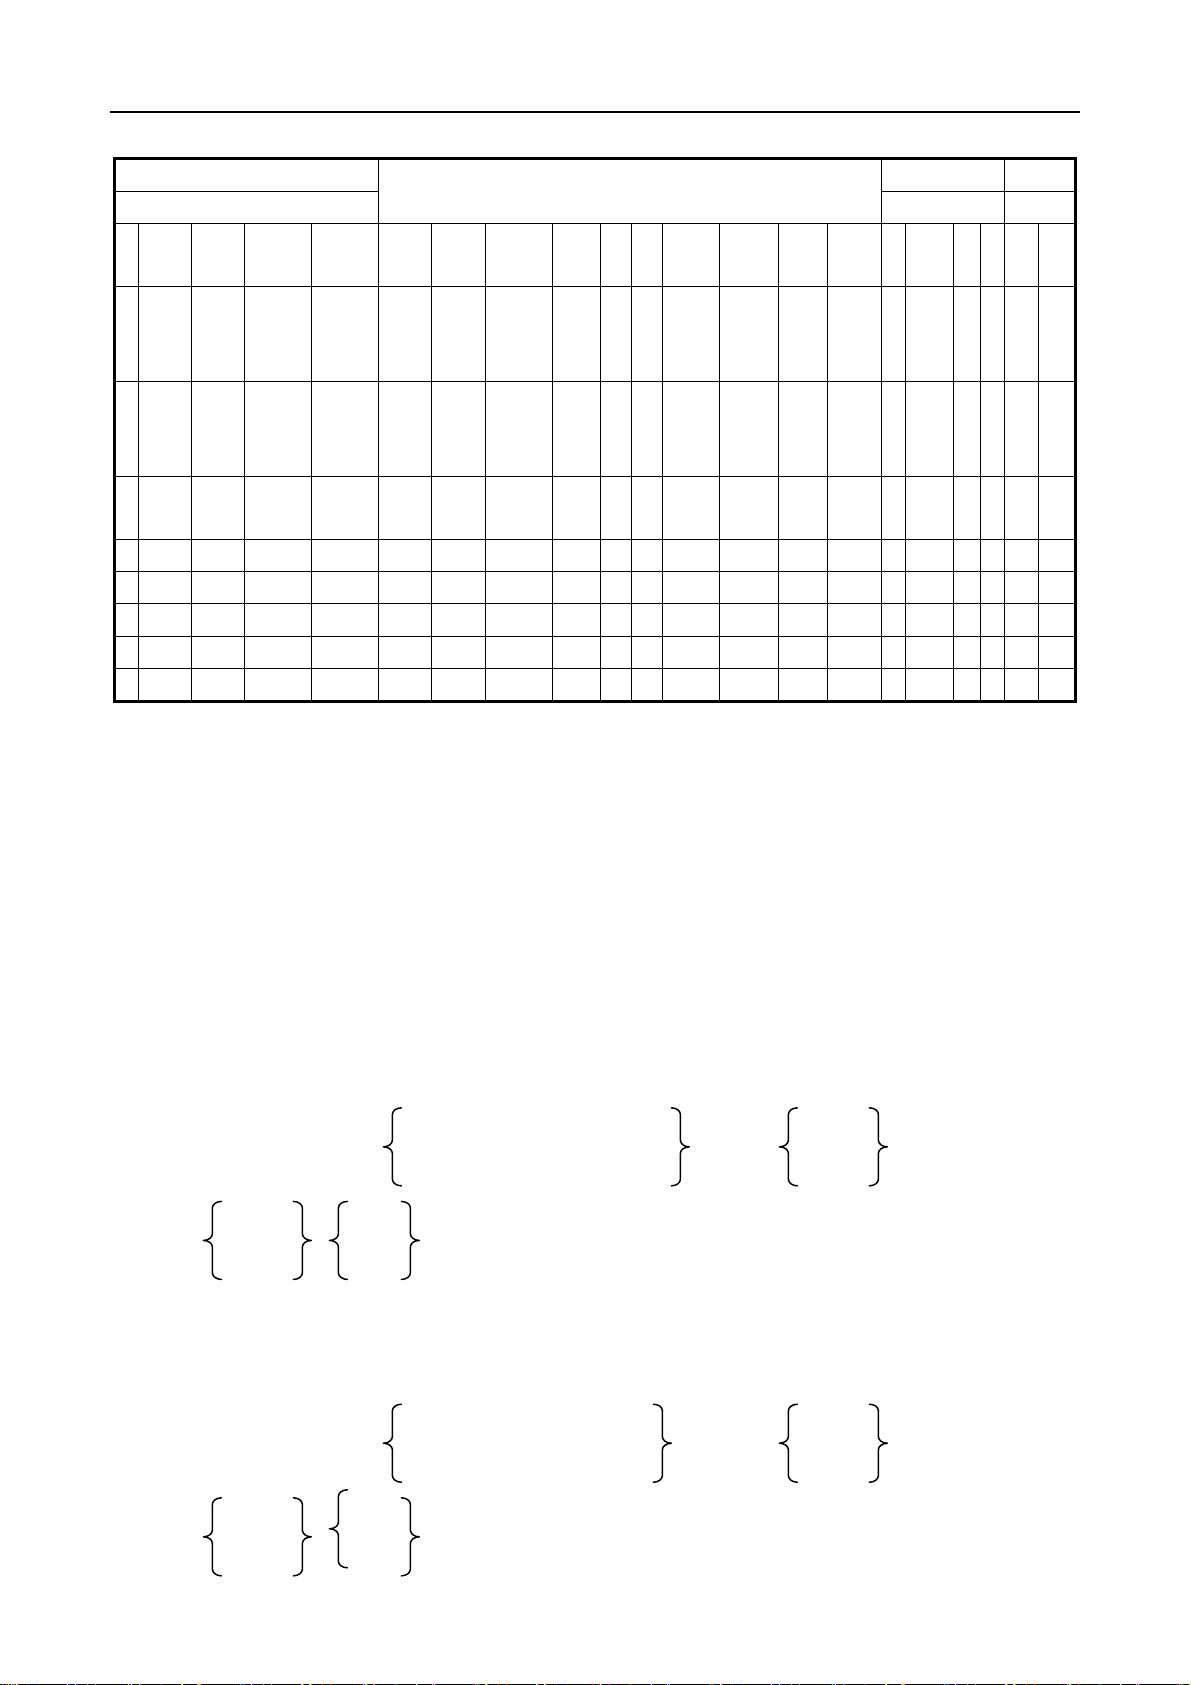
In the following program list, a line indicates a block and a case in the block indicates a program word.
Name S57.10.10 Page/
Program No. 0 (: ) 2002
/ N G X Y Z A/B/C C/V/W R/I J K F S T M B H/D L P Q
N20 G92 X
100.0 Y 200.0 Z 300
N21 G00 X
196.0 Y 315.0 Z 500
N22 G01 F10.0
(Note ) CR(EIA),LF(ISO)
.0
S400 T15 M03
.0
;
;
;
;
3.2.3 Input format
All program words composing a block shall be instructed in the formats as specified below. The
input format of this system is a variable block format. Therefore, the number of the program
words in a block and the number of characters in a program word are variable, which makes
programming easier.
(1) Input in metric system
NO4·G02·XL+053·YL053·ZL+053·
RD053 D02
αL+053·βL+053· ·F050· ·
ID053·JD053·KD+053 H02
S02 T02
· ·B03·M02;
S04 T04
(2) Input in Inch system
NO4·G02·XL+044·YL+044·ZL+044·
RD044 D02
αL+053·βL+053· ·F032· ·
ID044·JD044·KD044 H02
S02 T02
· ·B03·M02;
16
Page 25

GSK983M Milling CNC System Operation Manual (Volume I: Specifications and Programming)
S04 T04
Note 1: α and β are for any one of A, B, C, U, V and W.
Note 2: The address and digits in the above formats have the following meanings.
X L + 0 5 3
The three digits behind decimal point
The five digits before decimal point
Leading zero may be omitted.
With a symbol
Absolute value or incremental value
Address
J D 0 5 3
The three digits behind decimal point
The five digits before decimal point
Leading zero may be omitted.
Incremental value with a symbol
Address
For example: When a cutting tool moves to 50.123mm along X axis, its move instruction is as follows:
G00
X50 123
The three digits behind decimal point
The five digits before decimal point: 00050
The leading zero and T are omitted.
G00 must not be omitted even the leading zero may be
omitted. (G00 specifies rapid traverse (positioning)).
Note 3: When an address word in a block is instructed twice or more times, the last instruction will be
valid and not give any alarm in principle.
For example: G01 M03 S200 M08;
Now M08 is valid and M03 invalid. For G codes, the lastly specified one in each group of G
codes in a block is valid. However, G90/G91 is only valid at the specified location in a block
(see Section 3.3.8.).
Example G90 X10.0
G91 Y20.0 ;
Absolute Incremental
If R and I, J or K are concurrently instructed in an arc interpolation instruction, R is always valid
and this is not related to instruction sequence.
Note 4:F050 in Inch-system input format may also be changed into F051 through parameter switching.
Refer to Section 3.4.3 “To multiply feedrate by 1/10”.
Note 5: Since P and Q have a number of meanings, they are omitted in the above format.
Note 6: Refer to Section 3.2.4 ”Decimal entries”.
17
Page 26

GSK983M Milling CNC System Operation Manual (Volume I: Specifications and Programming)
Note 7: Multiply the value input in metric system of X, Y, Z, A, B, C, U, V, W, I, J, K, Q and R by 10 by
means of parameter setting.
RD052
XL+052·YL+052·ZL+052·αL+052·βL+052· ID052·JD052·KD052
(α and β are A, B, C, U, V and W) (Input in metric system) Refer to Section 3.3.2.2 “To multiply
an input unit by 10”.
Note 8: Refer to Section 3.3.2.2 “To multiply an input unit by 10”.
3.2.4 Decimal programming
It is possible for this unit to input the numerical values with a decimal point. Decimal point is
used in the values in the unit of distance, time or speed. However, some addresses may not
use decimal for entry. The location of a decimal point indicates the position of mm, inch,
degree or second.
X15.0 X15mm or x15 inches
F10.0 10mm/min for 10 inch/min
G04×1 Feedrate for 1 second
B90.0 B90deg
The addresses that can be entered with decimal point are as follows:
X, Y, Z, A, B, C, I, J, K, R, Q and F.
Note 1: During the dwell of an instruction, X can be input with the decimal point but P cannot (because
P is also specified with a sequence number).
Note 2: When G codes are used to change the location of the decimal point, it is necessary to
predetermine G codes even in a block. G20; (specify in Inch system ) X1.0G04;X1.0 is
considered as a travel distance (in inch) because it does not indicate time. The result is held
for 10 seconds in relation to X10000G04.
When G04 is entered, its indication changes from 1.0 to 10.0.
G04X1.0 is treated as G04X1000 and the result is held for 1 second.
Note 3: Take note that the condition with or without a decimal point is quite different. Its programming
mode differs from an electronic computer.
G21; (specified in metric system)
X1……X1 mm
X1……X0.001 mm
G20; (specified in Inch system )
X1……X1 inch
18
Page 27

GSK983M Milling CNC System Operation Manual (Volume I: Specifications and Programming)
X1……X0.0001 inch
Note 4: The numerical values with/without a decimal point can be mixed.
X1000 Y23.7;
X10 Y22359;
Note 5: If a specified value is less than the minimum setting, the value will be rounded down. The
instruction of X1.23456 is considered as X1.234 when it is entered in metric system and
1.2345 in Inch system . It has cumulative error for an incremental value instruction and has no
cumulative error but rounding error for an absolute value instruction. The instructed digits must
not exceed the allowable maximum digit.
X1.23456789……There is an error because it has more than 8 digits.
X1.2345678…… There is no error when it is up to 8 digits inclusive.
Note 6: When a figure with a decimal point is entered, the figure will be converted into the integer of the
minimum input increment.
(Example)X12.34 12340(entered in metric system)
In addition, it is necessary to perform digit number verification for the converted integer.
(Example)X1234567.8 X1234567800(entered in metric system). It gives an alarm
because the number of digits exceeds 8.
3.2.5 Maximum instruction value
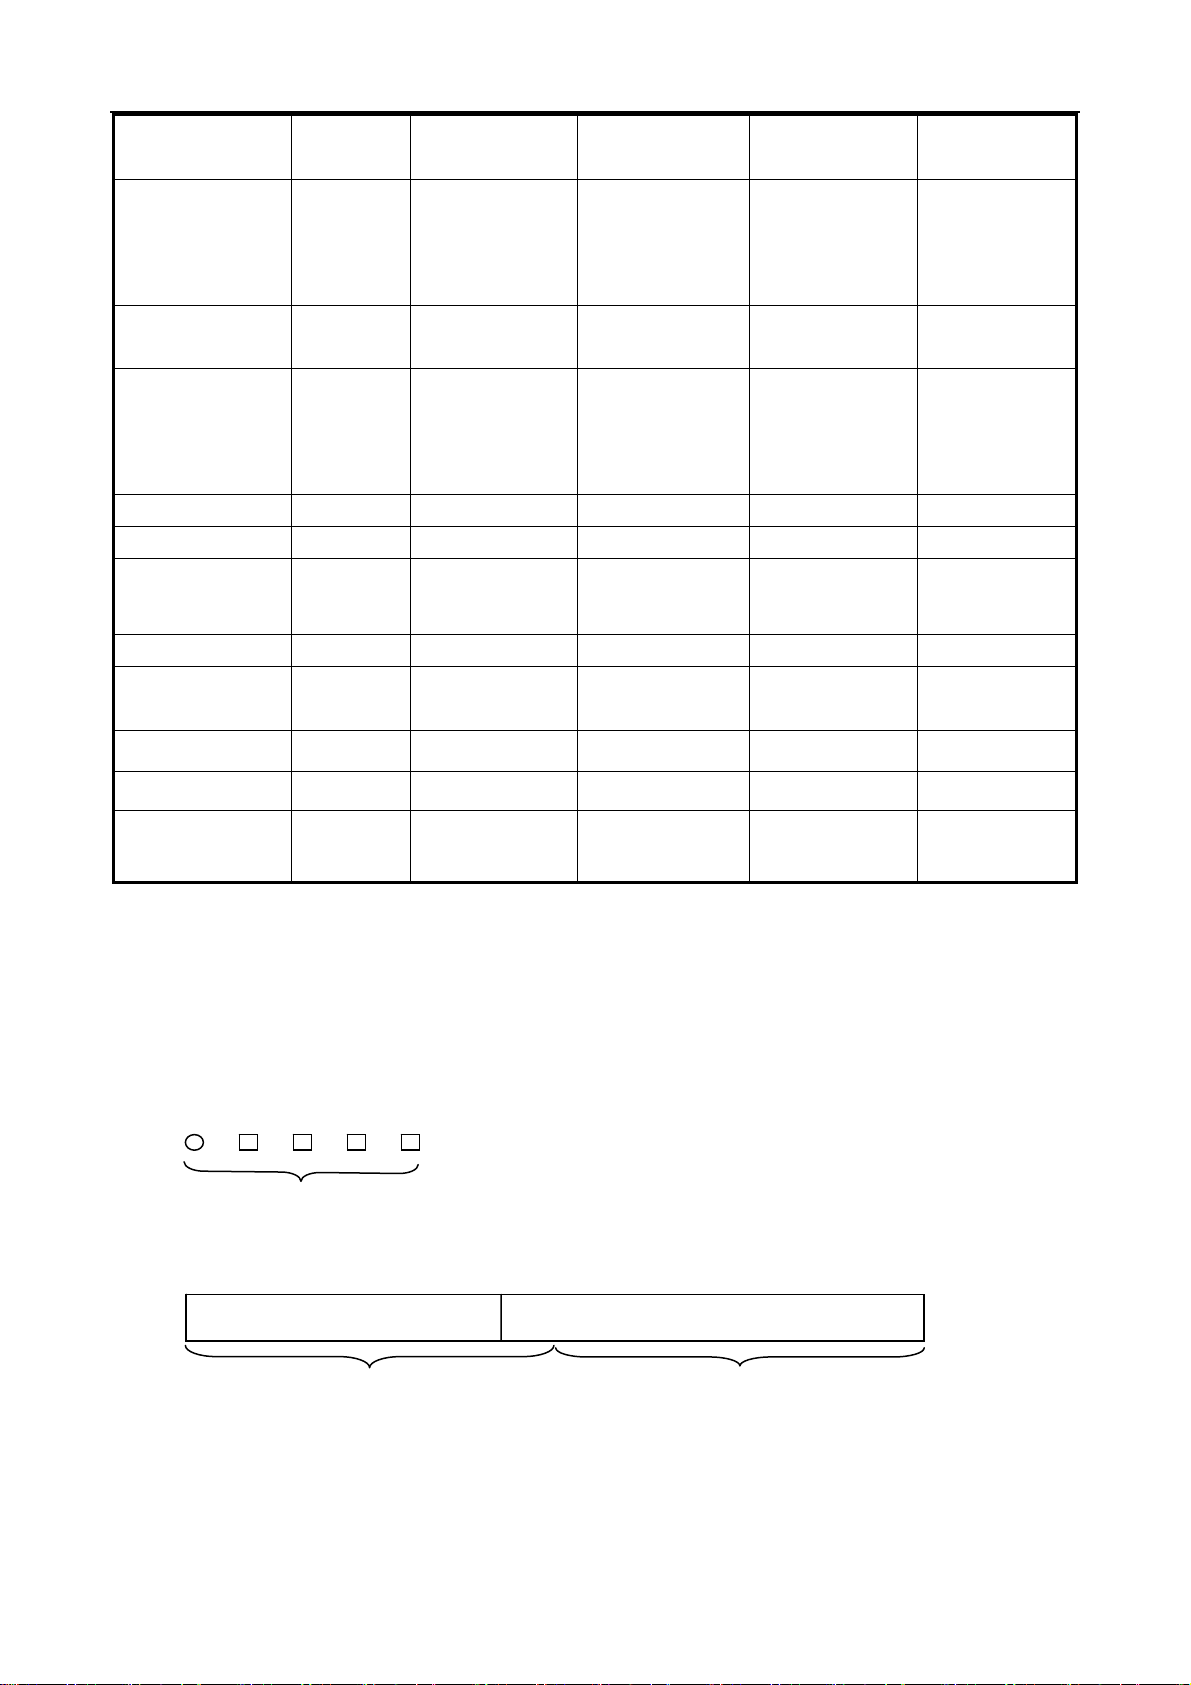
The maximum instruction values of all addresses are as listed in the table below. Take note
that what the table lists are the ranges of the maximum specified values for the NC unit rather
than the mechanical moving ranges of the NC machine tool. For instance, the moving range of
X axis is about 100m (entered in metric system) for an NC unit while the travel distance of axis
X is likely to be limited to 2m for a machine tool and so is its feedrate. The cutting feedrate of
an NC unit is up to 15m/min while that of an NC machine tool is likely to be limited to 6m/min.
In actual programming, both this manual and the instruction manual supplied by machine
builder shall be referred to. Programming shall be performed on the basis of full knowledge
about the programming ranges of a specific machine tool.
Table 2.5: Basic addresses and ranges of instruction values (including additional options)
Name Address
Program No.
Sequence No. N
: (ISO)
O (EIA)
Input in mm
Output in mm
1~9999
1~9999
Input in inch
Output in mm
See the left See the left See the left
″ ″ ″
19
Input in mm
Output in inch
Input in inch
Output in
inch
Page 28
GSK983M Milling CNC System Operation Manual (Volume I: Specifications and Programming)
Preparatory
function
Coordinate word
Feed per minute F
Feed per minute
(feedrate l/10)
(parameter
setting)
Spindle function S
Tool function T
Miscellaneous
function
Dwell X, P
Sequence No.
setting
G
X, Y, Z, I,
J, K, Q, R,
A, B, C,
U, V, W
F
M
P
0~99
±99999.999mm
±99999.999°
1~15000
mm/min
0.1~15000.0
mm/min
0~30000
0~9999
0~99
0s~99999.99s
1~9999
″ ″ ″
±3937.0078inch
±99999.999°
0.01~600.00
inch/min
See the above
See the left See the left See the left
″ ″ ″
″ ″ ″
″ ″ ″
″ ″ ″
±99999.999mm
±99999.999°
1~15000
mm/min
0.1~15000.0
mm/min
±937.0078inch
±9999.999°
0.01~600.00
inch/min
See the above
Repeated times L
Offset No. S, H
2nd auxiliary
function
B
1~9999
0~200
0~999
″ ″ ″
″ ″ ″
″ ″ ″
3.2.6 Program number
The control unit can store a number of programs in the memory of the NC. Program numbers
are added to all programs in order to distinguish them.
Program number
(From 1 to 9999.0 and preceding 0 may be omitted)
4 digits
The program starts from the program number and ends at M02, M30 or M99.
#1111 pr ogr am #2222 program
01111……………………M02; 02222………………………M30;
M02 and M30 indicate the end of a main program. M99 indicates the end of a subprogram.
20
Page 29

GSK983M Milling CNC System Operation Manual (Volume I: Specifications and Programming)
05555………………………M99;
#5555 subprogram
Note 1: For ISO codes, replace O with a “:”.
Note 2: The block with an optional block skip code such as /M02, /M30 and /M99 shall not be deemed
as the end of a program.
Note 3: When a program is not provided with a preceding program number, the first sequence number
(N…) other than NO of the program may be used to replace the program number.
Note 4: If a program is not provided with a preceding program number or sequence number, MDI/LCD
panel shall be used to specify a program number when storing the program into the memory.
Note 5: For several programs, the second program and the succeeding ones are not necessarily
provided with an EOB code skipped wit a mark. However, an EOB code shall be used before
the program when the foregoing program ends by ER (EIA) or %(ISO).
Note 6: It is possible to operate without a program number. Subprogram shall be provided with a
program number.
Note 7: In some cases, the program number from 9000 ~ 9899 can only used by machine
manufacturer rather than user.
Note 8: When it has a robot option, program numbers 9900~9999 are used as robot data.
Note 9: When there is no M02, M30 or M99 but ER (EIA)%(ISO) at the end of the program, or the next
program number is 0, the end of the program shall be set by parameter No.306 BIT3 (NEOP).
3.2.7 Sequence number
A sequence number may be specified with N followed by four or less digits (1~9999) at the
start of a block. The order of sequence numbers is random and discontinuous. It is likely that
all blocks are provided with sequence numbers or sequence numbers are only added at the
necessary locations of a program.
It is recommended to specify sequence number in succession at key locations, e.g. when
replacing new tools or change the worktable indexing to a new machined surface.
Note 1: The use of the sequence number NO. is not allowed for the purpose of compatibility with the
program formats of other NC units.
Note 2: Since 0 cannot be used as a program number, the sequence number treated as a program
number shall not be 0.
3.2.8 To skip over an optional block
When a slash followed by a digit /n(n=1~9) is specified at the beginning of a block and the
21
Page 30

GSK983M Milling CNC System Operation Manual (Volume I: Specifications and Programming)
OPTIONAL BLOCK SKTP switch n is enabled on the operation panel , the block with a /n
corresponding to switch number n will be ignored.
When the OPTIONAL BLOCK SKTP switch n is disabled, the block with a /n is valid, namely
operator may choose to skip over the block with a /n. The 1 in /1 can be ignored. However, the
1 in /1 must not be ignored when two or more OPTIONAL BLOCK SKTP switches are used.
When an OPTIONAL BLOCK SKTP switch is enabled, the ignored area is as follows:
;/2N123G01X4……………………;N7856
Ignored area
Example: N100X100;
N101/2z100;
N102/2/3X200;
N103/3z200;
In the above example, blocks N101 and N102 will be skipped over when No. 2 switch is
enabled and N102 and N103 skipped over when No. 3 switch enabled.
Note 1:Slash (/) shall be specified at the beginning of a block. If it is specified at other places of a block,
the information from the slash (/) to EOB code will be ignored but the information before the
slash (/) will remain valid.
Note 2: When the OPTIONAL BLOCK SKTP switch is enabled, TH and TV checkouts shall be
performed for the skipped part as the switch is disabled.
Note 3: The block to be skipped over is identified when the memory sends information to the buffer
register. When the block preceded by a slash is written in the buffer register, it will not be
ignored even if the OPTIONAL BLOCK SKTP switch is enabled.
Note 4: The function remains available during sequence number searching.
Note 5: The function is invalid when saving a program in the memory. That is, the block preceded by a
slash (/) will be written in the memory regardless the state of OPTIONIAL BLOCK SKIP.
Note 6: The programs may be completely output from the memory regardless the state of OPTIONIAL
BLOCK SKIP.
Note 7: Some OPTIONIAL BLOCK SKIP switches are likely to be unavailable for some machines.
Therefore, it is necessary to consult the machine manufacturer for the number of usable
switches.
Note 8: For the system with additional function to skip over an optional block, the 1 in /1 must not be
omitted if there are two or more marks for skipping over an optional block in one block.
/1 shall be specified as per the above requirements.
Example: Incorrect: //3 G00 X10.0;
Correct: /1/3 G00 X10.0;
22
Page 31

GSK983M Milling CNC System Operation Manual (Volume I: Specifications and Programming)
3.3 Dimension Word
A dimension word prescribes the movement of a tool. It composes a relevant instruction with
the address of a kinematical axis and a value indicating the direction and amount of travel. It
varies depending on the different absolute and incremental programming modes. (See Section
3.3.8.)
Address of dimension world Meaning
The addresses of all axes in a rectangular coordinate
Basic axes X, Y, Z
Additional axes A, B, C, U, V, W
R To specify the radius of an arc. Arc
interpolation
parameters
I, J, K
system: To indicate the location of the axis or the
distance in axial direction.
th
The addresses of the 4
angle of axis of rotation or the location and distance of
linear axis.
To indicate the distance from the home point to the arc
center along axis X, Y or Z or an axis parallel to them.
and 5th axes: To indicate the
3.3.1 Controllable axis
The kinematical axis of a machine under the control of the NC system is called controllable
axis.
Each control shaft is recalled with the dimension word address of the control unit.
The number of axes that can be controlled by the NC system may be 3 (axes X, Y and Z) and
can be added to 4 or 5.
An additional axis may use any address among A, B, C, U, V or W. A, B and C are
recommended for axis of rotation and U, V and W for linear axis.
2 standard axes can be controlled in a block at the same time. The number of concurrently
controllable may be increased to 3 or 4 by means of additional selection. Separate control of
additional axis is only used for 3-axis link. The selection of additional axis gang control function
enables the link of 2 or 3 additional axes. If 3-axis gang control function is selected, it is not
necessary to select additional axis gang control function any more.
Number of
controllable
axes
3 2
Number of
standard
axes
Number of concurrently controllable axes
Selection of
concurrently
controllable
additional axes
Concurrent
selection
of 3 axes
23
selection of 3 axes
control selection of
additional axes
3
Concurrent
+ Concurrent
Concurrent
selection of
4 axes
Page 32

GSK983M Milling CNC System Operation Manual (Volume I: Specifications and Programming)
4
5
additional axes)
2
(Including
X, Y, Z 3
(Including
additional axes)
4
Note 1: The system gives #17 alarm if additional axes (A, B, C, U, V, W) are specified without
additional control function.
Note 2: The number of link axes is always 2 in manual operation.
th
Note 3: When the system has the 5
axis, the following function control shall be exerted.
① Thread cutting and synchronous feed cannot be performed.
② The capacity of part program is reduced to 75%.
③ Additional S4 digit analog output function is not available.
④ Additional constant surface speed control function is not available.
Coordinate axes and movement symbols
If the machine coordinate axes specified by the machine are not identical with the tool
movement symbols, programming is subject to serious disorder. The concerned basic
concepts are provided in EIA RS-267-A or ISO841.
However, the following points shall be observed during programming.
a) Program shall be developed on the basis of a standard coordinate system (right-manual
rectangular coordinate system).
b) When programming, assume that workpiece does not move and a cutting tool moves around
it.
24
Page 33

GSK983M Milling CNC System Operation Manual (Volume I: Specifications and Programming)
3.3.2 Set unit
3.3.2.1 Minimum set unit and minimum travel unit
1) Minimum set unit (input unit)
Minimum unit of tool travel is input by instruction. The minimum unit is given in mm, inch or
degree.
2) Minimum travel unit (output unit)
The minimum unit output to the machine is indicated in mm, inch or degree. Any one of the
following combinations may be employed.
Input/output Minimum set unit Minimum travel unit
Input in mm and output in mm 0.001mm 0.001mm
Linear axis
Note: The set unit of an axis of rotation cannot be converted between Inch and metric systems.
Whether the minimum travel unit is 0.001 mm or 0.0001inch shall be determined by the
machine and selected by presetting parameter No.006 BIT0 (SCW).
Whether the minimum travel unit is 0.001 mm or 0.0001inch shall be selected by G codes or by
setting parameter through MDI/LCD panel.
Input in inch and output in mm 0.0001inch 0.001mm
Input in mm and output in inch 0.001mm 0.0001inch
Input in inch and output in inch 0.0001inch 0.0001inch
Axis of rotation 0.001° 0.001°
G20……The minimum set unit of a linear axis is 0.0001inch.
G21……The minimum set unit of a linear axis is 0.001mm.
The state of G20 and G21 remains unchanged when the system is powered on/off.
25
Page 34

GSK983M Milling CNC System Operation Manual (Volume I: Specifications and Programming)
3.3.2.2 Input unit×10
The minimum set unit in mm may be changed to 0.01mm by parameter No.006 BIT1 setting.
The minimum set unit in inch cannot be changed.
setting.
Address
Dimension word X, Y, Z, Q, R, I, J, K, U, V, W 0.01mm 0.0001inch
Revolution axis A, B, C 0.01° 0.01°
Dwell time
It cannot be changed in the following cases:
a) Inputting differs from the above conditions
b) Display unit
c) Maximum range of instruction value
d) Units of step feed and manual feed
e) Offset input
f) Others
Note 1: In the following descriptions herein, input unit is either 0.0001inch or 0.001mm.
Note 2: Display unit may become 0.01mm or 0.01 degree by parameter No.006 BIT2 (MDL)
X 0.01s 0.001s
P 0.01s 0.001s
Input in mm Input in inch
Minimum set unit
3.3.3 Maximum travel
The maximum travels that can be instructed of the device are as listed in the table below:
Input in mm and
output in mm
±99999.999mm
±99999.999°
Note: The travels listed in the above table change depending on different machines.
Input in inch and
output in mm
±3937.0078inch
±99999.999°
3.3.4 Program origin and coordinate system
Program origin and coordinate system shall be determined during programming. Generally a
specific point on the workpiece is determined as the program origin.
Input in mm and
output in inch
±99999.999mm
±99999.999°
Input in inch and
output in inch
±9999.9999inch
±99999.999°
26
Page 35
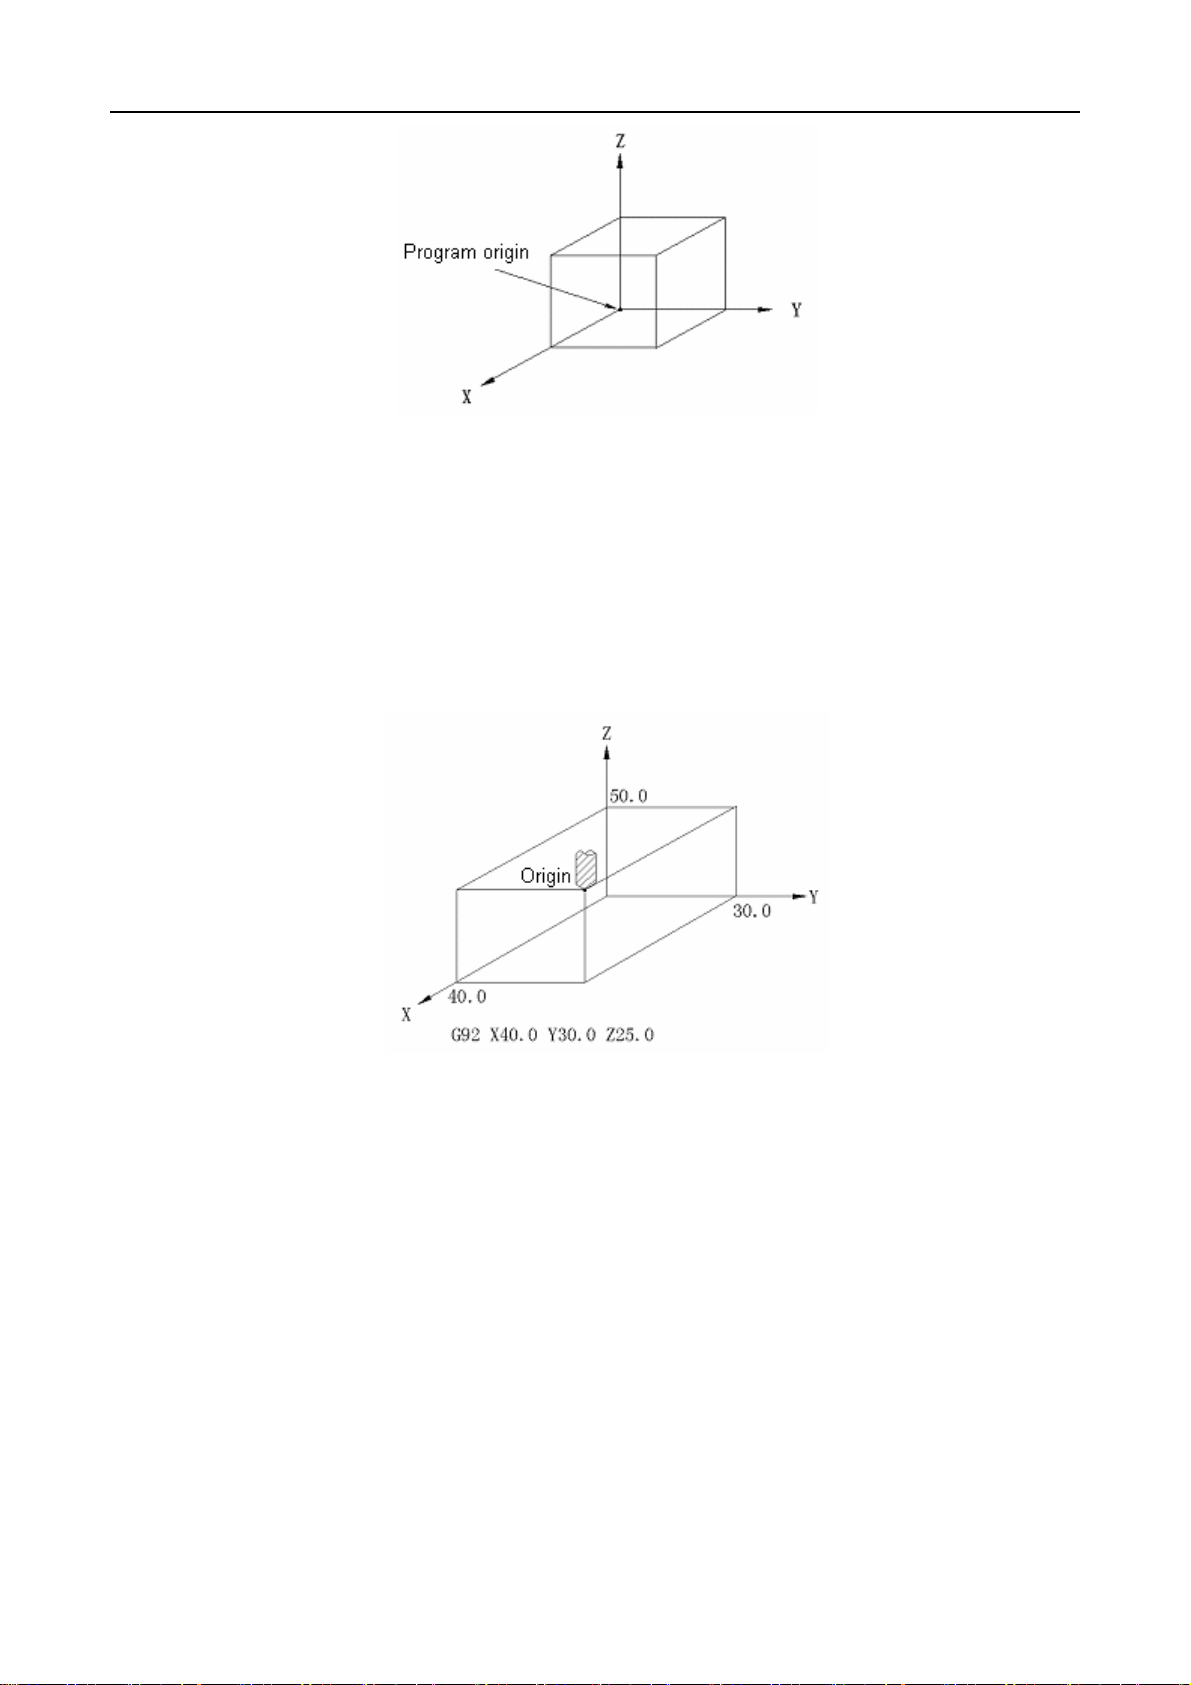
GSK983M Milling CNC System Operation Manual (Volume I: Specifications and Programming)
This coordinate system is a workpiece coordinate system.
3.3.5 Coordinate system and origin of processing
A workpiece coordinate system needs to be used when a program is sent to the NC. The
cutting tool starts motion from the origin and the program starts from the origin, but the NC
always need to know the coordinates of the cutting tool at the origin through G92 instruction
(coordinate system setting).
3.3.6 Workpiece coordinate system
Several workpiece coordinate systems are needed when the mounting positions of the several
trailing bars for the machine are different. In this case, the 6 coordinate systems
preestablished on the machine may be selected with 6 G codes (G54~G59) and the following
programs are executed in the selected coordinate system. All coordinate systems shall be
determined with the set distance between a reference point (a fixed point on the machine) and
their respective origins of coordinate (workpiece origin offset). See the following diagram for
details.
Refer to Section 4.4.13 for the setting method of workpiece origin offset.
27
Page 36

GSK983M Milling CNC System Operation Manual (Volume I: Specifications and Programming)
It is not necessary to establish a coordinate system with G92 instruction when the
above-mentioned workpiece coordinate system is used. Concurrent use of G54~G59 and
G92 may substitute the coordinate system established by G54~G59. Therefore, usually G92
shall not be used in conjunction with G54~G59.
Note: When using the workpiece coordinate system established by G54~G59, make sure to
return to the first reference point after switching on so that G54 will automatically generate a
workpiece system. Hence it is not necessary to set an automatic coordinate system.
3.3.7 Reference (position) point
Reference point is a fixed point on the machine. Reference point return function allows the
cutting tool to return to the reference point. Therefore, a program is likely not to start from one
point on a workpiece coordinate system but from the reference point. In this case, the return of
the tool to the position of the reference point shall always be specified with G92 in the
workpiece coordinate system because the reference point is a specific point on the machine
and the program is developed on the basis of the workpiece coordinate system with a point on
the workpiece as its origin.
28
Page 37

GSK983M Milling CNC System Operation Manual (Volume I: Specifications and Programming)
Note: G92 instruction is not necessary when the workpiece coordinate systems established
with G54~G59 are used.
3.3.8 Absolute value instruction and incremental value instruction
The distance that a cutting tool moves along all axes may be programmed with an incremental
instruction or absolute instruction.
It is possible to directly program a running distance in a block using an incremental instruction
(G91).
When using an absolute instruction (G90), the end position of the cutting tool is indicated with
a coordinates in the block.
In the above diagram, the program will give the following position when an incremental
instruction is employed:
G91 X-60.0 Y40.0;
In the above diagram, the program will give the following position when an absolute instruction
is employed:
G90 X40.0 Y70.0;
29
Page 38

GSK983M Milling CNC System Operation Manual (Volume I: Specifications and Programming)
The instruction mode of G90/G91 must not be changed for all addresses in a block so that the
program can be compatible with other NC.
3.4 Feed Function (F function)
3.4.1 Rapid traverse (positioning) function
All axes of the machine operate at the specified rapid traverse speed during rapid traverse.
As a rule, the rapid traverse speed has been set by manufacturer before shipment (set by
parameters RPDFX through RPDF4).
Since all axes of the machine moves individually, the times for all axes to move from their
home positions to end positions are different.
For example, when the rapid traverse speeds of axes X and Y reach 5m/min and 8m/min
respectively and movement program is as follows:
G91 X200.0 Y200.0;
The times for axes X and Y of the machine to run from the starting point to the end point are
24s and 15s respectively.
The locus of the cutting tool in the above example is as indicated in the figure below:
The control over the override of the rapid traverse speed can be achieved with the switch on
the operation panel of the machine. (FO, 25%, 50%, 100%) FO shall be determined by
setting parameter No.113 (SPDFL) and its unit shall not be indicated in percentage (%) but
mm/min or inch/min.
3.4.2 Cutting feedrate
The cutting feedrate shall be specified in the form of the distance per minute. The feedrate is
30
Page 39

GSK983M Milling CNC System Operation Manual (Volume I: Specifications and Programming)
specified as follows with F codes:
F1 (1mm/min; 0.01inch/min)
F15000(15000mm/min) or F60000(600.00 inch/min)
The feedrate is restrained to the upper limit.
According to the upper limit, the manufacturer of the machine sets feedrate by parameter
No.106 (FEDMX) or exerts override restraint from 0 to 200% (10% each step) with the switch
on the operation panel. The control over upper limit speed is also effective for override feedrate.
The means of specifying feedrate with F codes is also applicable for the axis of rotation.
Example: To input in metric system F050
To input in Inch system F032
When inputting in metric and Inch system s, decimal point may be used for inputting
and it is located in the position of degree/min.
To input in metric system F12 0.12 degree/min
To input in Inch system F12 0.12 degree/min
To input in metric system F12.0 12 degree/min
To input in Inch system F12.0 12 degree/min
Note 1: Except the acceleration and deceleration processes in the row of NC, NC’s calculus error
regarding instructed feedrate is kept within ±2%. Moreover, the error is determined by
measuring a travel distance over 500mm when NC is in stable running state.
Note 2: The number of the digits of F codes is up to 7. Should the input feedrate is above the upper
limit, the feedrate is restrained to the upper limit.
3.4.3 To reduce feedrate to 1/10
The input speed in metric system can be changed to 1/10 of the original speed by parameter
No.006 BIT3 (FMIC) setting.
Item Minimum input unit Range
Feed per minute 0.1mm/min
F1 to F150,000 (0.1 mm/min to
15000.0mm/min)
3.4.4 Synchronous feed (feed per rotation)
It is possible to specify a feedrate in relation to the feed amount per minute of the spindle. G95
specifies synchronous feed while G94 feed per minute (with travel per minute as the feedrate).
31
Page 40

GSK983M Milling CNC System Operation Manual (Volume I: Specifications and Programming)
Meaning
Address
G code
Input in
Range
Restraining
value
Override
A restraining value is set in mm/min or inch/min. Synchronous speed is converted to mm/min
or inch/min with the following formula:
fm=fr×R
mm
Input in
inch
Both the feed per minute and synchronous feed at specific feedrate are
restrained. The restraining value is set by manufacturer (only the feedrate with
override is restrained).
The override from 0 to 200% (10% each step) is effective for both feed per
minute or synchronous feed.
Feed per minute Synchronous feed
Feed amount per minute of
cutting tool
F F
G94 G95
1mm/min~15000mm/min
(F1~F15000)
0.01inch/min~600.0inch/min
(F1~F60000)
Feed amount of cutting tool per
rotation of spindle
0.01mm/r~500.00mm/r
(F1~F50000)
0.0001inch/r~50.0000inch/r
Where fm: the feed per minute in mm/min or inch/min
fr: the synchronous feedrate in mm/r or inch/r
R: the rotational speed of the spindle in r/min
Note 1: Both G94 and G95 are modal. Once they are specified, they will be effective until other G
codes appear.
Note 2: The spindle shall be provided with a synchronous feed position coder.
Note 3: When the rotational speed of the position coder is as low as 1 rpm, the feedrate will become
irregular. The irregularity has no impact on the machining of the machine. Therefore it is still
usable when the rotational speed is as low as 1 rpm. However, the degree of irregularity must
not worsen more as the further reduction in rotational speed is subject to deterioration.
3.4.5 F1 digit feed
Specifying a digit (1~9) behind F sets the feedrate of the corresponding number. Feedrate is
preset for each number using parameter. Specify FO as the rapid traverse speed and set the
F1 digit feedrate switch on the machine panel to ON. Then rotate the manual pulse generator
to increase or reduce the feedrate of the currently selected number.
The increase or reduction in feedrate:
Fma
1×
F=△
100
Where: Fma×1 is used as the upper limit of feedrates of F1~F4 (set with a parameter).
/Manual pulse generator per case
X
32
Page 41
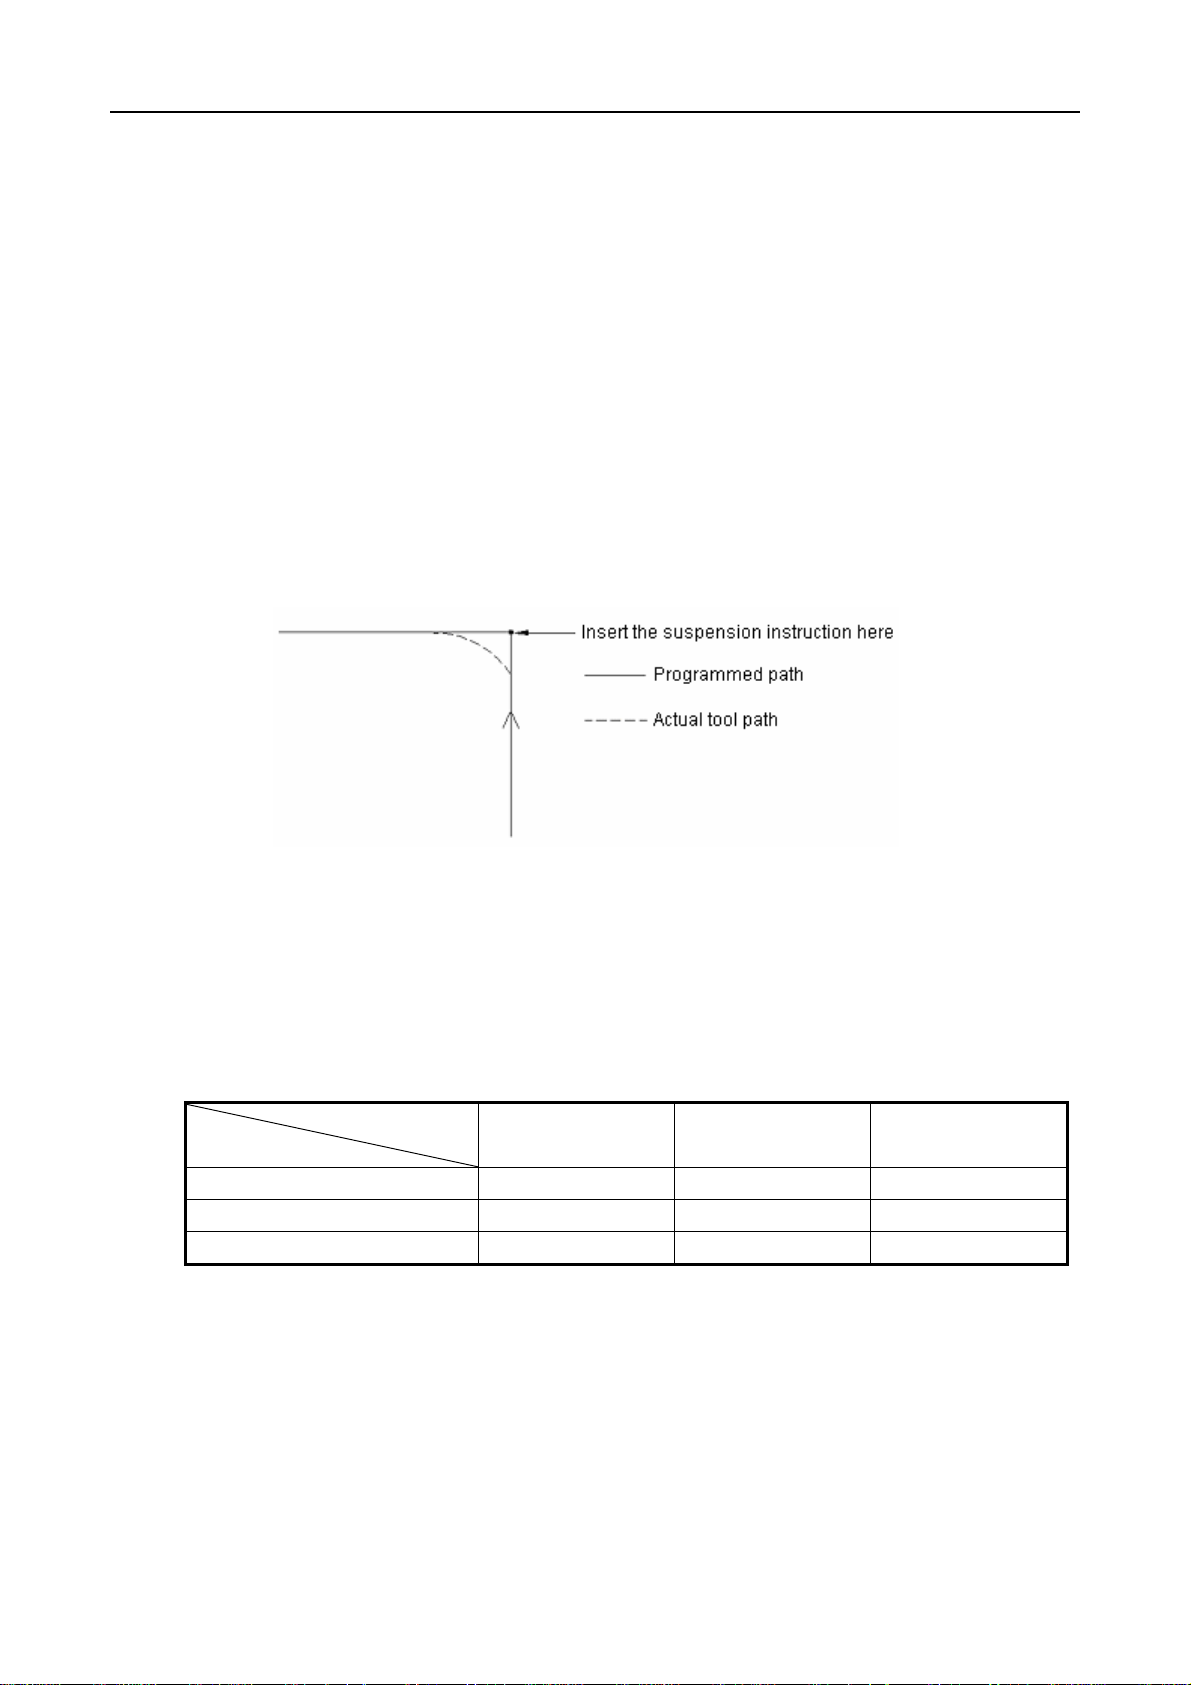
GSK983M Milling CNC System Operation Manual (Volume I: Specifications and Programming)
Fma×2: is used as the upper limit of feedrates of F5~F9 (set with a parameter).
X: Any figure between 1 and 127 (set with a parameter).
Set or modified feedrate can be saved even in case of power failure. The current feedrate is
displayed on the LCD.
3.4.6 Automatic acceleration and deceleration
During the start or stop of feed, acceleration or deceleration is performed at some time
constant so as to prevent the mechanical system from shock. Hence it is possible to consider
the problem of acceleration and deceleration during programming.
It is impossible to machine a sharp angle under the influence of automatic acceleration and
deceleration. To machine a sharp angle, dwell instruction (G04) must be added between two
blocks.
Once the dwell instruction is inserted, the actual tool path tallies with the programmed path.
The rapider feedrate is, the greater time constant of acceleration and deceleration and angle
error will be.
Note 1: The changes of feedrate between the blocks that have specified different moving modes are
as listed in the table below.
Foregoing blocks
New blocks
Positioning × × ×
Cutting feed ×
Not to move × × ×
×: The next block will be executed when the instruction speed is reduced to zero.
○: Continue to execute the next block so that the feedrate will not change excessively.
Note 2: Acceleration/deceleration is independently performed on both axes (axes X and Z) and their
feedrates changes between blocks, resulting in the discrepancy between the actual path of the
tool and programmed path. For example, if the tool only moves along axis X in a block and
along axis Z in the next block, the movement in the direction of axis X starts to decelerate near
the angle. Meanwhile, it starts accelerated movement in the direction of axis Z. The actual path
Positioning Cutting feed Not to move
○
×
33
Page 42

GSK983M Milling CNC System Operation Manual (Volume I: Specifications and Programming)
of the tool is as indicated in the figure below.
In arc interpolation, the actual arc radius is less than the programmed on (see the Appendix).
The deviation may be increased by minimizing the time constant of acceleration and
deceleration.
3.4.7 Automatic angle adjustment
Tool cutting is subject to overload if the tool performs the rough machining with tool
compensation in inner angle and inner arc area at programmed feedrate. The function
automatically reduces feedrate so as to lower the tool’s overload in the above machining areas,
thereby obtaining a smooth machining surface.
3.4.7.1 Automatic adjustment of inner angle
1) Working conditions
Feedrate can be automatically regulated provided that both the two blocks in succession
passing the angle satisfy the following requirements.
a. The G codes of Group 01 are G01, G02 or G03.
b. The offset is not 0 in offset mode.
c. Offsetting shall be performed inside the angle to be processed.
d. The axis moves along the offset surface.
e. Instructions G41 and G42 do not exit in the succeeding block.
f. Instructions G41 and G42 do not exist in the preceding block or the block is not started
though it has the two instructions.
g. The inner angle is less than the θ preset by parameter.
The angle judgment with regard to programmed path:
34
Page 43
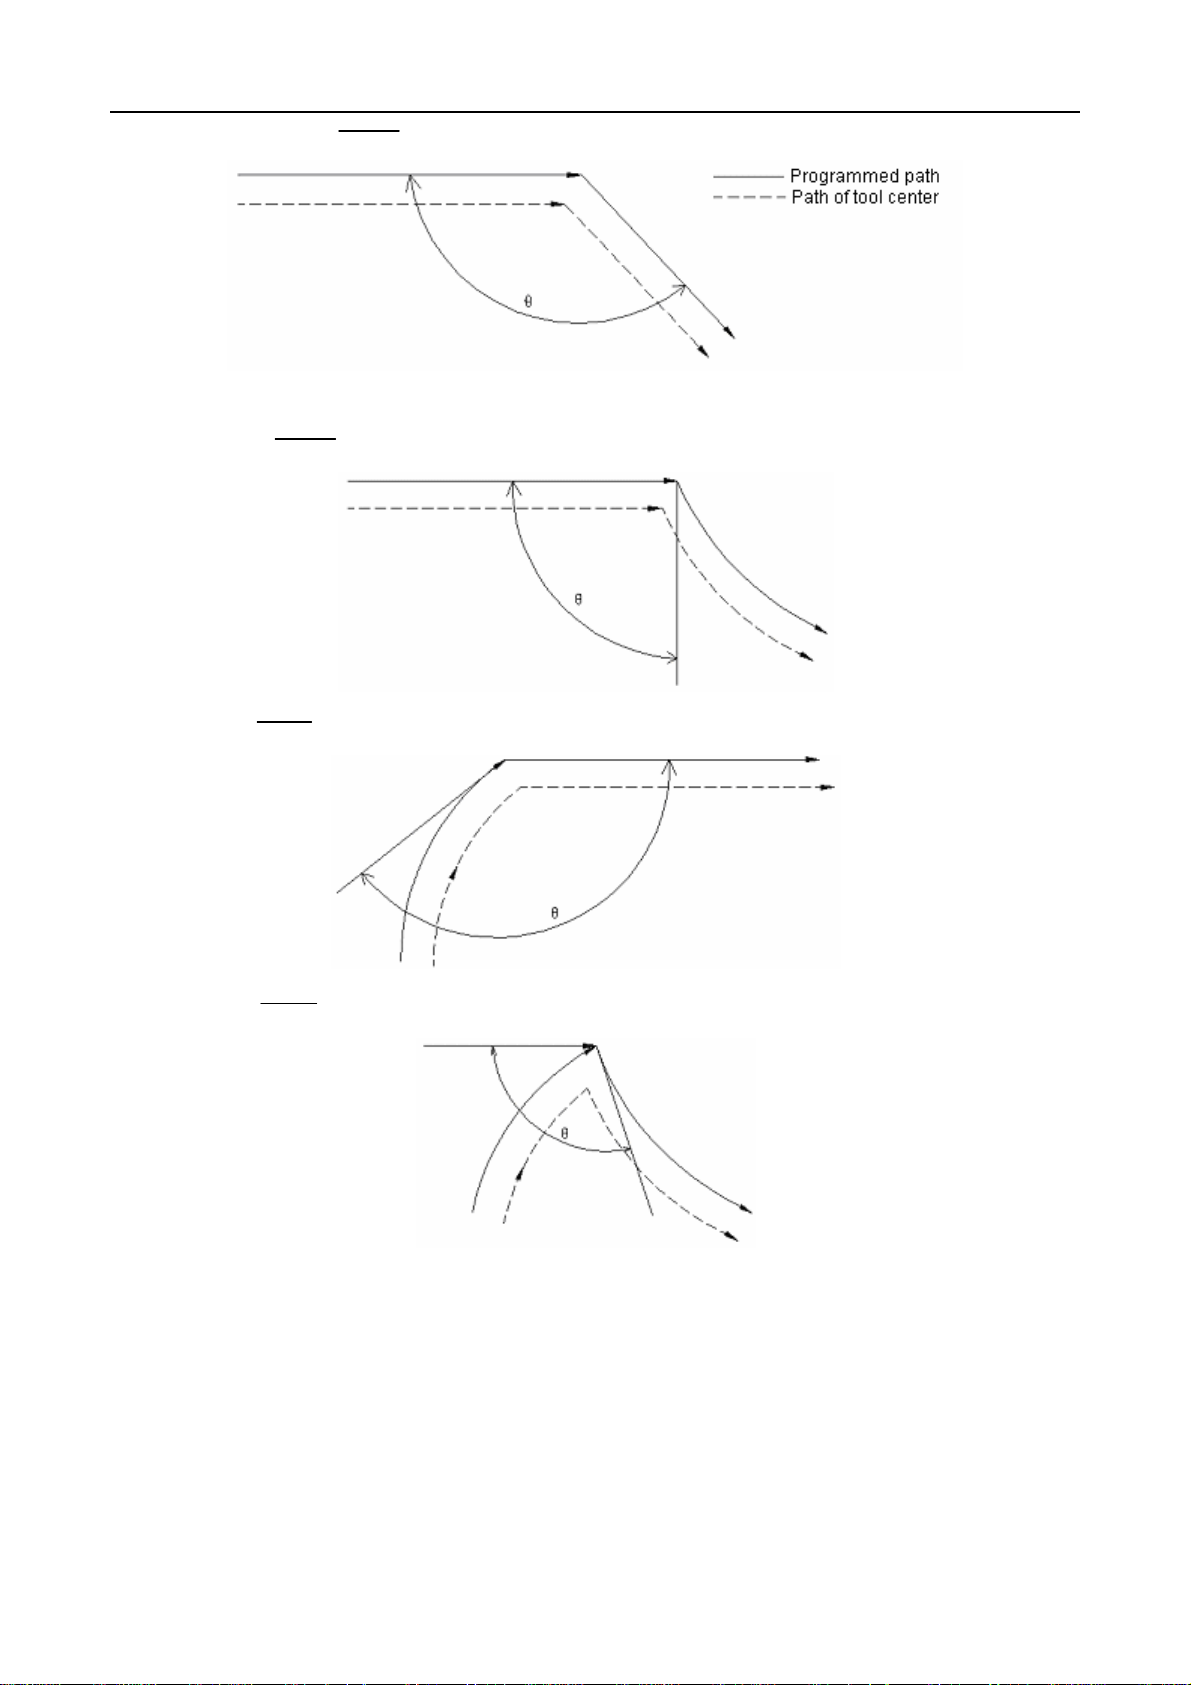
GSK983M Milling CNC System Operation Manual (Volume I: Specifications and Programming)
(I) Straight line Straight line
(II) Straight line Arc
(III) Arc Straight line
(IV) Arc Arc
The angle may be considered as an inner angle when θ≤θP. The value of θP shall be set by
parameter (NO·335) (1°≤θP≤179°). It is subject to error in judgment less than 0.001° provided
that θ is nearly equal to θP.
Operation range
When an angle is determined as an inner angle, feedrate is regulated from the range specified
by the Lθ in the block on one side of the intersection point of the angle to the range specified
by the Ls in the block one the other side of the intersection point. Ls and Lθ are the straight
distances from one point on the path of the tool center to the intersection point. Lθand Ls are
35
Page 44

GSK983M Milling CNC System Operation Manual (Volume I: Specifications and Programming)
set by different parameters (N0·355 and 356).
Feedrate is regulated in the range from point a to point b.
Feedrate is regulated within the range from Point a to Point b.
For an arc, the adjustment function is effective for the end point of a block provided that the
following requirements are fulfilled.
① Within the range of Lθ;
② The origin and end point of the arc are in the same quadrant or the origin is in the quadrant
adjacent to the one in which the end point is. Similarly, the adjustment of the origin of the
block is effective when the following conditions are met.
① Within the range of Ls;
② The origin and end point of the arc are in the same quadrant or the origin is in the quadrant
adjacent to the one in which the end point is.
(Example) For a disc:
For the program for an② arc, feedrate is regulated from point a to point b and from point c to
point d.
Amount of adjustment
36
Page 45
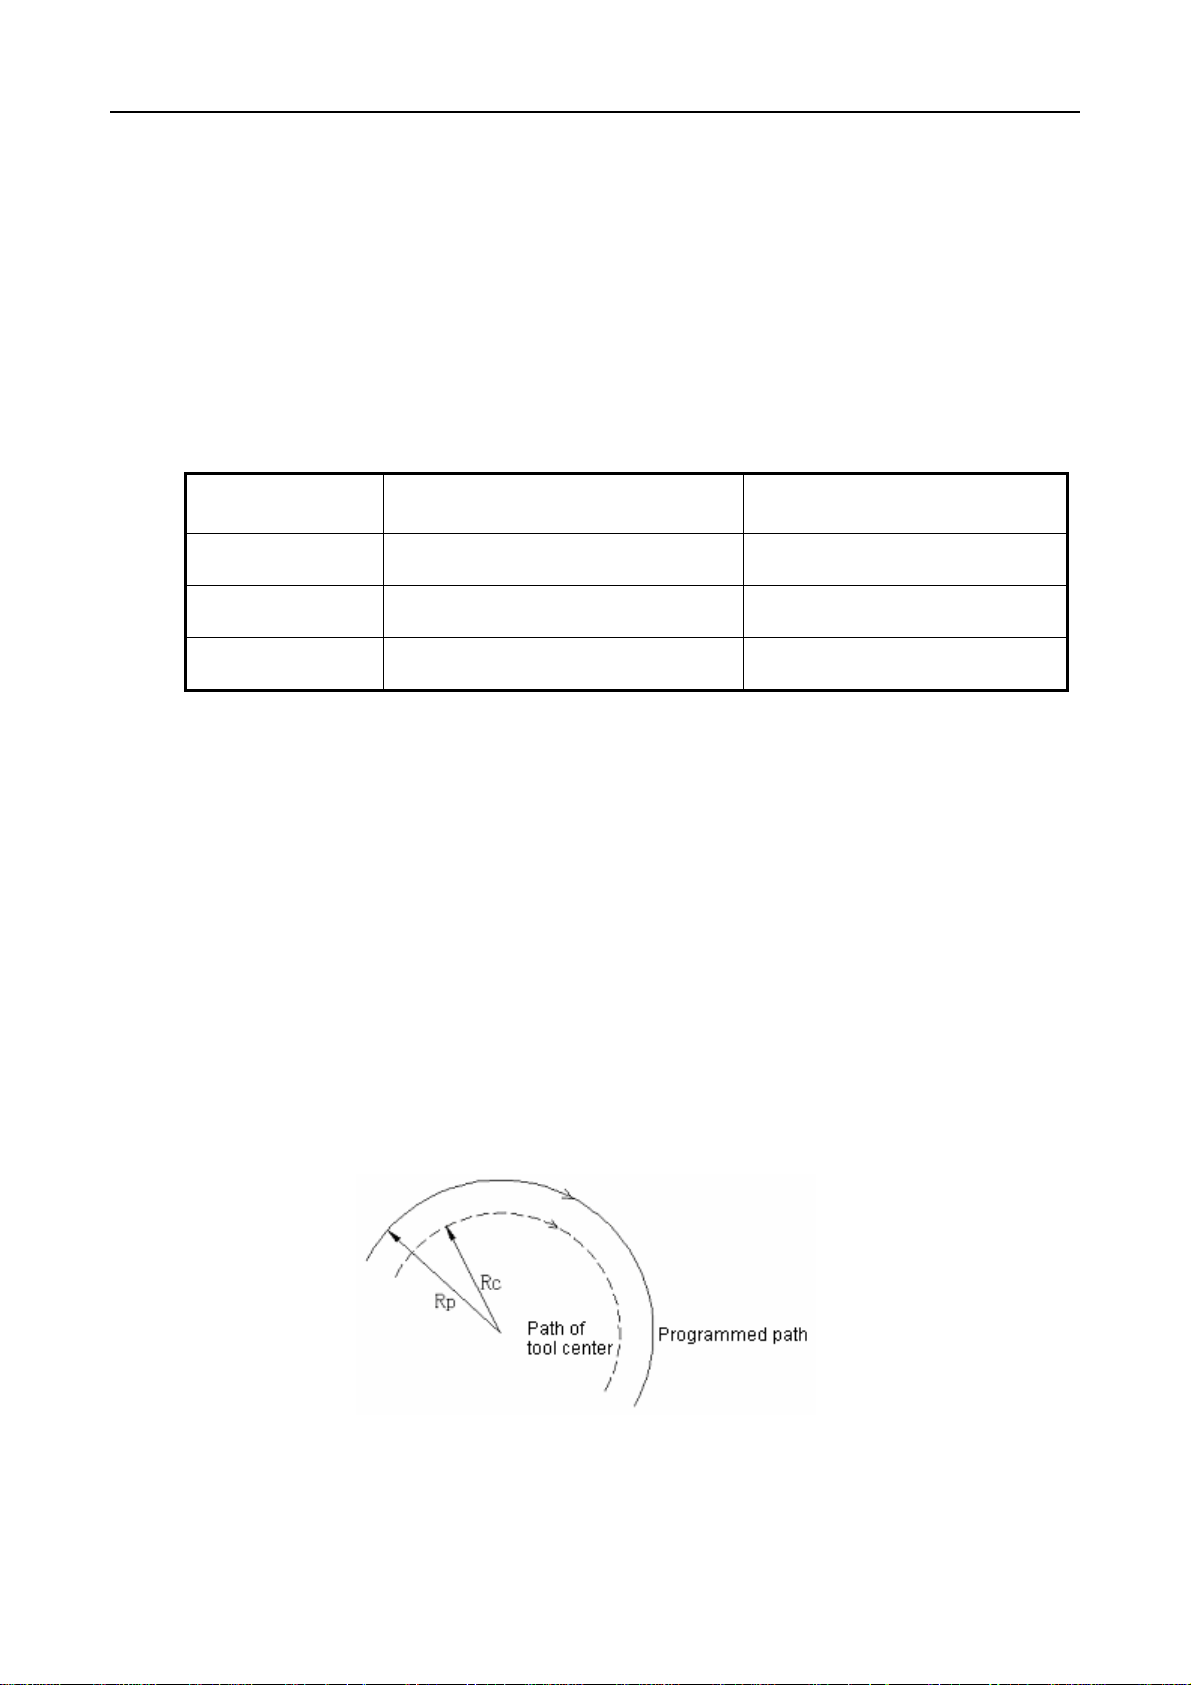
GSK983M Milling CNC System Operation Manual (Volume I: Specifications and Programming)
Amount of adjustment is set by No. 335 parameter.
1≤amount of adjustment (1% each step) ≤100 (%)
This is effective for commissioning and F1 digit instruction. For F4 digit instruction, the actual
feedrate will become:
Fx (inner angle adjustment) × (feedrate adjustment)
Whether inner angle adjustment is effective
Whether to adjust an inner angle or not may be selected with G codes. The inclusion of G62 in
the group 15 in which G61 and G64 are is as shown in the table below. These G codes are
related to accurate stop checking mode.
Accurate stop detecting mode Inner angle adjustment
G61 Valid Invalid
G62 Invalid Valid
G64 Invalid Invalid
Note 1: It is in G64 mode when powered on or cleared.
Note 2: It is necessary to specify G09 when you plan to perform accurate stop detection in G62 mode.
Note 3: The switch of inner arc cutting feedrate is always valid as described in Section 4.7.2 and is not
subject to the influence of G codes.
3.4.7.2 Switch of inner arc cutting feedrate
For inner arc offset cutting, the feedrate of programmed path shall be specified by F codes
while its actual feedrate F×R
radius of program path.
The switch is also effective for commissioning and F1 digit instruction.
(Example 1)
(where RC is the radius of the path of tool center and RP the
C/RP
However, if RC is much less than RP, i.e. RC/RP=0, the tool will stop. Therefore, when
R
≤MDR after the minimum reduction ratio (MDR) is set, the actual feedrate will be FX
C/RP
(MDR).
37
Page 46

GSK983M Milling CNC System Operation Manual (Volume I: Specifications and Programming)
MDR is set by N0·333 parameter. When 1≤MDR (1% each step)≤100, it is applicable for F1
digit and commissioning. The reduction ratio of automatic inner angle adjustment is not under
the influence of MDR.
Note: If inner arc cutting is overlapped on automatic inner angle adjustment, now the actual
feedrate will be F×
Rc
× (angle adjustment)× (feedrate override).
Rp
3.5 Preparation Function (G function)
The two digits following address G determine the meaning that the concerned block involves.
G codes may be divided into the following two types:
Type Meaning
Primary valid G codes It is only valid in its instructed block.
Modal G codes
(Example) G01 and G00 are modal G codes.
G01 X ;
Y ; G01 is valid in this range.
After being instructed to be valid, the G codes become invalid only
when another G code in the same group is instructed.
X ;
G00 Y ;
Table 5.1: G codes list
G codes Group Function
G00 Positioning (rapid traverse)
G01 Linear interpolation (feed)
G02 Arc interpolation CW (clockwise)
G03
G04 Hold
G07 Speed sine-curve control (specified imaginary axis)
G09 Accurate stop detection
G10
G17 To select XY plane
G18 To select ZX plane
G19
G20 Input in inch
G21
G22 04 Storage travel limit ON
01
Arc interpolation CCW (counterclockwise)
00
Offset setting, workpiece zero offset setting
02
To select YZ plane
06
Input in mm
38
Page 47
GSK983M Milling CNC System Operation Manual (Volume I: Specifications and Programming)
G23 Storage travel limit OFF
G27 Reference point return check
G28 To return to reference point
G29 To return from reference point
00
G30 To return to the 2nd, 3rd and 4th reference points
G31
To skip over cutting
G33 01 Thread cutting
G40 To cancel tool compensation
G41 Tool compensation – left side
G42
07
Tool compensation – right side
G43 Forward compensation of tool length
G44 Reverse compensation of tool length
G49
08
To cancel tool length compensation
G45 To increase tool offset
G46 To reduce tool offset
00
G47 To increase tool offset by twice
G48
G50 Zooming OFF
11
G51
To reduce tool offset by twice
Zooming ON
G54 14 To select workpiece coordinate system 1
G55 To select workpiece coordinate system 2
G56 To select workpiece coordinate system 3
G57 To select workpiece coordinate system 4
14
G58 To select workpiece coordinate system 5
G59
To select workpiece coordinate system 6
G60 00 unidirectional positioning
G61 Accurate stop detecting mode
G62 To enable automatic angle adjustment
G64
15
Cutting mode
G65 00 Simple recall of a microinstruction
G66 Modal recall of microinstruction
G67
12
To cancel modal recall of microinstruction
G73 Gun drilling cycle
G74 Reverse-tapping cycle
G76 Finish boring
G80 To disable fixed cycle
G81 Drilling cycle, spotter
G82 Drilling cycle, counterboring
G83 Peck drilling cycle
09
G84 Tapping cycle
G85 Boring cycle
G86 Boring cycle
G87 Reverse boring cycle
G88 Boring cycle
G89
Boring cycle
39
Page 48

GSK983M Milling CNC System Operation Manual (Volume I: Specifications and Programming)
G90 Absolute value programming
G91
G92 Absolute zero programming
G94 Feed per minute
G95
G98 To return fixed cycle to the initial point
G99
G96
G97
(Note 1) The G codes marked with ^ are the initial G codes of all groups. That is, these G codes are
established when the system parameters specifying initial G codes are validated by
powering on or pressing the RESET key. For G22 and G23, G22 is selected when power is
switched on and G22 or G23 (one of them is valid before reset) is established after reset.
The selection of the state of the initial G codes such as G00, G01, G43, G44, G49, G90, G91
or G94 and G95 shall be set by parameters ((G00, G43, G44, G90 and G95).
For G20 or G21, the valid one is selected before powering off or pressing the RESET key.
03
Incremental value programming
05
Feed per rotation
10
To return fixed cycle to point R
B
(Note 2) The G codes in group 00 are modal and are only valid in the blocks they belong to.
(Note 3) When a G code not listed in the above table is specified or an optional G code not defined by
control unit is specified, (N0.0/0) will give an alarm. (N0.0/0) But G38 and G39 are ignored.
(Note 4) Some G codes may be specified in the same block even they do not belong to the same
group. When 2 or more G codes than belong to the same group are specified in a block, the
lastly specified G code will be valid.
(Note 5) If any G code in group 01 in fixed cycle mode, the fixed cycle will be automatically disabled
and the system will be in G80 state. However, the G codes in group 01 are not subject to the
influence of the G codes of fixed cycle.
(Note 6) G70 and G71 replaces G20 and G21 (special G codes) by parameter No.008 BIT5 (GSP)
setting.
(Note 7) The G codes of all groups are displayed.
3.5.1 Selection of planes (G17, G18, G19)
A plane is selected with the instruction for arc interpolation and tool compensation.
G17……XY plane
G18……ZX plane
G19……YZ plane
Travel instruction is not related to the selection of planes G17/G18/G19. For example, when
G17Z—— is specified, Z will move.
40
Page 49

GSK983M Milling CNC System Operation Manual (Volume I: Specifications and Programming)
3.5.2 Positioning (G00)
Using this code positions the tool at the points programmed by addresses X, Y and Z or A, B,
C, U, V and W. Coordinates shall be always specified in absolute instructions while the
distance from the origin to the end point in incremental instructions. All axes move the tool at
rapid traverse (positioning) rates individually and the tool path is not always straight line
during positioning.
2 axes (2 addresses) can be programmed concurrently in a block. But only one can be
programmed for the 4
G00 specifies a position.
G00α——β——:
(α·β=X, Y or Z)
Example: The program shall be as follows when the rapid traverse (positioning)rate is
9.600mm/min in the direction of axis X and 9.600mm/min in the direction of axis Y:
th
axis.
G00 X25.0 Y-10.0
Note 1: The rapid traverse (positioning) rate in G00 instruction is set for all axes respectively by
manufacturer. Therefore rapid traverse (positioning) rate can not be specified through
program.
In the positioning mode of G00, the tool start speeding up until it reaches the predetermined
speed. Then it rapidly travels and finally slows down to the end point. When it comes to the
“proper position”, the next block is executed in sequence (Note 2).
Note 2: The so-called “proper position” means motor feed is within the specified range (The range is
determined by manufacturer). The travel instruction in the following format may be specified
provided that the system selects three-axis link function.
G00 X——Y——Z——:
In this example, axes X, Y and Z move the tool to designated position in specified rapid
traverse.
When the system selects the linked control function with additional axes, not only addresses X,
Y and Z, but also the addresses of additional axes may be instructed. If they are instructed in
this way, 3 or 4 axes can move at the same time.
Example: X500.0 Y300.0 Z25.0 B20.0:
41
Page 50

GSK983M Milling CNC System Operation Manual (Volume I: Specifications and Programming)
3.5.3 Unidirectional positioning (G60)
For the accurate positioning without offset, final positioning can be achieved in only one
direction.
Origin
End point
(The direction for final positioning is from right to left.)
The condition that replaces G00 with G60 is as follows:
G60 α——β——γ——δ——:
(α, β and γ= X, Y and Z or additional axes A, B, C, U, V or W. This is the case of concurrent
control of 3 or 4 axes. The situation of concurrent control of 2 or 3 axes includes the selection
of one additional axis.
Overshoot and positioning direction are set by parameter. The tool stops once before the end
point even the positioning direction of instruction is identical with parameter setting.
Note 1: G60 is an one-off valid G code.
Note 2: Axis Z must not be positioned in a single direction in fixed drilling cycle.
Note 3: The axis whose overshoot has not been set by parameter shall not be positioned in a single
direction.
Note 4: When the travel distance instruction is O, unidirectional positioning will not be performed.
Note 5: When mirroring function is used, it is invalid to set its direction by parameter.
Note 6: Unidirectional position does not apply to fixed cycles G76 and G87.
3.5.4 Linear interpolation (G01)
G01α——β——F——:
th
(α, β and γ=X, Y, Z, A, B, C, U, V and W. Gang control is exerted for 4
This actually specifies linear interpolation mode. α and β defines the travel distance of the tool.
Whether the distance is in absolute or incremental mode depends on the current state of
G90/G91. Feedrate shall be specified by F codes, which are modal.
and other axes.)
42
Page 51

GSK983M Milling CNC System Operation Manual (Volume I: Specifications and Programming)
α
β
Example of program: (G91) G01 X200.0 Y100.0 F200.0
Y End point
0 Origin 200.0 X
The feedrate instructed by F codes is the traveling speed of the tool. If F codes are not
specified, the feedrate is considered as 0.
The travel instruction (linear interpolation) with 3-axis gang control function is as follows:
G01 X——Y——Z——F——:
It is possible for the instruction to perform linear interpolation for 3 axes at one time.
When additional gang control function is selected, the addresses (A, B or C) of the fourth axis
th
may be used to replace X, Y or Z. In this way the 3-axis gang control involving the 4
axis can
be exerted.
Example: G01 X500.0 Y300.0 B20.0 F10.0:
When the system is provided with optional 4-axis gang control functio0n, the use of the
following instruction is allowed.
G01α——β——γ——δ——F——:
Where α, β, γ, δ= X, Y, Z, A, B, C, U, V or W.
Note 1: Axial feedrates are as follows:
G01αα
The feedrate in the direction of axis α: Fα=
ββ F f:
·f
L
The feedrate in the direction of axis β: Fβ=
·f
L
2
2
+
β
α
L=
Note 2: The feedrate of an axis of rotation shall be instructed in degree/min (input in metric system:
F050; input in inch system: F032).
Example: G91 G01 B90.0 F300:
43
Page 52
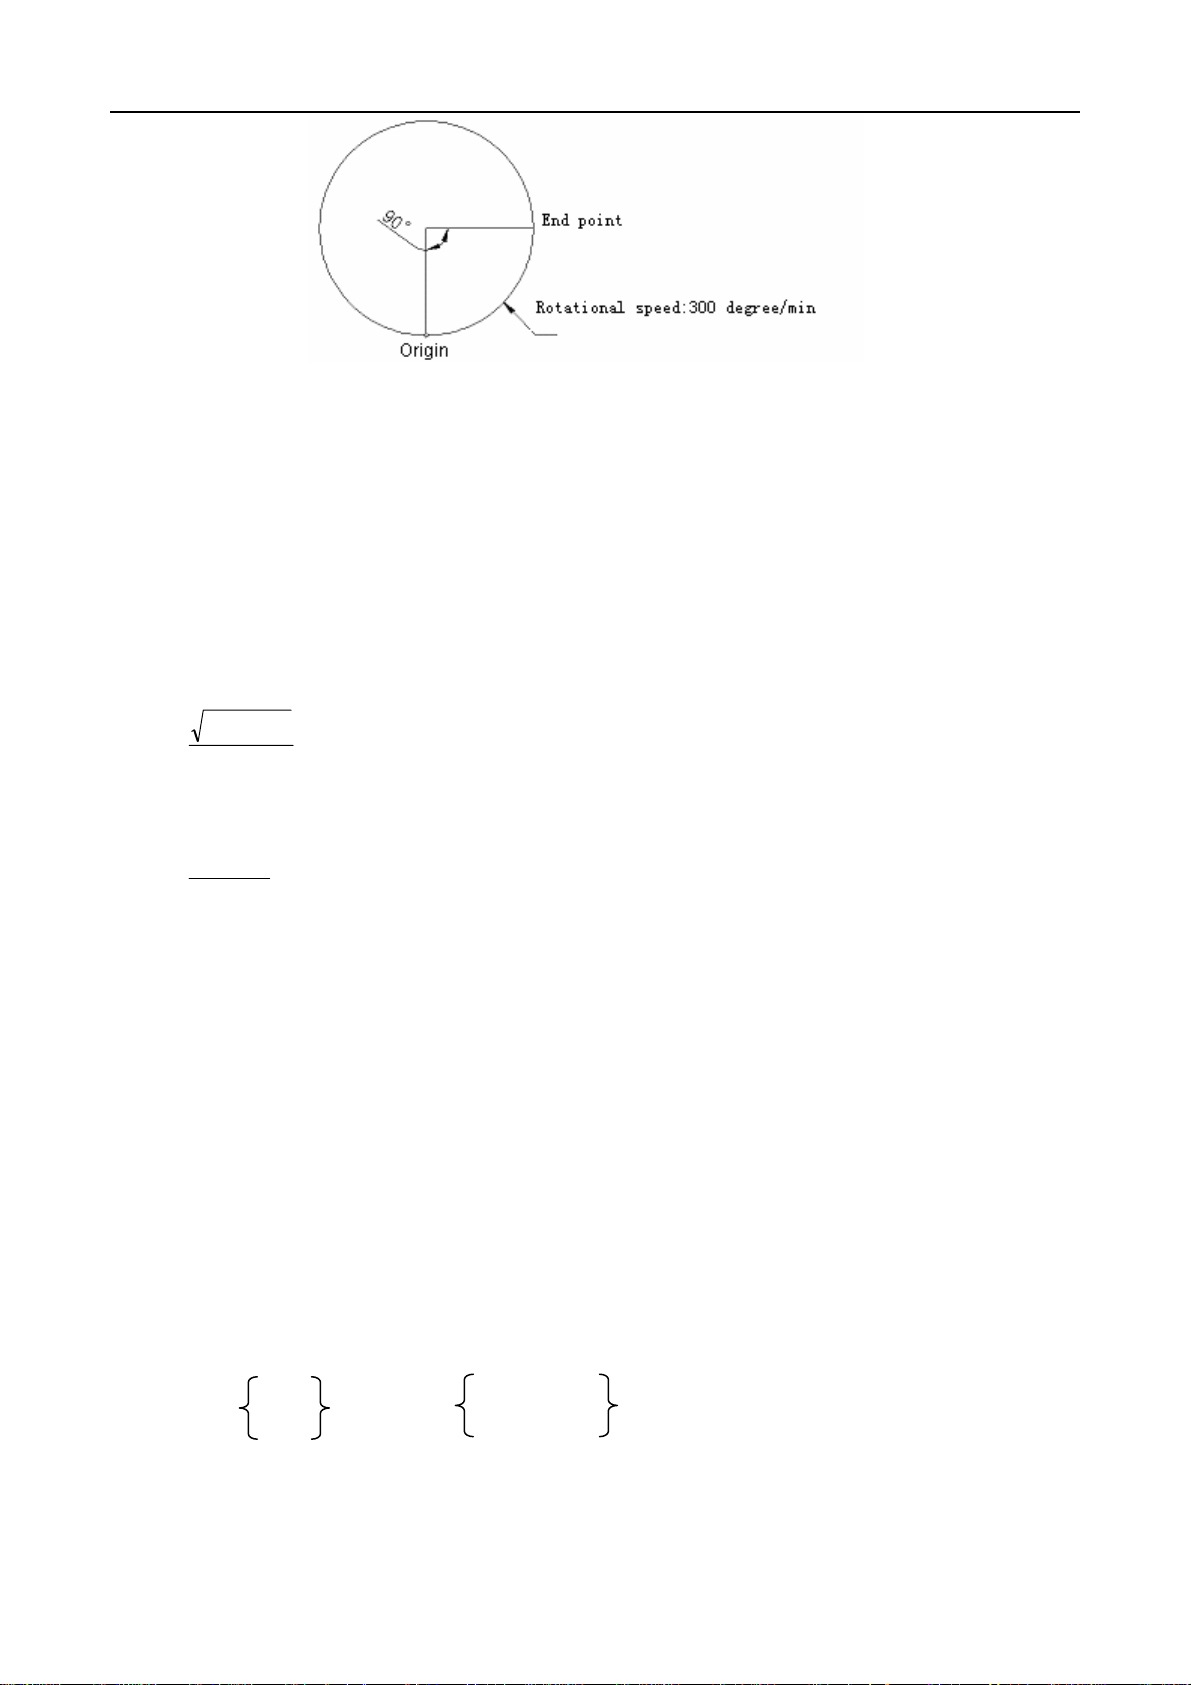
GSK983M Milling CNC System Operation Manual (Volume I: Specifications and Programming)
Note 3: In the linear interpolation involving the 4
th
axis (axis of rotation A, B or C), the unit of cutting
feed is changed from degree to inch (or mm) and the cutting feedrate in α—β rectangular
coordinate system is controlled so that it keeps identical with the speed specified by F codes.
The feedrate of an axis of rotation is determined with the formulas in Note 1 and its unit is
changed into degree/min.
E: G91 G01 X20.0 B40.0 F300.0:
When the unit (degree) of B-axis movement instruction is changed into mm or inch, machining
time shall be determined as follows:
22
+
4020
300
=0.014907 (min)
The feedrate of axis B is:
40
=268.3 °/min
14907.0
Note 4: For 3- or 4-axis link, the method for calculating the feedrate in rectangular coordinate system is
the same as 2-axis control.
Note 5: For inputting in Inch system and inputting in metric system, the upper limit of the feedrate of an
axis of rotation is approximately 6000°/min. The speed is fixed at the upper limit even the
feedrate of an instruction exceeds the upper limit.
3.5.5 Arc interpolation (G02, G03)
3.5.5.1 Arc interpolation without any additional axis
The instruction below moves the tool along the arc.
The arc in the X——Y plane:
G02 R——
G17 X——Y—— F——;
G03 I——J——
44
Page 53

GSK983M Milling CNC System Operation Manual (Volume I: Specifications and Programming)
The arc in the Z——X plane:
G02 R——
G18 X——Z—— F——:
G03 I——K——
The arc in the Y——Z plane:
G02 R——
G19 X——Z—— F——:
G03 J——K——
Item Instruction Meaning
G17 The arc in the plane of XY
1 Plane selection
G18 The arc in the plane of ZX
G19 The arc in the plane of YZ
G02 Clockwise (CW)
2 Rotating direction
G03 Counterclockwise (CCW)
The position of the end point in the
workspace coordinate system
The distance from the origin to the
end point
The distance from the origin to the
center
The position
3
of end point
The distance from the
starting point to the center
4
G90 mode 2 of axes X, Y and Z
G91 mode 2 of axes X, Y and Z
2 of axes I, J and K
Arc radius R Arc radius
Once the unit is switched on, G17 is enabled as the initial code for plane selection.
Whether it is in clockwise or counterclockwise direction depends on the left-manual or
right-manual coordinate system.
The end point of the arc is determined by address X, Y or Z and its indication in absolute or
incremental value by G90 or G91. In incremental indication, the coordinate of the end point is
specified from the origin of the arc.
45
Page 54

GSK983M Milling CNC System Operation Manual (Volume I: Specifications and Programming)
The center of the arc is determined by the addresses I, J and K corresponding to axes X, Y and Z.
The digit following I, J or K is a coordinate component from the origin to the center of the arc and
they are always specified as an incremental value. The provision has no bearing upon G90 and
G91.
The marks of I, J and K correspond to the specified directions.
Arc interpolation may substitute I and J with R or gives an instruction with K. The instruction is
given in the following format:
G02
X——Y——R——:
G03
There are two types of arc in the arc interpolation with R (specified by radius) – the arc less
than 180° and more than 180°. Its analysis is as indicated in the diagram below.
Example of Instruction:
1. The arc less than 180°:
G02 X6.0 Y2.0 R5.0:
2. The arc over 180°:
G02 X6.0 Y2.0 R-5.0:
46
Page 55

GSK983M Milling CNC System Operation Manual (Volume I: Specifications and Programming)
a) Absolute programming
(1) G92 X200.0 Y40.0 Z0;
G90 G03 X140.0 Y100.0 I-60.0 F300.0;
G02 X120.0 Y60.0 I-50.0;
(2) G92 X200.0 Y40.0 Z0;
G90 G03 X140.0 Y100.0 R60.0 F300;
G01 X120.0 Y60.0 R50.0;
b) Increment programming
(I) G91 G03 X-60.0 Y60.0 I-60.0 F300;
G02 X-20.0 Y-40.0 I-50.0;
(II) G91 G03 X-60.0 Y60.0 R60.0 F300;
G02 X-20.0 Y-40.0 R50.0;
The tangential feedrate of arc interpolation is equal to the cutting feedrate specified by F codes.
However, the arc interpolation involving the fourth axis is not allowed.
Note 1: In arc interpolation, I0, J0 or K0 may be omitted.
Note 2: When the end point of an arc coincides with its origin, I, J and K are used to instruct a center of
a circle for programming a 360° arc (full circle) and X, Y and Z may be omitted.
Note 3: It will give No. 023 alarm if an arc of radius of 0 is programmed.
Note 4: The deviation of instruction feedrate from actual tool feedrate is less than or equal to ±2%. In
tool radius compensation, the actual tool feedrate is the speed of the tool center path.
Note 5: If the addresses I, J, K and R are assigned to the same block, the arc specified by address R is
valid and other I, J and K are ignored.
47
Page 56

GSK983M Milling CNC System Operation Manual (Volume I: Specifications and Programming)
π
3.5.5.2 Arc interpolation with an additional axis
The arc interpolation with an additional axis is allowable. An axis (X, Y or Z) shall be set to
parallel with the additional axis by parameter setting. If the additional axis does not parallel with
any axis, arc interpolation will be impractical. G code for plane selection shall be specified for
arc interpolation. An address of an axis is specified with the G code for plane selection so as to
determine the axes performing arc interpolation.
Example: Assuming that additional axes U and W parallel with axes X and Y respectively.
a) G17X-Y-…………………XY plane
b) G17U-Y-…………………UY plane (U parallels with X)
c) G17Y-……………………XY plane
d) G17………………………XY plane
e) G17 X-Y-U-……… …Alarm
f) G18X-W-………………XW plane (W parallels with Z)
Addresses I, J and K may also be used to specify the center of the arc. This is similar to the arc
interpolation without any additional axis. The addresses I, J and K are used for the axes
parallel to axes X, Y and Z.
The arc interpolation specified with R is also valid.
3.5.6 Sine-curve interpolation
In spiral cutting instruction, sinusoidal interpolation is realized by specifying an arc instruction
axis not to move during arc interpolation. The imaginary axis is specified as follows:
G07α0: (Specify α as the imaginary axis)
G07α1: (Specify α as the real axis)
(α= X, Y, Z or additional axes A, B, C, U, V and W)
After instruction G07α0, axis α is deemed as an imaginary axis until G07α1 instruction is given.
For the single-period sine interpolation in Y-Z plane, axis X serves as an imaginary axis.
2+Y2
= r2 (r: arc radius)
X
2
Y = rsin(
)Z( l : the travel distance along axis Z in a single period)
l
48
Page 57

GSK983M Milling CNC System Operation Manual (Volume I: Specifications and Programming)
N001 G07 X0:
N002 G91 G17 G03 X-200 Y0.0 I-10.0 Z20.0 F100:
N003 G01 X10.0:
N004 G07 X1:
Axis X is deemed as an imaginary axis during N002~N003 blocks.
In the N003 block, spiral-curve cutting instruction is given in this way when axis Z is used a
linear axis. However, axis Y moves only when axis Z is performing sine interpolation since axis
X does not move.
In N003 block, the machine is in suspended state after interpolation because axis X does not
move.
Note 1: Imaginary axis is only available for automatic operation but not for manual operation.
Note 2: Interlock, travel limit and external deceleration are also available for imaginary axis.
Note 3: Manual insertion is also valid for imaginary axis. That is, the axis moves by manual insertion.
3.5.7 Thread cutting (G33)
The possibility of cutting determines the threads of screw pitch.
G33Z Z
Where Z is the length of thread (incremental instruction) or end point of thread (absolute
instruction)
F: f:
f: screw pitch
Input in mm
Input in inch
Minimum input increment Range
0.01mm F1 to F50000 (0.01mm to 500.00mm)
0.0001inch F1 to 500000 (0.0001inch to 50.0000inch)
49
Page 58

GSK983M Milling CNC System Operation Manual (Volume I: Specifications and Programming)
Spindle axis is restricted as follows:
1≤R≤(Maximum feedrate/screw pitch) or allowable rotational speed of the position coder)
Where:
R: Spindle speed (r/min)
Screw pitch: mm or inch
Maximum feedrate: mm/min or inch/min
The instruction signal of maximum feed per minute or the maximum feedrate due to the
restriction of motor or machine, whichever is lower;
Allowable rotational speed of position coder: 4,000r/min (position coder A)
6, 000r/min (position coder B)
Note 1: Spindle speed may be read continuously through the position coder installed on the spindle.
The coder converts the spindle speed into the cutting feed per minute for purposes of feed.
Note 2: The converted cutting feedrate is not overridden but fixed at 100%.
Note 3: The converted cutting feedrate shall be fixed.
Note 4: Feed hold is invalid during thread cutting.
Example:
N20 G90 G00 X100.0 Y… S45 M03;
N21 Z200.0 ;
N22 G33 Z120.0 F5.0 ;
50
Page 59

GSK983M Milling CNC System Operation Manual (Volume I: Specifications and Programming)
N23 M19;
N24 G00 X105.0 M03;
N25 Z200.0 M00;
N26 X100.0 M03;
N27 G04 X2.0 ;
N28 G33 Z120.0 F5.0 ;
Notes:
N20, N21: To locate the tool at the center of the hole and to clockwise (CW) rotate the spindle.
N22: To perform thread cutting for the first time with screw pitch specified by address F.
N23: M19 orders the spindle to stop in a fixed position on the circumference (M19: Spindle
stops in a fixed position).
N24: To withdraw the cutting tool in the direction of axis X.
N25: To move the cutting tool above the hole: M00 orders the program to stop and allows
operator to adjust the tool for the thread cutting for the second time.
N26: To align the cutting tool with the center of the hole and to start forward rotation of the
spindle.
N27: When the travel instruction in the N26 block is relatively short, it is necessary to add
another dwell instruction so that the spindle has adequate time to reach the rated
rotational speed.
N28: To perform thread cutting for the second time.
3.5.8 Automatic return to reference point (reference positions G27~G30)
3.5.8.1 Check of return to reference point (G27)
A point fixed on a machined plane is called reference point (reference position). Once a tool is
manually returned to a reference point, it is positioned at the point.
G27 instruction function is used to check that the tool is positioned at the reference point.
G27α—β—:
(α, β are selected from address X, Y and Z and additional axes A, B, C, U, V and W) The
instruction is used to rapidly position the tool at the reference point.
Once the tool reaches the reference point, the indicator indicating controllable axis’s return to
the reference point is lit.
After returning to the reference point, the next block will be executed if M00 or M01 does not
exist in M00 or M01. If the return to the reference point is not required in all cycles, optional
51
Page 60

GSK983M Milling CNC System Operation Manual (Volume I: Specifications and Programming)
program skip function can be used.
If the system is provided with 3-axis gang control function, the G27 instruction may be
expressed in the following format:
G27α—β— r —:
(The addresses α, β and r shall be selected from X, Y, Z and additional axes A, B, C, U, V and
W. However, only one axis can be controlled at one time if concurrent control of additional axes
is not selected.)
The use of the following instruction is allowable when 4-axis gang control is selected:
G27α—β—r—δ—:
Where α, β, r, δ= X, Y, Z, A, B, C, U, V or W
Note 1: In tool compensation mode, the position that the tool reaches with G27 is the position with
offset. In this case, the tool is also not at the reference point and the indicator for return to the
reference point does not illuminate. As a rule, G27 is only used for compensation cancellation
mode.
Note 2: In a inch mechanical system that inputs in metric system, the indicator illuminates even the
programmed position of the tool offsets from the reference point by 1μ as a result of that the
minimum input increment is less than the minimum traveling increment of the mechanical
system.
3.5.8.2 Automatic return to reference point (G28)
G28 α—β—:
(The addresses α and β shall be selected from X, Y, Z and additional axes A, B, C, U, V and W.
However, additional axes can only be individually controlled without additional axis gang
control function.)
The axis specified by the instruction can be automatically positioned at the reference point. As
move instructions, α and β shall be specified in absolute/incremental value in G90/G91 mode.
The end point of the instruction is called “intermediate point” and the coordinates specified by
this instruction are saved to the NC.
The procedures in the G28 block are as follows:
First all controlled axes are positioned at intermediate points rapidly. Then they move from the
intermediate points to the reference points. If now the machine is not locked, the indicator for
return to the reference point is lit.
The positioning at the intermediate point and reference point in this way is equivalent to the
positioning of G00.
The instruction for 3-axis link is as follows:
G28α—β— r —:
52
Page 61

GSK983M Milling CNC System Operation Manual (Volume I: Specifications and Programming)
(The addresses α, β and r shall be selected from X, Y, Z and additional axes A, B, C, U, V and
W.) The following instruction is allowed for 4-axis link function.
G28α—β— r —δ—:
Where α, β, r, δ= X, Y, Z, A, B, C, U, V or W
Generally the G28 instruction is used for automatic tool change (ATC). In principle, tool radius
compensation, tool offset compensation and tool length compensation shall be cancelled
before executing the instruction.
Note 1: Not only the coordinates of move instruction, but also the coordinates of intermediate point is
saved to memory in the blocks of G28. This is, for the axes without instruction in the blocks of
G28, the foregoing coordinates in G28 serves as the coordinates of the intermediate point of
the axis.
Example: N1 G90 X100.0 Y200.0 Z300.0:
N2 G28 X400.0 Y500.0:
N3 G28 Z600.0:
Remarks:
N2: Intermediate point - 400.0, 500.0
N3: Intermediate point - 400.0, 500.0, 600.0
Note 2: After the system is switched on without manual return to the reference point, it moves from the
intermediate point when G28 is specified. This is similar to the manual return to the reference
point. Now the moving direction from the intermediate point has become the direction of return
to the reference point set by parameter.
Note 3: If G28 is instructed for an axis of rotation, the moving direction from the intermediate point to
the reference point has become the direction of return to the reference point. Furthermore, the
travel is within 360°.
3.5.8.3 Automatic return from reference point (G29)
G29α—β—:
(The addresses α and β shall be selected from X, Y, Z and additional axes A, B, C, U, V and W.
However, additional axes can not be interlocked with one the three basic axes if additional axis
gang control function is not selected.)
The tool may be positioned at the specified point through an intermediate point using this
function. As a rule, the instruction is used after a G28 instruction.
Α and β are specified in absolute/incremental value depending on the current G90/G91 state.
In an incremental instruction, an incremental value relative to the intermediate value shall be
specified.
Using the movement of the blocks of G29 allows all instructed axes to pass through the
intermediate point previously defined by G28 instruction and to reach the specified point at
rapid traverse (positioning) rate.
53
Page 62
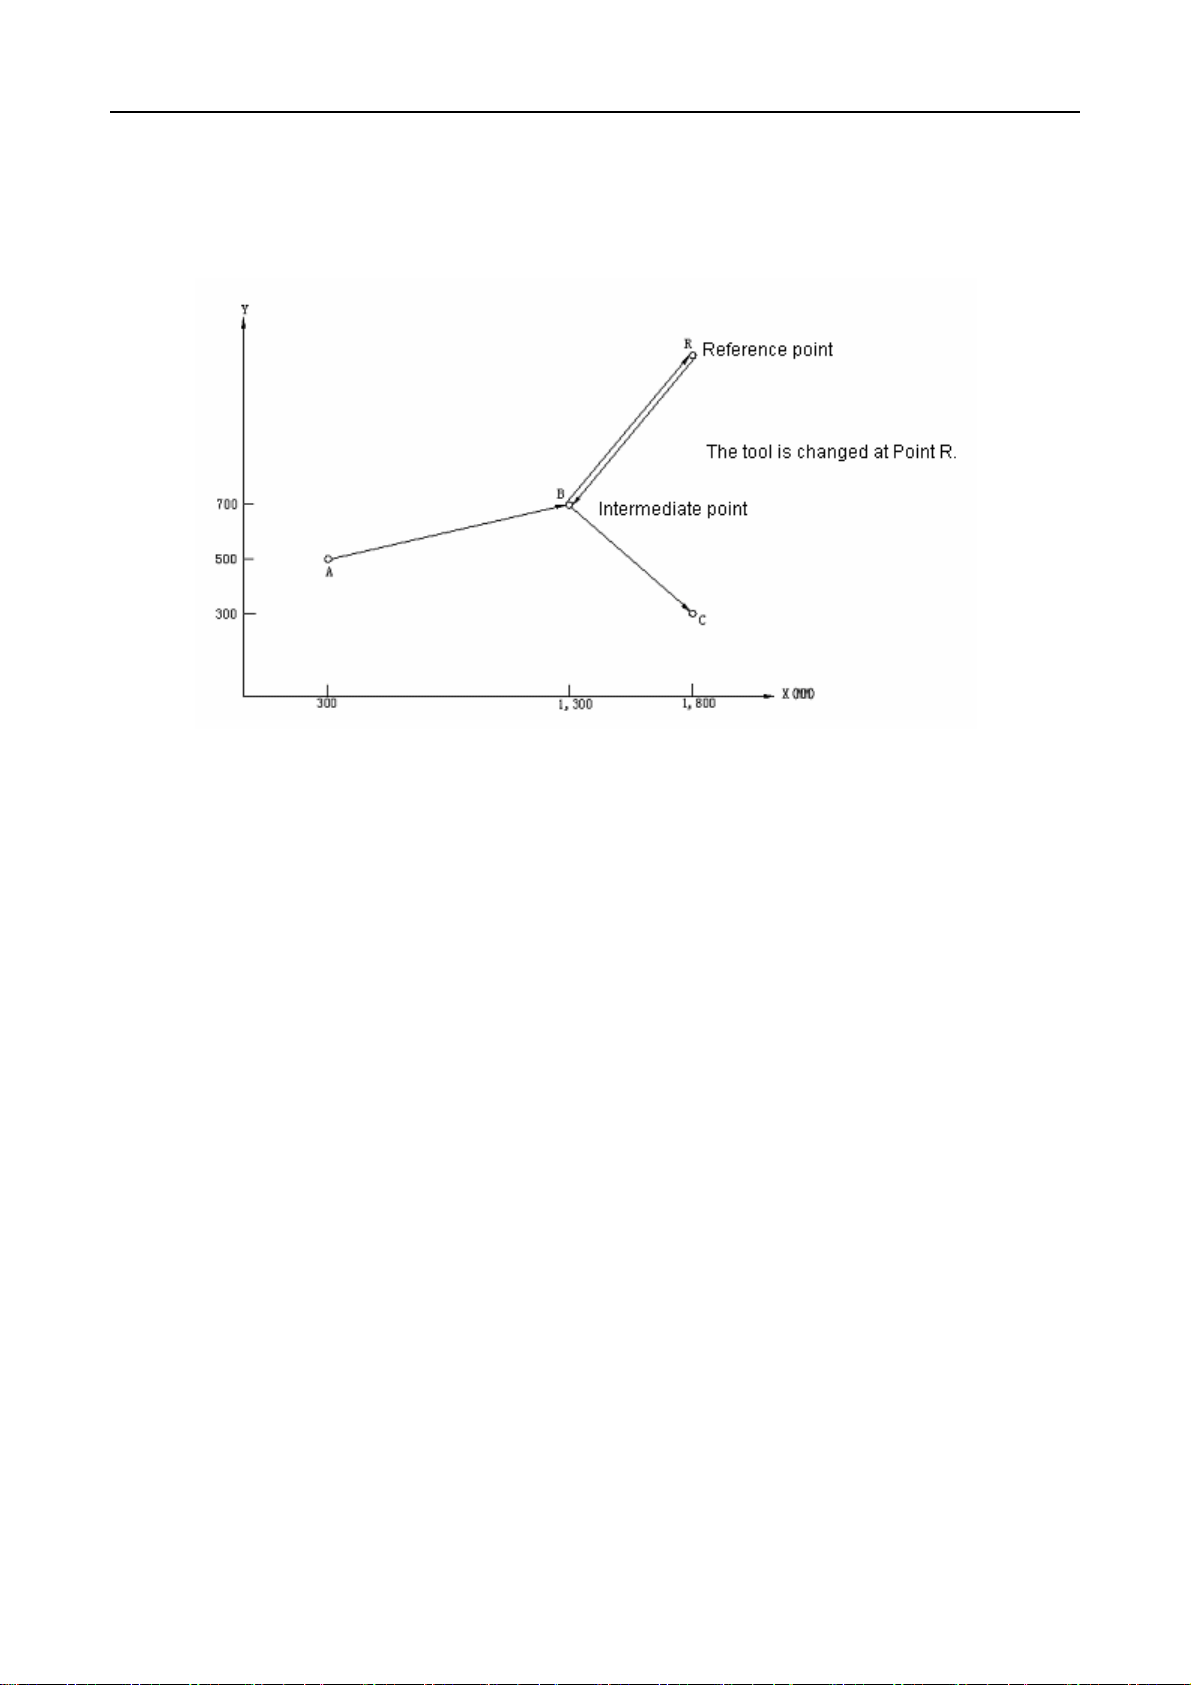
GSK983M Milling CNC System Operation Manual (Volume I: Specifications and Programming)
The procedures for positioning at the intermediate point and then the specified point are similar
to the positioning with G00.
Example of G28 and G29 application:
For G91:
G28 X1000.0 Y200.0: (From A to B)
M06:
G29 X500.0 Y-400.0: (From B to C)
The example shows that programmer needs not to calculate the actual travel distance from the
intermediate point to the reference point. The G29 instruction for a system with 3-axis
concurrent control function is as follows:
G29α—β— r —:
(The addresses α, β and r shall be selected from X, Y, Z and additional axes A, B, C, U, V and
W. However, additional axes can not be interlocked with one the three basic axes if additional
axis concurrent control function is not selected.)
The following instruction is allowed for the system with 4-axis link function:
G29α—β— r —δ—:
Where α, β, r, δ = X, Y, Z, A, B, C, U, V and W
Note: After the tool passes through the intermediate point and reaches the reference point
under the instruction of G29/30, the intermediate point shall move to a new coordinate system
in case of change in the position of workpiece coordinate system. Thereafter the tool shall pass
through the intermediate point that has moved to the new coordinate system and reach the
specified point when G29 is instructed.
54
Page 63
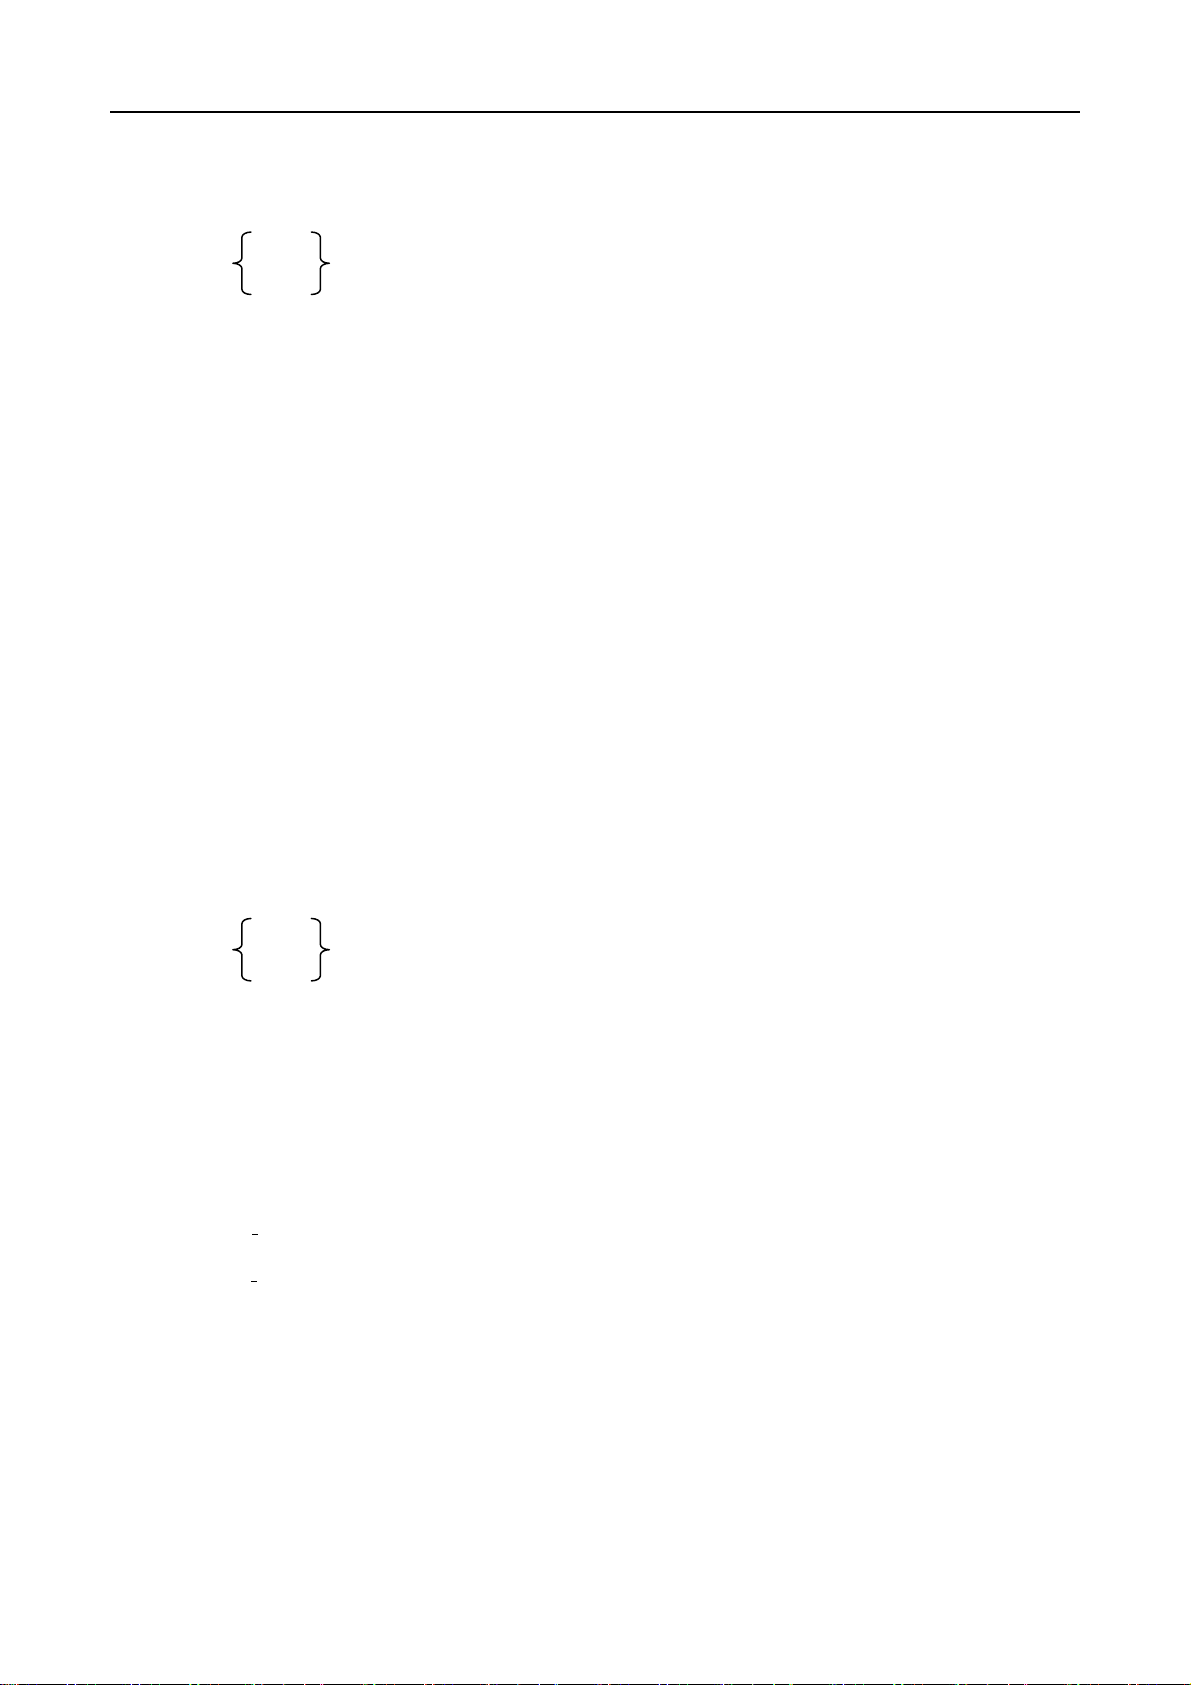
GSK983M Milling CNC System Operation Manual (Volume I: Specifications and Programming)
3.5.8.4 Return to the 2nd, 3rd or 4th reference point (G30)
The following instruction moves the specified axis to the 2nd, 3rd or 4th reference points (G30).
P2
G30 P3 α—β—; (P2 may be omitted)
P4
P2: The 2nd reference point
P3: The 3rd reference point
P4: The 4th reference point
Determining the positions of the 2
between the 1
st
1
reference point but to the 2nd, 3rd and 4th reference points, the function is similar to G28’s
st
reference points for field adjustment. Except that the tool does not return to the
instructions of return to reference point. After the G30 instruction, G29 instruction positions the
cutting tool to the specified position through the intermediated established by G30 instruction.
Its movement is the same as the situation of specifying G29 instruction after G28 instruction.
When the G30 instruction’s normal position of automatic tool change (ATC) varies from the
reference point, the G30 instruction is as follows if 3-axis link function is provided:
nd
, 3rd and 4th reference points is to preset the distance
G30α—β— r —:
(The addresses α, β and r shall be selected from X, Y, Z and additional axes A, B, C, U, V and
W. However, additional axes can not be concurrently controlled along with one the three basic
axes if additional axis concurrent control function is not selected.)
The following instruction may be used when 4-axis gang control function is selected.
P2
G30 P3 α—β— r —δ—;
P4
Where α, β, r, δ = X, Y, Z, A, B, C, U, V or W
Note: After switching on, it is necessary to manually or automatically return to the reference
point once (G28) before executing the G30 instruction.
3.5.9 Dwell (G04)
G04X (t): or
G04P (t
):
Either of the above methods may be used for hold. After executing the previous block, It is
necessary to wait for (t) seconds before executing the next block.
The maximum instruction time is 99999.999s and time error is about 16ms.
Example: To suspend for 2.5s
G04 X2.5 or G04 P2500:
Note 1: Address P does not program with a decimal point.
55
Page 64

GSK983M Milling CNC System Operation Manual (Volume I: Specifications and Programming)
Note 2: Dwell and time delay are applicable for the two conditions below and are enabled by
parameter setting.
1. After the speed of the foregoing block drops to 0
2. After the tool reaches the instruction value (after the inspection of locating point)
3.5.10 Accurate stop detection (G09)
A block involving G09 reduces its feedrate to 0 at the end point and affirms the state of locating
point (Note 2). Then the next block is executed. The function is used to machine a sharp edge
or corner. G09 is only valid in its specified block.
Note 1: Locating point detection is automatically performed in the locate modes (G00, G60) without
G09.
Note 2 Locating point means that a feed motor is within the range of the specified end point.
3.5.11 Accurate stop detecting mode (G61) and cutting mode (G64)
(1) Accurate stop detecting mode (G61)
The move instructions of all blocks following G61 decelerate to 0 at its end point until G64
instruction. They are determined as being in positioned state and then the next block is
executed.
(2) Cutting mode (G64)
The blocks following G64 do not accelerate until the end point of the move instruction of G61
but immediately go to the next block. Even in the G64 mode, feedrate is reduced to 0 and
positioning detection is performed under a positioning instruction (G00 or G60) or in the blocks
that has determined (G09) accurate stop detection.
3.5.12 Coordinate system setting (G92)
To move the cutting tool to a specific point with absolute instruction, make sure to preset the
coordinate system, which is established with the following instruction.
G92X (X) Y (Y) Z (Z) r (r) δ (δ):
(r, δ= A, B, C, U, V, W)
The instruction establishes a coordinate system whose origin is located at a point keeping a
specified distance from the tool. The following absolute instruction will refer to the coordinates
in the workpiece coordinate system.
56
Page 65

GSK983M Milling CNC System Operation Manual (Volume I: Specifications and Programming)
G92 X25.0 Z23.0:
As shown in the above program, G92 is used at the beginning of the block to ensure the nose
of the tool coincides with the origin of the program.
G92 X600.0 Z1200.0:
As shown in the above diagram, G92 will confirm that the tool point coincides with the origin of
the program and execute an absolute instruction. The standard point is positioned at the
specified point. To position the nose of the tool to the specified point, the deviation of the nose
of the point from the reference point shall be corrected by tool length compensation.
Note 1: In the coordinate system established with G92 instruction in offset mode, the coordinates of
the tool in specified position does not include offset.
Note 2: Tool radius compensation is temporarily disabled by G92 instruction.
3.5.13 Workpiece coordinate system (G54~G59)
G92 instruction is not used to establish a workpiece coordinate system. However, the
machine’s six exclusive coordinate systems may be preset and selected with G54 and G59.
G54…………………Workpiece coordinate system 1
57
Page 66
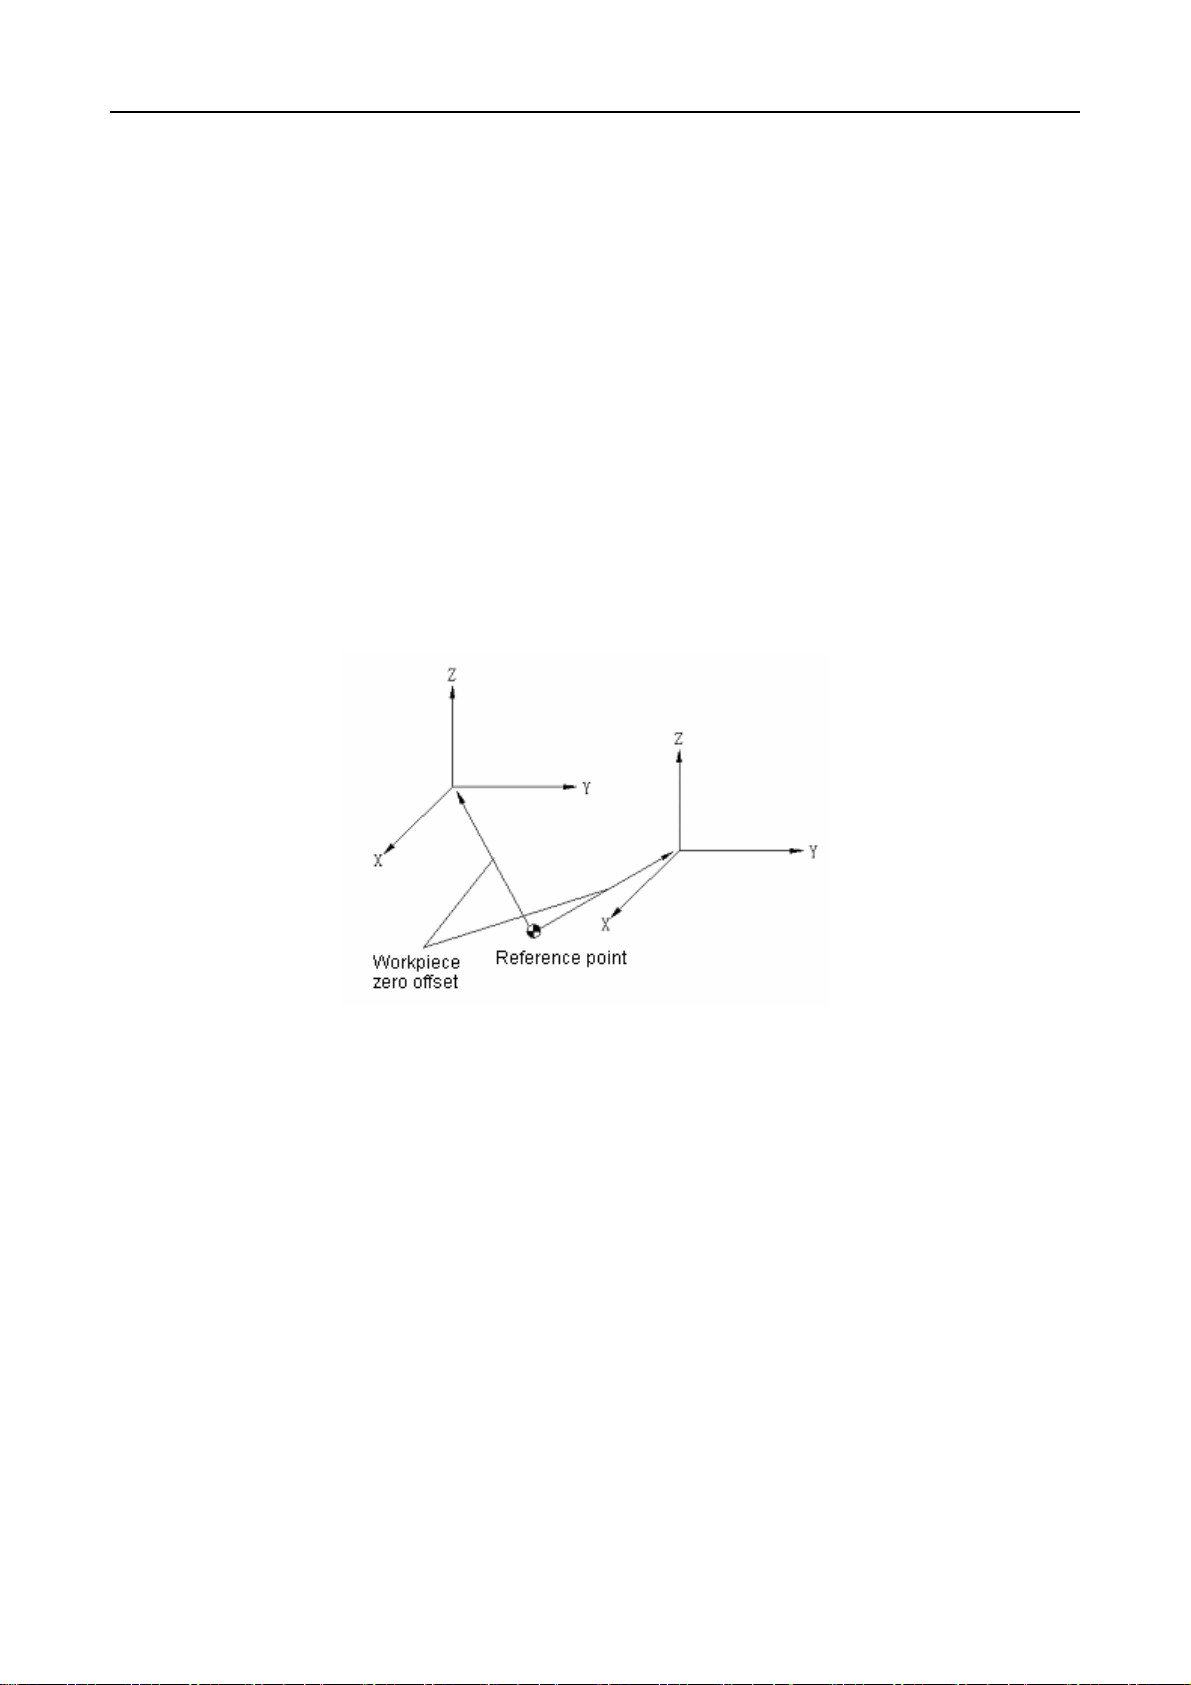
GSK983M Milling CNC System Operation Manual (Volume I: Specifications and Programming)
G55…………………Workpiece coordinate system 2
G56…………………Workpiece coordinate system 3
G57…………………Workpiece coordinate system 4
G58…………………Workpiece coordinate system 5
G59…………………Workpiece coordinate system 6
The six coordinate systems are determined by setting all axes’ distances (the offset of the zero
point of workpiece) from the reference point to their respective points.
Example: G55 G00 X100.0 Z20.0:
X15.5 Z25.5:
In the above example, it is positioned in the workpiece coordinate system 2 (X =100.0, Z =20.0)
and (X =15.5, Z =25.5).
Workpiece coordinate systems 1 to 6 are established after switching on and returning from the
reference point. G54 coordinate system is enabled upon switching on.
Note 1: When the range of the workpiece zero point offset of all axes compensated by external data
inputting (optional) is 0~±0.7999mm or 0~±0.7999mm, check the machine instruction
manual for the function.
Note 2:When G54~G59 are used, the coordinate system is not set with G92 but established with G92.
G54~G59 are used to move the coordinate system. G54~G59 must not be incorporated with
G92 except the special situation that G54~G59 are used to move the coordinate system.
58
Page 67

GSK983M Milling CNC System Operation Manual (Volume I: Specifications and Programming)
When the tool is positioned at (200, 160) in G54 mode, G92 X10 Y100; The specified
workpiece coordinate system 1 (X’, Y’) is moved by vector A. However, all other workpiece
coordinate systems shall concurrently offset vector A.
Note 3: When automatic coordinate system setting is not selected, proper parameter values shall be
set (309 APX~AP4).
3.5.14 To change workpiece coordinate system by program instruction
When the number of workpiece coordinate system becomes inadequate (although 6 are ready)
or when they are to be moved as required, we move them through programming instructions.
G10L2P P
Where P=1~6: the 1~6 X, Y, Z, r, δ (r, δ= one of A, B, C, U, V and W) of the corresponding
coordinate system: the workpiece zero offsets of all axes.
Note: External workpiece origin offset may be changed by setting P= 0.
X—Y—Z— r —δ:
3.5.15 Automatic setting of a coordinate system
A coordinate system may be set in the preset parameter number (375PPRTMX~441PPRTI5)
when returning to the reference point for the first time after switching on, namely it functions as
that G92 automatically sets a coordinate system at the reference point.
Note: If workpiece coordinate system setting function is enabled, it is necessary to set No.
375~378 and 400 parameters to 0 or No. 379~382 and 441 parameters to 0. If they are not
set to 0, the workpiece coordinate system
(1~6) will offset.
3.5.16 To switch between Inch and metric systems (G20, G21)
Inputting in metric or Inch system may be selected using G codes.
59
Page 68
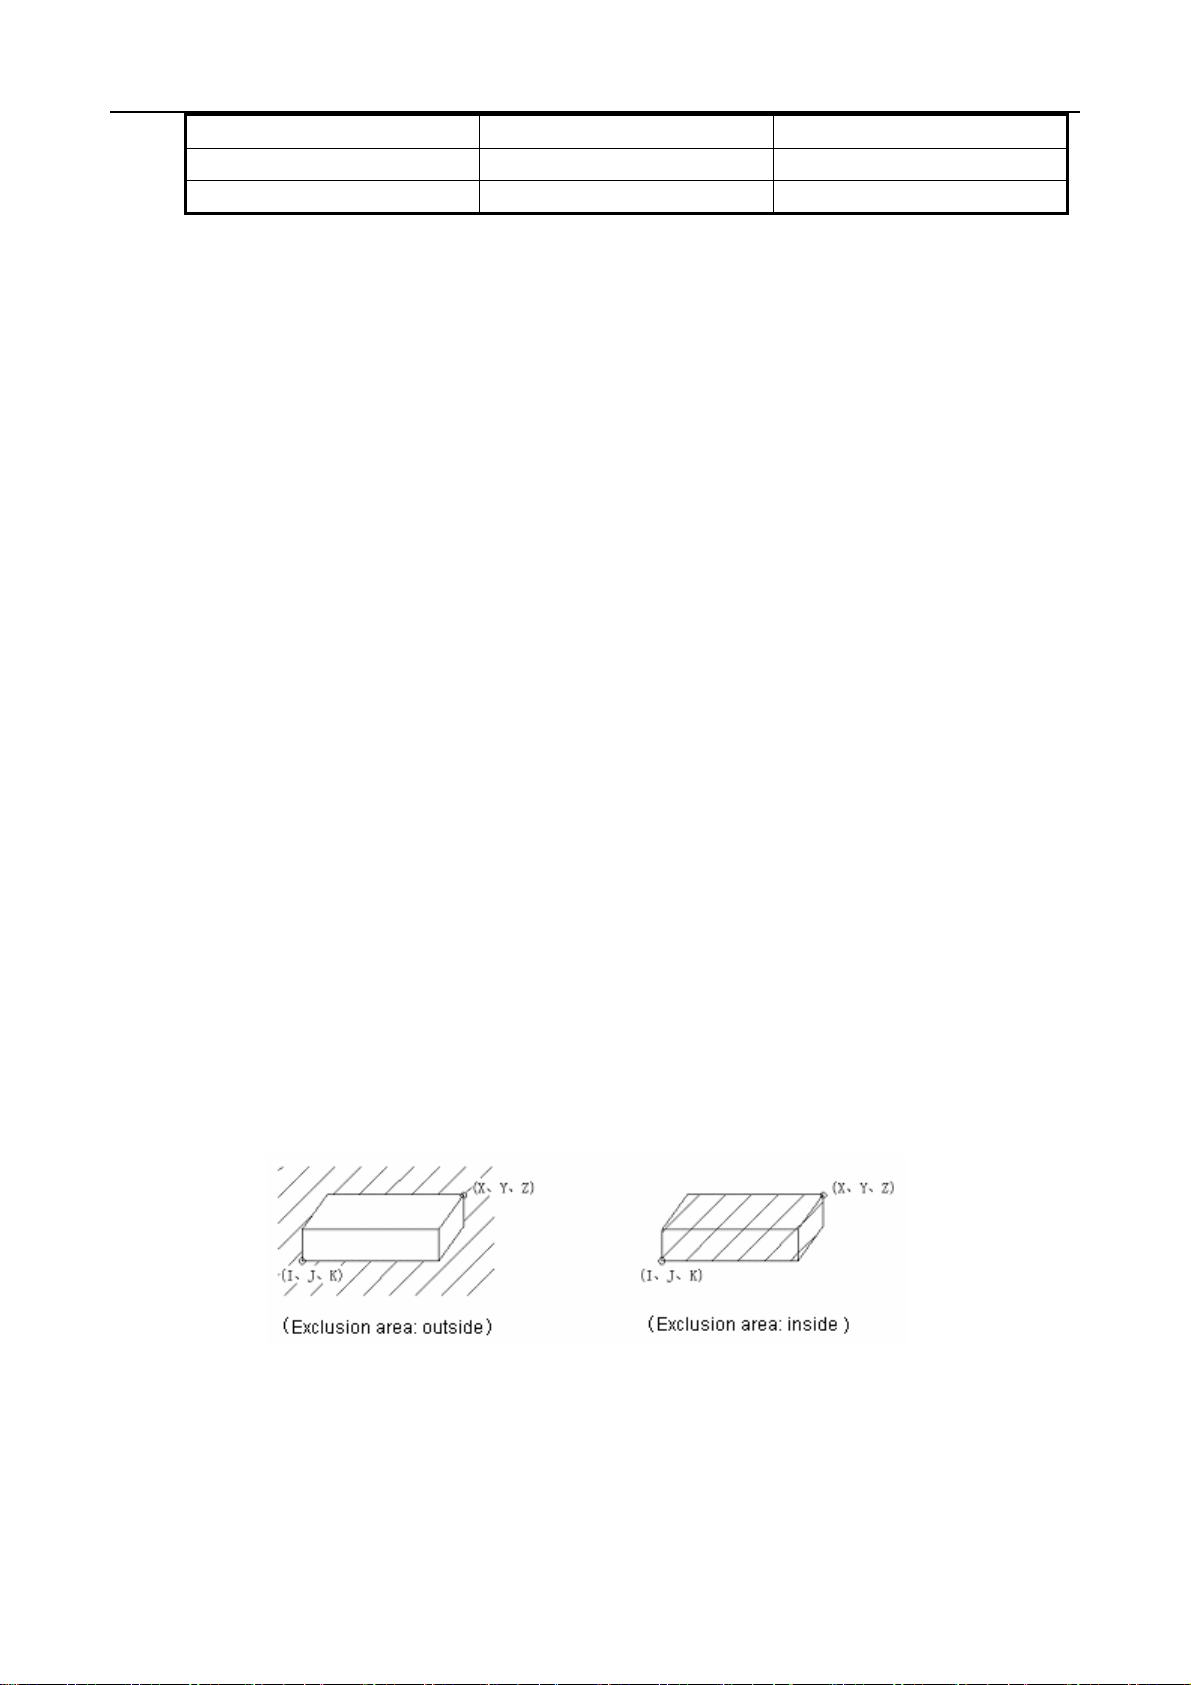
GSK983M Milling CNC System Operation Manual (Volume I: Specifications and Programming)
System of units G codes Minimum input unit
Inch (Inch system ) G20 0.0001inch
mm (metric system) G21 0.001mm
Both the G codes must be instructed with a single block before the start of the program and
setting of the workpiece coordinate system.
N10 G20:
N20 G92 X—Y—:
The following items changes with the G codes:
(1) The feedrate instructed by F;
(2) Position indication;
(3) Offset
(4) The unit of the scale of the manual pulse generator;
(5) The travel of incremental feed;
(6) A part of parameters
Note 1: Once it is switched on, it enters into the state before power off.
Note 2: Switching between G20 and G21 in the midway of a program is not allowed.
Note 3: When the system of the units of the machine differs from that of the program, the maximum
deviation is 1/2 of the minimum traveling unit. The deviation value does not accumulate.
3.5.17 Storage travel limit (G22, G23)
The movable range of the tool may be restricted by the two means below.
(The tool does not enter the shadow area.)
Storage travel limit 1:
The outside of the boundary set by parameter is an exclusion area. As a rule, it shall not
change once it is set by manufacturer. Therefore it is set at the maximum travel of the machine
and is equivalent to the current so-called software limit.
60
Page 69
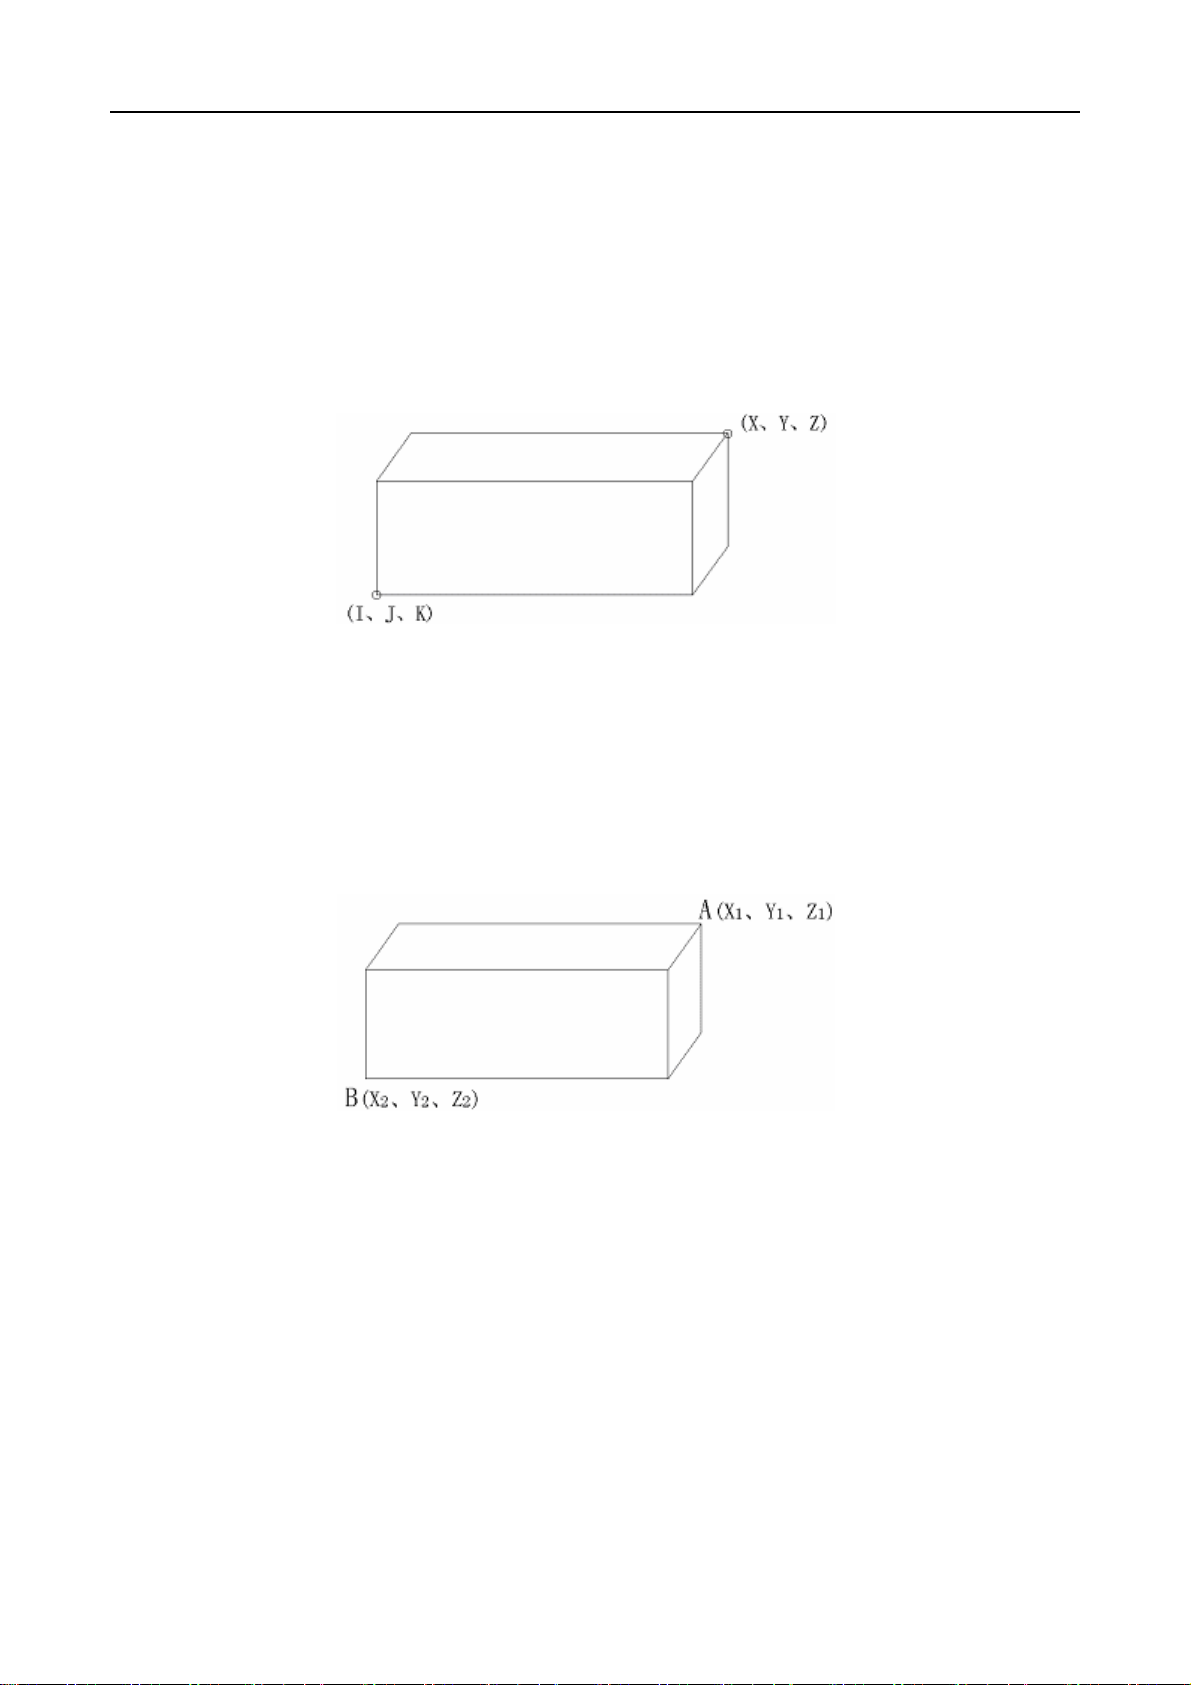
GSK983M Milling CNC System Operation Manual (Volume I: Specifications and Programming)
Storage travel limit 2:
The outside or inside of the boundary set by parameter or instruction is an exclusion area.
Whether it is inside or outside is determined by parameter No.009 BIT6(RWL).
G22 instruction is used to stop the tool from entering the exclusion area and G23 to cancel the
restriction.
The instruction below is used to establish or change an exclusion area.
G22 X—Y—Z—I—J—K—:
X>I, Y>J, Z>K
X-I>2000 (Minimum instruction increment)
Y-J>2000 (Minimum instruction increment)
Z-K>2000 (Minimum instruction increment)
The points A and B in the figure below shall be involved during parameter setting.
X
X
Y
, Y1>Y2, Z1>Z2
1>X2
>2000 (Minimum instruction increment)
1-X2
>2000 (Minimum instruction increment)
1-Y2
Z
>2000 (Minimum instruction increment)
1-Z2
If the exclusion area is set by parameter, X, Y, Z, I, J and K shall be set by the minimum travel
unit (input unit) of the mechanical system with the reference as its origin.
If the exclusion area is set by G22 instruction, X, Y, Z, I, J and K shall be set by the minimum
travel unit (input unit) of the mechanical system with the reference as its origin. Then the
programming data is changed into the numerical value in the minimum traveling unit and the
value is set a parameter.
61
Page 70

GSK983M Milling CNC System Operation Manual (Volume I: Specifications and Programming)
Since it is necessary to detect which part of the tool nose or clamp has entered the exclusion
area, the computing methods for X, Y, Z, I, J and K are different.
If point A is detected to enter into the exclusion area, a shall be set. If point B is detected to
enter into the exclusion area, b shall be set.
When point A is used to detect the nose of the tool, it is safe without changing the settings of
the tool each time if the tool of varied lengths are set to the required length.
Overlapped setting is possible for the area.
Note 1: All limits will become effective after power on and manual return from the reference point or
G28 completes automatic return from the reference point.
Note 2: If the reference point is within the exclusion area of all limits, the system immediately gives an
alarm when the storage travel limits are valid after power on and manual return from the
reference point. (For storage limit 2, only G22 mode is applicable.)
When G23 is changed to G22 and the tool is in the exclusion area, the system will give an
alarm in the next block.
Note 3: Pressing the emergent stop switch to cancel the restrictions and move the tool out of the
exclusion area in G23 mode when the tool remains still in the exclusion area under the
conditions of Note 2. The settings shall be changed if they are set incorrectly. Then the tool
returns from the reference point.
Note 4: Since the axis without the function of returning from the reference point, the axis does not give
an alarm in the exclusion area.
Note 5: For the setting of the exclusion area, the area is described as follows:
When the exclusion area is beyond the specified area, all the areas are movable.
62
Page 71
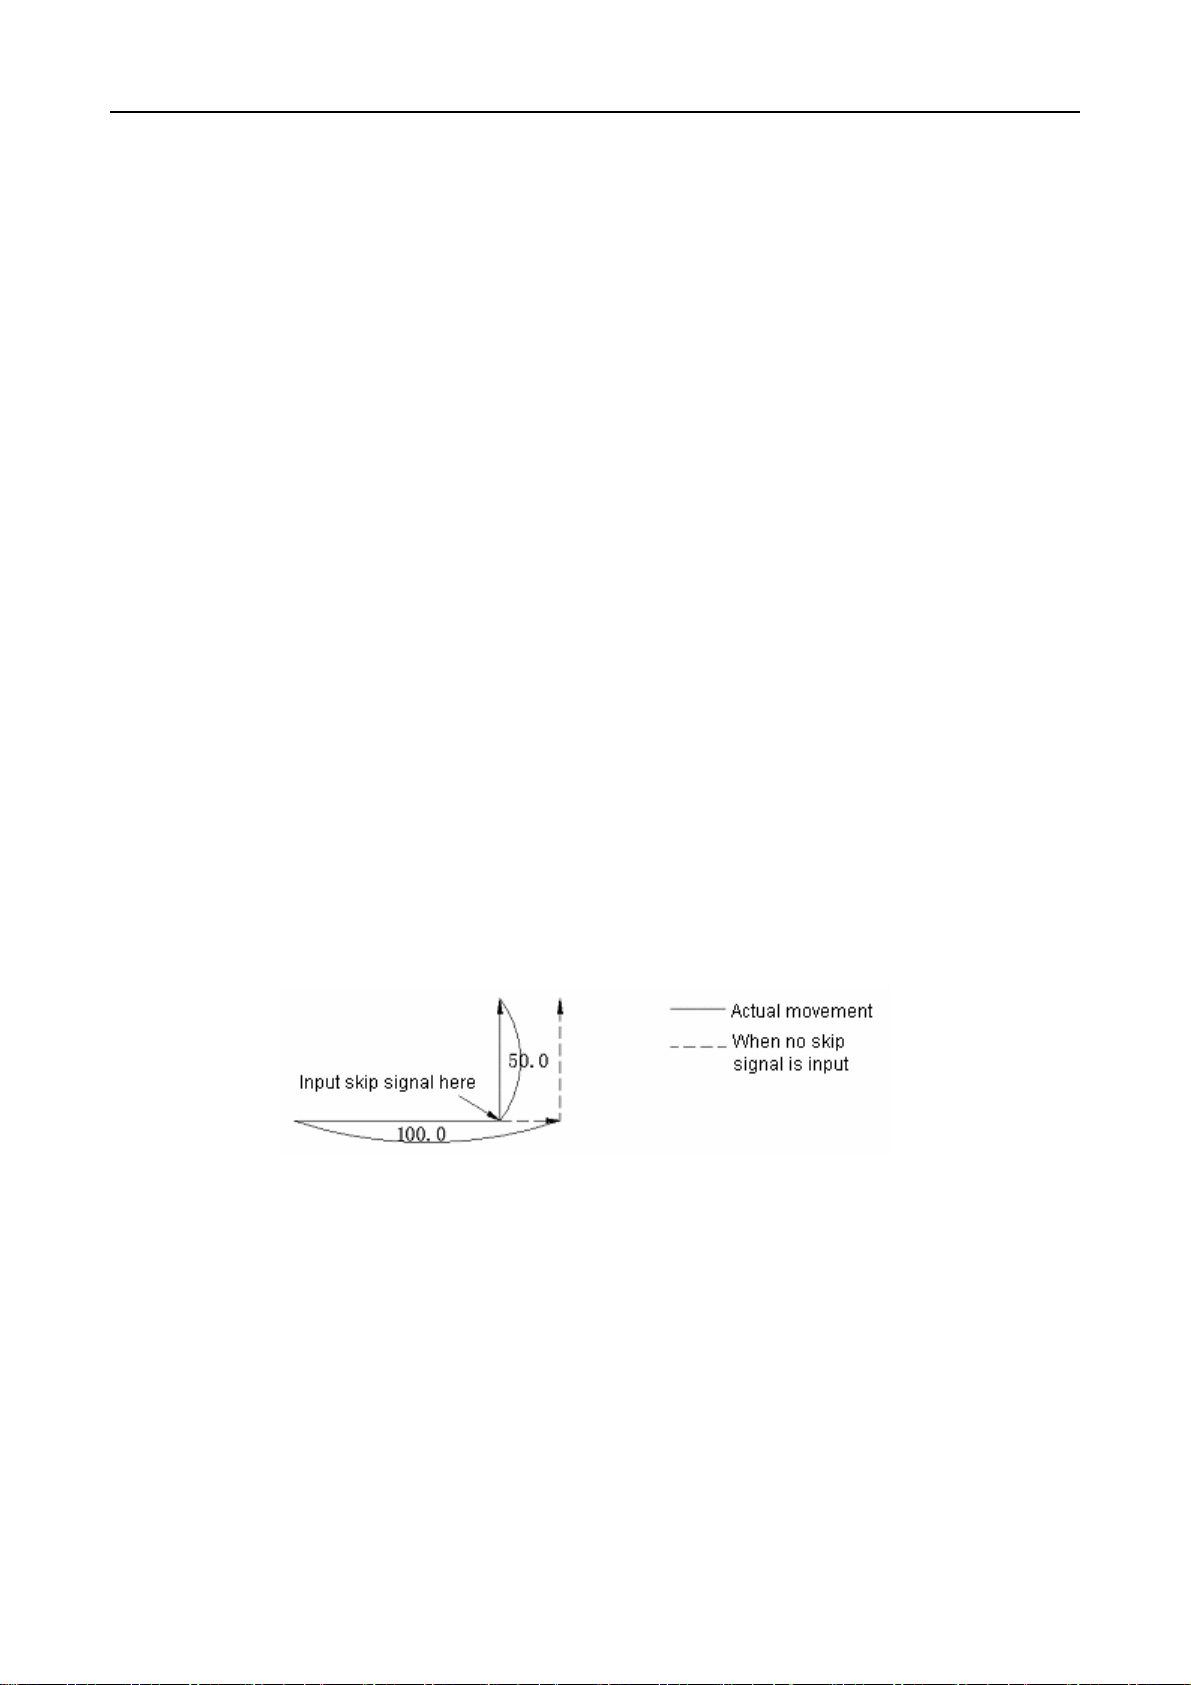
GSK983M Milling CNC System Operation Manual (Volume I: Specifications and Programming)
When the exclusion area is within the specified area, all the areas are restricted for movement
(in G22 mode).
Note 6: The settings beyond the travel of the machine are not necessary.
Note 7: The tool may reversely move provided that the tool is in the exclusion are and an alarm is
given.
Note 8: Even the sequence of the coordinates of the two points In the set area are set incorrectly, the
rectangle with the two points as its acmes can also be created into a limit area.
Note 9: G22 and G23 shall be instructed in single blocks.
Note 10: Storage travel limit 2 cannot be used for additional axes.
3.5.18 Skip function (G31)
The G31 followed by a move instruction is capable of instructing linear interpolation as G01. If
skip signal is input form the outside in the midway of the instruction, the remaining part of the
instruction will be interrupted and the next block will be executed.
G31 instruction is one-off and only valid in the instructed block.
The movement after skip signal depends on whether the next block is incremental or absolute.
1) The next block is an incremental instruction.
To make incremental movement from the break point:
Example: G31 G91 X100.0:
Y50.0:
The next block is an absolute instruction (only one axis)
The axis instructed in one block moves to the instructed position while those not instructed
remain in the positions input by skip signal.
Example: G31 G90 X200.0:
Y100.0:
63
Page 72

GSK983M Milling CNC System Operation Manual (Volume I: Specifications and Programming)
2) The next block is an absolute instruction (to instruct 2 axes)
The next block moves to the instructed position wherever skip signal is input.
Example: G31 G90 X200.0:
X300.0 Y100.0:
The feedrate of a block is specified (G31)with No. 306 (SKPF) parameter in the following two
ways:
a) Feedrate is specified with F codes (may be specified in the foregoing blocks or G31 block)
b) No. 342 parameter is set by No. 342 parameter.
The coordinates when skip signal is switched on are stored in the system variables #5061 to
#5065 of the user macro. Therefore they may be used in macros.
#5061………………………X coordinates
#5062………………………Y coordinates
#5063………………………Z coordinates
th
#5064………………………The 4
#5065………………………The 5
coordinates
th
coordinates
The skip function may be used to the situation with unknown travel. Therefore, it is applicable
in the following conditions.
a) For the standard-dimension feed of the milling machine;
b) To enable tool contact pick-off to measure
Note 1: Once G31 instruction is performed in the active state of tool compensation C, No. 035 alarm
64
Page 73

GSK983M Milling CNC System Operation Manual (Volume I: Specifications and Programming)
will be given. Tool compensation shall be canceled with G40 before G31 instruction.
Note 2: If the feedrate instructed by G31 is related to the speed set by parameter, it will have a bearing
upon parameter setting in no-load operation.
Note 3: If the feedrate instructed by G31 is related to the speed set by parameter, the automatic
acceleration/deceleration will be invalid. In this way the accuracy of automatic measurement in
skip function applications is improved.
3.6 Compensation
3.6.1 Tool length compensation (G43, G44, G49)
Using G43
Z—H—; or
G44
G43
H—;
G44
The end position of the axis Z move instruction is moved forward or reversely by setting the
offset set in the offset storage. Using this function may set the difference between the tool
length estimated in programming and the actual one in service into the offset storage to
achieve compensation without changing the program. H instructs the offset set into the offset
storage by instructing the offsetting direction with G43 and G44.
Offsetting direction
G43 Offset in + direction
G44 Offset in - direction
Whether in the situation of absolute or incremental instruction, the offset specified by H codes
and saved in the offset storage is added to the coordinates of the end point of the spindle move
instruction for G43 and detracted from it for G44. The calculated coordinates become the end
point of the coordinates. It may be illustrated in the same way when axis Z move instruction is
ignored as follows:
G43
G91 ZOH——;
G44
The offset is positive for G43 and negative for G44.
G43 and G44 are modal G codes and, when instructed, are always valid if no G codes in the
same group are coded. G 43 or G44 code is valid upon power on depends on parameter setting.
Offset specification
65
Page 74
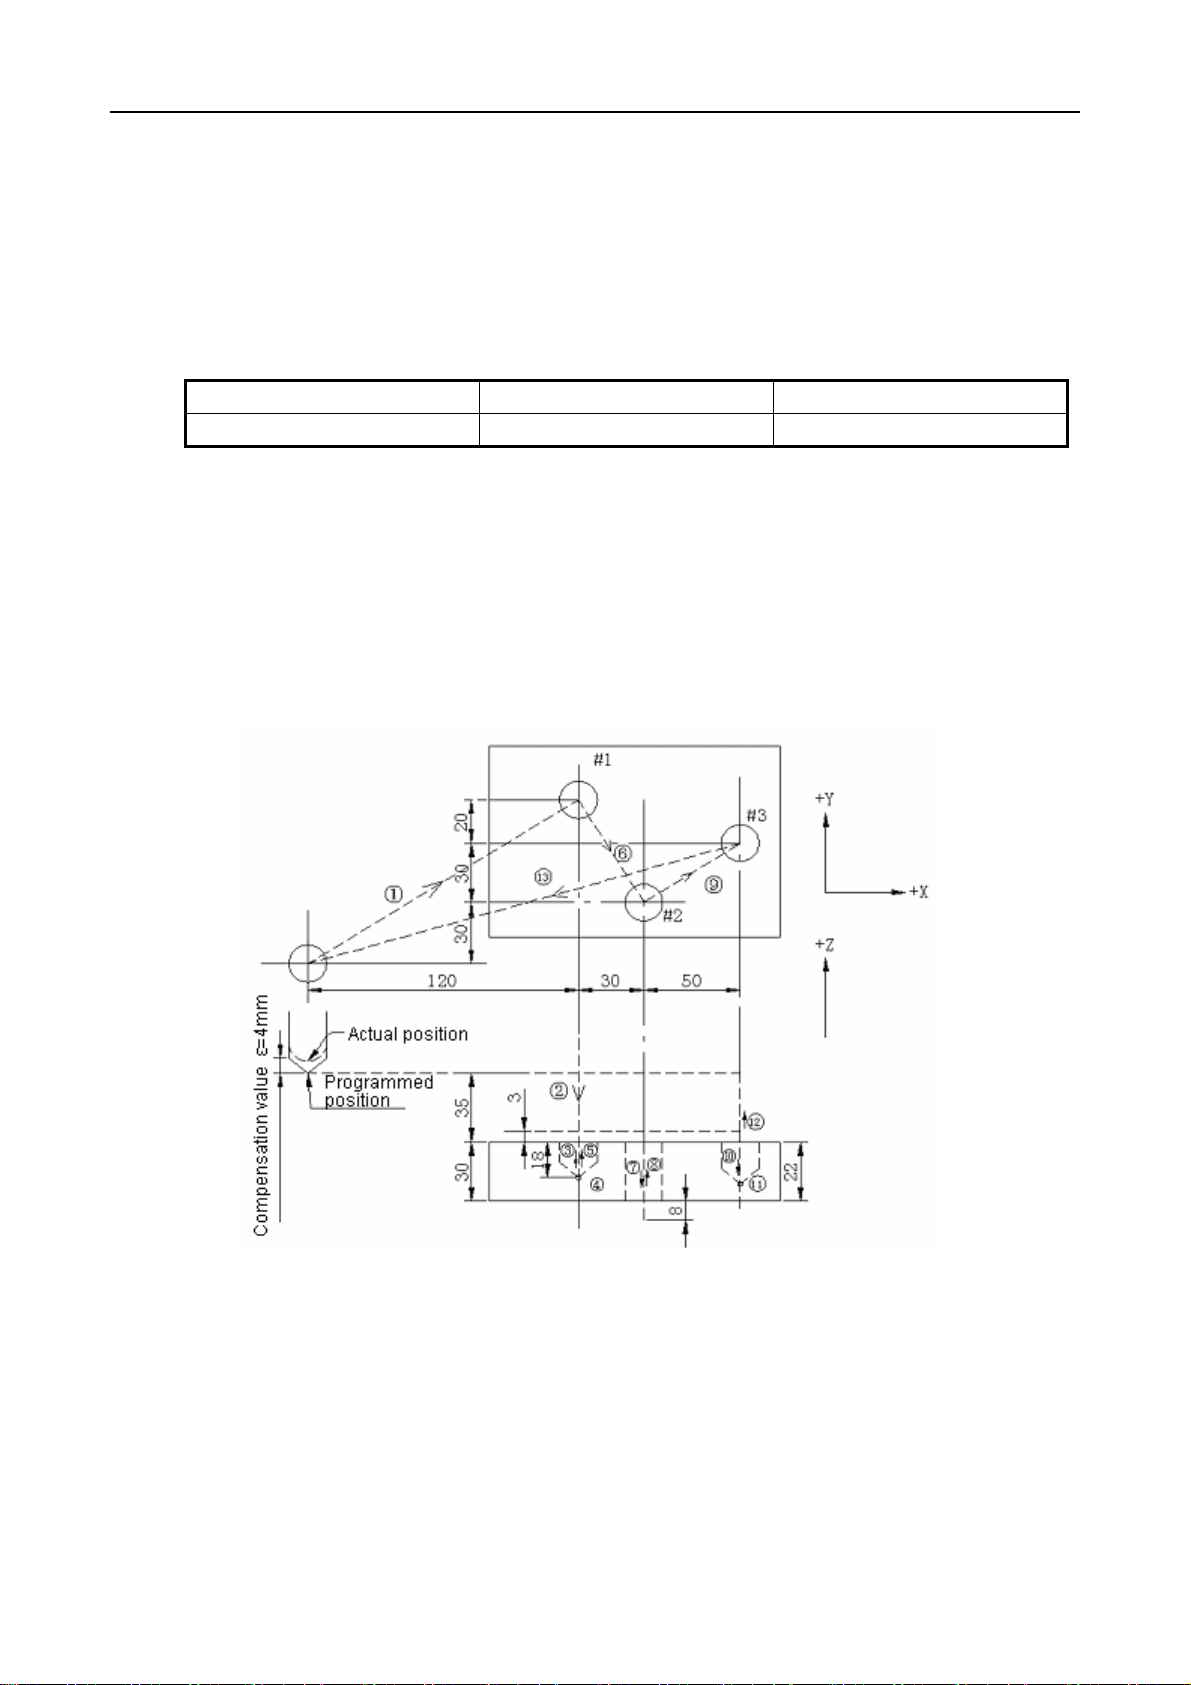
GSK983M Milling CNC System Operation Manual (Volume I: Specifications and Programming)
Offset number is specified with H codes. The offset set in the offset storage of the number is
added to or detracted from the programming value of axis Z. Offset number may be specified
with H00 or H200. The number of the D codes using tool radius compensation hits 32 (It is also
possible to choose 64, 99 or 200).
Offset corresponds to offset number and may be preset in the offset storage through MDI/LCD
or communicating operations. The setting range of the offset is as follows:
Input in mm Input in inch
Offset
0mm~±999.999mm 0 inch~±999.999inch
The offset of the corresponding offset No.00, i.e. H00 is generally 0. The offset corresponding
to H00 shall not be set.
Cancellation of tool length compensation
To cancel tool length compensation, G49 or H00 shall be instructed. Once H00 or G49 is
instructed, canceling operation will be performed.
(1) Example of tool length compensation (machining of #1, #2 and #3 holes)
H01= -4.0 (Offset)
N1 G91 G00 X120.0 Y80.0 ; ……………①
N2 G43 Z-32.0 H01 ; ……………②
N3 G01 Z-21.0 F1000 ; ……………③
N4 G04 P2000 ; ……………④
N5 G00 Z21.0 ; ……………⑤
66
Page 75

GSK983M Milling CNC System Operation Manual (Volume I: Specifications and Programming)
N6 X30.0 Y-50.0 ; ……………⑥
N7 G01 Z-41.0 ; ……………⑦
N8 G00 Z41.0 ; ……………⑧
N9 X50.0 Y30.0 ; ……………⑨
N10 G01 Z-25.0 ; ……………⑩
N11 G04 P2000 ; ……………⑪
N12 G00 Z57.0 H00 ; ……………⑫
N13 X-200.0 Y-60.0 ; ……………⑬
Note 1: When offset is changed due to the change of the offset number, the new offset will not be
added to the original offset.
H01…………Offset 20.0
H02…………Offset 30.0
G90 G43 Z100.0 H01: ……Z will hit 120.0
G90 G43 Z100.0 H02: ……Z will hit 130.0
Note 2: D codes cannot be used for tool length compensation. Other axes except axis Z may employ
tool length compensation.
Which axis will be added with tool length compensation is instructed with axis address α in the
same block with G43 and G44
G43
α_H_: (α: any axis)
G44
Tool length compensation can only be added to an axis at one time. Therefore the system
gives an alarm in the following instructions. To switch an axis for tool length compensation, it is
necessary to cancel the one-off tool length compensation.
G43 Z_H_:
G43 X_H_: (Alarm)
3.6.2 Tool offset (G45~G48)
The moving distance of the specified axis may be zoomed in or zoomed out by the numerical
values set in the offset storage through instructions G45~G48. G codes and their functions
are listed in Table 6.2.
67
Page 76
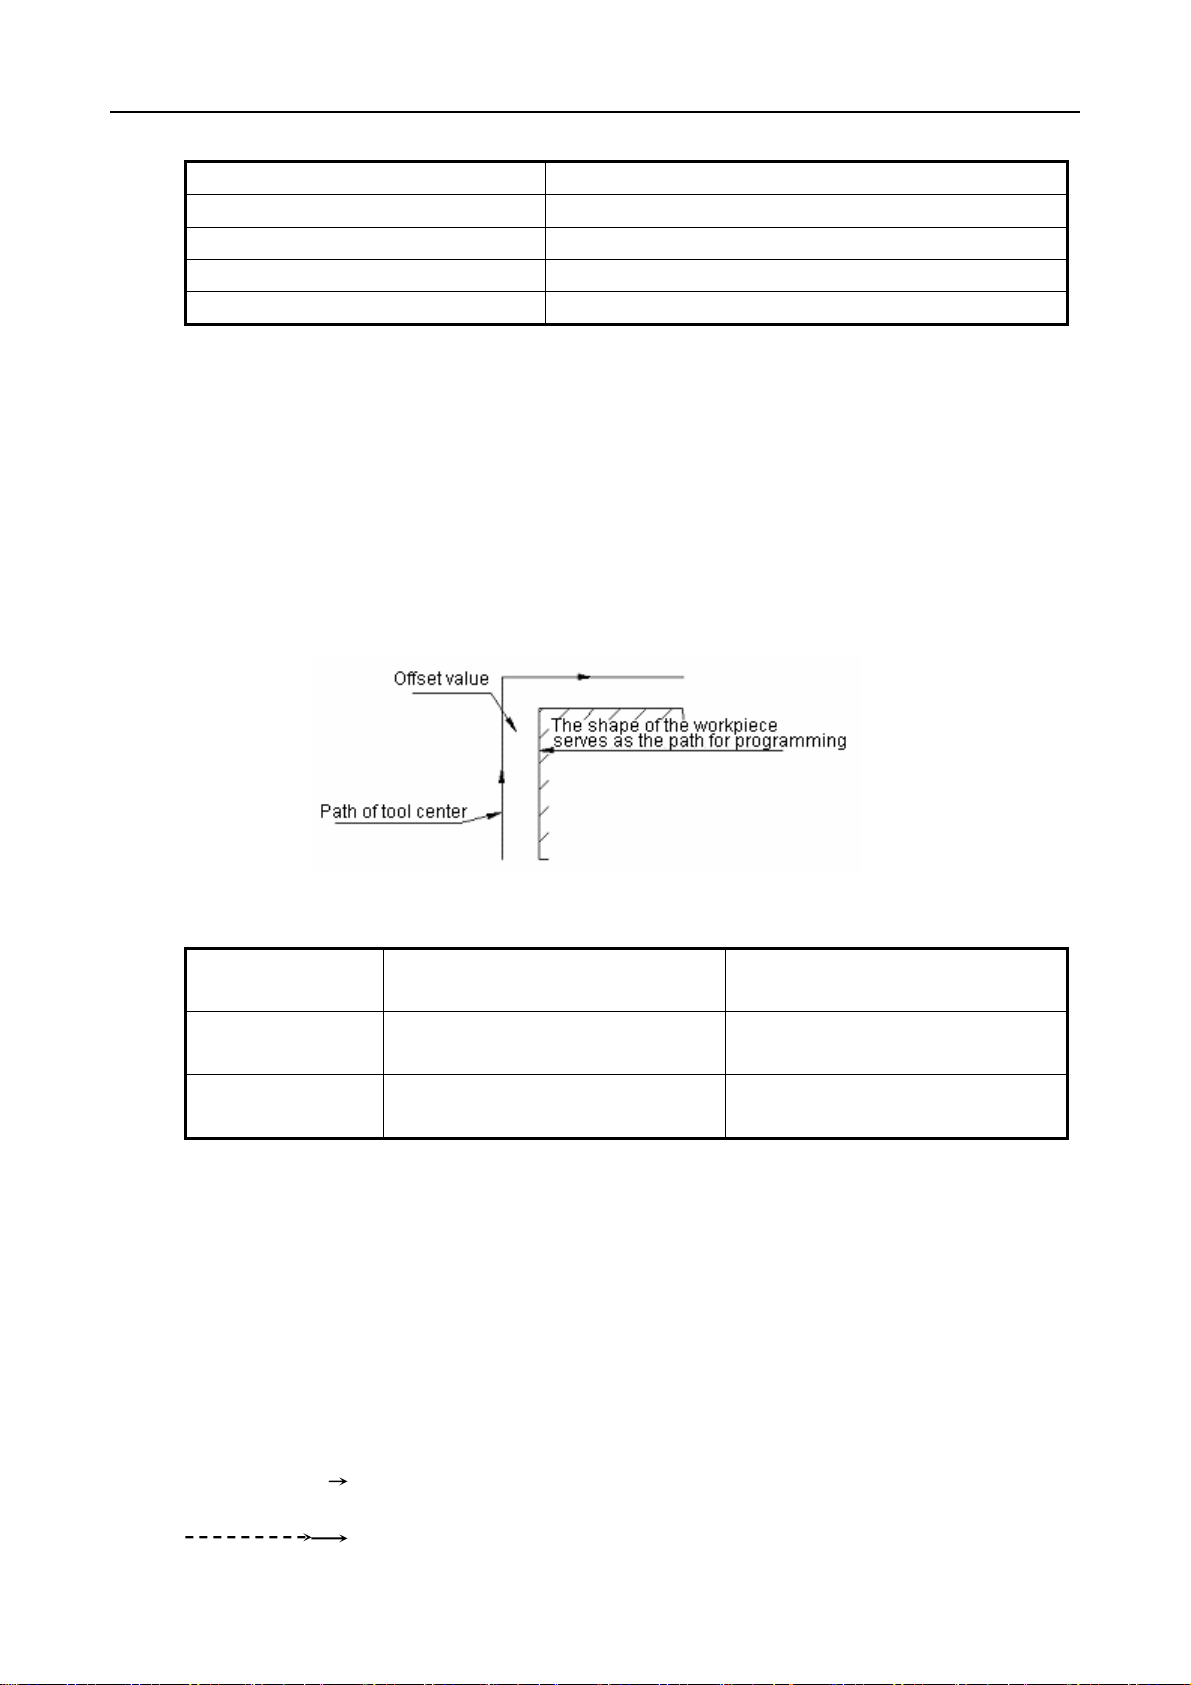
GSK983M Milling CNC System Operation Manual (Volume I: Specifications and Programming)
Table 6.2: Tool offset and G codes
G codes Function
G45 To zoom in an offset
G46 To zoom out an offset
G47 To zoom in an offset by twice
G48 To zoom out an offset by twice
These G codes are modal and only valid in instructed blocks.
These amounts of compensation are instructed by D or H codes and remain unchanged once
they selected before selecting other amounts of compensation.
Whether tool offset compensation uses H or D codes is set by parameter No.010 BIT3
(OFSD).
In offset storage, the shape of the workpiece serves as the path of the tool for programming
during the setting of the radius of the tool.
Range of offset
Input in metric system Input in Inch system
Offset value
Offset value
0mm~±999.999mm 0”~±99.9999”
0
~±999.9990 0
0
The offset function is valid for an additional axis (the 4
When the offset number is 00 (H00 or D00), the offset will also be 0.
Zooming is made in the moving direction of the tool of the axis. When the absolute value
instructs, the tool starts to move to the position instructed by the instructions in the blocks of
G45~G48 and makes zooming compensation.
1) G45 instruction (only to lengthen the offset)
th
axis).
0
~±999.9990
~~~~~~~ Move instruction value
Offset
68
Page 77
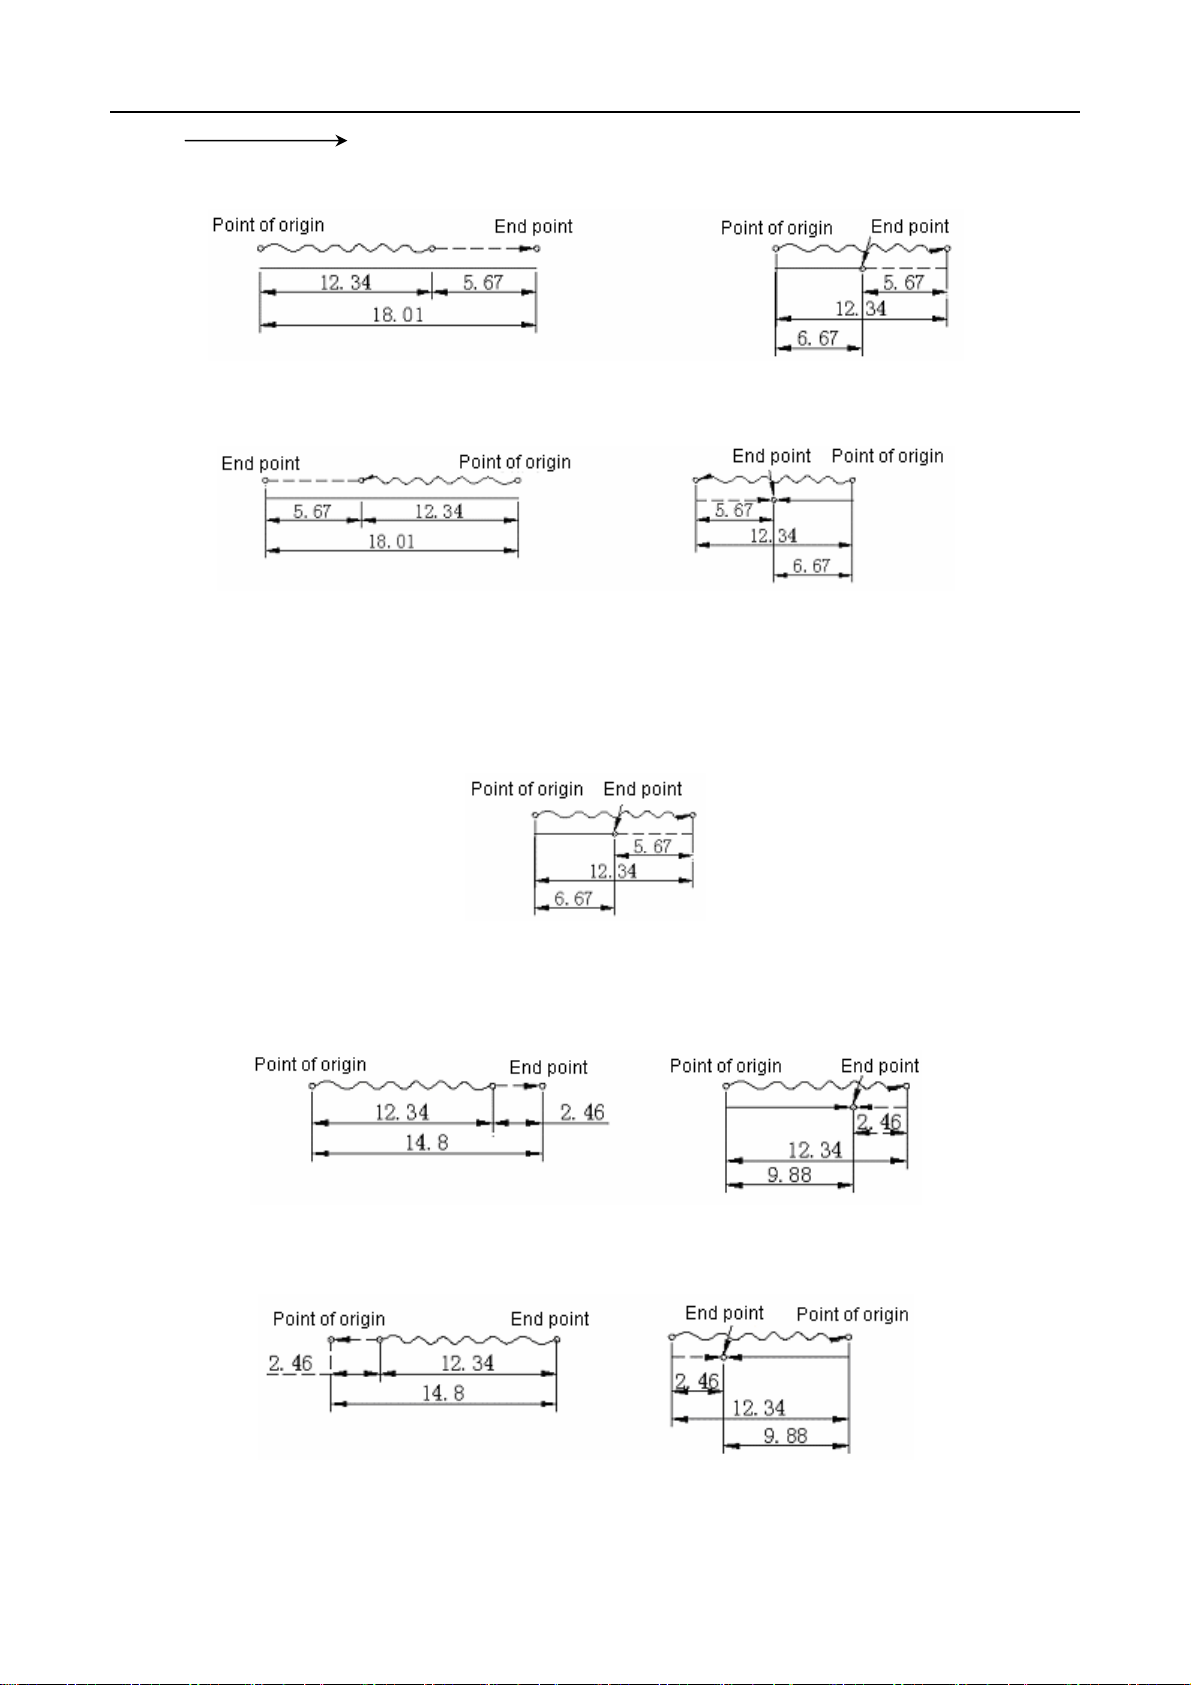
GSK983M Milling CNC System Operation Manual (Volume I: Specifications and Programming)
Actual travel
a) Move instruction +12.34 offset +5.67 b) Move instruction+12.34 offset
c) Move instruction offset +5.67 d) Move instruction -12.34 offset -5.67
2) G46 instruction (only to reduce by one offset)
If the sign of the offset is reversed in G45 instruction, it will be identical with G46.
a) Move instruction+12.34 offset+5.67(b)~(d) (omitted)
3) G47 instruction (lengthen the offset by twice)
a) Move instruction+12.34 offset+1.23 b) Move instruction+12.34 offset-1.23
c) Move instruction-12.34 offset+1.23 d) Move instruction-12.34 offset-1.23
4) G48 instruction (to reduce the offset by twice)
69
Page 78

GSK983M Milling CNC System Operation Manual (Volume I: Specifications and Programming)
If the sign of the offset is reversed in G47 instruction, it will be identical with G48.
a) Move instruction+12.34 offset +1.23(b)~(d) (omitted)
When offset is moved in the mode of incremental instruction (G91), the instruction for travel will
be 0. No movement will be performed if the travel instructed in the mode of absolute instruction
(G90).
Offset +12.34 (offset No. 01)
NC instruction G91 G45 X0 D01: G91 G46 X0 D01: G91 G45 X-0 D01 G91 G46 X-0 D01:
Equivalent
instructions
X12.34 X-12.34 X-12.34 X12.34:
Note 1: If one of G45~G48 is specified for 2-axis gang control, the tool offset is valid for both axes.
For G45
Move instruction X1000.0 Y5000.0
Offset +200.0 Offset No. 02
Programming instruction G45 G01 X1000.0 Y500.0 D02:
Note 2: During bevel machining, it is subject to overcutting or under-cutting if tool offsetting is
performed.
70
Page 79
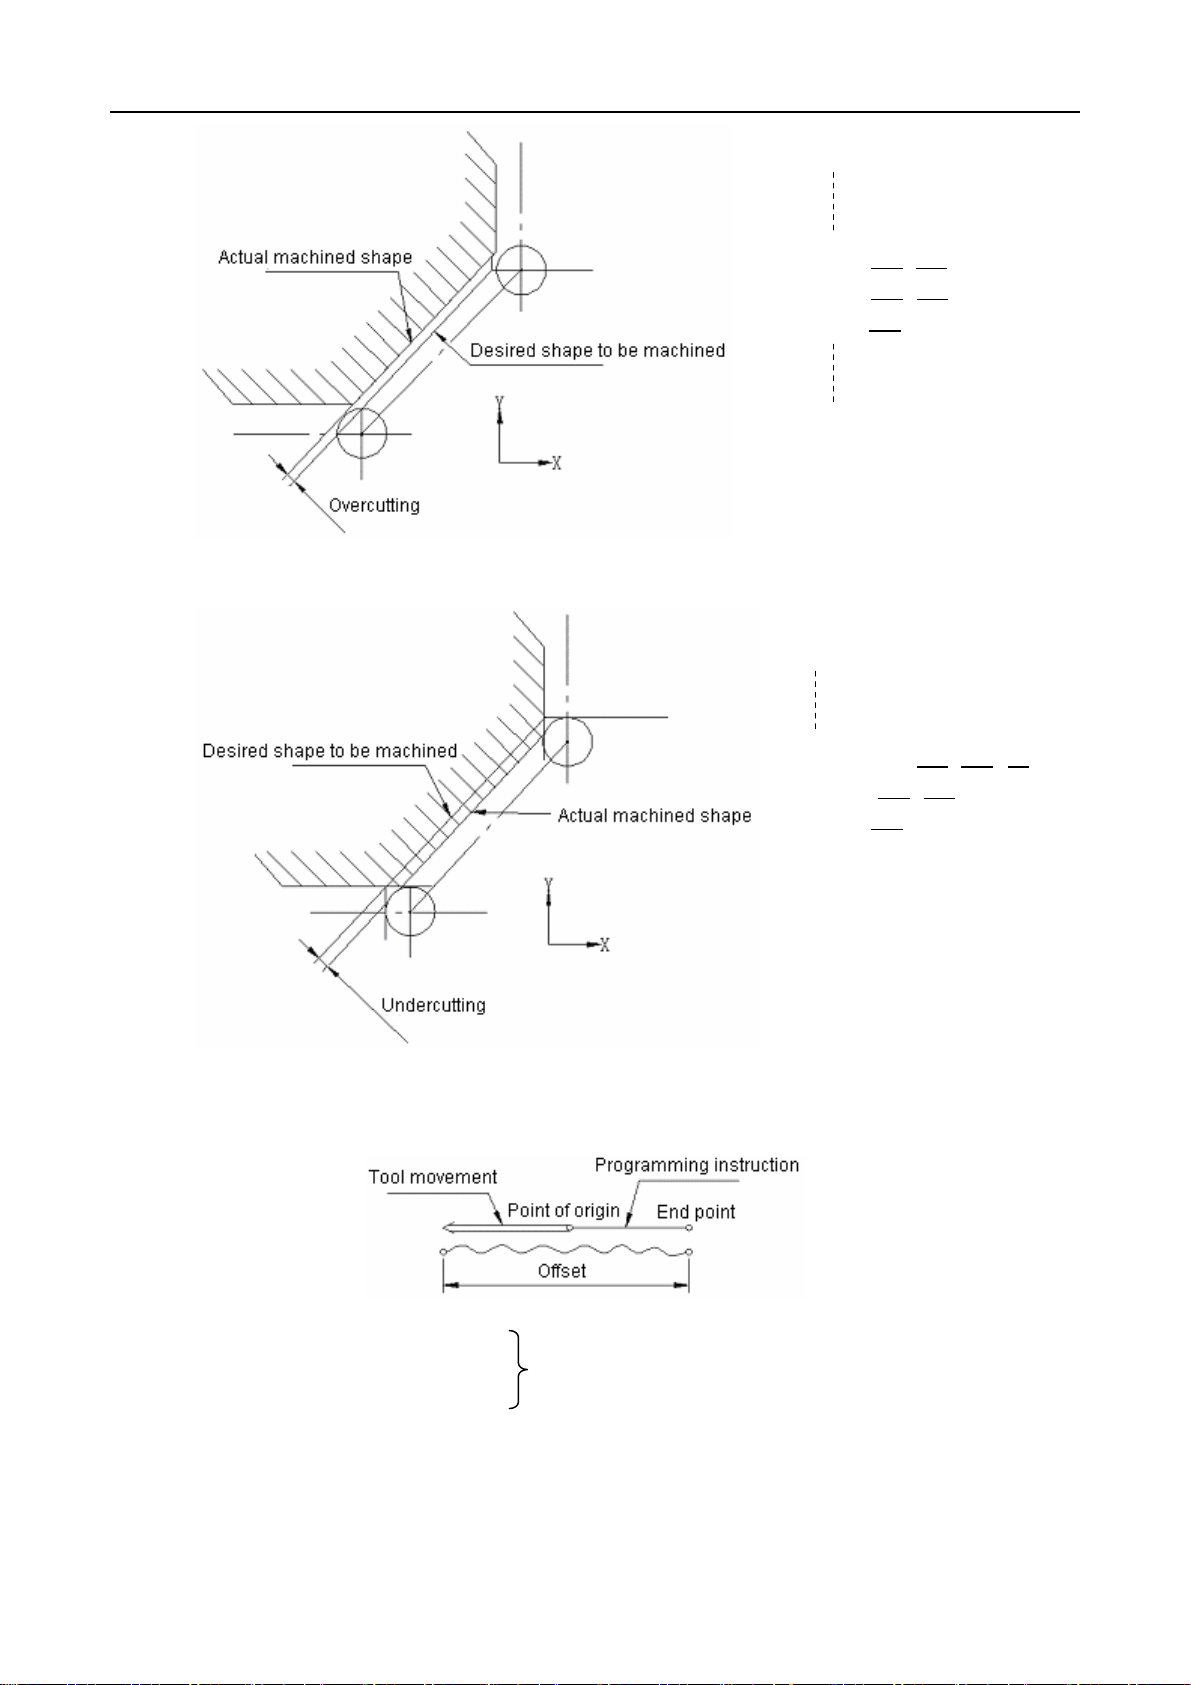
GSK983M Milling CNC System Operation Manual (Volume I: Specifications and Programming)
G01 X
G47 X
F ;
Y ;
Y ;
G01 G45 X
X
G45 Y ;
F D ;
Y ;
Note 3: When the offset is higher than the move instruction value, the actual moving direction of the
tool will be contrary to the programmed direction.
Example: G46 X2.50;
(Incremental instruction) Equivalent to X-1.20:
Offset+3.70
Note 4: For arc interpolation (G02, G03), only the tool offset under the conditions of 1/4 and 3/4 circles
may be resulted by G45 to G48 instructions. That is, tool compensation is only available for 1/4
and 3/4 arc instructions.
Example 6.21: Offset +20.0, Offset No. 01
71
Page 80

GSK983M Milling CNC System Operation Manual (Volume I: Specifications and Programming)
Example of programming:
(G91)
G45 G03 X-70.0 Y70.0 I-70.0 D01:
Example 6.22: The tool position offset during arc interpolation
N1 G46 G00 X—Y—D—;
N2 G45 G01 Y—F—;
N3 G45 G03 X—Y—I—;
N4 G01 X—;
Example 6.23: The program with tool offset
Tool radius compensation
72
Page 81

GSK983M Milling CNC System Operation Manual (Volume I: Specifications and Programming)
1. G91 G46 G00 X80.0 Y50.0 D01;
2. G47 G01 X50.0 F120;
3. Y40.0;
4. G48 X40.0;
5. Y-40.0;
6. G45 X30.0;
7. G45 G03 X30.0 Y30.0 J30.0;
8. G45 G01 Y20.0;
9. G46 X0; …… Only to move the offset in the direction of -X
10. G46 G02 X-30.0 Y30.0 J30.0;
11. G45 G01 Y0; …………Only to move the offset in the direction of -Y
12. G47 X-12.0;
13. G47 Y-80.0;
14. G46 G00 X-80.0 Y-50.0;
Note 5: Only axis Z moves an offset if H codes are used in G43 or G44 mode. Therefore, it is
recommended not to use H codes but D codes in the offsets of G45~G48 as much as
possible.
Note 6: G45~G48 modes are ignored in fixed cycles. Hence G45~G48 shall be programmed before
instructing fixed cycles and they must always be cancelled after fixed cycles.
73
Page 82

GSK983M Milling CNC System Operation Manual (Volume I: Specifications and Programming)
±
Note 7: Tool offset modes (G45 ~ G48) are not allowed in the modes of G41 or G42 (tool
compensation); otherwise P/S alarm will be given (alarm no. 36).
3.6.3 Tool radius compensation (G40~G42)
3.6.3.1 Tool radius compensation function
As shown in the figure below, to machine the workpiece indicated by A in the figure with a tool
of radius R, the corresponding tool center must always be B path keeping a distance of R away
from A. Moving the tool from the workpiece by one distance in this way is called offsetting. The
tool compensating function is used to determine the path (i.e. offset) of the tool that has moved
for a distance.
Therefore, programmer may use the tool offset mode to program the outline of a workpiece.
Furthermore, if tool radius (offset) is measured and set in the NC during machining, the tool
path will be offset (path B) regardless the programmed path.
Two types of tool compensation (B and C) are available. This section only describes type C.
The difference between B and C is as follows:
In the mode of type B tool compensation, inward offsetting cannot be performed for angles
equal to or less than 90°. In this condition, make sure to program it into a proper inward arc.
3.6.3.2 Offset (D codes)
At most 32 amounts of offset may be set in the offset storage (64, 99 and 200 are optional)
(including 32 amounts of offset for tool length compensation and tool position offsetting). The
offset depends upon the D instructed in program and the number of digits is set with MDI/LCD.
The range of programmable offsets is as follows:
Input in mm Input in inch
Offset
The offset corresponding to No. 00 or D00 is always 0.
0mm ~
999.999mm 0inch ~ ± 99.9999inch
So the offset corresponding to D00 need not be set.
74
Page 83

GSK983M Milling CNC System Operation Manual (Volume I: Specifications and Programming)
3.6.3.3 Offset vector
Two-dimensional offset vector is equal to the vector of the offset specified by D codes. It is
determined in the control unit and its direction is duly corrected in accordance with tool feed of
all axes. The offset vector (hereafter called “vector”) is generated in the control unit so as to
determine the amount of tool offsetting movement and calculate the actual path that the tool
radius offsets from the programmed path. The offset vector will be cleared away by reset.
The vector changes with the movement of the tool. It is very important to know the status of the
vector during developing a program. Please read the following sections and carefully make
certain how the vector is generated.
3.6.3.4 Plane selection and vector
The calculation of offset is performed in the plane established by G17, G18 and G19, which is
called offset plane. For instance, (X, Y) or (I, J) is used to calculate the offset as well as vector
when XY plane is selected. The coordinates of the axes beyond the offset plane are not under
the influence of offset but follows instructed value in the instruction.
In 3-axis gang control, the tool path projected on the offset plane is compensated.
Plane selection switching shall be performed in the mode of offset cancellation. No. 027 alarm
will be given if plane selection switching is performed in offset mode.
G codes Offset plane
G17
G18
G19
To set an offset plane with an additional axis, it is necessary to preset which one in axes X, Y
and Z that the additional axis parallels with by parameter. When none axis it parallels with, the
offset plane cannot be defined.
While setting the offset plane with an additional axis, the additional axis shall be instructed at
the same time with the G codes, i.e. G17, G18 and G19.
a) G17 X_Y_; ……XY plane
b) G17 U_Y_; ……UY plane (U parallels with axis X)
X-Y plane
Z-X plane
Y-Z plane
c) G17 Y_; ………XY plane
d) G17; …………XY plane
e) G17 X_Y_U_; ……Alarm
f) G18 X_W_; ……XW plane (W parallels with axis Z)
3.6.3.5 G40, G41 and G42
G40, G41 and G42 are used to specify the cancellation and generation of a tool radius
75
Page 84

GSK983M Milling CNC System Operation Manual (Volume I: Specifications and Programming)
compensation vector. To determine the direction of an offset vector and the moving direction of
the tool, G40, G41 and G42 may be instructed concurrently with G00, G01, G02 or G03.
G codes Function
G40 To cancel tool compensation
G41 Tool compensation, left
G42 Tool compensation, left
G41 or G42 instruction allows the system to enter into offset mode.
G40 instruction allows the system to enter into cancellation mode.
An example of offsetting course will be illustrated in the following figure.
Start-up block ①: Offset cancellation mode becomes offset mode (G41) in this block. The tool
center is offset at the end point (P
section of program path (from P
) of the block by the radius perpendicular to the lower
1
). The tool compensating value is specified by D07, i.e.
1~P2
offset No.7. G41 means that the tool offsets to the left.
After workpiece shape P
——→P8→P9→P1 programming and starting, the system
1→P2
automatically performs tool compensation.
In block ①, the tool returns to the point of origin (offset cancellation) through G40. The tool
center moves (from P
) normal to the programmed path at the end point of the 10th block.
9~P1
G 40 instruction (program cancellation) shall be instructed at the end point of the program.
Example of program for tool compensation C:
76
Page 85

GSK983M Milling CNC System Operation Manual (Volume I: Specifications and Programming)
G92 X0 Y0 Z0
① N1 G90 G17 G00 G41 D07 X250.0 Y550.0: (The offset is preset in D07 by MDI)
② N2 G01 Y900.0 F150:
③ N3 X450.0:
④ N4 G03 X500.0 Y1150.0 I-600.0 J250.0:
⑤ N5 G02 X900.0 I200.0 J150.0:
⑥ N6 G03 X950.0 Y900.0 I250.0 J0:
⑦ N7 G01 X1150.0:
⑧ N8 Y550.0:
⑨ N9 X700.0 Y650.0:
⑩ N10 X250.0 Y550.0:
⑪ N11 G00 G40 X0 Y0:
3.6.3.6 Details about tool radius compensation C
The tool radius compensation C is described in detail as follows.
77
Page 86
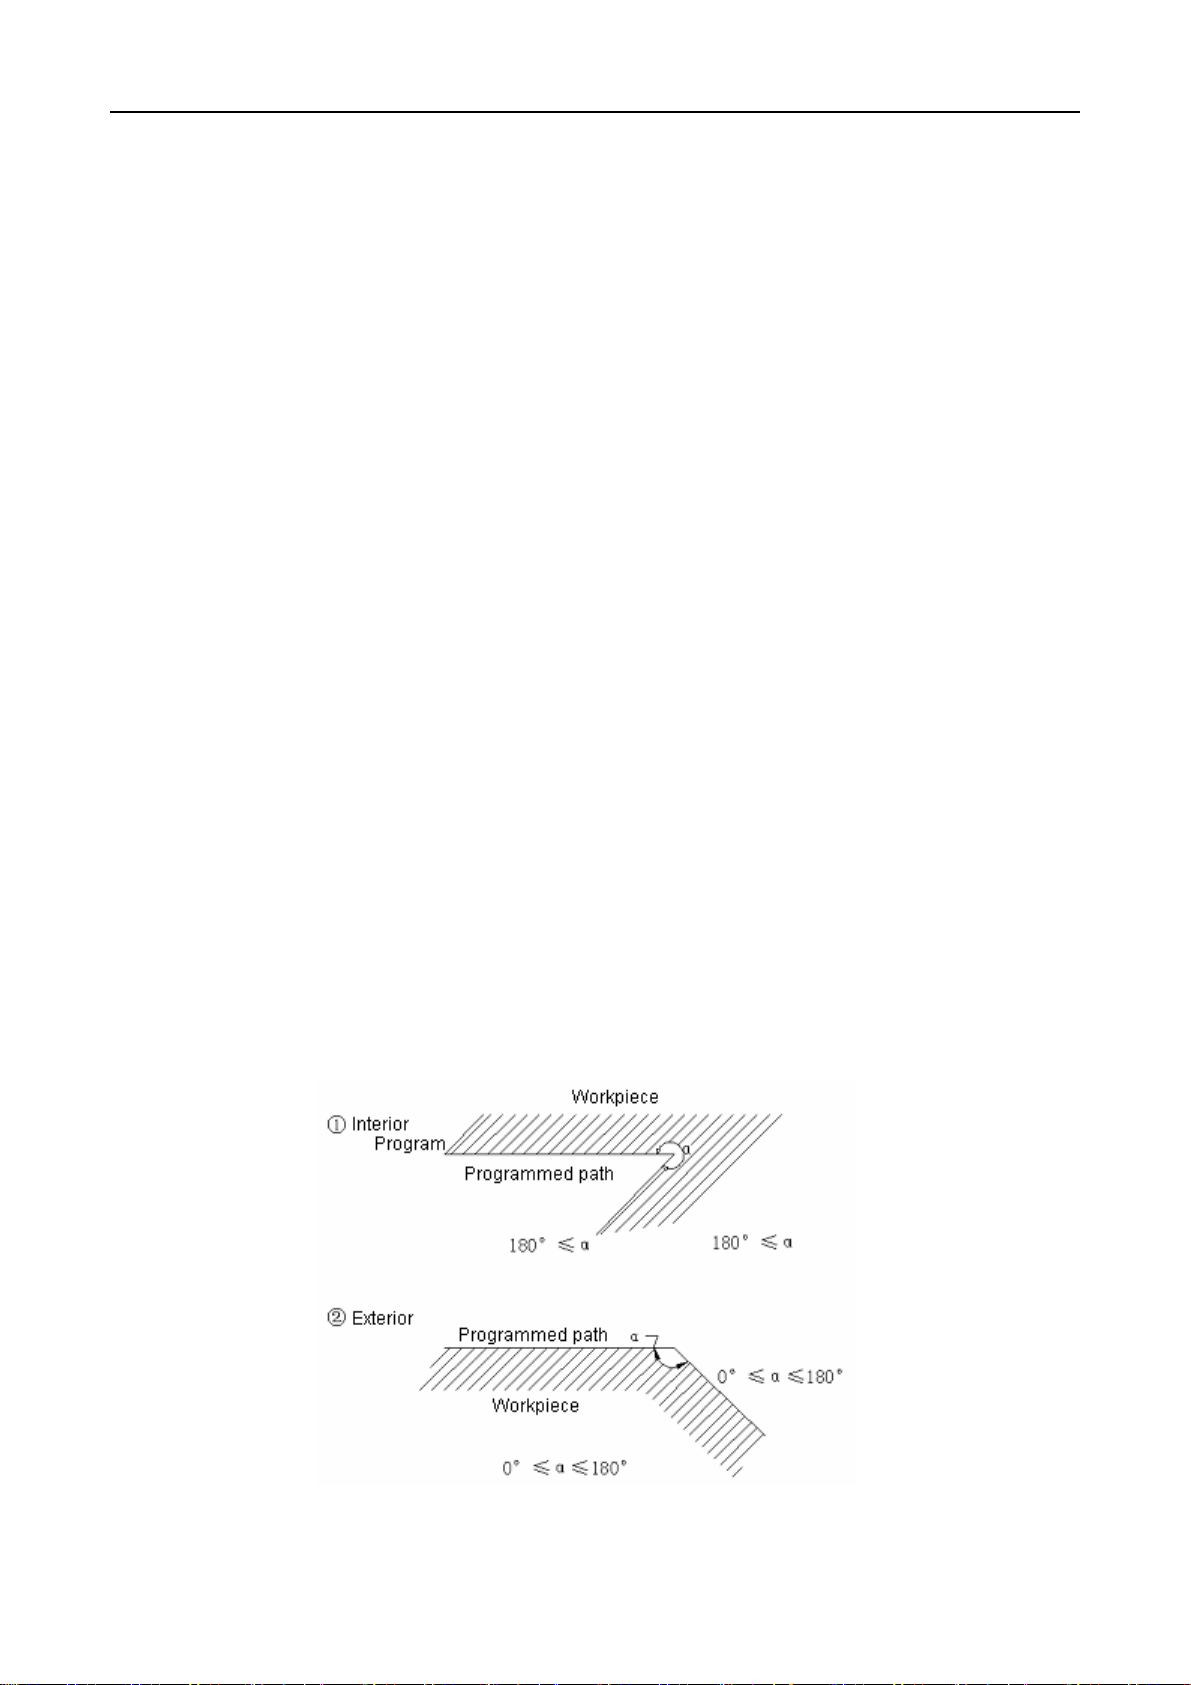
GSK983M Milling CNC System Operation Manual (Volume I: Specifications and Programming)
(1) Cancellation mode
The system will be in offset cancellation mode after power on, reset or completion of the
program by executing M02 and M03.
In cancellation mode, the vector is always 0 and the tool center path coincides with the
programmed path. It shall be ended up by means of cancellation at the end of the program.
When the program ends in offset mode, positioning the tool at the end point of the program
cannot be performed and the position of the tool will offset from the end position by a vector.
(2) Start-up
When a block satisfying all the following requirements is executed in cancellation mode, the
system will be in offset mode. This block is called start-up block.
a) G41or G42 has been instructed and the system is in the state of G41 or G42.
b) Tool compensation number is not D00.
c) Axes (other than axes I, J and K) (even one axis is acceptable) in the offset plane is
allowable and their travel is not 0.
In a start-up block, arc instructions (G02, G03) shall not be used; otherwise the NC will gives
No. 34 alarm and stops operation. The NC reads in two blocks. The next block enters into the
tool compensation buffer register (the contents of the register cannot be displayed) once the
first block is read in and executed.
In addition, two blocks in succession are read in when the system is in single block mode. The
block is firstly read in stops after execution. As a rule, two blocks are normally read in after that.
Hence there are three blocks in the NC, namely the executing block and the next two blocks.
Note: The meaning of the so-called interior angle and other terms are as indicated in the
following figure. The intersection angle of the move instructions of two blocks is called “interior
angle” when its angular degree on the workpiece side is above 180° and “exterior angle” when
it falls within 0°~180°.
(i) To machine along the interior side
Straight line → Straight line
78
Page 87

GSK983M Milling CNC System Operation Manual (Volume I: Specifications and Programming)
Where:
S indicates the dwell point of single block.
L indicates line motion.
C indicates arc motion.
Straight line → Arc
(ii) When the tool machines one side of an obtuse angle, the start-up and cancellation of a
(90°≤α≤180°) tool path have the noses A and B and they are selected by parameter No.011
BIT1 (SUPM).
Type A: (Straight line → Straight line)
(Straight line → Arc)
79
Page 88

GSK983M Milling CNC System Operation Manual (Volume I: Specifications and Programming)
Type B: (Straight line → Straight line)
Intersection point is a point at which the offset paths determined by two blocks in
succession intersect.
(Straight line → Arc)
The intersection point in the above diagram is a point where the offset paths of the r length
of two blocks.
(iii) To machine an acute angle (α<90°=exterior)
Type A (Straight line → Straight line)
(Straight line → Arc)
80
Page 89

GSK983M Milling CNC System Operation Manual (Volume I: Specifications and Programming)
Type B (Straight line→ Straight line)
(Straight line→ Arc)
Note: For Type B, compensation shall be performed as follows when the tool moves on one
side of a sharp angle less than 1
(3) Offset mode
In offset mode, arc interpolation may offset even linear interpolation is instructed.
In offset mode, the blocks without move instruction but miscellaneous function, hold, etc
cannot be instructed in two blocks in succession; otherwise it is subject to undercutting or
overcutting.
0
.
81
Page 90

GSK983M Milling CNC System Operation Manual (Volume I: Specifications and Programming)
Offset plane cannot be changed in offset mode; otherwise the system will stop after No. 37
alarm.
(i) Situations of interior angle (180°≤α)
Straight line→ Straight line
Straight line→ Arc
Arc→ Straight line
Arc→ Arc
82
Page 91

GSK983M Milling CNC System Operation Manual (Volume I: Specifications and Programming)
For the condition of straight line to straight line, a narrow and closed angle less than 1° is
machined. Now its offset vector becomes extremely big.
User may follow the above procedures for the conditions of arc to straight line, straight line
to arc and arc to arc.
(ii) To machine an obtuse angle along the exterior side (90°≤α<180°)
Straight line →Straight line
Straight line →Arc
83
Page 92
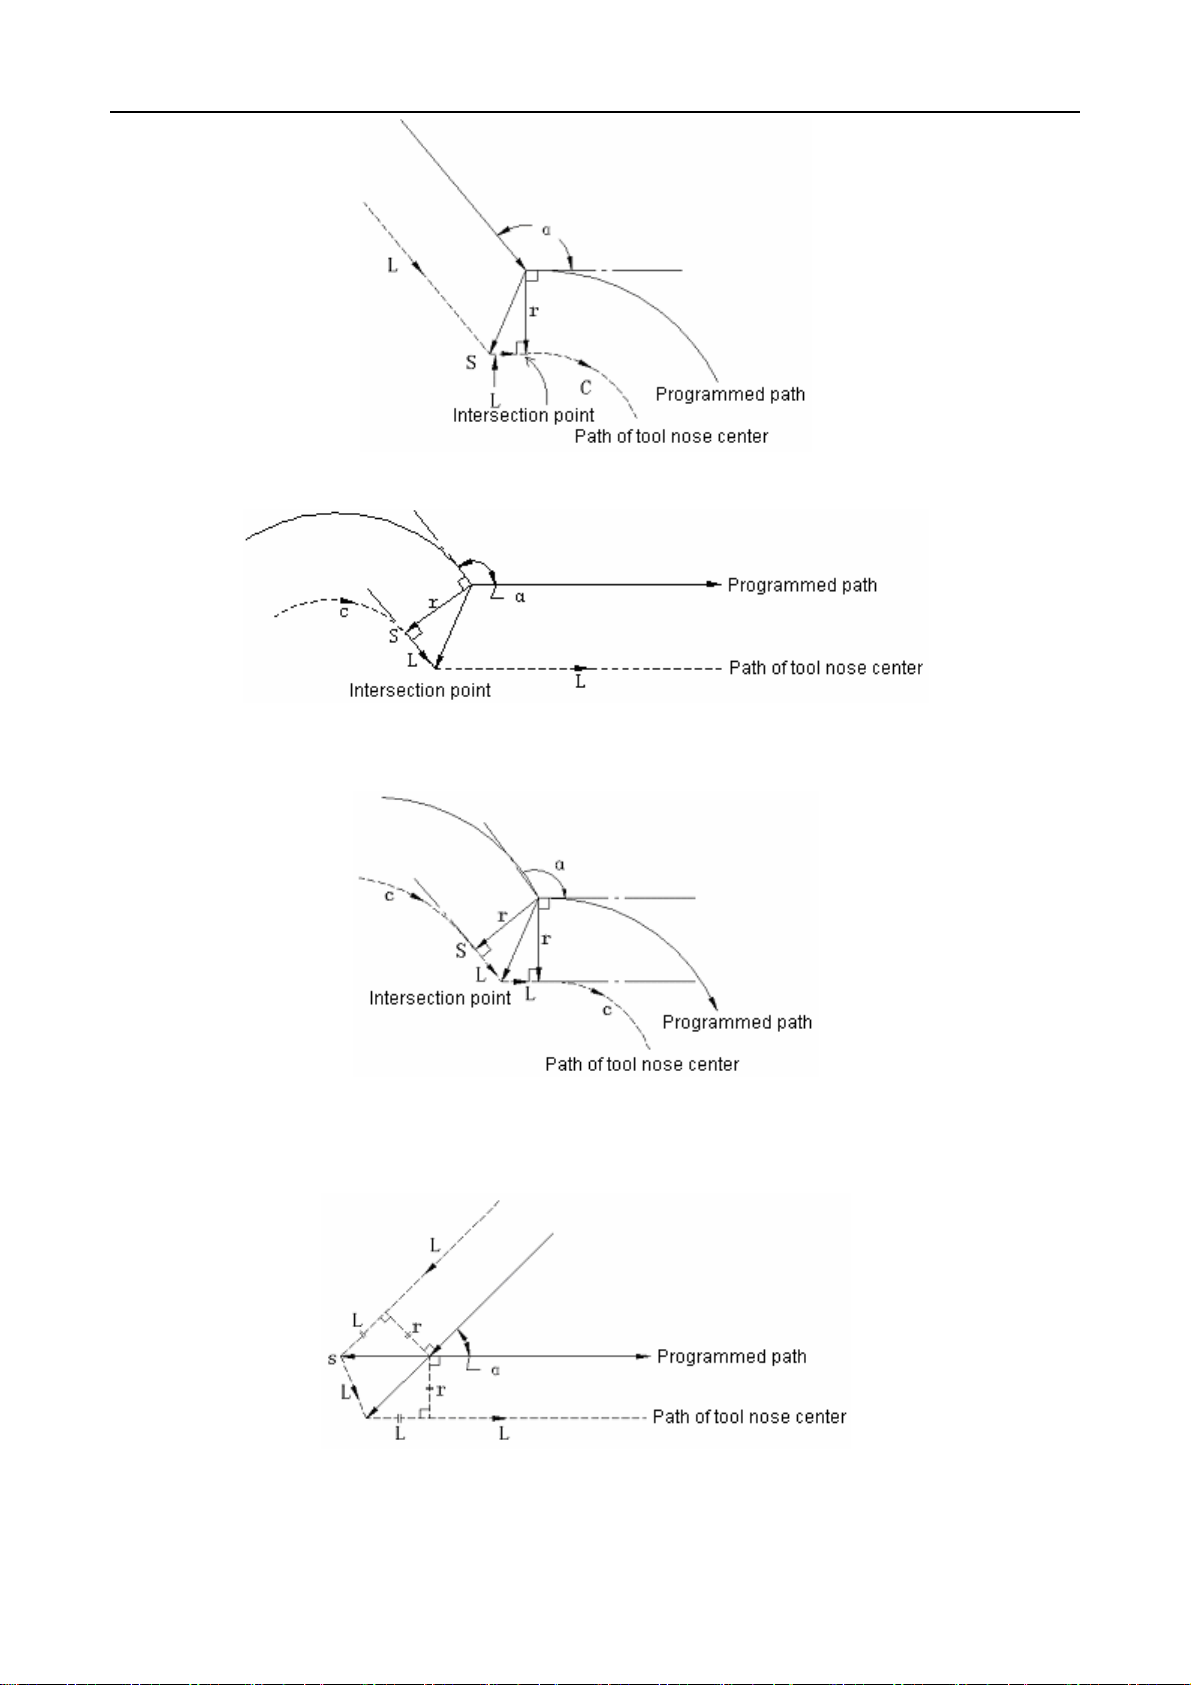
GSK983M Milling CNC System Operation Manual (Volume I: Specifications and Programming)
Arc→ Straight line
Arc→ Arc
(iii) To machine an acute angle along the exterior side
Straight line →Straight line
Straight line →Arc
84
Page 93
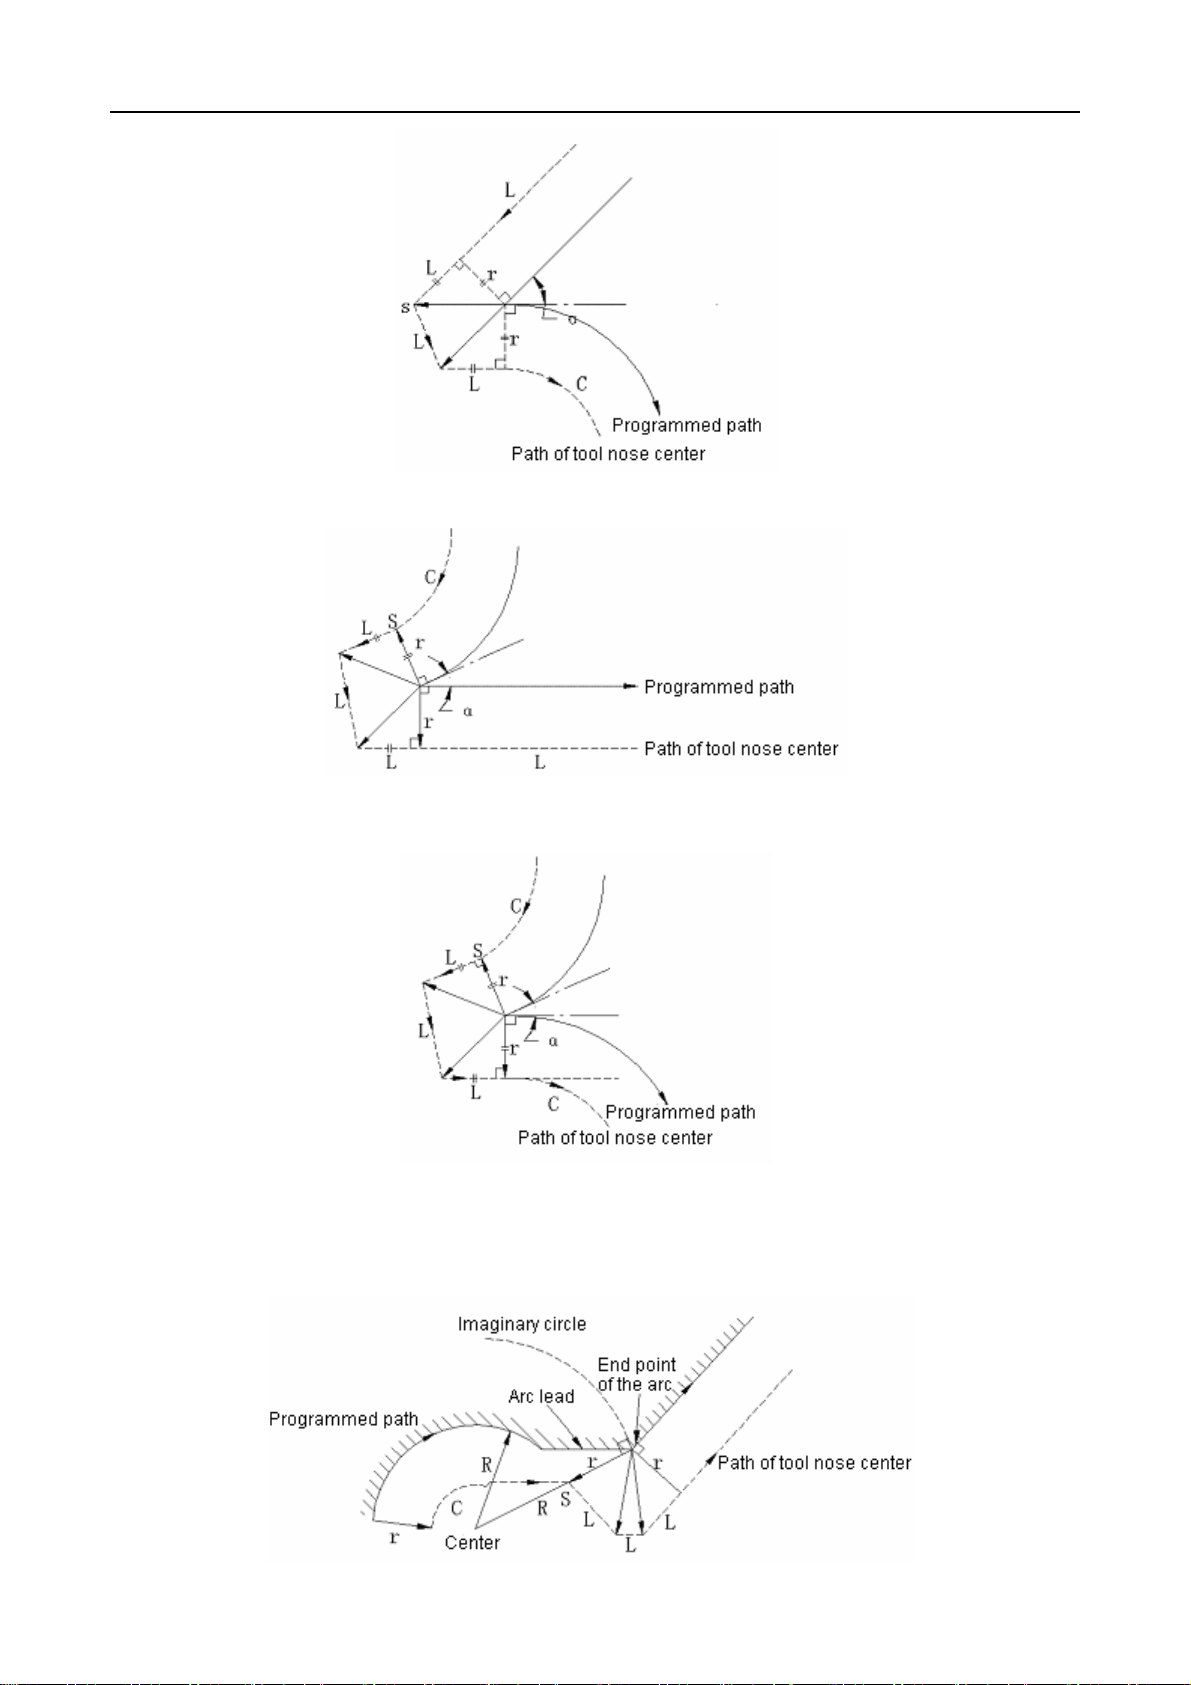
GSK983M Milling CNC System Operation Manual (Volume I: Specifications and Programming)
Arc→ Straight line
Arc→ Arc
Note 1: Special cases
When the end point of an arc is not on it
85
Page 94
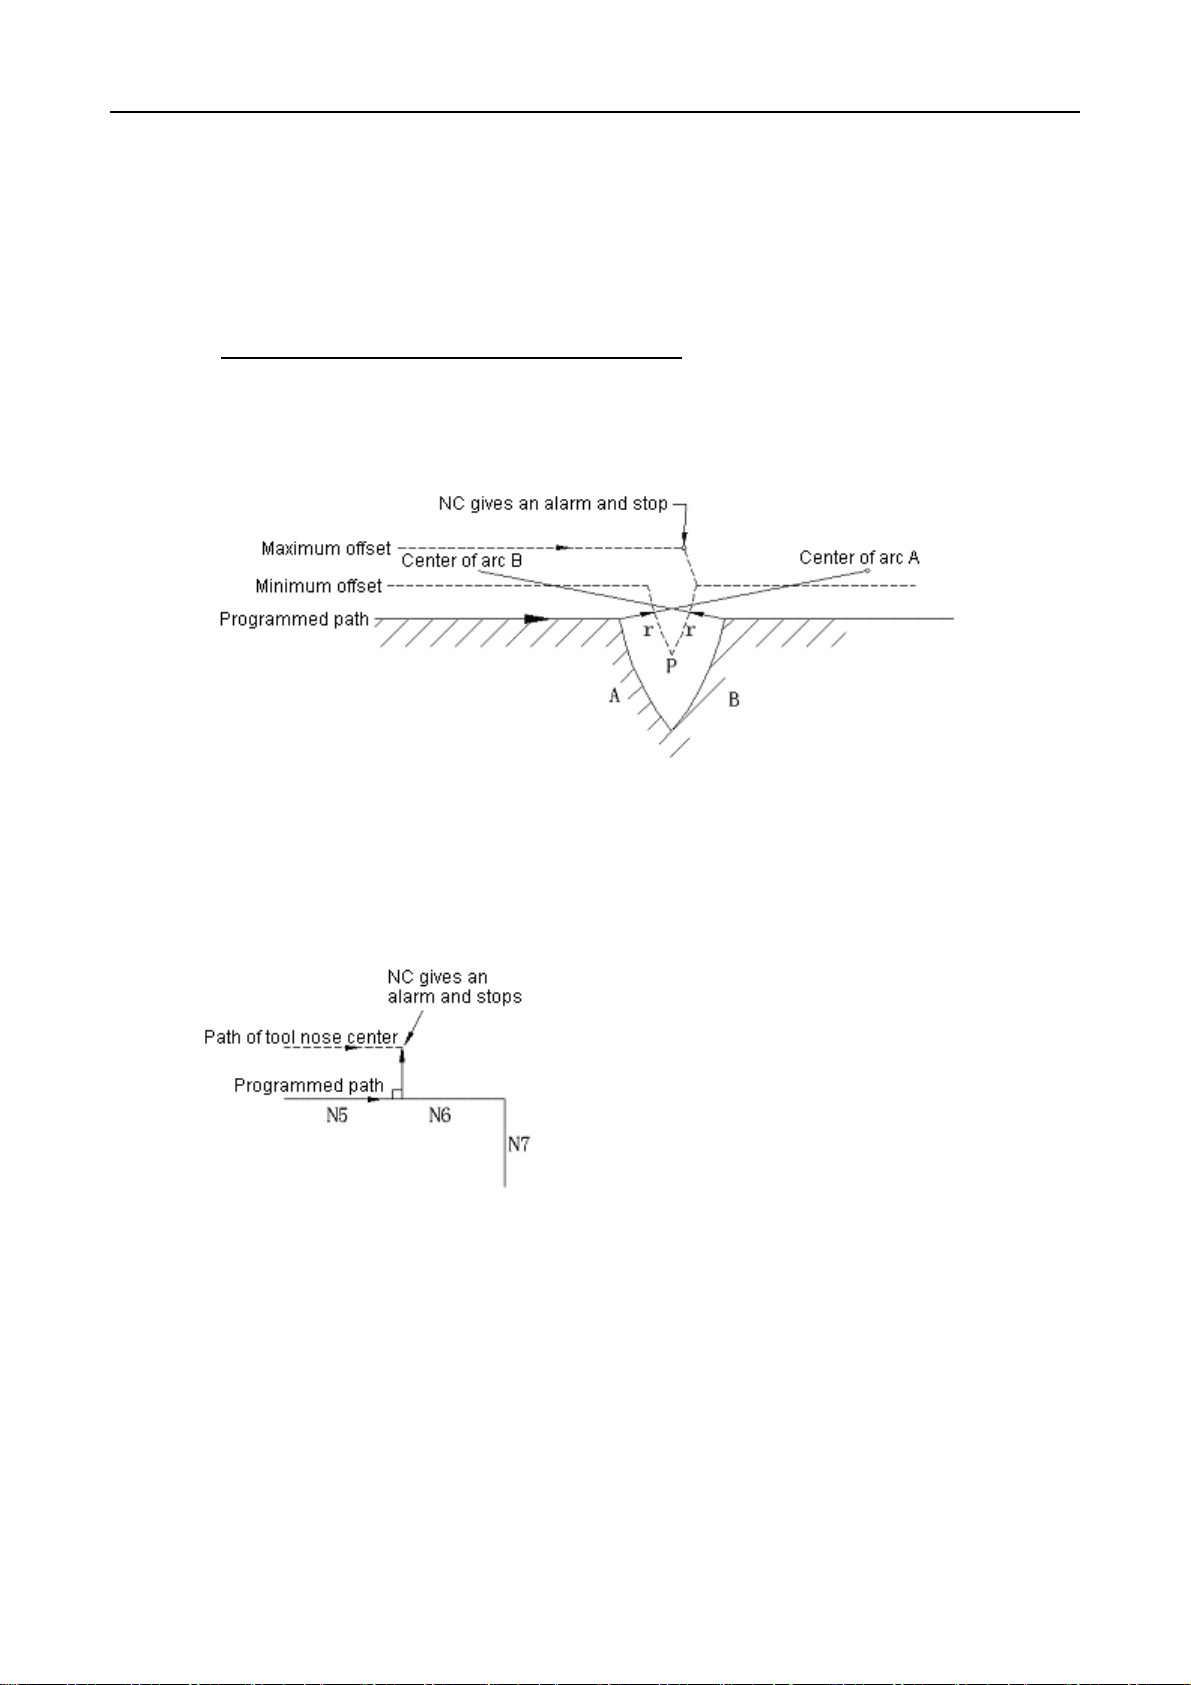
GSK983M Milling CNC System Operation Manual (Volume I: Specifications and Programming)
If there is a lead on the arc as shown in the diagram, use the arc center connecting to the
end point of the arc as the center of a circle to make a imaginary arc. Make a vector for
compensation by using the imaginary arc as the arc of tool compensation. Its result varies
from the tool center path that uses the arc lead a lead for tool compensation.
Follow the same procedures for the situation of arc → arc.
The situation without an internal intersection point
As shown in the diagram below, arc intersection point exists on compensation path when
the offset is small. Increase in the offset eliminates the intersection point. Now the system
gives No. 33 alarm and stops at the end point of the previous block.
As shown in the diagram below, arc intersection point P exists on compensation paths of arc A
and arc B when the offset is small. Increase in the offset eliminates the intersection point. For
that center coincides with the origin or end point, the system gives No. 38 alarm and stops
program execution at the end point of the previous block.
(4) Offset cancellation
When executing a block satisfying one of the following requirements in offset mode, the
system enters into tool cancellation mode. The function of the block is called offset
cancellation.
(G41 mode)
N5 G01 X1000;
N6 G02 X1000 I0 J0;
N7 G03 Y-1000 J-1000;
(a) G40 is instructed (b) D00 is instructed as a tool compensation number.
(G02) and (G03) cannot be instructed when offset cancellation is performed. If they are
instructed, No. 34 alarm will be sent out and NC will stop.
When a block is read in offset cancellation mode, two blocks including that stored in the buffer
(not display) for tool compensation will be executed. In single block mode, a block is read in
86
Page 95

GSK983M Milling CNC System Operation Manual (Volume I: Specifications and Programming)
and executed before stop. The next block is read in and executed by pressing the START
button.
After the control system enters into cancellation mode, the next executed block will be normally
saved in the buffer register rather than typed in the tool compensation buffer register.
(a) To machine an interior angle (α≥180°)
Straight line →Straight line
Arc→ Straight line
(b) To machine an exterior angle (90°≤α<180°, obtuse angle)
(i) Type A
Straight line →Straight line
Straight line →Arc
87
Page 96

GSK983M Milling CNC System Operation Manual (Volume I: Specifications and Programming)
(ii) Type B
Straight line →Straight line
Arc→ Straight line
(c) To machine the exterior angle of an acute angle (α<90°)
(i) Type A
Straight line →Straight line
88
Page 97

GSK983M Milling CNC System Operation Manual (Volume I: Specifications and Programming)
Arc→ Straight line
(ii) Type B
Straight line →Straight line
Arc→ Straight line
Note: For the situation of type B, compensation is performed as follows when the tool machine
0
an acute angle below 1
by means of straight line to straight line from the exterior side:
89
Page 98
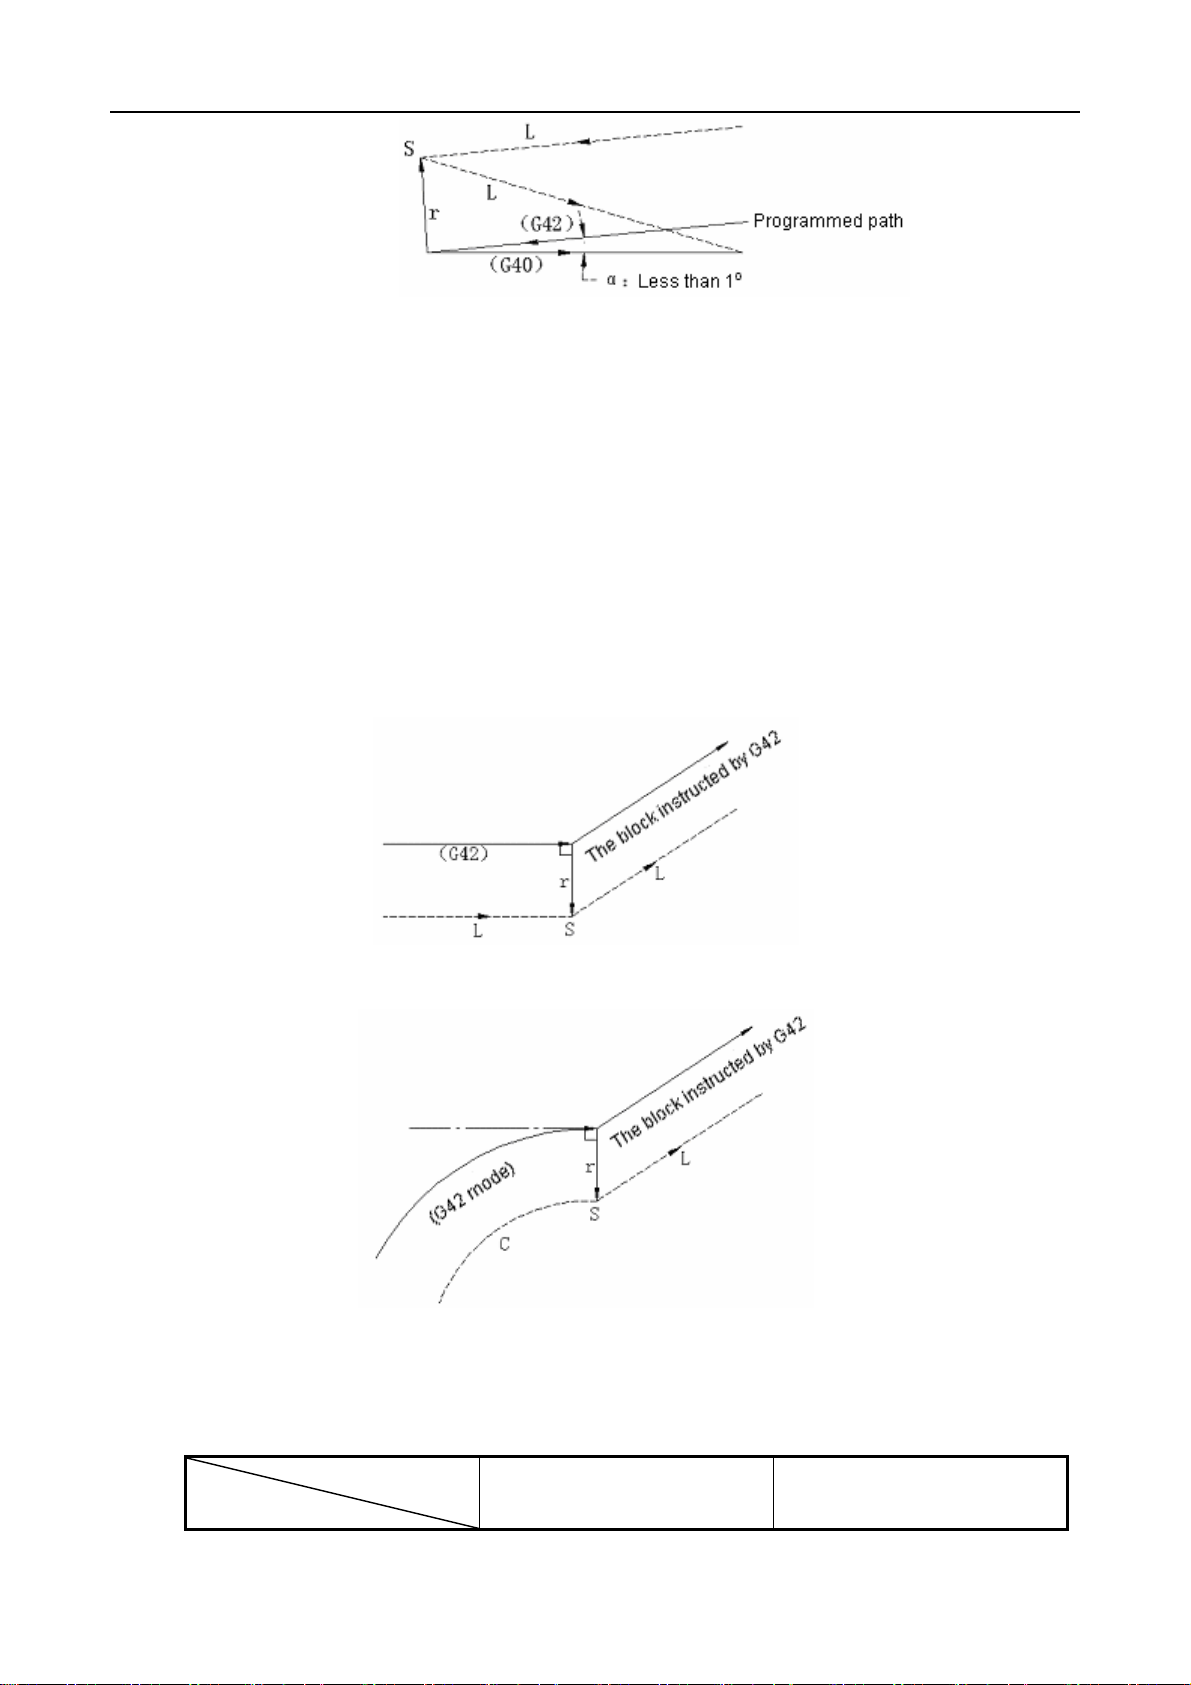
GSK983M Milling CNC System Operation Manual (Volume I: Specifications and Programming)
(5) G codes for tool compensation in offset mode
It is possible set an offset vector in relation to the direction of the foregoing block by individually
instructing G codes (G41, G42) for tool compensation in offset mode so as to create a correct
angle. It is independent of the inner wall or outer wall to be processed.
Correct arc motion cannot be performed provided that the codes (G41, G42) are included in an
arc instruction.
To reverse the direction of compensation through the G codes (G41, G42) for tool
compensation, refer to Note 2: To change offsetting direction in offset mode.
Straight line →Straight line
Arc→ Straight line
Note 2: Change offsetting direction in offset mode.
Offsetting direction is identified with the G codes (G41 and G42) for tool compensation and
offset signs as follows:
Offset signs
+ -
G codes
90
Page 99

GSK983M Milling CNC System Operation Manual (Volume I: Specifications and Programming)
G41 Offsetting to the left Offsetting to the right
G42 Offsetting to the right Offsetting to the left
In special cases, offsetting direction can be changed by switching between G41 and G42 in
offset mode. However, it cannot be changed for the start-up block and the block that follows. In
the situation of changing offsetting direction, the concepts of interior side and exterior side are
canceled to adapt to all conditions. The amounts of offset are assumed to be positive in all the
following examples.
(Straight line →Straight line)
(Straight line →Arc)
(Arc→ Straight line)
91
Page 100

GSK983M Milling CNC System Operation Manual (Volume I: Specifications and Programming)
(Arc→ Arc)
When a path with offset has not intersection point:
If the switch between G41 and G42 is performed and there is no intersection point of offset
path from block A to block B, a vector perpendicular to the programmed direction will be
established at the point of origin of block B.
92
 Loading...