
GSK980TDa Turning CNC
Concise User Manual

This user manual describes all proceedings concerning the operations of
this CNC system. However, it is impractical to give particular descriptions for
all unnecessary or unallowable system operations due to the manual content,
product specific applications and other causes. Therefore, the proceedings
not indicated herein should be considered impractical or unallowable.
This user manual is the property of GSK CNC Equipment Co., Ltd. All
rights are reserved. It is against the law for any organization or individual to
publish or reprint this manual without the express written permission of GSK
and the latter reserves the right to ascertain their legal liability.
2

PREFACE
Your excellency,
It’s our pleasure for your patronage and purchase of this GSK980TDa CNC system
made by GSK CNC Equipment Co., Ltd.
This book is the concise user manual of GSK980TDa Turning CNC System.
Warning
! Accident may occur by improper connection and operation! Please carefully
read this manual before usage!
Special tips:
The system power fixed on the cabinet is special for the CNC system made
by our company.
And this power is unallowed to be used for other purposes. Otherwise it
may cause severe danger.
This manual is reserved by final user.
All specifications and designs herein are subject to change without further notice.
We are full of heartfelt gratitude to you for supporting us in the use of GSK’s products.


Contents
Contents
Chapter 1 Programming Fundamentals..................................................................................... 1
1.1 Technology Flow of CNC Machining........................................................................................................1
1.2 Axis and Coordinate System......................................................................................................................1
1.3 Structure of an NC Program......................................................................................................................2
1.4 Absolute Programming and Incremental Programming ........................................................................3
1.5 Diameter programming and Radius programming.................................................................................4
Chapter 2 Programming................................................................................................................. 6
2.1 S Command.................................................................................................................................................6
2.2 M Command ...............................................................................................................................................6
2.3 T Command.................................................................................................................................................7
2.4 F Command.................................................................................................................................................7
2.5 G Command ................................................................................................................................................7
2.5.1 Rapid Traverse (Positioning) G00 ....................................................................................................................7
2.5.2 Linear Interpolation G01 ....................................................................................................................................8
2.5.3 Circular Interpolation G02/G03.........................................................................................................................8
2.5.4 Dwell G04.............................................................................................................................................................9
2.5.5 Workpiece Coordinate System G50.................................................................................................................9
2.5.6 Axial Cutting Cycle G90 ...................................................................................................................................10
2.5.7 Radial Cutting Cycle G94 ................................................................................................................................11
2.5.8 Axial Roughing Cycle G71...............................................................................................................................12
2.5.9 Radial Roughing Cycle G72............................................................................................................................14
2.5.10 Closed Cutting Cycle G73 .............................................................................................................................16
2.5.11 Finishing Cycle G70 .......................................................................................................................................17
2.5.12 Axial Grooving Multiple Cycle G74 ..............................................................................................................18
2.5.13 Radial Grooving Multiple Cycle G75............................................................................................................19
2.5.14 Thread Cutting with Constant Lead G32.....................................................................................................21
2.5.15 Thread Cutting with Variable Lead G34 .................................................................................................22
2.5.16 Z Tapping Cycle G33......................................................................................................................................23
2.5.17 Thread Cutting Cycle G92.............................................................................................................................24
2.5.18 Multiple Thread Cutting Cycle G76 ..............................................................................................................25
2.6 Compound Program Example.................................................................................................................27
Chapter 3 Operation ......................................................................................................................28
3.1 Operation Mode and Display Interface..................................................................................................28
3.1.1 GSK980TDa Panel Introduction .....................................................................................................................28
3.1.2 Machine Panel Keys.........................................................................................................................................29
3.1.3 Display Menu .....................................................................................................................................................30
3.1.4 Summary of Interface and Operation.............................................................................................................31
3.1.4.1 Position Interface...........................................................................................................................................31
3.1.4.2 Program Interface..........................................................................................................................................33
3.1.4.3 TOOL OFFSET&WEAR, MACRO Interface...............................................................................................35
3.1.4.4 Alarm Interface .............................................................................................................................................35
3.1.4.5 Setting Interface ............................................................................................................................................37
3.1.4.6 BIT PARAMET ER, DATA PARAMETER, SCREW-PITCH COMP Interface............................................40
3.1.4.7 CNC DIAGNOSIS, PLC STATE, PL C VALUE, machine soft panel, VERSION MESSAGE Interface.....42
3.2 Program Edit.............................................................................................................................................44
3.2.1 Program Creation..............................................................................................................................................44
3.2.2 Input of the Program.........................................................................................................................................45
3.2.3 Deletion and Insertion of the Character.........................................................................................................45
3.2.4 Selection of the Program .................................................................................................................................46
3.2.5 Execution of the Program ................................................................................................................................46
I

GSK980TDa Turning CNC System
3.3 Manual Operation.................................................................................................................................... 47
3.3.1 Manual Feed and Rapid Traverse..................................................................................................................47
3.3.2 Handwheel feed................................................................................................................................................ 47
3.3.3 Manual Tool Change ........................................................................................................................................48
3.3.4 Spindle Control..................................................................................................................................................48
3.3.5 Coolant Control .................................................................................................................................................48
3.3.6 Emergency Operation ......................................................................................................................................48
3.4 MDI Operation......................................................................................................................................... 49
3.4.1 Code words input..............................................................................................................................................49
3.4.2 Code Words Execution.................................................................................................................................... 50
3.5 Tool Setting............................................................................................................................................... 50
3.5.1 Tool Setting Operation (Trial Tool Setting) .................................................................................................... 50
3.5.2 Tool Setting Operation (Tool Setting by machine zero return, machine zero switch needed)...............51
3.5.3 The Alteration of the Offset Value ..................................................................................................................53
3.5.4 Clearing of the Offset Values ..........................................................................................................................54
3.6 Part Machining Example ........................................................................................................................54
Chapter 4 Appendix........................................................................................................................58
Operation List................................................................................................................................................... 58
II
Chapter 1 Programming Fundamentals
Chapter 1 Programming Fundamentals
1.1 Technology Flow of CNC Machining
Programming is a course of workpiece contours, machining technologies, technology parameters and
tool parameters being edit into part programs according to special CNC programming commands. CNC
machining is a course of CNC controlling a machine tool to complete machining of workpiece according to
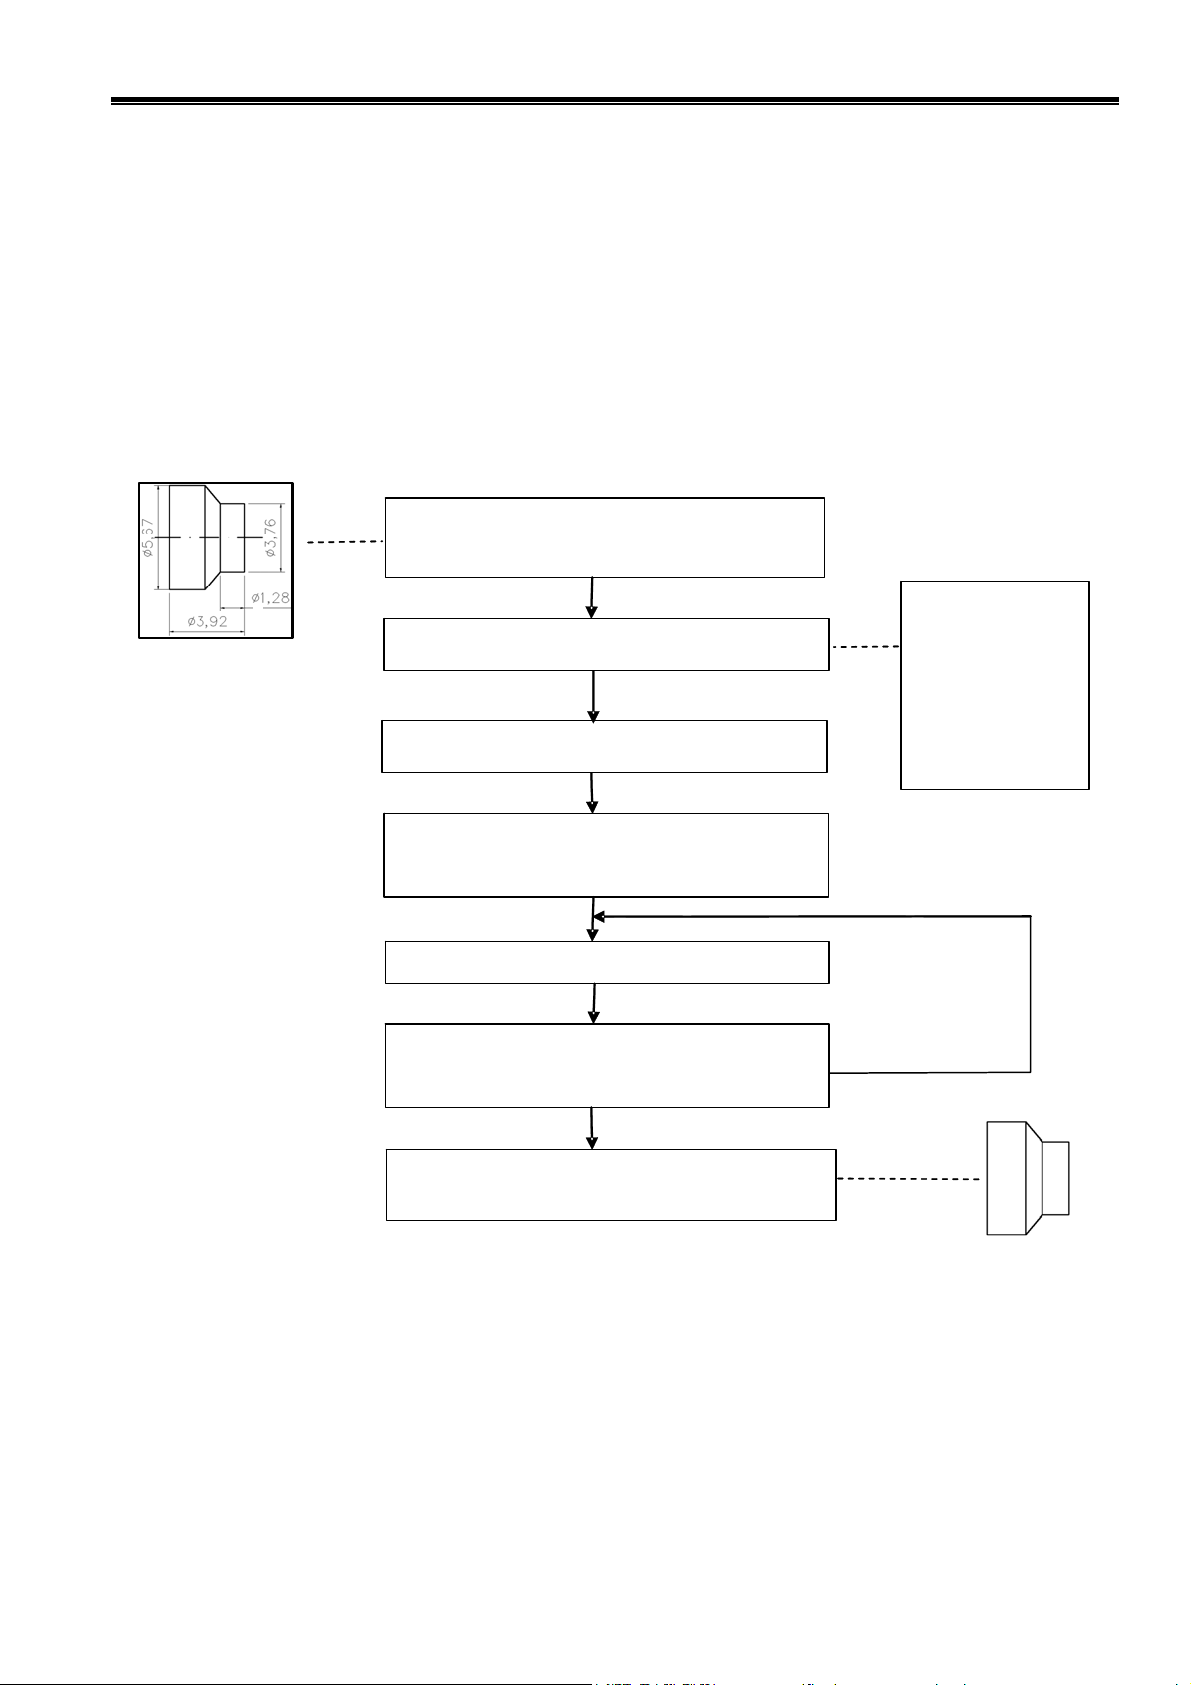
requirements of part programs. Technology flow of CNC machining is as following Fig. 1-1.
Analyse workpiece drawings and confirm
machining technologies
Edit part programs and record into CNC
Test part programs and execute trial run
Execute tool setting and set tool offsets and
coordinates
Run part programs and machine workpieces
Check part dimension and modify part
programs and compensations
The machining ends and the workpiece is
formed
O0001
G01 Z- 1.28 F50
…
M30
%
;
G00 X3.76 Z0
;
;
;
Fig. 1-1
1.2 Axis and Coordinate System
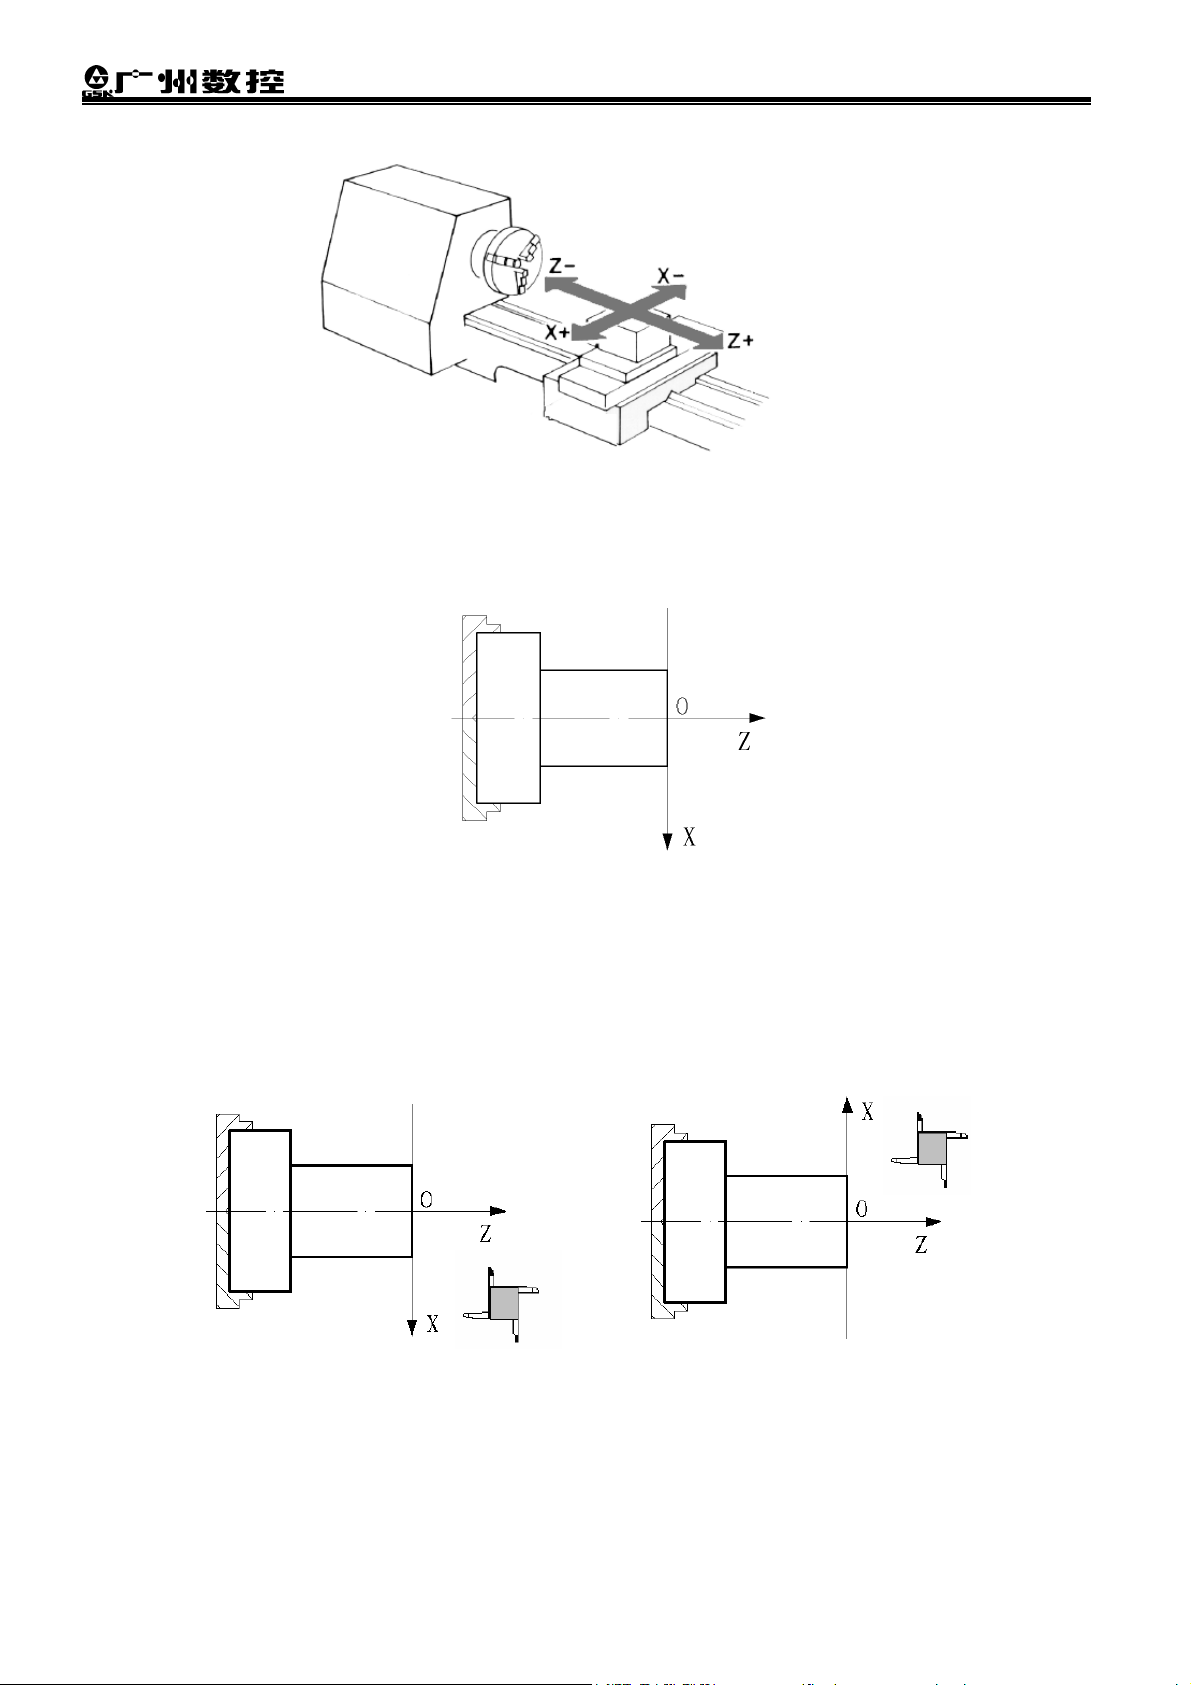
GSK980TDa uses a rectangular coordinate system composed of X, Z axis. X axis is perpendicular with
axes of spindle and Z axis is parallel with axes of spindle; negative directions of them approach to the
workpiece and positive ones are away from it. GSK980TDa uses a rectangular coordinate system composed
of X and Z axis, and the coordinate system plane is the motion plane of tool post. Fig. 1-2 is the front tool
post coordinate sketch map of a vertical turning machine.
1
GSK980TDa Turning CNC System
After the coordinate system plane is established, we need to establish the coordinate system.
GSK980TDa uses G50 to establish the workpiece, and the established workpiece is valid till it is replaced by
a new one. Generally, Z axis of the workpiece coordinate system coincides with the spindle axis.
Fig. 1-2
Fig. 1-3
There are a front tool post and a rear tool post of NC turning machine according to their relative position
between the tool post and the spindle, Fig. 1-4 is a coordinate system of the front tool post and Fig. 1-5 is a
rear toolpost one. It shows exactly the opposite of X axis, but the same of Z axis from figures. In the manual,
it will introduce programming application with the front tool post coordinate system in the following figures
and examples.
Fig.1-4 Front tool post coordinate system Fig. 1-5
Rear tool post coordinate system
1.3 Structure of an NC Program
A program consists of a sequence of blocks, beginning with “OXXXX”(program name)and ending with
“%”; a block begins with block number (omitted) and ends with “;” or “*”. See the general structure of program
as Fig.1-6:
2

Program name
Chapter 1 Programming Fundamentals
Word
Block
Character for end of block
Character of end of program
Program
Fig. 1-6 Structure of program
Program name To identify it, each program has only one program name (there is no the same
program name), beginning with command address O and the following 4-bit digits.
Word A word is the basic command unit to command CNC system to complete the control function,
composed of an English letter (called command address) and the following number (operation
command with/without sign). The command address describes the meaning of its following
operation command. The common words include G, M, F, S, T and so on.
Block number A block number consists of an address N and its following 4-bit digits: N0000~N9999.
The block number must be at the beginning of block, otherwise the block is invalid. In
programming, the block number is generally omitted.
Character for end of block “;” marking the block is completed.
Example: block N0001 G01 X100 Z100 G98 F200;
Meanings as follows:
Block number is N0001, G 01 is the linear interpolation, X100 Z100 is the position of absolute
coordinate of end point. G98 is the feed per minute, F200 is the cutting speed 200mm/min. The
block indicates the tool cuts linearly with the cutting speed 200mm/min from the current point to the
one which absolute position is X100, Z100.
Character for end of program “%” is an ending character of program. “%” is a mark of
communication ended when the program is transmitted. The
system will automatically insert “%” at the end of program.
1.4 Absolute Programming and Incremental Programming
Describing the position of target point uses the absolute value and incremental value methods in CNC
programming.
3
GSK980TDa Turning CNC System
Fig. 1-7
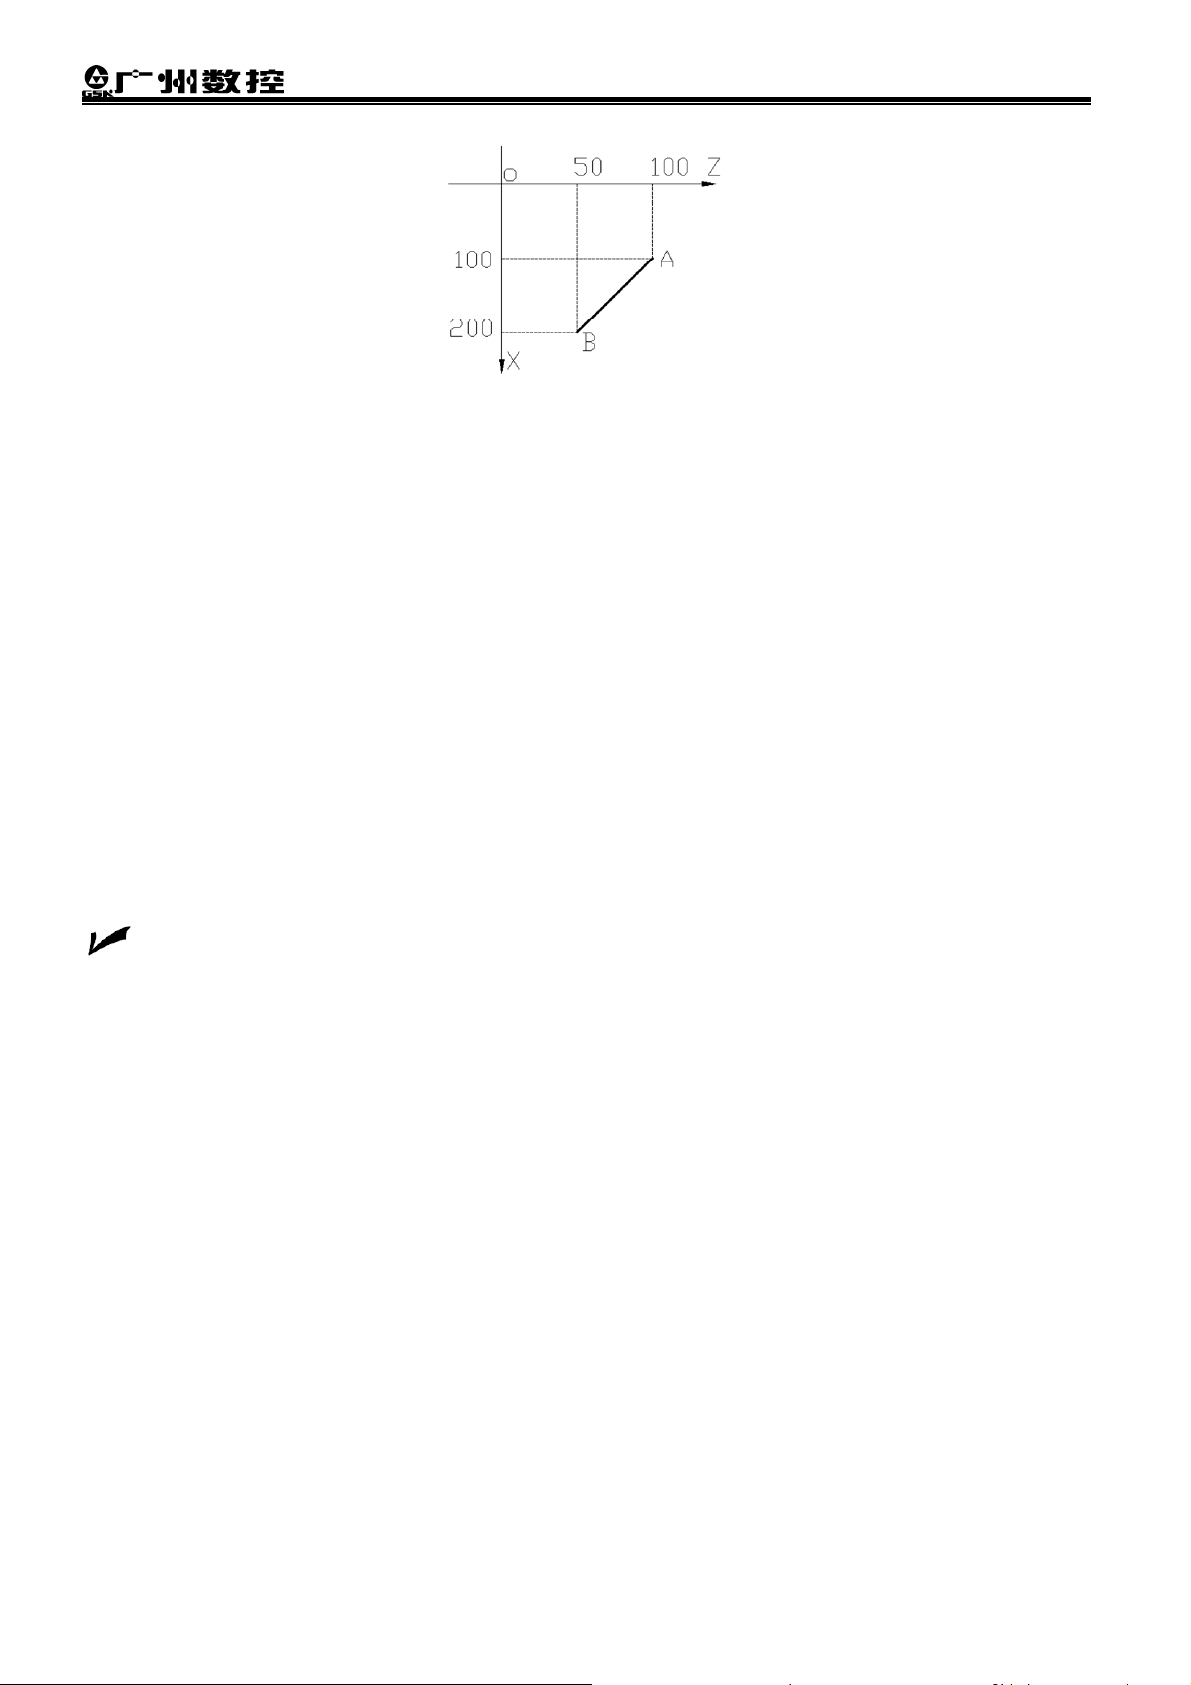
Absolute value method uses the absolute position of target position in the workpiece coordinate system
to describe the target point; as Fig. 1-7, A absolute coordinates: X100, Z100; B absolute coordinates: Z200,
Z50.
Programming with absolute value to program (X, Z) is defined to be the absolute programming;
Incremental value method uses the offset of target point compared to the coordinates of starting point to
describe the target point; In the figure, A coordinates compared to those of B point are U100, W-50. U100 is
the X positive offset 100 of B compared to A point; W-50 is Z negative offset 50 of B compared to A point.
Programming with incremental movement (U, W) is defined to be the incremental programming;
In GSK980TDa, X, Z axis separately uses the absolute programming and incremental program, which is
called the compound programming.
Example: A→B linear interpolation. As Fig.1-7, use three methods to execute the linear
interpolation from the starting point of A to B point. G01 is the linear interpolation.
Absolute programming: G01 X200 Z50;
Incremental programming: G01 U100 W-50;
Compound programming: G01 X200 W-50;or G01 U100 Z50
1.5 Diameter programming and Radius programming
Programming methods of X coordinates are divided into: diameter programming and radius
programming.
Diameter programming: When X input command value is by diameter and X coordinates are shown
in diameter at the moment;
Radius programming: When X input command value is by diameter and X coordinates are shown in
radius at the moment
Whether the diameter programming or the radius programming is determined by the system parameter,
generally, we use the diameter programming.
4
Chapter 1 Programming Fundamentals
Note: The diameter programming is used except for the special description in the following
explanation.
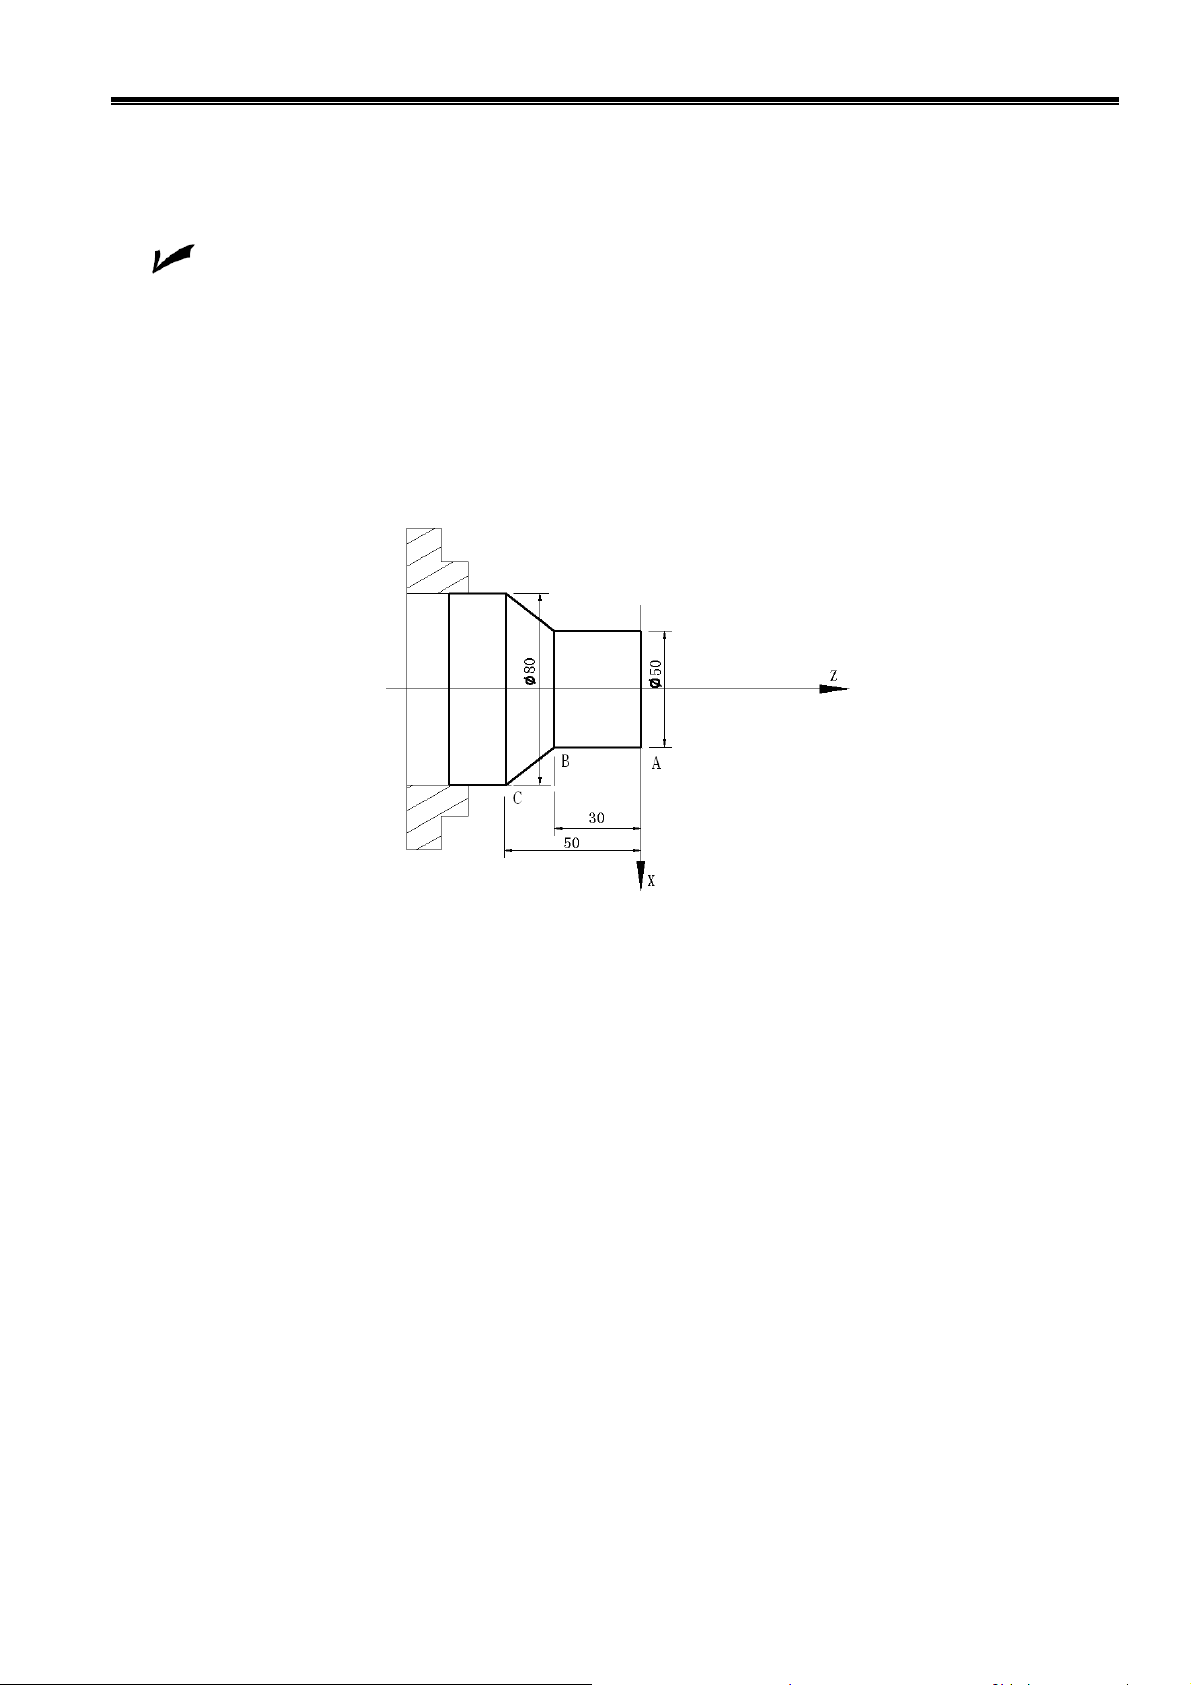
Example: As Fig.1-8, X axis of workpiece coordinate system is right end face of workpiece,
Diameter programming: A coordinates X50 Z0;
B coordinates X50 Z-30
C coordinates X80 Z-50
Radius programming: A coordinates X25 Z0;
B coordinates X25 Z-30;
C coordinates X40 Z-50;
Fig. 1-8
5
GSK980TDa Turning CNC System
Chapter 2 Programming
Automatic machining process of CNC machine is defined to the automatic run course of part programs
which have been edit in advance. Programming is that we use commands (words) which are exclusive to
CNC system to describe the drawings and technology to compile the machining programs of parts.
The chapter mainly introduces the common commands of programs.
2.1 S Command
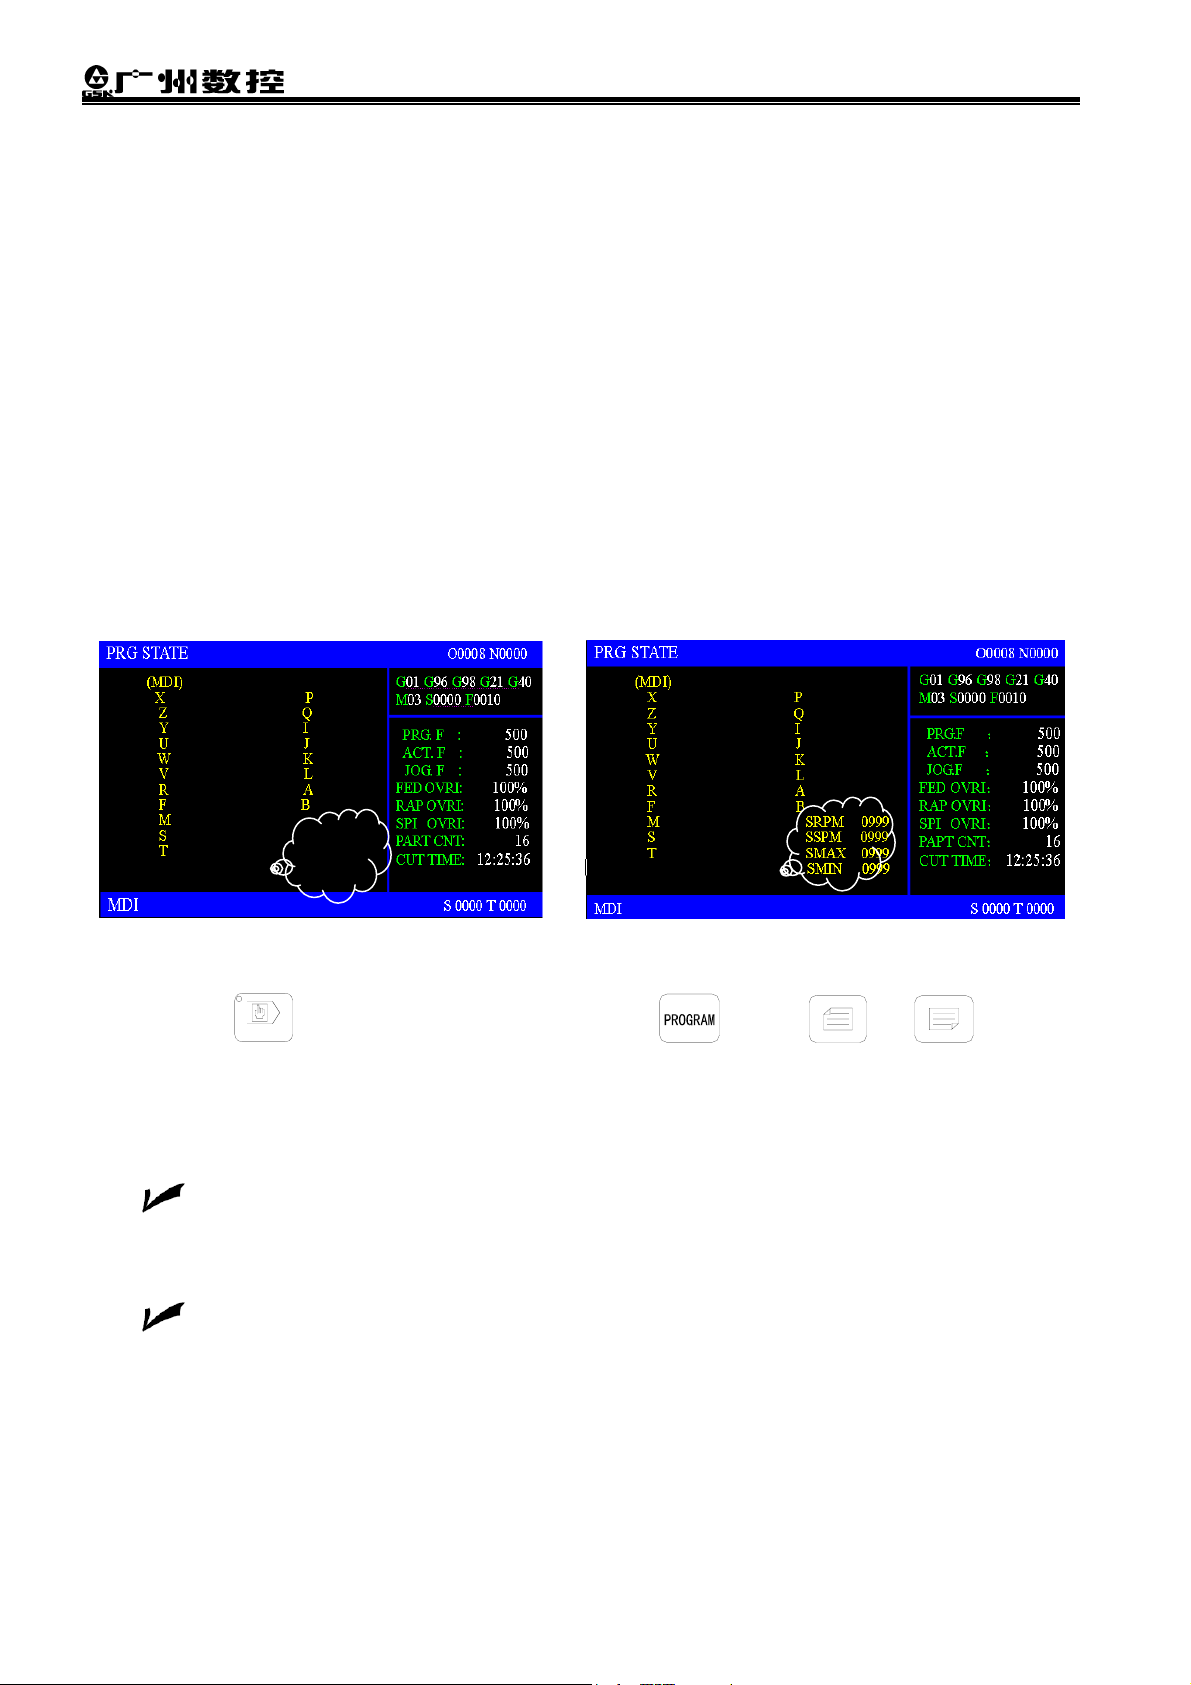
S command is used for controlling spindle speed and GSK980TD has two modes to control it, Spindle
speed switching value control: spindle speed gear control and spindle speed frequency conversion control.
One of them used by GSK980TDa is determined by the system parameter (after delivery, the spindle
control mode is determined by the machine manufacturer), and can be judged by the display windows.
Spindle speed gear control mode Spindle speed frequency conversion mode
MDI
Note: Press
program window.
Spindle speed gear control mode: S□□□□(01~04)specifies the spindle gear and controls the spindle
speed.
spindle. Unit: rev/min.
Example: S01 specifies the first gear of spindle speed, and the actual speed is determined by
the machine.
Spindle speed frequency conversion control mode: S□□□□(0~9999)specifies the actual speed of
Example: S300 specifies the spindle speed to be 300 rev//min; S1260 specifies the spindle
speed to be 1260 rev/min.
into MDI operation mode, press (press or ) into the
2.2 M Command
M command consists of command address M and its following 1~2 digits, used for controlling the
operations ON/OFF of the machine and run sequence of machining program, and the common M
commands are as follows:
6

Chapter 2 Programming
Common M commands
Command Function Remark
M03 Spindle CCW
M04 Spindle CW
M05 Spindle stop
M03 and M04 control the spindle direction, and the actual speed is
specified by S command, so, M03/M04 and S command should be
matched in machining. “M03, S500” is the CCW spindle 500
rev/min.
M08 Cooling ON
M09 Cooling OFF
M30 End of program
2.3 T Command
Machining one workpiece needs several different tools which coordinates are different coordinates of
cutting position because their installation and tool length are different. So, the system must automatically
execute the tool change to eliminate the influence caused by the above difference, otherwise, which causes
the difficult programming and large calculation. T command of GSK980TDa can execute the automatic tool
change and tool compensation.
Command format:
T □□ 〇〇
Tool offset number (00-32)
Target tool number (01-32)
Command function: The automatic tool post rotates to the target tool number and the tool offset of tool
offset number commanded is executed. After tool offset is executed, the system
can execute T□□00 to cancel the tool offset, and there is only one T command in
one block.
Example: T0202 indicates that the system executes the No. 2 tool change and the No. 2 tool offset.
2.4 F Command
Use F command to specify the cutting feedrate in the block.
In G98, the format: F ;(F0001~F8000, feed distance per minute of slide, unit: mm/min)
In G99, the format: F;(F0.001~F500,
The actual cutting feed of the tool is controlled by F value and feedrate override, and the system
provides 16 steps feedrate override (0~150%, increment of 10%), which is controlled by the feedrate
FEEDRATE
OVERRIDE
FEEDRATE
override key
OVERRIDE
or
on the machine panel.
2.5 G Command
G command consists of command address G and its following 1~2 bits command value, used for
defining the motion mode of tool relative to the workpiece, defining the coordinates and so on.
2.5.1 Rapid Traverse (Positioning) G00
Command format: G00 X(U) Z(W) ;
7
GSK980TDa Turning CNC System
Command function: rapid traverse
Command specifications: X(U),Z(W)are coordinate values of end points, X, Z are absolute values,
U, W are incremental values.
All or one of X (U), Z (W) can be omitted. When one of them is omitted, the
coordinate values of starting point and end point of the axis; when they are
omitted, the starting point and end point are in the same position.
Note: For the following G commands in the User Manual, X (U), Z (W) specifications are the same
except for the special notes.
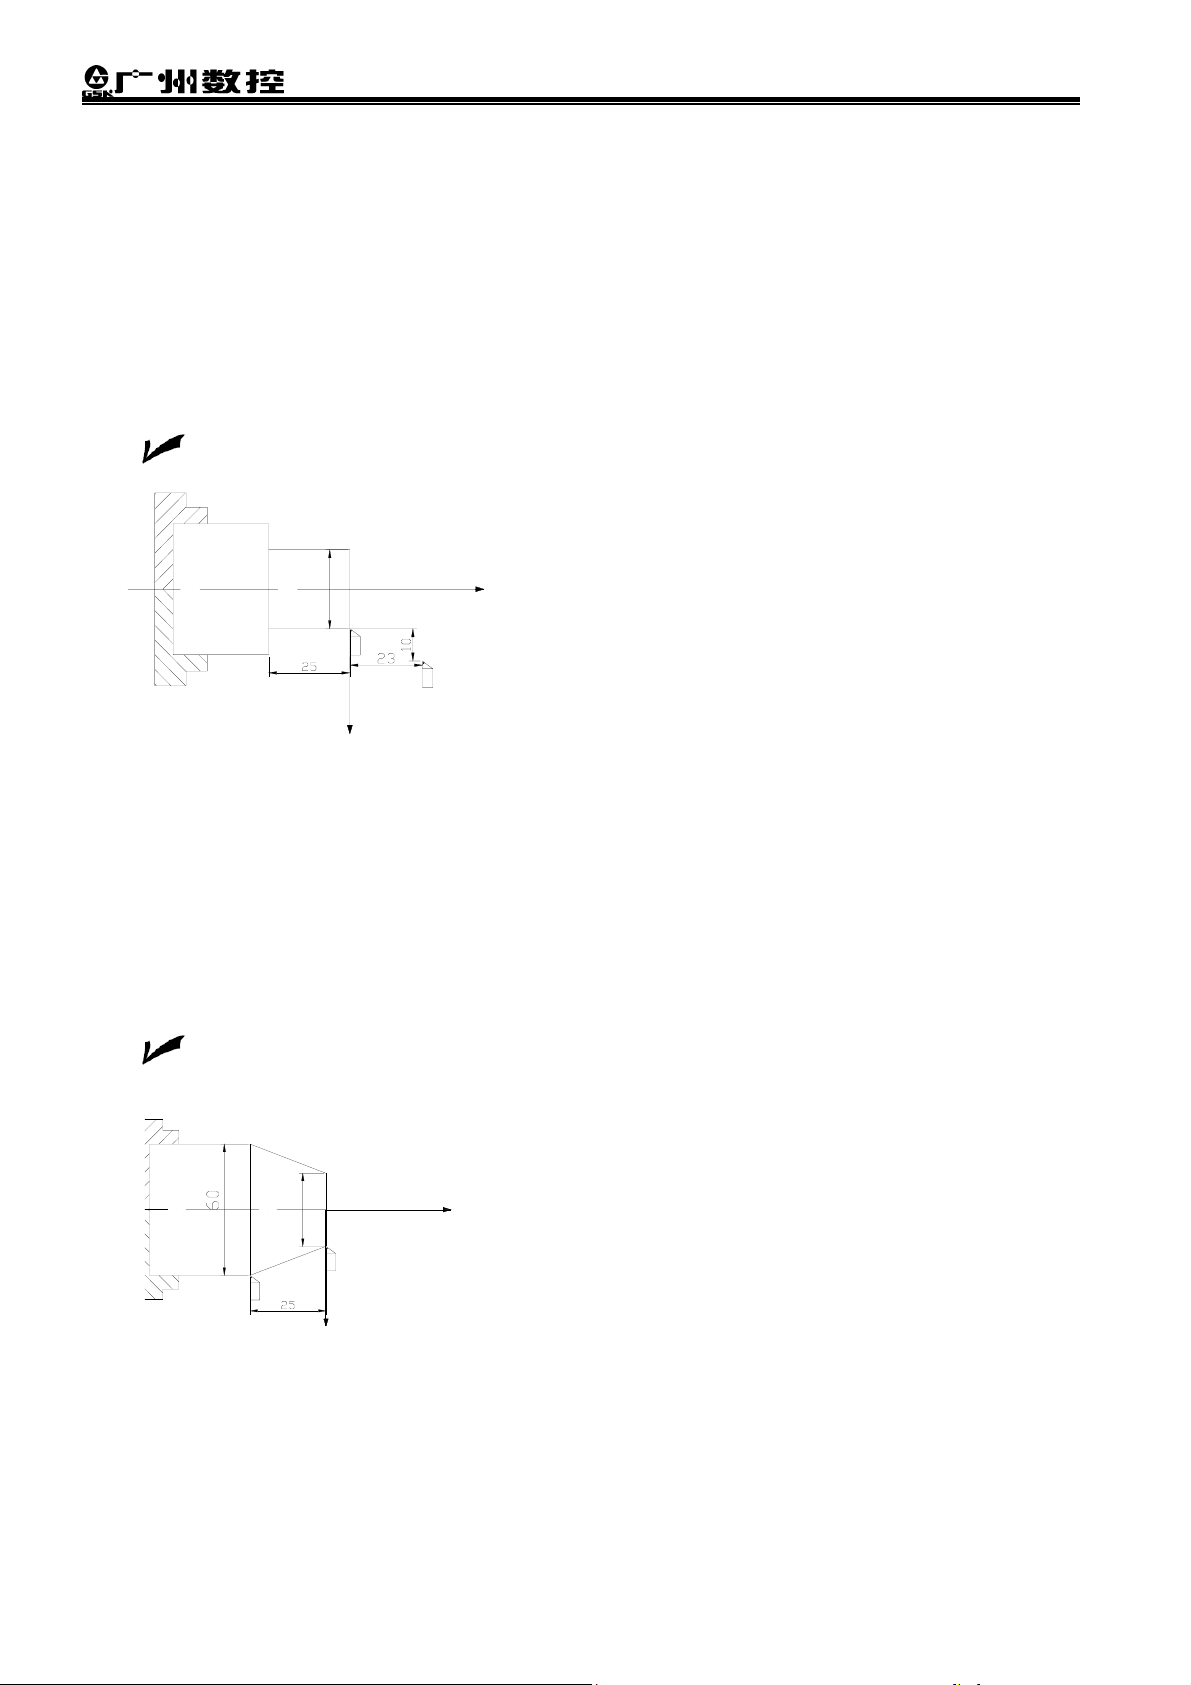
Example: The program is realized by the tool rapidly traversing from A (60, 23) to B (40, 0) as
follows:
Program:
G00 X40 Z0 (absolute programming)
G00 U-20 W-23 (incremental programming)
Φ40
End point B
终点 B
Z
G00 X40 W-23 (compound programming)
G00 U-20 Z0 (compound programming)
起点 A
Starting point A
X
Fig. 2-1
2.5.2 Linear Interpolation G01
Command format:G01 X(U)_ Z(W)_ F_;
Command function: linear cutting.
Command specification: F is the feedrate when the linear interpolation is being executed. After F
command value is executed, it has been reserved unless the new one is
executed.
Example: The program is realized by the tool executing the linear cutting with 500mm/min from
A (40, 0) to B (60, -25) as follows:
Program:
G01 X60 Z-25 F500; (Absolute programming)
G01 U20 W-25 F500; (Incremental programming)
Φ
Φ40
Starting point A
Z
G01 X60 W-25 F500; (Compound programming)
G01 U20 Z-25 F500; (Compound programming)
End
point B
X
Fig. 2-2
图 2-2
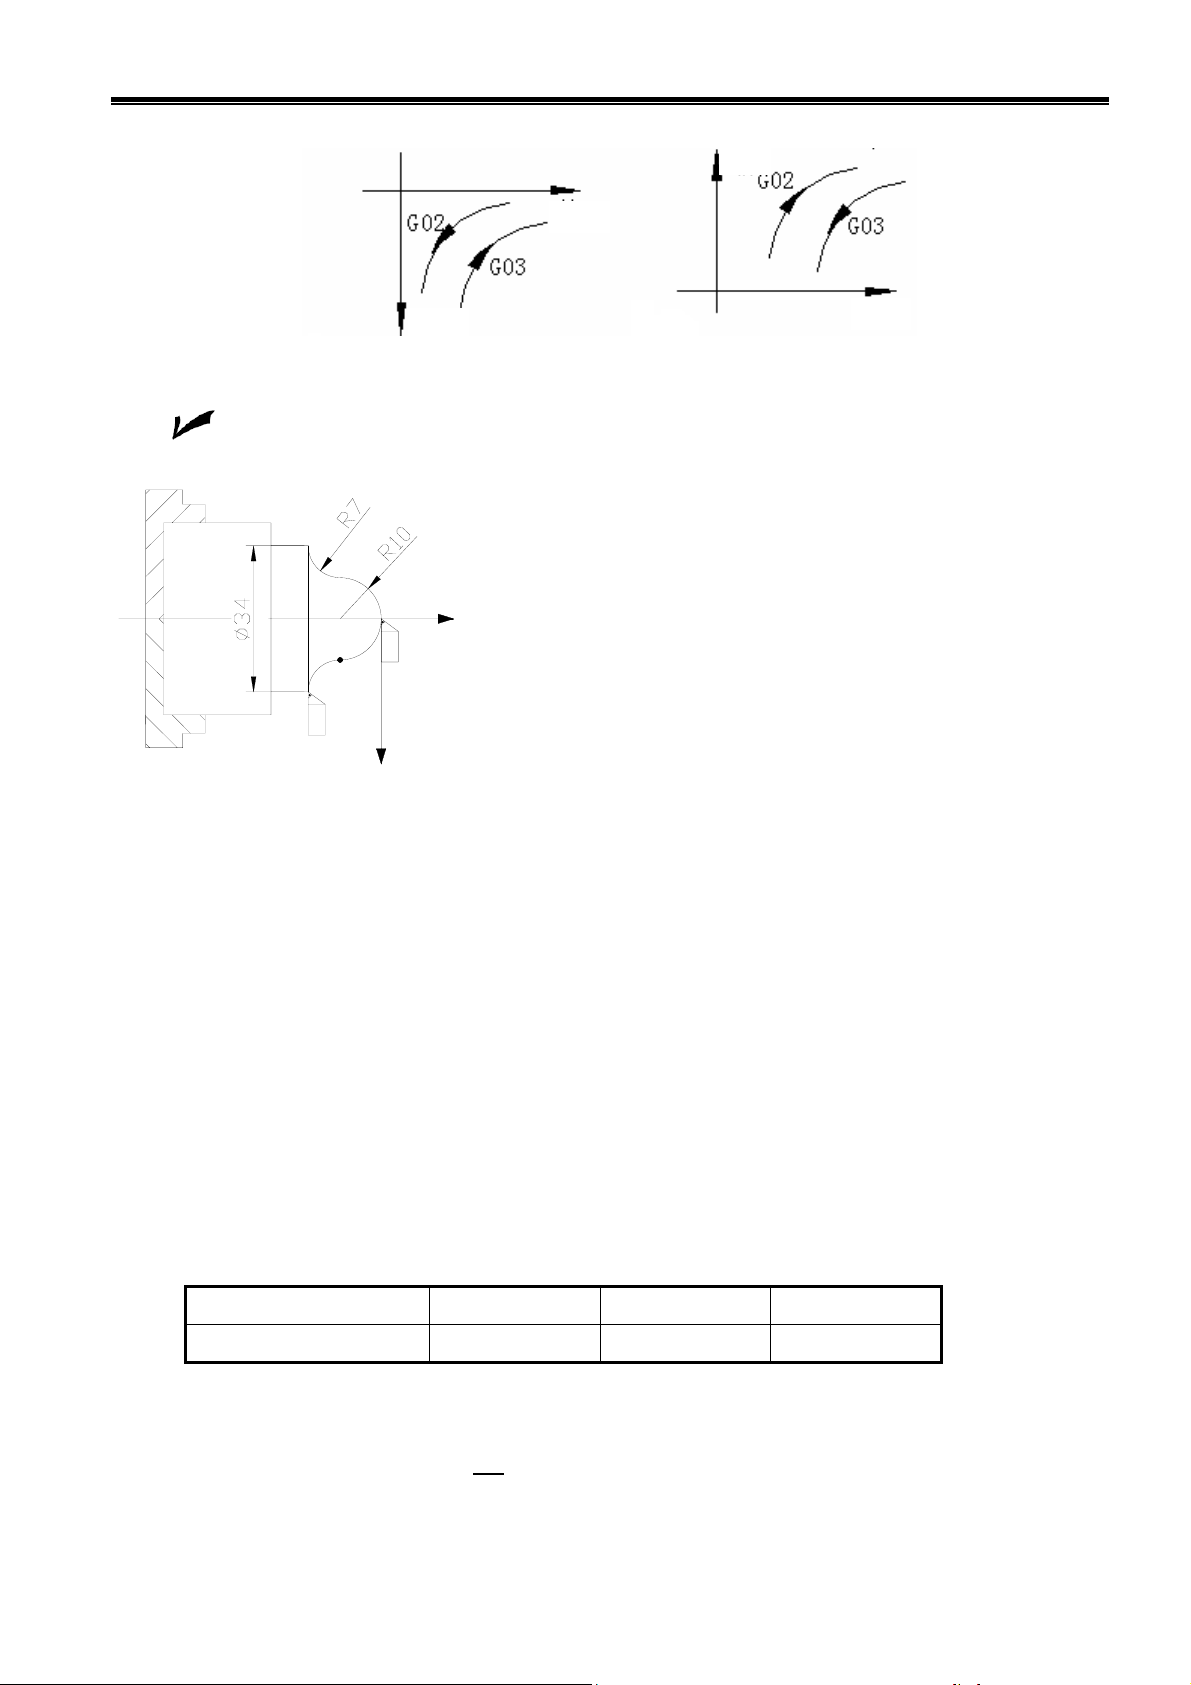
2.5.3 Circular Interpolation G02/G03
Command format:G02 X(U)_ Z(W)_ R_;
G03 X(U)_ Z(W)_ R_;
Command function: G02, CW circular cutting
G03, CCW circular cutting
In the front tool post coordinate system and rear tool post coordinate system, G02/G03 direction is as
8
Chapter 2 Programming
Fig. 2-3.
X axis
Command specification: R is the circular radius;
Example: The program is realized by the tool executing the circular interpolation with
30mm/min from A (0, 0) to C (34,-17) as follows:
B(20,-10)is the tangential point of two circulars;
R10, R7 is separately the radius of the two circular.
A
B
Program:
G03 X20 Z-10 R10 F300 (A→B)
Z
G02 X34 Z-17 R7 (B→C) (Absolute program)
C
G03 U20 W-10 R10 F300 (A→B)
G02 U14 W-7 R7 (B→C) (Incremental programming)
X
Fig. 2-4
X axis
Z axis
Z axis
Fig. 2-3
Or
2.5.4 Dwell G04
Command format: G04 P__ ;or
G04 X__ ;or
G04 U__ ;or
G04;
Command function: each axis stops the motion, the modal of G commands and the reserved data,
state are not changed, and execute the next block after dwelling the defined
time.
Command specifications: G04 is non-modal.
Command address P U X
Unit 0.001 second Second Second
2.5.5 Workpiece Coordinate System G50
The dwell time is defined by the word P__, X__ or U__.
Range of P, X, U: 0.001~99999.999 seconds.
Time of P__, X__ or U__ is as follows:
Table 3-3
Command format: G50 X_ Z
Command function: To define the absolute coordinates of current position and create the workpiece
coordinates system (called floating coordinates system) by setting the absolute
coordinates of current position in the system.
;
9
GSK980TDa Turning CNC System
Command specifications:
G50 is non-modal;
X: X new absolute coordinates of current position;
Z: Z new absolute coordinates of current position;
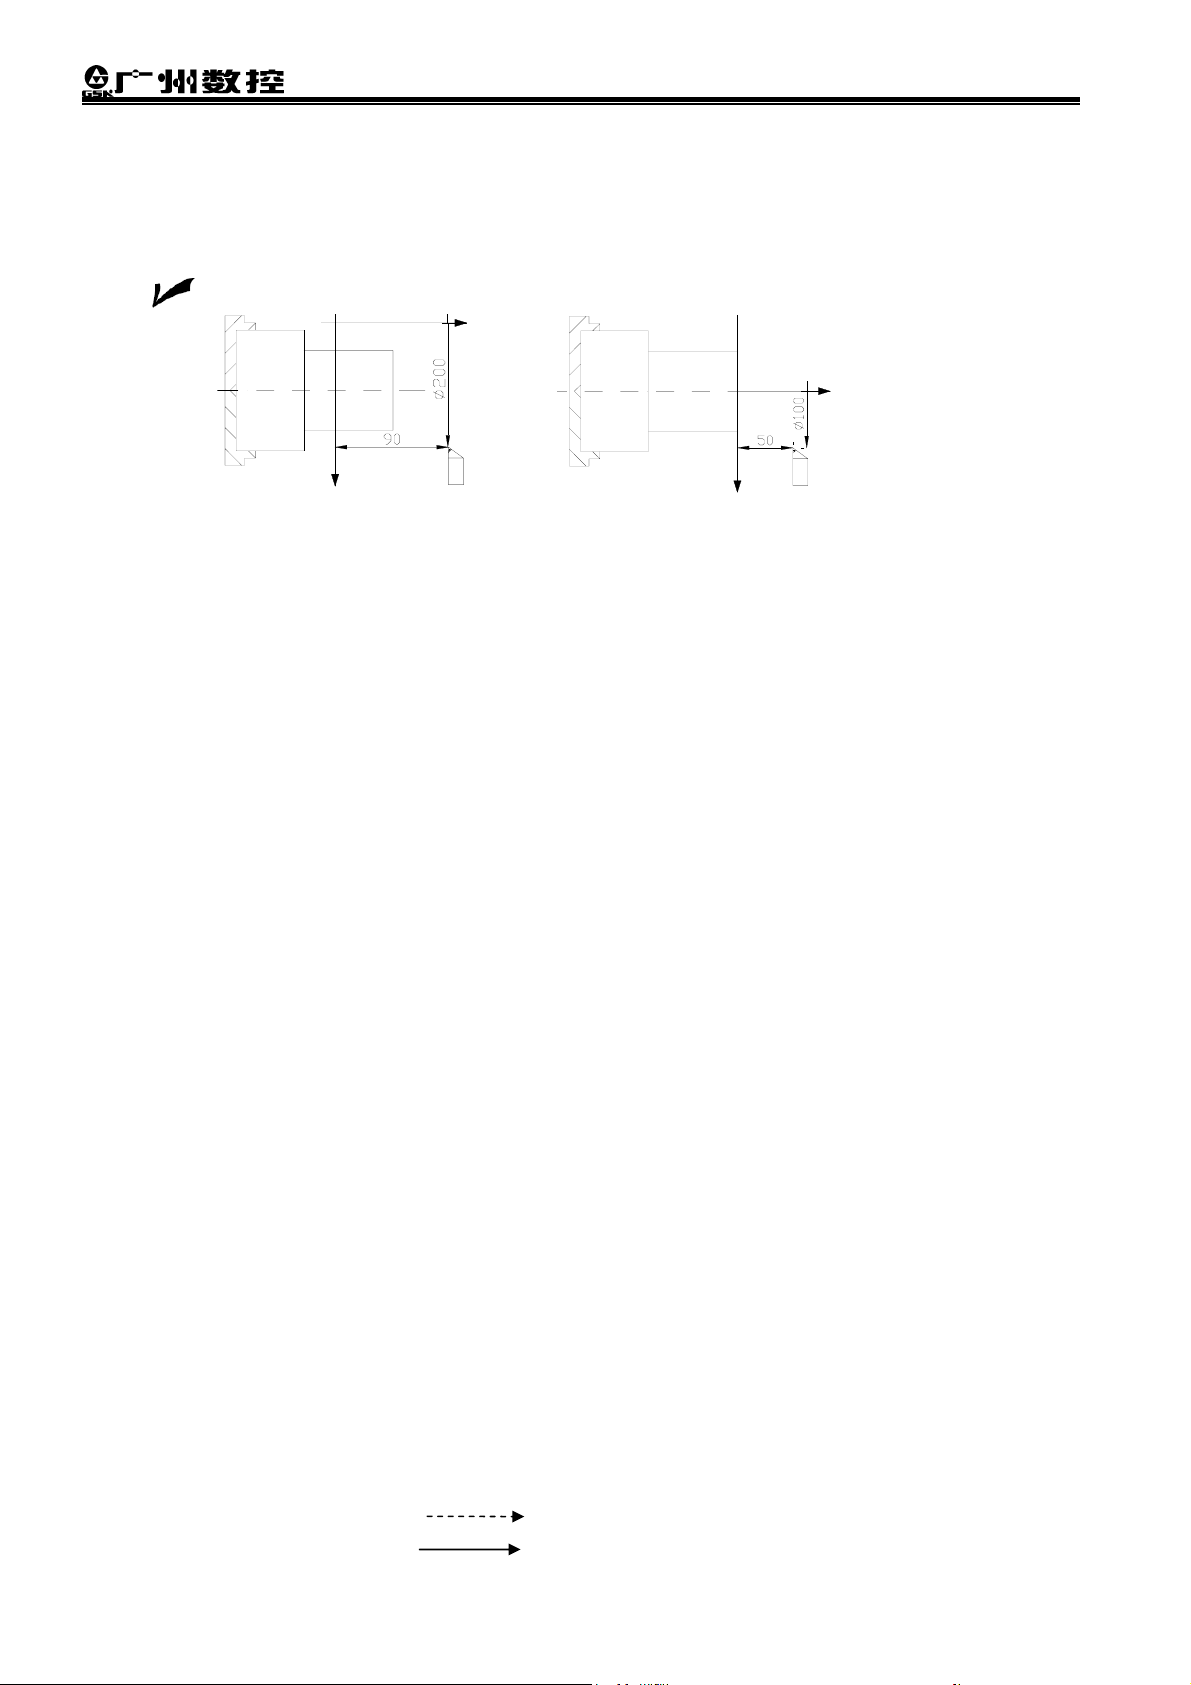
Example:
Z
Z
A(200,90)
X
Previous workpiece cooridnate system
X
New workpiece corridnate system set by G50
A(100,50)
Fig. 2-5
As Fig. 2-5, before the coordinate system is set by G50, the absolute coordinates of A point are (200,
90). After “G50 X100 Z50;” is executed, the absolute coordinates of A become (100,50), and the origin of
coordinate system is also changed to the right figure in Fig.2-5.
Note: Before the coordinate system is set by G50, the system must be without (with) tool offset
value, and the tool offset value must have been executed. T display on the panel can display
whether the current tool offset value exists, i.e., when the T offset number is displayed without the
highlight at the bottom right on the panel (such as the display is T0100), the tool offset value has
been executed, and the new coordinate system can be set by G50; when it is displayed with the
highlight, (the display is T0100), the tool offset value has not been executed, at the time, the
coordinate system is set correctly till the tool offset value has been executed, otherwise, the new
set coordinate value is less one tool offset value than the input value. Executing the tool offset
value is as follows:
(1) Executing tool change function. After the target tool is changed, the slide traverses to the middle of
two guides;
(2) The system is switched to “PROGRAM” window in MDI mode, G01 G98 U0 W0 F50 is input and the
CYCLE START is pressed; when the slide is traversing, the RESET stops. At the same time, the offset
number in T command is no more displayed reversely; the tool offset value has been executed.
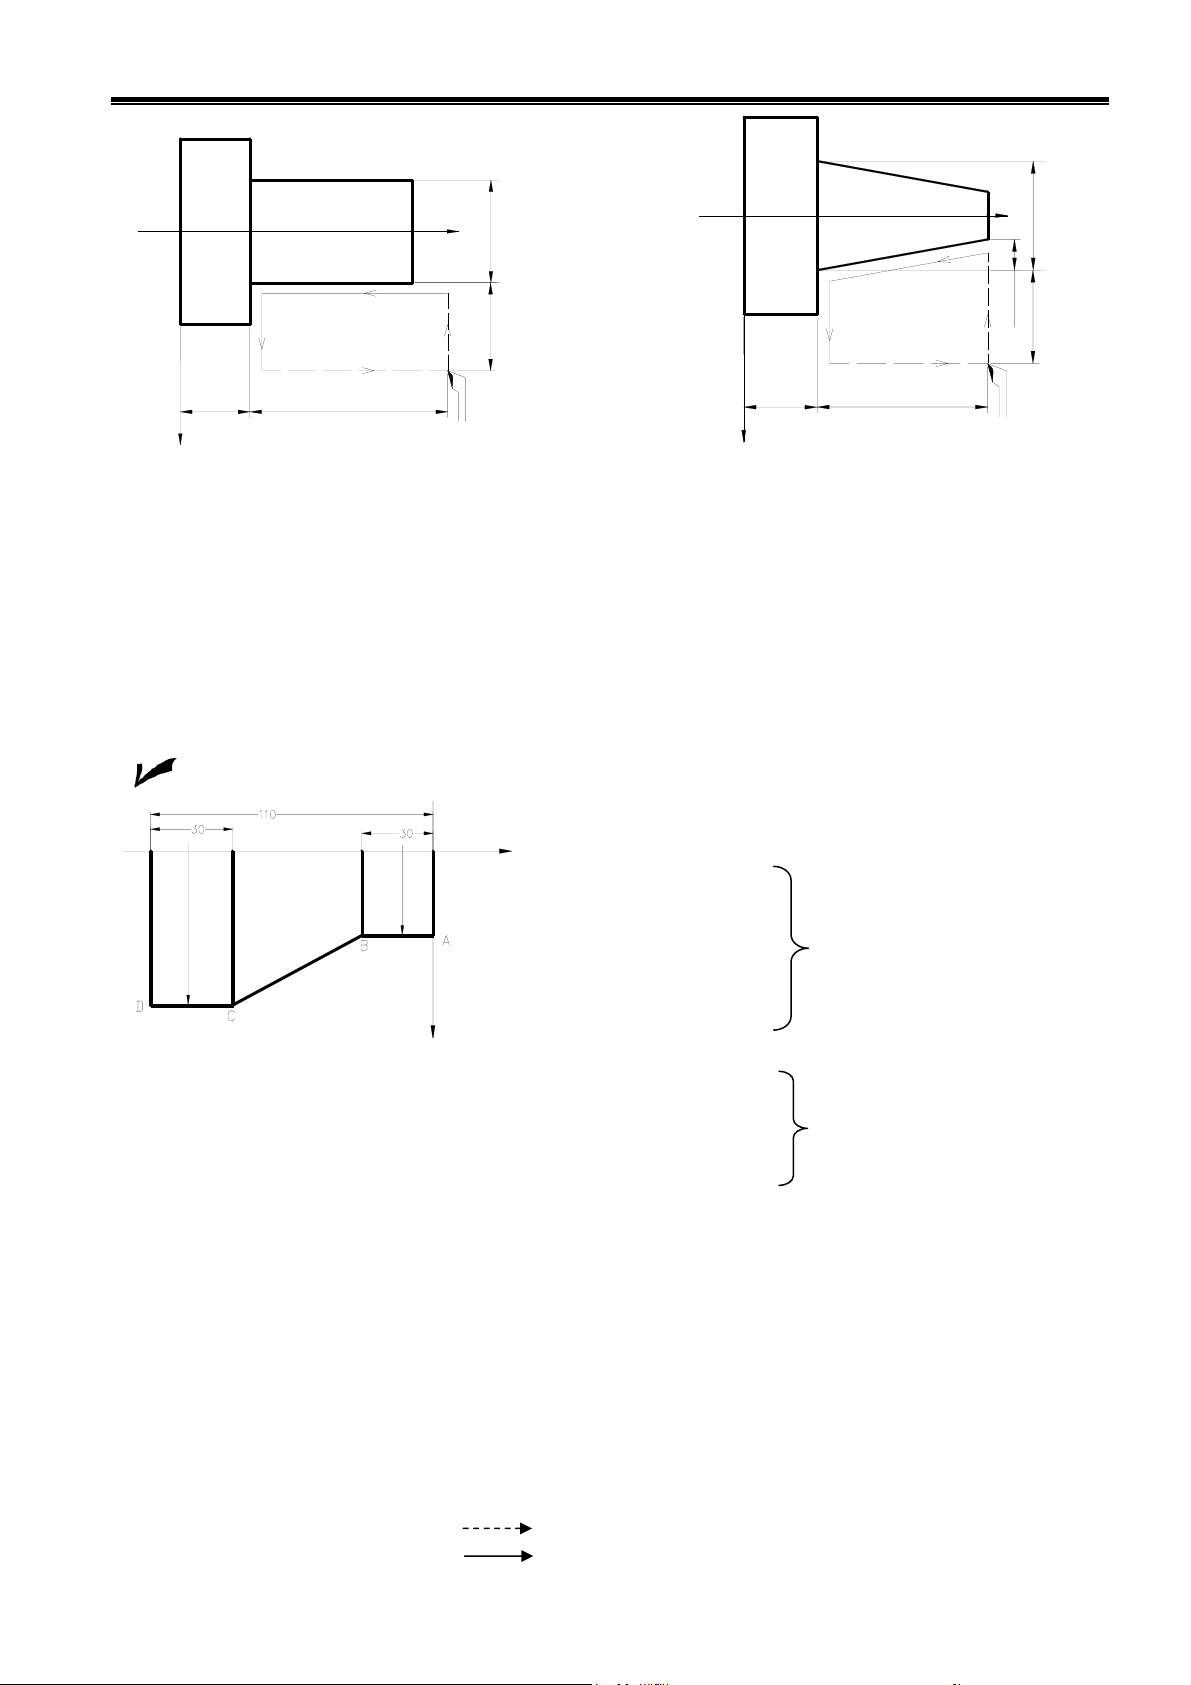
2.5.6 Axial Cutting Cycle G90
Command format: G90 X(U)__ Z(W)__ F__; (column cutting)
G90 X(U)__ Z(W)__ R__ F__;(taper cutting)
Command path: A→B→C→D→A
A→B, D→A are the rapid traverse speed, B→C, C→D is the cutting feed.
Rapid traverse
Cutting feed
10
Chapter 2 Programming
Z axis
X
C
D
Z
X axis
C
D
Z
W
B
U/2
A
X axis
Fig. 2-5 Fig. 2-6
Command specifications: X (U): X coordinate of column/taper end point(C), unit: mm;
Z (W): Z coordinate of column/taper end point(C), unit: mm;
R: difference value (radius value) of X absolute coordinates between the (B)
and end point (C) with sign symbols, when R and U have the different sign
symbols, │R│≤│U/2│; R=0 or the input is defaulted, the column cutting is
executed as Fig. 2-5, otherwise, the taper cutting is done as Fig. 2-6; unit:
mm.
Example:Fig.2-7,rod Φ125×110
Program:O0002;
M3 S300 G0 X130 Z3;
G90 X120 Z-110 F200;(A→D,cut Φ120)
Z axis
X110 Z-30;
X100;
(A→B,6 times
cutting cy
Φ60,increment of
10mm)
( B → C ,
times taper
cutting)
Φ120
Fig. 2-7
Φ60
X90;
X80;
X70;
X60;
X axis
G0 X120 Z-30;
G90 X120 Z-44 R-7.5 F150;
Z-56 R-15;
Z-68 R-22.5;
Z-80 R-30;
M30;
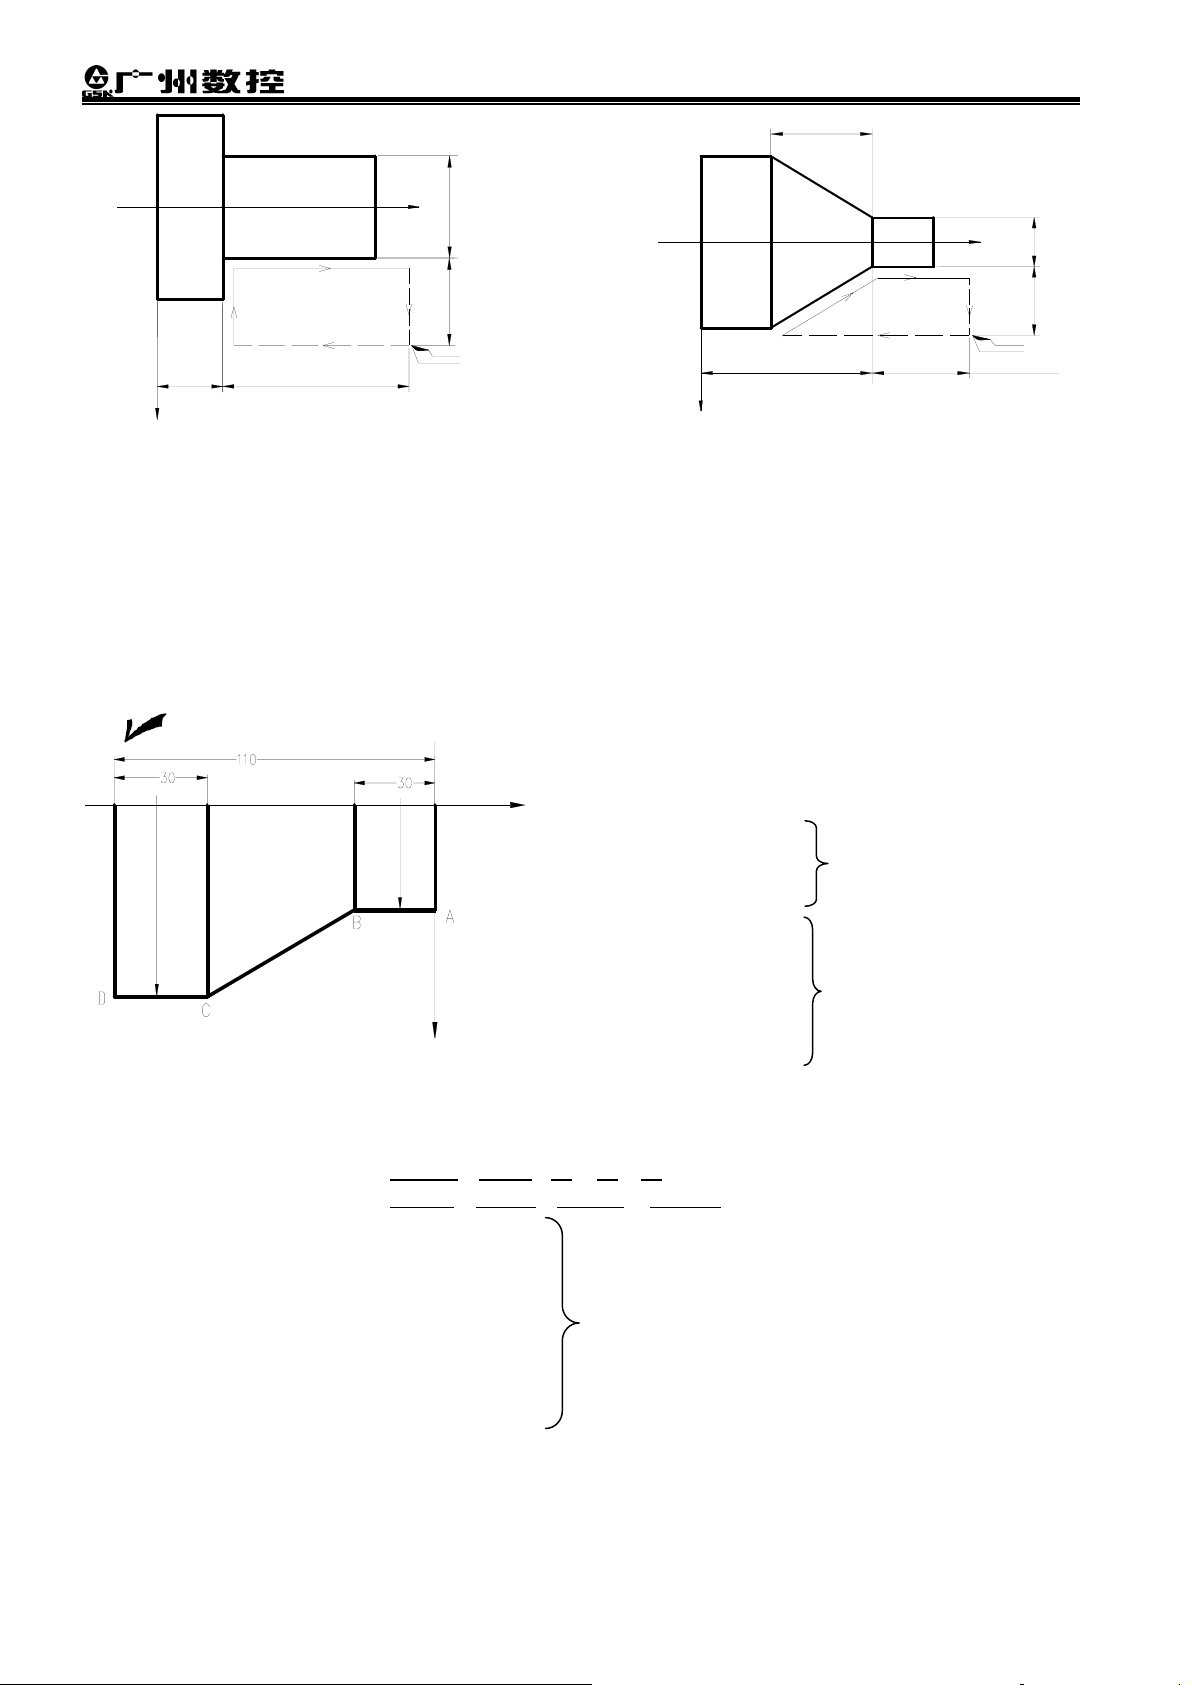
2.5.7 Radial Cutting Cycle G94
W
Z axis
B
A
cle
4
X
R
U/2
Command format:G94 X(U)__ Z(W)__ F__; (end face cutting)
G94 X(U)__ Z(W)__ R__ F__;(taper end face cutting)
Command path:A→B→C→D→A
A→B, D→A are the rapid traverse speed,B→C, C→D are the cutting feed.
Rapid traverse
Cutting feed
11
Z axis
R
X
GSK980TDa Turning CNC System
X
Z axis
X
D
U/2
A
axis
B
Z
C
D
A
W
X axis
C
B
Z
W
Fig. 2-8 Fig. 2-9
Command specifications: X (U): X coordinate of end point, unit: mm;
Z (W): Z coordinate of end point, unit: mm;
R: different value of Z absolute coordinates from end point to starting point.
When the sign symbols of R is not the same that of U, R, │R│≤│W│, the
radial linear cutting is as Fig.2-8, the radial taper cutting is as Fig. 2-9, unit:
mm.
Example: Fig. 2-10, rod Φ125×112
Program:O0003;
G00 X130 Z5 M3 S1;
Z axis
Φ60
Φ120
G94 X0 Z0 F200;
X120 Z-110 F300;
G00 X120 Z0;
G94 X108 Z-30 R-10;
(cut outer Φ12)
X96 R-20;
X84 R-30;
Fig. 2-10
X axis
X72 R-40;
X60 R-50;
M30;
(C→B→A, cut Φ60)
U/2
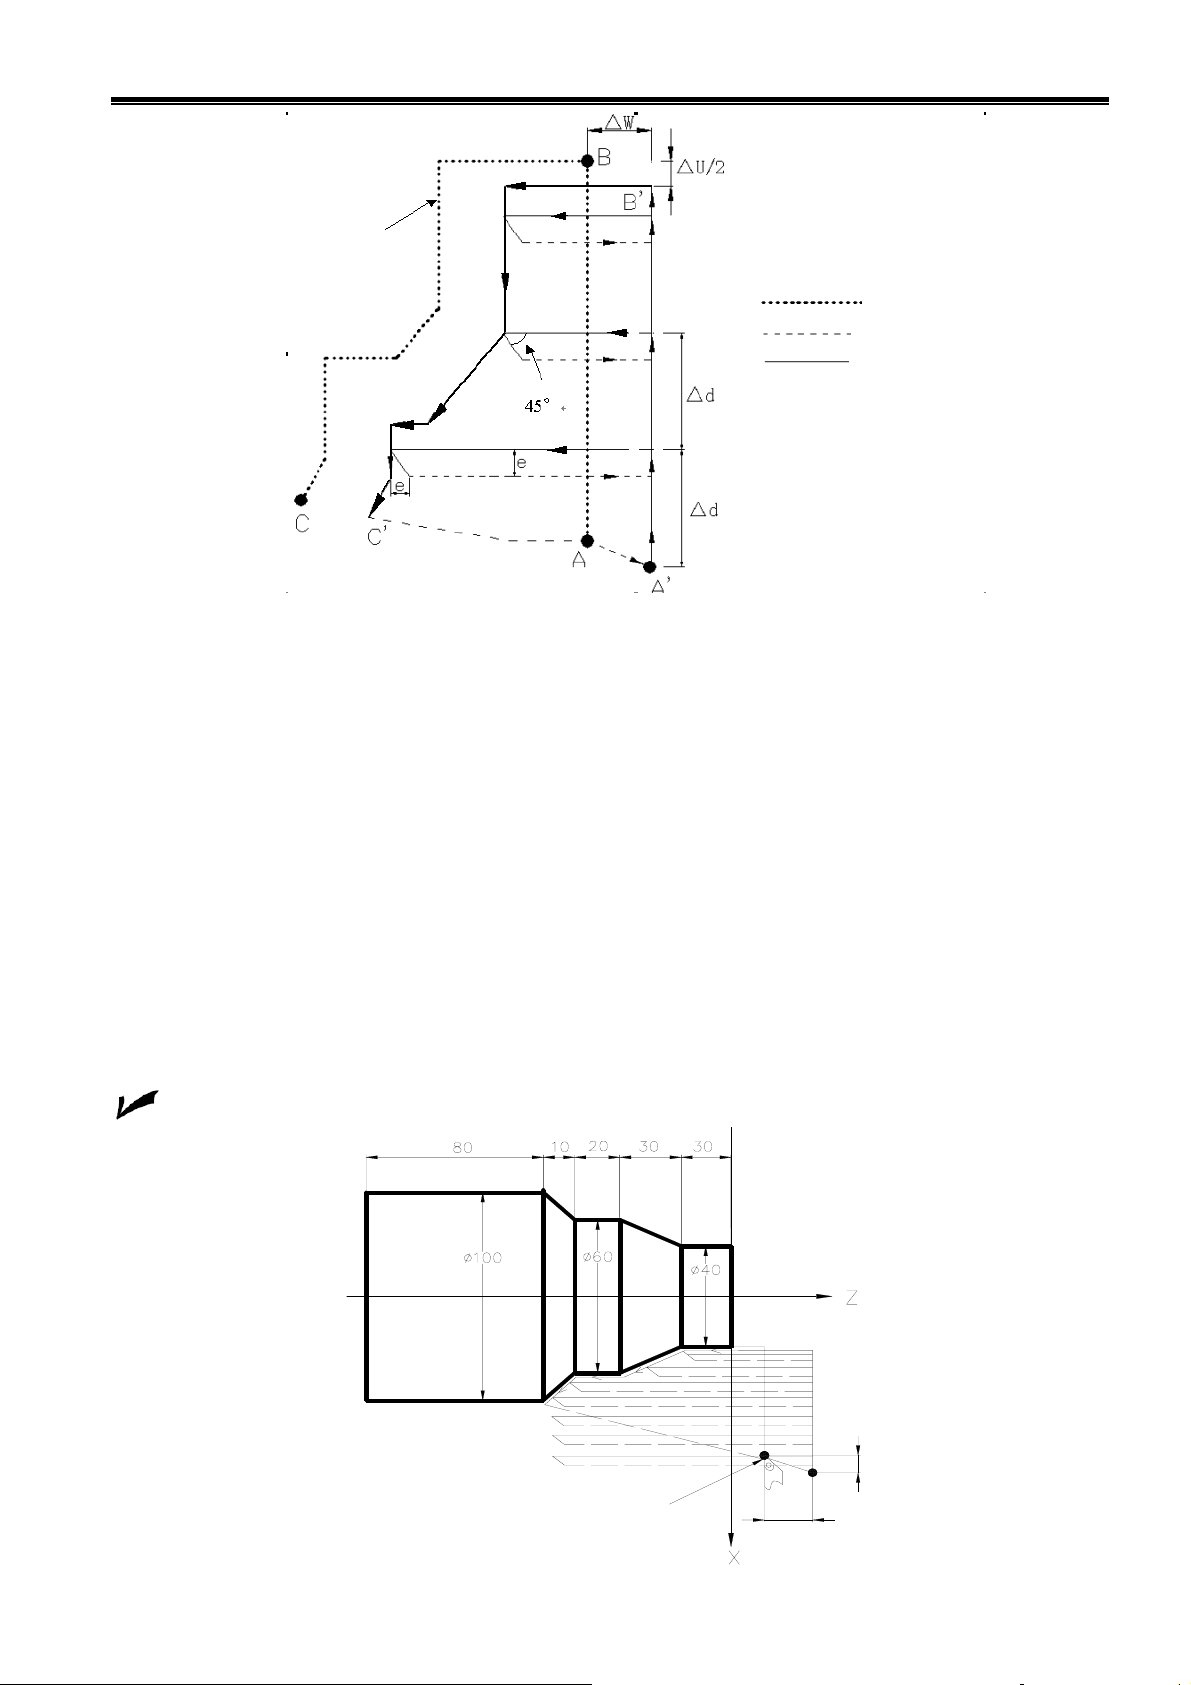
2.5.8 Axial Roughing Cycle G71
Command format: G71 U
G71 P
(Δd) R(e)
F S T
(ns) Q(nf) U(Δu) W(Δw); ⑵
;
⑴
N(ns) .....;
....;
....F;
....S;
....
⑶
·
N(nf).....;
Command path: A→A’→……B’→C’→A→B→C→A
A’→……B’ is the roughing cycle (tool infeed →cutting→tool retraction→tool
infeed……).
12
Chapter 2 Programming
Specified path by program
Finishing path
Rapid traverse
Cutting feed
Starting point (end point)
Roughing path
Fig. 2-11
Command specifications:
Δd:it is each travel(unit:mm,radius value)of X tool infeed in roughing, its value: 0.001~99.999(unit
:
mm,radius value)without sign symbols.
e: it is travel(unit:mm,radius value)of X tool retraction in roughing its value: 0.001~99.999(unit
mm,radius value)without sign symbols.
ns: Block number of the first block of finishing path.
nf: Block number of the last block of finishing path.
Δu: X finishing allowance is -9999.999~9999.999 (unit: mm, in diameter) with sign symbol, i.e. the
different value of X absolute coordinates between A’ and A.
Δw: Z finishing allowance is -9999.999~9999.999 with sign symbol (unit: mm in diameter). i.e. the
different value of Z absolute coordinates between A’ and A.
F: Feedrate; S: Spindle speed; T: Tool number, tool offset number.
Example: Fig. 2-12
:
b
d
c
a
e
0.5
Starting
point
(200,10)
2
13
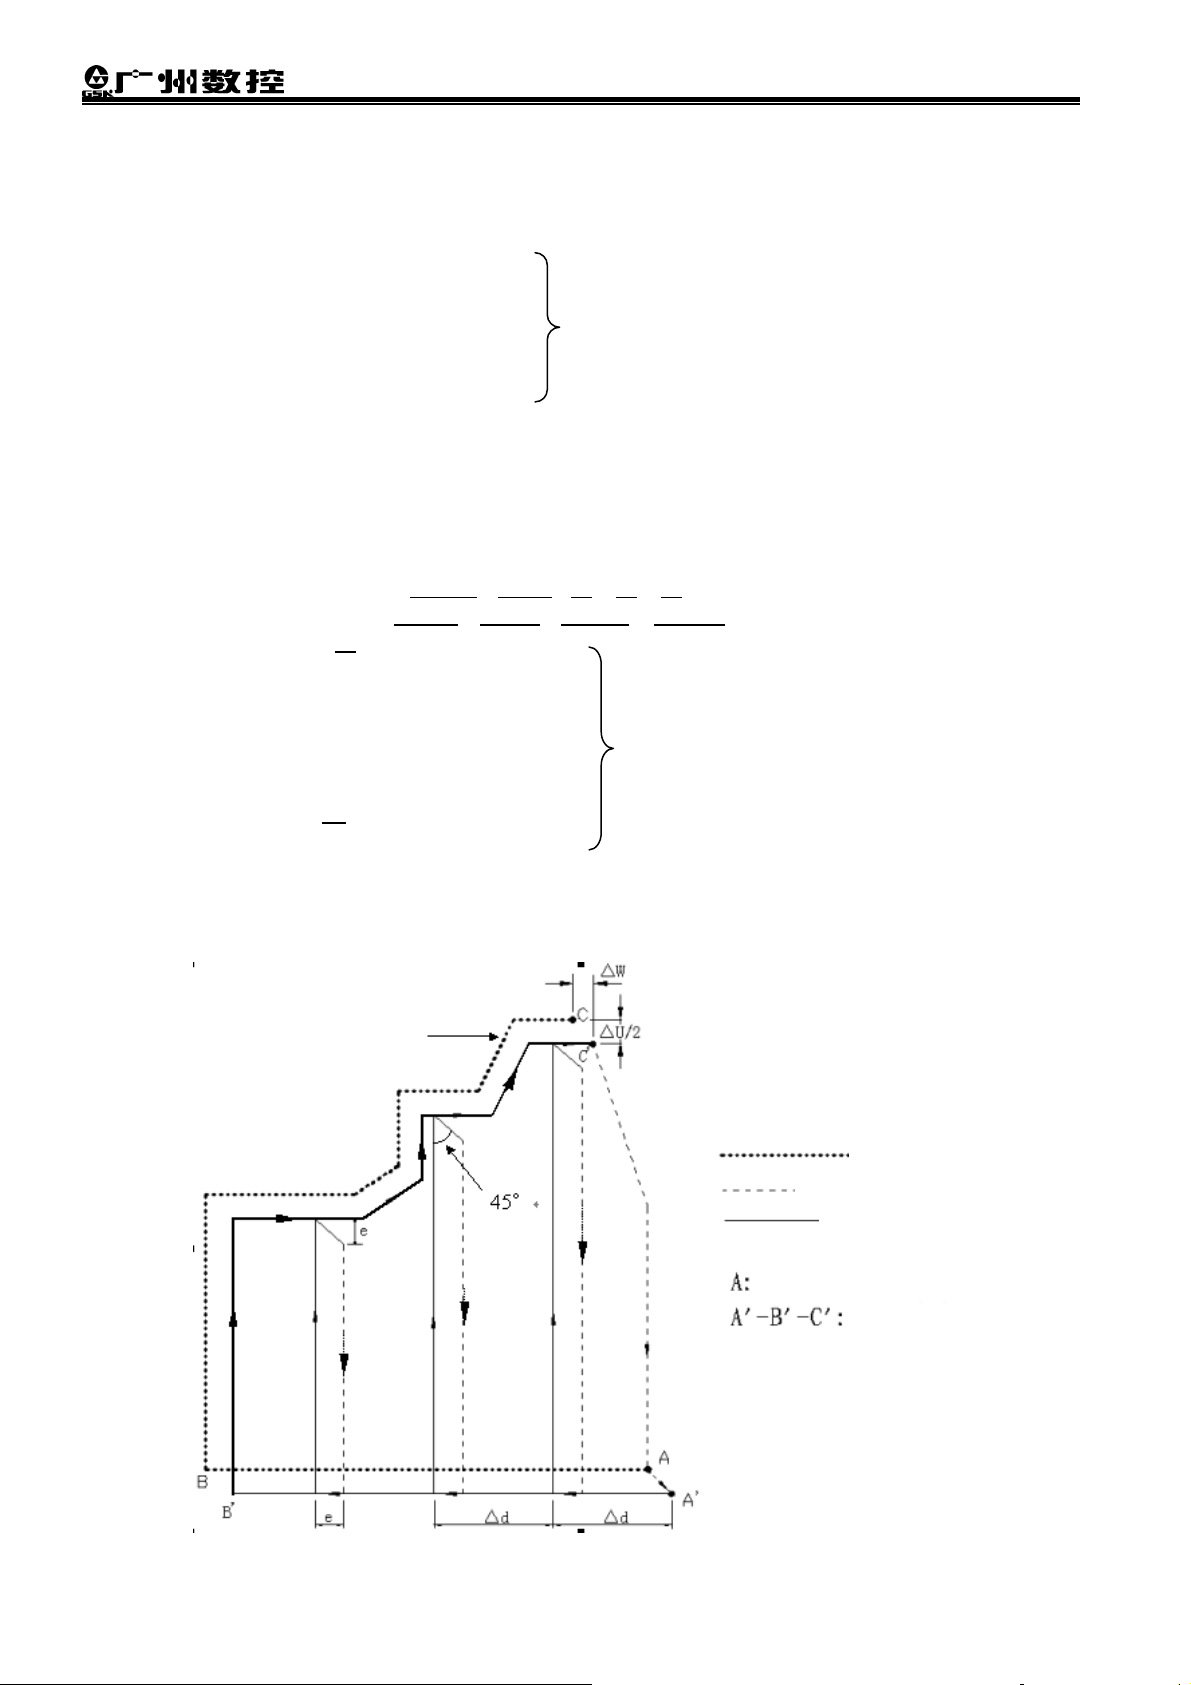
Program:O0004;
G00 X200 Z10 M3 S800; (Spindle clockwise with 800 rev/min)
G71 U2 R1 F200; (Cutting depth each time 4mm,tool retraction 2mm,[diameter])
G71 P80 Q120 U1 W2; (Roughing a---e,X machining allowance 0.5mm , Z 2mm)
N80 G00 X40 S1200; (Position)
G01 Z-30 F100 ; (a→b)
X60 W-30; (b→c) a→b→c→d→e blocks for finishing path
W-20; (c→d)
N120 X100 W-10; (d→e)
G70 P80 Q120; (a---e blocks for finishing path)
M30; (End of program)
2.5.9 Radial Roughing Cycle G72
GSK980TDa Turning CNC System
Command format: G72 W
G72 P
N
......;
....F;
....S;
....;
(Δd) R(e)
(ns) Q(nf) U(Δu) W(Δw); ⑵
(ns) .....;
⑶
·
N (nf
).....;
Command path: A→A’→……B’→C’→A→B→C→A
A’→……B’ is the roughing cycle (tool infeed→cutting→tool retraction→tool
infeed……)
Specified path by program
F S T
;
⑴
Finishing path
Rapid traverse
Cutting feed
14
Starting point (end point)
Roughing path
Fig. 2-13
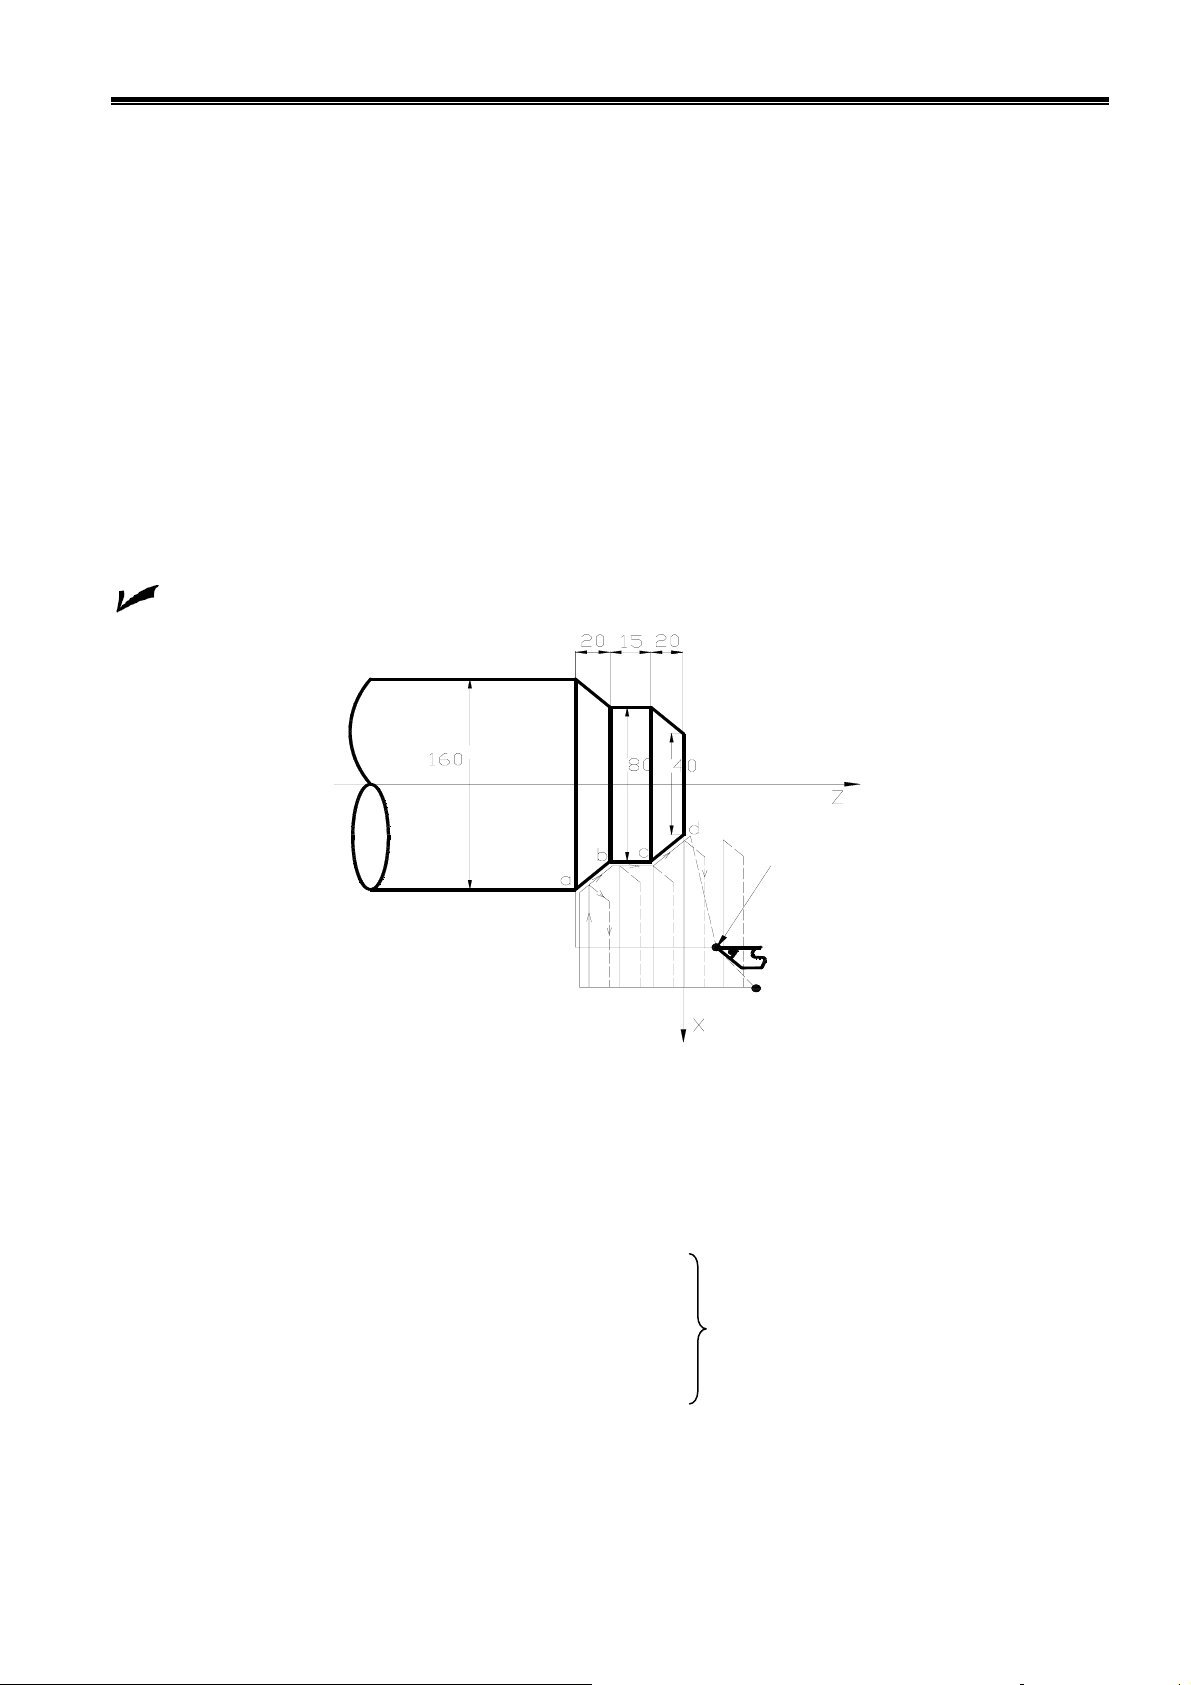
Chapter 2 Programming
)
Command specifications:
Δd: it is each travel(unit:mm,)of Z tool infeed in roughing, its value: 0.001~99.999(unit:mm,without
sign symbols).
e: it is each travel(unit:mm)of Z tool infeed in roughing, its value: 0.001~99.999(unit:mm, without
sign symbols).
ns: Block number of the first block of finishing path.
Nf: Block number of the last block of finishing path.
Δu: X finishing allowance in roughing, its value: -9999.999~9999.999 (unit: mm, with sign symbol, in
diameter), i.e. the different value of X absolute coordinates between A’ and A.
Δu: Z finishing allowance in roughing, its value: -9999.999~9999.999 (unit: mm, with sign symbol, in
diameter), i.e. the different value of X absolute coordinates between A’ and A.
F: Cutting feedrate; S: Spindle speed; T : Tool number, tool offset number.
Example: Fig. 2-14
φ
Fig.2-14
φ
φ
Starting
point
(176,10
Program:O0005;
G00 X176 Z10 M03 S500 (Change No.2 tool and execute its compensation, spindle rotation
with 500 rev/min)
G72 W2.0 R0.5 F300; (Tool infeed 2mm, tool retraction 2mm)
G72 P10 Q20 U0.2 W0.1; (Roughing a--d,X roughing allowance 0.2mm and Z 0.1mm)
N10 G00 Z-55 S800 ; (Rapid traverse)
G01 X160 F120; (Infeed to a point)
X80 W20; (Machining a—b) Blocks for finishing path
W15; (Machining b—c)
N20 X40 W20 ; (Machining c—d)
G70 P050 Q090 M30; (Finishing a—d)
15
 Loading...