
This user manual describes all items concerning the operation of
the system in detail as much as possible. However, it is impractical to give
particular descriptions of all unnecessary and/or unavailable operations of
the system due to the manual content limit, product specific operations and
other causes. Therefore, the operations not specified herein shall be
considered impossible or unallowable.
This user manual is the property of GSK CNC Equipment Co.,
Ltd. All rights are reserved. It is against the law for any organization or
individual to publish or reprint this manual without the express written
permission of GSK and the latter reserves the right to ascertain their legal
liability.

GSK218TB Turning CNC System User Manual
FOREWORD
Dear user,
We are really grateful for your patronage and purchase of this GSK218TB Turning
CNC system made by GSK CNC Equipment Co., Ltd.
The user manual describes the programming, operation, installation and connection
of this GSK218TB Turning CNC system. Please read it carefully before operation in
order to get the safe and effective working.
Warning
This system can only be operated by authorized and qualified personnel as
improper operations may cause accidents.
Please carefully read this user manual before use!
Note: The power supply installed on (in) the cabinet is exclusive to GSK’S CNC
systems.
The power supply form is forbidden to be used for other purposes. Otherwise,
there may be extreme danger!
This user manual shall be kept by final user.
II

content
Content
CONTENT ··············································································································· III
1. OVERVIEW ·········································································································· 3
1.1 OVERVIEW··················································································································· 3
1.2. BRIEF INTRODUCTION OF THE SYSTEM ········································································· 3
1.3. MODEL AND MEANING·································································································· 4
1.4 INTRODUCTION OF ORDER ···························································································· 4
1. BASIC KNOWLEDGE OF PROGRAMMING······················································· 7
1.1 DEFINITION OF THE COORDINATE AXIS··········································································· 7
1.2 MACHINE COORDINATE SYSTEM AND MACHINE ZERO······················································ 8
1.3 WORK PIECE COORDINATE SYSTEM AND REFERENCE POSITION (PROGRAM ZERO) ·········· 8
1.4 NUMBER OF CONTROLLED AXES ··················································································· 9
1.5 SETTING UNITS ············································································································ 9
1.6 MAX LIMIT···················································································································· 9
1.7 ABSOLUTE AND RELATIVE COORDINATE PROGRAMMING ················································· 9
1.8 PROGRAMMING THROUGH DIAMETER AND RADUIS METHOD·········································· 10
1.9 MODE, NON-MODE AND INITIAL STATE···········································································11
2. COMPOSITION OF A PART PROGRAM··························································· 13
2.1 COMMON STRUCTURE OF A PROGRAM ········································································ 13
2.1.1 Program name ····························································································· 13
2.1.2 Sequence number and blocks······································································ 14
2.1.3 Command word···························································································· 14
2.2 RELATIONS BETWEEN THE COMMAND NUMERICAL VALUE AND THE DECIMAL POINT ········ 17
2.3 SUBPROGRAM CONTROL ···························································································· 17
2.3.1 The main program and the subprogram······················································· 17
2.3.2 The subprogram calling M98········································································ 18
2.3.3 Return to M99 from the subprogram ···························································· 18
3. G CODES OF PREPARATORY FUNCTION ······················································ 20
3.1 CATAGORIES OF PREPARATORY FUNCTION G CODES ··················································· 20
3.2 SIMPLE G CODES······································································································· 22
3.2.1 Rapid position G00······················································································· 22
3.2.2 Linear interpolation G01··············································································· 23
3.2.3 Circular interpolation G02/G03····································································· 25
3.2.4 Optional angle chamfering and corner rounding ·········································· 27
3.2.5 Dwell command G04···················································································· 28
III

GSK218TB Turning CNC System User Manual
3.2.6 Return to machine zero (mechanical zero) G28 ···········································29
3.2.7 Setting work piece coordinate system G50 ··················································30
3.2.8 Feedrate per minute (G98) ···········································································31
3.2.9 Feedrate per revolution (G99) ······································································31
3.2.10 Constant surface speed control (G96, G97) ···············································32
3.2.11 Cutting thread with a constant lead command G32 ····································33
3.2.12 Thread cutting with the variable leads command G34································36
3.2.13 Z axis tapping cycle G33 ············································································37
3.3 FIXED CYCLE COMMAND OF SINGLE TYPE·····································································38
3.3.1 Outer/inner circle cutting cycle G90······························································38
3.3.2 End face cutting cycle G94 ···········································································40
3.3.3 Thread cutting cycle G92··············································································42
3.3.4 Precautions of single fixed cycle commands ················································44
3.4 COMMANDS OF FIXED CYCLE IN COMPOUND TYPE ························································45
3.4.1 Outer/inner circle roughing cycle G71 ··························································45
3.4.2 End face roughing cycle G72········································································48
3.4.3 Closed cutting cycle G73 ··············································································51
3.4.4 Finishing cycle G70 ······················································································53
3.4.5 Machining cycle of end face deep hole G74·················································54
3.4.6 Outer grooving cycle G75 ·············································································56
3.4.7 Compound thread cutting cycle G76 ····························································57
3.4.8 Precautions of the fixed cycle command in compound type·························60
4. M CODES OF MISCELLANEOUS FUNCTION·················································· 61
4.1 MISCELLANEOUS FUNCTION (M FUNCTION)··································································61
4.2 M CODE CALLING SUBPROGRAM··················································································62
4.3 S CODE CALLING SUBPROGRAM ··················································································63
4.4 T CODE CALLING SUBPROGRAM···················································································63
4.5 MISCELLANEOUS FUNCTION PARAMETERS ···································································63
4.6 ALARMS RELATIVE WITH MISCELLANEOUS FUNCTIONS ··················································64
5. S CODES OF SPINDLE FUNCTION·································································· 65
5.1 SPINDLE SWITCH CONTROL ·························································································65
5.2 SPINDLE ANALOG CONTROL ························································································65
6. T CODES OF TOOL FUNCTION········································································66
6.1 PROCESS OF TOOL CHANGE ························································································66
6.2 RELATIVE PARAMETERS OF TOOL CHANGE ···································································67
6.3 TOOL OFFSET ·············································································································68
6.3.1 Basic tool offset ····························································································68
IV

content
6.3.2 T code of the tool offset················································································ 68
6.3.3 Offset············································································································ 69
6.3.4 Programming example ················································································· 70
6.3.5 Single T code ······························································································· 71
7. USER MACRO PROGRAM ··············································································· 72
7.1 USER MACRO COMMAND ···························································································· 72
7.2 USER MACRO BODY ··································································································· 72
7.3 CALCULATION AND TRANSFER COMMONDS (G65) ························································ 75
7.4 PRECAUTIONS OF THE USER MACRO BODY·································································· 79
7.5 USER MACRO EXAMPLES ···························································································· 79
8. TOOL COMPENSATION FUNCTION C····························································· 80
8.1 BASIC CONCEPT OF TOOL COMPENSATION FUNCTION C ··············································· 80
8.1.1 Assumed tool nose concept ········································································· 80
8.1.2 Direction of the assumed tool nose······························································ 82
8.1.3 Setting the compensation values ································································· 85
8.1.4 Relative position of the tool and the work piece··········································· 86
8.1.5 Inside and outside ························································································ 88
8.1.6 Formats of G41, G42 and G40····································································· 88
8.2 TOOL COMPENSATION ································································································ 88
8.2.1 Analyzing the tool nose radius compensation·············································· 88
8.2.2 Change in the compensation direction in the tool compensation················· 95
8.2.3 Cancel tool compensation temporarily ························································· 96
8.2.4 Non-movement commands in tool compensation ········································ 98
8.2.5 Tool compensation interference check························································· 99
8.2.6 Tool nose radius compensation of G90/G94 command ····························· 101
8.2.7 Tool nose radius compensation in G70 command ····································· 102
8.3 PRECAUTIONS FOR TOOL COMPENSATION C······························································ 103
8.4 MACHINING EXAMPLES OF TOOL COMPENSATION C···················································· 103
Ⅲ OPERATION ································································································· 108
1. OPRATIONAL PANEL ····················································································· 110
1.1 PANEL DIVISION·········································································································110
1.2 PANEL FUNCTION ······································································································111
1.2.1 LCD display area·························································································111
1.2.2 Editing keypad·····························································································111
1.2.3 Introduction of screen operation keys··························································112
1.2.4 Machine control area···················································································112
V

GSK218TB Turning CNC System User Manual
2. SYSTEM POWER ON, POWER OFF AND SAFETY OPERATION ················· 115
2.1 SYSTEM POWER ON ·································································································· 115
2.2 POWER OFF ·············································································································115
2.3 SAFETY OPERATION ·································································································· 116
2.3.1 Resetting operation····················································································· 116
2.3.2 Emergency stop·························································································· 116
2.3.3 Feed hold····································································································116
2.3.4 Cut off power supply ··················································································· 116
2.4 CYCLE START AND FEED HOLD···················································································117
2.5 OVERTRAVEL PROTECTION························································································117
2.5.1 Hardware overtravel protection··································································· 117
2.5.2 Software overtravel protection ····································································117
3. INTERFACE DISPLAY AND REWRITING AND SETTING DATA ···················· 118
3.1 POSITION DISPLAY ···································································································· 118
3.1.1 Four methods of position page display ·······················································118
3.1.2 Display of information of machining time, number of parts, programming speed,
override and actual speed···········································································120
3.1.3 Number of machined workpieces, time of cutting and zero clearing method121
3.2 DISPLAY PROGRAM ···································································································121
3.3 DISPLAY, REWRITING AND SETTING TOOL COMPENSATION ···········································123
3.3.1 Display tool compensation··········································································123
3.3.2 Rewriting and setting tool compensation values·········································124
3.3.2.1 Rewriting and setting tool compensation values ··························124
3.3.2.2 Rewriting and setting macro variables ·········································124
3.4 DISPLAY ALARM ········································································································125
3.5 DISPLAY SETTING ·····································································································125
3.5.1 Introduction of【setting】interface ·····························································126
3.5.2 【Graph】 interface operation introduction ···············································127
3.6 DISPLAY, REWRITING AND SETTING PARAMETERS ·······················································129
3.6.1 Display parameter·······················································································129
3.6.2 Rewriting and setting parameters and thread compensation values ··········130
3.7 DISPLAY DIAGNOSIS··································································································132
3.7.1 Display diagnosis data················································································132
4. MANUAL OPERATION ···················································································· 134
4.1 COORDINATE AXIS MOVEMENT···················································································134
4.1.1 Manual feeding ···························································································134
4.1.2 Manual rapid traverse ·················································································134
VI

content
4.1.3 Manual feeding and selecting manual rapid traverse feedrate ·················· 134
4.2 SPINDLE CONTROL··································································································· 135
4.2.1 Spindle rotating CCW (counterclockwise)·················································· 135
4.2.2 Spindle rotating CW (clockwise)································································· 136
4.2.3 Spindle stop································································································ 136
4.3 OTHER MAUNAL OPERATION ····················································································· 136
4.3.1 Cooling control ··························································································· 136
4.3.2 Lubricating control······················································································ 136
4.3.3 Manual tool change control ········································································ 136
4.4 TOOL SETTING OPERATION ······················································································· 136
4.4.1 Positioning tool-setting ··············································································· 136
4.4.2 Trial cut tool setting ···················································································· 137
4.4.3 Tool setting of machine zero return···························································· 139
4.5 ADJUSTING TOOL COMPENSATION VALUE··································································· 141
5. MPG/SINGLE STEP OPERATION··································································· 143
5.1 SINGLE STEP ··········································································································· 143
5.2 MPG (MANUAL PULSE GENERATOR) FEEDING ··························································· 143
5.2.1 Selecting the movement axis and direction················································ 144
5.2.2 Introduction of MPG feeding ······································································ 145
5.3 MISCELLANEOUS CONTROL OF MPG/SINGLE STEP ···················································· 145
6. AUTOMATIC OPERATION············································································ 146
6.1 SELECTING AUTOMATICAL RUNNING PROGRAM ·························································· 146
6.2 START AUTOMATIC RUNNING ····················································································· 146
6.3 STOP AUTOMATIC RUNNING ······················································································ 147
6.4 AUTOMATIC RUNNING FROM ANY BLOCK ···································································· 147
6.5 DRY RUN ················································································································· 148
6.6 SINGLE BLOCK ········································································································· 148
6.7 MACHINE LOCK ········································································································ 150
6.8 MISCELLANEOUS FUNCTION LOCK············································································· 150
6.9 BLOCK SKIP ············································································································· 150
6.10 ADJUSTING FEEDRATE AND RAPID FEEDRATE IN AUTOMATIC RUNNING······················· 150
6.11 ADJUSTING SPINDLE SPEED IN AUTOMATIC RUNNING ················································ 151
6.12 COOLING CONTROL································································································ 151
7. MDI OPERATION····························································································· 152
7.1 INPUT MDI BLOCK···································································································· 152
7.2 RUNNING AND STOP MDI BLOCK ··············································································· 152
7.3 REWRITING AND CLEARING MDI BLOCK FIELDS·························································· 153
7.4 SWITCH BETWEEN VARIOUS MODES ·········································································· 153
VII

GSK218TB Turning CNC System User Manual
8. ZERO RETURN OPERATION·········································································· 154
8.1 MACHINE ZERO POINT CONCEPT················································································154
8.2 OPERATION STEPS OF MACHINE ZERO RETURN ··························································155
8.3 PROGRAM ZERO POINT CONCEPT ··············································································155
8.4 OPERATION STEPS OF PROGRAM ZERO RETURN·························································156
9. EDITING OPERATION ····················································································· 157
9.1 EDITING A PROGRAM·································································································157
9.1.1 Creating a program·····················································································157
9.1.1.1 Automatic generating the sequence number······················································ 157
9.1.1.2 Inputting and saving the program content ·························································· 157
9.1.1.3 Searching the sequence number, characters and line number·························· 159
9.1.1.4 Positioning method of cursors ············································································ 159
9.1.1.5 Inserting, deleting and rewriting a character······················································· 160
9.1.2 Deleting a single program ···········································································160
9.1.3 Deleting all programs··················································································161
9.1.4 Copying a program ·····················································································161
9.1.5 Renaming a program ··················································································161
9.2 PROGRAM MANAGEMENT ··························································································162
9.2.1 Searching the program content ··································································162
9.2.2 Number of stored programs········································································162
9.2.3 Memory capacity·························································································162
9.2.4 Locking a program ······················································································162
9.3 OTHER OPERATIONS IN EDIT MODE············································································162
10. COMMUNICATION OF SERIAL PORT·························································· 163
10.1 RUNNING MAIN INTERFACE······················································································163
10.2 EDITING AND SENDING A FILE···················································································164
10.3 SENDING A FILE ······································································································165
10.4 RECEIVING A FILE ···································································································167
10.5 COMMUNICATION BETWEEN CNC AND CNC ····························································169
Ⅳ INSTALLATION AND CONNECTION····························································· 171
1. SYSTEM STRUCTURE AND INSTALLATION················································· 173
1.1 COMPOSITION OF THE SYSTEM··················································································173
1.2 SYSTEM INSTALLATION AND CONNECTION ··································································173
1.3 CNC SYSTEM INSTALLATION DIMENSIONAL DRAWING ················································174
1.4 ADDITIONAL PANEL DRAWING·····················································································175
2. CONNECTION BETWEEN EQUIMENTS························································· 177
2.1 BLOCK DIAGRAM OF SYSTEM INTERFACE····································································177
VIII

content
2.1.1 Interface position layout ············································································· 177
2.1.2 Introduction of the interface········································································ 177
2.1.3 Connection block diagram·········································································· 178
2.2 CONNECTION BETWEEN THE SYSTEM AND DRIVE UNIT ··············································· 178
2.2.1 Connection with the drive unit ···································································· 178
2.2.2 Introduction of signals ················································································ 179
2.2.3 Connection diagram between the system and drive unit ··························· 182
2.3 CONNECTING THE SPINDLE CODER ··········································································· 183
2.4 RS232-C STANDARD SERIAL PORT (OPTIONAL PART) ················································· 183
2.5 ANALOG SPINDLE INTERFACE (OPTIONAL PARTS) ······················································· 184
2.6 MPG INTERFACE ····································································································· 184
2.7 CONNECTING THE POWER SUPPLY INTERFACE··························································· 184
3. MACHINE INPUT/OUTPUT INTERFACE ························································ 185
3.1 CONNECTION DIAGRAM OF MACHINE INPUT/OUTPUT INTERFACES······························· 185
3.2 INPUT SIGNALS ········································································································ 186
3.3 INTRODUCTION OF SIGNALS······················································································ 187
3.4 OUTPUT SIGNALS····································································································· 193
3.5 SPINDLE AUTOMATICAL GEAR CHANGE CONTROL ······················································· 195
3.6 CHUCK CONTROL····································································································· 196
3.7 TAIL STOCK CONTROL······························································································· 197
3.8 HAND UNIT ·············································································································· 198
3.9 EXTERNAL PROGRAM LOCK ······················································································ 198
3.10 EXTERNAL FEED HOLD AND SPINDLE PAUSE····························································· 199
3.11 INPUT AND OUTPUT SIGNAL DIAGNOSIS TABLE ·························································· 199
3.12 FUNCTION DISCRIPTION·························································································· 201
4. DEBUGGING A MACHINE ·············································································· 202
4.1 DEBUGGING PREPARATION ························································································· 202
4.2 SYSTEM POWER ON ································································································· 202
4.3 EMERGENCY STOP AND LIMIT···················································································· 202
4.4 DEBUGGING DRIVEN AXIS ························································································· 203
4.5 ADJUSTING ELECTRICAL GEAR·················································································· 203
4.6 RAPID TRAVERSE RATE AND LINEAR ACCELERATION AND DECELERATION ADJUSTMENT 203
4.7 MAX SPEED OF CUTTING AND FEEDING······································································ 204
4.8 ADJUSTING THREAD MACHINING ··············································································· 204
4.9 MACHINE ZERO POINT (MECHANICAL ZERO POINT) ADJUSTMENT································· 204
4.10 THREAD GAP COMPENSATION ················································································· 204
4.11 DEBUGGING ELECTRICAL TOOL POST ······································································ 204
4.12 DEBUGGING MACHINE SPINDLE··············································································· 205
4.13 SINGLE STEP/MPG ADJUSTMENT············································································ 205
4.14 OTHER ADJUSTMENT······························································································ 205
5. PITCH ERROR COMPENSATION DATA FUNCTION IN MEMORY TYPE······ 207
IX

GSK218TB Turning CNC System User Manual
APPENDIXⅠ LIST OF GSK218TB PARAMETERS ··········································· 211
1 PARAMETE R INTRODUCTION ················································································211
2 BIT PARAMETERS····································································································212
3 DATA PARAMETERS ································································································219
APPENDIX Ⅱ LIST OF ALARMS ······································································232
APPENDIX Ⅲ LIST OF DIAGNOSIS································································ 237
1 DI/DO DIAGNOSIS INFORMATION ············································································237
1.1 Input signal of machine side (I/O board) ············································237
1.2 Output the signal to the machine side (I/O board)························237
2 SYSTEM INTERFACE SIGNAL·················································································238
3 MDI OPERATION PANEL KEYPAD···········································································239
4 CNC INPUT/OUTPUT SIGNAL··················································································239
5 SIGNAL OUTPUT FROM CNC····················································································241
6 CNC STATE INFORMATION OF SYSTEM·································································241
APPENDIX Ⅳ LIST OF SPECIFICATION ························································ 243
APPENDIX Ⅴ TAIWAN LIUXIN TOOLPOST WIRING TABLE ························ 245
X

Volume Ⅰ Overview
I OVERVIEW
1

GSK218TB Turning CNC System User Manual
2

Volume Ⅰ Overview
1. OVERVIEW
1.1 Overview
Ⅰ Overview: It introduces the system, the composition of the chapter, the system model, and the
relative usage introduction and precaution of reading the manual.
Ⅱ Programming: It introduces the composition of the part program and the basic knowledge of
programming, and the function of each code, and the command format, which is
programmed by NC language, and its characteristics and limits.
Ⅲ Operation: It introduces each interface and setting, each operation of the machine, input/output of
programs, editing and the system communication, etc in GSK 218TB system.
Ⅳ Connection of the machine: It introduces the structure and the installation dimension of GSK218TB
system, and connection between equipments, the definitions of I/O interfaces, the
machine debugging, the system specification, and matched pitch error
compensation function in memory type.
Appendix: It lists the parameter table, which includes parameter default values and setting
ranges, the alarm table and the diagnosis table.
This manual applies to GSK218TB Turning CNC system.
1.2. Brief introduction of the system
GSK218TB CNC Turning System is the economical and popularized CNC system, which is
researched and designed by GSK CNC EQUIPMENT CO., LTD.
As an upgraded product, GSK218TB possesses the following characteristics:
● It adopts the hardware interpolation technology of CPU and CPLD in 32 bits to realize the μm
level control at high speed;
● It adopts four-layer circuit board, high integrated level, and the system process structure is
proper, and high reliability.
● LCD screen, display in Chinese and English versions, friendly interface, convenient operation;
● Adjustable acceleration and deceleration, matching with the step or the servo drive unit;
● Adjustable electrical gear ratio, and convenient application.
3
GSK218TB Turning CNC System User Manual
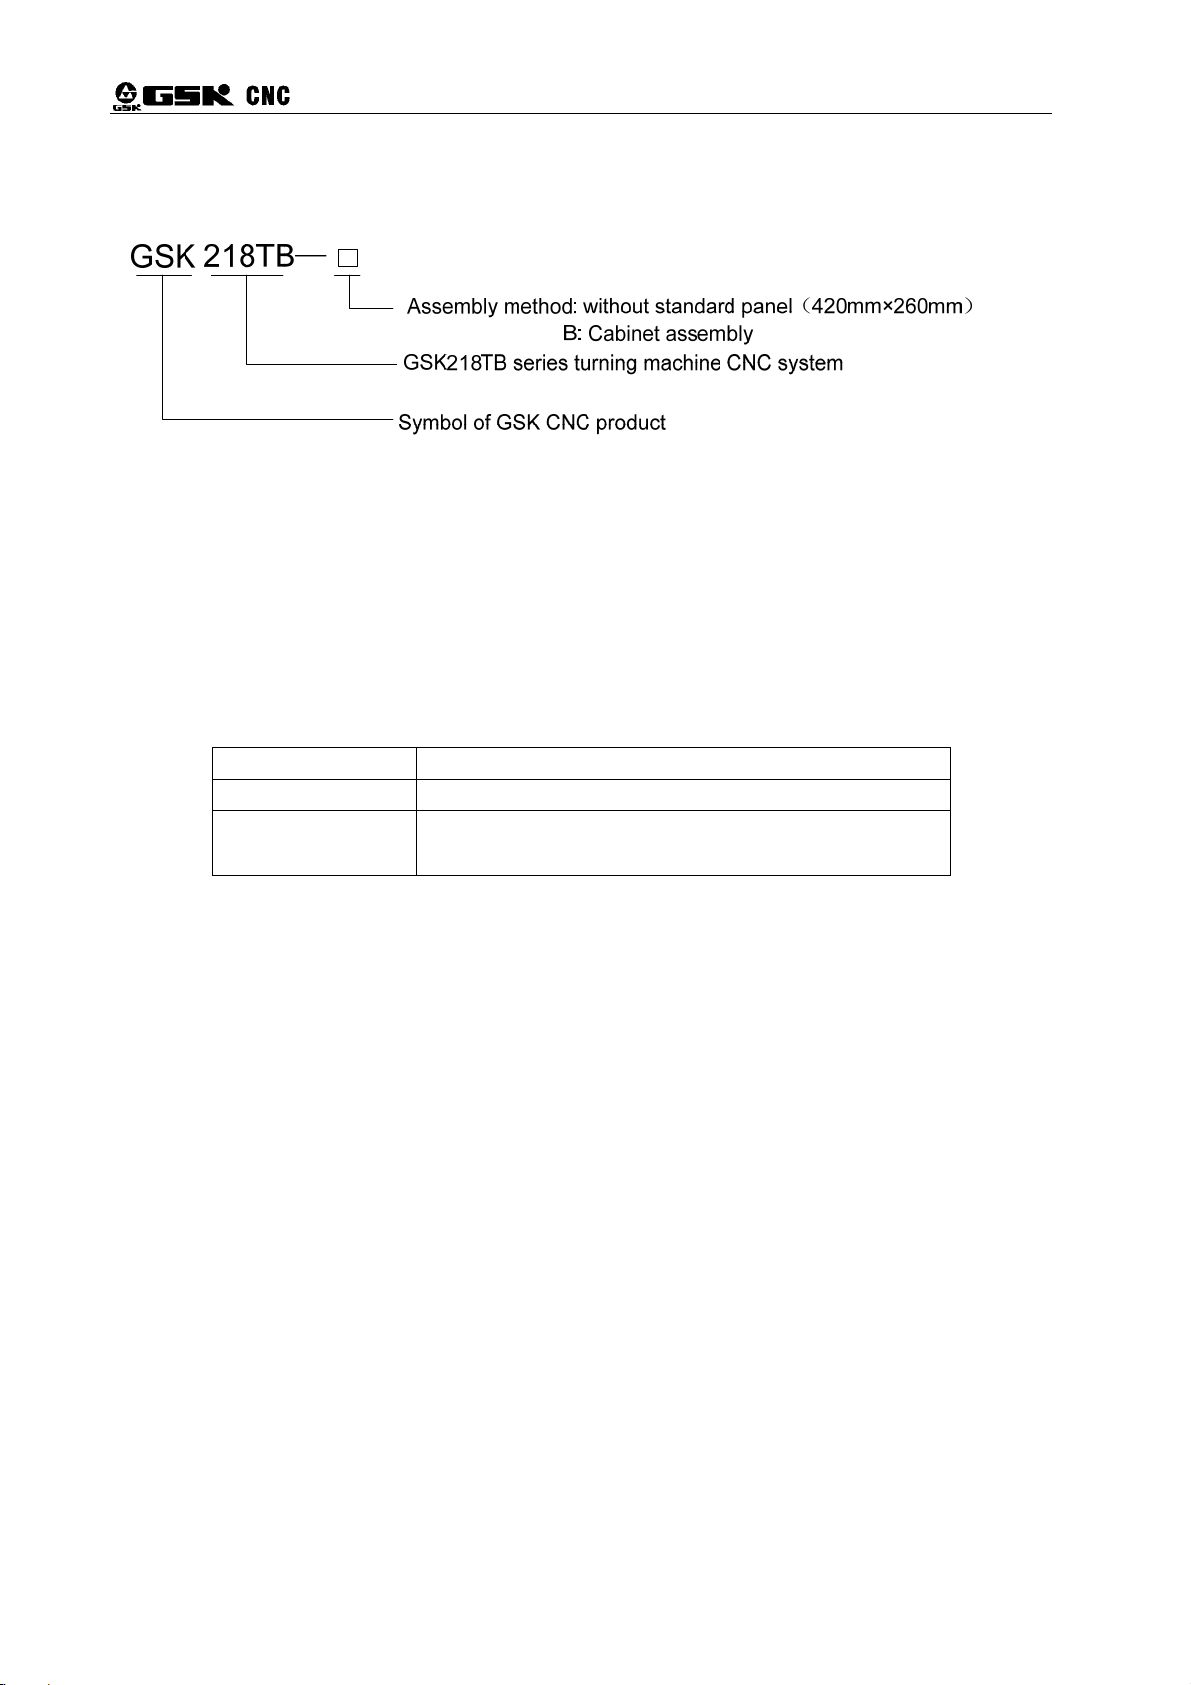
1.3. Model and meaning
Fig. 1-3
1.4 Introduction of order
The standard collocation of the system is linkage of two axes, and whether select Y axis as the
additional axis should be marked during order. About the introduction of Y axis operation, refer to
relevant content.
Model Specification
GSK218TB Aluminum operation panel 420mm×260mm
GSK218TB-B GSK218TB assembled with AP01 operation cabinet
Table 1-4
(445mm×345mm×182mm)
4

Volume Ⅱ Programming
PⅡ ROGRAMMING
5

GSK218TB Turning CNC System User Manual
6
Volume Ⅱ Programming
1. BASIC KNOWLEDGE of PROGRAMMING
1.1 Definition of the coordinate axis
It is very significant to name the coordinate axis of CNC machine and movement directions. The
designer of CNC machine, operator and maintenance worker should have the correct and uniform
knowledge about the CNC machine. Otherwise, it perhaps results in programming confusion,
mistakes of data communication, accident occurred in operation, and failing to maintain.
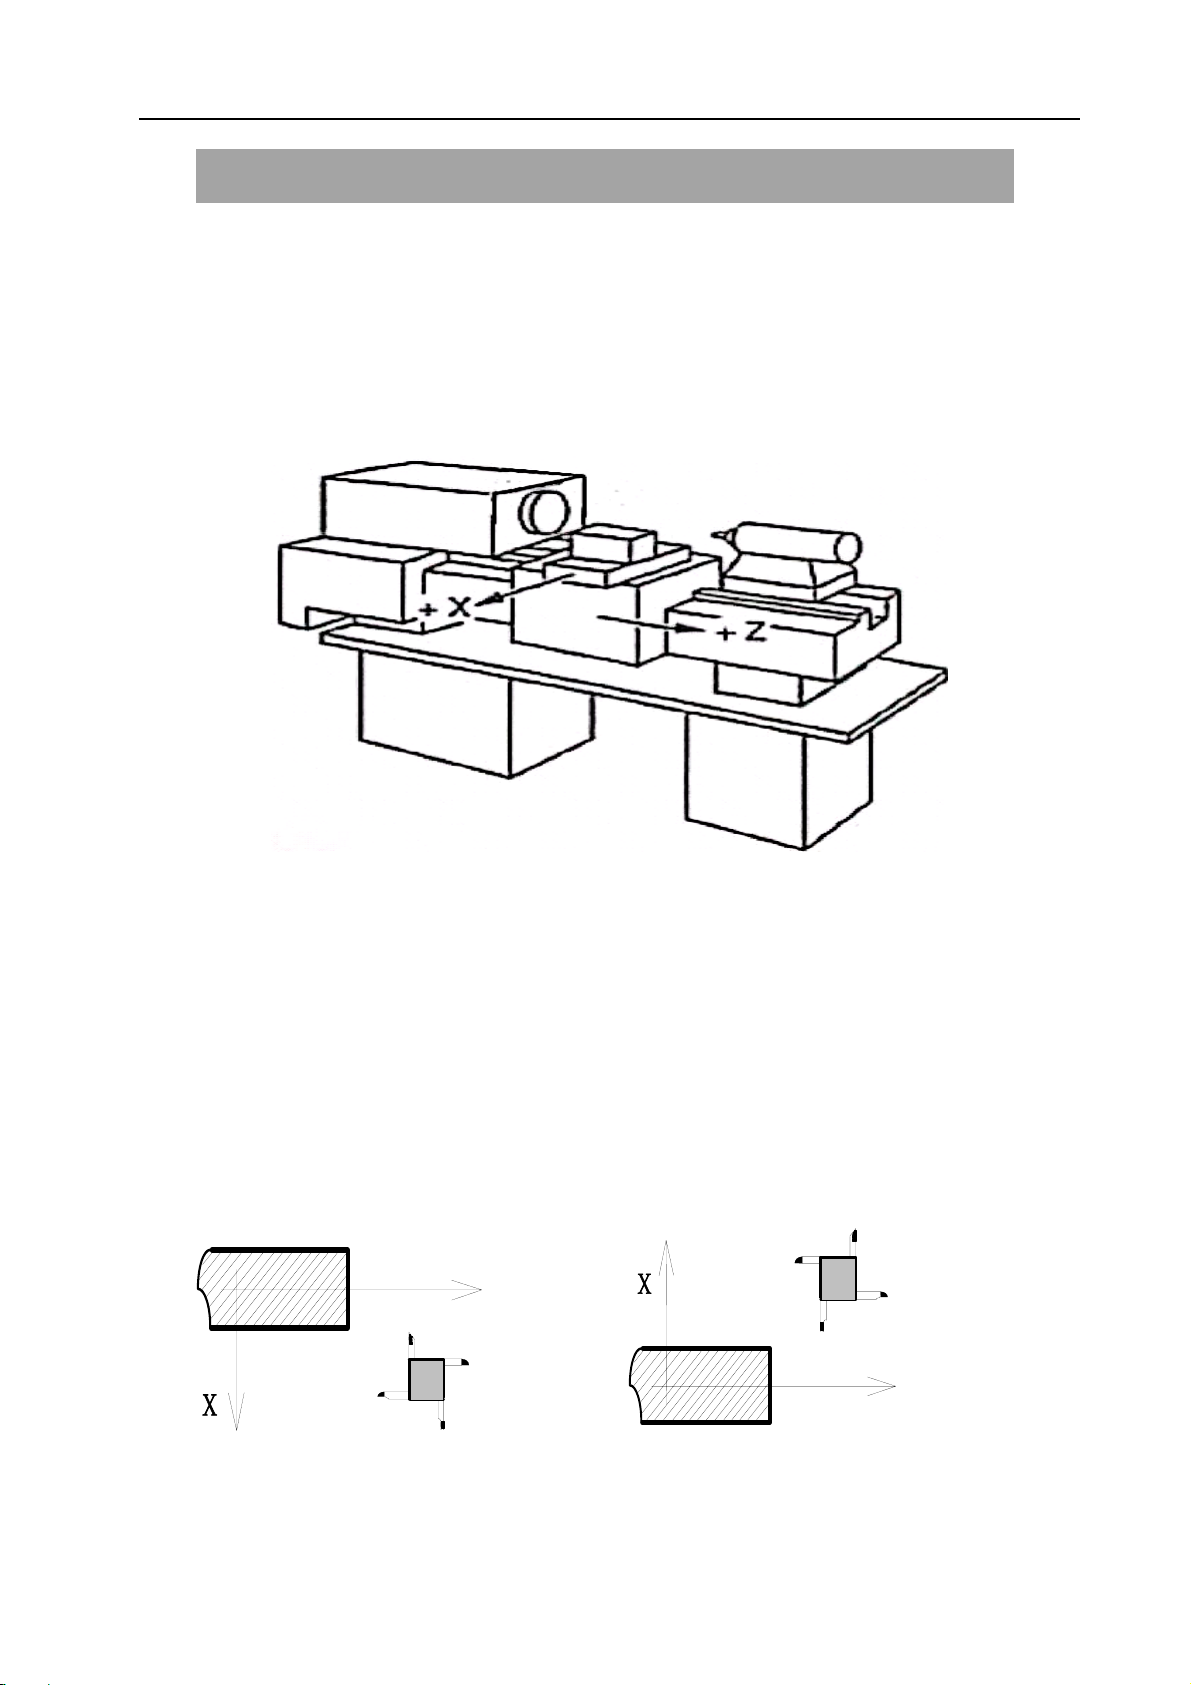
Fig. 1-1-1 is sketch map of turning machine axes.
Fig. 1-1-1
The system adopts the right angle coordinate system, which is composed of X and Z axes for
positioning and interpolation. X axis is the back-and-forth direction and Z axis left-and-right on the
horizontal plane. The direction close to the work piece is negative and leaving the work piece is
positive, which is shown in figure 1-1-1.
The system supports the front and rear tool post function and stipulates the tool post in front of
the work piece is front post, otherwise, the rear tool post, which is looked from the right side. The
figure 1-1-2 shows the coordinate system of the front tool post and the figure 1-1-3 the rear one. From
figures 1-1-2 and 1-1-3, we can find that the X-axis directions in the front and rear tool post are
opposite, but those of Z axis are same. In the following figures and examples, the manual introduces
the front tool post coordinate system, while the rear tool post can be analogized.
Z
X
X
Z
Fig. 1-1-2 Coordinate system of front tool post Fig. 1-1-3 Coordinate system of rear tool post
7

GSK218TB Turning CNC System User Manual
1.2 Machine coordinate system and machine zero
The machine coordinate system is fixed, and the origins of the machine coordinate system are
regarded as the machine zero or the mechanical zero, and it is normally located at the max travel
between the positive directions of X and Z axes. After designing, manufacturing and adjusting, the
machine zero will be determined and fixed. When CNC device is turned on without determining the
machine zero, it requires automatic or manual returning to the machine zero to set the machine
coordinate system. After the machine returns to the machine zero, the CNC has set the machine
coordinate system.
Remark: please do not use the relative functions of the machine zero provided by the system when
the machine zero is not set in the machine coordinate system.
1.3 Work piece coordinate system and reference position (program
zero)
The work piece coordinate system, which is also called as the floating coordinate system, is used
by programmer during programming. Programmers select one point as the reference position, which
is also called as the program zero, to set a new coordinate system, which is called as the work piece
coordinate system. Once the work piece coordinate system has been created, then it becomes valid
until it is replaced by a new one. And the zero position can not be saved during power off or shutdown.
The system uses G50 to define the work piece coordinate system. When there is no G50 in the
program, then the current absolute coordinate value is taken as the reference position to set the work
piece coordinate system. The reference position of the work piece coordinate system should try to
satisfy the conditions of simple programming, less dimension conversion and machining errors.
Normally, the reference position should be selected at the datum marked by the dimension or at the
positioning datum. About the turning machine programming, the reference position of the work piece
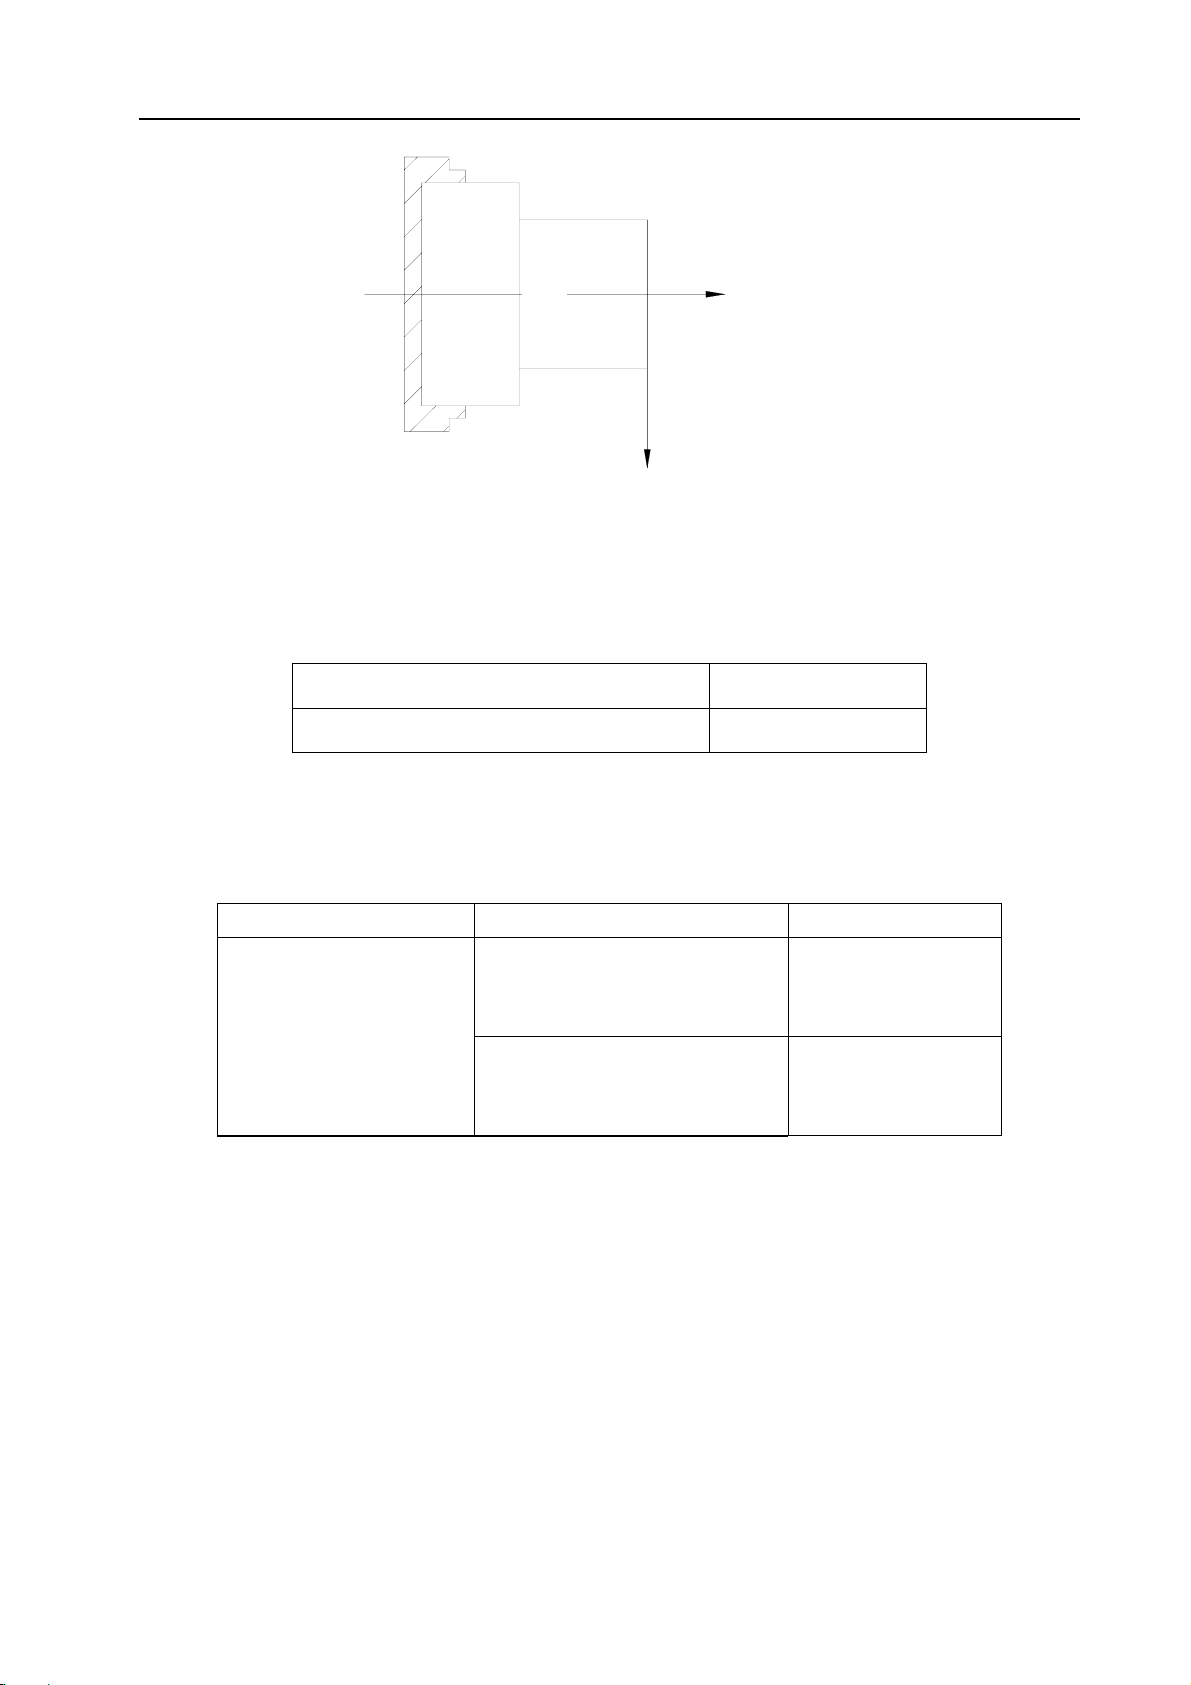
coordinate system is always located on the end face between the work piece axis and the chuck
(refer to the Fig. 1-3-1) or in the point of intersection on the end face of the work piece (refer to the Fig.
1-3-2).
Z
X
Fig. 1-3-1 Reference position on the end face of chuck
8
Z
Volume Ⅱ Programming
Fig. 1-3-2 Reference position on the end face of the work piece
1.4 Number of controlled axes
Table 1-4
Number of controlled axes
Number of controlled axes simultaneously
1.5 Setting units
Table 1-5
The input/output system Least setting unit Least movement unit
X:0.001 mm
Z:0.001 mm (Specified by
The input/output
metric system
diameter)
X:0.001 mm
Z:0.001 mm (Specified by
radius)
X
2 axes(X,Z)
2 axes(X,Z)
X:0.0005 mm
Z:0.001 mm
X:0.001 mm
Z:0.001 mm
Diameter/radius is set by bit parameter NO: 1# 2 and the parameter is only valid to X axis.
Regarding to the setting unit, refer to the manual of the machine manufacturer.
1.6 Max limit
Max limit=Min setting unit X 9999999
1.7 Absolute and relative coordinate programming
There are two methods for movement amount of the specified axis: the absolute and relative
value commands. The absolute value command adopts the coordinate value of the end point of the
axis movement to execute the programming, which is called as the absolute coordinate programming.
The relative value command uses the axis movement value for programming, which is called as the
9
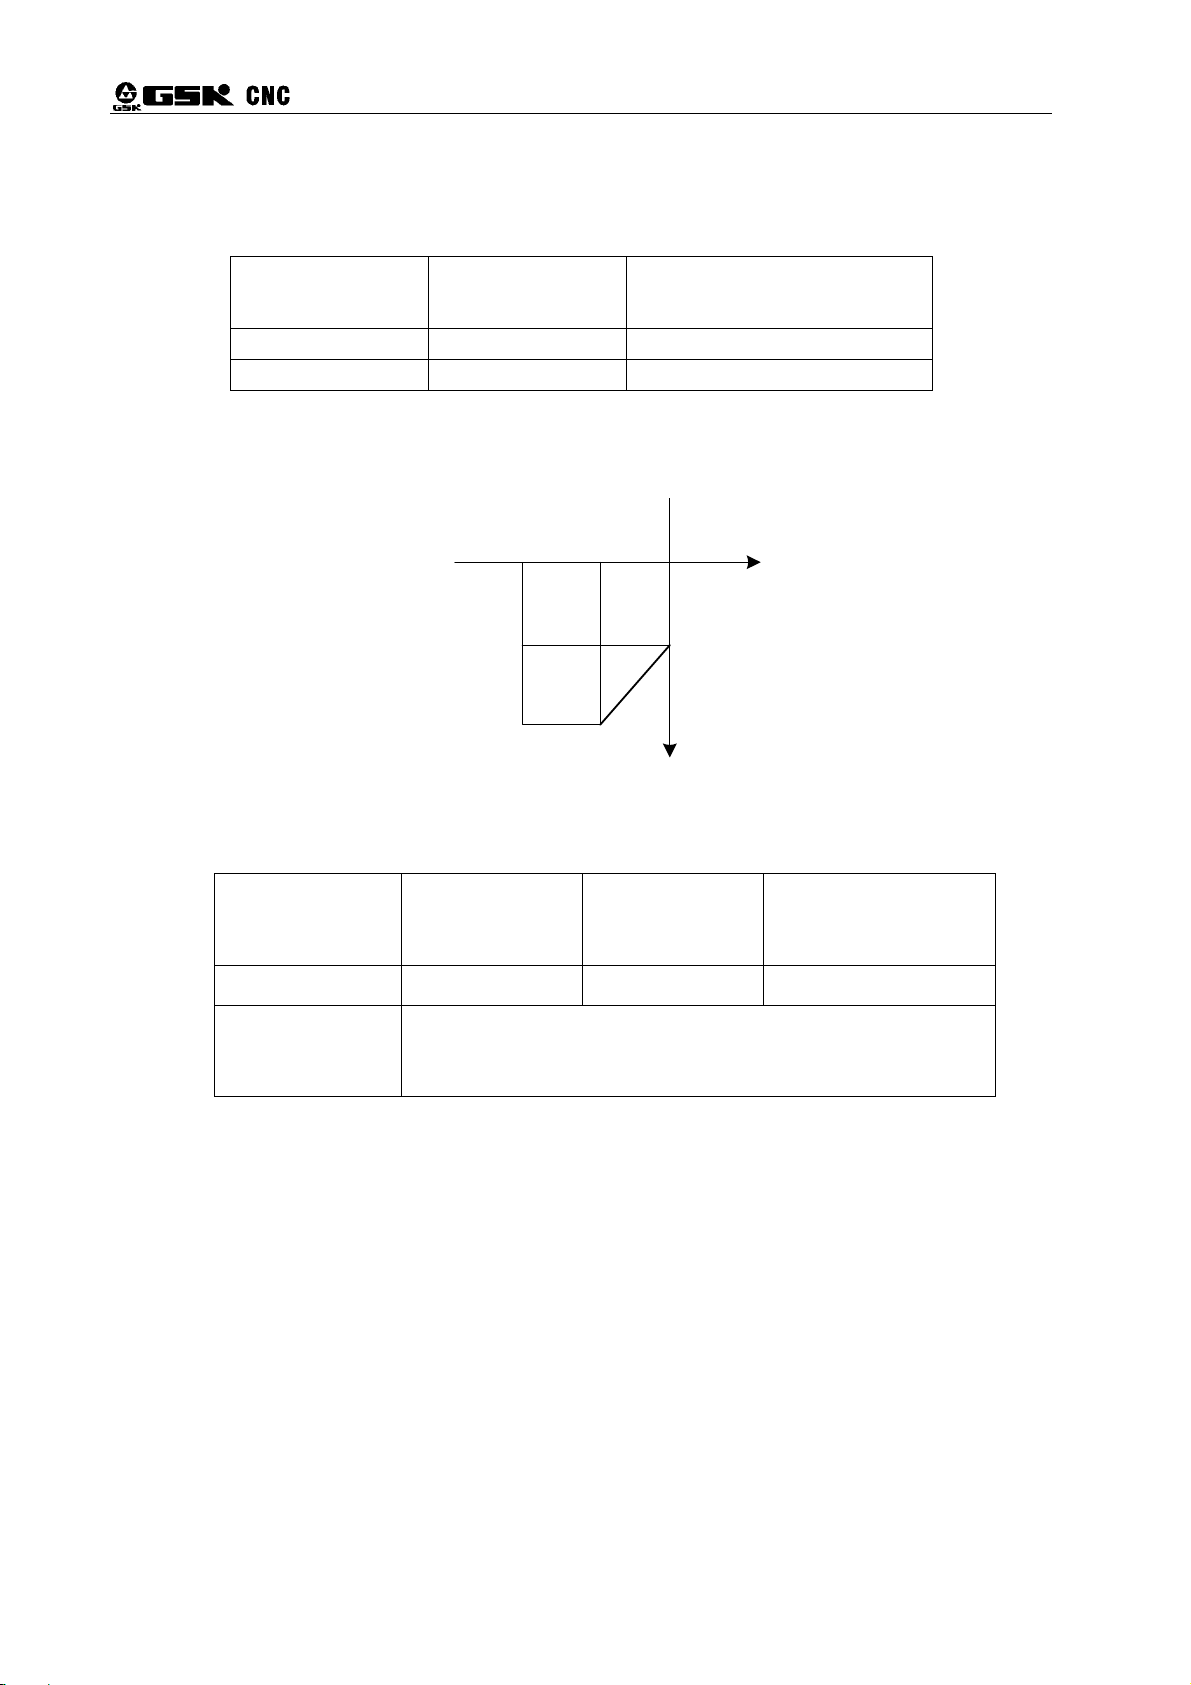
relative coordinate programming. In the system, the absolute coordinate programming adopts
addresses X and Z, and the relative uses U and W.
GSK218TB Turning CNC System User Manual
Table 1-7-1
Absolute value
commands
X U X axis movement commands
Z W Z axis movement commands
Example: It respectively uses the absolute coordinate, the relative coordinate and the combining
coordinate for programming A→B program in the Fig. 1-7.
Relative value
commands
-100 -50
100
Remark
0
Z
A
200
B
Fig. 1-7
Table 1-7-2
X
Programming
method
Program G1 X200 Z-50 G1 U100 W-50 G1 X200 W-50
Remark It is assumed that the tool is located at point A as the current
Remark: When one block is with X and U or Z and W, it alarms #132: the coordinate value is with X
and U or Z and W at the same time.
Such as: G50 X10 Z20;
G1 X20 W30 U20 Z30;
Absolute
coordinate
programming
coordinate point, and uses the linear interpolation for
movement.
Relative
coordinate
programming
Combining
coordinate
programming
1.8 Programming through diameter and raduis method
The outer appearance of the work piece, which is machined by CNC turning machine, is body of
revolution and X axis dimension can be specified by two methods: diameter and radius methods. It
can be set by bit parameter NO: 1#2.
When the bit parameter NO: 1#2 is 1, it is specified by the radius for programming.
When the bit parameter NO: 1#2 is 0, it is specified by the diameter for programming.
10

Volume Ⅱ Programming
Table 1-8 Diameter and radius specification
ITEM
Z axis command No connection with the diameter and the radius
X axis command Specified by
Increment commands
of address U
Setting coordinate system (G50) Set by
Tool offset X axis value It is specified by the diameter value or the
Radius command of circular
interpolation (R, I , K )
Feedrate of X axis direction Changeable radius (mm/min, mm/r)
Display X axis position Display the diameter value Display the radius value
Remark 1: In the following content, it is normally specified by the diameter without special
explanation.
Remark 2: The meaning of the tool offset value using the diameter/radius is the outer diameter of the
work piece changes through the diameter or the radius value when the tool offset value
changes. For example: if the diameter specifies and compensation amount is 10mm,
then the outer diameter value of cutting work piece changes into 10mm; and if the radius
specifies and compensation amount is 10mm, then diameter value of cutting work piece
diameter changes into 20mm.
SPECIFIED BY
THE DIAMETER
the diameter value
Specified by
the diameter value
the diameter value
radius value set by bit parameter NO:2#5
Specified by
the radius value
SPECIFIED BY
THE RADIUS
Specified by
the radius value
Specified by
the radius value
Specified by
the radius value
Specified by
the radius value
1.9 Mode, non-mode and initial state
The mode means once the function and status of corresponding fields are executed, it will be
valid until the new function and status are executed again. That is to say, the following blocks use the
same function and status, and then the fields are not required to input again.
Like the following programs:
G0 X100 Z100;(Rapid position in X 100 Z100)
X120 Z30;(Rapid position in X 120 Z30, G0 is mode command and can be omitted)
G1 X50 Z50 F300;(Linear interpolation is at the position of X50 Z50, the feedrate is
300mm/min G0→G1)
X100; (Linear interpolation is at the position of X100 Z50, and the feedrate is 300mm/min,
G1, Z50 and F300 are modal commands and can be omitted.)
G0 X0 Z0;(Rapid position in X0 Z0)
Non-mode means once the function and status of corresponding fields are executed, it will be
valid for one time. If the same function and status are required to use again, they should be executed,
11

GSK218TB Turning CNC System User Manual
again. That is to say, the following blocks use the same function and status, and then the fields should
be input again.
The initial state is the default function and status after the system is turned on, that is to say, if the
corresponding function and state are not specified after power on, it will execute the function in initial
mode and status. The initial states are G00, G40, G97, G98, M05, M09 and M33.
Like the following programs:
O0001;
G0 X100 Z100;(Rapid position in X 100 Z100, G0 is the initial state of the system)
G1 X0 Z0 F100;( Linear interpolation is at the position of X0 Z0, feeding per minute, the feedrate is
100mm/min, G98 is the system initial state at power on.)
12
Volume Ⅱ Programming
2. COMPOSITION of a PART PROGRAM
The series gathering of machining commands, which CNC machine completes the machining of
parts, is called programs. The programs are input into the system, according to the commands, the
system can control the tool moving along the straight line and arc, or the spindle rotation, stop and
cooling ON/OFF, etc. In the programs, these commands can be edited on the base of the actual
movement series of the machine.
2.1 Common structure of a program
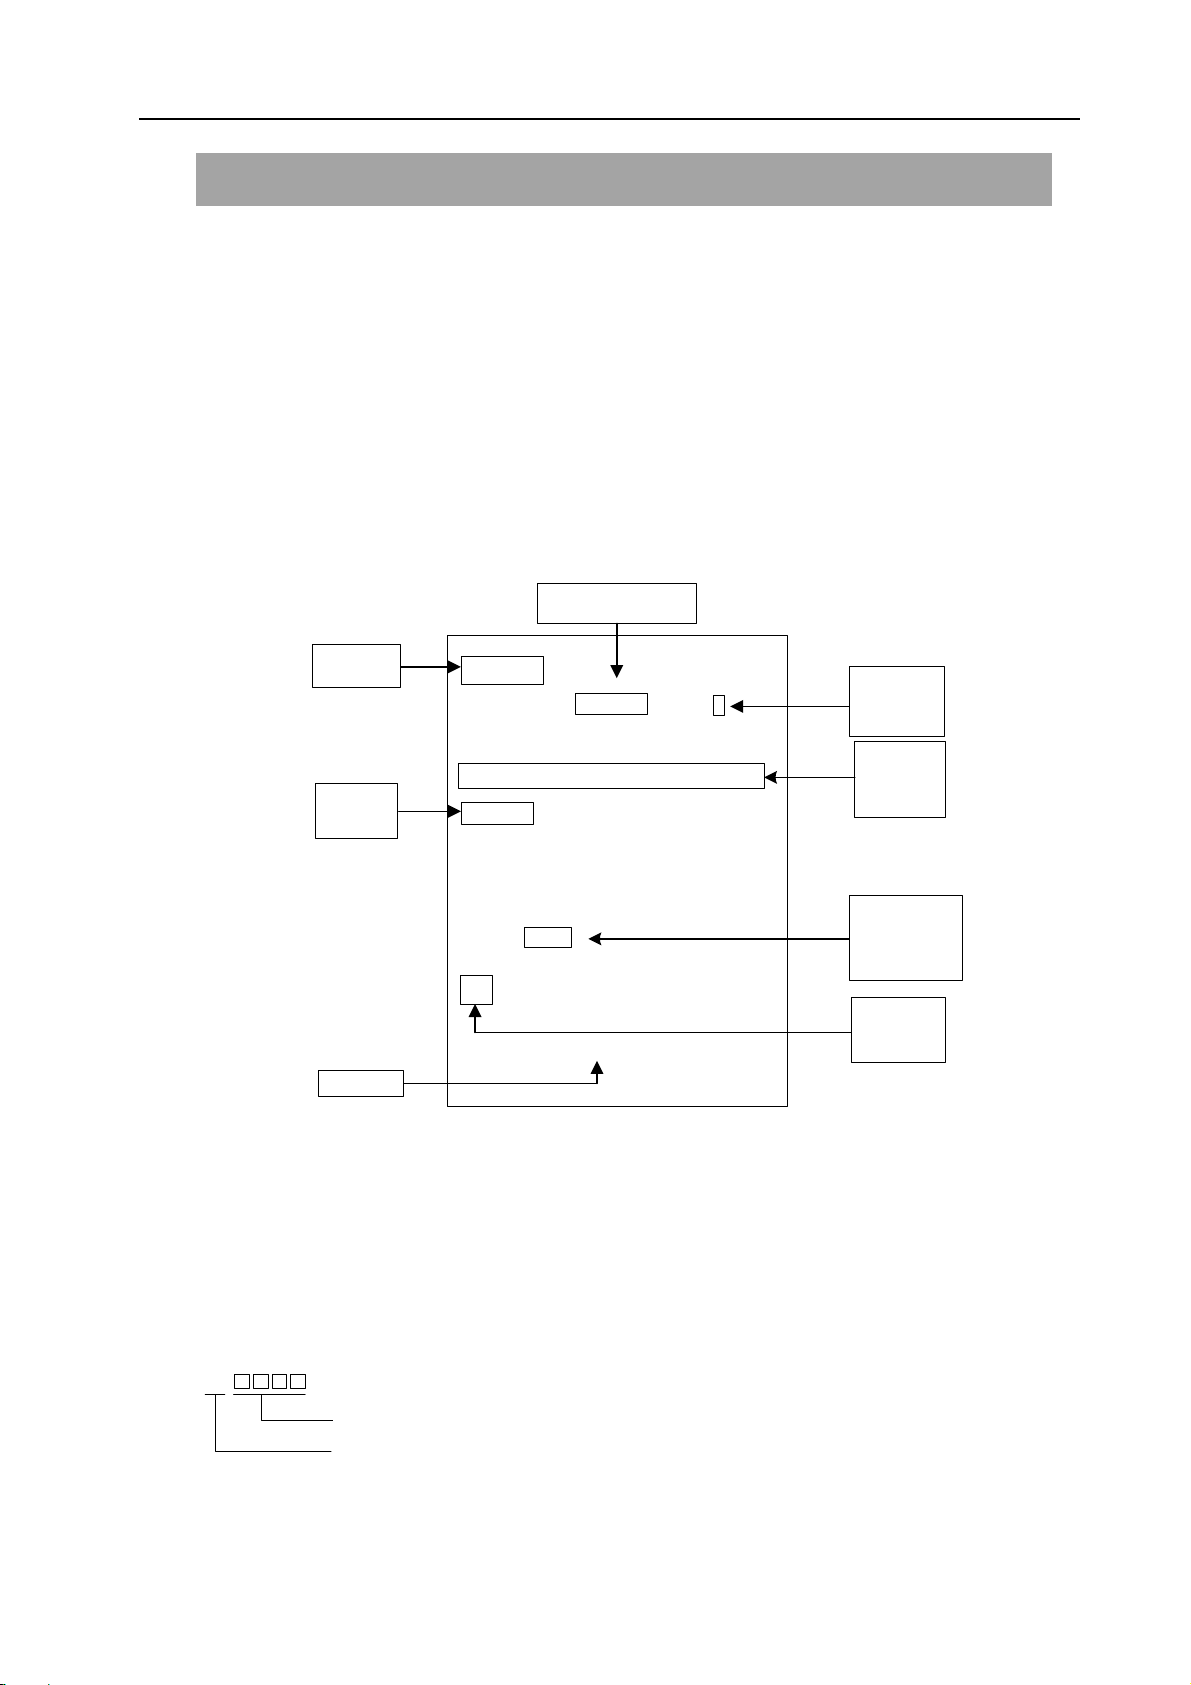
The program is composed of many blocks, and a block consists of many fields. Each block uses
EOB code to separate each other, for example, the EOB code of ISO is LF, EIA is CR. The field “;”
represents EOB code. The common structure of program is shown in the figure 2-1:
Command word
Program
name
Serial
number
Program
Fig. 2-1
O0001
N0010 G50 X1000 Z100 ;
N0020 G0 X40 Z5 ;
N0030 G01 X10 Z-30 F200 ;
N0040 G01 U50 W20 F100 ;
……;
……;
……;
N0200 M30 ;
%
;
2.1.1 Program name
EOB
code
Block
Program
end
EOB
code
In the system, the memorizer of the system can store 700 user programs. To differentiate these
programs, at the beginning of the program, the address O and the following 4 digits constitutes the
program name.
O
Program number (0000~9999,lead zero can be omitted. )
Address O
Program end
The program starts from the program name and ends with “%”.
13

GSK218TB Turning CNC System User Manual
2.1.2 Sequence number and blocks
The program is composed of many commands and one command unit is called as a block, refer
to Fig. 2-1. The block is separated through end code (refer to Fig. 2-1), it adopts the field “;” as the
end code.
At the beginning of the block, the sequence number is composed of address N and the following
four digits.
N
Program number (0000~9999,lead zero can be omitted. )
Address N
The order of sequence number is arbitrary and the bit parameter NO: 2 # 7 sets whether the
sequence number is inserted or not. Its interval may not be equal and the space will be set by data
parameter P50. All the blocks can be with the sequence number, or just some important one. But
according to the machining sequence, the sequence number should be from small to large.
2.1.3 Command word
The command word is the component of the blocks and the word is composed of the
address and the following digits, sometimes followed by marks of +, -, which is shown in the
Fig. 2-1-3:
X
Add Digit
Command Word
Fig. 2-1-3
Address is one of the English letters from A to Z, and it stipulates the meaning of following
numerical values. In the system, the address and meaning which are useful are shown in the table
2-1-3. According to the different commands, sometimes an address has different meanings.
ADDRESS RANGE OF VALUES MEANING
O
1000
Z
Add Digit
Command word
Table 2-1-3 List of command words
0~9999
Program name
-500
N
G
-9999.999~9999.999(mm)
X
0~9999.999(s)
Z
U
14
-9999.999~9999.999(mm)
-9999.999~9999.999(mm)
0~9999
00~99
Sequence number
Preparatory function
Coordinate address of X direction
Specified pause time
Coordinated address of Z axis
X direction increment

Volume Ⅱ Programming
ADDRESS RANGE OF VALUES MEANING
W
-9999.999~9999.999(mm)
0.001~9999.999(mm)
-9999.999~9999.999(mm)
-9999.999~9999.999(mm)
0.001~9999.999(mm)
-9999.999~9999.999(mm)
-9999.999~9999.999(mm)
-9999.999~9999.999(mm)
0.001~9999.999(mm)
1~9999999(time)
Finishing allowance in X direction of
G71,G72 and G73 commands
G71 cutting depth
G73 moving distance of tool retraction in
X direction
Z direction increment
G72 cutting depth
Finishing allowance in Z direction of
G71,G72 and G73 commands
G73 moving distance of tool retraction in
Z direction
Radius of arc
Cycle moving distance retraction in G71
and G72
Times of roughing in G73
R
I
K
F
S
T
M
P
0~9999.999(mm)
0~9999.999(mm)
0~9999.999(mm)
-9999.999~9999.999(mm)
-9999.999~9999.999(mm)
0.06~25400(teeth/inch)
-9999.999~9999.999(mm)
1~8000(mm/min)
0.001~500(mm/r)
0.001~500(mm)
0~9999(r/min)
00~04
10~99
0100~0800
00~99
1~9999999(0.001s)
0~9999
0~999
The moving distance of retraction
in G74 and G75 after cutting
The moving distance of retraction in G74
and G75 when cut to the end
Finishing allowance in G76
Tapering in G90, G92 and G94
Relative start point of circular center in X
axis vector
Number of thread teeth of inch system
Relative start point of circular center in Z
axis vector
Feedrate per minute
Feedrate per rev
Screw thread lead of metric system
Specified spindle speed
Multilevel spindle output
Subprogram calling
Tool function and subprogram calling
Miscellaneous function output, program
execution process, subprogram calling
Pause time
Number of calling subprogram
Times of subprogram calling
15

ADDRESS RANGE OF VALUES MEANING
GSK218TB Turning CNC System User Manual
0.001~9999.999(mm)
Refer to introduction of
commands in programming
chapter 3.4.
1~9999
1~9999
Q
H
L
Table 2-1-3 shows all the limit values of CNC devices, but the limit of the machine does not
include in the table. Please pay attention to the operation manual of the machine and understand the
programming limits during programming.
0~9999.999(mm)
1~9999.999(mm)
01~99
01~99
Cycle moving amount in X direction of
G74 and G75
Thread cutting parameters in G76
Initial block sequence number of
compound cycle command finishing
Last block sequence number of
compound cycle command finishing
Cycle moving distance in Z direction of
G74 and G75
Cutting amount at the first time in G76
Operator in G65
Number of thread heads in G92
16

Volume Ⅱ Programming
2.2 Relations between the command numerical value and the
decimal point
In the system, some commands can not input the decimal point, and whether the programming
uses the decimal points is set by the bit parameter NO: 11#0. Table 2-2 lists the relations between the
command numerical value and the decimal point:
Table 2-2
ADDRESS
X
Z
U
W
R
I
K
P
S
WITH DECIMAL
POINT OR NOT
Yes
Yes Command: G1 Z20
Yes Command: G1 U20
Yes Command: G1 W20
Yes
Yes
Yes
No Command:G4 P2
No
NO:11#0=1 NO:11#0=0 REMARK
Command:G1 X20
Positioning point: 20
Command:G4 X20
Delay:20s
Positioning point: 20
Increment value:
20mm
Increment value:
20mm
Delay: 0.002s
Command:G1 X20
Positioning point: 0.02
Command:G4 X20
Delay:0.02s
Command: G1 Z20
Positioning point: 0.02
Command: G1 U20
Increment value:
0.02mm
Command: G1 W20
Increment value:
0.02mm
Same as
address X
No connection
with the decimal
point
2.3 Subprogram control
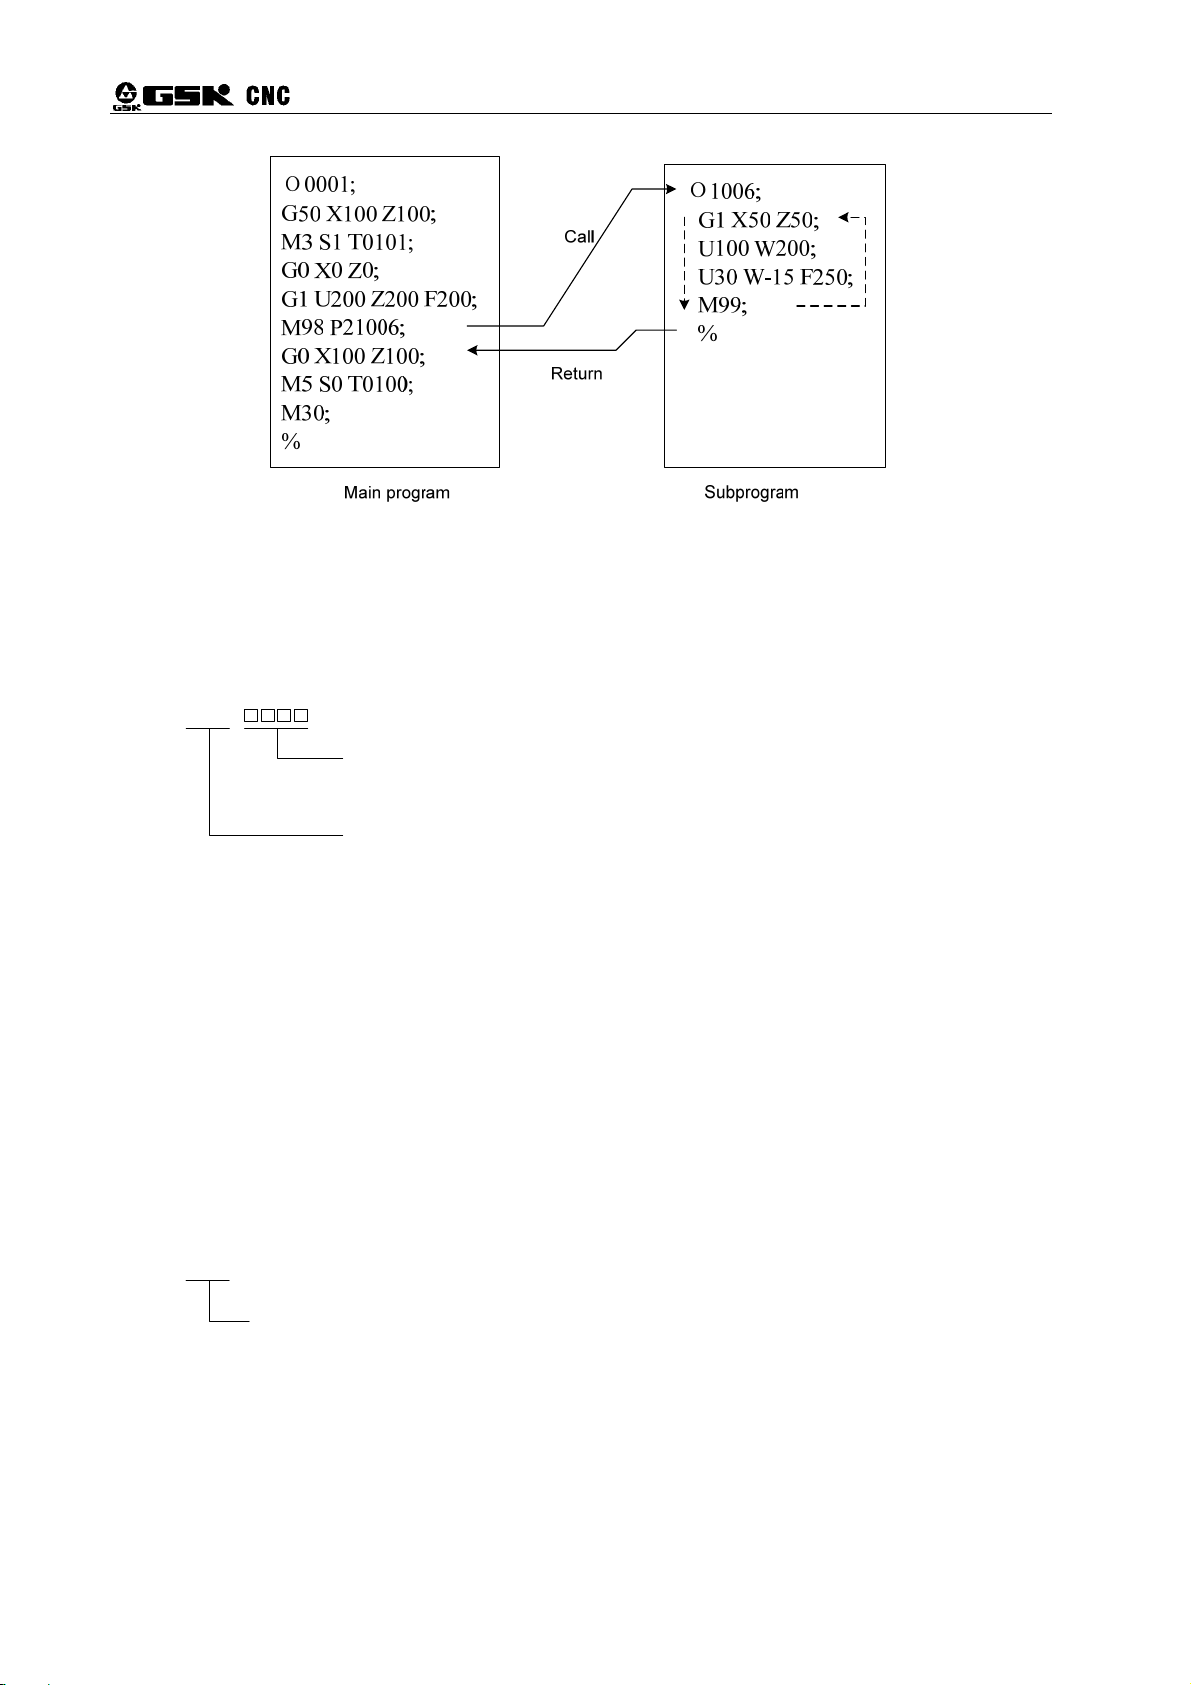
2.3.1 The main program and the subprogram
To simplify the program, when the same or similar machining path or control process should be
used for many times, the program command of this part can be edited as the independent program
for calling. The program which calls the other one is the main program, and the program which is
called and ends with M99 is subprogram. Subprogram and main program should take the program
capacity and storing space. The subprogram should have its own program name, and can be called
by any main programs and independently run. After the subprogram ends, it will return to the main
program and continuously run, which is shown as the following figure:
17
GSK218TB Turning CNC System User Manual
2.3.2 The subprogram calling M98
Format:
M98 Pooo
The program which is called is from 0000 to 9998. When calling times is
not input, the leading 0 before subprogram number can be omitted; when
the calling times is input, the subprogram should be in 4 digits;
Calling times(1-999), when the calling time is just one, it is not required
to input.
Command function: When the other commands of present block are executed completely, the
system will not execute the next block, but execute the subprogram which is
specified by P, and the max times of subprogram being executed are 999.
Remark 1: The subprogram can not be called in the MD1 mode!
Remark 2: The subprogram can not be called in O9999, and the block with G70 command can not
run, either.
2.3.3 Return to M99 from the subprogram
Format:
M98 Poooo
Return to the program number (0000~9998) which is executed
by the main program and the leading 0 can be omitted.
Function: After completing to execute the other commands of the present block in the subprogram,
it will return to the blocks of the main program, which is specified by P. During returning
the main program without P, the subprogram is called after the one called by M98
currently. If M99 is used for ending the main program, then the present block can be
executed repeatedly.
18
Volume Ⅱ Programming
;
;
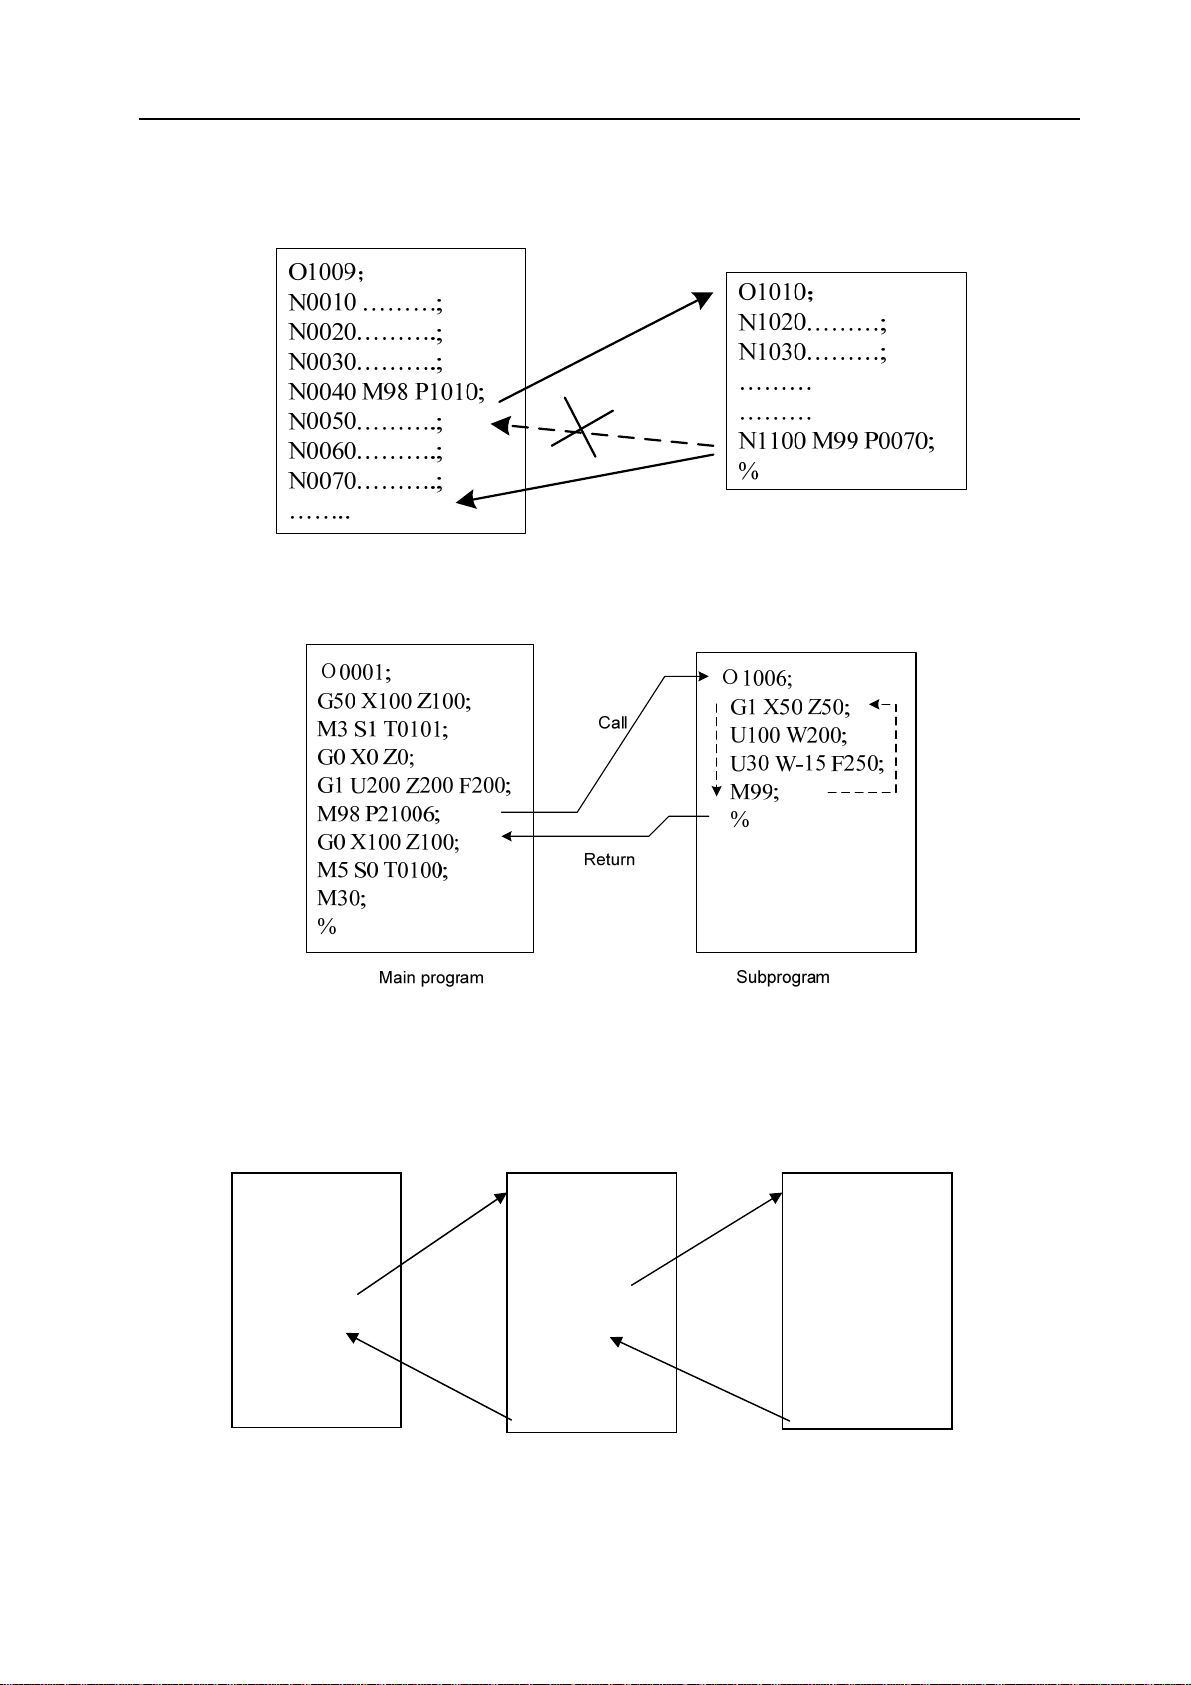
Example: Fig. 2-3-3-1 indicates the execution path of calling subprograms and M99 includes P
command word and the Fig. 2-3-3-2 represents the calling and returning path without P in
M99.
Fig. 2-3-3-1
Fig. 2-3-3-2
The system can call four-nested subprogram at the most, that is to say, the subprogram can also call
the other subprograms. The two-nested subprogram is shown in the Fig. 2-3-3-3.
Main program
O0001;
…
…
…
M98P1000;
…
…
…
…
M30
First-nested subprogram
O1000;
…
…
…
M98P2000;
…
…
…
…
M99;
Second-nested subprogram
O2000;
…
…
…
M98P3000;
…
…
…
…
M99
First nest
Second nest
Fig. 2-3-3-3 Two-nested subprogram
19
 Loading...