

Page 1

Parker
Instructions for Use
04.AL.01_11GB • 10/2017
...with people in mind
Page 2

WARNING
To avoid injury, always read this Instructions for Use and accompanied
documents before using the product.
Mandatory to read the Instructions for Use
Design Policy and Copyright
® and ™ are trademarks belonging to the ArjoHuntleigh group of companies.
© ArjoHuntleigh AB 2013.
As our policy is one of continuous improvement, we reserve the right to modify designs
without prior notice.The content of this publication may not be copied either whole or in
part without the consent of ArjoHuntleigh AB.
Page 3

Content s
Foreword ................................................................................... 4
Intended Use .............................................................................5
Safety Instructions ....................................................................6
Preparations ..............................................................................7
Parts Designation ......................................................................8
Control Panel ..........................................................................10
Hand Controls .........................................................................11
Product Description/Functions ................................................12
Drain Control Knob ..............................................................12
Fill Function .........................................................................12
Auto Fill Function (option) ...................................................12
Scalding Protection .............................................................12
Temperature Display ...........................................................12
Emergency Stop ..................................................................13
Shower Handle ....................................................................13
Functions Lock ....................................................................13
Door Lock ............................................................................13
Air Spa System (option) ......................................................14
Sound & Vision® System (option) .......................................14
Disinfection Unit (option) .....................................................15
Battery Back-up ...................................................................15
Head Cushion, Back Support Cushions and
Leg Rest (accessories) ........................................................16
Bathe Patient ...........................................................................17
Bathe Patient using a Standing & Raising Aid ........................23
Bathe Patient using a Ceiling Lift ............................................26
Cleaning and Disinfection Instructions ....................................28
Care and Preventive Maintenance ..........................................42
Troubleshooting ......................................................................47
Technical Specifications .........................................................49
Labels .....................................................................................54
List of Standards and Certificates............................................56
Electromagnetic Compatibility .................................................57
Parts and Accessories ............................................................61
ArjoHuntleigh Addresses ............................................Last page
3
Page 4

Foreword
Thank you for purchasing ArjoHuntleigh
Equipment
Your Parker® bath 500 is part of a series of quality
products designed especially for hospitals, nursing
homes and other health care uses.
Please contact us if you have any questions about the
operation or maintenance of your ArjoHuntleigh
equipment.
Please read this Instructions for Use
thoroughly!
Please read this Instructions for Use (IFU) in its entirety
before using your Parker bathing system. Information
in this IFU is crucial to the proper operation and
maintenance of the equipment, will help protect your
product, and ensure that the equipment performs to your
satisfaction. Some of the information in this IFU is
important for your safety and must be read and
understood to help prevent possible injury .
Unauthorized modifications on any ArjoHuntleigh
equipment may affect its safety. ArjoHuntleigh will not
be held responsible for any accidents, incidents or lack
of performance that occur as a result of any
unauthorized modification to its products.
Definitions in this IFU
WARNING
Means:
Safety warning. Failure to understand and obey this
warning may result in injury to you or to others.
CAUTION
Means:
Failure to follow these instructions may cause damage
to all or parts of the system or equipment.
NOTE
Means:
This is important information for the correct use of this
system or equipment.
Means:
The name and address of the manufacturer .
Service and Support
A service routine has to be done to your Parker bath to
ensure the safety and operating procedures of your
product. See section Care and Preventive Maintenance
on page 42.
If you require further information, please contact
ArjoHuntleigh for comprehensive support and service
programs to maximize the long-term safety , reliability
and value of the product.
Contact ArjoHuntleigh for replacement parts. Contact
information appears on the last page of this IFU.
4
Page 5

Intended Use
This equipment must be used in accordance
with these safety instructions. Anyone using
this equipment must also have read and
understood the instructions in this
Instructions for Use (IFU).
If there is anything you do not completely
understand, ask your ArjoHuntleigh
representative.
This bath is intended for assisted bathing and showering
of adult residents in care facilities (excluding use at
home).
The Parker bath must be used by appropriately trained
caregivers with adequate knowledge of the care
environment, its common practices and procedures, and
in accordance with the guidelines in the Instructions for
Use (IFU).
Any other use is prohibited. The bath should only be
used for the purpose specified here.
Installation & Service Requirements
The Parker bath must be installed by appropriately
trained personnel according to the Assembly and
Installation Instructions, requirements in the Assembly
and Installation Instructions can only be superseded by
local code.
The expected life of this equipment, unless otherwise
stated, is ten (10) years, subject to preventive
maintenance being carried out in accordance with the
instructions in section Care and Preventive
Maintenance on page 42.
Resident Assessment
We recommend that facilities establish regular
assessment routines.
Caregivers should assess each resident according to the
following criteria prior to use:
• The resident's weight should not exceed 210 kg/
463 lbs (Max Patient Weight).
• Active and semi-active residents (i.e. able to sit
upright self supported on the side of a bed or
toilet) can use the bath. Correct transfer
equipment shall be used, if needed.
• Residents with no capacity to support them selves
at all (i.e. able to sit upright with support) can use
the bath, only with a ceiling and a 2-point spreader
bar with loop sling for transfer and bath.
• The resident should have the ability to understand
and respond to instructions, or have limited
physical capacity to move, to ensure a safe
position during the bathing procedure.
If a resident does not meet these criteria an alternative
equipment or system shall be used.
Indication for Use
T o relieve pain and itching and as an aid in the healing
process of inflamed and traumatized tissue, and it
serves as a setting for removal of contaminated tissue.
5
Page 6

Safety Instructions
WARNING
To avoid injury to both the patient and the
caregiver, never modify the equipment or
use incompatible parts.
WARNING
To avoid explosion or fire, never use the
equipment in oxygen rich environment, in
presence of heat source or flammable
anaesthetic gases.
WARNING
To avoid electric shock, never use other
electrical equipment near this device.
WARNING
To avoid injury, make sure that the patient
is not left unattended at any time.
WARNING
To avoid the device in use from tipping, do
not raise or lower other equipment close to
it and be aware of stationary object when
lowering.
6
Page 7

Preparations
Site Preparations
Prior to the installation of the Parker bath the
floor and walls within the required area must
be finished.
Material: The floor should be made of a slip-resistant
material, free of bumps.
Floor Slope: When using a floor drain, the slope
towards the drain should not exceed 1:50.
Floor attachments: The floor construction must be
suitable for anchoring the bolts
Actions Before First Use
(11 steps)
1 Visually check the package for damage. If the
product looks damaged due to freight, make a
complaint to the transport agency.
2 The packaging should be recycled according to
local regulations.
3 Install the Parker bath by qualified personnel. See
Assembly and Installation Instructions.
4 Check that all parts of the product are supplied.
Compare with section Parts Designation on
page 8. If any part is missing or damaged - do
NOT use the product.
10
WARNING
To prevent scalding, make sure that the
water mixer has been calibrated.
Confirm that responsible organization
has established calibration routines.
Make sure the Parker bath thermostatic mixer has
been calibrated according to the Assembly and
Installation Instructions by qualified personnel or
an ArjoHuntleigh technician.
11 Make sure to have a rescue plan ready in case of a
patient emergency.
Actions Before Every Use
(3 steps)
1 Check that all parts are in place. Compare to
section Parts Designation on page 8.
2 If any part is missing or damaged - do NOT use
the product.
3
WARNING
To prevent cross-contamination, always
follow the disinfection instructions in
this Instructions for Use.
5 Unpack the hand control(s) from the plastic.
6 Read the IFU.
7 Disinfect the product according to section
Cleaning and Disinfection Instructions on
page 28.
8 Perform a functionality test. See section Care and
Preventive Maintenance on page 42.
9 Choose a designated area, where the IFU should
be kept and is easily accessible at all times.
Before every use, make sure the Parker bath is
cleaned and disinfected according to section
Cleaning and Disinfection Instructions on
page 28.
NOTE
If you have any questions, please contact your
local ArjoHuntleigh representative for support
and service. The contact numbers appear on
the last page of this IFU.
7
Page 8
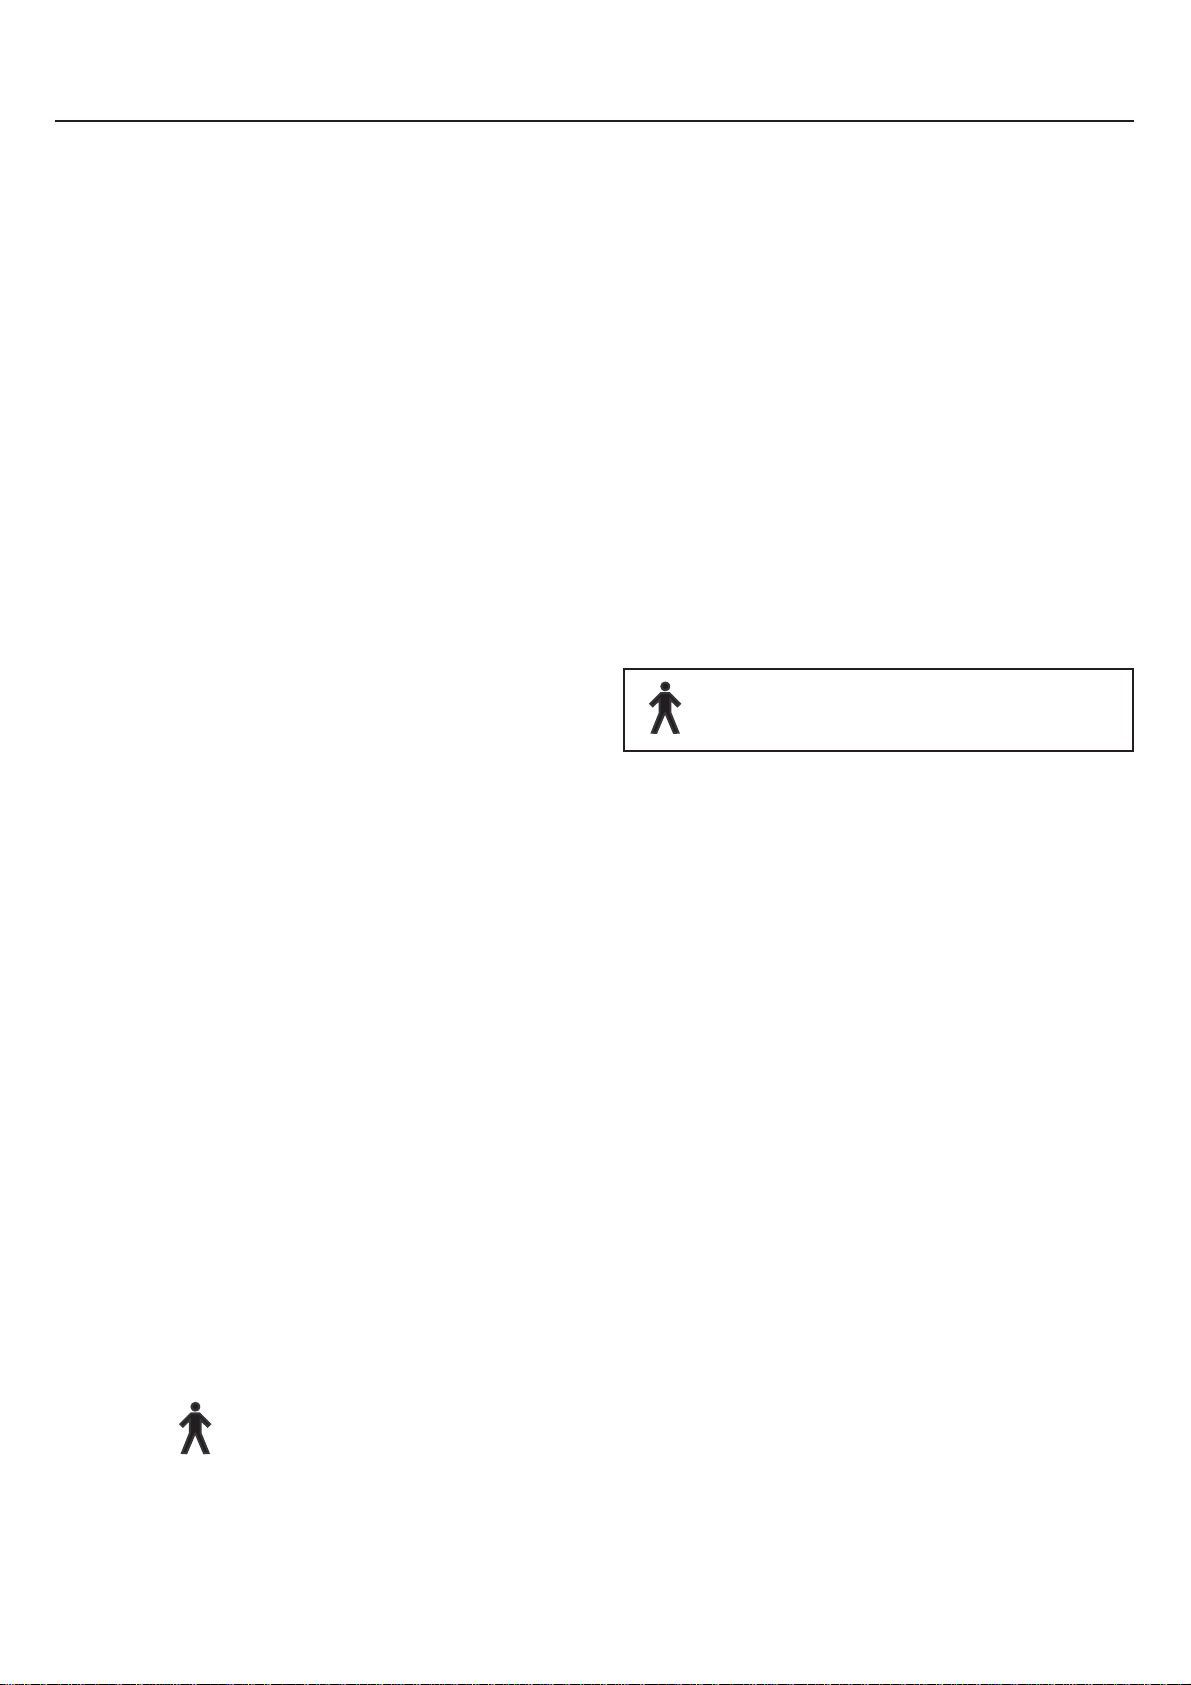
Part s Designation
Type B Applied part.
Degree of Protection - Electrical shock
1 Trigger handle
2 Lock button
3 USB connection
(with Sound & Vision system option)
4 USB memory stick
(with Sound & Vision system option)
5 Disinfectant flowmeter
(with Disinfection option)
6 Sound & Vision system hand control
(with Sound & Vision system option)
7 Disinfection spray handle
(with Disinfection option)
8 Door lock handle
9 Shower stand (for GB only)
10 Filling spout
26 Compartment for disinfectant bottle
(with Disinfection option)
27 Sound & Vision system speakers
(with Sound & Vision system option)
28 Disinfection suction part
(with Disinfection option)
29 Disinfectant bottle
(with Disinfection option)
30 Lock keys for disinfectant compartment
(with Disinfection option)
31 Head cushion (accessory)
32 Back support cushions (accessory)
33 Leg rest (accessory)
11 Shower holder/shower handle
12 Emergency stop button
13 Grab handle
14 Hand control
15 Cover
(with Disinfection and/or Sound & Vision system
option)
16 Control panel
17 Door hinge
18 Sound & Vision system light
(with Sound & Vision system option)
19 Water sensory knobs (3 pcs)
20 Drain
21 Drain control knob with built-in surface overflow
outlet
22 Disinfectant/Rinsing Inlet
(with Air Spa system option)
23 Bathtub
24 Air Spa system outlets (9 pcs)
(with Air Spa system option)
25 Height adjustable feet
8
Page 9
19
24
26
25
16
17
21
22
101211
9
13
8
20
18
23
2
1
MI
X
8
0
70
6
0
5
0
4
0
30
2
0
30
29
28
27
3
4
5
6
7
14
15
333231
9
Page 10
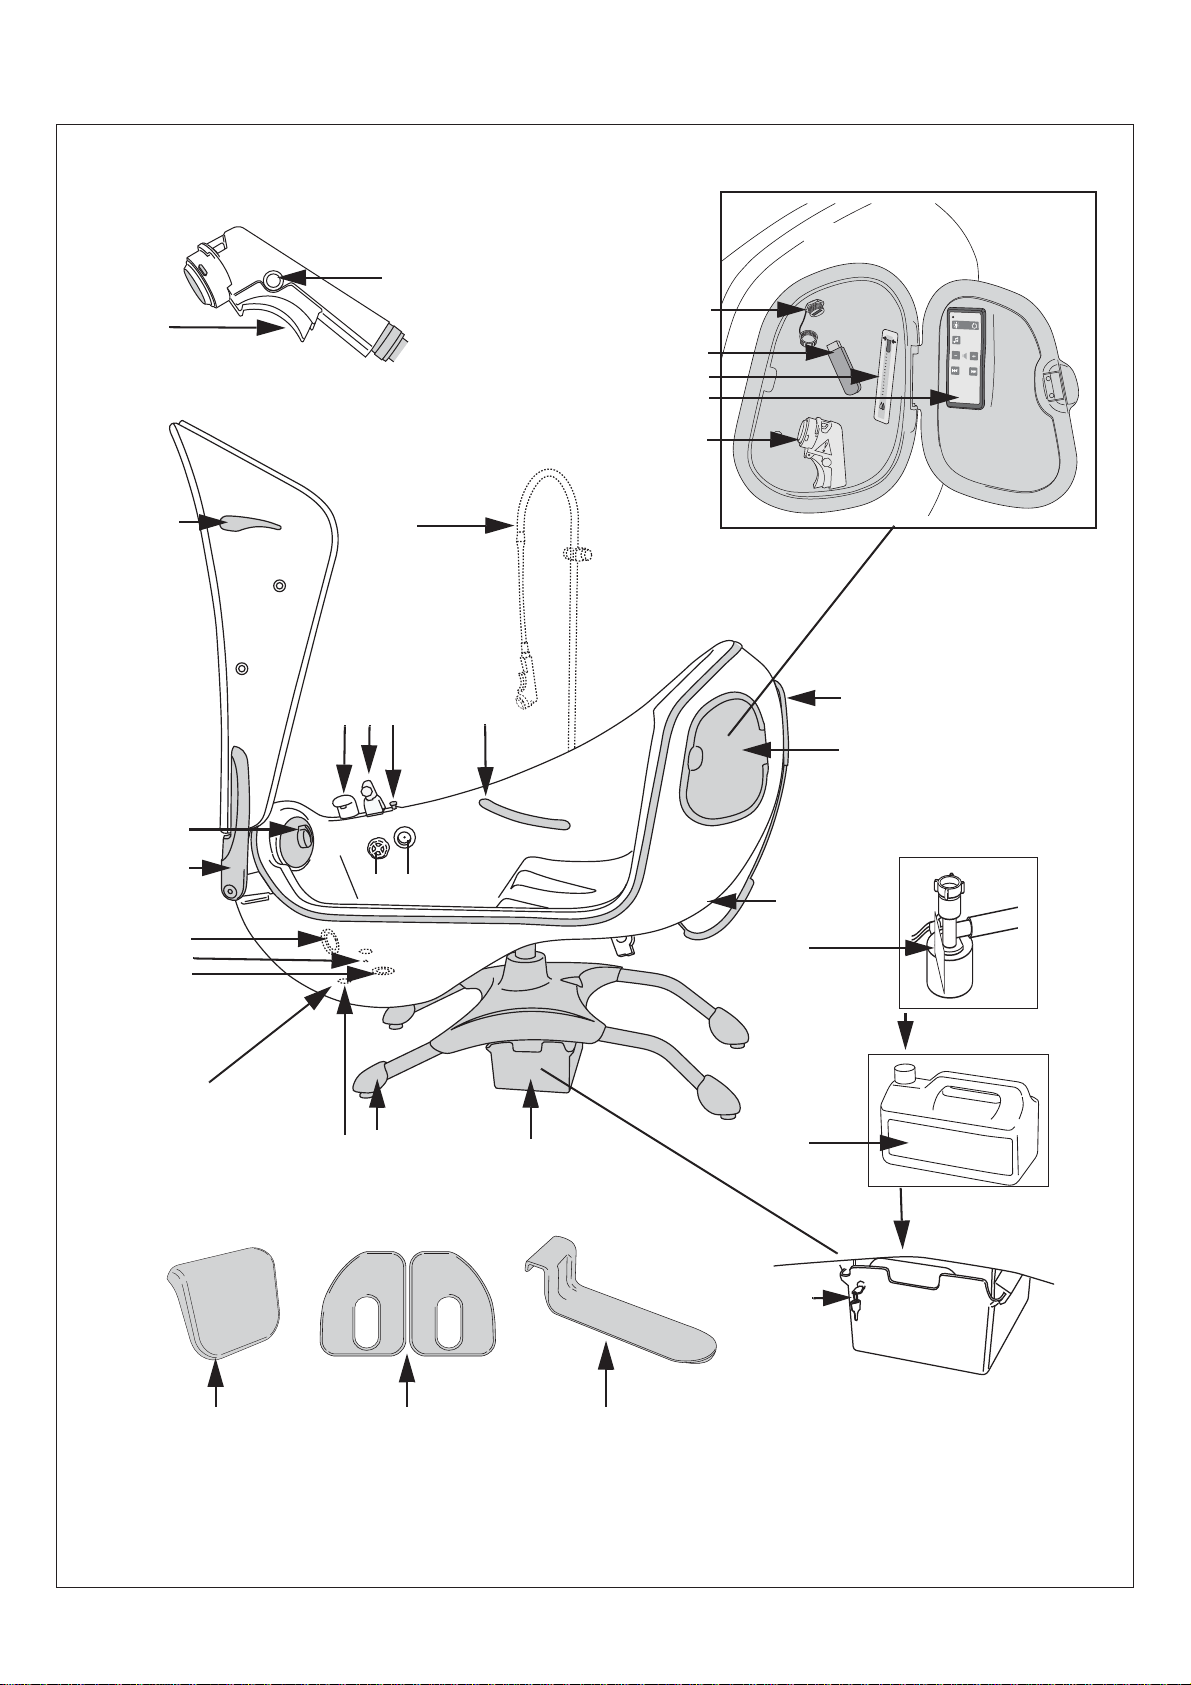
Control Panel
1
89 12
2
10
11
6
7543
14 1513
1 LED for shower indication
2 Filling water and Shower temperature display
with scalding protection
3 Bath water temperature display with scalding
protection.
4 LED, lock function indicator
5 Mixing gradient
6 LED, ON/OFF disinfectant indicator (option)
7 Disinfection ON/OFF (option)
8 Fill ON/OFF (Auto fill option)
9 Shower ON/OFF
10 Air Spa system - whole tub ON/Intensity/OFF
(option)
11 Air Spa system - foot well ON/Intensity/OFF
(option)
12 Function lock ON/OFF
13 Knob for water temperature adjustment
14 LED, battery back-up indicator
15 LED, mains indicator
10
Page 11
1
2
3
4
5
6
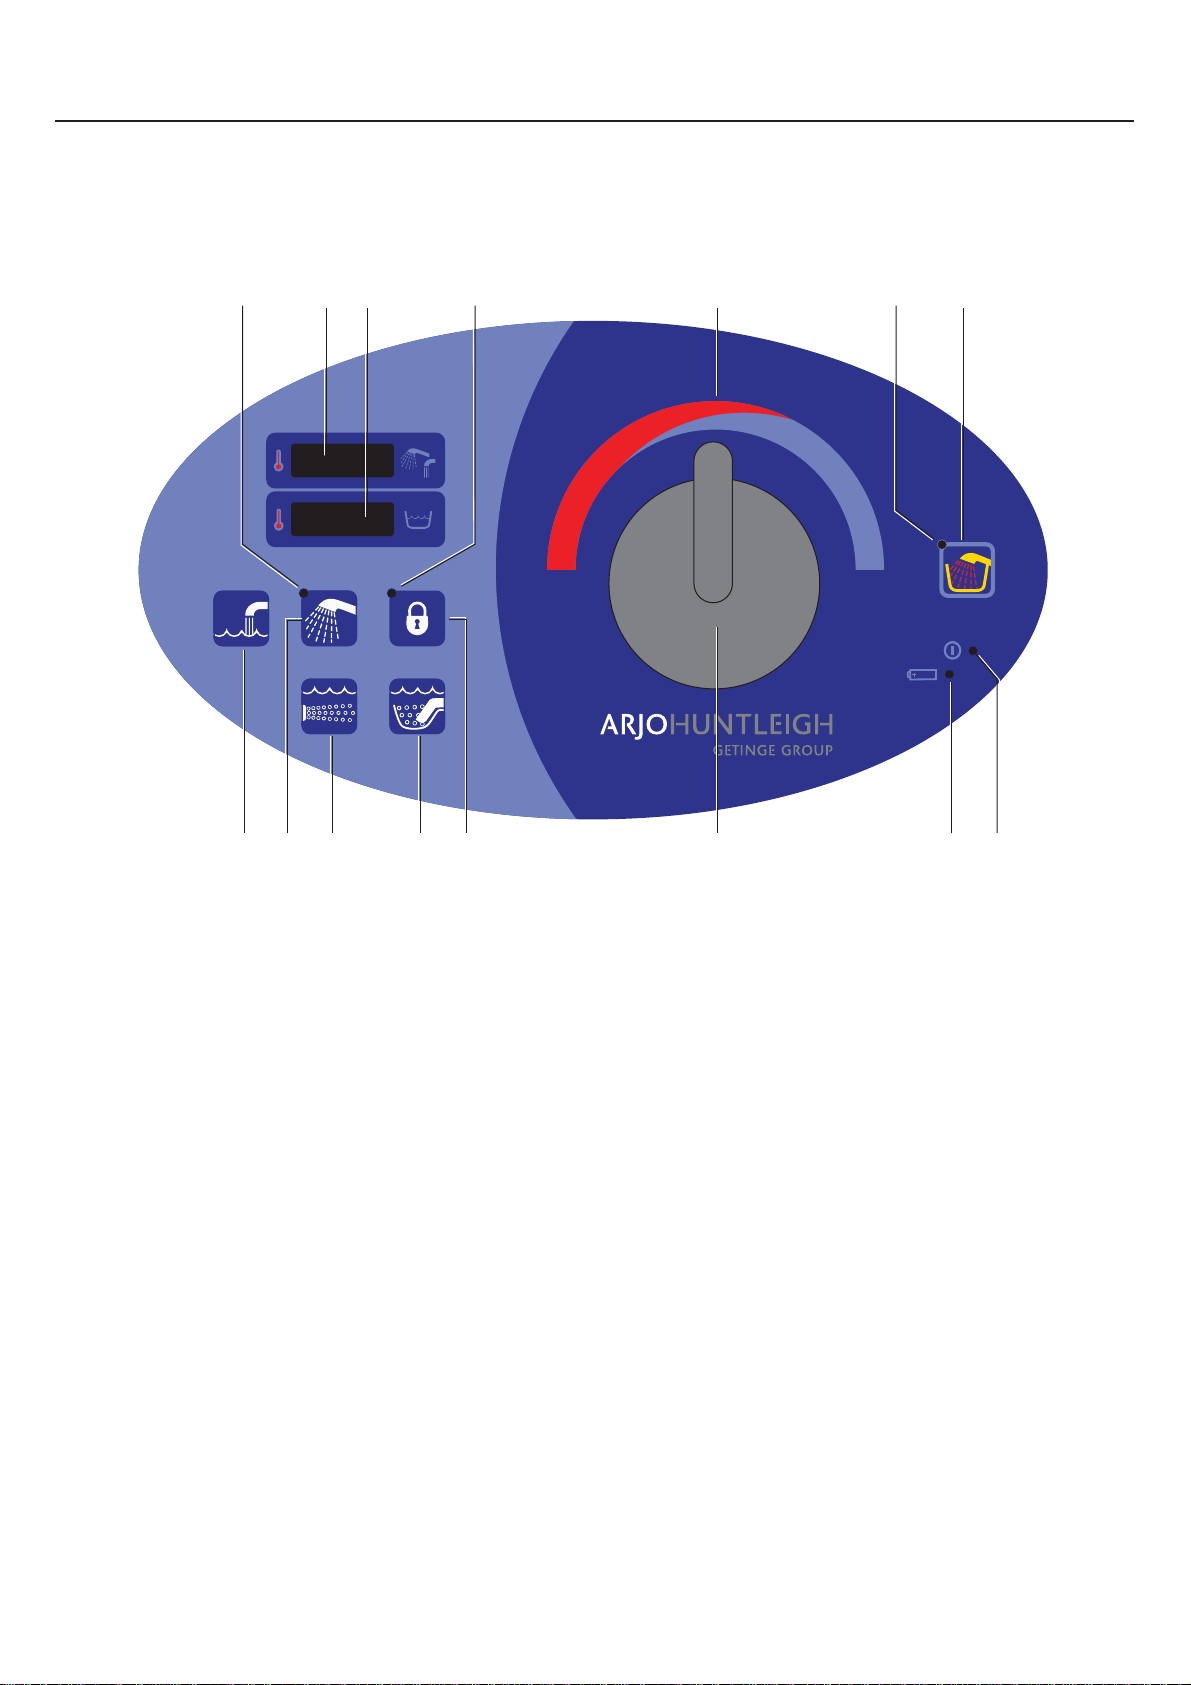
Hand Controls
1
2
4
5
8
7
6
3
Hand Control
1 Raise bathtub
2 Lower bathtub
3 Tilt bathtub to upright position
4 Tilt bathtub to reclined position
5 Air Spa system - whole tub ON/Intensity/OFF (option)
6 Air Spa system - foot well ON/Intensity/OFF (option)
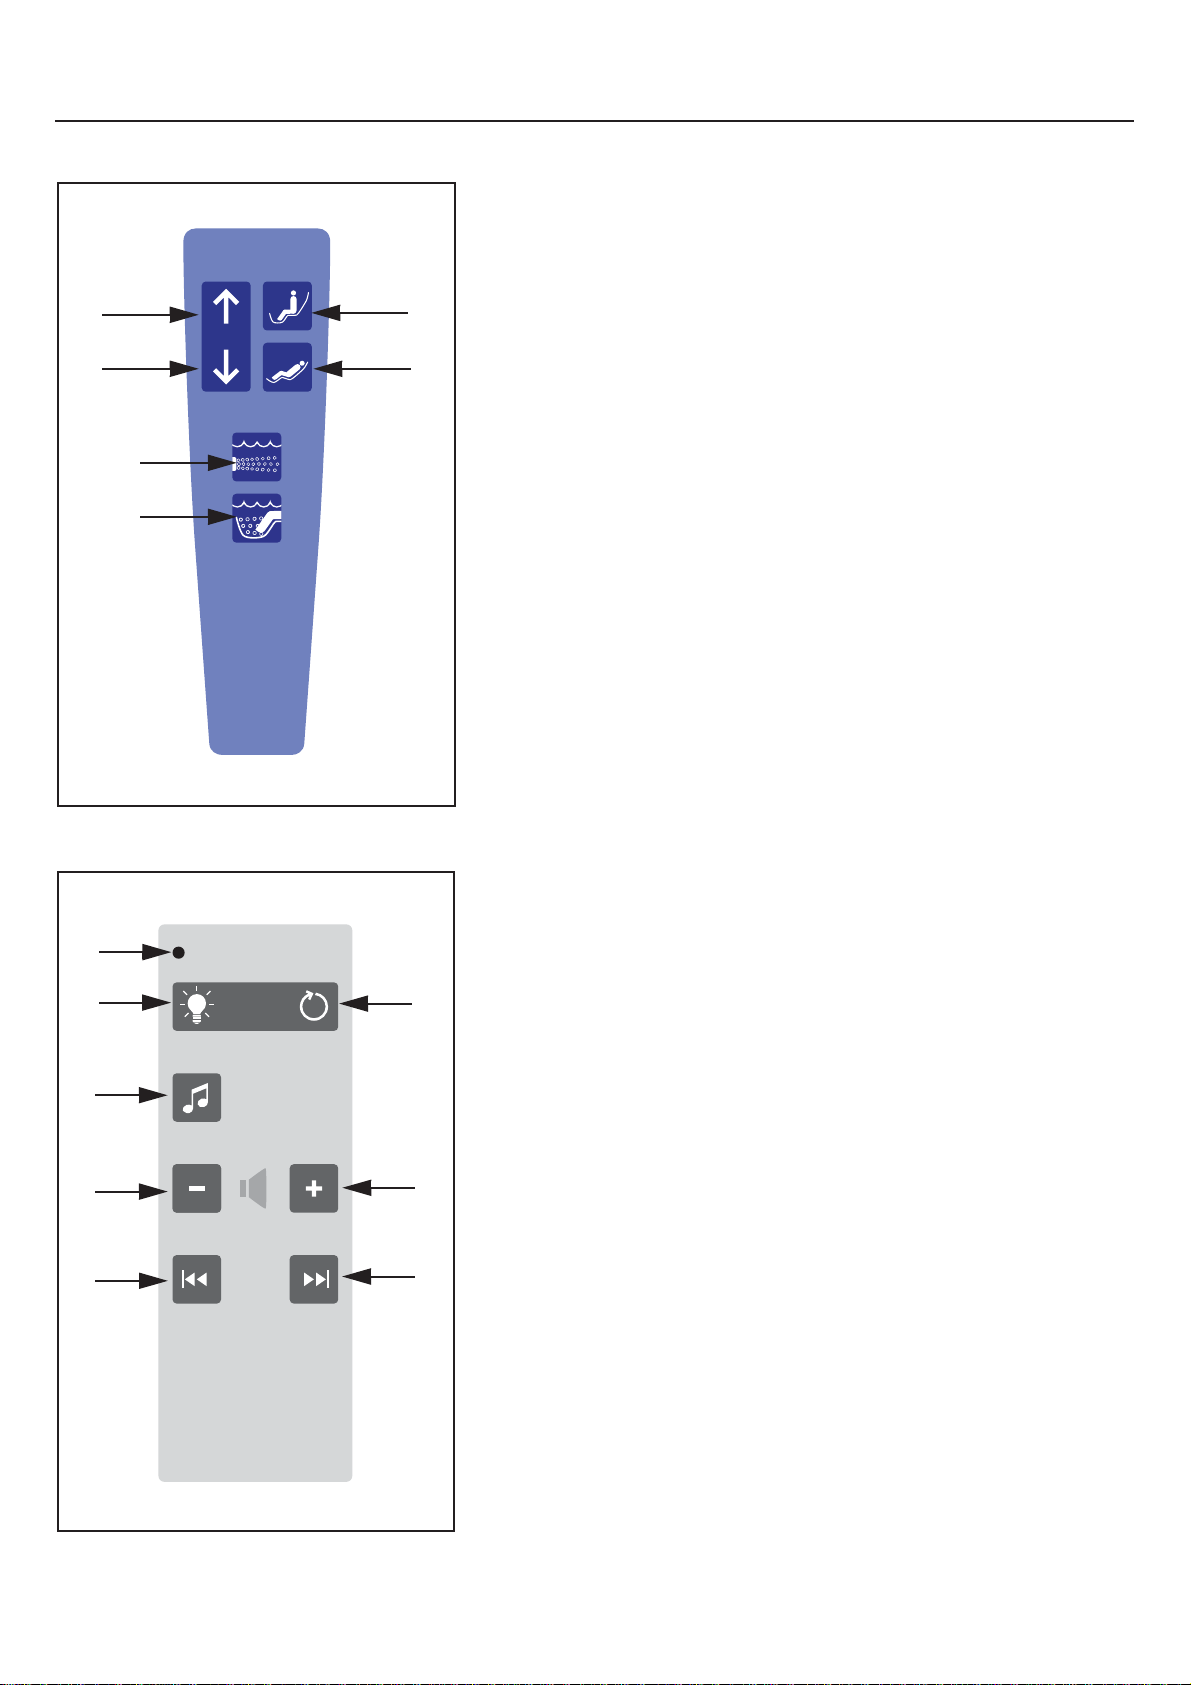
Sound & Vision® System Hand Control
(option)
1 LED - activity indicator
2 Sound & Vision system light - ON/OFF
3 Automatic light colour change - ON/OFF
4 MP3 player ON/PAUSE
5 Reduce (–) volume.
6 Increase (+) volume
7 MP3 track forward
8 MP3 track reverse
11
Page 12
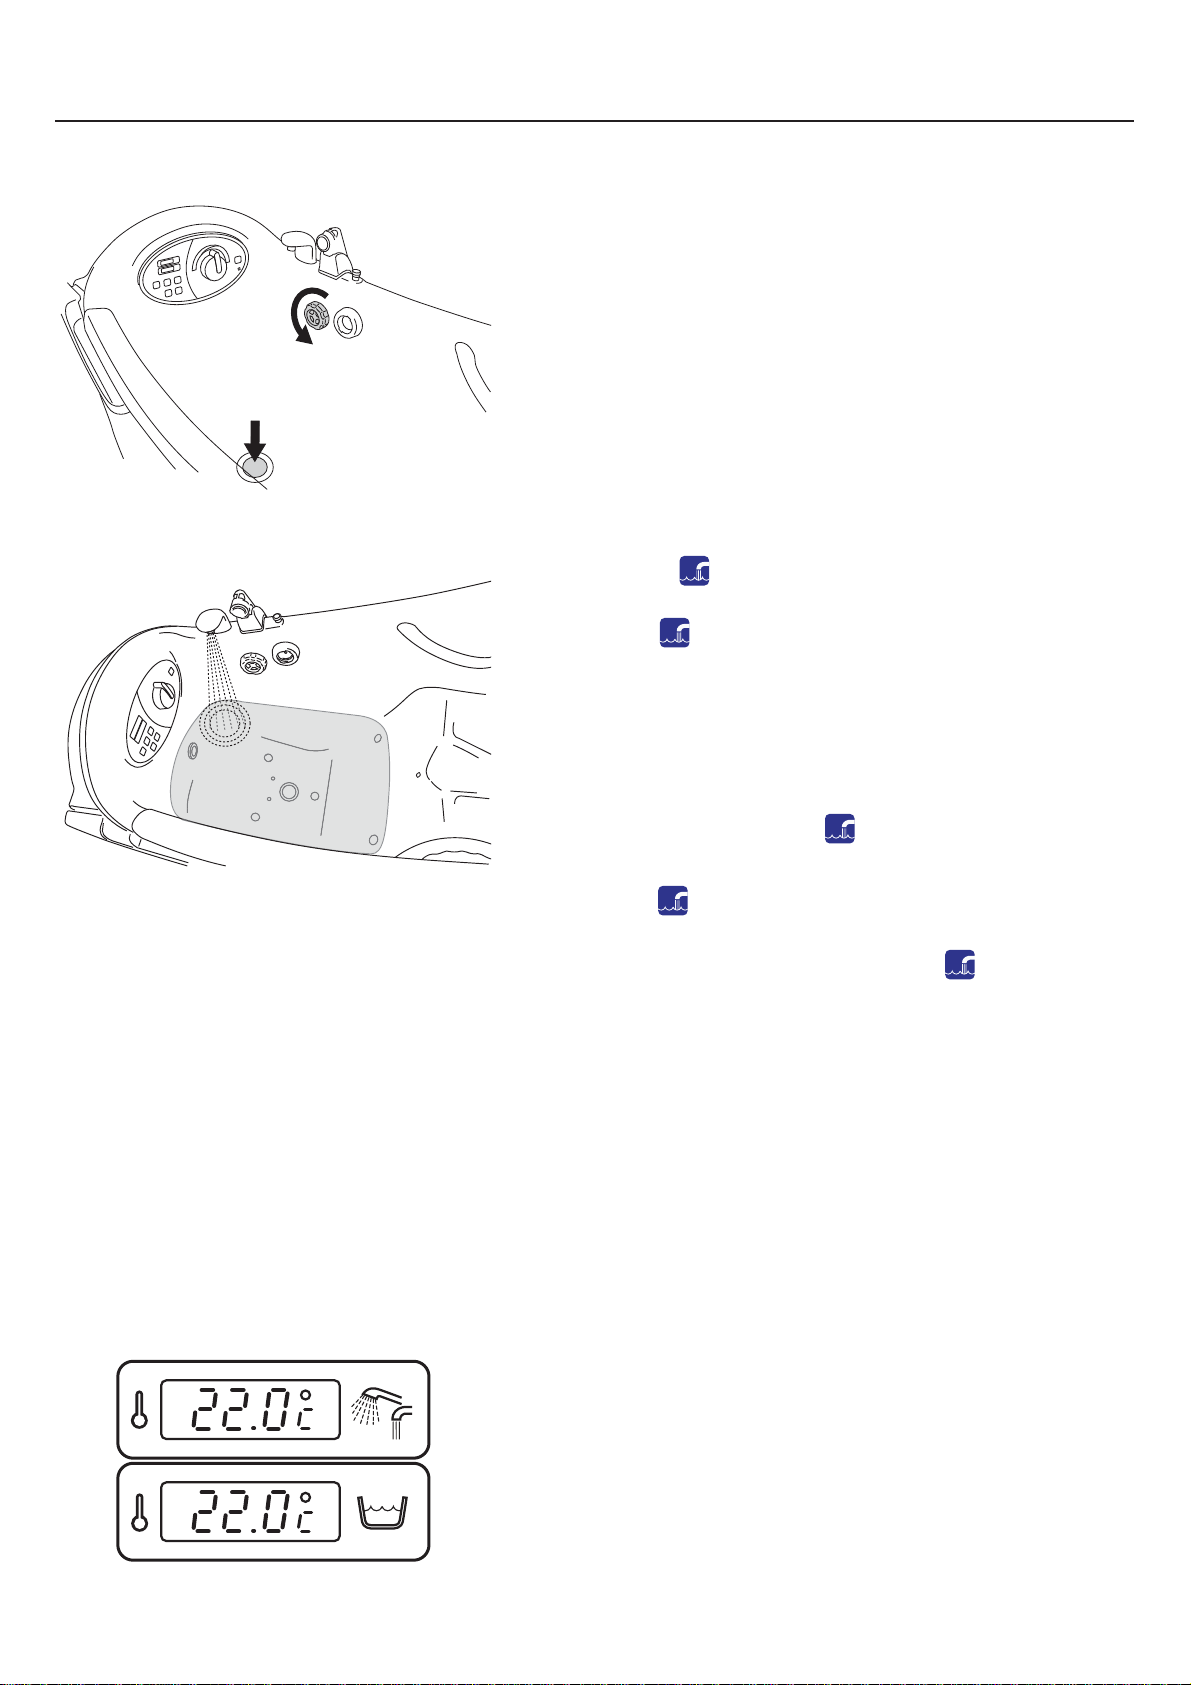
Fig. 1
Fig. 2
Fig. 3
Product Description/Functions
Drain Control Knob
The drainage plug opens and closes by turning the drain control
knob in the bathtub. (See Fig. 1)
• Open - turn clockwise
• Close - turn counter clockwise
The drain control knob is equipped with a built in surface
overflow outlet to prevent water from overflowing the tub.
Fill Function
• Press the tub filling button to start filling the footwell
or the whole tub. (See Fig. 2)
• Press the tub filling button again to stop the filling.
(See Fig. 2)
Auto Fill Function (option)
A Parker bath equipped with auto fill function, prefills the
footwell. (See Fig. 2)
• Activate it by pressing the auto fill button.
• Once the filling level is reached it stops by itself.
• Press the auto fill button again and filling continues for
another 60 s.
• Stop filling at any time by pressing the auto fill button.
Scalding Protection
If a dangerous temperature level of 45 °C (113 °F) is reached, the
electronic scalding protection shuts off the water after 10 s.
• Activated scalding protection: a yellow flashing light and
a beeping sound on both temperature displays.
If scalding protection turns on, get the patient out safely . S top
using the bath and contact an ArjoHuntleigh service technician.
Temperature Display
The Parker bath has two temperature displays:
(See Fig. 3)
• Top temperature display: shows the active filling or
shower temperature. If filling or shower is not turned on, the
display shows “– –. –”
During disinfection the display shows the temperature of the
disinfectant mixture.
• The bottom temperature display: shows the current
bathtub water temperature.
12
Page 13
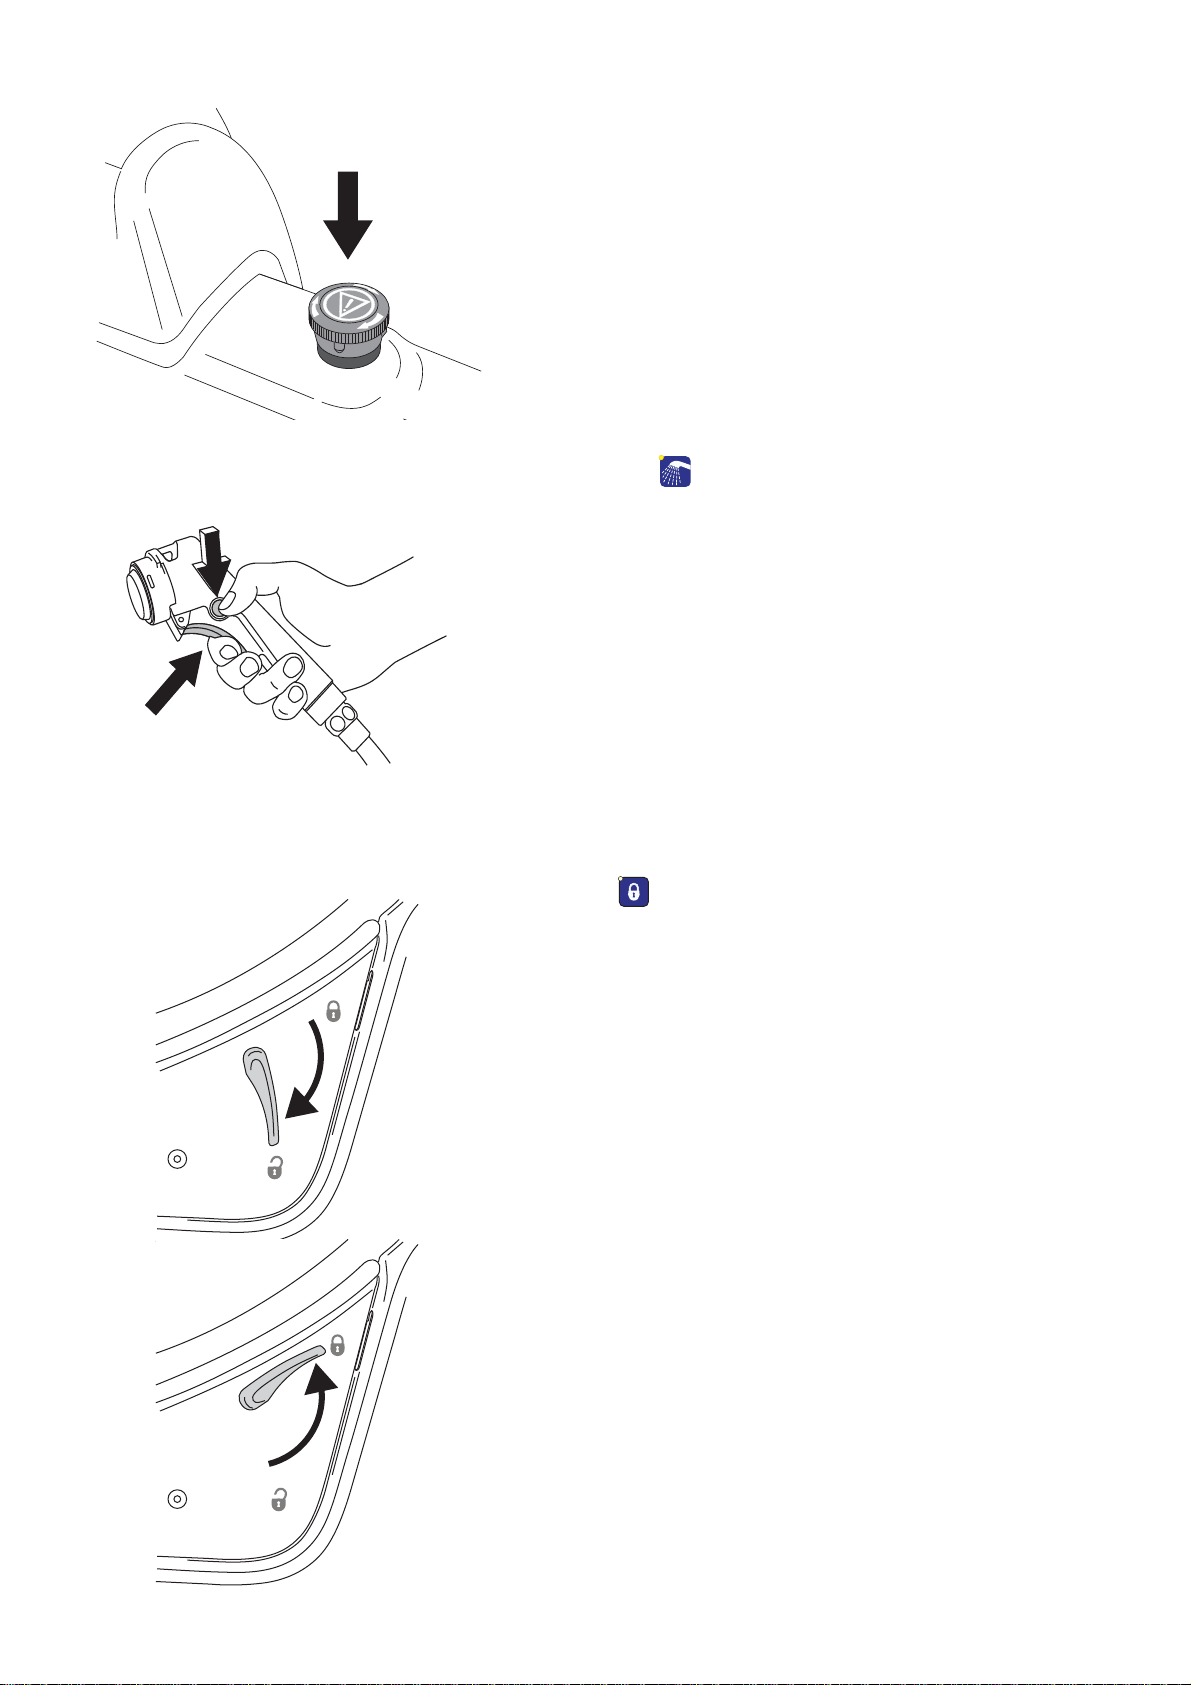
Emergency Stop
Fig. 4
T rigger
Lock Button
Fig. 5
Fig. 6
A
• Press the emergency stop button, to stop all functions.
(See Fig. 4)
• To release the emergency stop button, turn it clockwise.
(See Fig. 4)
If the emergency stop button was used due to an equipment error ,
stop using the bath and contact an ArjoHuntleigh technician.
Shower Handle
The shower handle is located in the holder or the stand.
(See Fig. 5)
• Press the shower button to start the shower. The green
LED will turn on when active.
• Press the trigger on the shower handle to regulate the water .
Hold the trigger in for constant water flow.
T o get continuous water flow without having to hold in the trigger
do as follows:
• Press the trigger and push the lock button on the side. The
water will continue to flow without having to press the
trigger.
• Unlock by pressing the handle trigger and the lock button
will pop out by itself.
Functions Lock
Press the function lock button on the control panel and it locks
all the functions except:
• scalding protection
• emergency stop
For example, if the function lock is activated during a shower, the
shower can only be turned off after deactivating the function lock.
The function lock LED is flashing yellow when active.
Door Lock
The Parker bath has a door handle that works as a door lock.The
door handle needs to be aligned with the sticker showing an open
or closed lock. (See Fig. 6)
• To unlock the door: press the door handle down until
aligned with the sticker showing an open lock. (A)
• To lock the door: press the door handle up until the handle
is aligned with the sticker showing a closed lock. (This may
require some physical force). (B)
B
13
Page 14
Air Spa System (Option)
MI
X
8
0
7
0
6
0
5
0
4
0
3
0
2
0
Fig. 7
A
B
A Parker bath with Air Spa system allows the patient to sit
comfortably and enjoy a massage by air jets in the water .
Both the Air Spa system tub button and the Air Spa
system footwell button have two adjustable intensities that can be
selected. The maximum treatment time is 15 minutes.
The Air Spa system can be activated either for the whole bathtub
or just in the footwell.
NOTE
Operating the Air Spa system with soapy water can
cause excessive foaming.
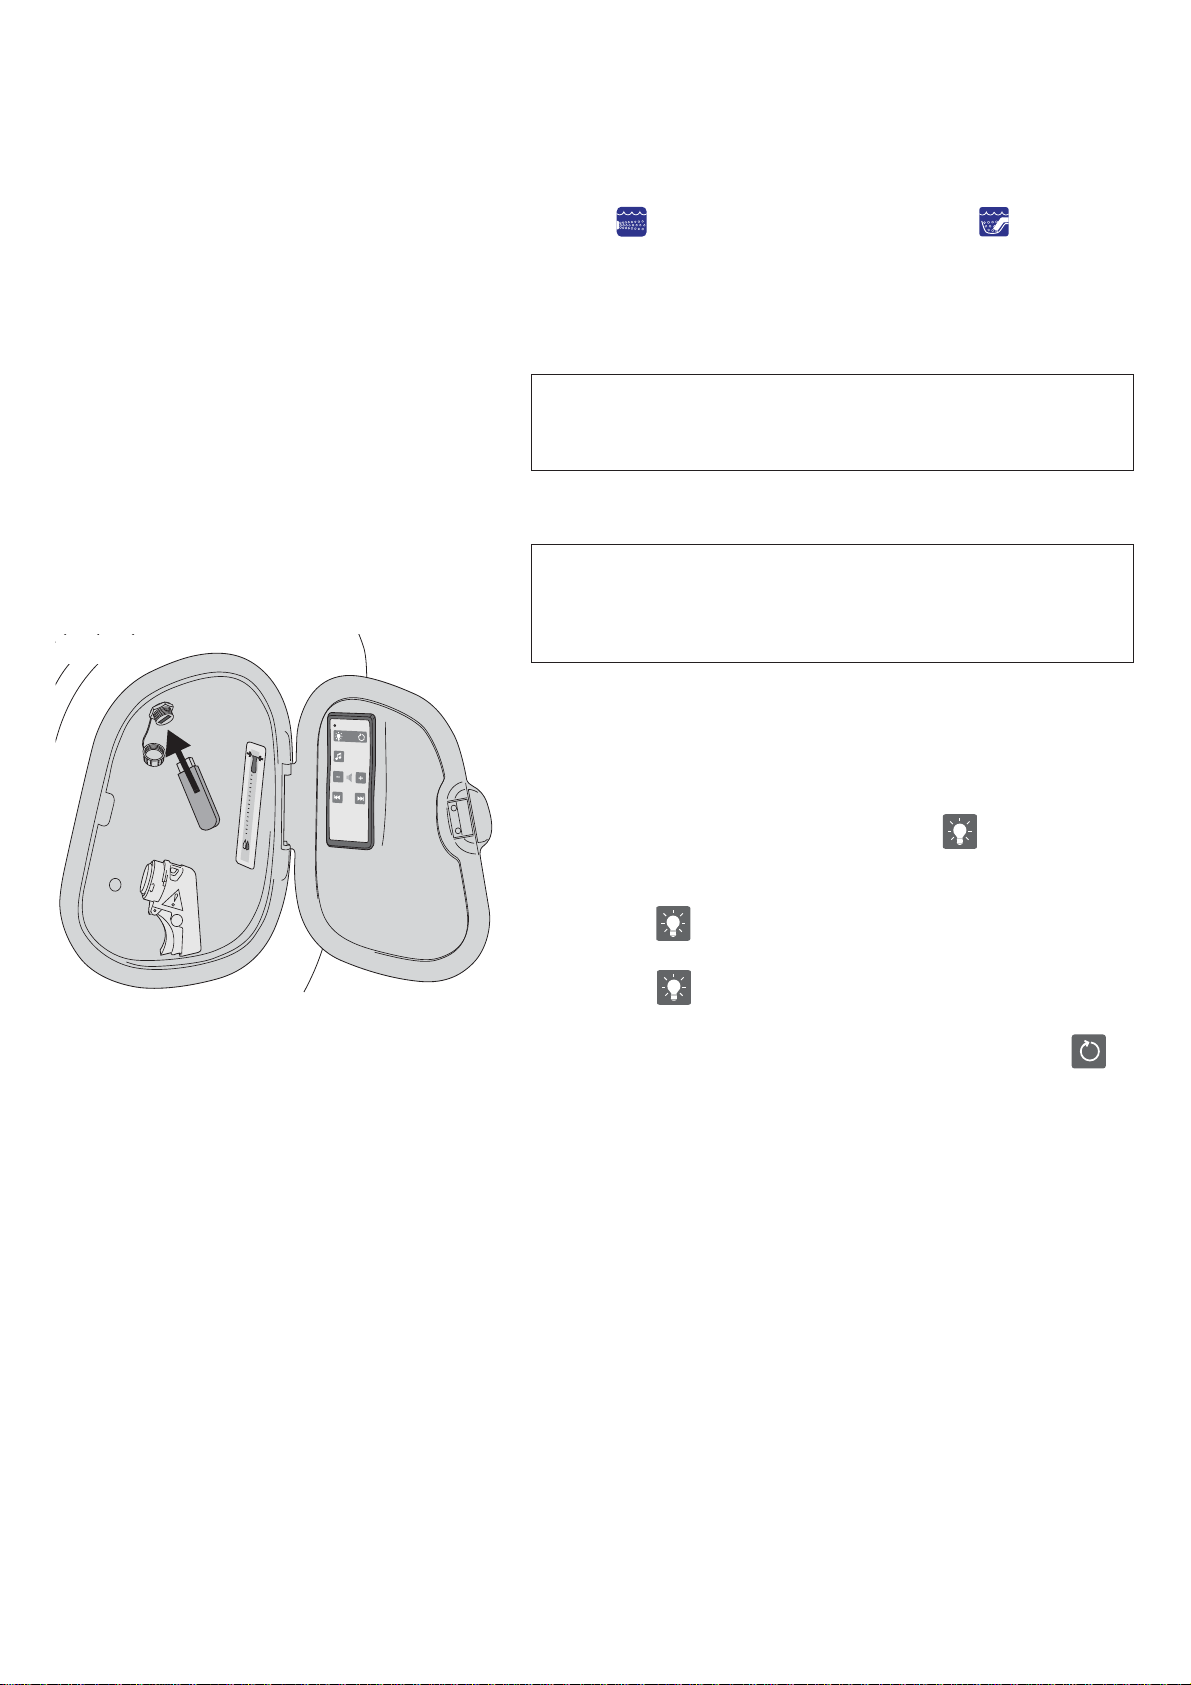
Sound & Vision® System (option)
WARNING
To avoid electric shock, only use the USB memory
stick in the connector on the bath.
The USB outlet is located behind the cover . (See Fig. 7)
• Unscrew the black cap counter clockwise to get to the USB
outlet (A) and plug in the Sound & Vision system memory
stick (B).
• T o get colored light in the tub, press the Sound & Vision
system light button on the Sound & Vision system hand
control.
• Press the Sound & Vision system light button one more
time to change light colour.
• Press the Sound & Vision system light button for 2 s to
turn the light off.
• To start a rotation of different light colours press the
Sound & Vision system automatic light colour change
button.
Continue with the steps on the next page.
14
Page 15

MI
X
8
0
70
6
0
50
4
0
30
2
0
Fig. 8
• To start the music press the MP3 button on the
Sound & Vision system hand control. Only MP3 files can be
read and only files from the root (not in “folders”).
• Sound & Vision system hand control LED flashes when
active.
NOTE
The music function will stop automatically 30 minutes
after activation. Press the MP3 player button on the
Sound & Vision system hand control for continued
listening.
NOTE
The Sound & Vision system will stop automatically
30 minutes after activation. Press the Sound & Vision
system light ON/OFF button on the Sound & Vision
system hand control for continued lighting.
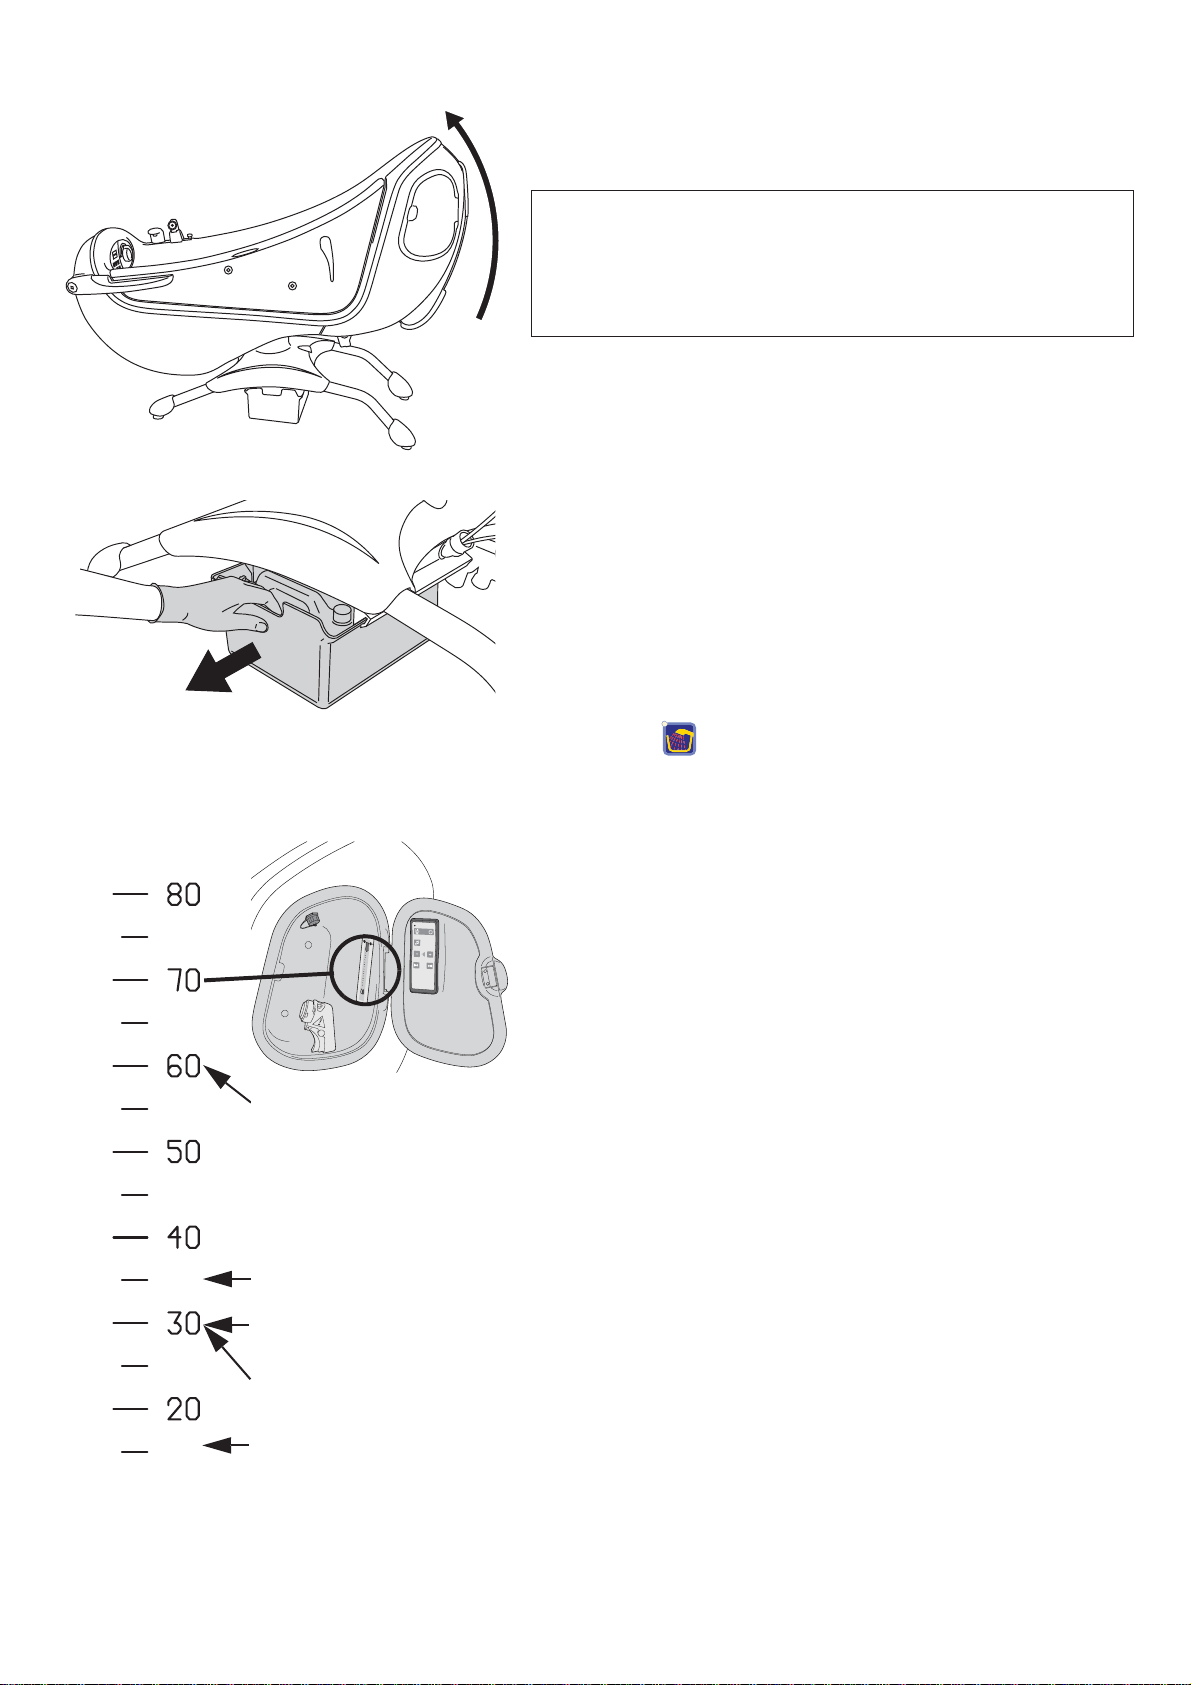
Disinfection Unit (Option)
The Parker bath has the a built in disinfection unit as an option.
(See Fig. 8)
There is a disinfectant bottle with an adjustable top to adjust the
mixing value of the disinfectant concentration and water . It is
located in the lockable compartment between the bathtub legs.
There is also a disinfection spray handle and flowmeter, located
behind the cover.
T o use the disinfection unit:
1 Press the disinfection button and hold it in for 5 s to
activate it.
2 The LED will turn green when active.
3 If the disinfectant bottle is empty, the LED will start
flashing when pressing the disinfection button. A beeping
sound comes on and it is not possible to disinfect the bath.
Replace with a full disinfection bottle and try again (see section
Replace Disinfectant Bottle on page 30).
15
Page 16

Battery Back-up
Fig. 9
A battery will work as a back-up if there is a power failure. It is
possible to help a patient out of a bathtub during that time.
Everything on the bath will work under the battery back-up except
for the auto fill function, Air Spa system and Sound & Vision
system.
If the battery fails to work during a power failure contact your
ArjoHuntleigh technician.
CAUTION
Never put the patient in the bathtub when the power
indicator light on the control panel is out. Ensure
that the bath is connected to a power outlet or the
battery might run out of power.
Contact your local ArjoHuntleigh technician if
problem occurs.
Battery charge level when the main power supply is
not connected.
Y ellow LED on No mains connected
No mains connected and battery is
Y ellow LED
flashing
No LED light
running low.
The Battery is automatically
charged when the Parker bath is
connected to the mains.
Connect the Parker bath to the
mains to charge the battery.
Head Cushion, Back Support Cushions and
Leg Rest (accessories)
Extra cushions are available for added comfort for the patient. The
back support cushions have suction cups for easy attachment to
the bath. (See Fig. 9)
These accessories can be ordered from your local ArjoHuntleigh
representative.
CAUTION
Always fit leg rest on the opposite side of the door.
If hung on the door, damage to the door may occur.
16
Page 17

Fig. 1
Fig. 2
Fig. 3
Bathe Patient
To complete a full patient bath follow these 36 steps.
WARNING
To prevent scalding, always check the water
temperature with your naked hand before directing
the water on the patient. Do not use gloves as it
may insulate to the extent that the water
temperature can be misjudged. Point the flow of the
water away from the patient.
Fill the Footwell with Water
(Step 1-3 of 36)
1 Ensure that the bathtub is in a upright position. (See Fig. 1)
2 Close the drainage plug by rotating the drain control knob
counter clockwise. (See Fig. 2)
3 Parker bath with fill: start filling the footwell by pressing
the tub filling button. (See Fig. 3)
• Feel the water temperature with a naked hand and let the
patient feel the water. Adjust the knob to a comfortable
temperature.
• At desired footwell water level, stop the filling by
pressing the tub filling button again.
Parker bath with Auto fill: activate prefill by pressing
the auto fill button. (See Fig. 3)
• Feel the water temperature with a naked hand and let the
patient feel the water. Adjust the knob to a comfortable
temperature.
• The filling stops automatically when the footwell is filled.
Continue with the steps on the next page.
17
Page 18
Bathe the Patient
Fig. 4
Fig. 5
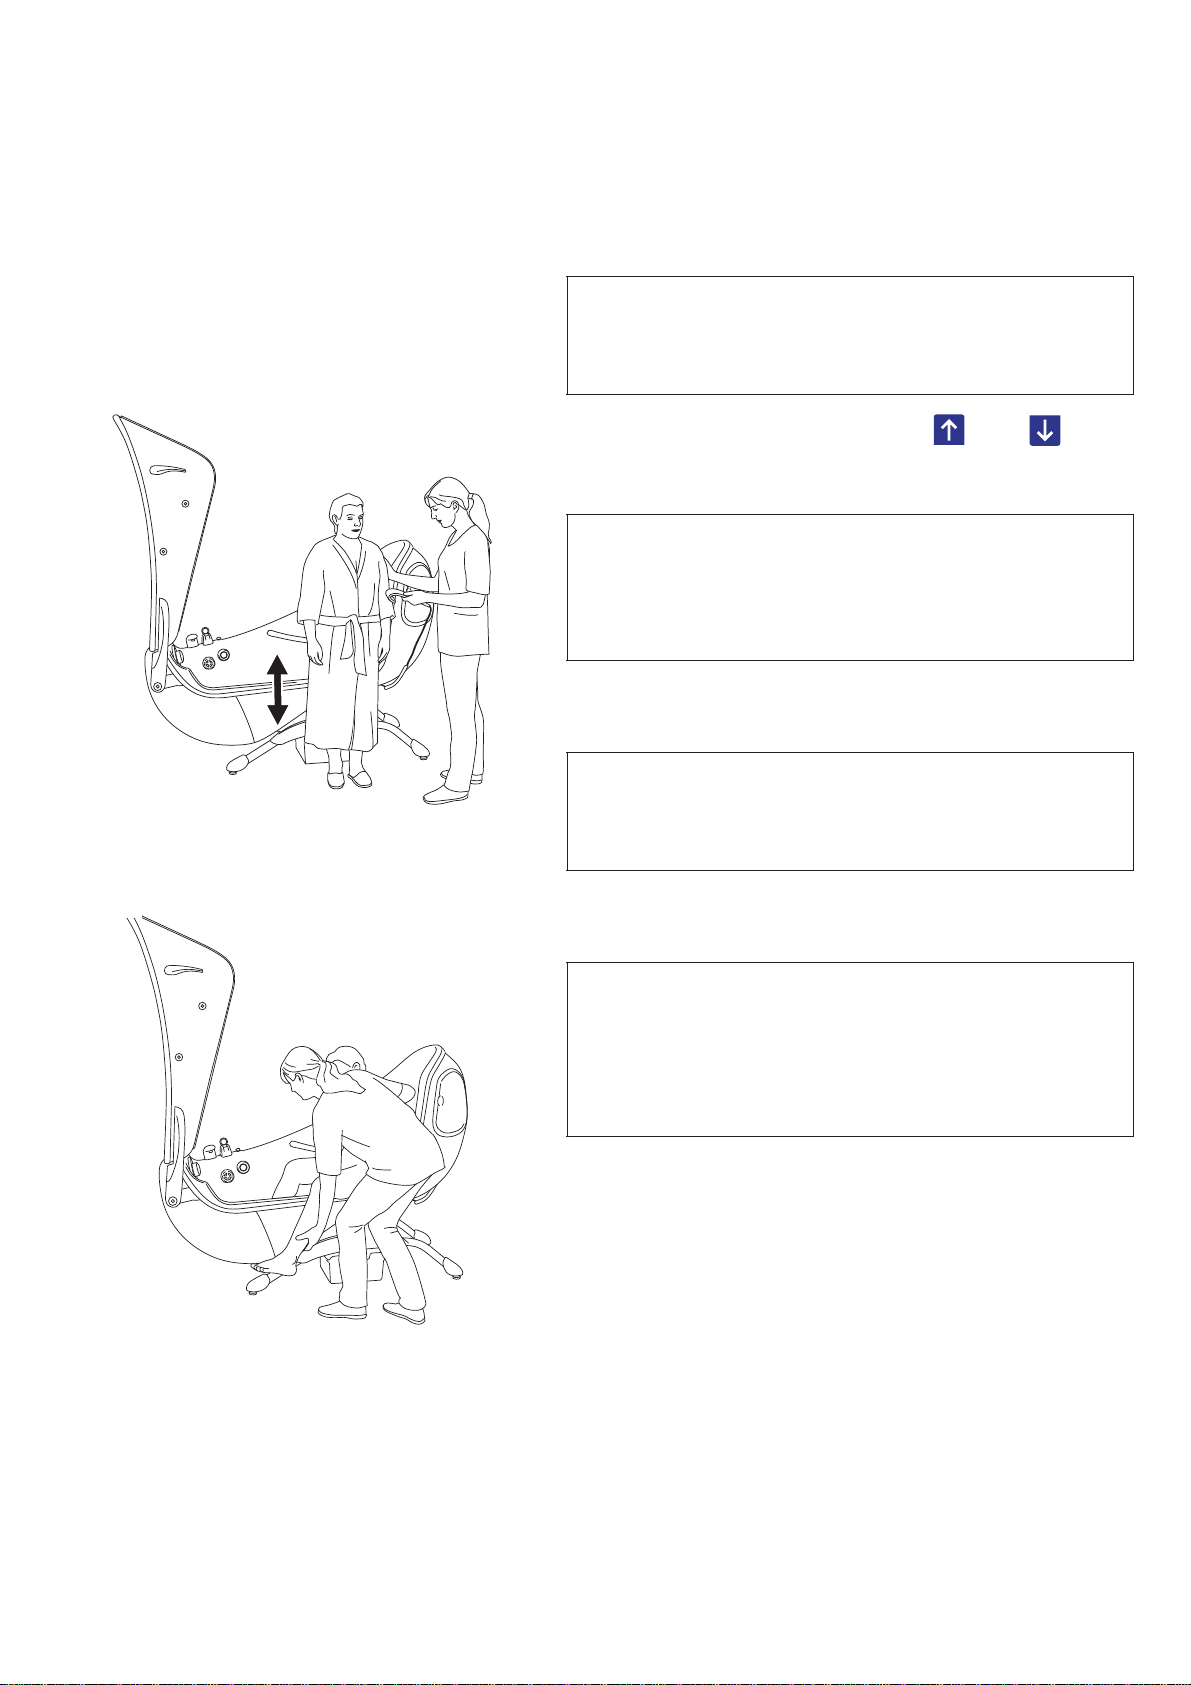
(Step 4-14 of 36)
4 Open the bath door by pressing the door handle down. Make
sure no objects are in the path of opening the door. Raise the
door to a fully open position.
5
WARNING
To avoid falling, make sure the patient always
remains in a seated position.
Adjust the bathtub height by pressing up or down
button on the hand control, in order to get the right patient
seating height. (See Fig. 4)
6
WARNING
To avoid falling, make sure the patient uses the
grab rails for support when entering or exiting
the bath.
If needed, help the patient get seated in the Parker bath.
(See Fig. 4)
7
WARNING
To avoid falling, make sure the patient always
remains in a seated position.
If needed, help the patient to place their feet into the
footwell. (See Fig. 5)
8
WARNING
To avoid entrapment, make sure to keep the
patients hair, arms and feet close to the body
and use designated grab supports during any
movement.
Close and lock the bat h do or by pulling the door handle fully
up (with some physical force) until aligned with the closed
lock sticker.
Continue with the steps on the next page.
18
Page 19
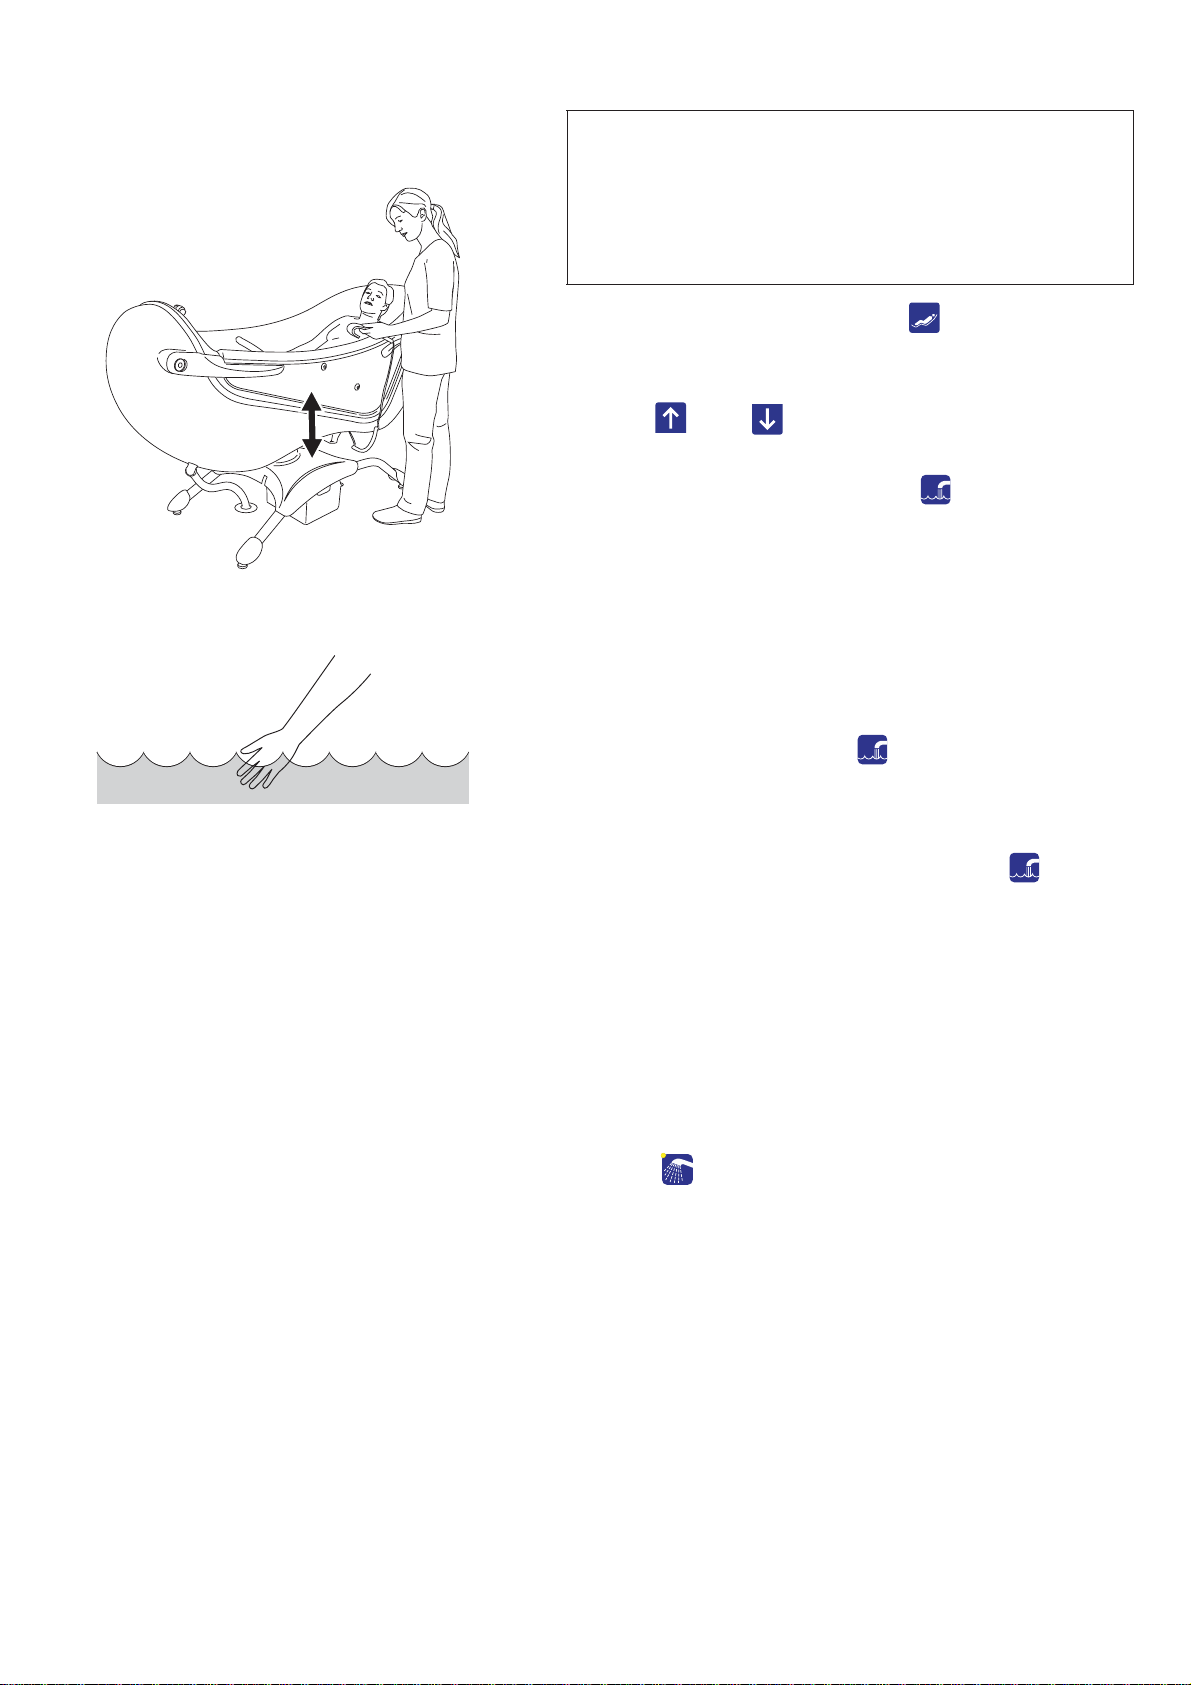
Fig. 6
Fig. 7
9
WARNING
To avoid entrapment, make sure to keep the
patients hair, arms and feet close to the body
and use designated grab supports during any
movement.
Recline the bathtub by pressing the tilt back button on
the hand control.
10 Position the bathtub to the preferred working height by
pressing up or down buttons on the hand control.
(See Fig. 6)
11 Adjust bath water depth by pressing
fill/auto fill button.
12 Adjust the water temperature by rotating the temperature
knob on the control panel.
13 Feel the water temperature with a naked hand and let the
patient feel the water as well. (See Fig. 7)
14 At a desired water level, turn the water off.
• Parker bath with fill: Press filling button again when
the water has reached desired level to turn it off.
• Parker bath with Auto fill: The filling stops
automatically after 60 s.
To stop filling within this time frame, press auto fill
button.
If the button is pressed once again, the filling starts for
another 60 s.
Shower the Patient
(Step 15-24 of 36)
15 Lift off the shower handle from the holder or stand.
16 Hold the shower handle away from the patient.
17 Press the shower button on the control panel (the LED
lights up when active).
Continue with the steps on the next page.
19
Page 20

Fig. 8
Fig. 9
18
WARNING
To prevent scalding, always check the water
temperature with your naked hand before
directing the water on the patient. Do not use
gloves as it may insulate to the extent that the
water temperature can be misjudged. Point the
flow of the water away from the patient.
Press the trigger on the shower handle directing the water
stream away from the patient.
19 The top display shows the shower water temperature. Allow
a few seconds for the display to adjust the temperature. If
needed, turn the knob to adjust the water temperature.
20 Also check by placing your naked hand in the water stream
that the water temperature is not to hot. (See Fig. 8)
21 Allow the patient to feel the water with his or her hand
before the water stream is directed onto the patient. If
needed, adjust water temperature by turning the knob.
(See Fig. 9)
22 T o keep the trigger handle in for a longer period, activate the
lock button by pushing it in. T o deactivate, push the trigger .
23 When showering is finished, press the shower button on
the control panel.
24 Make sure the shower trigger is unlocked before placing the
shower handle back into the holder or stand.
NOTE
Raise the bathtub, for optimum use of the shower
stand, and turn the shower stand away from the patient
when not in use. (GB only)
Continue with the steps on the next page.
20
Page 21

Air Spa System (option)
MI
X
8
0
7
0
6
0
5
0
4
0
3
0
2
0
Fig. 10
Fig. 11
Fig. 12
(Step 25-25 of 36)
25 T o activate the Air Spa system, use either the buttons on the
control panel or on the hand control.
• T o activate the Air Spa system in the whole bath, press the
Air Spa - whole bath button. The Air Spa system will
start with low intensity in the whole tub.
• If pressed a second time the Air Spa system intensity will
increase.
• If pressed a third time the Air Spa system will stop.
• The above sequence apply to the Air Spa system footwell button as well.
Sound & Vision® System (option)
(Step 26 of 36)
26 Activate the Sound & V ision system through the USB outlet
and the Sound & Vision system hand control, which is
located behind the cover.
Unscrew the black cap counter clockwise to get to the USB
outlet and plug in the Sound & V ision system USB memory
stick. (See Fig. 10)
End the bath cycle
(Step 27-35 of 36)
27 When bathing is complete, drain the bat ht ub by opening the
drain. Turn the drain control knob clockwise.
28 With intervals, tilt the bathtub to upright position by
pressing the tilt up button on the hand control. Try to
keep the patient in the water as long as possible.
29 In the mean time, keep the patient warm by showering the
upper body or covering him or her with a towel.
30 When the bathtub is in an upright position, lean the patient
forward and ask him or her to grab the handles. Shower and
dry the patient’s upper body and place a towel around the
patient to preserve heat. (See Fig. 11)
31 Lower the bathtub to the lowest position. (See Fig. 12)
Continue with the steps on the next page.
21
Page 22

Fig. 13
Fig. 14
Fig. 15
32 Make sure that the water level is below the door opening.
(See Fig. 13)
33 Unlock and open the bath door by pulling the door handle
down and lift the door up. Make sure no objects are in the
path of opening the door.
34 If necessary, gently grab the patient’s legs and dry them
before placing them on the floor. (See Fig. 14)
35
WARNING
To avoid falling, make sure the patient uses the
grab rails for support when entering or exiting
the bath.
Remove the patient and dry remaining wet areas of the
patient’s body.
Disinfect after each Patient
(Step 36-36 of 36)
36 Make the bath ready for the next patient. The bath must be
fully disinfected after each use to prevent crosscontamination. See section Cleaning and Disinfection
Instructions on page 28. (See Fig. 15)
NOTE
To preserve the door seal, leave the door slightly open
when not in use.
Place the hand control on the hand control holder when
not in use.
22
Page 23

Fig. 1
Fig. 2
Fig. 3
Bathe Patient using a Standing & Raising Aid
Parker bath integrates with ArjoHuntleigh products according to
Allowed Combinations in section Technical Specifications on
page 49.
Patient Transfer from Sara 3000 to Parker
Bath
(30 steps)
1 Lower the bathtub to the lowest position.
2 Start filling the footwell. (See Fig. 1)
3
WARNING
To prevent scalding, always check the water
temperature with your naked hand before
directing the water on the patient. Do not use
gloves as it may insulate to the extent that the
water temperature can be misjudged. Point the
flow of the water away from the patient.
Check the water temperature with your naked hand.
(See Fig. 2)
4 Open the bath door . Make sure no objects are in the path of
opening the door.
5 Transfer the patient to the bathroom.
6 Place the sling around the patient and fasten it to the
standing and raising aid.
7 Activate the standing and raising aid and raise the patient.
8 Pull down the patient’s trousers or skirt.
9 Transfer the patient to the Parker bath. (See Fig. 3)
Continue with the steps on the next page.
23
Page 24

Fig. 4
Fig. 5
Fig. 6
10 Lower the patient in order to place him or her on the bat htu b
seat. (See Fig. 4)
11 Detach the sling and pull the standing and raising aid away.
12 Undress the patient’s upper half.
13 Take off the patient’s trousers or skirt.
14 Let the patient feel the water temperature in the footwell.
15 If needed, gently, spin the patient around and place his or
her feet in the footwell. (See Fig. 5)
16
WARNING
To avoid entrapment, make sure to keep the
patients hair, arms and feet close to the body
and use designated grab supports during any
movement.
Close the bath door.
17 Perform the bathing, see section Bathe the Patient on
page 18.
18 Lower the bathtub after ending the bathing cycle.
19 Position the standing and raising aid close to the Parker
bath.
20 Open the bath door . Make sure no objects are in the path of
opening the door.
21 Gently, spin the patient around and place his or her feet
outside the bath and dry them thoroughly. (See Fig. 6)
Continue with the steps on the next page.
24
Page 25

22 Dress the patient’s upper body.
23 Dry the patient’s feet and legs.
24 Pull the patient’ s trousers or skirt up to his or her ankle area.
25 Put the sling on.
26 Adjust the height of the bathtub until the patient’s feet are
positioned on the standing and raising aid.
27 Attach the sling to the standing and raising aid.
28 Activate the lift and raise the patient up.
29 Dry the remaining wet areas of the patient’s body.
30 Pull the patient’s trousers or skirt all the way up.
25
Page 26
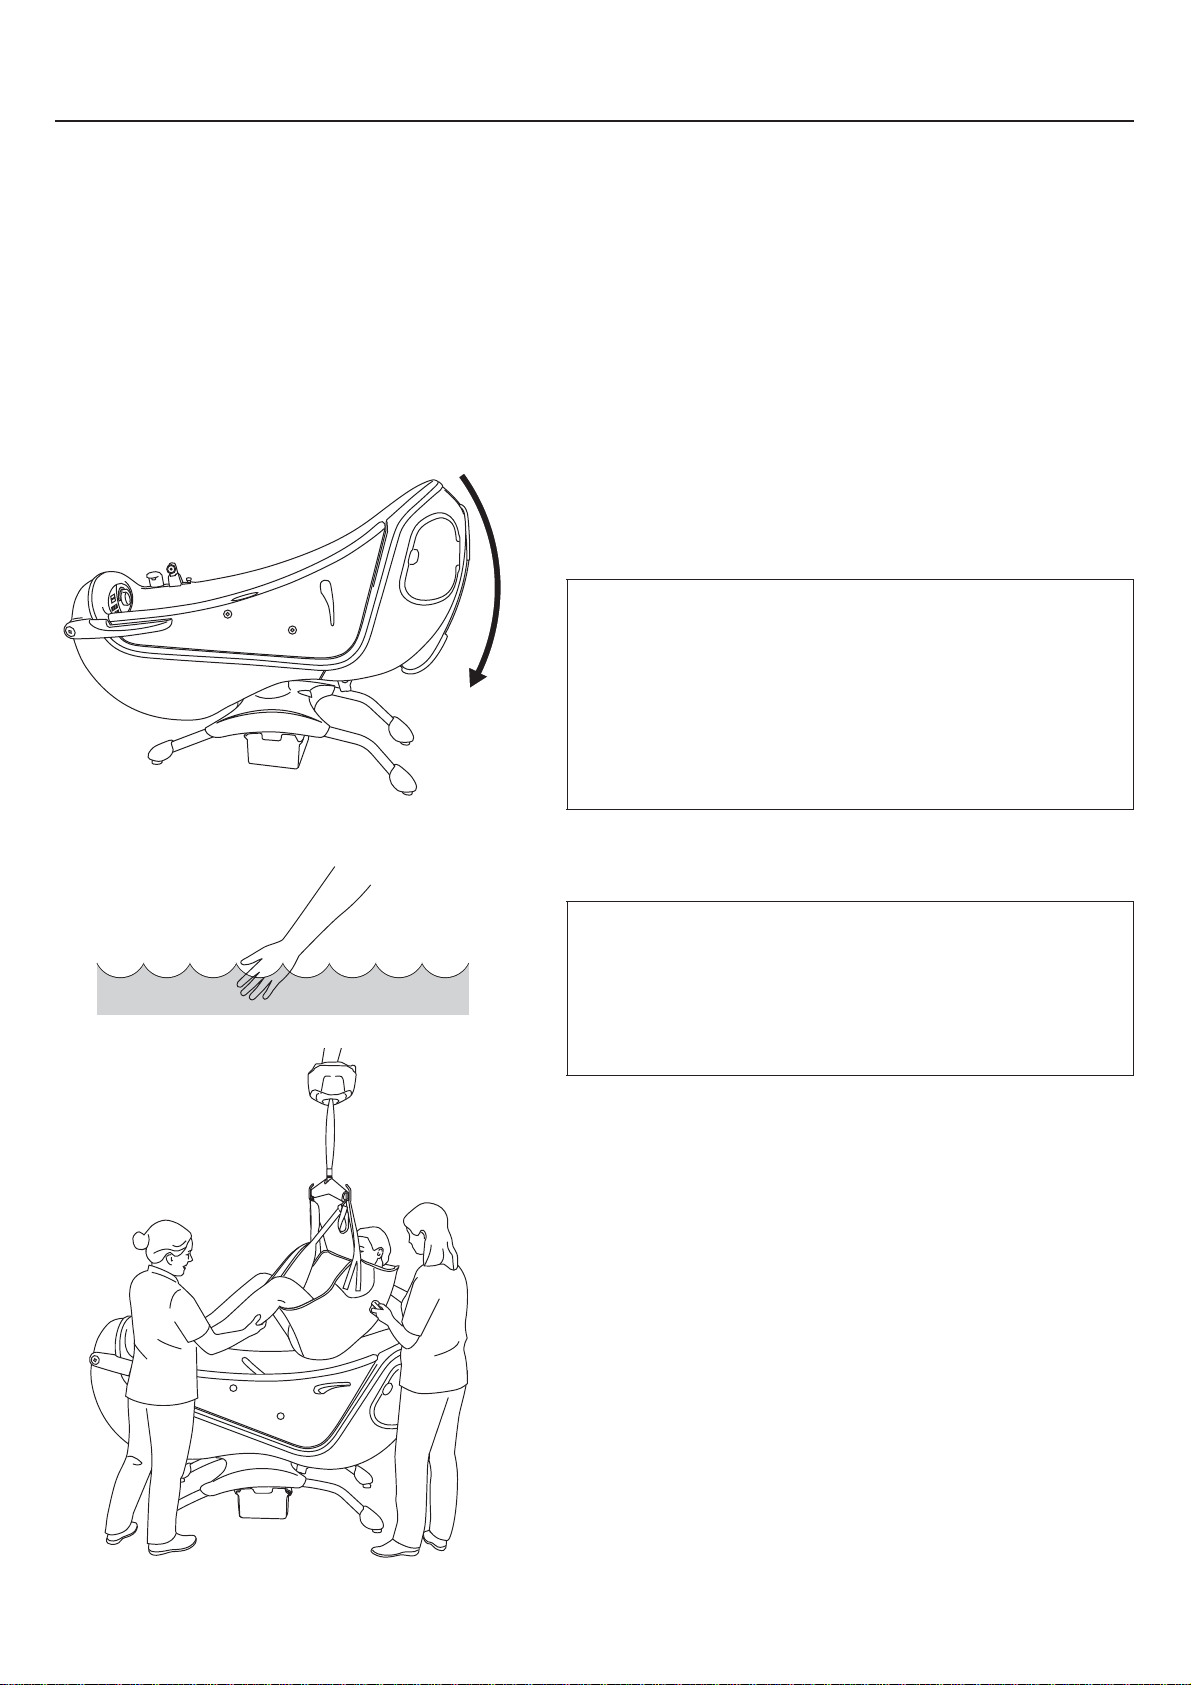
Fig. 1
Fig. 2
Fig. 3
Bathe Patient using a Ceiling Lift
Parker bath integrates with ArjoHuntleigh products according to
Allowed Combinations in section Technical Specifications on
page 49.
Patient Transfer from a Ceiling Lift to Parker
Bath
(16 steps)
1 Close door and prefill the bath with the bat htu b in an upright
position.
2 When prefilled, recline the bat ht ub and lower it to its lowest
position. (See Fig. 1)
3 Put the patient in a sling.
4
WARNING
To prevent scalding, always check the water
temperature with your naked hand before
directing the water on the patient. Do not use
gloves as it may insulate to the extent that the
water temperature can be misjudged. Point the
flow of the water away from the patient.
Check the water temperature with your naked hand.
(See Fig. 2)
5
WARNING
To avoid entrapment, make sure to keep the
patients hair, arms and feet close to the body
and use designated grab supports during any
movement.
Transfer the patient over the closed bath door to the reclined
bathtub. (See Fig. 3)
Continue with the steps on the next page.
26
Page 27

Fig. 4
Fig. 5
Fig. 6
Fig. 7
6 Raise the bathtub to an ergonomic working height. Adjust
the height of the spreader bar, if needed.
7 Let there be some tension in the sling from the spreader bar
to keep the patient in place. (See Fig. 4)
8 Fill the bathtub with water to an appropriate level.
9 Make sure to feel the water temperature and adjust, if
needed. (See Fig. 5)
10 Perform the bathing (see section Bathe the Patient on
page 18).
11 Begin to drain the bathtub by opening the drain.
12 Lower the bat htub to its lowest position.
13 Lift patient slightly up from the bathtub and shower the
patient’s back. (See Fig. 6)
14 Dry the patient in the sling and transfer him or her over the
closed bath door to a preferred helping aid. Finish drying the
patient. (See Fig. 7)
15 Tilt the bathtub to upright position to drain the bath
completely.
16 Disinfect the bath to prevent cross-contamination. See
section Cleaning and Disinfection Instructions on page 28.
27
Page 28

Cleaning and Disinfection Instructions
Thorough disinfection routines are necessary to prevent
the build-up of bacteria on and in the equipment and to
prevent cross-contamination. This is particularly vital in
cases where the Parker bath is in a shared facility.
WARNING
To avoid eye and skin damage, always use
protective glasses and gloves. If contact
occurs rinse with plenty of water. If eyes or
skin becomes irritated, contact a physician.
Always read the material safety data sheet
of the disinfectant.
WARNING
To prevent cross-contamination, always
follow the disinfection instructions in this
Instructions for Use.
ArjoHuntleigh Disinfectants
For optimal performance only use ArjoHuntleigh
Disinfectants. If you have any questions regarding
disinfecting the equipment or wish to order disinfectant,
see section Parts and Accessories on page 61.
If the Parker bath is equipped with Air Spa system, the
bath must be disinfected with its integrated disinfection
system.
If the Parker bath does not have an integrated
disinfection system, the Multi Clean disinfection system
must be used.
Always disinfect the Air Spa system, even when the
blower has not been used.
Accessories for Cleaning and
Disinfection
• Protective glasses
• Protective gloves
• Spray bottle with disinfectant or disinfection spray
handle with disinfectant.
• Spray bottle with water/shower handle with water
WARNING
To avoid eye or skin irritation, never
disinfect in the presence of a patient.
CAUTION
To avoid damage on the equipment only
use ArjoHuntleigh branded disinfectants.
• Cloths – wet and dry
• Disposable towels
• Soft bristled brush
• Long handled soft bristled brush
28
Page 29

Microbiological Formation Prevention
In order to enhance the on-site curative actions (chlorine or
thermal shock), which do not guarantee a reduction of the
contamination long term, make sure to follow the instructions
below .
Installation precautions
In order to limit the growth of bacterial flora, it is
necessary to take action at four levels:
• Avoid stagnating water and make sure proper water
circulation;
• Take precautions against the formation of scale and
corrosion based on the water quality;
• Maintain a high water temperature all the way from
the hot water dispenser to the different distribution
pipes;
• Mix hot and cold water as close as possible to the
point of use.
Use
• Make sure that the water circulates in the bath and
the shower on a daily basis even if the bathtub is not
used; and particular to make sure to remove any
water that may be left behind in the hose.
• Let the water flow approximately 5 minutes before the
first bath of the day.
• Clean and disinfect the bathtub according to the IFU
before the first bath of the day and after the bath of
each patient.
Do not forget to contact ArjoHuntleigh for the annual Preventive
Maintenance visit.
29
Page 30
Replace Disinfectant Bottle
Fig. 1
Fig. 2
MI
X
8
0
70
6
0
50
4
0
3
0
20
Arjo Clean (30)
Arjo General Purpose
Disinfectant (35)
Arjo Disinfectant
Cleanser IV (60)
Cen-Kleen IV (30)
Arjo Guard (15)
Fig. 3
(10 steps)
WARNING
To prevent cross-contamination, always follow the
disinfection instructions in this Instructions for
Use.
1 Make sure that the Parker bath is in an upright position.
(See Fig. 1)
2 Open the compartment for disinfectant bottle. (See Fig. 2)
3 On the disinfectant bottle:
• open the bottle lock
• disconnect the suction part from the bottle.
4 Discard the old bottle and replace with a new one.
5 Open the cover and grab the disinfection spray handle.
6 Press the disinfection button for 5 s.
7 Spray disinfectant in the bath while keeping an eye on the
flowmeter.
8 Check the mix ratio on the flowmeter so that it is in
accordance with the setting range stated in this IFU.
(See Fig. 3)
Continue with the steps on the next page.
30
Page 31

Fig. 4
9 If necessary, adjust the bottle cap by hand to get the right
mix ratio. (See Fig. 4)
10 Adjust water temperature so that the disinfectant mixtures
reaches approximately 20 °C (68 °F).
Clean and Disinfect with a Spray Bottle
(31 steps)
WARNING
To prevent cross-contamination, always follow the
disinfection instructions in this Instructions for
Use.
Remove visual residue
(Step 1-5 of 31)
1 Raise the bathtub to convenient working position.
2 Make sure all functions are turned off.
3 Open the drain to empty any left over water.
4 Detach and place the accessories (if applicable) such as
head cushion, back support cushions and leg rest, at the
bottom of the bathtub.
5 Shower and rinse the bathtub and the accessories in the
bottom of the bathtub with water to remove visible residue.
Turn the accessories and rinse again.
Continue with the steps on the next page.
31
Page 32

Clean
Fig. 1
Fig. 2
(Step 6-17 of 31)
6 Put on protective gloves and eye wear.
7 Mix the disinfectant according to the label instructions
stated on the disinfectant bottle.
8 Spray disinfectant in drain. Use a long handled brush to
scrub drain.
9 Close the drain.
10 Spray disinfectant using the spray bottle on all internal
bathtub surfaces and the accessories at the bottom of the
bathtub. Turn the accessories and spray on the other side.
Pay attention to parts and knobs and sensors attached to the
bathtub surface such as drain control knob/surface overflow
outlet. (See Fig. 1)
CAUTION
Never use green or brown Scotch-Brite nor steel
wool on the bath as it may scratch the surface.
11 Scrub the surfaces of the bathtub, loose parts and
accessories with a soft bristle brush or cloth (to remove any
deposits e.g. skin flakes). Scrub thoroughly, especially on
handles and hand control.
(See Fig. 2)
12 Open the drain.
13 Raise the Parker bath to upright position.
14 Rinse all parts clean with plenty of water having a
temperature of approximately 25 °C (77 °F) using the
shower handle to remove disinfectant.
15 Soak a cloth in disinfectant.
16 Wipe all other contact areas such as the outside of the
bathtub (particularly behind the head), metal sensory knobs
and hand control with the cloth.
17 Wet a new cloth with water and remove all traces of
disinfectant on contact areas. The cloth should occasionally
be rinsed in running water when removing disinfectant.
Continue with the steps on the next page.
32
Page 33

Disinfect
Fig. 3
Fig. 4
(Step 18-31 of 31)
18 Use a spray bottle and spray disinfectant in drain.
19 Close the drain.
20 Spray disinfectant on all internal bathtub surfaces and the
accessories at the bottom of the bathtub. Turn the
accessories and spray on the other side. Pay attention to
parts and knobs and sensors attached to the bathtub surface
such as drain control knob/surface overflow outlet.
(See Fig. 3)
21 Allow an appropriate contact time of the disinfectant
according to the instructions on the disinfectant bottle.
22 Open the drain.
23 Raise the Parker bath to upright position.
24 Push the button for shower.
25 Rinse all parts clean with water having a temperature of
approximately 25 °C (77 °F) using the shower handle to
remove the disinfectant. (See Fig. 4)
26 Soak a cloth in disinfectant.
27 Wipe all other contact areas such as the outside of the
bathtub (particularly behind the head), metal sensory knobs
and hand control with the cloth.
28 Allow an appropriate contact time of the disinfectant
according to the instructions on the disinfectant bottle.
29 Wet a new cloth with water and remove all traces of
disinfectant on contact areas. The cloth should occasionally
be rinsed in running water when removing disinfectant.
30 Leave to air dry.
31 Attach any accessories.
33
Page 34

Clean and Disinfect with Disinfection Spray
MI
X
80
70
6
0
5
0
4
0
3
0
20
Arjo Clean (30)
Arjo General Purpose
Disinfectant (35)
Arjo Disinfectant
Cleanser IV (60)
Cen-Kleen IV (30)
Arjo Guard (15)
Fig. 1
Fig. 2
Handle
(66 steps)
WARNING
To prevent cross-contamination, always follow the
disinfection instructions in this Instructions for
Use.
Remove visual residue
(Step 1-10 of 66)
1 Determining the disinfectant mixing ratio: Spray
disinfectant in the bathtub while keeping an eye on the
flowmeter.
2 Check the level of the disinfectant in the disinfectant bottle.
3 Check the mix ratio of the disinfectant on the flowmeter so
that it is in accordance with the setting stated in this IFU.
(See Fig. 1)
4 If necessary, adjust the bottle cap by hand to get the right
mix ratio.
5 Raise the bathtub to convenient working
position. (See Fig. 2)
6 Make sure all functions are turned off.
7 Open the drain and empty any left over water so that the
water sensory knobs do not detect any water. If water is
detected, the disinfection function will remain
de-activated.
8 Tilt the bathtub to an upright position. (See Fig. 2)
9 Detach and place the accessories (if applicable) such as
head cushion, back support cushions and leg rest, at the
bottom of the bathtub.
10 Shower and rinse the bathtub and the accessories in the
bottom of the bathtub with water to remove visible residue.
Turn the accessories and rinse again.
Continue with the steps on the next page.
34
Page 35

Clean
MI
X
80
70
6
0
50
4
0
3
0
20
Arjo Clean (30)
Arjo General Purpose
Disinfectant (35)
Arjo Disinfectant
Cleanser IV (60)
Cen-Kleen IV (30)
Arjo Guard (15)
Fig. 3
Fig. 4
Fig. 5
(Step 11-38 of 66)
11 Open the cover, lift out the disinfection spray handle and
direct the disinfectant spray towards the bottom of the
bathtub.
12 Press the disinfection button for 5 s on the control
panel to turn it on.
13 Press the trigger on disinfection spray handle and spray
disinfectant in the bathtub while keeping an eye on the
flowmeter. (See Fig. 3)
14 Spray until the flowmeter shows the correct mixing value.
If the flow meter value is not correct, adjust it according to
section Cleaning and Disinfection Instructions on page 28.
(See Fig. 3)
15 Adjust water temperature so that disinfectant mixtures
reaches approximately 20 °C (68 °F).
16 Spray disinfectant in the drain. Use a long handled brush to
scrub the drain.
17 Close the drain.
18 Spray disinfectant using the disinfection spray handle on all
internal bathtub surfaces and the accessories at the bottom
of the bathtub. Turn the accessories and spray on the other
side. Pay attention to parts and knobs and sensors attached
to the bathtub surface such as drain control knob/surface
overflow outlet. (See Fig. 4)
19 Scrub the surfaces of the bathtub, loose parts and
accessories with a soft bristle brush or cloth (to remove any
deposits e.g. skin flakes). Scrub thoroughly, especially on
handles and hand control.
For Parker bath without Air Spa system continue from step
31. Additional steps 20-30 for Air Spa system only:
20 Tilt the Parker bath backwards so that all nozzles will come
in contact with disinfectant.
21 Release trigger and place the disinfection spray handle into
the disinfectant/rinsing inlet (some force may be needed).
(See Fig. 5)
22 The inlet is fitted with insert locks and can be turned either
way to be secured tightly. (See Fig. 5)
Continue with the steps on the next page.
35
Page 36

Fig. 6
NOTE
Disinfection should be distributed through all Air Spa
system nozzles or proper disinfection can not be
guaranteed. Contact an ArjoHuntleigh technician if
problem occurs.
23 Press the trigger handle and hold it until the disinfectant
flows from all Air Spa system nozzles.
24 Let it run for another 30 s.
25 Release the trigger and remove the disinfection spray
handle from the disinfectant/rinsing inlet.
26 Press the disinfection button for 5 s to turn disinfection
off.
27 Place the disinfection spray handle back in its holder.
28 Place the shower handle into the disinfectant/rinsing inlet
and turn it either way to secure it tightly.
29 Press the trigger on the shower handle and hold it until clean
water flows from all nozzles.
30 Let it run for another 30 s.
31 Open the drain.
32 Raise the Parker bath to upright position.
33 Rinse all parts clean with plenty of water having a
temperature of approximately 25 °C (77 °F) using the
shower handle to remove disinfectant. (See Fig. 6)
34 Press the shower button on the front panel to turn it off.
35 Place the shower handle back into the holder.
36 Soak a cloth in disinfectant.
37 Wipe all other contact areas such as the outside of the
bathtub (particularly behind the head), metal sensory knobs
and hand control with the cloth.
38 Wet a new cloth with water and remove all traces of
disinfectant on contact areas. The cloth should occasionally
be rinsed in running water when removing disinfectant.
Continue with the steps on the next page.
36
Page 37

Disinfect
Fig. 7
Fig. 8
(Step 39-66 of 66)
39 Direct the disinfection spray handle towards the drain and
spray disinfectant in the drain.
40 Close the drain.
41 Spray disinfectant using the disinfection spray handle on all
internal bathtub surfaces and the accessories at the bottom
of the bathtub. Turn the accessories and spray on the other
side. Pay attention to parts and knobs and sensors attached
to the bathtub surface such as drain control knob/surface
overflow outlet. (See Fig. 7)
For Parker bath without Air Spa system continue from step
55. Additional steps 42-54 for Air Spa system only:
42 Tilt the Parker bath backwards so that all nozzles will come
in contact with disinfectant.
43 Release trigger and place the disinfection spray handle into
the disinfectant/rinsing inlet (some force may be needed).
(See Fig. 8)
44 The inlet is fitted with insert locks and can be turned either
way to be secured tightly. (See Fig. 8)
NOTE
Disinfection should be distributed through all Air Spa
system nozzles or proper disinfection can not be
guaranteed. Contact an ArjoHuntleigh technician if
problem occurs.
45 Press the trigger handle and hold it until the disinfectant
flows from all Air Spa system nozzles.
46 Let it run for another 30 s.
47 Release the trigger and remove the disinfection spray
handle from the disinfectant/rinsing inlet.
48 Press the disinfection button for 5 s to turn disinfection
off.
49 Allow an appropriate contact time of the disinfectant
according to the instructions on the disinfectant bottle.
50 Place the disinfection spray handle back in its holder.
51 Place the shower handle into the disinfectant/rinsing inlet
and turn it either way to secure it tightly.
37
Continue with the steps on the next page.
Page 38

Fig. 9
52 Press the trigger on the shower handle and hold it until clean
water flows from all nozzles.
53 Let it run for another 30 s.
54 Take out the shower handle from the disinfectant/rinsing
inlet.
55 Open the drain.
56 Raise the Parker bath to upright position.
57 Rinse all parts clean with water having a temperature of
approximately 25 °C (77 °F) using the shower handle to
remove the disinfectant. (See Fig. 9)
58 Soak a cloth in disinfectant.
59 Wipe all other contact areas such as the outside of the
bathtub (particularly behind the head), metal sensory knobs
and hand control with the cloth.
60 Allow an appropriate contact time of the disinfectant
according to the instructions on the disinfectant bottle.
61 Wet a new cloth with water and remove all traces of
disinfectant on contact areas. The cloth should occasionally
be rinsed in running water when removing disinfectant.
62 Leave to air dry.
63 Attach any accessories.
Additional steps 64-66 for Air Spa system only:
64 Press twice on the Air Spa system button for the whole
bath, to activate the highest Air Spa system intensity.
65 Keep it running for 30 s to remove water inside the Air Spa
system jets.
66 Turn off Air Spa system by pressing the Air Spa
system - whole tub button again.
38
Page 39

Clean and Disinfect Parker Bath using
Arjo Clean (30)
Arjo General Purpose
Disinfectant (35)
Arjo Disinfectant
Cleanser IV (60)
Cen-Kleen IV (30)
Arjo Guard (15)
Fig. 1
Fig. 2
Fig. 3
MultiClean
(33 steps)
WARNING
To prevent cross-contamination, always follow the
disinfection instructions in this Instructions for
Use. (See Fig. 1)
Follow steps 1- 30 after bathing each patient.
1 Check the level of the disinfectant in the disinfectant bottle.
2 Raise the bathtub to convenient working height.
3 Open the drain and make sure it is empty of water.
4 Detach and place the accessories (if applicable) such as
head cushion, back support cushions and leg rest, at the
bottom of the bathtub.
5 Shower and rinse the bath and accessories with water.
6 Lift out the spray handle from the Multi Clean disinfection
system and hold it over the bathtub.
7 Turn the ON/OFF control on the Multi Clean to the ON
position. Turn the function selection control to the
disinfection setting (yellow).
8 Adjust water temperature so that disinfectant mixtures
reaches approximately 20 °C (68 °F).
9 Apply the disinfectant by spraying all internal bath surfaces,
and the accessories in the bottom of the tub. (See Fig. 2)
10 Scrub the surfaces with a soft bristle brush or cloth to
remove any build up of biofilm which may have been
deposited.
For Parker bath without Air Spa system continue from step
16. Additional steps 11 - 15 for Air Spa system only:
11 The Parker bath must be tilted backwards to disinfect
through all nozzles.
12 Place the disinfection spray handle into the disinfectant/
rinsing inlet and turn either way to secure it (some force
may be needed). (See Fig. 3)
Continue with the steps on the next page.
39
Page 40

Fig. 4
Fig. 5
NOTE
Disinfection should be distributed through all Air Spa
system nozzles or proper disinfection can not be
guaranteed. Contact an ArjoHuntleigh technician if
problem occurs.
13 Press the trigger handle and hold it until the disinfectant
flows from all Air Spa system nozzles.
14 Let it run for another 30 s.
15 Remove the disinfection spray handle from the disinfectant/
rinsing inlet.
16 Turn the Multi Clean control to the OFF position.
17 Place the disinfection spray handle in its holder.
18 Allow an appropriate contact time of the disinfectant
according to the instructions on the disinfectant bottle,
during this time clean all surfaces. (See Fig. 4)
19 Wipe all other contact areas such as the outside of the bath
(particularly behind the head area), metal sensory knobs,
door seals and the hand control with a cloth soaked in
disinfectant.
20 Turn the function selection control on the Multi Clean to the
rinse setting (blue).
For Parker bath without Air Spa system continue from step
26. Additional steps 21-25 for Air Spa system only:
21 The Parker bath must be tilted backwards to rinse through
all nozzles.
22 Place the water spray handle into the disinfectant/rinsing
inlet and turn either way to secure it (some force may be
needed).
23 Press the trigger handle and hold it until clean water flows
from all nozzles.
24 Let it run for another 30 s.
25 Remove the shower handle from the disinfectant/rinsing
inlet.
26 Rinse the bath and the accessories. (See Fig. 5)
27 Place the spray handle back into the holder on the
Multi Clean and turn the unit off.
40
Continue with the steps on the next page.
Page 41

Fig. 6
Additional steps 28-30 for Air Spa system only:
28 Press twice on the Air Spa system button for the whole
bath, to activate the highest Air Spa system intensity.
29 Keep it running for 30 s to remove residual water from
within the Air Spa system jets.
30 Turn off Air Spa system by pressing the Air Spa
system - whole tub button again.
Follow additional steps 31-33 after the last bath of the day .
31 Wipe the inner wall of the bath vigorously with a cloth
soaked in the disinfectant to remove any build up of biofilm
that may have accumulated during the day. (See Fig. 6)
32 Rinse thoroughly with water until no residual disinfectant is
visible.
33 Leave to air dry so that the bath is clean, disinfected and
ready to be used the next morning.
41
Page 42

Care and Preventive Maintenance
The Parker bath is subject to wear and tear , and the following actions must be performed when specified to ensure that
the product remains within its original manufacturing specification.
WARNING
To avoid malfunction resulting in injury, make sure to conduct regular inspections and follow
the recommended maintenance schedule. In some cases due to heavy use of the product and
exposure to aggressive environment more frequent inspections should be carried out. Local
regulations and standards may be more stringent than the recommended maintenance
schedule.
NOTE
Product cannot be maintained and serviced while in use with the patient.
PREVENTIVE MAINTENANCE SCHEDULE: Parker bath
CAREGIVER OBLIGATIONS Action/Check
Clean and Disinfect X
Visually check all exposed parts X
Check pillows/leg rest X
Visually check hoses, pipes and connections X
Check hand control and cable X
Check door/seal X
Perform functionality test X
Check/clean shower heads X
Exercise the thermostat mixer X
Check/clean filters incoming water X
Yearly checks by qualified personnel only X
Check electrical installation
(to be performed by authorized electrician)
Between
Patients
Intervals according to local requirements
Every
WEEK
Every
MONTH
Every
YEAR
WARNING
To avoid injury to both the patient and the caregiver, never modify the equipment or use
incompatible parts.
42
Page 43

Caregiver Obligations
Fig. 1
Fig. 2
Fig. 3
Caregiver obligations shall be carried out by personnel with
sufficient Parker bathknowledge following the instructions in this
IFU.
Between Patients
Clean and disinfect:
Before every use, make sure the Parker bath is cleaned and
disinfected according to section Cleaning and Disinfection
Instructions on page 28.
Every week
• Visually check exposed parts:
V isually check all exposed parts, especially where personal
contact is made by either the patient or caregiver. Make sure
no cracks or sharp edges have developed that could cause
the patient or user injury or that has become unhygienic and
can cause cross-contamination. Any use of chlorine or
alcohol can damage the bathtub and cause cracks.
• Check accessories:
Check pillows/leg rest to make sure there are no cracks or
tears that would allow water to get into the filling. If there is
such damage, replace. (See Fig. 1)
• Visually check hoses, pipes and connections:
Visually inspect for leaks of any kind by looking under the
tub. (See Fig. 2)
• Check hand control and cable:
Visually check the condition of the hand control and its
cable. Replace as per below if cut or damaged. (See Fig. 3)
The hand control can be replaced without ArjoHuntleigh
support. T o replace the hand control: Pull the cord connector
out from under the back shell located behind the back seat
area of the Parker bath. Reach in and plug in the new cord
connector of the new hand control.
43
Continue with the steps on the next page.
Page 44
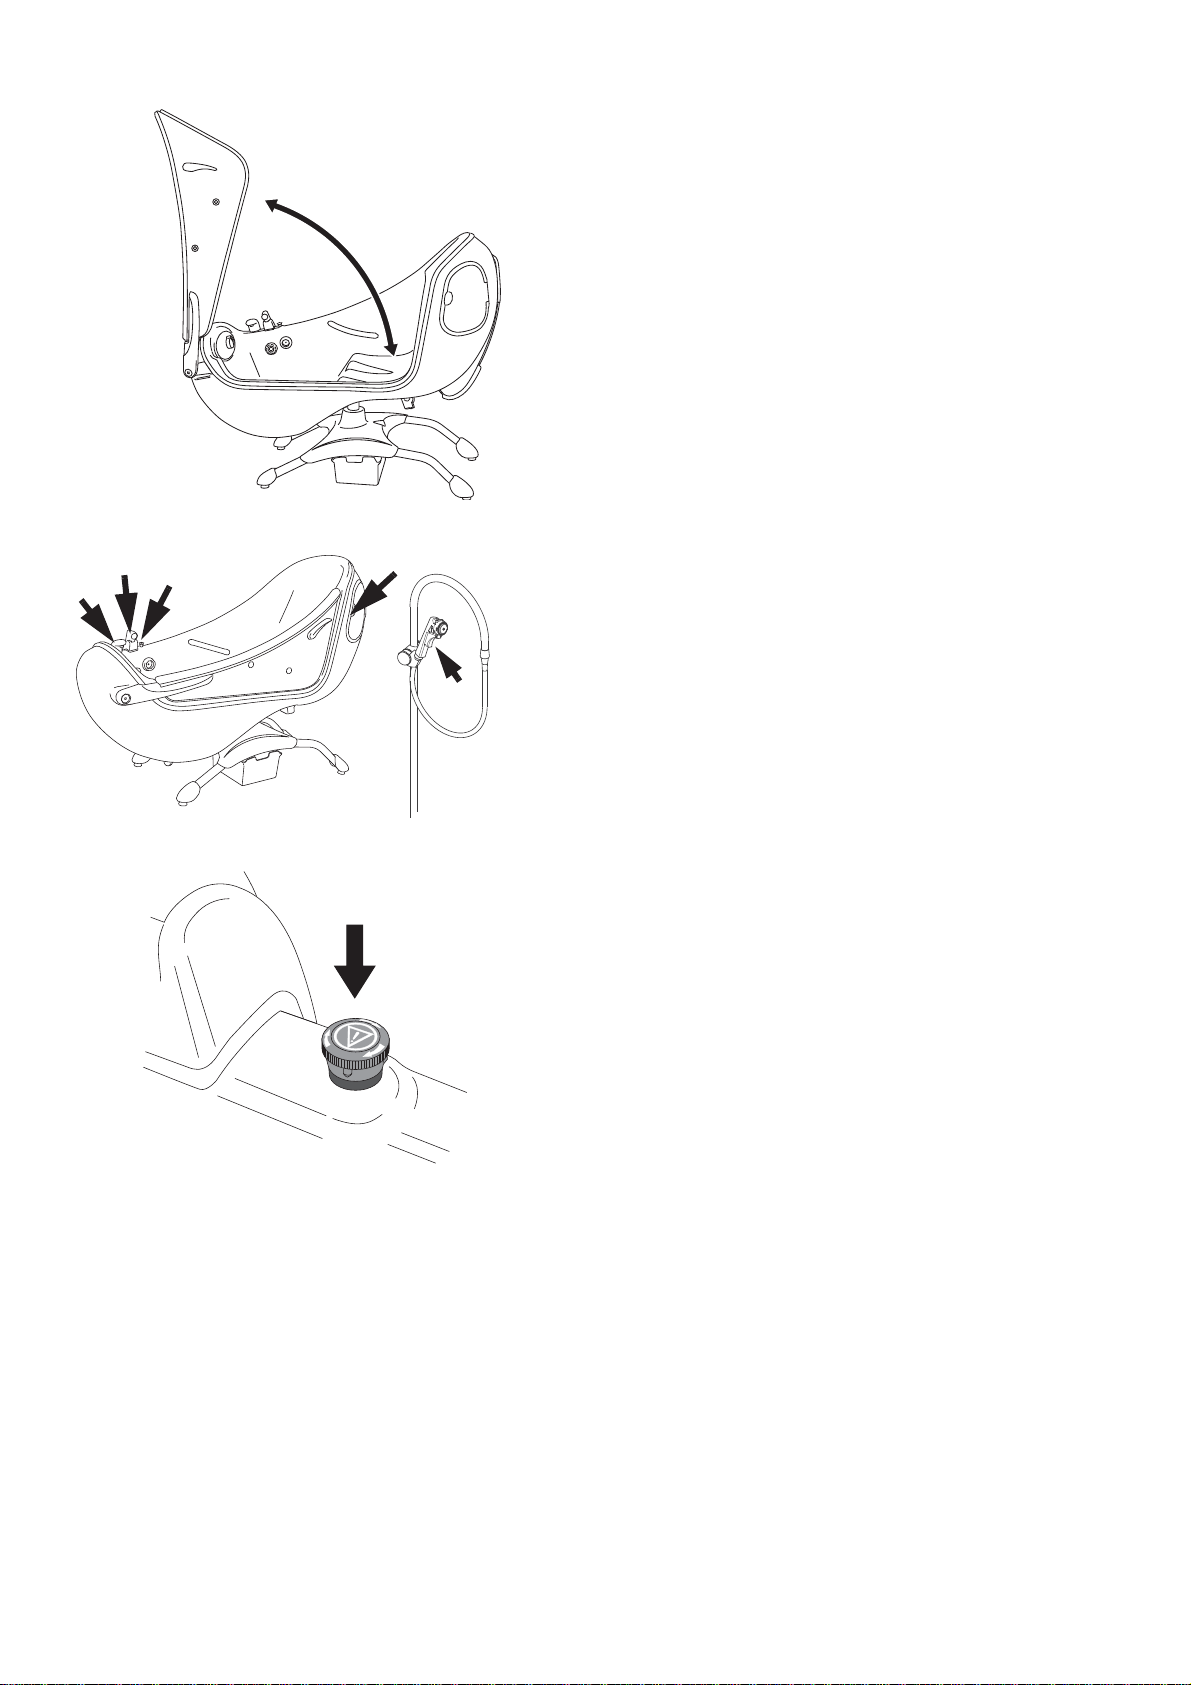
Fig. 4
Fig. 5
Fig. 6
• Check door/seal:
1 Open and close the door and check its supports for correct
function i.e the door should not drop by itself during
closing. Check the lock for proper function. (See Fig. 4)
2 Examine the door seal for cuts, tears or distortion.
• Perform functionality test (See Fig. 5):
1 Test all functions. Water, Air Spa system and tub
movement.
2 With water on: check shower hose and shower handle for
damage. Replace if damaged. The shower handle can be
replaced without ArjoHuntleigh support.
3 If the shower stand on the Parker b ath for GB is damaged,
contact and ArjoHuntleigh technician.
• Check the emergency stop function:
Check the emergency stop function by pushing down the
button. (See Fig. 6)
No filling or showering is possible. Both temperature
display background lights will turn off.
Continue with the steps on the next page.
44
Page 45

Fig. 7
Fig. 8
Fig. 9
A
B
C
Every month
• Remove and clean the shower head (See Fig. 7):
A
1 Loosen the screw.
2 Remove the parts according to the illustration.
3 Clean carefully.
4 Re-assemble. The parts (A) must be assembled before
they can be set into the handle.
5 Tighten the screw carefully.
• Exercise the thermostat mixer:
Turn the temperature control back and forth over the whole
temperature range with water on. This is particularly
important in areas with hard water. (See Fig. 8)
• Check/clean filters for incoming water:
WARNING
Pressurised system and risk of scalding. Make
sure that the valve (A) is closed before removing
the cap, this is especially important for the hot
water valve.
A rinsing valve with a filter is mounted on each of the two
water supply hoses found under the bath. The filter in both
valves should be rinsed in the order listed. (See Fig. 9)
1 Close the valves (A). The handles (red for hot water and
blue for cold) should be in a cross position.
2 Remove the cap (B) with a wrench.
3 Pull out the filter (C) and clean it carefully in water.
4 Reassemble.
5 Open the valves.
45
Page 46

Yearly Checks by Qualified Personnel Only
The Parker bath must be serviced once a year in accordance with
the Maintenance and Repair Manual.
T o make sure that you have a problem free and safe operation, it is
recommended to have regular scheduled services with calibration
of the thermostatic mixer and thermometer by a trained
technician. Relocation of the bath, significant changes or
modifications in local water supply may require re-calibration of
the thermostatic mixing valve.
Contact your local ArjoHuntleigh service representative to sign
for a service agreement.
WARNING
To avoid injury and/or unsafe product, the
maintenance activities must be carried out at the
correct frequency by qualified personnel using
correct tools, parts and knowledge of procedures.
Qualified personnel must have documented
training in maintenance of this device.
NOTE
All Caregiver Obligations are to be checked when
performing the Qualified Personnel Service. For details,
see separate service instructions.
46
Page 47

Troubleshooting
NOTE
Before starting the troubleshooting check: Power supply, Water supply and the LEDs on control
panel. If the problem can not be solved with the problem solving actions below, please contact an
ArjoHuntleigh authorized technician.
PROBLEM ACTION
Hand control does not work or control panel buttons do
not work and the green power indicator LED is on (not
the Sound & Vision system hand control).
Hand control still not working (not the Sound & Vision
system hand control).
Everything but fill and Air Spa system works, the green
power indicator LED is off.
The temperature displays have no backlight.
1 Check that the emergency stop is not pressed
down. If pressed down then release it by turning
the button clockwise.
2 Make sure the Lock function is not active with
LED flashing. If lock function is active press the
lock button for 2 s to deactivate it.
3 If the control panel works check the attachment of
the hand control. If attachment is intact, replace
the hand control.
4 If attachment of the hand control is intact then
check the Air Spa system function on the control
panel. If the Air Spa system buttons on the control
panel work, the hand control needs to be replaced.
1 The power to the bathtub is off with the battery
LED indicator turned on. If it is running on
battery, finish the bathing and get the patient out
safely.
2 Contact an electrician to make sure the power
supply is working correctly before next bathing
session.
Nothing works, the power indicator LED is off and
temperature display is off.
Fill or shower function stops with a beeping sound. 1 The back light on the temperature display is
It is only possible to lower the lift. The lifting device of this equipment is equipped with a
1 The power is off and there is a flashing or no
battery LED indicator.
2 The battery needs to be replaced and the bat htub
will not function until the power is on.
Contact qualified personnel for a battery
replacement.
flashing.
2 Water is too hot and scalding protection has been
activated. There is a wrong temperature setting or
water supply fault.
safety nut. If the safety nut will be activated it will only
be possible to raise or lower the equipment any more. In
case of this scenario stop using the equipment and
contact qualified personnel for repair of the equipment.
47
Page 48

PROBLEM ACTION
Air Spa system stops during operation. (Option) 1 Normal, if used more than 15 minutes.
2 If used less than 15 minutes it may be overheated
due to high ambient temperature or clogged filter.
Can be restarted when cooled off.
3 Power failure.
Only the water flow to the shower is slow . Check and clean the shower head according to section
Care and Preventive Maintenance on page 42.
Water flow from shower and filling spout is slow. 1 In order to feel if any hot water is coming in, feel
the incoming hot water line to see if hot.
2 Check and clean filter for incoming water
according to section Care and Preventive
Maintenance on page 42.
Disinfection does not work. (Option, not for GB) 1 Make sure the bathtub is empty of any left over
water. If there is water in the bathtub the
disinfection LED on the control panel will flash
and beep.
Auto fill function will not stop filling after footwell
level. (Option)
Sound & Vision system hand control is not working.
(Option)
2 Make sure disinfection button is pressed in for at
least 5 s.
3 If the disinfection LED on the control panel is
flashing and beeping, it can also indicate that the
level of disinfectant bottle is running low and
needs to be replaced. See section Cleaning and
Disinfection Instructions on page 28.
4 Make sure shower, fill or Air Spa system is not
activated and try again.
5 If power is off and the bathtub is running on
battery, the disinfection will not work.
Metal sensory plugs need cleaning because of collected
build up. See section Cleaning and Disinfection
Instructions on page 28.
1 The LED on the remote control should flash when
active.
2 If it is not flashing, replace the Sound & Vision
system hand control.
Sound & Vision system sound is not working, but
bathtub light is working. (Option)
No Sound & Vision system light but sound is working.
(Option)
1 The USB memory stick may be defective. If
possible, check the USB LED light for indication.
Solid light = power ON, Flashing light = reading.
2 Test another USB memory stick.
Light is broken and it needs to be replaced by qualified
personnel.
48
Page 49

Technical Specifications
A full technical description of the Parker can be found in the service documentation, please contact ArjoHuntleigh for
a copy . Contact information appears on the last page of this IFU.
TECHNICAL DATA
General
Tub length in the upright position 1855 mm / 73 inches
Tub length in reclined position 1960 mm / 77 1/8 inches
Tub width 750 mm / 29 1/2 inches
Height of door with bathtub in highest position, feet in lowest
2510 mm / 98 7/8 inches
position
Maximum patient weight 210 kg / 463 lbs
SWL (Safe Working Load) (patient + water) 300 kg / 661 lbs
Transfer height at lowest position 565 mm / 22 1/4 inches
Transfer height at highest position 685 mm / 27 inches
Maximum duty cycle Lift/Hi-Lo 1 minute ON, 9 minutes OFF
Maximum duty cycle Air Spa system 15 minutes ON, 15 minutes OFF
Operating forces of controls (Control Panel) 4 N
Operating forces of controls (Hand Control) 3 N
Operating forces of controls (Sound & Vision System Hand
3 N
Control)
Medical Equipment Type B
Pollution degree 2
Degree of fire protection In accordance with standard
EN/ISO 60601-1
Water
Water consumption (prefilled foot well volume) 96 l / 25.4 US gallons
Filling time at 3.0 bar (43.5 PSI) dynamic pressure (prefill) 100 s
Water content up to overflow level 230 l / 60.8 US gallons
Water content up to auto fill level 96 l / 25.4 US gallons
Emptying time from auto fill level (96 l) 3 minutes
Thermometer
Range 10-50 °C (50-122 °F)
Accuracy +/-1 °C (1.8 °F)
Resolution 0.1 °C (0.18 °F)
49
Page 50

Motion
Raising time with full load (approximately) 16 +/- 5 s
Lowering time with full load (approximately) 12 +/- 5 s
Sound Levels
Sound level at raising / lowering, no load 61 dBA
Sound level at raising / lowering, maximum load 60 dBA
Sound level of Air Spa system, high intensity 83 dBA
Sound level tilt, no load 60 dBA
Battery
Battery Type Lead, 24 V
Battery Type Number 59776
IP Classification
IP Class IP X4
IP Class hand control and Sound & Vision System Hand control IP X7
Weight
Parker bath depending on selected options (excluding packaging) 124 - 131 kg
273 - 289 lbs
Recycling
Package Wood and corrugated cardboard, recyclable
The product Electric, steel and plastic parts shall be separated and recycled according
to WEEE
Battery Recyclable, Not for disposal. Environmental danger.The device contains a
lead battery that shall be disposed according to local regulations
Disposal of Parker bath
Bathtub The device is marked with the WEEE symbol to indicate that it is electronic
equipment covered by the Directive 2012/19/EU on waste electrical and
electronic equipment. In European countries the crossed out wheeled-bin
WEEE symbol reminds you that all the electrical and electronic products,
batteries and accumulators must be taken to separate collection at end of
their working life. This requirement applies in the European Union. Do not
dispose these products as unsorted municipal waste. You can return your
device and accessories to ArjoHuntleigh or you can contact your local
authorities for advice on disposal.
50
Page 51

Allowed Combinations
Parker bath integrates with the following ArjoHuntleigh products: Stedy, Sara Lite,
Sara 3000, Sara Plus,
Maxi Sky 600 (with 2-point
spreader bar), Mesh sling
with head support
(MLA4060 XS-L, XL) and,
Mesh sling without head
support (MLA4531 S-L, XL)
No other combinations are allowed
SITE PREPARATION
NOTE
All drainage, water and electrical installation work should be carried out by qualified personnel, in
accordance with local and national regulations.
Floor
Maximum floor load 450 kg / 0.8 m
Maximum floor pressure 0.6 N/mm
Operating Conditions
2
2
Ambient temperature 10 °C - 40 °C
(50 °F -104 °F)
Relative humidity 30% - 95% Rh
Atmospheric pressure 800 hPa to 1060 hPa
T ransport and S torage
Ambient temperature -20 °C to 70 °C
(-4 °F to 158 °F)
Relative humidity 10% - 80% at 20 °C (68 °F)
Atmospheric pressure 500 hPa - 1100 hPa
51
Page 52

Electrical Data: EU and North America
Voltage 230 V (EU)
120 V (North America)
Frequency 50 Hz (EU)
60 Hz (North America)
Power consumption (maximum) 900 VA
Number of phases Single phase AC
Fuses 230 V 10 A
120 V 13 A
Protective earth Yes
Potential equalisation Yes
Power supply cord replaced by qualified personnel
Mains disconnection device
Permanently installed in wall, visible and accessible at all times
Mains transient voltage 4 kV*
Creepage distance 3 mm*
Air clearance 1.8 mm*
Direction of movement Up and down, right and left,
clockwise and
counterclockwise
* If local regulations are higher, they must be met.
WARNING
To avoid electric shock, make sure that the equipment is connected to:
• Continuously powered supply mains with protective earth.
• Separate fuse and ground fault circuit interrupter (GFCI)
• A mains disconnection device
• Equipotential bonding point
All installations must be in accordance with local codes and regulations.
52
Page 53

WATER SUPPLY
Drain requirement
Flow capacity 100 l/minute
26.4 US gallons/minute
Position (floor, Wall) either
Water (Hot and Cold)
Connection 3/4” B.S.P female
Upper limit static pressure 6 bar / 87 PSI
Recommended dynamic pressure, at 8 °C (46 °F) and at
3 bar / 43 PSI
80 °C (176 °F) flow of 58 l/minute (15.3 US gallons/minute)
Lower limit dynamic pressure at 8 °C and at 80 °C and
0.8 bar / 12 PSI
26 l/minute flow (GB)
Lower limit dynamic pressure at 8 °C (46 °F) and
1 bar / 15 PSI
80 °C (176 °F) degrees and 29 l/minute (7.7 US gallons/minute)
flow.(North America without disinfection)
Lower limit dynamic pressure at 8 °C (46 °F) and
2 bar / 29 PSI
80 °C (176 °F) degrees and 45 l/minute
(11.9 US gallons/minute) flow.
(All other markets) (North America with disinfection)
Maximum pressure difference between hot and cold water +/- 0.5 bar / +/- 7 PSI
Cold water lower limit temperature 2 °C (36 °F)
Cold water upper limit temperature 20 °C (68 °F)
Hot water lower limit temperature 60 °C (140 °F)
Hot water upper limit temperature 80 °C (176 °F)
Microbiological Demands
Fulfil WHO:s demands on drinking water and the Drinking Water Directive (DWD) in EU
53
Page 54

Labels
Label explanation
Applied Part Type B, Applied part: protection
against electrical shock in
accordance with IEC 60601-1.
Attention
Label
Approval
Label
Calibration
Label
Important user information for
correct use.
States approvals for the current
product.
States that a calibration has to be
done before first use and after every
installation. See Assembly and
Installations Instructions and call an
ArjoHuntleigh technician.
Caution Label States a potential hazard for the
product.
Data Label States technical performance and
requirements, e.g. Input Power,
Input Voltage and maximum Patient
Weight etc.
Identification
Label
States the product identification,
serial number and year and month
of manufacturing.
Product
Feature Label
States the product feature name and
recycling requirements.
Symbol explanation
Lifting Stroke
Label for equipotential
connection point (bonding lug)
IP X4 Degree of Protection (i.e. the
product is protected against
splashing water)
Air Spa system
Duty Cycle
Time span of having Air Spa
system turned ON and OFF.
Lift Duty Cycle T ime span of lifting the Parker
bath and rest time.
Read the IFU before use
Separate electrical and electronic
components for recycling in
accordance with the European
Directive 2012/19/EU (WEEE)
Water Supply (Water Fittings)
Regulations 1999 (the Water
Byelaws 2000 in Scotland)
CE marking in accordance with
The Medical Devices Directive
93/42/EEC.
0086
The equipment has been EMCtested and fulfils all requirements
according to IEC 60601-1-2.
Classified by Underwriters
Laboratories Inc. with respect to
electrical shock, fire, mechanical,
hazards and other specified
hazards only in accordance with
the Approvals and List of
Standards.
Recyclable
Max Patient
Maximum weight of the patient
Weight
Max Load Maximum weight of patient and
water
Input Voltage Voltage feed
Input Power Power
Fuse F1
Identity of fuses
Fuse F2
Fuse F3
Class 1 T ype of protection - grounded
54
Name and address of the
manufacturer
Manufacturing date
Page 55

8360890
8418710 A
Sound & Vision
ARJO HOSPITAL EQUIPMENT AB, ESLÖV SWEDEN
Identification Label
Caution
Label
Equipotential
Bonding Lug Label
Approval Label
Sound & Vision System
Data Label US
Data Label EU
Data Label US
Calibration Label
(located on the control
panel before first use)
Product Feature Label
Approval Label
Applied Part
Attention
Label
Calibration Label
(located on the control
panel before first use)
55
Page 56

List of Standards and Certificates
ST ANDARDS/
CERTIFICA TES
DESCRIPTION
EN/IEC 60601-1:2005
AMD1:2012
ANSI/AAMI ES60601-1
(2005)
AMD 1 (2012)
CAN/CSA-C22.2 No.
60601.1-1:14
ANSI Z124. 1 Standards for Plastic Bathtub Units
ANSI/ASME A1 12.19.7 Whirlpool Bathtub Appliances
ASSE 1001
CSA B64.1.1
ANSI/ASSE 1014 Handheld Shower
ANSI/ASSE 1016 Individual Thermostatic, Pressure Balancing and Combination Pressure Balancing
EN 1717 Protection against pollution of portable water in water installation and general
Medical Electrical Equipment - Part 1: General Requirements for Basic Safety and
Essential Performance.
Medical Electrical Equipment - Part 1: General Requirements for Basic Safety and
Essential Performance.
Medical Electrical Equipment - Part 1: General Requirements for Basic Safety and
Essential Performance.
Pipe Applied Atmospheric T ype Vacuum Breaker
and Thermostatic Control Valves for Individual Fixtures.
requirements of devices to prevent pollution by backflow .
WRAS Water Supply (Water Fittings) Regulations 1999 (the Water Byelaws 2000 in
Scotland)
WRAS approved to the UK Water Supply Byelaws.
WRAS approval to: National Health Service Model Engineering Specification D
08-TMV3.
Thermostatic Mixing Valves
(Healthcare Premises).
Designation Code: HP/LP-S41/T44.
56
Page 57

Electromagnetic Compatibility
Medical electrical equipment needs special precautions regarding EMC (Electromagnetic compatibility) and needs to
be used according to the EMC information below .
Portable and mobile RF communications equipment can affect the Parker bath.
WARNING
Stacking or placing other electrical equipment next to this device is not recommended, it can
interfere with the equipment’s operation and safety. Portable and mobile radio-frequency (RF)
communications equipment can interfere with this equipment operation and safety.
WARNING
The equipment may cause radio interference or may disrupt the operation of nearby
equipment. It may be necessary to take action, such as reorienting, relocating the equipment
or shielding the location.
Guidance and manufacturer’s declaration – electromagnetic emissions
The Parker bath is intended for use in the electromagnetic environment specified below . The customer or the user
of the Parker bath should assure that it is used in such an environment.
Emissions test Compliance Electromagnetic environment – guidance
RF emissions
CISPR 11
RF emissions
CISPR 11
Harmonic emission
IEC 61000-3-2
Voltage fluctuations/flicker
emission
IEC 61000-3-3
Group 1 The Parker bath uses RF energy only for its internal function.
Therefore, its RF emissions are very low and are not likely to
cause any interference in nearby electronic equipment.
Class B The Parker bath is suitable for use in all establishments,
including domestic establishments and those directly
connected to the public low-voltage power supply network that
Class A
Complies
supplies buildings used for domestic purposes.
57
Page 58

Guidance and manufacturer’s declaration – electromagnetic immunity
The Parker bath is intended for use in the electromagnetic environment specified below. The customer or the user
of the Parker bath should assure that it is used in such an environment.
Immunity test IEC 60601 test level Compliance level
Electrostatic
discharge (ESD)
± 6 kV contact
± 8 kV air
± 6 kV contact
± 8 kV air
IEC 61000-4-2
Electrical fast
transient/burs
IEC 61000-4-4
Surge
IEC 61000-4-5
Voltage dips,
short
interruptions and
voltage
variations on
power supply
input lines
IEC 61000-4-11
± 2 kV for power supply
lines
± 1 kV for input/output lines
± 1 kV line(s) to line(s)
± 2 kV line(s) to earth
<5% U
T
(>95% dip in UT)
for 0.5 cycle
40% U
T
(60% dip in UT)
70% U
T
(30% dip in UT)
<5% U
T
± 2 kV for power supply lines
input/output lines not applicable
± 1 kV line(s) to line(s)
± 2 kV line(s) to earth
<5% U
40% U
70% U
<5% U
T
T
T
T
(>95% dip in UT) for 5 s
(>95% dip in UT) for 5 s
Electromagnetic
environment – guidance
Floors should be wood,
concrete or ceramic tile. If
floors are covered with
synthetic material, the
relative humidity should be at
least 30%.
Mains power quality should
be that of a typical
commercial or hospital
environment.
Power frequency
(50/60 Hz)
Magnetic field
IEC 61000-4-8
3 A/m 3 A/m Power frequency magnetic
fields should be at levels
characteristic of a typical
location in a typical
commercial or hospital
environment.
NOTE - U
is the a.c. mains voltage prior to application of the test level
T
Lift-functions, tilt-functions and temperature measurement were determined to be Essential Performance.
58
Page 59

Guidance and manufacturer’s declaration – electromagnetic immunity
The Parker bath is intended for use in the electromagnetic environment specified below . The customer or the user
of the Parker bath should assure that it is used in such an environment.
Immunity test
Conducted RF
IEC 61000-4-6
Radiated RF
IEC 61000-4-3
IEC 60601
test level
3 V rms
150 kHz to
80 MHz
3 V/m
80 MHz to
2.5 GHz
Compliance
level
Electromagnetic environment – guidance
10 V rms Portable and mobile RF communications equipment
should be used no closer to any part of the Parker bath,
including cables, than the recommended separation
distance calculated from the equation applicable to the
frequency of the transmitter.
3 V/m Recommended separation distance
d=0.35¥P
d=1.2¥P 80 MHz to 800 MHz
d=2.3¥P 800 MHz to 2.5 GHz
Where P is the maximum output power rating of the
transmitters in watts (W) according to the transmitter
manufacturer and d is the recommended separation
distance in metres (m).
Field strengths from fixed RF transmitters, as
determined by an electromagnetic site survey ,
a
should
be less than the compliance level in each frequency
range.
b
Interference may occur in the vicinity of equipment
marked with the following symbol:
NOTE 1 - At 80 MHz and 800 MHz, the higher frequency range applies.
NOTE 2 - These guidelines may not apply in all situations. Electromagnetic propagation is affected by absorption
and reflection from structures, objects and people.
a
Field strengths from fixed transmitters, such as base stations for radio (cellular/cordless) telephones and land
mobile radios, amateur radio, AM and FM radio broadcast and TV broadcast cannot be predicted theoretically with
accuracy . To assess the electromagnetic environment due to fixed RF transmitters, an electromagnetic site survey
should be considered. If the measured field strength in the location in which the Parker bath is used exceeds the
applicable RF compliance level above, the Parker bath should be observed to verify normal operation. If abnormal
performance is observed, additional measures may be necessary , such as re-orienting or relocating the Parker bath.
b
Over the frequency range 150 kHz to 80 MHz, field strengths should be less than 10 V/m.
59
Page 60

Recommended separation dist ances between port able and mobile RF communications
equipment and the Parker bath
The Parker bath is intended for use in an electromagnetic environment in which radiated RF disturbances are
controlled. The customer or the user of the Parker bath can help prevent electromagnetic interference by
maintaining a minimum distance between portable and mobile RF communications equipment (transmitters) and
the Parker bath as recommended below , according to the maximum output power of the communications
equipment.
Rated maximum
output power of
transmitter
W
Separation distance according to frequency of transmitter
m
150 kHz to 800 MHz
d=0.35¥P
80 MHz to 800 MHz
d=1.2¥P
800 MHz to 2.5 GHz
d=2.3¥P
0.01 0.04 0.12 0.23
0.1 0.11 0.38 0.73
1 0.35 1.2 2.3
10 1.1 3.8 7.3
100 3.5 12 23
For transmitter rated at a maximum output power not listed above, the recommended separation distance d in
metres (m) can be estimated using the equation applicable to the frequency of the transmitter, where Pis the
maximum output power rating of the transmitter in watts (W) according to the transmitter manufacturer .
NOTE 1 - At 80 MHz and 800 MHz, the separation distance for the higher frequency range applies.
NOTE 2 - These guidelines may not apply in all situations. Electromagnetic propagation is affected by absorption
and reflection from structures, objects and people.
60
Page 61

Parts and Accessories
400.00.00.02- Grey
400.00.00.15 - Blue
Back Support Cushion
For disinfectant contact
local ArjoHuntleigh
representative
400.00.00.09 - Grey
400.00.00.16 - Blue
Head Cushion
8257376-031
Leg Rest
61
Page 62

Intentionally left blank
62
Page 63

AUSTRALIA
ArjoHuntleigh Pty Ltd
78, Forsyth Street
O’Connor
AU-6163 Western Australia
Tel: +61 89337 4111
Free: +1 800 072 040
Fax: + 61 89337 9077
BELGIQUE / BELGIË
ArjoHuntleigh NV/SA
Evenbroekveld 16
BE-9420 ERPE-MERE
Tél/Tel: +32 (0) 53 60 73 80
Fax: +32 (0) 53 60 73 81
E-mail: info.belgium@arjohuntleigh.be
BRASIL
Maquet do Brasil
Equipamentos Médicos Ltda
Rua Tenente Alberto Spicciati, 200
Barra Funda, 01140-130
SÃO PAULO, SP - BRASIL
Fone: +55 (11) 2608-7400
Fax: +55 (11) 2608-7410
CANADA
ArjoHuntleigh
90 Matheson Boulevard West
Suite 300
CA-MISSISSAUGA, ON, L5R 3R3
Tel/Tél: +1 905 238 7880
Free: +1 800 665 4831 Institutional
Free: +1 800 868 0441 Home Care
Fax: +1 905 238 7881
E-mail: info.canada@arjohuntleigh.com
ýESKÁ REPUBLIKA
ArjoHuntleigh s.r.o.
Hlinky 118
CZ-603 00 BRNO
Tel: +420 549 254 252
Fax: +420 541 213 550
DANMARK
ArjoHuntleigh A/S
Vassingerødvej 52
DK-3540 LYNGE
Tel: +45 49 13 84 86
Fax: +45 49 13 84 87
E-mail: dk_kundeservice@arjohuntleigh.com
DEUTSCHLAND
ArjoHuntleigh GmbH
Peter-Sander-Strasse 10
DE-55252 MAINZ-KASTEL
Tel: +49 (0) 6134 186 0
Fax: +49 (0) 6134 186 160
E-mail: info-de@arjohuntleigh.com
ESPAÑA
ArjoHuntleigh Ibérica S.L.
Ctra. de Rubí, 88 1ª planta - A1
08173 Sant Cugat del Vallés
ES- BARCELONA 08173
Tel: +34 93 583 11 20
Fax: +34 93 583 11 22
E-mail: info.es@arjohuntleigh.com
FRANCE
ArjoHuntleigh SAS
2 Avenue Alcide de Gasperi
CS 70133
FR-59436 RONCQ CEDEX
Tél: +33 (0) 3 20 28 13 13
Fax: +33 (0) 3 20 28 13 14
E-mail: info.france@arjohuntleigh.com
HONG KONG
Getinge Group Hong Kong Ltd
1510-17, 15/F, Tower 2
Kowloon Commerce Centre
51 Kwai Cheong Road
Kwai Chung
HONG KONG
Tel: +852 2207 6363
Fax: +852 2207 6368
IITALIA
ArjoHuntleigh S.p.A.
Via Giacomo Peroni 400-402
IT-00131 ROMA
Tel: +39 (0) 6 87426211
Fax: +39 (0) 6 87426222
E-mail: Italy.promo@arjohuntleigh.com
MIDDLE EAST
Getinge Group Middle East
Office G005 - Nucleotide Complex,
Dubai Biotechnology & Research Park,
P.O.Box 214742, Dubai,
United Arab Emirates
Tel: +971 (0)4 447 0942
E-mail: Info.ME@getinge.com
NEDERLAND
ArjoHuntleigh Nederland BV
Biezenwei 21
4004 MB TIEL
Postbus 6116
4000 HC TIEL
Tel: +31 (0) 344 64 08 00
Fax: +31 (0) 344 64 08 85
E-mail: info.nl@arjohuntleigh.com
NEW ZEALAND
ArjoHuntleigh Ltd
41 Vestey Drive
Mount Wellington
NZ-AUCKLAND 1060
Tel: +64 (0) 9 573 5344
Free Call: 0800 000 151
Fax: +64 (0) 9 573 5384
E-mail: nz.info@ArjoHuntleigh.com
NORGE
ArjoHuntleigh Norway AS
Olaf Helsets vei 5
N-0694 OSLO
Tel: +47 22 08 00 50
Faks: +47 22 08 00 51
E-mail: no.kundeservice@arjohuntleigh.com
ÖSTERREICH
ArjoHuntleigh GmbH
Dörrstrasse 85
AT-6020 INNSBRUCK
Tel: +43 (0) 512 204 160 0
Fax: +43 (0) 512 204 160 75
POLSKA
ArjoHuntleigh Polska Sp. z o.o.
ul. Ks Piotra Wawrzyniaka 2
PL-62-052 KOMORNIKI (PoznaĔ)
Tel: +48 61 662 15 50
Fax: +48 61 662 15 90
E-mail: arjo@arjohuntleigh.com
PORTUGAL
ArjoHuntleigh em Portugal
MAQUET Portugal, Lda. (Distribudor Exclusivo)
Rua Poeta Bocage n.º 2 - 2G
PT-1600-233 Lisboa
Tel: +351 214 189 815
Fax: +351 214 177 413
E-mail: Portugal@arjohuntleigh.com
SUISSE / SCHWEIZ
ArjoHuntleigh AG
Fabrikstrasse 8
Postfach
CH-4614 HÄGENDORF
Tél/Tel: +41 (0) 61 337 97 77
Fax: +41 (0) 61 311 97 42
SUOMI
ArjoHuntleigh Finland
c/o Getinge Finland Oy
Riihitontuntie 7 C
02200 Espoo
Finland
Puh: +358 9 6824 1260
E-mail: Asiakaspalvelu.finland@arjohuntleigh.com
SVERIGE
Arjo Sverige AB
Hans Michelsensgatan 10
SE-211 20 MALMÖ
Tel: +46 (0) 10 494 7760
Fax: +46 (0) 10 494 7761
E-mail: kundservice@arjohuntleigh.com
UNITED KINGDOM
ArjoHuntleigh UK
ArjoHuntleigh House
Houghton Hall Park
Houghton Regis
UK-DUNSTABLE LU5 5XF
Tel: +44 (0) 1582 745 700
Fax: +44 (0) 1582 745 745
E-mail: sales.admin@arjohuntleigh.com
USA
ArjoHuntleigh Inc.
2349 W Lake Street Suite 250
US-Addison, IL 60101
Tel: +1 630 307 2756
Free: +1 800 323 1245 Institutional
Free: +1 800 868 0441 Home Care
Fax: +1 630 307 6195
E-mail: us.info@arjohuntleigh.com
ࢤࢸࣥࢤࢢ࣮ࣝࣉ࣭ࢪࣕࣃࣥᰴᘧ♫
ࠛ
ᮾி㒔ရᕝ༊ᮾရᕝ
ࢫࣇࢱ࣮࣡ኳ⋤Ὢ)
㟁ヰ㸸
)D[㸸
www.arjohuntleigh.com
Address page - REV 20: 08/2017
Page 64

ArjoHuntleigh AB
Hans Michelsensgatan 10
211 20 Malmö, Sweden
www.arjohuntleigh.com
ArjoHuntleigh is a world-leading provider of integrated products and
solutions that improve the lives of patients and residents with reduced
mobility. We help healthcare facilities deliver wellness
and effective everyday care, early mobilisation, safe patient handling,
venous thromboembolism prevention, pressure injury prevention,
hygiene routines, bariatric care and diagnostics. With extensive know-
ledge and experience, we strive to improve effi ciency and ensure
a safer and dignifi ed environment for caregivers and their patients.
 Loading...