

Page 1

User Guide
Gateway Connected DVD Player
Page 2

Page 3

Contents
1 Checking Out Your Gateway Connected DVD Player. . . . . . . . . . . . . . . . . . . 1
Features . . . . . . . . . . . . . . . . . . . . . . . . . . . . . . . . . . . . . . . . . . . . . . . . . . . . . . . . . . . . . . . . . 2
Player overview . . . . . . . . . . . . . . . . . . . . . . . . . . . . . . . . . . . . . . . . . . . . . . . . . . . . . . . . . . . 3
Front controls . . . . . . . . . . . . . . . . . . . . . . . . . . . . . . . . . . . . . . . . . . . . . . . . . . . . . . . . . . 3
Back . . . . . . . . . . . . . . . . . . . . . . . . . . . . . . . . . . . . . . . . . . . . . . . . . . . . . . . . . . . . . . . . . 6
Remote control . . . . . . . . . . . . . . . . . . . . . . . . . . . . . . . . . . . . . . . . . . . . . . . . . . . . . . . . 9
2 Setting Up Your Player . . . . . . . . . . . . . . . . . . . . . . . . . . . . . . . . . . . . . . . . . . . . . . . . 13
Overview . . . . . . . . . . . . . . . . . . . . . . . . . . . . . . . . . . . . . . . . . . . . . . . . . . . . . . . . . . . . . . . 14
About your home network . . . . . . . . . . . . . . . . . . . . . . . . . . . . . . . . . . . . . . . . . . . . . . . . . . 15
Installing Gateway Media Server . . . . . . . . . . . . . . . . . . . . . . . . . . . . . . . . . . . . . . . . . . . . . 16
Computer requirements . . . . . . . . . . . . . . . . . . . . . . . . . . . . . . . . . . . . . . . . . . . . . . . . . 16
Connecting the player . . . . . . . . . . . . . . . . . . . . . . . . . . . . . . . . . . . . . . . . . . . . . . . . . . . . . 18
Connecting to your audio/video system . . . . . . . . . . . . . . . . . . . . . . . . . . . . . . . . . . . . 18
Installing batteries into the remote control . . . . . . . . . . . . . . . . . . . . . . . . . . . . . . . . . . 21
Installing the network card . . . . . . . . . . . . . . . . . . . . . . . . . . . . . . . . . . . . . . . . . . . . . . 21
Turning on your player . . . . . . . . . . . . . . . . . . . . . . . . . . . . . . . . . . . . . . . . . . . . . . . . . 22
Setting up digital audio . . . . . . . . . . . . . . . . . . . . . . . . . . . . . . . . . . . . . . . . . . . . . . . . . . . . 24
Navigating the player’s setup menus . . . . . . . . . . . . . . . . . . . . . . . . . . . . . . . . . . . . . . 24
Configuring Dolby Digital . . . . . . . . . . . . . . . . . . . . . . . . . . . . . . . . . . . . . . . . . . . . . . . . 25
Configuring MP3 audio . . . . . . . . . . . . . . . . . . . . . . . . . . . . . . . . . . . . . . . . . . . . . . . . . 26
Configuring CD audio . . . . . . . . . . . . . . . . . . . . . . . . . . . . . . . . . . . . . . . . . . . . . . . . . . 27
Configuring LPCM . . . . . . . . . . . . . . . . . . . . . . . . . . . . . . . . . . . . . . . . . . . . . . . . . . . . . 28
Configuring for other formats . . . . . . . . . . . . . . . . . . . . . . . . . . . . . . . . . . . . . . . . . . . . 29
Setting up analog audio . . . . . . . . . . . . . . . . . . . . . . . . . . . . . . . . . . . . . . . . . . . . . . . . . . . . 30
Navigating the player’s setup menus . . . . . . . . . . . . . . . . . . . . . . . . . . . . . . . . . . . . . . 30
Adjusting the speaker balance . . . . . . . . . . . . . . . . . . . . . . . . . . . . . . . . . . . . . . . . . . . 31
Configuring Pro Logic virtual surround sound . . . . . . . . . . . . . . . . . . . . . . . . . . . . . . . 32
Adjusting center delay . . . . . . . . . . . . . . . . . . . . . . . . . . . . . . . . . . . . . . . . . . . . . . . . . . 33
Adjusting surround delay . . . . . . . . . . . . . . . . . . . . . . . . . . . . . . . . . . . . . . . . . . . . . . . . 34
Defining the speaker set . . . . . . . . . . . . . . . . . . . . . . . . . . . . . . . . . . . . . . . . . . . . . . . . 35
Setting up the network . . . . . . . . . . . . . . . . . . . . . . . . . . . . . . . . . . . . . . . . . . . . . . . . . . . . . 36
Navigating the player’s setup menus . . . . . . . . . . . . . . . . . . . . . . . . . . . . . . . . . . . . . . 36
Wireless access point setup . . . . . . . . . . . . . . . . . . . . . . . . . . . . . . . . . . . . . . . . . . . . . 37
Wireless peer-to-peer setup . . . . . . . . . . . . . . . . . . . . . . . . . . . . . . . . . . . . . . . . . . . . . 39
Wired Ethernet setup . . . . . . . . . . . . . . . . . . . . . . . . . . . . . . . . . . . . . . . . . . . . . . . . . . . 41
Setting the IP address . . . . . . . . . . . . . . . . . . . . . . . . . . . . . . . . . . . . . . . . . . . . . . . . . . 42
Changing the player name . . . . . . . . . . . . . . . . . . . . . . . . . . . . . . . . . . . . . . . . . . . . . . 43
3 Customizing. . . . . . . . . . . . . . . . . . . . . . . . . . . . . . . . . . . . . . . . . . . . . . . . . . . . . . . . . . . 45
Setup menu overview . . . . . . . . . . . . . . . . . . . . . . . . . . . . . . . . . . . . . . . . . . . . . . . . . . . . . 46
Using the remote control in Setup menus . . . . . . . . . . . . . . . . . . . . . . . . . . . . . . . . . . 46
www.gateway.com
i
Page 4

Setting up languages . . . . . . . . . . . . . . . . . . . . . . . . . . . . . . . . . . . . . . . . . . . . . . . . . . . . . . 47
Setting up video . . . . . . . . . . . . . . . . . . . . . . . . . . . . . . . . . . . . . . . . . . . . . . . . . . . . . . . . . . 48
Setting up parental controls . . . . . . . . . . . . . . . . . . . . . . . . . . . . . . . . . . . . . . . . . . . . . . . . . 49
4 Using Gateway Medi a Server. . . . . . . . . . . . . . . . . . . . . . . . . . . . . . . . . . . . . . . . . . 51
Compatible file formats . . . . . . . . . . . . . . . . . . . . . . . . . . . . . . . . . . . . . . . . . . . . . . . . . . . . . 52
Opening Media Server . . . . . . . . . . . . . . . . . . . . . . . . . . . . . . . . . . . . . . . . . . . . . . . . . . . . . 53
Importing media files . . . . . . . . . . . . . . . . . . . . . . . . . . . . . . . . . . . . . . . . . . . . . . . . . . . . . . 54
Importing media directly from your hard drive . . . . . . . . . . . . . . . . . . . . . . . . . . . . . . . 54
Importing media using plugins . . . . . . . . . . . . . . . . . . . . . . . . . . . . . . . . . . . . . . . . . . . . 56
Scheduling automatic scans . . . . . . . . . . . . . . . . . . . . . . . . . . . . . . . . . . . . . . . . . . . . . 57
Working with media files . . . . . . . . . . . . . . . . . . . . . . . . . . . . . . . . . . . . . . . . . . . . . . . . . . . 58
Listing media files . . . . . . . . . . . . . . . . . . . . . . . . . . . . . . . . . . . . . . . . . . . . . . . . . . . . . 58
Editing media file attributes . . . . . . . . . . . . . . . . . . . . . . . . . . . . . . . . . . . . . . . . . . . . . . 58
Deleting media files . . . . . . . . . . . . . . . . . . . . . . . . . . . . . . . . . . . . . . . . . . . . . . . . . . . . 59
Working with playlists . . . . . . . . . . . . . . . . . . . . . . . . . . . . . . . . . . . . . . . . . . . . . . . . . . . . . . 60
Creating a new playlist . . . . . . . . . . . . . . . . . . . . . . . . . . . . . . . . . . . . . . . . . . . . . . . . . 60
Editing a playlist . . . . . . . . . . . . . . . . . . . . . . . . . . . . . . . . . . . . . . . . . . . . . . . . . . . . . . . 61
Renaming a playlist . . . . . . . . . . . . . . . . . . . . . . . . . . . . . . . . . . . . . . . . . . . . . . . . . . . . 61
Deleting a playlist . . . . . . . . . . . . . . . . . . . . . . . . . . . . . . . . . . . . . . . . . . . . . . . . . . . . . . 61
Importing a playlist . . . . . . . . . . . . . . . . . . . . . . . . . . . . . . . . . . . . . . . . . . . . . . . . . . . . . 62
Working with slide shows . . . . . . . . . . . . . . . . . . . . . . . . . . . . . . . . . . . . . . . . . . . . . . . . . . . 63
Creating a new slide show . . . . . . . . . . . . . . . . . . . . . . . . . . . . . . . . . . . . . . . . . . . . . . 63
Editing a slide show . . . . . . . . . . . . . . . . . . . . . . . . . . . . . . . . . . . . . . . . . . . . . . . . . . . . 64
Renaming a slide show . . . . . . . . . . . . . . . . . . . . . . . . . . . . . . . . . . . . . . . . . . . . . . . . . 64
Deleting a slide show . . . . . . . . . . . . . . . . . . . . . . . . . . . . . . . . . . . . . . . . . . . . . . . . . . . 65
Viewing and changing network settings . . . . . . . . . . . . . . . . . . . . . . . . . . . . . . . . . . . . . . . . 66
Changing the computer name . . . . . . . . . . . . . . . . . . . . . . . . . . . . . . . . . . . . . . . . . . . . 66
Selecting the network card . . . . . . . . . . . . . . . . . . . . . . . . . . . . . . . . . . . . . . . . . . . . . . 67
Changing the language . . . . . . . . . . . . . . . . . . . . . . . . . . . . . . . . . . . . . . . . . . . . . . . . . 67
5 Playing Media . . . . . . . . . . . . . . . . . . . . . . . . . . . . . . . . . . . . . . . . . . . . . . . . . . . . . . . . . 69
Playing discs . . . . . . . . . . . . . . . . . . . . . . . . . . . . . . . . . . . . . . . . . . . . . . . . . . . . . . . . . . . . . 70
Accessing advanced features . . . . . . . . . . . . . . . . . . . . . . . . . . . . . . . . . . . . . . . . . . . . 73
Playing photo CDs . . . . . . . . . . . . . . . . . . . . . . . . . . . . . . . . . . . . . . . . . . . . . . . . . . . . . 75
Playing computer media files . . . . . . . . . . . . . . . . . . . . . . . . . . . . . . . . . . . . . . . . . . . . . . . . 77
Entering Network mode . . . . . . . . . . . . . . . . . . . . . . . . . . . . . . . . . . . . . . . . . . . . . . . . . 77
Exiting Network mode . . . . . . . . . . . . . . . . . . . . . . . . . . . . . . . . . . . . . . . . . . . . . . . . . . 78
Playing music . . . . . . . . . . . . . . . . . . . . . . . . . . . . . . . . . . . . . . . . . . . . . . . . . . . . . . . . . 78
Playing a playlist . . . . . . . . . . . . . . . . . . . . . . . . . . . . . . . . . . . . . . . . . . . . . . . . . . . . . . 79
Playing movies . . . . . . . . . . . . . . . . . . . . . . . . . . . . . . . . . . . . . . . . . . . . . . . . . . . . . . . . 79
Viewing pictures . . . . . . . . . . . . . . . . . . . . . . . . . . . . . . . . . . . . . . . . . . . . . . . . . . . . . . . 79
6 Maintaining and Troubleshooting . . . . . . . . . . . . . . . . . . . . . . . . . . . . . . . . . . . . . 81
Maintaining your player . . . . . . . . . . . . . . . . . . . . . . . . . . . . . . . . . . . . . . . . . . . . . . . . . . . . 8 2
ii
www.gateway.com
Page 5

Network troubleshooting . . . . . . . . . . . . . . . . . . . . . . . . . . . . . . . . . . . . . . . . . . . . . . . . . . . 83
DVD troubleshooting . . . . . . . . . . . . . . . . . . . . . . . . . . . . . . . . . . . . . . . . . . . . . . . . . . . . . . 85
Getting help . . . . . . . . . . . . . . . . . . . . . . . . . . . . . . . . . . . . . . . . . . . . . . . . . . . . . . . . . . . . . 88
A Specifications. . . . . . . . . . . . . . . . . . . . . . . . . . . . . . . . . . . . . . . . . . . . . . . . . . . . . . . . . 89
B Safety, Regulatory, and Legal Information . . . . . . . . . . . . . . . . . . . . . . . . . . . . 93
Index . . . . . . . . . . . . . . . . . . . . . . . . . . . . . . . . . . . . . . . . . . . . . . . . . . . . . . . . . . . . . . . . . . . . . 97
www.gateway.com
iii
Page 6

iv
www.gateway.com
Page 7

Chapter 1
Checking Out Your Gateway
Connected DVD Player
■ Features
■ Controls
■ Connectors
1
Page 8

Features
With your Gateway Connected DVD Player, you can play DVDs, CDs, and digital media
files on your home network.
■ PC Card slot for wired or wireless access to a Microsoft Windows
■ Capable of streaming digital content from your computer to your TV, including
®
-based home network
MPEG1/MPEG2 video, JPG photos, and MP3/WMA audio files
■ Dolby Di gital de coding and output
■ Composite video, S-Video, and component video outputs (including progressive scan)
■ Optical and coax ial digital audio jacks
■ 5.1-channel audio jacks
Compa tible file fo rmats
Format Supported specification
Photo
Audio
■
JPG/JPEG (at least 108 × 171 pixels)
■
BMP
■
PSD
■
PCT
■
TIFF
■
MP3 (bit ra te great er than 8 0 kbps)
■
WMA (bit rate greater than 48 kbps)
■
M3U (playlist)
■
PLS (playlist)
■
Video
MPEG-1 and 2 (not greater than 3 MB/sec)
■
AVI (most types)
■
DVR-MS (better, good, and fair qualities)
Compa tib le dis cs
■ DVD (Region 1, North America)
■ Dolby D igita l 5.1
■ Audio CD (CDDA)
■ Video CD (VCD and SVCD)
■ MP3 files on CD-R and CD-RW
■ Kodak Picture CD
2
www.gateway .com
Page 9
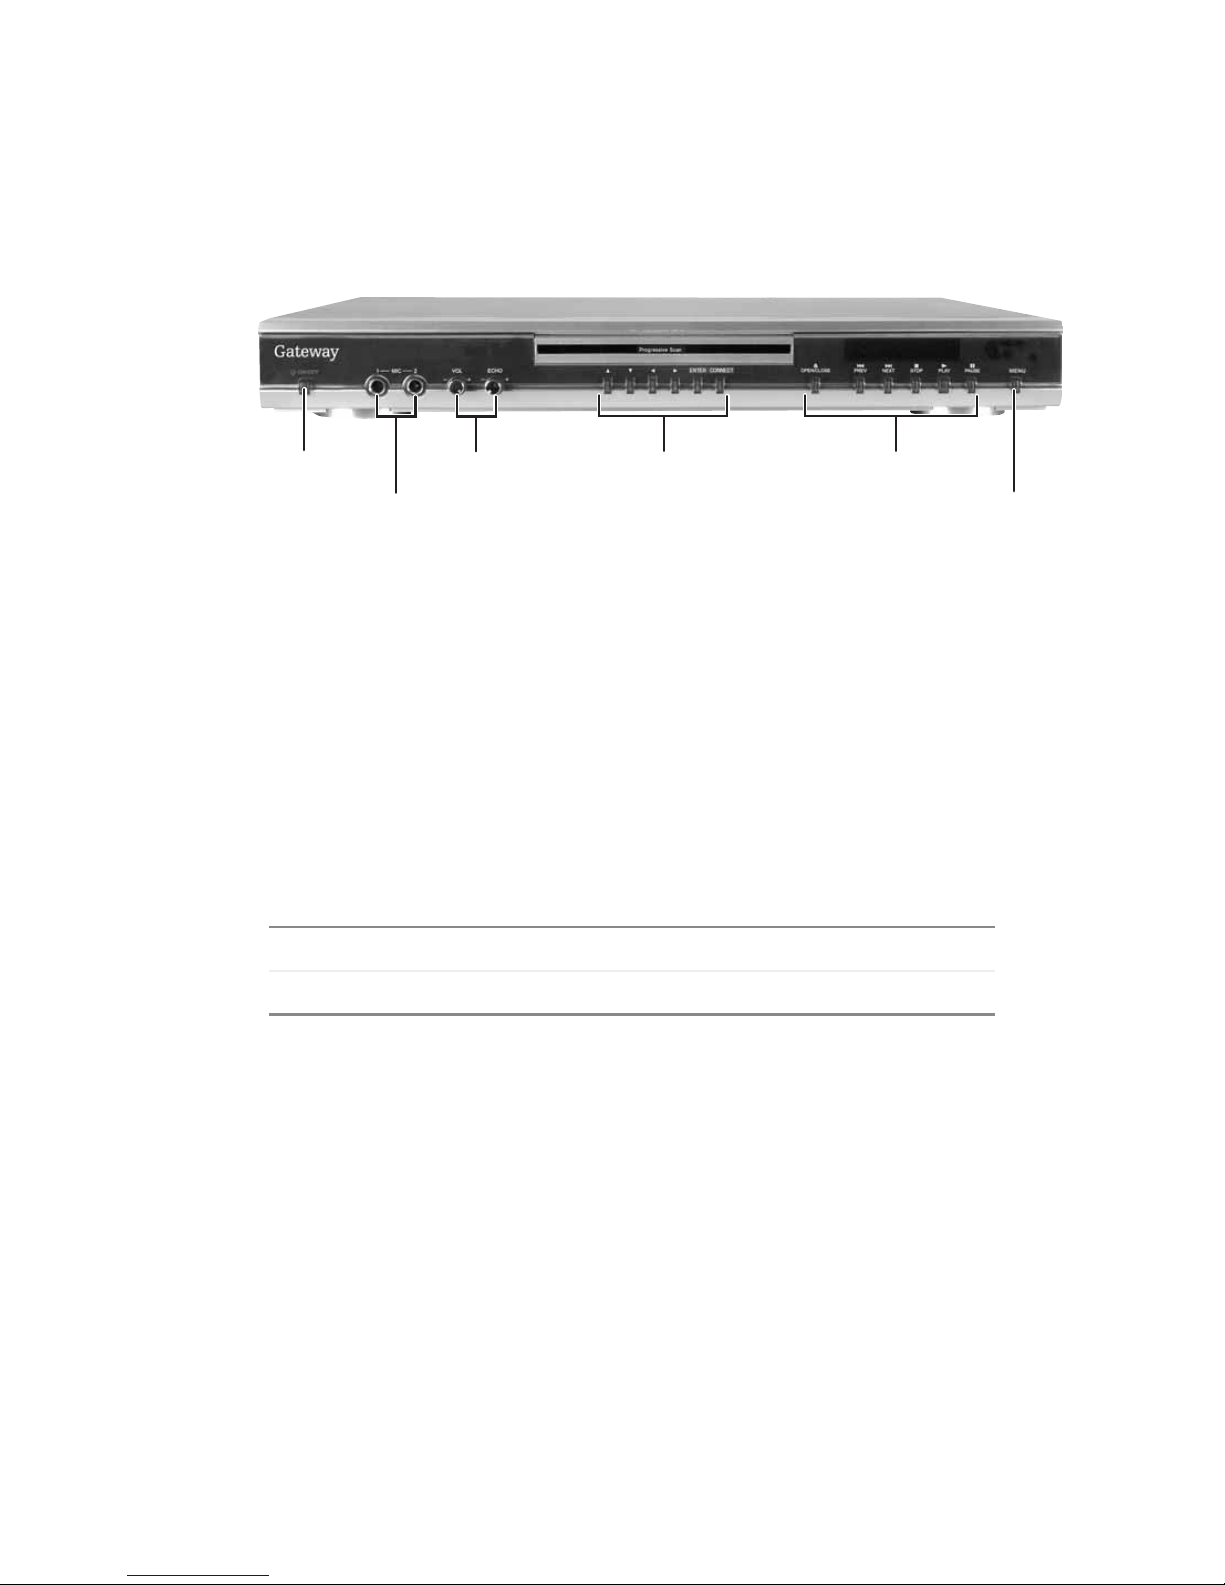
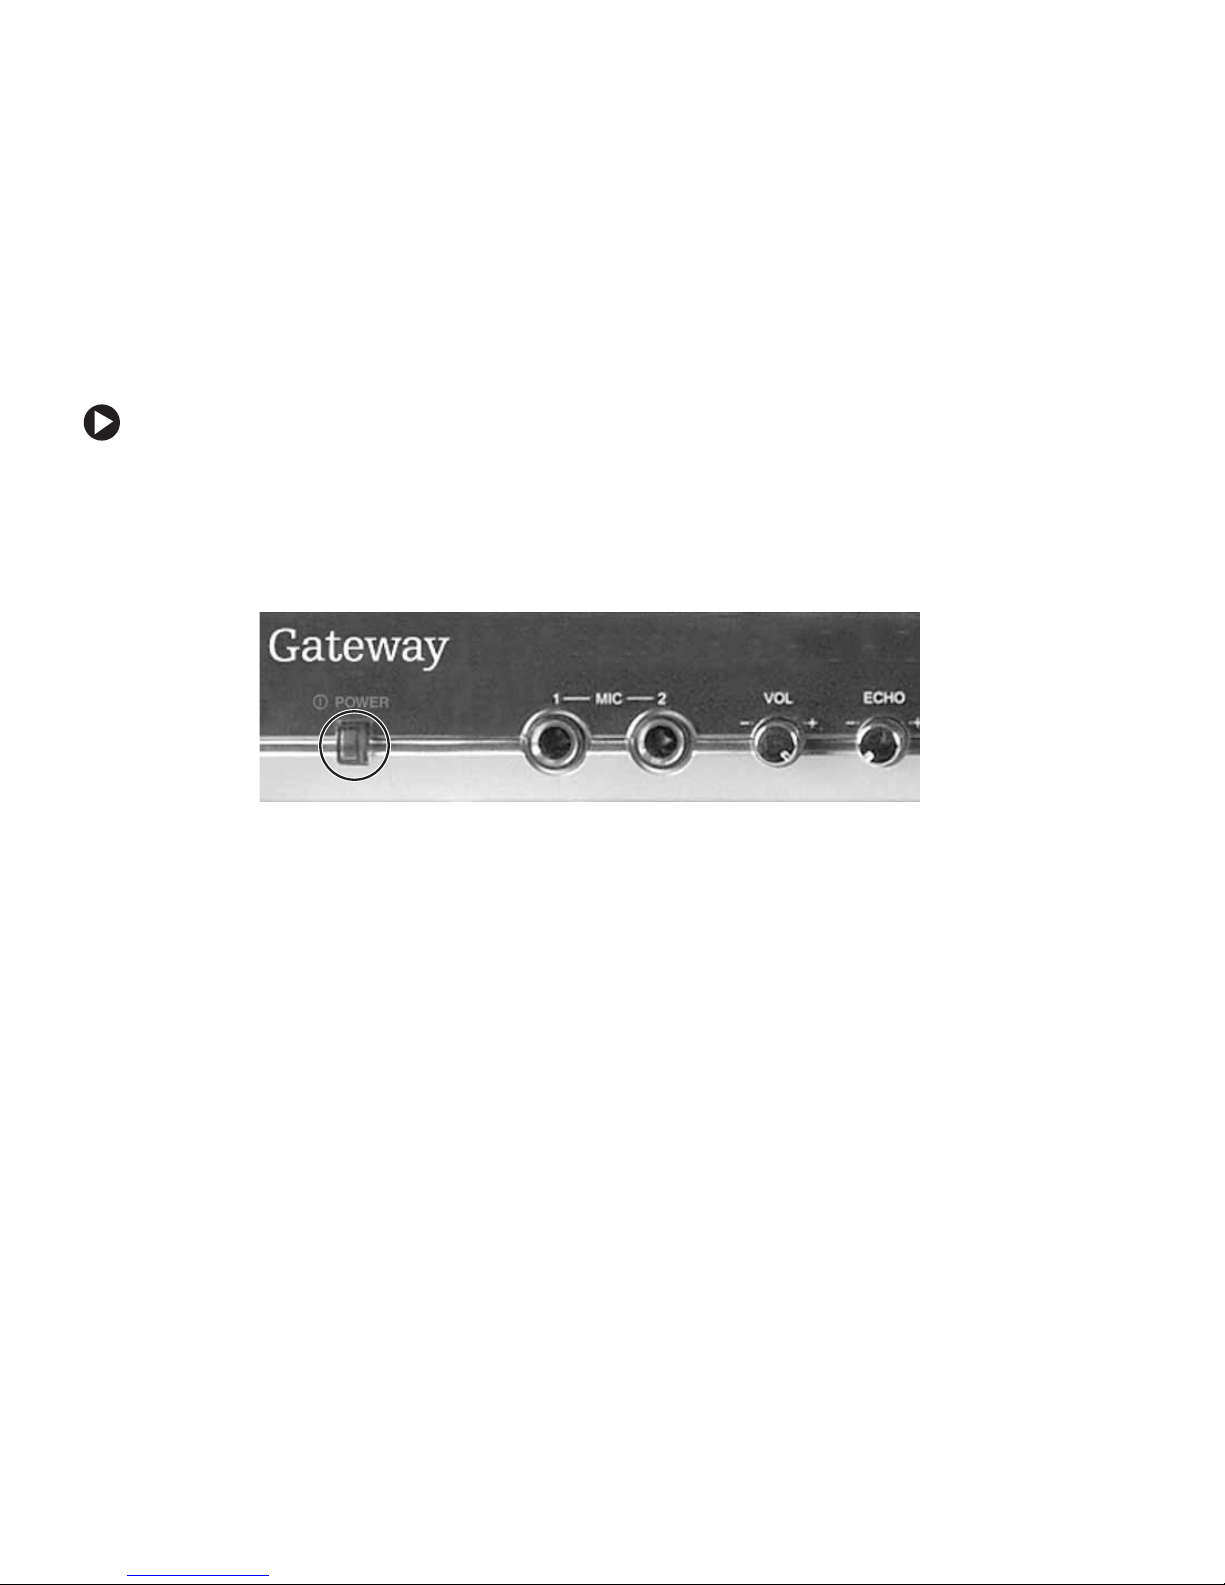
Play er ov erview
Front controls
Power button Sound controls DVD playback
MIC jacks
Menu contro ls
controls
Menu
button
POWER button
Press to turn the player on and off.
When the button is pressed, the green Power LED turns on and the player enters On (fully
operational) mode. Press the
and Standby (low power) modes. When the player enters Standby mode, the red Power
LED turns on. When the player is off, the Power LED turns off.
POWER button on the remote control to switch between On
MIC jacks
Insert ¼-inch microphone plugs here for karaoke.
Sound con trol s
VOL Rotate to adjust the microphone input volume.
ECHO Rotate to adjust the echo eff ec t f or the mic rophone i nput.
www.gateway.com
3
Page 10
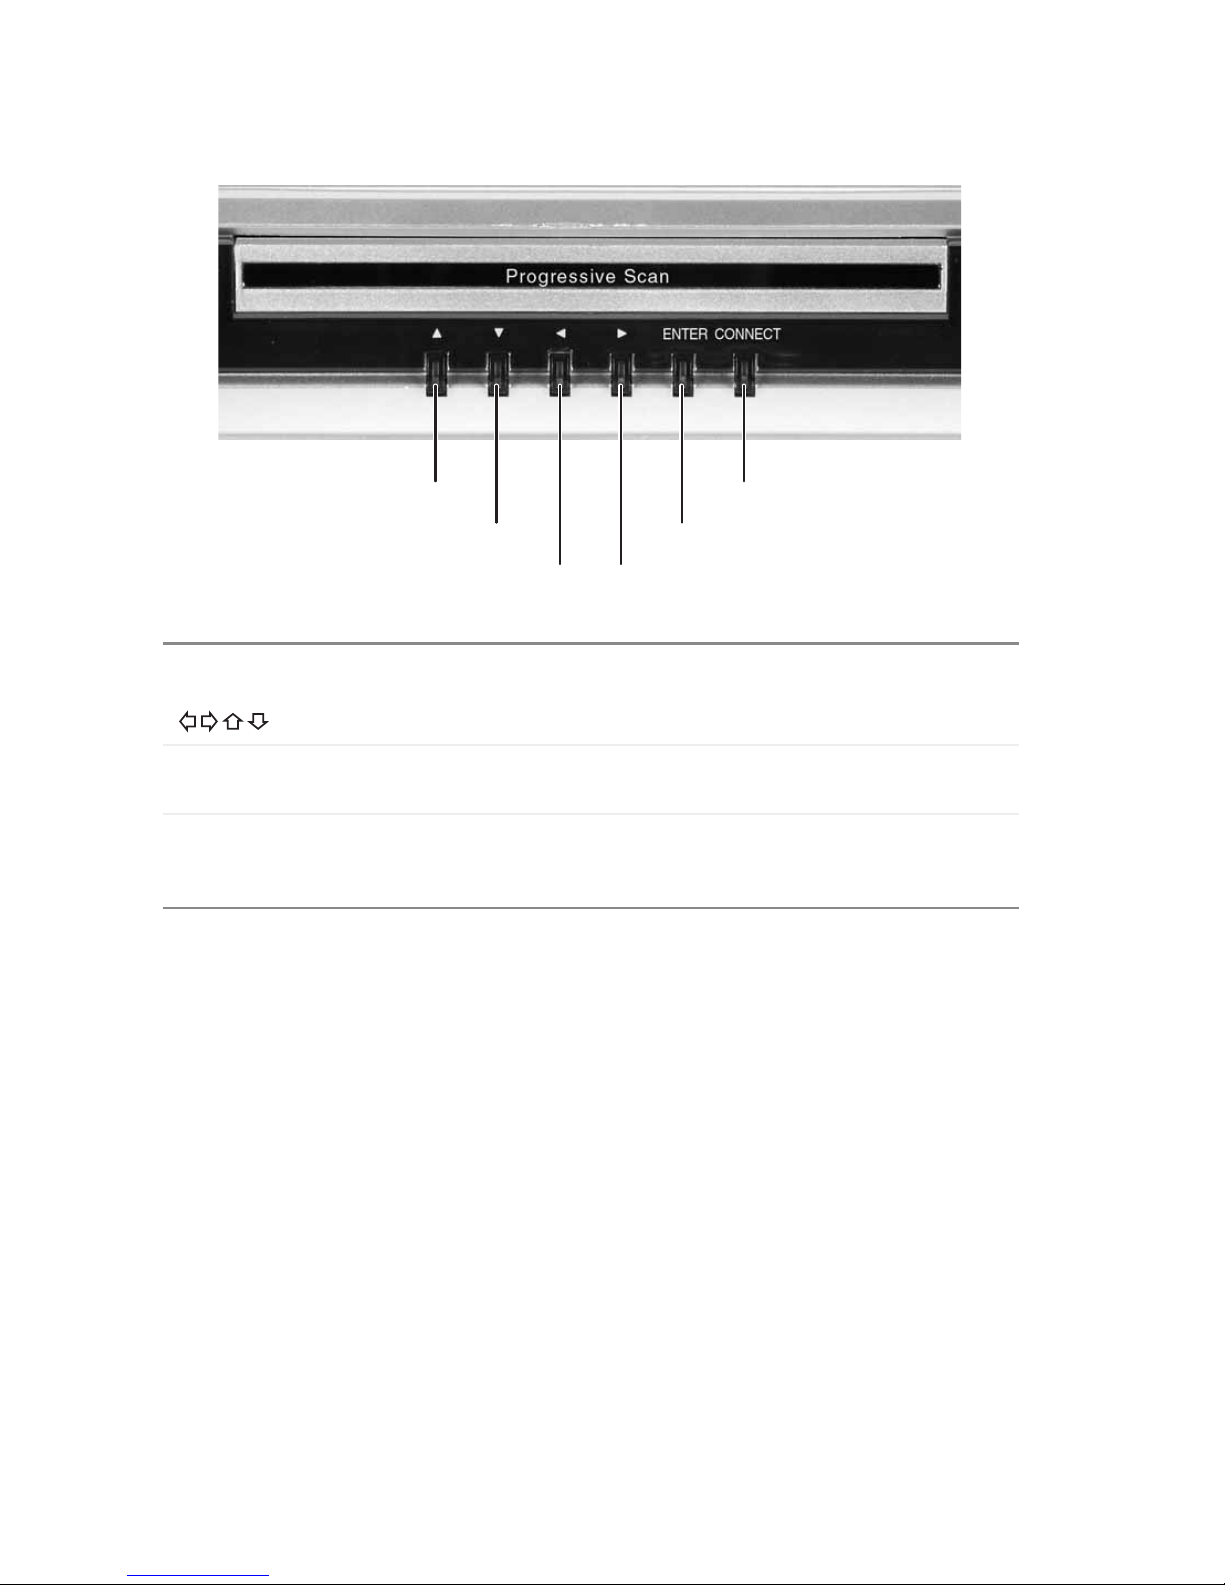
Menu controls
Left, Right, Up, and
Down buttons
ENTER
CONNECT
Up button
Down button
Right buttonLeft button
Press to navigate the on-screen menus. You can use these
buttons as an alternative to the remote control’s arrow buttons.
Press to make on-screen selections. You can use this button as
an alternative to the remote control’s ENTER button.
Press to connect the player to the network. You can use this
button as an alternative to the remote control’s CONNECT
button.
Connect button
Enter button
4
www.gateway .com
Page 11
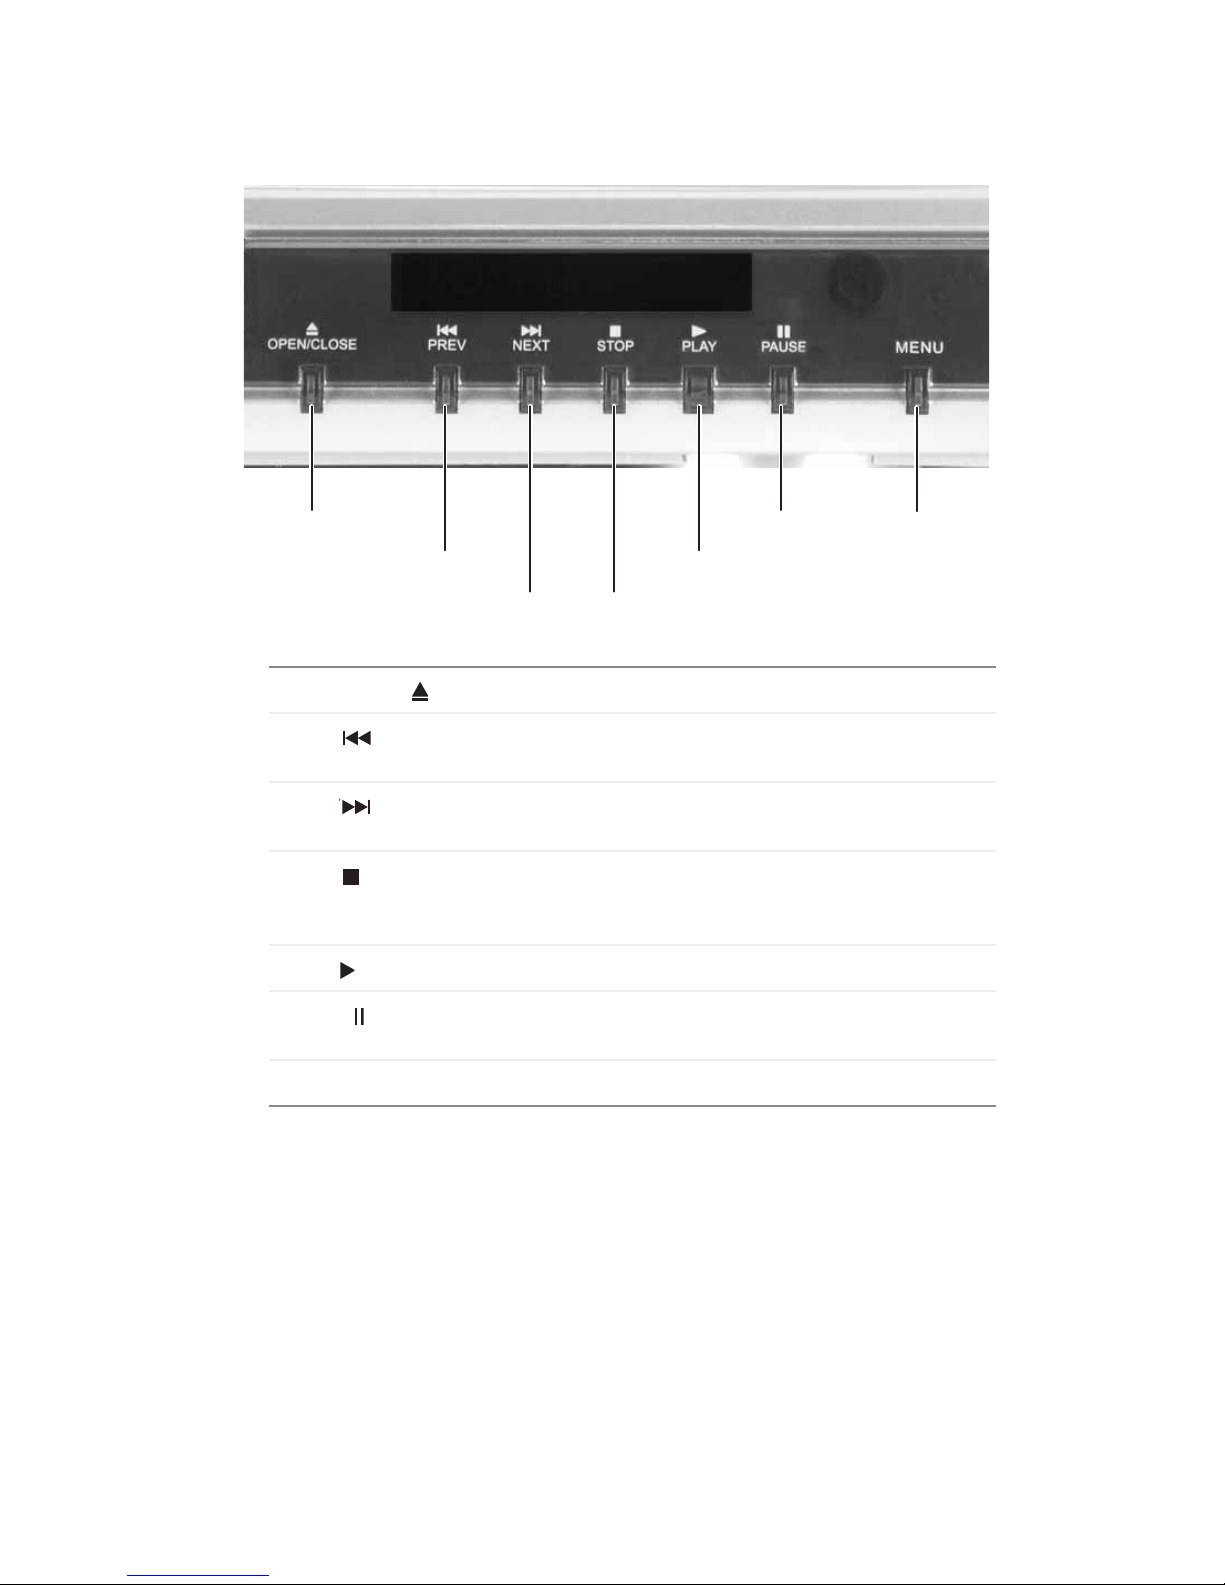
DVD pla yback c ontr ols
Open/close button Menu button
Prev bu tto n Play bu tto n
Next button Stop button
OPEN/CLOSE
PREV
NEXT
STOP
PLAY
PAUSE
MENU
Press to open and close the disc tray.
Press to skip to the previous chapter or track whil e
in playback mode.
Press to skip to the next chapter or track while in
playback mode.
Press to stop playback, and press again to return
to the menu on the DVD. Press PLAY to resume
playback.
Press to start playback.
Press to pause playback and view the current
frame. Press PLAY to resume playback.
Press to view the DVD menu.
Pause button
www.gateway.com
5
Page 12
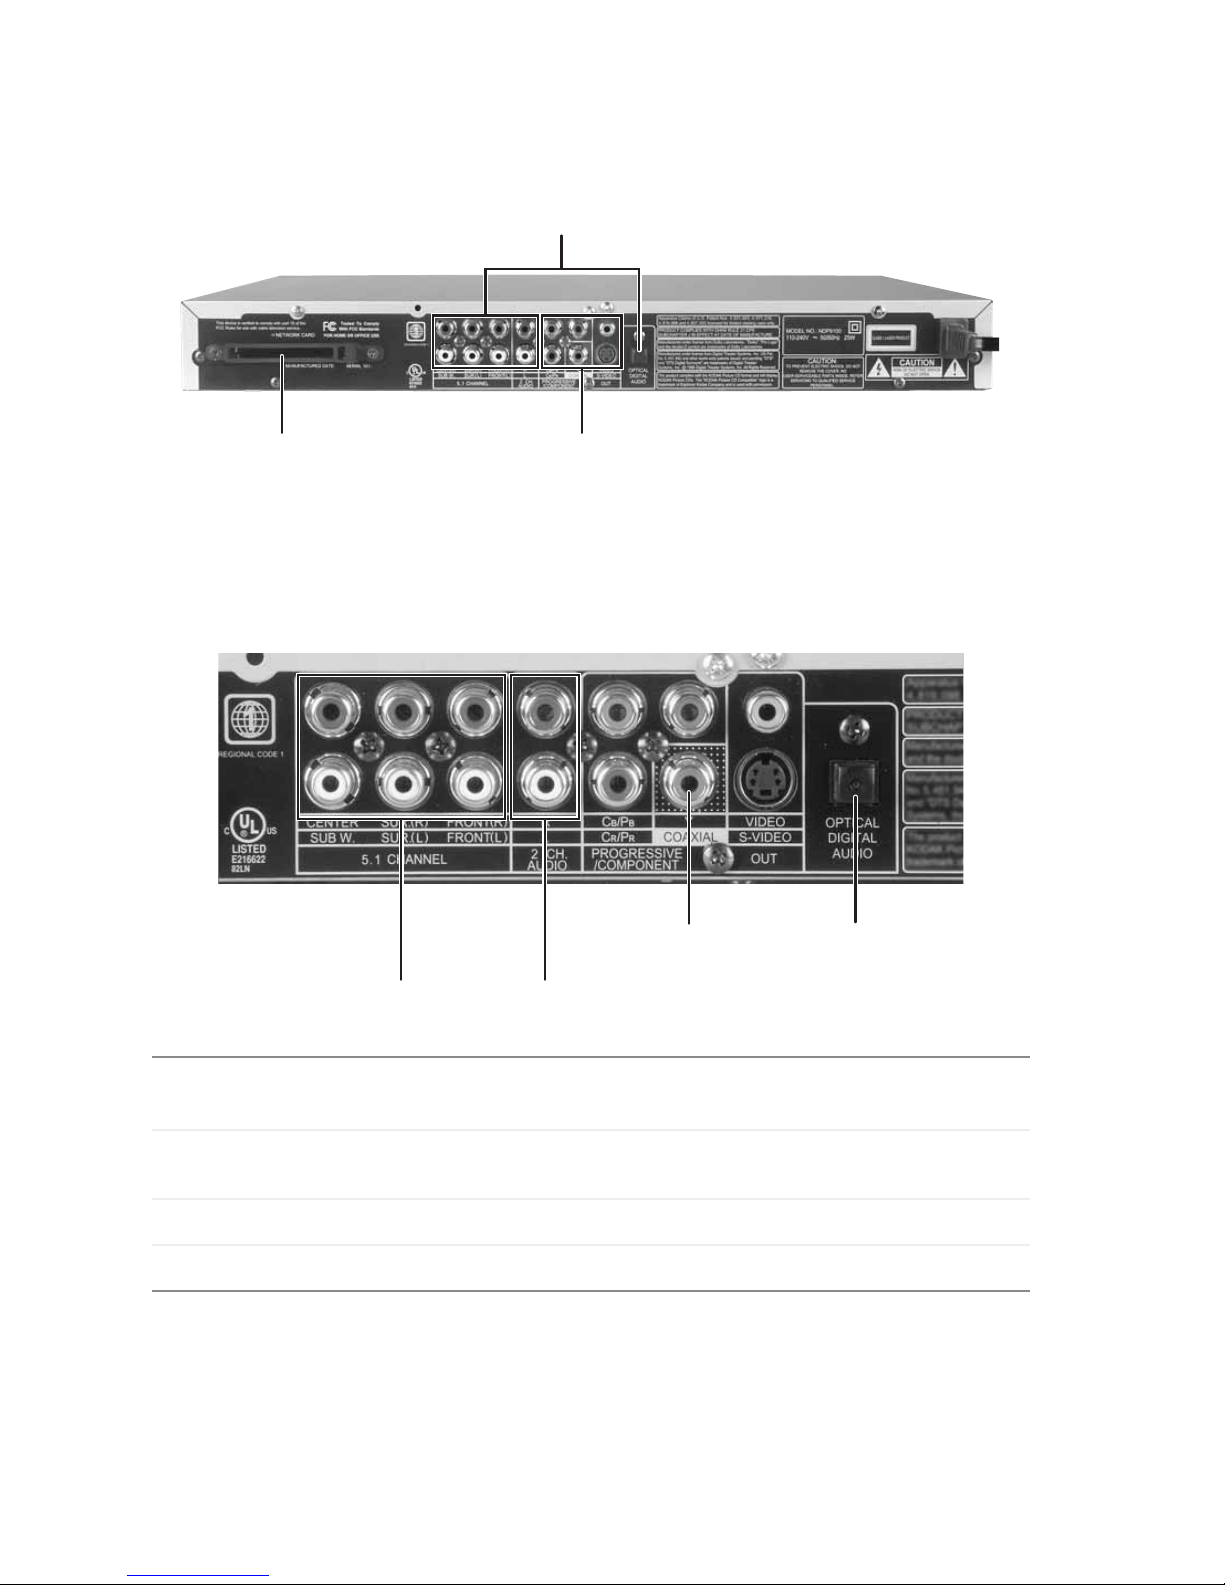
Back
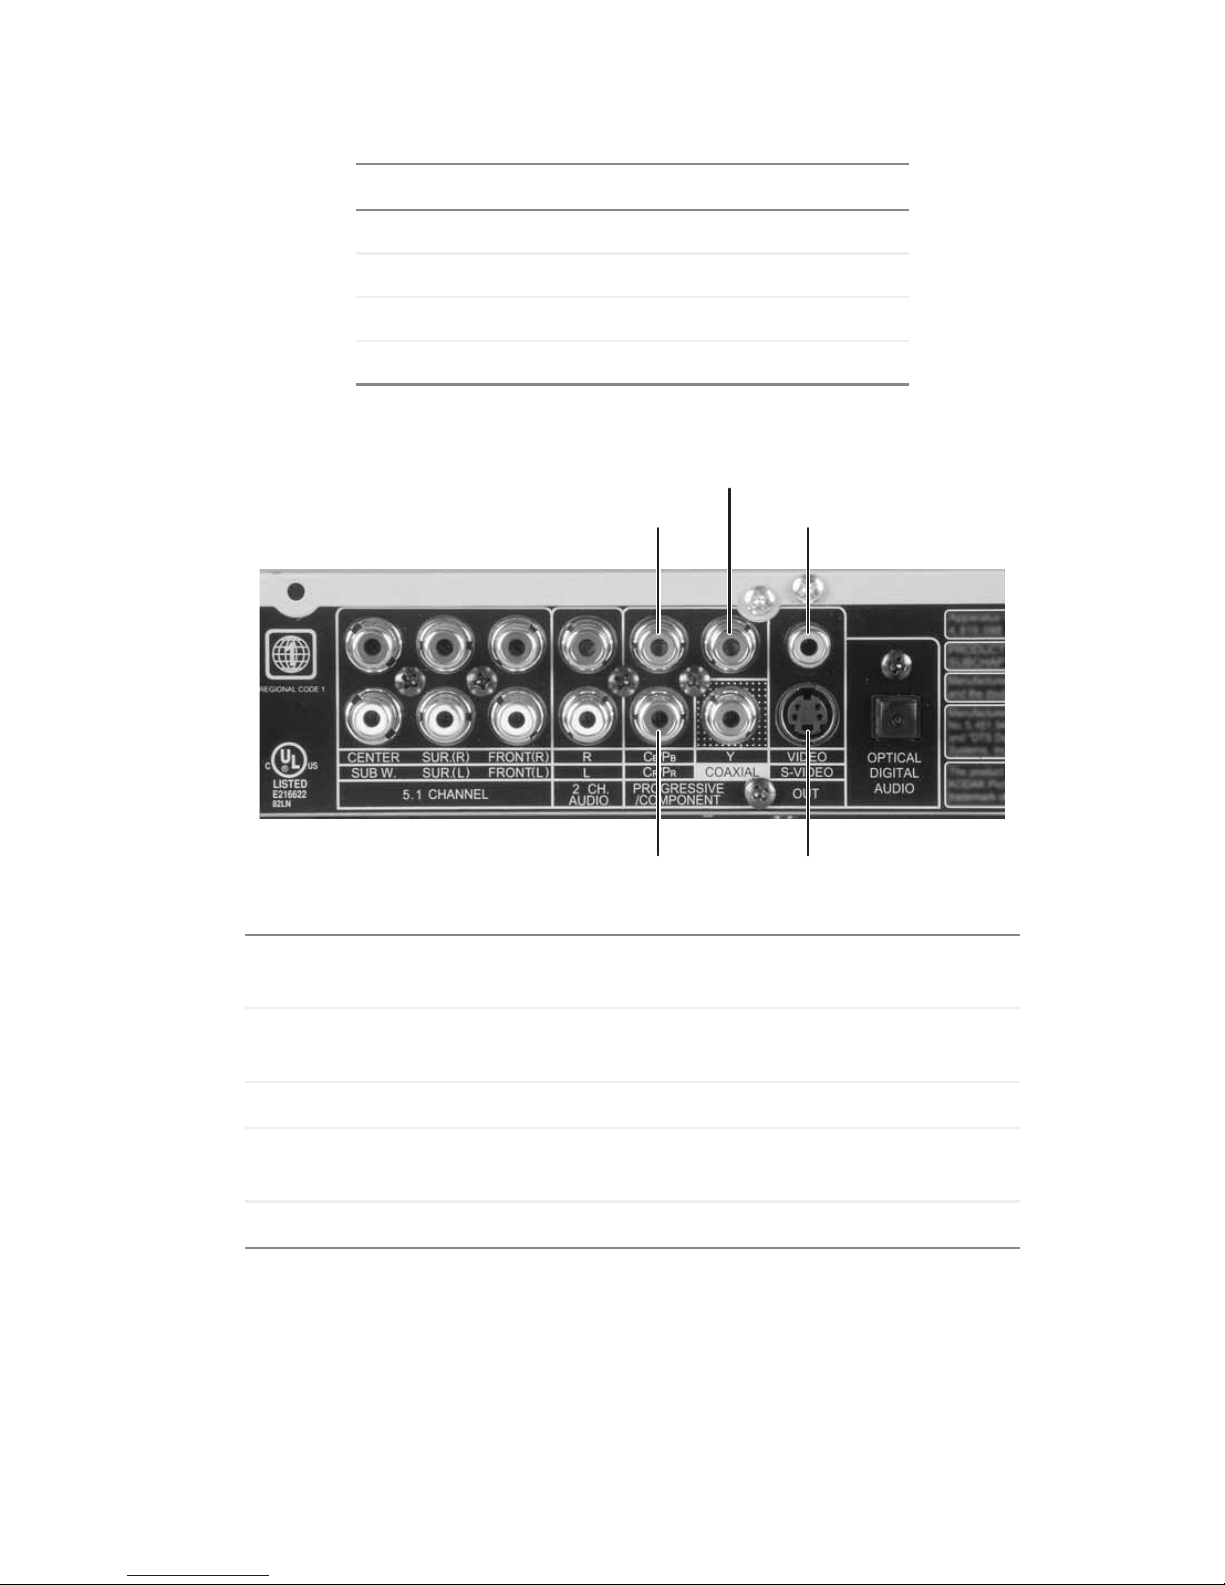
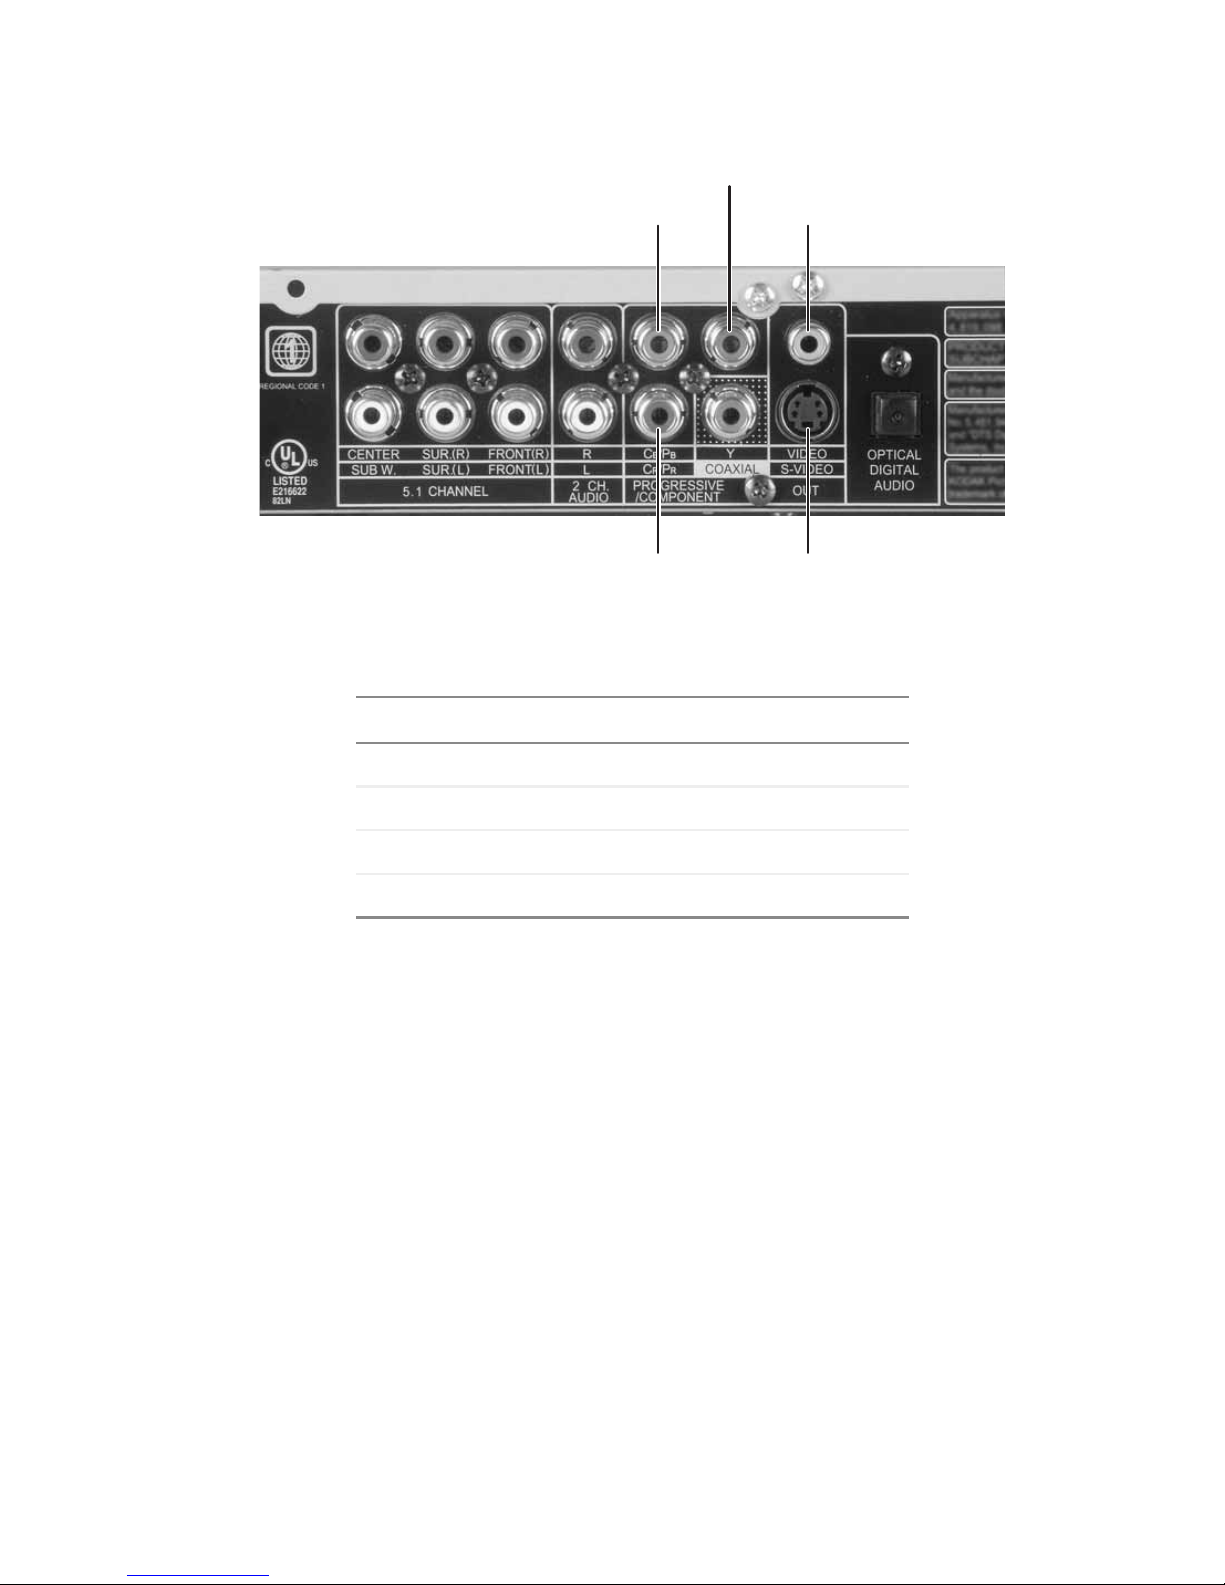
Audi o ja cks
Network card slot
Network card s lot
Insert a network PC Card into this slot.
Audio jacks
5.1 channel (surround sound) 2 channel (stereo)
Video jacks
Coaxial (digital
audio)
Optical digital
audio
5.1 channel (surround
Connect to the analog audio inputs of a 5.1-channel amplifier.
sound)
2 channel (stereo)
Coaxial (di gital audi o)
Optical digital audio
Connect to the left/right analog audio inputs of a TV, stereo, or
2-channel amplifier.
Connect to the c oaxial dig ital audi o input o f a 5. 1-channel am plifier.
Connect to the optica l digita l audio i nput of a 5.1 -ch annel am plifi er.
6
www.gateway .com
Page 13
Audio connection qualities
Video jacks
Audio connection Quality
2 channel (stereo) Fair
5.1 channel (surround sound) Good
Coaxial (digital audio) Better
Optical digital audio Best
Y
Cb/Pb (component/
progressive blue)
Y (component black
and white)
Cb/Pb
Cr/Pr
Connect to the Pb/Cb video inputs of your TV.
Connect to the Y video input of your TV.
Video out (composite)
S-Video out
Video out (comp osite)
Cr/Pr (component/
progressive red)
S-Video out
Connect to the Composite Video input of your TV.
Connect to the Pr/Cr video inputs of your TV.
Connect to the S-Video input of your TV.
www.gateway.com
7
Page 14

Video connection qualities
Video connection Quality
Video out (composite) Good
S-Video out Better
Component/progressive Best
8
www.gateway .com
Page 15
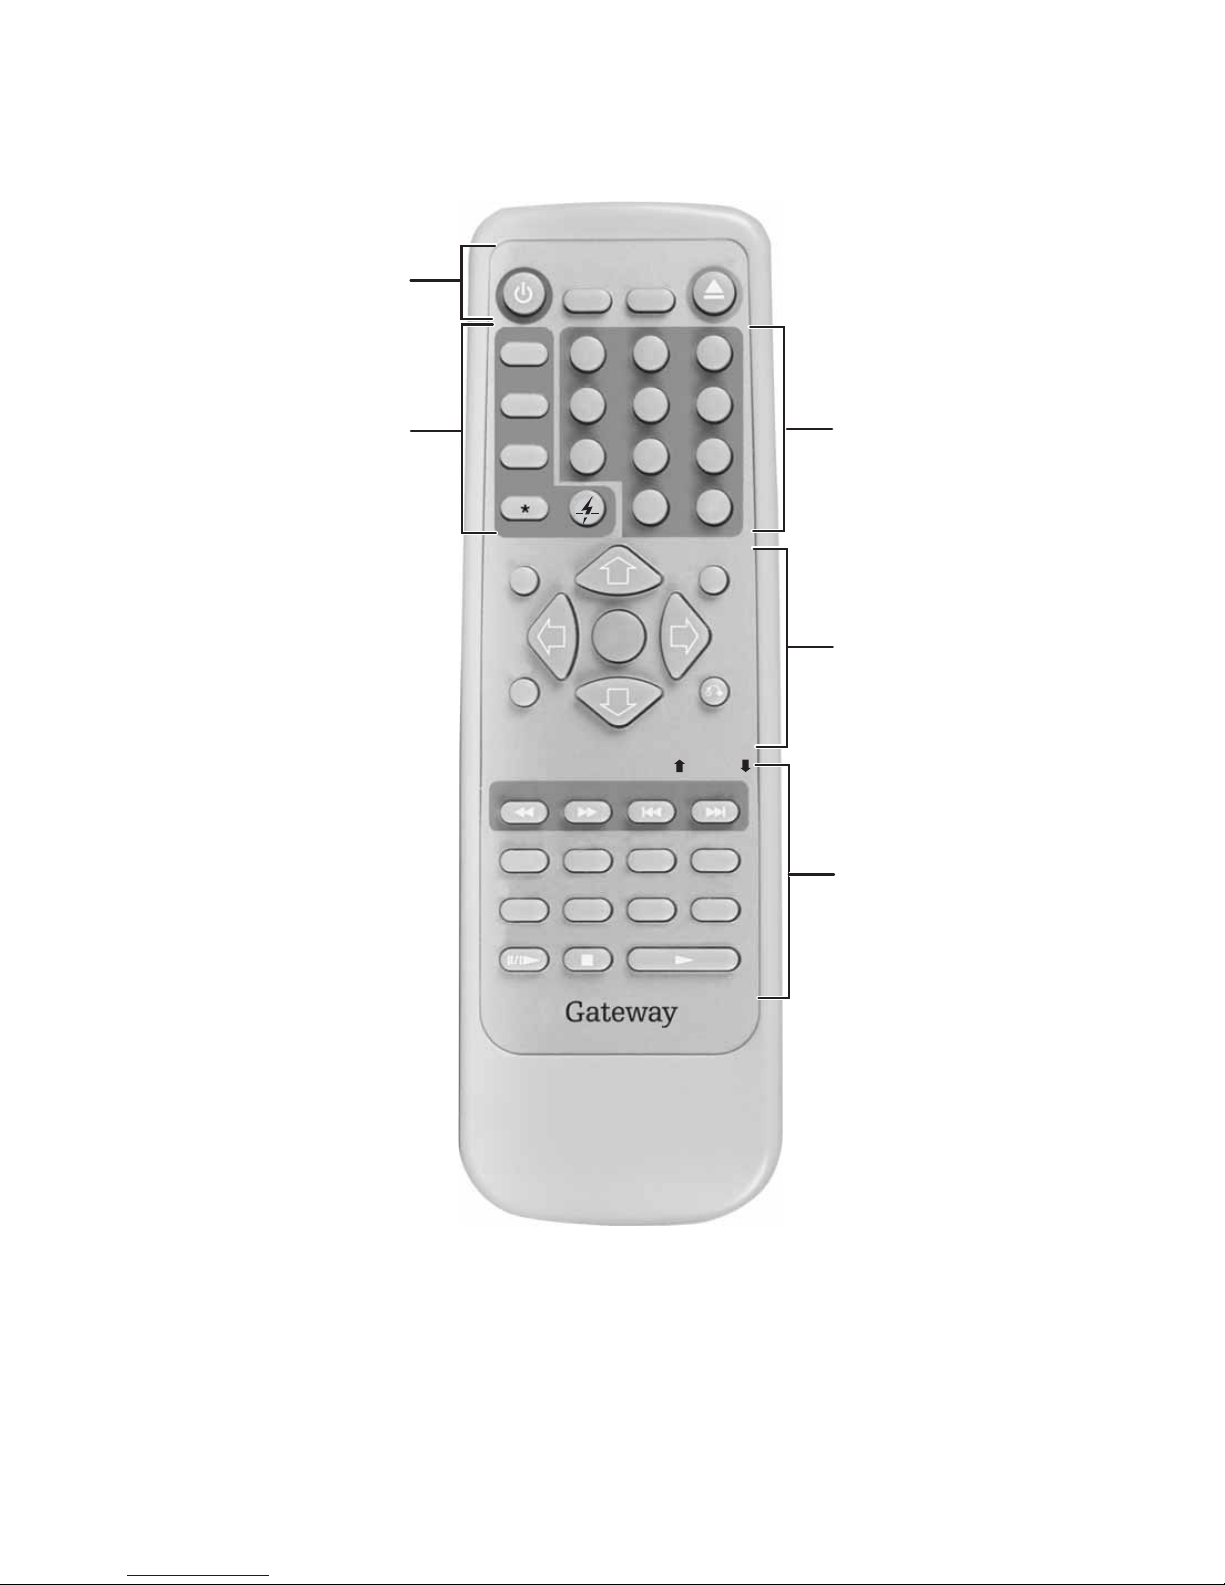
Remote control
Main controls
Networking
controls
POWER
TITLE SETUP
MY
MUSIC
MY
PHOTOS
MY
VIDEOS
MENU
REV FWD PREV NEXT
ZOOM VIDEO OUT REPEA T A-B
1
4
GHI JKL MNO
7
PQRS TUV WXYZ
CONNECT
ENTER
OPEN/CLOSE
23
ABC
5
8 9
CLEAR
0
DISPLAYSEARCH
RETURN
PAGE
DEF
6
Numeric keypad
Menu controls
PAGE
SLOW AUDIO SUBTITLE ANGLE
P A USE/STEP STOP PLAY
Media playback
controls
www.gateway.com
9
Page 16

Main con trols
POWER
TITLE
SETUP
OPEN/CLOSE
Networking c ontrols
MY MUSIC
Press to s witch the pla yer between Standby (low power)
and On (fully operational) modes.
The blue LED behind the front arrow buttons on the
player lights when the unit is On.
This button works only when the POWER button on the
front of the player is pressed.
Press to display DVD title menus for discs with multiple
titles. If a disc has a single title, TITLE functions like
MENU.
While disc playback is stopped, press to open the
Welcome to Setup
Network settings.
Press to open and close the disc tray.
Press to display the player’s My Music folder on the TV,
which lists the music media files available on your
networked computers. If a computer has not been
detected , only th e Connec t menu appe ars.
screen for adjusting DVD and
MY PHOTOS
MY VIDEOS
CONNECT
Press to displa y the pla yer’ s My Photos folder on the TV,
which lists the JPG image files available on your
networked computers. If a computer has not been
detected , only th e Connec t menu appe ars.
Press to display the player’s My Videos f older o n the TV,
which list s the MPEG movi e files available o n your
networked computers. If a computer has not been
detected , only th e Connec t menu appe ars.
Press to search the network for shared media. A menu
will show y ou the My Music, My Photos, and My Videos
folders.
Numeric keypad
Press these buttons to input numbers (such as the chapter, track, or time) in on-screen
menus.
10
www.gateway .com
Page 17

Menu contr ols
Arrow buttons
ENTER
SEARCH
DISPLAY
MENU
RETURN
Media playback controls
REV
FWD
PREV
NEXT
ZOOM
Press repeatedly to scan backward at variable speeds.
Press repeatedly to scan forward at variable speeds.
Press to skip to the previous chapter or track.
Press to skip to the next chapter or track.
Press to zoom in or out at various levels of magnification.
Press to navi gate on-scre en menus.
Press to conf irm menu settings.
Press to jump to a specific time, title, chapter, or track
during disc playback.
Press to display current disc time and status information.
Press to view the DVD’s mai n menu.
Press to return to the
Welcome to Setup
screen.
VIDEO OUT
REPEAT
A-B
SLOW
AUDIO
SUBTITLE
ANGLE
PAUSE/STEP
STOP
PLAY
While playback is stopped, press repeatedly until the setting matches your video
cable connection. For more information, see “Turning on your player” on page 22.
Press to set special playback functions, including Repeat.
Press to repeat a n aud io or video segmen t betw ee n two poin ts (A and B). F or m ore
information, see “Repeating a scene or segment” on page 73.
Press repeatedly for slow motion playback at variable speeds.
Press to select among available audio tracks/formats/channels during
DVD/SVCD/VCD playback.
Press to select among available subtitle languages during DVD/SVCD playback.
Press to view alternate angles during DVD playback (if available).
Press once to pause pla ybac k, then pres s again to step f orw ard one frame at a time.
Press once to s top playback (press PLAY to resume). Press twice to s to p pl ayback
and reset to the beginning of the disc.
Press to start playback.
www.gateway.com
11
Page 18

12
www.gateway .com
Page 19

Chapter 2
Setting Up Your Player
■ Installing Media Server
■ Connecting the player to your
audio/video system
■ Setting up your network
13
Page 20

Overview
This chapter describes how to connect your Gateway Connected DVD Player to your TV,
audio system, and home network. You need to complete these steps in the following order:
1 Set up your network and make sure that your home network is working correctly.
2 Install the Gateway Media Server program and start it for the first time.
3 Connect the player to your TV, audio system, and network.
14
www.gateway .com
Page 21

About your home network
Before you begin, you must have a Microsoft Windo ws-based ho me network set up . If y ou
do not already have a network installed, you need to purchase the network components
and follow the installation instructions provided by the manufacturer. The Gatew ay
Connected DVD Player supports all major types of home networks, including:
■ Wireless access point
A Wireless access point network uses radio waves to link devices using a wireless
network card, an access p oint, and a wired Ethernet netw ork.
■ Wireless peer-to-peer
A wireless peer-to-peer network consists of two or more wireless Ethernet computers
that communicate with each other without a wireless access point.
■ Wired Ethernet
A wired Ethernet network consists of two or more devices conn ected through an
Ethernet cable.
Your Gateway Connected DVD Player came with a wireless 802.11g network PC Card.
Important If you are using a wireless network with an access point, be sure to
configur e the access point acc ording to t he manufacturer 's
instru ctions before c ontinuing.
www.gateway.com
15
Page 22

Installing Gateway Media Server
After you make sure that your home network is working correctly, install the Media Server
program onto each computer that has media files you want to access. For instructions on
running Media Server, see “Using Gateway Media Server” on page 51.
Important Do not install Media Server until you make sure that your home
network is working correctly.
Computer requir ements
■ Computer with Pentium processor, 700 MHz or faster
■ Network connection (wired or wireless)
■ Hard drive with at least 20 MB of free space
■ 128 MB of memo ry
■ CD drive
■ Network PC Card (also known as PCMCIA). A wireless network card is included with
your player.
■ Microsoft
®
Win dow s®98 SE, Windows®Me, Windows®2000, or Windows®XP
To install Media Server:
1 Turn on the computer, then close all open programs.
2 Insert the Gateway Connected DVD Player Installation CD into the CD drive on your
computer. The install wizard starts.
If you are prompted to enter the CD key, you can find it printed on the CD insert.
3 Follow the on-screen instructions to finish the installation.
If you are prompted to select your computer’s network card, click the network card
you want to use, then click
Media Server opens after the install program is finished, and o pens automatically
whenever your computer is started. The Media Server icon in the Windows taskbar
shows that Media Server is running.
You are pro mpted to import media.
Next.
16
www.gateway .com
Page 23

4 If you do not have any music, movies, or pictures on your computer, click No. Your
first-time setup of Media Server is complete. Go to Step 6.
- OR If you have media on your computer, click
Yes. You are prompted to select plugins.
5 Click the plugin you want to use, then click Scan. Your files are imported into Media
Server. Your first-time setup of Media Server is complete. Go to Step 6.
Tips & Tricks Select only one plugin f or each type of m edia . F or e xam ple , to impo rt
MP3 files o n a c o mput e r w h ere you have both Mu si cM atc h Jukebox
and Windows Media Player installed, select only one of the two
plugins.
You can select only one plugin at a time. If you have more than one
media type, select one plugin and import the media for that plugin.
Then select another plugin and import the media for that plugin.
6 Repeat Steps 1-5 on each computer you want to access from the player. For more
information on using Media Server, see “Using Gateway Media Server” on page 51.
www.gateway.com
17
Page 24

Connecting the pla yer
Connecting to your audio/video system
Important Write your player’s order number inside the front cover of your user’s
guide. You will need the order number as proof of purchase if you
contact Technical Support.
To connect your player to your audio/video system:
1 Make sure that all video components are turned off.
2 Connect the player to your TV or other video device in one of three ways:
Video connection Quality
Video out (composite) Good
S-Video out Better
Component/progressive Best
■ Video out (composite)
Connect one end of the supplied yellow video cable to the
back of the player, then connect the other end to the jack on your TV or other
video device.
■ S-Video out
Connect one end of an S-Video cable (not included ) to the
the back of the player, then connect the other end to the S-Video jack on your
TV or other video device.
■ Component/Progressive video (best vide o quality)
Connect one end of each co mponent video cable (not inc luded) to the
PROGRESSIVE/COMPONENT Cb/Pb, Y, and Cr/Pr jacks on the back of the player, then
connect the other ends to the corresponding color-coded jacks on your TV or other
video device.
VIDEO OUT jack on the
S-VIDEO OUT jack on
18
www.gateway .com
Page 25
Cb/Pb (c omponent/
progressive blue)
Y (component/progressive
black and white)
Video out (composite)
Cr/Pr (component/
progressive red)
S-Video out
3 Connect your player to your audio system in one of four ways:
Audio connection Quality
2 channel (stereo) Fair
5.1 channel (surround sound) Good
Coaxial (digital audio) Better
Optical digital audio Best
■ 2 channel (stereo)
Connect one end of the included red an d white audio/video cables to the
AUDIO
R and L jacks on the back of the player, then connect the other ends to the
right/left audio jacks on your TV, stereo, or 2-channel analog amplifier or other
audio device.
■ 5.1 channel (surround sound)
2 CH.
Connect one end of the six audio cables (not included) to the
SUR.(R), FRONT(R), SUB W., SUR(L), and FRONT(L) jacks on the back of the player,
then connect the other ends to the corresponding analog audio jacks on your
5.1-channel amplifier or other audio device.
■ Coaxial (digital audio)
Connect one end of a digital coaxial cable (not included) to the
the back of the player, then connect the other end to the coaxial digital audio jack
on your amplifier or other audio device.
www.gateway.com
5.1 CHANNEL CENTER,
COAXIAL jack on
19
Page 26
■ Optical Digital Audio
Connect one end of an optical cable (not included) to the
OPTICAL DIGITAL AUDIO
jack on the back of the player, then connect the other end to the optical digital
audio jack on your amplifier or oth er audio device.
Tips & Tricks If you are using a digital audio connection (COAXIAL or OPTICAL
DIGIT AL A UDIO ), you must set the audio output format on the player
to match the digital de coding capab ilities of your amplifier or alternate
audio device. For more information, see “Setting up digital audio” on
page 24.
5.1 channel front (R)
5.1 channel sur. (R) (surround
sound right)
5.1 channel center
(surround sound center)
2 Ch. R (right stereo)
5.1 channel sub w.
(surround sound subwoofer)
5.1 channel sur. (L) (surround
sound left)
5.1 channel front (L) 2 Ch. L (left stereo)
Optical di gital au dio
Coaxial (digital audio)
20
www.gateway .com
Page 27

Installing batteries into the remote control
To install the batteries:
1 Turn the remote control over, then remove the battery cover.
2 Insert two AAA batteries into the battery bay. Make sure that the batteries are oriented
according to the diagram inside the battery bay.
3 Replace the battery cover.
Installing the network card
Do not plug in the player’s power cord or press the POWER button on the front until you
have installed the network card.
To install the network card:
1 Make sure that the player is turned off.
2 Insert your wireless network PC Card into the NETWORK CARD slot in the back of the
player. Make sure that the network card is pressed all the way in.
Network card slot
Important Do not remove the card while the player is turned on. If you remove
the card while the player is on, all playback of networked media will
stop.
www.gateway.com
21
Page 28
3 If the player’s network card is a wired Ethernet card, connect one end of an Ethernet
cable to the network card, then connect the other end to an Ethernet jack on your
existing network.
4 After you connect video and audio cables and install the network card, configure your
video by following the instructions in “Turning on your player” on page 22.
Turning on your player
To turn on your player:
1 Make sure that your computer is on and running Media Server, your home network
is set up, and all audio and video devices are turned on.
2 Connect the player’s power cord to a wall outlet, then press the POWER button on
the front of the player. The LED in the POWER button turns green.
3 Turn on your TV.
4 Tu rn on any video device the DVD player is connected to, then use the video device’s
controls to set it to the audio/video input type connected to the player.
5 Tu rn on any audio devic e the DVD pl ayer is connected to , then use th e audio device’s
controls to set it to the audio input type connected to the player.
22
www.gateway .com
Page 29

6 Press VIDEO OUT on the player’s remote control repeatedly until the setting matches
your video connection. Se e the table below for combinations of video settings an d
connections that also work. The column on the left identifies the type of cable
connection your player and TV use, and the row across the top identifies the video
setting you can select by pressing the VIDEO OUT button.
Audio jacks Composite
setting
Composite jack
S-Video jack
Interlaced
Best Works
Works Best
Works Best
S-Video
setting
Interlaced
Component
setting
Progressive
Component
setting
component jacks
Progressive
Best
component jacks
Tips & Tricks T o determine whether y our player’s audi o a nd vi deo are correctly set
up, press the player’s OPEN/CLOSE button to open the DVD tray,
insert a DVD, then press OPEN/CLOSE again to close the tray. The
DVD begins playing.
7 Go to “Setting up the networ k” on page 36 to complete the initial setup of your player .
www.gateway.com
23
Page 30
Setting up digital audio
The Digital menu lets you set the signal format for the coaxial and optical digital audio
jacks. For example, if you c onnected the p layer to an externa l amplifier th at has a Dolby
Digital decoder, you should set the Dolby Digital settings to Bitstream (to let your
amplifier’s Dolby Digital decoder work with the player’s audio signal).
Navigating the pla yer’s setup menus
To navigate the player’s setup menus, press the following buttons on your remote control:
Remote Button Function
STOP Press before pressing SETUP.
SETUP Press to open and close the
(up and
down arrows)
(left and
right arrows)
ENTER Press to activate the current selection.
Tips & Tricks Unless specified otherwise, all buttons mentioned in the following
Press to hi ghlight op tions wit hin menus.
Press to change option settings within menus.
procedures are buttons on the remote control.
Welcome to Setup
screen.
24
www.gateway .com
Page 31

Configuring Dolb y Digital
This setting configures the format of Dolby Digital 5.1 output signals.
To set your Dolby Digital preferences :
1 On the player’s remote control, press STOP, then press SETUP. The We l co m e to S e tu p
screen opens.
2 Use your remote control’s arrow buttons to highlight Digital, then press ENTER. The
Digital au dio setup menu opens.
3 Highlight Dolby, then press the buttons to select:
■ Bitstream
Outputs raw 5.1-channel digital signals from the optical or coaxial digital audio
jacks. Use this setting when the player is connected to an external am plifier with
a Dolby Digital decoder.
■ Off
Turns off Dolby Digital output.
■ PCM
Outputs 2-channel digital audio from the optical or coaxial dig ital audio jacks.
4 Highlight OK, then press ENTER.
www.gateway.com
25
Page 32

Configuring MP3 audio
This option sets the outgoing digital audio format of MP3 tracks.
To set your MP3 output format:
1 On the player’s remote control, press STOP, then press SETUP. The We l co m e to S e tu p
screen opens.
2 Use your remote control’s arrow buttons to highlight Digital, then press ENTER. The
Digital a udio setup menu appears.
3 Highlight MP3, then press the buttons to select:
■ Bitstream
Outputs raw MP3 digital signals from the optical or coaxial digital audio jacks.
■ Off
Turns off MP3 output.
■ PCM
Outputs 2-channel digital audio from the optical or coaxial dig ital audio jacks.
4 Highlight OK, then press ENTER.
26
www.gateway .com
Page 33

Configuring CD audio
This option sets the outgoing digital audio format of CD tracks.
To set your CD output format:
1 On the player’s remote control, press STOP, then press SETUP. The We l co m e to S e tu p
screen opens.
2 Use your remote control’s arrow buttons to highlight Digital, then press ENTER. The
Digital au dio setup menu opens.
3 Highlight CD, then press the buttons to select:
■ Original
Outputs CD digital audio from the optical or coaxial digital audio jacks in its
original format.
■ Off
Turns off CD audio output.
■ PCM
Outputs 2-channel digital audio from the optical or coaxial dig ital audio jacks.
4 Highlight OK, then press ENTER.
www.gateway.com
27
Page 34

Configuring LPCM
This option sets the outgoing digital audio format of LPCM tracks.
To set your LPCM output format:
1 On the player’s remote control, press STOP, then press SETUP. The We l co m e to S e tu p
screen opens.
2 Use your remote control’s arrow buttons to highlight Digital, then press ENTER. The
Digital audio setup menu opens.
3 Highlight NextPage, then press ENTER.
4 Highlight LPCM, then press the buttons to select:
■ Original
Outputs the LPCM digital audio signals from the optical or co axial digital audio
jacks in its original format.
■ Off
Turns off LPCM audio output.
■ PCM
Outputs 2-channel digital audio from the optical or coaxial dig ital audio jacks.
5 Highlight OK, then press ENTER.
28
www.gateway .com
Page 35

Configuring f or other formats
This option sets the outgoing digital audio for formats not covered in the previous
procedures.
To set your digital output for other formats:
1 On the player’s remote control, press STOP, then press SETUP. The We l co m e to S e tu p
screen opens.
2 Use your remote control’s arrow buttons to highlight Digital, then press ENTER. The
Digital audio setup menu opens.
3 Highlight NextPage, then press ENTER.
4 Highlight Others, then press the buttons to select:
■ Bitstream
Outputs digital audio signals from the optical or coaxial digital audio jacks.
■ Off
Turns off audio output for other formats.
■ PCM
Outputs 2-channel digital audio from the optical or coaxial dig ital audio jacks.
5 Highlight OK, then press ENTER.
www.gateway.com
29
Page 36

Setting up analog audio
The Analog Audio menu lets you set the format of the signal from the 5.1 channel
(surround) and 2 channel (stereo) audio jacks.
Navigating the pla yer’s setup menus
To navigate the player’s setup menus, press the following buttons on your remote control:
Remote Button Function
STOP Press before pressing SETUP.
SETUP Press to open and close the
(up and
down arrows)
(left and
right arrows)
ENTER Press to activate the current selection.
Tips & Tricks Unless specified otherwise, all buttons mentioned in the following
Press to hi ghlight op tions wit hin menus.
Press to change option settings within menus.
procedures are buttons on the remote control.
Welcome to Setup
screen.
30
www.gateway .com
Page 37

Adjusting the speaker balance
This feature adjusts the sound balance of your 5.1-channel speaker system.
To run the speaker test:
1 On the player’s remote control, press STOP, then press SETUP. The We l co m e to S e tu p
screen opens.
2 Use your remote control’s ar row buttons to highlight Analog, then press ENTER. The
Analog audio setup menu opens.
3 Highlight Speaker Test, then press ENTER. A five-second test tone is sent to each of
the six speakers in the following order: Left, Center, Right, Right Surround, Left
Surround , Subwoofer.
4 Adjust the speaker levels on your amplifier as required, then press STOP to cancel the
test tone.
www.gateway.com
31
Page 38

Configuring Pr o Logic virtual surround sound
The player has a built-in Dolby Pro Logic decoder to provide virtual surround sound for
PCM (stereo) from the 5. 1-channel analog aud io jacks.
To adjust Pro Logic settings:
1 On the player’s remote control, press STOP, then press SETUP. The We l co m e to S e tu p
screen opens.
2 Use your remote control’s ar row buttons to highlight Analog, then press ENTER. The
Analog audio setup menu opens.
3 Highlight Pro Logic, then press the buttons to select:
■ Auto
Outputs stereo audio soundtracks in Dolby Pro Logic mode.
■ On
Outputs all audio soundtracks in Dolby Pro Logic mode.
■ Off
Turns off Dolby Pro Logic.
4 Highlight OK, then press ENTER.
32
www.gateway .com
Page 39

Adjusting cen ter delay
Use this setting to delay the sound from the center speaker so it arrives at your listening
area at the same time as the left and right front speakers. Use this setting only if the c enter
speaker is closer to your listening area than your front speakers are.
To adjust the center delay:
1 On the player’s remote control, press STOP, then press SETUP. The We l co m e to S e tu p
screen opens.
2 Use your remote control’s ar row buttons to highlight Analog, then press ENTER. The
Analog audio setup menu opens.
3 Highlight Ctr. Delay, then press the buttons to set how much closer the center
speaker is to you than the front speakers are, from 0 to 1.75 meters.
4 Highlight OK, then press ENTER.
www.gateway.com
33
Page 40

Adjusting surround dela y
Use this setting to delay the sound from the surround left and right speakers so it arrives
at your listening area at the same time as the left and right front speakers. Use this setting
only if the surround speakers are closer to your primary listening area than your front
speakers are.
To adjust the surround delay:
1 On the player’s remote control, press STOP, then press SETUP. The We l co m e to S e tu p
screen opens.
2 Use your remote control’s ar row buttons to highlight Analog, then press ENTER. The
Analog audio setup menu opens.
3 Highlight Surr. Delay , t hen press the buttons to set how much closer the surround
speakers are to you than the front speakers are, from 0 to 5.25 meters.
4 Highlight OK, then press ENTER.
34
www.gateway .com
Page 41

Defining the speaker set
Use this setting to identify the type of speakers in your audio setup.
To define your speaker setup:
1 On the player’s remote control, press STOP, then press SETUP. The We l co m e to S e tu p
screen opens.
2 Use your remote control’s ar row buttons to highlight Analog, then press ENTER. The
Analog audio setup menu opens.
3 Highlight Speaker Set, then press ENTER. The active speakers are listed.
4 Highlight each of the following speakers, then press the buttons to turn them
on or off:
■ Subwoofer
Turns subwoofer output on or off.
■ Surround
Turns left/right surround speaker output on or off.
■ Center
Turns center speaker output on or off.
5 Highlight Ctr Spkr Size, then press the buttons to select Large or Small to indicate
the relative size of the center speaker.
6 Highlight OK, then press ENTER.
www.gateway.com
35
Page 42

Setting up the network
Setting the Network Setup options lets your player connect to your home network. Choose
one of the three setup options depen ding on your network configuration:
■ For wireless access point setup, see “Wireless access point setup” on page 37.
■ For wireless peer-to-peer setup, see “Wireless peer-to-peer setup” on page 39.
■ For wired Ethernet setup, see “Wired Ethernet setup” on page 41.
Important
■
Always have Media Server running on your comp uter bef ore turning
on the player.
■
For help during network setup, highlight Help, then press ENTER.
Navigating the pla yer’s setup menus
To navigate the player’s setup menus, press the following buttons on your remote control:
Remote Button Function
STOP Press before pressing SETUP.
SETUP Press to open and close the
(up and
down arrows)
(left and
right arrows)
ENTER Press to activate the current selection.
Press to hi ghlight op tions wit hin menus.
Press to change option settings within menus.
Welcome to Setup
screen.
Tips & Tricks Unless specified otherwise, all buttons mentioned in the following
procedures are buttons on the remote control.
36
www.gateway .com
Page 43

Wireless access point setup
To configure the player for a wireless access point network:
1 Make sure that your computer is on and Media Server is running. The Media Server
icon in the Windows taskbar shows that the program is running.
If the Media Server icon has a red “x” on it, Media Server is running but c annot
connect to the network. See “ Network troubleshooting” on page 83.
2 On the player’s remote control, press STOP, then press SETUP. The We l co m e to S e tu p
screen opens on the TV.
3 Use your remote control’s arrow buttons to highlight Network, then press ENTER.
4 Highlight Find Your Netw ork, then press ENTER to search for an available network. A list
of available networks opens. Names of networks using wireless a ccess points end with
“ACC PT.”
5 Highlight one of the detected networks, then press ENTER. The message “Joining new
network please wait” appears, then the message “Successfully joined [network n ame]”
appears.
6 Press ENTER to continue. The main Network menu opens.
The IP address appears in the lower-right corner of the screen. To change the way the
IP address is select ed, see “Setting the IP address” on page 42.
To change the player name (as it appears to other players), see “Changing the player
name” on page 43.
7 Highlight View WEP Settings, then press ENTER.
8 Highlight Key Format, then press the buttons to select either P assphrase, Hex digits ,
ASCII characters, or Disabled.
www.gateway.com
37
Page 44

9 Highlight Key Size , then press the buttons to select one of the following:
If you selected
■ 64/40 bits (10 digits)
■ 128/104 bits (26 digits)
Hex digits in Step 8:
If you selected ASCII characters in Step 8:
■ 64/40 bits (5 characters)
■ 128/104 bits (13 charac ters)
10 Highlight Key Index, then press the buttons to select the key index that matches
your network’s.
11 Highlight Key data, then repeatedly press the number buttons on yo ur remote control
to enter your network’s encryption key. Press the button to set the next character,
and press
If you selected
below:
CLEAR to erase a character.
Passphrase or Hex digits in Step 8, enter the key according to the table
Press: For:
- OR -
11, A, B, C
22, D, E, F
33
44
55
66
77
88
99
00
38
www.gateway .com
Page 45

If you selected ASCII characters in Step 8, enter the key according to the table below:
Press: For:
1 1 . @ / : ‘ , ? ! - _ # * \ " $ % & + ; = ( ) < > [ ] ‘ ~ ^ { } |
2 2, A, B, C, a, b, c
3 3, D, E, F, d, e, f
4 4, G, H , I, g, h, i
5 5, J, K, L, j, k, l
6 6, M, N, O, m, n, o
7 7, P, Q, R, S, p, q, r, s
8 8, T, U, V, t, u, v
9 9, W, X, Y, Z, w, x, y, z
00
12 Highlight OK, then press ENTER.
13 Highlight OK again, then press ENTER. Network setup is complete.
14 Press SETUP to close the We lco m e to S e t up screen.
15 Go to “Customizing” on page 45 for instructions on customizing your player’s other
settings.
Wireless peer-to-peer setup
Important Wireless network cards used in a peer-to-peer network must be set
ad hoc
to
on how to do this, see your network card’s documentation.
To configure the player for a wireless peer-to-peer network:
1 Make sure that your computer is on and Media Server is running. The Media Server
icon in the Windows taskbar shows that the program is running.
If the Media Server icon has a red “x” on it, Media Server is running but c annot
connect to the network. See “ Network troubleshooting” on page 83.
2 On the player’s remote control, press STOP, then press SETUP. The We l co m e to S e tu p
screen opens on the TV.
mode instead of
infrastructure
mode. For more inf o rmation
www.gateway.com
39
Page 46

3 Use your remote control’s arrow buttons to highlight Network, then press ENTER.
4 Highlight Find Your Network, then press ENTER. A list of available networks opens.
Names of peer-to-peer networks end with “P2P.”
5 Highlight Cr eate or Join Network, then press ENTER.
6 Enter the name of the network by repeatedly pressing the remote control's number
buttons according to the following table. Press to set the next character, and press
CLEAR to erase a character.
Press: For:
11
2 2, A, B, C, a, b, c
3 3, D, E, F, d, e, f
4 4, G, H, I, g, h, i
5 5, J, K, L, j, k, l
6 6, M, N, O, m, n, o
7 7, P, Q, R, S, p, q, r, s
8 8, T, U, V, t, u, v
9 9, W, X, Y, Z, w, x, y, z
00
7 Highlight OK, then press ENTER. “Successfully created P2P network” appears.
8 Press ENTER.
9 On your computer, click Start, Control Panel, then click Network Connections.
10 Right-click Wireless Network Connection, then click View Available Wirele ss Networks .
11 Click the P2P network name you just created on the player, then click Connect.
If you want to change the player name (as it appears to other pla yers), s ee “Changing
the player name” on page 4 3.
40
www.gateway .com
Page 47

12 On the player, highlight OK, then press ENTER on the remote control. Network setup
is complete.
13 Press SETUP to close the We lco m e to S e t up screen.
14 Go to “Customizing” on page 45 for instructions on customizing your player’s other
settings.
Wired E thernet setup
To configure the player for a wired Ethernet network:
1 Make sure that your computer is on and Media Server is running. The Media Server
icon in the Windows taskbar shows that the program is running.
If the Media Server icon has a red “x” on it, Media Server is running but c annot
connect to the network. See “ Network troubleshooting” on page 83.
2 On the player’s remote control, press STOP, then press SETUP. The We l co m e to S e tu p
screen opens on the TV.
3 Use your remote control’s arrow buttons to highlight Network, then press ENTER. The
message “Loading network settings” appears, and the player automatically connects
to the wired Ethernet network. If multiple networks are available, highlight the
Network setting, then press ENTER again to select the correct network from the list.
The IP address appears in the lower-right corner of the screen. To change the way the
IP address is selected, see “Setting the IP address” on page 42. To change the player
name (as it appears to other players), see “Changing the player name” on page 43.
4 Highlight OK, then press ENTER. Network setup is complete.
5 Press SETUP to close the We l co m e to S e tu p screen.
6 Go to “Customizing” on page 45 for instructions on customizing your player’s other
settings.
www.gateway.com
41
Page 48

Setting the IP address
While connecting to a network, networked devices are assigned a unique identifier known
as an IP address. IP addresses are used to direct network traffic to the correct d estination.
An IP address is usually displayed as numbers separated by periods, such as 192.168.0.2.
To change the way the IP address is assigned:
1 On the player’s remote control, press STOP, then press SETUP. The We l co m e to S e tu p
screen opens.
2 Highlight Network, then press ENTER.
3 Highlight Get IP Address.
4 Press the buttons to choose one of the following:
■ DHCP (Auto) — Automatically assigns an IP address and provides other
configuration information (recommended).
Important DHCP (Dynamic Host Conf ig ur ati on Prot ocol) is an Internet protocol
for automatically configuring computers that use TCP/IP. DHCP can
be used to automatically assign IP addresses and to provide other
configuration information.
■ Auto I P — Lets the pl ayer obtain an IP address for itself.
■ Static (Press Enter to Edit) — Lets you set the IP address and Subnet Mask.
Important Static IP addresses are numeric addresses that you assign to
uniquely identify your network devices. Only experienced network
users sh ould manual ly set th e IP a ddress.
If you select Sta tic (Press Enter to Edit), press Enter, then manually
enter the IP address and Subnet Mask with the 0 through 9 buttons.
Highlight OK, then press ENTER to save and exit.
42
www.gateway .com
Page 49

5 Highlight OK, then press ENTER.
6 Press SETUP to close the We l co m e to S e tu p screen.
Changing the player name
To change the name of the player on the network:
1 On the player’s remote control, press STOP, then press SETUP. The We l co m e to S e tu p
screen opens.
2 Highlight Network, then press ENTER.
3 Highlight the Edit Player Name field, then use the follo wing buttons to name the player:
■ — Press to move the text insertion point left and right.
■ 0-9 buttons — Press repeatedly to select the desired character, then press the
button to save the character and move to the next character.
■ CLEAR — Press to erase a character.
4 Highlight OK, then press ENTER.
5 Press SETUP to close the We l co m e to S e tu p screen.
www.gateway.com
43
Page 50

44
www.gateway .com
Page 51

Chapter 3
Customizing
■ Changing menu languages
■ Changing video settings
■ Setting up parental lockout controls
45
Page 52

Setup menu overview
After the player’s audio and video cables are c onnected, you are ready to a djust audio,
video, and parental controls.
■ For display settings, see page 47.
■ For video settings, see page 48.
■ For digital audio settings, see page 24.
■ For analog audio settings, see page 30.
■ For parental control settings, see page 49.
Using the remote c ontrol in Setup menus
To move through the player’s Setup menus, press the following buttons on your remote
control:
Remote Button Function
STOP Press before pressing SETUP.
SETUP Press to open and close the
(up and
down arrows)
(left and
right arrows)
ENTER Press to activate the current selection.
Tips & Tricks Unless otherwise specified, all buttons mentioned in the following
Press to hi ghlight op tions wit hin menus.
Press to change option settings within menus.
procedures are buttons on the remote control.
Welcome to Setup
screen.
46
www.gateway .com
Page 53

Setting up languages
The Display menu lets you set your language preferences for DVD subtitles, DVD audio
soundtracks, and DVD menus.
To set your language preferences:
1 On the player’s remote control, press STOP, then press SETUP. The main Setup menu
opens.
2 Use your remote control’s arrow buttons to highlight Display, then press ENTER. The
Display setup menu opens.
3 Press the buttons to highlight any of the following:
■ Set On Screen Display
Press the buttons to select English, French, or Spanish for the DVD player’s
on-screen setup menus and display tex t.
■ Subtitle Language
Press the buttons to select English, French, Spanish, Auto, or Off. Select Auto to
always select the DVD’ s default subt itle language. Select
off. Because subtitle selections vary among DVDs, the DVD itself may override your
selection.
■ Turn Closed Caption
Press the buttons to select Off, TV, or DVD.
■ Set Networked Slideshow Time
Press the buttons to select Slow, Medium, o r Fast.
4 Highlight OK, then press ENTER.
5 Press SETUP to close the We l co m e to S e tu p screen.
Off to always turn subtitles
www.gateway.com
47
Page 54

Setting up video
The Video menu lets you set the aspect ratio (video format to match the shape of your
TV screen) for DVD movies.
To set the aspect ratio:
1 On the player’s remote control, press STOP, then press SETUP. The main Setup menu
opens.
2 Use your remote control’s arrow buttons to highlight Video, then press ENTER. The
Video setup menu opens.
3 Press the buttons to select Set TV Aspect.
4 Press the buttons to select:
■ Fullscreen
Select if you have a standard 4:3 television and prefer to watch full-screen versions
of DVD movies (if available).
■ Letterbox
Select if you have a standard 4:3 television and prefer to watch wide screen versions
of DVD movies (if available).
■ 16:9
Select if you have a wide screen 16:9 television.
5 Highlight OK, then press ENTER.
6 Press SETUP to close the We l co m e to S e tu p screen.
48
www.gateway .com
Page 55

Setting up parental controls
The Rating menu lets you block playback of DVDs by using a password-protected rating
system. Not all DVDs are rated.
To set parental controls:
1 On the player’s remote control, press STOP, then press SETUP. The We l co m e to S e tu p
screen opens.
2 Use your remote control’s arrow buttons to highlight Parental, then press ENTER. The
Parental menu opens.
3 Highlight Set Highest Rating, then press the button to change the rating level. D VDs
that are rated higher than the level you select will not play without entering the correct
password.
If a password has already been set, you will not be able to select
the correct password.
Rating until you enter
4 Highlight Edit Password, then press the following buttons to enter a four-character
password:
■ — Move the text insertion point left and right.
■ 0-9 buttons — Press repeatedly to select the desired character, then press the
button to save the character and move to the next character.
■ CLEAR — Press to erase a character.
■ ENTER — Press to save the password.
5 Highlight OK, then press ENTER.
Tips & Tricks If you forget the Rating password, enter 0106 to unlock the parental
control s etting. Keep this password ou t of reac h of chil dren.
www.gateway.com
49
Page 56

50
www.gateway .com
Page 57

Chapter 4
Using Gateway Media Server
■ Opening Media Server
■ Importing media files from the network
■ Listing and deleting media files
■ Creating and editing playlists
■ Creating and editing slide shows
■ Changing network settings
51
Page 58

Compa tible file formats
Media Server supports the following media formats:
Format Supported specification
Photo
Audio
Video
■
JPG/JPEG (at least 108 × 171 pixels)
■
BMP
■
PSD
■
PCT
■
TIFF
■
MP3 (bit ra te great er than 8 0 kbps)
■
WMA (bit rate greater than 48 kbps)
■
M3U (playlist)
■
PLS (playlist)
■
MPEG-1 and 2 (not greater than 3 MB/sec)
■
AVI (most types)
■
DVR-MS (better, good, and fair qualities)
52
www.gateway .com
Page 59

Opening Media Server
The Gateway Media Server program lets you make the media files on your computer
available to the Gateway Connected DVD Player. Media Server must be running on your
computer for the DVD player to communicate with your computer.
During installation, Media Server was added to your Sta rtup menu so it starts automatically
when your computer starts.
To open Media Server:
1 Click the Gateway Media Server icon in the Windows system tray. Media Server
opens.
- OR Click
Server opens.
Start, Programs, Gateway Media Server, then click Gateway Media Server. Media
2 For information about:
■ Importing media files, see page 54.
■ Working with media files, see page 58.
■ Working with playlists, see page 60.
■ Working with slide shows, see page 63.
■ Viewing and changing network settings, see page 66.
www.gateway.com
53
Page 60

Importing media files
You can imp ort audio, video, and image files into Media Server so the DVD player can
display or play them. You can import files from media programs (such as Windows Media
Player) or directly from your hard drive.
Important You can import files only from hard drives, not from mapped drives
or removab le media drives . If you ha v e data on mapp ed or remov ab le
drives that you want to play through the DVD player, copy the files
to your hard drive and import them from the hard drive.
Importing media directly from your hard drive
To import media:
1 Open Media Server, then click the Options tab.
2 In the File types to scan option area, click the check boxes for the media types you
want to import.
54
www.gateway .com
Page 61

3 Click the Media Import tab.
4 Click the folders containing the media files you want to import.
5 Click Scan. Media files from the selected folders are imported into Media Server. To
stop the scan before it completes, click
Stop Scan.
www.gateway.com
55
Page 62

Importing media using plugins
You can import files that are associated with a media player program into Media Server.
This method of importing uses a part of the media player’s program (called a plugin) to
import the files.
To import files using plugins:
1 Open Media Server, then click the Media Import tab.
2 Click Plugin Import. The Plugins dialog box opens.
3 Click the plugin you want to use (for example, MusicMatch Jukeb ox Scanner or Windows
Media Player Sca nner
into Media Server.
), then click Scan. Media files for the selected plugin are imported
56
www.gateway .com
Page 63

Tips & Tricks Select only one plugin f or each type of m edia . F or e xam ple , to impo rt
MP3 files o n a c o mput e r w h ere you have both Mu si cM atc h Jukebox
and Windows Media Player installed, select only one of the two
plugins.
You can select only one plugin at a time. If you have more than one
media type, select one plugin and import the media for that plugin.
Then select another plugin and import the media for that plugin.
Scheduling automatic scans
You can schedule automatic scans for importing media fi les, or you can set a time interval
for periodic scans.
To schedule automatic scans:
1 Open Media Server, then click the Media Import tab.
2 Click Scheduler. The Time Scheduler Options dialog box opens.
3 Click Plugin Selector. The Plugins Time Scheduler dialog box opens.
4 From the Plugin list, click the plugin you want to use.
5 Click the Update Period you want to use:
■ Manual Only (default) — Perform scans manually.
■ Every — Select a preset interv al to scan, f rom ever y 30 minute s to every 12 hours.
■ Time — Define a time of day to start the scan.
6 Click OK, then click OK again. The scan will occur automatically at the time you
specified, but only while the computer is on and Media Server is running.
www.gateway.com
57
Page 64

W orking with media files
The Media Files tab in Media Server displays the audio, video, and photo files tha t have
been imported from your hard drive into Media Server. You can list, hide, reveal, delete,
and edit file attributes for each file.
Listing media files
To list the media files on your hard drive:
1 Open Media Server, then click the Media Files tab.
2 Click the button for the media type you want to view in the Albums, Artists, and Title
lists.
(All) (Audio) (Video) (Photo)
If you have not imported any media files yet, the Artist, Album, and Title panes are
blank. For instructions on importing media, see “Importing media files” on page 54.
Editing media file attributes
You can edit the attributes for all media files.
To edit media file attributes:
1 Open Media Server, then click the Media Files tab.
2 Click the button for the media type you want to view in the Albums, Artists, and Title
lists.
(All) (Audio) (Video) (Photo)
3 In the Title list, right-click the file you want to edit the attributes for, then click Edit
Media details
Only one file can be edited at a time.
4 Type your changes in the Filename, Title, Artist, Album, Genre, or URL boxes, then click
Update. The file attributes are updated.
. The Edit Media Details dialog box opens.
58
www.gateway .com
Page 65

Deleting media files
You can delet e media files from Media Server.
To delete media files:
1 Open Media Server, then click the Media Files tab.
2 Click the button for the media type you want to view in the Albums, Artists, and Title
lists.
(All) (Audio) (Video) (Photo)
3 In the Title pane, right-click the file you want to delete, then click Delete from library
or
Delete from hard drive. To select multiple files, press and hold CTRL while clicking
the file names.
4 Click Yes. The file is deleted.
Important Subsequent scans of your hard drive will find files that were only
deleted from the library. To prevent media files from reappearing in
Media Server after a scan, delete them from your hard drive.
www.gateway.com
59
Page 66

W orking with pla ylists
You can create, edit, rename, or delete music playlists that can be played through your
DVD player. You can also import playlists from other media player programs.
Creat ing a new pla ylist
To create a new playlist:
1 To create a new playlist, you should first import media. For instructions, see
“Importing media files” on page 54.
2 Open Media Server, then click the Media Files tab.
3 Click New Playlist/Show. The Create New Playlist/Show dialog box opens.
4 Click Music Playlist, then type a name for a list in the List name box.
5 Click OK. The new playlist appears in the Playlists list.
6 T o add album or artist tracks, click and drag albums from the Albums list to the playlist,
or click and drag the artists from the
to the playlist.
7 To add separate tracks to the playlist, click the button, then click Add files from
hard drive
(hold down the C
to the playlist.
60
. Navigate to the folder containing the files you want to add, click the files
TRL key to select multiple files), then click Open. The tracks are added
Artists list to the playlist. The tracks are added
www.gateway .com
Page 67

Editing a playlist
To edit an existing playlist:
1 Open Media Server, then click the Media Files tab.
2 Click the button to display only audio media.
3 In the Playlists list, click the playlist you want to edit. The fi les contained in the playlist
appear in the Title list on the right side of the dialog box.
4 Click and drag the files to change their order in the list.
5 T o delete a file from the list, click the fi le you want to delete, then click the button.
To select multiple files, press and hold C
- OR -
TRL while cl icking th e file name s.
Right-click the file you want to delete, then click
drive
. To select multiple files, press and hold CTRL while clicking the file names.
Renaming a pla ylist
To rename a playlist:
1 Open Media Server, then click the Media Files tab.
2 Right-click the playlist you want to rename, then click Rename.
3 Type the new name, then press ENTER. The name is changed.
Deleting a playlist
To delete a playlist:
1 Open Media Server, then click the Media Files tab.
2 Right-click the playlist you want to delete, then click Delete. The playlist is deleted.
Delete from library or Delete from hard
www.gateway.com
61
Page 68

Importing a playlist
To import a playlist:
1 Open Media Server, then click the Options tab.
2 In the File types to scan option area, click the PLS playlist checkbox (Windows Media
Player playlists) or the
3 Click the Media Impo rt tab.
4 Click Plugin Import. The Plugins dialog box opens.
M3U playlist checkbox (MusicMatch Jukebox playlists).
5 Click the plugin you want to use (MusicMatc h J ukeb o x Scann er or Windo ws M edia Pla y er
Scanner
Server and appear in the Media Files tab’s
), then click Scan. Playlists for the selected plugin are imported into Media
Playlists/Shows list.
62
www.gateway .com
Page 69

W orking with slide show s
Y ou ca n create slide shows c ontaining images and background music. You can even import
and play slide shows created in other media player programs.
Creating a new slide show
When you create a new slide show in Media Server , each image is displayed for five seconds.
The image list starts over again if the music has not completed by the time th e last picture
is finished displaying.
To create a new slide show:
1 Open Media Server, then click the Media Files tab.
2 Click New Playlist/Show. The Create New Playlist/Show dialog box opens.
3 Click Slideshow, then type a name for the slide show in the List name box.
4 Click OK. The new slide show appears in the Playlists list.
5 Click the button to display only photo media.
6 To add entire albums to the slide show, click and drag the photo albums you want
to include in the slide show from the
photos are added to the slide show.
Albums list to the slide show you created. The
www.gateway.com
63
Page 70

7 To add separate photos to the slide show, click the button, then click Add fil es
from hard drive
files (hold down the C
are added to the slide show.
. Navigate to the folder containing the files you want to add, click the
8 To add background music to a slide show, click the button to display only audio
media, click the button, then click
containing the music file you want to add, click the file, then click
is added to the slide show.
Editing a slide show
To edit an existing slide show:
1 Open Media Server, then click the Media Files tab.
2 Click the button to display only photo media.
3 In the Playlists/Shows list, click the slide show you want to edit. The files contained
in the slide show appear in the Title list on the right side of the dialog box.
4 Click and drag the files to change their order in the list.
TRL key to select multiple files), then click Open. The p hotos
Add files from har d drive. Navigate to the folder
Open. The music
5 T o delete a file from the list, click the fi le you want to delete, then click the button.
To select multiple files, press and hold C
- OR Right-click the file you want to delete, then click
drive
. To select multiple files, press and hold CTRL while clicking the file names.
Renaming a slide show
To rename a slide show:
1 Open Media Server, then click the Media Files tab.
2 Right-click the slide show you want to rename, then click Rename.
3 Type the new name, then press ENTER. The name is changed.
TRL while cl icking th e file name s.
Delete from library or Delete from hard
64
www.gateway .com
Page 71

Deleting a slide show
To delete a slide show:
1 Open Media Server, then click the Media Files tab.
2 Right-click the slide show you want to delete, then click Delete. The slide show is
deleted.
www.gateway.com
65
Page 72

Viewing and changing network settings
You can view and change the following information about your computer’s network
settings:
■ Network information
■ Network status
■ Network adapter status
■ Language
Changing the computer name
You can change the computer’s name as it appears on the DVD player menus. Changing
the computer name does not affect the computer’s identification on the home network.
To change the computer name:
1 On the computer you want to change the name for, open Media Server, then click
the
System tab.
2 Click Change. The New - Server Name dialog box opens.
3 Type the name you want, then click Update Name.
4 Restart your computer for the new name to take effect.
66
www.gateway .com
Page 73

Selecting the network card
If your computer has more than one network adapter card installed, you must select the
card to use for the network connected to your DVD player.
To select the network card:
1 Open Media Server, click the System tab, then click Change Adapter. The Network
Adapters dialog box opens.
2 Click the appropriate network adapter card , then click OK.
Changing the language
You can change the language for the Media Server program.
To change the language:
1 Open Media Server, then click the Options tab.
2 Click the Change Language list, then click the language you want from the list.
3 Click Apply. The change in language takes effect the next time you start the Media
Server program .
www.gateway.com
67
Page 74

68
www.gateway .com
Page 75

Chapter 5
Playing Media
■ Playing CDs and DVDs
■ Activating Network mode
■ Playing networked music
■ Playing networked movies
■ Viewing networked pictures
69
Page 76

Playing discs
Before you begin:
1 Turn on the player using the POWER button on the front of the player. If the player
is in Standby power mode, press
green.
2 Turn on your TV, then set it to the audio/video input connected to the DVD player.
3 Turn on your audio system (if using an external amplifier or audio system), then set
it to the audio input connected to the DVD player.
To play a disc:
1 Press OPEN/CLOSE on the remo te control or on the front of t he player. The disc tray
opens.
POWER on the remote control. The Power LED turns
70
www.gateway .com
Page 77

2 Place the disc in the tray with the label side facing up. If the disc has no label and
both sides are playable, make sure that the playback side you want is facing down.
3 Press OPEN/CLOSE to close the disc tray. The disc begins p laying. If the disc is scratched,
dirty, or if the DVD is not encoded for Region 1, the disc will not play.
4 If the disc does not automatically begin playing, press PLAY on the remote control
or on the front of the player.
Caution Always press STOP to stop playback of a disc before turning off
the player.
5 Press the following remote control buttons for other playback features:
Button Function
PAUSE/STEP
PREV/NEXT
REV/FWD
SLOW
STOP
Press to freeze at the current frame during playback. Press again
to advance one frame at a time. Press PLAY to resume normal
playback.
Press to skip to the previous or next chapter or track.
Press repeatedly to scan backward or forward at variable speeds
during playback.
Press repeatedly to play in slow motion at variable speeds.
Press to stop playback, then press PLAY to resume playback.
Press STOP twice to stop playback and start over at the main menu.
www.gateway.com
71
Page 78

6 Press the following remote control buttons to navigate within disc menus:
Button Function
MENU
ENTER
0-9
RETURN
CLEAR
Press to display the disc menu for the currently loaded disc.
Press to move the cursor left, right, up, and down in the disc menu.
Press to make se lections in the disc m enu.
Press to make direct selections in some disc menus.
Press to dis play the previous me nu or to clos e the disc menu.
Press to erase a character when entering names in some menus.
Playin g MP3 CDs
You can play MP3 files that have been burned (recorded) onto a CD-R or CD-RW.
Important To ensure proper pla yback of discs b urned from MP3 fil es, mak e sure
that the files on the MP3 CD have been recorded at a bit rate of at
least 12 8 kbps.
If there are any gaps (blank data) on multi-session discs, you may
experience playback problems.
To play an MP3 CD:
1 Insert a CD-R or CD-RW disc containing MP3 files into the disc tray. The MP3 main
menu opens.
Important Depending on the number of tracks or folders on the CD, the player
may take up to on e minute to read the CD.
If the CD contains multiple folders, only the first folder’s contents are
displayed. Folder track names are abbreviated to twelve characters.
2 To select a different folder, use the arrow buttons to highlight the name of the folder
you want, then press
ENTER.
3 To play a track, use the arrow buttons to navigate to the track you want, then press
ENTER.
■ To move up and down the track list, press the buttons.
■ To move to the previous or next page, press the buttons.
■ To skip to the previous or next track, press PREV or NEXT .
4 To s t op p l a y b a c k , p r e s s STOP .
72
www.gateway .com
Page 79

To create a custom playlist for an MP3 CD:
1 Highlight Browse Disc, then press ENTER.
2 Highlight a track you want to add to the playlist, then press ENTER. Repeat for each
track you want to add.
3 When you are finished, highlight Create Prog, then press ENTER. The tracks you
selected are displayed.
4 Highlight the first track, then press PLAY to play the playlist.
Accessing adv anced featur es
Selecting a title
When you play a DVD that conta ins more than one title, you can select th e title you wa nt.
To select the title:
1 Press TITLE. The DVD’s Title menu opens. If no Title menu opens, the DVD do es not
contain multiple titles.
2 Press the or 0-9 buttons to select a title, then press ENTER to start playback.
Repeating a scene or segment
You can repeat any segment of a DVD or CD continuously.
To repeat a disc segment:
1 Press A-B during playback to select the starting point (point A).
2 Press A-B again to select the ending point (point B). The segment repeats in a
continuous loop.
3 Press A-B again to cancel.
Adjusting the zoom of the image
You can adjust the zoom (scale) of the on-screen image during DVD playback.
To adjust the zoom of the DVD image:
■ Press ZOOM repeatedly. The size of the on-screen image is progressively increased,
then zoom turns off.
www.gateway.com
73
Page 80

Changing angles
Some DVDs contain scenes filmed from multiple angles. If additional angles are available
for a scene, the Angle icon is displayed during play back.
To change the selected angle:
1 Press ANGLE when you see the Angle icon appear on screen durin g DVD playback.
2 Press ANGLE repeatedly to select from all available angles on the disc. You can not
change the angle setting during VCD playback.
Displa ying subt itles
On some DVDs, you can select subtitles in various languages.
To change subtitles:
1 Press SUBTITLE during DVD playback. Subtitles appear on the bottom of the TV screen.
2 Press SUBTITLE repeatedly to select from all available subtitle languages, or to turn
subtitles off.
Selecting audio format
On some DVDs, you can select from multiple audio formats, such as Dolby Digital 5.1 or
2-channel stereo. You may also be able to select soundtracks in multiple languages.
To select the audio format or soundtrack:
1 Press AUDIO during DVD playback. The selected audio format or soundtrack chang es.
2 Press AUDIO repeatedly to select from all available audio formats or soundtracks.
Searching for a loca tion on the disc
You can jump to a specific time, title, chapter, or track on the disc.
To search for a s pecific location on the disc:
1 Press SEARCH during disc playback. The Search menu opens.
2 Press the buttons to select Time, Title/Chapter, or Track.
3 Press 0-9 to enter the time, title/chapter, or track you want. Press CLEAR to delete a
character.
4 Press ENTER to start playba ck at the location you sp ecified.
74
www.gateway .com
Page 81

T urning on pr ogressiv e scan
If you connected the player to your TV using the Component Out jacks, you can change
the video output to Progressive Scan for superior video qu ality.
To turn on progres sive scan:
■ While playback is stopped, press VIDEO OUT repeatedly to cycle through the video
settings until “Progressive Scan” appears on the screen. You need to set this only
once.
Displaying disc information on the screen
You can select the type of information to display on the TV screen during DVD playback.
To select the information to display:
1 Press DISPLAY to view information about the disc being played.
2 Press DISPLAY once to view elapsed/remaining time.
3 Press DISPLAY again for de tailed disc information such as disc type, title number,
chapter number, angle number, audio soundtrack, and subtitle langu age.
4 Press DISPLAY again to turn off the display.
Selecting audio channels
You can select a specific audio channel from all the available audio channels.
To select an audio channel:
1 Press AUDIO during VCD playback.
2 Press AUDIO repeatedly to se lec t the audi o ch annel you w ant t o hear, such as STEREO,
LEFT, and RIGHT.
Playing photo CDs
Photo CDs contain JPG images that you can view on your TV.
To view images on a photo CD:
1 Insert a photo CD into the disc tray. The first image on the disc displays on the TV
screen.
2 To display the previous or next image, press PREV or NEXT .
www.gateway.com
75
Page 82

3 To display a specific image, press the 0-9 buttons to enter the image number, then
press
ENTER.
4 To see the number of the current image, press DISPLAY.
5 To view up to 16 thumbnails of the pictures per page, press TITLE, press the arrow
buttons to highlight the image you want to display, then press
To manipulate the displayed image:
ENTER.
1 To rotate a picture 180°, press the button.
2 To rotate a picture in 90° increments, press the ANGLE button.
3 To magnify an image, press ZOOM. While an image is magnified, press the
buttons to scroll the image.
4 To return to normal, press the button.
To create a slide show of images on a photo CD:
1 Press the buttons to highlight Browse Disc, then press ENTER.
2 Highlight an image you want to add to the slide show, then press ENTER. R epeat for
each image you want to add.
3 When you are finished, highlight Create Prog, then press ENTER. A list of the pictures
you selected is displayed.
4 Highlight the first image, then press PLAY. The slide show plays.
5 To stop the slide show and re-open the menu, press STOP.
76
www.gateway .com
Page 83

Playing c omputer media files
You can play three types of computer media on your player:
■ Photo
■ Audio
■ Video
Format Supported specification
Photo
Audio
Video
■
JPG/JPEG (at least 108 × 171 pixels)
■
BMP
■
PSD
■
PCT
■
TIFF
■
MP3 (bit r ate great er than 8 0 kbps)
■
WMA (bit rate greater than 48 kbps)
■
M3U (playlist)
■
PLS (playlist)
■
MPEG-1 and 2 (not greater than 3 MB/sec)
■
AVI (most types)
■
DVR-MS (better, good, and fair qualities)
Entering Network mode
To play computer media files, your player must first be in Network mode.
To enter Network mode:
1 Make sure your computer is on and running Media Server.
2 Press the POWER button on the front of the player. If the player is in Standby power
mode, press
POWER on the remote control to turn on the player.
3 Turn on your TV or oth er video device, then set it to the audio/video input that is
connected to your play er.
4 Turn on your audio system if using an extern al amplifier or audio system, then set
it to the input connected to the player.
www.gateway.com
77
Page 84

5 Press CONNECT on the remote control to enter Network mode. The player connects
to the network, then displays the Network main menu. Use the following remote
control buttons to navigate in Network mode:
Button Function
CONNECT Press to switch between Network mode and DVD mode.
Press to move the cursor left, right, up, and down in the
Network
menu.
ENTER Press to make selections in the
Network
menu.
Exiting Network mode
To exit Network mode and return to DVD mode:
■ Press the CONNECT button. The player exits Network mode and enters DVD mode.
If a DVD is in the disc tray, the DVD plays automatically.
Playing music
You can play your computer’s MP3 and WMA audio files on your audio system.
To play music:
1 Enter Network mode by pressing CONNECT on the pl ayer’s remote control. For more
information, see “Entering Network mode ” on page 7 7.
2 Highlight Audio, then press ENTER.
3 Highlight a category (for example, Artist), then press ENTER.
4 Highlight an artist, then press ENTER.
5 To play a song, highlight the song by the artist, then press ENTER.
- OR To play all songs in the current folder in a repeating loop, press
78
PLAY .
www.gateway .com
Page 85

Playing a playlist
For information on creating a playlist, see “Working with playlists” on page 60.
To play a playlist:
1 Enter Network mode by pressing CONNECT on the pl ayer’s remote control. For more
information, see “Entering Network mode ” on page 7 7.
2 Highlight Audio, then press ENTER.
3 Highlight Playlists, then press ENTER.
4 Highlight the playlist you want, then press PLAY to play the entire playlist.
- OR If you want to play only a certain song within playlist, highlight the playlist, press
ENTER, then highlight the song and press PLAY.
Playing mo vies
You can play video files from your computer on your TV.
To play a movie:
1 Enter Network mode by pressing CONNECT on the pl ayer’s remote control. For more
information, see “Entering Network mode ” on page 7 7.
2 Highlight Video, then press ENTER.
3 To play one movie, highlight the movie, then press ENTER.
- OR To play all movies in a repeating loop, highlight the first movie you want to play,
then press
PLAY.
Viewing pictures
To view a picture:
1 Enter Network mode by pressing CONNECT on the pl ayer’s remote control. For more
information, see “Entering Network mode ” on page 7 7.
2 Highlight Images, then press ENTER.
www.gateway.com
79
Page 86

3 Highlight a category, then press ENTER.
4 To view only one picture, highlight the picture you want to view, then press ENTER.
- OR To view all pictures in a repeating loop, press
Tips & Tricks If you view the first picture in the list, all of the remaining pictures in
the list will automatically display in a slide show.
For information on creating a slide show, see “Working with slide shows” on page 63.
PLAY.
To view a slide show:
1 Enter Network mode by pressing CONNECT on the pl ayer’s remote control. For more
information, see “Entering Network mode ” on page 7 7.
2 Highlight Images, then press ENTER.
3 Highlight Slideshows, then press ENTER.
4 To play a slide show, highlight the slide show you want, then press PLAY.
- OR To display the list of pictures in the slide show and the song for the slide show,
highlight the slide show you want, then press
ENTER.
To view thumbnails of your images:
■ While viewing an image or a slide show, press ZOOM to view up to 16 thumbnails
per screen.
80
www.gateway .com
Page 87

Chapter 6
Maintaining and
Troubleshooting
■ Maintaining your DVD player
■ Network troubleshooting
■ DVD troubleshooting
■ Getting help
81
Page 88

Maintaining your player
■ Unplug the power cord before you clean the outside of the player. Use a damp cloth
for cleaning. Do not use liquid cleaners or aerosol cleaners.
■ Do not use this product near water or in damp environments, such as a bathroom,
and do not use this product near heat sources, such as radiators and stoves.
■ Never block the ventilation openings. Do not put the player on a soft surface such
as a bed, couch, or carpet.
■ Do not place the power cord in a location where it can be pinched (such as behind
a hinge of a cabinet door) or stepped on, an d plug the player in to a surge protecto r
instead of directly into a wall outlet. For extra protection during a lightning storm,
unplug the player from the surge protector or wall outlet.
■ Do not try to service this product yourself. Opening or removing any covers can
expose you to dangerous voltages and w ill void the player’s warranty.
Caring for DVDs and other discs
■ To keep the disc clean, always ho ld it by the ed ges. Do not touch the surface. When
the disc is not being played, store it in its case.
■ Do not expose the disc to direct sunlight or heat sources. Leaving it in a car parked
in direct sunlight is likely to damage the disc because temperatures may rise
considerably inside the car.
Cleaning dis cs
Clean discs by wiping from the center to the edge, no t ar ound in a c ir cle, using a product,
such as a soft cloth, made especially for cleaning CDs and DVDs. Do no t use solv ents such
as benzine, thinner, or anti-static spray made for vinyl records.
82
www.gateway .com
Page 89

Network tr oubleshooting
This chapter provides some solutions to common networking and DVD problems. If the
suggestions in this chapter do not correct the problem, see “Getting help” on page 88.
The DVD player cannot connect to the network.
■ Make sure that Gateway Media Server is installed a nd running on the computer.
■ Make sure that you have selected a network card in the Media Server program. For
more information, see “Selecting the network card” on pa ge 67.
■ Make sure that your computer has an IP address assigned to it. To check, open Media
Server, then click the
■ Make sure that you do not have a software firewall activated, such as Norton Antiv irus
or the Windows XP firewall.
When I try to se t up a n etwork c onnection at the play er, I get the messag e “No Netw ork
Card. Please insert a supported card and restart.”
■ Make sure that the network PC Card is installed correctly. For more information, see
“Installing the network card” on page 21.
■ Make sure that the PC Card you are using is a supported card. View a list of supp orted
PC Cards at support.gateway.com
About tab.
.
The DVD player searches for a computer, but cannot find one.
■ Make sure that the network PC Card is installed correctly. For more information, see
“Installing the network card” on page 21.
■ Make sure that Gateway Media Server is running on the computer.
■ Turn the DVD player off, then turn it back on again.
■ Restart the computer.
No songs ar e foun d when I try to i mport the fil es int o Media Server.
■ Open music files in a m edia player program s uch as Windows Media Player, then
import music files into the Gateway Media Server program using the appropriate
plugin. For more information, see “Importing media using plugins” on page 56.
A song starts playing, then it stops for no r eason.
■ Try to play the song again. If the song still does not start, make sure that your network
connection is working.
■ If your network uses a wireless access point, restart the access point, then restart the
switch or router.
www.gateway.com
83
Page 90

How can I determine what version of the player firmware my player has?
■ Press Stop, then press Setup to open the W elcome to Setup screen. The firmware version
number appears on the bottom of that screen.
Media Server cannot find mu sic file s tha t I know ar e the re.
■ Make sure that Media Server is installed and running on the computer that has the
music files.
■ Make sure that the songs are supported formats (MP3 and WMA).
■ Songs must meet the bit rate requirements (at least 80 kbps for MP3, at least 48 kbps
for WMA). If the media file does not meet the bit rate requirements of the DVD player ,
the file is not displayed.
Media Server cannot find picture files that I know are there.
■ Make sure that Media Server is installed and running on the computer that has the
picture files.
■ Place all pictures within a single folder on your computer, then import the images
into Media Server. For more information, see “Importing media directly from your
hard drive” on page 54
Media Serv er cannot find all o f my picture s.
■ Make sure that Media Server is installed and running on the computer that has the
picture files.
■ Make sure that the pictures are JPEG or JPG format.
■ Pictures must be at least 171 pixels in width and 108 pixels in height.
Media Serv er cannot find th e mo vies o n my hard dr iv e.
■ Make sure that Media Server is installed and running on the computer that has the
movie files.
■ Open movie files in a m edia player program suc h as Windows Media Player, then
import them into Media Server. For more information, see “Importing media using
plugins” on page 56.
■ Make sure that they are supported movie formats. For a list of supported movie
formats, see “Specifica tions” on page 89.
■ MPEGs must not have a display rate greater than 3 MB/sec.
Why does my firewall software block the DVD player from Gateway Media Server?
■ Disable your firewall software or set up the firewall software to allow the Gateway
Media Server. To set up your firewall software, see its documentation.
84
www.gateway .com
Page 91

Is there a way to manually enter the SSID when doing wireless networking?
■ Wireless access points can disable the broadcast of the service set identification (SSID).
If the SSID is not broadcasting, there is no way to manually enter the SSID information
in the player. To enter the SSID under these circumstances, enable SSID broadcasting
on the access point. Y o u can then connect with the player , after which you can disable
the SSID on the access point.
D VD troubleshooting
The player does not have power .
■ Make sure that the AC power cord is securely plugged into the wall outlet.
■ Make sure that the POWER button on the front of the player is pressed in.
■ Make sure that the player is not in sleep mode (press POWER on the remote control).
No picture appears on my TV.
■ Make sure that the video cables are securely plugged into the player and the TV.
■ If the video cables are damaged, replace them .
■ Make sure that the player is connected to the correct TV input.
■ Make sure that the video input on the TV is set to view the DVD player.
■ Make sure that video is set to the correct mode. Press the VIDEO OUT button on the
remote control until a picture is visible.
The picture on m y TV has a lot of static o r “n oise”
■ Make sure that the DVD is not dirty or flawed. For information about cleaning your
disc, see “Caring for DVDs and other discs” on page 82.
■ If the picture output from your player goes through your VCR to get to your TV, the
copy-protection signal used on some DVDs could diminish the picture quality. Try
connecting the player directly to the TV. If you still experience problems, try
connecting your player to your TV’s S-Video input.
The DV D picture d oes not fill the scre en on m y stan dard t elev ision.
■ Change the aspect ratio. For more information, see “To set the aspect ratio:” on
page 48.
■ If the picture does not change, the DVD’s aspect ratio may be fixed and cannot be
adjusted.
No sound plays while playing media through the player .
■ Make sure that all aud io cables are securely plugged in.
www.gateway.com
85
Page 92

■ If any audio or speaker cab les are damaged, replace them.
■ Make sure that the volume is turned up on your TV.
■ Make sure that the player’s audio settings match your TV and audio system settings.
■ The player may be in Pause, Slow Motion, or Forward/Reverse Scan mode. Press PLAY
on the remote control to return to normal playback mode.
There is no sur round effect d uring playb ack of Dolby Di gital soundtr ack.
■ Make sure your audio cables are correctly connected. For more information, see
“Configuring Dolby Digital” on page 25.
■ Depending on the DVD, the audio output may not use all 5.1 channels, but instead
output mono or stereo sound, even if the soundtrack is recorded in Dolby Digital
format.
I keep hearing a loud hum or noise.
■ Make sure that all components in your audio system are securely plugged in.
■ Make sure that you keep your audio system’s cables away from a transformer or motor ,
and that you keep them at least 10 feet away from a TV or fluorescent lights.
■ Move your TV away from your audio components.
■ The plugs and jacks may be dirty. Unplug them, then wipe them clean with a cloth
slightly moistened with isopropyl alcohol.
■ Clean the DVD. For information about cleaning your disc, see “Caring for DVDs and
other discs” on page 82.
The remote control does not work.
■ Point the remote control directly at the sensor on the front of the player.
■ Remove any obstacles between the remote control and the p layer.
■ Move closer to the player when using the remote control.
■ Replace the batteries.
The DV D does not play.
■ Make sure that there is a DVD in the tray.
■ If the DVD has two playable sides, make sure that the side you want to play is facing
down in the tray.
■ The DVD may be warped and unplayable.
■ The region code on the DVD m ay not be Region 1.
■ Moisture may have condensed inside the player. Remove the DVD and leave the player
turned on for about half an hour to dry the condensation.
86
www.gateway .com
Page 93

The DVD does not start playing from the beginning.
■ Resume Play is active. Press STOP twice, then restart DVD playback.
When I play a DVD , the voice audio is really quiet, but the music is really loud.
■ Y our pl ayer may be outputting a 5. 1-channel sound signal, while y ou have only stereo
speakers connected. Check your audio sett ings and speaker connections. For more
information, see “Connecting to your audio/video system” on pa ge 18.
www.gateway.com
87
Page 94

Getting help
If the troubleshooting information in this chapter does not solve your problem:
■ Review this manual for information that can help you.
■ If you need tutorial help setting up your system, contact Answers by Gateway at
www.gateway.com/answers
■ Visit the Gateway eSupport Web site at support.gateway.com. Gateway's online
support is available 24 hours per day, 7 days per week.
■ Call Gateway’s toll-free telephone support. Toll-free support for your product is for
technical problems only, not tutorial help. Telephone support is available 7 days per
week, from 7:00 a.m. to 9:00 p.m. Central Time. Contact Gateway Technical Support
at 888-737-6949. TDD technical support (for the hearing impaired) is available
weekdays from 6:00 a.m. to 8:00 p.m. Central Time, and weekends from 6:00 a.m. to
5:00 p.m. Central Time.
. A fee may apply.
88
www.gateway .com
Page 95

Appendix A
Specifications
89
Page 96

Video
Video Out 1.0Vp-p 75Ω sync, negative polarity, RCA pin jack (1)
S-Video Out
(separate Y and C
signal output)
Component Video
Out (progressive/
interlace scan mo des)
Supported video
formats
Supported image
formats
Audio
Y: 1.0Vp-p 75Ω sync, negative polarity
C: 0.286Vp-p 75
Y: 1.0Vp-p 75
Ω
Ω
Cb: 0.7Vp-p 75Ω
Cr: 0.7Vp-p 75Ω
■
MPEG-1 and 2 (not greater than 3 MB/sec)
■
DVR-MS (better, good, and fair qualities)
■
AVI
AVI files must have the following FOURCC types and must have an index chuck:
■
H263, I263, MJPG, DIVX, divx, DX50, XVID, xvid, mp4s, MP4S, M4S2, m4s2,
DIV3, div3, MP43, MP42, M PG4, WMV1, dvsl, dvsd, D VSD, dvhd, mpg1, mpg2,
PIM1, MJPG, HFYU, hfyu
■
JPG/JPEG (at least 108 × 171 pixels)
■
BMP
■
PSD
■
PCT
■
TIFF
Analog Out 1.85V(rms)/10kΩ RCA L/R pin jack (1)
Coaxial Out 0.5Vp-p 75
Ω; RCA pin jack (1)
Optical Out Optical fiber transmitter
Frequency response 20 Hz to 20 kHz
Signal-to-noise ratio 90 dB
Total harmonic
Less than 0.05%
distortion
■
Supported audio
formats
MP3 (bit rate greater than 80 kbps)
■
WMA (bit rate greater than 48 kbps)
■
M3U (playlist)
■
PLS (playlist)
90
www.gateway .com
Page 97

General
Power requirements 120 VAC, 60 Hz
Power consumption <25 W
Video standard NTSC
Weight (approximate) 5.5 lbs. (2.5 kg)
Dimensions
(approximate)
DVD player: 16.9 × 11.6 × 2.2 inches (430 × 295 × 55 mm)
Remote control: 7.3 × 1.8 × 1 inches (185 × 45 × 25 mm)
www.gateway.com
91
Page 98

92
www.gateway .com
Page 99

Appendix B
Safety , Regulatory , and L egal
Information
93
Page 100

Regulatory complianc e statemen ts
United States of America
Federal C ommunications C ommission (FC C)
Unintentional emit ter per FC CPart15
This device has been tested and found to comply with the limits for a Class B digital device, pursuant to Part 15
of the FCC rules. These limit s are designed t o provide reasonable protection again st harmful inter ference in a
residential installati on.
This equipment generates, uses, and can radiate radio frequency energy and, if not installed and used in
accordance with the instructions, may cause harmful interference to radio or television reception. However,
there is no guarantee that interference will no t occur in a particular installatio n. If this equipment does cause
interference to radio and television reception, which can be determined by turning the equipment off a nd on,
the user is encouraged to try to correct the interference by one or more of the following measures:
■
Reorient or relocate t he receiving antenna
■
Increase the separation between the equipment and receiver
■
Connect the equipment to an outlet on a different circuit from that to which the recei ver is connected
■
Consult the dealer or an experienced radio/TV technician for help.
Compliance Accessories: The accessories associated with this equipment are: shielded video cable. These
accessories are required to be used in order to ensure compliance with FCC rules.
Caution Changes or modifications not expressly approved by Gateway could
void the FCC compliance and negate your authority to operate the
product.
Canada
Industry Canada (IC)
Unintentional emit ter per I CES-003
This digital apparatus does not exceed the Class B limits for radio noise emissions from digital apparatus as set
out in the radio interference regulations of Industry Canada.
Le présent appareil numérique n’émet pas de bruits radioélectriques dépassant les limites applicables aux
appareils numériques de Classe B prescrites dans le règlement sur le brouillage radioélectrique édic té par I ndustrie
Canada.
Laser safety statement
All Gateway systems equipped with CD and DVD drives comply with the appropriate safety standards, including
IEC 825. The laser devices in these components are classified as “Class 1 Laser Products” under a US Department
of Health and Human Services (DHHS) Radiation Performance Standard. Should the unit ever need servicing,
contact an authorized service location.
94
www.gateway .com
 Loading...