

Page 1
2202650
TC_SCPandT_Couv_PC_UK 23/02/04 17:50 Page 4
Page 2

WARNING: READ BEFORE PLAYING
A very small percentage of individuals may experience epileptic seizures when
exposed to certain light patterns or flashing lights. Exposure to certain patterns or
backgrounds on a computer screen, or while playing video games, may induce an
epileptic seizure in these individuals. Certain conditions may induce previously undetected epileptic symptoms even in persons who have no history of prior seizures or
epilepsy.
If you, or anyone in your family, have an epileptic condition, consult your physician
prior to playing. If you experience any of the following symptoms while playing a video
or computer game -- dizziness, altered vision, eye or muscle twitches, loss of awareness, disorientation, any involuntary movement, or convulsions -- IMMEDIATELY
discontinue use and consult your physician before resuming play.
TC_SCPandT_Couv_PC_UK 23/02/04 12:56 Page 2
Page 3

1
Table of Content
GENERAL MENU. . . . . . . . . . . . . . . . . . . . . . . . . . . . . . . . . . . . . . . . . . . . . . . . . . . .
SINGLE PLAYER MODE. . . . . . . . . . . . . . . . . . . . . . . . . . . . . . . . . . . . . . . . . . . . . . 2
The Threat . . . . . . . . . . . . . . . . . . . . . . . . . . . . . . . . . . . . . . . . . . . . . . . . . . . . . . . . . 2
Sam Fisher Profile . . . . . . . . . . . . . . . . . . . . . . . . . . . . . . . . . . . . . . . . . . . . . . . . . . . 2
Third Echelon Team. . . . . . . . . . . . . . . . . . . . . . . . . . . . . . . . . . . . . . . . . . . . . . . . . . . 2
Other characters. . . . . . . . . . . . . . . . . . . . . . . . . . . . . . . . . . . . . . . . . . . . . . . . . . . . . 3
Getting Started. . . . . . . . . . . . . . . . . . . . . . . . . . . . . . . . . . . . . . . . . . . . . . . . . . . . . . 4
Main Menu . . . . . . . . . . . . . . . . . . . . . . . . . . . . . . . . . . . . . . . . . . . . . . . . . . . . . . . . 4
Game Screen . . . . . . . . . . . . . . . . . . . . . . . . . . . . . . . . . . . . . . . . . . . . . . . . . . . . . . . 5
Game Menu. . . . . . . . . . . . . . . . . . . . . . . . . . . . . . . . . . . . . . . . . . . . . . . . . . . . . . . . 6
OPSAT (Operational Satellite Uplink) . . . . . . . . . . . . . . . . . . . . . . . . . . . . . . . . . . . . . . 6
About Stealth Action . . . . . . . . . . . . . . . . . . . . . . . . . . . . . . . . . . . . . . . . . . . . . . . . . . 6
Sam’s Actions and Movements . . . . . . . . . . . . . . . . . . . . . . . . . . . . . . . . . . . . . . . . . . . 6
Weapons, Gadgets, Items, and In-Game Elements . . . . . . . . . . . . . . . . . . . . . . . . . . . . 10
MULTIPLAYER MODE . . . . . . . . . . . . . . . . . . . . . . . . . . . . . . . . . . . . . . . . . . . . . . 14
The Game Principle. . . . . . . . . . . . . . . . . . . . . . . . . . . . . . . . . . . . . . . . . . . . . . . . . . 14
The Different Game Modes . . . . . . . . . . . . . . . . . . . . . . . . . . . . . . . . . . . . . . . . . . . . 14
Controls. . . . . . . . . . . . . . . . . . . . . . . . . . . . . . . . . . . . . . . . . . . . . . . . . . . . . . . . . . 15
Quick Start-Up . . . . . . . . . . . . . . . . . . . . . . . . . . . . . . . . . . . . . . . . . . . . . . . . . . . . . 16
Menus . . . . . . . . . . . . . . . . . . . . . . . . . . . . . . . . . . . . . . . . . . . . . . . . . . . . . . . . . . . 17
Game Screens . . . . . . . . . . . . . . . . . . . . . . . . . . . . . . . . . . . . . . . . . . . . . . . . . . . . . 19
Characters’ Abilities. . . . . . . . . . . . . . . . . . . . . . . . . . . . . . . . . . . . . . . . . . . . . . . . . . 20
Arsenal . . . . . . . . . . . . . . . . . . . . . . . . . . . . . . . . . . . . . . . . . . . . . . . . . . . . . . . . . . 24
The Game Levels . . . . . . . . . . . . . . . . . . . . . . . . . . . . . . . . . . . . . . . . . . . . . . . . . . . 27
The Gameplay Objects. . . . . . . . . . . . . . . . . . . . . . . . . . . . . . . . . . . . . . . . . . . . . . . . 27
Warranty (Complete with template) . . . . . . . . . . . . . . . . . . . . . . . . . . . . . . . . . . . . . . 29
Support Technique (Complete with template). . . . . . . . . . . . . . . . . . . . . . . . . . . . . . . . 30
TC_SCPandT_Manuel_PC_UK 23/02/04 12:58 Page 1
Page 4
2
Single Player
The Threat
In response to the growing use of sophisticated digital encryption to conceal potential threats to the national security
of the United States, the NSA (National Security Agency) has ushered forth a new dawn of intelligence-gathering
techniques. This top-secret initiative, dubbed Third Echelon, marks a return to classical methods of espionage,
enhanced with leading-edge surveillance and combat technology for the aggressive collection of stored data in hostile
territories. When intelligence deemed critical to national security cannot be obtained by traditional means, Third
Echelon is granted clearance to conduct physical operations. Denied to exist by the U.S. government, Third Echelon
deploys units known as Splinter Cells: elite intelligence-gathering forces consisting of a lone field operative supported
by a remote team. Like a sliver of glass, a Splinter Cell is small, sharp, and nearly invisible.
2006: The U.S. installs a temporary military base on East Timor to train the developing defense force of the “world’s
youngest democracy.” Resistance to the U.S. military presence in Southeast Asia is widespread and passionate, but
the threat Indonesian militias pose to Timorese democracy is deemed sufficient justification. At the same time, the
U.S. doesn’t mind having an excuse to install active military personnel within easy reach of both North Korea and the
largest Muslim population in Asia.
Anti-U.S. resentment comes to a head under the leadership of guerilla militia leader Suhadi Sadono, acting with the
unofficial support of major corrupt factions of the Indonesian government. Suhadi’s men attack and occupy the U.S.
Embassy in Jakarta, taking dozens of civilian and military personnel hostage.
You are Sam Fisher. You’re sent in, not to rescue the hostages, but to destroy top-secret documentation held in the
embassy before Suhadi’s men access it.
Sam Fisher Profile
Fisher has been on the front lines of espionage in several defining conflicts throughout the past decades. He has not
only survived, but also excelled in the field of covert operations through hard work, insatiable curiosity, and brutal
honesty. He has little time for polite niceties and even less for lies.
Though fully aware and confident of his abilities, Fisher understands that his survival has often been a gift of chance.
He knows he is human and fallible, and he does not want to die. He has a strange and slightly dark sense of humour.
He is quiet, instinctive, and observant: somebody who watches from the outside. Combat, espionage, and constant
training have defined his adult life; his tactical experience has become part of his instinct. Now, even outside of work
he is most comfortable on the fringes of society, keenly observant but still removed.
Fisher has acquired an admirable collection of scars and secured his place in Valhalla; he has little left to prove to the
world. Now older and wiser, he has no interest in glory. If he fights, it is because he believes the cause is necessary
and he is capable.
Third Echelon Team
Colonel Irving Lambert
Born: 1961 in Batcave, NC Height: 6’2” Weight: 270 lbs.
THIRD ECHELON Operations Coordinator
Lambert is the link between the field agent (or agents) and Third Echelon’s team of researchers,
hackers, strategists, and commanders. While Fisher is in the field, he is in constant contact with
Lambert via sub dermal microchips and a cochlear implant.
TC_SCPandT_Manuel_PC_UK 23/02/04 12:58 Page 2
Page 5
3
Dermot P. Brunton
Born: 1963 Height: 5’5” Weight: 136 lbs.
SHADOWNET Operations Coordinator
Dermot is the “Irving Lambert” of the SHADOWNET initiative. As his operations specifically prohibit live satellite
contact between coordinator and operatives, Dermot’s function is more bureaucratic and managerial.
Anna Grimsdóttir
Born: 1974 in Boston, MA Height: 5’8” Weight: 128 lbs.
THIRD ECHELON Communications Lead
Grímsdóttir heads a small team of programmers responsible for providing technological, cryptographic,
and data support for the field operative. Grímsdóttir will assist Fisher in his interface with the high-tech
components of his missions.
Other characters
Suhadi Sadono
Indonesian Guerilla Leader of the DARAH DAN DOA
Suhadi has been fighting for Indonesian sovereignty since he was 15 years old.
He worked his way quickly through the ranks and by his 21st birthday was the
leader of the Darah Dan Doa (Blood and Prayer), at that time a gang of a few
dozen. By the mid-90s, funded (covertly) by the Kopassus (Indonesian Special
Forces) and operation REDBEARD, the Darah Dan Doa had grown into a militia
of thousands. Despite the withdrawal of U.S. and CIA support in 1999, the
DDD continues to thrive.
Norman Soth
Mercenary
Soth is a CIA-trained mercenary and former freedom fighter operating in Southeast Asia, most
notably Indonesia. In 1992 he was part of CIA operation REDBEARD, after which he spent nearly a
decade arming and training the Kopassus to stamp down Timorese uprisings.
Dahlia Tal
Shin Bet Agent
Shin Bet, the Israeli Secret Police, handles the country’s less savory intelligence-
related tasks, such as interrogations, public relations, and psyops.
TC_SCPandT_Manuel_PC_UK 23/02/04 12:58 Page 3
Page 6
4
Getting started
Installation
To install Splinter Cell, follow these simple steps:
1. Start your computer
2. Insert the Splinter Cell Installation CD into your CD-ROM drive. The Autorun Menu should appear.
Note: If the Autorun Menu does not automatically appear, double-click on the My Computer icon located on your
desktop and then double-click on the icon that corresponds to your computer’s CD-ROM drive. The Autorun Menu
should now appear.
3. Click on the Install Splinter Cell button. The installation wizard now walks you through each step of the setup and
installation process for the game. Once you have created a directory for Splinter Cell, the game is installed on your
hard drive. The game automatically asks you if you want to install DirectX v9.0. You can not play Splinter Cell without
v8.1 or higher on your computer. If you already have a version of DirectX that is v8.1 or higher, simply check the
No button, and it does not install DirectX. If you are not sure, click Yes, and the DirectX installer performs its own
verification.
4. After installing the game, select “Ubisoft: Splinter Cell Pandora Tomorrow: Play Splinter Cell Pandora Tomorrow”
from your computer’s Start menu or double-click the “Play Splinter Cell Pandora Tomorrow” shortcut on your desktop.
Doing either starts the game.
Note: The Splinter Cell Pandora Tomorrow Play CD must be in your CD-ROM drive to start the game.
Uninstalling/Reinstalling the game
To uninstall Splinter Cell Pandora Tomorrow, follow these simple steps:
1. Start your computer
2. Insert either Splinter Cell Pandora Tomorrow CD into your CD-ROM drive. The Autorun Menu should appear.
3. When it appears, click on the Uninstall Splinter Cell button. The uninstall wizard automatically asks if you really
want to uninstall the game. If you are sure you want to remove Splinter Cell Pandora Tomorrow from your hard drive,
click the Yes button. If you don’t want to uninstall the game, click No, which cancels the process. If you uninstall
Splinter Cell, all previously saved games remain on your hard drive, unless you answer Yes to the “Delete all
configuration and saved games files” question.
Note: You can also uninstall Splinter Cell Pandora Tomorrow by using the Add/Remove Programs control panel in
Windows.
Main Menu
From the initial Startup screen, you can select one of the following three menu options:
• Single Player
• Multiplayer
• Extras
Single Player Menu
Select Single Player if you’d like to play the single-player game. You will be taken to the Single Player menu, which
contains the following options:
TC_SCPandT_Manuel_PC_UK 23/02/04 12:58 Page 4
Page 7
5
Start Game
Begin a new game or resume a previous game. When you select
this option, you will be taken to the Profiles screen, where you can
create a profile, load an existing profile, or even delete an old one.
You can create up to 10 different profiles with up to three different
saves for each. Once you are ready, select your profile to start a
new game. To play an existing saved game, you must select a
player profile and then select a saved game to load.
Options
Select Options to adjust sound and video settings, such as brightness
and contrast.
Back to Main Menu
Select this option to go back to the Main Menu of the game.
Multiplayer Menu
Select Multiplayer if you’d like to play multiplayer Splinter Cell Pandora Tomorrow on lan or online.
Extras
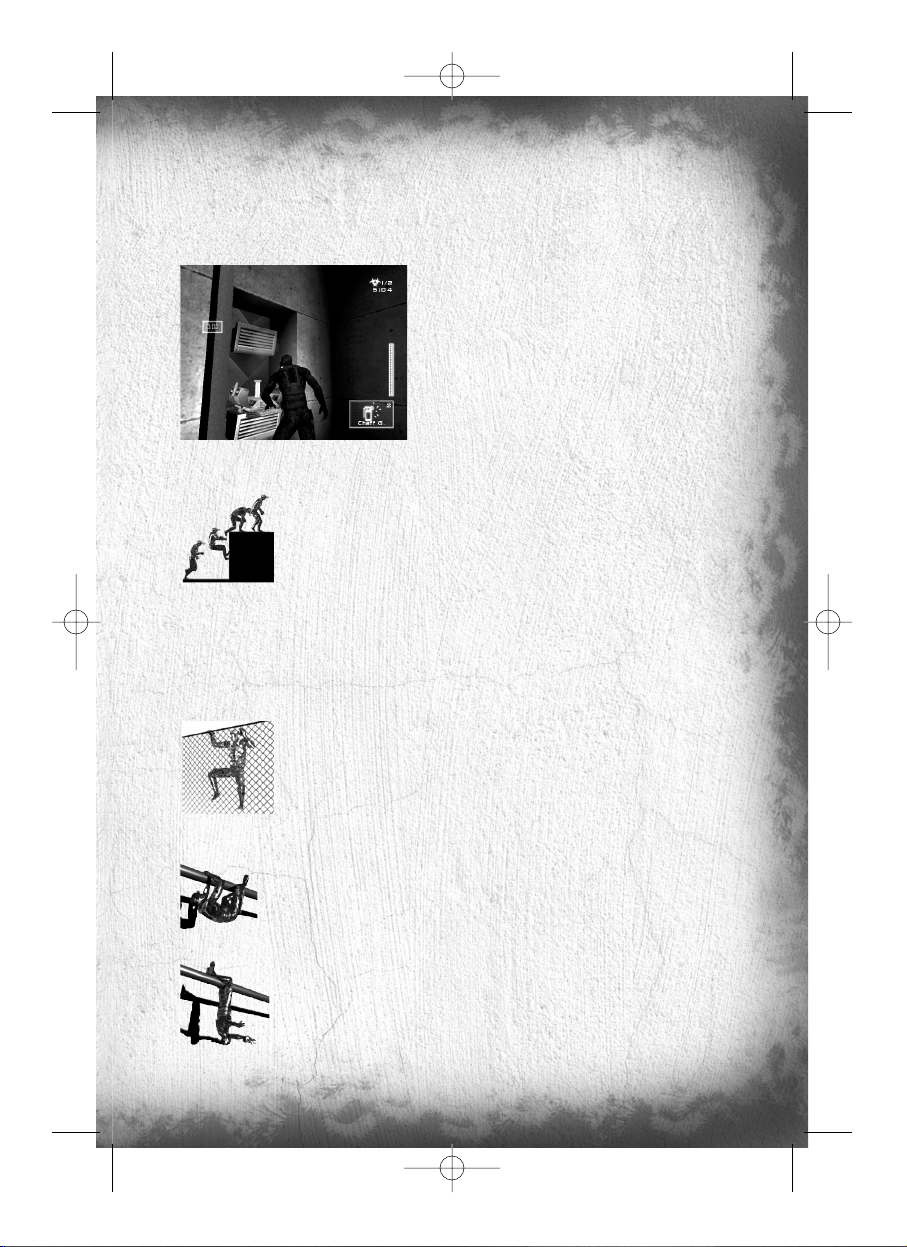
Game Screen
1. Life Bar: This represents the status of Sam’s health/life.
2. Stealth Meter: The meter moves left and right to represent the amount of light in Sam’s area.
3. Interaction System: This system appears when you can interact with an object or person in the environment.
4. Objective: Displays the next goal to reach in your mission.
5. Selected Weapon, Gadget, or Item: Displays the current selection.
6. Communication Box: Appears at the top of the screen when you receive a communication.
7. OPSAT: When a small flashing envelope appears above your OPSAT, a new goal or a new note is available.
Press F1 to open your OPSAT and read it.
8. Total Ammo.
9. Ammo in One Magazine.
6
8
9
5
2
3
1
4
7
TC_SCPandT_Manuel_PC_UK 23/02/04 12:58 Page 5
Page 8
6
GAME MENU
During the game, press Esc to access the Game menu.
• Load Game: Load a saved game or restart a level. During
the game you can also press F5 to do a quicksave, which you
can reload by pressing F8.
• Save game: To save the current game.
• Options: Adjust the controls, sound and video settings.
• Back to Single Player Menu: Go back to the Single Player menu.
OPSAT (Operational Satellite Uplink)
The OPSAT is a compact, wrist-mounted version of a standard civilian PDA designed for military use. It enables Sam
to receive mission objectives and updates from Third Echelon headquarters. The OPSAT also displays real-time images
from Sticky Cameras. During the game, press F1 to open your OPSAT.
• Goals: View the specific details of your mission objectives.
• Notes: Read additional hints and clues that may have been
gathered during the mission.
• Data: Recon data provides intelligence about enemies, locations,
or other key elements pertinent to the operation. Pay special
attention to the data sticks, as they contain key information.
• Inventory: The inventory section provides information about
the items and equipment you are carrying.
About Stealth Action
Sam’s ability to operate covertly is his most valuable asset against overwhelming enemy forces. The visibility meter
on Sam’s OPSAT is an important indicator of stealth. If it is completely to the left, Sam is invisible to enemy
surveillance. If it is completely to the right, Sam is in critical danger of being detected and/or intercepted. Remaining
under the cover of shadows is an important stealth technique, but crouching, moving slowly, and keeping your back
to the wall also contribute to Sam’s invisibility.
A Splinter Cell operative must defy not only enemy eyes, but also enemy ears. Consider that while running and
jumping are sometimes necessary movements, they also generate sound – a golden invitation for an enemy patrol
to investigate your position. Moving slowly while crouched is much more likely to avoid enemy investigation.
Alarms
Note that if an enemy detects Sam, or even suspects the presence of an intruder, they have been specifically trained
to alert nearby comrades or trigger an alarm, rather than engage Sam by themselves. They will be more prepared
and armed each time a new alarm level is reached. And because of the extremely covert nature of Splinter Cell
operations, indiscretion with alarms can lead to Third Echelon aborting a mission.
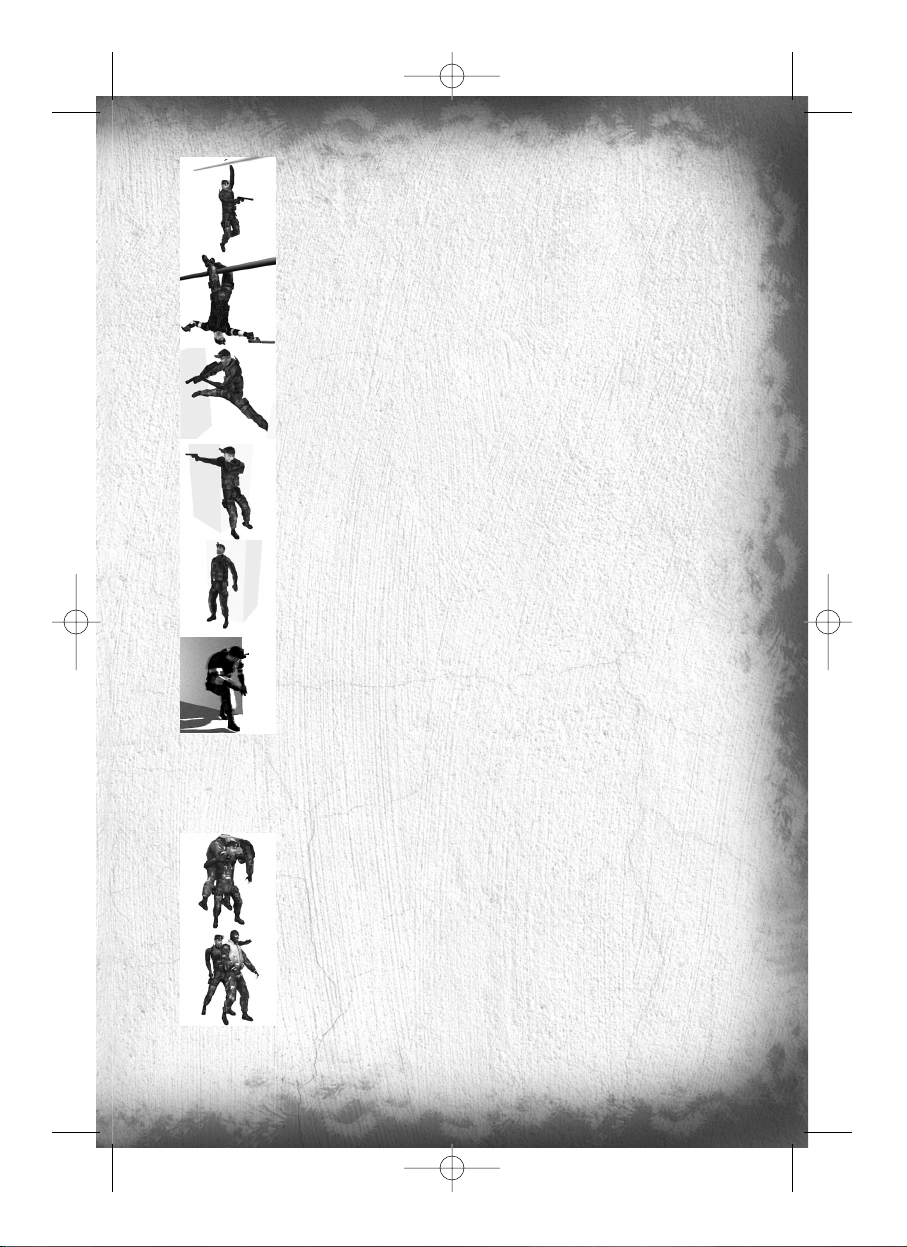
Sam’s Actions and Movements
Each time Sam can perform a special action, an Interaction System window will open. Press Action (Enter) and hold
it, and then use your mouse wheel or q and m to select the action you want to perform. Release Action (Enter)
to validate your choice.
TC_SCPandT_Manuel_PC_UK 23/02/04 12:58 Page 6
Page 9
7
Basic movement
The basic movement speed when you press q is the walk. Use the mouse wheel to increase or decrease your movement speed. Since moving slowly allows greater stealth than moving quickly, it is important to remember to exercise
control. An enemy who hears you behind him can almost always spin around and shoot faster than you can cross an
open area. While it may seem unnerving to move slowly through a well-lit space with an enemy nearby, it’s often
lethal to try to dash across the space.
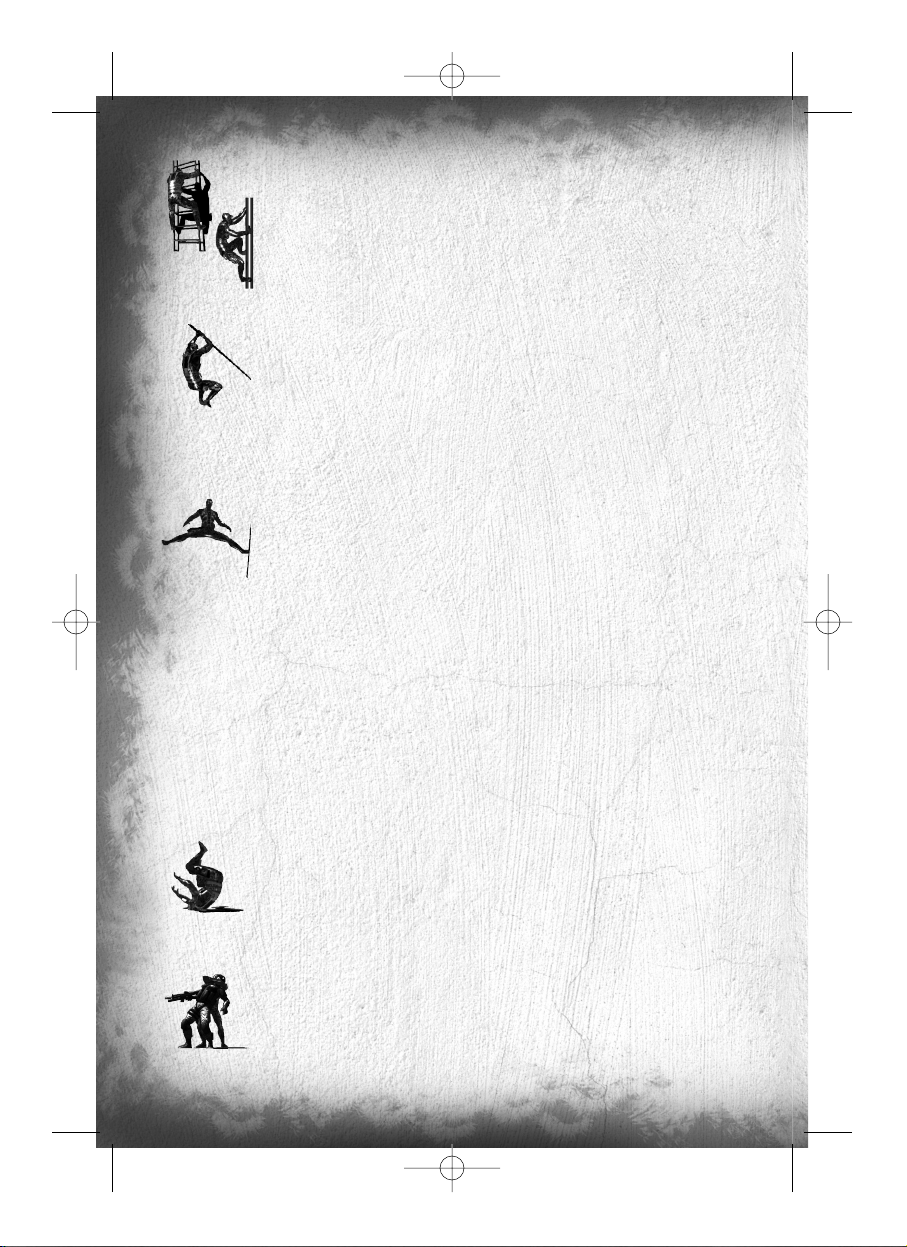
Basic Moves
Sam has a wide range of moves. Knowing how to get around – and how to do it undetected – is critical.
Crouching
Press Crouch (KP 0) to crouch. Movement is slower, but quieter, and Sam is less visible while
crouched.
Mantling
Press Jump (Shift) and move forward into low objects like crates or tables and Sam will crawl,
or “mantle,” onto them.
Climbing
To climb a pipe, ladder, vertical cable, or fence, simply walk into it. Press Crouch (KP 0) to
jump off.
Close Attack
With your weapon holstered, press Fire (left mouse button) when very close to an enemy to
hit him with your elbow.
Back to Wall
Press Back to wall (KP 4) when standing or crouched to put Sam’s back to the wall. Sam is
less visible with his back to a wall.
Shimmying
Press Jump (Shift) to grab and hang from ledges above Sam’s head. Sam can move left and
right as well as pull himself up if there is room. Press Crouch (KP 0) to let go of a ledge.
Hand-over-Hand
Press Jump (Shift) to grab and hold a horizontal pipe. Bring Sam’s legs up to clear obstacles
by pressing Jump (Shift) again.
Zip Line
Press Jump (Shift) to grab hold of a sloped wire or zip line. Sam will slide down automatically.
Raise Sam’s legs by pressing Jump (Shift) again. Press Crouch (KP 0) to let go.
TC_SCPandT_Manuel_PC_UK 23/02/04 12:58 Page 7
Page 10
8
Advanced Moves
Advanced moves are just as crucial as basic moves. Mastering these will allow Sam to move through his environment
with much greater safety and precision. Many of these advanced moves are combinations that allow Sam to attack.
For information on equipping and using weapons, refer to page X.
Rolling
Press and hold Crouch (KP 0) while running to do a roll.
Split Jump
If Sam is in a corridor near a wall that is about as wide as he is tall, press jump (Shift) then
Jump (Shift) a second time to allow him to enter the Split Jump position.
Half Split Jump
If Sam is in a smaller corridor near a wall, he will be able to do a Half Split Jump. Jump
(Shift), then Jump (Shift) a second time to allow him to enter the Half Split Jump position.
Half Split Jump and Jump
From a Half Split Jump, Sam can reach a higher spot. Make Sam face the higher position by
moving left to right. Then Jump (Shift) to reach it.
Drop Attack
If you can get above an enemy and drop directly down on him, you will knock him out.
Press Crouch (KP 0) to Drop Attack.
Quiet Landing
When falling, quickly press Crouch (KP 0) to do a Quiet Landing.
Rappelling
To rappel from a small chimney, stand near it and select the Rappel interaction. Sam can
move up and down the rope. Press Jump (Shift) to kick off the wall.
Rappel Shooting
Sam can equip and fire his weapon while rappelling. Press Use/Equip (KP 1) to equip the
selected weapon.
TC_SCPandT_Manuel_PC_UK 23/02/04 12:58 Page 8
Page 11
9
Hanging Shooting
Sam can equip and fire his weapon while hanging from a pipe, but only if his legs are not
tucked. Press Use/Equip (KP 1) to equip the selected weapon.
Upside-Down Shooting
While Sam is holding a horizontal pipe with his legs up, press Use/Equip (KP 1) to draw his
weapon, hanging by his legs.
Split Jump Shooting
Sam can equip and fire his weapon while in the Split Jump position. Press Use/Equip (KP 1)
to equip the selected weapon.
Back-to-Wall Shooting
When Sam approaches a corner with his back to the wall, he will automatically peek around
the corner. Press Use/Equip (KP 1) while peeking to equip the selected weapon, and he can
shoot around the corner.
Back-to-Wall Throwing
While peeking, press up and down on the directional pad to select an object you can throw.
Press Use/Equip (KP 1) to equip it. While equipped, you can adjust throwing length by
pressing Alt Fire (right mouse button). Press Fire (left mouse button) to throw it.
SWAT Turn
While Sam is peeking at an open door or a small corridor, press Action (Enter) to perform a
SWAT Turn. The SWAT Turn is a highly trained Special Forces movement that makes you
almost invisible.
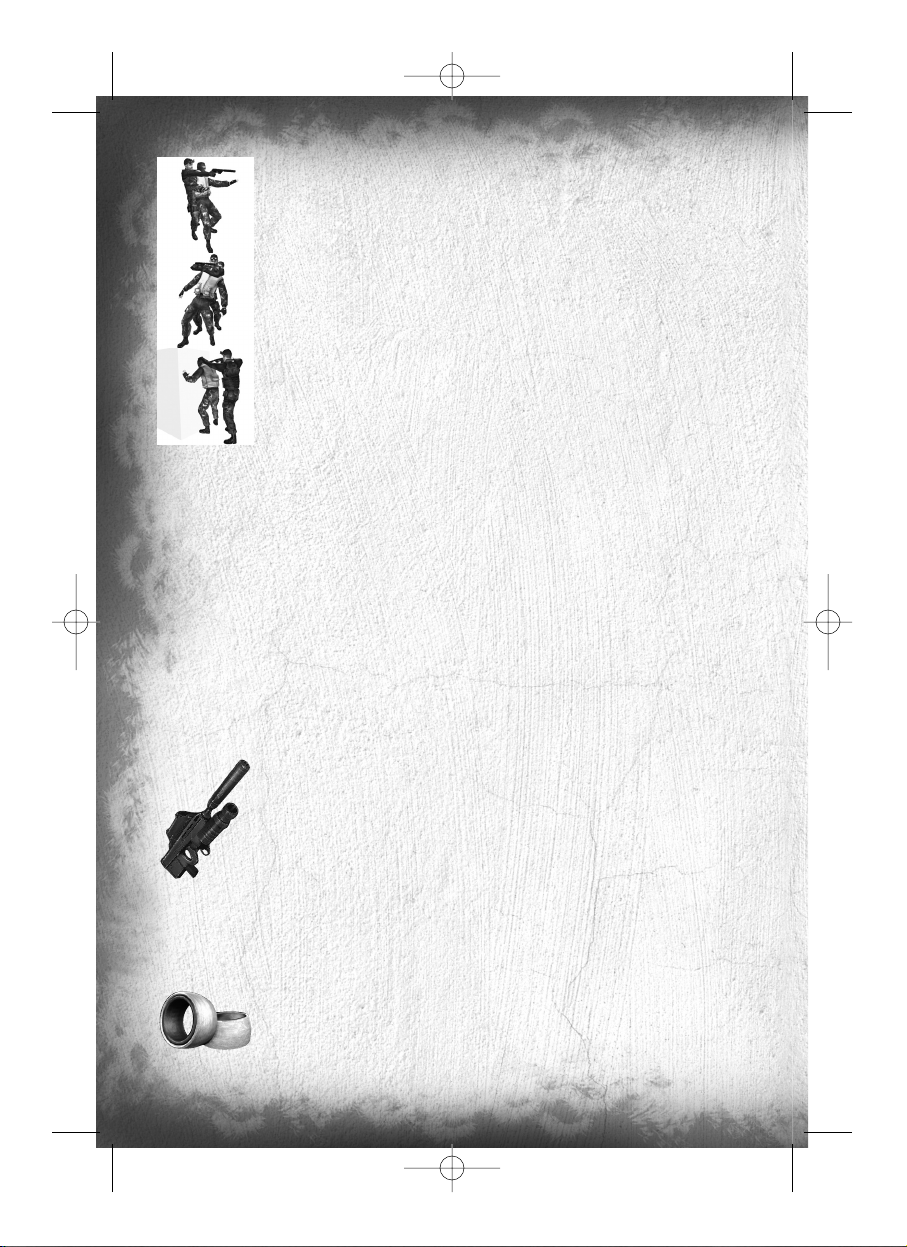
Non-Player Character-Linked Moves
Sam has several special moves that can only be performed on NPCs (Non-Player Characters). Being able to get close
to an enemy without being detected is necessary to execute these moves.
Move Body
Sam will need to hide dead or unconscious bodies in order to prevent them from being
discovered. Select the Body interaction to carry a body. Press Action (Enter) to put him down
quietly, or simply press Use/Equip (KP 1) to equip a weapon and drop the body in a hurry.
Grabbing
Grab an enemy by sneaking up close to him undetected and selecting the Grab Character
interaction.
TC_SCPandT_Manuel_PC_UK 23/02/04 12:58 Page 9
Page 12
10
Human Shield
While holding an enemy, you can press Use/Equip (KP 1) to equip your sidearm and fire at
other enemies while using the enemy you are holding as a human shield.
Interrogation
Some NPCs can be interrogated for useful information. While holding an NPC, select the
Interrogate interaction to make him talk.
Forced Cooperation
Some objects in the world can’t be used by Sam, but there may be NPCs who can use the
objects for him. To force an NPC to cooperate, grab him, drag him to the object you want him
to use, and select the Force Cooperate interaction.
Other Actions
• Reload: Press KP. to manually reload your weapon.
• Whistle: Press V to whistle. Enemies will come to you when they’re hearing the whistle.
• Rate of fire: When you’re using the SC-20K, press F to change your rate of fire.
• Change of vision: Press Del to enter night vision, and End to enter Heat Vision.
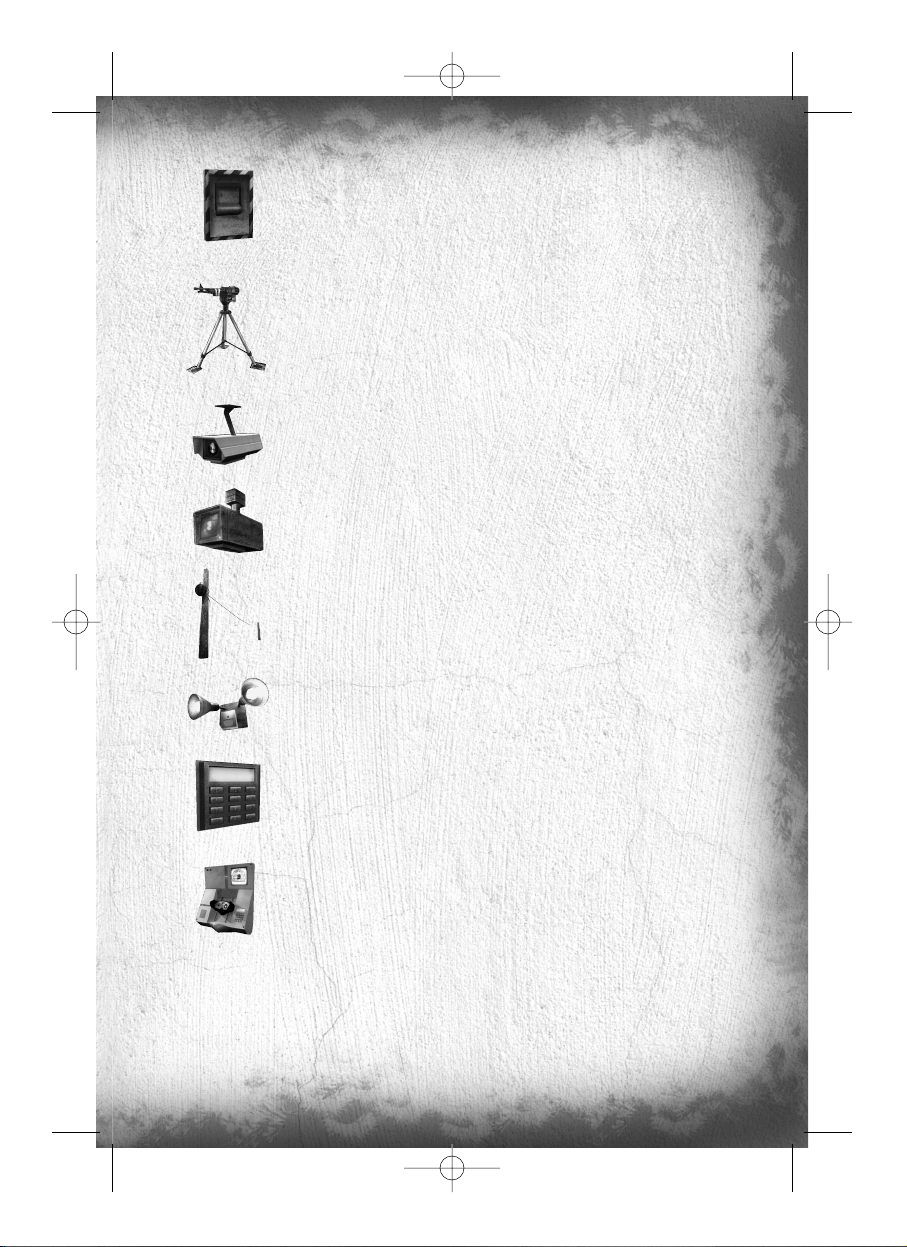
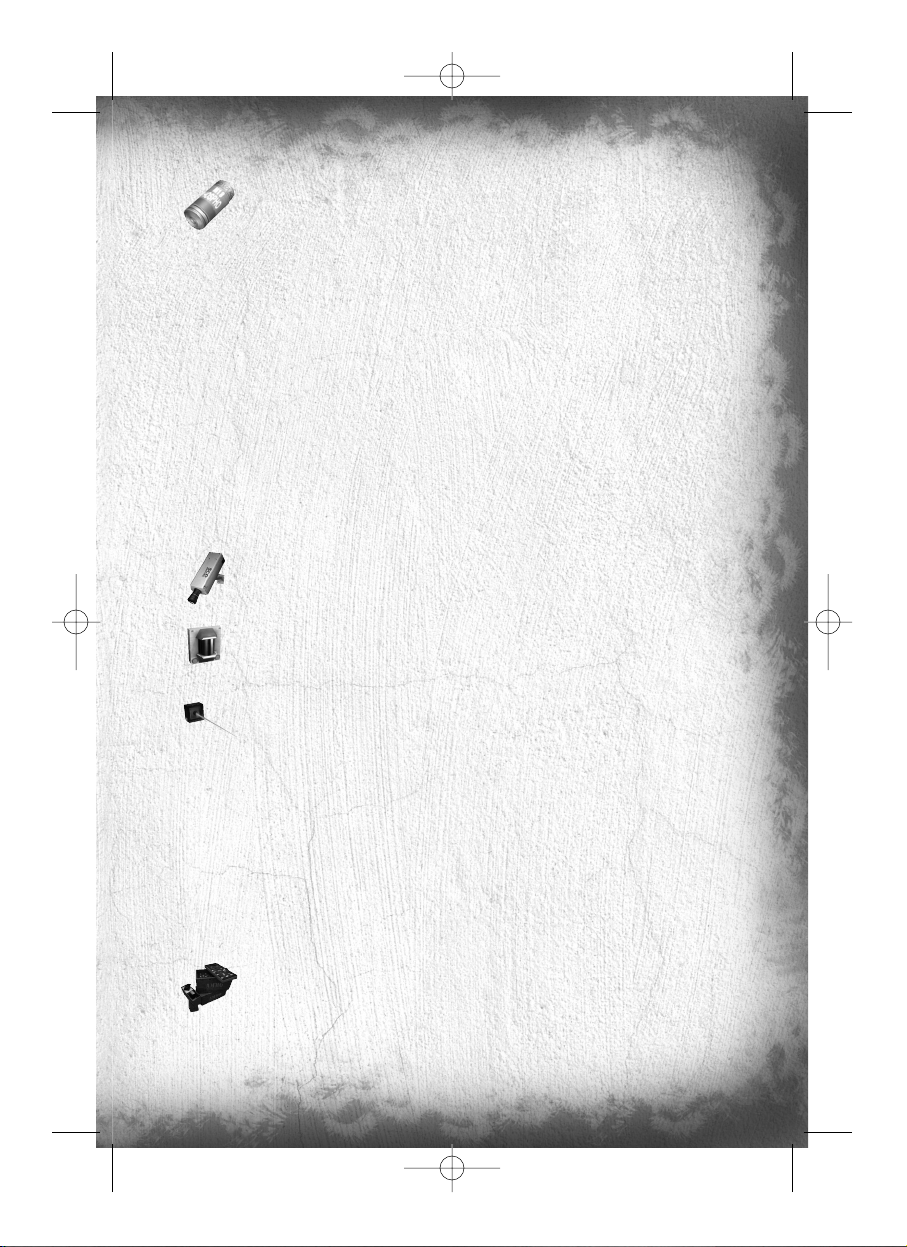
Weapons, Gadgets, items, and In-game elements
During the game, press Control to access the quick inventory. Use your mouse to select an item. To use the item,
press Fire (Left mouse button).
Weapons and Gadgets
SC-20K M.A.W.S. (Modular Assault Weapon System)
The bull-pup configuration of this assault rifle makes it light and compact without sacrificing
firepower (5.56x45mm ss109). Its modular configuration allows it to be customized to fit
any mission profile. Equipped with a flash/sound suppressor and combined with a multipurpose launcher, the SC-20K becomes the obvious choice of weaponry for Sam when
infiltrating enemy territory.
When you’re equipped with the SC-20K rifle, click the middle mouse button to go into Sniper
mode. Use the wheel mouse to zoom in or out (you can also use Page Up or Page Down).
SC-20K’s Multipurpose Launcher
Press Fire (Left mouse button) to fire with the launcher. The launcher cannot be fired in Sniper mode.
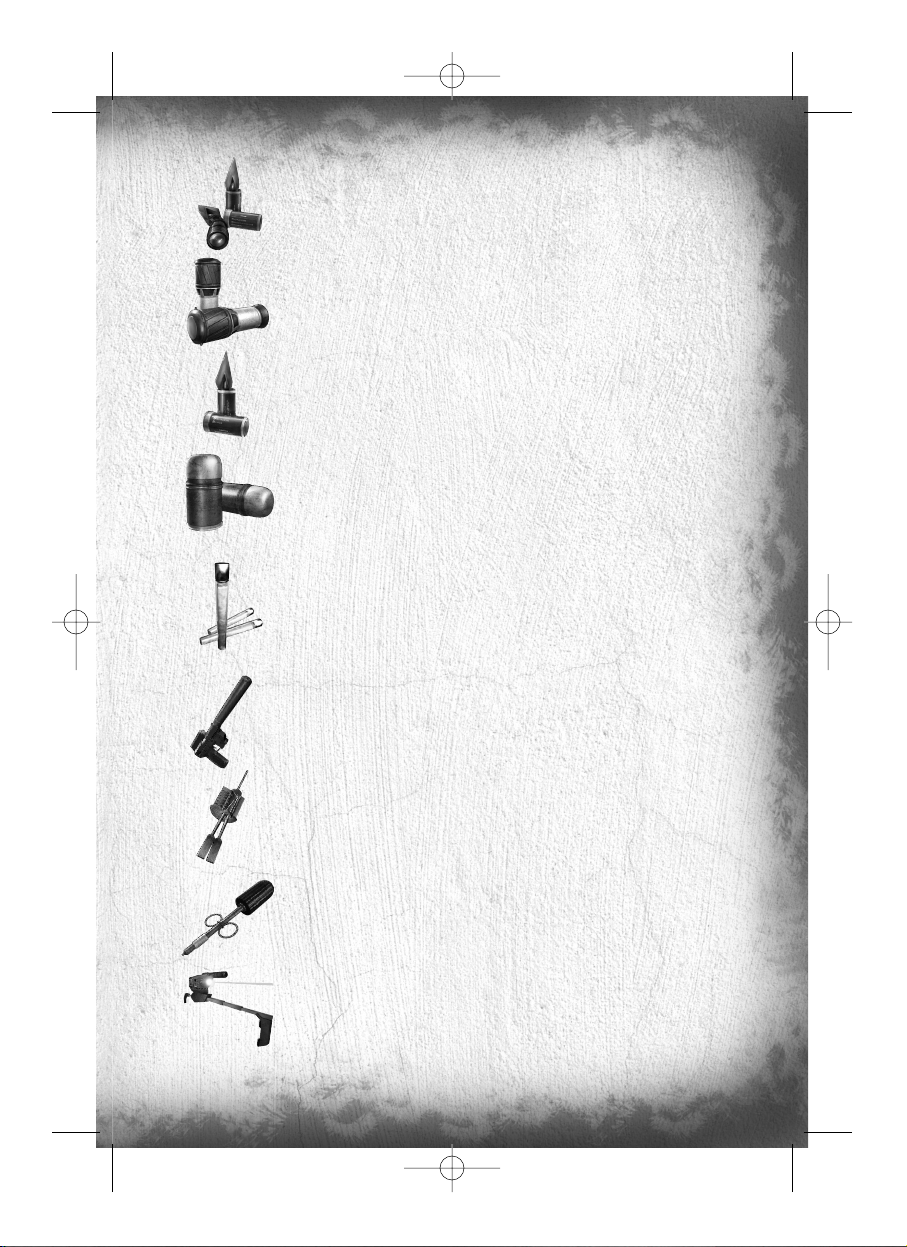
Ring Airfoil Projectile
A high-impact, zero-penetration projectile designed to incapacitate rather than kill.
Note: The Ring Airfoil is much more effective if it hits the head.
TC_SCPandT_Manuel_PC_UK 23/02/04 12:58 Page 10
Page 13
11
Sticky Camera
A miniature camera with full pan and zoom functionality, plus night and thermal vision modes.
The Sticky Camera feeds its image directly to Sam’s OPSAT. Sticky Cams are reusable.
This camera is also used to record conversations not directly accessible by Sam
Sticky Shocker
A high-voltage discharge device coated in adhesive resin. The Sticky Shocker will adhere to
an enemy and give him an incapacitating shock.
Hint: Fired into pools of water, the Sticky Shocker can neutralize multiple opponents.
Distraction Camera
This camera can be triggered to attract enemies with sound and then dispense a cloud of
incapacitating gas when they are nearby.
Gas Grenade
This standard gas canister grenade can incapacitate groups of enemies. Prolonged exposure
causes unconsciousness.
Flash Bang
Grenade with powerful lightning effect that can blind you at medium range.
Chaff Grenade
When exploded, it releases a cloud of magnetic particles, which will disable electronic devices
in its radius. This also affects Sam’s gears.
Laser Aiming
The pistol is equipped with Laser Aiming to allow better accuracy. But be careful, the red spot
can be detected by enemies.
Lock Pick
Standard set of picks, wrenches, and probes for bypassing standard cylinder locks. Press the
different direction keys (q, m, k, or o) until you see and hear the first pin begin to
move. This means you press the right key. Keep pressing this key to release one of the pins
in the lock. Repeat until all pins are released.
Disposable Pick
Unconventional lock picks, these micro explosive-shaped charges deliver a quick impact to any
standard lock cylinder that will shatter the pins and unlock the door.
Laser Microphone: T.A.K. (Tactical Audio Kit)
A laser-operated microphone integrated in the SC pistol that enables the user to read the
vibration off certain surfaces (mainly glass windows). Used to listen in on conversations.
TC_SCPandT_Manuel_PC_UK 23/02/04 12:58 Page 11
Page 14
12
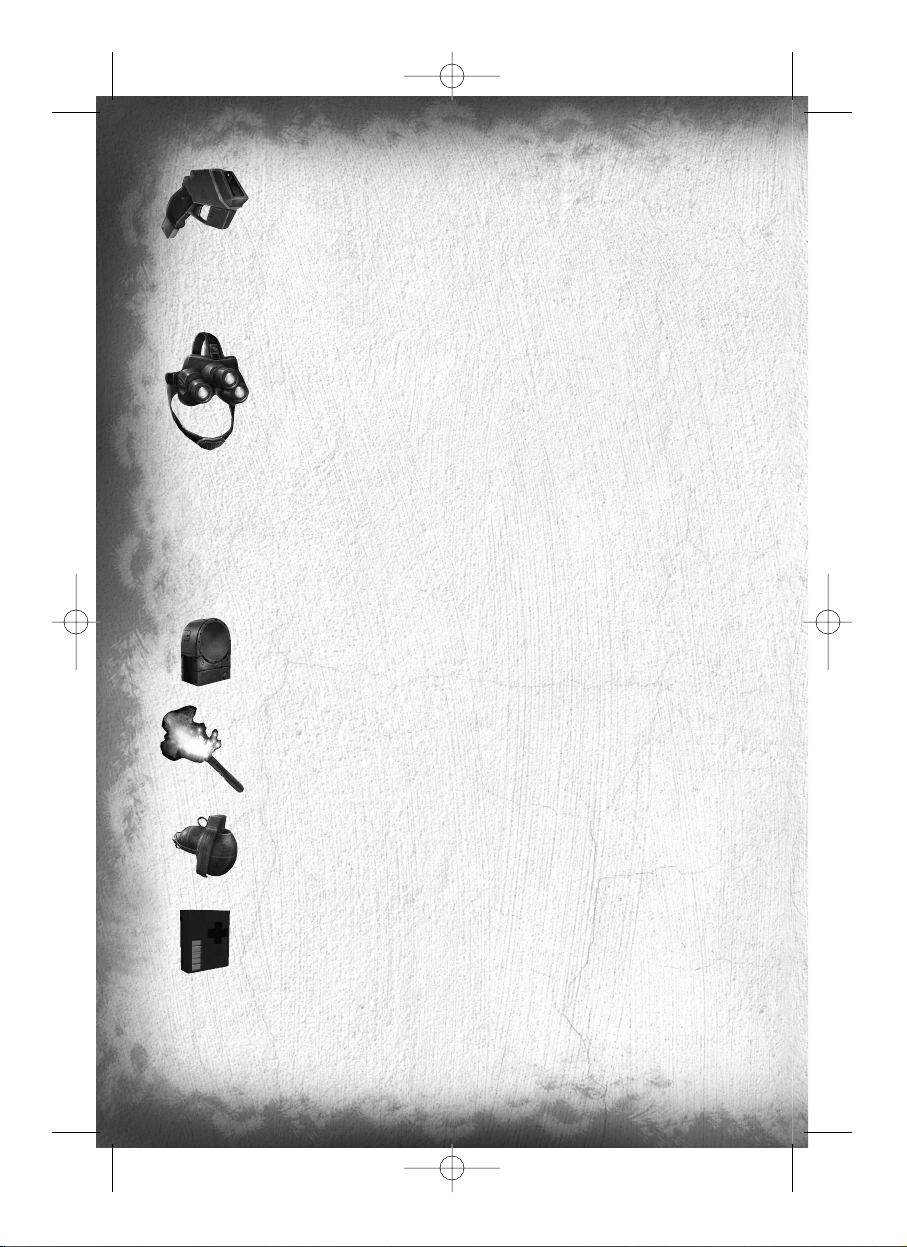
Camera Jammer
The Camera Jammer emits microwave pulses that disrupt the surveillance cameras. The battery
has to be recharged after a short time.
Optic Cable
This flexible cable /camera can easily be slipped under doors to view the other side. Complete
with night and thermal vision enhancement.
Goggles
Night vision goggles amplify very low existing light, especially lights at the lower end of the
infrared spectrum.
The thermal vision headset is an essential tool in low-light situations. This technology differs
from night vision in that it captures the upper level of the infrared light spectrum, which is
emitted as heat rather than reflected as light.
Items
Some objects, like grenades, flares, or other miscellaneous objects in the world, can be thrown. To throw an object,
equip it and press KP1. A series of reticles on-screen will show your aiming trajectory. Use the mouse to aim and the
right mouse button to flatten or arch the trajectory. Press the left mouse button to throw the object or press KP1 again
to abort the throw.
Wall Mine
The Wall Mine is a motion-sensitive explosive device that can be attached to almost any
surface. To deactivate and pick up a Wall Mine, wait for the green light.
Emergency Flare
These standard road flares also emit a great deal of heat, making them useful for distracting
heat sensors such as those found on automated turrets.
Frag Grenade
The 14-ounce M67 fragmentation grenade consists of a 2.5” steel sphere surrounding
6.5 ounces of high explosive. Upon detonation, the steel sphere shatters, emitting a burst of
high-velocity shrapnel.
Medical Kit
Standard field first-aid kit.
In-Game Elements
Enemy static defenses present a wide range of potential obstacles to overcome – from simple keypads that control
doors to automated turrets that detect heat and movement and fire on intruders.
TC_SCPandT_Manuel_PC_UK 23/02/04 12:58 Page 12
Page 15
13
Alarm Panel
Standard alarm switches that can be triggered by enemies to alert nearby comrades. Because
of the extremely covert nature of Sam’s operations, indiscretion with alarms can lead to Third
Echelon aborting a mission.
Automated Turret
Heat-and motion-sensing turrets with an Independent Friendly Fire (IFF) recognition system.
Tur rets can be hacked from their attached control computer. Either deactivate a turret entirely,
or disable its IFF system. With IFF disabled, the turret will still attack Sam, but it will also
attack enemies. Use the directional pad to navigate in the attached control computer.
Surveillance Camera
Standard, off-the-shelf surveillance cameras that detect movement and have the ability to
directly trigger alarms. This type of camera is fragile and can be destroyed.
Armored Camera
Except for the bulletproof casing, these cameras are identical to the standard surveillance
camera.
Booby Trap
This basic grenade links to a small cable.
Motion Detector
When Sam is moving too quickly near a motion detector, it releases a powerful lightning
effect that can blind at medium range.
Keypad Lock
Standard push-button security pads linked to electromagnetic locking systems in a door. Only
the correct code will allow a keypad-locked door to be opened. Multiple failed attempts to
enter a code will sound an alarm.
Retinal Scanner
A locking device that reads the unique imprint of a person’s retina before unlocking a door.
No one without access can open a retinal scanner–locked door, but those with the correct
retinas can sometimes be “convinced” to open them for you. An incorrect retinal scan
automatically triggers an alarm.
TC_SCPandT_Manuel_PC_UK 23/02/04 12:58 Page 13
Page 16
14
MULTIPLAYER MODE
The Game Principle
The game is based on two opposing teams of two human players. The Shadownet team must move forward without
being spotted, analyze its environment and fulfill the conditions for victory. The mercenaries’ team (ARGUS.) must
prevent the Shadownet team from making progress by tracking them down, finding them and eliminating them.
The Different Game Modes
NEUTRALIZATION Mode
Shadownet Team ARGUS Corporation
GOAL
Find the Viral containers (ND133s) and neutralize Protect the containers and eradicate the intruders.
them.
VICTORY Neutralize the ND133s or eliminate Eradicate all the intruders or protect the ND133s
all the mercenaries. within the time limit.
RULES To neutralize a ND133, position yourself in front of
it and press ACTION.Neutralization takes time,
but you can break off whenever you want and
take up again where you left off.
EXTRACTION Mode
Shadownet Team ARGUS Corporation
GOAL
Find the ND133s, take the tubes and bring them Prevent the intruders from the tubes and
to the extraction point. eradicate the threat they constitute.
VICTORY Bring back enough tubes to the extraction point. Eradicate all the intruders or protect the tubes
within the time limit.
RULES To take a ND133 tube, position yourself in front of Protect the tubes on their supports.
it and press ACTION. Then take it back to You can retrieve a tube stolen by an intruder by
an extraction point. eliminating the intruder before he reaches
the outer limit of sites and passing over the tube.
SABOTAGE Mode
Shadownet Team ARGUS Corporation
GOAL
Find the ND133s and neutralize them Protect the containers from the intruders who try
by placing a modem nearby. to neutralize them with their modems.
VICTORY Neutralize the ND133s using your modems, Eradicate the intruders or prevent them from
or neutralize the mercenaries. neutralizing the ND133s.
RULES Place a modem on a wall near an ND133, by pressing Protect the ND133s from the modems.
ACTION. The ND133 will be neutralized at the end When a countdown appears, look for the modem
of the countdown. If the modem is destroyed, in question and neutralize it by removing it or
placing a new modem will resume countdown where shooting it.
it was stopped. Pick a new modem on ammo pack.
TC_SCPandT_Manuel_PC_UK 23/02/04 12:58 Page 14
Page 17
15
Controls
The Controls are divided into four groups : the Settings (everything concerning the configuration), The General
Controls, The Spy controls and the Mercenary Controls.
SETTINGS
Action Explanations Default Keys Configuration
MOUSE
Change your mouse sensitivity O and P
INGAME MENU Open the menu when the game is in progress Esc
HUD Display HUD explanations F4
QUIT Quit the game F12
CHAT Open the chat interface
2
FULL SCREEN Toggle the display to full screen. Alt + Enter
GENERAL CONTROLS
Action Explanations Default Keys Configuration
MOVE
Move your character forward W
MOVE Move your character backward S
MOVE Move your character to the left A
MOVE Move your character to the right D
ACTION Interact with your environment and also,
Spy : Place a bombe to neutralize a ND133
(sabotage game mode only), Release a suffocating Shift
gaz cloud while in the sticky camera view.
Mercenary : While keeping a direction pressed,
perform a charge.
SPECIAL ACTION 1 Perform the special action of your team:
Spy : Perform a roll. Q
Mercenary : Toggle your lasersight on/off)
SPECIAL ACTION 2 Perform the second special action of your team:
Spy : Take out/ Put away your weapon. E
Mercenary : Switch your torchlight on/off)
PRIMARY FIRE Use your weapon (Spy : in weapon mode only),
and also :|Spy : Throw the gadget binded to gadget Left Click
slot 1 at your feet while in third person view.
SECONDARY FIRE Fire a gadget (Spy : in weapon mode only),
and also :|Spy : Throw the gadget binded to gadget Right Click
slot 2 at your feet while in third person view.
Mercenary : Hold breath (in snipe Mode).
JUMP Make your character jump Space
CROUCH Make your character crouch or stand up C
TC_SCPandT_Manuel_PC_UK 23/02/04 12:58 Page 15
Page 18
16
HACK COMM Listen to your enemy’s communication (when a spy
bullet or a spy trap is triggered and active) H
SWITCH VISION Switch between your different special visions TAB
GADGET 1 Select gadget 1 from your inventory 1
GADGET 2 Select gadget 2 from your inventory 2
GADGET 3 Select gadget 3 from your inventory 3
GADGET 4 Select gadget 4 from your inventory 4
ENHANCED REALITY Change the Enhanced Reality display mode (off, on) F9
VISION 1 Use your first special vision :
Spy : Nightvision. F1
Mercenary : Movement Vision.
VISION 2 Use your second special vision :
Spy : Thermal vision. F2
Mercenary : EMF Vision.
NEXT GADGET Select the next gadget of the inventory 5
PREVIOUS GADGET Slect the previous gadget of the inventory 6
BINOCULARS/ Spy : Use your binoculars
SNIPE Mercenary : use your weapon sniper mode. Middle Mouse button
Here is the list of the default controls and actions available for a Shadownet spy :
SPY CONTROLS
Action Explanations Default Keys Configuration
BACK TO WALL
When facing a wall, perform a back to wall Z
Gadgets
LASER
Toggle your laser’s Weapon aiming device on or off. L
Here is the list of the default controls and actions available for a ARGUS mercenary :
MERCENARY CONTROLS
Action Explanations Default Keys Configuration
FIRE RATE
Change your weapon’s fire rate F
RELOAD Reload your weapon R
Quick Start-Up
From the Splinter Cell: Pandora Tomorrow general menu, select “MULTIPLAYER” to access the general multiplayer
menu. Choose a profile by selecting it click on SELECT to play using this Profile. Choose DELETE to delete a profile
and NEW PROFILE to create a new one.
PLEASE NOTE: the profiles created in Single Player mode and those created in Multiplayer mode is common but
the options are independent in each game mode (single player or multiplayer).
TC_SCPandT_Manuel_PC_UK 23/02/04 12:58 Page 16
Page 19
17
If this is the first time you have clicked on “MULTIPLAYER”, you will automatically be invited to create a profile by
entering a name. When your profile has been created, you will be automatically directed to two tutorials: the first one
trains you as a spy. The second one trains you as a mercenary. You can quit these tutorials any time by pressing
ESCAPE ingame and choosing QUIT.
Then you will be taken to the following menu:
• PLAY ON ubi.com: Play on the Internet, using the Ubi.com service.
• PLAY ON LAN: Create or join games on a local network.
• TUTORIALS: A bunch of tips and tools to help you master the game. You can also access tutorial maps.
• OPTIONS: Modify the settings for the profile being used.
Menus
Menu Details
Profile and editing menu for gadgets
The PROFILE OPTIONS field of the main menu enables you to edit the settings relating to your profile:
• EQUIPMENT: To edit the gadgets that each of your characters can use in the game.
Each profile contains details of spy and mercenary equipment. To see what your other character possesses, click on
the switch team button. Each character has 4 locations, each of which can accommodate a gadget. To change a
gadget, click on it. You will then be taken to a page showing you all the gadgets available for the member of the
team you are editing. They are 6 in number. Choose the gadget that you wish to take by clicking on it. The new
gadget will appear in your inventory.
Please note: For the spy equipment, it is recommended to allocate grenade-like gadgets on the 1 and 2 slots,
as these can be used in emergency with the PRIMARY FIRE and SECONDARY FIRE buttons.
• GAME: To adjust the settings related to the game controls:
Vibration (to activate or deactivate Vibration in the game), Invert Y Axis (to invert the vertical aiming axis), Invert X
Axis for Spies (to invert the camera’s horizontal direction of rotation), Auto-Centre (to turn on or off automatic return
to the horizontal when mercenaries move forward), Unit System (to display distances in meters or feet).
• AUDIO: To configure the game’s sound settings. You can adjust:
- The effects volume in the game, by modifying the EFFECTS VOLUME option.
- The music volume in the game, by modifying the MUSIC VOLUME option.
- The voice chat volume in the game, by modifying the VOICE VOLUME option.
- The EAX option will notice if this option is Enable or Disable on your system.
• VIDEO: To configure the game’s graphic settings:
- Screen Resolution: enables you to change the game resolution.
- Quality: Choose between LOW, MEDIUM and HIGH to adjust the texture quality.
- Show Test Card:adjust your screen in accordance with the displayed on screen explanations to have a better
game experience.
Once you’ve chosen the resolution, click on VALIDATE to set your choices. The game will adopt your new settings and
ask you to confirm your changes.
• The KEYBOARD CONFIGURATIONheading enables you to configure the key linked to each action of the game.
To change the key assigned to an action, click on the key next to the action and press the key you want to assign.
Play on ubi.com Menu
Important Note: You may encounter some troubles connecting to ubi.com if you’re using a firewall on your computer.
Here are the ports you’ll have to open to play on ubi.com :
TC_SCPandT_Manuel_PC_UK 23/02/04 12:58 Page 17
Page 20
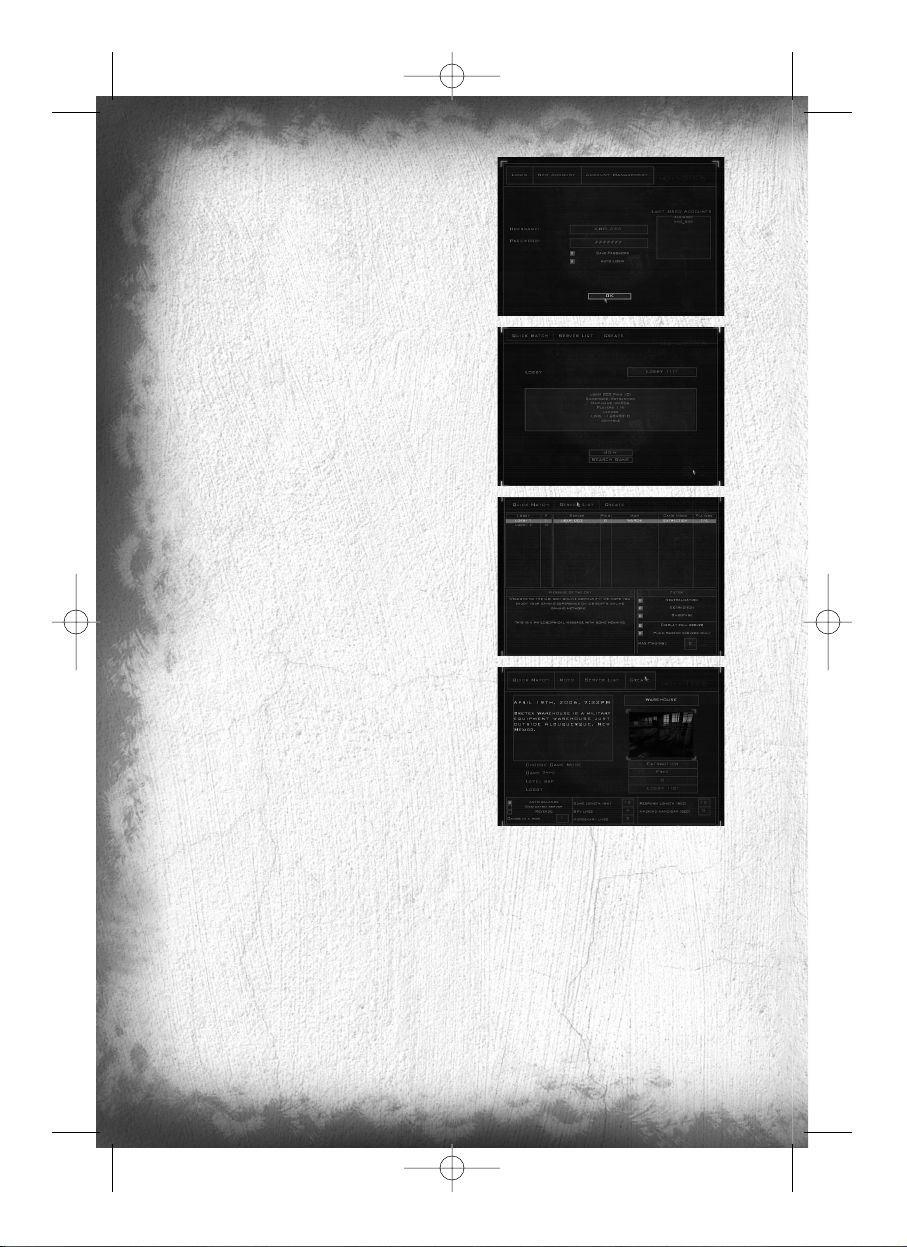
18
[TCP] 40000 - 43000 included inbound-outbound
[UDP] 44000 inbound-outbound
[UDP] 45000 inbound-outbound
[UDP] 45001 inbound-outbound
After reading and accepting the User agreement, enter your
ubi.com account name and password. Click the “Save Password”
option if you want the game to remember your password. Validate
the “Auto-login” option to automatically log in the game using this
ubi.com account. Use the “New Profile” and “Account management” options to create a new account or to change your account
parameters.
Once logged in, you will be taken to this interface:
• QUICK MATCH: To find a game with an available place which
you can join quickly.
• MOTD: Stands for Message Of The Day. This is where you can
check all the messages from ubi.com.
• SERVERS LIST: This is where you can search and join existing
game sessions. First of all, choose a lobby. The game sessions
available for this lobby will appear on the left. You can set some
filters at the bottom of the screen to sort the existing sessions.
Refresh the sessions list by pressing the REFRESH button. To join
a session, select it and click on the JOIN button. You will be taken
to the game waiting room. When all the players are ready
(They appear white) and you are also ready, launch the game by
clicking on the LAUNCH button.
• CREATE MATCH: To set up a game session by specifying
the game parameters. Choose the desired level for the game,
the game mode, the type of game (free or “Ranking”) and the
LEVEL GAP (the tolerated divergence of level between players).
Once the settings have been made (at the bottom at the screen),
go to the game waiting room by pressing the CREATE button.
When all the players are ready (They appear white), and you are
also ready, launch the game by clicking on the LAUNCH button.
Menu Play On LAN
• FIND SESSION: To join an existing game. Choose the game you want to join by clicking on the JOIN button.
Search for other sessions by clicking on the REFRESH button. Once you’ve selected a game session, you will be taken
to the game waiting room. When all the players are ready (they appear white), and you are also ready, launch the
game by clicking on the LAUNCH button.
• CREATE SESSION: To set up a game session. You must choose the map for the session, as well as the game
mode. When the settings have been made (at the bottom at the screen), you can go to the game waiting room by
clicking on the CREATE button. When all the players are ready (they appear white), and you are also ready, launch
the game by clicking on the LAUNCH button.
Tutorials Menu
The TUTORIALS heading includes the following sub-headings:
TC_SCPandT_Manuel_PC_UK 23/02/04 12:58 Page 18
Page 21
19
• VIEW HUD: To consult explanations relating to the items displayed on the game screen.
• TIPS: To obtain Tips or additional explanations concerning the abilities of characters in each team. From the Tips
page for spies, click on the SWITCH TEAM button to display the Tips for the other team. To view a Tip, select it and
click on the SELECT button.
• SHADOWNET SPY TUTORIAL: Play the Spy’s tutorial map.
• ARGUS MERCENARY TUTORIAL: Play the mercenary’s tutorial.
• VISIT MAP: To visit the level of your choice (alone) within a chosen team. Select the level you want to visit,
the team you want to join and the game mode.
Game Screens
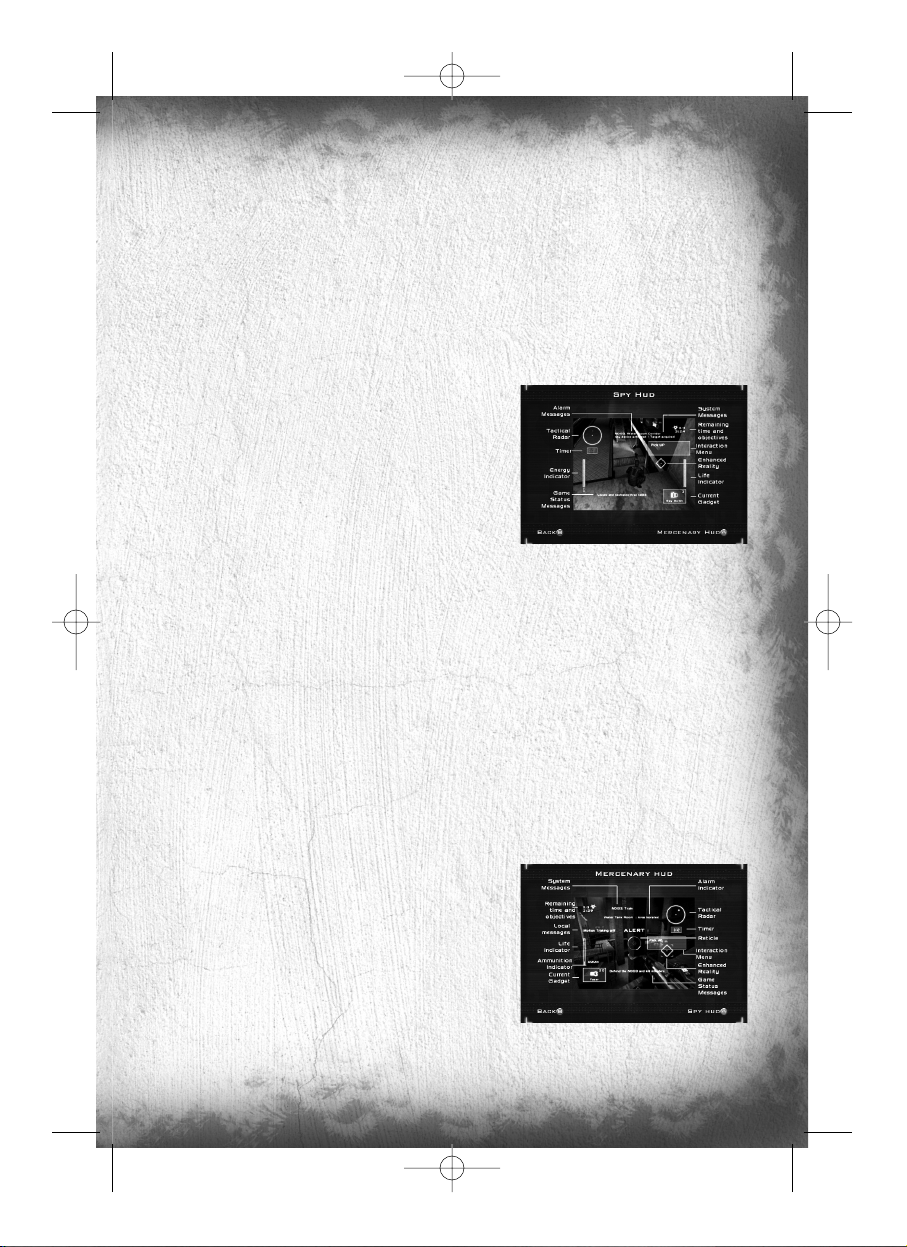
Shadownet team member screen
1. Tactical Radar: This radar displays the position of your
team-mate and the locked enemies (only appears when something needs to be displayed).
2. ND133 Counter: Displays the number of objectives left to
win and the objectives already taken.
3. ND133 Capture Timer: Displays the remaining time for an
ND133 to be neutralized by the Shadownet team.
4. Time Remaining in the Game: Displays the time remaining before the end of the mission.
5. Energy Bar: This interface is displayed only when the player is in weapon mode, when the energy bar is refilling.
It is an indication of the remaining energy available for the spy electrical gun.
6. Status Messages: Here are displayed messages when your presence has been detected, or to inform you
special device status (spy bullet or alarm snare).
7. Interaction Menu: This interface displays the different interactions with an object (in the screenshot example,
pick up.
8. Game Info Screen: This window is used to display all the ingame messages (objective taken, alarm triggered,
player killed by player, etc.).
9. Life Bar: This Interface displays the player’s remaining life.
10. Current Gadget: This interface displays the current gadget, its name and the number of units of this gadget
available (in the screenshot example, the player has 3 Spy bullets).
11. Enhanced Reality: This indicator displays information about the position of the ND133, the distance between
the player and this ND133 and its current status.
ARGUS Corporation member screen
1. System Info: Here are displayed messages concerning your
equipment status.
2. Status message: Here are displayed intrusions and alarm
messages, indicating the name and position of the alarms that
have been triggered. Objectives status and special device status as
spy trap are also displayed here.
3. Game Info Screen: This window is used to display all the
ingame messages (player killed by player, etc.). The messages are displayed using horizontal scrolling.
4. Life Bar: This Interface displays the player’s remaining life.
TC_SCPandT_Manuel_PC_UK 23/02/04 12:58 Page 19
Page 22
20
5. Ammunition Indicator: This Interface displays the player’s ammunition. The number on the left is the number
of bullets in your current clip. The number on the right represents the number of global remaining bullets.
6. Current Gadget: This interface displays the current gadget, its name and the number of units of this gadget.
7. Tactical Radar: This radar displays the position of the player’s team-mate, the triggered alarms, the locked
enemies, etc. (only appears when something needs to be displayed).
8. Time Remaining in the Game: This interface displays the time remaining for the spies to complete the mission.
9. ND133 Counter: Displays the number of objectives left to win and the objectives already taken.
10. ND133 Capture Timer: Displays the remaining time for an ND133 to be neutralized by the Shadownet
team.
11. Interaction Menu: This interface displays the different interactions with an object (in the screenshot example,
a switch).
12. Enhanced Reality: This indicator gives information about the position of the ND133 or the triggered alarm,
and the distance between the player and the ND133 or the alarm. It also give you feedback on its status and the
percentage of hacking.
13. Reticule: Your aiming device. Little arrows around it gives you location of surrounding sound relatively to your
position. Indicators inside the reticule (upper or lower part) also gives you indications regarding altitude of detected
sounds.
Characters’ Abilities
Shadownet team members’ abilities
Basic Actions
Sneak, Walk and Run
You can change your character speed by using the wheel mouse Up to speed up, and wheel
mouse Down to slow down.
Crouch
The CROUCH key toggles crouching. Crouching is a good way to ensure slow, quiet
movement.
Jump
Pressing the JUMP key will make your character jump straight up in the air. Pressing the JUMPkey while running
will make the character jump forward. If you press the CROUCH key falling (i.e. when landing from a jump), you
will make a silent landing, which is very useful to avoid being located. If you land on an opponent, you may knock
him out.
Wall Jump
After a jump, it is also possible to push against a wall. To do this, just move towards the wall
and press the JUMP key. The resulting action will depend on how the place is configured:
• If it is possible to cling on a little higher up the wall, your character will push against the
wall to gain altitude and be able to cling on.
• If it is not possible to cling on, you character will push against the wall to perform a flip.
TC_SCPandT_Manuel_PC_UK 23/02/04 12:58 Page 20
Page 23
21
Shoot
To take a weapon in hand, press the WEAPON MODE key. To shoot, press the PRIMARY FIRE key. In this representation mode (second-person, weapon in hand) you cannot jump. However, you can interact with your environment
by pressing the ACTION key. To come out of this weapon-in-hand mode, press the WEAPON MODE key.
Use a Gadget
To use one of your gadgets, you must have your weapon in hand.
To use a gadget, press SECONDARY FIRE. Some gadgets can be
used quickly. The correct procedure is described in the “Quick
Inventory” paragraph.
Interact
You can interact with certain items in the universe by pushing the
ACTION key. These actions include: turning on /off a light switch,
using an elevator picking up an object
Special Abilities
The Ledge Hang
If you just miss a jump, fall off a platform or jump up from below a platform, you can hang
onto the ledge. Press FORWARD or JUMP to make your character pull himself up onto
the ledge. Press BACKWARD or pres JUMP button to release your character from the
ledge. Pressing Left and Right while ledge-hanging will allow him to shimmy along the ledge.
Climbing halfway up an object
If you are confronted with an object that you cannot cling onto, but on which you can climb, press the JUMP key
for your character to “start” a jump and climb onto the box.
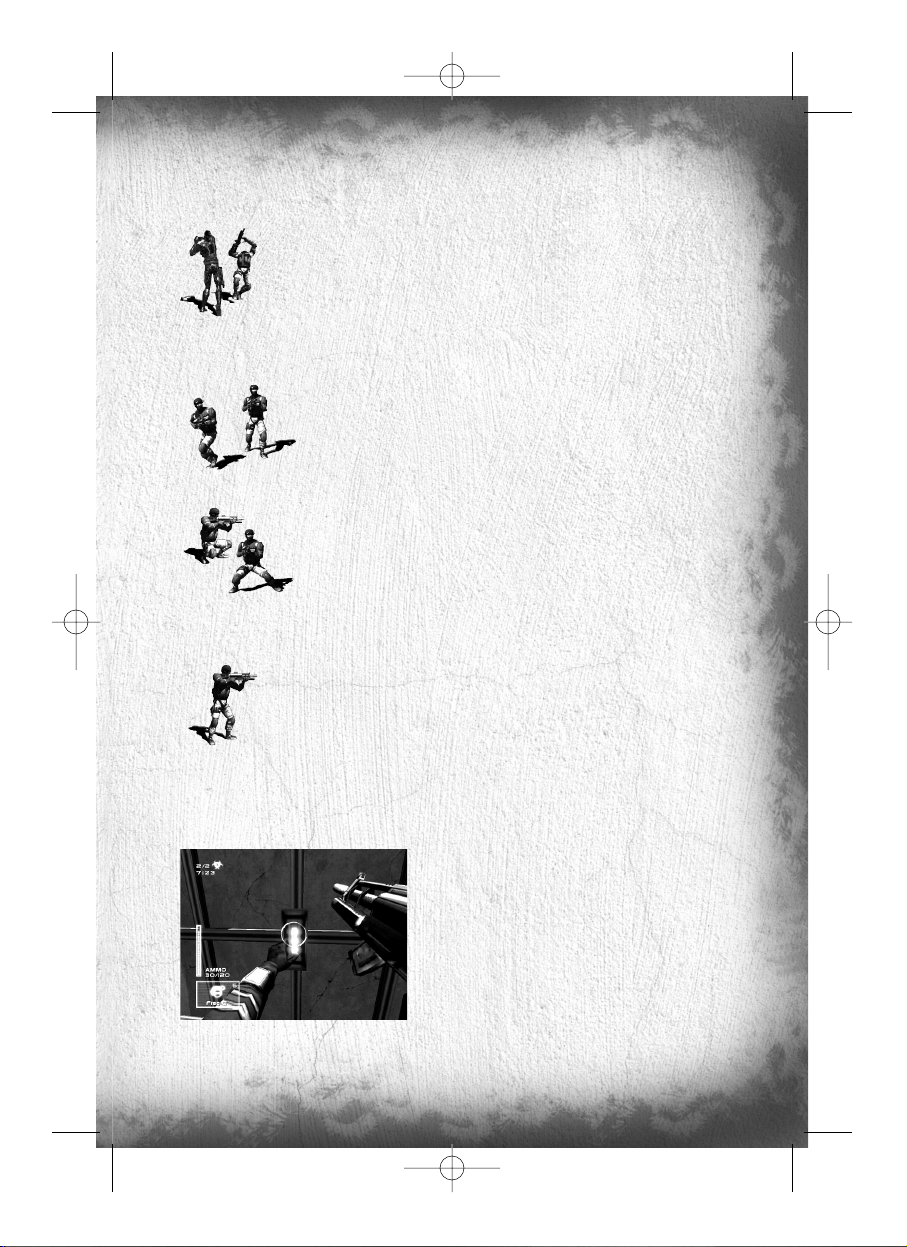
The Fence Climb
You can either initiate climbing by walking or jumping onto these surfaces (press JUMP while
keeping FORWARD pressed). Pressing FORWARD or BACKWARD then makes the character
climb up and down, while LEFT and RIGHT make him climb from side to side. To release the
character from the surface, press JUMP. If you reach the top of a climbable wall, your character
will automatically climb up off the wall if you continue to push forward. If you are climbing a fence,
pressing FORWARDat the top will make your character climb to the other side of the fence.
The Hand-over-Hand Climb
Your character is able to hang from pipes and move under them by swinging hand-over-hand.
All you have to do is position yourself under the pipe and press JUMP. Once you are hanging
on, move along using FORWARD and BACKWARD. Press JUMP to make your character
swing his legs up on to the pipe (and JUMP again to make him swing his legs down).
Pressing CROUCH will release the character from the pipe.
You can hang from one arm and shoot when you stop moving forward and press WEAPON
MODE. If you are hanging with your feet above the pipe and you take your weapon into your
hand, you will end up hanging by the feet with the weapon in hand. Press once WEAPON MODE
to go back to the initial position. However, if you press CROUCH while hanging by your feet, you
will perform a somersault and fall back to the ground below the place where you were hanging on.
TC_SCPandT_Manuel_PC_UK 23/02/04 12:58 Page 21
Page 24
22
The Ladder Climb and Vertical Pipe Climb
Your character can climb up and down ladders and vertical pipes. Push into a ladder or a
pipe (or jump onto it by pressing JUMP) to grab onto it. Pressing FORWARD and
BACKWARD will make the character climb up and down. If you press ACTION while
pressing BACKWARD, the character will quickly slide down the ladder or the pipe. If you
stop pressing BACKWARD, the character will stop sliding. Press CROUCH to jump
backwards off the ladder or the pipe.
The Ziplines
You can hang onto, and slide along, a taut rope (zipline). To use this method of movement,
position yourself under the zipline and press JUMP. You can accelerate by pressing
FORWARD. Once a certain speed has been reached, the character will raise his feet. By
pressing BACKWARD, you can slow down his descent. Let go of the rope by pressing
CROUCH.
The Split Jump
You can hold on between two walls by doing the splits. To do this, position yourself between
the two walls, near one of the two walls, and press once JUMP. When you are in the air,
press a second time JUMP to support yourself against the wall. Your character will end up
doing the splits between the two walls. In this position, you can perform the following actions:
• Take out your weapon and shoot.
• Drop back down. To do this, press CROUCH.
• Use the available gadgets in your inventory by pressing SECONDARY FIRE.
The Back to Wall
To stick close to a wall, position yourself facing the wall and press ACTION. To move, use LEFT and RIGHT.
Press CROUCH to crouch down. To move out of this position, you have different possibilities:
• Press ACTION again.
• Take your weapon into your hand.
If you are moving up to the corner of a wall, and you keep pressing in the direction of the corner of the wall, your
character will shift automatically into SNEAK mode (he will poke his head round the side of the wall to see what is
going on). From this position, you can manually target and take your gun by pressing WEAPON MODE.
Shoot by pressing PRIMARY FIRE, use a gadget by pressing SECONDARY FIRE. Press WEAPON MODE
to put your weapon away.
The Roll
You can perform rolls. To do this, press one of the MOVE keys and press ROLL. The length
of your roll will depend on your initial speed.
The Grab
You can slip up behind an enemy and grab hold of him. To do this, position yourself behind
a mercenary and press ACTION. From this position you can:
• Move towards him with the same controls.
• Break your victim’s neck by pressing ACTION.
• Knock your victim out with a blow from the elbow by pressing PRIMARY FIRE. Your
opponent will only be knocked out temporarily: he will get up again after a few moments.
TC_SCPandT_Manuel_PC_UK 23/02/04 12:58 Page 22
Page 25
23
Whatever the situation, you can only grab hold of a mercenary for a limited period of time. Beyond this time-limit,
the mercenary will suffocate and collapse.
The “Elbow Shot”
You are capable of striking out with your elbow in such a way that a mercenary is temporarily
neutralized or disoriented. To perform an “elbow shot”, make contact with the enemy and
press PRIMARY FIRE. If you are in front of your opponent or to one side of him, you will knock
him back.
ARGUS Corporation members’ abilities
Basic Actions
Sneak, Walk and Run
You can change your character speed by using the wheel mouse Up to speed up, and wheel
mouse Down to slow down.
Crouch
The CROUCH key toggles crouching.
Jump
Pressing the JUMP key will make your character jump straight up in the air. Pressing the
JUMP key while running will make the character jump forward.
Shoot
Aim by moving the onscreen reticule using the mouse. To shoot, press PRIMARY FIRE.
Change shooting mode by pressing and holding WEAPON MODE:
• BURST: You shoot a burst of 3 bullets each time you press PRIMARY FIRE.
• FULL-AUTO: You shoot a continuous burst of fire so long as you keep PRIMARY FIRE
pressed down.
The current shooting mode is indicated by an icon on your weapon.
Reload
Reload manually your weapon by pressing RELOAD. Reloading is automatic when there are no more bullets available in your current clip.
Use a Gadget
To use a gadget, press SECONDARY FIRE.
Interact
You can interact with certain items in the universe by pressing
ACTION. These actions include: turning on/off a light switch,
using an elevator or picking up an object.
TC_SCPandT_Manuel_PC_UK 23/02/04 12:58 Page 23
Page 26

24
Special Abilities
Pupil Adaptation
This ability is a version of a natural phenomenon: when you go into a very dark room, it is virtually impossible to
make out the slightest shape. After a few seconds, the pupil dilates, allowing more light to enter the eye, slightly
improving your vision in the darkness. So, if the mercenary remains motionless, or if he moves very slowly through
a dark room, the ambient light will gradually increase. This increase enables the mercenary to discern certain shapes
and – why not? – a few spies too!
Charge / Weapon Slam.
You can swing your weapon at your opponent to push him back at close range by pressing
ACTION. When moving weapon slamming will turn will cause your character to dash
forward to perform a charge in the specified direction. Please note the it’ll take a few seconds
to recover your full speed after a charge.
Arsenal
Weapon
The spy is obliged to kill no-one and to leave no traces. To meet this obligation, he only has one non-lethal weapon:
the Sticky Shocker. This weapon emits electrical discharges that put the person they hit into temporary shock. The
player can fire limited-consecutive discharges before his weapon is completely discharged. It recharges automatically,
in the course of time. To shoot, you must hold the weapon in your hand. When you are holding it, press PRIMARY
FIRE to fire. Your weapon has a secondary function that enables it to fire Smoke Grenades and Sticky Cameras,
among other things (the list of gadgets is provided in the “Shadownet team members’ gadgets” section).
ARGUS members have a special weapon. This weapon operates with high-velocity projectiles. It has two shooting
modes: BURST and FULL-AUTO. You have 5 clips with 30 bullets. You can reload by pressing RELOAD. If you find
yourself short of ammunition, you can reload near ammunitions pack, that you will find in each level. Your weapon
also has a secondary function that enables it to fire Fragmentation Grenades and Flares, among other things.
The Gadgets
Shadownet team members’ gadgets
Enhanced Reality.
This function is similar to military targeting systems. It enables you to
locate an ND133, providing a 2D representation of its position, its state
and its distance from you. You can toggle Enhanced Reality on and off,
by pressing ENHANCED REALITY.
Night Vision Goggles.
Night Vision Goggles amplify the ambient light, particularly emissions
from the lower end of the infrared spectrum. To use Night Vision, press
NIGHTVISION.
Thermal Vision Goggles.
Thermal Vision Goggles are similar to Night Vision Goggles, except that
they pick up the upper part of the infrared spectrum, namely heat
emissions rather than light emissions. This vision mode displays heat
sources in red on the screen. But remember that the range of these
goggles is limited. To use the Thermal Vision Goggles, press THERMAL.
TC_SCPandT_Manuel_PC_UK 23/02/04 12:58 Page 24
Page 27

25
Binoculars.
This tool can be used at any time and provides a more detailed view of certain zones. You can zoom in and out using
ZOOM IN and ZOOM OUT. You can also use Thermal Vision or Night Vision, or lock an ND133 to locate it more
easily. To use the binoculars, press BINOCULARS.
Please note : when targeting someone using binoculars, you can intercept his communications.
The following gadgets can all be operated in the same way : select it from the inventory, then take your weapon in
your hand, aim and fire the gadget by pressing SECONDARY FIRE.
Spy Bullets.
These are double-purpose cartridges: they either temporarily mark an enemy hit by the bullet (he
appears on your radar, and on your team-mate’s radar) or, if the bullet hits a wall or another part of the
décor, it transforms the zone around the point of impact into a radar (making it possible to locate any
enemy entering this action zone). When an enemy is tagged, you can hear his communications as well.
Sticky Cameras.
This miniature camera has many functions (zoom, Night Vision, Thermal Vision, gas jet).
Chaff Grenade.
This grenade emits electromagnetic particles when it explodes. These particles disrupt and neutralize
electronic devices (surveillance cameras, motion detectors, laser mines as well as mercenaries
visions). When the particles have discharged their magnetic field, the neutralized devices operate
normally again.
Alarm Snare.
This accessory is also double-purpose. It emits a series of noises similar to those made by a spy
(logical and realistic sequences of sounds). The aim is to fool the mercenaries. When fired near a
detection system (camera, presence detector, etc.), it can also trigger the detection system, again
deceiving the mercenaries
Flashbang Grenade.
This grenade temporarily blinds the mercenaries when it explodes in their field of vision.
Smoke Grenade.
This grenade gives off a cloud of smoke when it explodes. The cloud enables Shadownet team
members to move forward without being spotted. The smoke also slows down, hampers and
neutralizes any ARGUS members within the cloud.
ARGUS members’ gadgets
Enhanced Reality.
This function is similar to military targeting systems. It enables you
to locate ND133s and alarms that have just been triggered, providing a 2D representation of their position, their state and the distance between you and these items.
Flashlight.
This flashlight can be used to peer into dark places, in search of
intruders. To use it, press TORCH LIGHT.
Laser sight.
The Laser sight is a laser beam projected from the weapon that makes it possible to identify a character, even if he
is in shadow. To activate the Laser sight, press LASER. The position of a spotted enemy will be transferred on your
teammate’s radar as well.
TC_SCPandT_Manuel_PC_UK 23/02/04 12:58 Page 25
Page 28
26
EMF (Electro Magnetic Field) Vision.
With EMF Vision, you can locate interference given off by electronic devices. If an object with functioning electronics,
especially the spy goggles when used for special vision, and the spy weapon, is within the field of vision, it is picked
up by EMF Vision and displayed in white. A spy going through a phosphorescent grenade will also appear in EMF
Vision. To activate this vision, press EMF.
Motion Vision.
With Motion Vision, you can “reveal” air turbulence created by spies or objects in motion. Whenever a moving object
is located, a frame appears around it, making it easier to distinguish the object in question. If the object disappears
from the direct field of vision (without obstacles between the object and the player), or if the object’s speed is too
low, the frame gradually disappears. To activate Motion Vision, press MOVEMENT.
Binoculars in Snipe Mode.
The mercenaries have special binoculars that enable them to zoom in (3 possible zoom levels, with a magnification
of 2, 4 or 6) and – above all – fire (only in Single Shot mode). To shift into this special view mode, press SNIPE.
You can change zoom mode with ZOOM IN and ZOOM OUT. To hold your breath, for greater precision when
aiming, keep BREATHpressed down. You can only hold your breath so long as the breath gauge is not empty (this
gauge is located to the left of your reticule in zoomed vision mode).
Please note : when targeting someone using snipe binoculars, you can intercept his communications.
Mines.
You possess a deadly mine capable of identity recognition (it only detects spies). It has a double
activation system. You can choose the mode of activation when you lay the mine. If you choose
LASER MINE, you lay a mine that is activated by a laser beam projected by the mine itself. Any spy
who cuts through the beam sets off the mine. However, if you choose PROXIMITY MINE, you lay a
mine that is activated by a motion detector. Any spy who passes too quickly through the detector’s
range will set off the mine. To lay a mine, position yourself in front of a wall and press SECONDARY
FIRE. If you give a short press, you will lay a PROXIMITY MINE. However, if you keep
SECONDARY FIRE pressed down, a menu appears from which you can choose the mine you wish
to lay (make your choice using the FORWARD and BACKWARD). Release SECONDARY FIRE
to lay the mine. You can remove a mine that has already been laid (provided your stock of mines is
not at its maximum level) by going near it and pressing button ACTION.
Spy Trap.
This device is a locating system. When in operation, it is activated if a spy cuts through the laser beam emitted by
the Trap, thereby marking him with a transmitter that makes him visible on the radars of all members of the ARGUS.
The device is placed against a wall, in the same way as a mine. Select it from the inventory, position yourself facing
a wall and press button ACTION. You can listen to an enemy tagged by a spy trap. Position of a tagged enemy will
be transferred on your teammate’s radar as well.
Tazer.
This defense system fires a strong electrical discharge at anyone nearby. The person who is hit is
immobilized for a few seconds. To use the Tazer, press on SECONDARY FIRE. If someone is near
you, that person will receive an electric shock.
The following gadgets can all be operated in the same way : select it from the inventory, then take
your weapon in your hand, aim and fire the gadget by pressing SECONDARY FIRE.
Flares.
The Flare produces dynamic light that is fairly short-lived. It lights up with a radius of a few meters
Fragmentation Grenade.
The Fragmentation Grenade is a deadly grenade that, on exploding, inflicts damage on anyone within the explosion zone.
TC_SCPandT_Manuel_PC_UK 23/02/04 12:58 Page 26
Page 29
27
Phosphorescent grenade.
This grenade diffuses a large cloud of phosphorescent particles, which will stick on any character going
through it. These particles can be seen in EMF vision and will diffuse some light. Also the character
will leave clearly visible footsteps as he’s walking away. This gadget is very convenient to mark and
track a spy.
The Game Levels
There are many, varied game environments and they are – above all – interactive. They constitute an integral part
of the game, affecting both teams.
Passive Defenses
Trigger mechanisms are located in the level (motion detectors, surveillance cameras, lasers, etc.). If an intruder sets
off one of these mechanisms, he either activates an intruder alarm that gives his position or an alarm that sections
off the zone in which he is located. In both cases, the intruder’s stealthy progress is jeopardized.
These mechanisms can be seen using Thermal Vision. They are indestructible but it is possible to neutralize them
temporarily using the Sticky Shocker or the Chaff Grenade. Any item neutralized by one or both of these means is
encircled by electric arcs and gives off smoke.
Please note : disabling defenses with a sticky shocker or a chaff grenade will prevent giving precise location of the
intrusion as general warning message will be sent to mercenaries (“security failure”)
Surveillance Cameras.
The Surveillance Cameras emit sound and light (GREEN when they see nothing; RED when the alarm
is activated). A character is located when he enters the camera’s cone of vision.
Motion Detectors.
These detectors can locate any spy who penetrates their active zone. The indicator lights on the
housing are green if the detector has located nothing and red if they have detected something.
Lasers.
Whenever a spy cuts through the laser beam, he sets off the associated alarm.
An alarm stops automatically after a few seconds if nothing appears to trigger the alarm once again.
Please note : triggered laser alarm system can cause temporary isolation of certain areas.
The Gameplay Objects
Some décor items are gameplay elements.
Destructible Lights.
To destroy certain light sources, take out your weapon, aim and fire.
Extinguishers.
When you shoot at an Extinguisher, a cloud of “smoke” appears at the bullet’s point of impact, blinding mercenaries
who are passing through the cloud.
Ammunition Reloads.
Enable you to reload bullets for your weapon and stock up on grenades. Press ACTION in front of
the box to reload.
Health Reloads.
Enable you to refill your life. Press ACTION in front of the box to get back to full life.
TC_SCPandT_Manuel_PC_UK 23/02/04 12:58 Page 27
Page 30
28
Ready for your next challenge?
Log on to www.splintercell.com & set your sights on the top of the worldwide multiplayer ranking. The
Splinter Cell community are waiting to help you become the best! The official website, the best source for info,
materials & goodies.
“You Got the Game, Now Get the Guide. Prima's Official Strategy
Guide: Tom Clancy's Splinter Cell®Pandora Tomorrow.”
Register your game!
To get an insider knwoledge for the coming Ubi Soft games, receive exclusive offers, participate in focus
groups, or help create games... please take a few minutes to register your game, on:
http://register.ubi.com/pandora
Copyrights
© 2004 Ubisoft Entertainment. All Rights Reserved. Splinter Cell, Sam Fisher, Splinter Cell: Pandora Tomorrow, Ubisoft,
ubi.com, and the Ubisoft logo are trademarks of Ubisoft Entertainment in the U.S. and/or other countries. All other trademarks are the property of their respective owners.
Unreal Engine is a trademark of Epic Games Inc.
Uses Bink video. Copyright ©1997-2001 by RAD Game Tools, Inc.
Opening Cinematic Music Composed and Produced by Jack Wall, including Lalo Schifrin's Original Splinter Cell Theme.
Original Splinter Cell Theme Composed by Lalo Schifrin.
Music Performed by the Century Fox Orchestra in Los Angeles.
The Sony Ericsson marble logo is the trademark or registered trademark of Sony Ericsson Mobile Communications AB.
Sony is the trademark or registered trademark of Sony Corporation.
Ericsson is the trademark or registered trademark of Telefonaktiebolaget LM Ericsson
RenderWare Physics
is a registered trademark of Criterion Software Ltd. Portions of this software are Copyright Criterion
Software Ltd 1998-2004
© 2003 Criterion Software Inc.Criterion and RenderWare are registered trademarks of Canon Inc.
TC_SCPandT_Manuel_PC_UK 23/02/04 12:58 Page 28
Page 31

29
WARRANTY
Ubisoft offers a Technical Support service which details are indicated in the text of the manual relative to Technical
Support.
When you (the “User”) contact Technical Support, please be as specific as you can be about the problem you are
experiencing and have the below details available:
• The name of the manufacturer of your computer system
• The brand and speed of the processor
• How much RAM you have
• The version number of windows you are using (if you aren’t sure, right-click on the my computer icon on your
desktop and select ‘properties’)
• The manufacturer name and model number of your video card, modem, and sound card.
Ubisoft guarantees to the original buyer of the multimedia product that the compact disc (CD) supplied with this
multimedia product shall not show any fault during a normal-use period of one hundred and eighty (180) days from
the invoiced date of purchase, or any other longer warranty time period provided by applicable legislation.
Please return any defective multimedia product by registered letter to: Technical Support together with this manual
and your registration card if you have not already sent it to us. Please state your full name and address (including
postcode), as well as the date and location of purchase. You may also exchange the multimedia product at the place
of purchase.
If a disc is returned without proof of purchase or after the warranty period has expired, Ubisoft will choose either to
repair or to replace it at customer expense. This warranty is invalid if the disc has been damaged through negligence,
accident or misuse, or if it has been modified after acquisition.
The User recognises expressly that he uses the multimedia product at his own risk.
The multimedia product is provided as is, without any warranty other than what is laid down above. The User is
responsible for any costs of repairing and/or correcting the multimedia product.
To the extent of what is laid down by law, Ubisoft rejects any warranty relating to the market value of the multimedia
product, the User’s satisfaction or its capacity to perform a specific use.
The User is responsible for all risks connected with lost profit, lost data, errors and lost business or other information
as a result of owning or using the multimedia product.
As some legislations do not allow for the aforementioned warranty limitation, it is possible that it does not apply to
the User.
OWNERSHIP
The User recognises that all of the rights associated with this multimedia product and its components, its manual and
packaging, as well as the rights relating to the trademark, royalties and copyrights, are the property of Ubisoft and
Ubisoft’s licensors, and are protected by French regulations or other laws, treaties and international agreements
concerning intellectual property. Documentation should not be copied, reproduced, translated or transferred, in whole
or in part and in whatever form, without prior written agreement of Ubisoft.
TC_SCPandT_Manuel_PC_UK 23/02/04 12:58 Page 29
Page 32

30
UBISOFT CONTACTS AT YOUR DISPOSAL
TECHNICAL SUPPORT
NEW: To serve you better, Ubisoft is now providing full ONLINE support, to solve your gaming problems quickly and
efficiently.
Simply go to http://www.ubi.com/uk and visit the Ubisoft Frequently Asked Questions first!
By visiting our FAQ database, you can find exactly the same answers that are available to you by calling or sending
web-mail to our support representatives. This service is free and available 24/7!
If for any reason you do not find the answer to your question, you can click on the Ask a question link in the FAQ
to send us a web-mail, ensuring that we get all the important information on your system and your problem so we
can answer correctly the first time.
Make sure to include all information on your system, your problem, and the game you are
playing.
If you do not have internet access, Our support representatives can assist you from 9:00 am until 7:00pm, Monday
– Friday (excluding Bank Holidays) on Telephone: 0905-482-0109 Calls cost 30p per minute. Please be at your system when calling Ubisoft for support.
Australian technical support
Technical Support Info Hotline
1902 262 102
(calls are charged at $1.98 per minute including GST. Higher from public and mobile phones).
HINTS & TIPS
Looking for cheats to go up to the next level? Call us for Hints and Tips Telephone Number: 0906 643 0200, available hours 9.00 am until 7.00 pm Monday – Friday (excluding Bank Holidays) to speak to one of our representatives. Calls cost £1.50 per minute, please ask permission from the person who pays the phone bill before making
the call.
TC_SCPandT_Manuel_PC_UK 23/02/04 12:58 Page 30
Page 33

31
TC_SCPandT_Manuel_PC_UK 23/02/04 12:58 Page 31
Page 34

32
TC_SCPandT_Manuel_PC_UK 23/02/04 12:58 Page 32
Page 35

2202648
HANDLEIDING
TC_SCPandT_Couv_PC_NL 23/02/04 18:02 Page I
Page 36

WAARSCHUWING
Bij sommige mensen kunnen flikkerende lichten of patronen in onze dagelijkse leefwereld een epilepsieaanval of verlies van bewustzijn uitlokken. Dit kan ook gebeuren
bij het bekijken van televisiebeelden of bij het spelen van PC en videospellen. Ook bij
personen die nooit eerder epileptische aanvallen of aan epilepsie verwante verschijnselen hebben gehad, kan dat voorkomen. Raadpleeg je arts alvorens te spelen
wanneer jij, of iemand in je familie, eerder aan epilepsie verwante symptomen (aanvallen of verlies van bewustzijn) hebt ervaren tijdens blootstelling aan flikkerende
lichten. Wanneer bij jou tijdens het spelen van een pc of videospel één van de volgende symptomen optreden: duizeligheid, verminderd gezichtsvermogen, oog- of
spiertrekkingen, verminderd bewustzijn, desoriëntatie, willekeurige reflexbewegingen
of stuipen, stop dan ONMIDDELLIJK met spelen en raadpleeg je huisarts voordat je
verder speelt.
TC_SCPandT_Couv_PC_NL 23/02/04 14:49 Page III
Page 37

1
Inhoud
OFFLINE - ÉÉN SPELER VARIANT . . . . . . . . . . . . . . . . . . . . . . . . . . . . . . . . . . . . . 2
Het Gevaar . . . . . . . . . . . . . . . . . . . . . . . . . . . . . . . . . . . . . . . . . . . . . . . . . . . . . . . . 2
Sam Fisher. . . . . . . . . . . . . . . . . . . . . . . . . . . . . . . . . . . . . . . . . . . . . . . . . . . . . . . . . 2
Het Third Echelon Team. . . . . . . . . . . . . . . . . . . . . . . . . . . . . . . . . . . . . . . . . . . . . . . . 2
Andere Personages. . . . . . . . . . . . . . . . . . . . . . . . . . . . . . . . . . . . . . . . . . . . . . . . . . . 3
Aan de slag . . . . . . . . . . . . . . . . . . . . . . . . . . . . . . . . . . . . . . . . . . . . . . . . . . . . . . . . 4
Eén Speler en Multiplayer Menu’s. . . . . . . . . . . . . . . . . . . . . . . . . . . . . . . . . . . . . . . . . 4
Het Spelscherm . . . . . . . . . . . . . . . . . . . . . . . . . . . . . . . . . . . . . . . . . . . . . . . . . . . . . 5
Menu’s . . . . . . . . . . . . . . . . . . . . . . . . . . . . . . . . . . . . . . . . . . . . . . . . . . . . . . . . . . . 6
OPSAT (Operationele Satelliet Verbinding). . . . . . . . . . . . . . . . . . . . . . . . . . . . . . . . . . . 6
Sluip Door, Kruip Door . . . . . . . . . . . . . . . . . . . . . . . . . . . . . . . . . . . . . . . . . . . . . . . . 6
Wat Sam Kan, Kan Sam Alleen. . . . . . . . . . . . . . . . . . . . . . . . . . . . . . . . . . . . . . . . . . . 6
Wapens, gadgets en voorwerpen in het Spel . . . . . . . . . . . . . . . . . . . . . . . . . . . . . . . . 10
ONLINE - MULTIPLAYER SPELVARIANT . . . . . . . . . . . . . . . . . . . . . . . . . . . . . . . 14
Waar Gaat het Om . . . . . . . . . . . . . . . . . . . . . . . . . . . . . . . . . . . . . . . . . . . . . . . . . . 14
De verschillende spelvarianten. . . . . . . . . . . . . . . . . . . . . . . . . . . . . . . . . . . . . . . . . . 14
Besturing. . . . . . . . . . . . . . . . . . . . . . . . . . . . . . . . . . . . . . . . . . . . . . . . . . . . . . . . . 15
Snel aan de slag. . . . . . . . . . . . . . . . . . . . . . . . . . . . . . . . . . . . . . . . . . . . . . . . . . . . 16
Menu’s. . . . . . . . . . . . . . . . . . . . . . . . . . . . . . . . . . . . . . . . . . . . . . . . . . . . . . . . . . . 17
Het Spelscherm. . . . . . . . . . . . . . . . . . . . . . . . . . . . . . . . . . . . . . . . . . . . . . . . . . . . . 19
De Personages . . . . . . . . . . . . . . . . . . . . . . . . . . . . . . . . . . . . . . . . . . . . . . . . . . . . . 20
Bewapening. . . . . . . . . . . . . . . . . . . . . . . . . . . . . . . . . . . . . . . . . . . . . . . . . . . . . . . 24
Voorwerpen in het spel . . . . . . . . . . . . . . . . . . . . . . . . . . . . . . . . . . . . . . . . . . . . . . . 27
Wat kom je nog meer tegen . . . . . . . . . . . . . . . . . . . . . . . . . . . . . . . . . . . . . . . . . . . 27
Garantie . . . . . . . . . . . . . . . . . . . . . . . . . . . . . . . . . . . . . . . . . . . . . . . . . . . . . . . . . 29
Technische Ondersteuning . . . . . . . . . . . . . . . . . . . . . . . . . . . . . . . . . . . . . . . . . . . . . 30
TC_SCPandT_Manuel_PC_NL 23/02/04 14:51 Page 1
Page 38

2
Offline - Eén speler spelvariant
Het Gevaar
Als antwoord op het toenemende gebruik van geavanceerde digitale codering om potentiële gevaren voor de nationale veiligheid van
Amerika te verbergen, heeft de NSA (de nationale veiligheidsdienst) een revolutie op het gebied van informatieverzameling teweeggebracht. Dit topgeheime initiatief, ook wel Third Echelon genoemd, betekent een terugkeer naar de klassieke spionagemethodieken. Daarbij
wordt gebruik gemaakt van de allermodernste beveiligings- en gevechtstechnieken om op agressieve wijze informatie te verzamelen die
in vijandelijke gebieden voor handen is. Wanneer informatie die noodzakelijk wordt geacht voor de nationale veiligheid niet op traditionele wijze kan worden bemachtigd, krijgt Third Echelon toestemming om ter plaatse missies uit te voeren. Het bestaan van Third Echelon
wordt uiteraard door de Amerikaanse regering ontkend. Third Echelon gebruikt eenheden die bekend staan als zogenaamde Splinter
Cellen; dit zijn elite spionage-eenheden, die bestaan uit een enkele veldagent, bijgestaan door een elders gestationeerd hulpteam.
Net als een glassplinter is een Splinter Cell klein, scherp en vrijwel onzichtbaar.
2006: de Verenigde Staten zetten op Oost Timor een tijdelijke militaire basis op om het langzaam groeiende verdedigingsleger van “´s
werelds jongste democratie” te trainen. Alom is er gepassioneerd verzet tegen de militaire aanwezigheid van de V.S. in Zuidoost Azië,
maar de dreiging die het Indonesische leger vormt voor de Timorese democratie wordt opgevoerd als voldoende rechtvaardiging.
Tegelijkertijd heeft de Amerikaanse regering er geen moeite mee onder dit mom actief militair personeel op een steenworp afstand te hebben van zowel Noord Korea als de grootste Moslim bevolking in Azië.
Onder leiding van Suhadi Sadono, de bevelhebber van de guerilla´s verenigen zich de groeperingen die tegen de militaire aanwezigheid
van de Amerikanen zijn. Sadono wordt hierin officieus gesteund door de belangrijkste corrupte spelers binnen de Indonesische regering.
Zijn troepen vallen de Amerikaanse ambassade in Jakarta binnen en bezetten deze, waarbij ze het burger- en militair personeel gijzelen.
Jij bent Sam Fisher, en je wordt er op afgestuurd. Niet om de gijzelaars te bevrijden, maar om topgeheime documenten die zich in de
ambassade bevinden te vernietigen voordat Suhadi´s mensen ze vinden.
Sam Fisher
Fisher heeft de afgelopen decennia tijdens een aantal belangrijke conflicten vooraan gestaan bij spionageoperaties. Hij heeft dit niet alleen overleefd,
maar dankzij hard werken, een onverzadigbare nieuwsgierigheid en openhartige eerlijkheid blonk hij zelfs uit bij het uitvoeren van geheime missies.
Hij houdt niet van diplomatiek geneuzel en nog minder van leugens.
Fisher weet wat hij kan en hij vertrouwt op zijn vaardigheden, maar begrijpt ook dat in het verleden overleven vaak een kwestie van geluk geweest
is. Hij weet dat hij ook maar een mens is en fouten maakt en hij wil niet dood. Hij heeft een vreemd en enigszins zwart gevoel voor humor.
Fisher is een rustig iemand, werkt gevoelsmatig en observeert: iemand die van buitenaf naar de dingen kijkt. Zijn leven wordt gevuld met vechten,
spionage en voortdurend in training zijn. Zijn tactische ervaring is deel gaan uitmaken van zijn instincten. Tegenwoordig voelt hij zich zelfs buiten zijn
werk het meest op zijn gemak aan de rand van de gemeenschap. Niets ontgaat hem weliswaar, maar hij blijft een buitenstaander.
Dankzij zijn bewonderenswaardige verzameling littekens heeft Fisher zijn plek in het Walhalla onderhand wel veilig gesteld. Hij hoeft de wereld niets
meer te bewijzen. Nu hij ouder en wijzer is, hoeft roem voor hem niet meer. Als hij vecht, dan is dat omdat hij ervan overtuigd is
dat het noodzakelijk is en omdat hij weet dat hij het kan.
Het Third Echelon Team
Kolonel Irving Lambert
Geboren: 1961 in Batcave, NC Lengte: 189 cm Gewicht: 122 kilo
THIRD ECHELON Missiecoördinator
Lambert onderhoudt de verbindingen tussen de agent (of agenten) in het veld en Third Echelon’s
team van onderzoekers, hackers, strategen en commandanten. Terwijl Fisher in het veld bezig is staat
hij continu in contact met Lambert via onderhuidse microchips en een oorimplantaat.
TC_SCPandT_Manuel_PC_NL 23/02/04 14:51 Page 2
Page 39

3
Dermot P. Brunton
Geboren: 1963 Lengte: 164 cm Gewicht: 62 kilo
SHADOWNET missiecoördinator
Dermot is de “Irving Lambert” van de SHADOWNET organisatie. Omdat in deze organisatie direct satelliet contact met
de mensen in het veld niet toegestaan is, heeft hij een meer bureaucratische baan.
Anna Grimsdóttir
Geboren: 1974, Boston, MA Lengte: 173 cm Gewicht: 58 kilo
THIRD ECHELON Hoofd communicatie
Grímsdóttir heeft de leiding over een klein team programmeurs dat verantwoordelijk is voor het leve-
ren van technologische hulp, het decoderen van berichten en het verschaffen van informatie aan de
agenten. Grímsdóttir helpt Fisher bij het omgaan met hi-tech apparatuur tijdens zijn missie.
Andere Personages
Suhadi Sadono
Indonesische leider van de DARAH DAN DOA guerilla´s.
Suhadi strijdt al sinds zijn vijftiende voor de Indonesische onafhankelijkheid.
Zijn ster steeg snel binnen de organisatie en op zijn eenentwintigste was hij de
leider van de Darah Dan Doa (bloed en gebeden). Toen had de organisatie
slechts een veertig leden. Tegen het midden van de negentiger jaren werd de
organisatie heimelijk gefinancierd door de Kopassus (de Indonesische speciale
troepen). Na operatie REDBEARD groeide de Darah Dan Doa uit tot een burgerleger met vele duizenden leden. Alhoewel de Verenigde Staten en de CIA
in 1999 hun financiering stopten, blijft de DDD groeien.
Norman Soth
Huurling
Soth werd door de CIA opgeleid. Hij is huurling en voormalig vrijheidsstrijder en werkt in Zuidoost
Azië, en dan met name in Indonesië. In 1992 nam hij deel aan de door de CIA opgezette operatie
REDBEARD. Hierna hield hij zich bijna tien jaar bezig met het bewapenen en opleiden
van de Kopassus om de Timorese opstanden te onderdrukken.
Dahlia Tal
Lid van de Shin Bet
De Shin Bet, de geheime dienst van de Israëli, houdt zich bezig met de minder aan-
gename kanten van het geheime werk voor hun land. Daaronder vallen ondermeer
het verhoren, voorlichten en geestelijk begeleiden van mensen.
TC_SCPandT_Manuel_PC_NL 23/02/04 14:51 Page 3
Page 40

4
Aan de slag
Installatie
Om Splinter Cell te installeren ga je als volgt te werk:
1. Zet je computer aan.
2. Plaats de Splinter Cell installatie CD in je cd-rom speler. Het Autorun menu verschijnt nu.
NB: als het Autorun menu niet verschijnt dubbelklik dan op het icoontje Deze Computer op je bureaublad. Dubbelklik
vervolgens op het cd-rom icoontje. Nu moet het Autorun menu verschijnen.
3. Klik op de knop Install Splinter Cell. Je wordt nu stap voor stap door de installatie van het spel geleid. Wanneer
je een map op je harde schijf hebt aangemaakt voor Splinter Cell wordt het spel geïnstalleerd. Je krijgt automatisch
de vraag gesteld of DirectX v9.0 geïnstalleerd moet worden. Je kunt Splinter Cell alleen spelen als DirectX v8.1 of
hoger op je systeem geïnstalleerd is. Indien dat het geval is dan klik je op de No-knop en DirectX wordt niet geïnstalleerd. Als je het niet zeker weet, klik dan op Yes en de DirectX installatiesoftware controleert welke versie op jouw
systeem geïnstalleerd is.
4. Na het installeren van het spel selecteer je vanuit het Windows Start menu Programma´s -> Ubisoft -> Splinter
Cell Pandora Tomorrow -> Play Splinter Cell Pandora Tomorrow of klik op de “Play Splinter Cell Pandora Tomorrow”
snelkoppeling op het bureaublad.
NB: De Splinter Cell Pandora Tomorrow Play CD moet zich in je cd-rom speler bevinden om het spel te kunnen starten.
Het spel verwijderen/opnieuw installeren
Om Splinter Cell Pandora Tomorrow te verwijderen ga je als volgt te werk:
1. Zet je computer aan.
2. Plaats een van de Splinter Cell Pandora Tomorrow CD´s in je cd-rom speler. Het Autorun menu verschijnt nu.
3. Klik op de knop “Uninstall Splinter Cell” (SC verwijderen). Als je zeker weet dat je Splinter Cell Pandora Tomorrow
wilt verwijderen van de harde schijf klik dan op Yes. Wil je het spel niet verwijderen klik dan op No. Als je Splinter
Cell verwijdert blijven alle save-bestanden op je harde schijf staan behalve als je de vraag “Delete all configuration
and saved games files” (alle configuratie en save-bestanden verwijderen?) met Yes (ja) beantwoordt.
NB: je kunt Splinter Cell Pandora Tomorrow ook verwijderen door in het Windows Configuratie scherm op Software
te klikken.
Eén speler en multiplayer menu´s
In het hoofdscherm kun je uit drie opties kiezen:
• Single Player
• Multiplayer
• Extra´s
Eén speler menu
Kies Single Player als je alleen wilt spelen. Je komt in het Single Player menu terecht waar je de volgende opties
hebt:
TC_SCPandT_Manuel_PC_NL 23/02/04 14:51 Page 4
Page 41

5
Start Game
Begin aan een nieuwe game of ga verder met een eerder opgeslagen game. Als je deze optie kiest ga je naar het Player Profile
scherm waar je een spelerprofiel kunt aanmaken, laden of een
oud profiel verwijderen. Je kunt maximaal tien verschillende profielen aanmaken, waarbij elk profiel drie save games kan hebben.
Als je klaar bent kies je een profiel om aan een nieuwe game te
beginnen. Om een opgeslagen game te spelen kies je eerst een
profiel en vervolgens de game die je wilt laden.
Options (opties)
Kies Options om geluids- en beeldinstellingen zoals helderheid en
contrast in te stellen.
Back to Main Menu:
terug naar het hoofdmenu.
Multiplayer Menu
Kies Multiplayer als je Splinter Cell Pandora Tomorrow via een LAN of op het internet wilt spelen.
Extra’s
Het Spelscherm
1. Gezondheidsmeter: geeft de status van Sam’s gezondheid/leven aan.
2. Zichtmeter:
deze meter beweegt van links naar rechts om de hoeveelheid licht in Sam’s directe omgeving aan te geven.
3. Interactie systeem: dit verschijnt op het moment dat je gebruik kunt maken van een voorwerp of kunt pra-
ten met een persoon in de omgeving.
4. Doel: laat het volgende missiedoel zien.
5. Geselecteerd wapen, gadget of voorwerp: laat de huidige selectie zien.
6. Communicatievenster: verschijnt aan de bovenkant van het scherm op het moment dat je een bericht ont-
vangt.
7. OPSAT: als er een kleine enveloppe boven je OPSAT staat betekent dit dat er een bericht binnen gekomen is.
Druk op <F1> om je OPSAT te openen en het bericht te lezen.
8. Totaal aan munitie.
9. Munitie in één clip.
6
8
9
5
2
3
1
4
7
TC_SCPandT_Manuel_PC_NL 23/02/04 14:52 Page 5
Page 42

6
Menu’s
Druk tijdens het spel op <Esc> om naar het spelmenu te gaan.
• Load Game: laad een opgeslagen spel of begin opnieuw aan
een level. Tijdens het spel kun je met de <F5> toets de situatie
opslaan, je kunt deze laden met <F8>.
• Options: wijzig de geluids- en beeldinstellingen.
• Controller: stel de configuratie van je controller in.
• Back to Single Player Menu: terug naar het één speler menu.
OPSAT (Operational Satellite Uplink) (operationele satellietverbinding)
De OPSAT is een compacte, op de pols te dragen versie van een gewone PDA ontwikkeld voor militaire doeleinden. Het stelt
Sam in staat om missiedoelstellingen en nieuws te ontvangen vanuit het Third Echelon hoofdkantoor. De OPSAT vertoont
ook de realtime beelden van de Plakcamera (sticky camera). Druk tijdens het spel op <F1> om de OPSAT te openen.
• Goals: doelstellingen; bekijk de doelstellingen van de missie.
• Notes: notities; hier vind je extra hints en aanwijzingen die tijdens de missie verzameld zijn.
• Data: informatie; hier vind je verkenningsinformatie zoals gegevens over vijanden, locaties of andere zaken die van belang zijn voor de huidige missie. Let
speciaal op de data sticks, aangezien deze belangrijke informatie bevatten.
• Inventory: inventaris; hier vind je informatie over de voor-
werpen en wapens die je bij je hebt.
Sluip door, kruip door
Het meest waardevolle voordeel dat Sam heeft is dat hij in staat is in het geheim te werken, zelfs temidden van vijandelijke troepen. De zichtmeter op Sam’s OPSAT geeft aan of hij onopgemerkt blijft. Staat deze helemaal naar links, dan is Sam
onzichtbaar voor vijandelijke waarneming. Staat hij helemaal naar rechts, dan loopt Sam groot gevaar opgemerkt en onderschept te worden. In de schaduwen blijven is een goede manier om niet op te vallen, maar soms is het nodig om te kruipen, heel voorzichtig te lopen of met de rug tegen de muur te gaan staan om niet gezien te worden.
Een Splinter Cell agent moet niet alleen vijandelijke ogen, maar ook vijandelijke oren vermijden. Het is soms noodzakelijk
om te rennen en springen, maar dan maak je geluid – dé uitnodiging voor vijandelijke patrouilles om jouw locatie te onderzoeken. Langzaam bewegen terwijl je kruipt zal veel minder snel vijandelijk bezoek uitlokken.
Alarm
Je zult merken dat als een vijand Sam ziet, of zelfs alleen maar een vermoeden heeft dat er een indringer is, hij opdracht heeft
collega’s hiervan op de hoogte te stellen of een alarm af te laten gaan in plaats van zelf een confrontatie met Sam aan te gaan.
Naarmate er vaker een alarm afgaat zullen ze alerter en agressiever reageren bij een nieuw alarmsignaal. Vanwege de extreem
geheime aard van Splinter Cell missies kan het afgaan van een alarm Third Echelon doen besluiten de missie af te blazen.
Wat Sam kan, kan Sam alleen
Elke keer als Sam een speciale handeling kan doen opent het interactie systeem een venster. Hou de ACTIE toets
(<ENTER>) ingedrukt en selecteer met het muiswiel of q en m wat je wil gaan doen. Laat <ENTER> los om de
gekozen handeling uit te voeren.
TC_SCPandT_Manuel_PC_NL 23/02/04 14:52 Page 6
Page 43

7
Standaardbeweging
Als je de cursorpijl q indrukt gaat Sam lopen. Met het muiswiel bepaal je hoe snel – of langzaam – hij loopt.
Aangezien langzaam bewegen minder aandacht trekt dan snel bewegen is het belangrijk om jezelf leren te beheersen. Een tegenstander die jou achter zich hoort kan zich bijna altijd sneller omdraaien en schieten dan dat jij een open
gebied oversteekt. Het voelt misschien ongemakkelijk aan om langzaam door een goed verlicht gebied in de nabijheid van een vijand te lopen… maar naar de overkant te rennen bekoop je zeker met de dood.
Basisbewegingen
Sam kan een grote hoeveelheid bewegingen uitvoeren. Weten hoe je je verplaatst… en hoe je dat ongemerkt kunt doen… is van essentieel belang.
NB. <Num 1> betekent toets 1 op het numeriek eiland.
Hurken
Druk op <Num 0> (crouch/hurken) om te hurken. Sam beweegt nu weliswaar langzamer
maar wel stiller en hij valt minder op.
Opklimmen
Druk op <Shift> (jump/springen) en beweeg voorwaarts tegen lage voorwerpen zoals kratten of tafels aan om Sam hier op te laten klimmen.
Beklimmen
Om in een pijp, ladder, touw of hek te klimmen hoef je er alleen maar tegenaan te lopen.
Druk op <Num 0> (crouch/hurken) om er weer af te springen.
Van dichtbij aanvallen
Ter wijl je wapen in de holster zit en je vlakbij een tegenstander staat druk je op de vuurknop
(linker muisknop) om hem met je elleboog een mep te geven.
Rug tegen de muur
Druk op <Num 4> (back to wall/rug tegen de muur) terwijl je staat of hurkt om Sam’s rug
tegen de muur te zetten. Sam valt minder op als hij met zijn rug tegen de muur staat.
Hangen
Spring door de <Shift> (jump/springen) in te drukken omhoog om richels boven Sam’s hoofd te grijpen en hieraan te gaan hangen. Sam kan zowel naar links en rechts bewegen als zichzelf omhoog trekken, als daar tenminste ruimte voor is. Druk op <Num 0> (crouch/hurken) om los te laten.
Hand-over-Hand
Spring met <Shift> (jump/springen) omhoog om een horizontale pijp vast te pakken. Trek door
weer <Shift> (jump/springen) in te drukken Sam’s benen op om langs obstakels te geraken.
Touwglijden
Spring met <Shift> (jump/springen) omhoog om een touw te pakken. Sam zal automatisch
naar beneden glijden. Trek Sam´s benen op door weer <Shift> in te drukken. Druk op <Num
0> (crouch/hurken) om los te laten.
TC_SCPandT_Manuel_PC_NL 23/02/04 14:52 Page 7
Page 44

8
Geavanceerde bewegingen
Geavanceerde bewegingen zijn net zo essentieel als de basisbewegingen. Door deze onder de knie te krijgen zal Sam veiliger en
efficiënter zijn weg kunnen vinden. Veel van deze geavanceerde bewegingen zijn combinaties die Sam kan gebruiken om aan te
vallen. Zie elders in deze handleiding voor meer informatie over het gebruiken en meenemen van wapens.
Rollen
Druk terwijl je beweegt op <Num 0> (crouch/hurken) en hou deze ingedrukt om een rol te maken.
Spagaatsprong
Als Sam zich in een gang bevindt die ongeveer net zo breed is als Sam lang is, kan hij een
spagaatpositie aannemen. Spring met <Shift> (jump/springen) en druk <Shift>
(jump/springen) nog een keertje in om de spagaatsprong te maken.
Halve spagaat
In een kleinere gang kan Sam een halve spagaatsprong doen. Spring met <Shift> en druk
vervolgens <Shift> nog een keertje in om de halve spagaatsprong te maken.
Halve spagaat en nog een keer springen
Vanuit een halve spagaat kan Sam nog hoger springen. Laat door links/rechts te bewegen Sam
naar de hogere positie kijken en druk vervolgens op <Shift> om er naar toe te springen.
Bovenaanval
Als je boven een vijand weet te komen en van boven op hem kunt springen sla je hem bewusteloos. Druk <Num 0> (crouch/hurken) om een bovenaanval uit te voeren.
Stille landing
Druk wanneer je valt snel op <Num 0> (crouch/hurken) voor een geluidloze landing.
Abseilen
Om via een schoorsteen af te dalen ga je er vlakbij staan en selecteer je de Rappel (abseilen) interactie. Sam kan via het touw omhoog en naar beneden bewegen. Druk op <Shift>
(jump/springen) om je tegen de muur af te zetten.
Abseilend schieten
Sam kan zijn wapen trekken en schieten wanneer hij aan het abseilen is. Druk op <Num 1>
(Use/Equip - gebruiken/pakken) om je geselecteerde wapen te trekken.
TC_SCPandT_Manuel_PC_NL 23/02/04 14:52 Page 8
Page 45

9
Hangend schieten
Sam kan zijn wapen trekken en afschieten wanneer hij aan een pijp hangt, maar alleen als
zijn benen niet opgetrokken zijn. Druk op <Num 1> (Use/Equip - gebruiken/pakken) om je
geselecteerde wapen te trekken.
Ondersteboven schieten
Als Sam ondersteboven aan een pijp hangt trek je met <Num 1> (Use/Equip - gebruiken/pakken) zijn wapen.
Schieten vanuit de spagaatpositie
Sam kan zijn wapen trekken en afschieten vanuit de spagaatpositie. Druk op <Num 1>
(Use/Equip - gebruiken/pakken) om je geselecteerde wapen te trekken.
Schieten met de rug tegen de muur
Als Sam, terwijl hij met zijn rug tegen de muur staat een hoek bereikt dan zal hij automatisch om de hoek kijken. Druk terwijl hij kijkt op <Num 1> (Use/Equip - gebruiken/pakken)
om zijn wapen te trekken waarna hij om de hoek kan schieten.
Gooien met de rug tegen de muur
Als je om de hoek kijkt selecteer je met qmeen voorwerp om te gooien. Druk op
<Num 1> (Use/Equip - gebruiken/pakken) om het te pakken. Als je het voorwerp vast hebt
bepaal je met de tweede vuurknop (rechter muisknop) hoe ver je gaat gooien. Met de vuurknop (linker muisknop) gooi je het voorwerp.
ME draai
Als Sam naar een geopende deur of in een kleine gang kijkt kun je de actie knop (<Enter>)
indrukken om een ME draai te maken. De ME draai is een beweging die elite troepen leren
waardoor ze bijna onzichtbaar kunnen worden.
Bewegingen met computergestuurde personages (NPC’s)
Sam heeft een aantal speciale bewegingen die alleen gebruikt kunnen worden tegen NPC’s. Om deze bewegingen uit te
kunnen voeren moet je eerst dichtbij een tegenstander zien te komen zonder gezien te worden.
Lichaam verplaatsen
Om te voorkomen dat ze ontdekt worden zal Sam de lichamen van bewusteloze of dode
tegenstanders moeten verplaatsen. Kies de Body (lichaam) interactie om een lichaam op te
tillen. Druk op de actie knop (<Enter>) om het lichaam zachtjes neer te leggen of trek een
wapen met <Num 1> (Use/Equip - gebruiken/pakken) om het lichaam snel te laten vallen.
Vastgrijpen
Grijp een tegenstander vast door achter hem te gaan staan zonder dat hij het merkt en selecteer dan de Grab (Vastgrijp) interactie.
TC_SCPandT_Manuel_PC_NL 23/02/04 14:52 Page 9
Page 46

10
Menselijk schild
Terwijl je een tegenstander vasthoudt kun je een pistool trekken en op andere tegenstanders
schieten. Je gebruikt de tegenstander die je vast hebt dan als menselijk schild. Druk hiervoor
op <Num 1> (Use/Equip - gebruiken/pakken).
Ondervragen
Sommige NPC’s hebben nuttige informatie en kunnen ondervraagd worden. Kies voor de
Interrogate (Ondervraag) interactie terwijl je een NPC vast hebt om hem aan het praten te krijgen.
Dwingen tot meewerken
Bepaalde voorwerpen in de wereld kunnen niet gebruikt worden door Sam. Maar er zijn soms
NPC’s in de buurt die dit wel kunnen. Om een NPC tot medewerking te dwingen moet je hem
vastgrijpen en naar het voorwerp duwen wat je hem wilt laten gebruiken. Kies nu voor de
Force Cooperate (Dwing tot meewerken) interactie.
Andere handelingen
• Reload (herladen): druk op <Num .> (punt op het numeriek eiland) om je wapen handmatig te herladen.
• Whistle (fluiten): druk op <V> om te fluiten. Als de vijand je fluitje hoort komen ze op je af.
• Rate of fire (vuursnelheid): als je de SC-20K gebruikt kun je met <F> de vuursnelheid wijzigen.
• Change of vision (zicht wijzigen): druk op <Del> om nachtzicht in te schakelen; met <End> gebruik je infraroodzicht.
Wapens, gadgets en voorwerpen in de game
Druk tijdens het spelen op <Ctrl> om naar de inventaris te gaan. Selecteer met de muis een voorwerp. Om een voorwerp te gebruiken druk je op de vuurknop (linker muisknop).
Wapens en gadgets
SC-20K M.A.W.S. (Modulair Aanvals Wapen Systeem)
Dankzij de compacte configuratie van dit geweer is het licht en klein, zonder daarbij aan vuurkracht te verliezen (5.56x45mm ss109). Door de modulaire configuratie kan de SC-20K aangepast worden om binnen het profiel van elke missie te passen. Uitgerust met een licht- en
geluidsdemper en gecombineerd met een multifunctionele lanceerinrichting, is de SC-20K de
voor de hand liggende wapenkeuze voor Sam wanneer hij vijandelijke gebieden infiltreert.
Als je de SC-20K gebruikt kun je met de middelste muisknop de sluipschutterstand aanzetten. Met het muiswiel zoom je in en uit. Zoomen kan ook met <Page Down> en <Page Up>
(op sommige toetsenborden weergegeven als <PgUp> en <PgDn>).
De multifunctionele lanceerinrichting van de SC-20K:
Druk op de vuurknop (linker muisknop) om de lanceerinrichting te gebruiken. Je kunt de lanceerinrichting niet gebruiken in de Sluipschutterstand.
Ringvormig airfoil projectiel
Een projectiel met hoge impact maar zonder penetratiekracht. Ontworpen om tegenstanders
uit te schakelen zonder ze te doden.
Let op: het ringvormige airfoil is een stuk effectiever als het hoofd geraakt wordt
TC_SCPandT_Manuel_PC_NL 23/02/04 14:52 Page 10
Page 47

11
Plakcamera (sticky camera)
Een minicamera met volledige draai- en zoomfuncties alsmede een nacht- en een infrarood
stand. De opnames van de camera worden meteen naar Sam’s OPSAT doorgestuurd. Ideaal
voor verkenningstochten en spionage. Plakcamera´s zijn meerdere malen te gebruiken. Je
kunt met deze camera ook gesprekken opnemen waar Sam niet bij aanwezig is.
Kleverige Schokker (sticky shocker)
Een apparaat, bedekt met een kleverige vloeistof, wat hoge voltages afgeeft. De kleverige
schokker hecht zich aan tegenstanders vast en geeft ze een verlammende schok.
Hint: Door de schokker in een plas met water te schieten kunnen meerdere vijanden in één keer uitgeschakeld worden.
Afleidingscamera (distraction camera)
Een variant op de plakcamera. Bij de afleidingscamera zijn de draai, zoom en zichtverbeterende functies vervangen door een herriemaker en een CO2 gasfles. Door het apparaat aan te zetten worden
tegenstanders door het geluid er naartoe gelokt, waarna een wolk gas vrijkomt die ze uitschakelt.
Gasgranaat
Standaard traangasgranaten die groepjes tegenstanders kunnen uitschakelen. Blootstelling aan traangas
zorgt voor forse ademhalingsproblemen. Langdurige blootstelling leidt tot bewusteloosheid.
Flitsgranaat (flash bang)
Deze granaat geeft een heldere flits af die iedereen binnen bereik verblindt.
Fragmentatiegranaat (chaff grenade)
Als deze granaat ontploft komt er een wolk magnetische deeltjes vrij die alle elektronische
apparatuur in de buurt ontregelt. Dit geldt ook voor de spullen van Sam.
Pistool met laservizier (laser aiming)
Het pistool is voorzien van een laservizier waardoor je beter kunt richten. Maar denk er wel
aan dat vijanden de rode punt kunnen zien.
Slotenmakersset (lock pick)
Standaard set met lopers, moersleutels en voelers om normale cilindersloten open te maken. Maak
met de pijltjestoetsen (q, m, k, of o) langzaam een cirkelende beweging totdat je de
eerste pen ziet en hoort bewegen. Dit betekent dat je de juiste toets ingedrukt hebt. Blijf deze toets
indrukken om een van de pennen in het slot los te krijgen. Doe dit voor alle pennen.
Micro explosieven (disposable pick)
Deze niet alledaagse lopers zijn uitgerust met micro explosieven die elk standaard cilinderslot
een forse opdonder geven, waardoor de pennen barsten en het slot open gaat.
Laser Microfoon: T.A.K. (Tactische Audio Kit).
De lasergestuurde microfoon in de SC-20K stelt de gebruiker in staat om de trillingen van
bepaalde oppervlaktes op te vangen (dit werkt vooral goed op glazen ramen). Wordt gebruikt
om gesprekken af te luisteren.
TC_SCPandT_Manuel_PC_NL 23/02/04 14:52 Page 11
Page 48

12
Camera-stoorder (camera jammer)
De camera-stoorder zendt microgolf pulsen uit die de microcircuits van de beveiligingscamera’s
storen. Na gebruik moet de stoorder een tijdje opladen voordat hij weer werkt.
Optische kabel (optic cable)
Deze flexibele kabel/camera kan gemakkelijk onder deuren door worden geschoven om te
zien wat er aan de andere kant is. Heeft nacht- en infraroodzicht.
Brillen (goggles)
Met een nachtzichtbril heb je goed zicht wanneer er weinig licht is. Vooral licht wat zich laag
op het infrarood spectrum bevindt wordt versterkt.
Net als nachtzicht is infrarood een belangrijk hulpmiddel in situaties waarin er weinig licht is.
Deze technologie verschilt van nachtzicht omdat hier de bovenste deel van het infrarood spectrum gevangen wordt, wat inhoudt dat hitte zichtbaar wordt in plaats van licht.
Voorwerpen
Sommige dingen, zoals granaten, lichtseinen en diverse andere voorwerpen kunnen gegooid worden. Om een voorwerp te gooien moet je dit selecteren en op <Num 1> drukken. Een reeks dradenkruizen op het scherm geeft aan
waar je op mikt. Met de muis mik je, met de rechter muisknop verander je de baan van het projectiel. Met de linker
muisknop gooi je het voorwerp; met <Num 1> breek je de worp af.
Muurmijn (wall mine)
De muurmijn is een bewegingsgevoelig explosief wat op bijna alle oppervlaktes kan worden
bevestigd. Wacht op het groene licht als je een muurmijn wilt uitschakelen en oppakken.
Noodsein (emergency flare)
Deze standaard seinen geven een heleboel hitte af. Hierdoor zijn ze te gebruiken om hittegevoelige sensoren, zoals de sensoren op automatisch bestuurde geweren, af te leiden.
Fragmentatiegranaat (frag grenade)
De M67 fragmentatie granaat weegt krap 400 gram en bestaat uit een stalen bol met een
diameter van 6 centimeter. Hierin bevinden zich 180 gram zware explosieven. Bij de ontploffing versplintert de stalen bol, waardoor de scherven met hoge snelheid wegspatten.
EHBO doos (medical kit)
Standaard medische uitrusting voor eerste hulp bij verwondingen.
Voorwerpen van de vijand
De verdedigingsmiddelen van de vijand zorgen voor een groot aantal obstakels die je moet passeren. Dit varieert van simpele cijferpanelen die deuren openen en sluiten tot automatische geweren die hitte detecteren en op indringers schieten.
TC_SCPandT_Manuel_PC_NL 23/02/04 14:52 Page 12
Page 49

13
Alarm Paneel
Standaard alarmknoppen die door vijanden geactiveerd kunnen worden om kameraden die
zich in de buurt bevinden te alarmeren. Vanwege de extreem geheime aard van Splinter Cell
missies kan het afgaan van een alarm Third Echelon doen besluiten de missie af te blazen.
Automatisch machinegeweer (automated turret)
Deze automatisch bestuurde geweren zijn uitgerust met hitte- en bewegingsdetectoren en een
Independent Friendly Fire (IFF) herkenningssysteem wat ervoor zorgt dat ze niet op de eigen
eenheden schieten. Deze geweren kunnen gehacked worden via hun besturingscomputer.
Met de cursortoetsen bedien je de besturingscomputer van het geweer. Je kunt hiermee een
automatisch geweer helemaal of alleen het IFF systeem uitschakelen. Als het IFF uitgeschakeld is zal het geweer wel nog steeds op Sam schieten, maar ook op Sam’s vijanden.
Beveiligingscamera (surveillance camera)
Standaard beveiligingscamera’s die beweging detecteren en een alarm af kunnen laten gaan.
Dit soort camera is breekbaar en kan kapot gemaakt worden.
Gepantserde camera (armored camera)
Afgezien van de kogelvrije bekleding is deze camera identiek aan de standaard beveiligingscamera.
Valstrikgranaat (booby trap)
Deze standaard granaat is verbonden met een kleine kabel.
Bewegingsdetector (motion detector)
Als Sam in de buurt van een bewegingsdetector té snel beweegt geeft deze een ontzettend
sterke lichtflits af die iedereen in de nabijheid verblindt.
Cijferpaneel (keypad lock)
Standaard cijferpanelen die verbonden zijn met de elektromagnetische sluitingssystemen van
een deur. Alleen door het invoeren van de juiste code is een deur die gesloten is met een cijferpaneel, te openen. Meerdere malen een foute code invoeren doet een alarm afgaan.
Oogscanner (retinal scanner)
Een sluitingsmechanisme dat de iris van iemands oog scant voordat het een deur opent. Wie
geen toegangsrecht heeft kan een deur die met een oogscanner gesloten is, niet openen.
Maar iemand met de juiste ogen kan soms “overgehaald” worden om de deur voor jou te
openen. Een foutieve oogscan laat automatisch het alarm afgaan.
TC_SCPandT_Manuel_PC_NL 23/02/04 14:52 Page 13
Page 50

14
ONLINE - MULTIPLAYER GAMEVARIANT
Waar gaat het om
De game is gebaseerd op twee tegen elkaar strijdende teams met elk twee menselijke gamers. Het Shadownet team moet zonder gezien te
worden optrekken, de omgeving verkennen en voldoen aan de voorwaarden voor de overwinning. Het huurlingen team (ARGUS) moet zien
te voorkomen dat het Shadownet team iets bereikt door ze op te sporen, de confrontatie aan te gaan en ze uit te schakelen.
De verschillende spelvarianten
Spelvariant NEUTRALIZATION
Shadownet team ARGUS
GOAL
Zoek de houders met het virus (ND133´s) Bescherm de houders en schakel de indringers uit.
(doel) en maak ze onschadelijk.
VICTORY Maak alle ND133´s onschadelijk of schakel Schakel binnen de gestelde tijd alle indringers
(overwinning) alle huurlingen uit. uit of bescherm de ND133´s.
RULES Om een ND133 onschadelijk te maken ga je ervoor
(werkwijze) staan en druk je op A. Het onschadelijk maken
duurt even maar je kunt het op elk moment
onderbreken.
Spelvariant EXTRACTION
Shadownet Team ARGUS
GOAL
Zoek de ND133´s, pak de buisjes en breng ze Voorkom dat de indringers de buisjes stelen en
(doel) naar het ophaalpunt. en schakel hen uit.
VICTORY Breng voldoende buisjes naar het ophaalpunt. Schakel binnen de gestelde tijd alle indringers
(overwinning) indringers uit of bescherm de buisjes.
RULES
Om een ND133 buisje te pakken ga je ervoor staan en
Bescherm de buisjes in de houders. Je kunt een door
(werkwijze) druk je op de Actieknop (<Enter>). Breng het buisje een indringer gestolen buisje terug krijgen door
vervolgens naar het ophaalpunt. hem uit te schakelen voordat hij de rand van het
terrein bereikt en de buisjes overhandigt.
Spelvariant SABOTAGE
Shadownet Team ARGUS
GOAL
Zoek de ND133´s en neutraliseer ze door er een Bescherm de houders tegen de indringers die zullen
(doel) modem bij te plaatsen.
proberen ze te neutraliseren door modems te plaatsen.
VICTORY Neutraliseer de ND133´s met behulp van je Schakel de indringers uit of voorkom dat ze de
(overwinning) modems of schakel de huurlingen uit. ND133´s neutraliseren.
RULES
Plaats met <Enter> een modem op de muur bij een ND133.
Bescherm de ND133’s tegen modems. Als het
(werkwijze) Als het aftellen klaar is de ND133 geneutraliseerd. aftellen begint zoek je het modem en schakel je het
Als het modem vernietigd wordt kun je een nieuw modem
uit door het te verwijderen of aan flarden te schieten.
plaatsen en het aftellen gaat dan gewoon verder. Een nieuw
modem haal je uit een munitievoorraad.
TC_SCPandT_Manuel_PC_NL 23/02/04 14:52 Page 14
Page 51

15
Besturing
Besturing is onderverdeeld in vier groepen: instellingen (alles met betrekking tot de configuratie), de algemene
besturing, besturing voor een spion en besturing voor een huurling.
INSTELLINGEN
Handeling Uitleg Standaard ingestelde toets
MUIS
Wijzigt hoe gevoelig de muis reageert. O en P
SPELMENU Opent het menu tijdens het spel. Esc
HUD (info op spelscherm)
Uitleg over wat je op het spelscherm ziet. F4
QUIT (Stoppen) Stopt het spel. F12
CHAT Opent het chatvenster.
2
VOLLEDIG SCHERM
Wisselt tussen in een Windows venster of beeldvullend spelen.
Alt + Enter
ALGEMEEN
Handeling Uitleg Standaard ingestelde toets
BEWEGEN
Beweeg je personage naar voren. W
BEWEGEN Beweeg je personage achteruit. S
BEWEGEN Beweeg je personage naar links. A
BEWEGEN Beweeg je personage naar rechts. D
ACTIE Reageer op de omgeving en ook,
Spion: plaats een bom om een ND133 te neutraliseren
neutraliseren (uitsluitend in spelvariant sabotage); als je de
Shift
sticky camera gebruikt kun je een gaswolk laten ontsnappen.
Huurling: voer een aanval uit in de richting
die je ingedrukt houdt.
SPECIALE ACTIE 1 Voer de specialiteit van jouw team uit:
Spion: voer een zijwaartse rol uit. Q
Huurling: zet je laservizier aan/uit.
SPECIALE ACTIE 2 Voer de andere specialiteit van jouw team uit:
Spion: pak je wapen / berg het weg. E
Huurling: doe je zaklantaarn aan/uit.
EERSTE VUURKNOP
Gebruik je wapen (spion: uitsluitend als hij een wapen heeft)
en ook: spion: gooi het gadget dat je met gadget 1 bedient
Links klikken
aan je voeten neer (in derde persoons gezichtspunt).
TWEEDE VUURKNOP
Gebruik/vuur een gadget af (spion: uitsluitend als hij een
wapen heeft) en ook: gooi het gadget dat je met gadget 2
Rechts klikken
bedient aan je voeten neer (in derde persoons gezichtspunt).
Huurling: adem inhouden (in sluipschutterstand).
SPRINGEN Je personage springt. Spatiebalk
HURKEN Je personage hurkt of komt overeind. C
TC_SCPandT_Manuel_PC_NL 23/02/04 14:52 Page 15
Page 52

16
COMMUNICATIE Luister de vijanden af (als een spy bullet of een spy
HACKEN spy trap geactiveerd en actief is). H
VAN ZICHT WISSELEN
Tussen de verschillende manieren van kijken wisselen. TAB
GADGET 1 Kies gadget 1 in je inventaris. 1
GADGET 2 Kies gadget 2 in je inventaris. 2
GADGET 3 Kies gadget 3 in je inventaris. 3
GADGET 4 Kies gadget 4 in je inventaris. 4
ENHANCED REALITY ZOEKSYSTEEM
Zet dit zoeksysteem aan/uit. F9
ZICHT 1 Gebruik je eerste speciale manier van kijken:
Spion: nachtzicht. F1
Huurling: detecteren van beweging.
ZICHT 2 Gebruik je tweede speciale manier van kijken:
Spion: infraroodzicht. F2
Huurling: EMF (elektromagnetisch) zicht.
VOLGEND GADGET Kies het volgende gadget in de inventaris. 5
VORIG GADGET Kies het vorige gadget in de inventaris. 6
VERREKIJKER / Spion: pak je verrekijker.
SLUIPSCHUTTERSTAND
Huurling: gebruik je wapen in de sluipschutterstand. Middelste muisknop
Overzicht van de standaardbesturing en handelingen voor een spion van Shadownet:
Besturing spion
Handeling Uitleg Standaard ingestelde toets
RUG TEGEN
Als je naar de muur kijkt, kun je met je rug tegen
DE MUUR de muur gaan staan.
Z
Gadgets
LASER
Zet het laser richtvizier op je wapen aan/uit. L
Overzicht van de standaardbesturing en handelingen voor een huurling van ARGUS:
Besturing huurling
Handeling Uitleg Standaard ingestelde toets
VUURSNELHEID
Wijzigt de vuursnelheid van je wapen. F
HERLADEN Je wapen herladen. R
Snel aan de slag
Kies in het hoofdmenu van Tom Clancy´s Splinter Cell Pandora Tomorrow “MULTIPLAYER” om naar het multiplayer
hoofdmenu te gaan. Selecteer een spelerprofiel en klik op SELECT om het te gebruiken. Je verwijdert een profiel door
het te selecteren en op DELETE te klikken; klik op NEW PROFILE om een nieuw profiel aan te maken.
LET OP: de profielen in de Single Player spelvariant en die in Multiplayer zijn gelijk, maar elke spelvariant heeft zijn
eigen opties.
TC_SCPandT_Manuel_PC_NL 23/02/04 14:52 Page 16
Page 53

17
Als dit de eerste keer is dat je “MULTIPLAYER” gekozen hebt dan moet je een spelerprofiel aanmaken door een naam
in te voeren. Als het profiel aangemaakt is ga je automatisch naar twee korte handleidingen. De eerste is voor je
opleiding als spion, de tweede leidt je op tot huurling. Je kunt deze instructies te allen tijde stoppen door tijdens het
spel op <ESC> te drukken en “Quit” te kiezen.
Vervolgens kom je in dit menu terecht:
• PLAY ON ubi.com: speel op het internet via de ubi.com servers.
• PLAY ON LAN: zet zelf games op een lokaal netwerk op of doe aan games mee.
• TUTORIALS: tips, hints en hulpmiddelen om de game onder de knie te krijgen. Je kunt ook kaarten bekijken.
• OPTIONS: wijzig de instellingen voor het gebruikte profiel.
Menu’s
Meer info over de menu´s
Menu om je profiel en uitrusting te wijzigen
Kies PROFILE OPTIONS in het hoofdmenu om de instellingen van je profiel te wijzigen:
• EQUIPMENT (uitrusting): wijzig de voorwerpen die elk van je personages in de game kan gebruiken.
Elk profiel heeft nadere gegevens over de uitrusting van een spion of huurling. Druk op de Team wissel knop om te
zien wat je andere personage in bezit heeft. Elk personage heeft vier plekken waar een gadget opgeborgen kan worden. Om een gadget te vervangen klik je er op. Je gaat vervolgens naar een scherm met alle gadgets die beschikbaar zijn voor het teamlid waar je mee bezig bent. In totaal zijn dit er zes. Kies het gadget dat je wilt hebben door
er op te klikken en het naar je inventaris te verplaatsen.
Let op: wat betreft de uitrusting voor een spion het volgende. Als het gaat om granaat-achtige gadgets kun je deze het beste
opbergen in de sleuven 1 en 2. Deze kun je namelijk in een noodsituatie met EERSTE en TWEEDE VUURKNOP bedienen.
• GAME: wijzig instellingen met betrekking tot de besturing:
- Invert Y Axis – de verticale as bij het richten omdraaien.
- Invert X Axis for Spies - bij spionnen de horizontale draairichting van de camera omkeren.
- Auto-Center – automatisch centreren aan/uit. Bij huurlingen het automatisch terugkeren naar het horizontale vlak als ze voorwaarts lopen.
- Unit System – afstanden weergeven in meters of Engelse voeten.
• AUDIO: wijzig de geluidsinstellingen. Je kunt het volgende wijzigen:
-Effects Volume – het geluidsvolume van de geluidseffecten.
- Music Volume - het geluidsvolume van de muziek.
-Voice Volume – het geluidsvolume van de chat.
- EAX – de EAX optie detecteert automatisch of EAX aan- of uitstaat op je systeem.
• VIDEO: bepaal de beeldinstellingen:
- Screen Resolution: wijzig de schermresolutie.
- Quality: kies uit LOW, MEDIUM en HIGH om de kwaliteit van de textures te bepalen.
- Show Test Card: pas je scherm aan de hand van de op het scherm gegeven uitleg aan om een nog intensere spelervaring te krijgen.
Als je de resolutie bepaald hebt klik je op VALIDATE (uitvoeren) om de instellingen in te voeren. Het spel zal de instellingen wijzigen waarna je deze moet bevestigen.
• KEYBOARD CONFIGURATION – configuratie van het toetsenbord; je kunt bepalen welke toets voor welke
actie gebruikt wordt. Om een aan een actie toegewezen toets te wijzigen klik je op de toets naast de actie en druk
je vervolgens de toets in die je er wel voor wilt gebruiken.
Online menu (spelen op ubi.com)
Belangrijk: als je een firewall op je computer gebruikt kan het zijn dat het niet lukt verbinding met ubi.com te krijgen. Om op ubi.com te kunnen spelen moeten de volgende poorten open staan:
TC_SCPandT_Manuel_PC_NL 23/02/04 14:52 Page 17
Page 54

18
[TCP] 40000 t/m 43000
[UDP] 44000 ingaand-uitgaand
[UDP] 45000 ingaand-uitgaand
[UDP] 45001 ingaand-uitgaand
Nadat je de gebruikersvoorwaarden gelezen en geaccepteerd hebt
kun je je ubi.com accountnaam en wachtwoord invoeren. Klik op
“Save Password” (wachtwoord opslaan) als je wilt dat het spel je
wachtwoord voor je onthoudt. Zet de “Auto-login” optie aan om
met dit ubi.com account automatisch in te loggen. Met de “New
Profile” en “Account management” opties maak je een nieuw
account aan of wijzig je je huidige account.
Als je ingelogd bent kom je in het volgende menu terecht:
• QUICK MATCH: hiermee zoek je een game op waar je
meteen aan mee kunt doen.
• MOTD: Message of the day, bericht van de dag. Hier kun je
alle berichten van ubi.com lezen.
• SERVERS LIST: met deze optie kun je zoeken naar spellen
die aan de gang zijn en er aan meedoen. Selecteer eerst een
lobby (wachtkamer). De spellen die in deze lobby beschikbaar zijn
zie je links. Je kunt onderaan het scherm bepaalde filters instellen
om de missies nader te selecteren. Ververs het speloverzicht door
op de REFRESH knop te klikken. Om aan een spel mee te doen
selecteer je het spel en klik je erop. Als alle gamers klaar zijn om
te spelen (ze zijn wit) en jij bent er ook klaar voor, start dan de
game door op LAUNCH te klikken.
• CREATE MATCH: je kunt zelf een game opzetten, je moet
dan de volgende parameters invoeren. Kies de gewenste moeilijkheidsgraad voor je game, de gamevariant, het soort game (vrij of
“Ranking” (rangorde)) en de LEVEL GAP (het toegestane ver-
schil in ervaring tussen de verschillende gamers). Als de instellingen (onderin het scherm) gedaan zijn ga je naar de lobby door op
de CREATEknop te klikken. Als alle gamers klaar zijn om te spelen (ze zijn wit) en jij bent er ook klaar voor, start dan de game
door op LAUNCH te klikken.
LAN (netwerk) menu
• FIND SESSION: doe mee aan een bestaande game. Klik op de JOIN knop om de game te kiezen waar je aan
mee wilt doen. Klik eventueel op de REFRESH knop om het overzicht spellen te updaten. Als je een spel gekozen
hebt ga je naar de wachtkamer van de game. Als alle gamers gereed zijn (ze zijn wit) en jij bent er ook klaar voor,
klik dan op LAUNCH.
• CREATE SESSION: een eigen game sessie opzetten. Je moet zowel de map bepalen waarop gespeeld wordt
als de gamevariant. Als alle instellingen gedaan zijn (onderin het scherm) klik je op de CREATE knop om naar de
wachtkamer van de game te gaan. Als alle gamers gereed zijn (ze zijn wit) en jij bent er ook klaar voor, klik dan op
LAUNCH.
Tutorials Menu
Onder TUTORIALS (korte handleidingen) heb je de volgende opties:
TC_SCPandT_Manuel_PC_NL 23/02/04 14:52 Page 18
Page 55

19
• VIEW HUD: gamescherm informatie bekijken; uitleg van wat je op het gamescherm te zien krijgt.
• TIPS: tips en extra uitleg over wat de personages in elk team kunnen. Als je op de tips pagina voor de spionnen
bent klik je op de SWITCH TEAM knop om de vaardigheden van de personages in het andere team te zien. Om een
tip te bekijken kies je deze en klik je op de SELECT knop.
• SHADOWNET SPY TUTORIAL: speel op een map van de spionnen om te leren hoe een en ander werkt.
• ARGUS MERCENARY TUTORIAL: leer hoe huurlingen te werk gaan.
• VISIT MAP: ga alleen naar een level om dat vanuit een bepaald team te bekijken. Kies het level dat je wilt
bezoeken, het team en de gamevariant.
Spelschermen
Het scherm van een lid van het Shadownet team
1. Tactical Radar: strategische radar. Deze radar geeft de posi-
tie weer van je maatje en de vijanden die vastgelegd (locked) zijn.
Verschijnt alleen indien nodig.
2. ND133 Counter: teller. Hoeveel ND133´s je nog moet
oppikken om te winnen en hoeveel je er al hebt.
3. ND133 Capture Timer: tijdklok. Geeft de resterende tijd
die het Shadownet team heeft om een ND133 te neutraliseren.
4. Time Remaining in the Game: resterende tijd. Geeft aan hoeveel tijd je nog hebt voordat de missie over is.
5. Energy Bar: energiemeter. Wordt alleen getoond als de speler een wapen hanteert of als de energiemeter
gevuld wordt. Geeft aan hoeveel energie er nog is voor het elektrische spionnengeweer (spy electrical gun).
6. Status Messages: hier kun je a. lezen dat men je ontdekt heeft of b. informatie krijgen over de status van
speciale apparatuur zoals een spy bullet (spionnenkogel) of een alarm snare (strikdraad).
7. Interaction Menu: laat de verschillende mogelijke interacties met een voorwerp zien. In deze schermfoto is
dat bijvoorbeeld “pick up” (oprapen).
8. Game Info Screen: in dit venster krijg je alle berichten van de game, zoals doel gehaald, alarm gaat af, gamer
gedood door gamer enzovoorts.
9. Life Bar: gezondheidsmeter. Geeft de resterende gezondheid van de gamer aan.
10. Current Gadget: het gadget wat je op dit moment gebruikt, de naam ervan plus hoeveel je er van hebt. In
de schermfoto zijn dat bijvoorbeeld drie spybullets.
11. Enhanced Reality: deze indicator geeft informatie over de lokatie van een ND133, hoever de gamer verwijderd is ervan en de status van de ND133.
Het scherm van een ARGUS huurling
1. System Info: berichten over de status van je uitrusting.
2. Status message: hier krijg je berichten over indringers en
alarms die afgaan, met daarin de naam en positie van het alarm
dat je hebt laten afgaan. Tevens kun je hier zien wat de status van
de doelen in de missie is evenals hoe het ervoor staat met speciale
apparatuur zoals bijvoorbeeld een “spytrap” (spionnenval).
3. Game Info Screen: in dit venster zie je alle berichten van
de game (gamer doodt gamer bijvoorbeeld). De berichten worden in een lichtkrant weergegeven.
4. Life Bar: gezondheidsmeter. Laat zien hoeveel gezondheid een gamer nog heeft.
TC_SCPandT_Manuel_PC_NL 23/02/04 14:52 Page 19
Page 56

20
5. Ammunition Indicator: laat zien hoeveel munitie de gamer nog heeft. Het getal links is het aantal kogels in
het huidige magazijn. Het getal rechts geeft aan hoeveel kogels je in totaal nog hebt.
6. Current Gadget: huidige gadget. Toont het gadget wat je nu gebruikt, de naam ervan en hoeveel er nog van
beschikbaar zijn.
7. Tactical Radar: strategische radar. Deze radar geeft de positie weer van je maatje, alarms die afgegaan zijn
en de vijanden die vastgelegd (locked) zijn. Verschijnt alleen indien nodig.
8 Time Remaining in the Game: resterende tijd. Geeft aan hoeveel tijd je nog hebt voordat de missie over is.
9. ND133 Counter: teller. Hoeveel ND133´s je nog moet oppikken om te winnen en hoeveel je er al hebt.
10. ND133 Capture Timer: geeft aan hoeveel tijd het Shadownet team nog heeft om een ND133 te neutrali-
seren.
11. Interaction Menu: laat zien welke acties je met een voorwerp kunt doen; in deze afbeelding gaat het om
een schakelaar.
12. Enhanced Reality: deze indicator geeft informatie over de lokatie van een ND133 of een alarm dat afgegaan is en hoever de gamer verwijderd is ervan. Je krijgt ook informatie over de status en in hoeverre de systemen
gehacked zijn.
13. Reticule: richtvizier. De kleine pijlen eromheen geven aan waar het omgevingsgeluid zich bevindt ten opzichte van
je. De indicatoren in het vizier (onderste en bovenste deel) geven aan op wat voor hoogte de geluiden zich bevinden.
De personages
Leden van een Shadownet team
Standaard handelingen
Sluipen, lopen en rennen
Je beweegt sneller met muiswiel omhoog, je gaat langzamer met muiswiel omlaag.
Hurken
Druk op de HURKEN toets om te hurken of om vanuit hurkstand overeind te komen. Als je
gehurkt bent verplaats je je langzaam en stilletjes.
Springen
Druk op de SPRING toets om recht omhoog te springen. Als je op de SPRING toets drukt terwijl je rent spring je
voorwaarts. Als je in een val (bijvoorbeeld als je neerkomt na een sprong) op de HURKEN toets drukt dan kom je
stilletjes neer. Wat erg handig is om niet ontdekt te worden. Als je bovenop een tegenstander neerkomt kan hij bewusteloos raken.
Muursprong
Je kunt je na een sprong afzetten tegen een muur. Om dit te doen ga je richting de muur en
druk je op de SPRING toets. Wat er dan gaat gebeuren is afhankelijk van de situatie:
• Als het mogelijk is te blijven hangen aan de muur, dan grijp je je zo hoog mogelijk vast en
blijf je hangen.
• Als het niet mogelijk is te blijven hangen dan zet je je af tegen de muur voor een salto.
TC_SCPandT_Manuel_PC_NL 23/02/04 14:52 Page 20
Page 57

21
Schieten
Druk op de WAPEN MODUS toets om een wapen ter hand te nemen. Met de EERSTE VUURKNOP schiet je. In
deze situatie (tweede persoons perspectief, wapen in de hand) kun je niet springen. Maar je kunt wel dingen doen en reageren op je omgeving met behulp van de ACTIE knop. Om het wapen weg te doen druk je op de WAPEN MODUS toets.
Een gadget gebruiken
Om een van je gadgets te kunnen gebruiken moet je een wapen in de
hand hebben. Om een gadget gebruiken druk je op de TWEEDE
VUURKNOP. Sommige gadgets kun je heel snel inzetten. De juiste
manier van handelen vind je in het hoofdstukje “Snelle inventaris”.
Interactie
Door op de ACTIE toets te drukken kun je bepaalde voorwerpen in
de wereld gebruiken, bijvoorbeeld een lichtschakelaar omzetten,
een lift gebruiken of een voorwerp oprapen.
Speciale vaardigheden
Aan een richel hangen
Als je mis springt, van een platform afvalt of omhoog springt naar een platform dan kun je aan de rand gaan hangen. Ga NAAR VOREN of SPRING om jezelf op te trekken. Ga ACHTERUIT of SPRING om de rand los te
laten. Als je aan de rand hangt kun je met LINKS/RECHTS naar links of rechts gaan.
Tegen een voorwerp opklimmen
Als je een object tegenkomt waar je je niet aan vast kunt houden maar waar je wel bovenop kunt klimmen dan druk je de SPRING toets in zodat je tegen het voorwerp opspringt en
vervolgens erop klimt.
Een hek beklimmen
Door er tegenaan te lopen (druk de SPRING toets in terwijl je NAAR VOREN ingedrukt houdt)
klim je ergens op of springt er bovenop. Met NAAR VOREN en ACHTERUITkun je nog hoger
of weer omlaag klimmen, terwijl LINKS/RECHTS je zijdelings verplaatst. Met SPRING spring
je er vanaf. Als je bovenaan een muur komt waar je tegenop klimt dan trek je jezelf automatisch
op de muur als je naar voren blijft drukken. Als je boven aan een hek komt en je drukt NAAR
VOREN dan klim je over het hek heen.
Hand over hand klimmen
Je kunt aan pijpen hangen en je hand over hand erlangs verplaatsen. Het enige wat je moet doen is
onder een pijp te gaan staan en SPRING indrukken. Als je eenmaal hangt kun je jezelf met NAAR
VOREN / ACHTERUIT verplaatsen. Druk op SPRING om je benen om de pijp heen te slaan.
Nogmaals SPRING brengt je benen weer omlaag. Druk op HURKEN om de pijp los te laten.
Je kunt aan één hand hangen en schieten. Stop met bewegen en druk op WAPEN
MODUS. Als je je benen om de pijp heen geslagen hebt en je pakt een wapen dan hang je
ondersteboven met het wapen in de hand. Druk weer op WAPEN MODUS om het wapen
weg te bergen. Je kunt echter ook op HURKEN drukken als je zo hangt, je maakt dan een
salto en komt op de grond terecht.
TC_SCPandT_Manuel_PC_NL 23/02/04 14:52 Page 21
Page 58

22
In ladders en verticale pijpen klimmen
Je kunt langs ladders en verticale pijpen omhoog en omlaag klimmen. Loop tegen een ladder of pijp aan (of SPRING er tegenaan) om deze vast te pakken. NAAR VOREN /
ACHTERUIT laat je omhoog/omlaag klimmen. Als je omlaag klimt en je drukt op de
ACTIE toets dan glij je langs de ladder of pijp omlaag. Als je ACHTERUIT loslaat stop je
met omlaag glijden. Druk op HURKEN om achterwaarts van de ladder of pijp te springen.
Touwen
Je kunt niet alleen aan een touw gaan hangen maar je er ook langs verplaatsen
(glijden). Ga onder het touw staan en druk op SPRINGEN. Je glijdt sneller door NAAR
VOREN in te drukken. Als je een bepaalde snelheid bereikt, trekt je personage de benen
omhoog. ACHTERUIT doet je langzamer gaan. Door op HURKEN te drukken laat je het
touw los.
Spagaatsprong
In een smalle gang kun je omhoog springen, je benen naar beide zijden uitsteken en jezelf
zo in de lucht positioneren. Ga om dit te doen vlak bij een van de twee muren staan en druk
op SPRINGEN. Als je springt druk je weer op SPRINGEN om jezelf tegen de muren af te
zetten. Als je zo in de hoogte hangt kun je de volgende dingen doen:
• je wapen trekken en schieten.
• je weer naar beneden laten vallen. Druk hiervoor op HURKEN.
• De beschikbare gadgets in je inventaris gebruiken. Druk hiervoor op de TWEEDE VUURKNOP.
Rug tegen de muur
Om je tegen een muur aan te drukken ga je met het gezicht naar die muur staan en druk je op de ACTIE toets. Met LINKS/RECHTS
verplaats je je. Druk op HURKEN om te hurken. Als je niet langer tegen de muur wilt staan, kun je het volgende doen:
• weer op ACTIE drukken.
• je wapen trekken.
Als je naar een hoek gaat en je blijft in de richting van de hoek van de muur drukken dan ga je automatisch op
“sluipen” over. Je steekt dan je hoofd om de hoek om te zien wat er aan de hand is. Vanuit deze positie kun je
door op de WAPEN MODUStoets te drukken je wapen pakken en richten. Met de EERSTE VUURKNOP schiet
je, met de TWEEDE VUURKNOP gebruik je een gadget. Druk op de WAPEN MODUS toets om je wapen
weg te bergen.
Rollen
Je kunt om en omrollen. Om dit te doen druk je een van de bewegingstoetsen in en vervolgens ROLLEN. Hoever je rolt hangt van je aanvangssnelheid af.
Vastgrijpen
Je kunt een vijand van achteren besluipen en hem vastgrijpen. Om dit te doen ga je achter
hem staan en druk je op de ACTIE toets. Je kunt nu één van de volgende dingen doen:
• nog dichter naar hem toe gaan.
• hem de nek breken door op de ACTIE toets te drukken.
• hem bewusteloos slaan met je elleboog (EERSTE VUURKNOP). Hij zal echter slechts
korte tijd buiten westen zijn en al snel weer overeind komen.
TC_SCPandT_Manuel_PC_NL 23/02/04 14:52 Page 22
Page 59

23
Ongeacht wat je doet, je kunt een huurling slechts een korte tijd vasthouden. Daarna stikt hij en valt op de grond.
Elleboogje
Je kunt je elleboog gebruiken om een huurling uit te schakelen of te desoriënteren. Om hem
een elleboogje te geven raak je hem aan en druk je op de EERSTE VUURKNOP. Als je
voor of naast hem staat struikelt hij achteruit.
De huurlingen van ARGUS
Standaard handelingen
Sluipen, lopen en rennen
Je beweegt sneller met muiswiel omhoog, je gaat langzamer met muiswiel omlaag.
Hurken
Druk op de HURKEN toets om te hurken of om vanuit hurkstand overeind te komen.
Springen
Druk op de SPRING toets om recht omhoog te springen. Als je op de SPRING toets drukt
terwijl je rent spring je voorwaarts.
Schieten
Met de muis verplaats je het vizier over het scherm. Druk op de EERSTE VUURKNOP om
te schieten. Hou de WAPEN MODUS toets ingedrukt om van schietwijze te wisselen:
• BURST: je schiet een salvo van drie kogels af elke keer als je op de EERSTE VUURKNOPdrukt.
• FULL-AUTO: je blijft vuren zolang je de EERSTE VUURKNOP ingedrukt houdt.
Welke schietwijze in gebruik is wordt weergegeven door een icoontje op je wapen.
Herladen
Je herlaadt je wapen handmatig door op HERLADEN te drukken. Herladen gebeurt automatisch als de kogels in
een clip op zijn.
Een gadget gebruiken
Druk op de TWEEDE VUURKNOP om een gadget te gebruiken.
Interactie
Je kunt met behulp van de ACTIE toets bepaalde voorwerpen in de
wereld om je heen gebruiken, bijvoorbeeld een lichtschakelaar
omzetten, een lift gebruiken of een voorwerp oprapen.
TC_SCPandT_Manuel_PC_NL 23/02/04 14:52 Page 23
Page 60

24
Speciale vaardigheden
Aanpassing pupil
Deze vaardigheid is afgeleid van een natuurlijk fenomeen. Als je een donkere kamer binnen gaat kun je aanvankelijk geen hand voor ogen zien. Na een paar seconden verwijdt de pupil in je oog zich waardoor meer licht de oogzenuwen kan bereiken. Hierdoor kun je iets beter zien. Als een huurling zich dus doodstil houdt of heel langzaam
door een donkere kamer beweegt kan hij langzamerhand beter zien. Op deze manier kan hij bepaalde voorwerpen
en – wie weet – zelfs een spion zien!
Aanvallen/met je wapen slaan
Je kunt met de ACTIE toets je wapen gebruiken om een vijand naar achteren te dwingen.
Als je dit doet terwijl je beweegt dan sprint je naar voren in de aangegeven richting. Denk er
wel aan dat je na zo´n sprint even tijd nodig hebt om op snelheid te komen.
BEWAPENING
Wapen
Een spion mag niemand doden en geen sporen achterlaten. Om daarvoor te zorgen heeft hij slechts één wapen, de
Sticky Shocker. Dit wapen is absoluut niet dodelijk. Met dit wapen geef je iemand elektrische schokken die het slachtoffer verlammen. Je kunt een paar keer achter elkaar een schok toedienen maar daarna is het wapen ontladen. Het
wordt automatisch herladen maar dit duurt even. Om het te kunnen gebruiken moet je het wapen in de hand hebben. Als je het wapen vasthebt, schiet je het met de EERSTE VUURKNOP af. Dit wapen heeft een tweede functie, het kan namelijk onder andere rookgranaten en plakcamera´s afvuren (zie ook het overzicht in het hoofdstuk
“Gadgets voor teamleden van Shadownet”).
Huurlingen van ARGUS hebben een speciaal wapen. Dit wapen schiet kogels met hoge snelheid af. Je kunt het op twee
manieren gebruiken, BURST en FULL-AUTO. Je hebt vijf magazijnen met 30 kogels. Druk op HERLADEN om te herladen.
Als je geen munitie meer hebt kun je herladen als je je vlakbij een munitievoorraad bent die je op elk level vindt. Ook dit
wapen heeft een tweede functie, het kan onder andere fragmentatiegranaten en noodseinen afvuren.
De Gadgets
Gadgets voor de Shadownet teamleden
Enhanced Reality
Dit is een soort militair doelzoeksysteem. Je kunt er een ND133 mee
lokaliseren, je krijgt een tweedimensionale weergave van waar de
ND133 zich bevindt, de status ervan en hoe ver je ervan verwijderd
bent. Met de ENHANCED REALITY toets kun je ER aan/uit zetten.
Night Vision Goggles (nachtbril)
Met een nachtbril heb je goed zicht wanneer er weinig licht is. Vooral
licht wat zich laag op het infrarood spectrum bevindt wordt versterkt.
Druk op de NACHTZICHT toets om deze bril te kunnen gebruiken.
Thermal Vision Goggles (infraroodbril)
Net als nachtzicht is infrarood een belangrijk hulpmiddel in situaties waarin er
weinig licht is. Deze technologie verschilt van nachtzicht omdat hier de bovenste deel van het infrarood spectrum gevangen wordt, wat inhoudt dat hitte
zichtbaar wordt in plaats van licht. Warmtebronnen worden in rood op het
scherm weergegeven. Denk er wel aan dat het bereik van deze bril beperkt is.
Om de infraroodbril te gebruiken druk je op de INFRAROOD toets.
TC_SCPandT_Manuel_PC_NL 23/02/04 14:52 Page 24
Page 61

25
Verrekijker
Je kunt de verrekijker op elk willekeurig moment gebruiken om bepaalde gebieden beter te bekijken. Met
INZOOMEN/UITZOOMEN zoom je in en uit. Je kunt ook nacht- en infraroodzicht gebruiken of een ND133
vastleggen zodat je die makkelijker kunt vinden. Om de verrekijker te gebruiken druk je op de VERREKIJKER
toets. Let op: als je iemand met de verrekijker bekijkt kun je zijn gesprekken onderscheppen.
De volgende gadgets worden allemaal op dezelfde manier gebruikt. Selecteer het gadget in de inventaris, neem je
wapen in de hand, mik en schiet het gadget af met behulp van de TWEEDE VUURKNOP.
Spy Bullets (spionkogels)
Deze kogels hebben een dubbele functie. Enerzijds merken ze een vijand die erdoor geraakt wordt gedurende
korte tijd waardoor hij op jouw radar en die van je maatje te zien is. Daarnaast, als de kogel een muur of ander
deel van de omgeving raakt wordt het gebied rondom de inslag een soort radar, waardoor je het kunt zien als
een vijand het gebied betreedt. Als je een vijand in de peiling hebt kun je zijn gesprekken ook horen.
Sticky Cameras (plakcamera´s)
Deze minicamera heeft een groot aantal functies (in en uitzoomen, nacht- en infraroodzicht en een
gaswolk).
Chaff Grenade (fragmentatiegranaat)
Als deze granaat ontploft komt er een wolk magnetische deeltjes vrij die alle elektronische apparatuur (beveiligingscamera´s, bewegingsdetectoren, lasermijnen evenals brillen van de huurlingen) in
de buurt ontregelt. Als de deeltjes hun lading verloren hebben werkt alle apparatuur weer normaal.
Noise Emitter (herriemaker)
Ook dit apparaat heeft twee functies. Het brengt een aantal geluiden voort waardoor het lijkt alsof er
een spion in de buurt is. Doel is de huurlingen voor de gek te houden. Als je het apparaat bij een
detectiesysteem (camera etc) af laat gaan wordt het detectiesysteem geactiveerd waardoor de huurlingen ook weer in de war gebracht worden.
Flashbang Grenade (flitsgranaat)
Deze granaat geeft een heldere flits af die iedere huurling binnen bereik verblindt.
Smoke Grenade (rookgranaat)
Als deze granaat ontploft krijg je een grote rookwolk. Hierdoor kunnen Shadownet teamleden verder
gaan zonder gezien te worden. Huurlingen van Argus die zich in de rookwolk bevinden hebben last
van de rook, ze kunnen er zelfs door uitgeschakeld worden.
Gadgets van ARGUS
Enhanced Reality
Dit is een soort militair doelzoeksysteem. Je kunt er een ND133
mee lokaliseren evenals alarms die afgaan, je krijgt een twee
dimensionale weergave van hun lokatie, de status ervan en hoe ver
je ervan verwijderd bent.
Flashlight (zaklantaarn)
Met de zaklantaarn kun je op donkere plekken kijken, op zoek naar indringers. Druk op de ZAKLANTAARN toets om de zaklantaarn te gebruiken.
Laser sight (laservizier)
Het laservizier is een laserstraal die door je wapen geprojecteerd wordt en waardoor je iemand kunt zien, zelfs als
hij zich in de schaduw verborgen houdt. Druk op de LASER toets om het laservizier te gebruiken. De positie van een
vijand wordt ook getoond op de radar van je maatje.
TC_SCPandT_Manuel_PC_NL 23/02/04 14:52 Page 25
Page 62

26
EMF (Electro Magnetic Field) Vision (elektromagnetisch veldzicht)
Met EMF zicht kun je elektronische straling van apparaten zien. Als een voorwerp met werkende elektronica - met
name bijvoorbeeld de spy goggles (spionnenbril) en het spy weapon (spionnenwapen) – binnen zichtbereik is dan
kun je dit met behulp van EMF zien. Het apparaat wordt in wit weergegeven. Een spion die door een fosfor granaat
loopt kun je ook met EMF zien. Om EMF aan te zetten druk je op de EMF toets.
Motion Vision (bewegingsdetectie)
Met Motion Vision kun je bewegingen van de lucht (veroorzaakt door spionnen of bewegende voorwerpen) om je heen
zien. Als een bewegend voorwerp gedetecteerd is verschijnt er een kader omheen zodat het gemakkelijker te herkennen is.
Als het voorwerp buiten bereik raakt (zonder dat er obstakels tussen jou en het voorwerp staan) of de snelheid van het voorwerp wordt te laag dan verdwijnt het kader geleidelijk. Motion Vision zet je aan met de toets BEWEGINGSDETECTIE.
De verrekijker in de sluipschutterstand
Huurlingen hebben speciale verrekijkers waarmee ze niet alleen in kunnen zoomen (drie vergrotingsfactoren, 2, 4 en
6 maal) maar je kunt er ook mee schieten (alleen enkelschots). Om dit te kunnen doen druk je op de toets SLUIP-
SCHUTTERSTAND. Met INZOOMEN / UITZOOMEN wijzig je de vergrotingsfactor. Om je adem in te houden zodat je beter kunt mikken hou je ADEM INHOUDEN ingedrukt. Je kunt je adem zo lang inhouden als er
lucht in je meter zit (de luchtmeter zie je links van het vizier als je ingezoomd bent).
Let op: als je iemand met een sluipschutter verrekijker bekijkt kun je zijn gesprekken ook horen.
Mines (mijnen)
J
e hebt in je bezit een dodelijke mijn die mensen kan herkennen (alleen spionnen overigens). De mijn kan op
twee manieren geactiveerd worden, hoe dat gebeurt bepaal je op het moment dat je de mijn plaatst. Als je
LASER MINE kiest plaats je een mijn die geactiveerd wordt door een door de mijn geprojecteerde laserstraal.
Een spion die de straal verbreekt laat de mijn afgaan.
Als je echter een PROXIMITY MINE kiest plaats je een mijn die door een bewegingsdetector geactiveerd
wordt. Een spion die té snel door het detectieveld loopt laat de mijn afgaan.
Om een mijn te plaatsen ga je voor een muur staan en druk je op de TWEEDE VUURKNOP. Kort indrukken
plaatst een PROXIMITY MINE. Als je echter de TWEEDE VUURKNOP ingedrukt houdt krijg je een menu
waarin je een mijn kunt selecteren. Kies met behulp van NAAR VOREN / ACHTERUIT. Laat de TWEE-
DE VUURKNOP los om de mijn te plaatsen. Je kunt een mijn die je geplaatst hebt weer oppakken – vooropgesteld dat je ruimte hebt – door ernaast te gaan staan en op de ACTIE toets te drukken.
Spy Trap (spionnenval)
Dit apparaat is een detecteringssysteem. Als het aan staat en een spion loopt door de laserstraal van de val dan wordt
er een zendertje op hem afgeschoten waardoor hij op de radar van iedere huurling van Argus te zien is. Je plaatst
het apparaatje net als een mijn tegen de muur. Selecteer het in de inventaris, ga met je gezicht naar de muur staan
en druk op de ACTIE toets. Je kunt een vijand die door de spionnenval gemarkeerd is afluisteren. De positie van een
gemarkeerde vijand wordt ook op de radar van je maatje getoond.
Tazer
Dit verdedigingswapen geeft een forse elektrische schok af als iemand in de buurt komt. De getroffen tegenstander is een paar seconden verlamd. Om de tazer te gebruiken druk je op de TWEEDE
VUURKNOP. Als nu iemand in je buurt komt, krijgt hij een elektrische schok.
De volgende gadgets bedien je allemaal op dezelfde manier. Selecteer ze in je inventaris, pak je
wapen in de hand, mik en schiet het gadget af met de TWEEDE VUURKNOP.
Flares (noodseinen)
Een noodsein geeft gedurende korte tijd een fel licht af, maximale radius is een paar meter.
Fragmentation Grenade (fragmentatiegranaat)
De fragmentatiegranaat is een dodelijk wapen dat als het ontploft iedereen binnen het bereik ervan fors verwondt.
TC_SCPandT_Manuel_PC_NL 23/02/04 14:52 Page 26
Page 63

27
Phospho Grenade (fosforgranaat)
Als deze granaat ontploft komt er een grote fosforwolk vrij. De fosfordeeltjes hechten zich aan de kleding van iedereen die door de wolk loopt. De fosfordeeltjes kun je met behulp van EMF zien, bovendien verstrooien zij het licht enigszins. Tot slot laat de persoon duidelijk zichtbare voetstappen achter.
Dit is een uitermate handig apparaat om een spion te markeren en te volgen.
Voorwerpen in het spel
Er zijn heel veel verschillende lokaties in het spel en ze zijn allemaal interactief. Ze vormen een integraal deel van
het spel en beïnvloeden beide teams.
Passieve verdedigingsmiddelen
Overal in het level bevinden zich apparaten die een alarm kunnen laten afgaan (bewegingsdetectoren, beveiligingscamera´s, lasers enzovoorts). Als een indringer een van deze apparaten laat afgaan geeft het alarm of aan waar hij
zich bevindt of het gedeelte waarin hij zich bevindt wordt afgesloten. In beide gevallen heeft hij een probleem.
Deze apparaten kun je met INFRAROODZICHT zien. Je kunt ze niet vernietigen maar je kunt ze met een Sticky Shocker of
Chaff Grenade tijdelijk uitschakelen. Een apparaat dat op die manier uitgeschakeld is staat te vonken en er komt rook uit.
Let op: een dergelijk apparaat met een Sticky Shocker of een Chaff Grenade uitschakelen zorgt ervoor dat niet precies bepaald
kan worden waar de indringer zich bevindt. De huurlingen krijgen een algemeen bericht dat de beveiliging gefaald heeft.
Beveiligingscamera´s
Een beveiligingscamera geeft met licht en geluid zijn status aan: GROEN als er niets aan de hand is, ROOD
als het alarm afgaat. Een persoon wordt gezien zodra hij binnen het bereik van de camera komt.
Bewegingsdetectoren
Deze detectoren kunnen iedere spion vinden die binnen hun bereik komt. De lampjes op de kast zijn
groen als er niks aan de hand is, rood als er iemand gedetecteerd is.
Lasers
Als een spion een laserstraal verbreekt gaat er een alarm af. Het alarm stopt na een paar seconden
vanzelf als er verder niets gebeurt.
Let op: laser systemen die afgaan kunnen tijdelijk een bepaald gebied afsluiten zodat niemand erin of eruit kan.
Wat kom je nog meer tegen
Met sommige voorwerpen in de wereld om je heen kun je iets.
Verlichting
Sommige lampen kun je uitschieten. Pistool pakken, mikken en schieten, meer is niet nodig.
Brandblussers
Als je op een brandblusser schiet spuit er een rookwolk uit het kogelgat. Huurlingen die door de wolk lopen worden
verblind.
Munitie voorraden
Je kunt kogels bij krijgen voor je wapen en granaten meenemen. Druk op de ACTIE toets als je voor
de kist staat om te herladen.
Gezondheid
Je kunt je gezondheid verhogen. Druk op de ACTIE toets als je voor de doos staat om gezondheid te krijgen.
TC_SCPandT_Manuel_PC_NL 23/02/04 14:52 Page 27
Page 64

28
Klaar voor de volgende stap?
Surf naar www.splintercell.com en doe mee aan de wereldwijde ranglijsten! De internationale Splinter
Cell gemeenschap wil je graag helpen de allerbeste gamer te worden. Dit is de officiële website, dé plek voor
de nieuwste informatie, spulletjes en hebbedingen!
Registreer jouw exemplaar van het spel!
Slechts een paar minuten van je kostbare tijd is nodig om je te registreren op
http://register.ubi.com/pandora
Wat je daarvoor terugkrijgt?? Ondermeer al heel vroeg informatie over de nieuwste Ubisoft spellen,
exclusieve aanbiedingen en je kunt zelfs meehelpen aan het ontwikkelen van spellen!
Dus niet gedraald…. registreren!
Copyrights
© 2004 Ubisoft Entertainment. Alle rechten voorbehouden. Splinter Cell, Sam Fisher, Splinter Cell: Pandora Tomorrow, Ubisoft, ubi.com en het
Ubisoft logo zijn handelsmerken van Ubisoft Entertainment in de V.S en/of andere landen. Alle andere handelsmerken zijn het eigendom van
de respectievelijke eigenaren. Microsoft, XBox, de XBox Logo´s en XBox Live zijn hetzij geregistreerde handelsmerken of handelsmerken van
Microsoft Corporation in de V.S en/of andere landen.
Unreal Engine is een handelsmerk van Epic Games Inc.
Maat gebruik van Bink video. Copyright ©1997-2001 door RAD Game Tools, Inc.
Inleidende muziek gecomponeerd en geproduceerd door Jack Wall, inclusief het originele Splinter Cell thema van Lalo Schifrin.
Sony is een handelsmerk of geregistreerd handelsmerk van Sony Corporation.
Ericsson is het handelsmerk of geregistreerd handelsmerk van Telefonaktiebolaget LM Ericsson.
RenderWare Physics
is een geregistreerd handelsmerk van Criterion Software Ltd. Gedeelten van deze software zijn copyright Criterion
Software Ltd 1998 – 2004
© 2003 Criterion Software Inc.Criterion en RenderWare zijn geregistreerde handelsmerken van Canon Inc.
TC_SCPandT_Manuel_PC_NL 23/02/04 14:52 Page 28
Page 65

29
GARANTIE
Ubisoft garandeert de oorspronkelijke koper van het multimediaproduct dat het product geen fouten bevat gedurende een periode van normaal gebruik van honderdtachtig (180) dagen vanaf de aankoopdatum, of gedurende een
langere garantieperiode in het geval van daarvoor van toepassing zijnde wetgeving.
U kunt het multimediaproduct omruilen op de plek van aankoop.
De Gebruiker erkent nadrukkelijk dat hij of zij het multimediaproduct voor eigen risico gebruikt.
Het multimediaproduct wordt “as is” geleverd, zonder enige garantie behalve bovengenoemde. De Gebruiker is verantwoordelijk voor alle reparatie- of vervangingskosten van het multimediaproduct.
In zoverre de wet het toestaat, wijst Ubisoft alle garanties af die gerelateerd zijn aan de marktwaarde van het multimediaproduct, de tevredenheid van de Gebruiker of de geschiktheid van het product voor een specifiek doel.
De Gebruiker draagt alle risico’s met betrekking tot winstderving, schade in welke vorm dan ook, dataverlies, fouten
en gederfde zakelijke kansen of andere informatie voortvloeiende uit het bezit of het gebruik van het multimediaproduct.
Bepaalde wetgeving staat de voornoemde garantiebeperking niet toe. Het is daarom mogelijk dat deze clausule niet
van toepassing is op de Gebruiker.
EIGENDOMSRECHT
De gebruiker erkent dat alle rechten die van toepassing zijn op dit multimediaproduct en zijn componenten, de handleiding en verpakking, en tevens de rechten met betrekking tot het handelsmerk, royalty’s en copyrights, eigendom
zijn van Ubisoft en Ubisofts licentiehouders, en dat deze beschermd worden door Franse en/of Europese en/of
Nederlandse regel- en/of wetgeving, verdragen en internationale overeenkomsten die betrekking hebben op intellectueel eigendom. Het is verboden om documentatie te kopiëren, reproduceren, vertalen of over te dragen, in zijn
geheel of in delen en in welke vorm dan ook, zonder voorafgaande schriftelijke toestemming van Ubisoft.
TC_SCPandT_Manuel_PC_NL 23/02/04 14:52 Page 29
Page 66

30
TECHNISCHE ONDERSTEUNING
NIEUW! Voor een betere service biedt Ubisoft u nu volledige on-line support!
Surf naar http://ubisoft-en.custhelp.com en breng eerst een bezoekje aan de FAQ van Ubisoft!
In onze FAQ-database vindt u antwoorden op de meest gestelde vragen aan onze support medewerkers. Bovendien
is deze database 24 uur per dag beschikbaar! De online database is alleen in het Engels beschikbaar.
Helaas is het op dit moment nog niet mogelijk om gebruik te maken van de “Ask a question” functie. Als u geen
antwoord kunt vinden in onze database kunt u gebruik maken van onze telefonische helpdesk.
Van maandag tot en met vrijdag kunt u gebruik maken van de telefonische helpdesk, van 9.00 tot 18.00 uur op het
telefoonnummer 0900 – 2 04 04 04 (70 ecpm). Zorg ervoor dat u achter uw computer zit wanneer u Ubisoft
belt voor hulp.
Geef alle informatie over uw computer, het probleem en het spel op, zodat wij u zo goed mogelijk kunnen helpen.
HINTS & TIPS
Helaas, de technische support van Ubisoft geeft geen hints, tips of richtlijnen voor onze computerspellen, maar zullen wel proberen u zo goed mogelijk op weg te helpen. U vindt wel links voor Hints & Tips op onze website onder
de button “technisch advies”.
TC_SCPandT_Manuel_PC_NL 23/02/04 14:52 Page 30
Page 67

31
TC_SCPandT_Manuel_PC_NL 23/02/04 14:52 Page 31
Page 68

32
TC_SCPandT_Manuel_PC_NL 23/02/04 14:52 Page 32
Page 69

®
Tom Clancy’s Splinter Cell
Pandora Tomorrow
Εγχειρίδιο Οδηγιών Έκδοσης PC
Page 1 de 28
Page 70

Περιεχόµενα
ΚΕΝΤΡΙΚΟ ΜΕΝΟΥ.............................................................................................................................................
Single Player Mode .................................................................................................................................................
ΞΕΚΙΝΩΝΤΑΣ ............................................................................................................................... 3
MAIN MENUS ..............................................................................................................................3
ΟΘΟΝΗ ΠΑΙΧΝΙ∆ΙΟΥ.................................................................................................................... 4
MENU ΠΑΙΧΝΙ∆ΙΟΥ
OPSAT (OPERATIONAL SATELLITE UPLINK)
ΣΧΕΤΙΚΑ ΜΕ STEALTH ∆ΡΑΣΗ
ΟΙ ΚΙΝΗΣΕΙΣ ΤΟΥ SAM ................................................................................................................. 5
ΌΠΛΑ, GADGETS, ΑΝΤΙΚΕΙΜΕΝΑ ΚΑΙ ΣΤΟΙΧΕΙΑ ΠΑΙΧΝΙ∆ΙΟΥ ..................................................... 8
MULTIPLAYER MODE ................................................................................................................................... 10
T
O ΠΑΙΧΝΙ∆Ι ............................................................................................................................. 10
TΑ ∆ΙΑΦΟΡΑ GAME MODES ...................................................................................................... 10
ΕΛΕΓΧΟΣ ................................................................................................................................... 10
ΓΡΗΓΟΡΟ ΞΕΚΙΝΗΜΑ ................................................................................................................. 12
ΤΑ ΜENU .................................................................................................................................. 12
ΟΘΟΝΕΣ ΠΑΙΧΝΙ∆ΙΟΥ ................................................................................................................ 16
ΙΚΑΝΟΤΗΤΕΣ ΧΑΡΑΚΤΗΡΑ ......................................................................................................... 18
ΟΠΛΟΣΤΑΣΙΟ ............................................................................................................................. 21
ΤΑ ΕΠΙΠΕ∆Α ΤΟΥ ΠΑΙΧΝΙ∆ΙΟΥ .................................................................................................. 23
Page 2 de 28
Page 71

Ξεκινώντας
Εγκατάσταση
Για να εγκαταστήσετε το Splinter Cell, ακολουθήστε αυτά τα απλά βήµατα:
1. Ανοίξτε το PC σας
2. Τοποθετήστε το CD εγκατάστασης του Splinter Cell στο CD-Rom Drive σας. Το Autorun
Menu θα εµφανιστεί.
Σηµείωση: Αν το Autorun Menu δεν εµφανιστεί αυτόµατα, κάνετε διπλό click στο εικονίδιο
My Computer που βρίσκεται στο Desktop σας και µετά στο εικονίδιο του CD-Rom σας. Το
Autorun Menu θα εµφανιστεί.
3. Κάντε click στο «Install Splinter Cell». O οδηγός εγκατάστασης θα σας οδηγήσει µέσα από
κάθε βήµα για την εγκατάσταση και την ρύθµιση του παιχνιδιού. Όταν δηµιουργηθεί ο
φάκελος εγκατάστασης του Splinter Cell, το παιχνίδι θα έχει εγκατασταθεί στον σκληρό σας
δίσκο. Το παιχνίδι θα σας ρωτήσει αυτόµατα αν θέλετε να εγκαταστήσετε το DirectX v9.0.
∆εν µπορείτε να παίξετε το Splinter Cell χωρίς µια έκδοση πάνω από την v8.1 του DirectX.
Αν έχετε ήδη µια έκδοση του DirectX από την v8.1 και πάνω, απλά πατήστε το πλήκτρο Νο
για να περάσετε αυτό το βήµα. Αν δεν είσαστε σίγουροι, πατήστε Yes και το DirectX installer
θα το ελέγξει µόνο του.
4. Αφού εγκαταστήσετε το παιχνίδι, επιλέξτε Ubisoft Splinter Cell Pandora Tomorrow
Play Splinter Cell Pandora Tomorrow από το Start Menu του υπολογιστή σας η κάνετε διπλό
click στην συντόµευση “Play Splinter Cell Pandora Tomorrow” που θα εµφανιστεί στο
Desktop σας. Οποιοδήποτε από τα παραπάνω θα ξεκινήσει το παιχνίδι.
Σηµείωση: Το Splinter Cell Pandora Tomorrow Play CD πρέπει να βρίσκεται στο CD-Rom
σας για να ξεκινήσετε το παιχνίδι.
Απεγκατάσταση/Επανεγκατάσταση του παιχνιδιού
Για να απεγκαταστήσετε το Splinter Cell Pandora Tomorrow, ακολουθήστε αυτά τα απλά
βήµατα:
1. Ανοίξτε το PC σας.
2. Τοποθετήστε οποιοδήποτε CD του Splinter Cell Pandora Tomorrow στο CD-Rom σας. Το
Autorun Menu θα εµφανιστεί.
3. Όταν εµφανιστεί, επιλέξτε το εικονίδιο Uninstall Splinter Cell. Ο οδηγός απεγκατάστασης
θα σας ρωτήσει αυτόµατα αν θέλετε να απεγκαταστήσετε το παιχνίδι. Αν είσαστε σίγουροι,
πατήστε το πλήκτρο Yes. Αν δεν θέλετε να απεγκαταστήσετε το Splinter Cell Pandora
Tomorrow, πατήστε το No, το οποίο σταµατάει την διαδικασία. Αν απεγκαταστήσετε το
Splinter Cell, όλα τα saves θα παραµείνουν στον σκληρό σας δίσκο, εκτός κι αν απαντήσετε
Yes στην ερώτηση “Delete all configuration and saved games files”.
Σηµείωση: Μπορείτε ακόµα να απεγκαταστήσετε το Splinter Cell Pandora Tomorrow
χρησιµοποιώντας το Add/Remove Programs από τον Πίνακα Ελέγχου (Control Panel) των
Windows.
Page 3 de 28
Page 72

MAIN MENU
Από την αρχική Startup οθόνη, µπορείτε να διαλέξετε µια από τις τρεις ακόλουθες επιλογές:
• Single Player: Σας επιτρέπει να παίξετε την νέα περιπέτεια του Sam Fisher.
• Multiplayer: Σας επιτρέπει να παίξετε σε multiplayer περιβάλλον.
• Extra Features: Σας επιτρέπει να δείτε κάποια videos.
Τα δύο είδη παιχνιδιού είναι διαφορετικά. Γι’ αυτό θα βρείτε και δύο διαφορετικά µέρη για
κάθε mode σε αυτό το εγχειρίδιο οδηγιών.
ΟΘΟΝΗ ΠΑΙΧΝΙ∆ΙΟΥ
1 Μπάρα Ενέργειας: Αυτή σας δείχνει την κατάσταση της υγείας/ζωής του Sam
2 Μπάρα Stealth: Αυτή η µπάρα κινείται από αριστερά προς τα δεξιά και αναπαριστά το
επίπεδο φωτός στην περιοχή όπου βρίσκεται ο Sam.
3 Σύστηµα Αλληλεπίδρασης: Εδώ ειδοποιείστε όταν µπορείτε να αλληλεπιδράσετε µε ένα
αντικείµενο η άτοµο στο περιβάλλον
4 Σκοπός: Εδώ εµφανίζεται ο επόµενος σκοπός της αποστολής σας.
5 Επιλεγµένο Όπλο, Gadget η Αντικείµενο: Εµφανίζει την τρέχουσα επιλογή.
6 Μπάρα Επικοινωνίας: Εµφανίζεται στο πάνω µέρος της οθόνης οποτεδήποτε δέχεστε κάποιο
µήνυµα.
7 OPSAT: Όταν εµφανίζεται ένας µικρός φάκελος που αναβοσβήνει
υπάρχει µια νέα αποστολή η µια νέα σηµείωση. Πατήστε το F1 για να ανοίξετε το OPSAT σας και να
το διαβάσετε.
8 Συνολικά Πυροµαχικά.
9 Πυροµαχικά στον γεµιστήρα.
του χώρου που βρίσκεστε.
πάνω από το OPSAT σας,
MENU ΠΑΙΧΝΙ∆ΙΟΥ
Κατά την διάρκεια του παιχνιδιού, πατήστε το Esc για να µπείτε στο menu του παιχνιδιού
(Game Menu).
Page 4 de 28
Page 73

• Load Game : Κάνετε load ένα αποθηκευµένο παιχνίδι η ξεκινήστε ξανά µια πίστα.
Κατά την διάρκεια του παιχνιδιού µπορείτε να πατήσετε το F5 για να κάνετε ένα
quicksave, το οποίο µπορείτε να κάνετε load πατώντας το F8.
• Options: Ρυθµίστε τις επιλογές του ήχου και της εικόνας.
• Controller: Ρυθµίστε τις επιλογές του χειρισµού.
• Back to Single Player Menu: Επιστρέψτε στο Single Player Menu.
OPSAT (Operational Satellite Uplink)
Το OPSAT είναι ένα PDA ειδικά σχεδιασµένο για στρατιωτική χρήση που τοποθετείται στον
καρπό. Επιτρέπει στον Sam να παίρνει πληροφορίες και εντολές για τις αποστολές του και να
ενηµερώνεται από τα κεντρικά της Third Echelon (Third Echelon headquarters). Το OPSAT
εµφανίζει ακόµα εικόνες από τις Sticky Cameras. Κατά την διάρκεια του παιχνιδιού, πατήστε
το F1 για να ανοίξετε το OPSAT σας.
• Goals: Εδώ µπορείτε να βρείτε πληροφορίες για τις αποστολές σας.
• Notes: Εδώ µπορείτε να βρείτε έξτρα βοήθεια και στοιχεία που έχετε συλλέξει κατά
την διάρκεια της αποστολή σας.
• Data: Εδώ µπορείτε να βρείτε πληροφορίες για τους εχθρούς σας, για τις τοποθεσίες
η άλλα χρήσιµα για την αποστολή στοιχεία. ∆ώστε ιδιαίτερη προσοχή στα data sticks,
καθώς περιλαµβάνουν σηµαντικές πληροφορίες.
• Inventory: Το κοµµάτι του inventory σας παρέχει πληροφορίες σχετικά µε τα
αντικείµενα και τον εξοπλισµό σας.
Page 5 de 28
Page 74

OI ΚΙΝΗΣΕΙΣ ΤΟΥ SAM
Κάθε φορά που ο Sam µπορεί να κάνει µια ειδική κίνηση, ένα ειδικό παράθυρο Interaction
System θα εµφανιστεί. Πατήστε το πλήκτρο Action (Enter) και κρατήστε το πατηµένο, και
µετά χρησιµοποιήστε το mouse wheel η τα και για να επιλέξετε την κίνηση που θέλετε
να κάνετε. Αφήστε το πλήκτρο Action (Enter) για να επαληθεύσετε την επιλογή σας.
Βασική Κίνηση
Η κλασική ταχύτητα κίνησης είναι αυτή που θα δείτε όταν πατήσετε το . Χρησιµοποιήστε
το mouse wheel για να επιταχύνετε, να αυξήσετε η να µειώσετε την ταχύτητα κίνησής σας. Η
αργή κίνηση προσφέρει περισσότερο stealth απ’ το να κινείστε γρήγορα, γι’ αυτό είναι πολύ
σηµαντικό να κάνετε πρακτική σε αυτό τον τοµέα.. Αν ένας αντίπαλος σας ακούσει να
κινείστε πίσω από την πλάτη του, θα γυρίσει γρήγορα και θα ανοίξει πυρ εναντίον σας, κάτι
που δεν σας επιτρέπει (χρονικά) να προσπαθήσετε να τον αποφύγετε. Αν και είναι αρκετά
ριψοκίνδυνο να κινήστε αργά σε µια καλά φωτισµένη περιοχή µε έναν εχθρό, είναι αρκετά
πιο ριψοκίνδυνο να προσπαθείτε να τρέξετε γρήγορα προς ένα άνοιγµα.
Βασικές Κινήσεις
Ο Sam έχει µια µεγάλη γκάµα κινήσεων. Η γνώση όλων αυτών και η χρήση τους στα σωστά
σηµεία έχει µεγάλη σηµασία.
Σκύψιµο
Πατήστε το Crouch (KP 0) για να σκύψει ο Sam. Η κίνηση είναι αργότερη, αλλά και πιο
ήσυχη. Ο Sam φαίνεται λιγότερο όταν είναι σκυµµένος.
Κάλυψη
Πατήστε το Jump (Shift) και κινηθείτε προς κάποια χαµηλά αντικείµενα όπως κιβώτια και
τραπέζια. Ο Sam θα γονατίσει και θα καλυφθεί σε αυτά.
Σκαρφάλωµα
Για να ανέβετε σε ένα σωλήνα, σε µια σκάλα, σε ένα οριζόντιο καλώδιο η σε έναν φράχτη,
απλά περπατήστε προς το µέρος του. Πατήστε το Crouch (KP 0) για να κατέβετε.
Κοντινή Επίθεση
Κρατώντας το όπλο σας, πατήστε το Fire (αριστερό πλήκτρο του mouse) ενώ βρίσκεστε
κοντά σε έναν εχθρό για να τον χτυπήσετε µε τον αγκώνα σας.
Πλάτη στον Τοίχο
Πατήστε Back to wall (KP 4) ενώ είσαστε όρθιοι η γονατιστοί για να κάνετε τον Sam να
βάλει την πλάτη του στον τοίχο. Ο Sam γίνεται έτσι λιγότερο ορατός.
Κρέµασµα
Πατήστε το Jump (Shift) για να πιαστείτε και να κρεµαστείτε σε µια άκρη πάνω από το
κεφάλι του Sam. Ο Sam µπορεί να κινηθεί αριστερά και δεξιά, καθώς και να ανέβει,
τραβώντας τον εαυτό του πάνω, αν υπάρχει χώρος. Πατήστε το Crouch (KP 0) για να
σταµατήσετε να κρέµεστε.
Page 6 de 28
Page 75

Κρέµασµα µε τα πόδια ψηλά
Πατήστε το Jump (Shift) για να πιαστείτε και να κρεµαστείτε από µια οριζόντια σωλήνα.
Φέρτε τα πόδια του Sam πάνω στην σωλήνα για να περάσετε διάφορα εµπόδια πατώντας το
Jump (Shift) ξανά.
Κεκλιµένη Σωλήνα
Πατήστε το Jump (Shift) για να πιαστείτε και να κρεµαστείτε σε µια κεκλιµένη σωλήνα η σε
ένα καλώδιο. Ο Sam θα κυλήσει αυτόµατα προς το κάτω µέρος. Σηκώστε τα πόδια του Sam
πατώντας το Jump (Shift) ξανά. Πατήστε το Crouch (KP 0) για να αφήσετε τα χέρια σας.
Ειδικές Κινήσεις
Οι ειδικές κινήσεις είναι τόσο σηµαντικές όσο και οι βασικές. Αν καταφέρετε να µάθετε να
τις παίζετε στα δάχτυλα, θα βοηθήσετε τον Sam να κινηθεί πιο έξυπνα και µε µεγαλύτερη
ασφάλεια µέσα στο περιβάλλον του παιχνιδιού. Πολλές από τις εξειδικευµένες κινήσεις είναι
συνδυασµοί που επιτρέπουν στον Sam να επιτεθεί.
Κύλιση
Πατήστε και κρατήστε πατηµένο το Crouch (KP 0) ενώ τρέχετε για να κάνετε τον Sam να
κυλιθεί.
Split Jump
Αν ο Sam βρίσκεται σε έναν διάδροµο δίπλα σε ένα τοίχο που είναι σε απόσταση όση το
ύψος του, πατήστε το Jump (Shift) και µετά ξανά το Jump (Shift) για να µπείτε σε θέση Split
Jump.
Half Split Jump
Αν ο Sam βρίσκεται σε έναν µικρότερο διάδροµο δίπλα σε ένα τοίχο, θα µπορεί να κάνει ένα
Half Split Jump. Πατήστε το Jump (Shift) δύο φορές για να µπείτε σε θέση Half Split Jump.
Half Split Jump και Άλµα
Αν βρίσκεστε σε θέση Half Split Jump, ο Sam µπορεί να φτάνει σε ένα ψηλότερο σηµείο.
Στρέψτε τον Sam έτσι ώστε να κοιτάζει προς τα πάνω ενώ κινείται
δεξιά. Πατήστε το Jump (Shift) για να φτάσετε εκεί.
Επίθεση Πτώσης
Αν µπορείτε να φτάσετε πάνω από έναν εχθρό και να πέσετε ακριβώς πάνω του, θα τον
εξοντώσετε. Πατήστε το Crouch (KP 0) για να κάνετε επίθεση πτώσης.
Αθόρυβη Προσεδάφιση/Πτώση
Κατά την διάρκεια της πτώσης σας προς το
έδαφος πατήστε Crouch (KP 0) για να
προσεδαφιστείτε αθόρυβα.
Σχοινί
Για να κρεµαστείτε από µια καµινάδα, σταθείτε δίπλα της και πατήστε το πλήκτρο Rappel. Ο
Sam µπορεί να κινηθεί πάνω και κάτω µε το σχοινί. Πατήστε το Jump (Shift) για να πάρε
φόρα πατώντας στον τοίχο.
Όπλο στο σχοινί
Ο Sam µπορεί να πάρει στα
χέρια του όπλο να και αρχίσει να πυροβολεί ενώ κρέµεται.
Πατήστε το Use/Equip (KP 1) για να πάρετε στα χέρια σας το επιλεγµένο όπλο.
Page 7 de 28
από τα αριστερά προς τα
Page 76

Πυρ ενώ κρέµεστε
Ο Sam µπορεί να οπλίσει και να πυροβολήσει την ώρα που κρέµεται από µια σωλήνα, αλλά
µόνο αν τα πόδια του δεν είναι µαζεµένα. Πατήστε Use/Equip (KP 1) για να πάρετε στα χέρια
σας το επιλεγµένο όπλο.
Κρέµασµα από τα πόδια
Ενώ ο Sam κρατιέται από µια οριζόντια σωλήνα µε τα πόδια του µαζεµένα, πατήστε
Use/Equip (KP 1) για να πυροβολήσει, ενώ κρεµιέται από τα πόδια.
Split Jump Πυροβολισµός
Ο Sam µπορεί να οπλίσει και να πυροβολήσει ενώ βρίσκεται σε θέση Split Jump. Πατήστε το
Use/Equip (KP 1) για να οπλίσετε το επιλεγµένο όπλο.
Πυροβολισµός µε πλάτη στον τοίχο
Αν ο Sam φτάσει σε µια γωνία ενώ κινείται µε την πλάτη του στον τοίχο, θα κοιτάξει πίσω
από την γωνία αυτόµατα. Πατήστε το Use/Equip (KP 1) την ώρα που κοιτάζει για να πάρετε
στα χέρια σας το επιλεγµένο όπλο και να πυροβολήσετε µε ασφάλεια.
Πέταγµα µε πλάτη στον τοίχο
Την ώρα που ο Sam κοιτάει πίσω από την γωνία, πατήστε πάνω και κάτω στο directional pad
για να επιλέξετε το αντικείµενο που θέλετε να πετάξετε. Πατήστε Use/Equip (KP 1) για να το
πάρετε στα χέρια σας. Μπορείτε να ρυθµίσετε το µήκος της ρίψης σας, πατώντας το Alt Fire
(δεξί πλήκτρο του mouse). Πατήστε το Fire (αριστερό πλήκτρο του mouse) για να πετάξετε
το αντικείµενο.
Στροφή SWAT
Την ώρα που ο Sam κοιτάζει µέσα από µια ανοιχτή πόρτα, η σε έναν µικρό διάδροµο,
πατήστε το Action (Enter) για να κάνετε µια στροφή SWAT. Η στροφή SWAT είναι µια
ειδική κίνηση που µαθαίνουν οι στρατιώτες των Ειδικών ∆υνάµεων και τους κάνει σχεδόν
αόρατους.
Κινήσεις για NPCs (Non-Player Characters)
O Sam µπορεί να κάνει κάποιες ειδικές κινήσεις µόνο στα NPCs (Non-Player Characters).
Για να εκτελέσει αυτές τις κινήσεις, ο Sam θα πρέπει να πλησιάσει τους εχθρούς αθόρυβα.
Κουβάληµα Πτωµάτων
Ο Sam θα χρειαστεί να κρύβει τα πτώµατα η τα σώµατα των εχθρών που έχουν πέσει
αναίσθητοι για να αποφύγει να τον καταλάβουν. Πατήστε το πλήκτρο Body για να
κουβαλήσετε έναν εχθρό. Πατήστε το Action (Enter) για να τον αφήσετε αθόρυβα η απλά
πατήστε Use/Equip (KP 1) για να πάρετε στα χέρια σας ένα όπλο και να πετάξετε τον εχθρό
γρήγορα.
Πιάσιµο
Πιάστε έναν εχθρό πλησιάζοντάς τον αθόρυβα και πατήστε το πλήκτρο Grab Character.
Ανθρώπινη Ασπίδα
Ενώ κρατάτε έναν εχθρό, µπορείτε να πατήσετε Use/Equip (KP 1) για να πάρετε στα χέρια
σας ένα όπλο και να ανοίξετε πυρ ενώ χρησιµοποιείτε τον όµηρο εχθρό σαν ανθρώπινη
ασπίδα.
Page 8 de 28
Page 77

Ανάκριση
Κάποια NPCs µπορείτε να τα ανακρίνετε για να πάρετε χρήσιµες πληροφορίες. Ενώ κρατάτε
ένα NPC, επιλέξτε την Interrogate Interaction για να τον κάνετε να µιλήσει.
«Αναγκαστική» συνεργασία
Μερικά αντικείµενα στο περιβάλλον δεν µπορούν να χρησιµοποιηθούν από τον Sam, αλλά τα
NPCs µπορούν να τα χρησιµοποιήσουν για εκείνον. Για να αναγκάσετε ένα NPC να
συνεργαστεί, πιάστε το, τραβήξτε το προς το αντικείµενο που θέλετε να χρησιµοποιήσει και
επιλέξτε την Force Cooperate Interaction.
Άλλες Κινήσεις
·Reload: Πατήστε το KP . για να γεµίσετε αυτόµατα το όπλο σας.
·Σφύριγµα: Πατήστε το V για να σφυρίξετε. Οι εχθροί θα έρθουν προς το µέρος σας όταν
ακούσουν το σφύριγµα.
·Συχνότητα Πυρών: Όταν χρησιµοποιείτε το SC-20K, πατήστε το F για να αλλάξετε την
συχνότητα πυρών σας.
·Αλλαγή Οπτικής: Πατήστε το Del για να µπείτε σε Night Vision (νυχτερινή όραση) και το
End για να µπείτε σε Heat Vision (θερµική όραση).
ΟΠΛΑ, GADGETS, ANTIKEIMENA KAI ΣΤΟΙΧΕΙΑ ΠΑΙΧΝΙ∆ΙΟΥ
Κατά την διάρκεια του παιχνιδιού, πατήστε Control για να µπείτε στο quick inventory.
Χρησιµοποιήστε το mouse για να επιλέξετε ένα αντικείµενο. Για να το χρησιµοποιήστε,
πατήστε το Fire (αριστερό πλήκτρο του mouse).
Όπλα και Gadgets
SC-20K M.A.W.S. (Modular Assault Weapon System)
Η κατασκευή αυτού του όπλου το κάνει ελαφρύ και ισχυρό χωρίς να θυσιάζει την δύναµη
πυρός του (5.56x45mm ss109). Λόγω µεγέθους µπορεί να χρησιµοποιηθεί σε οποιαδήποτε
αποστολή. Είναι εφοδιασµένο µε σιγαστήρα ήχου/εικόνας και συνδέεται µε έναν πολύεκτοξευτή. Τα παραπάνω κάνουν το SC-20K την πιο προφανή λύση στην επιλογή όπλου για
όλες τις αποστολές του Sam.
Όταν έχετε στα χέρια σας το SC-20K, πατήστε το µεσαίο πλήκτρο του mouse για να µπείτε
σε Sniper mode. Χρησιµοποιήστε το wheel (ρόδα) του mouse για να κάνετε zoom in η zoom
out (µπορείτε επίσης να χρησιµοποιήσετε τα Page Up και Page Down).
SC-20K’s Multipurpose Launcher
Πατήστε Fire (αριστερό πλήκτρο του mouse) για να ενεργοποιήσετε τον εκτοξευτή. Αυτό το
όπλο δεν µπορεί να χρησιµοποιηθεί σε Sniper mode.
Ring Airfoil Projectile
Sticky Camera
Sticky Shocker
Distraction Camera
Gas Grenade
Flash Bang
Chaff Grenade
Laser Aiming
(Για περισσότερες πληροφορίες, παρακαλούµε ανατρέξτε στο αγγλικό εγχειρίδιο οδηγιών)
Page 9 de 28
Page 78

Lock Pick
Κλασικό σετ εργαλείων για να µην σας απασχολούν πλέον οι κλασικές κυλινδρικές
κλειδαριές. Πατήστε τα διάφορα πλήκτρα κατευθύνσεων (, , , η ) µέχρι να δείτε και
να ακούσετε το πρώτο έµβολο να κινείται. Αυτό σηµαίνει ότι έχετε πατήσει το σωστό
πλήκτρο. Συνεχίστε να πατάτε αυτό το πλήκτρο για να ξεκλειδώσετε ένα έµβολο της
κλειδαριάς. Επαναλάβετε µέχρι να τα ξεκλειδώσετε όλα.
Disposable Pick - Laser Microphone: T.A.K. (Tactical Audio Kit) - Camera Jammer Optic Cable – Goggles: Για περισσότερες πληροφορίες, παρακαλούµε ανατρέξτε στο
αγγλικό εγχειρίδιο οδηγιών.
Αντικείµενα
Μερικά αντικείµενα όπως τα grenades, flare και άλλα διάφορα µπορούν να εκτοξευτούν. Για
να πετάξετε ένα αντικείµενο, πάρετέ το στα χέρια σας και πατήστε το KP1. Μια σειρά
στόχων που εµφανίζονται στην οθόνη θα σας επιτρέψουν να καθορίσετε την τροχιά της
ρίψης. Χρησιµοποιήστε το mouse για να στοχεύσετε και το δεξί πλήκτρο του για να αλλάξετε
το είδος της τροχιάς ρίψης. Πατήστε το αριστερό πλήκτρο του mouse για να ρίξετε ένα
αντικείµενο η πατήστε το KP1 ξανά για να ακυρώσετε την ρίψη.
Wall Mine - Emergency Flare - Frag Grenade - Medical Kit (Για περισσότερες
πληροφορίες, παρακαλούµε ανατρέξτε στο αγγλικό εγχειρίδιο οδηγιών).
Στοιχεία Παιχνιδιού
Τα εµπόδια που βάζουν οι εχθροί στο δρόµο σας ποικίλουν –από απλά keypads που ελέγχουν
πόρτες µέχρι αυτόµατα turrets που ενεργοποιούνται µε διαφορά θερµοκρασίας η εντοπισµό
κίνησης.
Alarm Panel - Automated Turret - Surveillance Camera - Armored Camera - Booby
Trap - Motion Detector - Keypad Lock - Retinal Scanner: (Για περισσότερες
πληροφορίες, παρακαλούµε ανατρέξτε στο αγγλικό εγχειρίδιο οδηγιών).
MULTIPLAYER MODE
Το Παιχνίδι
Το παιχνίδι είναι βασισµένο σε δύο αντίπαλες οµάδες που αποτελούνται από δύο άτοµα η
κάθε µία. Η οµάδα Shadownet πρέπει να κινείται χωρίς να εντοπίζεται, να αναλύει το
περιβάλλον και να πληροί τις προϋποθέσεις νίκης στην εκάστοτε αποστολή. Η οµάδα
µισθοφόρων (ARGUS.) πρέπει να αποτρέψει την ο
στην αποστολή, να την εντοπίσει και να την εξοντώσει.
µάδα Shadownet από το να προχωρήσει
Page 10 de 28
Page 79

Τα ∆ιάφορα Game Modes - Για περισσότερες πληροφορίες, παρακαλούµε
ανατρέξτε στο αγγλικό εγχειρίδιο οδηγιών.
NEUTRALIZATION Mode
EXTRACTION Mode
SABOTAGE Mode
Χειρισµός
Ο χειρισµός χωρίζεται σε 4 κατηγορίες: οι ρυθµίσεις (οτιδήποτε έχει να κάνει µε
ρυθµίσεις), οι βασικές κινήσεις, οι κατασκοπικές κινήσεις και ο έλεγχος των µισθοφόρων.
Ρυθµίσεις
Ενέργεια Εξήγηση Προ-Επιλεγµένα Πλήκτρα
MOUSE Αλλάζει τις ρυθµίσεις ευαισθησίας στην κίνηση του mouse O και P
INGAME MENU Ανοίγει το menu όταν το παιχνίδι είναι σε εξέλιξη Esc
HUD Εµφανίζει λεπτοµέρειες HUD F4
QUIT Έξοδος από το παιχνίδι F12
CHAT Άνοιγµα του περιβάλλοντος chat ²
FULL SCREEN Αλλάζει την προβολή της εικόνας σε full screen (όλη η οθόνη). Alt + Enter
ΒΑΣΙΚΕΣ ΚΙΝΗΣΕΙΣ
Ενέργεια Εξήγηση Προ-Επιλεγµένα Πλήκτρα
MOVE Κινεί τον χαρακτήρα σας προς τα µπροστά Z
MOVE Κινεί τον χαρακτήρα σας προς τα πίσω S
MOVE Κινεί τον χαρακτήρα σας προς τα αριστερά Q
MOVE Κινεί τον χαρακτήρα σας προς τα δεξιά D
ACTION
PRIMARY FIRE Χρήση του όπλου (Κατάσκοπος: στο weapon mode µόνο) Αριστερό Click
SECONDARY FIRE
JUMP Ο χαρακτήρας σας κάνει άλµα Space
CROUCH Ο χαρακτήρας σας σκύβει η σηκώνεται C
WALK / RUN Αλλαγή ταχύτητας του χαρακτήρα σας Mouse Wheel Πάνω/Κάτω
HACK COMM
SWITCH VISION Εναλλαγή ανάµεσα στις διάφορες ειδικές οπτικές TAB
GADGET 1 Επιλέξτε το Gadget 1 από το inventory σας 1
GADGET 2 Επιλέξτε το Gadget 2 από το inventory σας 2
GADGET 3 Επιλέξτε το Gadget 3 από το inventory σας 3
GADGET 4 Επιλέξτε το Gadget 4 από το inventory σας 4
ZOOM IN/OUT Αλλαγή του επιπέδου zoom στα κιάλια και στο Sniper mode. Mouse Wheel Πάνω/Κάτω
ENHANCED REALITY Αλλαγή του Enhanced Reality display mode (off, on) F9
∆ράση στο περιβάλλον (Κατάσκοπος: Εξουδετέρωση ενός ND133,
hacking ενός υπολογιστή. Μισθοφόρος: χρήση των κιβωτίων µε
πυροµαχικά).
Κατάσκοπος Μόνο: ∆ίπλα από έναν εχθρό, χτυπάει τον εχθρό µε τον
αγώνα ενώ τον κοιτάζει/ τον πιάνει από πίσω όταν έχει γυρισµένη την
πλάτη του.
Χρήση ενός gadget (Κατάσκοπος: στο weapon mode µόνο). Κρατήστε
το πλήκτρο πατηµένο για να ορίσετε την δύναµη ρίψης.
Παρακολούθηση της επικοινωνίας των εχθρών (όταν µια spy bullet η
µια spy trap έχει εκτοξευτεί η είναι ενεργή)
Shift
∆εξί Click
H
Page 11 de 28
Page 80

Εδώ θα βρείτε µια λίστα των προκαθορισµένων εντολών και κινήσεων για έναν κατάσκοπο
της Shadownet:
ΚΑΤΑΣΚΟΠΙΚΕΣ
ΚΙΝΗΣΕΙΣ
Ενέργεια Εξήγηση Προ-Επιλεγµένα Πλήκτρα
QUICK USE 0
QUICK USE 1
PLACE MODEM
ROLL Πραγµατοποίηση τούµπας
WEAPON MODE Ο χαρακτήρας αφήνει το όπλο. Μεσαίο Πλήκτρο mouse η E
BACK TO WALL
BINOCULARS Χρήση των κιαλιών B
Gadgets
RELEASE GAZ
EXIT CAMERA
CAMERA ZOOM IN/OUT Zoom in η out στο περιβάλλον της Sticky camera Mouse Wheel Πάνω/Κάτω
NIGHTVISION Ενεργοποιεί και απενεργοποιεί την Night vision. F1
THERMAL Ενεργοποιεί και απενεργοποιεί την Thermal vision. F2
LASER
Πέταγµα του gadget που βρίσκεται στην πρώτη θέση στα πόδια σας,
ενώ χρησιµοποιείτε προοπτική τρίτου προσώπου.
Πέταγµα του gadget που βρίσκεται στη δεύτερη θέση στα πόδια σας,
ενώ χρησιµοποιείτε προοπτική τρίτου προσώπου.
Τοποθέτηση µιας βόµβας για εξουδετέρωση ενός ND133 (µόνο για το
sabotage game mode)
Όταν ο χαρακτήρας κοιτάει προς έναν τοίχο, τον κάνει να τον πλησιάσει
µε την πλάτη του
Εξαπολύει ένα ασφυκτικό σύννεφο αερίου την ώρα που χρησιµοποιείτε
την οπτική της sticky camera
Έξοδος από το περιβάλλον της sticky camera και επιστροφή στην
κανονική οπτική.
Ενεργοποιεί και απενεργοποιεί την laser συσκευή σκόπευσης του
όπλου σας.
Αριστερό Click
∆εξί Click
Shift
A / Γρήγορο Mouse Wheel
Πάνω
W
Αριστερό Click
∆εξί Click
L
Εδώ θα βρείτε µια λίστα των προκαθορισµένων εντολών και κινήσεων για έναν µισθοφόρο
της ARGUS:
ΕΛΕΓΧΟΣ ΜΙΣΘΟΦΟΡΩΝ
Ενέργεια Εξήγηση Προ-Επιλεγµένα Πλήκτρα
FIRE RATE Αλλαγή συχνότητας ρίψης του όπλου F
RELOAD Γέµισµα του όπλου R
SECONDARY FIRE Κράτηµα ανάσας (στο snipe mode) ∆εξί Click
RUSH Επίθεση προς τον αντίπαλο για να τον εξοντώσετε
Gadgets
TORCH LIGHT Ανάβει και σβήνει τον φακό. E
SNIPE Χρήση του sniper mode του όπλου σας Μεσαίο Πλήκτρο Mouse
MOVEMENT Ενεργοποίηση και απενεργοποίηση του movement vision. F1
E.M.F. Ενεργοποίηση και απενεργοποίηση του EMF Vision. F2
LASER SIGHT Ενεργοποίηση και απενεργοποίηση του laser sight. A
Run + Shift / Γρήγορο Mouse
Wheel Πάνω
Γρήγορο Ξεκίνηµα
Από το κεντρικό µενού του Splinter Cell: Pandora Tomorrow, επιλέξτε “MULTIPLAYER” για
να µπείτε στο κεντρικό multiplayer menu. Επιλέξτε ένα προφίλ κάνοντας click πάνω του
και πατήστε το SELECT για να παίξετε χρησιµοποιώντας το. Πατήστε DELETE για να
σβήσετε ένα προφίλ και NEW PROFILE για να δηµιουργήσετε ένα νέο.
Page 12 de 28
Page 81

ΣΗΜΕΙΩΣΗ: Τα προφίλ που δηµιουργούνται στο Single Player Mode και αυτά που
δηµιουργούνται στο Multiplayer Mode είναι κοινά, αλλά οι ρυθµίσεις είναι ξεχωριστές σε
κάθε mode (single player η multiplayer).
Την πρώτη φορά που θα κάνετε click στο “MULTIPLAYER”, θα µεταφερθείτε αυτόµατα στο
µενού δηµιουργίας προφίλ δίνοντας ένα όνοµα. Όταν δηµιουργηθεί το προφίλ σας,
θα
µεταφερθείτε αυτόµατα σε δύο tutorials: το πρώτο σας προπονεί σαν κατάσκοπο. Το
δεύτερο σας προπονεί σαν µισθοφόρο. Μπορείτε να περάσετε τα tutorials πατώντας το
ESCAPE κατά την διάρκεια του παιχνιδιού και επιλέγοντας QUIT.
Αµέσως µετά θα µεταφερθείς στο ακόλουθο menu:
• PLAY ON UBI.COM: Παίξτε στο Internet, χρησιµοποιώντας την υπηρεσία Ubi.com.
• PLAY ON LAN: ∆ηµιουργήστε
η µπείτε σε παιχνίδια σε ένα τοπικό δίκτυο (LAN).
• TUTORIALS: Μια σειρά tips και εργαλείων που θα σας βοηθήσουν να γίνετε
καλύτερος παίκτης. Μπορείτε να δείτε επίσης και τους χάρτες των tutorials.
• OPTIONS: Αλλάξτε τις ρυθµίσεις για το προφίλ που χρησιµοποιείτε.
Τα Menu
Λεπτοµέρειες Menu
Προφίλ και menu αλλαγών για τα gadgets
H επιλογή PROFILE OPTIONS στο βασικό menu, θα σας επιτρέψει να αλλάξετε τις
ρυθµίσεις που αφορούν στο προφίλ σας:
EQUIPMENT: Για να κάνετε edit όλα τα gadgets που χρησιµοποιεί ο χαρακτήρας σας
στο παιχνίδι.
Κάθε προφίλ περιλαµβάνει εξοπλισµό κατασκόπου η µισθοφόρου. Για να δείτε τι έχει ο
άλλος χαρακτήρας, κάντε click στο πλήκτρο switch team. Κάθε χαρακτήρας έχει 4
σηµεία, στα οποία µπορεί να τοποθετήσει ένα gadget. Για να αλλάξετε ένα gadget,
κάντε click πάνω
είναι διαθέσιµα για το µέλος της οµάδας που ετοιµάζετε. Υπάρχουν 6 τον αριθµό.
Επιλέξτε το gadget που θέλετε να πάρετε κάνοντας click πάνω του. Το νέο gadget θα
εµφανιστεί στο inventory σας.
Σηµείωση: Για τον εξοπλισµό κατασκόπου,
και 2 για gadgets που σχετίζονται µε χειροβοµβίδες, καθώς αυτά µπορούν να
χρησιµοποιηθούν σε περιπτώσεις έκτακτης ανάγκης µε τα πλήκτρα PRIMARY FIRE και
SECONDARY FIRE.
GAME: Για να αλλάξετε τις ρυθµίσεις που σχετίζονται µε τον χειρισµό:
Vibration (για να ενεργοποιήσετε και να απενεργοποιήσετε την λειτουργία δόνησης στο
παιχνίδι), Invert Y Axis (για να αντιστρέψετε την στόχευση στον κάθετο άξονα), Invert X
Axis for Spies (για να αντιστρέψετε την οριζόντια κατεύθυνση περιστροφής της κάµερας),
Auto-Center (για να ενεργοποιήσετε και να απενεργοποιήσετε την αυτό
στον οριζόντιο άξονα όταν ο µισθοφόρος κινείται ευθεία), Unit System (για να
εµφανίζονται οι αποστάσεις σε µέτρα η πόδια).
AUDIO: Για να αλλάξτε τις ρυθµίσεις του ήχου στο παιχνίδι. Μπορείτε να ρυθµίσετε:
- Τα εφέ έντασης του παιχνιδιού, αλλάζοντας την επιλογή EFFECTS VOLUME.
- Την ένταση της µουσικής του παιχνιδιού, αλλάζοντας την επιλογή MUSIC
VOLUME.
- Την επιλογή EAX, η οποία θα σας ενηµερώσει αν είναι διαθέσιµη στο σύστηµά
σας η όχι.
του. Θα µεταφερθείτε σε µια σελίδα που σας δείχνει τα gadgets που
είναι απαραίτητο να αφήσετε τις θέσεις 1
µατη επιστροφή
Page 13 de 28
Page 82

VIDEO: Για να ρυθµίσετε τα γραφικά του παιχνιδιού:
- Screen Resolution: Σας επιτρέπει να αλλάξετε την ανάλυση της εικόνας.
- Quality: Επιλέξτε ανάµεσα στα LOW, MEDIUM και HIGH για να ρυθµίσετε το
επίπεδο λεπτοµέρειας των textures.
- Use Mipmapping: Κάντε αυτή την επιλογή για να ενεργοποιήσετε το
mipmapping.
- Use Trilinear: Κάντε αυτή την επιλογή για
να ενεργοποιήσετε το trilenar
filtering.
- Show Test Card: Ρυθµίστε την οθόνη σας µε την βοήθεια των εντολών που
θα εµφανιστούν για να απολαύσετε καλύτερα το παιχνίδι.
Αφού επιλέξετε την ανάλυση, κάντε click στο VALIDATE για να αποθηκεύσετε τις
επιλογές σας. Το παιχνίδι θα αναλύσει τις ρυθµίσεις και θα σας ζητήσει επιβεβαίωση.
Η επιλογή KEYBOARD CONFIGURATION σας επιτρέπει να αλλάξετε τις αντιστοιχίες
των πλήκτρων για κάθε κίνηση µέσα στο παιχνίδι. Για να αλλάξετε µια αντιστοιχία,
κάντε click δίπλα στην πράξη που θέλετε να ορίσετε και πατήστε το πλήκτρο της
επιλογής σας.
Παίζοντας στο UBI.com Menu
Αφού διαβάσετε και αποδεχτείτε τις εντολές που θα σας δοθούν, δώστε τον λογαριασµό
σας στο UBI.com και τον κωδικό σας. Κάντε click στο “Save Password” αν θέλετε το
παιχνίδι να αποθηκεύσει τον κωδικό σας. Επιλέξτε το “Auto-login” για να µπαίνετε
αυτόµατα στο UBI.com χρησιµοποιώντας τον λογαριασµό που δώσατε. Χρησιµοποιήστε τα
“New Profile”
και “Account Management” για να δηµιουργήσετε ένα νέο λογαριασµό η να
αλλάξετε τις παραµέτρους του ήδη υπάρχοντος.
Αφού συνδεθείτε, θα µεταφερθείτε σε ένα νέο menu:
Page 14 de 28
Page 83

QUICK MATCH: Για να βρείτε ένα παιχνίδι µε ελεύθερη θέση για να µπείτε και να
παίξετε γρήγορα.
MOTD: Χώρος για τα Μηνύµατα της Ηµέρας. Εδώ µπορείτε να βλέπετε όλα τα
µηνύµατα από το UBI.com.
SERVERS LIST: Εδώ µπορείτε να ψάξετε και να µπείτε σε διάφορα παιχνίδια. Πρώτα
απ’ όλα, επιλέξτε ένα Lobby. Τα παιχνίδια που είναι διαθέσιµα σε αυτό το lobby θα
εµφανιστούν στα αριστερά. Μπορείτε να «φιλτράρετε» την αναζήτησή σας από το
κάτω µέρος της οθόνης. Για ανανέωση της λίστας, πατήστε το πλήκτρο REFRESH. Για
µπείτε σε ένα παιχνίδι, επιλέξτε το και πατήστε το πλήκτρο JOIN. Θα µεταφερθείτε
να
σε έναν χώρο «αναµονής». Όταν ετοιµαστούν όλοι οι παίκτες (τα ονόµατά τους γίνουν
άσπρα), τρέξτε το παιχνίδι πατώντας το πλήκτρο LAUNCH.
Page 15 de 28
Page 84

CREATE MATCH: Εδώ µπορείτε να φτιάξετε ένα παιχνίδι µε τις δικές σας
παραµέτρους. Επιλέξτε το επίπεδο του παιχνιδιού, το game mode, τον τύπο του
παιχνιδιού (ελεύθερο η “Ranking”) και το LEVEL GAP (η ανεκτή διαφορά επιπέδου
ανάµεσα στους παίκτες). Αφού γίνουν όλες οι ρυθµίσεις (στο κάτω µέρος της οθόνης),
πηγαίνετε στον χώρο ανα
µονής του παιχνιδιού, αφού πατήσετε το πλήκτρο CREATE.
Όταν ετοιµαστούν όλοι οι παίκτες (τα ονόµατά τους γίνουν άσπρα), τρέξτε το παιχνίδι
πατώντας το πλήκτρο LAUNCH.
Page 16 de 28
Page 85

Menu Παιχνιδιού σε LAN
FIND SESSION: Για να µπείτε σε ένα υπάρχον παιχνίδι. Επιλέξτε το παιχνίδι που
θέλετε να µπείτε και πατήστε το πλήκτρο JOIN. Ψάξτε για άλλα παιχνίδια επιλέγοντας
το πλήκτρο REFRESH. Αφού επιλέξετε παιχνίδι, θα µεταφερθείτε στον χώρο αναµονής.
Όταν ετοιµαστούν όλοι οι παίκτες (τα ονόµατά τους γίνουν άσπρα), τρέξτε το παιχνίδι
πατώντας
το πλήκτρο LAUNCH.
CREATE SESSION: Για να φτιάξετε ένα παιχνίδι. Πρέπει να επιλέξετε το χάρτη του
παιχνιδιού, καθώς και το game mode. Όταν όλες οι ρυθµίσεις τελειώσουν (στο κάτω
µέρος της οθόνης), µπορείτε να µεταφερθείτε στο χώρο αναµονής πατώντας το
πλήκτρο CREATE. Όταν ετοιµαστούν όλοι οι παίκτες (τα ονόµατά τους γίνουν άσπρα),
τρέξτε
το παιχνίδι πατώντας το πλήκτρο LAUNCH.
Tutorials Menu
Το menu TUTORIALS περιλαµβάνει τα ακόλουθα:
VIEW HUD: Εµφανίζει πληροφορίες για τα αντικείµενα που εµφανίζονται στην οθόνη
παιχνιδιού.
TIPS: Για να πάρετε Tips και έξτρα πληροφορίες για τις ικανότητες των χαρακτήρων
κάθε οµάδας. Στην οθόνη Tips για κατασκόπους, κάντε click πάνω στο SWITCH TEAM
για να εµφανίσετε tips για την άλλη οµάδα. Για να δείτε ένα tip, επιλέξτε το και κάντε
click στο πλήκτρο SELECT.
SHADOWNET SPY TUTORIAL: Παίξτε τον tutorial χάρτη των κατασκόπων.
Page 17 de 28
Page 86

ARGUS MERCENARY TUTORIAL: Παίξτε τον tutorial χάρτη των µισθοφόρων.
VISIT MAP: Για να µπείτε στο επίπεδο της επιλογής σας (µόνος) µέσα σε µια οµάδα.
Επιλέξτε το επίπεδο που θέλετε, την οµάδα και το game mode.
Οθόνες Παιχνιδιού
Οθόνη Παιχνιδιού Οµάδας Shadownet
6
1
3
5
8
6
2 και 4
7
11
9
10
1. Tactical Radar: Αυτό το ραντάρ εµφανίζει την θέση των συµµάχων σας και των
αντιπάλων που έχετε εντοπίσει (εµφανίζονται µόνο όταν χρειάζεται).
2. ND133 Counter: Εµφανίζει τον αριθµό των objectives που σας έχουν µείνει για να
ολοκληρώσετε νικηφόρα την αποστολή και αυτά που έχετε ήδη ολοκληρώσει.
3. ND133 Capture Timer: Εµφανίζει
ένα ND133 από την οµάδα Shadownet.
4. Time Remaining in the Game: Εµφανίζει τον εναποµείναντα χρόνο µέχρι το τέλος
της αποστολής.
5. Energy Bar: Αυτή η µπάρα εµφανίζεται µόνο όταν ο παίκτης είναι σε weapon mode
(κρατάει όπλο) και όταν γεµίζει η µπάρα ενέργειας. Εδώ εµφανίζεται η
έχει αποµείνει για το spy electrical gun.
τον εναποµείναντα χρόνο για να απενεργοποιηθεί
ενέργεια που σας
Page 18 de 28
Page 87

6. Status Messages: Εδώ εµφανίζονται µηνύµατα όταν σας εντοπίσουν η όταν
χρειάζεται να ενηµερωθείτε για ειδικές περιστάσεις (παρουσία spy bullet η alarm snare).
7. Interaction Menu: Αυτή η ένδειξη εµφανίζει τα πράγµατα που µπορείτε να κάνετε σε
ένα αντικείµενο (στην εικόνα για παράδειγµα, pick up, δηλαδή να το σηκώσετε).
8. Game Info Screen: Αυτή
του παιχνιδιού (στόχοι που έχουν επιτευχθεί, ενεργοποίηση συναγερµού, παίκτες που
έχουν σκοτωθεί, κτλ.).
9. Life Bar: Εδώ εµφανίζεται το υπόλοιπο της ενέργειας του παίκτη.
10. Current Gadget: Εδώ εµφανίζεται το gadget που χρησιµοποιείτε στην παρούσα
χρονική στιγµή, το
εικόνα για παράδειγµα, ο παίκτης έχει 3 Spy bullets).
11. Enhanced Reality: Εδώ εµφανίζονται οι πληροφορίες για την τοποθεσία του ND133,
την απόσταση ανάµεσα στον παίκτη και το ND133 και την τρέχουσα κατάσταση.
όνοµά του και ο αριθµός των gadgets που είναι διαθέσιµος (στην
η ένδειξη χρησιµοποιείται για να εµφανίσει όλα τα µηνύµατα
Οθόνη Παιχνιδιού Οµάδας ARGUS
2
8 και 9
1
4
5
2
7
10
12
11
6
3
1. System Info: Εδώ εµφανίζονται πληροφορίες που αφορούν στον εξοπλισµό σας.
2. Status message: Εδώ εµφανίζονται εντολές και µηνύµατα ειδοποίησης, που
αναφέρουν το όνοµα και την θέση των συναγερµών που έχουν ενεργοποιηθεί. Το
Page 19 de 28
Page 88

ποσοστό ολοκλήρωσης της αποστολής σας, καθώς και η κατάσταση ορισµένων
εξειδικευµένων συσκευών εµφανίζεται εδώ.
3. Game Info Screen: Εδώ εµφανίζονται όλα τα µηνύµατα του παιχνιδιού (παίκτες που
έχουν σκοτωθεί, κτλ). Τα µηνύµατα εµφανίζονται µε οριζόντια κύλιση.
4. Life Bar: Εδώ εµφανίζεται το υπόλοιπο της ενέργειας
5. Ammunition Indicator: Εδώ εµφανίζονται τα πυροµαχικά του παίκτη. Ο αριθµός στα
αριστερά εµφανίζει τον αριθµό των πυροµαχικών που έχουν αποµείνει στον γεµιστήρα. Ο
αριθµός στα δεξιά αναπαριστά τον συνολικό αριθµό που έχουν αποµείνει.
6. Current Gadget: Εδώ εµφανίζεται
χρονική στιγµή, το όνοµά του και ο αριθµός των gadgets που είναι διαθέσιµος.
7. Tactical Radar: Αυτό το ραντάρ εµφανίζει την τοποθεσία των υπόλοιπων µελών της
οµάδας, τους ενεργοποιηµένους συναγερµούς, τους εχθρούς που έχουν εντοπιστεί κτλ.
(εµφανίζονται µόνο
8 Time Remaining in the Game: Εµφανίζει τον εναποµείναντα χρόνο µέχρι το τέλος
της αποστολής.
9. ND133 Counter: Εµφανίζει τον αριθµό των στόχων που έχουν αποµείνει για να
κερδίσετε το παιχνίδι και τον αριθµό αυτών που έχουν επιτευχθεί.
10. ND133 Capture Timer: Εµφανίζει τον εναποµείναντα χρόνο για να απενεργοποιηθεί
ένα ND133 από την οµάδα Shadownet.
11. Interaction Menu: Αυτή η ένδειξη εµφανίζει τα πράγµατα που µπορείτε να κάνετε
σε ένα αντικείµενο (στην εικόνα, υπάρχει ένας διακόπτης).
12. Enhanced Reality: Εδώ εµφανίζονται οι πληροφορίες για την τοποθεσία του ND133,
την απόσταση ανάµεσα στον παίκτη και το ND133 και την τρέχουσα κατάσταση. Ακόµ
σας ενηµερώνει για το ποσοστό hacking που έχει γίνει στο ND133.
13. Reticule: O στόχος σας. Μικρά βέλη γύρω του σας δείχνουν την τοποθεσία. Τα βέλη
µέσα στον στόχο σας, σας ειδοποιούν για την απόσταση των ήχων που έρχονται από τον
στόχο σας.
όταν χρειάζεται).
το gadget που χρησιµοποιείτε στην παρούσα
του παίκτη..
α,
Ικανότητες Χαρακτήρα
Ικανότητες Μελών Οµάδας Shadownet
Βασικές Ικανότητες
Αθόρυβη Κίνηση, Περπάτηµα και Τρέξιµο
Σκύψιµο
Η εντολή CROUCH κάνει τον χαρακτήρα να σκύβει. Αυτή η µέθοδος είναι αρκετά καλή για
να πλησιάσετε αθόρυβα και αργά τον στόχο σας.
Άλµα
Πατώντας το πλήκτρο JUMP θα κάνετε τον χαρακτήρα σας να πηδήξει κατακόρυφα στον
αέρα. Πατώντας το
πηδήξει προς τα µπροστά. Αν πατήσετε το πλήκτρο CROUCH κατά την διάρκεια της
πτώσης (η κατά την διάρκεια της προσγείωσης), θα κάνετε µια αθόρυβη προσγείωση. Κάτι
πλήκτρο JUMP την ώρα που ο χαρακτήρας σας τρέχει, θα τον κάνει να
Page 20 de 28
Page 89

τέτοιο είναι αρκετά χρήσιµο, ιδιαίτερα αν δεν θέλετε να σας εντοπίσουν. Αν προσγειωθείτε
πάνω σε έναν αντίπαλο, θα τον εξοντώσετε.
Wall Jump
Μετά από ένα άλµα, υπάρχει η δυνατότητα να πατήσετε σε έναν τοίχο. Για να το κάνετε
αυτό, κινηθείτε προς τον τοίχο και πατήστε το πλήκτρο
από την διαρρύθµιση του χώρου:
• Αν είναι δυνατόν να σταθείτε λίγο ψηλότερα στον τοίχο, ο χαρακτήρας σας θα
πατήσει στον τοίχο και θα πάρει φόρα για να φτάσει πιο ψηλά.
• Αν δεν είναι δυνατόν να σταθείτε λίγο ψηλότερα στον τοίχο, ο χαρακτήρας θα
πατήσει
Πυροβολισµός
Για να πάρετε ένα όπλο στα χέρια, πατήστε το πλήκτρο WEAPON MODE. Για να
πυροβολήσετε, πατήστε το πλήκτρο PRIMARY FIRE. Σε περίπτωση που χρησιµοποιείτε την
προοπτική δευτέρου προσώπου µε το όπλο στο χέρι, δεν θα µπορείτε να πηδήξετε.
Ωστόσο, µπορείτε να αλληλεπιδράσετε µε το
Για να βρείτε από αυτό το mode, πατήστε το πλήκτρο WEAPON MODE.
Χρησιµοποιώντας ένα Gadget
Για να χρησιµοποιήστε ένα από τα gadgets σας, πρέπει να έχετε ένα όπλο στα χέρια σας.
Για να χρησιµοποιήσετε το gadget, πατήστε το πλήκτρο SECONDARY FIRE. Μερικά
Gadgets µπορούν να χρησιµοποιηθούν γρήγορα. Η σωστή
κοµµάτι “Quick Inventory”.
Αλληλεπίδραση
Μπορείτε να αλληλεπιδράσετε µε διάφορα αντικείµενα στο περιβάλλον πατώντας το
πλήκτρο ACTION. Αυτές οι κινήσεις περιλαµβάνουν: άναµµα και σβήσιµο διακοπτών,
χρήση ανελκυστήρων, σήκωµα αντικειµένων από το έδαφος κτλ.
στον τοίχο και θα πάρει φόρα.
περιβάλλον, πατώντας το πλήκτρο ACTION.
JUMP. Το αποτέλεσµα εξαρτάται
διαδικασία περιγράφεται στο
Ειδικές Ικανότητες
Page 21 de 28
Page 90

Κρέµασµα
Πατήστε FORWARD η JUMP για να κάνετε τον χαρακτήρα σας να κρεµαστεί από µια άκρη. Πατήστε
BACKWARD η το πλήκτρο JUMP για να τον αφήσετε να πέσει. Πατώντας αριστερά και δεξιά κατά
την διάρκεια που ο χαρακτήρας είναι κρεµασµένος, θα τον κάνετε να κινηθεί
προς µια κατεύθυνση της
εξοχής.
Σκαρφάλωµα µε όλους τους τρόπους
Αν αντιµετωπίσετε δυσκολία µε ένα αντικείµενο, στο οποίο δεν µπορείτε να σκαρφαλώσετε, αλλά
συναντήσετε ένα το οποίο µπορείτε, πατήστε το πλήκτρο JUMP για να ξεκινήσει ο χαρακτήρας να
κάνει ένα άλµα και να σκαρφαλώσει.
Σκαρφάλωµα
σε Φράχτη
Μπορείτε να ξεκινήσετε το σκαρφάλωµα είτε περπατώντας προς είτε πηδώντας προς ένα
φράχτη (η οποιαδήποτε παρόµοια τοποθεσία). Πατώντας FORWARD η BACKWARD θα
κάνετε τον χαρακτήρα να κινείται ανοδικά η καθοδικά, ενώ τα LEFT και RIGHT θα τον
κάνετε να κινείτε προς κάποια κατεύθυνση. Για να αφήσετε τον φράχτη,
πατήστε το
JUMP. Αν φτάσετε στο πάνω µέρος µιας επιφάνειας, ο χαρακτήρας σας θα σκαρφαλώσει
αυτόµατα αν συνεχίσετε να πατάτε το πλήκτρο forward. Αν σκαρφαλώνετε σε έναν τοίχο
και φτάσετε στο πάνω µέρος, αν συνεχίσετε να πατάτε forward ο πρωταγωνιστής θα
περάσει από πάνω του και θα κατέβει.
Κρέµασµα
Τοποθετήστε τον εαυτό σας κάτω από µια σωλήνα και πατήστε το πλήκτρο JUMP. Ενώ
κρέµεστε, µπορείτε να κινηθείτε κατά µήκος της σωλήνας πατώντας FORWARD και
BACKWARD. Πατήστε το JUMP για να κάνετε τον χαρακτήρα σας να τυλίξει τα πόδια του
γύρω από την σωλήνα (πατήστε το JUMP ξανά για να
τον κάνετε να τα αφήσει).
Πατώντας το CROUCH ο χαρακτήρας σας θα αφήσει την σωλήνα.
Μπορείτε να κρεµαστείτε µε το ένα χέρι και να πυροβολήσετε αν σταµατήσετε να κινείστε
και πατήσετε το WEAPON MODE. Αν έχετε τα πόδια σας πάνω στην σωλήνα και πάρετε
το όπλο τα χέρια σας
, θα καταλήξετε να κρέµεστε από τα πόδια µε το όπλο στα χέρια.
Πατήστε µια φορά το WEAPON MODE για να επιστρέψετε στην αρχική θέση. Ωστόσο, αν
πατήσετε CROUCH ενώ κρέµεστε µε τα πόδια σας, θα κάνετε µια τούµπα και θα
προσγειωθείτε στο έδαφος.
Σκαρφάλωµα Σκάλας και Κάθετης
Σωλήνας
Ο χαρακτήρας σας µπορεί να σκαρφαλώνει σωλήνες και σκάλες. Πηγαίνετε πάνω στην
σωλήνα η την σκάλα (η πηδήξτε πάνω τους µε το πλήκτρο JUMP) για να πιαστείτε.
Πατήστε FORWARD και BACKWARD για να κάνετε τον χαρακτήρα να σκαρφαλώσει η να
αρχίσει να κατεβαίνει. Αν πατήσετε το πλήκτρο ACTION ενώ πατάτε
BACKWARD, ο
χαρακτήρας σας θα γλιστρήσει προς τα κάτω. Αν σταµατήσετε να πατάτε BACKWARD, ο
χαρακτήρας θα σταµατήσει να γλιστράει. Πατήστε το πλήκτρο CROUCH για να κάνετε
άλµα προς τα πίσω.
Σύρµατα και Σχοινιά
Μπορείτε να κρεµαστείτε και να γλιστρήσετε σε ένα τεντωµένο σύρµ
α η σχοινί. Για να
χρησιµοποιήσετε αυτή την µέθοδο κίνηση, σταθείτε κάτω από το σύρµα η το σχοινί και
πατήστε το πλήκτρο JUMP. Μπορείτε να επιταχύνετε πατώντας FORWARD. Μόλις πιάσετε
την επιθυµητή ταχύτητα, ο χαρακτήρας θα σηκώσει τα πόδια του. Πατώντας BACKWARD,
µπορείτε να σταµατήσετε την
κάθοδο. Μπορείτε να αφήσετε το σχοινί πατώντας το
πλήκτρο CROUCH.
Split Jump
Μπορείτε να σταθείτε ανάµεσα σε δύο τοίχους. Για να το κάνετε αυτό, σταθείτε ανάµεσα
στους δύο τοίχους, πιο κοντά στον ένα από τους δύο, και πατήστε το πλήκτρο JUMP.
Όταν βρεθείτε στον αέρα, πατήστε δεύτερη φορά το πλήκτρο
JUMP για να πατήσετε µε τα
πόδια στους τοίχους. Ο χαρακτήρας σας θα σταθεί µε ανοιχτά τα πόδια στους δύο τοίχους.
Από αυτή τη θέση µπορείτε να κάνετε τα ακόλουθα:
Page 22 de 28
Page 91

• Να βγάλετε το όπλο σας και να πυροβολήσετε.
• Να πέσετε κάτω πατώντας το πλήκτρο CROUCH.
• Να χρησιµοποιήσετε τα διαθέσιµα Gadgets από το Inventory σας, πατώντας το
πλήκτρο SECONDARY FIRE.
Η πλάτη στον Τοίχο
Για να βάλετε την πλάτη σας στον τοίχο, κινηθείτε προς έναν τοίχο και πατήστε το
πλήκτρο ACTION. Για να κινηθείτε πατήστε τα LEFT και RIGHT. Πατήστε το CROUCH
για να σκύψετε. Για να φύγετε από αυτή την θέση, έχετε δύο επιλογές:
• Πατήστε το πλήκτρο ACTION ξανά.
• Πάρτε το όπλο σας στα χέρια.
Αν κινείστε προς µια γωνία ενός τοίχο και συνεχίσετε να πατάτε
χαρακτήρας σας θα µπει αυτόµατα σε SNEAK mode (θα στρίψει το κεφάλι του για να δει τι
γίνεται µετά την γωνία). Από αυτή την θέση, µπορείτε να σκοπεύσετε χειροκίνητα και να
πάρετε το όπλο σας πατώντας το WEAPON MODE. Πυροβολήστε πατώντας το πλήκτρο
PRIMARY FIRE, χρησιµοποιήστε ένα gadget πατώντας το
Πατήστε το πλήκτρο WEAPON MODE για να αφήσετε το όπλο σας.
Τούµπα
Μπορείτε να κάνετε τούµπα. Για να κάνετε τον χαρακτήρα σας να κάνει τούµπα, πατήστε
µια φορά ένα από τα πλήκτρα MOVE και µετά το ROLL. Η διάρκεια της τούµπα εξαρτάται
από την ταχύτητά
Το πιάσιµο
Μπορείτε να πάτε πίσω από έναν αντίπαλό σας και να πιαστείτε πάνω του. Για να το
κάνετε αυτό, τοποθετήστε τον χαρακτήρα σας πίσω από έναν εχθρό και πατήστε το
ACTION. Από αυτή την θέση µπορείτε:
• Να κινηθείτε προς το µέρος του µε τον ίδιο τρόπο.
• Να του σπάσετε τον λαιµό πατώντας το πλήκτρο ACTION.
• Να τον χτυπήσετε µε τον αγκώνα σας πατώντας το πλήκτρο PRIMARY FIRE. Ο
αντίπαλός σας θα βγει εκτός µάχης προσωρινά. Λίγο αργότερα θα ξαναβρεί τις
αισθήσεις του.
Ασχέτως περίπτωσης, µπορείτε να κρατήσετε αιχµάλωτο έναν αντίπαλο για περιορισµένο
χρονικό
θα πεθάνει.
Η «Αγκωνιά»
Μπορείτε να χτυπήσετε τους αντιπάλους σας µε τον αγκώνα έτσι ώστε να τους
ακινητοποιήσετε προσωρινά η να τους αφήσετε αναίσθητους. Για να πετύχετε το χτύπηµα
µε τον αγκώνα πρέπει
PRIMARY FIRE. Αν δεν βρίσκεστε ακριβώς πίσω η απέναντι από τον αντίπαλο, απλά θα
τον χτυπήσετε και θα πέσει κάτω.
διάστηµα. Από αυτό το διάστηµα και µετά, ο «αιχµάλωτος» θα πάθει ασφυξία και
σας.
να έρθετε σε επαφή µε τον εχθρό και να πατήσετε το πλήκτρο
πλήκτρο SECONDARY FIRE.
την κατεύθυνση αυτή, ο
Ικανότητες Μελών Οµάδας ARGUS
Βασικές Ικανότητες
Αθόρυβη Κίνηση, Περπάτηµα και Τρέξιµο
Μπορείτε να αλλάξετε την ταχύτητα του χαρακτήρα σας κινώντας το wheel (ρόδα) του
mouse προς τα πάνω η προς τα κάτω.
Σκύψιµο
Η εντολή CROUCH κάνει τον χαρακτήρα να σκύβει.
Page 23 de 28
Page 92

Άλµα
Πατώντας το πλήκτρο JUMP θα κάνετε τον χαρακτήρα σας να πηδήξει κατακόρυφα στον
αέρα. Πατώντας το πλήκτρο JUMP την ώρα που ο χαρακτήρας σας τρέχει, θα τον κάνει να
πηδήξει προς τα µπροστά.
Πυροβολισµός
Σκοπεύστε µε τον στόχο που φαίνεται στην οθόνη σας. Για να
πλήκτρο PRIMARY FIRE. Μπορείτε να αλλάξετε το shooting mode κρατώντας πατηµένο
το WEAPON MODE:
• BURST: Ρίχνετε 3 σφαίρες κάθε φορά που πατάτε το πλήκτρο PRIMARY FIRE.
• FULL-AUTO: Ρίχνετε συνεχόµενα όσο κρατάτε πατηµένο το πλήκτρο PRIMARY FIRE.
Το τρέχον shooting mode εµφανίζεται µε ένα εικονίδιο στο όπλο σας.
Γέµισµα
Μπορείτε να
γέµισµα γίνεται αυτόµατα ότι δεν υπάρχουν άλλες σφαίρες στον γεµιστήρα που
χρησιµοποιείτε.
Χρησιµοποιώντας ένα Gadget
Για να χρησιµοποιήσετε το gadget, πατήστε το πλήκτρο SECONDARY FIRE. Μερικά
Αλληλεπίδραση
Μπορείτε να αλληλεπιδράσετε µε διάφορα αντικείµενα
πλήκτρο ACTION. Αυτές οι κινήσεις περιλαµβάνουν: άναµµα και σβήσιµο διακοπτών,
χρήση ανελκυστήρων, σήκωµα αντικειµένων από το έδαφος κτλ.
γεµίσετε χειροκίνητα το όπλο σας πατώντας το πλήκτρο RELOAD. Το
πυροβολήσετε, πατήστε το
στο περιβάλλον πατώντας το
Ειδικές Ικανότητες
Ματιά στο Σκοτάδι
Αυτή η ικανότητα είναι µια έκδοση ενός φυσικού φαινοµένου: όταν µπαίνετε σε ένα πολύ
σκοτεινό δωµάτιο, είναι αδύνατον να διακρίνετε αντικείµενα. Μετά από λίγα
δευτερόλεπτα, η κόρη των µατιών σας διαστέλλεται κι έτσι µπορείτε να δείτε καλύτερα
µέσα στο σκοτάδι.
Χτύπηµα µε
Μπορείτε να χτυπήσετε τον αντίπαλό σας µε ένα όπλο αν τον πετύχετε από πίσω και από
κοντινή απόσταση, πατώντας το πλήκτρο ACTION.
Όπλο
Page 24 de 28
Page 93

Οπλοστάσιο
Όπλα
Για να πυροβολήσετε, πρέπει να κρατάτε το όπλο στα χέρια σας. Ενώ το κρατάτε, πατήστε
το πλήκτρο PRIMARY FIRE για να πυροβολήσετε. Το όπλο σας έχει και δευτερεύουσα
λειτουργία που του επιτρέπει να ρίχνει Smoke Grenades (βόµβες καπνού) και Sticky
Cameras, όπως και άλλα αντικείµενα (η λίστα των αντικειµένων αναφέρεται στο κο
“Gadgets των µελών της οµάδας Shadownet”).
Τα µέλη της οµάδας ARGUS έχουν ένα ειδικό όπλο. Αυτό, λειτουργεί µε βλήµατα υπερυψηλής ταχύτητας. Γι’ αυτό έχει δύο shooting modes, τα BURST και FULL-AUTO. Έχετε 5
γεµιστήρες µε 30 σφαίρες στον καθένα. Μπορείτε να γεµίσετε το όπλο σας πατώντας το
πλήκτρο RELOAD. Αν βρείτε
στολής σας. Το όπλο σας έχει και δευτερεύουσα λειτουργία, που σας επιτρέπει να ρίχνετε
Fragmentation Grenades και Flares, καθώς και διάφορα άλλα πράγµατα.
πυροµαχικά, µπορείτε να γεµίσετε τις πλαϊνές θέσεις της
µµάτι
Τα Gadgets
Gadgets των µελών της οµάδας Shadownet
Page 25 de 28
Page 94

Εικονική Πραγµατικότητα
Αυτή η λειτουργία θυµίζει έντονα τα οπλικά συστήµατα του στρατού. Σας επιτρέπει να
εντοπίσετε ένα ND133 και σας παρέχει µια δισδιάστατη αναπαράσταση της τοποθεσίας
του, της κατάστασής του και της απόστασης από εσάς. Μπορείτε να ενεργοποιήσετε και να
απενεργοποιήσετε αυτή την λειτουργία πατώντας το πλήκτρο ENHANCED REALITY.
Night Vision Goggles
Τα Night Vision Goggles ενισχύουν το φως του περιβάλλοντος την νύχτα, έτσι ώστε να
µπορείτε να έχετε καλύτερη οπτική επαφή. Για να χρησιµοποιήσετε τα Night Vision,
πατήσετε το πλήκτρο NIGHTVISION.
Thermal Vision Goggles
Τα Thermal Vision Goggles είναι παρόµοια µε τα Night Vision Goggles, µε την διαφορά ότι
αντί για το φως της νύχτας χρησιµοποιούν σαν αντικείµενο ανίχνευσης
Αυτό το είδος οπτικής εµφανίζει τις πηγές θερµοκρασίας µε κόκκινο στην οθόνη.
Θυµηθείτε ότι η ακτίνα δράσης των goggles είναι περιορισµένη. Για να χρησιµοποιήσετε τα
Thermal Vision Goggles, πατήστε το πλήκτρο THERMAL.
Κιάλια
Αυτό το εργαλείο µπορεί να χρησιµοποιηθεί ανά πάσα χρονική στιγµή και
λεπτοµερή εικόνα από µεγάλες αποστάσεις. Μπορείτε να κάνετε zoom in και zoom out
χρησιµοποιώντας τα ZOOM IN και ZOOM OUT. Μπορείτε επίσης να χρησιµοποιήσετε τα
Thermal Vision η Night Vision, η να εντοπίσετε το ND133 πολύ πιο εύκολα. Για να
χρησιµοποιήσετε τα κιάλια, πατήστε το πλήκτρο BINOCULARS.
Σηµείωση: Όταν κοιτάτε κάποιο άτοµο µε τα
συζητήσεις που κάνει.
Τα ακόλουθα gadgets µπορούν να λειτουργήσουν µε τον ίδιο τρόπο: επιλέξτε το από το
inventory, έπειτα πάρτε το όπλο στα χέρια σας, σκοπεύστε και ενεργοποιήστε το gadget,
πατώντας το πλήκτρο SECONDARY FIRE.
Page 26 de 28
κιάλια, µπορείτε να ακούσετε και τις
την θερµοκρασία.
παρέχει
Page 95

Spy Bullets - Sticky Cameras - Chaff Grenade - Noise Emitter - Flashbang
Grenade - Smoke Grenade – Για περισσότερες πληροφορίες, παρακαλούµε να
ανατρέξετε στο αγγλικό εγχειρίδιο οδηγιών.
Gadgets των µελών της οµάδαςARGUS
Εικονική Πραγµατικότητα
Flashlight: Πατήστε το πλήκτρο TORCH LIGHT.
Laser sight : Πατήστε το πλήκτρο LASER
EMF (Electro Magnetic Field) Vision
.
Με την EMF Vision, µπορείτε να ανακαλύψετε οποιαδήποτε παρεµβολή προκαλείται από
ηλεκτρονική συσκευή. Για να ενεργοποιήσετε την EMF Vision, πατήστε το πλήκτρο EMF.
Motion Vision
Με την Motion Vision, µπορείτε να «αποκαλύψετε» αναταραχές στον αέρα που
προκαλούνται από κατασκόπους η αντικείµενα που κινούνται. Για να ενεργοποιήσετε την
Motion Vision, πατήστε το πλήκτρο MOVEMENT.
Κιάλια σε Snipe Mode
.
Οι µισθοφόροι έχουν ειδικά κιάλια που επιτρέπουν το zoom (σε 3 επίπεδα µε µεγέθυνση
x2, x4 και x6) και τον πυροβολισµό (µόνο σε Single Shot mode). Για να µπείτε σε αυτό το
mode, πατήστε το πλήκτρο SNIPE. Μπορείτε να αλλάξετε το zoom mode µε τα ZOOM IN
και ZOOM OUT. Για να κρατήσετε την αναπνοή σας, κάτι που σας δίνει µεγαλύτερη
ευκολία
στην σκόπευση, κρατήστε πατηµένο το πλήκτρο BREATH. Μπορείτε να κρατήσετε
την ανάσα σας µόνο όσο η ειδική µπάρα δεν είναι άδεια (η µπάρα βρίσκεται στα αριστερά
στο zoomed vision mode).
Σηµείωση: Όταν σκοπεύετε κάποιον µε snipe binoculars, δεν µπορείτε να υποκλέψετε τις
συνοµιλίες του.
Page 27 de 28
Page 96

Νάρκες
Έχετε στην κατοχή σας µια νάρκη που ενεργοποιείται µε αναγνώριση (ενεργοποιείται όταν
ανακαλύψει κατάσκοπο). Για να τοποθετήσετε µια νάρκη, πηγαίνετε µπροστά από ένα
τοίχο και πατήστε το πλήκτρο SECONDARY FIRE. Αν πατήσετε το πλήκτρο ελαφριά, θα
τοποθετήσετε µια PROXIMITY MINE. Ωστόσο, αν κρατήσετε το SECONDARY FIRE
πατηµένο, θα εµφανιστεί ένα menu, απ’ όπου µπορείτε
να επιλέξετε την νάρκη που θέλετε
να τοποθετήσετε (κάντε την επιλογή σας χρησιµοποιώντας τα FORWARD και
BACKWARD). Αφήστε το SECONDARY FIRE για να τοποθετήσετε την νάρκη. Μπορείτε
να αφαιρέσετε µια νάρκη που έχει ήδη τοποθετηθεί (µπορείτε να πάρετε την νάρκη µαζί
σας αν δεν έχετε πάνω σας τον ανώτατο αριθµ
ό που µπορείτε να κουβαλήσετε)
πηγαίνοντας δίπλα της και πατώντας το πλήκτρο ACTION.
Spy Trap (Παγίδα Κατασκόπου)
Αυτή η συσκευή είναι συσκευή εντοπισµού. Τοποθετείται σε τοίχο, όπως ακριβώς και οι
νάρκες. Επιλέξτε την από το inventory σας, τοποθετήστε τον εαυτό σας µε το πρόσωπο
προς έναν τοίχο και πατήστε το πλήκτρο ACTION. Μπορείτε να ακούσετε έναν εχθρό να
εξοντώνεται από µια Spy Trap. Η θέση του χτυπηµένου αντιπάλου θα
εµφανιστεί και στο
ραντάρ της οµάδας σας.
Tazer
Πατήστε το πλήκτρο SECONDARY FIRE.
Τα ακόλουθα gadgets µπορούν να λειτουργήσουν µε τον ίδιο τρόπο: επιλέξτε τα από το
inventory σας, πάρτε τα στα χέρια σας, σκοπεύστε και εκτοξεύστε τα πατώντας το
πλήκτρο SECONDARY FIRE : Flares - Fragmentation Grenade - Phosphorescent
grenade: Για περισσότερες πληροφορίες, παρακαλούµε ανατρέξατε στο αγγλικό
εγχειρίδιο οδηγιών.
Τα Επίπεδα του Παιχνιδιού
Υπάρχουν διάφορα είδη περιβάλλοντος και είναι όλα interactive. Αυτό αποτελεί ένα ακόµα
στοιχείο τελειότητας του παιχνιδιού, που επηρεάζει και τις δύο οµάδες.
Παθητική Άµυνα
Μηχανισµοί µε σκανδάλες είναι τοποθετηµένοι σε όλη την πίστα (ανιχνευτές κίνησης,
κάµερες παρακολούθησης, lasers, κτλ.). Αν ένας εισβολέας ενεργοποιήσει κάποιον από
αυτούς τους µηχανισµούς, είτε θα ενεργοποιήσει έναν συναγερµό που προδίδει την θέση
του η την ζώνη στην οποία βρίσκεται. Και στις δύο περιπτώσεις, η θέση
Αυτοί οι µηχανισµοί µπορούν να εντοπιστούν από εσάς µε τα Thermal Vision Goggles. ∆εν
µπορείτε να τους καταστρέψετε, αλλά µπορείτε να τους αδρανοποιήσετε προσωρινά
χρησιµοποιώντας είτε Sticky Shocker είτε Chaff Grenade. Οποιοδήποτε αντικείµενο
αδρανοποιηθεί µε κάποιον από τους παραπάνω τρόπους, περικυκλώνεται από ηλεκτρικά
κύµατα και βγάζει καπνό.
του προδίδεται.
Page 28 de 28
Page 97

Tom Clancy’s Splinter Cell®
Pandora Tomorrow
Manual do Utilizador para PC
Página 1 de 27
Page 98

Índice
MENU PRINCIPAL...................................................................................................................
JOGADOR INDIVIDUAL .........................................................................................................
INTRODUÇÃO.....................................................................................................3
MENU..................................................................................................................3
ECRÃ DO JOGO.......................................................................................................4
MENU DO JOGO…………………………………………………………………………………………………… 5
OPSAT (OPERATIONAL SATELLITE UPLINK - LIGAÇÃO OPERACIONAL AO SATÉLITE)……………….. 5
ACÇÕES E MOVIMENTOS DO SAM .................................................................................6
ARMAS, DISPOSITIVOS, ITENS E ELEMENTOS DO JOGO.......................................................9
MULTIPLAYER MODE (MODO MULTIJOGADOR) ................................................................ 11
PRESSUPOSTO DO JOGO .......................................................................................... 11
OS DIFERENTES MODOS DE JOGO ............................................................................... 11
CONTROLOS ........................................................................................................ 11
ARRANQUE RÁPIDO................................................................................................13
MENUS .............................................................................................................. 13
ECRÃS DO JOGO ................................................................................................... 17
CAPACIDADES DAS PERSONAGENS .............................................................................. 20
ARSENAL ............................................................................................................ 24
OS NÍVEIS DO JOGO............................................................................................... 27
Página 2 de 27
Page 99

INTRODUÇÃO
Instalação
Para instalar o Splinter Cell, execute os passos a seguir indicados:
1. Ligue o computador
2. Introduza o CD de instalação do Splinter Cell na unidade de CD-ROM. É
apresentado o Autorun Menu (Execução automática).
Nota: Se o Autorun Menu (Execução automática) for apresentado automaticamente,
faça duplo clique no ícone O meu computador, no ambiente de trabalho e, em
seguida, faça duplo clique no ícone correspondente à unidade de CD-ROM do seu
computador. O Autorun Menu (Execução automática) deverá agora ser apresentado.
3. Faça clique no botão Install Splinter Cell (Instalar Splinter Cell). O assistente de
instalação guiá-lo-á através do processo de instalação e configuração do jogo. Uma
vez criado um directório Splinter Cell, o jogo é instalado na unidade de disco rígido.
O jogo solicita automaticamente ao utilizador que indique se pretende instalar o
DirectX v9.0. Não poderá jogar o Splinter Cell, se não tiver o DirectX v8.1 ou
posterior instalado no computador. Se já tiver o DirectX v8.1 ou posterior instalado,
terá apenas de activar o botão No (Não), para que o DirectX não seja instalado. Se
não tiver a certeza, faça clique em Yes (Sim), para que o programa de instalação do
DirectX execute uma auto-verificação.
4. Uma vez instalado o jogo, seleccione “Ubisoft: Splinter Cell Pandora Tomorrow:
Play Splinter Cell Pandora Tomorrow” (Ubisoft: Splinter Cell Pandora Tomorrow:
Jogar Splinter Cell Pandora Tomorrow), no menu Iniciar do seu computador ou faça
duplo clique no atalho “Play Splinter Cell Pandora Tomorrow” (Jogar Splinter Cell
Pandora Tomorrow) no ambiente de trabalho. Ambos os procedimentos iniciam o
jogo.
Nota: O CD Splinter Cell Pandora Tomorrow Play tem de estar introduzido na
unidade de CD-ROM para que o jogo seja iniciado.
Desinstalar/Reinstalar o jogo
Para desinstalar o Splinter Cell Pandora Tomorrow, execute os seguintes passos:
1. Ligue o computador
2. Introduza um dos CDs Splinter Cell Pandora Tomorrow na unidade de CD-ROM. É
apresentado o Autorun Menu (Execução automática).
3. No menu apresentado, faça clique no botão Uninstall Splinter Cell (Desinstalar
Splinter Cell). O assistente de desinstalação pede que confirme se tem a certeza de
que pretende desinstalar o jogo. Se tiver a certeza de que pretende remover o
Splinter Cell Pandora Tomorrow da unidade de disco rígido, faça clique no botão Yes
(Sim). Se não pretender desinstalar o jogo, faça clique em No (Não), para cancelar o
processo. Se desinstalar o Splinter Cell, todos os jogos anteriormente guardados
permanecerão na unidade de disco rígido, excepto se responder Yes (Sim) à
pergunta “Delete all configuration and saved games files” (Eliminar todos os ficheiros
de configuração e de jogos guardados).
Página 3 de 27
Page 100

Nota: Pode igualmente desinstalar o Splinter Cell Pandora Tomorrow utilizando o
painel de controlo Adicionar/remover programas do Windows.
MAIN MENU
O ecrã Startup (Arranque) inicial apresenta as seguintes três opções de menu:
• Single Player (Jogador individual): Permite jogar a nova aventura de Sam
Fisher
• Multiplayer (Multijogador): Permite jogar uma sessão multijogador).
• Extras Features (Funções adicionais): Permite visualizar alguns vídeos.
Os dois jogos são diferentes. Por este motivo, encontrará neste manual uma secção
específica para cada um dos modos de jogo.
ECRÃ DO JOGO
1 Life Bar (Barra de vitalidade): Representa o estado de vitalidade/saúde do
Sam.
2 Stealth Meter (Medidor de visibilidade): O indicador desloca-se para a
esquerda e para a direita para representar o nível de visibilidade na área onde
Sam se encontra.
3 Interaction System (Sistema de interacção): Este sistema é apresentado
quando é possível ao jogador interagir com um objecto ou pessoa existente no
ambiente.
4 Objective (Objectivo): Apresenta o objectivo seguinte da missão.
5 Selected Weapon, Gadget, or Item (Arma, Dispositivo ou Item
seleccionado): Apresenta a selecção actual.
6 Communication Box (Caixa de comunicações): É apresentada na parte
superior do ecrã quando o jogador recebe uma comunicação.
7 OPSAT: Quando é apresentado um pequeno envelope intermitente sobre o símbolo OPSAT
(Operational Satellite Uplink - Ligação Operacional ao Satélite), significa que está disponível um
novo objectivo ou uma nova mensagem. Prima F1 para abrir e ler a mensagem OPSAT.
8 Total Ammo. (Total de munições)
9 Ammo in One Magazine (Munições num paiol).
Página 4 de 27
 Loading...