


TABLE OF
CONTENTS
First Things First . . . . . . . . . . . . . . . . .3
The ReadMe File . . . . . . . . . . . . . . . . . . . . .3
Setup and Installation . . . . . . . . . . . . . . . . .4
Introduction . . . . . . . . . . . . . . . . . . . . . . . . .6
Using This Manual . . . . . . . . . . . . . . . . . . . .8
Menu and Interface Reference . . . . . .9
Launcher Screen . . . . . . . . . . . . . . . . . . . . .9
Saving and Loading . . . . . . . . . . . . . . . . . .10
Main Menu . . . . . . . . . . . . . . . . . . . . . . . . .10
Play Menu . . . . . . . . . . . . . . . . . . . . . . . . .11
Tools Menu . . . . . . . . . . . . . . . . . . . . . . . .12
Options . . . . . . . . . . . . . . . . . . . . . . . . . . .13
Career Menu . . . . . . . . . . . . . . . . . . . . . . .18
Common Interface Elements . . . . . . . . . .19
Dashboard . . . . . . . . . . . . . . . . . . . . . . . . .28
Maps . . . . . . . . . . . . . . . . . . . . . . . . . . . . . .29
View Options . . . . . . . . . . . . . . . . . . . . . |
.30 |
Files & Options . . . . . . . . . . . . . . . . . . . . . |
31 |
Park Administration . . . . . . . . . . . . . . . . . . |
31 |
Rides . . . . . . . . . . . . . . . . . . . . . . . . . . . . . |
41 |
Shops . . . . . . . . . . . . . . . . . . . . . . . . . . . . . |
42 |
Scenery . . . . . . . . . . . . . . . . . . . . . . . . . . . |
42 |
Paths . . . . . . . . . . . . . . . . . . . . . . . . . . . . . |
43 |
Terrain Tools . . . . . . . . . . . . . . . . . . . . . . . |
43 |
Demolish . . . . . . . . . . . . . . . . . . . . . . . . . . |
47 |
Control Panels . . . . . . . . . . . . . . . . . . . . . . |
48 |
Coaster Building Toolbox . . . . . . . . . . . . . |
61 |
Fireworks MixMaster™ . . . . . . . . . . . . . . . |
63 |
Peep Group Editor . . . . . . . . . . . . . . . . . . |
64 |
Scenario Editor . . . . . . . . . . . . . . . . . . . . . |
66 |
1

A Tycoon’s Guide To … . . . . . . . . . . .74
Managing A Park . . . . . . . . . . . . . . . |
. . . . .74 |
Becoming A Tycoon . . . . . . . . . . . . . . |
. . . .78 |
SharingYour Creations . . . . . . . . . . . |
. . . .81 |
Building a Roller Coaster . . . . . . . . . |
. . . .84 |
Creating Paths . . . . . . . . . . . . . . . . . . |
. . . .89 |
Managing Land and Shaping Terrain |
. . . . .92 |
Designing and Constructing Buildings . . .95 |
|
Awards for Park Appearance . . . . . . |
. . . .96 |
Creating Fireworks Shows . . . . . . . . |
. . . .96 |
PuttingYour Group in the Park . . . . |
. . . .98 |
CreateYour Own Scenarios . . . . . . . . . . .99
Sandbox Mode . . . . . . . . . . . . . . . . . . . . .100
About theVIPeeps . . . . . . . . . . . . . . . . . .100
Credits . . . . . . . . . . . . . . . . . . . . . . . . . . .102
Atari Web Sites . . . . . . . . . . . . . . . . . . . .105
Technical Support . . . . . . . . . . . . . . . . . .106
End-User License Agreement . . . . . . . . .108
Controls . . . . . . . . . . . . . . . . . . . . . .112
FIRST THINGS FIRST
THE README FILE
The RollerCoaster Tycoon® 3 CD-ROM game has a ReadMe file where you can view both the License Agreement and updated information about the game.We strongly encourage you to read this file in order to benefit from changes made after this manual went to print.
To view this file, double-click on it in the RollerCoaster Tycoon® 3 directory found on your hard drive (usually C:\Program Files\Atari\RollerCoaster Tycoon 3).You can also view the ReadMe file by first clicking on the Start button on your Windows® taskbar, then on Programs, then on Atari, then on RollerCoaster Tycoon® 3, and then on the ReadMe file.
System Requirements
Operating System |
Windows® 98/Me/2000/XP (Windows® XP recommended) |
Processor |
Pentium® III 733 MHz or compatible (Pentium® 4 1.3 GHz or |
|
compatible recommended) |
Memory |
128 MB RAM; 256 MB for XP (256 MB; 384 MB for |
|
XP recommended) |
Hard Disk Space |
600 MB Free |
CD–ROM Drive |
4X Speed or faster (8X Speed or faster recommended) |
Video |
32 MB or greater Hardware Transform & Lighting capable video |
|
card, including ATI Radeon™ or GeForce™ 2 or higher. |
|
(64 MB Hardware T&L capable video card recommended) |
Sound |
Windows® 98/Me/2000/XP-compatible 16-bit sound card |
|
(PC audio solution containing Dolby Digital Live required |
|
for Dolby Digital audio) |
DirectX® |
DirectX® version 9.0 (included) or higher |
If your PC does not meet the video hardware requirements above, this game will not run.
2 |
3 |

SETUP AND INSTALLATION
1.Start Windows® 98/Me/2000/XP.
2.Insert the RollerCoaster Tycoon® 3 CD–ROM game disc into your CD–ROM drive.
3.If AutoPlay is enabled, the RollerCoaster Tycoon® 3 launcher screen should appear. If AutoPlay is not enabled, or the installation does not start automatically, click on the Start button on your Windows® taskbar, then on Run.Type D:\StartMe.exe and click on OK. Note: If your CDROM drive is assigned to a letter other than D, substitute that letter.
4.On the RollerCoaster Tycoon® 3 launcher screen, click the Install RCT3 button and follow the on–screen instructions to finish installing the RollerCoaster Tycoon® 3 CD-ROM game.
5.After installing the game, we strongly recommend that you check for updates. Re-insert the
game disc into your CD-ROM drive and click on the Updates button on the launcher screen.
6.After RollerCoaster Tycoon® 3 is installed, you may launch the game either from the launcher screen by clicking Play RCT3, or by clicking on the Start button, then Programs > Atari > RollerCoaster Tycoon 3 > Play RollerCoaster Tycoon 3 (for XP users, click on the Start button, then on All Programs > Atari > RollerCoaster Tycoon 3 > Play RollerCoaster Tycoon 3).
7.Visit atari.com/rollercoastertycoon for the latest information about the game.
Note: You must have the RollerCoaster Tycoon® 3 game disc in your CD-ROM drive to play.
Installation of DirectX®
RollerCoaster Tycoon® 3 requires DirectX® 9.0 or higher in order to run. If you do not have DirectX® 9.0 or higher installed on your computer, click “Yes” to accept the DirectX® 9.0 License Agreement. This will then launch the DirectX® 9.0 Installer.
Microsoft Photo Story® 3
Microsoft Photo Story 3 for Windows lets you create fun and exciting video stories from your pictures. By using Photo Story 3, you can touch-up, add motion, effects, music, and more to your pictures and save them as a video story that you and others can watch in a media player that supports playback of Windows Media® Video (WMV) files, such as Windows Media Player 10.
Photo Story 3 is included with RollerCoaster Tycoon® 3 so you can share the screenshots and the peep photos you take in RollerCoaster Tycoon® 3 with your friends and family in a fun and
exciting way.
When you are installing RollerCoaster Tycoon® 3, the setup program will ask you if you want to install Photo Story 3.To install Photo Story 3 for Windows, click OK, and then follow the instructions on the screen. If Photo Story 3 for Windows is already installed on your computer, or if your computer is not running the Microsoft Windows XP operating system, the game setup program will skip this step.
Note: To install Microsoft Photo Story 3 for Windows, your computer must be running the Microsoft Windows XP operating system, and Windows Media Player 10 must be installed. For a complete list of system requirements, see the Microsoft Photo Story 3 for Windows Web site (www.microsoft.com/photostory).
Atari does not control, and disclaims any responsibility or liability for, the functioning and performance of thirdparty web sites and any content on or available through third-party web sites.
If you do not choose to install Photo Story 3 when you are first installing RollerCoaster Tycoon® 3, you can choose to install Photo Story 3 at any time by doing one of the following:
Click the Install Photo Story 3 button on the RollerCoaster Tycoon® 3 launcher screen.
Insert the RollerCoaster Tycoon® 3 CD in your CD-ROM drive. In Windows Explorer, locate the Photo Story 3 for Windows folder on the game CD-ROM, and then double-click the Photo Story 3 Setup file named PStory.msi file to begin installing Photo Story 3.
For complete information about using Photo Story 3, see Photo Story 3 for Windows Help.
4 |
5 |

INTRODUCTION
Welcome to RollerCoaster Tycoon® 3, the third installment of the world’s greatest tycoon game. RollerCoaster Tycoon® 3 is completely new and redesigned to take the series to all-new heights. Featuring incredible 3D graphics and the exclusive new CoasterCam™, you can now see your park from any angle and ride what you build. From street level to blimp, feel your park pulse with fun and excitement like never before.
If you’ve played RollerCoaster Tycoon® or RollerCoaster Tycoon® 2, you are in for a treat; all the features that made those games great are the foundation for RollerCoaster Tycoon® 3, including coaster construction, park creation, retail management, staff supervision, scenario design, ride exchange and more.
We’ve also designed RollerCoaster Tycoon® 3 to appeal to new players. More than ever, you can play RollerCoaster Tycoon® 3 any way you want; whether you want to drop down a few rides and shops to see how the peeps react, micromanage prices and wages, tinker with landscaping and park layout, or build and ride the most awesome roller coasters ever imagined.You can look forward to the following features in the game:
3D Camera Controls
Fluid camera movement, unrestricted zoom controls and 4 camera control pre-sets allow you to see your park from virtually any vantage point — from a wide angle shot of your whole park to extreme close-up on the expressions of the peeps.
Ride The Rides – CoasterCam™
With the new CoasterCam™ you can now ride any ride in your amusement park. Experience first hand the gut-wrenching white-knuckle spine-tingling blackout-inducing g-forces of loops, spirals and towering drops; or a gentle trip through the park on a monorail or chairlift; or the dizzying delights of the carousel and ferris wheel.
All New Peeps
Peeps (RollerCoaster Tycoon® park guests and employees) now come in many shapes, colors and sizes. Peeps also now appear in groups, such as families, couples or circle of friends. And occasionally, a VIPeep celebrity will show up to wow their fans.You can even customize the look of your peeps with the all new Peep Designer. Note: Peeps behave differently than in previous RCT games. For more details regarding peep behavior, see the FAQ section of the ReadMe file.
Day and Night
Things are different after the sun goes down –– the stars come out, the lights come on and the coasters get scary. At night the park needs to be teen-friendly, but during the day, your park needs to appeal to families.The challenge is finding a happy balance.
Improved Coaster Construction and Game Controls
RollerCoaster Tycoon® 3 offers new ease-of-use features, such as coaster construction auto–complete, and improved game controls including a new dashboard interface to maximize the information available to you while maintaining an unobstructed view of your amusement park.
Fireworks MixMaster™
Tantalize your guests with a dazzling fireworks show. And not just any show, but one you’ve created using the new Fireworks MixMaster™, an easy to use editing tool that allows you choreograph dazzling pyrotechnic wonders synchronized to your own music library.
PhotoStory 3 and Photo Spots
You can now place Photo Spots near your favorite scenery creations, allowing the peeps to stop and pose while the group leader takes a snapshot. If you created a group in the Peep Designer, their snapshots are saved to your My Pictures folder (found within your my Documents folder) where you can create a multimedia presentation using PhotoStory 3, which comes bundled with RollerCoaster Tycoon® 3. (For complete information about using Photo Story 3, see Photo Story 3 for Windows Help.)
Coasters From RollerCoaster Tycoon® and RollerCoaster Tycoon® 2
RollerCoaster Tycoon® 3 is backward compatible with the user-created coasters from RollerCoaster Tycoon® and RollerCoaster Tycoon® 2. So any coaster you created in the previous games can be loaded and enjoyed in your new parks.You no longer have to imagine what it would be like to ride the favorite coasters you created. Note: Some coasters may not work properly due to differences in how costers are represented in 2D and how they are constructed in 3D. See page 83 for more information.
6 |
7 |

Five Theme Categories
You can decorate your amusement park using five diverse and comprehensive themes:
•Generic – For all your amusement park needs
•Spooky – Frighten you park guests silly
• Sci-Fi – To inspire guests with visions of tomorrow
•Western – For transporting peeps to the early American frontier
•Adventure – Give your visitors a taste of Arabian nights or Caribbean escapades
Game Difficulty
In previous versions of RollerCoaster Tycoon®, the game offered easy, medium and hard scenarios. RollerCoaster Tycoon® 3 allows you to play all of the scenarios at three difficulty levels:Apprentice, Entrepreneur and Tycoon.When you first begin RollerCoaster Tycoon® 3, only a third of the scenarios are available, the remaining are locked and become unlocked as you complete scenarios at Apprentice level.
Sandbox
Throw caution to the wind and cast off all the constraints of ordinary scenario play. Now you can create the crowning achievement of amusement parks without worrying about money, time or other restrictions. Experiment to your heart’s content with any aspect of the game.
USING THIS MANUAL
With all the freedom and flexibility offered in RollerCoaster Tycoon® 3, there is also an added layer of complexity.The game’s interface has been designed to be easy to navigate once you get the hang of it, but there is a lot to absorb. For that reason, we’ve broken the manual into two sections.
The first part,“Menu and Interface Reference” (pages 9–73), provides a thorough explanation of each menu and panel you’ll encounter in the game.The second part,“A Tycoon’s Guide To …” (pages 74–101) provides advice and hints about how to succeed in virtually any aspect of the game.We also encourage you to take advantage of the in-game tutorials, which provide step-by-step animated instructions about how to get started on your RollerCoaster Tycoon® 3 career.
Throughout the manual you will find an interview with the real-world roller coaster designer John Wardley. For more information about John and his creations visit www.john-wardley.demon.co.uk.
MENU AND INTERFACE REFERENCE
LAUNCHER SCREEN
The Launcher screen is displayed when you insert the RollerCoaster Tycoon® 3 game disc into your CD–ROM drive.You can also display the Launcher screen by double-clicking on the StartMe.exe program on the CD–ROM game disc.
|
|
|
|
READ INSTALL GUIDE |
that offers instructions for installing the game |
||
(after the game is installed, |
button). |
||
INSTALL – Installs the |
game (after the game is installed, this is |
||
replaced by the REPAIR |
|
|
|
README – Displays the |
|
|
|
MANUAL – Opens the |
manual. If Acrobat Reader is not installed on |
||
your computer, you will be |
|
|
|
ACROBAT READER |
version 5.0.5 (if Acrobat Reader 5.0.5 or |
||
newer is already installed, |
|
|
|
PHOTO STORY 3 – |
Windows. (If Photo Story 3 is already |
||
installed, this button is |
PHOTO STORY 3.) Note: If your computer |
||
is not running on the |
system, this button is grayed out. |
||
8 |
9 |

UPDATES – Checks the Internet for any patches or other updates and if found, prompts you to download and install the update. An Internet connection and separate account is required for this feature to work properly. (If the game is not installed, this button is grayed out.)
RCT3 WEBPAGE – Opens your web browser to the RollerCoaster Tycoon® website.
SAVING AND LOADING
Save your progress at any time by click on the SAVE button (found under the Tools and Options button).When the SAVE dialog box appears, confirm the name of your save game and click the SAVE button.
Load a previously saved game from the career screen by clicking on a scenario button and then on the LOAD button.When the LOAD dialog box appears, select a game from the list and then click the LOAD button. To load a saved game while playing, click the LOAD button (found under the Files and Settings button) and follow the same steps.
MAIN MENU
Play
Play a Sandbox game, Career game (classic scenario-based gameplay), custom scenario (a scenario you added) or Tutorial scenarios.
Tools
Gives you access to the Peep Designer, Scenario Editor, Building Designer and Coaster Designer.
Options
Adjust various game options and settings.You can also access the Game Options window while playing the game.
Exit
Quit RollerCoaster Tycoon® 3.
PLAY MENU
Tutorial mode
Gives you access to the lesson scenarios where you can master the various features before encountering them in a scenario.
Career mode
The classic RollerCoaster Tycoon® gameplay, where you face the challenges offered in scenarios.
31
4
25

 8 9
8 9
1.Saved Profile – When selected, is highlighted with a blue outline
2.Thumbnail View – Provides a the park in the selected profile.
3.Scenario Completion Level – Shows the number of scenarios that have been completed at each difficulty setting.
4.Profile Name – Click to edit.
10 |
11 |

5.Game Completion Level – Percentage of the entire game that has been completed.
6.New Career – Create a new career.
7.Load Career – Load the selected career.
8.Return to Previous Menu
9.Delete Profile – Delete selected profile (cannot be undone).
Sandbox
Load or start a new sandbox game, in which you can play without the constraints of time or money. See page 81 for information about where these files are stored.
Custom Scenario
Here is where you get to match your park building skills against the custom scenario designs of others, or even your own. See page 81 for information about where these files are stored.
TOOLS MENU
Peep Designer
Allows you to customize peeps or other small parties.
Scenario Editor
Create your own scenarios, which other players.
Building Designer
Construct awesome castles, palaces, mansions and more with the Building Designer tool, then use them in your parks.
Coaster Designer
Take your time and design your ultimate ride right. Any coaster you create can be added to your game or traded with other players.
OPTIONS
Game
•Currency
• |
Distance |
meters and kilograms) or imperial |
|
(miles, feet |
|
•Temperature
• |
Game |
of in-game sounds. |
• |
Music |
in-game music. |
• |
GUI Volume |
clicks and other game system sounds. |
• |
Import |
.wma and .wav files as soundtracks to |
|
rides and |
My Music folder (within the My Documents |
|
folder of |
your favorite music files there.When you |
|
click the |
panel, the game will look in the RCT3 |
|
folder and |
that may be assigned to that ride. |
12 |
13 |

Keyboard Bindings
Click on an assigned keyboard shortcut and type a new key to change that shortcut setting.
Graphic Settings
(Note: When you first run RollerCoaster Tycoon® 3, the game automatically sets these for optimum performance on your PC. Of course, you are free to change them but bear in mind when experimenting that higher graphical settings can degrade performance on some computers. Use the ‘reset defaults’ button to restore the auto-configured settings at any time.)
•Screen Resolution – Click the drop-down list to select one of the four screen resolutions supported by the game.
•Anti-Aliasing Quality – Open the drop-down list to select what level of anti-aliasing will be used.
•32-bit Color – Enable this checkbox to use high color graphics.
•Full Screen – When checked, causes the game to run full-screen.
•Detail Level and Draw Distance – Adjust the slider to set amount of detail that will be drawn as well as the draw distances for each item listed.
•Blend – When checked, various blending techniques (such as shadow blending and texture blending) are employed to display your park in a more visually pleasing manner.
•Compress Textures – When checked, textures are compressed to save memory.This results in a barely discernable loss of visual quality.
• |
Textures – This slider controls the maximum level of detail for displaying textures. |
•Geometry Imposter Distance – The distance an object is from the camera before some 3D objects will be replaced with 2D graphic.
14
•
•
•
•
•
•
•
•
Visibility Alpha – This slider controls the level of translucency when the View Scenery,View Peeps or View Ride Supports option is turned off (see “View Options” on page 30).
Graphics Detail Button – (Button with tools-shaped icon) Click this icon to have the game auto-detect your hardware and adjust the graphical settings best suited for your system.
Bloom – When checked, the game uses advanced features of your video hardware (if present) to display certain objects with a flaring shine effect.This technology is not available on all video hardware.
Aggressive Z-Bias – When checked, the game uses advanced features of your video hardware (if present) to reduce flickering. Use at your own risk!
Camera Settings
Allows you to change how the game camera behaves, as well as the cameras carried by peeps and those used on rides.
Allow All Photos – When checked, the peep group you created will take pictures of each other and save them to disc.These are stored in the My Pictures folder (within the My Documents folder of your PC).
Allow Photo Spot Photos – When checked, your peep group will take pictures of each other at the places where you inserted Photo Spot objects.These are saved to the My Pictures folder (within the My Documents folder of your PC).
Allow Rollercoaster Camera Photos – When checked, roller coaster camera points take pictures of your peep family and save them to the My Pictures folder (within the My Documents folder of your PC).
Auto Scroll – When checked, causes the screen to be nudged when the pointer touches the edge of the screen.
15

•Control Mode – A drop-down list allows you to select from the following camera modes and settings:
1.Normal – Default camera for the game provides ease of use and flexibility.
2.Advanced – An alternate to Normal with slightly different button assignments.
Camera Controls – A setting of 0, 1 or 2 changes the mouse buttons that control camera movements.
Ignore Scenery – When checked, the camera will rotate around a spot on the ground; when unchecked, the camera will rotate on a spot on the scenery.
Focus on Screen Middle – When checked, the camera will rotate around a spot in the middle of the screen; when unchecked, the camera will rotate around the position of the mouse pointer.
3.Freelook – Camera controls designed to assist you in looking up.
Sensitivity Flying – This setting determines how the camera moves in response to mouse movement; the higher the number, the more sensitive the camera is to mouse movement.
4.Isometric – Restricts movement of the camera to 90° angles (useful for veterans of RCT and RCT2 who want to experience RollerCoaster Tycoon® 3 in the same manner).
Isometric Rotation Sensitivity – This setting determines how the camera moves in response to mouse movement while in isometric mode; the higher the number, the more responsive the camera.
 Scenic Settings
•3D Trees and Plants – When checked, causes trees and plants to be displayed using 3D
models. Uncheck this setting to cause trees and plants to be displayed with 2D “sprites.”
•Simple Terrain Textures – When checked, causes the game to use lower-detailed textures for the terrain to save on memory.
•Use Reflective Water* – When checked, causes water to reflect the surrounding environment.
•Reflect Background* – When checked, causes the water to reflect the background.
• |
Reflect Terrain* – When checked, causes the water to reflect the nearby terrain. |
•Reflect Scenery* – When checked, causes the water to reflect nearby scenery.
•Reflect People* – When checked, causes the water to reflect nearby peeps.
•Clouds – When checked, clouds are displayed in the overhead sky.
•Sky – When checked, the sky includes gradients, the sun, stars and the moon.
•Background – When checked, a background far beyond the edges of the amusement park is displayed.
* May not be present when RollerCoaster Tycoon® 3 is played on some lower-end graphics cards.
16 |
17 |
CAREER MENU
7
8
3 4
4 
9
2
10

1.Unlocked Scenarios
2.Locked Scenarios
3.Start Game – Play selected scenario from the beginning.
4. Resume Game – Load |
last saved game |
of this scenario. |
|
7.Scenario Description
8.Screenshot of Selected Scenario
9.Return to Game – Continue playing the current game (if a game is in progress).
10.Return to the Main Menu
5.Load Game – Load any previously game of this scenario.
6.Save Game – Save the current game (if a game is in progress).
11.Quit Game – Exit RCT3 and return to Windows.
COMMON INTERFACE ELEMENTS
Maps
Options
Files and Options
Exit
Park Administration
Ride Placement
Shop and Facilities Placement
Scenery Placement
Paths Placement
Terrain Tools
Delete
You can manage any object in the park (shops, rides, peeps or scenery) by clicking on it.This reveals that object’s control panel, where you can view statistics and adjust settings.When you select an object in the park, its control panel appears in the lower-right corner of the screen.When you select an object from a list browser to place in the park, its construction panel will appear in the lower-left corner of the screen.
18 |
19 |
General
Found on all control panels:
4
3
2
1
1.Close – Closes the control panel and cancels any pending action with
the item.
2.Camera – Centers the screen on the object.
3.Close-up – Close–up view of the item;
|
double–click to move the |
so the |
|
selected object is in the center of |
|
|
the screen. |
|
4. |
Retract Panel – Hides |
detail panel. |
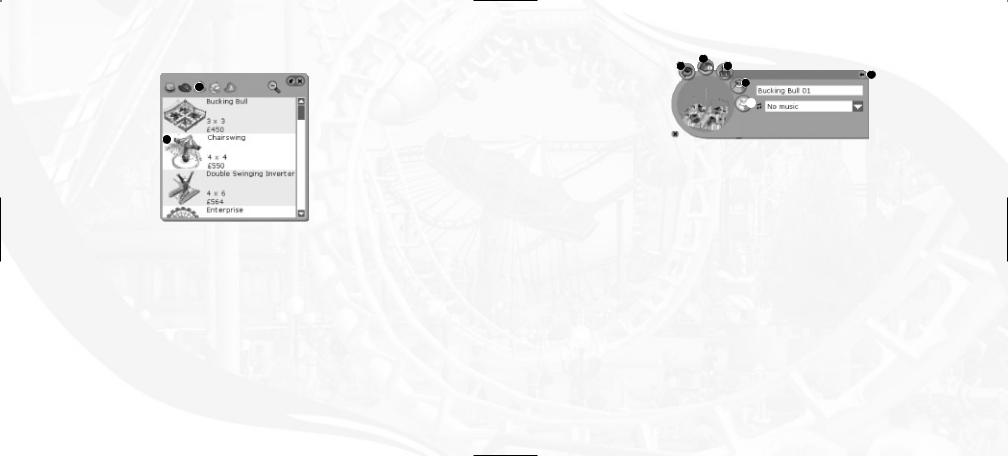
Coaster and Track Ride Browser
This toolbox is used for all track rides, including coasters, transport rides, auto rides and water rides.
Ride Browser shows all of the different coaster types you may place in your park. Double-click a coaster type to see additional details.
3
1
42
1.Build Custom Design – Click to
build a custom-designed coaster using the coaster construction toolbox.
2.Build Saved Ride – Opens the Track Browser, where you can choose from a list of pre-designed track layouts.
3.Expand / Contract All – Causes the list to expand to show the large thumbnail picture and object details OR contract to show a simple list.
4.Filter Type – Causes the list to include only the categories that are NOT grayed-out. Click to turn the filter
on or off.
20 |
21 |
Attraction List Browser
This toolbox is used for placing all shops, facilities and all non-track rides, including junior rides, thrill rides and gentle rides.
2
1
1. Object Placement – Click to attach this 2. |
Theme Category – Click to filter the |
object to your pointer so you may place it |
list with this category. When the icon is |
in the park. |
grayed out, items from that category are |
|
removed from the list. |
Shop/Ride/Scenery Construction Panel
Found on construction panels for shops, rides and most scenery:
3
1
2
6
1.Rotate – Turn the selected item 90° counter–clockwise
2. |
Collapse – Hides |
detail portion of |
|
control panel. |
|
3.Information – Expands the control panel to display details, statistics and settings for the object.
4.Color – Displays the color options for that object.
5.Conform Land – When clicked, and as you place an object in the park, causes the land around the object to flatten.
6.Cut Land – When clicked, and as you place an object in the park, causes the land around the object to be cut.
22 |
23 |
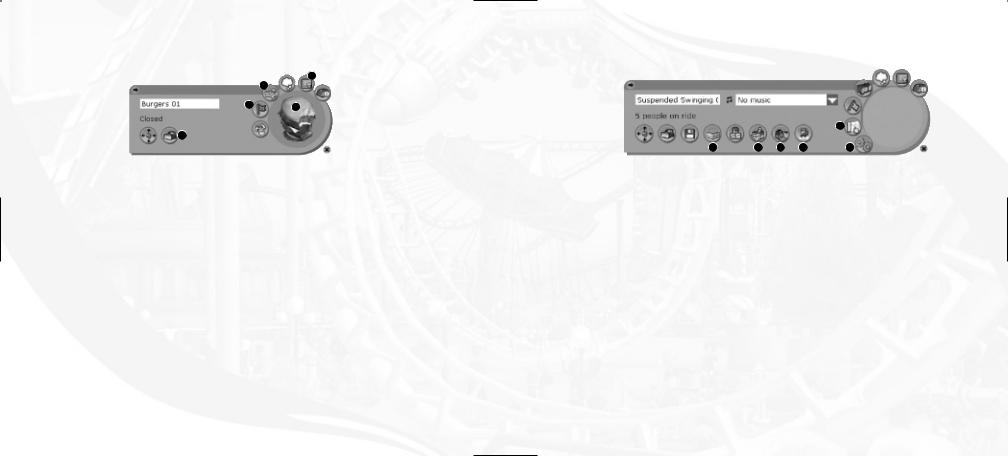
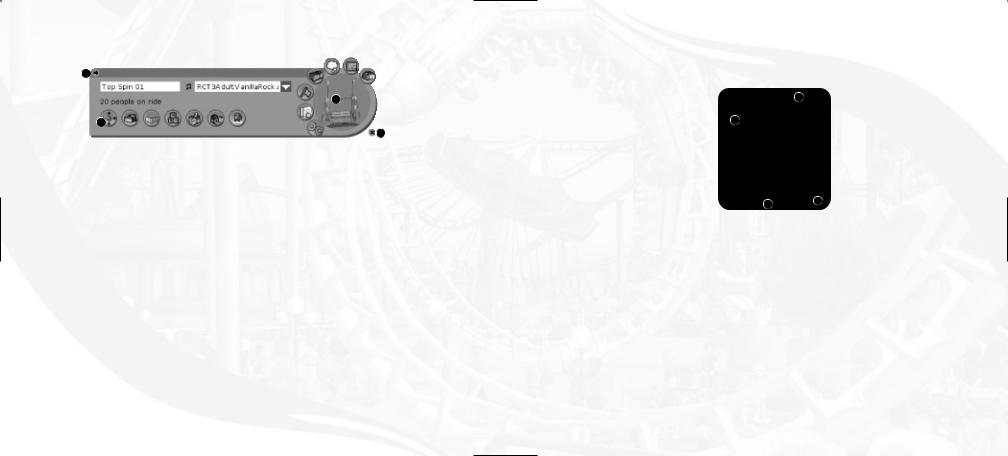
Shop/Ride Control Panel
Found on control panels for shops and rides:
3
2
1 4
5
1. |
Open Indicator – Allows you open |
|
or close the attraction. |
2.Inventory – Adjust price(s) and (for shops) the inventory selection
3.Statistics – View the sales history of the attraction.
4.Close-up – If the selected object is a ride, double-clicking on the close-up allows you to ride the ride. For all other objects, double-clicking centers the game screen on the object.
5.Demolish – Deletes this object from the park and adds the resale price to your cash.
Ride Control Panel
Found on control panels for rides:
5
1 |
2 |
6 |
4 |
1.Fence – Select the type of fence that will border the ride.
2.Entrance – Select the type of entrance that will be used.
3.Exit – Select the type of exit that will be used.
4.Launch Condition – Adjust when the ride will start the next cycle.
5.Test Results – View the results of the ride’s test run.
6.CoasterCam – Click to ride this ride.
24 |
25 |
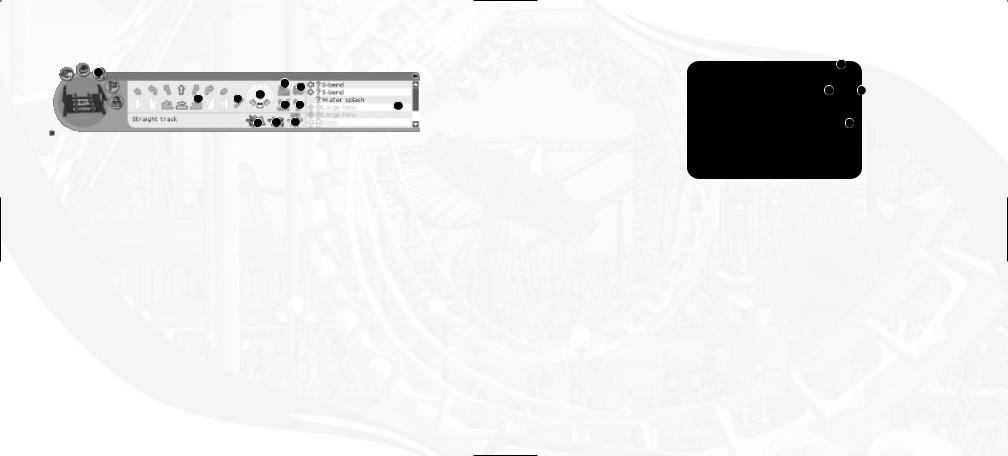
Track Ride Construction Panel
Found on control panels for track rides:
1
|
|
|
4 |
7 |
|
|
8 |
|
|
2 |
3 |
|
|
|
|
|
12 |
||
|
|
|
|
|
|
|
10 |
9 |
|
1.Construction Options – Expands the track options portion of the object control window, allowing you to build or change track pieces for the ride.
2.Track Pieces – Shows the tracks you can place next.
3.Lift – Adds or removes the chain drive for the highlighted track piece.
4.Loading Station – Toggles whether or not a boarding station is added to the highlighted track piece.
5.Block Brake – Toggles whether or not a block brake is added to the highlighted track piece. (For track rides with more than one train.)
6.Straight Brake – Toggles whether or not straight brakes are added to the highlighted track piece. (To reduce the speed of trains on a track ride.)
7.Photo Trigger – Toggles whether or not a photo trigger is added to the highlighted track piece.
8.Bank – Adjusts the banking options for the highlighted track piece.
9.Remove – Removes the selected (or previous) track piece.
10.Autocomplete – Automatically places the remaining tracks for the coaster being edited. After an autocomplete solution is found, click the icon again to accept the autocomplete solution, or click on another track piece to cancel.
11.Height markers – Click to turn the height markers on or off for this ride.
12.Special Tracks – Shows what special tracks may be added next. This selection changes depending on what piece has last been placed.
Park Management Control Panel
Found on control panels for administration:
1
3 4
2
1. |
Pin – Minimizes the |
3. |
Sort – Sorts the list by the selected |
|
|
toolbox and pins it to |
|
criteria. |
|
|
the screen |
4. |
Dropdown – Causes a list to be |
|
2. |
Scroll – Scrolls the list |
|||
|
displayed. |
26 |
27 |

DASHBOARD
The dashboard can be found at the top edge of the screen and gives you quick access to critical information.
1 |
2 |
8 |
10 
7
1.Scenario Objectives – Click to reveal the
scenario |
and the goals you need to |
reach |
complete the scenario.These are |
grouped by difficulty level,Apprentice (easy), Entrepreneur (hard) and Tycoon (expert).
Indicates you are playing at Apprentice level
Indicates you are playing at
Entrepreneur level
Indicates you are playing at
Tycoon level
When you complete all of the Apprentice objectives, this indicator changes to the Entrepreneur icon.The Tycoon icon appears after the Entrepreneur objectives have been accomplished. A checkmark next to an objective indicates you have completed that objective.
If a VIPeep objective is listed, click the Setup Route button to prepare for a visit from the VIPeep.
See “Tycoon’s Guide for Hosting A VIPeep” for instructions on how to use the “Setup Route” feature.
2.Day/Night Settings – Allows you to restrict the game’s time of day to Day, Night or Day and Night, giving you the ability to edit your park for a particular time of day. (Present only in Sandbox mode and the Scenario Editor.)
3.Game–time Speed – Select the speed at which time runs: Paused, Normal, Fast or Speedy.
4.Cash – Shows your current cash levels. Double-click to open your Finances window.
5.Park Attendance – Shows the total number of peeps in your park.
6.Park Rating – Shows your park’s current approval rating. Hold the pointer over this icon to see the numeric rating value and a breakdown of how this value was calculated. Note: The park rating is recalculated once
7.Game Message Console – Important messages appear in this pull-down.You can even elect to have additional messages appear here, such as thoughts from various peeps. Click the open list to close
it. Click the icon next to a message to move the camera to the item mentioned by the message. If a message is longer than the width of the console, hold the mouse cursor over the message to display the full text.
8.Weather – Shows current temperature and weather conditions.
9.Date and Time – The present date and time.
.Toggle Group Marker – Turns the peep group indicator on or off.When on, the peep families you created with the Peep Designer will be labeled with bubbles, each containing the name of that peep.
11.Fireworks Camera – Switch to camera ideal for viewing fireworks.
MAPS
Displays various thumbnail maps of your park as well as checkboxes to display or hide the location of assorted objects or peeps, the ownership status of land in and around the park, and the types of themed elements used.
28 |
29 |
VIEW OPTIONS
These options allow you to display or hide various terrain indicators and park scenery as you build your park.
Terrain Grid – Displays or hides a grid that reveals how the terrain undulates tile-by-tile.
Terrain Contours – Displays or hides topographical contour lines.The difference in elevation between one contour line and the next is 2 meters (if you selected the “metric” setting in the game options panel) or about 2 yards (for the “imperial” setting).
Peeps – Displays or grays out peeps.
Supports – Displays or grays out the pilings for tracks and walkways.
Ride Height – Displays or hides markers that show the height of your rides.
Path Height – Displays or hides markers that show the height of your paths.
Scenery – Displays or grays out scenery.
30
FILES & OPTIONS
Allows you to load or save games and gives you access to various options and settings.
About – Displays the About box, showing version number, legal notice and game credits.
Game Options – Displays the Game Options control panel. See “Options” on page 13 for details.
Save Game – Saves your current progress. In the Save Game dialog box, click on the game-name field and type in a name of your choosing, and then click the Save button. If the name you typed is the same as one already saved, the game will ask you if you want to overwrite it.
Load Game – Opens a dialog box where you may load a previously saved game.
Return to Career Screen – Exits your current game and returns to the Career Screen, where you may play any of the other unlocked scenarios. Note: Save your game before returning to the Career Screen, or your progress will be lost.
PARK ADMINISTRATION
The Administration tools give you access to financial and staff management.There are seven buttons that appear when you click on the Park Administration button.
Park Operations |
Finances |
Staff |
Objectives |
Research |
Attractions |
|
Guests |
31
Park Operations
Land and Status
|
4 |
|
1 |
5 |
2 |
|
|
|
|
|
6 |
1.Park Name – The name of your amusement park; click to edit.
2.Park Status – Shows if the park is open or closed; click to change.
3.Center on Park Entrance – Click to center the view on the park entrance.
4.Park Detail
5.Entrance Fee – Shows the current entrance fee; click the up or down arrows to change the price. In some scenarios, the entrance fee cannot be adjusted.
6.Land Management – These buttons allow you to buy land or the construction rights to land.You must own land before you can
on it or shape the terrain.
Construction rights may be leased if you only want to place track pieces over the land. Land-ownership status is indicated by the following grids:
•Outlined Blue Grid – Land you own.
•Land with For Sale Signs –
Land you may purchase.
•Dashed Blue Grid – Land for which you have construction rights.
•Land with Barricade Signs –
Land construction rights you may lease.
•Land with No Grid – Land you may never own.
•Solid Blue Grid – Land that you may own or lease after you meet a scenario objective.
Purchase Land – Drag the mouse button over the outlined blue grid to purchase it. When finished, click the Purchase Land button again.
Construction Rights Easement – Drag the mouse button over the outlined yellow grid to lease it.When finished, click the Construction Rights Easement button again.
Land Selection Brush Size – The size of the brush for selecting land. Enlarge the brush size by place the mouse over the brush size button and dragging the mouse button to the right. Reduce the brush size by dragging the mouse button to the left.
Graphs and Stats
Click on a checkbox at the bottom to display the relative data in the line graph.The labels at the left edge of the graph change to match the box you last checked.
32 |
33 |
 Loading...