

Page 1
0605 Part No. X11-35541
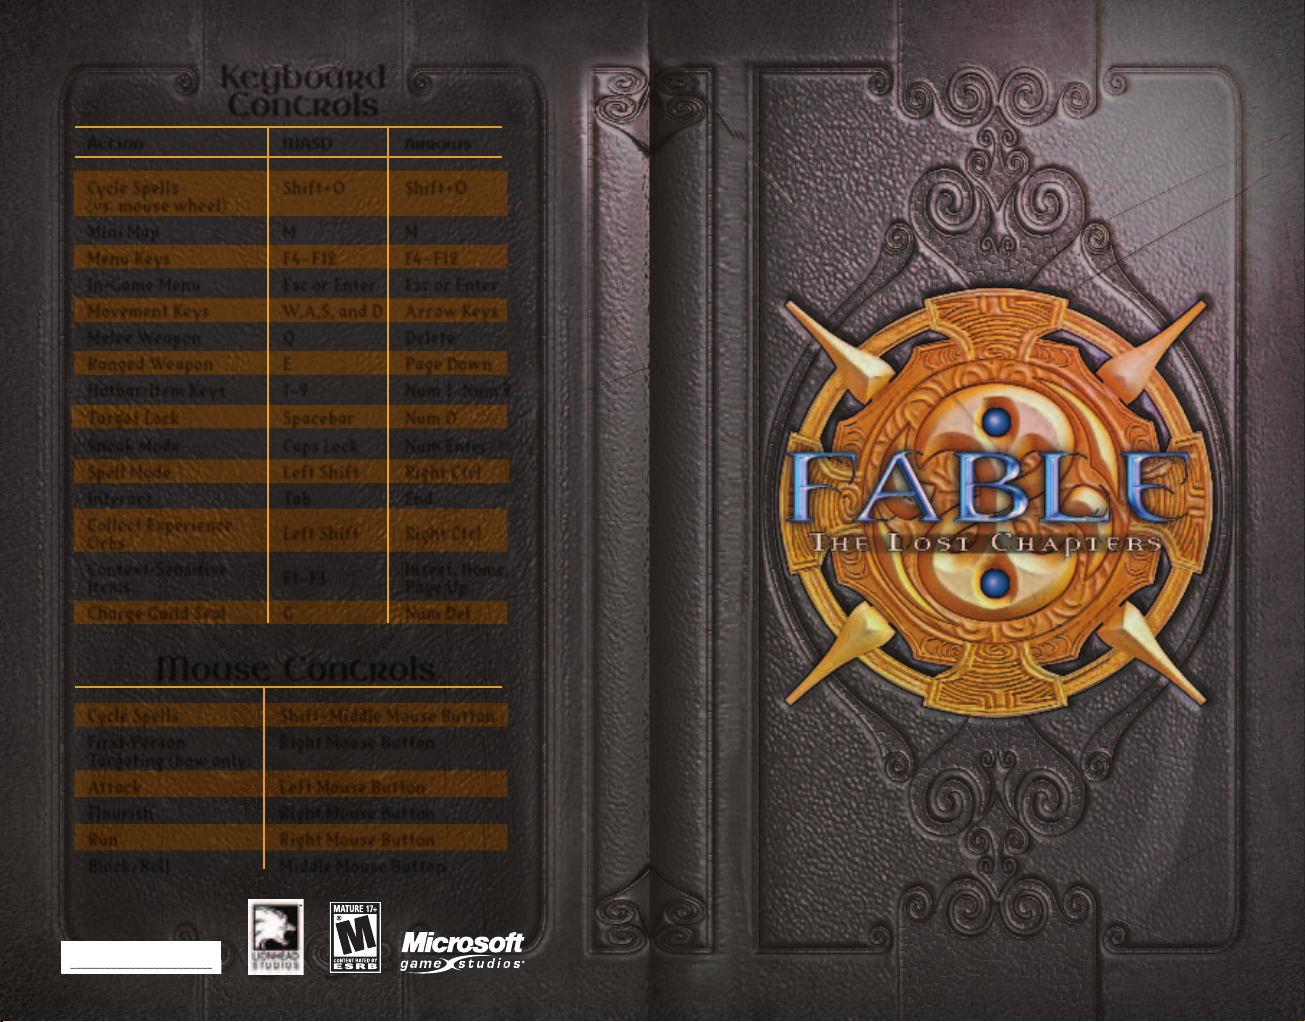
Keyboard
Controls
Action WASD Arrows
Cycle Spells
(vs. mouse wheel)
Shift+O Shift+O
Mini Map
M M
Menu Keys F4–F12 F4–F12
In-Game Menu Esc or Enter Esc or Enter
Movement Keys W,A,S, and D Arrow Keys
Melee Weapon
Q Delete
Ranged Weapon
E Page Down
Hotbar-Item Keys 1–9 Num 1–Num 9
Target Lock Spacebar Num 0
Sneak Mode Caps Lock Num Enter
Spell Mode Left Shift Right Ctrl
Interact Tab End
Collect Experience
Orbs
Left Shift Right Ctrl
Context-Sensitive
Items
F1–F3
Insert, Home,
Page Up
Charge Guild Seal
G Num Del
Mouse Controls
Cycle Spells Shift+Middle Mouse Button
First-Person
Targeting (bow only)
Right Mouse Button
Attack Left Mouse Button
Flourish Right Mouse Button
Run Right Mouse Button
Block/Roll Middle Mouse Button
Page 2
I
afety
Information
S
patterns that may appear in video games. Even people who have no history
of seizures or epilepsy may have an undiagnosed condition that can cause
these "photosensitive epileptic seizures" while watching video games.
These seizures may have a variety of symptoms, including lightheadedness,
altered vision, eye or face twitching, jerking or shaking of arms or legs,
disorientation, confusion, or momentary loss of awareness. Seizures may
also cause loss of consciousness or convulsions that can lead to injury from
falling down or striking nearby objects.
Immediately stop playing and consult a doctor if you experience any of
these symptoms. Parents should watch for or ask their children about the
above symptoms—children and teenagers are more likely than adults to
experience these seizures.
The risk of photosensitive epileptic seizures may be reduced by taking the
following precautions:
Play in a well-lit room.
Do not play when you are drowsy or fatigued.
If you or any of your relatives have a history of seizures or epilepsy,
consult a doctor before playing.
Information in this document, including URL and other Internet Web site references,
is subject to change without notice. Unless otherwise noted, the example companies,
organizations, products, domain names, e-mail addresses, logos, people, places, and
events depicted herein are fictitious, and no association with any real company,
organization, product, domain name, e-mail address, logo, person, place, or event is
intended or should be inferred. Complying with all applicable copyright laws is the
responsibility of the user. Without limiting the rights under copyright, no part of
this document may be reproduced, stored in or introduced into a retrieval system,
or transmitted in any form or by any means (electronic, mechanical, photocopying,
recording, or otherwise), or for any purpose, without the express written permission of
Microsoft Corporation.
Microsoft may have patents, patent applications, trademarks, copyrights, or other
intellectual property rights covering subject matter in this document. Except as
expressly provided in any written license agreement from Microsoft, the furnishing of
this document does not give you any license to these patents, trademarks, copyrights, or
other intellectual property.
Fable: The Lost Chapters © 2005 Lionhead Studios Limited. Lionhead, the Lionhead logo,
and Fable are registered trademarks owned by Lionhead Studios Limited. All rights
reserved. Published and distributed by Microsoft Corporation. Microsoft, the Microsoft
Game Studios logo, and Windows are either registered trademarks or trademarks of
Microsoft Corporation in the U.S. and/or other countries. All rights reserved. All other
trademarks and trade names are the property of their respective owners.
About Photosensitive Seizures
A very small percentage of people may
experience a seizure when exposed to certain
visual images, including flashing lights or
C
II
IV
V
VI
X
XIV
XVI
XVIII
XX
XXIV
XXIX
ontents
A Word from the Guildmaster
Installation and Setup
Game Screen
At Your Command
About the Guild
The Hero’s Apprenticeship
WASD Controls
Arrow Key Controls
The Way of a Hero
Buying and Selling Inventory
Enhancing Abilities and Weapons
Page 3
II
III
A
Word from the
Guildmaster
Congratulations are in store for you.
The fact you have been provided
with the
must be one of a lucky few with
enough potential to be invited here
as a Hero apprentice.
We consider this text sacred and
even, I would say, magical. You
would be wise to study it carefully
from cover to cover in order to
unveil its many secrets.
The task ahead of you will not be an easy one.
Only through years of hard work can you hope to
unleash your latent powers. During its long
history the Guild has seen many apprentices
fail through idleness and overconfidence, and I
would be sorry to see one with potential such as
you throw it all away. Albion needs its Heroes
now more than ever.
Book of the Guild
means you
greatness has no bearing with regard to perceived good
or evil. No, it has more to do with the Renown one
achieves through actions, regardless of morality. Be
forewarned that the work necessary to become a Hero is
not to be taken half-heartedly. On the contrary, this will
be a most gruelling and arduous training, encompassing
all aspects of mind, body, and spirit. I say this without a
wisp of doubt. We require that you apply yourself as
never before, but having done that, the rewards and
Renown you may achieve are unimaginable.
This said, if you do finally graduate from this Heroes’
Guild, you may even one day be acknowledged as the
greatest Hero ever to stride the cobbled paths of Albion.
Statues have been erected all over the land in honour of
those few Great Ones who came before you, those laid to
rest and permanently entombed at the Guild. We may
only hope our success in training you will one day flame
your successes throughout Albion, coarse a place as it is.
Go now, and seek your destiny!
Becoming a Hero of Renown means achieving
great things, and to accomplish less than
greatness is to have done next to nothing at
all. You must understand that, for the Guild,
Page 4
IV
V
nstallation and Setup
To install
I
If installation does not start automatically, follow these steps:
1. From the Start menu, click
D: is your CD-ROM drive).
2. Read the on-screen instructions, then click Next.
3. If you want to use the default settings for installing
Lost Chapters
options, click Custom Installation.
4. Enter your
5. Insert the appropriate CD-ROMs when prompted.
6. To start a new game, type a profile name or use the default
profile. On the same screen, you can choose the optional Arrow
keys control scheme instead of the default WASD control scheme.
7. Click OK, then click New Game to start playing.
your CD-ROM drive and click Install. Follow the
on-screen instructions to complete the setup process.
Fable: The Lost Chapters
Saving a Game
To save a game in progress:
1. Press
2. Click Options to display the Options menu.
3. Click World Save
4. Click the slot in which you want to save the game.
Note: During a Quest, you can choose Hero Save from the Options
menu. This saves the statistics you’ve accumulated, but not your
place in the Quest. On your next Quest, you can take advantage of
gold or other items you saved on previous Quests.
5. Click Yes.
Esc or Enter to display the In-Game menu.
Fable: The Lost Chapters
Run and type D:\setup.exe (where
, click Next. For more advanced installation
Product Key, then click OK.
.
, insert Disc 1 into
Fable: The
Loading a Saved Game
To load a previously saved game:
1. Start
2. Click Continue Game
3. Click the saved game you want
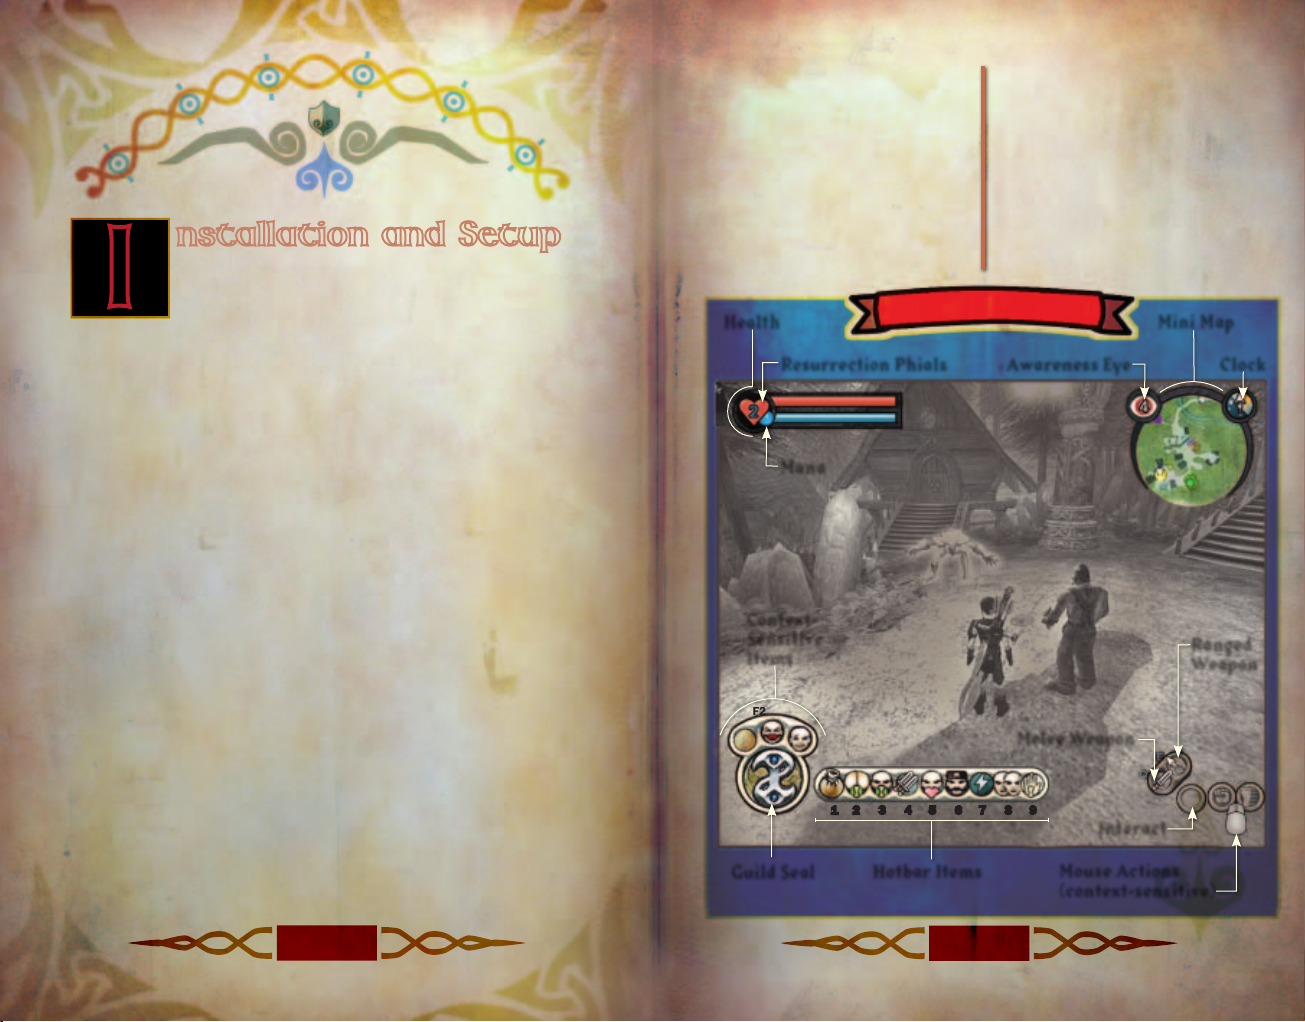
Health
Fable: The Lost Chapters
to load.
Resurrection Phials
Mana
ContextSensitive
Items
F2
F3
G
1 2 3 4 5 6 7 8 9
Guild Seal
.
.
Game Screen
Hotbar Items
If you are currently playing
Fable: The Lost Chapters
you want to load a saved game:
1. Press
2. Click
3. Click Load.
4. Click the saved game you
Awareness Eye
Esc or Enter to
display the In-Game menu.
Options.
want to load.
Melee Weapon
Interact
Mouse Actions
(context-sensitive)
and
Mini Map
Clock
Ranged
Weapon
Page 5
VI
VII
90
15
20
25
1 2 3 4 5 6 7 8 9
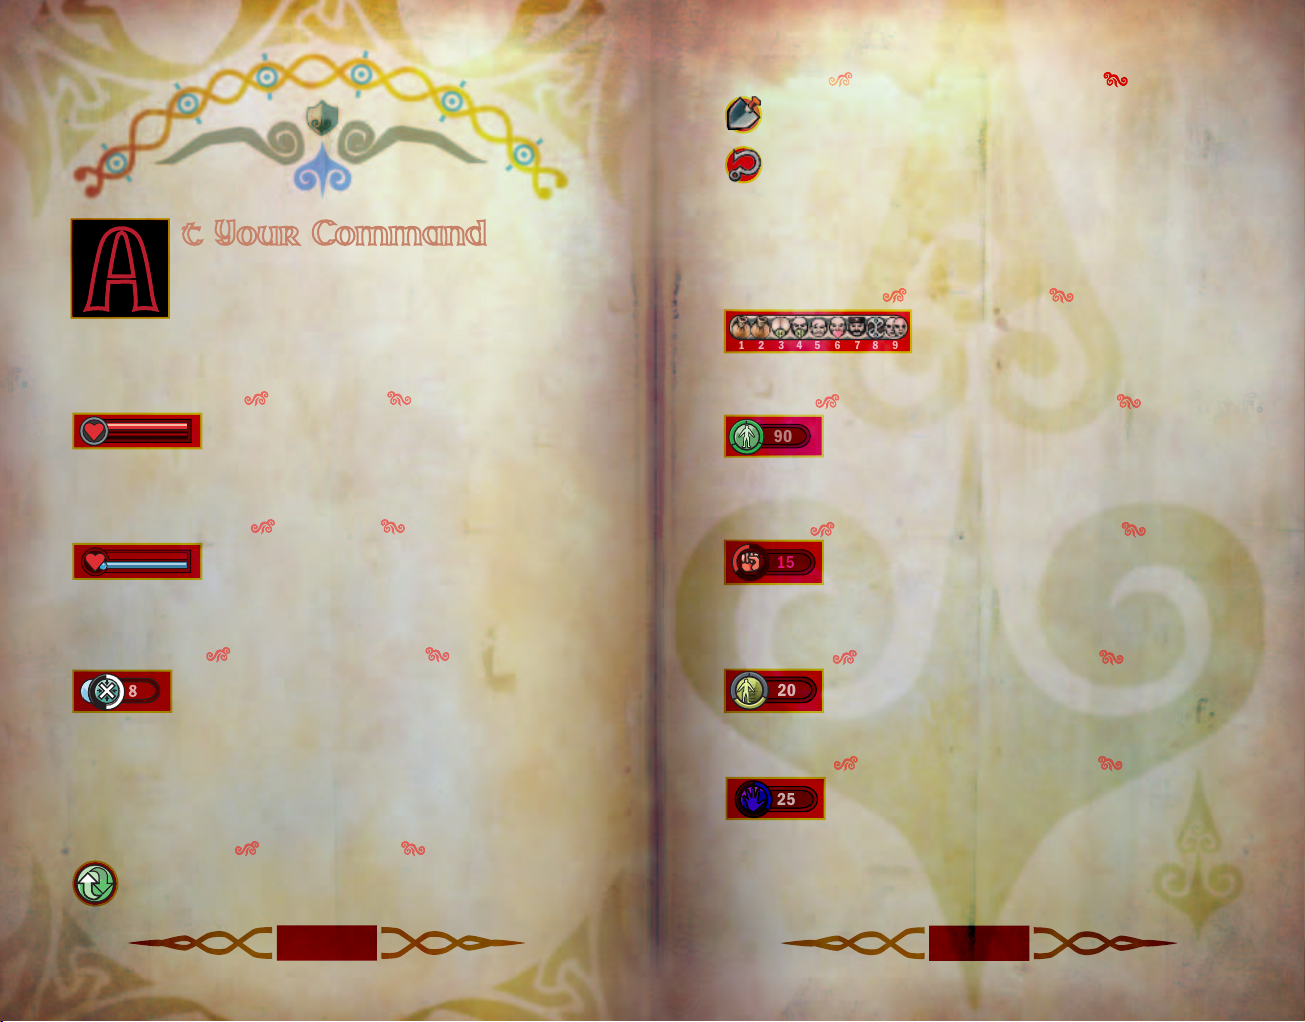
t Your Command
The following information describes the primary
A
are unable, apprentice, to describe every possible option
but have focused on those you will encounter most often.
items that appear in your view. Key commands
shown below are based on WASD key mapping. We
Context-Sensitive Items
Context-sensitive icons appear in the lower-left portion of
your view and temporarily replace other icons. Two of the
most helpful icons to be aware of are the Digging and
Fishing icons. Health, Mana, and Expressions also appear
just when you need them. Press F1, F2, or F3 to use the
item you need—the shovel, fishing rod, or whatever else makes
itself available. Pay close attention to these, and you never know
what you might discover.
Hotbar Items
You can drag up to nine items,
expressions, and spells to the Hotbar.
Press 1–9 to use them as the need arises.
Health Bar
The red bar in the upper-left portion of your
view is the Health bar. Each time you receive a
hit from an enemy, it impacts your health. Replenish your health
by eating some food or drinking a potion.
Mana Bar
The blue bar in the upper-left portion of your
view is the Mana bar. Mana depletes when you
use magical powers of the Will. It replenishes with time, but
returns more quickly when you drink blue potions.
Combat Multiplier
The Combat Multiplier indicates how much
Experience of all types you gain when you inflict
blows upon your enemies. The higher the number, the more
Experience points gained when you absorb Experience Orbs left in
the wake of their deaths. For this reason, it is prudent to wait
until you have your way with an entire group of enemies before
absorbing the Experience Orbs.
Interact Icon
This Interact icon reveals interactive objects, which emit a
blue or purple glow. Press Tab to interact with them.
General Experience Points
The General Experience Points notification appears
momentarily to indicate an increase in General
Experience points. These are accumulated by gathering
Experience Orbs.
Strength Experience Points
The Strength Experience Points notification
appears momentarily to indicate an increase in
Strength Experience points. These are accumulated by using your
fists or melee weapons in close combat.
Skill Experience Points
The Skill Experience Points notification appears
momentarily to indicate an increase in Skill
Experience points. These are accumulated by using the bow.
Will Experience Points
The Will Experience Points notification appears
momentarily to indicate an increase in Will
Experience points. These are accumulated by using magic.
Page 6
200
VIII
IX
Gold Notification
The Gold notification appears momentarily
to indicate how much gold you have as well as
how much you just gained or lost.
Unsheathe/Sheathe Melee Weapon
Press Q to unsheathe or sheathe your current melee
weapon. To wield a different weapon, select it from
Equipment/Weapons in your Inventory.
Teleport Icon/Guild Seal
Select the Teleport icon by pressing G. Continue pressing
and holding G until the Guild Seal completely charges
before you teleport to the Guild or an active Cullis Gate.
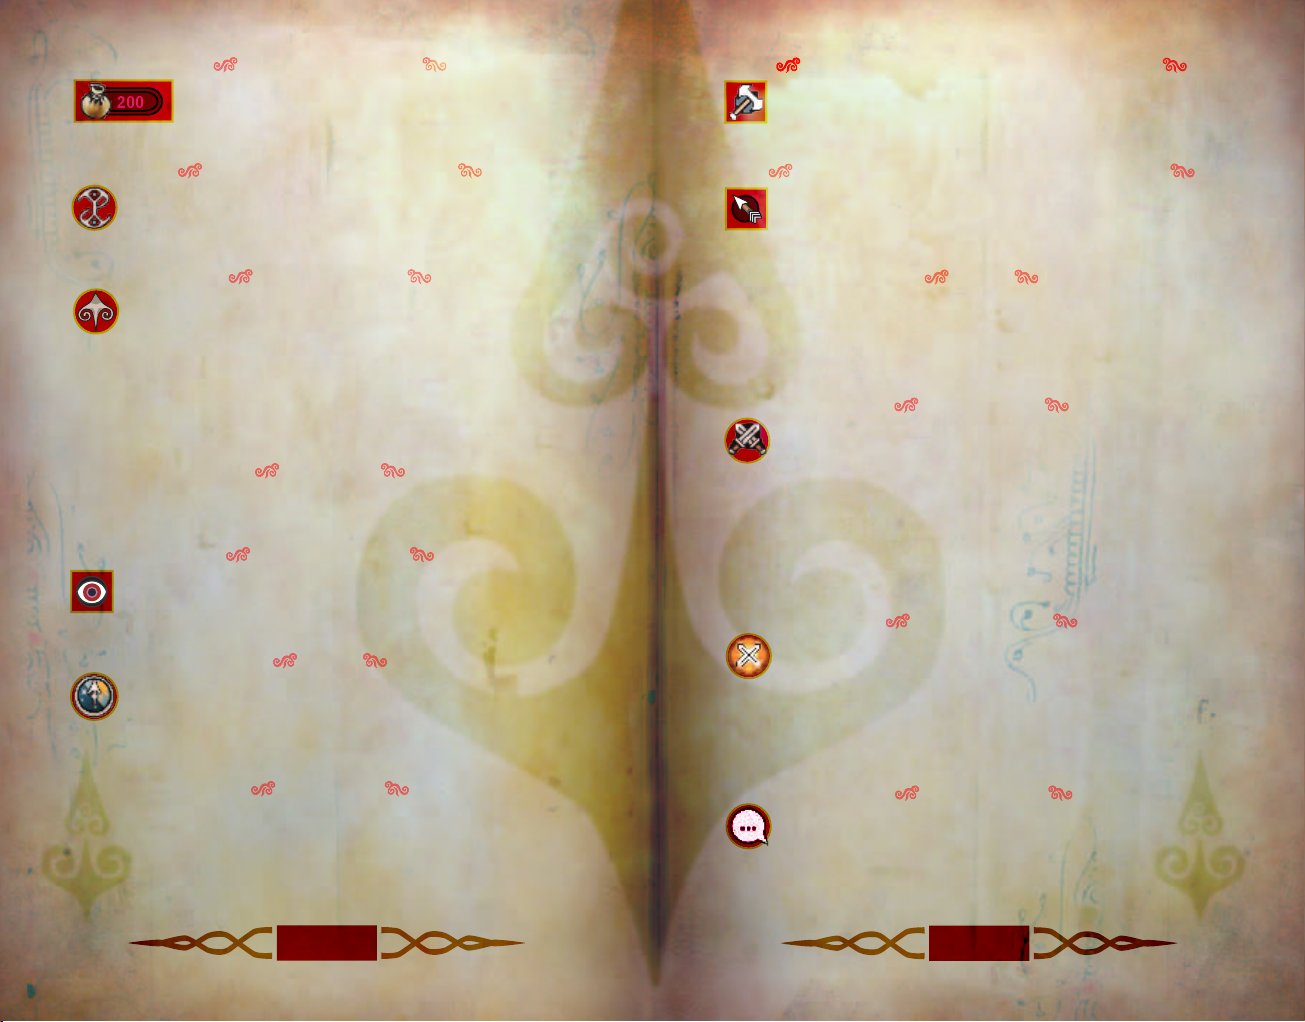
In-Game Menu
The In-Game menu appears when you press Esc or Enter.
Use the left mouse button to select menu items. Use the
right mouse button to go to a previous screen in the menu.
Press Esc or Enter again to exit the menu completely. If you
select Map from the In-Game menu, the In-Game map appears
with a legend beneath it. Use the mouse pointer to hover over
each map symbol and see a description for each.
Mini Map
The Mini Map is located in the upper-right corner of your view. To
determine your location, press M to zoom in on the map.
Awareness Eye
Attached to the Mini Map, the Awareness Eye indicates how
many individuals are aware of you. A red Awareness Eye
reveals to you that enemies are present.
Clock
Also attached to the Mini Map, the Clock is split in half
between night and day to mark the passing of time. This
allows you to know the approximate time of day or night
depending on where the arrow is pointing.
Unsheathe/Sheathe Ranged Weapon
When you press E, you wield or sheathe the bow. To wield a
different type of bow, select it from Equipment/Weapons in
your Inventory.
Block
Use the middle mouse button (you can reassign this from the
Options menu) to block an opponent’s attack. Also, while holding
down the middle mouse button, use the direction (W, A, S, and
D) keys to roll and block at the same time.
Attack Icon
Use the left mouse button to attack an enemy, whether
with hand-to-hand combat or a weapon. When using the
bow, click the left mouse button to shoot an arrow. The longer
you hold down the button, the more powerful the force of the
arrow, although accuracy might decrease. While charging your
shot, click the right mouse button to display and zoom the
crosshair. Rotate the middle mouse button to increase or
decrease the zoom.
Flourish Icon
The Flourish icon appears when you successfully land
several blows without reply on an enemy. When it appears,
click the right mouse button to unleash a vicious, unblockable
attack on the enemy. Direct the Flourish with the direction keys
(W, A, S, and D). String together multiple Flourish attacks by
continuing to make contact without missing.
Inventory
Press Esc or Enter to display the In-Game menu, then click
Inventory to display the Inventory menu. Left-click your
preferred category (Items, Weapons, or Clothing). Press Esc or
Enter again to exit the Inventory. Alternatively, you can quickly
display your Items, Weapons, or Clothing Inventories by pressing
F4, F5, or F7.
Speech Icon
The Speech icon indicates there is someone to interact with
by pressing Tab. A green highlight indicates someone with
information for you. Purple indicates neutral characters. Red
highlighting indicates people hostile toward you.
Page 7

X
XI
bout the Guild
The Guild is at the heart of Albion, and the
Heroes who have flourished since its
A
facilities are like no others in all of Albion. To help you
learn your way around the facilities and grounds,
we’ve provided a map.
Here at the Guild, we have a long, proud tradition. Built
as both a fortress and a sanctuary, these heavy, stonemasoned walls have provided protection and safety to
our young Hero apprentices for hundreds of years as
they’ve gone about their training. The Guild itself has
withstood many foolhardy bandit attacks and yet
remains standing while other buildings and entire
villages throughout Albion have not. Let it be known
that those who have dared attack the Guild have
always received proper payment in return.
Sleeping and Dining Quarters
By now, you’ve been shown to a comfortable bed in
the Guild’s sleeping quarters, upstairs in the main
Guild building. In addition to the sleeping quarters,
there is a dining hall downstairs which has beverages
on offer and fresh food prepared daily by the best
cooks in the region.
establishment keep the civilised world
functioning and in relative safety. The Guild’s
To the
W
Chamber
of Fate
Experience
Spending
Platform
Map of the Guild
N
To the
Guild Woods
Melee (Strength)
Training
Skill
Training
Dining Hall
Guild
Library
Boasting Platform
Shop
Map Room
Teleport Pad
S
Will
Training
Maze’s
Quarters
E
Page 8

XII
XIII
Map Room
The Map Room, located just beyond the front vestibule and
at the heart of the Guild’s main floor, contains a large threedimensional map of Albion. It is in the Map Room that you accept
Quest Cards the people of Albion deliver to the Guild. Also, if you
need to find the Guildmaster at any time during your training
at the Guild, he is likely to be found in the Map Room unless he’s
informed you of the contrary.
Library
The Guild Library contains a wealth of information regarding
the Guild itself, the region, and all of Albion. You will find details
about the Old Kingdom, as well as the creatures of Albion. Use
the Library to expand and refresh your knowledge of magical
spells, potions, medicines, and other powers that a Hero must
have to succeed at increasingly demanding Quests. Some Guild
texts have been removed and not returned. If you find them, do
please let us know.
Guild Shop
The Guild Shop, also in the main building, provides an opportunity
to purchase a variety of weapons, both melee and ranged, in
addition to a few clothing items. Of course, you will have to earn
yourself a little more gold than what the typical apprentice has
on hand in order to purchase them.
Training Facilities
Created specifically for developing young Heroes such as
yourself, the training facilities feature a melee arena where
you can work on hand-to-hand combat and weaponry skills.
Furthermore, we have an archery range with both moving and
stationary target dummies—a good place to hone and refine
one’s accuracy with the bow.
In addition to melee and archery training, there is a Will practise
area on the small island between the two bridges. A relatively
recent addition, the Will practise area comes complete with
state-of-the-art magic-response dummies for practising your
lightning-strike ability until your Mana wears out. Try to stay
clear of the area when apprentices are training—we’ve had too
many unwanted haircuts recently.
The Chamber of Fate
The Chamber of Fate is located through the Guild Library, beyond
the Guild Caves walkway. This is where Hero graduation takes
place, and it is also where you can return at any time to see your
heroic story depicted in fresco, as it unfolds.
Outbuildings and Grounds
Our outbuildings and grounds are unrivalled. Not only is the
scope of the Guild acreage quite extensive—we have our own
woods and a chalk stream flowing through the midst of the
property—but the woods, orchard, and stream all provide wild
game and fish our dining hall staff parlay into nutritious meals
for the apprentices, staff, and servants. Furthermore, apples
from the orchard are yours for the taking. These help replenish
you whenever your energy is low. We don’t tighten our belt when
it comes to developing strong Heroes.
Page 9

XIV
XV
T
he Hero’s
Apprenticeship
The Hero apprenticeship program focuses on the
three most important attributes a Hero must
develop to succeed: Strength, Skill, and Will. Mastery
of all three sets you on the way to greatness, but
to graduate, we only require that you have become
proficient enough to pass a final Guild test.
Strength
Although Strength is primarily physical ability,
that which you have inherited, we do expect you to
strengthen yourself on a daily basis while maintaining
a nutritious diet of wild game and freshly-harvested
produce. Especially after graduating from the Guild,
you will find increasing Strength benefits you through
your being able to carry heavier weapons. You can also
do more damage to opponents in battle.
Skill
Developing Hero-level battle skills requires daily training in
ranged combat. Training in ranged combat primarily focuses
upon use of the bow. The bow may be the most difficult of all
weapons to truly master, but once accomplished, is extremely
useful in combat. If you can see your enemies but they can’t see
you, you’re clearly at an advantage—and with ranged weapons,
enemies can be eliminated at a distance.
Will
Will is, in essence, the ability to use magical powers. The
mastery of Will is the most misunderstood and underrated Hero
ability and at the same time is a particularly distinguishing
characteristic between Heroes. Numerous Will powers are
available, and what you choose to specialize in is up to you.
In Will training, you are first shown one of the most basic
powers—that of the ranged Lightning Spell attack. This basic
attack will always serve you well, but as you gain additional
experience, you can increase your abilities and acquire other
powers. As with melee combat, some powers of the Will are
primarily for close-in encounters, while others are useful from
a distance. With any of them, it is the focus and duration of your
Will that inflicts more damage on your enemy.
During your apprenticeship, we encourage you to
wander the Guild woods and explore the grounds in
your free time. Running across the bridges may be
good exercise, but do be careful about running around
the facilities in your undergarments or apprentice
robe with your sword drawn—this is as dangerous to
others as it is to yourself. After you graduate from the
Guild, increase your Strength by gaining Experience
and then levelling up your physique, health, and
toughness at the Experience Spending Platform.
Strength
Skill
Will
Page 10

XVI
XVII
In-Game Menu/
?
‘
Skip Cutscenes
WASD Controls
Sword
Bow
Reset
Cam
Hero Cam
In-Game Menu
Menu
Items
Hotbar
Items
Context-Sensitive
Items/Expressions
Interact
ESC F1 F2 F3 F4 F5 F6 F7
1 2 3 4 5 6 7 8
Tab
Q W E R T Y U I
Caps
Shift
Ctrl Alt
A S D F G H J K
Z C V B N M
\
Alt
Space
Creep
(toggle)
Spell (hold)/
Collect Orbs
Movement
*Flourish overrules the ability to run.
Normal
Left Middle Right
Attack (click) Block/Roll Flourish/Run
Bow Drawn
Left Middle Right
Fire (rotate) Zoom In/Out
(click) Block/Roll
Guild
Seal
Lock-On
(toggle)
1st/3rd
Person
Map Zoom
(on/off)
9
0
P
O [
L
;
,
.
.
F11 F12
F10F8 F9
Ctrl
Ins Home Pg up
Del End Pg dn
Num
7 8 9
4 5 6
1 2 3
Ins Del
wheel (middle mouse button)
=
Backspace
]
#
‘
? ShiftX
*To roll, rotate the
Enter
while running, or tap a direction key while blocking.
Spellcasting (hold Shift)
Left Middle Right
Spell 1 (rotate) Scroll Spell Pairs Spell 2
Interaction/Cutscenes
Left Middle Right
Yes/Skip (click) Minigame
Instructions
/ *
-
+
Enter
No
Page 11

XVIII
XIX
Arrow Key Controls
?
‘
In-Game Menu/
Skip Cutscenes
In-Game Menu
Sword
Interact
Bow
Menu
Items
Hotbar
Items
Context Sensitive
Items/Expressions
ESC F1 F2 F3 F4 F5 F6 F7
1 2 3 4 5 6 7 8
Tab
Q W E R T Y U I
Caps
Shift Z C V B N M
Ctrl Alt
A S D F G H J K
\
X
Alt
Space
Hero
Cam
Map
Zoom
(on/off)
*Flourish overrules the ability to run.
Normal
Left Middle Right
Attack (click) Block/Roll Flourish/Run
Bow Drawn
Left Middle Right
Fire (rotate) Zoom In/Out
(click) Block/Roll
1st/3rd
Person
9
0
P
O [
L
;
.
,
.
F11 F12
F10F8 F9
=
Backspace
]
Enter
#
‘
?
Shift
Ctrl
Ins Home Pg up
Del End Pg dn
Num
/ *
7 8 9
4 5 6
1 2 3
Ins Del
-
+
Enter
Creep
(toggle)
Reset
Cam
Spell (hold)/
Collect Orbs
*To roll, rotate the
Movement
Lock-On
(toggle)
wheel (middle mouse button)
Guild
Seal
while running, or tap a direction key while blocking.
Spellcasting (hold Shift)
Left Middle Right
Spell 1 (rotate) Scroll Spell Pairs Spell 2
Interaction/Cutscenes
Left Middle Right
Yes/Skip (click) Minigame
No
Instructions
Page 12

XX
XXI
T
he Way of a Hero
Only after graduating from the Guild may you
call yourself a Hero, but this is just the first step.
Becoming a Hero of greatness requires you to
increase both your Renown and your Experience.
To this end, young Heroes must accept increasingly
challenging quests that the citizenry of Albion drop
off at the Guild. These are tasks deemed impossible
for ordinary citizens, and many are thought not
possible even for the mightiest of Heroes. Use the
Quest Card’s description to decide whether or not
a particular Quest suits you according to your
Experience and abilities. As we’ve stated before, it
takes time to become a great Hero, and the path to
greatness is yours for the choosing.
Accepting Quests
To help you decide between the various Quest Cards
available to you, it is important to keep in mind that
gold Quest Cards are those you must complete before
progressing; silver Quest Cards are optional; bronze
Quest Cards appear at key points in the game. To
accept a Quest, click Accept to interact with the map
in the Guild Map Room, click the quest you want, then
click Take Quest.
For Good, or for Evil?
Your actions as a Hero, good or evil, or somewhere in the middle,
determine your alignment, and in turn, your physical appearance.
Generally speaking, when you kill Guards, Traders, or villagers,
you might begin to grow horns, or even attract insects. If you
choose to save Traders and villagers from the evil beasts that
roam the woods, you may have lighter-colored eyes and a
butterfly-friendly demeanour. Good or Evil alignment also
affects the way the people of Albion respond to you.
Gaining Experience
As you go about a Quest, you will gain General Experience, as well
as specific Experience in Strength, Skill, and Will, depending on
the means used to succeed. The approach used to defeat enemies
has a direct bearing on this.
Using melee weapons gains you Experience in Strength. Using
the bow gains you Experience in Skill, and using magic gives you
Experience in the Will. Whichever ability you use to defeat
enemies, when vanquished they leave glowing Experience Orbs.
Walk through them or use your powers of the Will (press Left
Shift to draw them to you), and thereby gain General Experience.
When you gain Experience, notifications show you how much and
what kind of Experience you have gained. Now you can use this
Experience to enhance your abilities at the Experience Spending
Platform at the Guild.
As stated, the Guild makes no morality judgments
with respect to good or evil Quests, and you are free
to pursue your own path. You can kill and steal, or be
noble and help the villagers, defeating villains and
monsters as needed.
Page 13

XXII
XXIII
Gaining Renown
Everything you do affects the way the people
of Albion perceive you. The fair citizens may
love or hate you, as well as respect and fear
you. Or, they might simply laugh at you. The
choices are yours to make, and the type of
Renown you receive from the people in the villages throughout
Albion reflects your decisions. Word travels quite quickly here.
Renown is garnered through your actions in Quests, but Heroes
for hundreds of years have also furthered their Renown by
displaying Quest trophies. It goes without saying that
brandishing a Bandit’s head for all to see cannot help but
promote one’s heroism and great deeds across the land.
Heroic Boasting
You can also boast on the Boasting Platform before going on a
Quest. Just outside the front door of the Guild, the Boasting
Platform is where a Hero can stand up and make a mighty boast
such as “I’ll kill the Balverine while wearing no clothing,” if you
care to expose yourself in this way. Boasts bring you more gold
for completing a Quest, because they are wagers of confidence in
your abilities.
Travelling About Albion
The world of Albion is full of activity. Wild beasts roam the
wilderness preying on Bandits, Traders, wandering nomads, and
careless adventurers. As you travel the world, numerous random
encounters may take place. It is up to you just where you go and
what you do. You are not required to spend all of your time
pursuing Quests from the Guild. As a Hero, your time is your own
and the world is yours to explore as you wish.
However, as you travel, there are times when even a great Hero
finds himself lost in the woods looking for the front entrance
to Orchard Farm. This is where consulting your Mini Map could
aid you. Take a look at the map any time you need to re-orient
yourself by pressing M. For a key to the map, select the Map
heading in your Inventory and scroll down.
For a Hero, travel around Albion is now especially exciting.
This is because the Guild has recently finished construction of a
method of travel no other citizen possesses—that of the Teleport
Pad/Cullis Gate Travel system. Utilizing highly-advanced Guild
ingenuity, this travel system allows any Hero to use a certified
Cullis Gate that has become unlocked upon entering a region.
After one is unlocked, you can travel to that Cullis Gate any time
using your Guild Seal.
You can also use the Guild Seal as a recall device from anywhere
in the world of Albion back to your last location. You may also
teleport back to the Guild at any time, whether it is to quickly
obtain another Quest Card, replenish health, level up abilities, or
eat a quick meal at the Dining Hall. (Note: for your own safety,
please don’t drink mead or ale and then teleport; taking damage
cancels a recall.) Whatever the reason, we encourage our Heroes
to use their Guild Seals to return to the Guild any time they wish.
Our Guild is certainly your Guild.
Page 14

XXIV
XXV
B
uying and Selling
Inventory
The currency in Albion is gold, and as we hope you
learned in your Guild training, you must have gold
to be able to buy anything at all, except peace and
tranquillity—that’s found out on Fisher Creek.
There are many different ways to acquire gold, the
main method being that of completing Quests, but you
can also trade goods or even buy and sell houses and
shops for a profit. Most of the objects in Albion can be
bought and sold, though some, of course, are found in
the course of your travels.
When you have acquired enough gold, you can
purchase important items, such as food, potions,
medicines, and, of course, weapons and armour, for
your Inventory. You can purchase most of these items
in towns such as Bowerstone. Many items are also
available from wandering Traders throughout Albion.
Weapons and Armour
As far as obtaining weapons and armour, a small selection
is available at the Guild Shop, but it is best to look for the
appropriate Trader’s booth or shop in one of the towns or
villages. Be aware that heavier weapons require the Strength
to wield them or they will do you no good. To sell weapons
or armour from your inventory, choose to sell an item while
negotiating with the Trader.
Armour also may be purchased in town from the Armoury.
Additional armour is never a bad idea and may save your
neck, literally. It is not easily affordable, so make sure you have
accumulated enough gold before you try buying armour.
Potions and Medicines
A Hero’s use of potions and medicines is not trivial and should
be considered carefully. Regional apothecaries have built entire
trades out of these potions, but some have proven more useful
for reinvigorating one’s health, while others are primarily for
replenishing Mana. This is by no means an exact art, and the
strengths of potions vary significantly. As a general rule, the
blood-red potions indicate aid to physical health, and the blueazurite blends are for Mana replenishment. There may even be
newer, recently developed blends available, but we do not have
exact details on those yet. An accomplished Hero has learned the
value of keeping these potions on hand.
The fair city of Bowerstone, as with other towns,
offers a number of trading booths along its many
walkways and paths. If there’s an item you are
interested in, press Tab to speak to the proprietor,
and then sort through what he has on offer. You can
sell items from your inventory, such as in a case
where you need gold in a hurry. Be cautious about
getting the right price unless you do not care to make
a profit.
Page 15

XXVI
XXVII
A Hero’s Appearance
Another useful aspect of a Hero’s reputation is his appearance,
including body decorations one can purchase, such as tattoos and
haircuts, and a wardrobe with various suits of clothes. Whatever
the look you are after, the people of Albion will respond in kind.
Choosing Tattoos
You can enhance your appearance—and your reputation—by
purchasing tattoos to adorn parts of your body. In your travels,
you will encounter various tattoo vendors: wandering Traders or
the Tattooist himself. Each has a stock of tattoos you can buy.
Many Traders provide tattoos just as they do consumables and
other items. You can buy or customize tattoos to show your
uniqueness. Or perhaps you are thinking of getting married, and
you have decided you need a change of hairstyle. If this is the
case, visit the Barber of Bowerstone and request one. Do be
careful though, as her razors are always quite sharp.
You also have a standard issue Hero’s wardrobe available in your
Inventory which allows you to change the clothes you’re wearing
at any time. Sometimes, this may even provide a strategic
advantage. For example, you might need to sneak into a Bandit’s
Camp for some reason, and having a quick-change Bandit’s suit on
hand is just right for such an occasion. This allows you to slip into
something more comfortable for mingling with the Bandits, just
as if you were one of their own.
When you encounter a tattoo vendor, he’ll ask if you would like to
purchase a tattoo.
To purchase a tattoo:
1. Click Yes. This displays the Tattooist menu. It shows a list
of the names, prices, designs, and characteristics of the
vendor’s tattoos.
2. Click
3. Select a tattoo from the vendor’s list. When you select a tattoo,
4. Click
Buy x6. Note that the number will vary depending on the
number of tattoos the vendor has in stock.
the menu shows the part of the body (your arms, back, chest,
face, or legs) for which the tattoo is designed.
Buy to purchase the selected tattoo. This applies the tattoo
and deducts your payment. All who see you will know from your
tattoos that you’ve made your way in the world and are worthy
of respect.
Page 16

Customizing Tattoos
Do you want to create unique tattoos that reflect your
individuality? Do you think you can do better than the best
tattoo artists in Albion? Here’s how to do it.
In the Tattoos folder (found under My Documents\My
Games\Fable) you’ll see a folder named after your user profile.
Inside you’ll find a bitmap (.bmp) file for each of the tattoo types
you can customize. These include tattoos for arms, back, chest,
face, and legs.
Open the tattoo type you want to customize in an image-editing
program, such as Microsoft® Paint. After editing the image, save
the result. The next time you pay a visit to a Tattooist in the
game, your customized tattoo will be available for application in
the same way as those found on Tattoo Cards.
If you ever need to revert to one of the original tattoo images,
you will find them in your Fable installation folder (Microsoft
Games\Fable - The Lost Chapters\Data\Tattoos). Copy the
original bitmap file over the custom tattoo you want to replace.
Be sure to delete –base from the filename.
nhancing Abilities
and Weapons
E
Experience. This does not go unrecognized by the Guild, and, for
that reason, we created the Experience Spending Platform.
At the Experience Spending Platform, opposite the Guild Teleport
Pad in the Map Room, you can enhance your present abilities or
even gain new ones. To use the Experience Spending Platform,
first walk onto it. Select the ability to enhance or the new ability
to add. As you scroll over an item, view the points required for it,
as well as details about what the ability provides for you.
Each additional ability level requires an ever increasing amount
of Experience points. You can use General Experience points on
anything, but Experience in Strength, Skill, or Will can only be
spent on the associated ability and must be used up first, before
using General Experience. After you make a selection, click Buy.
When you are done levelling up, exit the menu.
Augmenting Weapons
Not only are there a number of weapons with varying capabilities
available to a Hero, but some weapons are augmentable. An
augmentable weapon has additional slots next to it when you
select it from Equipment/Weapons in your Inventory.
As mentioned, when you complete Quests and other
adventures in Albion, you accumulate valuable
XXVIII
For augmentations, you need augmentation jewels. You can find
these jewels in a number of places: from blacksmiths, Traders, the
Armoury, or in parts of Albion where jewels have been hidden or
forgotten. To perform an augmentation, select the weapon, then
click Augment. Select the augmentation you want from the list,
and the newly-augmented weapon is ready for use. After you
augment a weapon, you cannot remove the augmentation, so
choose wisely.
XXIX
Page 17

Credits
XXX
XXXI
Fable & Fable TLC Lead
Fable & Fable TLC
Solely Fable TLC
Solely Fable
LIONHEAD STUDIOS
DESIGNERS
Peter Molyneux
Dene Carter, Lead
Julian Glover, Lead
Richard Ham
Ben Huskins
Josh Atkins
CODERS
Simon Carter, Lead
Alex Dowdeswell, Lead
Martin Bell
Ben Board
Kaspar Daugaard
Iain Denniston
Matt Dixon
Mike Ducker
Tak L. Fung
Alan Harding
Joss Moore
Thanos Nikolopoulos
Guillaume Portes
Ollie Purkiss
Adam Russell
Jonathan Shaw
Daniel Smith
Dave Smith
SCRIPTERS
Ben Board, Lead
Mike West, Lead
Rhodri Broadbent
Tony Burton
Bennie Cook
Steve Lawrie
Ken Malcolm
Phil Robinson
Mark Rose
Neal Whitehead
ANIMATORS
Dean Finnigan, Lead
Gianni Malpeli, Lead
Karim Biri
Chris Darling
Paul Franklin
Luc Lemaire
Andrew Lindsay
Francis Pang
ARTISTS
Ian Lovett, Lead
Ian Faichnie, Lead
Pete Amachree
Andy Bass
Christian Bravery
Damian Buzugbe
Dominic Clubb
Jamie Durrant
Kareem Ettouney
Chris Furr
Mark Healey
Caroline Jeffries
Martin Johnson
John McCormack
Paul McLaughlin
Adam Sibbick
Leroy Simpson
Mark Smart
Angus Syme
Rob Watkins
WORLD CREATION
Julian Glover, Lead
Rob Stevens, Lead
Phil Noyce
Katie Roberts
WRITERS
James Leach, Lead
Mark Hill, Lead
CINEMATOGRAPHY
Georg Backer
John Bye
P.J. Hughes
David Le Merrer
Paul Nettleton
AUDIO
Russell Shaw, Lead
Fable Intro Theme
Composed by Danny
Elfman & Mixed by
Dennis Sands
Music Composed by
Russell Shaw
Craig Beattie
John Silke
Design - McCree
Music Ltd
AUDIO CODER
Paul Knight
PRODUCTION
Mark Webley,
Executive Producer
Louise Copley,
Studio Head
Nick Ricks
ASSOCIATE
PRODUCERS
Will Braham
Antonia Cullum
Adrian Price
Shaun Rutland
Jennifer Stanners
Rob Stevens
TEST DEPARTMENT
Andy Robson,
Head of Testing
Nathan Smethurst,
Assistant Head
Jeff Brutus, Lead
Charlton Edwards,
Assistant Lead
Chris Berry
Rob den Dekker
Kiernan Sleep
Jeremie Texier
Ted Timmins
Kevin Watt
Marcus Welfare
MICROSOFT GAME
STUDIOS
PRODUCERS
Jeff Holzhauer
Rick Martinez
Danan Davis,
Executive Producer
TEST LEAD
Patrick Barker
Erika Carlson
TEST TEAM
Kevin Dodd
Michael Forgey
Jeff Goetz
Mark Grimm
Chris Hind
Bryce Jones
Steve Larson
Ian Latham
Tian Li
Gregory Murphy
Jeff MacDermot
Justin Robey
Steve Robinson
Tiffany Walsh
Howie Catlin
Jeff Cloud
Khoi Duong
Natahri Felton
Josh Kragness
Clint Kreider
Aaron McKee
Ash Singh
Pete Stephens
PRODUCT
PLANNERS
Todd Stevens
Jay Ong
■
■
■
■
■
■
■
■
DEVELOPMENT
Orest Zborowski Mgr.
Jesse Janosov, Lead
J.C.A Baeza
Craig Cook
Glenn Doren
Phil Teschner
Craig Henry (Setup)
ART DIRECTOR
Kiki Wolfkill
AUDIO DIRECTOR
Matthew Lee Johnston
USER EXPERIENCE
Keith Cirillo, Lead
Beth Demetrescu,
Editor
Jon Seal, Writer
MANUAL DESIGN
Dana Ludwig, Lead
Doug Startzel
USER TESTING
Ray Kowalewski, Lead
Ben Babcock
LOCALIZATION
Jenni Gant
Virgina Spencer
PRODUCT MANAGERS
Craig Davison
Josh Goldberg
PRODUCT SUPPORT
Anthony Walp
SPECIAL THANKS
Autumn Allen
Chenelle Bremont
J. M. Byrd
Jama Cantrell
Hubert Cheng
Tom Edwards
Greg Jones
Shane Kim
Ken Lobb
Jeremy Los
Jimbo Pfeiffer
Phil Spencer
Keith Steury
Sue Stickney
The Loc Teams in
Ireland, Japan, Korea
and Taiwan
Data compression by
oberhumer.com
■
Volt
■
Excell Data Corp.
echnical Support
In the U.S., visit
T
In Canada, visit http://www.microsoft.ca/support
Outside the U.S. and Canada, visit
http://support.microsoft.com/international.aspx
On these Web sites, you can:
Download the latest updates.
Find Microsoft Knowledge Base articles that target specific issues.
View “Show Me How” videos for solving common problems.
Access other support services.
Microsoft support services are for technical issues only—please do not use
them to request game hints, codes, or cheats.
http://support.microsoft.com/games
■
Chat & E-mail Support: To chat immediately with a Microsoft Support
Professional, or to submit your issue by e-mail (e-mail responses may be
delayed by several hours), visit the location-appropriate Web site listed
above.
Phone Support: To speak with a Microsoft Support Professional (long hold
times may be experienced), in the U.S. call (800) 537-8324 and in Canada
call (800) 876-8533.
TTY Support: To use Microsoft text telephone, in the U.S. call
(800) 892-5234 and in Canada call (866) 857-9850.
Conditions: Microsoft’s support services are subject to then-current prices,
terms, and conditions, which are subject to change without notice.
.
.
.
Page 18

© 2005 Microsoft Corporation. All rights reserved.
Microsoft, the Microsoft Game Studios logo, Age of
Empires, and Ensemble Studios are either registered
trademarks or trademarks of Microsoft Corporation in
the United States and/or other countries.
 Loading...