

Page 1
TECHNICAL MANUAL
PILOT
Anaesthesia 2
Page 2

TABLE OF CHANGES
The information given in this document only concern devices of PILOT anaesthesia 2.
Technical reference N° ...................... .....................NT 0818
Revision date: ................................... .....................09/03/99
Applicable from serial N°.................... ..................... 16685686
Date Revision no. Pages concerned Changes
20/10/98 A0 all creation
09/03/99 A1 4
34
49
54
69
New block diagram.
3.2.3. UC board -> Power Supply board.
11: Check anti-siphon arm functionnamity.
Trouble shooting.
Up grade design ref.
Page 3

Page 4

Page 5

TABLE OF CONTENT
1 OVERVIEW.......................................................................................... 4
1.1. Block diagram..........................................................................................................4
1.2. Precautions before use.............................................................................................5
1.3. Overall product specifications ..................................................................................5
1.3.1. Biological specifications.........................................................................................5
1.3.2. Mechanical specifications......................................................................................5
1.3.3. Dimensions ...........................................................................................................5
1.3.4. Electrical specifications..........................................................................................5
1.3.5. Electronic specifications ........................................................................................5
1.3.6. PILOT anaesthesia 2 Operator's guide..................................................................5
2 ELECTRONIC BOARD........................................................................6
2.1. MOTOR POWER SUPPLY AND CONTROL BOARD .............................................. 6
2.1.1. Functional description............................................................................................6
2.1.2. Description of connectors.................................................................................... 13
2.1.3. Electrical layout................................................................................................... 15
2.1.4. Installation layout .................................................................................................15
2.2. CPU BOARD..........................................................................................................16
2.2.1. Functional description..........................................................................................16
2.2.2. Description of connectors.................................................................................... 19
2.2.3. Electrical layout................................................................................................... 21
2.2.4. Installation layout .................................................................................................21
2.3. DISPLAY BOARD.................................................................................................. 22
2.3.1. Overview.............................................................................................................22
2.3.2. Functional description..........................................................................................22
2.3.3. Description of connectors.................................................................................... 24
2.3.4. Power consumption............................................................................................. 24
2.3.5. Electrical layout................................................................................................... 24
2.3.6. Implantation layout ..............................................................................................24
3 CONFIGURATIONS, CALIBRATIONS AND CHECK........................25
3.1. CONFIGURATIONS...............................................................................................25
3.1.1. Configuration of the pressure functions................................................................25
3.1.2. Moving to the pressure configuration mode.......................................................... 25
3.1.3. Other parameters configuration ...........................................................................26
3.2. Calibration..............................................................................................................33
3.2.1. Three tension levels of battery calibration: EtAL.4.............................................33
3.2.2. Movement sensor calibration: EtAL.6................................................................34
3.2.3. Strength sensor calibration "EtAL.9" .................................................................34
NT 0818 Rev.A1 page : 1
Page 6

3.3. CHECKING THE PILOT.........................................................................................35
3.3.1. The After Sale Service test ..................................................................................35
3.3.2. Running time tESt.1........................................................................................36
3.3.3. Lights test tESt.2............................................................................................36
3.3.4. Key board test tESt.3.......................................................................................36
3.3.5. Battery voltage display tESt.4.......................................................................... 37
3.3.6. Last 10 alarms codes tESt.5...........................................................................37
3.3.7. Total running time tESt.6 ................................................................................38
3.3.8. TTL Serial link test: tESt.7...............................................................................38
3.3.9. Serial link test: tESt.8....................................................................................... 38
3.3.10. Strength on the plunger display: tESt.9......................................................... 38
3.3.11. Software version tESt.A .................................................................................39
3.3.12. Analog input display tESt.B............................................................................39
3.3.13. Driving block position display tESt.C...............................................................39
3.3.14. Buzzer test tESt.d..........................................................................................39
3.3.15. Calibration values display tESt.E....................................................................40
3.3.16. Syringe type display tESt.F............................................................................ 40
3.3.17. Displays of the last 10 events before the last blocking error tESt.J................. 40
3.3.18. Drug library tESt.L .........................................................................................40
4 REPLACING SUB-ASSEMBLIES......................................................41
4.1. Mounting the flexible circuit....................................................................................41
4.2. Wiring the components on the flexible circuit .........................................................42
4.2.1. Mounting the potentiometer.................................................................................43
4.2.2. Wiring the potentiometer ..................................................................................... 43
4.2.3. Plug holder connector..........................................................................................44
4.2.4. Lubricating the mechanical parts .........................................................................44
5 MAINTENANCE................................................................................. 45
5.1. Recommendations................................................................................................. 45
5.2. Cleaning and disinfection.......................................................................................45
5.3. Storage.................................................................................................................. 45
.........................................................................................................................................
.........................................................................................................................................
.........................................................................................................................................
.........................................................................................................................................
5.6. Checking disengagement system........................................................................... 50
5.7. Checking force sensor............................................................................................50
5.8. Checking back-pressure.........................................................................................50
5.9. Checking registered syringe list /syringe list label...................................................51
5.10. Checking Mains/Battery operation........................................................................51
5.11. Checking linearity.................................................................................................51
5.11.1. Equipment used ................................................................................................51
5.11.2. Operating mode.................................................................................................52
Page : 2 NT 0818 Rev.A1
Page 7

5.12. Checking end of infusion......................................................................................53
5.12.1. End of infusion pre-alarm...................................................................................53
5.12.2. End of infusion alarm......................................................................................... 53
5.13. Checking the Led's and keyboard.........................................................................53
5.14. Battery autonomy test .......................................................................................... 53
5.15. Continuity test ......................................................................................................53
5.16. Trouble Shooting.................................................................................................. 54
5.17. Error message Er(-)0, Er01, Er(-)2, Er03, CFPc ...................................................55
5.18. Flow rate control protocol: flow rate measurement with computer......................... 55
5.18.1. Equipment used: ............................................................................................... 56
5.18.2. installation......................................................................................................... 56
5.18.3. Operating mode.................................................................................................57
5.18.4. Installation drawing............................................................................................ 57
5.19. Flow rate control: flow rate control measurement with scales................................ 57
5.19.1. Equipment used: ............................................................................................... 57
5.19.2. Installation.........................................................................................................58
5.19.3. Operating mode.................................................................................................58
5.20. Flow rate control: flow rate measurement using a test tube................................... 59
5.20.1. Equipment used ................................................................................................59
5.20.2. Installation.........................................................................................................59
5.20.3. Operating mode.................................................................................................59
6 ANNEX 1: ILLUSTRATED PARTS LIST........................................... 61
6.1. Subassembly traceability table...............................................................................61
6.1.1. Introduction .........................................................................................................61
6.1.2. Replacement parts table ......................................................................................61
6.2. Exploded views and related parts lists.................................................................... 62
6.2.1. Mechanical part list..............................................................................................62
6.2.2. Electronical parts list............................................................................................ 67
6.2.3. Operator’s guide of PILOT anaesthesia 2 (NU).................................................... 68
6.2.4. Labels .................................................................................................................68
7 ANNEX 2: ELECTRONIC LAYOUT................................................... 69
7.1. Rear door wiring..................................................................................................... 69
7.2. Power supply and control board.............................................................................. 69
7.2.1. Electronic layout..................................................................................................69
7.2.2. Installation layout ................................................................................................ 69
7.3. CPU board............................................................................................................. 69
7.3.1. Electronic layout..................................................................................................69
7.3.2. Installation layout ................................................................................................ 69
7.4. Display board.........................................................................................................69
7.4.1. Electronic layout..................................................................................................69
7.4.2. Installation layout ................................................................................................ 69
8 ADDENDA AND INFORMATION BULLETINS
9 USEFUL ADDRESSES
NT 0818 Rev.A1 page : 3
Page 8
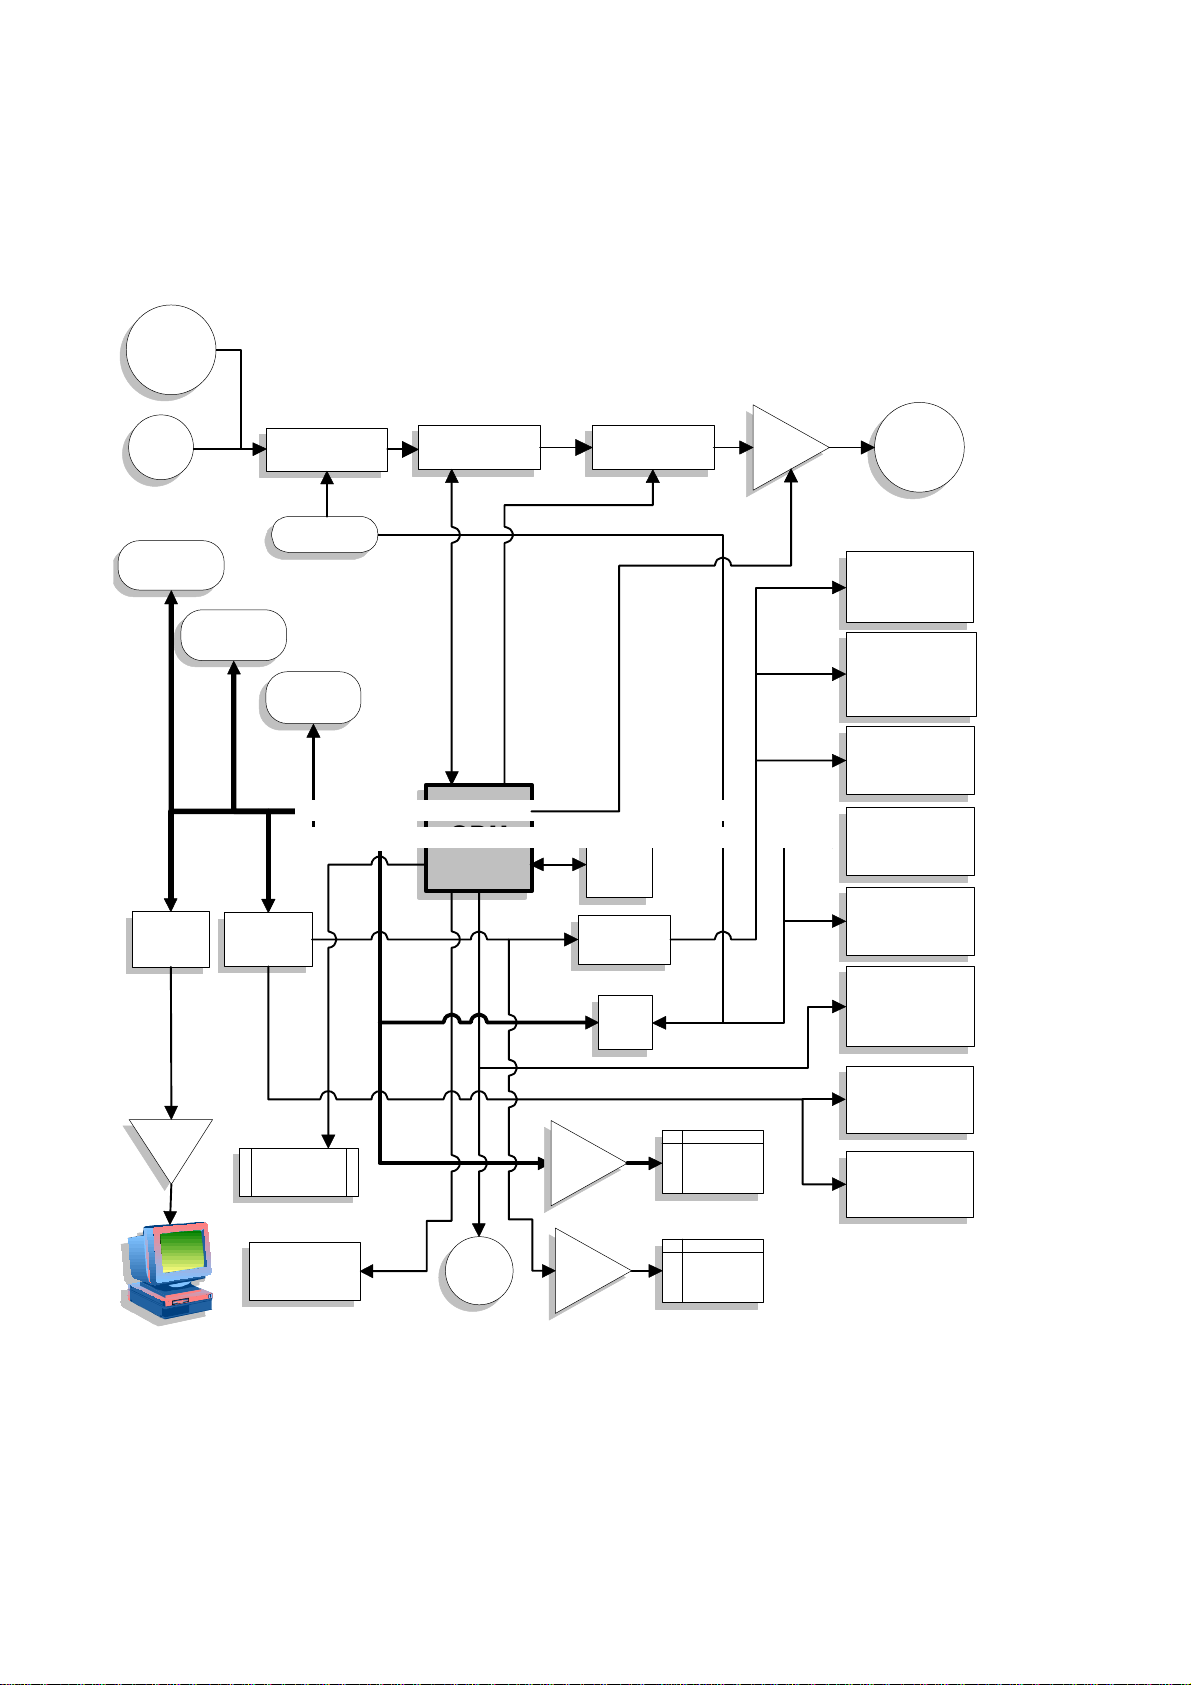
1 OVERVIEW
1.1. Block diagram
Ext
12/15V
15W
230V
EPROM
128K x 8
UART
RAM
8K x 8
interface
Power supply
Battery
EEPROM
512
Bus
BUS
SPI
ON / OFF
CPU
DC-DC
Converter
Watch
dog
opto
Interface
ADC
Motor
driver
Step
by step
motor
Motor
rotation
sensor
Syringe
barrel
sensor
Antisiphon
sensor
Occlusion
strength
sensor
Displacement
sensor
Nurse
call
(option)
Disengagement
Switch
RS232
Keyboard
Master
Buzzer
LCD
driver
LED
driver
LCD
Display
LED
Display
Flange
Switch
Page : 4 NT 0818 Rev.A1
Page 9

1.2. Precautions before use
Please consult the user guide
1.3. Overall product specifications
1.3.1. Biological specifications
Infusion liquid only comes into contact with the syringe and associated disposable.
1.3.2. Mechanical specifications
Device operation is based on a "lead screew/nut" principle. The mechanism pushes the piston of a syringe, of a given diameter, in a linear manner.
1.3.3. Dimensions
q H x L x D120 x 330 x 155 mm.
q CarrWeight 2.2 kg approximately.
1.3.4. Electrical specifications
q Power supply 230V - 50-60 Hz.(Check on the pump the identification label).
q Maximum consumption 23 VA.
q Fuse F2 100 mAT 250V IEC 127
q Battery 6V - 1.2Ah./1.3 Ah
q External power supply 12 - 15 DC - 15W
1.3.5. Electronic specifications
The PILOT anaesthesia 2 syringe pump is fitted with 3 circuit boards whose features vary in line with
product specifications and options.
q Motor power supply and control board.
q CPU board.
q Keyboard display board.
1.3.6. PILOT anaesthesia 2 Operator's guide
Operator's Guide can be obtained from our After Sales Service (see chapter 10.Useful addresses).
NT 0818 Rev.A1 page : 5
Page 10

2 ELECTRONIC BOARD
2.1. MOTOR POWER SUPPLY AND CONTROL BOARD
2.1.1. Functional description
In order to simplify wiring the motor power supply control board concentrates 6 functional modules,
which may be described separately:
q power supply module,
q motor control module,
q analog output module,
q disengage and anti-siphon opto switch module,
q microswitch input module,
q optional nurse call and RS232 interface module.
2.1.1.1. Power supply module
The power supply module consists of a cut-out power unit. It supplies all electronic components and
charges a 1,1 Ah / 1,2 Ah backup battery from a mains voltage input or a 12/15 volt DC power source. It
generates the + 5V and Vbat voltage required by the electronic components. Finally it comprises an
ON/OFF switch controlling the various power supplies.
2.1.1.1.1. Mains power supply
The mains power supply generates a DC voltage ranging from 10 and 16 volts for a maximum current of
1,2 A.
J1 mains input connector: 1 phase
2 neutral
Transformer: TR1(see Electrical chart), 15VA output voltage: 9 Vac
Fuse protection: F2 Principal characteristics chap1.1
Primary filtering 4.7 nf 4000 V HR capacitor, type DS1510 VDE
Secondary filtering C10 Chemical Capacitor
Output voltage measured on TP3 for mains voltage: 230V measured (±± 10%)
Min Max Unit
power off: 14 16 V dc
7 ohm charged on J4: 10 16 V dc
primary current charged: 80 mA ac
Maximum voltage 16 volts limited by the diode D 41
Minimum voltage 10 volts limited by the mains voltage - 10% and U1(MAX 652)
voltage higher than 10 volts.
Page : 6 NT 0818 Rev.A1
Page 11

2.1.1.1.2. External 12-15V AC/DC power supply
The DC power supply input is designed to provide the syringe pump with a constant, external power
source, such as a 12V battery.
Maximum input voltage ± 15 volts protection against polarity inversion by the PR2 WO4 diode bridge.
Minimum input voltage ± 11 volts 1.2 A limited by input voltage MAX 625 and loss, diode bridge on the PR2.
Limitation ± 16 volts maximum for through D 41.
2.1.1.1.3. Cut-out charger/controller
The controller is powered either from the mains or from an external DC power source. It generates a
maximum voltage of 6.9V VBC, as required to charge the 1.1/1.2 Ah gelified lead battery, connected to
J4, and power the electronic components.
J4 Connector: 1 battery +
2 battery -
VBC power comes directly from the battery if neither the mains nor the external power source are connected. Otherwise power, from an external source, supplies the electronic components and charges the
battery via diode D8 and the delayed protection fuse, F1, 1.6A.
Maximum fuse resistance 0.5 Ohms
Controller operation is indicated by two signals responsible for reporting operation using an external
power source either mains power or the external DC power unit.
LDSECT 10 mA drives a diode which checks that the SECT diode is on, using a TTL signal, with + 5V
pull up collector open, mains presence active at 0.
Cut-out controller: U1(MAX625) output voltage 7.05V 1.3 A min
Output voltage measured on J4.1
for 230 V mains:
Min. Max. Unit
Power OFF 3 mA charge on J4. : 6.7V 7V V DC
8 ohm charge on J4: 6.5V 7V V DC
On J4 the voltage must never exceed 7V, the maximum voltage of the charged battery.
The 6.5 minimum voltage is higher than the battery pre-alarm threshold.
2.1.1.1.4. ON/OFF control
The VBAT and + 5V control system is implemented using the following circuits: U2 4011, U4 4528 and
an G6AK 234P flip-flop relay.
This system is powered, at all times, by the VBC voltage.
2.1.1.1.4.1 System:
3 inputs:
TON ON key dry contact/GND
TOFF OFF key dry contact/GND
CDALIM active TTL signal with voltage cut-out
2 ouputs:
VBAT Battery power/mains power.
OFF TTL signal collector, + 5V PULL-UP open, OFF key pressed down, active at 0
NT 0818 Rev.A1 page : 7
Page 12

2.1.1.1.4.2 Operation:
Press TON briefly to turn power on.
Press TOFF continuously (5s<t<7s) to turn power off during a technical Failure.
Press OFF 3 seconds to power OFF via CDALIM micro signal.
The device can set ON or OFF via an external. Master module using the CD ON or CD OFF signal.
2.1.1.1.5. VBAT and + 5V power supply
VBAT voltage corresponds to mains voltage taken directly from the power unit/charger. Voltage is not
controlled. It powers the display system and the motor, both of which are heavy duty energy consumers.
This voltage is available on TP1 and J2
Min Max
VBAT 6,5V 7V
The + 5V ± 5% is generated, using VBAT voltage, by the NS 2931 V3 controller low drop-out 0.6V for a
100 mA output current.
It is thus possible to make the best possible use of the battery.This voltage is available on TP2.
The 5V rise time must be greater than 100 ms to allow for the RESET function on the CPU board.
2.1.1.2. Motor control module
The control module of step by step motor is equipped with a gear reduction of 89.286. which makes the
double threaded screw 2 mm turn.
- One motor step is equivalent to 0.8233 µm of linear displacement of the driving bloc.
- One motor turn is equivalent to 22.4 µm of linear displacement of the driving bloc.
2.1.1.2.1. Motor control
PILOT anaesthesia 2 motor control is implemented by a stepper motor driver, dual pole control module
for a motor - UBB 5N model - (11.5 Ohm coil) built using an ST L293E IC7 motor control circuit.
It features two functional modules:
The motor control electronic parts, built around the L293E U13 circuit, optimizes consumption and opti-
mal motor torque according to the pump flow rate.
2.1.1.2.1.1 Input signals
These signals are generated by the CPU board microprocessor and available on J02.
They drive the U15 ULN2803 circuit.
2.1.1.2.1.2 Output signals
These signals are connected to the motor coils via J5 connector.
Phase A A Motor phase control J2.5
Phase B B Motor phase control J2.6
Phase C C Motor phase control J2.7
Phase D D Motor phase control J2.8
I Motor current reduction control J2.9
B00ST Booster activation and regulation current J2.10
Page : 8 NT 0818 Rev.A1
Page 13
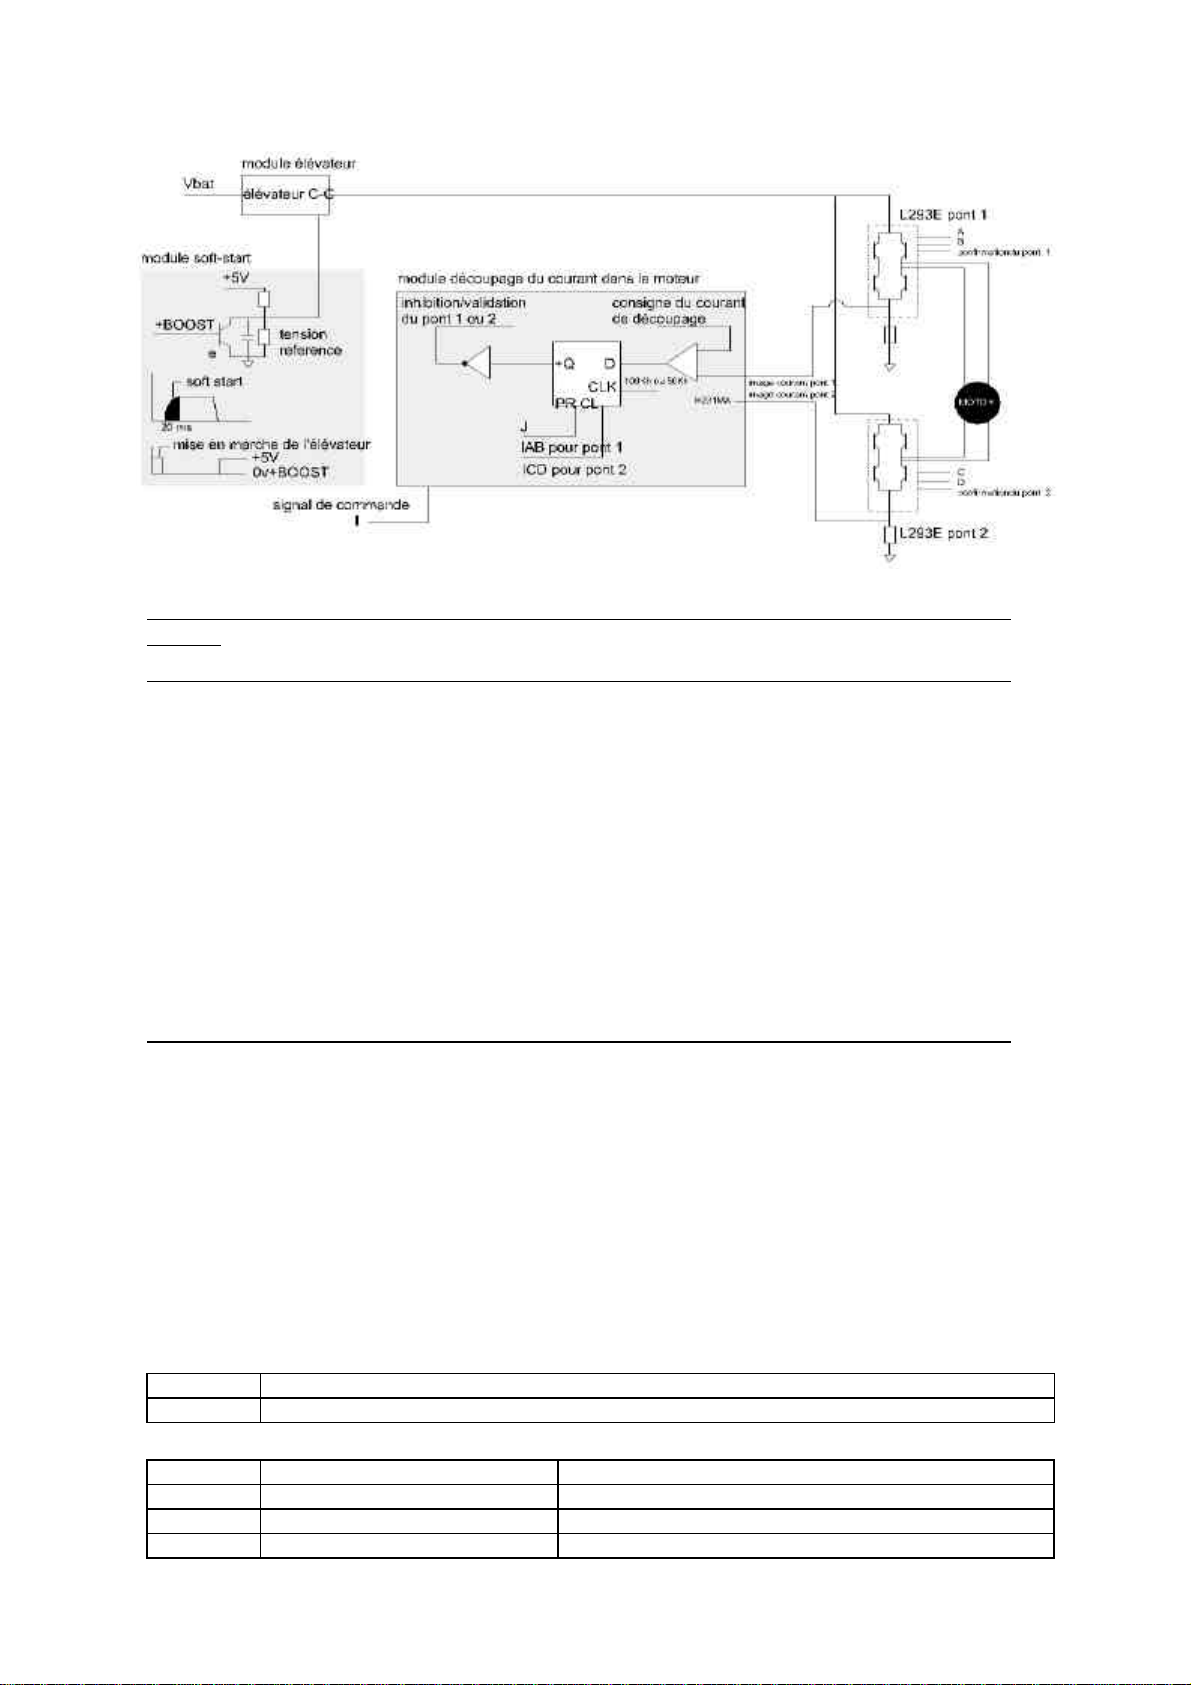
2.1.1.2.1.3 Booster module
BOOST = 0 The motor is powered via VBAT voltage.
BOOST = 1 Booster function activated, the motor is powered at 12 Volts.
L2 reactor, D18 diode, C15 capacitor and T8 transistor assembly allows a voltage of 12 V +/- 2 volts to
be obtained from VBAT.
This voltage is available on TP5.
The uncoupling frequency, 100 kHz, is generated by U9 oscillator, the booster is activated when the
boost line is at 1.
2.1.1.2.1.4 Soft-start module
The soft-start module, which is designed around the T9 transistor and C21 capacitor allows the pick up
current of the uncoupling elevator to be limited when BOOST goes to 1.
2.1.1.2.1.5 Current regulation module
BOOST = 1 and I = 1 regulation motor current module is activated.
The regulated current in the motor is 240 mA +/- 10% per motor phase.
The signals amplitude and current image are available in TP6 and TP7.
The current image of each coil is compared to a fixed level, which is implemented from the Divider
bridge using R31, R41/R37 and R42.
The control is achieved through the U11 toggle, via a divider bridge by inhibition or confirmation of the
L293E control H bridge driving the CE1 and CE2 inputs.
The calibrating frequency of 25 kHz is supplied by the U10 toggle.
2.1.1.2.1.6 Reduction current module
When the Boost signal sets at 0, the I line is used as current reducer.
I = 1 The H divider bridge is controlled by the A, B,C and D lines.
I = 0 The H divider bridge is inhibited, the coils are not forwarded.
According to its rotation frequency (step/second), the motor is driven in one of the 3 control modes.
Mode Frequency motor (step/second) Control description
Phase 1 from 0 to 32.3 Current reduction one ON supply
Phase 2 from 32.3 to 90 No current reduction and regulation, one ON supply
Phase 3 from 90 to 850 Current reduction, booster ON two supply
NT 0818 Rev.A1 page : 9
Page 14

2.1.1.3. Analog output module
The analog output module is built around a 10 bit, 5 channel analog/digital converter (MC 145053 U17)
with an SPI bus.
The following SPI CLK, SI, SO, CSADC bus signals are available on connector J2:
In addition the component generates an end of conversion signal (EOC).
The CDANA signal, which is active when set to 1, controls the transistor T14 IRFD 9120 which digitally
drives VREF. This voltage supplies the sensors and serves as a reference value for the ADC convertor.
All the test points are concentrated on connector J9.
Measurement of VREF on J9.7
VREF Pulsated signal of 5Volt ± 0.25V.
Convertor input:
ANO VBAT battery voltage measurement.
AN1 not in use
AN2 internal occlusion gauge bridge
AN3 NU
AN4 Absolute potentiometric position sensor
2.1.1.3.1. Battery voltage measurement
VBAT voltage is measured using a peak detection circuit comprising D19, R59, R60 and C23 in order to
overcome the lower voltage created by the motor's pulsing demand for current.
The voltage is available on J9.3.
For VBAT = 6.5V, V(J9.3)= 4V ± 10% motor running at 150 ml/h
2.1.1.3.2. Gauge bridge interfaces
The only PILOT anaesthesia 2 includes a force sensor fixed on the pusher.
2.1.1.3.2.1 Force sensor characteristics
Sensor technical Complete bridge with 4 gauges
Impedance 350 Ohms ± 15% or 1 KOhms ± 15%
Measurement range 0 to 150 N
Surcharge 250 N
Zero
< ± 10mV
Sensibility 8.5 to 12 mV at 150 N
zero derivation
2.1.1.3.2.2 Operation
85 µV /year
The force sensor generates a differential voltage proportional to the force sensor applied on the driving
bloc. This force is amplified by a gain of 200 +/- 20% via an amplifier built around U18 TLC 251. The
potentiometer P1 allows the offset to be compensated and for any other offset to be reset from the beginning. The sensor measurement chain transfer function can be defined by calibrating the sensor with
two known forces.
AN3 J9.4 Pulsated amplitude signal sets at 0.6 V +/- 0.05 V for no force applied on the driving bloc
2.1.1.3.2.3 Force sensor connector
J8.1 VREF Gauge bridge power supply (+)
J8.2 S(-) Out put Gauge bridge (-)
J8.3 S(+) Out put Gauge bridge (+)
J8.4 GND Gauge bridge power supply (-)
Page : 10 NT 0818 Rev.A1
Page 15

2.1.1.3.3. Driving bloc position sensor
The absolute position of the driving bloc is obtained by a potentiometric sensor driven by a movement
of the driving bloc.
The transfer function of the sensor can be characterized by calibration in two known positions.
The sensor is powered by a pulsated voltage. The output is filtered by R62 and C22 linked directly to the
input AN4 (J2)
Potentiometer connector:
J3.1 VREF
J3.2 Center point J9.2
J3.3 GND
2.1.1.4. Opto switch module
The opto switch module comprise 2 optical switches:
q A motor rotation detection switch
q A syringe position head detector switch
2.1.1.4.1. Motor rotation opto
The opto switch is mounted on a disk which is pierced with a hole and assembled on the motor.
It is used to check motor rotation, the opto diode is controlled in pulse mode to save energy.
The optical switch is connected on J5.
Control T11 transistor Current limitation (R51) at 8mA
Output T10 transistor TTL level
J2.14 Control signal CDOPT1 activate at 1
J2.11 Output signal SOPT1 activate at 1
J5.7 Diode anode
J5.8 Diode cathode
J5.10 Transistor transmitter
J5.9 Transistor collector
TdON max 100 µsec
TdOFF max 200 µsec
An anti-rebound device made of U20 flip-flop, reshapes the SOPT1 signal.
The CDOPT1 and SOPT1 are emitted by the CPU board, and available on J2 connector
2.1.1.4.2. Anti-siphon opto switch
The opto switch is mounted on the plunger holder, it is used to check the presence or not of the syringe
head.
It is connected on J8 connector.
Control T12 Transistor Current limitation (R52) 8mA
Output T13 Transistor TTL level
Control signal CDOPT2 activate at 1 J2.15
Output signal SOPT2 activate at 1 J2.12
Anode diode J8.6
Cathode diode J8.5
Transistor transmitter common ground J8.10
Transistor collector J8.7
SOPT2 0V Anti - siphon present
SOPT2 5V Anti - siphon missing
NT 0818 Rev.A1 page : 11
Page 16

J8 is the ribbon cable linking the occlusion, disengagement and position sensors located on the syringe
pump driver.
The CDOPT2 and SOPT2 signals are emitted by the CPU board and available on J2 connector.
The opto diode is powered by pulsated voltage in order to save energy.
2.1.1.5. Micro switch module
2.1.1.5.1. Disengagement micro - switch
The microswitch is mounted on the driving bloc ribbon cable. The center point of the microswitch is connected to the ground.
The signals are available on J2 connector.
J8.8 DEB/ON NU
J8.9 DEB/OFF OV engaged / 5V disengaged
J8.10 GRD
2.1.1.5.2. Nurse call option
This is implemented by a monostable inverter relay RL2, whose two contacts and common point are
available on J6 connector, the relay is driven by the BUZ signal which also drives the buzzer on the
display board.
J6.6 common point
J6.7 contact normally open cut out power 24V/ 1A
J6.8 contact normally shut
2.1.1.5.3. RS 232 option
The RS232 option interface RXD1 and TXD1 signals, in compliance with the V24 standard, signals
come from the UART 2691 serial link external controller on the CPU board. It is implemented using a
U19 LT 1180 CS circuit, associated with +/- 12V voltage generator, C31, C32, C33, C34 capacitors. This
circuit is operational only if the pins 2 and 5 of J6 are short-circuited.
J6.1 output transmits data TX1
J6.2 +5V (DSR)
J6.3 input receives data RX1
J6.4 GND
J6.5 confirmation (DTR)
J6.17 CTS
J6.18 RTS
2.1.1.5.4. Configuration link and Master plug
The syringe pump PILOT anaesthesia 2 may be fitted to master module connected to the SUB 15 points
plug located on the pump rear panel.
The module master communication link is done by the RX2 and TX2 signals.
J6.13 +VBAT Master power
J6.14 RX2 Receive data
J6.15 TX2 Transmit data
J6.16 GND Master ground
J6.9 CD-ON Syringe pump ON via master
J6.10 CD-OFF Syringe pump OFF via master
J6.12 I-SECT Master led main signal
J6.11 I-OPTOM Motor rotation opto master control signal
J6.19 BUZ Pilot buzzer command signal
Page : 12 NT 0818 Rev.A1
Page 17

2.1.2. Description of connectors
2.1.2.1. J1 mains connector
Pin description
1 Neutral
2 Phase
2.1.2.2. J2 board / CPU connection
Pin Description
1 + 5V controlled power supply
2 GND power supply
3 + VBAT power supply
4 GND power supply
5 phase A motor control
6 phase B motor control
7 phase C motor control
8 phase D motor control
9 I signal motor control
10 BOOST signal booster command
11 sopt1 opto rotation module out put
12 sopt2 opto anti-siphon module out put
13 not in use
14 cdopt1 opto rotation control module
15 cdopt2 opto anti-siphon module control
16 OFF signal off key pressed ON/OFF
17 SECT mains power on signal power supply
18 CDALIM power cut signal
19 LDSECT mains LED control
20 CTS clear to send
21 DEB/OFF disengage signal active, set to 0
22 RTS request to send
23 OCC/OFF occlusion signal active, set to 0
24 BUZ nurse call relay control
25 EOC end of conversion ADC
26 CSADC selection bus SPI ADC
27 CLK clock bus SPI ADC
28 SI data IN bus SPI ADC
29 SO data out bus SPI ADC
30 CDANA analog sensor power control
31 RX2 receive data TTL line 2
32 TX2 transmit data TTL line 2
33 TXD1 transmit data TTL line 1
34 RXD1 receive data TTL line 1
35 TOFF OFF key
36 TON ON key
37 + VBAT power supply
38 GND power supply
39 + 5V power supply
40 GND power supply
NT 0818 Rev.A1 page : 13
Page 18

2.1.2.3. J3 potentiometric sensor connector
Pin Description
1 VREF
2 center point
3 GND
2.1.2.4. J4 internal battery connector
Pin Description
1
2
2.1.2.5. J5 motor connector
Pin Description
1 + VBAT
2 + VBAT
3 PHASE D
4 PHASE C
5 PHASE B
6 PHASE A
7 opto rotation anode diode/ + 5V
8 opto rotation cathode diode
9 opto rotation collector transistor
10 opto rotation transmitter transistor / GND
battery +
battery -
2.1.2.6. J6 rear panel connector
The connector on the rear panel concentrates signals from the external gauge bridge, the optional
RS232 series link, the nurse call relay output and the configuration series link.
Pin Description
1 TX1 transmit data line 1
2 + 5V power supply
3 RX1 receive data line 1
4 GND power supply
5 DTR interface confirm
6 APP-INF COM nurse call relay common point
7 APP-INF NO nurse call relay normally open
8 APP-INF NF nurse call relay normally closed
9 CD ON external ON
10 CD OFF external OFF
11 I-OPTON motor control out put
12 I-SECT main led
13 + V BAT external power plug
14 RX 2 receive data line 2
15 T X 2 receive data line 2
16 GND power supply
17 CTS clear to send
18 RTS Request to send
19 BUZ buzzer external control
2.1.2.7. J7 external DC power supply connector
Pin Description
1 External power +/2 External power -/ +
2.1.2.8. J8 pump ribbon cable connector
The pump ribbon cable connector concentrates all the signals from the sensors located in the plunger:
disengage microswitch, gauge bridge and anti-siphon opto switch.
Page : 14 NT 0818 Rev.A1
Page 19

Pin Description
1 + VREF + internal gauge bridge
2 E1 internal gauge bridge/occlusion input on
3 E2 internal gauge bridge/occlusion input off
4 GND internal gauge bridge
5 C DOPT2 anti-siphon cathode diode
6 + 5V opto anti-siphon anode diode / + 5V
7 S OPT 2 opto anti-siphon collector transistor
8 DEB / ON disengage microswitch on
9 DEB / OFF disengage microswitch off
10 GND
♦ Important: Disassemble the ribbon cable holder on the supply board before extracting the me-
chanical assembly from the lower housing.
2.1.2.9. J9 Test Points
Pin Description
1 GND
2 out put position sensor
3 out put low battery control
4 out put force sensor amplifier
5 N.U.
6 out put optical switch motor control
7 force and position sensor voltage Ref.
8 out put optical switch syringe led detection
2.1.3. Electrical layout
(Refer to Annex 2)
2.1.4. Installation layout
(Refer to Annex 2)
NT 0818 Rev.A1 page : 15
Page 20

2.2. CPU BOARD
Overview
The CPU board is fitted to PILOT anaesthesia 2 version, around a 80C32 microprocessor used in
open mode. It concentrates all the peripheral devices directly connected to the 80C32 bus. It is
connected to the power supply board by a 40 contacts ribbon cable and to the display board by
fixed connectors. It forms a single unit, with the display board, which is fixed to the front panel.
The CPU board uses CMOS technology in order to minimize power consum ption.
Current used: 5 Volts 80 mA maximum.
2.2.1. Functional description
The CPU board comprises six functional units:
q Ram rom decoding processor
q Reset WATCH DOG
q Parallel port extensions
display/keyboard interface,
motor interface,
sensor interface.
q SPI BUS
q Asynchronous serial link
q Optical sensor
2.2.1.1. RAM ROM decoding processor
Decoding is carried out by an IC3 80C32 circuit, running at 12 MHz, clocked by Q1. It is used in open
mode, with the EA*/VP line connected to GND.
Address/data de-multiplexing is carried out by a 74HC573 U3.
On this BUS are implemented:
32 Ko static RAM U6
27C010 128 Ko (extension to 512 Ko) U4
2.2.1.2. Reset watch-dog
The RESET WATCH-DOG module comprises two TL7705 U10 and U11 circuits.
Operation: the U10 circuit generates RESET signals, active at 1, for the processor and the UART; RST*
active at 0 generates RESET signals for the other peripheral devices.
The signals are activate in two cases:
q when the system is powered up,
q as soon as the WATCH-DOG circuit is triggered. It remains active until the power is turned off.
2.2.1.2.1. Reset at power-up
The TL 7705 circuit guarantees the minimum duration of the reset lines, in the active state, once the +
5V voltage has exceeded the circuit operating threshold (4.75V). It returns to the active state, if the + 5V
voltage drops below the threshold or if the RESTIN* (U11.2) is at 0. The line is driven by the WATCHDOG module.
The duration of the reset, in the active state, at power-up is set by the C10 capacitor 220nF 100 ms.
Page : 16 NT 0818 Rev.A1
Page 21

2.2.1.2.2. Watch-dog
The WATCHDOG circuit comprises the following elements: U10, U11, C12, D2, D1, R4, C11.
When powered up the capacitor C12 is charged by the U10 circuit, via diode D1.
The charge is maintained at a threshold of over 1.5 V during operation.
The software writes, every 1 ms.This writing generates a 5V/1µs impulse on the U7.10 output, which re-
charges the capacitor C12 via a high pass peak detector circuit made up C8, D3, D2. The C12 capacitor
discharges in resistor R4.
When the software stops, the capacitor C12 completely discharges. The U11 RESTIN* line falls to 0 and
the RESET signals are activated, stopping all syringe-pump control operations in the inactive state.
Fault signals, the blinking FAIL diode and the continuous BUZZER are stuck in an active state.
WATCH-DOG trigger time is less than 400 ms.
2.2.1.3. Keyboard/display interfacing
2.2.1.3.1. Display registers
The display system is made of LED’s and of a 2 lines of 20 characters LCD graphic screen.The U7 circuit allows to address the matrix of the LED’s, the U8 circuit allows the writing and reading in the display
controller.
The LED’s matrix are DIG0 to DIG7 and SEG0 to SEG7.
The FAIL LED shows the device is failed, the command is inverted to be active by default at RESET. It
is active at 1 on the display board. The FAIL diode is out of the matrix to be able to light on when the
micropossor does not work.
2.2.1.3.2. Buzzer
The BUZZER command is inverted and controls the transistor, T3, which is mounted as a common
transmitter. Working in parallel, the transistor collector drives the BUZZER on the display board and the
nurse call relay on the motor control power supply board. After starting the pump, the BUZZER is activated for added safety.
BUZZ signal: J5 pin 6 and J3 pin 24 50 mA 6.75 Volts maximum.
2.2.1.3.3. Keyboard register
The keyboard is based on a 6 x 3 matrix, with 2 separate keys - TON and TOFF - with 1 common
point (GND). They turn power ON and OFF respectively and are connected to the display board. TON
and TOFF signals only transits via the CPU board.
The columns of the keyboard are driven by the same signals as the columns in the display matrix, thus
facilitating simultaneous keyboard and display monitoring. Register U15 reads the status of the three
keyboard lines, LIG1, LIG2 and LIG3 in order to check whether a key has been activated.
2.2.1.3.4. Motor control register
The U12 motor control register generates 4 motor phase signals, A,B,C and D, the I current control signal, the motor rotation opto control CDOPT1 signal and the BOOST BOOSTER control signal.
2.2.1.3.5. Sensor status register
The U16 sensor status register reads the microswitch digital sensors and the syringe pump opto switch.
NT 0818 Rev.A1 page : 17
Page 22

2.2.1.4. SPI bus EEPROM
The SPI bus is synchronous series communication bus using various peripheral circuits. The SPI bus is
driven by the 80C32 ports.
The PILOT anaesthesia 2 syringe pump has 2 peripheral devices on the SPI bus:
q The EEPROM 2 Ko 24C16 U12 located on the CPU board.
q The MC 145053 analog/digital converter located on the motor board.
This bus has 2 communication lines: 80C32 (see electrical diagrams)
Micoprocessor Ports
CLK clock generated by the microprocessor P 1.1
SI peripheral to processor data (input) P 1.2
2.2.1.5. Asynchronous serial links
The PILOT anaesthesia 2 syringe pump is fitted with two asynchronous serial links.
RS232 option line 1
TTL configuration serial link line 2
2.2.1.5.1. RS232 serial link
The RS232 serial link is implemented using the U8 SCC2691 circuit, which controls asynchronous communication, and RS232 interface circuit which is located on the motor power supply board.
The circuit is clocked by quartz Q2 at 3.6864 MHz. It includes a programmable baud rate generator. It
generates interrupts on the ITRS232 line connected to the processor at INTO.
The SCC2691 is on the microprocessor bus. It drives the RXD1 receive data signals on J3 (pin 34) and
TXD1 transmit data signals on J3 (pin 35).
The RS232 option is reserved for dialogue with the host computer responsible for monitoring or controlling the system.
2.2.1.5.2. TTL serial link
The TTL serial link is driven by the serial link controller inside the microprocessor. It uses one of the
internal timers to generate its baud rate, from the basis of the processor 12 MHz clock. The serial link
drives the TXD2 transmit data and RXD2 receive data lines. The input and output lines are buffered by
the U9 74HC14 buffer trigger inverter circuit.
The lines are available on J3.
TX2 J3 pin 33
RX2 J3 pin 34
This serial communication line is reserved for PILOT anaesthesia 2 software configuration and, when
appropriate, for connecting an external MASTER module.
2.2.1.6. Opto switch sensors
PILOT anaesthesia 2 syringe pump opto switch sensors are for piston pressure and syringe body pres-
ence and motor rotation.
The syringe body opto switch interface is located on the CPU board. It is implemented using transistors
T1, T2 and T3. Resistor R9 limits current in the diode to 8 mA.
Page : 18 NT 0818 Rev.A1
Page 23

2.2.1.6.1. Opto switch body syringe measurement.
q Note: The CI opto and the obturator are specific to the PILOT anaesthesia 2 equipped with
"flange detector" and are not compatible with previous versions.
q 2 opto devices allow to detect 2 syringe sizes: 60 cc and 20 cc.
J2.1 opto diode +5V anode
J2.2 opto cathode common point and transistor transmitter
J2.3 opto 1 transistor collector
J2.4 opto 2 transistor collector
Control signal: CODPT3 activate at 1 driven by microprocessor line T0.
Output signal: SOPT4 activate at 1 register U16 D1 address $ C000
Output signal: SOPT3 activate at 1 register U16 D0 address $ C000
.
SOPT3 SOPT4
Syringe clamp detection alarm, high position 1 0
60 cc detection 1 1
20 cc detection 0 1
Syringe clamp detection alarm, low position 0 0
The motor rotation and piston presence opto switch interfaces are located on the POWER SUPPLY
BOARD.
2.2.1.6.2. Motor rotation opto switch
Control signal: CDOPT1 activate at 1
Output signal: SOPT1 activate at 1
2.2.1.6.3. Piston presence opto switch (anti-siphon)
Control signal: CDOPT2 activate at 1
Output signal: SOPT2 activate at 1
2.2.2. Description of connectors
2.2.2.1. J1 not used
This connector is not used for the moment but it will be used for a future evolution of the software.
2.2.2.2. J2 Opto switch - syringe body connector
Pin Description
1 ground
2 flange switch
3 opto +5 V diode anode
4 cathode diode transmitter transistor opto 1 and opto 2 common points
5 collector transistor opto 1
6 collector transistor opto 2
NT 0818 Rev.A1 page : 19
Page 24

2.2.2.3. J3 Power supply/CPU ribbon cable
A 40 channel ribbon cable is soldered directly to J3, linking the power supply and the CPU.
Pin Description
1 + 5V controlled power supply
2 GND "
3 + VBAT "
4 GND "
5 A phase motor control
6 B phase "
7 C phase "
8 D phase "
9 I signal "
10 BOOST signal "
11 SOPT1 opto rotation module output
12 SOPT2 opto anti-siphon module output
13 APINF nurse call independent from buzzer signal
14 CDOPT1 opto rotation module control
15 CDOPT2 opto anti-siphon module control
16 OFF ON/OFF key depressed signal
17 SECT mains power supply on signal
18 CDALIM power cut signal
19 LDSECT mains LED control
20 CTS Clear to send line 2
21 DEB/OFF disengage active at 0 signal
22 RTS Request to send line 2
23 OCC/OFF occlusion active at 0 signal
24 BUZ nurse call relay control
25 EOC end of conversion ADC
26 CSADC selection SPI ADC bus
27 CLK clock SPI ADC bus
28 SI data INSPI ADC bus
29 SO data out SPI ADC bus
30 CDANA analog sensor power supply control
31 RX2 receive TTL data line 2
32 TX2 transmit TTL data line 2
33 TXD1 transmit TTL data line 1
34 RXD1 receive TTL data line 1
35 TON ON key
36 TOFF OFF key
37 + VBAT power supply
38 GND
39 + 5V
40 GND
Page : 20 NT 0818 Rev.A1
Page 25

2.2.2.4. J4 Display board interconnection
Pin Description
1 SEG1 display matrix line 1
2 SEG2 display matrix line 2
3 SEG3 display matrix line 3
4 SEG4 display matrix line 4
5 SEG5 display matrix line 5
6 SEG6 display matrix line 6
7 SEG7 display matrix line 7
8 SEG8 display matrix line 8
9 COL1 display matrix column 1
10 COL2 display matrix column 2
11 COL3 display matrix column 3
12 diode FAIL control
13 RDCRT current reduction control
14 LIG1 keyboard interface line 1
15 LIG2 keyboard interface line 2
16 LIG3 keyboard interface line 3
17 LDSECT mains LED lighting control
18 + 5V power supply
19 VBAT power supply
20 GND power supply
2.2.2.5. J5: Display/CPU connection
Pin Description
1 TON ON key
2 TOFF OFF key
3 SI SPI bus
4 CLK SPI bus
5 CSLCD bus
7 VBAT power supply
8 GND power supply
2.2.3. Electrical layout
(Refer to Annex 2)
2.2.4. Installation layout
(Refer to Annex 2)
NT 0818 Rev.A1 page : 21
Page 26

2.3. DISPLAY BOARD
2.3.1. Overview
The display board is mounted directly beneath the front plate of the syringe pump. It brings together all
the facilities for operator/device dialogue: Keyboard, buzzer and display.
It is connected to the CPU by rigid connectors, forming a sandwich, with the former, held in place by
struts.
The soft keyboard is connected to the display board.
2.3.2. Functional description
The display board comprises four modules:
q The electroluminescent display,
q The keyboard interface,
q The liquid crystal display,
q The buzzer.
2.3.2.1. Electroluminescent display
The electroluminescent display is made of eighteen LED's and five 7 segment display units, with the
decimal point, except two of them which are marked (*) in the table below.
The diodes and display units are driven in a multiplexed, 8 segments x 8 digit matrix. The LED's and
display units are mounted with a common cathode.
The 8 segments are driven by signals SEG0 to SEG7 and the 8 digit by signals DIG0 to DIG7.
The 2 LED’s, "MAIN PRESENCE" and "FAIL" are controlled independently of the matrix.
2.3.2.1.1. LED’s table
The following table lists the various diodes used in different models.
Ref Name Type Seg Dig
LD1 Mains On yellow * *
LD2 Body Alarm red 1 0
LD3 Piston Alarm red 2 0
LD4 ml green 5 1
LD5 Battery green 7 1
LD6 Fail red * *
LD7 Alarm red 4 to7 0
LD8 Worm screw 3 green 2 1
LD9 Prealarm orange 1 to 4 2
LD10 Occlusion Alarm red 0 0
LD11 Worm screw 2 green 3 1
LD12 Infusion End Alarm orange 0 2
LD13 Worm screw 1 green 4 1
LD14 NU
LD15 Connection to PC green 0 1
LD16 disengagement alarm red 3 0
LD17 ml/h green 5 1
LD18 Battery Alarm red 5 2
LD19 Validation Demand green 1 1
Page : 22 NT 0818 Rev.A1
Page 27

2.3.2.1.2. Seven segment display units
Ref Name Type Seg Dig
U3 hundreds green 0 to 7 6
U4 tens green 0 to 7 5
U5 units green 0 to 7 4
U6 tenths orange 0 to 7 3
U2 thousands green 0 to 7 7
2.3.2.2. Keyboard interface
The keyboard is an 18 key matrix keyboard. The keys are arranged in 3 rows of 6, with two separate
keys with a common point (GND), TON and TOFF, and power on and off switches, connected to J2.
Ref Digit Ligne
SILENT 2 2
STOP 1 2
VALIDATION 0 2
PURGE 3 2
BOLUS 2 0
DECAL 4 0
SELINC 3 0
SELDEC 2 1
ENTER 3 1
HISTO 4 1
Description of the connector
J2. 1 DIG 5
J2. 2 DIG 4
J2. 3 DIG 3
J2. 4 DIG 2
J2. 5 DIG 1
J2. 6 DIG 0
J2. 7 LINE 0
J2. 8 LINE 1
J2. 9 LINE 2
J2. 10 TON
J2. 11 TOFF
J2. 12 GND
2.3.2.3. LCD display unit
The LCD display unit is "chip on glass" type, the controller is fixed on the glass. It has 2 lines of 20 char-
acters.
The BUS gestion is multiplexed with the command of SEG0 and SEG7.
It has a double powered retrolighting.
The power supply of the LED pair, one by one, allows an optimum light for a minimum consumption.
2.3.2.4. The buzzer
The buzzer is an auto-exit buzzer supplied by VBAT.
It is driven by the BUZZ signal, available on connector J3, pin 6, which is generated by the CPU board.
It is mounted in parallel with the optional nurse call circuit, located on the motor power supply board.
NT 0818 Rev.A1 page : 23
Page 28

2.3.3. Description of connectors
2.3.3.1. J2 Display board / CPU board connection
Pin Description
1 SEG0 display matrix and command LCD display line 1
2 SEG1 display matrix and command LCD display line 2
3 SEG2 display matrix and command LCD display line 3
4 SEG3 display matrix and command LCD display line 4
5 SEG4 display matrix and command LCD display line 5
6 SEG5 display matrix and command LCD display line 6
7 SEG6 display matrix and command LCD display line 7
8 SEG7 display matrix and command LCD display line 8
9 COL1 display matrix and keyboard column 1
10 COL2 display matrix and keyboard column 2
11 COL3 display matrix and keyboard column 3
12 FAIL diode FAIL control Fail
13 RDCRT display control writing command
14 LIG1 keyboard interface line 1
15 LIG2 keyboard interface line 2
16 LIG3 keyboard interface line 3
17 LDSECT LED mains lighting control LED sector
18 + 5V power supply
19 VBAT power supply
20 GND power supply
2.3.3.2. J3 CPU board connection
Pin Description
1 TON ON key
2 TOFF OFF key
3 SI bus SPI
4 CLK bus SPI
5 CSLCD bus SPI
6 BUZZ BUZZER control
7 VBAT power supply
8 GND power supply
2.3.4. Power consumption
The measures are made on the battery.
Main supply (without battery) Battery supply
0 ml/h 1500 ml/h 0 ml/h 1500 ml/h
31 mA / 230v ~ 47 mA / 230v ~
72 mA / 6,0 V DC 690 mA / 6,0 VDC
2.3.5. Electrical layout
(Refer to Annex 2)
2.3.6. Implantation layout
(Refer to Annex 2)
Page : 24 NT 0818 Rev.A1
Page 29

3 CONFIGURATIONS, CALIBRATIONS AND CHECK
3.1. CONFIGURATIONS
3.1.1. Configuration of the pressure functions
The different operating possibilities presented will be particularly useful for adapting the module to the
specific needs of each department.
Fresenius Vial recommends the presence of its qualified personnel or of a member of the Technical Department of your establishment to help you implement the configuration procedures you wish to choose.
q N.B.: You can leave the configuration mode at any time by pressing the OFF key.
3.1.2. Moving to the pressure configuration mode
Configuration mode access is activated, when switching on, by simultaneously pressing on the keys
and until the display:
PrES.1
allows to scroll the parameters:
PrES.1, PrES.2, PrES.3, etc.......... on the 7 segment screen.
allow to valid your choice and to enter in the menus.
Inside the menus, the keys: and , allow to display the chosen values.
q PrES.1: Pressure limit memorization.
q PrES.2: Maximum pressure limits.
q PrES.3: Pressure drop detection threshold.
3.1.2.1. Pressure limit memorization PrES.1PrES.1
Allows to memorize the pressure limit which will be proposed every switching on.
This value is adjustable between 100 and 1100 mm Hg by step of 50 mm Hg.
Example:
Pres 1Pres 1
950 mm Hg950 mm Hg
If no value is memorized, the display is:
Pres 1Pres 1
___ mm Hg___ mm Hg
and it is the used pressure at the last switching off, which will be saved and proposed by default at the
next switching on.
NT 0818 Rev.A1 page : 25
Page 30

3.1.2.2. Maximum pressure limits PrES.2PrES.2
Allows to memorize the maximum limit pressure for each type of syringe:
q From 100 to 1100 mmHg by 50 mmHg for 50 cc syringes
q From 100 to 1500 mmHg by 50 mmHg for 20 cc syringes
This value is the upper limit of PrES.1
3.1.2.3. Pressure drop detection threshold PrES.3PrES.3
Allow to enter and memorize the pressure threshold below which the prealarm"Pressure drop" (Harrow
down way and alternative bip) will be activated during infusion.
This value is adjustable between 0 and 1100 mm Hg by step of 50 mm Hg.
3.1.3. Other parameters configuration
This configuration mode access is activated, when switching on, by simultaneously pressing on the
keys:
and until the display:
Par.1
allows to scroll the parameters:
Par.1Par.1, PAr.2PAr.2, PAr.3PAr.3, etc........... on the 7 segment screen.
allows to valid this choice and to enter in its menu, informations of which are displayed on the
LCD screen
Example:
Three types of menu are proposed:
1. Validation or invalidation of a function; example:
allows to mark or not the square at the right down corner.
allows to valid this choice.
Par2Par2
SEL 4SEL 4
Par1Par1
2. Choice of one parameter among a proposed list; example:
allows to select one parameter:
allows to valid this choice.:
Page : 26 NT 0818 Rev.A1
Page 31

3. Enter a value or a name; example:
STOP
Allows to select the digit or the letter (underlined).
Allows to increase the value of the selected character.
Allows to decrease the value of the selected character.
Allows to valid this choice.
At any time, the key
allows to get out the parameter entering mode without saving the out-
standing parameters.
Parameters list:
q PAr1: Infusion flow memorization (yes or no).
q PAr2: Syringe selection mode.
q PAr3: Keyboard selectionnable infusion maximum flow rates.
q PAr4: Selectionnable syringe list configuration.
q PAr5: Compulsory purge (yes or no).
q PAr6: Infusion quick start (yes or no).
q PAr9: RS232 communication speed.
q PArA: Empty syringe mode.
q PArB: Time to preventive check.
q PArC: Memorized protocols list
q PArD: Flange detection mode.
q PArE: Programmed bolus flow rates configuration.
q PArF: Bolus flow rate configuration.
q PArH: Language configuration.
q PArJ: Main line disconnection.
q PArL: "Drug name" and "Syringe in place" alternative display.
3.1.3.1. Infusion flow memorization (yes or no): PAr.1PAr.1
This parameter allows to choose if the infusion flow rate has to be memorized or not, when switching off
the PILOT anaesthesia 2.
: yes.
: no.
NT 0818 Rev.A1 page : 27
Page 32

3.1.3.2. Syringe selection mode: PAr.2PAr.2
This parameter allows to choose a syringe selection mode among two:
SEL 3 = automatic selection
SEL 4 = manual selection
If SEL 3 has been chosen and if there is more than one selectable syringe, PILOT anaesthesia 2 goes
automatically to "PAr 4PAr 4", selectionnable syringe list configuration at the next switch on.
3.1.3.3. keyboard selectionnable infusion maximum flow rates: PAr.3PAr.3.
This parameter allows to choose keyboard selectionnable infusion maximum flow rates for each type of
syringe.
rst
1
screen
Par3Par3
50cc 15050cc 15000
2
nd
screen
ml/hml/h
Par3Par3
20cc 7520cc 7500
ml/hml/h
3.1.3.4. Selectionnable syringe list configuration: PAr.4PAr.4
This parameter allows to make out the key board selectionnable syringe list.
Example:
BDKBDK
: BDK 50cc syringe no selectable.
: BDK 50cc syringe selectionnable.
MARQUE TYPE MARQUE TYPE
BD Plastipak 20 Dispomed Spritze 50
BD Plastipak wwd 20 Dispomed type P 50
Braun Omnifix 20 Fresenius Injectomat 50
Braun Perfusor 20 Fresenius P Spritze 50
Sherwood Monoject 20 Ibras 50
Terumo 20 Ico Gamma Plus 50
BD Perfusion 50 Ivac 50
BD Plastipak 50 Map Gliss L L 50
BD Plastipak wwd 50 Map Pic L L (Indolor) 50
Braun Omnifix 50 Sherwood Monoject 50
Braun Perfusor 50 Terumo 50
Didactic Perfusion 50 Tutoject type T 50
Zeneca PFS 50
Page : 28 NT 0818 Rev.A1
Page 33

3.1.3.5. Compulsory purge (yes or no): PAr.5PAr.5
This parameter allows to choose if the purge is compulsory or not after the syringe selection.
: Compulsory purge.
: Not compulsory purge.
3.1.3.6. Infusion quick start (yes or no): PAr.6PAr.6
This parameter allows to activate or not the infusion quick start:
Par6Par6
: Infusion quick start; when flow rate is small, the pusher goes quicker at the beginning of the
perfusion up to the contact with the syringe piston. This quick start is controlled by the strength sensor
and length limited.
: No infusion quick start; the infusion starts always with selected flow rate, even small.
3.1.3.7. RS232 communication speed: PAr.9PAr.9
This parameter allows to choose the communication speed among the following three ones:
q 4 800
q 9 600
q 19 200
q
Par9Par9
1920019200
3.1.3.8. Empty syringe mode: PAr.APAr.A
When the PILOT anaesthesia 2 goes to infusion end prealarm, if the empty syringe mode is authorized,
the validation LED flashes.
One press on will authorize the device to continue the infusion up to a 200 g counter-pressure
after passing the syringe hardheight.
If the empty syringe mode is not authorized, the PILOT anaesthesia 2 will stop at the end of infusion (syringe hardheight).
Par APar A
:Empty syringe authorized
:Empty syringe unauthorized.
NT 0818 Rev.A1 page : 29
Page 34

3.1.3.9. Time to preventive check: PAr.BPAr.B
STOP
This parameter allows to choose the time to the next preventive check between 1 and 9999 continuous
running.
Par B
3500 H
When this running time is over, at the switching on, the PILOT anaesthesia 2 will display this flashing
message:
Par .C
It will be possible to stop this message with but it will flash again at each switching on until the check be
performed.
3.1.3.10. Memorized protocols list : Par.CPar.C
or allow to scroll the parameters memorized in the EPROM.
Example:
ALFENTAN
Par .C
200.00µg/gl
If no protocol is memorized, the PILOT anaesthesia 2 displays:
----------------------
Par .C
allows to start a new protocol configuration.
allows to erase a memorized protocol.
ALFENTAN
Par .C
valid erasing. As long as long the erasing is not validated, pressing any key gives a BIP.
allows to get out PAr.C without memorizing the outstanding protocol configuration.
EEffffaacceemmeenntt?
?
Page : 30 NT 0818 Rev.A1
Page 35

3.1.3.10.1. Protocol modification: see operator’s guide.
Keys description:
allows to increase a digit or a letter.
allows to decrease a digit or a letter.
enter the outstanding value and goes to the next or comes back to protocol choice after entering the
outstanding value.
allows to select the character to be changed.
Used symbols: = flashing.
> I < : Minimum value selection.
> <
> <
+ : Fix increment.
: Default value selection.
: Maximum value selection.
: Increment selection.
= : Variable increment.
: Induction dose.
: Sustaining flow rate.
: Programmed bolus.
<<<<<< Simple bolus.
Occlusion alarm.
Parameters to be enter for any new protocol:
Protocol name.
Dilution.
Weight.
Induction dose.
Maintain flow rate.
Bolus dose.
Simple bolus flow rate.
Default pressure limit.
3.1.3.11. Flange detection mode: PArD
This parameter allows to activate or not the switch of detection of the flange of the syringe:
: switch activated.
: switch not activated.
NT 0818 Rev.A1 page : 31
Page 36

3.1.3.12. Programmed bolus flow rates configuration: PArEPArE
This parameter allows to memories or not the last programmed bolus flow rate when switching off the
device:
ParEParE
: Last programmed bolus flow rate.
: Default bolus flow rate; when switching on the device will propose the bolus flow rate enter in
this parameter:
ParEParE
50cc 850cc 8000.0 ml/l0.0 ml/l
3.1.3.13. Simple bolus flow rate configuration: PArF
This parameter allows to memorize or not the last simple flow rate used when switching off the device:
ParFParF
: Last simple bolus flow rate used.
: Default simple bolus flow rate; when switching on, the device will propose the simple bolus flow
rate enter in this parameter:
ParFParF
50cc 850cc 8000.0 ml/l0.0 ml/l
3.1.3.14. Language configuration: PArHPArH
This parameter allows to choose the dialog language with the device:
ParHParH
FrancaisFrancais
3.1.3.15. Main line disconnection: PArJPArJ
This parameter allows to activate or not the main line disconnection signal on the LCD screen:
ParJParJ
: Signal activated.
: Signal not activated.
3.1.3.16. "Drug name" and "syringe in place" alternative display: PArLPArL
Par LPar L
: Alternative display.
: No alternative display.
Page : 32 NT 0818 Rev.A1
Page 37

3.2. Calibration
STOP
NOTE: The access to calibration mode is only allowed with a secret code.
Calibration mode access is activated by simultaneously pressing, when switching on, on the keys:
and
until the display:
EtAL.
and flashing of the validation key.
If the key is not pressed within 3 seconds the PILOT anaesthesia 2 comes back to normal running.
Allows to go into Calibration mode.
Allows to get out Calibration mode, and to come back to the former calibration.
Screens displays:
00000000
Enter secret code and valid.
allows to scroll the values to be calibrated:
EtAL.4: 3 tension levels of battery calibration.
EtAL.6: Movement sensor calibration.
EtAL.9: strength sensor calibration.
3.2.1. Three tension levels of battery calibration: EtAL.4EtAL.4
The device displays “BAT1", feed the device with a 6.3V ± 0,05 V tension with a stabilized power supply
instead of the battery.
One press on reads this tension and store it in the EEPROM.
The device displays “BAT2", feed the device with a 5.9V ± 0,05 V tension with a stabilized power supply
instead of the battery.
One press on reads this tension and store it in the EEPROM.
The device displays “BAT3", feed the device with a 5.7V ± 0,05 V tension with a stabilized power supply
instead of the battery.
One press on reads this tension and store it in the EEPROM.
The device displays”EtAL.4" again and allows to choose a new calibration.
NT 0818 Rev.A1 page : 33
Page 38

3.2.2. Movement sensor calibration: EtAL.6EtAL.6
Display "HighHigh" and place a wedge of 115 mm +/- 0.05 mm, ref : 8104, in syringe flange groove and
push the driving block up against it. Keep the driving block in disengaged position.
One press on reads this tension and store it in the EEPROM.
Display "LowLow" and place a wedge of 20 mm +/- 0.05 mm, 8104, in the syringe flange groove and push
the driving block up against it. Keep the driving block in disengaged position.
One press on reads this tension and store it in the EEPROM.
Once the high and low values have been registered, the PILOT anaesthesia 2 indicates the number of
LSB in decimals between the two calibration points.
This value should be between 776 +/- 10 LSB. If the value displayed exceeds the tolerance level, you
should calibrate again.
"EtAL.6" will be re-displayed and you may select another calibration;
3.2.3. Strength sensor calibration "EtAL.9EtAL.9"
"0 g0 g" is displayed. Set the Power supply board P1 potentiometer so as to obtain O.6 V +/- 0.05 V be-
tween J9.4 and the J9.1 (earth), without any force being applied to the driving block.
One press on reads this tension and store it in the EEPROM.
"5 Kg5 Kg" is displayed. Apply a force of 5 kg +/- 20 g on the driving block.
One press on reads this tension and store it in the EEPROM.
"EtAL.9" will be re-displayed and you may select another calibration.
Page : 34 NT 0818 Rev.A1
Page 39

3.3. CHECKING THE PILOT
N.B.: the tests outlined below do not include the occlusion tests, the flow rate tests, the electrical
safety tests, etc.
3.3.1. The After Sale Service test
The ASS test is activated by pressing simultaneously on the keys:
and
until following display:
TESt.1
The validation LED flashes.If is not pressed, within 3 seconds, the device returns to normal running.
The device display, for example:
Test1Test1
0h0h
The keys , and allows to scroll in the following list:
"TEst.1TEst.1" = displays running time with zero reset if necessary and service date modification
"TEst.2TEst.2" = tests all indicator lights (LED's, 7-segment display unit AND LCD screen)
"TEst.3TEst.3" = tests keyboard.
"TEst.4TEst.4" = displays battery voltage
"TEst.5TEst.5" = displays code of last 10 alarms.
"TEst.6TEst.6" = displays total running time.
"TEst.7TEst.7" = TTL serial link test.
"TEst.8TEst.8" = RS232 serial link test.
"TEst.9TEst.9" = displays force on plunger.
"TEst.ATEst.A" = software version, check sum, loading date and language.
"TEst.BTEst.B" = displays ADC analog inputs.
"TEst.CTEst.C" = displays driving block position.
"TEst.DTEst.D" = tests BUZZER.
"TEst.ETEst.E" = displays calibration values.
"TEst.FTEst.F" = displays calibration syringe type.
"TEstTEst.JJ" = displays of the last 10 events before the last blocking error.
"TEst.LTEst.L" = drugs library.
NT 0818 Rev.A1 page : 35
Page 40

3.3.2. Running time tESt.1tESt.1
STOP
STOP
This test allows to display, first, the running time in hours, days and months.
Press on gives the maintenance date. This date may actualized with the key board.
3.3.3. Lights test tESt.2tESt.2
This test allows to check the lighting of LED’s of the front panel, of the 7 segments display and of the
LCD screen.
First, all the items light at the same time and then light one after another.
This test can be stopped at any time by pressing
3.3.4. Key board test tESt.3tESt.3
This test allows to test the correct functioning of every key. The message “Test 3” is permanently displayed.
When pressing on a key, its name displayed on the screen
OFF Switch off
SIAL Alarm silent
STOP Stop infusion
VAL Validation (note: pressing longer than 2 seconds on this key, drives
back
BOL Bolus manual control
BOPG Programmed bolus
DECAL Moving the traveller
INC Increase
DEC Decrease
ENTER Enter, validation
HISTO Historical file
to tests choice)
Nota: ON, can’t be tested
If several keys are pressed simultaneously, the device displays “Err” and gives an alternative "BIP".
The key works normally: the message “OFF”is displayed as soon as pressed, the device is
switched off if pressed more than one second.
Page : 36 NT 0818 Rev.A1
Page 41

3.3.5. Battery voltage display tESt.4tESt.4
This test displays the battery voltage over 5 digits. The voltage is calculated in accordance with corresponding analog input value and calibrating values. The values used are those for escape from an
alarm or pre-alarm (6.3 V) or starting an alarm (5.7 V).
The display is in volts and tenths of volts. The display is continuously updated according to the voltage
changes.
The battery and mains LED's are also updated. The battery LED begins to flash if the voltage displayed
is below the calibrated pre-alarm threshold and stops flashing if the voltage is above the pre-alarm output threshold.
Press the CONFIRM key to select another test.
3.3.6. Last 10 alarms codes tESt.5tESt.5
This test displays the codes of the last 10 events on the display units. Three types of events are memorized :
q ALARM
q ERROR
q SWITCH OFF: two cases
Normal SWITCH OFF by pressing the OFF key.
Abnormal SWITCH OFF due to misfonctioning.
When an alarm goes off, an “AA” is displayed followed by a number identifying the alarm:
Alarm Description
10 battery
11 syringe clamp
12 end of infusion
13 volume limit
14 disengagement
15 plunger head
16 occlusion
17 flange
In case of error, an “E” is displayed followed by error number:
Error Description
01 rotation control
03 communication
32 segment advance check
44 CPU / UART frequency control
50 ADC access self-test
52 advance check during take-up
60 checking coherence of syringe parameters (incoherence of the syringe diameter in relation
to the number of motor steps for 0.1 ml calculated when the syringe is confirmed)
70 incorrect motor frequency (motor step period too big or too small, calculated from the sy-
ringe diameter and the selected flow rate)
72 advance check over the whole length
80 important electromagnetic interferences or bad key board.
NT 0818 Rev.A1 page : 37
Page 42

The error codes: 10 (internal Ram self-test(+)
20 (external Ram self-test(+)
30 (EEPROM check-sum self-test) and
40 (EEPROM access)
These errors cannot be stored in the EEPROM; the running of the device is too pertubated to allow it to
write in the EEPROM.
When normally stop, the “OFF” message is displayed.
For abnormal stop “OFF” + flashing "F" (Fail) are displayed on the LCD screen.
The events are numbered from 0 to 9. 0 is the last event, 9 is the eldest one.
The keys and allows to scroll the events one way or the other
Example:
Test 5 8Test 5 8
E 01E 01
Means: event N° 8 was a type 01 error (rotation control)
3.3.7. Total running time tESt.6tESt.6
Use this test to display the total running time of the Pilot. Unlike “tESt 1" which resets the time at zero
when the service date is modified, it is not possible to modify this time manually.
Example:
Test 6Test 6
28 H28 H
3.3.8. TTL Serial link test: tESt.7tESt.7
This test allows to verify the TTL serial link TTL (80C32), by placing a plug on which the Rx and Tx lines
are " short-circuited "(pin 2 and 3).
If link is correct: LTOKLTOK is displayed
If link is not correct or if plug is not connected: LTER LTER is displayed
3.3.9. Serial link test: tESt.8tESt.8
This test allows to verify the RS 232 serial link (2691), by placing a plug on which the Rx and Tx, RTS
and CTS, DSR and +5 V lines are "short-circuited" (pin 2 and 3), (7 and 8),(4 and 6)
LROKLROK = RS 232 correct link.
LRERLRER = break between Tx and Rx
NORCNORC = - break between RTS and CTS,
- break between DSR and + 5 V
- no plug
3.3.10. Strength on the plunger display: tESt.9tESt.9
This test displays the strength applied on the plunger.The strength is calculated according to the value
of the corresponding analog input and the calibrating values. The display is in grams. The value is continually updated according to changes in the strength value.
Page : 38 NT 0818 Rev.A1
Page 43

3.3.11. Software version tESt.AtESt.A
This test allows to display the software number version, the check sum and the loading date.
Press on allow to display the language.
Example:
rst
1
screen
Test A V01.4
OCFO 01/12/1998
nd
2
screen
Test A Francais
V01.0 09/09/1998
3.3.12. Analog input display tESt.BtESt.B
This test allows to read the hexadecimal value of the 5 analogic inputs and of the 3 converter test inputs. The channel number is displayed above this value.
Example
Test B M
200
The keys and allows to pass from one channel to an other.
The analog inputs are divided as follows:
0 battery voltage
1 N.U.
2 force sensor
3 NU
4 potentiometer displacement
L converter zero test, between 0000 and 0004 if correct
M converter mid-scale test, between 01FB and 204 if correct
H converter full-scale test, between 03B and 3FF if correct
3.3.13. Driving block position display tESt.CtESt.C
This test displays the position of the driving block.The position is calculated in relation to the value of
the corresponding analog input and calibrating values. The display is in mm and tens of mm. The value
is continually updated as the driving block moves. The value displayed is ± 0,1 mm.
3.3.14. Buzzer test tESt.dtESt.d
This test allows to check the buzzer. The buzzer buzz continuously.
NT 0818 Rev.A1 page : 39
Page 44

3.3.15. Calibration values display tESt.EtESt.E
This test allows to show the calibration values stored in the EEPROM.
Every value is displayed on 3 digits.
The first line gives the shorted name of the value.
Example:
Test E LOWTest E LOW
The keys and allows to pass from one channel to an other.
bat1 alarm and pre-alarm battery voltage: 6.3 V
bat2 pre-alarm battery voltage: 5.9 V
bat3 alarm battery voltage: 5.7 V
HIGH displacement potentiometer with large 115.0 mm spacer
LOW displacement potentiometer with small 20.0 mm spacer
0G force meter with 0 kg
5Kg force meter with 5 kg
3.3.16. Syringe type display tESt.FtESt.F
082082
This test displays the type of syringe fitted to the Pilot. The type is defined with the indications given by
the optos of the syringe clamp.
The type of syringe is displayed with its capacity: 20cc (20/25cc), 50cc (50/60cc). The capacity may not
be displayed if the parameters in EEPROM indicate that certain types of syringes are not included.
When the syringe clamp is in the higher and the lower position 4 dashes are displayed.
The display is constantly updated in relation to changes in the syringe clamp system.
3.3.17. Displays of the last 10 events before the last blocking error tESt.JtESt.J
This test allows to display the 10 last events before the last blocking error.
3.3.18. Drug library tESt.LtESt.L
This test allows to read the name, the author and the date of the protocol library registered in the device.
Page : 40 NT 0818 Rev.A1
Page 45

4 REPLACING SUB-ASSEMBLIES
diam.12 tube
q Important: Disassemble the flexible circuit holder on the supply board before extracting the me-
chanical assembly from the lower box.
q Important: Device operation must be completely checked after all intervention inside the device.
4.1. Mounting the flexible circuit
q Important: Handle the flat cable with great care when mounting this sub-assembly: damage to
the flat cable will result in complete disassembly of the mechanical block.
Fitting the flat cable
1. Take the flat cable and, using the "flat cable insertion" tool, wind the flat cable on the opposite side
to the 10-point connector in the tool slot, keeping the flat cable tightened, wind it onto the equipment.
hood
2. Take the black hood of the flat cable insertion equipment and position it on the wound flat cable
part.
3. Insert the driving block cover and the input bearing on the diam. 12 tube, in the proper direction for
mounting the various components.
Important: The input bearing flange must be placed on the side external to the driving block cover.
q Visually check that the "input bearing + driving block cover" are properly mounted on the tube.
4. Insert the "flat cable insertion" tool in the diam. 12 tube on the input bearing side.
q The perpendicular flat cable parts are placed in the slits found at the ends of the tube.
5. Remove the black hood and the flat cable insertion equipment.
6. Correctly position the flat cable in the two slits visible at each end of the tube.
Important: The flat cable must not be twisted inside the tube.
7. Place the flexible circuit guards at both ends of the tube, passing the flat cable between the two
holding lugs
8. Place the diam. 12 tube on the driving block making match the indexing finger of the driving block
with the hole of the tube (opposite side of the 10 point connector)
flat cable
9. Match up the flexible circuit hole with the driving block holder centering tube.
10. Secure the clamping collar onto the driving block using two 2.5 x10 screws and two washers.
NT 0818 Rev.A1 page : 41
Page 46

4.2. Wiring the components on the flexible circuit
q Important: it is essential that the component mounting direction be respected.
1. Position the strut (1.5mm) between the 4 pin photo switch and weld the syringe head detection
photo switch flattening it against the flat cable.
Important: use a silicone between the optical switch and the flat ribbon cable. The silicon should not be
over the soldering area.
Important: verify there is no resistor continuity between the optical switch axis stop and the flat ribbon
cable.
2. Weld the disengaging switch flattening it against the flat cable.(at roughly 1.5 mm).
3. Cut the part of the flat cable corresponding to the back pressure microswitch of version A2 (see
cutting zone in the diagram below).
Disengaging switch
Diam 12 tube
Syringe head detection
Photo switch
anode long lug
Weld the disengaging microswitch without flattening it against the flat cable (at roughly 1.5 mm).
4. Weld the force sensor wires
Important: when disassembling a force sensor, take care not to damage the welding pellets.
green wire
lower marking
5. Pass the flat cable in the force sensor oblong.
Important: When disassembling the flexible circuit from the driving block holder, take care not
to detach or damage the holder protection square. The purposeof this square is to hold the flexible
circuit
correctly inplace and avoid short-circuits with the holder.
Page : 42 NT 0818 Rev.A1
Page 47

6. Mount the force sensor on the driving block holder using a TF HC M4x10 screw with weak lactate.
Important: avoid all contact between the force sensor and its holder.
7. Mount the contact plate on the force sensor using a TF M4x10 screw with weak loctite.
Important: Before calibrating the force sensor, adjust the threshold voltage (0.6V + 0.05V) using an os-
cilloscope between pin 1 (earth) of J09 and pin 4 of J09 (square pulse).
Important: The device must be in the calibration mode (EtA9), obtained by simultaneously pressing the
SILENCE ALARM key, the bolus key and the "ON" key.
8. Check that the amplitude of the square pulse increases when a manual force is exerted on the force
sensor. When the force is removed from the sensor, the signal must return to the initial position.
Otherwise, check that the sensor is correctly mounted (sensor/holder friction).
4.2.1. Mounting the potentiometer
1. Disassemble the reducer flask end shield.
2. Mount the potentiometer on the flask (take the nut on a thread).
3. Position the flask in equipment T 300 869 and lock it in place using the knurled screw.
4. Position the potentiometer in the equipment and bring it up against the end shield.
5. Tighten the potentiometer.
6. Extract the flask from equipment T 300 869.
7. Mount the pinion on the potentiometer (match up the indexing half flat).
q The pinion large diameter must be flattened against the potentiometer.
8. With the potentiometer facing you, turn the pinion in an anticlockwise direction until it blocks, then
turn it 1/4 of a turn in the opposite direction.
9. Mount the moving mechanical assembly on the reducer frame.
10. Insert the flask on the guides and rack.
q Check the position of the input bearing which must be on the driving block side.
q Important: Take care not to damage the flexible circuit when mounting (folding).
11. Secure the end shield using the three M3x3 TC screws.
12. Secure the input bearing using the two M3x3 TC screws.
4.2.2. Wiring the potentiometer
1. Weld the 3 wires perpendicular to the lugs by placing them in the holes.
Important: Do not fold the potentiometer lugs
2. Mount the pinion and the potentiometer matching the indexing half flat with
3
21
brown
red
black
the small diameter of the pinion towards the potentiometer.
3. Mount the pinion hocking diameter 4 Truarc ring using a pair of flat mose fliers bearing down on the
potentiometer shaft half flat.
4. With the pinion facing you, turn the potentiometer anticlockwise until it blocks, then turn it 1/4 of a
turn in the opposite direction.
5. Disengage the moving assembly and slide it until it blocks against the reduction gear flange.
6. See EtA6EtA6 calibrating test for the calibration of the potentiometer (section 3.2.2.).
NT 0818 Rev.A1 page : 43
1
2
3
Page 48

4.2.3. Plug holder connector
If the total pins on the plug holder connector does not correspond to the total pins on the power supply
board connector, the connecting method should be done as follows:
plug holder
straight
Power supply board
4.2.4. Lubricating the mechanical parts
NOTE: Use silicon grease exclusively.
Parts to be lubricated:
The two mechanical block guide rods
The screw rod
The top of the rack at guide level
The full length of the rack teeth
The disengaging spring housing in the 1/2 nut
The inside of the mechanical block.
Page : 44 NT 0818 Rev.A1
Page 49

5 MAINTENANCE
5.1. Recommendations
The qualified technicians in your establishment or our After-Sales Service should be notified of any abnormal operation of the device.
For further information concerning troubleshooting or usage procedure, please contact our After-Sales
Service or our Commercial Department. (see Useful Addresses, chapter 10).
If the device has to be returned to our After-Sales Service, it must be packed very carefully, if possible
in its original packaging before being sent.
FRESENIUS VIAL is not liable for loss or damage to the device during transport to our After-Sales
Service.
5.2. Cleaning and disinfection
The syringe pump forms a part of the patient's immediate environment. It is advisable to clean and disinfect the device's external surfaces on a daily basis, in order to protect patient and staff.
q Disconnect the power cable from the wall socket before commencing cleaning.
q Do not place in an AUTOCLAVE, nor IMMERSE the device, and do not allow liquids to enter
either the device's casing, or it's power supply cover.
q Use a cloth soaked in DETERGENT-DISINFECTANT, previously diluted with water if required,
to destroy micro-organisms
- Avoid abrasive scrubbing which could scratch the casing.
- Neither rinse, nor wipe surfaces.
q If the device is located in a high contamination risk unit, it is advisable to leave it in the room
during aerial disinfection, after having disinfected it in using a moist cloth.
q Do not use:
- TRICHLOROETHYLENE-DICHLOROETHYLENE,
- AMMONIA,
- AMMONIUM CHLORIDE,
- CHLORINE and AROMATIC HYDROCARBON,
- ETHYLENE DICHLORIDE-METHYLENE CHLORIDE,
- CETONE,
- BASED CLEANING PRODUCTS.
q These aggressive agents could damage the plastic parts and lead to apparatus malfunctions.
q Take care with ALCOHOL BASED SPRAYS (20-40% alcohol); They lead to tarnishing of, and
small cracks in, the plastic, and do not provide the requisite cleansing action prior to disinfection.
q Please contact the appropriate service, handling cleaning and disinfection products within your
establishment, for further details.
5.3. Storage
In the case of prolonged storage time, disconnect the battery through the battery door located below the
PILOT. This operation should be made by a fully competent technician.
Storage place should be dry and temperate.
q Temperature between 0 and 40°.
q Maximum relative humidity 85%, no condensation.
After storage, a full recharge of the battery is recommended before putting the syringe pump into use, in
order to avoid any risk caused by micro power cuts in the mains supply and to insure maximum autonomy.
NT 0818 Rev.A1 page : 45
Page 50

Page : 46 NT 0818 Rev.A1
Page 51

NT 0818 Rev.A1 page : 47
Page 52

Page : 48 NT 0818 Rev.A1
Page 53

NT 0818 Rev.A1 page : 49
Page 54

5.4. Checking disengagement system
1.Start the device.
2.Place a 50/60 ml syringe in the PILOT
3.Activate the disengaging lever.
q Ensure an acoustic and visual alarm is present.
4.Maintain the disengagement lever in high position and move the driving block
q Check easy driving block displacement (manual displacement).
5.Release the lever
q Ensure there is no alarm.
q Check driving block locking.
5.5. Checking force sensor
1. Proceed to test 9 (see section 3.3: checking the PILOT)
2. Use the disengagement system to pull the pusher backward so no force is applied to the sensor.
q Displayed value should be between 0 and 100 g
3. Press and release the force sensor
q Displayed value should be between 0 and 100 g
4. Apply a known force (about 5 Kg) on the pusher.
q Displayed value should be 5 Kg +/- 250g.
5.6. Checking back-pressure
NOTE: The PILOT anaesthesia 2 initiates the sensor after pusher engagement. When testing back-pressure, the infusion should be started with no pressure on the line.
1. Start the device by pressing the ON key.
2. Place a manometer (or any other pressure measuring instrument) at the syringe outlet.
3. Select BD 60 ml Syringe.
4. Select the Medium Limit Pressure by pressing the LIMIT PRESSURE key.
q M = (medium limit pressure) = 500 mmHg +/- 75 or 0.65 bar ± 0.1 bar.
1. Select maximum flow rate
2. Start the infusion (press START/CONFIRM).
q Ensure there is no acoustic and visual alarm (back-pressure Led off),
q Check infusion indicators are flashing.
q Check visual and acoustic alarm for a 500 mmHg +/- 75 or 0.65 bar ± 0.1 bar pressure.
NOTE: If the pressure value measured according to the selection made falls outside the reference values, refer to the "EtA9EtA9 " calibration test (see Chap.3.2.3.).
NOTE: Before calibrating the force sensor, check the voltage between point J09.1 (earth) and J09.4
using an oscilloscope. Voltage value = 0.6 V + 0.05 V (square pulse).
Page : 50 NT 0818 Rev.A1
Page 55

5.7. Checking registered syringe list /syringe list label.
This test allows to check if the list of syringes registered in the PILOT anaesthesia 2 is in accordance
with the list printed on the label.
Proceed to HH test (section 3.3: CHECKING THE PILOT)
5.8. Checking Mains/Battery operation
1. Connect the device to a mains supply and check the presence of the mains Led (permanent yellow
LED on).
2. Disconnect the device from the mains.
3. Connect the device battery lugs to a stabilized supply set at 6.3 V.
Important: Respect the +/-" polarities.
4. Place the device in the normal operating mode.
5. Select a syringe (from the syringes proposed by the PILOT) and validate.
6. Select a flow rate and validate.
7. Set the voltage on the stabilized supply between 5.8 V. and 6 V.
q The battery discharge pre-alarm is activated
NOTE: The acoustic alarm can be temporarily silenced (2 minutes) by pressing the SILENCE ALARM
key.
8. Turn down the voltage of the stabilized supply.
Check the battery discharge prealarm is activated between 5.6 and 5.8 Volts.
NOTE: If the values indicated above are not respected, refer to the "EtA4EtA4" test (Section: 3.2.1).
5.9. Checking linearity
Carry out this test to check the displacement of the driving block for a 50/60 ml B-D Plastipak syringe at
a flow rate of 50 ml/h. Any non-correspondence between the value measured and the table value indicates a mechanical and electronic failure which could cause flow rate errors.
A checking software ISCTRL allow to carry out this test automatically (call FRESENIUS VIAL AfterSale- Service for further information)
5.9.1. Equipment used
q Stop clock
q Electronic calliper
q 50 ml B-D Plastipak syringe
NT 0818 Rev.A1 page : 51
Page 56

5.9.2. Operating mode
1. Switch the device on by pressing on the ON key.
2. Place a 50/60 ml B-D Plastipak syringe on the device.
over view
3. Measure the distance X (in millimeters) as shown on the diagram -> X
1
4. Select a 50 ml B-D Plastipak syringe.
5. Select a flow rate of 50 ml/h.
6. Start the infusion by pressing on the CONFIRMATION key and start the stop clock at the same time.
7. Stop the infusion after 50 min, then measure X again -> X
8. The displacement X= X1 - X
in mm, must comply with the values indicated below.
2,
2
Table of "distance X" displacement measurements
NOTE: For precise measurement avoid any movement of the pusher during measurement.
Time Displacement in mm, for a flow rate selection of 50 m
minutes seconds minimum Average Maximum
50 00 74.96 75.72 76.47
50 30 75.71 76.47 77.24
51 00 76.46 77.23 78.00
51 30 77.21 77.99 78.77
52 00 77.96 78.74 79.53
52 30 78.71 79.50 80.30
53 00 79.46 80.26 81.06
53 30 80.21 81.02 81.83
54 00 80.95 81.77 82.59
54 30 81.70 82.53 83.35
55 00 82.45 83.29 84.12
55 30 83.20 84.04 84.88
56 00 83.95 84.80 85.65
56 30 84.70 85.56 86.41
57 00 85.45 86.32 87.18
57 30 86.20 87.07 87.94
58 00 86.95 87.83 88.71
58 30 87.70 88.59 89.47
59 00 88.45 89.34 90.24
59 30 89.20 90.10 91.00
60 00 89.95 90.86 91.77
60 30 90.70 91.62 92.53
61 00 91.45 92.37 93.30
61 30 92.20 93.13 94.06
62 00 92.95 93.89 94.83
q Important: if the distance measured does not correspond to the value indicated on the table
refer to "EtA6EtA6" Calibration mode.
Page : 52 NT 0818 Rev.A1
Page 57

5.10. Checking end of infusion
5.10.1. End of infusion pre-alarm
1. Start the device.
2. Select a 60 ml B-D PLASTIPAK syinge, 20 ml full.
3. Select a flow rate of 120 ml/hr.
q For normal flow rates, the end of infusion pre-alarm is activated 5 minutes before end of infu-
sion.
q For higher flow rates (50 ml/hr), the pre-alarm is activated when the volume remaining to be in-
fused equals 10% of total syringe capacity.
4. Ensure the end of infusion pre-alarm is present.
5. Press the SILENCE ALARM key to silence the acoustic alarm and check the end of infusion alarm
(see in 5.4.2.7.2.).
5.10.2. End of infusion alarm
1. At the end of infusion:
q Check the acoustic and visual end of infusion alarm.
over view
2. Measure the " hard height ": X, with 18.6 < X < 19.5 for a 50 ml B- D PLASTIPAK syringe.
q Important:
For accurate checking of the hard height, do not move the driving block when measuring.
3. If X value is out the tolerated ones see " Eta6", section 3.2.,CALIBRATION.
5.11. Checking the Led's and keyboard
Refer to tSt2tSt2 and tSt3tSt3 (see section 3.2.: CALIBRATION)
5.12. Battery autonomy test
1. Medium battery autonomy is 7 hours (minimum 5) when the device operates with a 50 ml B-D
PLASTIPAK syringe at a flow rate of 5 ml/hr (without Master module connection type)
2. The battery discharge pre-alarm warns the user the remaining autonomy is roughly 60 minutes (at
5 ml/h) before infusion will completely stop (total battery discharge alarm).
3. Battery recharging time is 16 hours minimum (100% of its capacity).
5.13. Continuity test
Using an multimeter connected ohmmeter, check the presence of an infinite electrical resistance between:
q phase and metal tube,
q neutral and metal tube.
NT 0818 Rev.A1 page : 53
Page 58

5.14. Trouble Shooting
Problem Causes
• Perfusion end detected too
early (about 10 ml).
• Syringe used does not fit to selected one.
• No occlusion prealarm and
alarm at perfusion end.
Major variation in flow rate or
displacement control.
• Occlusion alarm when
switching on.
• Occlusion alarm when working.
• Disengagement alarm when
switching on.
• Detection syringe piston unsuitable alarm.
• Syringe barrel holder unsuitable alarm.
• Syringe flange detection unsuitable alarm.
• Syringe used does not fit to selected one.
• Syringe used does not fit to selected one.
• Bad calibration of strength sensor.
• strength sensor out of order.
• Cut in flexible circuit.
• Pressure limit selected too low.
• Bad calibration of strength sensor.
• Disengagement microswitch out of order.
• Opto sensor and/or obturator of syringe piston out of or-
der.
• Opto sensor and/or obturator of syringe holder out of order.
• Flange detection switch and/or connectic out of order.
• Bad display : segments or
LED’s.
• Driving transistors and/or connectic of display board out
of order.
• Alarm without error code. • Wrong power supply (6,9V) See MAX 652
• Bad CPU board.
• In case of drop….. • Check mechanic set and centring of diameter 12 tube
See exploded view.
Page : 54 NT 0818 Rev.A1
Page 59

5.15. Error message Er(-)0, Er01, Er(-)2, Er03, CFPc
Error code Error code definition Cause
ER (-) 0
Device self test on start up was
not successful
Er10
Er20
Er30
Er40
Electronic control + software anomaly
Internal RAM anomaly
External RAM anomaly
EPROM anomaly
Eeprom anomaly
Check Sum: faulty RAM, EPROM,
EEPROM
When rewriting EEPROM on switching
off the device the Check Sum is rewritten in the memory to save the parameters.
r If the Hard cutoff circuit time is
shorter than the Soft circuit time, the
device is switched off before EEPROM
is fully written: Check Sum not conform
Er50
Er60
Er70
Er80
ER0 1
Problem detected in motor control mechanism or in the motor
itself.
ER(-) 2*
Plunger advance checking has
detected a error greater than the
acceptable one (+)-) from 1 to 7:
info: A.S.S.
Er32
Er52
Er72
ADC anomaly
Syringe parameters
anomaly
Motor frequency anomaly
Keyboard anomaly
Motor supply failure Motor rotation photo switch + associ-
Mechanical advance
checking anomaly
Short distance anomaly
Slack adjustment anomaly
All length anomaly
r Er(-)0 or CFPc: When the device is
in CFPc reconfiguration is compulsory:
faulty WATCH DOG
Faulty keyboard or short circuit in the
keyboard or excessive electromagnetic
interference.
ated circuits brake.
Potentiometer or ADC Often connector
calibration or position potentiometer
unscrewed
Er82
ER(-)4
Possible misfonctioning
Er14
Er24
Er34
CFPc
The device self-test on configuration was not satisfactory
Flow rate anomaly
Motor and flow rate cal-
culation parameters
anomalies
Motor period calculation
anomaly
Motor rotation direction
anomaly
Flow rate / period calculation anomaly
Configuration anomaly Erroneous parameters.
Functioning or configuration wrong pa-
rameters
5.16. Flow rate control protocol: flow rate measurement with computer
NT 0818 Rev.A1 page : 55
Page 60

The test procedure outlined below can be carried out with a 50 ml or 20 ml syringe. The operating mode
described below, reflects the flow rate Measurement software used by Fresenius Vial according to the Pr
EN 60-601-2-24 Standard for Infusion pumps. It is up to the user to adapt this procedure to the software
he uses.
5.16.1. Equipment used:
q Scales coupled to a microcomputer
scales sensitivity (in compliance with IEC 601.1 standard, 2nd part):
flow rate value (x) scale sensivity
x ≤ 5 ml/h
5 ml/h < x 30 ≤ ml/h
1/10000e
1/1000e
x > 30 ml/h 1/100e
q Multi scales acquisition program
q Test tube or beaker with 1 ml graduating
q Liquid: distilled water +/ oil)
q Luer Lock type plastic syringe (50 or 20 ml)
q Catheter extension with Luer Lock end piece (length 100 cm, inside diameter 2.5 mm).
q Needle:
flow rate value (x) nodale type
x < 30 ml/h G 26
x ≤ 30 ml/h G 18 ou G 21
5.16.2. installation
1. The equipment should be installed according to the installation drawings shown in below.
q Important: Make sure that the horizontal installation plane is respected.
2. Fill the syringe with 50 ml of distilled water. Prime if necessary to eliminate any air bubbles.
3. Secure the female Luer Lock end piece of the catheter extension onto the syringe and the male Luer
Lock end piece onto the needle.
4. Install the syringe onto the device.
5. Fill the test tube with water ensuring that the needle is dipped in the liquid (1 cm) and add several
drops of oil in order to create a greasy film on the surface of the liquid. In this way the user will avoid
any measurement error due to evaporation of the liquid.
6. Place the test tube in the centre of the scales platform.
7. Place the needle inside the test tube.
q Important: The infusion line (needle/catheter extension) must not be in contact or rest on the
Scales/test tube assembly at any time.
8. Start the device by pressing on the ON key (PILOT anaesthesia 2 in mains supply mode) then prime
the infusion line using the PRIME/BOLUS key.
q Important: check that there are no air bubbles.
Page : 56 NT 0818 Rev.A1
Page 61

5.16.3. Operating mode
q Remark: the software works following the operating mode described in the Pr EN 60-601-2-24
Standard for infusion pumps.
1. Start the acquisition program for the scales.
2. Enter the data necessary to carry out the program without validating the flow rate.
3. Adjust the scales to the specified flow rate.
4. Confirm the flow rate on the microcomputer so that the automatic setting of the scales can take
place.
5. Start infusion when 00.00 appears on the scales display screen.
6. When the specified time is over, note the error percentage displayed on the screen.
5.16.4. Installation drawing
catheter extension support stand
RS 232 cord
anti-vibration measurement table
5.17. Flow rate control: flow rate control measurement with scales
q In compliance with IEC 601.2 standard, 2nd part - 62D standard project for infusion pumps.
5.17.1. Equipment used:
q Stop clock
q Scales - scales sensitivity:
flow rate value (x) scale sensivity
x ≤ 5 ml/h
5 ml/h < x ≤ 30 ml/h
x > 30 ml/h 1/100e
q Test tube or beaker with 1 ml graduating
q Liquid: distilled water +/ oil)
1/10000e
1/1000e
q Luer Lock type plastic syringe (50 or 20 ml)
q Catheter extension with Luer Lock end piece (length 100 cm, inside diameter 2.5 mm)
q Needle:
flow rate value (x) needle type
x < 30 ml/h G 26
x ≤ 30 ml/h
G 18 ou G 21
NT 0818 Rev.A1 page : 57
Page 62

5.17.2. Installation
1. The equipment should be installed according to the installation drawings shown in 5.18.3.
Remark: Make sure that the horizontal installation plane is respected.
2. Fill the syringe with 50 ml of distilled water. Prime if necessary to eliminate any air bubbles.
3. Secure the female Luer Lock end piece of the catheter extension onto the syringe and the male Luer
Lock end piece onto the needle.
4. Install the syringe on the device following the instructions described in the Operator's Guide (See
Operator's Guide PILOT anaesthesia 2, Chap. 3: positioning the syringe).
5. Fill the test tube with water ensuring that the needle is dipped in the liquid (1 cm) and add several
drops of oil in order to create a greasy film on the surface of the liquid. In this way the user will avoid
any measurement error due to evaporation of the liquid.
6. Place the test tube in the centre of the scales platform.
7. Place the needle inside the test tube.
Important: The infusion line (needle/catheter extension) must not be in contact or rest on the Scales/test
tube assembly at any time.
8. Start the device by pressing on the ON key (PILOT anaesthesia 2 in mains supply mode) then drain
the perfusion line using the PRIME/BOLUS key.
Important: check that there are no air bubbles.
5.17.3. Operating mode
1. Select the flow rate
q Important: for low flow rates (< 5 ml/hr) validate and wait for the infusion to stabilize for 1 hour.
For higher flow rates, 10 to 30 minutes are sufficient for this stabilization.
2. Set the scales at 00.00 g
3. Start infusion by pressing on the START/CONFIRM key and set off the stop clock at the same time
(if necessary make a note of the stop clock start value).
4. The test lasts for 1 hour. When over, press on the STOP key to stop the infusion.
5. Note the value in grams of "infused" liquid.
6. Calculate the difference between the design value and the real value.
Remark: 1 gram = 1 ml.
7. The error percentage can be calculated from this difference.
Formula:
Measured value - Design value
X 100 = pourcentage
Ddesigned value
Page : 58 NT 0818 Rev.A1
Page 63

5.18. Flow rate control: flow rate measurement using a test tube
5.18.1. Equipment used
q Stop clock
q Test tube or beaker with 1 ml 0.5 ml graduating
q Liquid: distilled water +/ oil)
q Luer Lock type plastic syringe (50 or 20 ml)
q Catheter extension with Luer Lock end piece (length 150 cm, inside diameter 2.5 mm).
q Needle
flow rate value (x) needle type
x < 30 ml/h G 26
x ≤ 30 ml/h
5.18.2. Installation
1. The equipment should be installed according to the installation drawings shown in 5.18.3.
q Remark: Make sure that the horizontal installation plane is respected.
G 18 ou G 21
2. Fill the syringe with 50 ml of distilled water. Prime if necessary to eliminate any air bubbles.
3. Secure the female Luer Lock end piece of the catheter extension onto the syringe and the male Luer
Lock end piece onto the needle.
4. Install the syringe on the device.
5. Fill the test tube with water ensuring that the needle is dipped in the liquid (1 cm) and add several
drops of oil in order to create a greasy film on the surface of the liquid. In this way the user will avoid
any measurement error due to evaporation of the liquid.
6. Place the needle inside the test tube.
5.18.3. Operating mode
1. Select the flow rate
q Important: for low flow rates (5 ml/h) validate and wait for the infusion to stabilize for 1 hour. If
possible, use a smaller test tube guaranteeing greater precision in ml reading. For higher flow
rates, 10 to 30 minutes are sufficient for this stabilization.
2. Start infusion by pressing on the START/CONFIRM key and set off the stop clock at the same time
(if necessary make a note of the stop clock start value).The length of the test is determined by the
time necessary for a 50 ml infusion in the test tube.
3. Calculate the difference between the design value and the real value.
Real flow rate =
50 ml
Time in hours
4. The error percentage is calculated from this difference (Measurement error +/-1%),
Measured value - Design value
X 100 = pourcentage
Ddesigned value
NT 0818 Rev.A1 page : 59
Page 64

Page : 60 NT 0818 Rev.A1
Page 65

6 ANNEX 1: ILLUSTRATED PARTS LIST
6.1. Subassembly traceability table
6.1.1. Introduction
This chapter allows the technician to find which component has been changed on the product, also to
order the right part when it necessary for the pump maintenance.
6.1.2. Replacement parts table
The table below list the main modification made to improve the product. The PILOT anaesthesia 2 serial
number should be used when looking for components.
Equivalence table for
PILOT anaesthesia 2
Serial N° From:
16685686
to :
Display board
CPU board
Eprom
Upper case IEC kit
Upper case export kit
Lower case IEC kit
Lower case DIN kit
Lower case NL kit
Lower case IS kit
Wired motor
Battery connector
Potentiometer wired
Power supply and control board
From:
to:
From:
to:
NT 0818 Rev.A1 page : 61
Page 66

6.2. Exploded views and related parts lists
6.2.1. Mechanical part list
Upper and lower cases
Page : 62 NT 0818 Rev.A1
Page 67

6.2.1.1. Upper case
Référence Repère Quantité Désignation
99 1 Diam.17.5 Pilot
100 1 Syringe clamp
113 1 Syringe clamp shaft
102 1 Diam 5 retaining ring
103 1 Syringe clamp compression spring
104 1 Injected PC opto support
111 1 fenêtre PILOTE ANES window
112 1 VIAL front panel anes 2
112 1 FRESENIUS front panel anes 2
1 Injected Diam.6 block
1 Female hybrid M3x12 spacer
1 CPU board protector film
1 Buzzer foam
122 2 Opto
123 1 Flange pilot opto IC
124 1 Pilot 20/60 cc shutter
125 1 Flange pilot switch joint
126 1 ALPS SKHCAF switch
127 1 Flange pilot switch support
128 1 TCB 2.2 x 8 Eco-Syn screw
129 1 Flexible stiffened washer
1 Buzzer bell foam
6.2.1.2. Lower case
Référence Repère Quantité Désignation
105 1 9 points Sub d
106 1 15 points Sub d
115 1 16 va transformer
117 1 Main socket support
107 1 Buzzer bell
108 1 Socket support
109 1 3 points female socket
110 1 Injected buzzer adjustement button
1 Guide rail
1 Buzzer adjustement washer
1 Buzzer flexible washer
119 6 Adhesive black block
120 1 6V 1.2/1.3 Ah battery
121 1 Battery socket HE 13
2 Battery connector HE13
1 Injected flexible PC support
1 Main socket fiber joint
NT 0818 Rev.A1 page : 63
Page 68

Mechanical plunger unit PILOT anaesthesia 2
Page : 64 NT 0818 Rev.A1
Page 69

6.2.1.3. Plunger / mechanism unit
Ref.: Diag. Ref. Number Component
200/207 2 Diam. 3.5 mm retaining ring
201 1 Half nut spring cap
202 1 Half nut spring
203 1 Disengagement came
204 1 Upper machined half nut
206 1 Lower machined half nut
208 1 Tube retainer
209 1 Mechanical block + injected pad
210 1 Flexible circuit clip
220 1 Flexible circuit
221 1 Complete disengagement shaft
222 1 Diam.12 tube(version 20/60 ml)
223 1 Injected centering ring
1 O ring (to be placed in the centering ring)
1 Inox plate (To be placed between the centering ring and the flask)
224 1 Anti-siphon arm
225 1 Pusher housing
226 1 Pusher housing clip
227 1 Injected M 0.5 rack
228 1 Diam. 36 protective sticker
229 1 Injected contact plate
230 1 Force sensor
232 1 OMRON microswitch
249 1 RP I 131 type photo inter
253 1 C pusher support
254 1 Pusher protection film
256 1 Disengagement finger
258 2 Flexible circuit protector
259 1 Pusher/tube fastener
260 1 Retaining ring
261 1 Anti-siphon came
1 Anti-siphon spring
270 1 Disengagement lever
271 1 Disengagement lever spring
272 1 Pusher cover
205 1 Half nut spring shaft
257 1 Disengagement shaft bearing
NT 0818 Rev.A1 page : 65
Page 70

Motor reduction bloc
Mechanical kits
Page : 66 NT 0818 Rev.A1
Page 71

6.2.1.4. Motor reduction block
Reference Diag. Ref. Number Component
294 1 Injected M5 gear
296 1 HE13 wired potientiometer
300 1 Motor rotation photo switch
301 1 Support opto
302 1 Motor rotation blade
303 1 Pilot 2 Ph motor
304 1 Pilot motor gear
305 1 R80 reducer frame
6.2.1.5. Mechanical kits
Reference Diag. Ref. Number Component
1 Main cord
101 Upper case pilot anest 2 IEC Kit
101 Upper case pilot anest 2 export Kit
118 1 Lower case pilot 16 VA IEC
118 1 Lower case pilot 16 VA DIN
118 1 Lower case pilot 16 VA NL
118 1 Lower case pilot 16 VA IS
105/6/8/9 1 HE13 wired socket support C/D
122/123 1 HE13 wired opto printed circuit
298 1 pilot anest 2 mechanical kit
6.2.2. Electronical parts list
6.2.2.1. VA Power supply board
Reference Diag. Ref. Num-
ber
116 1 PILOT Anaesthesia 2 RS232 HE13 power supply board
6.2.2.2. led dysplay board
Reference Diag. Ref. Num-
ber
114 1 PILOT Anaesthesia 2/B 9 LEDS display board
6.2.2.3. CPU board
Reference Diag. Ref. Number Component
178 1 CPU board W. flange det. ANT + HE13
Warning
A PILOT anaesthesia 2 CPU Board should never be used on Pilot C, and vice versa. A CPU board is
configurated for one device type only.This configuration include the calibration modes depends to the
components characteristics, the syringe list specific to the product code and the pump serial number
located on the pump identifical label stacked on the lower housing.
Component
Component
NT 0818 Rev.A1 page : 67
Page 72

6.2.3. Operator’s guide of PILOT anaesthesia 2 (NU)
It is possible to get this Operator’s guide, reference:169510, on simple request to our commercial service (see useful addresses chapter 9).
6.2.4. Labels
6.2.4.1. Door Label
FR DIN IS BNF IT SP S B P
167892
6.2.4.2. Danger selection label
FR DIN IS BNF IT SP S B P
167979
6.2.4.3. Battery door label
FR DIN IS BNF IT SP S B P
6.2.4.4. Main DANGER label (inside)
FR DIN IS BNF IT SP S B P
6.2.4.5. Danger mains label(outside)
FR DIN IS NL IT SP S B P
Page : 68 NT 0818 Rev.A1
Page 73

7 ANNEX 2: ELECTRONIC LAYOUT
7.1. Rear door wiring
Designation FV.REF DESIGN. REF Rév.
Rear door wiring for PILOTE 15 VA (1/1 x A4)
7.2. Power supply and control board
7.2.1. Electronic layout
Designation FV.REF DESIGN. REF Rév.
Motor power supply and control board ( 5/5 X A3)
7.2.2. Installation layout
Designation FV.REF DESIGN. REF Rév.
Motor power supply and control board PILOT C (1/1 x A3)
7.3. CPU board
7.3.1. Electronic layout
Designation FV.REF DESIGN. REF Rév.
CPU board (3/3 x A3)
7.3.2. Installation layout
Designation FV.REF DESIGN. REF Rév.
CPU board PILOTE AILETTE RS232 (C) (1/2 x A3 only)
7.4. Display board
7.4.1. Electronic layout
Designation FV.REF DESIGN. REF Rév.
Display board Pilote anesthesie 2 (3/3 x A3)
7.4.2. Installation layout
Designation FV.REF DESIGN. REF Rév.
Display board Pilote anesthesie 2 (2/2x A3)
NT 0818 Rev.A1 page : 69
Page 74

Page 75

8 ADDENDA AND INFORMATION BULLETINS
NT 0818 Rev.A1
Page 76

NT 0818 Rev.A1
Page 77

9 USEFUL ADDRESSES
All requests for information or documentation (technical file, tubing catalogue or commercial documentation should be addressed to:
CUSTOMER SERVICE INTERNATIONAL
Fresenius Vial
Le Grand Chemin, 38590 Brezins FRANCE
AFTER-SALES SERVICES
INTERNATIONAL Fresenius Vial
Le Grand Chemin, 38590 Brezins FRANCE
BELGIUM FRESENIUS NV/SA Belgique
DIVISION VIAL MEDICAL
Molenberglei 7
2627 Schelle
BELGIQUE
GERMANY
Changes may be made at regular intervals, for inclusion in subsequent editions.
FRESENIUS MCM
AM-NEUNEN BERG 8
63749 ALZENAU
GERMANY
It is possible that this document contains errors or typing mistakes.
Tel.: 33 (0)4 76 67 10 81or 10 54
Fax: 33 (0)4 76 65 52 22
Tel.: 33 (0)4 76 67 10 76
Fax: 33 (0)4 76 65 56 66
Tel.: 32/3 880 73 07
Fax: 32/3 880 50 07
Tel.: 49/60 23 97 22-0
Fax: 49/60 23 43 06
COPYRIGHT © 1998, Fresenius Vial S.A
This technical manual may not be reproduced in whole or in part without the written consent of Fresenius Vial S.A.
Fresenius Vial S.A. - head office: Le Grand Chemin - 38590 Brezins (FRANCE)
With directory and supervisor board - capital 90128000 F - SIREN Grenoble B 408 720 282
NT 0818 Rev.A1
Page 78

NT 0818 Rev.A1
 Loading...