

Page 1

FRESENIUS 2008K
HEMODIALYSIS SYSTEM
CALIBRATION
PROCEDURES
Part Number 507296 Rev. B
Page 2

FRESENIUS MEDICAL CARE
NORTH AMERICA
2637 Shadelands Drive, Walnut Creek, CA 94598
800-227-2572 or 925-295-0200
REGIONAL EQUIPMENT SPECIALIST:___________________________________
Page 3

FRESENIUS 2008K
HEMODIALYSIS SYSTEM
CALIBRATION
PROCEDURES
Part Number 507296 Rev B
Copyright 2000 - 2003 Fresenius Medical Care North America
Page 4

WARNINGS
Shock hazard. Refer servicing to qualified personnel.
Never perform maintenance when a patient is connected to the
machine. If possible, remove the machine from the treatment
area when it is being serviced. Label the machine to ensure it is
not accidentally returned to clinical use before the service work
is completed. Always fully test the machine when maintenance
is completed. Confirm dialysate conductivity and pH level
before returning the machine to clinical use.
The electrical source must be 120 volts, 60 Hz, single phase.
The outlet must be a three-conductor type with a hospital-grade
receptacle and a ground fault interrupter. Test the polarity and
ground integrity before installation and ensure it is maintained
thereafter. Failure to do so may result in electrical shock to the
operator or patient.
Calibration procedures must be performed using primary
standards or by using standards that are regularly calibrated in a
program traceable to the National Institute of Standards and
Technology (National Bureau of Standards).
Calibrate the Level Detector module for the model of venous line
being used. During calibration ensure the filter inside the drip
chamber is below the sensor heads. Also verify that the venous
clamp fully occludes the line when closed.
Failure to install, operate and maintain this equipment according
to the manufacturer’s instructions may cause injury or death to
the patient or the operator.
Page ii
Fresenius 2008K Calibration Procedures
P/N 507296 Rev B
Page 5

CALIBRATION PROCEDURES
TABLE OF CONTENTS
1.0 INTRODUCTION..................................................................................................... 1
1.1 TEST EQUIPMENT NEEDED....................................................................................................... 2
1.2 OPERATING MODES................................................................................................................... 3
1.3 FRONT PANEL CONTROLS .......................................................................................................6
1.4 MEASURING FLUID VOLUMES..................................................................................................8
1.5 CALIBRATE IF REPLACED ........................................................................................................ 9
2.0 SERVICE MODE CALIBRATIONS ......................................................................... 10
2.1 TOUCH SCREEN CALIBRATION.............................................................................................. 10
2.2 HYDRAULIC CALIBRATION PROCEDURES........................................................................... 11
2.2.1 DEAERATION AND LOADING PRESSURE CALIBRATION............................................................ 12
2.2.2 FLOW PRESSURE CALIBRATION .................................................................................................. 14
2.2.3 BALANCE CHAMBER VOLUME CALIBRATION ............................................................................. 15
2.2.4 ACID (CONCENTRATE) PUMP VOLUME CALIBRATION .............................................................. 17
2.2.5 BICARBONATE PUMP VOLUME CALIBRATION ............................................................................ 19
2.2.6 UF PUMP VOLUME CALIBRATION................................................................................................. 21
2.3 SENSOR CALIBRATION PROCEDURES................................................................................. 24
2.3.1 ARTERIAL PRESSURE CALIBRATION........................................................................................... 25
2.3.2 VENOUS PRESSURE CALIBRATION ............................................................................................. 31
2.3.3 DIALYSATE PRESSURE CALIBRATION......................................................................................... 34
2.3.4 TEMPERATURE SENSOR CALIBRATION ...................................................................................... 36
2.3.5 POST TEMPERATURE SENSOR CALIBRATION ........................................................................... 38
2.3.6 TEMPERATURE CONTROL CALIBRATION ................................................................................... 40
2.3.6.1 TEMPERATURE CONTROL CALIBRATION (METHOD 1) ................................................... 41
2.3.6.2 TEMPERATURE CONTROL CALIBRATION (METHOD 2) ................................................... 44
2.3.6.3 TEMPERATURE CONTROL CALIBRATION (METHOD 3) ................................................... 48
2.3.6.4 TEMPERATURE CONTROL CALIBRATION (METHOD 4) ................................................... 51
2.3.7 BLOOD LEAK CALIBRATION ..........................................................................................................54
2.3.8 CONDUCTIVITY CELLS CALIBRATION.......................................................................................... 56
2.3.8.1 CONDUCTIVITY CELLS CALIBRATION (v2.16 or less)........................................................ 56
2.3.8.2 CONDUCTIVITY CELLS CALIBRATION (v2.25 or greater) ................................................... 58
2.4 MONITOR CALIBRATION PROCEDURES...............................................................................61
2.4.1 SET CLOCK...................................................................................................................................... 62
2.4.2 VOLTAGE DETECTION CALIBRATION .......................................................................................... 63
2.4.3 ARTERIAL PUMP RATE .................................................................................................................. 66
2.4.4 VENOUS PUMP RATE..................................................................................................................... 67
3.0 CALIBRATION PROCEDURES NOT PERFORMED IN SERVICE MODE ................. 68
3.1 INLET WATER PRESSURE REGULATOR CALIBRATION ..................................................... 68
3.2 LEVEL DETECTOR CALIBRATION .......................................................................................... 70
3.3 BLOOD PUMP CALIBRATION .................................................................................................. 72
Fresenius 2008K Calibration Procedures
P/N 507296 Rev B
Page iii
Page 6

NOTE
This document is written for Fresenius 2008K
Hemodialysis Systems using software versions
2.16 or later.
Page iv
Fresenius 2008K Calibration Procedures
P/N 507296 Rev B
Page 7

1.0 INTRODUCTION
Calibration involves doing two things. One is making mechanical adjustments,
both to the hydraulics and to the electronics. The other part of calibration is
storing data in the electronic memory in the machine. The machine uses an
EEPROM, which stores calibration data until it is purposely erased and replaced
with new data. To store new data in the EEPROM, the machine is operated in
Service mode as described in Section 1.2. Service mode also shows important
data that is needed to make some of the mechanical adjustments.
Perform the calibration procedures only when needed following repairs, or if the
machine fails the performance tests included in the Preventive Maintenance
Procedures. Do not re-calibrate the machine routinely to verify normal operation.
Instead, use the performance tests included in the Preventive Maintenance
procedures to ensure the machine is working properly.
U
If the machine behaves erratically during calibration, perform the Preventive
Maintenance procedures. Clogged filters, leaky O-rings and similar items
routinely corrected during Preventive Maintenance are a common cause of
intermittent problems. When preparing to re-calibrate the Blood Leak Detector,
either perform a bleach rinse first or verify that it has been done recently. The
bleach rinse is required to clean the detector tube.
Warning! Once a chemical rinse is performed, the only selection the machine
will allow is a mandatory rinse. This information is stored on the functional
board. Therefore, if the functional board and EEPROM are swapped out
together when troubleshooting a calibration or machine problem, the machine
must be rinsed prior to releasing it back into service.
Page 1
Fresenius 2008K Calibration Procedures
P/N 507296 Rev B
Page 8

1.1 TEST EQUIPMENT NEEDED
The following supplies and test equipment are required to perform the calibration
procedures.
U
Warning! All of the test equipment used must be maintained and calibrated
regularly in accordance with NIST standards. In particular, the conductivity
meter must meet the specifications given below. Failure to do so could result in
injury or death to the patient or to the operator.
• Fresenius Test Kit (Fresenius part number 150034), which contains two
gauges with fittings and hoses for measuring loading pressure and
deaeration pressure.
• Fresenius test connectors containing precision resistors that simulate the
thermistor resistance at various temperatures (Fresenius part number 190060).
• Dialysate meter to measure dialysate pressure, temperature and conductivity
at the ends of the dialysate lines. The meter must be capable of making
pressure measurements of from -250 mmHg to +400 mmHg with an
accuracy of at least ±2 mmHg up to ±200 mmHg and an accuracy of at least
1% and ±1 mmHg beyond ±200 mmHg. The temperature function of this
meter must be accurate within 0.2°C from 20°C to 45°C and must be
capable of measuring dialysate temperatures up to 85°C with an accuracy of
at least ±4.0°C. The conductivity function of this meter must be accurate to
within 0.1 mS over a range of 12 mS to 17 mS at a temperature of 25°C.
Page 2
• Stopwatch with a resolution to 0.01 second and an accuracy of 0.01% or
better.
• Fresenius Buret, 25ml capacity with 0.1ml graduations (Fresenius part
number 290104).
• Graduated cylinder: 100ml capacity with a tolerance of 0.60ml at 100ml or
better.
Fresenius 2008K Calibration Procedures
P/N 507296 Rev B
Page 9

• Digital Multimeter to measure dc voltage, ac voltage and resistance with an
accuracy of at least 1% + 1 digit for dc voltage measurements 1.5% + 5
digits for ac measurements and 1% + 1 digit for resistance measurements.
• Syringe, 60 cc capacity. Tolerance is not important; the syringe is not used
for volume measurements.
For machines equipped with the blood pressure module, the following equipment
is also required to test the module as described in this manual:
• Test Device (Fresenius part number 370090). The Test Device contains two
air chambers with calibrated volumes.
• Mercury manometer or equivalent pressure meter accurate to within 1
mmHg at pressures up to 335 mmHg.
1.2 OPERATING MODES
The following calibration procedures contain instructions to place the 2008K into
Dialysis Mode and Service Mode.
To place the machine in Service Mode, turn the machine power On and wait for
the message Press CONFIRM for Service Mode to appear. Once it appears,
press the [CONFIRM] key and the message will change to Machine in Service
Mode. After the System Initializing process is complete, the machine will be in
Service Mode.
If the [CONFIRM] key is not pressed when the Press CONFIRM for Service
Mode message is on the screen, the screen will change and the message Machine
in Dialysis Mode will appear. After the System Initializing process is complete,
the machine will be in Dialysis Mode.
Fresenius 2008K Calibration Procedures
P/N 507296 Rev B
Page 3
Page 10

Upon power up in Service Mode, the following screen will appear on the front
panel display:
U
Select a calibration by touching the appropriate calibration button.
Calibration procedures that have a red button must be completed before the
machine will operate in Dialysis mode.
Select the desired calibration, then press the [CONFIRM] key to begin the
procedure.
Caution: Once a calibration procedure is begun, pressing the [CONFIRM]
key usually updates the calibration data in the EEPROM. Be careful not to
press the [CONFIRM] key unless you want to change the calibration data. To
leave a calibration procedure without changing the data in the EEPROM, press
the [Escape] key.
A safety feature in the machine helps prevent mis-calibration. If a calibration
value outside of acceptable limits is entered, the machine will reject the
calibration data and the message OPERATOR ERROR will appear on the
display screen. The data stored in the EEPROM will not be changed if this
message appears.
Page 4
Fresenius 2008K Calibration Procedures
P/N 507296 Rev B
Page 11

)
)
DEAERATION
(DEGAS) PUMP
CONNECTOR
MON-NTC
CONNECTOR
#3
NTC-POST
CONNECTOR
#44
ADJUSTMENT
#20
UF PUMP
FLOW PUMP
BYPASS VALVE
FLOW PUMP
OUTLET
BLOOD PRESSURE
MODULE
INLET REGULATOR (61
DRAIN PORT
PRESSURE
RELIEF VALV
RELIEF VALVE (65
DEAERATION PUMP
BYPASS VALVE
DEAERATION
PUMP INLET
E (78)
Figure 1 - 2008K Rear View
Page 5
Page 5
Fresenius 2008K Calibration Procedures
Fresenius 2008K Calibration Procedures
P/N 507296 Rev B
P/N 507296 Rev B
Page 12

1.3 FRONT PANEL CONTROLS
The front panel consists of two areas, the touch screen and the control panel. The
touch screen is the area under the glass in the center of the front panel. The
control panel surrounds the touch screen and it contains the membrane keys. The
following illustrates these areas:
Touch Screen
Figure 2 - 2008K Front Panel
Control Panel
Control Panel Operation
Throughout the calibration procedures, whenever a control panel key is to be
pressed, the appropriate key name is surrounded by square brackets as in the
following example:
Press the [CONFIRM] key and the screen will change.
In this example, the [CONFIRM] key on the control panel should be pressed.
Page 6
Fresenius 2008K Calibration Procedures
P/N 507296 Rev B
Page 13

Touch Screen Operation
The touch screen is designed to display information and is used to enter data. To
select a button during a procedure, locate the button on the screen and touch it.
Depending on the type of button, the screen will change. Data boxes are also
displayed on the touch screen. The following describes the type of buttons and
data boxes that will be encountered during the calibration process.
Data Button
A yellow data button is used during calibration to enter a
measured volume or value. When the yellow area of the data
button is touched, it will change to a darker yellow. The data
can be changed using the [
=] or [>] keys or the value can be
entered using the number keys both on the control panel.
Once the data is entered, press the [CONFIRM] key and the
data button changes back to light yellow. The [Escape] key
can be pressed when the data button is dark yellow to abort
the data entry and return it to light yellow. The entered data
does not get stored until the [CONFIRM] key is pressed.
A gray data button means the button is not active and
touching it will have no effect.
Screen Button
Blue rectangles on the touch screen are screen buttons. By
touching the blue area of the screen button the display will
either change to another screen or the selection of an option
will change. A screen button is not active if it is gray.
Data Box
This type of box shows selected data or data the machine is
measuring. During the calibration process this type of box is
used to verify a value or selection.
Fresenius 2008K Calibration Procedures
P/N 507296 Rev B
Page 7
Page 14

1.4 MEASURING FLUID VOLUMES
Several of the following procedures require measuring fluid volumes using
graduated cylinders and laboratory burets. When making these measurements do
the following:
• Make certain the container is clean and dry before collecting the fluid to be
measured. Two drops of fluid are approximately 0.1ml, which is enough to
affect the accuracy of critical measurements.
• Ensure that no items such as thermometers or tubing are allowed to come in
contact with the fluid in the graduate. Such items will change the
calibration of the graduate and affect the accuracy of measurements. Both
the total volume indicated and the amount of fluid indicated by each
increment on the graduated scale will be incorrect. For example, if a
graduate is calibrated in 1ml increments, a piece of tubing in contact with
the fluid will cause each increment to be less than 1ml, depending upon the
total volume of the tubing that penetrates into the fluid.
• Surface tension causes the fluid to curve into a meniscus (see Figure 3).
Measure the volume at the bottom of the meniscus curve as shown.
100
mL
90
BOTTOM OF
THE MENISCUS
CURVE
80
Figure 3 - Meniscus Curve
Page 8
Fresenius 2008K Calibration Procedures
P/N 507296 Rev B
Page 15

1.5 CALIBRATE IF REPLACED
During the process of servicing a machine, components may need to be replaced.
The following table shows calibrations that must be conducted after replacing
certain components.
Replaced Component
- Deaeration Pump Head
- Deaeration Motor (or rebuild)
- Loading Pressure Relief Valve
- Flow Pump Head
- Flow Motor (or rebuild)
- Flow Pressure Relief Valve
- Balance Chamber - Balance Chamber Volume Sec. 2.2.3
- Acid Pump - Acid Pump Volume Sec. 2.2.4
- Bicarbonate Pump - Bicarbonate Pump Volume Sec. 2.2.5
- UF Pump - UF Pump Volume Sec. 2.2.6
- Dialysate Pressure Transducer - Dialysate Pressure Sec. 2.3.3
- Temperature Sensor
- Heater Bar
- Blood Leak Detector - Blood Leak Sec. 2.3.7
- Conductivity Cell - Conductivity Sec. 2.3.8
- Functional Board (New EEPROM) - All Calibrations All Sections
- Sensor Board
Then Calibrate
- Deaeration & Loading Pressure Sec. 2.2.1
- Flow Pressure Sec. 2.2.2
- Temperature Control Sec. 2.3.6
- Arterial Pressure Sec. 2.3.1
- Venous Pressure Sec. 2.3.2
- Dialysate Pressure Sec. 2.3.3
- Temperature Sec. 2.3.6
- Blood Leak Sec. 2.3.7
- Conductivity Sec. 2.3.8
- Arterial Pump Rate Sec. 2.4.3
- Venous Pump Rate Sec. 2.4.4
Refer to:
- Blood Pump Module
- Level Detector Module
Fresenius 2008K Calibration Procedures
- Arterial Pressure Sec. 2.3.1
- Arterial Pump Rate Sec. 2.4.3
- Venous Pressure Sec. 2.3.2
- Level Detector Sec. 3.2
Table 1 - Calibrate if Replaced
P/N 507296 Rev B
Page 9
Page 16

2.0 SERVICE MODE CALIBRATIONS
Place the machine in Service Mode as described in Section 1.2 to perform the
following procedures. The procedures do not have to be completed in any
particular order. Go directly to the calibration procedures needed.
If calibration is being performed after working on the hydraulics unit, especially
if the inlet water pressure regulator has been changed, we recommend that you
calibrate the inlet water pressure regulator as described in Section 3.1 first.
2.1 TOUCH SCREEN CALIBRATION
The touch screen is calibrated from the Service Mode screen.
- Press the [New Tx] key to begin the touch screen calibration.
N
Note: The touch screen needs to be calibrated only when the machine is
installed or if the touch screen is replaced.
Page 10
- Touch the asterisk on the screen. Another asterisk will appear in a different
spot on the screen. There are a total of three asterisks that will appear. Touch
each asterisk as they appear. When the calibration is complete, the screen will
prompt you to power the machine off.
Fresenius 2008K Calibration Procedures
P/N 507296 Rev B
Page 17
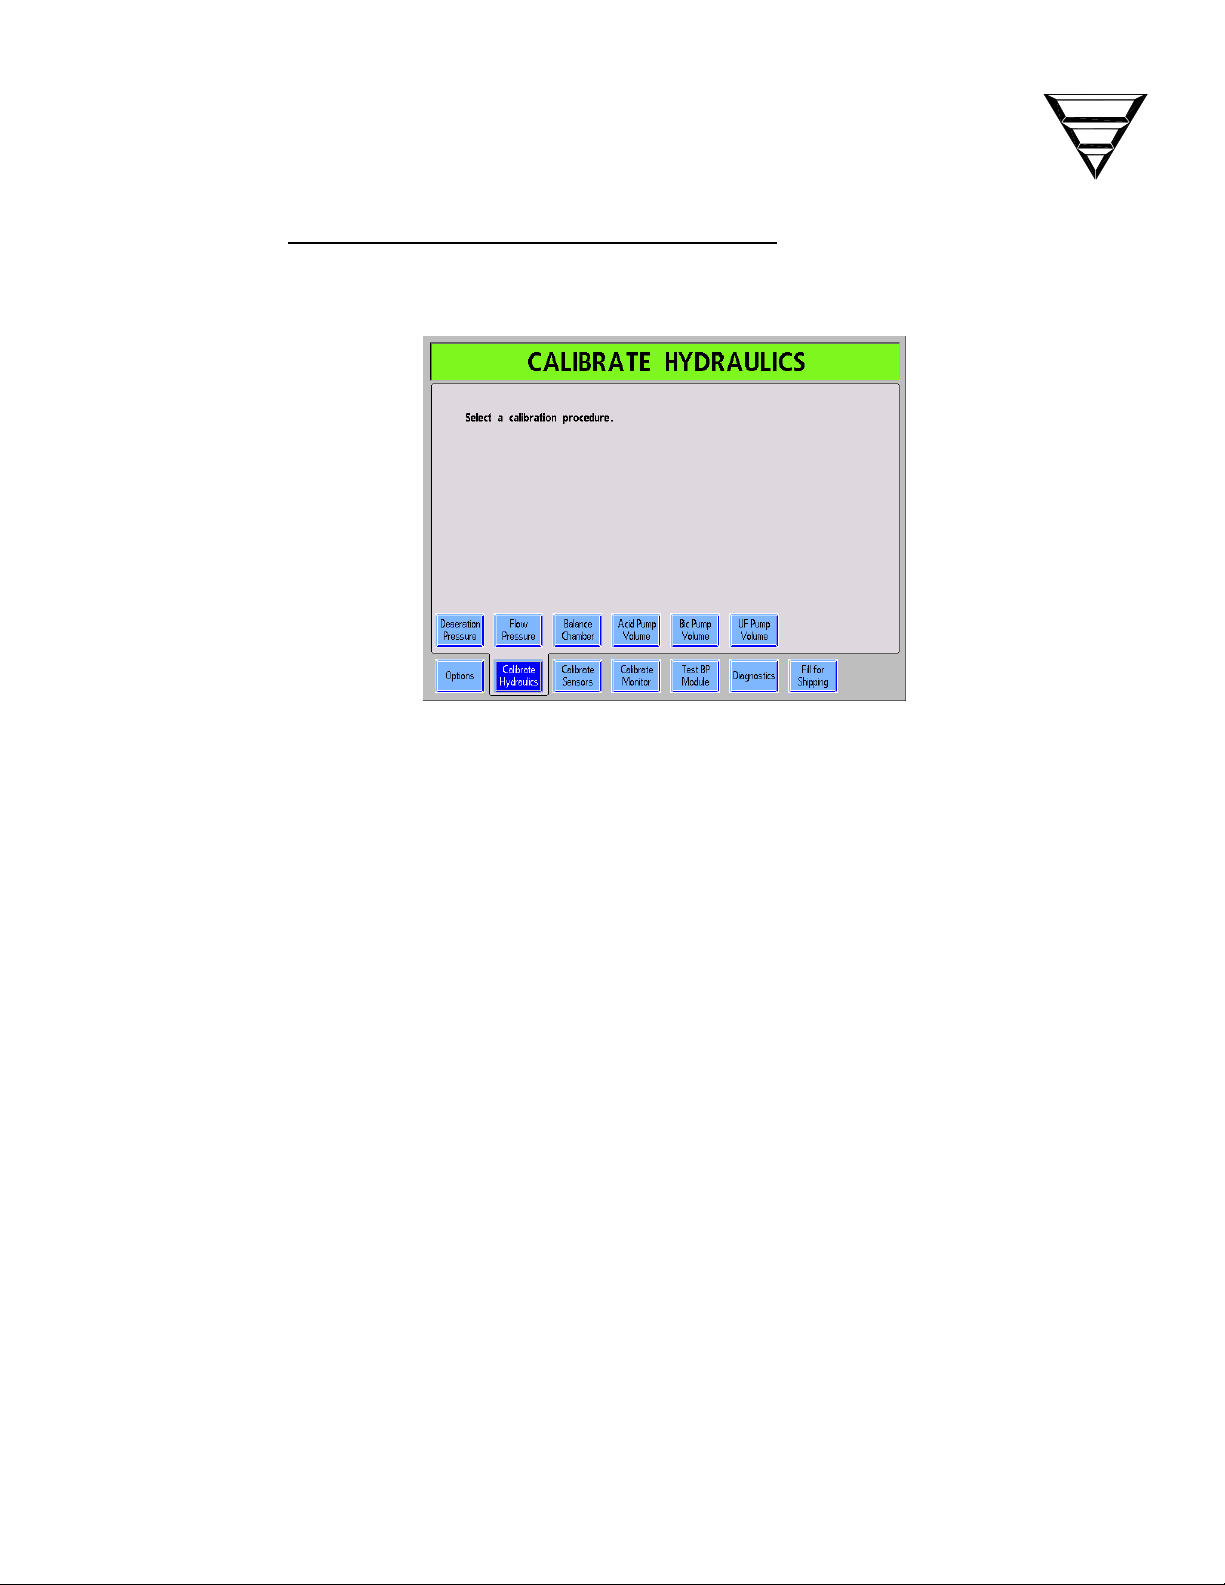
2.2 HYDRAULIC CALIBRATION PROCEDURES
From the Service Mode screen, select the Calibrate Hydraulics screen button.
The following screen will appear showing the six hydraulic calibrations:
Perform the following calibrations in the order listed below. To begin a
calibration, touch the appropriate calibration screen button.
• Deaeration Pressure
• Flow Pressure
• Balance Chamber
• Acid Pump Volume
• Bicarbonate Pump Volume
• UF Pump Volume
Page 11
Fresenius 2008K Calibration Procedures
P/N 507296 Rev B
Page 18

2.2.1 DEAERATION AND LOADING PRESSURE CALIBRATION
From the Calibrate Hydraulics screen, select the Deaeration Pressure screen
button. The screen will change to the following:
1. Connect a gauge in line at the inlet side of the deaeration pump (See Figure 1,
pg. 5).
N
Note: The inlet side of the deaeration pump is the side with the clear
plastic line. The output side has a white reinforced jacket over the line.
2. Connect a gauge equipped with a yellow connector into the red
ACETATE/ACID port.
3. Press the [CONFIRM] key. The deaeration pump will start and the screen
will change.
4. Select the PUMP RATE data button.
Set the PUMP RATE value to 180, then press the [CONFIRM] key.
Page 12
Fresenius 2008K Calibration Procedures
P/N 507296 Rev B
Page 19

5. Adjust the deaeration pump bypass valve (See Figure 1, pg. 5) on the
deaeration pump for a reading of -24 inHg on the gauge attached to the
deaeration pump. The gauge needle will be wiggling slightly. Set the
pressure so the maximum value is -24 inHg and verify that the needle
does not go below -25 inHg. If these values cannot be reached, set the
deaeration pump bypass valve for the closest reading possible, then
select a higher PUMP RATE value until the proper pressure is indicated
on the gauge.
6. The loading pressure gauge in the red RINSE port will be cycling between
two pressure levels. Adjust pressure relief valve #65 (See Figure 1, pg. 5) for
a reading between 18 and 20 psi when the gauge is reading its highest
pressure level. Verify that the pressure is greater than 10 psi at the lowest
level, and that it is stable within 1 psi at each level.
N
Note: If a DIASAFE
valve #65 for a reading between 23 and 25 psi when the gauge is reading
its highest pressure level.
7. Repeat steps 5 and 6 until both readings are correct without further
adjustment.
8. Press the [CONFIRM] key to save the data. The screen will change.
Remove the gauges.
Press the [CONFIRM] key to complete the calibration and return to the
Calibrate Hydraulics screen.
filter system is installed, adjust pressure relief
Page 13
Fresenius 2008K Calibration Procedures
P/N 507296 Rev B
Page 20

2.2.2 FLOW PRESSURE CALIBRATION
From the Calibrate Hydraulics screen, select the Flow Pressure screen button.
The screen will change to the following:
1. Connect a gauge in line at the output of the flow pump (See Figure 1, pg. 5).
N
N
Note: The output side of the flow pump is the side with the white
reinforced jacket over the line. The input side has clear plastic line
2. Press the [CONFIRM] key to start the flow pump.
Locate the flow bypass screw on the back of the flow pump (See Figure 1, pg. 5).
Turn the flow bypass screw all the way in (clockwise), then back it out two turns.
3. Adjust pressure relief valve #78 (See Figure 1, pg. 5) for a pressure
between 29 and 30 psi indicated on the gauge.
Note: If a DIASAFE
valve #78 for a pressure between 35 and 36 psi.
filter system is installed adjust pressure relief
Page 14
4. Press the [CONFIRM] key to complete the calibration and return to the
Calibrate Hydraulics screen.
Remove the gauge from the flow pump output.
Fresenius 2008K Calibration Procedures
P/N 507296 Rev B
Page 21

2.2.3 BALANCE CHAMBER VOLUME CALIBRATION
The balance chamber volume is measured at the factory with a high degree of
accuracy using equipment usually not available in the field. The chamber volume
will not change in use. Record the factory-measured chamber volume for
reference should the value need to the replaced in the EEPROM. Only perform
the following procedure if the factory-measured volume has been lost, or if the
balance chamber has been repaired or replaced.
From the Calibrate Hydraulics screen, select the Balance Chamber screen
button. The screen will change to the following:
N
Note: Be prepared to remove the drain hose from the back of the machine
(See Figure 1, pg. 5) and to collect fluid from the drain port with an empty
100ml graduated cylinder.
1. Press the [Prime] key to prime the balance chamber if needed. Press the
[Prime] key again to stop this optional priming.
2. Press the [CONFIRM] key to start the calibration. The status box will
change indicating the balance chamber is being prepared.
Once the balance chamber has been prepared, the screen will change and a
progress bar will begin to fill from left to right. This bar is showing an
approximate 15-second countdown before the contents of the balance
chambers are dispensed from the drain port with two pulses of fluid.
Fresenius 2008K Calibration Procedures
P/N 507296 Rev B
Page 15
Page 22

3. While this process is going on, remove the drain hose from the back of the
machine.
4. Prepare to catch the two pulses of fluid in the empty graduated cylinder by
placing it under the drain port.
5. As soon as the progress bar is completely blue, the machine will dispense
the two pulses out the drain port.
6. Place the graduated cylinder on a level surface and read the volume of fluid
it contains.
Select the BC Volume data button.
Set the BC Volume value to the amount collected in the graduated cylinder
and then press the [CONFIRM] key.
7. Press the [CONFIRM] key again to store the data. The screen will change.
Replace the drain hose on the drain port.
Press the [CONFIRM] key to complete the calibration and return to the
Calibrate Hydraulics screen.
Page 16
Fresenius 2008K Calibration Procedures
P/N 507296 Rev B
Page 23

2.2.4 ACID (CONCENTRATE) PUMP VOLUME CALIBRATION
From the Calibrate Hydraulics screen, select the Acid Pump Volume screen
button. The screen will change to the following:
1. Fill a 25ml buret with treated water or concentrate.
2. Attach the buret to the red concentrate line with a piece of tubing.
3. Press the [Prime] key. The acid pump will begin to stroke. Allow the
pump to stroke about 20 times or more to remove the air from the line then
press the [Prime] key again to stop the pump.
4. Select the Target data button.
Set the Target value to 30 strokes, then press the [CONFIRM] key.
5. Refill the buret exactly to the full (0ml) mark.
Press the [CONFIRM] key. The acid pump will stroke and the screen will
change.
6. Wait until the Target value reaches zero.
Page 17
Fresenius 2008K Calibration Procedures
P/N 507296 Rev B
Page 24

7. When the Target value reaches zero, the acid pump stops stroking.
Select the Volume data button.
Set the Volume value to the measured volume, then press the [CONFIRM] key.
8. Press the [CONFIRM] key again and the screen will change.
9. Refill the buret exactly to the full (0ml) mark.
U
Caution: Be sure the buret did not run out of fluid and allow air to be
pulled into the machine.
10. If needed, prime the line by pressing the [Prime] key. The acid pump will
begin to stroke. Allow the pump to stroke about 20 times or more to remove
the air from the line then press the [Prime] key again to stop the pump.
11. Select the Target data button.
Set the Target value to 30 strokes, then press the [CONFIRM] key.
12. Refill the buret exactly to the full (0ml) mark.
Press the [CONFIRM] key again. The acid pump will stroke and the
screen will change.
13. Wait until the Target value reaches zero.
14. When the Target value reaches zero, the acid pump stops stroking.
Select the Volume data button.
Page 18
Set the Volume value to the measured volume, then press the [CONFIRM] key.
15. Press the [CONFIRM] key again to save the data. The screen will change.
Press the [CONFIRM] key one more time to complete the calibration and
return to the Calibrate Hydraulics screen.
Fresenius 2008K Calibration Procedures
P/N 507296 Rev B
Page 25

2.2.5 BICARBONATE PUMP VOLUME CALIBRATION
From the Calibrate Hydraulics screen, select the Bic Pump Volume screen
button. The screen will change to the following:
1. Fill a 25ml buret with treated water or concentrate.
2. Attach the buret to the blue bicarbonate line with a piece of tubing.
3. Press the [Prime] key. The bicarbonate pump will begin to stroke.
Allow the pump to stroke about 20 times or more to remove the air from
the line then press the [Prime] key again to stop the pump.
4. Select the Target data button.
Set the Target value to 30 strokes, then press the [CONFIRM] key.
5. Refill the buret exactly to the full (0ml) mark.
Press the [CONFIRM] key. The bicarbonate pump will stroke and the
screen will change.
6. Wait until the Target value reaches zero.
Page 19
Fresenius 2008K Calibration Procedures
P/N 507296 Rev B
Page 26

7. When the Target value reaches zero, the bicarbonate pump stops stroking.
Select the Volume data button.
Set the Volume value to the measured volume, then press the [CONFIRM] key.
8. Press the [CONFIRM] key again and the screen will change.
9. Refill the buret exactly to the full (0ml) mark.
U
Caution: Be sure the buret did not run out of fluid and allow air to be
pulled into the machine.
10. If needed, prime the line by pressing the [Prime] key. The acid pump will
begin to stroke. Allow the pump to stroke about 20 times or more to remove
the air from the line then press the [Prime] key again to stop the pump.
11. Select the Target data button.
Set the Target value to 30 strokes, then press the [CONFIRM] key.
12. Refill the buret exactly to the full (0ml) mark.
Press the [CONFIRM] key again. The bicarbonate pump will stroke and
the screen will change.
13. Wait until the Target value reaches zero.
14. When the Target value reaches zero, the bicarbonate pump stops stroking.
Select the Volume data button.
Page 20
Set the Volume value to the measured volume, then press the [CONFIRM] key.
15. Press the [CONFIRM] key again to save the data. The screen will change.
Press the [CONFIRM] key one more time to complete the calibration and
return to the Calibrate Hydraulics screen.
Fresenius 2008K Calibration Procedures
P/N 507296 Rev B
Page 27

2.2.6 UF PUMP VOLUME CALIBRATION
From the Calibrate Hydraulics screen, select the UF Pump Volume screen
button. The screen will change to the following:
1. Remove the dialysate lines from the shunt and place them in a bucket of
water.
2. Press the [CONFIRM] key to start the calibration. The screen will change.
3. Remove the tubing from the FLUID SAMPLE / ULTRA-FILTRATE
OUTPUT port and connect it to a 25ml buret. Open the buret stopcock.
4. Press the [Prime] key. The UF pump will begin to stroke.
Allow the pump to stroke about 20 times or more to remove the air from
the line then press the [Prime] key again to stop the pump.
Add or remove fluid from the buret so the meniscus is exactly on the 25ml
mark (see Figure 4).
Page 21
Fresenius 2008K Calibration Procedures
P/N 507296 Rev B
Page 28

0ml
AFTER 24 STROKES THE
BURET SHOULD INDICATE
BETWEEN 0.90 AND 1.10 ml.
SET THE FLUID LEVEL AT
EXACTLY 25 ml TO BEGIN.
1
25
Page 22
LINE TO THE FLUID SAMPLE/ULTRAFILTRATE
OUTPUT PORT.
Figure 4 - UF Pump Volume Measurement
5. Select the Target data button.
Set the Target value to 24 strokes, then press the [CONFIRM] key.
6. Press the [CONFIRM] key again. The UF pump will stroke and the screen
will change.
7. Wait until the Target value reaches zero.
Fresenius 2008K Calibration Procedures
P/N 507296 Rev B
Page 29

8. When the Target value reaches zero, the UF pump will stop. Measure the
fluid collected in the buret. The buret scale should indicate between 0.90
and 1.10ml, indicating that between 23.90 and 24.10ml of fluid was
collected (see Figure 4). If the volume collected is not within this range,
adjust the UF pump volume as follows:
• On the rear center of the hydraulics assembly, remove the plastic cap
covering the pump adjustment screw (See Figure 1, pg. 5).
• Loosen the locking nut and turn the screw clockwise to decrease or
counter-clockwise to increase the pump volume.
N
9. Replace the plastic cap on the UF pump adjustment.
Note: Turning the adjustment screw approximately the
width of the screwdriver slot will change the amount of fluid
collected in 24 strokes by about 0.25ml. After making
adjustments, prime the pump again.
• Tighten the locking nut before proceeding.
• Press the [Escape] key and repeat the UF Pump Volume calibration
until the fluid fills the buret to between 0.90 and 1.10 on the scale
after 24 strokes of the UF pump.
Press the [CONFIRM] key to complete the calibration and return to the
Calibrate Hydraulics screen.
Page 23
Fresenius 2008K Calibration Procedures
P/N 507296 Rev B
Page 30

2.3 SENSOR CALIBRATION PROCEDURES
From the Service Mode screen, select the Calibrate Sensors screen button.
The following screen will appear showing the eight sensor calibrations:
Perform the following calibrations in the order listed below. To begin a
calibration, touch the appropriate calibration screen button.
• Arterial Pressure
• Venous Pressure
• Dialysate Pressure
• Temperature Sensor
• Post Temperature Sensor
• Temperature Control
• Blood Leak Detector
• Conductivity Cells
Page 24
Fresenius 2008K Calibration Procedures
P/N 507296 Rev B
Page 31

2.3.1 ARTERIAL PRESSURE CALIBRATION
The K arterial blood pump does not use potentiometers to calibrate the arterial
pressure. Instead, it stores a value in the blood pump. In order to calibrate the arterial
pressure, the pump must be put into its own service mode. This is done by moving the
Service Jumper located on the blood pump LP955 board. Refer to Figure 5 for
location and positioning of the Service Jumper.
N
Note: The DIP switches and Service Jumper on the blood pump must be set
prior to turning the machine ON.
R
O
T
I
N
O
M
LP955
E
C
I
V
F
F
O
/
N
O
R
E
S
E
C
L
D
A
A
I
F
N
R
R
G
E
E
S
T
N
I
D
E
N
C
G
I
A
V
R
E
S
F
F
O
/
N
O
F
N
F
O
O
Dip
switch Description
ON for future use
1
OFF for use on the 2008K
ON for Pre-Pump Arterial Pressure
2
OFF for Post-Pump Arterial Pressure
3 Not Used
ON for blood pump stop alarm after 30 sec
4
OFF for blood pump stop alarm after 15 sec
5 Not Used
6 Not Used
7 Not Used
ON for tubing diameter selection 2 to 10mm
(0.2mm increments)
8
OFF for tubing diameter selection 2.6, 4.8,
6.4 and 8.0mm only
ON/OFF
SERVICE
In Service Mode Not In Service Mode
ON/OFF
SERVICE
Figure 5 - K Blood Pump DIP switches & Service Jumper
Page 25
Fresenius 2008K Calibration Procedures
P/N 507296 Rev B
Page 32

The following procedure calibrates the pressure sensor on the K arterial blood
pump.
- With the machine turned OFF, position the blood pump Service Jumper into
the In Service Mode position.
- Locate DIP switch 2 on the blood pump LP955 board and configure it as
follows:
• For prepump, DIP switch 2 must be in the ON position
• For postpump, DIP switch 2 must be in the OFF position
- With the 2008K machine in Service mode, turn the power ON.
- When the power up sequence is complete, the blood pump display will be
alternating between these two displays:
N
Note: If the above display has a number 2 instead of a number 1, press the
[>] down key on the blood pump control panel to change it to 1.
Page 26
Fresenius 2008K Calibration Procedures
P/N 507296 Rev B
Page 33

From the Calibrate Sensors screen, select the Arterial Pressure screen button.
The screen will change to the following:
N
N
Note: Depending on the HARDWARE OPTION set for the ART PUMP
option, the above display may read POSTPUMP instead of PREPUMP.
The bargraph scale will also be different (500 to –80mmHg).
1. Open arterial transducer port P
(atmospheric pressure).
Note: Use the Arterial Level Adjust [
panel to abort the calibration process without changing the stored DAC
value on the blood pump.
Press the [Start/Stop] key on the blood pump and its display will change to
the following:
on the blood pump module to air
ART.
=] key on the blood pump control
Page 27
Fresenius 2008K Calibration Procedures
P/N 507296 Rev B
Page 34

Press the [Start/Stop] key again and the small zero will start to flash.
2. Use the [
=] and [>] keys on the blood pump to adjust the Arterial
Pressure data box on the 2008K display to indicate 0 mmHg.
Press the [CONFIRM] key and the 2008K display will change.
Press the [Start/Stop] key on the blood pump and its display will change
back to the following alternating display:
Press the [Start/Stop] key again and the display will change to the
following:
Press the [
=] key on the blood pump to change it to the following:
Page 28
Press the [Start/Stop] key and the small zero will start to flash.
Fresenius 2008K Calibration Procedures
P/N 507296 Rev B
Page 35

3. Attach a syringe and a calibrated pressure gauge to the P
port using a
ART.
T- fitting.
4. Push the syringe plunger in to show a pressure of 200mmHg on the
external pressure gauge.
5. While holding this pressure, do the following:
• Use the [=] and [>] keys on the blood pump to adjust the Arterial
Pressure data box on the 2008K display to indicate 200mmHg.
• Press the [CONFIRM] key and the 2008K display will change.
• Press the [Start/Stop] key on the blood pump and its display will
change back to the alternating display:
• Verify that the Arterial Pressure and Pressure at Actuator Board
meter boxes are within 10 mmHg of each other.
N
Note: After pressing the [CONFIRM] key, a delay of approximately
8 seconds may occur before the Pressure at Actuator Board data box
changes to be within 10 mmHg of the Arterial Pressure data box on the
display screen.
6. Pressurize the P
port by either pushing or pulling on the syringe.
ART.
7. Verify that the Arterial Pressure and Pressure at Actuator Board meter
boxes can reach at least 290mmHg (510mmHg for postpump) and that they are
within 10mmHg of each other.
Verify that the Arterial Pressure and Pressure at Actuator Board meter
boxes can reach at least -310mmHg (-90mmHg for postpump) and that they are
within 10mmHg of each other.
8. Press the [CONFIRM] key to save the data. The screen will change.
Fresenius 2008K Calibration Procedures
P/N 507296 Rev B
Page 29
Page 36

Caution: The following step must be performed on the blood pump or the
U
calibration data you just collected and tested will be lost when the machine
is turned off.
Press the [=] and [>] keys on the blood pump at the same time to save the
DAC values to the blood pump memory. While pressing both keys, the
blood pump display will show dashes as shown below:
Press the [CONFIRM] key to complete the calibration and return to the
Calibrate Sensors screen.
Power the machine OFF and move the blood pump Service Jumper into the
Not in Service Mode position (see Figure 5).
Page 30
Fresenius 2008K Calibration Procedures
P/N 507296 Rev B
Page 37

2.3.2 VENOUS PRESSURE CALIBRATION
From the Calibrate Sensors screen, select the Venous Pressure screen button.
The screen will change to the following:
1. Open the venous transducer port P
on the level detector module to air
VEN.
(atmospheric pressure).
2. Adjust the ZERO SET potentiometer (see Figure 6) so that the Venous
Pressure data box indicates zero mmHg.
Press the [CONFIRM] key and the screen will change.
3. Attach a syringe and a calibrated pressure gauge to the P
port using a
VEN.
T- fitting.
Page 31
Fresenius 2008K Calibration Procedures
P/N 507296 Rev B
Page 38

(
)
ZERO SET
(P3)
ZERO SET
(POT 146)
400 MMHG SET
POT 40
400 MMHG
SET
400 MMHG
SET
ZERO SET
(POT 39)
Page 32
POTENTIOMETER LOCATIONS
DEPEND UPON THE VERSION
OF THE BOARD AS SHOWN
Figure 6 - Venous Pressure Display Adjustments
Fresenius 2008K Calibration Procedures
P/N 507296 Rev B
Page 39

4. Push the syringe plunger in to show a pressure of 400mmHg on the
external pressure gauge.
5. While holding this pressure, do the following:
• Adjust the 400 MMHG SET potentiometer (see Figure 6) so the
Venous Pressure data box indicates 400 mmHg.
• Press the [CONFIRM] key and the screen will change.
• Verify that the Venous Pressure and Pressure at Actuator Board
meter boxes are within 10 mmHg of each other.
N
Note: After pressing the [CONFIRM] key, a delay of approximately
8 seconds may occur before the Pressure at Actuator Board data box
changes to be within 10 mmHg of the Venous Pressure data box on the
display screen.
6. Pressurize the P
7. Verify that the Venous Pressure and Pressure at Actuator Board meter
boxes can reach at least 510mmHg and that they are within 10mmHg of each
other.
Verify that the Venous Pressure and Pressure at Actuator Board meter
boxes can reach at least –90mmHg and that they are within 10mmHg of each
other.
8. Press the [CONFIRM] key to save the calibration. The screen will change.
Press the [CONFIRM] key again to complete the calibration and return to
the Calibrate Sensors screen.
port by either pushing or pulling on the syringe.
VEN.
Page 33
Fresenius 2008K Calibration Procedures
P/N 507296 Rev B
Page 40

2.3.3 DIALYSATE PRESSURE CALIBRATION
From the Calibrate Sensors screen, select the Dialysate Pressure screen
button. The screen will change to the following:
1. Hang a four-way connector on the I.V. pole at the normal dialyzer height.
Remove the dialyzer lines from the shunt and attach them to the connector.
N
N
Note: The four-way connector is included in the Fresenius Test Kit part
number 150034.
Connect a 30cc syringe to one of the four-way connector outlets and clamp
the tubing.
Connect an external pressure gauge to the remaining four-way connector
outlet and clamp the tubing.
2. Dialysate should be flowing, as indicated by the flow indicator in the
dialysate lines.
Note: If there is no dialysate flow through the flow indicator, make sure
the yellow [Dialysate Flow on/off] light is off and the shunt door is closed.
Page 34
Wait until no air is visible passing through the flow indicator, then press
the [CONFIRM] key. The screen will change.
Fresenius 2008K Calibration Procedures
P/N 507296 Rev B
Page 41

3. Press the [Dialysate Flow on/off] key to stop dialysate flow.
Unclamp the lines leading to the 30cc syringe and the pressure gauge.
4. Use the syringe to create a pressure reading of 0mmHg on the external
pressure gauge.
5. While holding this pressure, press the [CONFIRM] key. The screen will
change.
6. Use the syringe to create pressure reading of -250mmHg on the external
pressure gauge.
7. While holding this pressure, press the [CONFIRM] key to save the data.
The screen will change.
8. Press the [Dialysate Flow on/off] key to start dialysate flow.
9. Open the shunt and remove the lines from the external pressure gauge.
Replace them on the shunt and close the door.
Press the [CONFIRM] key to complete the calibration and return to the
Calibrate Sensors screen.
Page 35
Fresenius 2008K Calibration Procedures
P/N 507296 Rev B
Page 42

2.3.4 TEMPERATURE SENSOR CALIBRATION
Perform the temperature sensor calibration as follows using the test connector set
referenced in Section 1.1. The display screen calls for connecting specific
resistances to the X3 (MON-NTC) connector position on the distribution panel
(See Figure 1, pg. 5) for each test. The test connectors contain resistors which are
the closest 1% tolerance resistor available to these values. In the following
procedure, each test connector is identified by the number marked on its cover.
From the Calibrate Sensors screen, select the Temp Sensor screen button.
The screen will change to the following:
Page 36
1. Remove the distribution board cover from the back of the machine.
Unplug the X3 (MON-NTC) connector from the distribution board.
Connect test connector 34 (6.808KΩ) into X3 (MON-NTC) connection on
the distribution board.
Press the [CONFIRM] key to save the data. The screen will change.
2. Remove the previous test connector and connect test connector 40
(5.117KΩ) into X3 (MON-NTC) connection on the distribution board.
Press the [CONFIRM] key to save the data. The screen will change.
3. Remove the previous test connector and connect test connector 80
(1.255KΩ) into X3 (MON-NTC) connection on the distribution board.
Fresenius 2008K Calibration Procedures
P/N 507296 Rev B
Page 43

Press the [CONFIRM] key to save the data. The screen will change.
4. Remove the previous test connector and connect test connector 90
(0.915KΩ) into X3 (MON-NTC) connection on the distribution board.
Press the [CONFIRM] key to save the data.
5. The screen will confirm the calibration has been saved:
6. Insert each of the test connectors into X3 (MON-NTC) to confirm the
saved calibration data. Each connector must be within 0.1°C of the
Pre-Temperature data box.
Press the [CONFIRM] key to complete the calibration and return to the
Calibrate Sensors screen.
Remove the test connector and replace the X3 (MON-NTC) connector on
the distribution board.
Fresenius 2008K Calibration Procedures
P/N 507296 Rev B
Page 37
Page 44

2.3.5 POST TEMPERATURE SENSOR CALIBRATION
Perform the post temperature sensor calibration as follows using the test
connector set referenced in Section 1.1. The display screen calls for connecting
specific resistances to the X44 (NTC-POST) connector position on the
distribution panel (See Figure 1, pg. 5) for each test. The test connectors contain
resistors which are the closest 1% tolerance resistor available to these values. In
the following procedure, each test connector is identified by the number marked
on its cover.
From the Calibrate Sensors screen, select the Post Temp Sensor screen
button. The screen will change to the following:
Page 38
1. Remove the distribution board cover from the back of the machine.
Unplug the X44 (NTC-POST) connector from the distribution board.
Connect test connector 34 (6.808KΩ) into X44 (NTC-POST) connection
on the distribution board.
Wait for the Post-Temperature Reference data box to stabilize.
Press the [CONFIRM] key to save the data. The screen will change.
Fresenius 2008K Calibration Procedures
P/N 507296 Rev B
Page 45

2. Remove the previous test connector and connect test connector 40
(5.117KΩ) into X44 (NTC-POST) connection on the distribution board.
Wait for the Post-Temperature Reference data box to stabilize.
Press the [CONFIRM] key to save the data.
3. The screen will confirm the calibration has been saved:
4. Insert each of the test connectors into X44 (NTC-POST) to confirm
the saved calibration data. Each connector must be within 0.1°C of the
Post-Temperature data box.
Press the [CONFIRM] key to complete the calibration and return to the
Calibrate Sensors screen.
Remove the test connector and replace the X44 (NTC-POST) connector
on the distribution board.
Fresenius 2008K Calibration Procedures
P/N 507296 Rev B
Page 39
Page 46

2.3.6 TEMPERATURE CONTROL CALIBRATION
The Temperature Control Calibration is dependent upon Function Software
version and enabled options. Perform the appropriate calibration according to the
list below:
Function Software V2.16 or less:
Perform section 2.3.6.1 if all the following apply:
- CRRT option is not installed and Slow Flow option is disabled.
Perform section 2.3.6.2 if all the following apply:
- CRRT option is installed or Slow Flow option is enabled
Function Software V2.25 or greater:
Perform section 2.3.6.1 if all the following apply:
- OLC option not installed OR
OLC option is installed but Temp Comp
option is disabled.
- CRRT option is not installed and Slow Flow option is disabled.
Perform section 2.3.6.2 if all the following apply:
- OLC option not installed OR
OLC option is installed but Temp Comp
option is disabled.
- CRRT option is installed or Slow Flow option is enabled.
Perform section 2.3.6.3 if all the following apply:
- OLC option is installed and Temp Comp option is enabled.
Page 40
- CRRT option is not installed and Slow Flow option is disabled.
Perform section 2.3.6.4 if all the following apply:
- OLC option is installed and Temp Comp option is enabled.
- CRRT option is installed or Slow Flow option is enabled.
Fresenius 2008K Calibration Procedures
P/N 507296 Rev B
Page 47

2.3.6.1 TEMPERATURE CONTROL CALIBRATION (METHOD 1)
Perform this section only if the machine is equipped with the following:
- Functional Software v2.16 or less, the machine is not equipped with the
CRRT option and the slow flow option is disabled.
- Functional Software v2.25 or greater, the machine does not have the OLC
option installed OR OLC option is installed but the Temp Comp option is
disabled, the machine is not equipped with the CRRT option and the slow
flow option is disabled.
Replace any panels that have been removed so that the machine is closed up as it
would be in normal operation. It is important for this calibration that ventilation
around the hydraulics unit be the same as it is when the machine is used for
dialysis.
From the Calibrate Sensors screen, select the Temp Control screen button.
The screen will change to the following:
Page 41
Fresenius 2008K Calibration Procedures
P/N 507296 Rev B
Page 48

1. Verify in the Selected Concentrate box that the type of concentrate used
is selected.
If not correct, press the Change Type button.
N
N
Note: If the Change Type button is pressed, the Enter Conc screen will
be displayed. Change the selected concentrate and then select Calibrate
Sensors screen button and then Temp Control screen button to return to
step 1 above.
2. Press the [CONFIRM] key to start the calibration. The screen will change.
3. Connect the red and blue concentrate connectors to concentrate solutions as
in normal dialysis operation.
4. Remove the dialysate lines from the shunt and connect them to an external
temperature meter. Close the shunt door.
5. Press the [CONFIRM] key and the screen will change.
6. Select the TEMP DAC data button.
Adjust the TEMP DAC value, then press the [CONFIRM] key.
Note: Changing the DAC value by 2 or 3 units will produce a temperature
change of about 0.1°C. Wait for the temperature to change and stabilize
before changing it again to avoid overshooting the proper setting.
Page 42
N
Note: The TEMP DAC value does not take effect until the [CONFIRM]
key is pressed and the TEMP DAC data button is light yellow.
Fresenius 2008K Calibration Procedures
P/N 507296 Rev B
Page 49

The temperature of the dialysate shown on the external meter will change
after a delay. Find a TEMP DAC value that produces a temperature on the
external meter of 37°C.
Wait five minutes after the last adjustment of the TEMP DAC value, then
verify that the temperature on the external meter has remained at 37°C. If
not, change the TEMP DAC value, and wait five minutes again.
7. When the temperature remains at 37°C, press the [CONFIRM] key. The
screen will change.
8. Select the Monitor Reference data button.
Adjust the value shown for Monitor Reference until it matches the
external temperature meter at 37°C and then press the [CONFIRM] key.
9. Press the [CONFIRM] key again to save the data. The screen will change.
Open the shunt to stop the dialysate flow, remove the lines from the
external meter and replace them on the shunt.
Press the [CONFIRM] key to complete the calibration and return to the
Calibrate Sensors screen.
Fresenius 2008K Calibration Procedures
P/N 507296 Rev B
Page 43
Page 50

2.3.6.2 TEMPERATURE CONTROL CALIBRATION (METHOD 2)
Perform this section only if the machine is equipped with the following:
- Functional Software v2.16 or less, the machine is equipped with the CRRT
option OR the slow flow option is enabled.
- Functional Software v2.25 or greater, the machine does not have the OLC
option installed OR OLC option is installed but the Temp Comp option is
disabled, the machine is equipped with the CRRT option OR the slow flow
option is enabled.
If the CRRT option is installed or if the slow flow option is enabled, the Temp
Control calibration is done in two parts. The DAC and temperature monitor
calibration is performed at 500ml/min flow rate and then it is calibrated at a
100ml/min flow rate.
Replace any panels that have been removed so that the machine is closed up as it
would be in normal operation. It is important for this calibration that ventilation
around the hydraulics unit be the same as it is when the machine is used for
dialysis.
From the Calibrate Sensors screen, select the Temp Control screen button.
The screen will change to the following:
Page 44
Fresenius 2008K Calibration Procedures
P/N 507296 Rev B
Page 51

1. Verify in the Selected Concentrate box that the type of concentrate used
is selected.
If not correct, press the Change Type button.
N
Note: If the Change Type button is pressed, the Enter Conc screen will
be displayed. Change the selected concentrate and then select Calibrate
Sensors screen button and then Temp Control screen button to return to
step 1 above.
2. Press the [CONFIRM] key to start the calibration. The screen will change.
3. Connect the red and blue concentrate connectors to concentrate solutions as
in normal dialysis operation.
4. Remove the dialysate lines from the shunt and connect them to an external
temperature meter. Close the shunt door.
5. Press the [CONFIRM] key and the screen will change.
6. The Temp Control calibration begins with the flow at 500ml/min.
Select the TEMP DAC data button.
Adjust the TEMP DAC value, then press the [CONFIRM] key.
N
N
Note: Changing the DAC value by 2 or 3 units will produce a temperature
change of about 0.1°C. Wait for the temperature to change and stabilize
before changing it again to avoid overshooting the proper setting.
Note: The TEMP DAC value does not take effect until the [CONFIRM]
key is pressed and the TEMP DAC data button is light yellow.
Page 45
Fresenius 2008K Calibration Procedures
P/N 507296 Rev B
Page 52

The temperature of the dialysate shown on the external meter will change
after a delay. Find a TEMP DAC value that produces a temperature on the
external meter of 37°C.
Wait five minutes after the last adjustment of the TEMP DAC value, then
verify that the temperature on the external meter has remained at 37°C. If
not, change the TEMP DAC value, and wait five minutes again.
7. When the temperature remains at 37°C, press the [CONFIRM] key. The
screen will change.
8. Select the Monitor Reference data button.
Adjust the value shown for Monitor Reference until it matches the external
temperature meter at 37°C and then press the [CONFIRM] key.
9. Press the [CONFIRM] key again and the screen will change.
10. The Temp Control calibration now changes the flow to 100ml/min.
Press the [CONFIRM] key and then select the TEMP DAC data button.
Adjust the TEMP DAC value, then press the [CONFIRM] key.
N
N
Note: The TEMP DAC value does not take effect until the [CONFIRM]
key is pressed and the TEMP DAC data button is light yellow.
The temperature of the dialysate shown on the external meter will change
after a delay. Find a TEMP DAC value that produces a temperature on the
external meter of 37°C. Be patient, the 100ml/min flow rate calibration
takes time.
Note: Depending on the incoming water temperature, the DAC value
during the 100ml/min flow calibration may have to be set to the maximum
(255). If the temperature is less than 37°C, the DAC value is at 255, and
enough time has passed, go ahead and save the DAC value of 255. This
circumstance will be compensated for in dialysis or CRRT modes.
Page 46
Fresenius 2008K Calibration Procedures
P/N 507296 Rev B
Page 53

Wait five minutes after the last adjustment of the TEMP DAC value, then
verify that the temperature on the external meter has remained at 37°C. If
not, change the TEMP DAC value, and wait five minutes again.
11. When the temperature remains at 37°C, press the [CONFIRM] key. The
screen will change.
12. Select the Monitor Reference data button.
Adjust the value shown for Monitor Reference until it matches the
external temperature meter at 37°C and then press the [CONFIRM] key.
13. Press the [CONFIRM] key again to save the data. The screen will change.
Open the shunt to stop the dialysate flow, remove the lines from the
external meter and replace them on the shunt.
Press the [CONFIRM] key to complete the calibration and return to the
Calibrate Sensors screen.
Fresenius 2008K Calibration Procedures
P/N 507296 Rev B
Page 47
Page 54

2.3.6.3 TEMPERATURE CONTROL CALIBRATION (METHOD 3)
Perform this section only if the machine is equipped with the following:
- Functional Software v2.25 or greater, the machine has the OLC option
installed AND the Temp Comp option is enabled, the machine is not
equipped with the CRRT option and the slow flow option is disabled.
N
Note: The Temp Comp option is only present in Functional Software v2.25 or
greater and uses post temperature sensor NTC44. Do not attempt to calibrate a
non-OLC machine with the Temp Comp option enabled since NTC44 is not
present and an Operator Error will occur.
Replace any panels that have been removed so that the machine is closed up as it
would be in normal operation. It is important for this calibration that ventilation
around the hydraulics unit be the same as it is when the machine is used for
dialysis.
From the Calibrate Sensors screen, select the Temp Control screen button.
The screen will change to the following:
Page 48
Fresenius 2008K Calibration Procedures
P/N 507296 Rev B
Page 55

1. Verify in the Selected Concentrate box that the type of concentrated
used is selected.
If not correct, press the Change Type button.
N
Note: If the Change Type button is pressed, the Enter Conc screen will
be displayed. Change the selected concentrate and then select Calibrate
Sensors screen button and then Temp Control screen button to return to
step 1 above.
Connect the red and blue concentrate connectors to concentrate solutions as
in normal dialysis operation.
2. Press the [CONFIRM] key to start the calibration. The screen will change.
3. Remove the dialysate lines from the shunt and connect them to an external
temperature meter. Close the shunt door.
4. Press the [CONFIRM] key and the screen will change.
5. The screen will display Please wait, getting stable temperature.
The machine will run at a 500ml/min flow rate to bring up conductivity and
temperature. When the temperature becomes stable, the Stability counter
will start to count up. As soon as it is greater than 70 a 2-minute Timer
starts to count down. During this time the Stability counter will continue
to increase to 100 and stay at 100 for the remaining 2-minutes. Once the
2-minutes Timer reaches zero, the screen will change.
N
Note: If the Stability counter drops below 70 during the 2-minute Timer,
the 2-minutes will be reset and will wait for the Stability counter to be
greater than 70 again.
Page 49
Fresenius 2008K Calibration Procedures
P/N 507296 Rev B
Page 56

6. Select the Monitor Reference data button.
Adjust the value shown for Monitor Reference until it matches the
external temperature and then press the [CONFIRM] key and the screen
will change.
7. Press the [CONFIRM] key again and the screen will display Please wait,
getting stable temperature.
The machine now runs in bypass at a 500ml/min flow rate for 2-minutes.
Once the 2-minute Timer has reached zero, a 6-minute Timer is set. The
machine continues to run in bypass and at a 500ml/min flow rate and
depending on the stability, the 6-minute Timer may start to count down. It
is normal for the Stability counter to decrease during this time. If the
Stability counter becomes less than 70, the Timer will be reset to 6minutes and will wait for the Stability counter to be greater than 70 again.
Once the 6-minute Timer reaches zero, the screen will change.
8. Press the [CONFIRM] key to save the data. The screen will change.
Open the shunt to stop the dialysate flow, remove the lines from the
external meter and replace them on the shunt.
Press the [CONFIRM] key to complete the calibration and return to the
Calibrate Sensors screen.
Page 50
Fresenius 2008K Calibration Procedures
P/N 507296 Rev B
Page 57

2.3.6.4 TEMPERATURE CONTROL CALIBRATION (METHOD 4)
Perform this section only if the machine is equipped with the following:
- Functional Software v2.25 or greater, the machine has the OLC option
installed AND the Temp Comp option is enabled, the machine is equipped
with the CRRT option OR the slow flow option is enabled.
N
Note: The Temp Comp option is only present in Functional Software v2.25 or
greater and uses post temperature sensor NTC44. Do not attempt to calibrate a
non-OLC machine with the Temp Comp option enabled since NTC44 is not
present and an Operator Error will occur.
If the CRRT option is installed or if the slow flow option is enabled, the Temp
Control calibration is done in two parts. The DAC and temperature monitor
calibration is performed at 500ml/min flow rate and then it is calibrated at a
100ml/min flow rate.
Replace any panels that have been removed so that the machine is closed up as it
would be in normal operation. It is important for this calibration that ventilation
around the hydraulics unit be the same as it is when the machine is used for dialysis.
From the Calibrate Sensors screen, select the Temp Control screen button.
The screen will change to the following:
Fresenius 2008K Calibration Procedures
P/N 507296 Rev B
Page 51
Page 58

1. Verify in the Selected Concentrate box that the type of concentrate used
is selected.
If not correct, press the Change Type button.
N
Note: If the Change Type button is pressed, the Enter Conc screen will
be displayed. Change the selected concentrate and then select Calibrate
Sensors screen button and then Temp Control screen button to return to
step 1 above.
Connect the red and blue concentrate connectors to concentrate solutions as
in normal dialysis operation.
2. Press the [CONFIRM] key to start the calibration. The screen will change.
3. Remove the dialysate lines from the shunt and connect them to an external
temperature meter. Close the shunt door.
4. Press the [CONFIRM] key and the screen will change.
5. The screen will display Please wait, getting stable temperature.
The machine will run at a 500ml/min flow rate to bring up conductivity and
temperature. When the temperature becomes stable, the Stability counter
will start to count up. As soon as it is greater than 70 a 2-minute Timer
starts to count down. During this time the Stability counter will continue
to increase to 100 and stay at 100 for the remaining 2-minutes. Once the
2-minutes counter reaches zero, the screen will change.
Page 52
N
Note: If the Stability counter drops below 70 during the 2-minute Timer,
the 2 minutes will be reset and will wait for the Stability counter to be
greater than 70 again.
Fresenius 2008K Calibration Procedures
P/N 507296 Rev B
Page 59

6. Select the Monitor Reference data button.
Adjust the value shown for Monitor Reference until it matches the
external temperature and then press the [CONFIRM] key and the screen
will change.
7. Press the [CONFIRM] key again and the screen will display Please wait,
getting stable temperature.
The machine now runs in bypass at a 500ml/min flow rate for 2-minutes.
Once the 2-minute Timer has reached zero, a 6-minute Timer is set. The
machine continues to run in bypass and at a 500ml/min flow rate and
depending on the stability, the 6-minute Timer may start to count down. It
is normal for the Stability counter to decrease during this time. If the
Stability counter becomes less than 70, the Timer will be reset to 6-minutes
and will wait for the Stability counter to be greater than 70 again.
Once the 6-minute counter reaches zero, a 10-minute Timer is set. The
machine comes out of bypass and changes to a 100ml/min flow rate. When
the temperature becomes stable, the Stability counter will start to count up.
As soon as it is greater than 70 the 10-minute Timer starts to count down.
During this time the Stability counter will continue to increase to 100 and
stay at 100 for the remaining 10-minutes. Once the 10-minutes Timer
reaches zero, the screen will change.
N
Note: If the Stability counter drops below 70 during the 10-minute Timer
starts, the 10-minutes will be reset and will wait for the Stability counter to
be greater than 70 again.
8. Select the Monitor Reference data button.
Adjust the value shown for Monitor Reference until it matches the external
temperature and then press the [CONFIRM] key and the screen will change.
9. Press the [CONFIRM] key again to save the data. The screen will change.
Open the shunt to stop the dialysate flow, remove the lines from the
external meter and replace them on the shunt.
Press the [CONFIRM] key to complete the calibration and return to the
Calibrate Sensors screen.
Page 53
Fresenius 2008K Calibration Procedures
P/N 507296 Rev B
Page 60

2.3.7 BLOOD LEAK CALIBRATION
The glass tube in the blood leak detector must be clean before the blood leak
detector calibration can be completed successfully. The glass tube in the detector
is cleaned by performing a bleach rinse, which washes the tube out along with the
rest of the hydraulics.
There are two calibrations performed on the Blood Leak Detector. One calibrates
the detector itself and the other calibrates the dimness circuits. Perform the
procedures as described below.
From the Calibrate Sensors screen, select the Blood Leak Detector screen
button. The screen will change to the following:
Page 54
N
Note: The blood leak and blood dimness calibration is performed
automatically. Once started, the calibration will proceed on its own until
the calibration complete screen is displayed.
1. Verify that the machine has received a bleach rinse recently, or perform a
bleach rinse as described in the Operator’s Manual before calibrating the
blood leak detector.
2. Press the [CONFIRM] key. The screen will change and the blood leak
calibration will start.
Fresenius 2008K Calibration Procedures
P/N 507296 Rev B
Page 61

3. The first calibration that is performed is the automatic blood leak
calibration. When its finished, the screen will change.
4. The second calibration that is performed is the automatic blood dimness
calibration. When its finished, the following calibration complete screen
will be displayed:
5. Press the [CONFIRM] key to save the data. The screen will change.
Press the [CONFIRM] key again to complete the calibration and return to
the Calibrate Sensors screen.
Fresenius 2008K Calibration Procedures
P/N 507296 Rev B
Page 55
Page 62

2.3.8 CONDUCTIVITY CELLS CALIBRATION
If the machine is equipped with Functional Software v2.16 or less then perform
Section 2.3.8.1. If the machine is equipped with Functional Software v2.25 or
greater then perform Section 2.3.8.2.
2.3.8.1 CONDUCTIVITY CELLS CALIBRATION (v2.16 or less)
Machines equipped with Online Clearance (OLC) have two conductivity cells.
The first conductivity cell is PRE dialyzer and the second conductivity cell is
POST dialyzer.
N
Note: If the Clearance option is set to NO in Hardware Options, the post
conductivity cell will not be calibrated.
From the Calibrate Sensors screen, select the Cond Cells screen button. The
screen will change to the following:
Page 56
Fresenius 2008K Calibration Procedures
P/N 507296 Rev B
Page 63

1. Identify the concentrate you will be using to calibrate the conductivity cells.
Select the concentrate by pressing the Conc button. The screen will
change showing a list of concentrates. Use the [
through the list to locate your concentrate.
=] or [>] keys to scroll
N
N
Note: In order to select your concentrate from the list, it must have been
previously entered in the Enter Conc screen. This screen can be found by
pressing the OPTIONS screen button.
Press the [CONFIRM] key to select your concentrate and the screen will
return to the CALIBRATE CONDUCTIVITY CELL(S) screen.
2. Connect the red and blue concentrate connectors to concentrate solutions as
in normal dialysis operation.
3. Remove the dialysate lines from the shunt and connect them to an external
conductivity meter. Close the shunt door.
Note: If using the Automata Neo-1 meter, attach the ground strap per the
manufacturer’s instructions.
Press the [CONFIRM] key to start the calibration. The screen will change.
4. Wait until the conductivity value is stable. When conductivity is stable, the
screen will change.
5. Once the conductivity is stable and the screen has changed, select the
Conductivity data button.
Adjust the value shown for Conductivity until it matches the reading on the
external conductivity meter and then press the [CONFIRM] key.
6. Press the [CONFIRM] key again and the screen will change.
7. The machine is now adjusting to its first reference point of conductivity for
the post conductivity cell. When the reference conductivity is stable, the
screen will change.
Page 57
Fresenius 2008K Calibration Procedures
P/N 507296 Rev B
Page 64

8. The machine is now adjusting to a second reference point of conductivity
for the post conductivity cell. When the conductivity is stable again, the
screen will change.
Press the [CONFIRM] key to save the data. The screen will change.
Disconnect the conductivity meter and replace the dialysate lines in the shunt.
Press the [CONFIRM] key to complete the calibration and return to the
Calibrate Sensors screen.
2.3.8.2 CONDUCTIVITY CELLS CALIBRATION (v2.25 or greater)
Machines equipped with Online Clearance (OLC) have two conductivity cells.
The first conductivity cell is PRE dialyzer and the second conductivity cell is
POST dialyzer.
N
Note: If the Clearance option is set to NO in Hardware Options, the post
conductivity cell will not be calibrated.
From the Calibrate Sensors screen, select the Cond Cells screen button. The
screen will change to the following:
Page 58
Fresenius 2008K Calibration Procedures
P/N 507296 Rev B
Page 65

1. Identify the concentrate you will be using to calibrate the conductivity cells.
Select the concentrate by pressing the Conc button. The screen will
change showing a list of concentrates. Use the [
through the list to locate your concentrate.
=] or [>] keys to scroll
N
N
Note: In order to select your concentrate from the list, it must have been
previously entered in the Enter Conc screen. This screen can be found by
pressing the OPTIONS screen button.
Press the [CONFIRM] key to select your concentrate and the screen will
return to the CALIBRATE CONDUCTIVITY CELL(S) screen.
2. Connect the red and blue concentrate connectors to concentrate solutions as
in normal dialysis operation.
3. Remove the dialysate lines from the shunt and connect them to an external
conductivity meter. Close the shunt door.
Note: If using the Automata Neo-1 meter, attach the ground strap per the
manufacturer’s instructions.
Press the [CONFIRM] key to start the calibration. The screen will change.
4. Wait until the conductivity value is stable. When conductivity is stable, the
screen will change.
5. Once the conductivity is stable and the screen has changed, select the
Conductivity data button.
Adjust the value shown for Conductivity until it matches the reading on the
external conductivity meter and then press the [CONFIRM] key.
6. Press the [CONFIRM] key again and the screen will change.
Page 59
Fresenius 2008K Calibration Procedures
P/N 507296 Rev B
Page 66

7. Open the shunt door and remove the external conductivity meter from the
dialysate line.
Connect the dialysate lines to a large dialyzer with the blood side filled.
Close the shunt door and press the [CONFIRM] key.
8. The screen will change and the machine is now adjusting to its first
reference point of conductivity for the post conductivity cell. When the
reference conductivity is stable, the screen will change.
9. The machine is now adjusting to a second reference point of conductivity
for the post conductivity cell. When the conductivity is stable again, the
screen will change.
10. The machine is now adjusting to a third reference point of conductivity for
the post conductivity cell. When the conductivity is stable again, the
screen will change.
11. The machine is now adjusting to a fourth reference point of conductivity
for the post conductivity cell. When the conductivity is stable again, the
screen will change.
Press the [CONFIRM] key to save the data. The screen will change.
Disconnect the dialyzer and replace the dialysate lines in the shunt.
Press the [CONFIRM] key to complete the calibration and return to the
Calibrate Sensors screen.
Page 60
Fresenius 2008K Calibration Procedures
P/N 507296 Rev B
Page 67

2.4 MONITOR CALIBRATION PROCEDURES
From the Service Mode screen, select the Calibrate Monitor screen button. The
following screen will appear showing the four monitor calibrations:
Select one of the following calibrations by touching the appropriate calibration
screen button.
• Set Clock
• Voltage Detection
• Arterial Pump Rate
• Venous Pump Rate
Page 61
Fresenius 2008K Calibration Procedures
P/N 507296 Rev B
Page 68

2.4.1 SET CLOCK
From the Calibrate Monitor screen, select the Set Clock screen button. The
screen will change to the following:
Set each value as follows:
• Select the data button for the value to be changed.
• Set the correct value.
• Press the [CONFIRM] key.
• Repeat for any data button that needs to be changed.
• When all of the data has been entered, press the [CONFIRM] key to
return to the Calibrate Monitor screen.
Page 62
Fresenius 2008K Calibration Procedures
P/N 507296 Rev B
Page 69

2.4.2 VOLTAGE DETECTION CALIBRATION
From the Calibrate Monitor screen, select the Voltage Detection screen button.
The screen will change to the following:
1. Open the monitor unit and connect a Digital Voltmeter between the
+12 volt test and the ground test points shown in Figure 7.
2. Select the 12 volt set data button.
Set the 12 volt set value to the voltage shown on the digital voltmeter,
then press the [CONFIRM] key.
3. Press the [CONFIRM] key again and the screen will change.
Page 63
Fresenius 2008K Calibration Procedures
P/N 507296 Rev B
Page 70

+12 VOLT
TEST POINT
ON JUMPER 1
SENSOR BOARD
MONITOR CONTROL UNIT CARD CAGE
TOP VIEW
FUNCTIONAL BOARDS
P/N 190171
PIN 4 ON P5
FOR GROUND
P/N 190193
PIN 2 OR 3 ON P15
FOR GROUND
Page 64
FUNCTIONAL BOARD
Figure 7 - +12 Volt and Ground Test Points
Fresenius 2008K Calibration Procedures
P/N 507296 Rev B
Page 71

The screen will display:
4. Verify that the 5V EST. displayed on the screen is between 4.8 and
5.2 volts.
5. Verify that the 12V EST. displayed on the screen is between 11.7 and
12.3 volts.
N
Note: If the values are not within limits, repeat the Voltage Detection
calibration.
6. If the values are within limits, press the [CONFIRM] key to save the data.
The screen will change.
Disconnect the Digital Voltmeter and close the monitor unit.
Press the [CONFIRM] key to complete the calibration and return to the
Calibrate Monitor screen.
Page 65
Fresenius 2008K Calibration Procedures
P/N 507296 Rev B
Page 72

2.4.3 ARTERIAL PUMP RATE
From the Calibrate Monitor screen, select the Art Pump Rate screen button.
The screen will change to the following:
1. Adjust the arterial pump rate to 100ml/min.
Press the [CONFIRM] key and the screen will change.
2. Adjust the arterial pump rate to 400ml/min.
Press the [CONFIRM] key to save the data. The screen will change.
3. Press the [CONFIRM] key again to complete the calibration and return to
the Calibrate Monitor screen.
Page 66
Fresenius 2008K Calibration Procedures
P/N 507296 Rev B
Page 73

2.4.4 VENOUS PUMP RATE
From the Calibrate Monitor screen, select the Ven Pump Rate screen button.
The screen will change to the following:
1. Adjust the venous pump rate to 100ml/min.
Press the [CONFIRM] key and the screen will change.
2. Adjust the venous pump rate to 400ml/min.
Press the [CONFIRM] key to save the data. The screen will change.
3. Press the [CONFIRM] key again to complete the calibration and return to
the Calibrate Monitor screen.
Page 67
Fresenius 2008K Calibration Procedures
P/N 507296 Rev B
Page 74

3.0 CALIBRATION PROCEDURES NOT PERFORMED IN SERVICE MODE
The following procedures are performed with the machine in normal (not Service
mode) operation (see Section 1.2).
U
3.1 INLET WATER PRESSURE REGULATOR CALIBRATION
U
Caution: Verify that the machine power is Off before changing the position of
the SERVICE mode switch on the back of the Monitor Control Unit. Failure to
do so may cause calibration data to be lost.
1. Turn off the machine.
2. Shut off the water supply to the machine.
3. ine at the outlet of water inlet pressure
Insert a pressure ga e water luge in th
regulator #61 (See Figure 1, pg. 5).
Caution: Use tie wraps or tubing clamps to secure the connections. The w
pressure may be sufficient to blow the lines off of the gauge if they are not
secured.
4. Turn the water supply to the machine On.
ater
Page 68
5. Turn the machine On.
6.
With the dialysate lines in the shunt, select Dialysis mode and start the
dialysate flow. The pressure gauge
water inlet valve opens and closes.
Fresenius 2008K Calibration Procedures
P/N 507296 Rev B
will cycle between two readings as
Page 75

7. On regulator #61, loosen the lock nut around the adjustment screw (See
Figure 1, pg. 5). Use a 5mm Allen wrench to adjust the regulator for a
peak pressure of between 18 and 20 psi when water inlet valve 41 is closed.
N
Note: The gauge must indicate a minimum pressure greater than 8 psi
when valve 41 is open. If not, the treated water supply may not meet
specifications for flow and pressure.
8. etween 18 and 20
Tighten the lock nut and verify the peak pressure is still b
psi on the gauge.
9. achine Off, turn off the source water supply, remove the gauge
Turn the m
and reconnect the tubing using clamps to prevent leaks.
10. Turn the treated water supply source On, turn the machine On and select
Dialysis mode. Start dialysate flow and inspect all hoses and connections
for leaks.
Page 69
Fresenius 2008K Calibration Procedures
P/N 507296 Rev B
Page 76

3.2 LEV L DETECTOR CALIBRATIONE
1. Place the machine in Dialysis mode and clear all blood alarms.
2.
Insert a venous chamber filled with warm water into the level detector.
U
Warning! For accurate calibration, use a venous chamber identical to
norm d in the machine. ally use
3. Move the jumper on the LP241/LP450 board to the Calibrate position
(see Figure 8).
4. Observe the Channel 1 LED (see Figure 8). If the LED is On, turn channel
1 potentiometer (see Figure 8) clockwise until the LED turns off.
5. Slowly turn channel 1 potentiometer counter-clockwise until the c
LED switches on. Stop turning immediately, just past the point where th
LED lights.
Repeat Steps 5 and 6 for the Channel 2 LED, adjusti
6. ng channel 2
potentiometer (see Figure 8). The response of chan slo
channel 1. When adjusting to the switch point, mo ten
small steps and wait to see if the LED switches on.
7.
Move the jumper back to the Normal position (see Figure 8).
8. Press the [RESET] key to clear the alarm and check that both LED’s are
off, indicating that the Level Detector is sensing no air present in the
venous chamber.
nel 2 is
ve the po
wer than
that
hannel 1
e
tiometer in
Page 70
N
9.
Remove the venous chamber and watch the LED’s. Verify that channel 1
lights first f
Note: Channel 1 stops the blood pump and Channel 2 clamps the venous
blood line.
ollowed quickly by channel 2.
Fresenius 2008K Calibration Procedures
P/N 507296 Rev B
Page 77

POT 144
CHANNEL 1
POT 145
CHANNEL 2
LP241
LP450
R19
CHANNEL 1
R20
CHANNEL 2
CHANNEL 1 LED
LIGHTS FIRST
CHANNEL 2 LED
LIGHTS SECOND
JUMPER POSITIONS
OR
Abgleich
Betrieb
Abgleich
Betrieb
NORMAL
LP450
CALIBRATE
NORMAL
LP241
CALIBRATE
Figure 8 - Level Detector Calibration Adjustments
Page 71
Fresenius 2008K Calibration Procedures
P/N 507296 Rev B
Page 78

3.3 BLOOD PUMP CALIBRATION
The speed control circuit on a K blood pump consists of a feedback circuit that
monitors the motor speed and automatically adjusts to compensate for any speed
fluctuations. There are no adjustments or calibrations on this circuit.
Page 72
Fresenius 2008K Calibration Procedures
P/N 507296 Rev B
Page 79

NOTES:
____________________________________________________________________________________
____________________________________________________________________________________
____________________________________________________________________________________
____________________________________________________________________________________
____________________________________________________________________________________
____________________________________________________________________________________
____________________________________________________________________________________
____________________________________________________________________________________
____________________________________________________________________________________
____________________________________________________________________________________
____________________________________________________________________________________
____________________________________________________________________________________
____________________________________________________________________________________
____________________________________________________________________________________
____________________________________________________________________________________
____________________________________________________________________________________
____________________________________________________________________________________
____________________________________________________________________________________
____________________________________________________________________________________
____________________________________________________________________________________
______________________________________________________________________________
Page 73
Fresenius 2008K Calibration Procedures
P/N 507296 Rev B
Page 80

NOTES:
___________________________________________________________________________________
___________________________________________________________________________________
___________________________________________________________________________________
___________________________________________________________________________________
___________________________________________________________________________________
___________________________________________________________________________________
___________________________________________________________________________________
___________________________________________________________________________________
___________________________________________________________________________________
___________________________________________________________________________________
___________________________________________________________________________________
___________________________________________________________________________________
___________________________________________________________________________________
___________________________________________________________________________________
___________________________________________________________________________________
___________________________________________________________________________________
___________________________________________________________________________________
___________________________________________________________________________________
___________________________________________________________________________________
___________________________________________________________________________________
______________________________________________________________________________
Page 74
Fresenius 2008K Calibration Procedures
P/N 507296 Rev B
Page 81

NOTES:
____________________________________________________________________________________
____________________________________________________________________________________
____________________________________________________________________________________
____________________________________________________________________________________
____________________________________________________________________________________
____________________________________________________________________________________
____________________________________________________________________________________
____________________________________________________________________________________
____________________________________________________________________________________
____________________________________________________________________________________
____________________________________________________________________________________
____________________________________________________________________________________
____________________________________________________________________________________
____________________________________________________________________________________
____________________________________________________________________________________
____________________________________________________________________________________
____________________________________________________________________________________
____________________________________________________________________________________
____________________________________________________________________________________
____________________________________________________________________________________
______________________________________________________________________________
Page 75
Fresenius 2008K Calibration Procedures
P/N 507296 Rev B
Page 82

NOTES:
___________________________________________________________________________________
___________________________________________________________________________________
___________________________________________________________________________________
___________________________________________________________________________________
___________________________________________________________________________________
___________________________________________________________________________________
___________________________________________________________________________________
___________________________________________________________________________________
___________________________________________________________________________________
___________________________________________________________________________________
___________________________________________________________________________________
___________________________________________________________________________________
___________________________________________________________________________________
___________________________________________________________________________________
___________________________________________________________________________________
___________________________________________________________________________________
___________________________________________________________________________________
___________________________________________________________________________________
___________________________________________________________________________________
___________________________________________________________________________________
______________________________________________________________________________
Page 76
Fresenius 2008K Calibration Procedures
P/N 507296 Rev B
Page 83

COMMON CONVERSIONS
RESSURE
P
Bar 3 inHg
1
1 inHg 25.4 mmHg
1 Psi 51.72 mmHg
VOLUME
1 FLUID O
UNCE 26.6 MILLILITERS
1 U.S QUART 0.946 LITERS
1 U.S. GALLON 3.8 LITERS
0.034 FLUID OUNCES 1 MILLILITER
1.057 QUARTS 1 LITER
0.26 U.S. GALLON 1 LITER
MASS
1 OUNCE (avdp.) 28.35 GRAMS
1 POUND (avdp.) 0.45 KILOGRAM
0.035 OUNCE (avdp.) 1 GRAM
29.5
Page 84

FRESENIUS MEDICAL CARE
NORTH AMERICA
2637 Shadelands Drive
Walnut Creek, CA 94598
800 227-2572
 Loading...