


Ka 2008 2010

Feel the dierence
Ford Ka
Owner’s handbook
K10468_Service_Portfolio_090508.1 1 09.05.2008 15:52:47 Uhr
FordKa
Owner’s handbook
Feel the difference
COP LUM KA GB 16-07-2008 16:43 Pagina 1

About this handbook
Thank you for choosing Ford. We recommend that you take some time to get to know your vehicle by reading this handbook.
The more that you know about it, the greater the safety and pleasure you will get from driving it.
NOTE This handbook describes product features and options available throughout the range, sometimes even before they are
generally available. It may describe options not fitted to your vehicle.
NOTE Always use and operate your vehicle in line with all applicable laws and regulations.
NOTE Pass on this handbook when selling your vehicle. It is an integral part of the vehicle.
001-025 Ford KA GB 15-07-2008 8:51 Pagina 1

2
SAFETY
STARTING AND
DRIVING
WARNING
LIGHTS AND
MESSAGES
IN AN
EMERGENCY
MAINTENANCE
AND CARE
TECHNICAL
SPECIFICATIONS
ALPHABETICAL
INDEX
YOUR CAR
DASHBOARD
(LEFT-HAND DRIVE).......................................................... 3
DASHBOARD
(RIGHT-HAND DRIVE) ...................................................... 4
SYMBOLS ............................................................................... 5
THE FORD CODE SYSTEM .............................................. 5
THE KEYS .............................................................................. 6
INSTRUMENT PANEL AND ONBOARD
INSTRUMENTS ..................................................................... 10
DIGITAL DISPLAY .............................................................. 13
MULTIFUNCTIONAL DISPLAY ...................................... 17
TRIP COMPUTER ................................................................ 24
SEATS ..................................................................................... 26
HEAD RESTRAINTS ............................................................ 27
STEERING WHEEL ............................................................. 28
REARVIEW MIRRORS......................................................... 29
CLIMATE COMFORT ......................................................... 30
HEATING AND VENTILATION...................................... 31
MANUAL CLIMATE CONTROL SYSTEM ................... 32
AUTOMATIC CLIMATE CONTROL SYSTEM............. 34
EXTERNAL LIGHTS ........................................................... 37
WINDOW WASHING....................................................... 38
EILING LIGHTS .................................................................... 40
CONTROLS........................................................................... 41
INTERIOR FITTINGS........................................................... 43
FIXED GLASS ROOF........................................................... 44
DOORS .................................................................................. 45
POWER WINDOWS .......................................................... 46
BOOT...................................................................................... 47
BONNET ................................................................................ 49
ROOF RACK/SKI RACK ................................................... 51
HEADLIGHTS........................................................................ 51
ABS SYSTEM ......................................................................... 53
ESP SYSTEM .......................................................................... 54
EOBD SYSTEM ..................................................................... 57
PARKING SENSORS ........................................................... 58
SOUND SYSTEM.................................................................. 60
AT THE FILLING STATION ............................................. 62
ENVIRONMENTAL PROTECTION ............................... 63
YYYYOOOOUUUURRRR CCCCAAAARR
RR
001-025 Ford KA GB 15-07-2008 8:51 Pagina 2
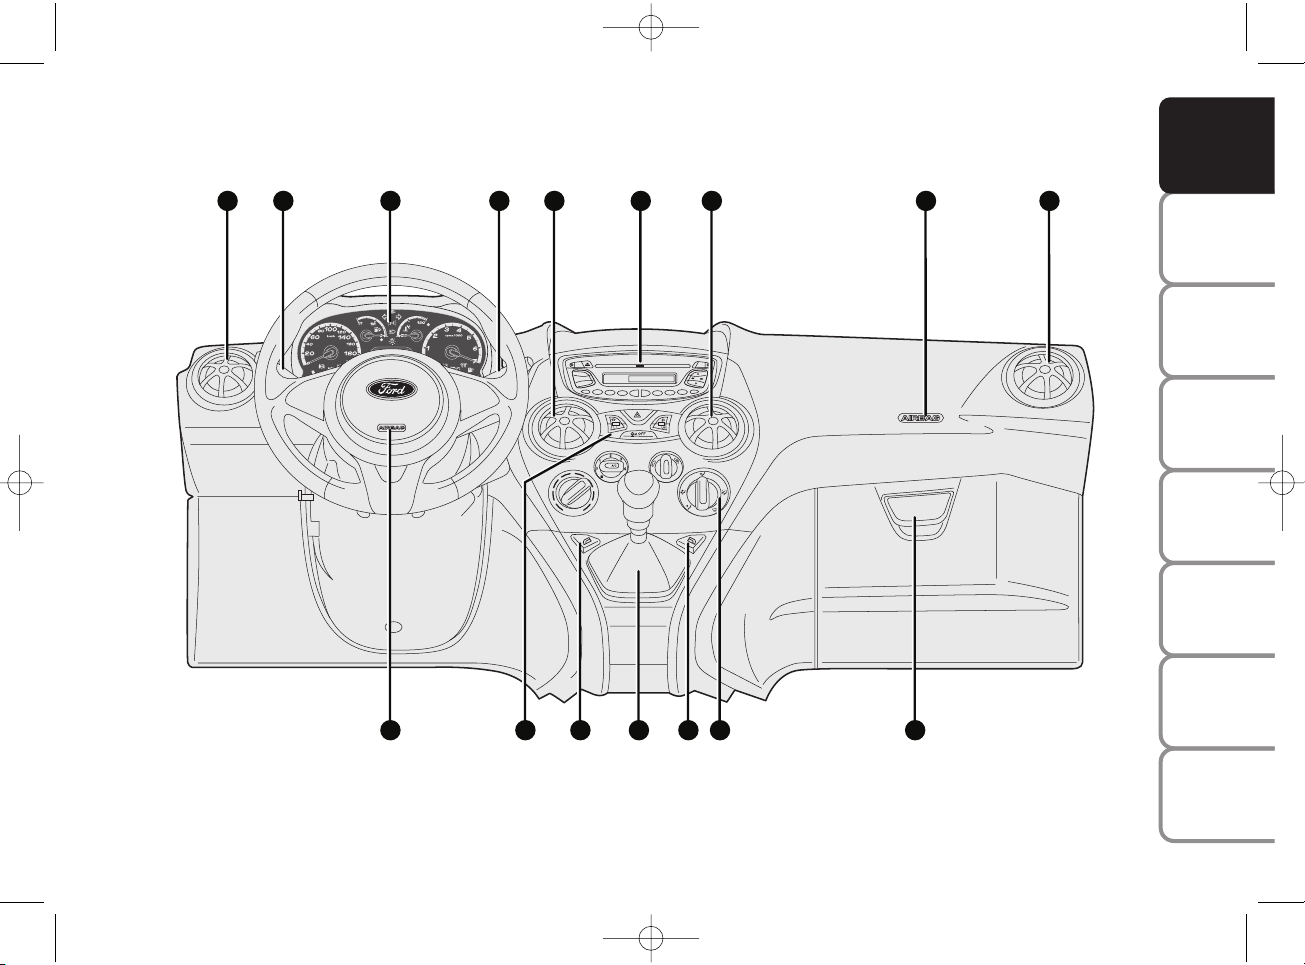
DASHBOARD (LEFT-HAND DRIVE)
The presence and position of the controls, the instruments and the indicators may vary according to the versions.
1. Side vent – 2. Left stalk: external lights control – 3. Instrument panel and warning lights – 4. Right stalk: controls wiper, washer,
trip computer – 5. Central air vents – 6. Oddment/Car radio compartment – 7. Passenger side airbag – 8. Oddment compartment/
hidden document tray – 9. Heating/ventilation/climate control – 10. Power windows control – 11 Oddment compartment –
12. Gear lever – 13. Driver side airbag.
3
SAFETY
STARTING AND
DRIVING
WARNING
LIGHTS AND
MESSAGES
IN AN
EMERGENCY
MAINTENANCE
AND CARE
TECHNICAL
SPECIFICATIONS
ALPHABETICAL
INDEX
YOUR CAR
31 2 4 17
13
12
10
11
10
9 8
CD
ON/OFF
MENU
1
2
3
FM
AM
4
5
6
MUTE
V+
V-
AUD
AS
6 55
KA00001m
fig. 1
001-025 Ford KA GB 15-07-2008 8:51 Pagina 3
4
SAFETY
STARTING AND
DRIVING
WARNING
LIGHTS AND
MESSAGES
IN AN
EMERGENCY
MAINTENANCE
AND CARE
TECHNICAL
SPECIFICATIONS
ALPHABETICAL
INDEX
YOUR CAR
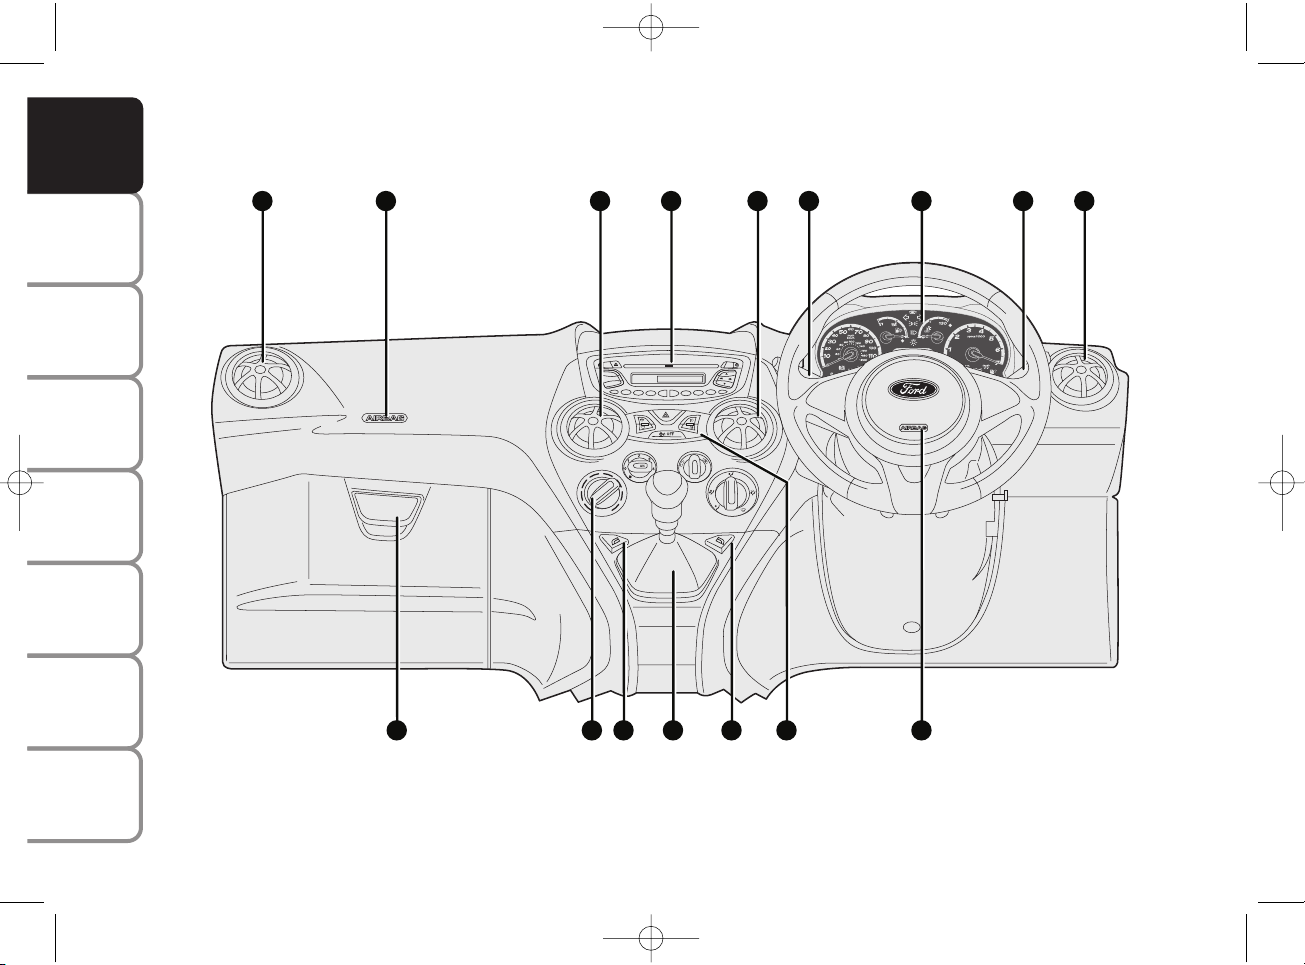
DASHBOARD (RIGHT-HAND DRIVE)
The presence and position of the controls, the instruments and the indicators may vary according to the versions.
1. Side air vent – 2. Passenger side air bag l – 3. Central air vents– 4. Oddment/radio compartment – 5. Left stalk:external lights
control – 6. Instrument panel and warning lights – 7. Right stalk: controls windscreen wiper, rear wiper trip computer –
8. Driver’s Air bag – 9. Control panel – 10. Power window control – 11. Gear lever – 12. Heating/ ventilation/climate control
controls – 13. Oddment compartment.
CD
ON/OFF
MENU
1
2
3
FM
AM
4
5
6
MUTE
V+
V-
AUD
AS
6
1
7
5
1
2
8
9
10
11
10
1213
43
3
KA00112m
fig. 2
001-025 Ford KA GB 15-07-2008 8:51 Pagina 4
5
SAFETY
STARTING AND
DRIVING
WARNING
LIGHTS AND
MESSAGES
IN AN
EMERGENCY
MAINTENANCE
AND CARE
TECHNICAL
SPECIFICATIONS
ALPHABETICAL
INDEX
YOUR CAR
Warning light Ycoming on
when driving
❒
If the warning light Yturns on, this
means that the system is running a
self-test (for example for a voltage
drop).
❒
If the problem persists, contact the
Ford Dealership.
SYMBOLS
Special coloured labels have been
attached near or actually on some of
the components of your car. These
labels bear symbols that remind you of
the precautions to be taken as regards
that particular component.
THE FORD SYSTEM
This is an electrical engine locking system
which increases protection from
attempted theft of the car. It is
automatically activated when the ignition
key is extracted.
Each time the car is started by turning
the ignition key to MAR, the Ford
CODE system control unit sends an
acknowledgement code to the engine
control unit to deactivate the inhibitor.
If, during ignition, the code is not
correctly recognized, the light
Y
lights up on the instrument panel.
In this case, turn the key to STOP and
then back to MAR. Try with the other
keys provided if the problem persists.
Contact a Ford Dealership if you still
cannot start the engine.
IMPORTANT Each key has its own
code which must be stored by the
system ECU. Contact the Ford
Dealership to have new keys (up to
eight) stored with the code.
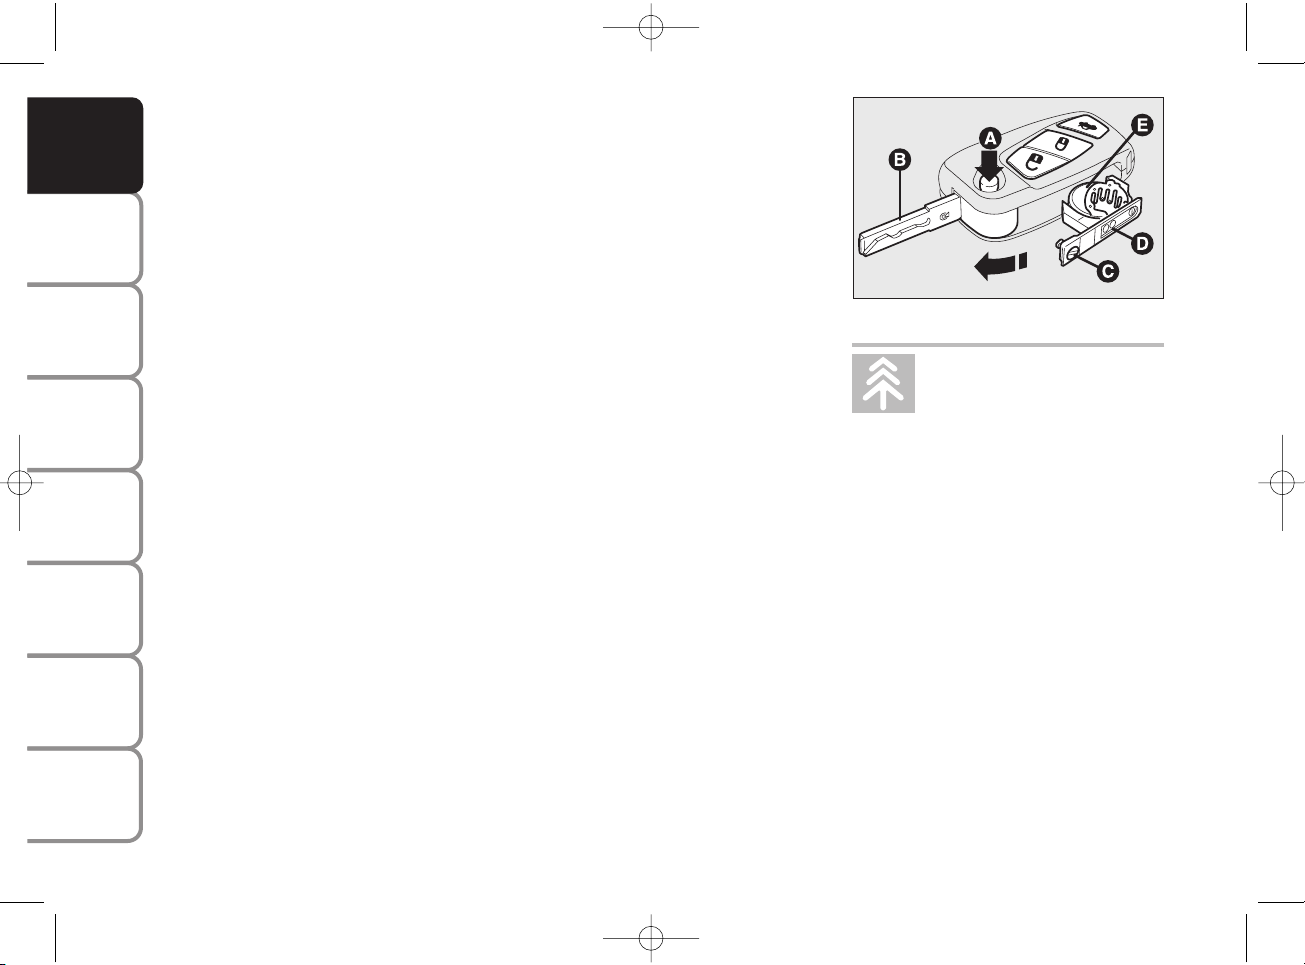
The electronic components
inside the key may be
damaged if the key is
subjected to violent shocks.
001-025 Ford KA GB 15-07-2008 8:51 Pagina 5
6
SAFETY
STARTING AND
DRIVING
WARNING
LIGHTS AND
MESSAGES
IN AN
EMERGENCY
MAINTENANCE
AND CARE
TECHNICAL
SPECIFICATIONS
ALPHABETICAL
INDEX
YOUR CAR
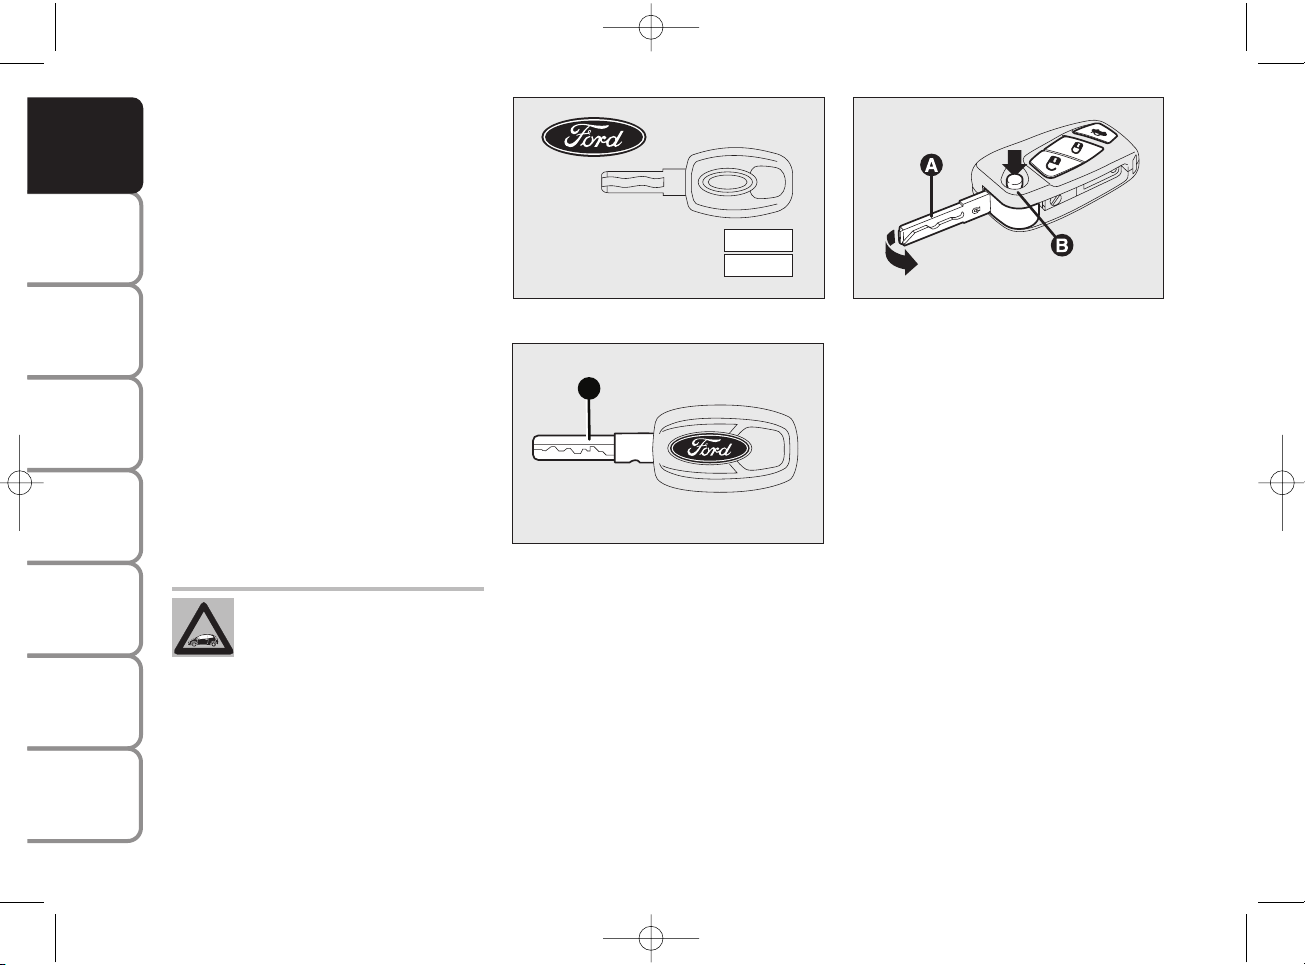
KEY WITH REMOTE CONTROL
(where provided) fig. 5
The metal insert A enables:
❒
the ignition switch;
❒
the door locks;
❒
the fuel cap lock/release;
To open/close the metal insert, press
button B.
fig. 3
A
B
CODE
ELECTRONIC KEYCODE
MECHANICAL KEYCODE
KA00121m
fig. 4
A
KA00002m
All the keys and the CODE
card must be handed over
to the new owner when
selling the car.
THE KEYS
CODE CARD (optional, for
relevant versions/markets)
fig. 3
The car is delivered with two copies of
the ignition key and with the CODE
card which bears the following:
A the electronic code.
B the mechanical key code to be given
to the Ford Dealership when ordering
duplicate keys.
IMPORTANT In order to ensure
perfect efficiency of the electronic
devices inside the keys, they should
never be exposed to direct sunlight.
KEY WITHOUT REMOTE
CONTROL fig. 4
The metal insert A enables:
❒
the ignition switch;
❒
the door and tailgate (where provided);
❒
the fuel cap lock/release;
fig. 5
KA00003m
001-025 Ford KA GB 15-07-2008 8:51 Pagina 6

7
SAFETY
STARTING AND
DRIVING
WARNING
LIGHTS AND
MESSAGES
IN AN
EMERGENCY
MAINTENANCE
AND CARE
TECHNICAL
SPECIFICATIONS
ALPHABETICAL
INDEX
YOUR CAR
Door release
Short pressure on button
Ë
: release of
the doors, timed activation of the
interior courtesy lights, lighting up of
the turn signals and activation of
courtesy lights (greeting lights) for
relevant versions/market).
Door locks are automatically released in
case of intervention of the fuel cut-off
system.
When releasing the doors by means of
the remote control, if a door is not
opened within 45 seconds, the system
automatically re-locks the doors.
Door locking
Short pressure on button
Á
: remote
locking of doors with deactivation of
the internal courtesy light and dual
flashing of direction indicators (where
present).
Locking does not take place if one or
more doors are opened. This is
indicated by a rapid flashing of the
direction indicators (where applicable).
The doors are not locked if the luggage
compartment is open.
Remote tailgate opening
Press button
R
twice to release
(open) the tailgate remotely.
Tailgate opening is indicated by lashing
of direction indicators.
001-025 Ford KA GB 15-07-2008 8:51 Pagina 7
8
SAFETY
STARTING AND
DRIVING
WARNING
LIGHTS AND
MESSAGES
IN AN
EMERGENCY
MAINTENANCE
AND CARE
TECHNICAL
SPECIFICATIONS
ALPHABETICAL
INDEX
YOUR CAR
REQUEST FOR ADDITIONAL
REMOTE CONTROLS
The system acknowledges up to 8
remote controls. Should a new remote
control be necessary, contact a Ford
Dealership and be ready to present the
CODE card, a personal identity
document and the car’s ownership
documents.
fig. 6
KA00004m
Used batteries are harmful
to the environment. They
should be disposed of as
specified by law in special
containers or taken to a Ford
Dealership, which will take care of
their disposal.
REPLACING THE BATTERY OF
THE KEY WITH REMOTE
CONTROL fig. 6
Battery replacement:
❒
press button A and open the metal
insert B;
❒
rotate the screw C to :using a
small point screwdriver;
❒
take out the battery case D and
replace the battery E respecting its
polarity;
❒
refit the battery case D inside the
key and lock it turning the screw C
to Á.
001-025 Ford KA GB 15-07-2008 8:51 Pagina 8
9
SAFETY
STARTING AND
DRIVING
WARNING
LIGHTS AND
MESSAGES
IN AN
EMERGENCY
MAINTENANCE
AND CARE
TECHNICAL
SPECIFICATIONS
ALPHABETICAL
INDEX
YOUR CAR
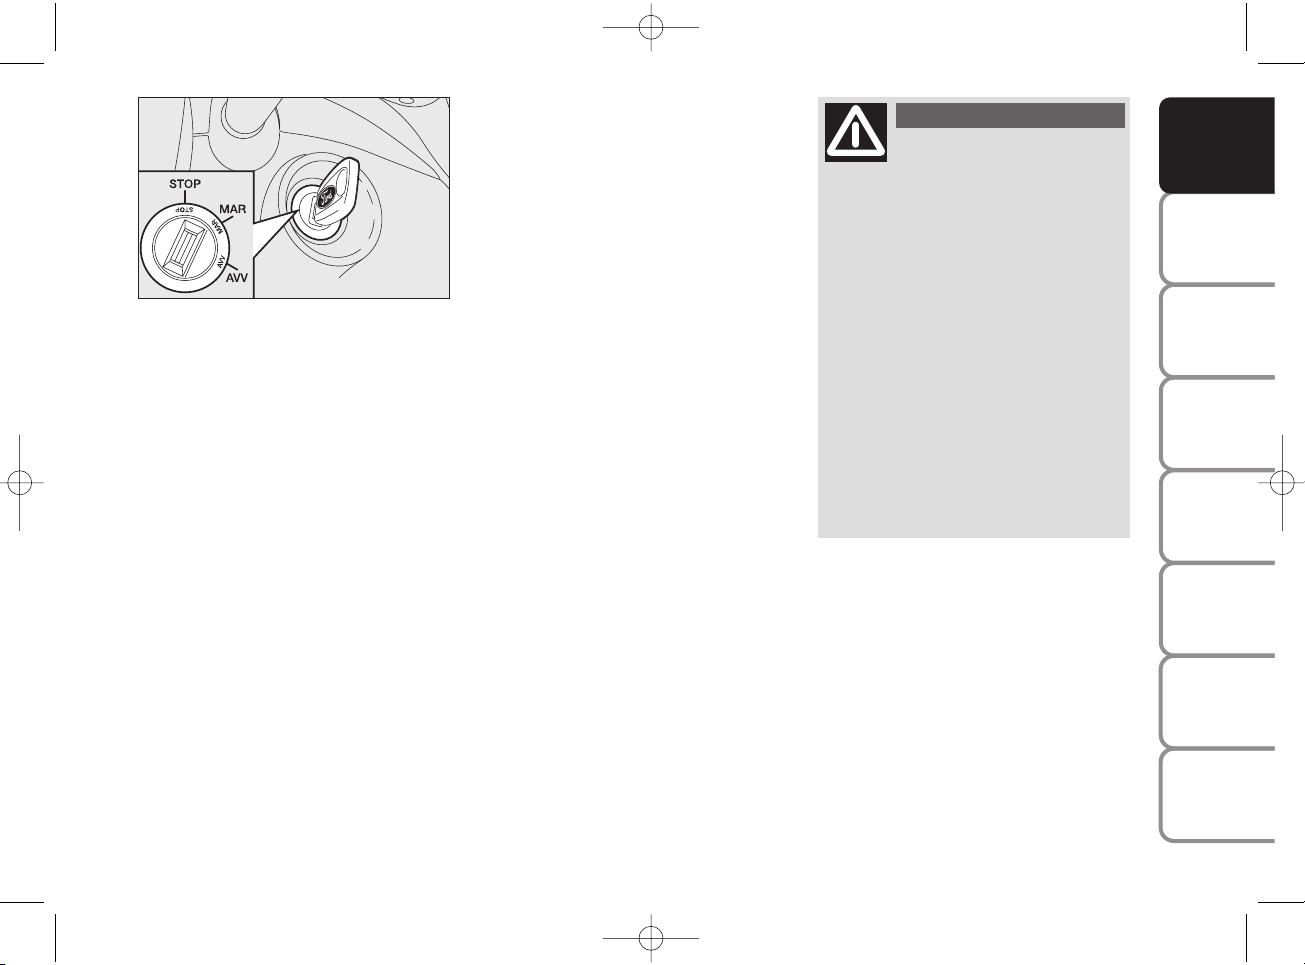
IGNITION SWITCH fig. 7
The key can be turned to 3 different
positions:
❒
STOP: the engine is off, the key can
be extracted, the steering is locked.
Some electrical devices (e.g. car
radio, central door locking system,
etc.) are enabled
❒
MAR: driving position. All electrical
devices are enabled
❒
AVV: engine start.
The ignition device is fitted with a safety
system that forces the driver to return
the ignition key to STOP before
repeating the starting operation, if the
engine does not start up.
Never extract the key
while the vehicle is moving.
The steering wheel would be locked
as soon as the steering wheel is
turned. This also applies to when
the car is towed.
Any operations in the aftermarket,
which would involve tampering with
the steering or the steering column
(e.g. fitting an anti-theft device), are
absolutley prohibited unless they
are carried out and authorized by a
Ford Dealership; in the addition of a
deterioration in the performance of
the system, this would affect the
warranty and cause serious
problems as well as resulting in
invalidating the vehicle’s type
approval.
WARNING
fig. 7
KA00005m
STEERING COLUMN LOCK
Engagement
When the key is at STOP, remove the
key and turn the steering wheel until it
locks.
Disengagement
Rock the steering wheel slightly as you
turn the ignition key to MAR.
001-025 Ford KA GB 15-07-2008 8:51 Pagina 9
10
SAFETY
STARTING AND
DRIVING
WARNING
LIGHTS AND
MESSAGES
IN AN
EMERGENCY
MAINTENANCE
AND CARE
TECHNICAL
SPECIFICATIONS
ALPHABETICAL
INDEX
YOUR CAR
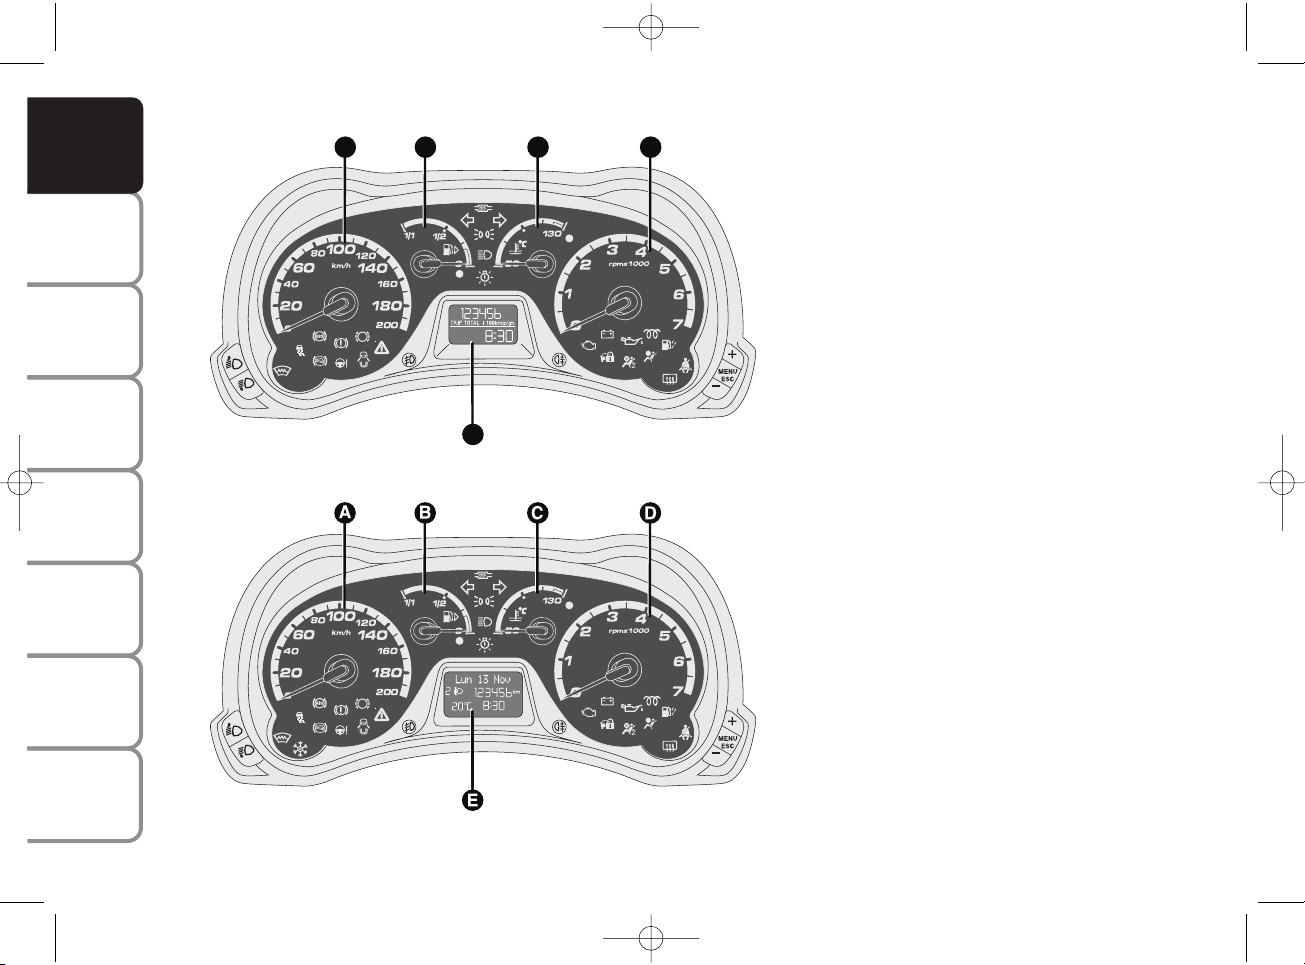
INSTRUMENT PANEL AND ONBOARD INSTRUMENTS
KA00009m
KA00010m
Left-hand drive versions
A Speedometer (speed indicator)
B Fuel level gauge with reserve
warning light
C Engine coolant temperature gauge
and excessive temperature warning
light
D Rev counter
E Display
Warning lights
m
and Eare available
only on Diesel versions.
fig. 8 - Versions with digital display
fig. 9 - Versions with multifunctional display
001-025 Ford KA GB 15-07-2008 8:51 Pagina 10
A
B
C
D
E

11
SAFETY
STARTING AND
DRIVING
WARNING
LIGHTS AND
MESSAGES
IN AN
EMERGENCY
MAINTENANCE
AND CARE
TECHNICAL
SPECIFICATIONS
ALPHABETICAL
INDEX
YOUR CAR
KA00011m
KA00012m
Right-hand drive versions
A Speedometer (speed indicator)
B Fuel level gauge with reserve
warning light
C Engine coolant temperature gauge
and excessive temperature warning
light
D Rev counter
E Display
Warning lights
m
and Eare present
only on Diesel versions.
fig. 10 - Versions with digital display
fig. 11 - Versions with multifunctional display
001-025 Ford KA GB 15-07-2008 8:51 Pagina 11
A
B
C
D
E

12
SAFETY
STARTING AND
DRIVING
WARNING
LIGHTS AND
MESSAGES
IN AN
EMERGENCY
MAINTENANCE
AND CARE
TECHNICAL
SPECIFICATIONS
ALPHABETICAL
INDEX
YOUR CAR
Instrument background colour and type
may vary according to the version.
SPEEDOMETER
It shows the engine speed.
REV COUNTER
Indicates the engine rpm.
FUEL LEVEL GAUGE
Shows the amount of fuel in the tank.
The reserve warning light turns on to
indicate that approximately 5 litres of
fuel are left in the tank.
Do not travel with the tank nearly
empty: lack of fuel supply could damage
the catalyser.
ENGINE COOLANT
TEMPERATURE INDICATOR
This shows the temperature of the
engine coolant fluid and starts working
when the fluid temperature exceeds
approx. 50°C.
The warning light may light up (and a
message on the multifunctional display
may appear in certain versions) to
indicate that the coolant temperature is
too high; in this case, stop the engine
and contact the Ford Dealership.
001-025 Ford KA GB 15-07-2008 8:51 Pagina 12
13
SAFETY
STARTING AND
DRIVING
WARNING
LIGHTS AND
MESSAGES
IN AN
EMERGENCY
MAINTENANCE
AND CARE
TECHNICAL
SPECIFICATIONS
ALPHABETICAL
INDEX
YOUR CAR
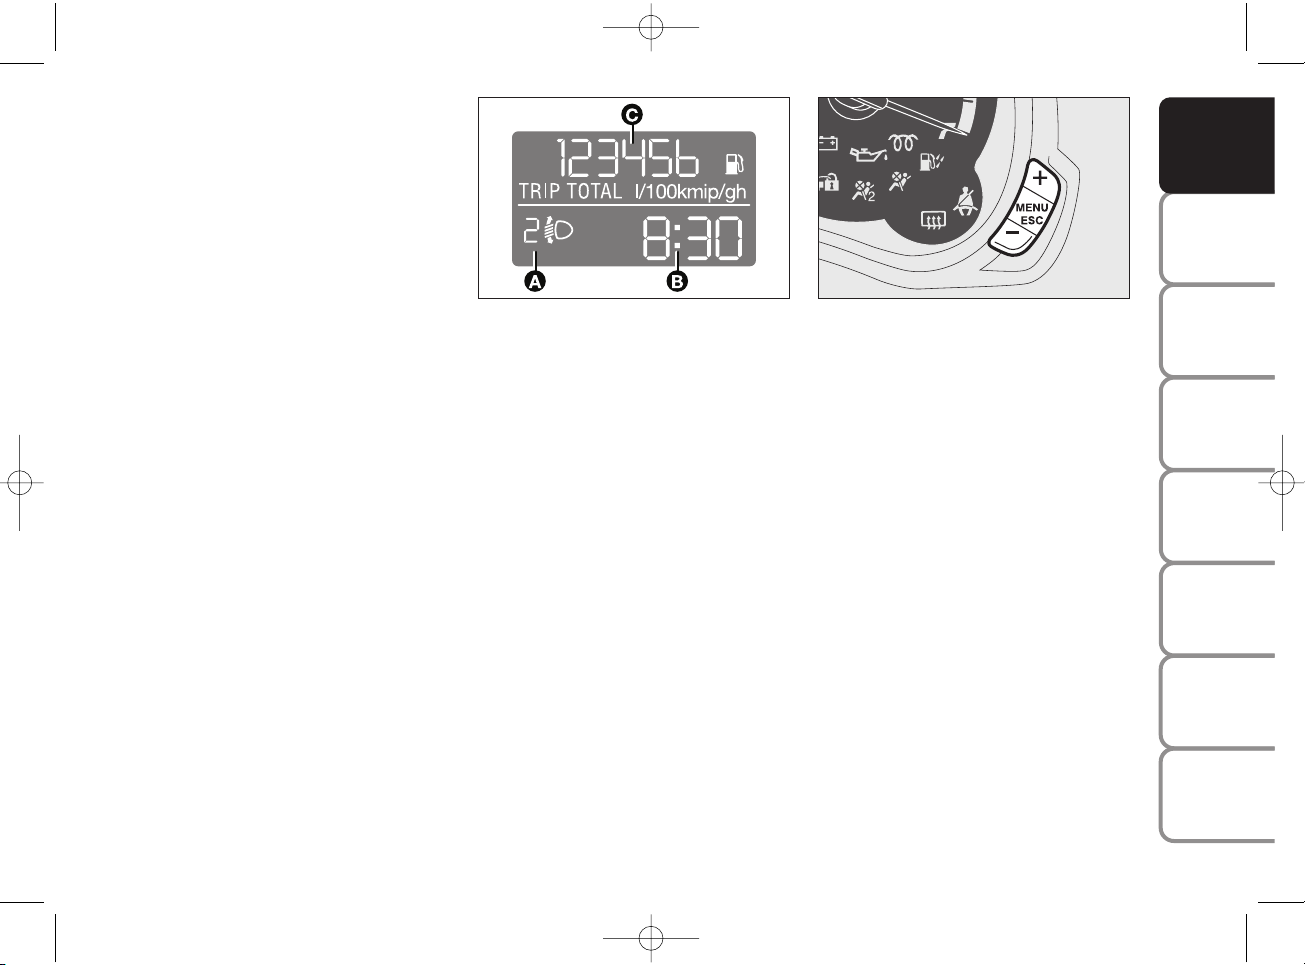
DIGITAL DISPLAY
STANDARD SCREEN fig. 12
The standard screen shows the
following information:
A Headlight aiming position (only with
dipped beam headlights on).
B Clock (always displayed, even with
ignition key removed and front
doors closed).
C Odometer (covered km or miles).
Note With key removed (when
opening one of the front doors) the
display turns on and shows the time and
km or miles covered for a few seconds.
CONTROL BUTTONS fig. 13
+ To scroll the displayed menu and
the related options upwards or to
increase the value displayed.
MENU Press briefly to display
ESC
the menu and/or to go to
next screen or to confirm the
required menu option.
Hold pressed to go back to
the standard screen.
– To scroll the displayed menu and
the related options downwards or
to decrease the value displayed.
Note Buttons + and – activate different
functions according to the following
situations:
Setup menu
– to scroll the menu options upwards
and downwards;
– to increase or decrease values during
settings.
fig. 12
KA00013m
fig. 13
KA00016m
001-025 Ford KA GB 15-07-2008 8:51 Pagina 13

14
SAFETY
STARTING AND
DRIVING
WARNING
LIGHTS AND
MESSAGES
IN AN
EMERGENCY
MAINTENANCE
AND CARE
TECHNICAL
SPECIFICATIONS
ALPHABETICAL
INDEX
YOUR CAR
SETUP MENU
The menu comprises a series of
functions arranged in a cycle which can
be selected through buttons + and – to
access the different select operations
and settings (setup) given in the
following paragraphs.
The setup menu can be activated by
pressing briefly button MENU ESC.
Single presses on buttons + and – will
scroll the setup menu options.
Handling modes differ with each other
according to the characteristic of the
option selected.
The menu includes the following
functions:
– HOUR
– BUZZ
– SPEED
– UNIT
– P BAG (*)
(*) Function activated only by taking
care to dealership.
Selecting a menu option
– press briefly button MENU
ESC to
select the main menu option to set;
– press buttons + and – (by single
presses) to select the new setting;
– briefly press button MENU
ESC to
store the new setting and to go back to
the previously selected submenu option.
Selecting “Set Clock”
– briefly press button MENU
ESC to
select the first value to change (hours);
– press buttons + and – (by single
presses) to select the new setting;
– briefly press button MENU ESC to
store the new setting and go to the
next setup menu option (minutes);
– after setting the values with the same
procedure, go back to the menu item
previously selected.
Hold button MENU ESC pressed:
– to quit the set up menu if you are in
the menu;
– to quit the displayed menu if you are
setting an option;
– to save the changes to stored settings
(and confirmed by pressing button
MENU
ESC).
The setup menu page is timed. Only the
changes saved by the user by briefly
pressing MENU ESC) after quitting the
menu when this timer has elapsed.
001-025 Ford KA GB 15-07-2008 8:51 Pagina 14

15
SAFETY
STARTING AND
DRIVING
WARNING
LIGHTS AND
MESSAGES
IN AN
EMERGENCY
MAINTENANCE
AND CARE
TECHNICAL
SPECIFICATIONS
ALPHABETICAL
INDEX
YOUR CAR
Setting the clock (Hour)
With this function it is possible to set
the clock.
To set the required unit proceed as
follows:
– briefly press button MENU
ESC,
“hours” will flash on the display;
– press button + or – for setting;
– briefly press button MENU ESC,
“minutes” will flash on the display;
– press button + or – for setting;
– briefly press button MENU ESC to
go back to the menu screen or press
the button for long to go back to the
standard screen without storing
settings.
Adjusting the buzzer volume
(Buzz)
This function is used to adjust the
volume of the buzzer triggering in the
event of failure/warning indications and
when MENU
ESC + and – buttons are
pressed.
To adjust the desired volume proceed
as follows:
– briefly press button MENU ESC , the
display will show the wording (bUZZ);
– press button + or – to select the
required volume (volume can be
adjusted according to 8 levels).
– briefly press button MENU
ESC to
go back to the menu screen or press
the button for long to go back to the
standard screen without storing
settings.
Setting the speed limit (Speed)
With this function it is possible to set
the car speed limit (km/h or mph),
when this limit is exceeded the driver is
immediately alerted (see section
“Warning lights and messages”).
To set the speed limit, proceed as
follows:
– briefly press button MENU
ESC , the
message (SPEED) and the previously set
unit (km/h) or (mph) will appear on the
display;
– press button + or – to select speed
limit activation (On) or deactivation
(OFF);
– when the function is activated (On)
pressing buttons + or – select the
speed limit and press MENU
ESC to
confirm selection.
Note Selection is possible between 30
and 200 km/h, or 20 and 125 mph
depending on the selected unit, see
paragraph “Unit of measure”. The
setting will increase/decrease by five
units each time button +/– is pressed.
Hold button +/– pressed to
increase/decrease the setting rapidly.
Complete the setting by briefly pressing
the button when the required setting is
approached.
– briefly press button MENU
ESC to
go back to the menu screen or press
the button for long to go back to the
standard screen without storing
settings.
To cancel the setting, proceed as
follows:
– briefly press button MENU ESC:
(On) will flash on the display;
– press button –: (Off) will flash on the
display;
– briefly press button MENU ESC to
go back to the menu screen or press
the button for long to go back to the
standard screen without storing
settings.
001-025 Ford KA GB 15-07-2008 8:51 Pagina 15
16
SAFETY
STARTING AND
DRIVING
WARNING
LIGHTS AND
MESSAGES
IN AN
EMERGENCY
MAINTENANCE
AND CARE
TECHNICAL
SPECIFICATIONS
ALPHABETICAL
INDEX
YOUR CAR
Front passenger’s airbag and side
bag activation/deactivation
(where provided) (P BAG P)
This function shall be used to
activate/deactivate the front passenger’s
air bag.
Proceed as follows:
❒
press button MENU ESC and, after
displaying the message (P BAG OFF)
(to deactivate) or the message
(P BAG On) (to activate) by pressing
buttons + o –, re-press MENU ESC;
❒
the confirmation request message
will be displayed;
Setting the distance unit (Unit)
With this function it is possible to set
the unit.
To set the required unit proceed as
follows:
– briefly press button MENU
ESC , the
display will show the wording (Unit) and
the previously set unit (km) or (mi);
– press button + or – to select the
required distance unit.
– briefly press button MENU
ESC to
go back to the menu screen or press
the button for long to go back to the
standard screen without storing
settings.
❒
press buttons + or – to select (YES)
(confirming activation/deactivation)
or (no) (to abort);
❒
briefly press the button MENU ESC
to view a message confirming your
selection and go back to the menu
screen. Alternatively, press the
button for a prolonged time and go
back to the standard screen without
storing the settings.
(*) Function activated only by taking car
to dealership.
001-025 Ford KA GB 15-07-2008 8:51 Pagina 16
17
SAFETY
STARTING AND
DRIVING
WARNING
LIGHTS AND
MESSAGES
IN AN
EMERGENCY
MAINTENANCE
AND CARE
TECHNICAL
SPECIFICATIONS
ALPHABETICAL
INDEX
YOUR CAR
KA00016m
fig. 15
fig. 14
KA00015m
To adjust light inside the passenger
compartment
– standard screen, to adjust instrument
panel brightness, sound system, and
automatic climate control system.
Setup menu
– within the menu, to scroll the menu
options upwards and downwards;
– to increase or decrease values during
settings.
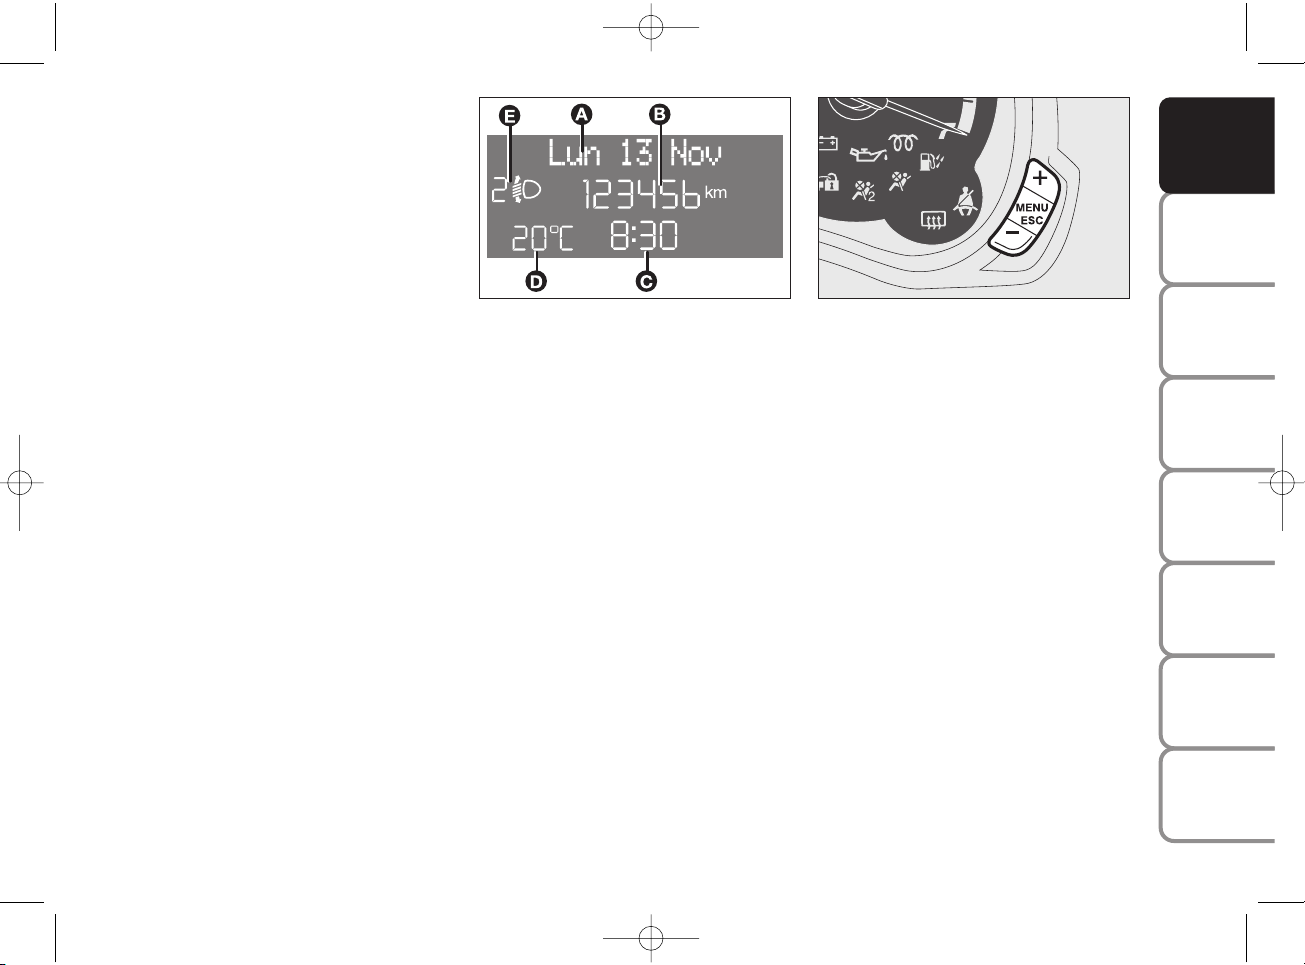
CONTROL BUTTONS fig. 15
+ To scroll the displayed menu and
the related options upwards or to
increase the value displayed.
MENU Press briefly to display
ESC
the menu and/or to go to
next screen or to confirm
the required menu option.
Hold pressed to go back to
the standard screen.
– To scroll the displayed menu and
the related options downwards or to
decrease the value displayed.
Note Buttons + and – activate different
functions according to the following
situations:
MULTIFUNCTIONAL
DISPLAY
(where provided)
The car can be equipped with the
multifunction display that, according to
the settings made, will show useful
information necessary when driving.
INFORMATION ON
“STANDARD” SCREEN fig. 14
The standard screen shows the
following information:
A Date
B Odometer (km or miles travelled).
C Time
D Outdoor temperature
(where provided)
E Headlight aiming position (only with
dipped beam headlights on).
Note When opening one of the front
doors, the display turns on and shows
the clock and the kilometres or miles
covered for a few seconds.
001-025 Ford KA GB 15-07-2008 8:51 Pagina 17

18
SAFETY
STARTING AND
DRIVING
WARNING
LIGHTS AND
MESSAGES
IN AN
EMERGENCY
MAINTENANCE
AND CARE
TECHNICAL
SPECIFICATIONS
ALPHABETICAL
INDEX
YOUR CAR
Selecting “Set Date” and “Set time”:
– Briefly press button MENU ESC to
select the first value to change (e.g.
hours /minutes or year / month / day).
– press buttons + or – (by single
presses) to select the new setting;
– briefly press button
MENU ESC to store the new setting
and to go to the next setup menu option,
if this is the last one you will go back to
the previously selected option of the
main menu.
By means of a long press on
MENU ESC:
– to quit the set up menu if you are in the
main menu;
– to quit the main menu if you are in
another point of the menu (e.g.: at
submenu option setting level, at
submenu level or at main menu option
setting level);
– to save the changes to stored settings
(and confirmed by pressing button MENU
ESC).
The setup menu page is timed. Only the
changes saved by the user by briefly
pressing MENU ESC are saved when
the menu is automatically closed.
Selecting an option of the main menu
without submenu
– press briefly button MENU
ESC to
select the main menu option to set;
– press buttons + or – (by single
presses) to select the new setting;
– press briefly button MENU ESC to
store the new setting and go back to
the main menu option previously
selected.
Selecting an option of the main menu with
submenu:
– briefly press button MENU
ESC to
display the first submenu option;
– press buttons + or – (by single
presses) to scroll all the submenu
options;
– press briefly button MENU ESC to
select the displayed submenu option
and to open the relevant setup menu;
– press buttons + or – (by single
presses) to select the new setting for
this submenu option;
– briefly press button MENU ESC to
store the new setting and to go back to
the previously selected submenu option.
SETUP MENU
The menu comprises a series of
functions arranged in a cycle which can
be selected through buttons + and – to
access the different select operations
and settings (setup) given in the
following paragraphs. A submenu is
provided for some items (Clock and Unit
setting).
The setup menu can be activated by
pressing briefly button MENU
ESC.
Single presses on buttons + or – will
scroll the setup menu options.
Handling modes are different according
to the characteristic of the option
selected.
The menu includes the following
functions:
– MENÙ
– SPEED BEEP
– TRIP B DATA
– TIME SETTING
– DATE SETTING
– SEE RADIO
– MEASUREMENT UNIT
– LANGUAGE
– WARNING VOLUME
– KEY VOL.
– PASSENGER AIRBAG (*)
– COURTESY LIGHTS
– EXIT MENU
(*) Function activated only by taking car
to dealership.
001-025 Ford KA GB 15-07-2008 8:51 Pagina 18

19
SAFETY
STARTING AND
DRIVING
WARNING
LIGHTS AND
MESSAGES
IN AN
EMERGENCY
MAINTENANCE
AND CARE
TECHNICAL
SPECIFICATIONS
ALPHABETICAL
INDEX
YOUR CAR
– briefly press button MENU ESC to
go back to the menu screen or press
the button for a long time to go back to
the standard screen without storing
settings.
To cancel the setting, proceed as
follows:
– briefly press button MENU ESC:
(On) will flash on the display;
– press button –: (Off) will flash on the
display;
– briefly press button MENU ESC to
go back to the menu screen or press
the button for long to go back to the
standard screen without storing
settings.
Trip B data (tripB on)
Through this option it is possible to
activate (On) or deactivate (Off) the
Trip B (partial trip) display.
For further information see “Trip
computer”.
For activation / deactivation, proceed as
follows:
– briefly press button MENU
ESC:
(On) or (Off) will flash on the display
(according to previous setting);
– press button + or – for setting;
– briefly press button MENU ESC to
go back to the menu screen or press
the button for long to go back to the
standard screen without storing
settings.
Speed beep (Speed limit)
With this function it is possible to set
the car speed limit (km/h or mph);
when this limit is exceeded the driver is
immediately alerted (see section
“Warning lights and messages”).
To set the speed limit, proceed as
follows:
– briefly press button MENU
ESC, the
display will show the message (Speed
Buzz);
– press button + or – to select speed
limit activation (On) or deactivation
(Off);
– if the function has been activated
(On), press buttons + or – to select the
required speed limit and then press
MENU
ESC to confirm.
Note The speed may be set in the range
from 30 to 200 km/h, or from 20 to 125
mph according to the previously chosen
unit (see “Setting the distance unit”)
described below. The setting will
increase/decrease by five units each time
button + / – is pressed. Hold button + / –
pressed to increase/decrease the setting
rapidly. Complete the setting by briefly
pressing the button when the required
setting is approached.
Setting the time (Clock)
This function enables to set the clock
through two sub-menus: “Time” and
“Format”.
Proceed as follows:
– briefly press button MENU ESC, the
display will show the two sub-menus
“Time” and “Mode”;
– press button + or – to surf the two
sub-menus;
– select the required option and then
press button MENU ESC;
– when accessing the “Hour” submenu:
briefly press button MENU ESC,
“hours” will flash on the display;
– press button + or – for setting;
– briefly press button MENU
ESC,
“minutes” will flash on the display;
– press + or – to make your choice;
001-025 Ford KA GB 15-07-2008 8:51 Pagina 19

20
SAFETY
STARTING AND
DRIVING
WARNING
LIGHTS AND
MESSAGES
IN AN
EMERGENCY
MAINTENANCE
AND CARE
TECHNICAL
SPECIFICATIONS
ALPHABETICAL
INDEX
YOUR CAR
Set date (Set Date)
This function enables to update the date
(year – month – day).
To update the date proceed as follows:
– briefly press button MENU ESC:
“day” (dd) will flash on the display;
– press button + or – for setting;
– briefly press button MENU ESC:
“month” (mm) will flash on the display;
– press button + or – for setting;
– briefly press button MENU ESC:
“year” (yyyy) will flash on the display;
– press button + or – for setting.
Note The setting will increase or
decrease by one unit each time + or –
is pressed. Hold the button pressed to
increase/decrease the setting rapidly.
Complete the setting by briefly pressing
the button when the required setting is
approached.
– briefly press button MENU ESC to
go back to the menu screen or press
the button for long to go back to the
standard screen without storing
settings.
– when you are in the “Format submenu:
briefly press button MENU
ESC the
previously set display format will flash
on the display;
– press button + or – to select “24h”
or “12h”.
When you have made the required
settings, briefly press button MENU
ESC to go back to the menu screen or
press the button for long to go back to
the standard screen without storing
settings.
– hold MENUESC pressed to go back
to the standard screen or main menu
according to the points of the menu
where you are at.
See radio
(Repeat audio information)
With this function the display repeats
information relevant to the sound
system.
– Radio: tuned radio station frequency
or RDS message, automatic tuning
activation or AutoSTore;
– audio CD, MP3 CD: track number;
– CD Changer: CD number and track
number.
To activate (On) or to deactivate (Off)
sound system info displaying proceed as
follows:
– briefly press button MENU ESC
(On) or (Off) will flash on the display
(according to previous setting);
– press button + or – for setting;
– briefly press button MENU ESC to
go back to the menu screen or press
the button for long to go back to the
standard screen without storing
settings.
001-025 Ford KA GB 15-07-2008 8:51 Pagina 20

21
SAFETY
STARTING AND
DRIVING
WARNING
LIGHTS AND
MESSAGES
IN AN
EMERGENCY
MAINTENANCE
AND CARE
TECHNICAL
SPECIFICATIONS
ALPHABETICAL
INDEX
YOUR CAR
Unit of measure (Set units)
This function may be used to set the
measurement unit in three submenus:
“Distances”, “Fuel Consumption” and
“Temperature”.
To set the required unit proceed as
follows:
– briefly press button MENU
ESC to
display the three sub-menus;
– press button + or – to surf the three
sub-menus;
– select the required sub-menu and then
press briefly button MENU
ESC;
– when accessing the “Distances” submenu:
briefly press MENU
ESC: either “km”
or “mi” will appear on the display
(according to the previous setting);
– press button + or – for setting;
– when accessing the
“Consumption”submenu (where present)
briefly press MENU
ESC: either “km/l ”,
“l/100km” or “mpg” will appear on the
display (according to the previous
setting);
If the distance unit set is “km” the fuel
consumption unit will be displayed in
km/l or l/100km.
If the distance unit set is “mi” the fuel
consumption unit will be displayed in
“mpg”.
– press button + or – for setting;
– when accessing the “Temperature”
submenu: briefly press MENU
ESC:
either “°C” or “°F” will appear on the
display according to the previous setting;
– press button + or – for setting;
When you have made the required
settings, briefly press button
MENU
ESC to go back to the menu
screen or press the button for long to
go back to the standard screen without
storing settings.
– hold MENU ESC pressed to go back
to the standard screen or main menu
according to the points of the menu
where you are at.
Language (Selecting the language)
The messages can be displayed in the
following languages: Italian, German,
English, Spanish, French, Portuguese,
Turkish and Dutch.
To set the required language proceed as
follows:
– briefly press button MENU
ESC: the
previously set “language” will flash on
the display;
– press button + or – for setting;
– briefly press button MENU ESC to
go back to the menu screen or press
the button for long to go back to the
standard screen without storing
settings.
001-025 Ford KA GB 15-07-2008 8:51 Pagina 21

22
SAFETY
STARTING AND
DRIVING
WARNING
LIGHTS AND
MESSAGES
IN AN
EMERGENCY
MAINTENANCE
AND CARE
TECHNICAL
SPECIFICATIONS
ALPHABETICAL
INDEX
YOUR CAR
Buzzer volume
(Adjusting the failure/warning
buzzer volume)
With this function the volume of the
buzzer accompanying any
failure/warning indication can be
adjusted according to 8 levels.
To adjust the desired volume proceed
as follows:
– briefly press button: MENU ESC; the
previously set volume “level” will flash
on the display;
– press button + or – for setting;
– briefly press button MENU ESC to
go back to the menu screen or press
the button for long to go back to the
standard screen without storing
settings.
Adjusting the button volume
(Button Vol.)
This function may be used to adjust the
volume of the beep accompanying the
activation of buttons MENU
ESC, +
and – can be adjusted according to
8 levels.
To adjust the desired volume proceed
as follows:
– briefly press button: MENU
ESC; the
previously set volume “level” will flash
on the display;
– press button + or – for setting;
– briefly press button MENU
ESC to
go back to the menu screen or press
the button for long to go back to the
standard screen without storing
settings.
Passenger bag Front passenger’s
airbag and side bag activation/
deactivation (where provided)
This function shall be used to
activate/deactivate the front passenger’s
air bag.
Proceed as follows:
– briefly press button MENU
ESC and,
after displaying the message “Bag pass:
Off) (to deactivate) or Bag pass: On)
(to activate) by pressing the buttons +
and –, press the button MENU ESC
again;
– the confirmation request message will
be displayed;
– press buttons
+ or – to select (Yes)
(confirming activation/deactivation) or
(No) (to abort);
– briefly press MENU
ESC to confirm
setting and go back to the menu screen
or press the button for long to go back
to the standard screen without storing
settings.
001-025 Ford KA GB 15-07-2008 8:51 Pagina 22

23
SAFETY
STARTING AND
DRIVING
WARNING
LIGHTS AND
MESSAGES
IN AN
EMERGENCY
MAINTENANCE
AND CARE
TECHNICAL
SPECIFICATIONS
ALPHABETICAL
INDEX
YOUR CAR
Exit Menu
This is the last function that closes the
setting cycle listed in the initial menu
screen.
Briefly press button MENU
ESC to go
back to the standard screen without
storing settings.
Press button – to return to the first
menu option (Speed Beep).
Courtesy lights (Greeting lights)
This functions allows the side lights and
number plate lights to be turned on
when the doors or boot are opened
using the remote control, with the
following exceptions:
– interruption 5 seconds following door
closure
– Interruption after a lock command
from the remote control
– Interruption after a lock or activation
command from the remote control
For activation/deactivation, proceed as
follows:
– briefly press button MENU
ESC:
(On) or (Off) will flash on the display
(according to previous setting);
– press button + or – for setting;
– briefly press button MENU
ESC to
go back to the menu screen or press
the button for long to go back to the
standard screen without storing
settings.
001-025 Ford KA GB 15-07-2008 8:51 Pagina 23

24
SAFETY
STARTING AND
DRIVING
WARNING
LIGHTS AND
MESSAGES
IN AN
EMERGENCY
MAINTENANCE
AND CARE
TECHNICAL
SPECIFICATIONS
ALPHABETICAL
INDEX
YOUR CAR
TRIP COMPUTER
General features
The “Trip computer” is used to display
information on car operation when the
key is turned to MAR. This function
allows to define two separate trips
called “Trip A” and “Trip B” for
monitoring the car’s “complete mission”
in a reciprocally independent manner.
Both functions are resettable (reset start of new mission).
“Trip A” shall be used to display the
figures relating to:
– Range
– Distance
– Average consumption
– Instant consumption
– Average speed
– Travel time (driving time).
“Trip B” shall be used to display the
figures relating to:
– Distance B
– Average consumption B
– Average speed B
– Travel time B (driving time)
– Reset trip B
Note “Trip B” may be excluded.
“Range” and “Instantaneous fuel
consumption” cannot be reset.
Values displayed
Range
This indicates the distance which may
be travelled with the fuel in the tank
assuming that driving conditions will not
change. The message “----” will appear
on the display in the following cases:
– value lower than 50 km (or 30 mi)
– the car is parked with the engine
running for a long time.
IMPORTANT The range depends on
several factors: driving style (see
paragraph “Driving style” in section
“Starting and driving”), type of route
(motorway, urban cycle, mountain
roads, etc…), conditions of use of the
vehicle (load, tyre pressure, etc…). Trip
planning must take into account the
above notes.
Trip distance
This value shows the distance covered
from the start of the new mission.
Average consumption
This value shows the approximate
average consumption from the start of
the new mission.
Instant consumption
This indicates the fuel consumption. The
value is constantly updated. The message
“----” will appear on the display if the car
is parked with the engine running.
001-025 Ford KA GB 15-07-2008 8:51 Pagina 24
25
SAFETY
STARTING AND
DRIVING
WARNING
LIGHTS AND
MESSAGES
IN AN
EMERGENCY
MAINTENANCE
AND CARE
TECHNICAL
SPECIFICATIONS
ALPHABETICAL
INDEX
YOUR CAR
Average speed
This value shows the car average speed
as a function of the overall time elapsed
since the start of the new mission.
Travel time
This value shows the time elapsed since
the start of the new mission.
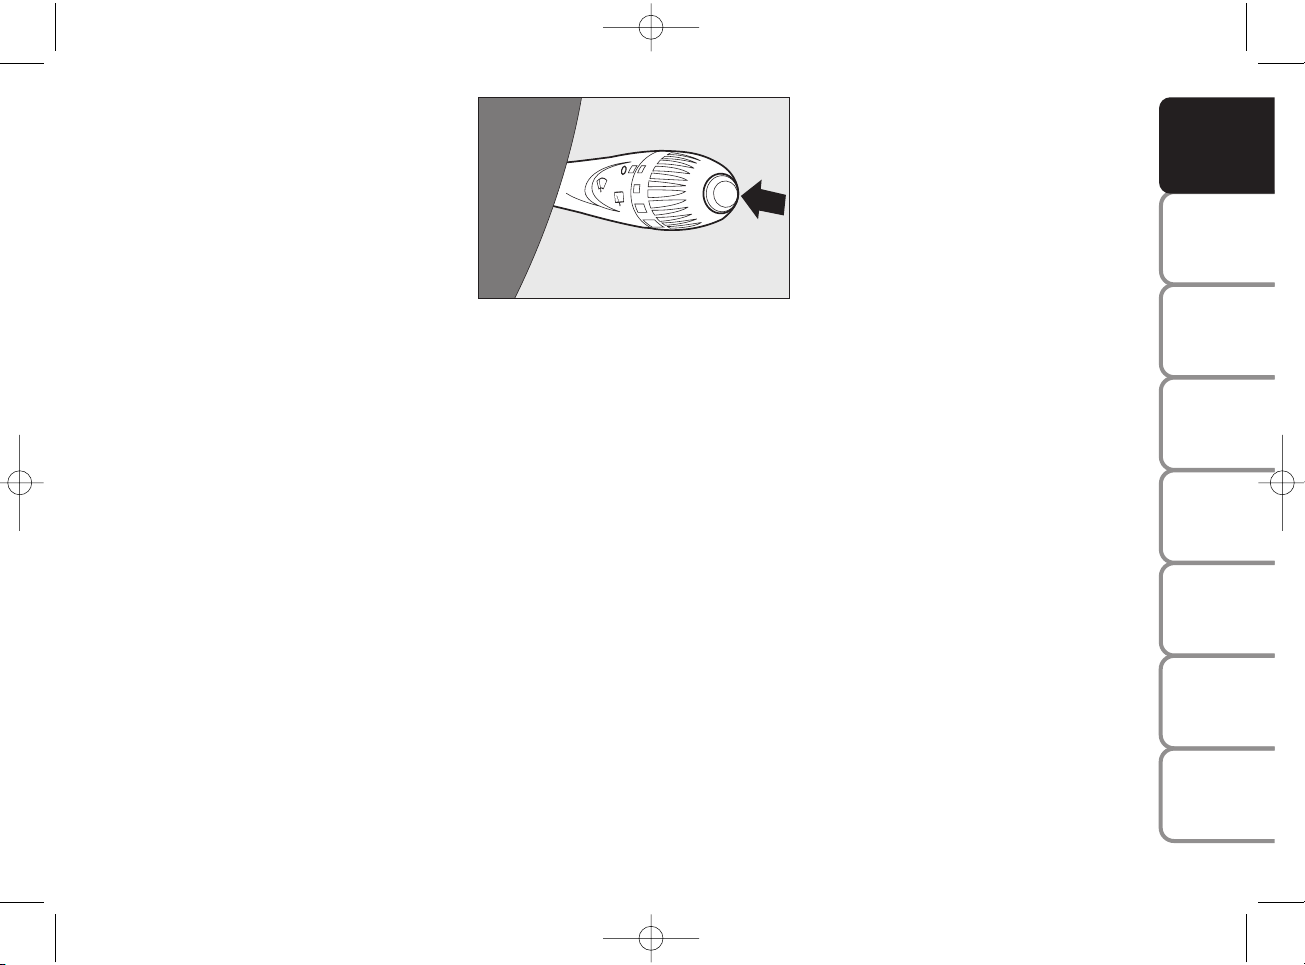
TRIP button fig. 16
Button TRIP, set on the right steering
column stalk, shall be used (with ignition
key on MAR) to display and to reset
the previously described values to start
a new mission:
– short push to display the different
values;
– long pressing to reset and then start a
new mission.
New mission
The new mission begins after:
– “manual” resetting by the user, by
pressing the relevant button;
– “automatic” resetting, when the “Trip
distance” reaches 9999.9 km or when
the “Travel time” reaches 99.59 (99
hours and 59 minutes);
– disconnection/reconnection of the
battery.
IMPORTANT The reset operation in
the presence of the screens concerning
the “Trip A” makes it possible to reset
only the information associated with
this function.
IMPORTANT The reset operation in
the presence of the screens concerning
the “Trip B” makes it possible to reset
only the information associated with
this function.
“Start trip” procedure
With ignition key on MAR, press and
hold button TRIP pressed for over 2
seconds to reset.
Exit Trip
The TRIP function is over when all the
values have been displayed or holding
the button MENU
ESC pressed for
longer than 1 second.
TR
IP
KA00017m
fig. 16
001-025 Ford KA GB 15-07-2008 8:51 Pagina 25
26
SAFETY
STARTING AND
DRIVING
WARNING
LIGHTS AND
MESSAGES
IN AN
EMERGENCY
MAINTENANCE
AND CARE
TECHNICAL
SPECIFICATIONS
ALPHABETICAL
INDEX
YOUR CAR
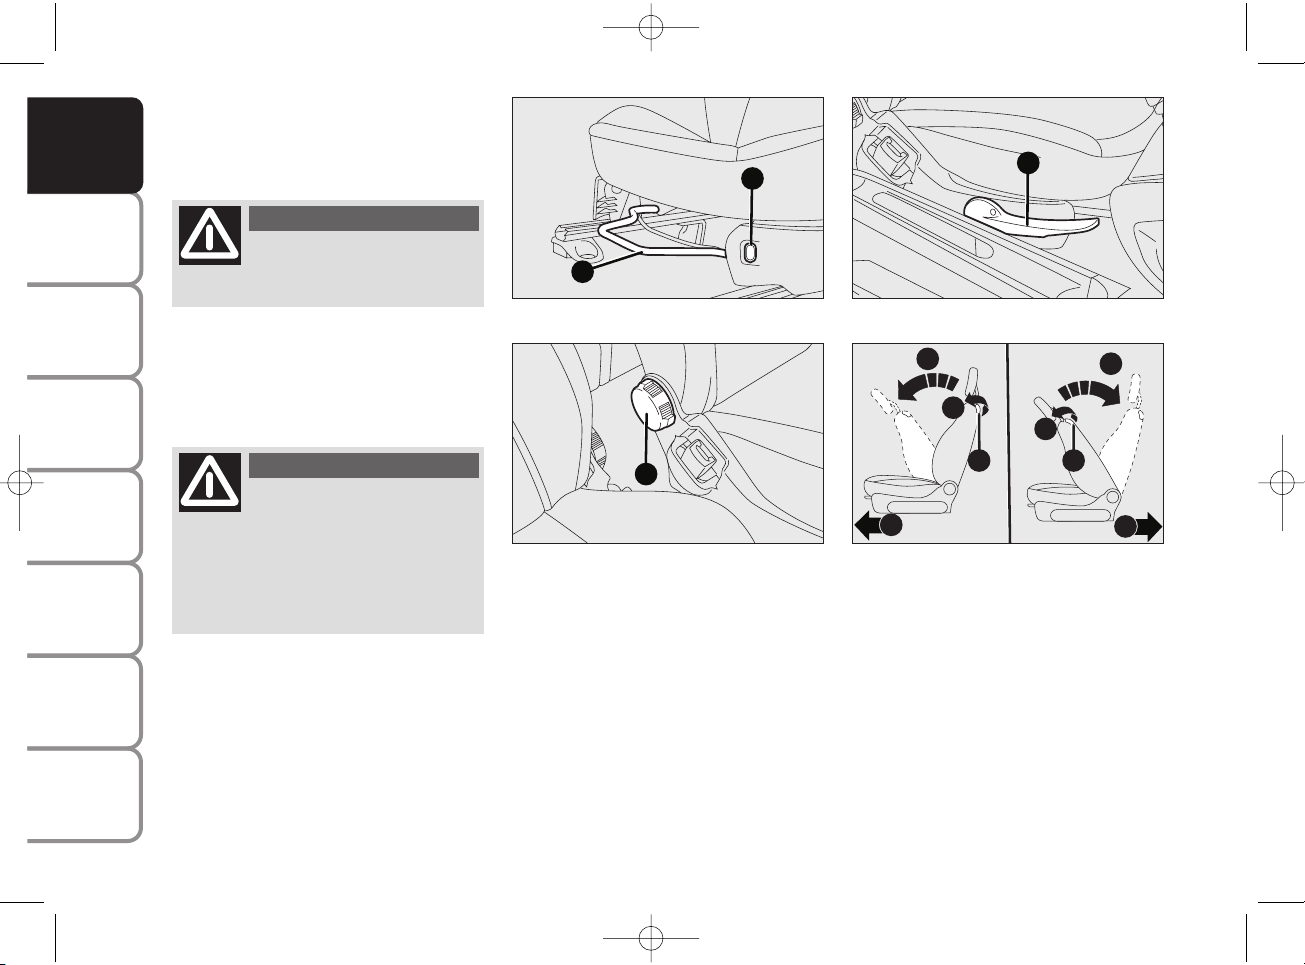
Back rest angle adjustment fig. 18
Turn knob B.
Seat height adjustment
(where provided) fig. 19
Operate lever C to lift or lower the
rear area of the cushion to achieve the
most comfortable driving position.
Backrest tilting fig. 20
To tilt the seat, operate lever D
(movement a) and push the backrest
forward to lock (movement b); release
leverD and push the backrest to slide
the seat forward (movement c, applies
only to seats with easy entry).
SEATS
FRONT SEATS
fig. 17
A
E
KA00006m
fig. 18
B
KA00007m
Fore/aft adjustment fig. 17
Lift lever A and push the seat forwards
and backwards.
All adjustments must be
made with the car
stationary.
WARNING
After releasing the
adjustment lever, always
check that the seat is locked on the
runners by trying to move it back
and forth. If it is not locked, the
seat may move unexpectedly and
make you lose control of the car.
WARNING
fig. 19
C
KA00008m
fig. 20
2
3
4
6
5
1
D D
KA00018m
Heated seats fig. 17
(where provided)
Press button E to switch the seat
warming on/off.
ATTENTION Operating the heated
seats with the engine off will drain the
battery.
026-046 Ford KA GB 15-07-2008 8:49 Pagina 26
27
SAFETY
STARTING AND
DRIVING
WARNING
LIGHTS AND
MESSAGES
IN AN
EMERGENCY
MAINTENANCE
AND CARE
TECHNICAL
SPECIFICATIONS
ALPHABETICAL
INDEX
YOUR CAR
Driver side, where equipped with
position memory
To return the seat to its initial position,
slide the seat back and press on the
backrest to lock the seat (movement d)
operate lever D (movement e) and
raise the backrest (movement f) until
it clicks home.
ATTENTION Using lever D before
locking the seat in its original position
causes the original seat position to be
lost. In this case, adjust the seat position
by means of the reach adjustment fig. 17.
Driver side and passenger side
where not equipped with position
memory
To return the seat to its initial position,
slide the seat back and press on the
backrest to lock the seat (movement d)
operate lever D (movement e) and
raise the backrest (movement f) until
it clicks home. Adjust reach using lever
A-fig. 17.
All adjustments must be
made with the car
stationary.
WARNING
fig. 21
BA
KA00019m
The type of reattachment movement
was chosen to ensure occupant safety.
If an obstacle is present (e.g. a bag) and
the seat cannot be returned to its
original position, it re-attaches the seat
even when only the backrest is
positioned to ensure the guides are
always locked.
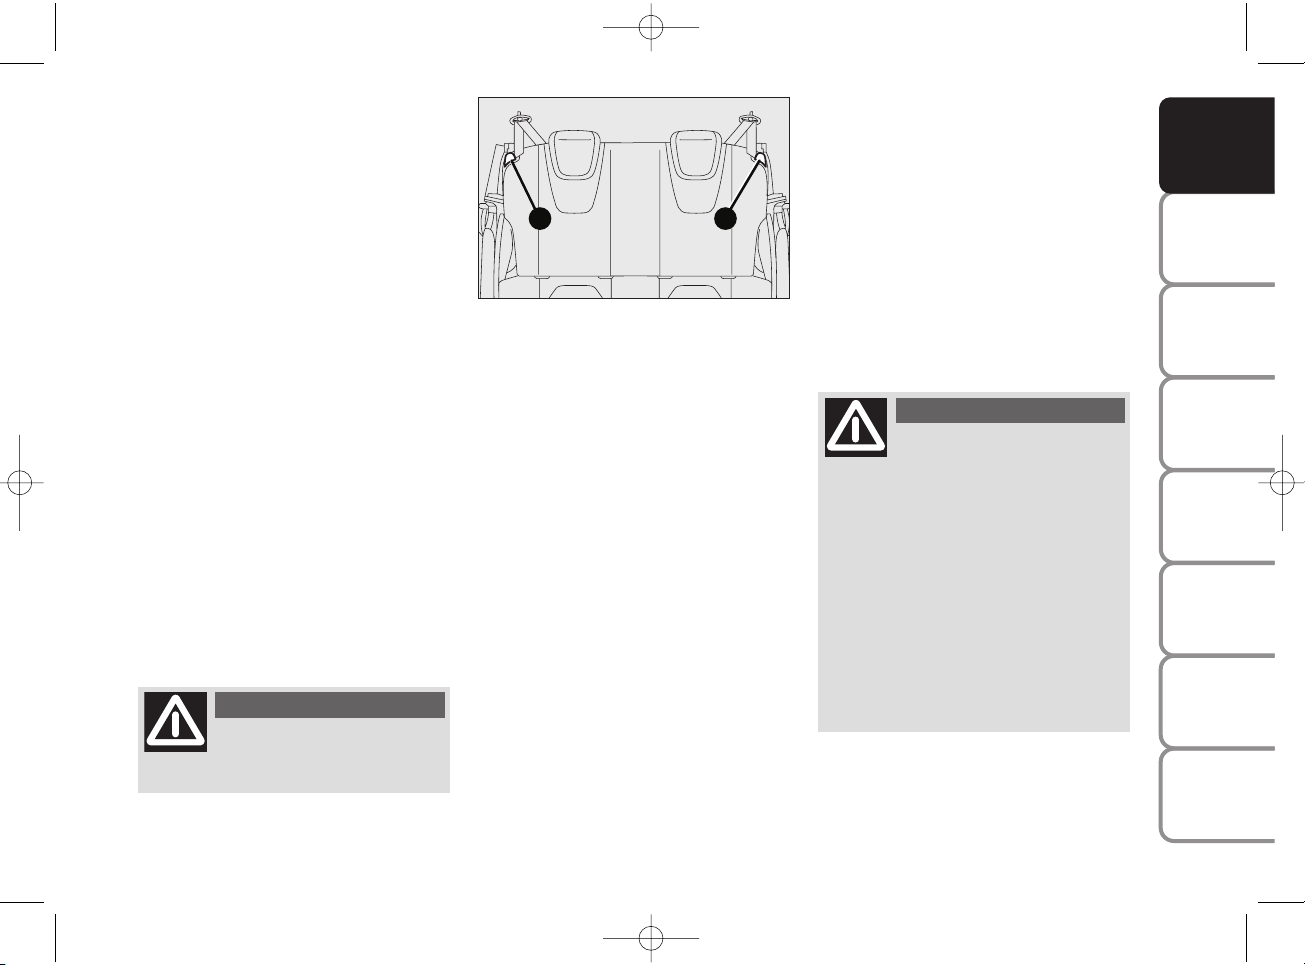
REAR SEATS fig. 21
Backrest release
❒
For versions with joint seat, lift handles
A and B and guide the backrest onto
the cushion.
❒
For versions with separate seats, lift
handle A or B to release respectively
the left or right part of the backrest and
guide the backrest onto the cushion.
Perform these operations
only when the car is
stationary and the engine is not
running.
The head restraints should be
adjusted to support the back of
your head and not your neck. Only
in this position do they exert their
protective action.
To optimise head restraint
protective action, adjust the
backrest upright and keep your
head as close as possible to the
head restraint.
WARNING
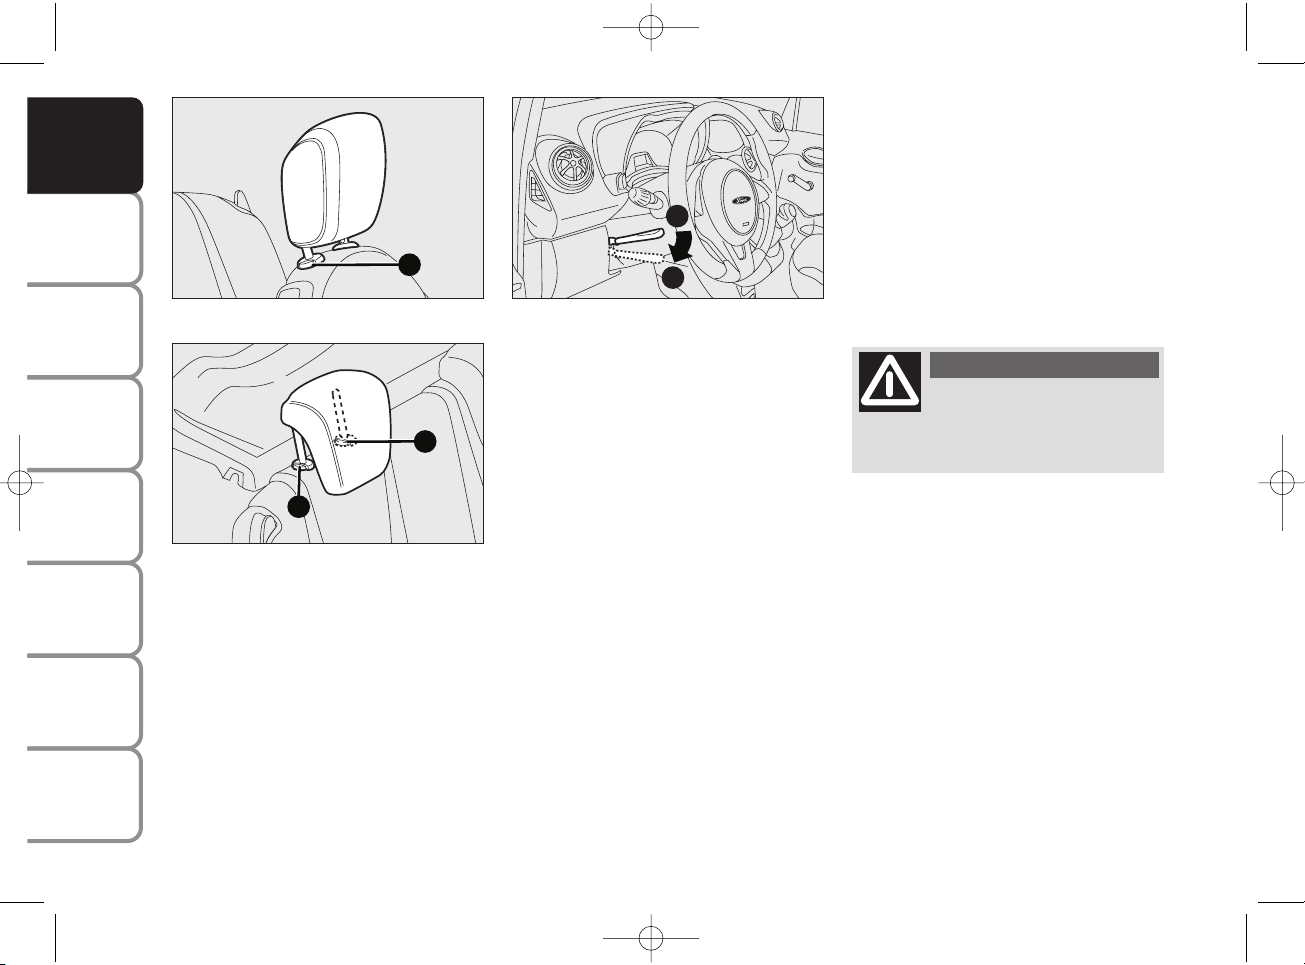
HEADRESTS
HEAD RESTRAINTS fig. 22
Head restraints height can be adjusted
as follows.
❒
upward adjustment: raise the head
restraint until you hear it click.
❒
Downward adjustment: press A and
lower the head restraint.
026-046 Ford KA GB 15-07-2008 8:49 Pagina 27
28
SAFETY
STARTING AND
DRIVING
WARNING
LIGHTS AND
MESSAGES
IN AN
EMERGENCY
MAINTENANCE
AND CARE
TECHNICAL
SPECIFICATIONS
ALPHABETICAL
INDEX
YOUR CAR
To lower the backrest, press button B.
The specific shape of the head restraint
interferes with the correct rest of the
back of the rear passenger on the
backrest; the shape is useful to force
the passenger to lift the headrest for its
correct use.
IMPORTANT Rear seat passengers shall
always set the head restraints in “fully
drawn out” position.
fig. 23
B
C
KA00021m
STEERING WHEEL
It can be adjusted vertically (where
provided).
For adjustment. bring the lever fig. 24
downward to position 2 then position
the wheel and lock it bringing lever to
position 1.
fig. 22
A
KA00020m
fig. 24
1
2
KA00113m
Perform these operations
only when the car is
stationary and the engine is not
running.
WARNING
REAR HEAD RESTRAINTS
(where provided) fig. 23
To lift out rear head restraints: press at
the same time buttons B e C set on
both sides and take them out. The rear
head restraint must be removed with
the backrest released and tilted toward
the passenger compartment To restore
the backrest to its service condition,
raise until it clicks home
026-046 Ford KA GB 15-07-2008 8:49 Pagina 28
29
SAFETY
STARTING AND
DRIVING
WARNING
LIGHTS AND
MESSAGES
IN AN
EMERGENCY
MAINTENANCE
AND CARE
TECHNICAL
SPECIFICATIONS
ALPHABETICAL
INDEX
YOUR CAR
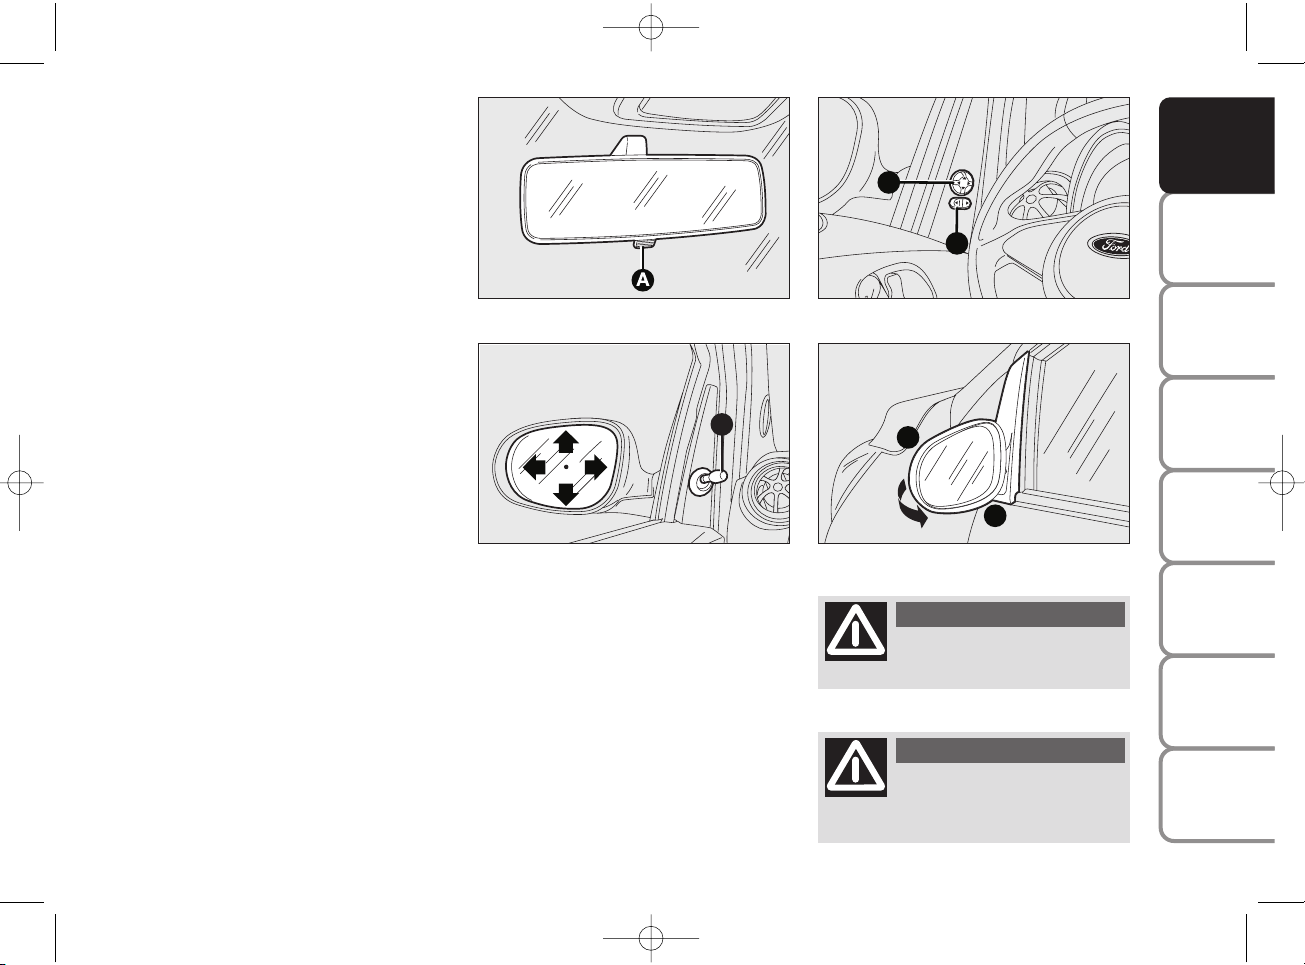
The door mirrors, being
curved, slightly alter the
perception of distance.
WARNING
When driving, the mirrors
shall always be in position 1.
WARNING
fig. 25
KA00022m
REARVIEW MIRRORS
DRIVING MIRROR fig. 25
The mirror is fitted with a safety device
that causes its release in the event of a
violent crash. It can be moved using
lever A to two different positions:
normal or antiglare.
DOOR MIRRORS
With electrical adjustment fig. 26a
From the inside of the car, operate
lever A to adjust the mirror.
With electrical adjustment fig. 26b
Proceed as follows:
❒
select the mirror with selector B;
❒
adjust the mirror using the joystick A
in the four directions.
fig. 27
1
2
KA00024m
fig. 26b
A
B
KA00023m
fig. 26a
A
KA00116m
Folding back door mirrors fig. 27
When required (for example when the
mirror causes difficulty in narrow
spaces) it is possible to fold the mirror
moving it from position 1 open, to
position 2 closed.
026-046 Ford KA GB 15-07-2008 8:49 Pagina 29
 Loading...