

Page 1
NRG 211-1
Installation Instructions 810 425- 00
Level Probe Type NRG 211-1
A Siebe Group Product
1
Page 2
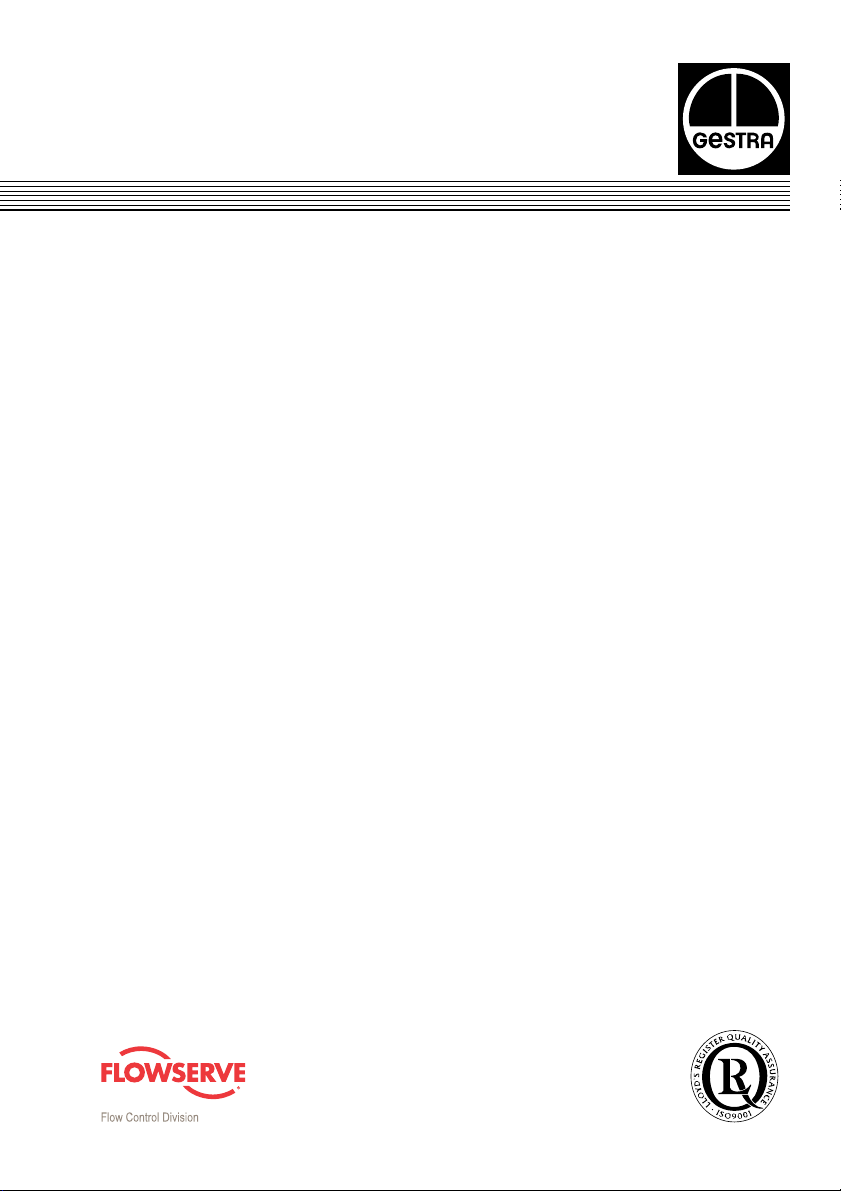
Dimensions
~118
~80
334.5
478
97
Fig. 1
∅43.5
2
Page 3
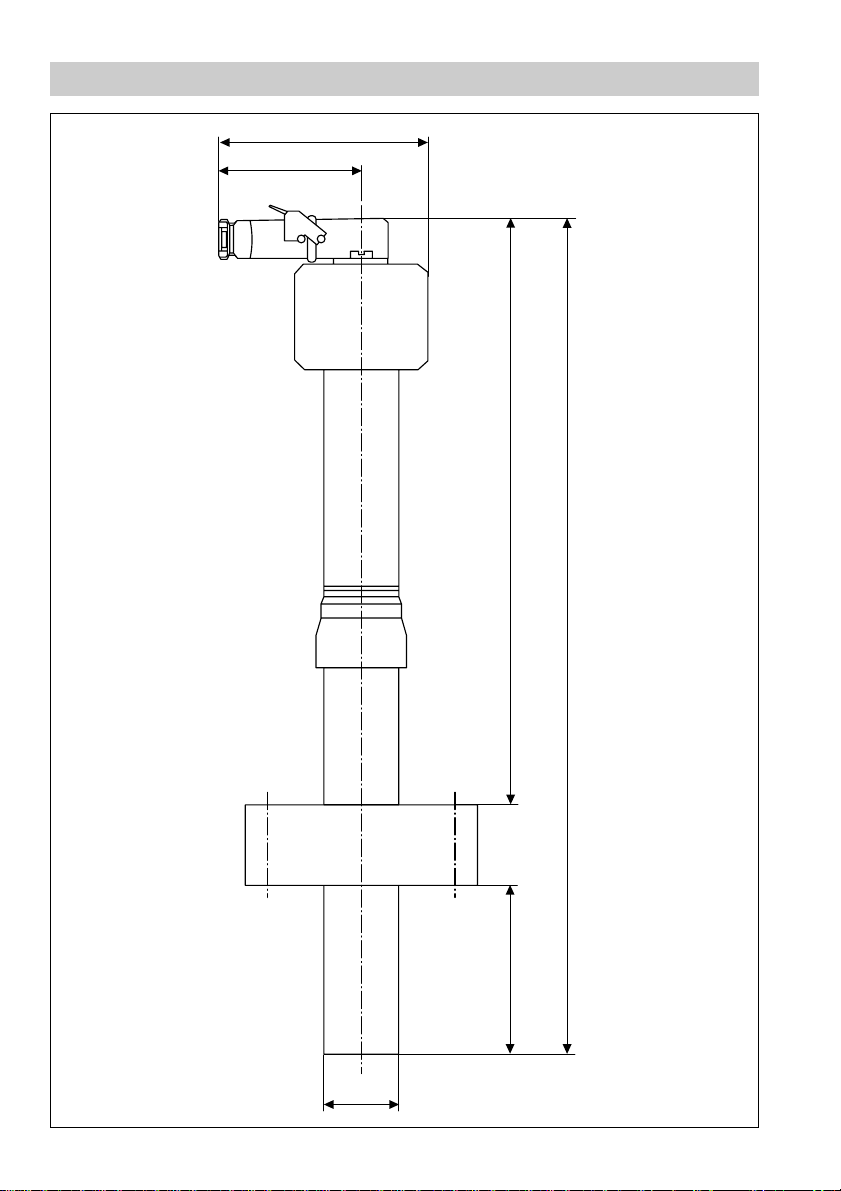
Parts Drawings
I J
HG
K
F
E
Fig. 2
L
M
N
D
C
B
A
O
3
Page 4
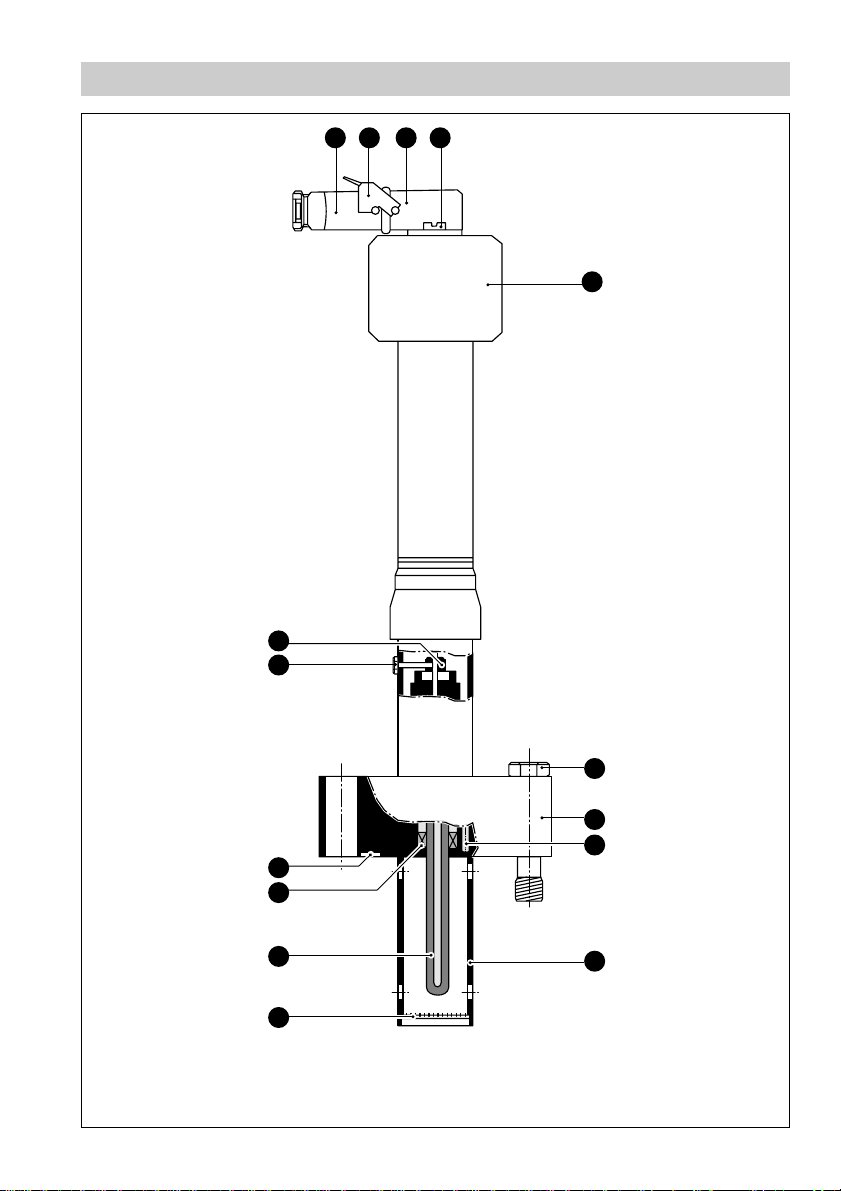
Parts Drawings
P Q G R S
40
5
Fig. 3
H
36251
4
4
Page 5

Key
A
Strainer
B
Measuring electrode
C
Stuffing box
D
Groove for gasket
E
Locking screw
F
Transit protection
G
Upper part of connector
H
Retaining clip
I
Lower part of connector
J
Fixing screw for connector
K
Terminal box with preamplifier
L
Expansion bolts
M
Flange
N
Temperature sensor
O
Protection tube
P
Cable
Q
Cable gland
R
Screw for connector insert
S
Connector insert
5
Page 6

Contents
Page
Important Notes
Safety note ...................................................................................................................... 8
Danger ............................................................................................................................ 8
Explanatory Notes
Scope of supply ..............................................................................................................9
System description .........................................................................................................9
Function .......................................................................................................................... 9
Design ............................................................................................................................. 9
Technical data – level probe .........................................................................................10
Techncial data – preamplifier........................................................................................ 10
Technical data – probe ..................................................................................................10
Installation
Welding standpipe ........................................................................................................11
Note .............................................................................................................................. 11
Danger ..........................................................................................................................11
Level probe ...................................................................................................................11
Attention........................................................................................................................11
Note .............................................................................................................................. 1 2
Tools..............................................................................................................................12
Wiring
Wiring diagram ..............................................................................................................13
Key to wiring diagram ...................................................................................................14
Attention........................................................................................................................14
Commissioning
Note ..............................................................................................................................15
Check wiring .................................................................................................................15
Apply mains voltage......................................................................................................15
Check switching function .............................................................................................. 15
Check voltage ............................................................................................................... 15
Table 1 – measuring voltages....................................................................................... 16
Check resistance thermometer .................................................................................... 16
Table 2 – resistance values ..........................................................................................16
6
Page 7

Contents – continued –
Page
Maintenance
Note ..............................................................................................................................17
Replace amplifier board................................................................................................ 17
Annex
Warning.........................................................................................................................18
Fault finding list .............................................................................................................18
Spare parts ................................................................................................................... 19
Declaration of conformity ..............................................................................................20
7
Page 8

Important Notes
Safety Note
Use level probe NRG 211-1 only in combination with GESTRA level switch
NRS 2-4/ NRS 2-5 to detect and monitor water or condensate levels.
The equipment must only be installed by qualified staff.
Qualified staff are those persons who – through adequate training in electrical
engineering, the use and application of safety equipment in accordance with
regulations concerning electrical safety systems, and first aid & accident
prevention – have achieved a recognised level of competence appropriate
to the installation and commissioning of this device.
Danger
When loosening the electrode live steam or hot water might escape.
This presents the danger of severe injury. It is therefore essential not to
dismantle the electrode unless the boiler pressure is verified to be zero.
8
Page 9

Explanatory Notes
Scope of supply
NRG 211-1
1 Level probe NRG 211-1
1 Gasket with serrated faces
1 Installation Instructions
System description
The capacitance level probe NRG 211-1 serves as sensor for the level switch
NRS 2-4 (high level) / NRS 2-5 (low level) and can be used as part of a controlled
draining system in power stations or for low level detection in tanks.
Function
The electrode is designed as a rod-type capacitor, the capacitance of which is
electronically compared with a reference capacitance. The result is a levelproportional measuring voltage. The fluid temperature is measured by an integral
resistance thermometer and electronically compared with a fixed limit. When the
two values are equal in magnitude the level-proportional measuring voltage will
be limited to 4 V.
Design
NRG 211-1
Design with welding standpipe for installation in vertical pipes.
9
Page 10

Technical data – level probe
Weight
Level probe approx. 5.6 kg
Welding standpipe approx. 4.5 kg
Technical data – preamplifier
Case
Terminal box made of aluminium, painted
Wiring
Via Harting connector with 6 terminals
Cable gland PG 11
Supply voltage
12 V DC, 30 mA
Output
1–10 V DC, measuring voltage U
M
Protection
IP 54 (DIN 40050)
Admissible ambient temperature
70 ° C
Supply cable for electrode
Screened three-core cable, conductor size 0.5 mm², max. length 500 m
Technical data – probe
Connection
Probe flange PN 320 with welding standpipe for pipes DN ≤ 100; with tee piece or for
pipes DN > 100 with lateral penetration
Materials for wetted parts
Protection tube up to 500°C St 35 (1.0305)
Protection tube up to 550°C 10 CrMo 9 10 (1.7380)
Strainer X 6 CrNiMoTi 17-12-2 (1.4571)
Insulting seal of probe rod Special ceramics material
Flange joint ring X 6 CrNiTi 18-10 (1.4541)/silver
Max. admissible pH value
10 (for ceramics insulation)
Temperature sensor
Pt 1000
Pressure/Temperature ratings
Material for flange/welding standpipe 1.5415 1.7380 1.4922
Admiss. service pressure
Admiss. service temperature
[bar] 4320 2200 320 2200 4320 3230
[psig] 4642 2901 4642 2901 4642 3336
[°C] 4120 2450 120 2500 4120 3550
[°F] 4248 2842 248 2932 4248 1022
10
Page 11

Installation
Welding standpipe
Weld standpipe inclined upwards by at least 5° onto vertical pipe to ensure that the
standpipe can completely empty if the level falls. Make sure that the marking TOP is
on top. See Fig. 5 on page 21
Note
n
We recommend full-penetration butt welding (e. g. type 22 to DIN 2559)
for the connection to pipes (tee pieces) DN ≤ 100.
With larger pipes the welding standpipe can be introduced through a
lateral penetration and then be welded.
Danger
n
During the welding process and post weld heat treatment of the
standpipe the temperature of the flange seating surface must not
exceed 350 °C.
Level probe
1. Clean flange seating surfaces.
2. Insert joint ring into the groove of the welding standpipe.
3. Put the probe onto it such that the connector at the terminal box shows to the
bottom.
4. Tighten expansion bolts in diagonally opposite pairs with a torque of 170 Nm .
5. Tighten expansion bolts in diagonally opposite pairs with a torque of 130 Nm .
6. Remove the locking screw of the transit protection .
L
L
E F
I
Attention
n
Handle level probe with care. Avoid subjecting the probe to mechanical
shocks as this might cause damage to the ceramic insulating seal and
consequent leakage.
n
Do not lag the body of the electrode above the mounting flange.
n
When removing the level probe for inspection work store it in a vertical
position.
11
Page 12

Installation – continued –
Note
n
The joint ring has serrated faces and silver coated rings at both ends
which must not be removed.
Tools
n
Open-end spanner, A. F. 27 mm
n
Screwdriver for slotted screws, size 6 mm, completely insulated to VDE 0680
12
Page 13

Wiring
Use screened three-core cable, min. conductor size 0.5 mm², max. length 500 m.
1. Lift up the retaining clip and remove the upper part of the connector . Fig. 3
2. Remove screw and connector insert .
R
3. Completely unscrew the cable gland and slip it over the cable .
4. Strip off cable insulation coating and remove conductor end insulation.
5. Insert cable into the upper part of the connector and effect wiring to connector
S
insert acc. to wiring diagram. Fig. 4
P
P G
6. Fix connector insert with the aid of screw , screw in cable gland and tighten.
7. Insert the upper connector par t into the lower connector part and lock by
means of the retaining clip .
Wiring diagram
H G
S
Q P
S R Q
G I
H
1
2
Fig. 4
NRG 211
C
M
NRV 2-30
4
321
U
M
6
3
4
5
6
ϑ
6
5
Ω
Pt 1000
13
Page 14

Key to wiring diagram
1
Supply voltage 12 V DC
2
Measuring voltage 1– 10 V DC
3
Pins
4
For resistance measurement: strip off conductor
5
For resistance measurement: Pt 1000
6
Fixing screws for amplifier board
Attention
n
Screen must not make any other electrical contact.
n
Connect the screen to the level switch only.
n
When switching off inductive loads, voltage spikes are produced
that may impair the operation of control and measuring systems.
Inductive loads should be provided with commercial arc suppressor
RC combinations, e. g. 0.1 µF/100 Ω.
14
Page 15

Commissioning
Note
The level probe NRG 211-1 can only be operated and checked in combination with the level switch NRS 2-4 (high level) or NRS 2-5 (low level).
Check wiring
1. Check whether the 19" slide-in unit has been properly installed in the magazine.
2. Check whether the mains supply corresponds to the wiring carried out on the level
probe.
Apply mains voltage
1. Switch on the mains supply and check whether the mains voltage is applied
across the level switch. See installation instructions NRS 2-4 or NRS 2-5.
Check switching function
1. With level switch NRS 2-4
Check the switching function “high level”. To assist with this objective raise the water
level in the tank above the preset high level. The LED high level located at the level
switch NRS 2-4 must light up and the corresponding function in the secondary
circuit must be operated.
With level switch NRS 2-5
Check the switching function “low level”. To assist with this objective lower the water
level in the tank below the preset low level. The LED low level located at the level
switch NRS 2-5 must light up and the corresponding function in the secondary
circuit must be operated.
2. Raise (NRS 2-5) or lower (NRS 2-4) the water level in the tank. The level electrode
NRG 211-1 must switch back to normal operation.
Check voltage
1. Check the supply and measuring voltage of the level electrode. The voltages can
be measured at the electrode or level switch. Fig. 4
Supply voltage: 12 V DC
Measuring voltage: see table 1 – measuring voltages on page 16
In order to check the measuring voltage for probe exposed refer to “Check
Resistance Thermometer”
15
Page 16

Table 1 Measuring voltages
Measuring voltage U
Decoding NRS 2-4 Decoding NRS 2-5
M
≤ 0 V – 1 V Malfunction in probe Malfunction in probe
supply line (short circuit supply line (short circuit
or interruption) or interruption)
= 1 V – 4 V Probe exposed / fluid Probe submerged
temperature ≥ 395°C
= 4 V – 7 V Probe submerged, Probe exposed,
HIGH level LOW level
≥ 9 V Malfunction in probe Malfunction in probe
(defective insulating seal, (defective insulating seal,
leaky stuffing box) leaky stuffing box)
Check resistance thermometer
1. Check the built-in resistance thermometer Pt 1000 and the measuring voltage
for
ELECTRODE EXPOSED. Lift the retaining clip and remove the upper part of
the connector . Fig. 3
2. Remove screw and connector insert .
3. Completely unscrew cable gland and slip it over the cable .
G
R
Q
H
S
P
4. Pull out the sensor supply cable for the thermometer and connect the ohmmeter.
Fig. 4
5. The setpoint to be measured depends on the plant temperature, see table 2
RESISTANCE VALUES.
6. Check measuring voltage: it must be within 1 – 4 V DC (electrode exposed)
7. Reconnect the sensor supply cable.
8. Fix connector insert with screw , screw in cable gland and tighten.
9. Put upper part of the connector into lower part of the connector and lock by
means of retaining clip .
S R
G
H
Q
I
Table 2 Resistance values
°C0 102030405060708090100Ω/°C
100 1000.0 1039.0 1077.9 1116.7 1155.4 1194.0 1232.4 1270.7 1308.9 1347.0 1385.0 3.85
100 1385.0 1422.8 1460.6 1498.2 1535.7 1573.2 1610.1 1647.6 1684.7 1721.6 1758.4 3.73
200 1758.4 1795.1 1831.7 1868.2 1904.6 1940.8 1977.0 2013.0 2048.8 2084.6 2120.3 3.61
300 2120.3 2155.8 2191.3 2226.6 2261.8 2296.9 2331.9 2366.7 2401.5 2436.1 2470.6 3.50
400 2470.6 2505.0 2539.3 2573.4 2607.5 2641.4 2675.2 2708.9 2742.5 2776.0 2809.3 3.38
500 2809.3 2842.6 2875.7 2908.7 2941.6 2974.3 3007.0 3039.5 3072.0 3104.3 3136.5 3.27
600 3136.5 3168.6 3200.5 3232.4 3264.1 3295.7 3327.2 3358.6 3389.9 3421.0 3452.1 3.15
700 3452.1 3483.0 3513.8 3544.5 3575.1 3605.5 3635.9 3666.1 3696.2 3726.2 3756.1 3.04
800 3756.1 3815.5 3815.5 3845.0 3874.5 3903.8 –––––2.95
Mean values of 100 °C ranges
16
1
Page 17

Maintenance
Note
n
Store probe only in vertical position.
Replace amplifier board
1. Unscrew fixing screw and remove terminal box cover. Fig. 2
J
2. Withdraw all terminals from pins.
3. Unscrew fixing screw and remove board. Fig. 4
4. Insert new board and screw in fixing screws .
6
6
5. Connect terminals to pins.
6. Re-install terminal box cover, screw in fixing screw and tighten.
J
17
Page 18

Annex
Warning
The terminal strip of the NRS 2-4/NRS 2-5 is live during operation. This
presents the danger of electric shock.
Cut off power supply before inserting or removing the 19" slide-in unit and
before undertaking any installation or maintenance work.
Fault finding list
Green LED OPERATION at level switch NRS 2-4 / NRS 2-5 is not illuminated
Fault: The supply voltage has failed.
Remedy: Measure the voltage across A/C28 and A/C30 of the NRS 2-4 / NRS 2-5.
Check power supply and wiring.
No function when level falls or rises – LED
HIGH LEVEL on level switch NRS 2-4 or LOW LEVEL on level switch NRS 2-5
MALFUNCTION IN PROBE and
are illuminated
Fault: The locking screw has not been removed from the level probe NRG 211-1.
Remedy: Remove locking screw.
Fault: Defective level probe (defective insulating seal, untight stuffing box)
Remedy: Measure voltage across C18/A18 of NRS 2-4 / NRS 2-5. Measure voltage
across terminals 2 and 3 of the NRG 211-1. If voltage ≥ 9 V check probe
supply cable and wiring.
No function when level falls or rises – LED
MALFUNCTION IN CABLE on level switch
NRS 2-4 / NRS 2-5 is illuminated
Fault: Malfunction in probe supply cable (short circuit, interr uption).
Remedy: Measure voltage across C18/A18 of NRS 2-4 / NRS 2-5. Measure voltage
across terminals 2 and 3 of level probe NRG 211-1. If voltage ≤ 1 V check
probe supply cable and wiring.
Level switch NRS 2-4: No function when level falls or rises or when high level
is exceeded – only the green LED
OPERATION of the level switch NRS 2-4 is
illuminated
Fault: Level probe does not enter the liquid.
Remedy: Measure voltage across C18/A18 of NRS 2-4. Check installation of
NRG 211-1 and measure voltage across terminals 2 and 3. If necessary
change position of installation of the level probe.
Fault: Defective level switch.
Remedy: Measure voltage across C16/A18 (supply voltage for level probe) on
NRS 2-4. Replace level switch if no voltage can be measured.
Fault: Defective preamplifier.
Remedy: Measure voltage across C18/A18 of NRS 2-4. Measure supply voltage
across terminals 1 and 3 of NRG 211-1 and measuring voltage across
terminals 2 and 3. If supply voltage = 12 V and no measuring voltage can
be measured, replace preamplifier.
18
Page 19

Annex – continued –
Fault: Defective temperature sensor.
Remedy: Check the measuring voltage across terminals 2 and 3 of NRG 211-1.
If the supply voltage 1 – 4 V check temperature sensor. If temperature
sensor is defective replace level probe.
Level switch NRS 2-5: No function when level falls or rises or when level is
below min. level – only the green LED
illuminated
Fault: Level probe does not enter the liquid.
Remedy: Measure voltage across C18/A18 of NRS 2-5. Check installation of
NRG 211-1 and measure voltage across terminals 2 and 3. If necessary
change position of installation of the level probe.
Fault: Defective level switch.
Remedy: Measure voltage across C16/A18 (supply voltage for level probe) on
NRS 2-5. Replace level switch if no voltage can be measured.
Fault: Defective preamplifier.
Remedy: Measure voltage across C18/A18 of NRS 2-5. Measure supply voltage
across terminals 1 and 3 of NRG 211-1 and measuring voltage across
terminals 2 and 3. If supply voltage = 12 V and no measuring voltage
can be measured, replace preamplifier.
Fault: Defective temperature sensor.
Remedy: Check the measuring voltage across terminals 2 and 3 of NRG 211-1.
If supply voltage = 1 – 4 V check temperature sensor. If temperature
sensor is defective replace level probe.
The temperature measured by means of the resistance thermometer does not
correspond to the actual installation temperature
Fault: Defective Pt 1000.
Remedy: Replace level probe.
Spare parts
OPERATION of the level switch NRS 2-5 is
Designation Reference no.
Amplifier board NRV 2-30 391 241
19
Page 20

Annex – continued –
Declaration of conformity
We hereby declare that the equipment NRG 211-1 conforms to the following
European guidelines:
n
LV guideline 73/23/EWG version 93/68/EWG
n
EMC guideline 89/336/EWG version 93/68/EWG
which are based on the following harmonised standards:
n
LV standard EN 60947-5-1: 1991
n
EMC standard EN 50 081-2, EN 50 082-2
This declaration is no longer valid if modifications are made to the equipment without
consultation with us.
Bremen, 28th April 1997
GESTRA GmbH
Dr. Anno Krautwald
Dr. Christian P olitt
20
Page 21

Examples of Installation
DN ≤ 100/4"
8
≈12
7
8
Fig. 5
∅ 63.5
8
≈24
∅ 63.5
DN ≥ 100/4"
Key
A
By customer
B
Welding standpipe (GESTRA)
21
Page 22

GESTRA Gesellschaften · GESTRA Companies · Sociétés GESTRA · Sociedades Gestra · Società GESTRA
GESTRA Gesellschaften · GESTRA Companies · Sociétés GESTRA · Sociedades Gestra · Società GESTRA
Vertretungen weltweit · Agencies all over the world · Représentations dans le monde entier · Representaciones en todo el mundo · Agenzie in tutto il mondo
Vertretungen weltweit · Agencies all over the world · Représentations dans le monde entier · Representaciones en todo el mundo · Agenzie in tutto il mondo
España
España
GESTRA ESPAÑOLA S.A.
GESTRA ESPAÑOLA S.A.
Luis Cabrera, 86-88
Luis Cabrera, 86-88
E-28002 Madrid
E-28002 Madrid
Tel. 003491/5152032
T el. (+34) 915152032
Fa x0 0349 1/413674 7; 515203 6
Fax (+34) 914136747; (+34) 915152036
E-mail: gestra@gestra.es
Polska
Polska
GESTRA POLONIA Spolka zo.o.
GESTRA POLONIA Spolka z. o.o.
Ul. Schuberta 104, P.O. Box 71
Ul. Schuberta 1 04, P.O.B. 727
PL-80-172 Gdansk
PL-80-958 Gdansk 50
Tel. 00 4858/3061002 oder 30610 10
T el. (58) 3061002
Fax 00 4858 /3061003 oder 30633 00
Fax (58) 3061003
E-mail: gestra@gestra.pl
France Portugal
France Portugal
GESTRA S.A.R.L.
10 Avenue du Centaure, BP 8263 CERGY
Flowserve Flow Control S.A.S.
F-95801 CERGY PONTOISE Cedex
10 Avenue du Centaure, BP 8263
Tél. (00 33) 01.34.43.26.60
F-95801 CERGY PONTOISE CEDEX
Fax (0033) 01.34.43.26.87
Tél. 0 0331/3443 2660
Fax 00331/34432687
Great Britain
E-mail: gnation@flowserve.com
GESTRA (U.K.) LTD.
9-11 Bancroft Court
Italia
Hitchin, Hertfordshire, SG5 1PH
T el. (01462) 4316 81
Italgestra S.r.l.
Fax (014 62) 4203 96
Via Carducci 125
l-20099 Sesto San Giovanni (MI)
Italia
Tel. 00 3902/2410 12.1
Fax 00 3902/2410 12.460
ITALGESTRA S.r.l.
E-mail: info@italgestra.it
Via Carducci 125
l-20099 S.S. Giovanni (MI)
T el. (02) 26297 -0
Fax (02) 26297460
GESTRA PORTUGUESA VAL VULAS LDA.
Av . Dr . Antunes Guimarães, 1159
GESTRA PORTUGUESA VALVULAS LDA.
P-4100 Porto
Av. Dr. Antunes Guimarães, 1159
T el. (2) 6107551
Porto 4100-082
Fax (2) 610 7575
Tel. 0035122/6 198770
Fax 0035122/ 6107575
USA
E-mail: gestra@gestra.pt
GESTRA Division
10 Y ork Avenue
West Caldwell, NJ 07006
T el. (973) 403-1556
Fax (973) 4 03-1557
®
®
GESTRA GmbH
Postfach 10 54 6 0
GESTRA GmbH
D-28054 Bremen
Münchener Str. 77
Hemmstraße 130
D-28215 Bremen
D-28215 Bremen
Tel. +49 (0) 421 35 03-0
Tel. +49 (0) 421 35 03-0
Fax+49 (0) 421 35 03-393
Fax +49 (0) 421 35 03-393
E-mail
gestra.gmbh@gestra.de
Internet www.gestra.de
Internet www.gestra.de
E-mail
gestra.gmbh@gestra.de
A Unit of Flowserve Corporation
A Siebe Group Company
810425-00/499c · ©1997 GESTRA GmbH · Bremen · Printed in Germany
22
 Loading...