

Page 1
®
CHAIN SHARPENER FSG 85 D1
CHAIN SHARPENER
Translation of the original instructions
NAPRAVA ZA OSTRENJE VERIG
Prevod originalnega navodila za uporabo
PRÍSTROJ NA OSTRENIE REŤAZÍ
Preklad pôvodného návodu na použitie
FŰRÉSZLÁNC ÉLEZŐ
Eredeti használati utasítás fordítása
OSTŘIČKA PILOVÝCH ŘETĚZŮ
Překlad původního návodu k používání
KETTENSCHÄRFGERÄT
Originalbetriebsanleitung
IAN 285177
Page 2

GB Translation of the original instructions Page 5
HU Eredeti használati utasítás fordítása Oldal 16
SI Prevod originalnega navodila za uporabo Stran 27
CZ Překlad původního návodu k používání Strana 39
SK Preklad pôvodného návodu na použitie Strana 50
DE / AT / CH Originalbetriebsanleitung Seite 61
Page 3
A
3
1
2
4
1a
21
1b
20
19
18
17
16
15
14
13
12
11
B C
23
5
6
7
8
9
10
12256
4
22
24 a
24 b
2
26
17
16
8
8
9
9
8
10
Page 4
D
13
12
11
10
14 a 14 b
15
7
D1
15 27
2
4
D2
6
27
18 a
14
12
11
10
D3
A
27 28
E
18 a 18 b
3 5
Page 5

List of pictograms used .............................................................................................Page 6
Introduction ........................................................................................................................Page 6
Intended Use ............................................................................................................................Page 6
Parts Description .......................................................................................................................Page 7
Scope of Delivery .....................................................................................................................Page 7
Technical Data .........................................................................................................................Page 7
General safety instructions ...................................................................................Page 8
Safe operation .........................................................................................................................Page 8
Additional safety notes ............................................................................................................Page 9
Before use ............................................................................................................................Page 10
Installation ..........................................................................................................................Page 10
Product setup ............................................................................................................................Page 10
Assembling the product ...........................................................................................................Page 10
Attaching the adjusting screw .................................................................................................Page 10
Initial use ..............................................................................................................................Page 10
Switching on and off ................................................................................................................Page 11
Sharpening a saw chain ..........................................................................................................Page 11
Maintenance and Cleaning ...................................................................................Page 12
Cleaning ...................................................................................................................................Page 13
Replacing the grinding disc .....................................................................................................Page 13
Storage ..................................................................................................................................Page 13
Disposal .................................................................................................................................Page 13
Service ....................................................................................................................................Page 14
Warranty claim procedure ......................................................................................................Page 14
Service ......................................................................................................................................Page 14
Warranty ..............................................................................................................................Page 14
Translation of original conformity declaration ....................................Page 15
5 GB
Page 6

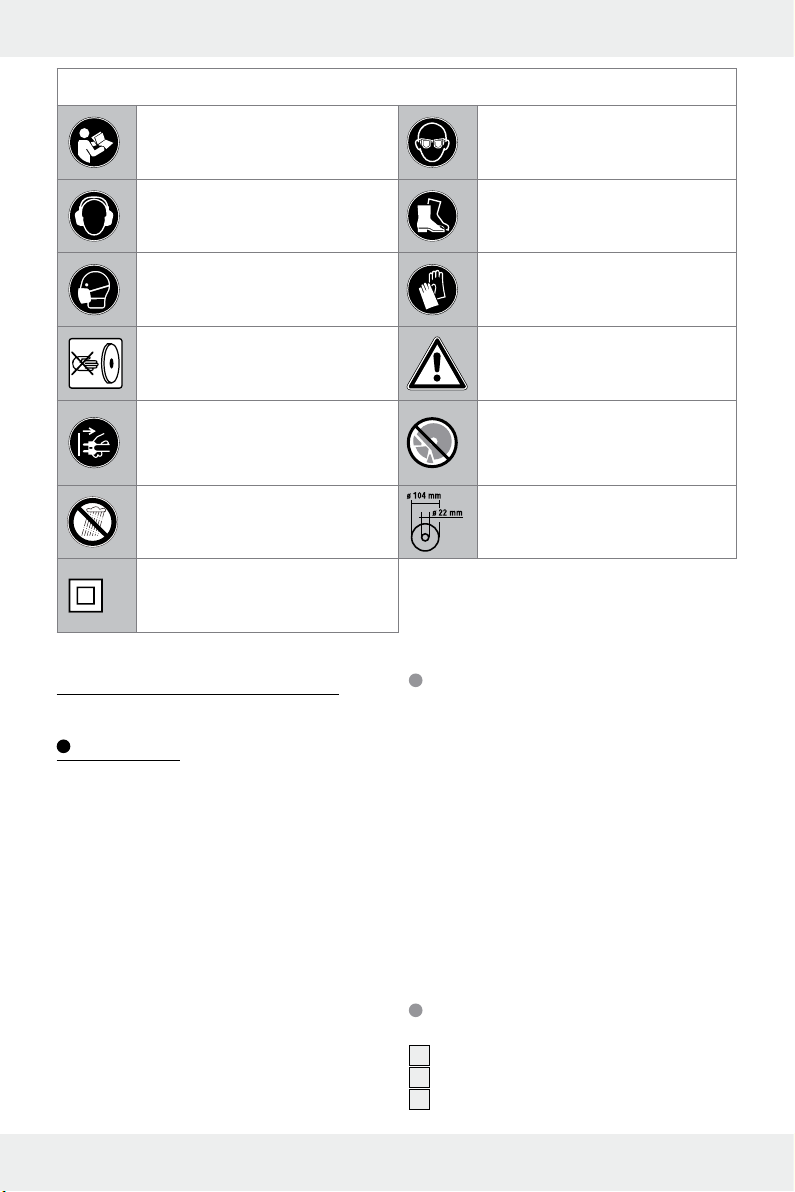
List of pictograms used
Read the instruction manual. Wear eye protection.
Wear hearing protection.
Wear a dust mask.
Risk of injuries due to rotating tool!
Keep hands away.
Risk of electric shock!
Unplug the mains plug from the
socket prior to performing
maintenance or repairs.
Protect the product from moisture. Grinding disc dimensions.
Protection class II
(double insulation)
Chain sharpener FSG 85 D1
Introduction
We congratulate you on the purchase of your
new product. You have chosen a high quality
product. The instructions for use are part of the
product. They contain important information concerning safety, use and disposal. Before using
the product, please familiarise yourself with all of
the safety information and instructions for use.
Only use the product as described and for the
specified applications. If you pass the product
on to anyone else, please ensure that you also
pass on all the documentation with it.
Wear protective, slip-resistant
footwear.
Wear cut-resistant safety gloves.
Cuts may otherwise occur.
Attention!
Do not use defective grinding
discs.
Intended Use
This product is suitable for sharpening conventional saw chain types. This product is not intended for any other use (e.g. grinding with
cooling liquid, grinding other items or materials
harmful to the health such as asbestos). The
light of product is intended to illuminate the
direct area at working operation and is not
intended for household room illumination. Any
other use or product modification shall be considered improper use and hold considerable
safety hazards. The manufacturer assumes no
liability for damages due to improper use. Not
intended for commercial use.
6 GB
Page 7
Parts Description
1
On / off switch
1a
On switch
1b
Off switch
2
Grinding head
3
Grinding disc cover
4
Handle
5
Grinding disc cover fastening screws
6
Depth limiter adjusting screw and
adjusting nut
7
Chain guide
8
Grinding base
9
Stop notches
10
Chain tensioner locking screw
11
Grinding angle scale (+35° to -35°)
12
Chain tensioner with rotary table
13
Chain clamping lever
14
Chain feed adjusting screw and adjusting nut
14a
Chain feed adjusting screw
14b
Chain feed adjusting nut
15
Stop
16
Cable holder
17
Mains lead
18a
Grinding disc
18b
Grinding disc nut
19
LED lamp (not shown)
20
Visual cover
21
Vents (not shown)
22
Work surface
23
Screw (for table mounting)
24a
Washer (for table mounting)
24b
Nut (for table mounting)
25
Washer (for adjusting screw)
26
Locknut (for adjusting screw)
27
Tooth (saw chain)
28
Depth limiter nose (saw chain)
Scope of Delivery
Technical Data
Rated input
voltage: 220–240
nating current),
50 Hz
Power input: max. 85 W
(S2: 15 min)*
Rated rest period: approx. 5 min
Protection class: II /
Rated idle speed n0: 5000 min
Setting angle: 35° left/right
For saw chains with
link size: 6.35 / 8.255 /
9.52 mm
(¹/₄“ / 0.325“
Grinding disc dimensions:
Outside diameter: Ø 104 mm (4
Hole diameter: Ø 22 mm
Thickness: 3.2 mm
Weight
(incl. accessories): approx. 2.3 kg
Noise emission value:
The A-rated noise level of the power is typically:
Noise level
Uncertainty K
Sound power level
Uncertainty K
: 65.5 dB(A)
: 3 dB
: 78.5 dB(A)
: 3 dB
* Short-time operation: Do not operate the unit
continuously for more than 15 minutes
** Maximum rotational speed of the grinding
wheel 40 m/s. The grinding disc must withstand
a minimum rotational speed of 27.8 m/s. If the
max. rotational speed of the disc is too low for
the tool, it could break!
V∼ (alter-
-1 **
/ ³/₈“)
¹/₁₆
in)
1 Chain sharpener with grinding disc installed
1 Handle
1 Chain tensioner with locking screw
1 Adjusting screw + washer
2 Screws with nuts and washer for table mounting
1 Instructions for use
7 GB
Page 8
General safety
instructions
WARNING! When using electric tools basic
safety precautions should always be followed
to reduce the risk of fire, electric shock and personal injury including the following. Read all
these instructions before attempting to operate
this product and save these instructions
Safe operation
1. Keep work area clear
Cluttered areas and benches invite injuries.
2. Consider work area environment
Do not expose tools to rain.
Do not use tools in damp or wet locations.
Keep work area well lit.
Do not use tools in the presence of flamma-
ble liquids or gases.
3. Guard against electric shock
Avoid body contact with earthed or
grounded surfaces (e.g. pipes, radiators,
ranges, refrigerators).
4. Keep other persons away
Do not let persons, especially children, not
involved in the work touch the tool or the
extension cord and keep them away from
the work area.
5. Store idle tools
When not in use, tools should be stored in
a dry locked-up place, out of reach of
children.
6. Do not force the tool
It will do the job better and safer at the rate
for which it was intended.
7. Use the right tool
Do not force small tools to do the job of a
heavy duty tool.
Do not use tools for purposes not intended;
for example do not use circular saws to cut
tree limbs or logs.
8. Dress properly
Do not wear loose clothing or jewellery,
they can be caught in moving parts.
Non-skid footwear is recommended when
working outdoors.
Wear protective hair covering to contain
long hair.
Always wear eye and
ear protection when disconnecting.
Wear other personal protective equipment
such as gloves.
9. Use protective equipment
Use safety glasses.
Use face or dust mask if working operations
create dust.
10. Connect dust extraction equipment
If the tool is provided for the connection of
dust extraction and collecting equipment,
ensure these are connected and properly
used.
11. Do not abuse the cord
Never yank the cord to disconnect it from
the socket. Keep the cord away from heat,
oil and sharp edges.
12. Secure work
Where possible use clamps or a vice to hold
the work. It is safer than using your hand.
13. Do not overreach
Keep proper footing and balance at all
times.
14. Maintain tools with care
Keep cutting tools sharp and clean for
better and safer performance.
Follow instruction for lubricating and chang-
ing accessories.
Inspect tool cords periodically and if dam-
aged have them repaired by an authorized
service facility.
Inspect extension cords periodically and
replace if damaged.
Keep handles dry, clean and free from oil
and grease.
15. Disconnect tools
When not in use, before servicing and
when changing accessories such as blades,
bits and cutters, disconnect tools from the
power supply.
8 GB
Page 9

16. Remove adjusting keys and
wrenches
Form the habit of checking to see that keys
and adjusting wrenches are removed from
the tool before turning it on.
17. Avoid unintentional starting
Ensure switch is in “off’ position when
plugging in.
18. Use outdoor extension leads
When the tool is used outdoors, use only
extension cords intended for outdoor use
and so marked.
19. Stay alert
Watch what you are doing, use common
sense and do not operate the tool when
you are tired.
20. Check damaged parts
Before further use of tool, it should be
carefully checked to determine that it will
operate properly and perform its intended
function.
Check for alignment of moving parts,
binding of moving parts, breakage of parts,
mounting and any other conditions that
may affect its operation.
A guard or other part that is damaged
should be properly repaired or replaced by
an authorized service centre unless otherwise indicated in this instruction manual.
Have defective switches replaced by an
authorized service centre.
Do not use the tool if the switch does not
turn it on and off.
21. Warning
The use of any accessory or attachment
other than one recommended in this instruction manual may present a risk of personal
injury.
22. Have your tool repaired by a
qualified person
This electric tool complies with the relevant
safety rules. Repairs should only be carried
out by qualified persons using original
spare parts, otherwise this may result in
considerable danger to the user.
The following residual risks remain in spite of
the measures to integrate safety in the design,
safety precautions and the complementary protective measures: The grinding disc will continue
running after switching off the tool. Risk of injury.
Additional safety notes
Only plug the product into a socket with a
residual-current-operated protective device
(FI switch) with a maximum rated leakage
current of 30 mA.
Keep the mains and extension cable away
from the grinding disc and the saw chain.
Immediately unplug from the socket if damaged or cut. Do not touch the lead until disconnected from the mains. Risk of electric
shock!
Visually inspect the grinding disc prior to use.
Do not use grinding discs with chips, tears
or any other damage. Replace the grinding
disc if worn.
Never operate the product without visual
cover.
Do not use the product when fatigued or
under the influence of alcohol or medica-
tions. Always take a break in due time.
Do not use the product in explosive atmos-
pheres or where sparks, fire, explosion,
etc. may occur. Failure to observe these in-
structions poses a risk of fire or explosion.
Be sure to keep the vents clear when work-
ing in dusty environments.
Keep your hands away from the grinding
disc and cutting teeth during use. Do not
move the saw chain by hand. Risk of injury.
Never place your fingers between the
grinding disc and rotary table or between
the grinding disc and the visual cover.
Crushing hazard.
The saw chain will become hot during use.
Never touch the processed area - risk of
burns.
Only use grinding discs recommended by
the manufacturer. Do not use saw blades.
9 GB
Page 10
Switch off the product and unplug from the
mains
- to remove a jammed insertion tool,
- if the mains cable is damaged or entangled,
- if you notice unusual noise.
Before use
Note: Remove all packaging material from the
product.
The operator should stand in front and stay
close to the power tool to prevent overreach.
Installation
Note: Always use the included screws
(M10 x 60) to secure the product.
Ensure you will have adequate space to
work in and will not put others at risk.
Always secure the product to the worktop
with screws of an adequate length and
thickness to always maintain control over
the product.
Product setup (see Fig. B)
- Required thickness of the edge of the table:
15–30 mm
- Drill diameter: 10.5 mm
- Size of screw: M10
Use the stop notches 9 to position the
product on the worktop
8
base
must extend beyond the edge of
the table.
Mark the bores with a pencil and remove
the product.
Now drill two holes in the worktop 22.
Fasten the grinding base to the worktop us-
ing the included screws
and nuts
24b
.
22
. The grinding
23
, washers
24a
Assembling the product
(see Fig. C)
Screw the handle 4 to the grinding
2
head
Loosen the locking screw 10 on the chain
tensioner
Attach the chain tensioner 12 to the grind-
ing base
screw
If applicable, attach the mains cable 17
inside the cable holder
.
12
.
8
and tighten with the locking
10
.
16
.
Attaching the adjusting
screw (see Fig. C)
Place the included washer 25 over the
adjusting screw
Screw the adjusting screw 6 to the locknut
26
fixed inside the grinding head.
6
.
Initial use
CAUTION! RISK OF INJURY!
Only use grinding discs and accessories
recommended by the manufacturer. Using
tools or accessories other than those recommended in the instructions for use could
result in injury.
Never operate the product without visual
cover.
Do not use saw blades.
Always unplug from the mains before work-
ing on the product.
Inspect the grinding disc prior to use: Check
the clearance between the visual cover and
grinding disc.
Do not use damaged or deformed grinding
discs.
Do not switch on the product until it has
been firmly secured to the worktop.
CAUTION! RISK OF INJURY!
Wear eye and hearing protection.
10 GB
Page 11
Wear cut-resistant safety gloves
and, if necessary, an apron
when working on the saw chain
to prevent cuts.
Keep your hands away from the
grinding disc and cutting teeth
during use. Do not move the saw
chain by hand. Risk of injury.
Switching on and off
Note: Verify the voltage specified on the
nameplate corresponds with the voltage of the
power source.
Note: Perform a test run of at least 30 seconds
without load before using this product for the
first time and after changing the grinding disc.
Switch off the product immediately if the grinding disc is out of round, considerable vibration
occurs or you notice abnormal noise.
Plug the mains cable into a
socket (note the mains voltage).
Press the „I“ on switch (green) 1a to switch
the product on.
Press the „0“ off switch (red) 1b to switch
the product off.
The grinding disc will continue running after
switching off the tool. Risk of injury.
Note: This product is equipped with an LED
lamp. The LED lamp
tically when the on switch
The LED lamp is switched off automatically
when the off switch
Note: This product has start-up protection: The
product will not automatically restart after automatically being switched off by voltage interruption or overload protection. To switch the
product on again, press the „I“ on switch
1a
(green)
and the product will start.
19
is switched on automa-
1a
is being pressed.
1b
is being pressed.
Sharpening a saw chain
(see Fig. D)
Note: Be sure to keep the vents clear when
working in dusty environments (see „Maintenance and Cleaning“).
If jammed, switch off the product
and unplug from the mains. Then
clear the jam.
An incorrectly sharpened saw chain may
damage the product and increase the risk
of saw kickback!
Be sure to accurately adjust the saw chain.
Observe the correct sharpening angle and
minimum chain size. Remove as little material
as possible.
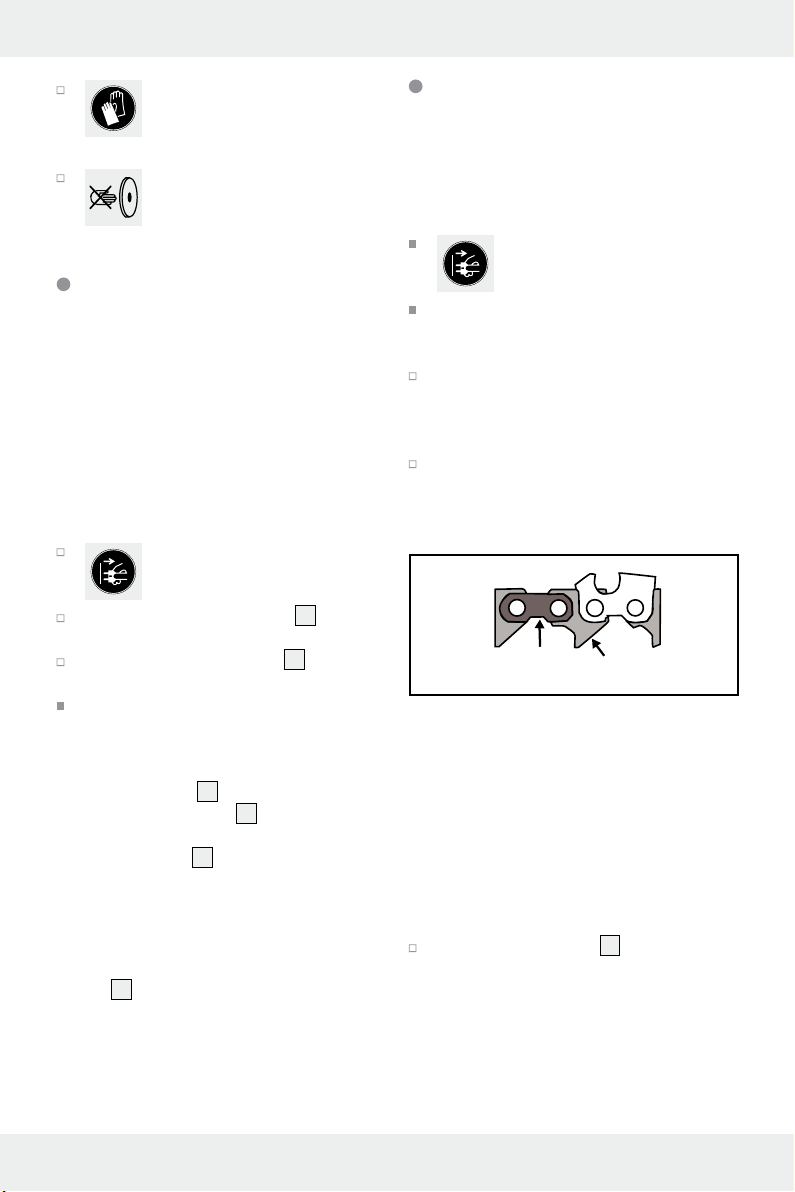
Do not sharpen drive links (a) or tie straps
(b) or the saw chain may break. Failure to do
so poses a risk of accidents when using the
chain saw.
b a
Note: Clean the saw chain before sharp-
ening. Clean any greasy wood residue or
oil residue with a brush or rag.
Note: All cutting links must be the same
length and width after sharpening.
Note: The saw chain is worn and must be
replaced if the cutter tooth is only approx.
4 mm.
Inserting the saw chain:
Turn the clamping lever 13 counter-clock-
wise to open the chain guide. You will need
to return the clamping lever to the original
position several times to do so. To unlock
the clamping lever, pull the clamping lever
outward, then return to the original position
and allow to lock into position.
11 GB
Page 12
Insert the saw chain in the chain guide 7.
The cutting edges must face the grinding
18a
disc
.
Flip down the stop 15 and pull the saw
chain toward the back until the cutting
27
tooth
to be sharpened makes contact
with the stop (see Fig. D1).
Adjusting the grinding angle:
Loosen the locking screw 10 and set the nec-
essary grinding angle α on the rotary table
for the chain tensioner
Then tighten the locking screw
12
using the scale 11.
10
.
Note: Use the grinding angle specified by
the manufacturer.
Adjusting the stop:
Move the grinding head 2 down on the
4
handle
Use the chain feed adjusting screw
move the cutting tooth
ing disc
with the motor switched off.
27
toward the grind-
18a
until the cutting tooth makes
14a
to
contact with the grinding disc (see Fig. D2).
Secure the adjusting screw
justing nut
14b
.
14a
with the ad-
Secure the links in the chain guide 7 by
turning the clamping lever
13
clockwise.
Use the adjusting screw 6 to set the depth
limiter so the grinding disc
18a
makes contact with the gullet (see Fig. D2). Fix the
grinding depth with the adjusting nut
6
Sharpening:
Switch on the product (see chapter „Switch-
ing on and off“).
Sharpen the cutting tooth 27 by moving the
grinding head
pressure to the handle
Never brake the grinding disc
2
down, applying light
4
.
18a
to a
stop. To prevent this, reduce the pressure
being applied in due time.
Switch the product off to move the saw
chain along. Loosen the clamping lever
and use the set stop
15
and the clamping
lever to secure the next link to be sharpened in the chain guide
7
Note: First sharpen the teeth on one side
of the chain. Then adjust the sharpening angle and sharpen the teeth on the other side.
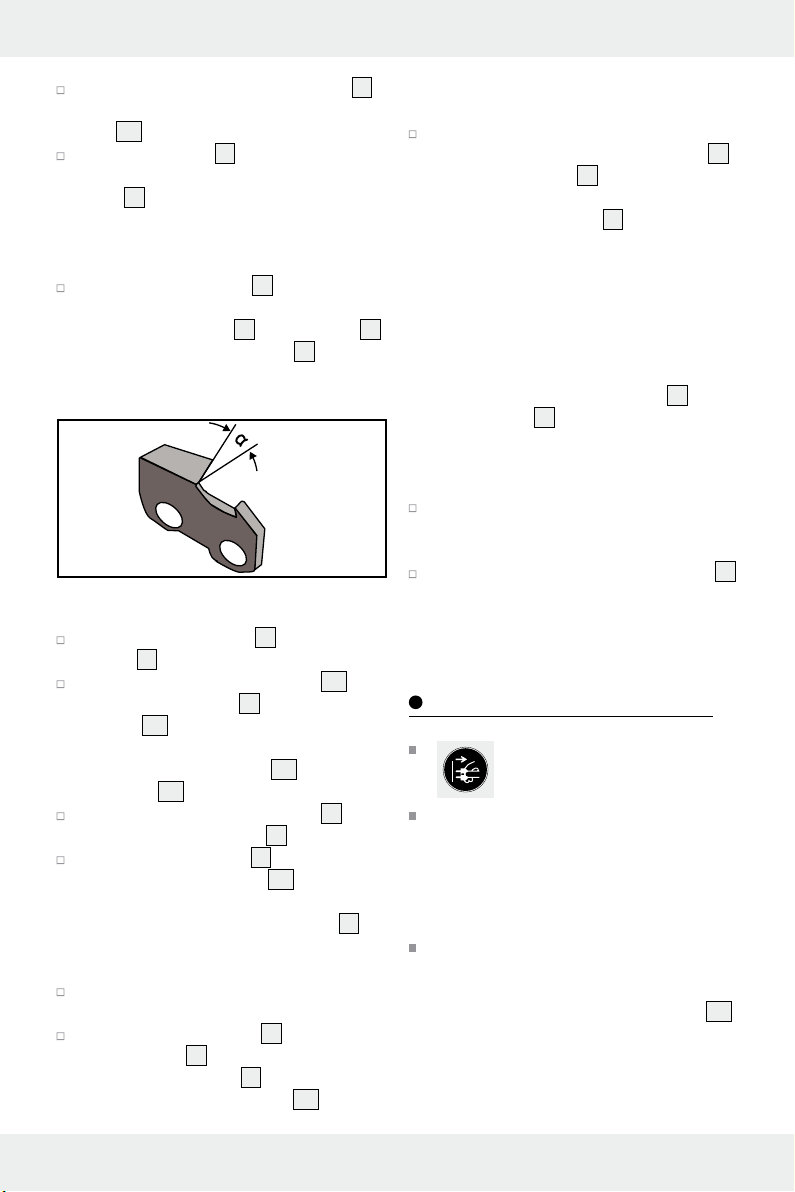
Checking the depth limiter distance
(see Fig. D3):
The cutting parts of the saw chain are the cutting links, consisting of a cutting tooth
depth limiter nose
28
. The height distance between these two determines the depth limiter
distance A.
Check the depth limiter distance A accord-
ing to saw chain manufacturer specifications after every third sharpening.
Rasp the height of the depth limiter nose 28
with a flat file and slightly round after removing the depth limiter nose. The original
shape must be maintained.
Maintenance and Cleaning
Always unplug from the mains
before any adjustment, service
or repairs.
Have any work not described in these in-
structions for use performed by a specialist
workshop. Always use original parts. Allow
the product to cool down before performing any maintenance or cleaning. Risk of
.
burns.
Check the product for any damage such as
loose, worn or damaged parts, correctly
fastened screws or other parts, before every
use. Particularly inspect the grinding disc
Replace any damaged parts.
13
.
27
and a
18a
.
12 GB
Page 13

Cleaning
Do not use cleaners or solvents. Chemicals
may damage plastic parts on this product.
Never clean the product under running
water.
Clean the product after every use.
Clean the vents 21 and the surface of the
product with a soft brush or a cloth.
Clean the chain guide 7 with a brush.
If very dirty, loosen the chain tensioner
locking screw
tensioner with rotary table
access. We recommend removing the side
panels for cleaning.
10
and remove the chain
12
for better
Remove the grinding disc
18a
from the
holder.
Place the new grinding disc on the uptake
and tighten the grinding disc nuts by hand.
Reinstall the grinding disc cover 3.
Note: Do not over-tighten the grinding disc
nuts to prevent the grinding disc and nut
from breaking
Perform a test run of at least 30 seconds
without load before using this product for
the first time and after changing the grinding disc. Switch off the product immediately
if the grinding disc is out of round, considerable vibration occurs or you notice abnormal noise.
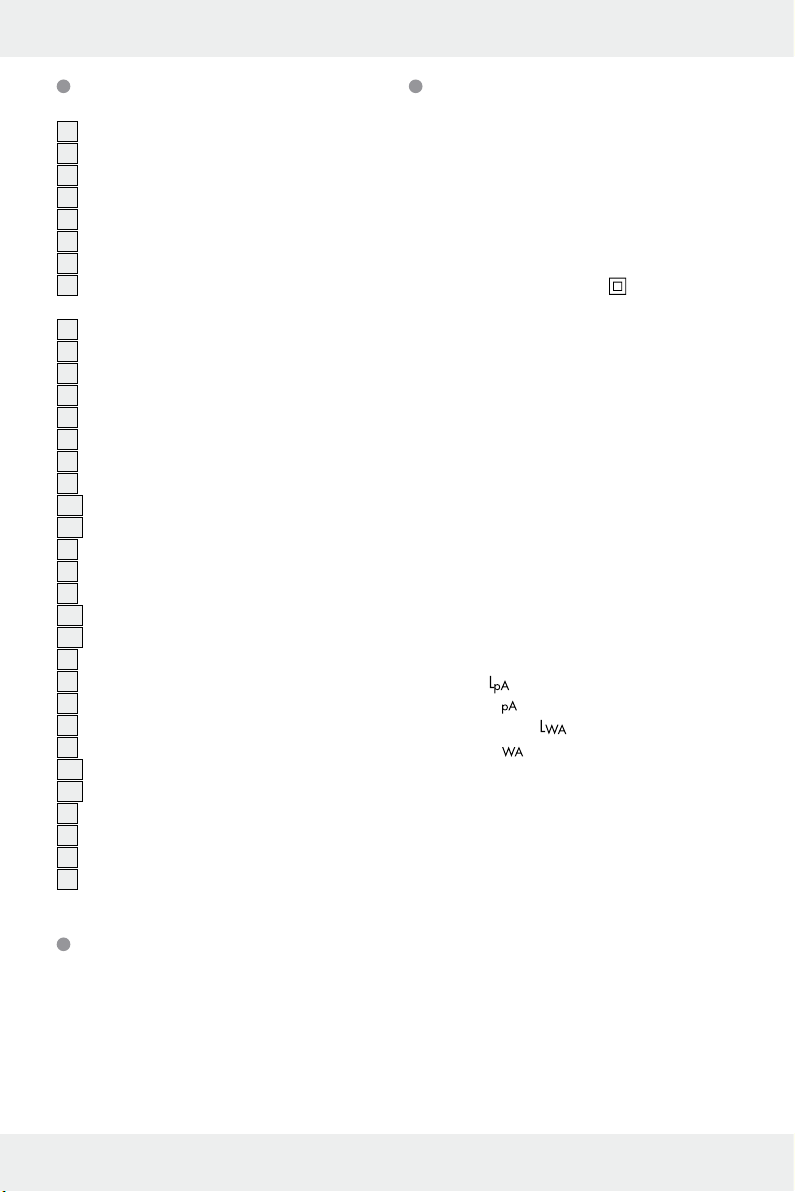
Replacing the grinding
disc (see Fig. E)
Information about replacing the
grinding disc:
Never operate the product without the
visual cover
Verify the speed specified on the grinding
disc
rated idle speed of the product. Verify the
dimensions of the grinding disc fit the prod-
uct. If the max. rotational speed of the disc
is too low for the product, it could break!
Always use grinding discs in good condi-
tion (ringing test).
Do not widen the uptake bore in the grind-
ing disc if it is too small.
Do not use separate reducing bushings or
adapters to fit grinding discs if the bore is
too large.
Do not use saw blades.
Always completely reassemble the product
after replacing the grinding disc.
Switch off the product and
Loosen the 3 fastening screws 5 and
remove the grinding disc cover
Unscrew the grinding disc nuts
20
.
18a
is equal to or greater than the
unplug from the mains. Allow the
product to cool down.
3
18b
.
by hand.
Storage
Store the product in a dry location pro-
tected from dust, out of the reach of children.
Note: Grinding discs must be stored dry
and upright, never stack.
Disposal
The packaging is made entirely of
recyclable materials, which you may
dispose of at local recycling facilities.
The Green Dot is not valid for
Germany.
Observe the marking of the
b
packaging materials for waste sepa-
a
ration, which are marked with abbreviations (a) and numbers (b) with
following meaning: 1–7: plastics / 20–22: paper and fibreboard / 80–98: composite materials.
The product and packaging materials are recyclable, dispose of it separately for better waste treatment. The
Triman logo is valid in France only.
13 GB
Page 14
Contact your local refuse disposal
authority for more details of how to
dispose of your worn-out product.
To help protect the environment, please
dispose of the product properly when
it has reached the end of its useful
life and not in the household waste.
Information on collection points and
their opening hours can be obtained
from your local authority.
Service
Have your product repaired at the service
centre or an electrician, using only original
manufacturer parts. This will maintain the
safety of this product.
Always have a plug or power cord replaced
by the product manufacturer or its service
centre. This will maintain the safety of this
product.
Warranty claim procedure
To ensure quick processing of your case, please
observe the following instructions:
Please have the till receipt and the item number
(e.g. IAN 123456) available as proof of
purchase.
You will find the item number on the type plate,
an engraving on the front page of the instructions
(bottom left), or as a sticker on the rear or
bottom of the appliance.
If functional or other defects occur, please
contact the service department listed either by
telephone or by e-mail.
You can return a defective product to us free of
charge to the service address that will be provided to you. Ensure that you enclose the proof
of purchase (till receipt) and information about
what the defect is and when it occurred.
Service
Service Great Britain
Tel.: 0871 5000 720
(0.07 £/min – 0.68 £/min +
0.13 £/call (set up fee) (fees depends
on operator))
E-Mail: owim@lidl.co.uk
IAN 285177
Warranty
The product has been manufactured to strict
quality guidelines and meticulously examined
before delivery. In the event of product defects
you have legal rights against the retailer of this
product. Your legal rights are not limited in any
way by our warranty detailed below.
The warranty for this product is 3 years from the
date of purchase. Should this product show any
fault in materials or manufacture within 3 years
from the date of purchase, we will repair or replace it – at our choice – free of charge to you.
The warranty period begins on the date of
pu
rchase. Please keep the original sales receipt
in a safe location. This document is required as
your proof of purchase. This warranty becomes
void if the product has been damaged, or used
or maintained improperly.
The warranty applies to defects in material or
manufacture. This warranty does not cover product parts subject to normal wear, thus possibly
considered consumables (e.g. batteries) or for
damage to fragile parts, e.g. switches, rechargeable batteries or glass parts.
14 GB
Page 15

Translation of original
conformity declaration
We, OWIM GmbH & Co. KG, Stiftsbergstraße 1,
DE-74167 Neckarsulm, GERMANY, hereby
declare under our sole responsibility that the
product: Chain sharpener FSG 85 D1,
Model No.: HG02366, Version: 04 / 2017, to
which this declaration refers, complies with the
standards / normative documents of
2006/42/EC, 2014/30/EU, 2011/65/EU.
Applied harmonised standards:
EN 61029-1/A11:2010
EN ISO 12100:2010
EN 55014-1/A2:2011
EN 55014-2: 2015
EN 61000-3-2:2014
EN 61000-3-3:2013
Serial number: IAN 285177
harmful substances in electrical and electronic
appliances.
Tobias König
Division Manager / Responsible for
documentation
OWIM GmbH & Co. KG, Stiftsbergstraße 1,
DE-74167 Neckarsulm, GERMANY
Neckarsulm, 12.01.2017
The declaration of conformity can also be viewed
at: www.owim.com.
The object of the declaration described above
satisfies the provisions of Directive 2011/65/EU
of the European Parliament and the Council of
8 June 2011 on limiting the use of certain
15 GB
Page 16

Az alkalmazott piktogramok jelmagyarázata ................................. Oldal 17
Bevezető ............................................................................................................................. Oldal 17
Rendeltetésszerű használat ................................................................................................... Oldal 17
Alkatrészleírás ........................................................................................................................ Oldal 17
A csomagolás tartalma .......................................................................................................... Oldal 18
Műszaki adatok ..................................................................................................................... Oldal 18
Általános biztonsági utasítások ..................................................................... Oldal 18
Biztonságos munkavégzés .................................................................................................... Oldal 19
További biztonsági utasítások ............................................................................................... Oldal 20
Az üzembe helyezés előtt .................................................................................... Oldal 21
Szerelés ............................................................................................................................... Oldal 21
A termék felállítása ................................................................................................................ Oldal 21
A termék szerelése ................................................................................................................. Oldal 21
Az álltócsavar szerelése ........................................................................................................ Oldal 21
Üzembe helyezés ........................................................................................................ Oldal 22
Be- és kikapcsolás .................................................................................................................. Oldal 22
Fűrészlánc élezése ................................................................................................................. Oldal 22
Karbantartás és tisztítás ....................................................................................... Oldal 24
Tisztítás .................................................................................................................................... Oldal 24
A csiszolótárcsa cseréje ........................................................................................................ Oldal 24
Tárolás .................................................................................................................................. Oldal 25
Mentesítés ......................................................................................................................... Oldal 25
Szerviz .................................................................................................................................. Oldal 25
Garanciális ügyek lebonyolítása .......................................................................................... Oldal 25
Szerviz .................................................................................................................................... Oldal 26
Garancia ............................................................................................................................. Oldal 26
Az eredeti Megfelelőségi Nyilatkozat fordítása ............................. Oldal 26
16 HU
Page 17
Az alkalmazott piktogramok jelmagyarázata
Olvassa el a Használati utasítást. Viseljen szemvédőt.
Viseljen hallásvédőt. Viseljen csúszásmentes védőcipőt.
Viseljen porvédő álarcot. Viseljen védőkesztyűt.
Sérülésveszély a forgó szerszám
által! Tartsa távol a kezeit.
Áramütés általi veszély áll fenn!
Karbantartási- és javítási munkálatok előtt húzza ki a hálózati
csatlakozó dugót a konnektorból.
Óvja a terméket nedvességtől. A csiszolótárcsa méretei.
Védelmi osztály II
(kettős szigetelés)
Fűrészlánc élező FSG 85 D1
Bevezető
Gratulálunk új termékének vásárlása alkalmából. Ezzel a döntésével vállalatunk értékes terméke mellett döntött. A használati utasítás ezen
termék része. A biztonságra, a használatára és
a megsemmisítésre vonatkozó fontos tudnivalókat tartalmazza. A termék használata előtt ismerje meg az összes használati és biztonsági
tudnivalót. A terméket csak a leírtak szerint és a
megadott felhasználási területeken alkalmazza.
A termék harmadik személy számára való továbbadása esetén kézbesítse vele annak a teljes
dokumentációját is.
Figyelem!
Ne helyezzen be sérült
csiszolótárcsát.
Rendeltetésszerű használat
A termék a gyekoribb fűrészláncok élezésére
való. Minden egyéb felhasználásra (pl.
hűtőfolyadékokkal, más szerszámmal, vagy
egészségre ártalmas anyaggal, pl. azbeszttel
törénő csiszolás) a termék nem alkalmas. A terméken található világítás a közvetlem munkaterület megvilágtására szolgál és nem helyettesíti
a háztartás helyiségeinek megvilágítását. A rendeletetésétől eltérő használatból eredő károkért
a gyártó nem felel. Nem közületi felhasználásra
készült.
Alkatrészleírás
1
Be- / Kikapcsoló
1a
Bekapcsoló
1b
Kikapcsoló
17 HU
Page 18
2
Csiszolófej/fenőfej
3
Csiszolótárcsa-borítás
4
Fogantyú
5
Rögzítőcsavar a csiszolótárcsa-borításhoz
6
Állítócsavar és állítóanya a mélységi
ütközöhöz
7
Láncvezető sín
8
Csiszolóperem
9
Ütközőbütyök
10
Rögzítőcsavar a láncfeszítő-egységhez
11
Skála az élezési szöghöz (+35° – -35°)
12
Láncfeszítőegység forgótányérral
13
Feszítőkar a láncrögzítéshez
14
Állítócsavar és állítóanya a
lánctovábbításhoz
14a
Állítócsavar a lánctovábbításhoz
14b
Állítóanya a lánctovábbításhoz
15
Ütköző
16
kábeltartó
17
Hálózati vezeték
18a
Csiszolótárcsa
18b
Csiszolótárcsa-borítás anyacsavarja
19
LED-lámpa (nincs ábrázolva)
20
Szemvédő tárcsa
21
Szellőzőnyílások (nincs ábrázolva)
22
Munkafelület
23
Csavar (az asztalhoz való rögzítéshez)
24a
Alátéttárcsa (az asztalhoz való rögzítéshez)
24b
Anya (az asztalhoz való rögzítéshez)
25
Alátétlemez (az állítócsavarhoz)
26
Rögzítőanya (az állítócsavarhoz)
27
Vágófog (fűrészlánc)
28
Mélységi határolókampó (fűrészlánc)
Műszaki adatok
Névleges bemeneti
feszültség: 220–240 V∼
(váltóáram), 50 Hz
Teljesítményfelvétel: max. 85 W
(S2: 15 min)*
Mérési pihenő tartama: kb. 5 perc
Védettségi osztály:: II /
Mérési üresjárati
fordulatszám n
0
: 5000 min
-1**
Beállítási szög: 35° balra/ jobbra
Tagolt fűrészláncokhoz: 6,35 / 8,255 /
9,52 mm (¹/₄“ /
0,325“
/ ³/₈“)
A csiszolótárcsa méretei:
Külső átmérő: Ø 104 mm (4
¹/₁₆
Lyukátmérő: Ø 22 mm
VAstagság: 3,2 mm
Súly (tartozékkal): kb. 2,3 kg
Zajkibocsátási érték:
Az elektromos készülék A-minősítésű zajkibocsátási szintje jellemzően a következő:
Hangnyomásszint
Bizonytalanság K
Hangteljesítményszint
Bizonytalanság K
: 65,5 dB(A)
: 3 dB
: 78,5 dB(A)
: 3 dB
* Gyorskezelés: Ne használja a terméket
15 percnél tovább egyhuzamban.
in)
A csomagolás tartalma
1 Láncélező készülék felszerelt csiszolótárcsával
1 Fogantyú
1 Láncfeszítő-egység rögzítőcsavarral
1 Állítócsavar + alátétlemez
2 Csavar anyákkal és alátétcsavarokkal az
asztalhoz való rögzítshez
1 Használati útmutató
18 HU
** A csiszolótárcsa maximális fordulati sebessége 40 m/s. A csiszolótárcsának tartania kell
legalább a 27,8 m/s-os fordulati sebességet.
Ha a tárcsa maximális fordulati sebessge a készülékkel ellentétben túl alacsony, akkor eltörhet!
Általános biztonsági
utasítások
FIGYELEM! Elektromos készülékek használata
során gondoskodni kell az áramütés elleni védelem
Page 19
érdekében a következő biztonsági intézkedések
betartásáról. Olvassa el mindegyik útmutatást,
mielőtt használni kezdi az elektromos készüléket
és őrizze meg jól a Biztonsági utasításokat.
Biztonságos munkavégzés
1. Tartsa rendben a munkaterületet
A munkaterületen lévő rendetlenség balesetek
kockázatát rejti.
2. Vegye figyelembe a környezeti
befolyásokat
Ne hagyja kint az esőben az elektromos
készülékeket.
Ne használja az elektromos készüléket
nedves környezetben.
Gondoskodjon a munkaterület jó megvilágí-
tásáról.
Ne használja az elektromos készüléket tűz-,
vagy robbanásveszélyes helyen.
3. Védje magát az elektromos áramütéstől
Kerülje a földelt berendezésekkel (pl. csövek,
radiátorok, elektromos sütők, hűtőszekrények).
való érintkezést.
4. Más személyeket tartson távol
Ne hagyja, hogy más személyek, különösen
gyerekek érjenek az elektromos készülékhez,
vagy a vezetékhez. Tratsa őket távol a
munkaterülettől.
5. Tárolja biztonságosan az elektromos
készülékeket
A használaton kívüli elektromos készülékeket
tárolja egy száraz, magason lévő, vagy
zárt helyen, gyermekektől távol.
6. Ne terhelje túl az elektromos
készüléket
Jobban és biztosabban dolgozhat a
megadott teljesítménytartományban.
7. A megfelelő elektromos készüléket
használja
Ne használjon gyenge teljesítményű gépet
nehéz munkákhoz.
Ne használja az elektromos készüléket nem
rendeltetésszerű célokra. Ne használjon
például kézi körfűrészt építőanyagok, vagy
tüzifa vágásához.
8. Viseljen megfelelő ruházatot
Ne viseljen bő ruházatot, vagy olyan ék-
szert, amit a mozgó alkatrszek magukkal
ránthatnak.
A szabadban történő munkavégzéshez
csúszásmentes cipő javasolt.
Hosszú hajra tegyen hajhálót.
A munka során
mindig visejen szem- és fülvédőt.
Kérjük, viseljen személyi védőfelszerelést
(pl. védőcipőt és egyéb védőruházatot).
9. Viseljen védőfelszerelést
Viseljen védőszemüveget.
Porral járó munkálatokhoz használjon
védőmaszkot.
10. Csatlakoztassa a porelszívóberendezést
Amennyiben a porelszívás csatlakozásai és
felfogóberendezése rendelkezésre áll, bizonyosodjon meg róla, hogy ezek megfelelően vannak-e csatlakoztatva és használva.
11. Ne használja a vezetéket
rendeltetésétől eltérő célokra
Ne a vezetéknél fogva húzza ki a dugót a
konnektorból. Védje a vezetéket hőtől,
olajtól és az éles szélektől.
12. Biztosítsa a munkadarabot
Használjon feszítőberendezéseket, vagy
egy satut a munkadarab rögzítéséhez.
Azokkal biztosabban tudja a munkadarabot tartani mint a kezével.
13. Kerülje a rendellenes testtartást
Gondoskodjon a biztos állásról és folyama-
tosan tartsa meg az egyensúlyát.
14. Gondosan ápolja szerszámait
A vágóeszközöket tartsa élesen és tisztán a
jobb és biztonságosabb munkavégzéshez.
Kövesse a zsírozásra és a szerszámcserére
vonatkozó előírásokat.
Rendszeresen ellenőrizze az elektromos
készülék csatlakozóvezetékét és sérülés
esetén egy elismert szakemberrel javíttassa
ki azt.
Rendszeresen ellenőrizze a hosszabbítót és
sérülés esetén cserélje ki azt.
19 HU
Page 20

Tartsa a markolatot szárazon, tisztán,
valamint olaj- és zsírmentesen.
15. Húzza ki a dugót a konnektorból
Ha nem használja az elektromos készüléket,
karbantartás s szerszámcsere, pl. fűrészlap,
fúrófej, marófej cseréje előtt.
16. Ne hagyja bedugva a szerszámkulcsot
A bekapcsolás előtt ellenőrizze, hogy a
kulcs és a beállítószerszámok el lettek-e
távolítva.
17. Kerülje a véletlen bekapcsolást
A dugó konnektorba való bedugása előtt
bizonyosodjon meg róla, hogy a kapcsoló
ki van-e kapcsolva.
18. Kültéren használjon hosszabbítóvezetéket
A szabadban csak az oda jóváhagyott és
ennek megfelelően jelölt hosszabbítót
használjon.
19. Legyen körültekintő
Ügyeljen arra, mit tesz. Körültekintéssel
kezdjen a munkához. Ne használja a
szerszámot, ha nem képes koncentrálni.
20. Minden használat előtt ellenőrizze
az elektromos készülék esetleges
sérüléseit
Az elektromos készülék további használata
előtt gondosan ellenőrizni kell a védőberendezések, vagy a könnyebben sérült részek
kifogástalan és rendeltetésszerű működését.
Ellenőrizze, hogy a mozgó részek kifogás-
talanul működnek, nincsenek becsípődve,
vagy hogy az alkatrészek nem sérültek. Az
egyes részeket helyesen kell összeszerelni
és minden olyan feltételnek meg kell felelniük,
ami az elektromos szerszám kifogástalan
működését biztosítja.
A sérült védőberendezéseket és alkatrészeket
egy elismert szakembernek kell rendeltetésszerűen kijavítania, vagy kicserélnie,
amennyiben a Használati útmutató nem
rendelkezik ettől eltérően.
A sérült kapcsolót az ügyfélszolgálati szer-
vízben kell kicseréltetni.
Ne használjon olyanelektromos szerszámot,
amelynek a kapcsolója nam képes be- és
kikapcsolni azt.
21. FIGYELEM!
Más cserealkatrész és tartozék használata
sérülés veszélyét rejti Önre nézve.
22. Az elektromos készüléket elektromossági szakemberrel javíttassa
Ez az elektromos készülék megfelel a vonat-
kozó biztonsági rendelkezéseknek. A javításokat csak elektromossági szakember végezheti
eredeti alkatrészek felhasználásával; egyéb
esetben a használót baleset érheti.
A biztonsági- és kiegészítő védelmi intézkedések fennállása mellett és a felépítés különösen
biztonságos tervezése ellenére a következő maradványkockázat áll fenn: a csiszolótárcsa a
szerszám kikapcsolását követően egy ideig még
tovább forog. Sérülésveszély áll fenn.
További biztonsági
utasítások
A terméket csak olyan kóboráram elleni vé-
dőberendezéssel (FI-relével) rendelkező
konnektorhoz csatlakoztassa, amelynek a
mért kóboráramerőssége nem haladja meg
a 30 mA-t.
Tartsa a hálózati- és a hosszabbítóvezeté-
ket távol a csiszolótárcsától, valamint a fűrészlánctól. Sérülés, vagy átvágás esetén
azonnal húzza ki a hálózati dugót a konnektorból. Ne érintse meg a vezetéket, mielőtt az még nincsen leválasztva az
áramhálózatról. Áramütés általi veszély áll
fenn!
Használat előtt szemrevételezéssel elle-
nőrizze a csiszolótárcsát.
Ne használja a lepattogzott, repedt,
vagy más módon sérült csiszolótárcsát. A
használt csiszolótárcsát cserélje ki.
Soha ne üzemeltesse a terméket szemvédő-
tárcsa nélkül.
20 HU
Page 21
Ne dolgozzon a termékkel, ha alkoholt
fogyasztott, vagy ha gyógyszert vett be.
Mindig idejében iktasson be szüneteket.
Ne használja a teméket robbanásveszélyes
környezetben, vagy olyan helyen, ahol
szikrát, tüzet, robbanást, stb. okozhat.
Fentiek figyelmen kvül hagyása esetén tűz-,
vagy robbanásveszély keletkezik.
Gondoskodjon arról, hogy porral járó mun-
kálatok során a levegőnyílások
szabadok legyenek.
Tartsa távol a kezét a csiszolótárcsától és a
lánc fogaitól a termék üzemelése alatt. Kezével mozgassa a fűrészláncot. Sérülésveszély áll fenn.
Soha ne nyúljon a csiszolótárcsa és a
forgótányér, vagy a csiszolótárcsa és a védőtárcsa közé. Becsípődés veszélye.
A fűrészlánc a csiszolás során felforrófodik.
Ne nyúljon a megmunkált területre az
égésveszély miatt.
Csak a gyártó által javasolt csiszolótárcsát
használjon. Ne használjon fűrészlapot.
Kapcsolja ki a terméket és húzza ki a
konnektorból
- a használt szerszám blokkolódásának
feloldásához,
- ha a hálózati vezeték megsérül, vagy
összegabalyodik,
- szokatlan zaj esetén.
Ügyeljen arra, hogy elegendő helye legyen
a munkavégzésre és hogy ezalatt ne
veszélyeztessen másokat.
Mindig megfelelő hosszúságú és vastag-
ságú csavarral rögzítse a munkafelületet,
hogy ne veszítse el a felügyeletet a termék
felett.
A termék felállítása
(lásd B-ábra)
- A használt asztal szélének vastagsága:
15–30 mm
- fúróátmérő: 10,5 mm
- csavarméret: M10
Tegye a terméket az ütközőütyök 9 segít-
ségével a munkafelületre
24a
és anyákkal
8
ezalatt túl kell lógnia az asztal
remnek
szélén.
Jelölje be a furatlyukakat egy ceruzával és
vegye el a terméket.
Csak két lyukat fúrjon a munkafelületbe 22.
Csavarozza szorosan a csiszolóperemet a
mellékelt csavarokkal
22
. A csiszolópe-
23
, alátétlemezekkel
24b
a munkafelületre.
A termék szerelése
(lásd C-ábra)
Az üzembe helyezés előtt
Tudnivaló: Távolítsa el teljesen a csomago-
lóanyagot.
A kezelést végző személy a használat
során álljon közel a termékhez, hogy ezzel
elkerülje a test felesleges feszítését és ezzel
a bizonytalan állást.
Szerelés
Tudnivaló: Mindig a mellékelt csavarokkal
rögzítse a terméket (M10 x 60).
Csavarozza a fogantyút 4 a csiszolófejre
2
.
Vegye le a rögzítőcsavart 10 a láncfeszí-
tő-egységről
Tegye a láncfeszítőegységet 12 a csiszoló-
peremre
tőcsavarral
Adott esetben rögzítse a hálózati vezetéket
17
a kábeltartón 16.
12
.
8
és csavarozza azt oda a rögzí-
10
.
Az álltócsavar szerelése
(lásd C-ábra)
Helyezze az alátétcsavart 25 az állítócsa-
6
varra
.
21 HU
Page 22

Csavarja az állítócsavart 6 a csiszolófe-
jere szorosan felszerelt rögzítőanyára
26
.
Üzembe helyezés
VIGYÁZAT! SÉRÜLÉSVESZÉLY!
Csak a gyártó által ajánlott csiszolótácsát
és tartozékot használjon. A Kezelési utasításban megadottaktól eltérő betétszerszámok, vagy más tartozékok használata az
ön számára sérülésveszélyt jelenthet.
Soha ne üzemeltesse a terméket szemvédő-
tárcsa nélkül.
Ne használjon fűrészlapot.
Minden munkálat előtt húzza ki a terméket
a konnektorból.
Használat előtt ellenőrizze a csiszolótárcsát:
Vizsgálja meg a a szemvédő tárcsa és a
csiszolótárcsa közötti távolságot.
Ne használjon sérült, vagy eldeformálódott
csiszolótárcsát.
Csak aztán kapcsolja be a terméket, amikor
az már biztosan fel van szerelve a munkafe-
lületre.
VIGYÁZAT! SÉRÜLÉSVE-
SZÉLY! Viseljen szem- és fülvé-
dőt.
A fűrészláncon végzett munka
során viseljen vágásbiztos védőkesztyyűt és ha szükséges, kö-
tényt is, hogy elkerülje a vágási sérüléseket.
Tartsa távol a kezét a csiszolótár-
csától és a lánc fogaitól a
termék üzemelése alatt. Ne mozgassa a fűrészláncot a kezével.
Sérülésveszély áll fenn.
Be- és kikapcsolás
Tudnivaló: Ügyeljen arra, hogy a típustáblán
megadott hálózati feszültség egyezzen az
áramforrás feszültségével.
Tudnivaló: Az első munkálatok előtt és minden csiszolótárcsa-cserét követően végezzem
próbaüzemet legalább 30 másodpercig terhe-
lés nélkül. Azonnal kapcsolja ki a terméket,
ha a csiszolótárcsa nem szabályosan forog,
komolyabb rezgések tapasztalhatóak, vagy
szokatlan hangok hallhatóak.
Dugja a vezetéket egy konnek-
torba (vegye figyelembe a
hálózati feszültséget).
A bekapcsoláshoz nyomja meg a bekap-
csolót „I“ (zöld)
1a
.
A kikapcsoláshoz nyomja meg a kikapcso-
lót„0“ (piros)
1b
.
A csiszolótárcsa még forog egy ideig,
miután kikapcsolta a szerszámot. Sérülésveszély áll fenn.
Tudnivaló: Ezen a terméken egy LED-lámpa
19
található. A LED-lámpa automatikusan beapcsol, amint megnyomta a bekapcsolót
1a
. A
LED-lámpa automatikusan kiapcsol, amint
megnyomta a kikapcsolót
1b
.
Tudnivaló: A termék újraindulás elleni kapcsolóval rendelkezik: A feszültség megszakadása, vagy a túlterhelés miatti automatikus
kikapcsolást követően a temék nem indul újra
automatikusan. Az ismételt bekapcsoláshoz
nyomja meg a bekapcsolót „I“ (zöld)
1a
,
ezután a termék beindul.
Fűrészlánc élezése (lásd
D-ábra)
Tudnivaló: Ügyeljen arra, hogy a porral járó
munkálatoknál a szellőzőnyílások szabadok
legyenek (lásd „Karbantartás és tisztítás“).
Blokkolás esetén kapcsolja ki a
terméket és húzza ki azt a konnektorból. Csak ezt követően
oldja fel a blokkolást.
A rosszul élezett fűrészlánc károsíthatja a
terméket és növelheti a fűrész visszacsapódásának veszélyét!
Ügyeljen a fűrészlapok pontos beállítására.
Ügyeljen a fűrészlánc csiszolásának megfelelő szögére és minimális méretére. Csak
22 HU
Page 23

annyi anyagot távolítson el, amennyit feltétlenül szükséges.
Ne csiszoljon az elválasztótagoknál (a)
vagy az összekötőelemeknél (b), különben
a fűrészlánc elszakadhat. Ennek be nem tartása esetén balesetveszély keletkezik a fűrészlánc közelében.
Végül szorítsa vissza a rögzítőcsavart 10.
Tudnivaló: Az élezés szögét a gyártó
adatai szerint álltsa be.
b a
Tudnivaló: Csiszolás előtt tisztítsa meg a
fűrészláncot. Az olajos fa-, ill. olajmaradványokat egy ecsettel, vagy tisztítókendővel
távolítsa el.
Tudnivaló: Minden vágóelemnek egyenlő
hosszúnak és szélesnek kell lennie az
élezés után.
Tdnivaló: A fűrészlánc akkor tekinthető
elhasználódottnak és kell újra cserélni, ha
már csak kb. 4 mm marad a vágófogból.
Fűrészlánc behelyezése:
A láncvezető sín nyításához fordítsa el a fe-
szítőkart
Ehhez többször vissza kell vinni a kiindulóhelyzetbe a feszítőkart. A feszítőkar kioldásához húzza kifelé a feszítőkart, majd a
kiindulóhelyzetbe visszavezetbe hagyja
bekattanni azt.
Tegye a fűrészláncot a láncvezetősínbe 7.
A vágóéleknek a csisziolótárcsa felé kell
mutatni
Hajtsa le az ütközőt 15 és húzza addig
hátrafelé a fűrészláncot, amíg az élezendő
vágófog
ábra).
Élezési szög beállítása:
Lazítsa ki a rögzítőcsavart 10 és állítsa be
a láncfeszítőegység forgótányérán
szükséges élezési szöget α a skála
gítségével.
13
az óra járásával ellentétesen.
18a
.
27
az ütközőhöz nem ér (lásd D1-
12
a
11
se-
Az ütköző finomhangolása
Kikapcsolt motor mellett mozgassa a fenő-
2
fejet
a fogantyún 4 ellentétesen.
A lánctovábító állítócsavarja segítségével
14a
vezesse a vágófogat 27 a csiszolótár-
18a
csán
, amíg a vágófog a csiszolótárcsára nem fekszik (lásd D2-ábra). Biztosítsa
az állítócsavart
14a
az állítóanyával
14b
Rögzítse a lánctagokat a láncvezető sínben
7
a feszítőkarnak 13 az óra járásával
megegyező irányba történő elfordtásával.
Úgy állítsa be a mélyütközőt az állítócsavar
6
segtségvel, hogy a csiszolótárcsa
18a
érintse a fogalapot (lásd D2-ábra). Biztosítsa
a csiszolás mélységét az állítóanyával
6
Fenés:
Kapcsolja be a terméket (lásd a „Be- és
Kikapcsolás“ fejezetet).
Csiszolja le a vágófogat 27 a fenőfejet 2
a fogantyú
4
enyhe nyomásával elfelé
mozgatva.
A csiszolótárcsát
18a
nem szabad állásig
fékezni. Ennek elkerüléséhez idejében csökkentse a nyomóerőt.
A fűrészlánc továbbításához kapcsolja ki a
terméket. Oldja ki a feszítőkart
13
és rögzítse a következő élezendő láncszemet a
finomhangolt ütköző
sínben lvő feszítőkar
15
és a láncvezető
7
segítségével.
Tudnivaló: Először a lánc egyik oldalá-
nak fogait élezze meg. Ezután állítsa át a
csiszolási szöget, majd élezze meg a fogakat a másik oldalon.
.
.
23 HU
Page 24

A mélységi határolókampó távolságának ellenőrzése (lásd D3-ábra):
A fűrészlánc fűrészelő részei a vágótagok,
amelyek egy vágófogból
határolókampóból
27
és egy mélységi
28
állnak. A magasságbeli
különbség e kettő között határozza meg a
mélységi határolókampó A-távolságát.
Minden harmadik fenés után ellenőrizze a
mélységi határolókampó A-távolságát a fűrészlánc gyártója által megadott adatok
szerint.
Egy lapos reszelővel csiszolja át a mélységi
határolókampó
28
magasságát és a visszahelyezést követően kissé kerekítse le a mélységi határolókampót. Az eredeti alakot
ugyanakkor meg kell őrizni.
Karbantartás és tisztítás
Minden beállítás, karbantartás,
vagy üzembehelyezés előtt ki
kell húzni a konnektorból.
Minden olyan munkálatot, amit nem írtunk
le ebben az útmutatóban, szakszervízben
végeztessen. Csak eredeti alkatrészeket
használjon. Hagyja a terméket minden karbantartási- és javítási munkálat előtt lehűlni.
Égésveszély áll fenn.
Vizsgálja meg minden egyes használat
előtt a terméket esetleges sérülések, úgymint leválló, elhasználódott, vagy sérült
részek, illetve a csavarok és egyéb alkatrészek megfelelő helyzete szempontjából. Különösen a csiszolótárcsát ellenőrizze
18a
Cserélje ki a sérült részeket.
Tisztítás
Ne használjon tisztító-, ill. oldószert. A
vegyszerek kikezdhetik a termék műanyag
részeit. Soha se tisztítsa a terméket folyó víz
alatt.
Minden használat után tisztítsa meg a
terméket.
Tisztítsa ki a szellőzőnyílásokat 21 és a
termék felületét egy puha kefével, ecsettel,
vagy kendővel.
Tisztítsa meg a láncvezető síneket 7 egy
kefével.
Erős szennyeződés esetén vegye ki a
láncfeszítő egység
10
rögzítőcsavarját és
vegye ki a láncfeszítő egységet a forgótá-
12
nyérral
a jobb hozzáférés érdekében.
Javasoljuk, hogy vegye le az oldallemezeket a tisztításhoz.
A csiszolótárcsa cseréje
(lásd E-ábra)
Tudnivalók a csiszolótárcsa cseréjéhez:
Soha ne üzemeltesse a terméket szemvédő-
20
tárcsa
Bizonyosodjon meg róla, hogy a csiszoló-
tárcsán
nos, vagy magasabb, mint a termék mérési
fordulatszáma. Bizonyosodjon meg róla,
hogy a csiszolótárcsa mérete illeszkedik a
termékhez. Ha a tárcsa maximális fordulati
sebessége a termékkel ellentétben túl alacsony, akkor eltörhet!
Csak kifogástalan csiszolótárcsát használ-
jon (csengéspróba).
Ne fúrjon a túl kicsi felvevőfurat helyett
utólag másikat a csiszolótárcsára.
Ne használjon osztott redukálóhüvelyt,
vagy adaptert ahhoz, hogy a csiszolótárcsa egy nagyobb lyukhoz is illeszkedjen.
Ne használjon fűrészlapot.
.
Mindig teljesen szerelje vissza a terméket a
csiszolótárcsa cseréjt követően.
Kapcsolja ki a terméket és húzza
Lazítsa ki a 3 rögzítőcsavart 5 és vegye le
a csiszolótárcsa-borítást
Kézzel csavarja ki a csiszolótárcsa-anyát
18b
Vegye le a csiszolótárcsát
nélkül.
18a
megadott fordulatszám azo-
ki azt a konnektorból. Hagyja
lehűlni a terméket.
3
.
.
18a
a felvevőről.
24 HU
Page 25

Tegye vissza a csiszolótárcsát a felvevőre
és kézzel csavarja vissza a csiszolótárcsa-anyát.
Csavarozza fel a csiszolótárcsa burkolatát
3
.
Tudnivaló: A csiszolótárcsa anyát nem szabad túl szorosan meghúzni, hogy elkerüljük a
csiszolótárcsa és az anyacsavar törését.
Az első munkálatok előtt és minden csiszo-
lótárcsa-cserét követően végezzem próbaüzemet legalább 30 másodpercig terhelés
nélkül. Azonnal kapcsolja ki a terméket, ha
a csiszolótárcsa nem szabályosan forog,
komolyabb rezgések tapasztalhatóak, vagy
szokatlan hangok hallhatóak.
Tárolás
Tárolja a terméket száraz és portól védett,
gyermekek számára nem elérhető helyen.
Tudnivaló: A csiszolótárcsát szárazon és
élével felfelé kell tárolni, valamint nem
szabad egymásra halmozni.
Mentesítés
A kiszolgált termék megsemmisítési
lehetőségeiről lakóhelye illetékes
önkormányzatánál tájékozódhat.
A környezete érdekében, ne dobja a
kiszolgált terméket a háztartási szemétbe, hanem adja le szakszerű ártalmatlanításra. A gyűjtőhelyekről és
azok nyitvatartási idejéről az illetékes
önkormányzatnál tájékozódhat.
Szerviz
A termék javításával csak a szervizt, vagy
elektronikai szakembert bízzon meg és csak
eredeti alkatrészekkel végeztessen. Így biztosítható a termék biztonságának megőrzése.
A dugó, vagy a vezeték cseréjét mindig a
termék gyártójval, vagy annak ügyfélszolgálatával végeztesse. Így biztosítható a
termék biztonságának megőrzése.
Garanciális ügyek
lebonyolítása
A csomagolás környezetbarát anyagokból készült, amelyeket a helyi
újrahasznosító helyeken adhat le ártalmatlanítás céljából. A zöld pont
Nématországra nem érvényes.
A hulladék elkülönítéséhez vegye
b
figyelembe a csomagolóanyagon ta-
a
lálható jelzéseket. Ezek rövidítéseket
(a) és számokat (b) tartalmaznak a
következő jelentéssel: 1–7: műanyagok / 20–22: papír és karton /
80–98: kötőanyagok.
A termék és a csomagolóanyagok
újrahasznosíthatóak, semmisítse meg
ezeket elkülönítve a jobb hulladékkezelés érdekében. A Triman-logó csak
Franciaországra vonatkozik.
Ügyének gyors elintézhetősége céljából, kérjük
kövesse az alábbi útmutatást:
Kérjük, kérdések esetére készítse elő a pénztárblokkot és a cikkszámot (pl. IAN 123456) a
vásárlás tényének az igazolására.
Kéjük, hogy a cikkszámot olvassa le a típustábláról, a gravírozásból, az Útmutató címoldaláról
(balra lent), illetve a hátoldalon, vagy a termék
alján található matricáról.
Amennyiben működési hibák, vagy egyéb hiányosság lépne fel, előszöris vegye fel a kapcsolatot a következőkben megnevezett szervizek
egyikével telefonon, vagy e-mailen.
A hibásnak ítélt terméket ezután a vásárlást
igazoló blokk, valamint a hiba leírásának és
keletkezési idejének mellékelésével díjmentesen
postázhatja az Önnel közölt szervizcímre.
25 HU
Page 26

Szerviz
Németországi magyarország
Tel.: 06 800 21225
(0.15 €/min)
E-mail: owim@lidl.hu
IAN 285177
Garancia
Az eredeti Megfelelőségi
Nyilatkozat fordítása
MI, az OWIM GmbH & Co. KG, Stiftsbergstraße 1, DE-74167 Neckarsulm, NÉMETORSZÁG, felelősségünk tudatában kijelentjük, hogy
a Fűrészlánc élező FSG 85 D1, Modell-sz.:
HG02366, változat: 04 / 2017, amelyre ezen
nyilatkozat vonatkozik, megfelel a 2006/42/EK,
2014/30/EU és 2011/65/EU jogszabálynak/
jogszabályszerű iratnak.
A terméket szigorú minőségi előírások betartásával
gondosan gyártottuk, és szállítás előtt lelkiismeretesen ellenőriztük. Ha a terméken hiányosságot
tapasztal, akkor a termék eladójával szemben
törvényes jogok illetik meg Önt. Ezeket a törvényes
jogokat a következőkben ismertetett garancia
vállalásunk nem korlátozza.
A termékre 3 év garanciát adunk a vásárlás
dátumától számítva. A garanciális idő a vásárlás
dátumával kezdődik. Kérjük, jól őrizze meg a
pénztári blokkot. Ez a bizonylat szükséges a
vásárlás tényének az igazolásához.
Ha a termék vásárlásától számított 3 éven belül
anyag- vagy gyártási hiba merül fel, akkor a választásunk szerint a terméket ingyen megjavítjuk
vagy kicseréljük. A garancia megszűnik, ha a terméket megrongálták, nem szakszerűen kezelték
vagy tartották karban.
A garancia az anyag- vagy gyártáshibákra vonatkozik. A garancia nem terjed ki azokra a termékrészekre, melyek normál kopásnak vannak
kitéve és ezért fogyóeszköznek tekinthetők (pl.
elemek), vagy a törékeny részekre sérülésére, pl.
kapcsolók, akkuk, vagy üvegből készült részek.
Alkalmazott összehangolt szabványok
EN 61029-1/A11:2010
EN ISO 12100:2010
EN 55014-1/A2:2011
EN 55014-2: 2015
EN 61000-3-2:2014
EN 61000-3-3:2013
Sorozatszám: IAN 285177
Tobias König
Ágazati vezető/A dokumentumért felelős
OWIM GmbH & Co. KG, Stiftsbergstraße 1,
DE-74167 Neckarsulm, NÉMETORSZÁG
Neckarsulm, 12.01.2017
A megfelelőségi nyilatkozat a www.owim.com
oldalon található.
26 HU
A nyilatkozat fönt leírt tárgya megfelel az
Európai Parlament és Tanács 2011/65/EU
számú, 2011. június 8-án hatályba lépett, az
elektromos készülékekben felhasznált bizonyos
veszélyes anyagokról szóló rendeletnek.
Page 27

Legenda uporabljenih piktogramov ........................................................... Stran 28
Uvod ........................................................................................................................................ Stran 28
Predvidena uporaba ............................................................................................................... Stran 28
Opis delov ............................................................................................................................... Stran 29
Obseg dobave ........................................................................................................................ Stran 29
Tehnični podatki ...................................................................................................................... Stran 29
Splošni varnostni napotki ..................................................................................... Stran 30
Varno delo ............................................................................................................................... Stran 30
Dodatni varnostni napotki ...................................................................................................... Stran 31
Pred začetkom uporabe ........................................................................................ Stran 32
Montaža ............................................................................................................................... Stran 32
Postavitev izdelka .................................................................................................................... Stran 32
Montaža izdelka ..................................................................................................................... Stran 32
Montaža nastavljalnega vijaka ............................................................................................. Stran 32
Začetek uporabe .......................................................................................................... Stran 32
Vklop in izklop ......................................................................................................................... Stran 33
Ostrenje verige žage .............................................................................................................. Stran 33
Vzdrževanje in čiščenje ........................................................................................... Stran 34
Čiščenje ................................................................................................................................... Stran 35
Menjava brusne plošče .......................................................................................................... Stran 35
Skladiščenje ...................................................................................................................... Stran 35
Odstranjevanje .............................................................................................................. Stran 35
Servis ...................................................................................................................................... Stran 36
Postopek pri uveljavljanju garancije ...................................................................................... Stran 36
Servis ........................................................................................................................................ Stran 36
Prevod originalne izjave o skladnosti ....................................................... Stran 36
Garancijski list ................................................................................................................ Stran 38
27 SI
Page 28

Legenda uporabljenih piktogramov
Preberite navodilo za uporabo. Nosite zaščito za oči.
Nosite zaščito za sluh. Nosite zaščitne nedrseče čevlje.
Nosite protiprašno masko. Nosite zaščitne rokavice.
Nevarnost telesnih poškodb
zaradi vrtljivega orodja! Ne približujte rok.
Nevarnost zaradi električnega
udara! Pred vzdrževalnimi deli in
popravili izvlecite omrežni vtič iz
vtičnice.
Zaščitite izdelek pred mokroto. Dimenzije brusne plošče.
Zaščitni razred II
(Dvojna izolacija)
Pozor!
Ne uporabljajte okvarjene brusne
plošče.
Naprava za ostrenje
verig FSG 85 D1
Uvod
Iskrene čestitke ob nakupu vašega novega
izdelka. Odločili ste se za zelo kakovosten izdelek. To navodilo za uporabo je sestavni del
tega izdelka. Vsebuje pomembna navodila za
varnost, uporabo in odstranitev. Preden začnete
izdelek uporabljati, se seznanite z vsemi navodili za uporabo in varnostnimi napotki. Izdelek
uporabljajte samo tako, kot je opisano, in samo
za navedena področja uporabe. Če izdelek
odstopite novemu lastniku, mu zraven izročite
tudi vse dokumente.
28 SI
Predvidena uporaba
Izdelek je primeren za ostrenje običajnih vrst
verig za žage. Za vse druge vrste uporabe (npr.
brušenje s hladilno tekočino, brušenje drugih
obdelovancev ali zdravju škodljivih materialov,
npr. azbesta) izdelek ni predviden. Osvetljava
na izdelku je namenjena za osvetljevanje neposrednega delovnega območja in ne kot osvetljava prostora v gospodinjstvu. Za poškodbe,
nastale zaradi nepredvidene uporabe, proizvajalec ne prevzema odgovornosti. Ni namenjen
za poslovno uporabo.
Page 29

Opis delov
1
Vklopno-izklopno stikalo
1a
Vklopno stikalo
1b
Izklopno stikalo
2
Brusna glava
3
Pokrov brusne plošče
4
Ročaj
5
Pritrdilni vijaki za pokrov brusne plošče
6
Nastavljalni vijak in matica za omejilo globine
7
Vodilo verige
8
Poševni podstavek
9
Zareze omejila
10
Ustavljalni vijak za vpenjalno enoto verige
11
Skala za kot ostrenja (+35° do -35°)
12
Vpenjalna enota verige z vrtljivim krožni-
kom
13
Vpenjalna ročica za pritrditev verige
14
Nastavljalni vijak in matica za pomik verige
14 a
Nastavljalni vijak za predtek verige
14 b
Nastavljalna matica za predtek verige
15
Prislon
16
Držalo kabla
17
Omrežni kabel
18a
Brusna plošča
18 b
Matica brusne plošče
19
LED lučka (ni na sliki)
20
Plošča za zaščito oči
21
Prezračevalne odprtine (niso na sliki)
22
Delovna površina
23
Vijak (za pritrditev na mizo)
24 a
Podložka (za pritrditev na mizo)
24 b
Matica (za pritrditev na mizo)
25
Podložka (za nastavljalni vijak)
26
Pritrdilna matica (za nastavljalni vijak)
27
Rezalni zobec (veriga žage)
28
Izboklina omejila globine (veriga žage)
2 vijaka z maticama in podložžkama za
pritrditev na mizo
1 navodilo za uporabo
Tehnični podatki
Nazivna vhodna
napetost: 220–240 V∼ (izme-
nični tok), 50 Hz
Poraba moči: maks. 85 W
(S2: 15 min)*
Izmerjeno trajanje
mirovanja: pribl. 5 min
Zaščitni razred: II /
Izmerjeno število vrtljajev
v prostem teku n
: 5000 min
0
-1**
Nastavljalni kot: 35° levo / desno
Za verige žag z
merami členov: 6,35 / 8,255 /
9,52 mm (¹/₄“ /
0,325“
/ ³/₈“)
Dimenzije brusne plošče:
Zunanji premer: Ø 104 mm (4
¹/₁₆
Premer luknje: Ø 22 mm
Debelina: 3,2 mm
Teža (vklj. s priborom): pribl. 2,3 kg
Vrednost emisije hrupa:
Z A ocenjena raven hrupa električnega orodja
znaša običajno:
Raven zvočnega tlaka
Negotovost K
: 3 dB
Raven zvočne moči
Negotovost K
: 3 dB
: 65,5 dB(A)
: 78,5 dB(A)
in)
Obseg dobave
1 naprava za ostrenje verige z nameščeno
brusno ploščo
1 ročaj
1 vpenjalna enota verige z ustavljalnim vijakom
1 nastavljalni vijak + podložka
* Kratkotrajna uporaba: izdelka ne uporabljajte
dlje kot 15 minut brez prekinitve.
** Maksimalna obodna hitrost brusne plošče
40 m/s. Brusna plošča mora vzdržati obodno
hitrost najmanj 27,8 m/s. Če je največja
obodna hitrost plošče v nasprotju z napravo
premajhna, se lahko plošča zlomi!
29 SI
Page 30

Splošni varnostni
napotki
POZOR! Pri uporabi električnega orodja je
za zaščito pred električnim udarom, telesnimi
poškodbami in nevarnostjo požara treba upoštevati naslednje temeljne varnostne ukrepe.
Pred uporabo tega električnega orodja preberite vse napotke in dobro shranite varnostne
napotke.
Varno delo
1. Delovno območje vedno ohranjajte
urejeno
Nered v delovnem območju lahko povzroči
nesreče.
2. Upoštevajte vplive okolice
Električnega orodja ne izpostavljajte dežju.
Električnega orodja ne uporabljajte v vlažnem
ali mokrem okolju.
Poskrbite za dobro osvetlitev delovnega
območja.
Električnega orodja ne uporabljajte, kjer
obstaja nevarnost poara ali eksplozije.
3. Zaščitite se pred električnim udarom
Izogibajte se telesnemu stiku z ozemljenimi
deli (npr. cevmi, radiatorji, električnimi
kuhalniki, hladilniki).
4. Drugim osebam ne dovolite, da se
približajo
Ne dovolite, da se druge osebe, zlasti otroci,
dotikajo električnega orodja ali kabla. Ne
dovolite, da se približajo delovnemu okolju.
5. Varno shranite električno orodje,
ki ga ne uporabljate
Električno orodje, ki ga ne uporabljate,
morate odložiti na suhem, visokem ali
zaprtem mestu zunaj dosega otrok.
6. Električnega orodja ne preobreme-
njujte
V navedenem območju zmogljivosti boste
delali bolje in varneje.
7. Uporabljajte pravilno električno
orodje
Za težka opravila ne uporabljajte orodja z
manjšo zmogljivostjo.
Električnega orodja ne uporaljajte v na-
mene, za katere ni predvideno. Na primer,
ne uporabljajte ročne krožne žage za gradbene stebre ali lesena polena.
8. Nosite ustrezna oblačila
Ne nosite širokih oblačil ali nakita, ki jih
lahko premični deli zajamejo.
Pri delu na prostem priporočamo nedrsečo
obutev.
Če imate dolge lase, uporabljajte mrežico
za lase.
Pri delu vedno nosite
zaščito za oči in sluh.
Prosimo, da uporabljate osebno zaščitno
opremo (npr. zaščitne rokavice in ostala zaščitna oblačiila).
9. Uporabljajte zaščitno opremo
Nosite zaščitna očala.
Pri delih, pri katerih nastaja prah, nosite
protiprašno masko.
10. Priključite napravo za odsesavanje
prahu
Če so na voljo priključki za odsesavanje
prahu in prestrezne naprave, se prepričajte,
ali so priključeni in se pravilno uporabljajo.
11. Kabla ne uporabljajte za namene,
za katere ni namenjen
Za vlečenje vtiča iz vtičnice ne uporabljajte
kabla. Kabel zavarujte pred vročino, oljem
in ostrimi robovi.
12. Zavarujte obdelovanec
Za pritrditev obdelovanca uporabite
vpenjalne naprave ali primež. Tako ga
boste varneje držali kot z roko.
13. Izogibajte se nenormalni drži telesa
Poskrbite za varno stojišče in vedno ohranite
ravnotežje.
14. Skrbno negujte svoje orodje
Rezalno orodje vedno ohranite ostro in
čisto, da boste delali bolje in varneje.
Upoštevajte napotke za mazanje in menjavo
orodja.
30 SI
Page 31

Redno preverjajte priključno napeljavo elek-
tričnega orodja in ga v primeru poškodb
predajte priznanemu strokovnjaku v popravilo.
Redno preverjajte podaljške napeljav in jih
zamenjajte, če so poškodovani.
Ročaji morajo biti suhi, čisti ter brez olja in
masti.
15. Izvlecite vtič iz vtičnice
Če električnega orodja ne uporabljate,
pred vzdrževanjem in pri menjavi orodja,
npr. žaginega lista, svedra, rezkalnika.
16. Ključev za orodje ne pustite
zataknjenih
Pred vklopom preverite, ali ste odstranili
ključe in nastavljalna orodja.
17. Preprečite nenamerni zagon
Prepričajte se, ali je stikalo med
vstavljanjem vtiča v vtičnico izklopljeno.
18. Na prostem uporabljajte kabelske
podaljške
Na prostem uporabljajte samo za to
odobrene in ustrezno označene kabelske
podaljške.
19. Bodite pozorni
Pazite, kaj delate. Delo opravljajte s pametjo.
Električnega orodja ne uporabljajte, če
niste zbrani.
20. Preverite električno orodje glede
morebitnih poškodb
Pred nadaljnjo uporabo električnega
orodja morate skrbno pregledati zaščitne
naprave ali rahlo poškodovane dele glede
brezhibnega in pravilnega delovanja.
Preverite, ali premični deli delujejo brez-
hibno in se ne zatikajo in ali so deli morebiti
poškodovani. Vsi deli morajo biti pravilno
nameščeni in izpolnjevati vse pogoje, da je
zagotovljeno brezhibno delovanje električnega orodja.
Poškodovane zaščitne naprave in dele
mora skladno z določili popraviti ali zamenjati priznana servisna delavnica, če ni
drugače navedeno v navodilih za uporabo.
Poškodovana stikala mora zamenjati servis
službe za pomoč strankam.
Ne uporabljajte električnega orodja, pri ka-
terem ni mogoče vklopiti ali izklopiti stikala.
21. POZOR!
Uporaba drugih orodiij in drugega pribora
lahko pomeni nevarnost telesnih poškodb.
22. Električno orodje naj popravi električar
To električno orodje ustreza zadevnim var-
nostnim določilom. Popravila sme izvesti le
strokovno usposobljeni električar, ki mora
uporabiti originalne nadomestne dele; v
nasprotnem primeru obstaja nevarnost
nesreče za uporabnika.
Naslednja tveganja ostanejo prisotna kljub
ukrepom za posebej varno zasnovo, varnostnim
in dodatnim ukrepom: Brusna plošča deluje tudi
po tem, ko ste izklopili orodje. Obstaja nevarnost poškodb.
Dodatni varnostni napotki
Izdelek priključite le v vtičnico z zaščitno
napravo za okvarni tok (FID) z izmerjenim
okvarnim tokom ne več kot 30 mA.
Omrežnih kablov in podaljškov ne približu-
jte brusni plošči in verigi žage. V
primeru poškodbe ali prereza takoj izvlecite
omrežni vtič iz vtičnice. Ne dotikajte se
napeljave, preden ni ločena z omrežja.
Nevarnost zaradi električnega udara!
Pred uporabo vizualno preglejte brusno
ploščo.
Ne uporabljajte brusnih plošč z odstopanji,
praskami ali drugimi poškodbami. Zamenjajte obrabljeno brusno ploščo.
Izdelka nikoli ne uporabljajte brez plošče
za zaščito oči.
Ne delajte z izdelkom, če ste utrujeni ali če
ste uživali alkohol ali tablete. Vedno si pravočasno vzemite odmor med delom.
Izdelka ne uporabljajte v eksplozivni atmos-
feri ali tam, kjer lahko povzroči iskre, ogenj,
eksplozije itd. Če tega ne upoštevate,
obstaja nevarnost požara ali eksplozije.
Poskrbite, da bodo pri delu, kjer nastaja
prah, prezračevalne odprtine proste.
31 SI
Page 32

Ne približujte dlani brusni plošči, kadar
izdelek deluje. Verige žage ne premikajte z
rokami. Obstaja nevarnost poškodb.
Nikoli ne imejte prstov med brusno ploščo
in vrtljivim krožnikom ali med brusno in zaščitno ploščo. Obstaja nevarnost zmečkanin.
Veriga žage se med brušenjem segreje.
Ne prijemajte obdelanih mest, saj obstaja
nevarnost opeklin.
Uporabljajte le brusne plošče, ki jih je odo-
bril proizvajalec. Ne uporabljajte žaginih
listov.
Izklopite izdelek in izvlecite omrežni vtič
- za sprostitev blokiranega orodja,
- če je kabel poškodovan ali zapleten,
- pri neobičajnem hrupu.
Pred začetkom uporabe
Napotek: Odstranite ves embalažni material.
Uporabnik mora med uporabo stati blizu
izdelka, da prepreči nepotrebno iztezanje
telesa in s tem nestabilnost.
Izdelek namestite s pomočjo zarez omejila 9
na delovno površino
8
mora pri tem segati prek roba mize.
S svinčnikom označite izvrtine in znova
odstranite izdelek.
Zdaj izvrtajte dve luknji v delovno
površino
Trdno privijte brusni podstavek s prilože-
nima vijakoma
ticama
22
.
24 b
na delovno površino.
22
. Brusni podstavek
23
, podložkama
24 a
in ma-
Montaža izdelka (glejte sl. C)
Privijte ročaj 4 na brusno glavo 2.
Odvijte ustavljalni vijak 10 z vpenjalne
enote verige
Namestite vpenjalno enoto verige 12 na
brusni podstavek
ustavljalnim vijakom
Po potrebi pritrdite omrežni kabel 17 v
kabelsko držalo
12
.
8
in ga trdno privijte z
10
.
16
.
Montaža nastavljalnega
vijaka (glejte sl. C)
Montaža
Napotek: Izdelek vedno pritrdite s priloženimi
vijaki (M10 x 60).
Poskrbite, da boste imeli dovolj prostora za
delo in ne boste ogrožali drugih oseb.
Izdelek vedno pritrdite na delovno površino
z dovolj dolgimi in debelimi vijaki, da ne
boste izgubili nadzora nad izdelkom.
Postavitev izdelka
(glejte sl. B)
- Debelina roba mize, ki ga boste uporabili:
15–30 mm
- Premer svedra: 10,5 mm
- Velikost vijaka: M10
32 SI
Namestite priloženo podložko 25 na
nastavljalni vijak
Privijte nastavljalni vijak 6 na fiksno pritr-
jeno pritrdilno matico
6
.
26
na brusni glavi.
Začetek uporabe
PREVIDNO! NEVARNOST TELESNIH
POŠKODB!
Uporabljajte le brusne plošče in dele
pribora, ki jih priporoča proizvajalec.
Uporaba drugih orodij ali opreme, kot je
navedeno v navodilu za uporabo, lahko za
vas predstavlja nevarnost poškodb.
Izdelka nikoli ne uporabljajte brez plošče
za zaščito oči.
Ne uporabljajte žaginih listov.
Pred vsemi deli na izdelku izvlecite omrežni
vtič.
Page 33

Pred uporabo preverite brusno ploščo: pre-
verite razdaljo med ploščo za zaščito oči in
brusno ploščo.
Ne uporabljajte poškodovanih ali deformi-
ranih brusnih plošč.
Izdelek vklopite šele, ko je varno pritrjen na
delovno površino.
PREVIDNO! NEVARNOST
TELESNIH POŠKODB! Nosite
zaščito za oči in sluh.
Pri delu z verigo žage nosite za-
ščitne rokavice, odporne na
reze, in po potrebi predpasnik,
da preprečite ureznine.
Ne približujte dlani brusni plošči,
kadar izdelek deluje. Verige
žage ne premikajte ročno.
Obstaja nevarnost poškodb.
Vklop in izklop
Napotek: Poskrbite, da se bo napetost,
navedena na identifikacijski ploščici, ujemala z
napetostjo vira toka.
Napotek: Pred začetkom dela in po vsaki menjavi brusne plošče izvedite poskusni tek za vsaj
30 sekund brez obremenitve. Izdelek takoj
izklopite, če brusna plošča ne teče naravnost,
če pride do znatnih nihanj ali če slišite neobičajen hrup.
Napotek: Izdelek ima zaščito pred ponovnim
zagonom: po samodejnem izklopu zaradi
prekinitve napetosti ali sprožitve zaščite zaradi
preobremenitve se izdelek ne zažene znova
samodejno. Za ponovni vklop pritisnite vklopno
stikalo „I“ (zeleno)
1a
in izdelek se zažene.
Ostrenje verige žage
(glejte sl. D)
Napotek: Poskrbite, da bodo pri delu, pri
katerem nastaja prah, prezračevalne odprtine
proste (glejte „Vzdrževanje in čiščenje“).
V primeru blokade izklopite
izdelek in izvlecite omrežni vtič.
Šele nato odpravite blokado.
Napačno naostrena veriga žage lahko po-
škoduje izdelek in poveča nevarnost
povratnega udarca žage!
Poskrbite za natančno nastavitev verige
žage. Upoštevajte pravilni kot ostrenja in
minimalne mere verige žage. Odstranite čim
manj materiala.
Ne brusite gonilnih členov (a) ali spojnih
členov (b), saj se lahko veriga žage strga. Če
tega ne upoštevate, obstaja nevarnost nes-
reče pri rokovanju z verižno žago.
Omrežni kabel priključite v vtič-
nico (upoštevajte omrežno napetost).
Za vklop pritisnite vklopno stikalo „I“
(zeleno)
Za izklop pritisnite izklopno stikalo „0“
(rdeče)
Brusna plošča še nekaj časa po izklopu
orodja deluje. Obstaja nevarnost poškodb.
Napotek: Ta izdelek je opremljen z LED
lučko
pritisnete vklopno stikalo
modejno izklopi, ko pritisnete izklopno stikalo
1b
.
1a
.
1b
.
19
. LED lučka se samodejno vklopi, ko
1a
. LED lučka se sa-
b a
Napotek: Pred ostrenjem očistite verigo
žage. Odstranite lesne ostanke z vsebno-
stjo olja s čopičem ali čistilno krpo.
Napotek: Vsi rezalni členi morajo biti po
ostrenju enako dolgi in široki.
Napotek: Veriga žage je obrabljena in jo
je treba zamenjati z novo, če je ostalo le še
pribl. 4 mm rezalnega zobca.
33 SI
Page 34

Vstavljanje verige žage:
Za odpiranje vodila verige zavrtite vpe-
njalno ročico
13
v levo. Za to morate vpenjalno ročico večkrat vrniti v izhodiščni
položaj. Za sprostitev vpenjalne ročice morate ročico povleči navzven in jo po vrnitvi v
izhodični položaj znova zaskočiti.
Vstavite verigo žage v vodilo verige 7. Re-
zalni robovi morajo biti obrnjeni proti brusni
18a
plošči
.
Skloopite prislon 15 navzdol in povlecite
verigo žage toliko nazaj, da bo rezalni
27
zobec
, ki ga želite naostriti, nalegal na
prislon (glejte sl. D1).
Nastavitev kota ostrenja:
Popustite ustavljalni vijak 10 in na vrtljivem
krožniku nastavite vpenjalno enoto verige
na potrebni kot za ostrenje α, za pomoč pa
uporabite lestvico
11
.
Nato znova trdno zategnite ustavljalni
10
vijak
.
Napotek: Kot ostrenja nasatvite po
navedbah proizvajalca.
Zavarujte globino brušenja z nasatavljalno
6
matico
.
Ostrenje:
Vklopite izdelek (glejte poglavje „Vklop in
izklop“).
Naostrite rezalni zobec 27, tako da brusno
2
glavo
z rahlim pritiskom na ročaj 4
premaknete navzdol.
Brusne plošče
18a
ni dovoljeno zavreti do
ustavitve. V izogib temu pravočasno zmanjšajte pritisk.
Za premik verige žage izklopite izdelek.
Popustite vpenjalno ročico
13
naslednji člen verige, ki jo boste naostrili, s
pomočjo nastavljenega prislona
njalne ročice v vodilo verige
12
Napotek: Najprej naostrite zobce na eni
strani verige. Nato nastavite kot ostrenja in
naostrite zobce na drugi strani.
Preverjanje razmika omejila globine
(glejte sl. D3):
Žagajoči deli verige žage so rezalni členi, ki so
sestavljeni iz rezalnega zobca
za omejevanje globine
27
28
. Višinski razmik med
obema določa razmik omejila globine A.
in pritrdite
15
in vpe-
7
.
in izbokline
Nasatvitev prislona:
Brusno glavo 2 na ročaju 4 pri izkloplje-
nem motorju premaknite navzdol.
S pomočjo nastavljalnega vijaka za predtek
14 a
verige
brusno ploščo
povlecite rezalni zobec 27 na
18a
, da bo rezalni zob nalegal na brusno ploščo (glejte sl. D2). Zavarujte nastavljalni vijak
14 b
matico
.
14 a
z nasatvljalno
Pritrdite člene verige v vodilo verige 7 z
vrtenjem vpenjalne ročice
13
v desno.
Nastavite omejilnik globine s pomočjo nas-
tavljalnega vijaka
plošča
34 SI
18 a
6
tako, da se bo brusna
dotikala dna zobca (glejte sl. D2).
Po vsakem tretjem ostrenju preverite razmik
omejila globine A skladno s podatki proizvajalca verižne žage.
Naknadno spilite višino izbokline za omeje-
vanje globine
28
s plosko pilo in jo po ponastavitvi izbokline za omejevanje globine
malo zaoblite. Prvotna oblika mora biti
ohranjena.
Vzdrževanje in čiščenje
Pred vsako nastavitvijo, vzdrže-
vanjem ali popravilom vedno
izvlecite omreni vtič.
Dela, ki niso opisana v teh navodilih za
uporabo, prepustite strokovni delavnici.
Uporabljajte le originalne dele. Pred vsemi
vzdrževalnimi in čistilnimi deli počakajte, da
Page 35

se izdelek ohladi. Obstaja nevarnost opreklin.
Pred vsako uporabo preverite izdelek glede
morebitnih poškodb, kot so razrahljani, obrabljeni ali poškodovani deli, pravilno prilagenja vijakov ali drugih delov. Zlasti
preverite brusno ploščo
18a
. Poškodovane
dele zamenjajte.
Čiščenje
Ne uporabljajte čistilnih sredstev oz. topil.
Kemične snovi lahko načnejo dele izdelka,
ki so iz umetne mase. Izdelka nikoli ne čis-
tite pod tekočo vodo.
Izdelek očistite po vsaki uporabi.
Očistite prezračevalne odprtine 21 in povr-
šino izdelka z mehko krtačo, s čopičem ali
krpo.
Vodilo verige 7 očistite s krtačo.
Pri močni umazaniji popustite ustavljalni vi-
jak za napenjalno enoto verige
boljšo dostopnost odstranite napenjalno
enoto verige z vrtljivim krožnikom
ročamo, da pred čiščenjem odstranite stran-
ske pločevine.
10
in za
12
. Pripo-
Ne uporabljajte ločenih reducirnih doz ali
adapterjev, da bi brusno ploščo prilagodili
luknji.
Ne uporabljajte žaginih listov.
Izdelek po menjavi brusne plošče znova
povsem sestavite.
V primeru blokade izklopite
izdelek in izvlecite omrežni vtič.
Počakajte, da se izdelek ohladi.
Popustite 3 pritrdilne vijake 5 in snemite
pokrov brusne plošče
Matico brusne plošče
Snemite brusno ploščo
3
.
18 b
odvijte ročno.
18a
z nosilca.
Namestite novo brusno ploščo na nosilec in
z roko privijte matico brusne plošče.
Znova privijte pokrov brusne plošče 3.
Napotek: Matice brusne plošče ne smete
preveč zategniti, da boste preprečili zlom
brusne plošče in matice
Pred začetkom dela in po vsaki menjavi
brusne plošče izvedite poskusni tek za vsaj
30 sekund brez obremenitve. Izdelek takoj
izklopite, če brusna plošča ne teče narav-
nost, če pride do znatnih nihanj ali če slišite
neobičajen hrup.
Skladiščenje
Menjava brusne plošče
(glejte sl. E)
Napotki za menjavo brusne plošče:
Izdelka nikoli ne uporabljajte brez plošče
za zaščito oči
Prepričajte se, ali je število vrtljajev, nave-
deno na brusni plošči
od izmerjenega števila vrtljajev v
prostem teku izdelka. Prepričajte se, ali
mere brusne plošče ustrezajo izdelko. Če je
največja obodna hitrost plošče v nasprotju
z izdelkom premajhna, se lahko plošča
zlomi!
Uporabljajte le brezhibne brusne plošče
(preizkus zvena).
Premajhne sprejemne luknje brusne plošče
ne smete naknadno izvrtati.
20
.
18a
, enako ali večje
Izdelek shranite na suhem in pred prahom
zaščitenem mestu ter zunaj dosega otrok.
Napotek: Brusne plošče je treba shraniti
suhe in pokončno ter jih ni dovoljeno
skladati.
Odstranjevanje
Embalaža je narejena iz okolju
primernih materialov, ki jih lahko
oddate za recikliranje na lokalnih
zbirališčih odpadkov. Zelena točka
ne velja za Nemčijo.
Upoštevajte oznake embalažnih
b
materialov za ločevanje odpadkov,
a
ki so označene s kraticami (a) in
35 SI
Page 36

številkami (b) z naslednjim pomenom:
1–7: umetne mase / 20–22: papir in
karton / 80–98: vezni materiali.
Izdelek in materiale embalaže je
mogoče reciklirati; za lažjo obdelavo
odpadkov jih odstranite ločeno.
Logotip Triman velja samo za Francijo.
O možnostih odstranjevanja odsluženega izdelka se lahko pozanimate
pri svoji občinski ali mestni upravi.
(spodaj levo) ali na nalepki na hrbtni ali spodnji
strani.
Če pride do napačnega delovanja ali drugih
pomanjkljivosti, se obrnite najprej na v nadaljevanju navedeni servisni oddelek po telefonu ali
prek e-pošte.
Izdelek, označen kot okvarjen, lahko nato brez
poštnine pošljete na navedeni naslov servisa,
zraven pa priložite potrdilo o nakupu (blagajniški račun) in navedite, za kakšno pomanjkljivost gre in kdaj je nastala.
Ko je vaš izdelek dotrajan, ga zaradi
varovanja okolja ne odvrzite med
gospodinjske odpadke, temveč ga
oddajte na ustreznem zbirališču tovrstnih odpadkov. O zbirnih mestih in
njihovih delovnih časih se lahko pozanimate pri svoji pristojni občinski
upravi.
Servis
Vaš izdelek naj popravi servisna delavnica
ali električar z uporabo originalnih nadomestnih delov. S tem bo zagotovljeno, da
se bo varnost izdelka ohranila.
Zamenjavo vtiča ali omrežne napeljave
prepustite proizvajalcu izdelka ali njegovi
servisni službi. S tem bo zagotovljeno, da
se bo varnost izdelka ohranila.
Postopek pri uveljavljanju
garancije
Za zagotovitev hitre obdelave vašega primera
vas prosimo, da sledite naslednjim napotkom:
Prosimo, da za vsa vprašanja pripravite račun
in številko izdelka (npr. IAN 123456) kot
dokazilo o nakupu.
Številko izdelka najdete na identifikacijski
ploščici, gravuri, naslovni strani v navodilih
Servis
Servis sovenija
Tel.: 080 080 917
(0.12 €/min)
E-Mail: owim@lidl.si
IAN 285177
Prevod originalne
izjave o skladnosti
Mi, OWIM GmbH & Co. KG, Stiftsbergstraße 1,
DE-74167 Neckarsulm, NEMČIJA, izjavljamo
na lastno odgovornost, da je izdelek: Naprava
za ostrenje verig FSG 85 D1, št. modela:
HG02366, različica: 04 / 2017, na katerega
se nanaša ta izjava, skladen s standardi/
normativnimi dokumenti direktiv 2006/42/ES,
2014/30/EU, 2011/65/EU.
Uporabljeni harmonizirani standardi:
EN 61029-1/A11:2010
EN ISO 12100:2010
EN 55014-1/A2:2011
EN 55014-2: 2015
EN 61000-3-2:2014
EN 61000-3-3:2013
Serijska številka: IAN 285177
36 SI
Page 37

Tobias König
Področni vodja / Odgovorni za dokumentacijo
OWIM GmbH & Co. KG, Stiftsbergstraße 1,
DE-74167 Neckarsulm, NEMČIJA
Neckarsulm, 12.01.2017
Izjavo o skladnosti najdete na spletni strani:
www.owim.com.
Zgoraj opisani predmet Izjave izpolnjuje
predpise Direktive 2011/65/EU Evropskega
parlamenta in Sveta z dne 8. junija 2011 glede
omejitve uporabe določenih nevarnih snovi v
električnih in elektronskih napravah.
37 SI
Page 38

Pooblaščeni serviser:
OWIM GmbH & Co. KG
Stiftsbergstraβe 1
DE-74167 Neckarsulm
NEMČIJA
Servisna telefonska številka: 00386 (0) 80 28 60
Garancijski list
1.
S tem garancijskim listom OWIM GmbH & Co.
KG, Stiftsbergstraβe 1, DE-74167 Neckarsulm,
NEMČIJA jamčimo, da bo izdelek v garancijskem roku ob normalni in pravilni uporabi
brezhibno deloval in se zavezujemo, da
bomo ob izpolnjenih spodaj navedenih
pogojih odpravili morebitne pomanjkljivosti
in okvare zaradi napak v materialu ali
izdelavi oziroma po svoji presoji izdelek
zamenjali ali vrnili kupnino.
2. Garancija je veljavna na ozemlju Republike
Slovenije.
3. Garancijski rok za proizvod je 3 leta od
datuma izročitve blaga. Datum izročitve
blaga je razviden iz računa.
4. Kupec je dolžan okvaro javiti pooblaščenemu servisu oziroma se informirati o nadaljnjih postopkih na zgoraj navedeni
telefonski številki. Svetujemo vam, da pred
tem natančno preberete navodila o sestavi
in uporabi izdelka.
5. Kupec je dolžan pooblaščenemu servisu predložiti garancijski list in račun, kot potrdilo in
dokazilo o nakupu ter dnevu izročitve blaga.
6.
V primeru, da proizvod popravlja nepooblaščen
i servis ali oseba, kupec ne more uve-
ljavljati zahtevkov iz te garancije.
7. Vzroki za okvaro oziroma nedelovanje
izdelka morajo biti lastnosti stvari same in
ne vzroki, ki so zunaj proizvajalčeve oziroma
prodajalčeve sfere. Kupec ne more uveljavljati zahtevkov iz te garancije, če se ni
držal priloženih navodil za sestavo in
uporabo izdelka ali če je izdelek kakorkoli
spremenjen ali nepravilno vzdrževan.
8. Jamčimo servisiranje in rezervne dele za
mini
malno dobo, ki je zahtevana s strani
zakonodaje.
9. Obrabni deli oz. potrošni material so izvzeti
iz garancije.
10. Vsi potrebni podatki za uveljavljanje garancije
se nahajajo na dveh ločenih dokumentih
(garancijski list, račun).
11. Ta garancija proizvajalca ne izključuje
pravic potrošnika, ki izhajajo iz odgovornosti
prodajalca za napake na blagu.
Prodajalec:
Lidl Slovenija d.o.o. k.d., Pod lipami 1, SI-1218 Komenda
38 SI
Page 39

Legenda použitých piktogramů ....................................................................Strana 40
Úvod ...................................................................................................................................... Strana 40
Použití ke stanovenému účelu...............................................................................................Strana 40
Popis dílů ...............................................................................................................................Strana 40
Obsah dodávky .................................................................................................................... Strana 41
Technické údaje ....................................................................................................................Strana 41
Všeobecná bezpečnostní upozornění .......................................................Strana 42
Bezpečná práce .................................................................................................................... Strana 42
Doplňkové bezpečnostní informace ....................................................................................Strana 43
Před uvedením do provozu...............................................................................Strana 44
Montáž ................................................................................................................................ Strana 44
Postavení výrobku ................................................................................................................. Strana 44
Montáž výrobku .................................................................................................................... Strana 44
Montáž stavěcího šroubu ..................................................................................................... Strana 44
Uvedení do provozu ................................................................................................ Strana 44
Zapínání a vypínání .............................................................................................................. Strana 45
Broušení řetězu pily ...............................................................................................................Strana 45
Údržba a čištění ........................................................................................................... Strana 46
Čištění .................................................................................................................................... Strana 47
Výměna brusného kotouče ................................................................................................... Strana 47
Skladování .......................................................................................................................Strana 47
Zlikvidování ....................................................................................................................Strana 47
Servis .................................................................................................................................... Strana 48
Postup v případě uplatňování záruky .................................................................................. Strana 48
Servis ......................................................................................................................................Strana 48
Záruka ................................................................................................................................. Strana 48
Překlad originálu prohlášení o konformitě ......................................... Strana 49
39 CZ
Page 40

Legenda použitých piktogramů
Přečtěte si návod kobsluze. Noste ochranné brýle.
Noste ochranu sluchu.
Noste ochrannou masku proti
prachu.
Nebezpečí zranění rotujícím nástrojem! Držte ruce v odstupu.
Nebezpečí zásahu elektrickým
proudem!
Před údržbou a opravami vytáhněte zástrčku ze zásuvky.
Chraňte výrobek před vlhkem. Rozměry brusného kotouče.
Ochranná třída II (dvojitá izolace)
Ostřička pilových
řetězů FSG 85 D1
Úvod
Blahopřejeme Vám ke koupi nového výrobku.
Rozhodli jste se pro kvalitní produkt. Návod
kobsluze je součástí tohoto výrobku. Obsahuje
důležité pokyny pro bezpečnost, použití a likvidaci. Před použitím výrobku se seznamte se
všemi pokyny k obsluze a bezpečnostními pokyny. Používejte výrobek jen popsa ným způsobem
a na uvedených místech. Při předání výrobku třetí
osobě předejte i všechny podklady.
Noste ochranné
a neklouzavé boty.
Noste ochranné rukavice.
Pozor!
Nenasazovat vadný brusný kotouč.
Použití ke stanovenému
účelu
Výrobek je vhodný k nabroušení běžných typů
řetězů pil. Výrobek není určen pro všechna jiná
použití (např. broušení s chladící kapalinou,
broušení jiných obrobků nebo broušení
zdravotně škodlivých materiálů jako je azbest).
Osvětlení na výrobku slouží k osvětlení pracovního prostoru a není určeno k osvětlení místnosti. Za škody vzniklé při použití k jinému než
ke stanovenému účelu nepřevezme výrobce
ručení. Není určen k živnostenskému využití.
Popis dílů
40 CZ
1
Vypínač
1a
Zapínání
1b
Vypínání
Page 41

2
Brusná hlava
3
Kryt brusného kotouče
4
Rukojeť
5
Šrouby krytu brusného kotouče
6
Stavěcí šroub a matka dorazu pro hloubku
7
Vodící lišta řetězu
8
Sokl
9
Zářezy dorazu
10
Seřizovací šroub pro upínací jednotku řetězu
11
Stupnice pro úhel ostření (od +35° do -35°)
12
Upínací jednotka řetězu s otočným talířem
13
Upínací páka na fixování řetězu
14
Šroub a matka pro nastavení posuvu řetězu
14a
Nastavovací šroub posuvu řetězu
14b
Nastavovací matka pro posuv řetězu
15
Zarážka
16
Držák kabelu
17
Síťový kabel
18a
Brusný kotouč
18b
Matka brusného kotouče
19
LED lampa (není na obrázku)
20
Průhledný kryt
21
Větrací otvory (nejsou na obrázku)
22
Pracovní plocha
23
Šroub (na připevnění stolu)
24a
Podložka (na připevnění stolu)
24b
Matka (na připevnění stolu)
25
Podložka (pro stavěcí šroub)
26
Matka (pro stavěcí šroub)
27
Řezající zub (řetěz pily)
28
Omezovací výčnělek hloubky (řetěz pily)
Technické údaje
Jmenovité vstupní napětí: 220–240 V∼ (stří-
davý proud), 50 Hz
Příkon: maximálně 85 W
(S2: 15 min.)*
Jmenovitá doba klidu: cca 5 minut
Třída ochrany: II /
Jmenovité otáčky
na prázdno n
: 5000 min
0
-1**
Úhel nastavení: 35° vlevo/ vpravo
Pro řetězy pil s
rozměry článků: 6,35 / 8,255 /
9,52 mm (¹/₄“ /
0,325“
/ ³/₈“)
Rozměry brusného kotouče:
Vnější průměr: Ø 104 mm (4
¹/₁₆
Průměr otvoru: Ø 22 mm
Tloušťka: 3,2 mm
Váha (včetně příslušenství): cca 2,3 kg
Hodnota emise hluku:
(A) hodnocená hladina hluku elektrického
nástroje činí typicky:
Hladina akustického
tlaku
: 65,5 dB(A)
Nepřesnost K
: 3 dB
Hladina akustického
výkonu
Nepřesnost K
: 78,5 dB(A)
: 3 dB
in)
Obsah dodávky
1 bruska řetězů s namontovaným brusným ko-
toučem
1 rukojeť
1 upínací jednotka řetězu se seřizovacím šroubem
1 stavěcí šroub + podložka
2 šrouby s matkami a podložkami na připevnění
stolu
1 návod kobsluze
* krátkodobý provoz: nepoužívejte výrobek
déle než 15 minut.
** maximální obvodová rychlost brusného kotouče 40 m/s. Brusný kotouč musí vydržet oběžnou rychlost nejméně 27,8 m/s. Jestliže je
maximální obvodová rychlost kotouče oproti výrobku příliš nízká, může prasknout!
41 CZ
Page 42

Všeobecná bezpečnostní
upozornění
POZOR! Při používání elektrických nástrojů je
třeba, za účelem ochrany proti zásahu elektrickým
proudem, před zraněním a požárem, dbát na
následující, zásadní bezpečnostní opatření.
Před použitím elektického nástroje si přečtěte
všechny tyto pokyny a uschovejte si bezpečnostní upozornění.
Bezpečná práce
1.
Udržujte na Vašem pracovišti
pořádek
Nepořádek na pracovišti může zapříčinit
nehody.
2. Přihlížejte k vlivům okolního
prostředí
Nevystavujte elektrické nástroje dešti.
Nepoužívejte elektrické nástroje ve vlhkém
nebo mokrém prostředí.
Zajistěte dobré osvětlení pracoviště.
Nepoužívejte elektrické nástroje v prostředí,
ve kterém hrozí nebezpečí požáru nebo
výbuchu.
3. Chraňte se před zásahem
elektrického proudu
Vyhýbejte se dotyku Vašeho těla s uzemně-
nými díly (např. s trubkami, radiátory, elektrickými kamny, chladícími přístroji).
4. Zajistěte dostatečný odstup
ostatních osob od pracoviště
Nenechte ostatní osoby, obzvlášť děti, se
dotýkat elektického nástroje nebo kabelu.
Zamezte jejich přístupu na pracoviště.
5. Nepoužívané elektrické nástroje
uchovávejte na bezpečném místě
Nepoužívané elektrické nástroje se mají
odkládat na suchém, vyvýšeném místě nebo
uzamčené, mimo dosah dětí.
6. Elektrické nástroje nepřetěžujte
V udaném výkonnostním rozsahu pracujete
lépe a bezpečně.
7. Používejte správný elektrický
nástroj
Nepoužívejte výkonnostně slabé stroje na
těžké pracovní úkony.
Nepoužívejte elektrický nástroj k jinému než
ke stanovenému účelu. Nepoužívejte například ruční kotoučové pily na řezání větví
stromů nebo polen.
8. Noste vhodné oblečení
Nenoste oblečení nebo šperky, které se
mohou zachytit do pohyblivých dílů.
Při práci venku se doporučuje nosit neklou-
zavou obuv.
Na dlouhé vlasy používejte síťku na vlasy.
Noste při práci vždy
ochranu sluchu a brýle.
Prosíme, používejte osobní ochranné po-
můcky (z. B. ochranné rukavice a ostatní
ochranné oblečení).
9. Používejte osobní ochranné
pomůcky
Noste ochranné brýle.
Při práci, při které vzniká prach noste
ochranu dýchacích cest.
10. Připojujte odsávání prachu
U existujících přípojek odsávání prachu a
záchytných zařízeních se přesvědčte o jejich správném připojení a správné funkci.
11. Nepoužívejte kabel k čemu není
určený
Nevytahujte zástrčku ze zásuvky tahem za
kabel. Chraňte kabel před horkem, olejem
a ostrými hranami.
12. Zajišťujte obrobek
Na držení obrobku používejte upínací zaří-
zení nebo svěrák. Upnutí je bezpečnější
než držení v ruce.
13. Vyhýbejte se abnormálnímu držení
těla
Zajistěte si bezpečný postoj a udržujte rov-
nováhu.
14. Ošetřujte Vaše nástroje pečlivě
Pro lepší a bezpečnější práci udržujte ře-
zací nástroje v čistotě a vždy nabroušené.
Řiďte se pokyny k mazání a výměně nástrojů.
42 CZ
Page 43

Kontrolujte pravidelně přívodní kabel elek-
trického nástroje, v případě jeho poškození
ho nechte opravit uznávaným odborníkem.
Kontrolujte pravidelně prodlužovací kabely,
v případě jejich poškození je vyměňte.
Udržujte rukojeti suché, čisté a bez mastnoty.
15. Vytahujte zástrčku ze zásuvky
U nepoužívaného elektrického nástroje,
před údržbou a výměnou nářadí, jako např.
pily, vrtáku, frézy.
16. Nenechávejte zastrčené klíče na
nástroje
Před zapnutím kontrolujte, jestli jsou odstra-
něné klíče a seřizovací pomůcky.
17. Zabraňte nechtěnému zapnutí
výrobku
Před zastrčením zástrčky do zásuvky se
ujistěte. že je výrobek vypnutý.
18. Používejte prodlužovací kabely
pro venkovní prostory
Venku používejte k tomu připuštěné a
odpovídajícím způsobem označené
prodlužovací kabely.
19. Buďte pozorní
Dávejte pozor co děláte. K práci přistupujte
rozumně. Nesoustředění elektrický nástroj
nepoužívejte.
20. Kontrolujte elektrický nástroj, jestli
není poškozený
Před použitím elektrického nástroje se musí
ochranná zařízení, bezvadná funkce a
funkčnost ostatních dílů ke stanovenému
účelu pečlivě zkontrolovat.
Zkontrolujte, zda pohyblivé díly fungují
bezvadně, zda se nezadrhávají nebo zda
nejsou součástky poškozené. Veškeré díly
musí být správně namontované a musí
splňovat veškeré podmínky pro bezvadný
provoz elektropřístroje.
Pokud to není v návodu k použití jinak
uvedené musí poškozená ochranná zařízení
a díly opravit nebo vyměnit uznávaná odborná dílna.
Poškozené spínače musí být vyměněny v
zákaznické dílně.
Nepoužívejte elektrické nástroje s nefungují-
cím vypínačem.
21. POZOR!
Použití jiných nástrojů než doporučených
vtomto návodu kobsluze nebo jiného příslušenství může pro Vás zvýšit nebezpečí
zranění.
22. Váš elektrický nástroj nechte opravovat vyučeným elektrikářem
Tento elektrický nástroj splňuje požadavky
příslušných bezpečnostních předpisů.
Opravy smí provádět za použití originálních náhradních dílů jen vyučený elektrikář,
v jiném případě může dojít k ohrožení uživatele.
Následující zbytková rizika zůstávají, přestože
byla provedená opatření vytvořením obzvlášť
bezpečného designu, musí se dbát na
bezpečnostní a doplňková ochranná opatření:
po vypnutí nástroje brusný kotouč ještě dobíhá.
Hrozí nebezpečí zranění.
Doplňkové bezpečnostní
informace
Připojujte výrobek jen na zásuvku s proudo-
vým chráničem (FI-spínač) s jmenovitým
chybným proudem do 30 mA.
Držte síťový a prodlužovací kabel mimo do
dosah brusného kotouče a řetězu. Při poškození nebo přeříznutí ihned vytáhněte zástrčku ze zásuvky. Nedotýkejte se kabelu
dokud není odpojen od přívodu elektrického proudu. Nebezpečí zásahu elektrickým proudem!
Před použitím zkontrolujte vizuálně brusný
kotouč.
Nepoužívejte brusný kotouč s odštěpeným
materiálem, trhlinami nebo jiným poškozením. Opotřebovaný brusný kotouč vyměňte.
Nikdy nepoužívejte výrobek bez průhled-
ného krytu.
Nepracujte s výrobkem, jestliže jste unavení
nebo po požití alkoholu anebo léků. Udělejte si vždy včas pracovní přestávku.
Nepoužívejte výrobek ve výbušné prostředí
nebo tam, kde mohou jiskry zapříčinit
43 CZ
Page 44

požár, výbuch atd.. Při nerespektování hrozí
nebezpečí požáru nebo výbuchu.
Zajistěte aby byla při práci způsobující
prach otevřená větrání.
Za provozu výrobku držte Vaše ruce mimo
dosah brusného kotouče a zubů řetězu.
Nepohybujte řetězem rukama. Hrozí nebezpečí zranění.
Nestrkejte nikdy prsty mezi brusný kotouč a
otočný talíř nebo mezi brusný kotouč a průhledný kryt. Hrozí nebezpečí uskřípnutí.
Řetěz je při broušení horký. Nedotýkat se
obrobeného místa, hrozí nebezpečí popálení.
Používejte jen brusné kotouče doporučené
výrobcem. Nepožívejte řezací kotouče.
Vypněte výrobek a vytáhněte zástrčku ze
zásuvky
- pro uvolnění zablokovaného nástroje,
- při poškození nebo zamotání přívodního
kabelu,
- při neobvyklých zvucích.
Před uvedením do provozu
Upozornění: Prosíme, odstraňte úplně
obalový materiál.
Postavení výrobku
(viz obr. B)
- Tloušťka použité hrany stolu: 15–30 mm
- průměr vrtáku: 10,5 mm
- šrouby: M10
Umístěte výrobek zářezy 9 na pracovní
22
plochu
hranu stolu.
Označte si místa pro vrtání otvorů tužkou a
výrobek zase sejměte.
Nyní vyvrtejte dva otvory do pracovní
plochy
Přišroubujte sokl přiloženými šrouby 23,
podložkami
pracovní plochu.
. Sokl 8 musí přesahovat přes
22
.
24a
a matkami
24b
na
Montáž výrobku (viz obr. C)
Přišroubujte rukojeť 4 na brusnou hlavu 2.
Odšroubujte šroub 10 od upínací jednotky
12
řetězu
Nasaďte upínací jednotku řetězu 12 na
sokl
Připevněte popřípadě síťový kabel 17 do
držáku kabelu
.
8
a přišroubujte jí šroubem 10.
16
.
Obsluha by měla stát při používání blízko
výrobku, natažení těla může vést k nejisté
poloze resp. postoji.
Montáž
Upozornění: připevňujte výrobek vždy jen
dodanými šrouby (M10 x 60).
Dávejte pozor na dostatečný prostor pro
práci a bezpečnost jiných osob.
Připevňujte výrobek šrouby dostatečné
délky a průměru, aby nedošlo ke ztrátě
kontroly nad výrobkem.
44 CZ
Montáž stavěcího šroubu
(viz obr. C)
Nasuňte přiloženou podložku 25 na
stavěcí šroub
Našroubujte stavěcí šroub 6 do matky 26
pevně namontované v brusné hlavě.
6
.
Uvedení do provozu
POZOR! NEBEZPEČÍ ZRANĚNÍ!
Používejte jen brusné kotouče a příslušenství
doporučené výrobcem. Použití jiných nástrojů než doporučených vtomto návodu
kobsluze nebo jiného příslušenství může
pro Vás zvýšit nebezpečí zranění.
Page 45

Nikdy nepoužívejte výrobek bez průhled-
ného krytu.
Nepožívejte řezací kotouče.
Před prováděním veškerých prací na výrobku
vytáhněte síťovou zástrčku ze zásuvky.
Před použitím zkontrolujte brusný kotouč:
kontrolujte odstup průhledného krytu od
brusného kotouče.
Nepoužívejte poškozené nebo zdeformo-
vané brusné kotouče.
Zapněte výrobek teprve potom až je
bezpečně připevněný na pracovní plochu.
POZOR! NEBEZPEČÍ ZRA-
NĚNÍ! Noste brýle a ochranu
sluchu.
Při práci se řetězem noste proti
proříznutí odolné ochranné ruka-
vice a jestliže je to zapotřebí i
zástěru, abyste zabránili zranění pořezáním.
Za provozu výrobku držte Vaše
ruce mimo dosah brusného ko-
touče a zubů řetězu. Nepohybujte řetězem rukama. Hrozí nebezpečí
zranění.
Zapínání a vypínání
Upozornění: dbejte na to, aby souhlasilo sí-
ťové napětí udané na typovém štítku s napětím
zdroje proudu, který máte k dispozici.
Upozornění: před první prací a po každé
výměně brusného kotouče proveďte zkušební
provoz bez zatížení, po dobu 30 vteřin. Výrobek ihned vypněte, jestliže se brusný kotouč
otáčí necentrovaný, dochází k vibracím nebo je
slyšet abnormální zvuky.
Upozornění: tento výrobek je vybaven LED
19
lampou
po zapnutí spínače
automaticky po vypnutí výrobku spínačem
Upozornění: výrobek je vybaven ochranou
proti nechtěnému startu: po automatickém vypnutí přerušením napětí nebo po zapůsobení
ochrany proti přetížení se výrobek samostatně,
normálně nerozběhne. K novému zapnutí stiskněte
spínač „I“ (zelený)
. LED lampa se zapíná automaticky
1a
. LED lampa se vypíná
1b
1a
, výrobek se rozběhne.
.
Broušení řetězu pily
(viz obr. D)
Upozornění: zajistěte aby byla při práci způ-
sobující prach otevřená větrání (viz „Údržba a
čištění“).
Jestliže se výrobek zablokuje,
vypněte ho a vytáhněte zástrčku
ze zásuvky. Nejdříve odstraňte
blokádu.
Nesprávně nabroušený řetěz může výrobek
poškodit a zvýšit nebezpečí zpětného rázu
pily!
Dbejte na přesné nastavení řetězu. Dbejte
na správný úhel ostření a minimální rozměry pilového řetězu. Ubírejte pokud možno
co nejméně materiálu.
Nebruste pohonné články (a) nebo spojovací
články (b), řetěz se může přetrhnout. Při broušení těchto článků hrozí později nebezpečí
úrazu při práci s řetězovou pilou.
Připojte síťový kabel do zásuvky
(dávejte pozor na síťové napětí).
K zapnutí stiskněte spínač „I“ (zelený) 1a.
K vypnutí stiskněte spínač „0“ (červený) 1b.
Po vypnutí výrobku brusný kotouč ještě
dobíhá. Hrozí nebezpečí zranění.
b a
Upozornění: před ostřením řetěz vyčis-
těte. Očistěte zbytky dřeva nasáklého
olejem resp. zbytky oleje štětcem nebo
hadrem.
45 CZ
Page 46

Upozornění: řezající články řetězu musí
být po ostření stejně dlouhé a stejně široké.
Upozornění: jestliže má pilový řetěz
řezající články jen cca 4 mm, platí jako
opotřebovaný a musí se vyměnit.
Vložení řetězu:
K otevření vodící lišty řetězu otočte páku
13
upínání
doleva. K tomu musíte páku
upínání vícekrát vrátit do výchozí polohy. K
odblokování páky upínání jí vytáhněte směrem ven a po vrácení do výchozí polohy jí
nechte zase zaskočit.
Položte pilový řetěz do vodící lišty 7. Ře-
zající ostří musí ukazovat k brusnému
18a
kotouči.
Sklopte doraz 15 dolů a zatáhněte řetěz
tak daleko dozadu až přilehne řezající
27
zub
, který chcete naostřit, na doraz
(vit obr. D1).
Nastavení úhlu broušení:
Povolte šroub 10 a nastavte na otočném ta-
líři upínací jednotky
12
pomocí stupnice 11
požadovaný úhel broušení.
Potom šroub
10
zase utáhněte.
Upozornění: úhel broušení nastavte
podle údajů výrobce.
Nastavte hloubkový doraz pomocí stavěcího
6
šroubu
tak, aby se brusný kotouč
dotýkal základu zubu (viz obr. D2). Zajistěte hloubku broušení stavěcí matkou
Ostření:
Zapněte výrobek (viz kapitola „Zapínání a
vypínání“).
Bruste řezající zub 27 mírným tlakem na
4
rukojeť
, pohybujícím brusnou hlavu 2
směrem dolů.
Brusný kotouč
18a
se nesmí zbrzdit a zasta-
vit. Proto včas redukujte přítlačnou sílu.
Před dalším přesunutím řetězu výrobek vy-
pněte. Povolte páku upínání
další článek řetězu k nabroušení pomocí
nastaveného dorazu
vodící liště
7
15
a upínací páky ve
.
Poznámka: Bruste nejdříve zuby na
jedné straně řetězu. Potom přestavte úhel
broušení a bruste zuby na druhé straně.
Kontrola odstupu hloubkového
dorazu (viz obr. D3):
Řezající díly řetězu jsou řezající články, skládající se ze zubu
hloubky
27
a omezovacího výčnělku
28
. Výškový rozdíl mezi oběma určuje
odstup omezovače hloubky A.
13
a zafixujte
18a
6
.
Nastavení dorazu:
Při vypnutém motoru pohybujte brusnou
2
hlavou
pomocí rukojeti 4 směrem dolů.
Zaveďte pomocí stavěcího šroubu pro posuv
14a
řetězu
touči
obr. D2). Zajistěte stavěcí šroub
matkou
řezající zub 27 k brusnému ko-
18a
, až na brusný kotouč přilehne (viz
14a
14b
.
stavěcí
Zajistěte články řetězu ve vodící liště 7
otočením páky upínání
46 CZ
13
doprava.
Po každém třetím broušení kontrolujte tento
odstup A podle údajů výrobce pilového
řetězu.
Opilujte plochým pilníkem výšku omezova-
cího výčnělku hloubky
28
a po posunutí
výčnělek poněkud zaoblete. Původní tvar
musí zůstat zachovaný.
Údržba a čištění
Před každým nastavením,
údržbou nebo ošetřením vždy
vytahujte zástrčku ze zásuvky.
Práce, které nejsou popsány v návodu k
provozu nechte provádět v odborné dílně.
Používejte jen originální díly. Před čištěním
Page 47

nebo údržbou nechte výrobek vychladnout.
Hrozí nebezpečí popálení.
Před každým použitím kontrolujte výrobek
jestli nemá povolené, opotřebované nebo
poškozené díly i správné držení šroubů a
jiných dílů. Kontrolujte obzvlášť brusný
18a
kotouč
. Poškozené díly vyměňte.
Čištění
Nepoužívejte žádné čistící prostředky nebo
rozpouštědla. Chemické substance mohou
poškodit umělohmotné díly výrobku. Nikdy
neomývejte výrobek pod tekoucí vodou.
Čistěte výrobek po každém použití.
Čistěte větrací otvory 21 a povrch výrobku
měkkým kartáčem, štětcem nebo hadrem.
Vodící lištu řetězu 7 čistěte kartáčem.
Při silném znečištění odšroubujte pro lepší
přístupnost upevňovací šroub upínací jed-
notky řetězu
s otočným talířem
jeme sejmout postranní plechy.
10
a sejměte upínací jednotku
12
. Pro čištění doporuču-
Nepožívejte řezací kotouče.
Po výměně brusného kotouče zase výrobek
kompletně smontujte.
Vypněte výrobek a vytáhněte sí-
ťovou zástrčku. Nechte výrobek
úplně vychladnout.
Odšroubujte 3 šrouby 5 a sejměte kryt
brusného kotouče
Odšroubujte matku brusného kotouče
3
.
18b
rukou.
Sejměte brusný kotouč
18a
z uložení.
Nasaďte nový brusný kotouč na uložení a
přišroubujte a utáhněte matku k jeho připevnění jen rukou.
Přišroubujte zpátky kryt brusného kotouče 3.
Upozornění: matka držící brusný kotouč
nesmí být příliš pevně utažená, aby se zabránilo prasknutí brusného kotouče
Před první prací a po každé výměně brus-
ného kotouče proveďte zkušební provoz
bez zatížení, po dobu 30 vteřin. Výrobek
ihned vypněte, jestliže se brusný kotouč
otáčí necentrovaný, dochází k vibracím
nebo je slyšet abnormální zvuky.
Výměna brusného kotouče
(viz obr. E)
Pokyny k výměně brusného kotouče:
Nikdy nepoužívejte výrobek bez průhled-
ného krytu
Přesvědčte se, že je na brusném kotouči
18a
než jsou jmenovité otáčky výrobku za
chodu naprázdno. Ujistěte se, že je brusný
kotouč jeho rozměry vhodný pro výrobek.
Jestliže je maximální obvodová rychlost
kotouče oproti výrobku příliš nízká, může
prasknout!
Používejte jen bezvadné brusné kotouče
(zkouška zněním).
Nevrtejte malý otvor brusného kotouče
dodatečně na větší.
Nepoužívejte žádná separátní redukční
pouzdra nebo adaptér k přizpůsobení
kotouče s velkým otvorem.
20
.
udaný počet otáček stejný nebo větší
Skladování
Skladujte výrobek na suchém, před pra-
chem chráněném místě a mimo dosah dětí.
Upozornění: brusné kotouče se musí
ukládat suché a postavené na výšku, nesmí
se stohovat.
Zlikvidování
Obal se skládá zekologických
materiálů, které můžete zlikvidovat
prostřednictvím místních sběren recyklovatelných materiálů. Zelený bod
neplatí pro Německo.
Při třídění odpadu se řiďte podle
b
označení obalových materiálů zkrat-
a
kami (a) a čísly (b), s následujícím
významem: 1–7: umělé hmoty /
47 CZ
Page 48

20–22: papír a lepenka / 80–98:
složené látky.
Výrobek a obalové materiály jsou recyklovatelné, zlikvidujte je odděleně
pro lepší odstranění odpadu. Logo
Triman platí jen pro Francii.
O možnostech likvidace vysloužilých
zařízení se informujte u správy vaší
obce nebo města.
V případě poruch funkce nebo jiných závad
nejdříve kontaktujte, telefonicky nebo e-mailem,
v následujícím textu uvedené servisní oddělení.
Výrobek registrovaný jako vadný potom můžete
s přiloženým dokladem o zakoupení (pokladní
stvrzenkou) a údaji k závadě a kdy k ní došlo,
bezplatně zaslat na adresu servisu, která Vám
byla sdělena.
Servis
Vzájmu ochrany životního prostředí
vysloužilý výrobek nevyhazujte do
domovního odpadu, ale předejte k
odborné likvidaci. O sběrnách a jejich otevíracích hodinách se můžete
informovat u příslušné správy města
nebo obce.
Servis
Opravy nechte provádět jen servis nebo
elektrikáře a jen originálními náhradními díly.
Tím je zajištěno, že zůstane bezpečnost
výrobku zachována.
Výměnu zástrčky přívodního kabelu nechte
provádět jen výrobce nebo jeho servis.
Tím je zajištěno, že zůstane bezpečnost
výrobku zachována.
Postup v případě
uplatňování záruky
Pro zajištění rychlého zpracování Vašeho
případu se řiďte následujícími pokyny:
Pro všechny požadavky si připravte pokladní
stvrzenku a číslo artiklu (např. IAN 123456)
jako doklad o zakoupení.
Číslo artiklu najdete na typovém štítku, gravuře,
titulní stránce návodu (vlevo dole) nebo na
nálepce na zadní nebo spodní straně.
Servis česká republika
Tel.: 800 143 873
E-Mail: owim@lidl.cz
IAN 285177
Záruka
Výrobek byl vyroben s nejvyšší pečlivostí podle
přísných kvalitativních směrnic a před odesláním
prošel výstupní kontrolou. V případě závad
máte možnost uplatnění zákonných práv vůči
prodejci. Vaše práva ze zákona nejsou omezena
naší níže uvedenou zárukou.
Na tento artikl platí 3 záruka od data zakoupení.
Záruční lhůta začíná od data zakoupení.
Uschovejte si dobře originál pokladní stvrzenky.
Tuto stvrzenku budete potřebovat jako doklad o
zakoupení.
Pokud se do 3 let od data zakoupení tohoto
výrobku vyskytne vada materiálu nebo výrobní
vada, výrobek Vám – dle našeho rozhodnutí –
bezplatně opravíme nebo vyměníme. Tato záruka
zaniká, jestliže se výrobek poškodí, neodborně
použil nebo neobdržel pravidelnou údržbu.
Záruka platí na vady materiálu a výrobní vady.
Tato záruka se nevztahuje na díly výrobku podléhající opotřebení (např. na baterie), dále na
poškození křehkých, choulostivých dílů, např.
vypínačů, akumulátorů nebo dílů zhotovených
ze skla.
48 CZ
Page 49

Překlad originálu prohlášení
o konformitě
My, firma OWIM GmbH & Co. KG, Stiftsbergstraße 1, DE-74167 Neckarsulm, NĚMECKO,
prohlašujeme na vlastní zodpovědnost, že výrobek: Ostřička pilových řetězů FSG 85 D1, model č.: HG02366, verze: 04 / 2017, na který s
toto prohlášení vztahuje, odpovídá normám a
normativním dokumentům 2006/42/ES,
2014/30/EU, 2011/65/EU.
Aplikované harmonizující normy:
EN 61029-1/A11:2010
EN ISO 12100:2010
EN 55014-1/A2:2011
EN 55014-2: 2015
EN 61000-3-2:2014
EN 61000-3-3:2013
Sériové číslo: IAN 285177
Tobias König
Oblastní manažer/ Zodpovědný za dokumenty
OWIM GmbH & Co. KG, Stiftsbergstraße 1,
DE-74167 Neckarsulm, NĚMECKO
Neckarsulm, 12.01.2017
Prohlášení o konformitě najdete také na:
www.owim.com.
Výše popsaný předmět prohlášení splňuje
předpisy ve směrnici 2011/65/EU Evropského
parlamentu a Rady z 8.června 2011 o omezení
použití určitých nebezpečných látek v elektrických a elektronických přístrojích.
49 CZ
Page 50

Legenda použitých piktogramov ................................................................. Strana 51
Úvod ...................................................................................................................................... Strana 51
Používanie v súlade s určeným účelom ............................................................................... Strana 51
Popis častí .............................................................................................................................. Strana 52
Obsah dodávky .................................................................................................................... Strana 52
Technické údaje ....................................................................................................................Strana 52
Všeobecné bezpečnostné upozornenia .................................................. Strana 53
Bezpečná práca ....................................................................................................................Strana 53
Ďalšie bezpečnostné upozornenia ...................................................................................... Strana 54
Pred uvedením do prevádzky ........................................................................ Strana 55
Montáž ................................................................................................................................ Strana 55
Postavenie výrobku ............................................................................................................... Strana 55
Montáž výrobku .................................................................................................................... Strana 55
Montáž regulačnej skrutky ................................................................................................... Strana 56
Uvedenie do prevádzky ...................................................................................... Strana 56
Za- a vypnutie ........................................................................................................................Strana 56
Brúsenie pílovej reťaze ......................................................................................................... Strana 56
Údržba a čistenie ........................................................................................................ Strana 58
Čistenie .................................................................................................................................. Strana 58
Výmena brúsneho kotúča ..................................................................................................... Strana 58
Skladovanie ....................................................................................................................Strana 59
Likvidácia .......................................................................................................................... Strana 59
Servis .................................................................................................................................... Strana 59
Postup v prípade poškodenia v záruke ............................................................................... Strana 59
Servis ......................................................................................................................................Strana 60
Záruka ................................................................................................................................. Strana 60
Preklad originálneho konformitného prehlásenia ....................... Strana 60
50 SK
Page 51

Legenda použitých piktogramov
Prečítajte si návod na obsluhu. Noste ochranu očí.
Noste ochranu sluchu.
Noste ochrannú protiprachovú
masku.
Nebezpečenstvo poranenia skrze
otáčajúce sa náradie! Držte ruky v
bezpečnej vzdialenosti.
Nebezpečenstvo zásahu elektrickým prúdom!
Pred údržbovými a opravnými prácami vytiahnite sieťovú zástrčku zo
zásuvky.
Chráňte výrobok pred vlhkosťou. Rozmery brúsneho kotúča.
Trieda ochrany II (Dvojitá izolácia)
Prístroj na ostrenie
reťazí FSG 85 D1
Úvod
Blahoželáme Vám ku kúpe Vášho nového výrobku.
Rozhodli ste sa pre veľmi kvalitný výrobok.
Návod na obsluhu je súčasťou tohto výrobku.
Obsahuje dôležité upozornenia týkajúce sa
bezpečnosti, používania a likvidácie. Skôr ako
začnete výrobok používať, oboznámte sa so
všetkými pokynmi k obsluhe a bezpečnosti.
Výrobok používajte iba v súlade s popisom a v
uvedených oblastiach používania. V prípade
postúpenia výrobku ďalším osobám odovzdajte
aj všetky dokumenty patriace k výrobku.
Noste ochrannú
protišmykovú obuv.
Noste ochranné rukavice.
Pozor!
Nenasadzujte defektný brúsny
kotúč.
Používanie v súlade s
určeným účelom
Výrobok je vhodný na brúsenie bežných typov
pílových reťazí. Výrobok nie je určený pre
všetky ostatné aplikácie (napr. brúsenie s chladiacou kvapalinou, brúsenie iných obrábaných
predmetov alebo zdraviu škodlivých materiálov
ako azbest). Osvetlenie na výrobku slúži na osvetlenie bezprostredného pracovného prostredia a nie je určené na osvetlenie miestností v
domácnosti. Výrobca nepreberá ručenie za
škody vzniknuté používaním, ktoré je v rozpore
s určeným účelom. Nevhodné na priemyselné
používanie.
51 SK
Page 52

Popis častí
1
Za-/ vypínač
1a
Zapínač
1b
Vypínač
2
Brúsna hlavica
3
Kryt brúsneho kameňa
4
Rukoväť
5
Upevňovacie skrutky pre kryt brúsnych kotú-
čov
6
Regulačná skrutka a regulačná matica pre
hĺbkový doraz
7
Vodiaca koľajnička pre reťaz
8
Brúsny podstavec
9
Zastavovacie zárezy
10
Fixačná skrutka pre upínacie zariadenie
pre reťaz
11
Škála uhlov ostrenia (+35° až -35°)
12
Upínacie zariadenie pre reťaz s otočným
tanierom
13
Upínacia páka pre upevnenie reťaze
14
Regulačná skrutka a matica pre posun
reťaze
14a
Regulačná skrutka pre posun reťaze
14b
Regulačná matica pre posun reťaze
15
Zarážka
16
Držiak kábla
17
Sieťový kábel
18a
Brúsny kotúč
18b
Matica brúsneho kotúča
19
LED-lampa (nie je zobrazená)
20
Clona pre ochrana zraku
21
Vetracie otvory (nie sú zobrazené)
22
Pracovná plocha
23
Skrutka (pre upevnenie stola)
24a
Podložka pod maticu (pre upevnenie stola)
24b
Matica (pre upevnenie stola)
25
Podložné koliesko (pre regulačnú skrutku)
26
Upevňovacia matica (pre regulačnú skrutku)
27
Rezný zub (pílová reťaz)
28
Špička hĺbkového oddeľovača (pílová reťaz)
Obsah dodávky
1 brúska pílových reťazí s integrovaným brúsnym
kotúčom
1 rukoväť
1 upínacie zariadenie s fixačnou skrutkou
1 regulačná skrutka + podložka
2 skrutky s maticami a podložnými kolieskami
pre upevnenie stola
1 návod na používanie
Technické údaje
Menovité vstupné
napätie: 220–240 V∼ (strie-
davý prúd), 50 Hz
Príkon: max. 85 W
(S2: 15 min)*
Menovitá doba kľudu: cca. 5 min.
Trieda ochrany: II /
Menovitý počet
voľnobežných otáčok n
: 5000 min
0
-1**
Uhol nastavenia: 35° vľavo / vpravo
Pre pílové reťaze s
rozmerom článkov: 6,35 / 8,255 /
9,52 mm (¹/₄“ /
0,325“
/ ³/₈“)
Rozmery brúsneho kotúča:
Vonkajší priemer: Ø 104 mm (4
¹/₁₆
in)
Priemer diery: Ø 22 mm
Hrúbka: 3,2 mm
Hmotnosť (inkl.
príslušenstva): cca. 2,3 kg
Emisná hodnota hluku:
A-zhodnotená hladina hluku elektronáradia obnáša, typicky:
Hladina akustického
tlaku
: 65,5 dB(A)
Odchýlka K
: 3 dB
Hladina akustického
výkonu
Odchýlka K
: 78,5 dB(A)
: 3 dB
52 SK
Page 53

* Krátkodobé ovládanie: Nepoužívajte výrobok
dlhšie ako 15 minút vkuse.
** Maximálna rýchlosť obehu brúsneho kotúča
40 m/s. Brúsny kotúč musí vydržať s rýchlosťou
obehu minimálne 27,8 m/s. Ak je maximálna
rýchlosť obehu brúsneho kotúča v porovnaní s
prístrojom príliš malá, môže sa kotúč zlomiť!
Všeobecné bezpečnostné
upozornenia
POZOR! Pri používaní elektronáradia je
potrebné dodržiavať nasledujúce základné
bezpečnostné opatrenia pre ochranu proti
zásahu elektrickým prúdom, nebezpečenstvu
poranenia a požiaru. Pred používaním tohto
elektroprístroja si prečítajte všetky tieto pokyny
a dobre ich uschovajte.
Bezpečná práca
1. Udržiavajte Vaše pracovisko v
poriadku
Neporiadok na pracovisku môže mať za
následok nehody.
2. Zohľadnite okolité vplyvy
Nevystavujte elektroprístroje dažďu.
Nepoužívajte elektroprístroje vo vlhkom
alebo mokrom prostredí.
Postarajte sa o dobré vetranie pracovnej
oblasti.
Nepoužívajte elektronáradie na miestach s
nebezpečenstvom požiaru alebo explózie.
3. Chráňte sa pred zásahom elektrickým prúdom
Zabráňte kontaktu tela s uzemnenými
časťami (napr. rúrami, radiátormi, elektrosporákmi, chladiacimi prístrojmi).
4. Držte iné osoby v bezpečnej
vzdialenosti od produktu
Nedovoľte iným osobám, najmä deťom,
aby sa dotýkali elektronáradia alebo kábla.
Držte ich vzdialené od Vášho pracoviska.
5. Nepoužívané elektronáradie
uskladnite na bezpečnom mieste
Nepoužívané elektronáradie by malo byť
uskladnené na suchom, vysoko položenom
alebo uzamknutom mieste mimo dosahu detí.
6. Nepreťažujte Vaše elektronáradie
Lepšie a bezpečnejšie pracujete v uvedenej
oblasti výkonu.
7. Používajte správne elektronáradie
Pri ťažkých prácach nepoužívajte prístroje
so slabým výkonom.
Nepoužívajte elektronáradie na účely, pre
ktoré nie je určené. Nepoužívajte napríklad
ručnú kotúčovú pílu na rezanie konárov
stromov alebo polien.
8. Noste vhodné oblečenie
Nenoste široké oblečenie alebo visiace
ozdoby, mohli by ich zachytiť pohyblivé časti.
Pri prácach vonku odporúčame obuv
zabezpečenú proti šmyku.
V prípade dlhých vlasov noste sieťku na vlasy.
Pri práci vždy noste
ochranu očí a sluchu.
Používajte prosím osobnú ochrannú výbavu
(napr. ochranné rukavice a iné ochranné
oblečenie).
9. Používajte ochranné vybavenie
Noste ochranné okuliare.
Pri prácach, ktoré zapríčiňujú vznik prachu,
používajte dýchaciu masku.
10. Zapojte zariadenie pre odsávanie
prachu
Ak sú prítomné prípojky pre odsávanie pra-
chu a zachytávacie zariadenie, presvedčte
sa, že sú zapojené a správne používané.
11. Používajte kábel iba na účely, pre
ktoré je určený
Nepoužívajte kábel na vyťahovanie zá-
strčky zo zásuvky. Chráňte kábel pred horúčavou, olejom a ostrými hranami.
12. Zaistite obrábaný predmet
Používajte upínacie zariadenia alebo zverák,
aby ste upevnili obrobok. Vďaka tomu bude
upevnený bezpečnejšie ako vo Vašej ruke.
53 SK
Page 54

13. Zabráňte abnormálnemu
držaniu tela
Dbajte na pevný postoj a na to, aby ste
vždy stáli v rovnováhe.
14. Dôkladne sa starajte o Vaše náradie
Udržiavajte Vaše rezné náradie ostré a
čisté, aby ste mohli lepšie pracovať.
Riaďte sa pokynmi pre mazanie a výmenu
náradia.
Pravidelne kontrolujte prívodové vedenie
elektronáradia a v prípade poškodenia ho
nechajte vymeniť kvalifikovaným odborníkom.
Pravidelne kontrolujte predlžovacie vedenia
a vymeňte ich, keď sú poškodené.
Rukoväte udržiavajte suché, čisté a bez
oleja a mastnoty.
15. Sieťovú zástrčku vytiahnite zo
zásuvky
Pri nepoužívaní náradia, pred údržbou a
výmenou náradí ako sú napr. pílové kotúče,
vrtáky, frézy.
16. Nenechávajte zastrčené skrutkové
kľúče
Pred zapnutím skontrolujte, či sú kľúče a
nastavovacie náradie odstránené.
17. Zabráňte neúmyselnému zapnutiu
Uistite sa, že je spínač pri strkaní zástrčky
do zásuvky vypnutý.
18. V oblasti exteriéru používajte
predlžovací kábel
Vonku používajte iba vhodné a príslušne
označené predlžovacie káble.
19. Buďte opatrný
Dbajte na to, čo robíte. Pri práci postupujte
rozvážne. Nepoužívajte elektronáradie, ak
ste nesústredený.
20. Skontrolujte elektronáradie
ohľadom prípadných poškodení
Pred ďalším používaním elektronáradia je
nutné dôkladne skontrolovať ochranné zariadenia alebo ľahko poškodené časti ohľadom bezchybného a náležitého fungovania.
Skontrolujte, či pohyblivé časti bezchybne
fungujú a nie sú zaseknuté, alebo či niektoré časti nie sú poškodené. Všetky časti
musia byť správne namontované a musia
spĺňať všetky podmienky, aby bola zabezpečená bezchybná prevádzka elektroprístroja.
Poškodené ochranné zariadenia a časti
musia byť opravené alebo vymenené v súlade
s určením prostredníctvom autorizovaného
servisného pracoviska, pokiaľ v návode na
používanie nie je uvedené nič iné.
Poškodené spínače musia byť vymenené
zákazníckou servisnou službou.
Nepoužívajte elektroprístroje, ktorých
spínač nie je možné za- alebo vypnúť.
21. POZOR!
Používanie iných vkladaných nástrojov a
iného príslušenstva pre Vás môže znamenať
nebezpečenstvo poranenia.
22. Opravu elektronáradia prenechajte elektroodborníkovi
Toto elektronáradie je v súlade s príslušnými
bezpečnostnými ustanoveniami. Opravy
smie vykonať iba elektroodborník s použitím
originálnych dielov; inak môže dôjsť k
ohrozeniu používateľa.
Nasledujúce zvyškové riziká ostávajú napriek
opatreniam pokúšajúcim sa vytvoriť mimoriadne
bezpečnú konštrukciu a napriek bezpečnostným
a dodatočným bezpečnostným opatreniam:
Brúsny kotúč sa točí i po vypnutí náradia. Hrozí
nebezpečenstvo poranenia.
Ďalšie bezpečnostné
upozornenia
Zapojte výrobok iba do zásuvky s ochra-
nou proti chybovému prúdu (FI-spínač) s
menovitým chybovým prúdom menším ako
30 mA.
Držte sieťový a predlžovací kábel v bezpeč-
nej vzdialenosti od brúsneho kotúča ako aj
pílovej reťaze. V prípade poškodenia alebo
prerezania okamžite vytiahnite sieťovú zástrčku zo zásuvky. Nedotýkajte sa vedenia,
kým je zapojené do siete. Nebezpečenstvo
zásahu elektrickým prúdom!
Pred použitím vizuálne skontrolujte brúsny
kotúč.
54 SK
Page 55

Nepoužívajte brúsne kotúče s odlomeni-
nami, trhlinami alebo inými poškodeniami.
Opotrebovaný brúsny kotúč vymeňte.
Nikdy nepoužívajte výrobok bez clony pre
ochranu zraku.
Nepracujte s výrobkom, ak ste unavený
alebo po konzume alkoholu alebo liekov. V
správnych intervaloch robte prestávky.
Nepoužívajte výrobok v atmosfére s nebez-
pečenstvom výbuchu alebo tam, kde by
mohol spôsobiť iskry, požiar, explóziu atď.
Pri nerešpektovaní existuje nebezpečenstvo
požiaru alebo explózie.
Dbajte na to, aby boli vetracie otvory pri
prašných prácach vždy voľné.
Keď je výrobok v prevádzke, držte Vaše
ruky vždy v bezpečnej vzdialenosti od brúsneho kotúča a zubov reťaze. Neposúvajte
pílovú reťaz rukami. Hrozí nebezpečenstvo
poranenia.
Nikdy nedržte prsty medzi brúsnym kotú-
čom a otočným tanierom, alebo medzi
brúsnym kotúčom a ochranným diskom.
Vzniká nebezpečenstvo pomliaždenia.
Pílová reťaz je počas brúsenia horúca. Ne-
dotýkajte sa jej na opracovávanom mieste,
vzniká nebezpečenstvo popálenia.
Používajte iba brúsne kotúče odporúčané
výrobcom. Nepoužívajte pílové listy.
Vypnite produkt a vytiahnite sieťovú zá-
strčku zo zásuvky, keď chcete uvoľniť
- zaseknuté vložené náradie,
- keď je sieťový kábel poškodený alebo
zamotaný,
- pri nezvyčajných zvukoch.
Pred uvedením do
prevádzky
Poznámka: Úplne prosím odstráňte obalový
materiál.
Ovládajúca osoba by pri používaní mala
stáť blízko pri produkte, aby sa vyhla nepotrebnému naťahovaniu tela a v dôsledku
toho nestabilnému postoju.
Montáž
Poznámka: Výrobok vždy upevnite pomocou
priložených skrutiek (M10 x 60).
Dbajte na to, aby ste mali dostatok miesta
pri práci a neohrozovali pritom iné osoby.
Výrobok upevnite na pracovnú plochu vždy
pomocou skrutiek dostatočnej dĺžky a
hrúbky, aby ste nestratili kontrolu nad
výrobkom.
Postavenie výrobku
(pozri obr. B)
- Hrúbka hrany použitého stola: 15–30 mm
- Priemer vrtáka: 10,5 mm
- veľkosť skrutiek: M10
Výrobok upevnite na pracovnú plochu 22
pomocou zastavujúcich zárezov
podstavec
hranu stola.
Ceruzkou označte otvory pre vŕtanie a
opäť odnímte výrobok.
Teraz vyvŕtajte dva otvory do pracovnej
plochy
Pevne prišróbujte brúsny podstavec prilože-
nými skrutkami
cami
8
pritom musí vyčnievať ponad
22
.
23
, podložkami
24b
na pracovnú plochu.
9
24a
. Brúsny
a mati-
Montáž výrobku
(pozri obr. C)
Prišróbujte rukoväť 4 na brúsnu hlavicu 2.
Uvoľnite fixačnú skrutku 10 z upínacieho
zariadenia pre reťaze
Nasaďte upínacie zariadenie pre reťaze
12
na brúsny podstavec 8 a pevne ho
priskrutkujte fixačnou skrutkou
Príp. upevnite sieťový kábel 17 v držiaku
pre kábel
16
.
12
.
10
.
55 SK
Page 56

Montáž regulačnej skrutky
(pozri obr. C)
Umiestnite priloženú podložku 25 na regu-
lačnú skrutku
Prišróbujte regulačnú skrutku 6 na upevňo-
vaciu skrutku, ktorá je pevne namontovaná
na brúsnej hlavici
6
.
26
.
Uvedenie do prevádzky
Za- a vypnutie
Poznámka: Dbajte na to, aby sa sieťové na-
pätie uvedené na typovom štítku zhodovalo s
napätím zdroja prúdu.
Poznámka: Pred prvou prácou a po každej
výmene brúsneho kotúča nechajte na minimálne
30 sekúnd bežat skúšobný chod bez záťaže.
Výrobok ihneď vypnite, ak brúsny kotúč beží nepravidelne, vyskytnú sa značné kmity alebo počujete atypické zvuky.
POZOR! NEBEZPEČENSTVO
PORANENIA!
Používajte iba brúsne kotúče a časti príslu-
šenstva odporúčané výrobcom. Používanie
iných vkladaných nástrojov alebo iného príslušenstva, ako je odporúčané v návode na
používanie, môže pre Vás znamenať riziko
poranenia.
Nikdy nepoužívajte výrobok bez clony pre
ochranu zraku.
Nepoužívajte pílové listy.
Pred každou prácou vytiahnite z výrobku
sieťovú zástrčku.
Pred použitím skontrolujte brúsny kotúč:
Skontrolujte odstup medzi clonou pre
ochranu zraku a brúsnym kotúčom.
Nepoužívajte poškodené alebo zdeformo-
vané brúsne kotúče.
Výrobok zapnite až vtedy, keď je bezpečne
namontovaný na pracovnej ploche.
POZOR! NEBEZPEČEN-
STVO PORANENIA! Noste
ochranu očí a sluchu.
Pri práci s pílovou reťazou noste
rukavice zabezpečené proti pre-
rezaniu a ak je to potrebné, aj
zásteru, aby ste predišli rezným poraneniam.
Keď je výrobok v prevádzke,
držte Vaše ruky vždy v bezpeč-
nej vzdialenosti od brúsneho
kotúča a zubov reťaze. Neposúvajte pílovú
reťaz rukami. Hrozí nebezpečenstvo poranenia.
Zapojte sieťový kábel do
zásuvky (dbajte na sieťové
napätie).
Pre zapnutie stlačte zapínač „I“ (zelený) 1a.
Pre vypnutie stlačte vypínač „0“ (červený) 1b.
Brúsny kotúč ešte chvíľu po vypnutí prístroja
beží. Hrozí nebezpečenstvo poranenia.
Poznámka: Tento výrobok je vybavený
LED-lampou
zapne, keď stlačíte zapínač
automaticky vypne, keď stlačíte vypínač
Poznámka: Výrobok disponuje ochranou
proti opätovnému zapnutiu: Po automatickom
vypnutí v dôsledku prerušenia prívodu prúdu
alebo ochrany pred preťažením sa výrobok
sám znova nezapne. Pre nové zapnutie stlačte
zapínač „I“ (zelený)
19
. LED-lampa sa automaticky
1a
. LED-lampa sa
1a
, výrobok sa zapne.
1b
.
Brúsenie pílovej reťaze
(pozri obr. D)
Poznámka: Dbajte na to, aby boli vetracie
otvory pri prašných prácach vždy voľné (pozri
„Údržba a čistenie“).
V prípade zaseknutia vypnite
produkt a vytiahnite sieťovú zá-
strčku zo zásuvky. Až potom od-
stráňte blokáciu.
Nesprávne vybrúsená pílová reťaz môže
poškodiť výrobok a zvýšiť nebezpečenstvo
spätného nárazu píly!
56 SK
Page 57

Dbajte na správne vyrovnanie pílovej re-
ťaze. Dbajte na správny uhol ostrenia a
minimálne rozmery reťaze. Odstráňte čo
najmenej materiálu.
Nebrúste hnacie články (a) alebo spojova-
cie články (b), pílová reťaz by sa mohla roztrhnúť. V prípade nerešpektovania hrozí
nebezpečenstvo poranenia pri nárabaní s
pílovou reťazou.
reťaze 12 potrebný uhol ostrenia α s pomocou škály
11
.
Následne opäť pevne zatiahnite fixačnú
10
skrutku
.
Poznámka: Uhol ostrenia nastavte podľa
údajov od výrobcu.
b a
Poznámka: Pred brúsením vyčistite pílovú
reťaz. Zvyšky dreva alebo zvyšky oleja odstráňte handričkou.
Poznámka: Všetky rezné články musia byť
po brúsení rovnako dlhé a široké.
Poznámka: Pílová reťaz je opotrebovaná
a musí byť nahradená novou pílovou reťazou, ak ostali len cca. 4 mm rezných
zubov.
Vloženie pílovej reťaze:
Pre otvorenie vodiacej koľajničky pre reťaz
otočte upínaciu páku
nových ručičiek. Za týmto účelom musíte
upínaciu páku viackrát posunúť do východiskovej polohy. Pre odblokovanie upínacej
páky potiahnite upínaciu páku smerom von
a nechajte ju po vrátení naspäť do východiskovej polohy opäť zapadnúť.
Vložte pílovú reťaz do vodiacej koľajničky
pre reťaze
7
vať smerom k brúsnemu kotúču
Vyklopte doraz 15 smerom nadol a potiah-
nite pílovú reťaz čo najďalej dozadu, až
kým rezný zub určený na brúsenie
prilieha na doraze (pozri obr. D1).
Nastavenie uhla ostrenia:
Uvoľnite fixačnú skrutku 10 a nastavte na
otočnom tanieri upínacieho zariadenia pre
13
proti smeru hodi-
. Rezné hrany musia ukazo-
18a
.
27
Nastavenie dorazu:
Hýbte brúsnou hlavicou 2 na rukoväti 4
pri vypnutom motore nadol.
Pomocou regulačnej skrutky pre posun re-
14a
ťaze
priblížte rezný zub 27 k brúsnemu
18a
kotúču
, až kým rezný zub neprilieha na
brúsnom kotúči (pozri obr. D2). Zaistite regulačnú skrutku
14b
matice
14a
pomocou regulačnej
.
Zaistite reťazové články vo vodiacej lište
pre reťaze
7
otáčaním upínacej páky 13
v smere hodinových ručičiek.
Nastavte hĺbkovú zarážku pomocou regu-
lačnej skrutky
18a
dotýkal základne ozubenia (pozri obr.
6
tak, aby sa brúsny kotúč
D2). Zaistite hĺbku brúsenia
pomocou regulačnej matice
6
.
Brúsenie:
Zapnite výrobok (pozri kapitolu „Za- a
vypínanie“).
Brúste rezný zub 27 tak, že brúsnu hlavicu
2
posúvate nadol jemným tlakom na ruko-
4
väť
.
Brúsny kotúč
18a
nesmie byť pribrzdený do
zastavenia. Pre zabránenie včas znížte prítlačnú silu.
Pre ďalší presun pílovej reťaze vypnite výro-
bok. Uvoľnite upínaciu páku
13
a zafixujte
ďalšiu časť reťaze určenú pre brúsenie pomocou nastavovacej záražky
15
a
57 SK
Page 58

upínacej páky vo vodiacej koľajničke pre
7
reťaze
.
Poznámka: Najskôr naostrite zuby jed-
nej strany reťaze. Potom prestavte uhol
ostrenia a naostrite zuby druhej strany.
Kontrola odstupu hĺbkového
oddeľovača (pozri obr. D3):
Píliace časti pílovej reťaze sú rezné časti, ktoré
sa skladajú z rezného zubu
vého oddeľovača
28
27
a špičky hĺbko-
. Odstup medzi nimi
dvoma určuje odstup hĺbkového oddeľovača A.
Po každom treťom brúsení skontrolujte
odstup hĺbkového oddeľovača A podľa
údajov výrobcu pílovej reťaze.
Obrúste výšku špičky hĺbkového oddeľo-
28
vača
plochým pilníkom a po
vrátení naspäť trochu zaoblite špičku hĺbkového oddeľovača. Pôvodný tvar musí ostať
zachovaný.
Údržba a čistenie
Pred každým nastavovaním,
údržbou alebo opravou vždy
vytiahnite sieťovú zástrčku zo
zásuvky.
Práce, ktoré nie sú uvedené v tomto návode
na používanie, prenechajte odbornému
servisnému pracovisku. Používajte iba originálne diely. Pred všetkými údržbovými a čistiacimi prácami nechajte výrobok
vychladnúť. Existuje nebezpečenstvo popálenia.
Pred každým používaním skontrolujte výro-
bok ohľadom prípadných poškodení ako sú
uvoľnené, opotrebované alebo poškodené
diely, správne priliehanie skrutiek alebo
iných častí. Skontrolujte najmä brúsny
18a
kotúč
. Poškodené časti vymeňte.
Čistenie
Nepoužívajte čistiace prostriedky resp. roz-
púšťadlá. Chemické substancie môžu napádať umelohmotné časti výrobku. Výrobok
nikdy nečistite pod tečúcou vodou.
Výrobok po každom použití očistite.
Vetracie otvory 21 a povrch výrobku čistite
mäkkou kefou, štetcom alebo handričkou.
Vodiacu koľajničku pre reťaz 7 vyčistite
kefou.
Pri silnom znečistení uvoľnite fixačnú skrutku
pre upínacie zariadenie pre reťaz
10
a vy-
berte upínacie zariadenie s otočným tanie-
12
rom
pre lepšiu prístupnosť. Pri čistení
odporúčame odobratie bočných plechov.
Výmena brúsneho kotúča
(pozri obr. E)
Pokyny pre výmenu brúsneho kotúča:
Nikdy nepoužívajte výrobok bez ochrany
20
zraku
Uistite sa, že počet otáčok uvedený na
brúsnom kotúči
ako menovitý počet voľnobežných otáčok
výrobku. Uistite sa, že rozmery brúsneho
kotúča sa hodia k výrobku. Ak je maxi-
málna rýchlosť obehu kotúča v porovnaní s
výrobkom príliš malá, môže sa kotúč zlomiť!
Používajte iba bezchybné brúsne kotúče
(zvuková skúška).
Ak je otvor na brúsnom kotúči príliš malý,
dodatočne ho nevŕtajte.
Nepoužívajte samostatné redukcie alebo
adaptéry, aby ste prispôsobili brúsne
kotúče s príliš veľkou dierou.
Nepoužívajte pílové listy.
Po výmene brúsneho kotúča výrobok znova
kompletne zmontujte.
Vypnite produkt a vytiahnite sie-
Uvoľnite 3 upevňovacie skrutky 5 a vy-
berte kryt brúsneho kotúča
Rukou odšróbujte maticu brúsneho kotúča
.
18a
je rovnaký alebo väčší
ťovú zástrčku zo zásuvky. Nechajte produkt vychladnúť.
3
.
18b
.
58 SK
Page 59

Vyberte brúsny kotúč
18a
z uchytenia.
Nasaďte nový brúsny kotúč na uchytenie a
rukou prišróbujte maticu brúsneho kotúča.
Opäť priskrutkujte kryt brúsneho kotúča 3.
Poznámka: Matica brúsneho kotúča nesmie byť príliš utiahnutá, aby nedošlo k zlomeniu brúsneho kotúča a matice.
Pred prvou prácou a po každej výmene
brúsneho kotúča nechajte na minimálne
30 sekúnd bežat skúšobný chod bez záťaže.
Výrobok ihneď vypnite, ak brúsny kotúč
beží nepravidelne, vyskytnú sa značné
kmity alebo počujete atypické zvuky.
Skladovanie
O možnostiach likvidácie opotrebovaného výrobku sa môžete informovať na Vašej obecnej alebo mestskej
správe.
Ak výrobok doslúžil, v záujme
ochrany životného prostredia ho
neodhoďte do domového odpadu,
ale odovzdajte na odbornú likvidáciu. Informácie o zberných miestach
a ich otváracích hodinách získate na
Vašej príslušnej správe.
Servis
Produkt skladujte na suchom a bezprašnom
mieste a mimo dosahu detí.
Poznámka: Brúsne kotúče musia byť skladované v suchu a postavené na výšku a nesmú byť naskladané na seba.
Likvidácia
Obal pozostáva z ekologických
materiálov, ktoré môžete odovzdať
na miestnych recyklačných zberných
miestach. Označenie Grüne Punkt
(Zelený bod) neplatí pre Nemecko.
Všímajte si prosím označenie obalo-
b
vých materiálov pre triedenie od-
a
padu, sú označené skratkami (a) a
číslami (b) s nasledujúcim významom: 1–7: Plasty / 20–22: Papier a
kartón / 80–98: Spojené látky.
Výrobok a obalové materiály sú
recyklovateľné, zlikvidujte ich oddelene pre lepšie spracovanie odpadu.
Triman-Logo platí iba pre Francúzsko.
Opravami produktu poverte len servisné
pracovisko alebo elektroodborníka a pou-
žite len originálne náhradné diely. Tým
ostane zaistená bezpečnosť produktu.
Výmenou zástrčky alebo sieťového vedenia
poverte vždy výrobcu produktu alebo jeho
zákaznícky servis. Tým ostane zaistená
bezpečnosť produktu.
Postup v prípade
poškodenia v záruke
Pre zaručenie rýchleho spracovania Vašej požiadavky dodržte prosím nasledujúce pokyny:
Pre všetky otázky majte pripravený pokladničný
doklad a číslo výrobku (napr. IAN 123456)
ako dôkaz o kúpe.
Číslo výrobku nájdete na typovom štítku,
gravúre, na prednej strane Vášho návodu
(dole vľavo) alebo ako nálepku na zadnej
alebo spodnej strane.
Ak sa vyskytnú funkčné poruchy alebo iné
nedostatky, najskôr telefonicky alebo e-mailom
kontaktujte následne uvedené servisné oddelenie.
Produkt označený ako defektný potom môžete s
priloženým dokladom o kúpe (pokladničný
lístok) a uvedením, v čom spočíva nedostatok a
59 SK
Page 60

kedy sa vyskytol, bezplatne odoslať na Vám
oznámenú adresu servisného pracoviska.
Servis
Servis slovensko
Tel.: 0850 232001
(0.13 €/min)
E-pošta: owim@lidl.sk
IAN 285177
Záruka
Tento výrobok bol dôkladne vyrobený podľa
prísnych akostných smerníc a pred dodaním
svedomito testovaný. V prípade nedostatkov tohto
výrobku Vám prináležia zákonné práva voči
predajcovi produktu. Tieto zákonné práva nie sú
našou nižšie uvedenou zárukou obmedzené.
Na tento produkt poskytujeme 3-ročnú záruku
od dátumu nákupu. Záručná doba začína plynúť dátumom kúpy. Starostlivo si prosím uschovajte originálny pokladničný lístok. Tento doklad
je potrebný ako dôkaz o kúpe.
Ak sa v rámci 3 rokov od dátumu nákupu tohto
výrobku vyskytne chyba materiálu alebo výrobná chyba, výrobok Vám bezplatne opravíme
alebo vymeníme – podľa nášho výberu. Táto
záruka zaniká, ak bol produkt poškodený, neodborne používaný alebo neodborne udržiavaný.
Poskytnutie záruky sa vzťahuje na chyby materiálu a výrobné chyby. Táto záruka sa nevzťahuje
na časti produktu, ktoré sú vystavené normálnemu opotrebovaniu, a preto ich je možné považovať za opotrebovateľné diely (napr. batérie)
alebo na poškodenia na rozbitných dieloch,
napr. na spínači, akumulátorových batériach
alebo častiach, ktoré sú zhotovené zo skla.
Preklad originálneho
konformitného prehlásenia
My, OWIM GmbH & Co. KG, Stiftsbergstraße 1,
DE-74167 Neckarsulm, NEMECKO, prehlasujeme vo výlučnej zodpovednosti, že výrobok:
Prístroj na ostrenie reťazí FSG 85 D1, model č.:
HG02366, verzia: 04 / 2017, na ktorý sa vzťahuje toto prehlásenie, je v súlade s normami /
normatívnymi dokumentami 2006/42/ES,
2014/30/EÚ, 2011/65/EÚ.
Použité harmonizované normy:
EN 61029-1/A11:2010
EN ISO 12100:2010
EN 55014-1/A2:2011
EN 55014-2: 2015
EN 61000-3-2:2014
EN 61000-3-3:2013
Sériové číslo: IAN 285177
Tobias König
Vedúci oddelenia /Zodpovedný za dokumenty
OWIM GmbH & Co. KG, Stiftsbergstraße 1,
DE-74167 Neckarsulm, NEMECKO
Neckarsulm, 12.01.2017
Konformitné prehlásenie nájdete i na:
www.owim.com.
Vyššie popísaný predmet prehlásenia spĺňa
predpisy smernice 2011/65/EÚ Európskeho
parlamentu a Rady z 8. júna 2011 o obmedzení
používania určitých nebezpečných látok v elektrických a elektronických zariadeniach.
60 SK
Page 61

Legende der verwendeten Piktogramme ................................................Seite 62
Einleitung ..............................................................................................................................Seite 62
Bestimmungsgemäße Verwendung .........................................................................................Seite 62
Teilebeschreibung ....................................................................................................................Seite 63
Lieferumfang .............................................................................................................................Seite 63
Technische Daten .....................................................................................................................Seite 63
Allgemeine Sicherheitshinweise .......................................................................Seite 64
Sicheres Arbeiten .....................................................................................................................Seite 64
Weiterführende Sicherheitshinweise .......................................................................................Seite 66
Vor der Inbetriebnahme .........................................................................................Seite 66
Montage ................................................................................................................................Seite 66
Produkt aufstellen .....................................................................................................................Seite 66
Produkt montieren ....................................................................................................................Seite 67
Stellschraube montieren...........................................................................................................Seite 67
Inbetriebnahme ..............................................................................................................Seite 67
Ein- und Ausschalten ................................................................................................................Seite 67
Sägekette schärfen...................................................................................................................Seite 68
Wartung und Reinigung ..........................................................................................Seite 69
Reinigen ....................................................................................................................................Seite 69
Schleifscheibe wechseln ..........................................................................................................Seite 70
Lagerung ..............................................................................................................................Seite 70
Entsorgung ..........................................................................................................................Seite 70
Service ....................................................................................................................................Seite 71
Abwicklung im Garantiefall .....................................................................................................Seite 71
Service ......................................................................................................................................Seite 71
Garantie ................................................................................................................................Seite 71
Original-Konformitätserklärung ......................................................................Seite 72
61 DE/AT/CH
Page 62

Legende der verwendeten Piktogramme
Lesen Sie die
Bedienungsanleitung.
Tragen Sie Gehörschutz.
Tragen Sie eine Staubschutzmaske.
Verletzungsgefahr durch sich
drehendes Werkzeug! Halten Sie
Hände fern.
Gefahr durch elektrischen Schlag!
Ziehen Sie vor Wartungs- und
Reparaturarbeiten den Netzstecker
aus der Steckdose.
Schützen Sie das Produkt vor
Nässe.
Schutzklasse II (Doppelisolierung)
Kettenschärfgerät FSG 85 D1
Tragen Sie Augenschutz.
Tragen Sie schützendes,
rutschfestes Schuhwerk.
Tragen Sie schnittsichere
Handschuhe. Gefahr durch
Schnittverletzungen.
Achtung!
Keine defekte Schleifscheibe
einsetzen.
Abmessungen Schleifscheibe.
Bestimmungsgemäße
Verwendung
Einleitung
Wir beglückwünschen Sie zum Kauf Ihres neuen
Produkts. Sie haben sich damit für ein hochwertiges Produkt entschieden. Die Bedienungsanleitung ist Teil dieses Produkts. Sie enthält wichtige
Hinweise für Sicherheit, Gebrauch und Entsorgung. Machen Sie sich vor der Benutzung des
Produkts mit allen Bedien- und Sicherheitshinweisen vertraut. Benutzen Sie das Produkt nur wie
beschrieben und für die angegebenen Einsatzbereiche. Händigen Sie alle Unterlagen bei
Weitergabe des Produkts an Dritte mit aus.
62 DE/AT/CH
Das Produkt eignet sich zum Schärfen der
gängigen Sägekettentypen. Für alle anderen
Anwendungen (z. B. Schleifen mit einer
Kühlflüssigkeit, Schleifen anderer Werkstücke
oder gesundheitsgefährdender Materialien wie
Asbest) ist das Produkt nicht vorgesehen. Die
Beleuchtung am Produkt dient dazu, den unmittelbaren Arbeitsbereich zu beleuchten und ist
nicht für den Einsatz als Raumbeleuchtung im
Haushalt vorgesehen. Jede andere Verwendung
oder Veränderung des Produkts gilt als nicht
bestimmungsgemäß und birgt erhebliche Unfallgefahren. Für aus bestimmungswidriger Verwendung entstandene Schäden übernimmt der
Hersteller keine Haftung. Nicht für den gewerblichen Einsatz bestimmt.
Page 63

Teilebeschreibung
1
Ein- / Ausschalter
1a
Einschalter
1b
Ausschalter
2
Schleifkopf
3
Schleifscheiben-Abdeckung
4
Handgriff
5
Befestigungsschrauben für Schleifscheiben-
Abdeckung
6
Stellschraube und Stellmutter für den
Tiefenanschlag
7
Kettenführungsschiene
8
Schleifsockel
9
Anschlagkerben
10
Feststellschraube für die Kettenspanneinheit
11
Skala für Schärfwinkel (+35° bis -35°)
12
Kettenspanneinheit mit Drehteller
13
Spannhebel zur Kettenfixierung
14
Stellschraube und Stellmutter für den
Kettenvorschub
14a
Stellschraube für den Kettenvorschub
14b
Stellmutter für den Kettenvorschub
15
Anschlag
16
Kabelhalter
17
Netzkabel
18a
Schleifscheibe
18b
Schleifscheiben-Mutter
19
LED-Lampe (nicht abgebildet)
20
Sichtschutzscheibe
21
Lüftungsöffnungen (nicht abgebildet)
22
Arbeitsfläche
23
Schraube (zur Tischbefestigung)
24a
Unterlegscheibe (zur Tischbefestigung)
24b
Mutter (zur Tischbefestigung)
25
Unterlegscheibe (für Stellschraube)
26
Befestigungsmutter (für Stellschraube)
27
Schneidezahn (Sägekette)
28
Tiefenbegrenzernase (Sägekette)
2 Schrauben mit Muttern und Unterlegscheiben
zur Tischbefestigung
1 Bedienungsanleitung
Technische Daten
Nenneingangsspannung: 220–240 V∼ (Wech-
selstrom), 50 Hz
Leistungsaufnahme: max. 85 W
(S2: 15 min)*
Bemessungsruhedauer: ca. 5 min
Schutzklasse: II /
Bemessungs-Leerlaufdrehzahl n
: 5000 min
0
Einstellwinkel: 35° links / rechts
Für Sägeketten mit
Gliedermaß: 6,35 / 8,255 /
9,52 mm
(¹/₄“ / 0,325“
Abmessungen Schleifscheibe:
Außendurchmesser: Ø 104 mm (4
Lochdurchmesser: Ø 22 mm
Stärke: 3,2 mm
Gewicht (inkl. Zubehör): ca. 2,3 kg
Geräuschemissionswert:
Der A-bewertete Geräuschpegel des Elektrowerkzeugs beträgt, typischerweise:
Schalldruckpegel
Unsicherheit K
Schallleistungspegel
Unsicherheit K
: 65,5 dB(A)
: 3 dB
: 78,5 dB(A)
: 3 dB
* Kurzzeit-Bedienung: Verwenden Sie das
Produkt nicht länger als 15 Minuten am Stück.
-1**
/ ³/₈“)
¹/₁₆
in)
Lieferumfang
1 Kettenschärfgerät mit montierter Schleifscheibe
1 Handgriff
1 Kettenspanneinheit mit Feststellschraube
1 Stellschraube + Unterlegscheibe
** Maximiale Umlaufgeschwindigkeit der Schleifscheibe 40 m/s. Die Schleifscheibe muss einer
Umlaufgeschwindigkeit von mind. 27,8 m/s
standhalten. Ist die max. Umlaufgeschwindigkeit
der Scheibe im Gegensatz zum Gerät zu klein,
kann diese zerbrechen!
63 DE/AT/CH
Page 64

Allgemeine
Sicherheitshinweise
ACHTUNG! Beim Gebrauch von Elektrowerk-
zeugen sind zum Schutz gegen elektrischen
Schlag, Verletzungs- und Brandgefahr folgende
grundsätzliche Sicherheitsmaßnahmen zu beachten. Lesen Sie alle diese Hinweise, bevor Sie
dieses Elektrowerkzeug benutzen, und bewahren Sie die Sicherheitshinweise gut auf.
Sicheres Arbeiten
1. Halten Sie Ihren Arbeitsbereich in
Ordnung
Unordnung im Arbeitsbereich kann Unfälle
zur Folge haben.
2. Berücksichtigen Sie
Umgebungseinflüsse
Setzen Sie Elektrowerkzeuge nicht dem
Regen aus.
Benützen Sie Elektrowerkzeuge nicht in
feuchter oder nasser Umgebung.
Sorgen Sie für gute Beleuchtung des
Arbeitsbereichs.
Benutzen Sie Elektrowerkzeuge nicht, wo
Brand- oder Explosionsgefahr besteht.
3. Schützen Sie sich vor elektrischem
Schlag
Vermeiden Sie Körperberührung mit geer-
deten Teilen (z. B. Rohren, Radiatoren,
Elektroherden, Kühlgeräten).
4. Halten Sie andere Personen fern
Lassen Sie andere Personen, insbesondere
Kinder, nicht das Elektrowerkzeug oder das
Kabel berühren. Halten Sie sie von Ihrem
Arbeitsbereich fern.
5. Bewahren Sie unbenutzte
Elektrowerkzeuge sicher auf
Unbenutzte Elektrowerkzeuge sollten an ei-
nem trockenen, hochgelegenen oder abgeschlossenen Ort, außerhalb der Reichweite
von Kindern, abgelegt werden.
6. Überlasten Sie Ihr Elektrowerkzeug nicht
Sie arbeiten besser und sicherer im angege-
benen Leistungsbereich.
7. Benutzen Sie das richtige
Elektrowerkzeug
Verwenden Sie keine leistungsschwachen
Maschinen für schwere Arbeiten.
Benutzen Sie das Elektrowerkzeug nicht für
solche Zwecke, für die es nicht vorgesehen
ist. Benutzen Sie zum Beispiel keine Handkreissäge zum Schneiden von Baumästen
oder Holzscheiten.
8. Tragen Sie geeignete Kleidung
Tragen Sie keine weite Kleidung oder
Schmuck, sie könnten von beweglichen
Teilen erfasst werden.
Bei Arbeiten im Freien ist rutschfestes
Schuhwerk empfehlenswert.
Tragen Sie bei langen Haaren ein Haarnetz.
Tragen Sie bei der Arbeit
immer einen Augen- und Ohrenschutz.
Bitte verwenden Sie persönliche Schutzaus-
rüstung (z. B. Schutzhandschuhe und
sonstige Schutzkleidung).
9. Benutzen Sie Schutzausrüstung
Tragen Sie eine Schutzbrille.
Verwenden Sie bei stauberzeugenden
Arbeiten eine Atemmaske.
10. Schließen Sie die StaubabsaugEinrichtung an
Falls Anschlüsse zur Staubabsaugung und
Auffangeinrichtung vorhanden sind, überzeugen Sie sich, dass diese angeschlossen
und richtig benutzt werden.
11. Verwenden Sie das Kabel nicht für
Zwecke, für die es nicht bestimmt ist
Benutzen Sie das Kabel nicht, um den Ste-
cker aus der Steckdose zu ziehen. Schützen
Sie das Kabel vor Hitze, Öl und scharfen
Kanten.
12. Sichern Sie das Werkstück
Benutzen Sie Spannvorrichtungen oder
einen Schraubstock, um das Werkstück
festzuhalten. Es ist damit sicherer gehalten
als mit Ihrer Hand.
64 DE/AT/CH
Page 65

13. Vermeiden Sie abnormale
Körperhaltung
Sorgen Sie für sicheren Stand und halten
Sie jederzeit das Gleichgewicht.
14. Pflegen Sie Ihre Werkzeuge mit
Sorgfalt
Halten Sie die Schneidwerkzeuge scharf
und sauber, um besser und sicherer arbeiten zu können.
Befolgen Sie die Hinweise zur Schmierung
und zum Werkzeugwechsel.
Kontrollieren Sie regelmäßig die Anschluss-
leitung des Elektrowerkzeugs und lassen Sie
diese bei Beschädigung von einem anerkannten Fachmann erneuern.
Kontrollieren Sie Verlängerungsleitungen
regelmäßig und ersetzen Sie diese, wenn
sie beschädigt sind.
Halten Sie Handgriffe trocken, sauber und
frei von Öl und Fett.
15. Ziehen Sie den Stecker aus der
Steckdose
Bei Nichtgebrauch des Elektrowerkzeugs,
vor der Wartung und beim Wechsel von
Werkzeugen wie z. B. Sägeblatt, Bohrer,
Fräser.
16. Lassen Sie keine Werkzeugschlüssel
stecken
Überprüfen Sie vor dem Einschalten, dass
Schlüssel und Einstellwerkzeuge entfernt
sind.
17. Vermeiden Sie unbeabsichtigten
Anlauf
Vergewissern Sie sich, dass der Schalter
beim Einstecken des Steckers in die Steckdose ausgeschaltet ist.
18. Benutzen Sie Verlängerungskabel
für den Außenbereich
Verwenden Sie im Freien nur dafür zugelas-
sene und entsprechend gekennzeichnete
Verlängerungskabel.
19. Seien Sie aufmerksam
Achten Sie darauf, was Sie tun. Gehen Sie
mit Vernunft an die Arbeit. Benutzen Sie das
Elektrowerkzeug nicht, wenn Sie unkonzentriert sind.
20. Überprüfen Sie das Elektrowerkzeug
auf eventuelle Beschädigungen
Vor weiterem Gebrauch des Elektrowerk-
zeugs müssen Schutzvorrichtungen oder
leicht beschädigte Teile sorgfältig auf ihre
einwandfreie und bestimmungsgemäße
Funktion untersucht werden.
Überprüfen Sie, ob die beweglichen Teile
einwandfrei funktionieren und nicht klemmen oder ob Teile beschädigt sind. Sämtliche Teile müssen richtig montiert sein und
alle Bedingungen erfüllen, um den einwandfreien Betrieb des Elektrowerkzeugs
zu gewährleisten.
Beschädigte Schutzvorrichtungen und Teile
müssen bestimmungsgemäß durch eine anerkannte Fachwerkstatt repariert oder ausgewechselt werden, soweit nichts anderes
in der Gebrauchsanweisung angegeben ist.
Beschädigte Schalter müssen bei einer
Kundendienstwerkstatt ersetzt werden.
Benutzen Sie keine Elektrowerkzeuge, bei
denen sich der Schalter nicht ein- und
ausschalten lässt.
21. ACHTUNG!
Der Gebrauch anderer Einsatzwerkzeuge
und anderen Zubehörs kann eine Verletzungsgefahr für Sie bedeuten.
22.
Lassen Sie Ihr Elektrowerkzeug durch
eine Elektrofachkraft reparieren
Dieses Elektrowerkzeug entspricht den ein-
schlägigen Sicherheitsbestimmungen. Reparaturen dürfen nur von einer Elektrofachkraft
ausgeführt werden, indem Originalersatzteile verwendet werden; anderenfalls können Unfälle für den Benutzer entstehen.
Die folgenden Restrisiken bleiben trotz der
Maßnahmen, das Design besonders sicher zu
gestalten, der Sicherungs- und ergänzenden
Schutzmaßnahmen bestehen: Die Schleifscheibe
läuft nach, nachdem das Werkzeug abgeschaltet
wurde. Es besteht Verletzungsgefahr.
65 DE/AT/CH
Page 66

Weiterführende
Sicherheitshinweise
Schließen Sie das Produkt nur an eine
Steckdose mit Fehlerstrom-Schutzeinrichtung
(FI-Schalter) mit einem Bemessungsfehlerstrom von nicht mehr als 30 mA an.
Halten Sie Netz- und Verlängerungskabel
von der Schleifscheibe sowie der Sägekette
fern. Ziehen Sie bei Beschädigung oder
Durchschneiden sofort den Netzstecker aus
der Steckdose. Berühren Sie die Leitung
nicht, bevor sie vom Netz getrennt ist.
Gefahr durch elektrischen Schlag!
Unterziehen Sie die Schleifscheibe vor dem
Gebrauch einer Sichtprüfung.
Verwenden Sie keine Schleifscheiben mit
Abplatzungen, Rissen oder anderen Beschädigungen. Wechseln Sie eine abgenutzte Schleifscheibe aus.
Betreiben Sie das Produkt niemals ohne
Sichtschutzscheibe.
Arbeiten Sie mit dem Produkt nicht, wenn
Sie müde sind oder nach der Einnahme von
Alkohol oder Tabletten. Legen Sie immer
rechtzeitig eine Arbeitspause ein.
Benutzen Sie das Produkt nicht in explosi-
onsfähiger Atmosphäre oder dort, wo es
Funken, Feuer, Explosionen, usw. verursachen könnte. Bei Nichtbeachtung besteht
Brand- oder Explosionsgefahr.
Sorgen Sie dafür, dass bei staubigen
Arbeiten die Lüftungsöffnungen frei sind.
Halten Sie Ihre Hände von der Schleif-
scheibe und den Kettenzähnen fern, wenn
das Produkt in Betrieb ist. Bewegen Sie die
Sägekette nicht mit den Händen. Es besteht
Verletzungsgefahr.
Halten Sie nie die Finger zwischen Schleif-
scheibe und Drehteller oder zwischen
Schleifscheibe und Schutzscheibe. Es
besteht Quteschgefahr.
Die Sägekette wird beim Schleifen heiß.
Nicht an der bearbeiteten Stelle anfassen,
es besteht Verbrennungsgefahr.
Verwenden Sie nur vom Hersteller empfoh-
lene Schleifscheiben. Verwenden Sie keine
Sägeblätter.
Schalten Sie das Produkt aus und ziehen
Sie den Netzstecker
- zum Lösen eines blockierten Einsatzwerk-
zeuges,
- wenn das Netzkabel beschädigt oder
verheddert ist,
- bei ungewöhnlichen Geräuschen.
Vor der Inbetriebnahme
Hinweis: Entfernen Sie vollständig das
Verpackungsmaterial.
Die Bedienperson sollte bei der Verwendung
nah am Produkt stehen, um eine unnötige
Körperstreckung und damit einen unsicheren
Stand zu vermeiden.
Montage
Hinweis: Befestigen Sie das Produkt immer mit
den mitgelieferten Schrauben (M10 x 60).
Achten Sie darauf, dass Sie genügend Platz
zum Arbeiten haben und andere Personen
dabei nicht zu gefährden.
Befestigen Sie das Produkt immer mittels
Schrauben ausreichender Länge und Stärke
auf der Arbeitsfläche, um nicht die Kontrolle
über das Produkt zu verlieren.
Produkt aufstellen
(siehe Abb. B)
- Stärke der zu verwendenden Tischkante:
15–30 mm
- Bohrerdurchmesser: 10,5 mm
- Schraubengröße: M10
Positionieren Sie das Produkt mit Hilfe der
Anschlagkerben
22
. Der Schleifsockel 8 muss dabei über
die Tischkante herausragen.
9
auf der Arbeitsfläche
66 DE/AT/CH
Page 67

Markieren Sie die Bohrlöcher mit einem
Bleistift und entfernen Sie das Produkt
wieder.
Bohren Sie nun zwei Bohrlöcher in die
Arbeitsfläche
22
.
Schrauben Sie den Schleifsockel mit den
beiliegenden Schrauben
24a
ben
und Muttern
23
, Unterlegschei-
24b
auf der Arbeits-
fläche fest.
Produkt montieren
(siehe Abb. C)
Schrauben Sie den Handgriff 4 an den
Schleifkopf
2
an.
Lösen Sie die Feststellschraube 10 von der
Kettenspanneinheit
12
.
Setzen Sie die Kettenspanneinheit 12 auf
den Schleifsockel
diese mit der Feststellschraube
8
und schrauben Sie
10
fest.
Befestigen Sie ggf. das Netzkabel 17 im
Kabelhalter
16
.
Stellschraube montieren
(siehe Abb. C)
Ziehen Sie vor allen Arbeiten am Produkt
den Netzstecker.
Kontrollieren Sie die Schleifscheibe vor ihrer
Verwendung: Überprüfen Sie den Abstand
zwischen Sichtschutzscheibe und Schleifscheibe.
Verwenden Sie keine beschädigten oder
verformten Schleifscheiben.
Schalten Sie das Produkt erst ein, wenn es
sicher auf der Arbeitsfläche montiert ist.
VORSICHT! VERLETZUNGS-
GEFAHR! Tragen Sie Augen-
und Gehörschutz.
Tragen Sie bei der Arbeit mit der
Sägekette schnittsichere Schutz-
handschuhe und wenn nötig eine
Schürze, um Schnittverletzungen zu vermeiden.
Halten Sie Ihre Hände von der
Schleifscheibe und den Ketten-
zähnen fern, wenn das Produkt
in Betrieb ist. Bewegen Sie die Sägekette
nicht mit der Hand. Es besteht Verletzungsgefahr.
Ein- und Ausschalten
Platzieren Sie die beiliegende Unterleg-
25
scheibe
auf der Stellschraube 6.
Schrauben Sie die Stellschraube 6 auf die
im Schleifkopf fest montierte Befestigungs-
26
mutter
auf.
Inbetriebnahme
VORSICHT! VERLETZUNGSGEFAHR!
Verwenden Sie nur Schleifscheiben und
Zubehörteile, die vom Hersteller empfohlen
werden. Der Gebrauch anderer als in der
Bedienungsanleitung empfohlener Einsatzwerkzeuge oder anderen Zubehörs kann
eine Verletzungsgefahr für Sie bedeuten.
Betreiben Sie das Produkt niemals ohne
Sichtschutzscheibe.
Verwenden Sie keine Sägeblätter.
Hinweis: Achten Sie darauf, dass die auf dem
Typenschild angegebene Netzspannung mit der
Spannung der Stromquelle übereinstimmt.
Hinweis: Führen Sie vor dem ersten Arbeiten
und nach jedem Schleifscheibenwechsel einen
Probelauf von mindestens 30 Sekunden ohne
Belastung durch. Schalten Sie das Produkt sofort aus, wenn die Schleifscheibe unrund läuft,
beträchtliche Schwingungen auftreten oder
abnorme Geräusche zu hören sind.
Schließen Sie das Netzkabel an
eine Steckdose an (beachten Sie
die Netzspannung).
Zum Einschalten drücken Sie den Einschal-
ter „I“ (grün)
1a
.
Zum Ausschalten drücken Sie den Ausschal-
ter „0“ (rot)
1b
.
67 DE/AT/CH
Page 68

Die Schleifscheibe läuft nach, nachdem das
Werkzeug abgeschaltet wurde. Es besteht
Verletzungsgefahr.
Hinweis: Dieses Produkt ist mit einer LED-
19
Lampe
sich automatisch ein, sobald der Einschalter
ausgestattet. Die LED-Lampe schaltet
1a
betätigt wird. Die LED-Lampe schaltet sich
automatisch aus, sobald der Ausschalter
1b
betätigt wird.
Hinweis: Das Produkt verfügt über einen
Wiederanlaufschutz: Nach einer automatischen
Abschaltung durch Spannungsunterbrechung
oder Überastungsschutz läuft das Produkt nicht
selbsttätig wieder an. Zum erneuten Einschalten
drücken Sie den Einschalter „I“ (grün)
1a
, das
Produkt läuft an.
Sägekette schärfen
(siehe Abb. D)
Hinweis: Sorgen Sie dafür, dass bei staubigen
Arbeiten die Lüftungsöffnungen frei sind (siehe
„Wartung und Reinigung“).
Schalten Sie bei Blockierung das
Produkt aus und ziehen Sie den
Netzstecker. Beseitigen Sie erst
dann die Blockierung.
Eine falsch geschärfte Sägekette kann das
Produkt beschädigen und die Rückschlaggefahr der Säge erhöhen!
Achten Sie auf eine genaue Justage der Sä-
gekette. Beachten Sie die richtigen Schärfwinkel und Mindestmaße der Sägekette.
Entfernen Sie so wenig Material wie möglich.
Schleifen Sie nicht in Treibglieder (a) oder
Verbindungsglieder (b), die Sägekette kann
sonst reißen. Bei Nichtbeachtung besteht Unfallgefahr beim Umgang mit der Kettensäge.
Hinweis: Reinigen Sie vor dem Schärfen
die Sägekette. Beseitigen Sie ölhaltige
Holzreste bzw. Ölrückstände mit einem
Pinsel oder Putzlappen.
Hinweis: Alle Schneidglieder müssen nach
dem Schärfen gleich lang und breit sein.
Hinweis: Die Sägekette ist abgenutzt und
muss gegen eine neue Sägekette ersetzt
werden, wenn nur noch ca. 4 mm des
Schneidezahns übrig ist.
Sägekette einlegen:
Zum Öffnen der Kettenführungsschiene
drehen Sie den Spannhebel
13
Uhrzeigersinn. Dazu müssen Sie den
Spannhebel mehrmals in die Ausgangsposition zurückführen. Zur Entriegelung des
Spannhebels ziehen Sie den Spannhebel
nach außen und lassen ihn nach Zurückführen in die Ausgangsstellung wieder einrasten.
Legen Sie die Sägekette in die Kettenfüh-
rungsschiene
müssen zur Schleifscheibe
7
ein. Die Schneidkanten
18a
zeigen.
Klappen Sie den Anschlag 15 nach unten
und ziehen Sie die Sägekette soweit nach
hinten, bis der zu schärfende Schneidezahn
27
am Anschlag anliegt (siehe Abb. D1).
Schärfwinkel einstellen:
Lockern Sie die Feststellschraube 10 und
stellen Sie am Drehteller der Kettenspann-
12
einheit
den erforderlichen Schärfwinkel
α unter Zuhilfenahme der Skala
Ziehen Sie anschließend die Feststellschraube
10
wieder fest an.
Hinweis: Den Schärfwinkel stellen Sie
nach Angaben des Herstellers ein.
gegen den
11
ein.
68 DE/AT/CH
b a
Page 69

Anschlag justieren:
Bewegen Sie den Schleifkopf 2 am Hand-
4
griff
bei ausgeschaltetem Motor abwärts.
Führen Sie mit Hilfe der Stellschraube für den
Kettenvorschub
an die Schleifscheibe
14a
den Schneidezahn 27
18a
heran, bis der
Schneidezahn an der Schleifscheibe anliegt
(siehe Abb. D2). Sichern Sie die Stellschraube
14a
mit der Stellmutter
14b
.
Fixieren Sie die Kettenglieder in der Ketten-
führungsschiene
Spannhebels
7
durch Drehen des
13
im Uhrzeigersinn.
Stellen Sie den Tiefenanschlag mit Hilfe der
Stellschraube
scheibe
6
so ein, dass die Schleif-
18a
den Zahngrund berührt (siehe
Abb. D2). Sichern Sie die Schleiftiefe mit
der Stellmutter
6
.
Schärfen:
Schalten Sie das Produkt ein (siehe Kapitel
„Ein- und Ausschalten“).
Schärfen Sie den Schneidezahn 27, indem
Sie den Schleifkopf
auf den Handgriff
Die Schleifscheibe
2
durch sanften Druck
4
abwärts bewegen.
18a
darf nicht bis zum
Stillstand abgebremst werden. Zur Vermeidung verringern Sie rechtzeitig den Anpressdruck.
Zum Weitertransport der Sägekette schal-
ten Sie das Produkt aus. Lösen Sie den
Spannhebel
13
und fixieren Sie das
nächste zu schärfende Kettenglied mit Hilfe
des justierten Anschlags
hebels in der Kettenführungsschiene
15
und des Spann-
7
.
Hinweis: Schärfen Sie zuerst die Zähne
einer Kettenseite. Verstellen Sie dann den
Schärfwinkel und schärfen Sie die Zähne
der anderen Seite.
Tiefenbegrenzer-Abstand prüfen
(siehe Abb. D3):
Die sägenden Teile der Sägekette sind die
Schneidglieder, die aus einem Schneidezahn
27
und einer Tiefenbegrenzernase 28 bestehen. Der Höhenabstand zwischen diesen beiden bestimmt den Tiefenbegrenzer-Abstand A.
Prüfen Sie nach jedem dritten Schärfen den
Tiefenbegrenzer-Abstand A gemäß den
Angaben des Sägeketten-Herstellers.
Feilen Sie die Höhe der Tiefenbegrenzer-
28
nase
mit einer Flachfeile nach und
runden Sie nach dem Zurücksetzen die
Tiefenbegrenzernase etwas ab. Die ursprüngliche Form muss erhalten bleiben.
Wartung und Reinigung
Vor jeglicher Einstellung, Instand-
haltung oder Instandsetzung
immer den Netzstecker ziehen.
Lassen Sie Arbeiten, die nicht in dieser Be-
triebsanleitung beschrieben sind, von einer
Fachwerkstatt durchführen. Nur Originalteile verwenden. Lassen Sie das Produkt vor
allen Wartungs- und Reinigungsarbeiten
abkühlen. Es besteht Verbrennungsgefahr.
Kontrollieren Sie das Produkt vor jedem Ge-
brauch auf ebentuelle Beschädigungen wie
lose, abgenutzte oder beschädigte Teile,
korrekten Sitz von Schrauben oder anderer
Teile. Prüfen Sie insbesondere die Schleif-
18a
scheibe
. Tauschen Sie beschädigte
Teile aus.
Reinigen
Verwenden Sie keine Reinigungs- bzw.
Lösungsmittel. Chemische Substanzen
können die Kunststoffteile des Produktes angreifen. Reinigen Sie das Produkt niemals
unter fließendem Wasser.
Reinigen Sie das Produkt nach jedem
Gebrauch.
Reinigen Sie die Lüftungsöffnungen 21 und
die Oberfläche des Produktes mit einer weichen Bürste, einem Pinsel oder einem Tuch.
Reinigen Sie die Kettenführungsschiene 7
mit einer Bürste.
Bei starken Verunreinigungen lösen Sie Fest-
stellschraube für die Kettenspanneinheit
und entnehmen Sie die Kettenspanneinheit
10
69 DE/AT/CH
Page 70

mit Drehteller 12 zwecks besserer Zugänglichkeit. Wir empfehlen die seitlichen Bleche
für die Reinigung abzunehmen.
Schleifscheibe wechseln
(siehe Abb. E)
Hinweise zum Wechseln der Schleifscheibe:
Betreiben Sie das Produkt niemals ohne
Sichtschutzscheibe
Vergewissern Sie sich, dass die auf der
Schleifscheibe
gleich oder größer als die BemessungsLeerlaufdrehzahl des Produktes ist. Vergewissern Sie sich, dass die Maße der
Schleifscheibe zum Produkt
passen. Ist die max. Umlaufgeschwindigkeit
der Scheibe im Gegensatz zum Produkt zu
klein, kann diese zerbrechen!
Benutzen Sie nur einwandfreie Schleifschei-
ben (Klangprobe).
Bohren Sie eine zu kleine Aufnahmebohrung
der Schleifscheibe nicht nachträglich auf.
Verwenden Sie keine getrennten Reduzier-
buchsen oder Adapter, um Schleifscheiben
mit großem Loch passend zu machen.
Verwenden Sie keine Sägeblätter.
Montieren Sie das Produkt nach dem Schleif-
scheibenwechsel stets wieder vollständig.
Schalten Sie das Produkt aus
Lösen Sie die 3 Befestigungsschrauben 5
und nehmen Sie die Schleifscheiben-Abde-
3
ckung
ab.
Schrauben Sie die Schleifscheiben-Mutter
18b
von Hand ab.
Nehmen Sie die Schleifscheibe
Aufnahme ab.
Setzen Sie die neue Schleifscheibe auf die
Aufnahme auf und schrauben Sie von Hand
die Schleifscheiben-Mutter auf.
Schrauben Sie die Schleifscheiben-Abde-
3
ckung
wieder an.
20
.
18a
angegebene Drehzahl
und ziehen Sie den Netzstecker.
Lassen Sie das Produkt abkühlen.
18a
von der
Hinweis: Die Schleifscheiben-Mutter darf
nicht zu fest angezogen werden, um ein
Brechen von Schleifscheibe und Mutter zu
vermeiden
Führen Sie vor dem ersten Arbeiten und
nach jedem Schleifscheibenwechsel einen
Probelauf von mindestens 30 Sekunden
ohne Belastung durch. Schalten Sie das
Produkt sofort aus, wenn die Schleifscheibe
unrund läuft, beträchtliche Schwingungen
auftreten oder abnorme Geräusche zu
hören sind.
Lagerung
Bewahren Sie das Produkt an einem trocke-
nen und staubgeschützten Ort auf, außerhalb der Reichweite von Kindern.
Hinweis: Schleifscheiben müssen trocken
und hochkant aufbewahrt und dürfen nicht
gestapelt werden.
Entsorgung
Die Verpackung besteht aus umweltfreundlichen Materialien, die Sie
über die örtlichen Recyclingstellen
entsorgen können. Der Grüne Punkt
gilt nicht für Deutschland.
Beachten Sie die Kennzeichnung der
b
Verpackungsmaterialien bei der Ab-
a
falltrennung, diese sind gekennzeichnet
mit Abkürzungen (a) und Nummern
(b) mit folgender Bedeutung: 1–7:
Kunststoffe / 20–22: Papier und
Pappe / 80–98: Verbundstoffe.
Das Produkt und die Verpackungsmaterialien sind recycelbar, entsorgen Sie diese getrennt für eine
bessere Abfallbehandlung. Das
Triman-Logo gilt nur für Frankreich.
70 DE/AT/CH
Page 71

Möglichkeiten zur Entsorgung des
ausgedienten Produkts erfahren Sie
bei Ihrer Gemeinde- oder Stadtverwaltung.
Werfen Sie Ihr Produkt, wenn es
ausgedient hat, im Interesse des Umweltschutzes nicht in den Hausmüll,
sondern führen Sie es einer fachgerechten Entsorgung zu. Über Sammelstellen und deren Öffnungszeiten
können Sie sich bei Ihrer zuständigen
Verwaltung informieren.
Service
Lassen Sie Ihr Produkt von der Servicestelle
oder einer Elektrofachkraft und nur mit
Original-Ersatzteilen reparieren. Damit wird
sichergestellt, dass die Sicherheit des Pro-
dukts erhalten bleibt.
Lassen Sie den Austausch des Steckers oder
der Netzleitung immer vom Hersteller des
Produkts oder seinem Kundendienst ausfüh-
ren. Damit wird sichergestellt, dass die
Sicherheit des Produkts erhalten bleibt.
Ein als defekt erfasstes Produkt können Sie dann
unter Beifügung des Kaufbelegs (Kassenbon)
und der Angabe, worin der Mangel besteht
und wann er aufgetreten ist, für Sie portofrei an
die Ihnen mitgeteilte Service-Anschrift übersenden.
Service
Service Deutschland
Tel.: 0800 5435 111 (kostenfrei aus dem
dt. Festnetz / Mobilfunknetz)
E-Mail: owim@lidl.de
Service Österreich
Tel.: 0820 201 222
(0,20 €/min)
E-Mail: owim@lidl.at
Service Schweiz
Tel.: 0842 665566 (0,08 CHF/Min.,
Mobilfunk max. 0,40 CHF/Min.)
E-Mail: owim@lidl.ch
IAN 285177
Garantie
Abwicklung im Garantiefall
Um eine schnelle Bearbeitung ihres Anliegens
zu gewährleisten, folgen Sie bitte den folgenden Hinweisen:
Bitte halten Sie für alle Anfragen den Kassenbon und die Artikelnummer (z. B. IAN 123456)
als Nachweis für den Kauf bereit.
Die Artikelnummer entnehmen Sie bitte dem
Typenschild, einer Gravur, auf dem Titelblatt
ihrer Anleitung (unten links) oder als Aufkleber
auf der Ruck- oder Unterseite.
Sollten Funktionsfehler oder sonstige Mangel
auftreten kontaktieren Sie zunächst die nachfolgend benannte Serviceabteilung telefonisch
oder per E-Mail.
Das Produkt wurde nach strengen Qualitätsrichtlini
en sorgfältig produziert und vor Anlieferung
gewissenhaft geprüft. Im Falle von Mängeln
dieses Produkts stehen Ihnen gegen den Verkäufer des Produkts gesetzliche Rechte zu. Diese
gesetzlichen Rechte werden durch unsere im
Folgenden dargestellte Garantie nicht eingeschränkt.
Sie erhalten auf dieses Produkt 3 Jahre Garantie ab Kaufdatum. Die Garantiefrist beginnt mit
dem Kaufdatum. Bitte bewahren Sie den Original-Kassenbon gut auf. Diese Unterlage wird als
Nachweis für den Kauf benötigt.
71 DE/AT/CH
Page 72

Tritt innerhalb von 3 Jahren ab dem Kaufdatum
dieses Produkts ein Material- oder Fabrikationsfehler auf, wird das Produkt von uns – nach unserer Wahl –
Diese Garanti
schädigt, nicht sachgemäß benutzt oder
gewartet wurde.
Die Garantieleistung gilt für Material- oder
Fabrikationsfehler. Diese Garantie erstreckt sich
nicht auf
ausgesetzt
Verschleißteile angesehen werden können oder
für Beschädigungen an zerbrechlichen Teilen,
z. B. Schalter, Akkus oder die aus Glas gefertigt
sind.
für Sie kostenlos repariert oder ersetzt.
e verfällt, wenn das Produkt be-
Produktteile, die normaler Abnutzung
sind (z. B. Batterien) und daher als
Original-
Konformitätserklärung
Wir, OWIM GmbH & Co. KG, Stiftsbergstraße 1,
DE-74167 Neckarsulm, DEUTSCHLAND,
erklären in alleiniger Verantwortung, dass das
Produkt: Kettenschärfgerät FSG 85 D1,
Modell-Nr.: HG02366, Version: 04 / 2017, auf
das sich diese Erklärung bezieht, mit den
Normen / normativen Dokumenten der
2006/42/EG, 2014/30/EU, 2011/65/EU
übereinstimmt.
Tobias König
Bereichsleiter / Dokumentenverantwortlicher
OWIM GmbH & Co. KG, Stiftsbergstraße 1,
DE-74167 Neckarsulm, DEUTSCHLAND
Neckarsulm, 12.01.2017
Die Konformitätserklärung finden Sie auch
unter: www.owim.com.
Der oben beschriebene Gegenstand der
Erklärung erfüllt die Vorschriften der Richtlinie
2011/65/EU des Europäischen Parlaments und
des Rates vom 8. Juni 2011 zur Beschränkung
der Verwendung bestimmter gefährlicher Stoffe
in Elektro- und Elektronikgeräten.
Angewandte harmonisierte Normen:
EN 61029-1/A11:2010
EN ISO 12100:2010
EN 55014-1/A2:2011
EN 55014-2:2015
EN 61000-3-2:2014
EN 61000-3-3:2013
Seriennummer: IAN 285177
72 DE/AT/CH
Page 73

OWIM GmbH & Co. KG
Stiftsbergstraße 1
DE-74167 Neckarsulm
GERMANY
Model-No.: HG02366
Version: 04/ 2017
Last Information Update · Információk állása
Stanje informacij · Stav informací · Stav
informácií · Stand der Informationen:
04 / 2017 · Ident.-No.: HG02366042017-4
IAN 285177
 Loading...