

FLORABEST FRMA 36/1 A1 Translation Of The Original Instructions
®
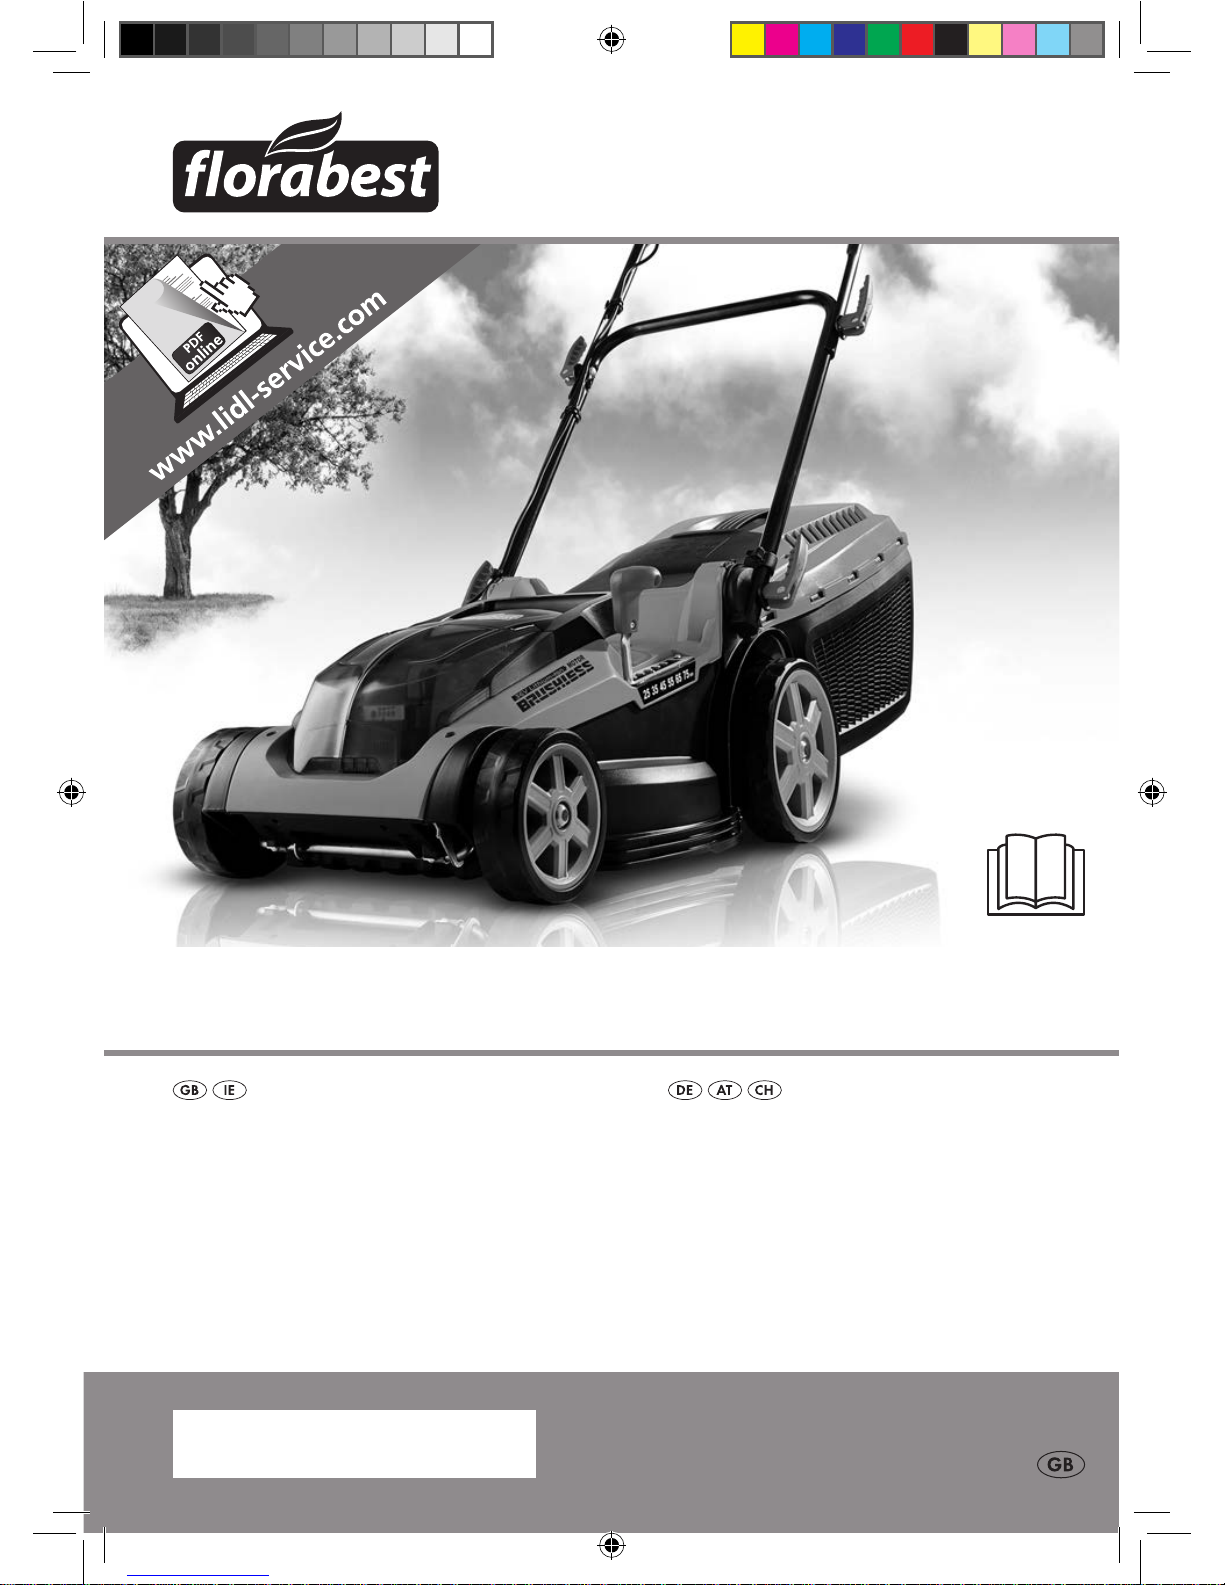
CORDLESS LAWNMOWER FRMA 36/1 A1
AKKU-RASENMÄHER
Originalbetriebsanleitung
CORDLESS LAWNMOWER
Translation of the original instructions
IAN 274755
274755_flo_Akku-Rasenmaeher_cover_GB.indd 2 18.12.15 11:07

GB / IE Translation of the original instructions Page 4
DE / AT / CH Originalbetriebsanleitung Seite 24
Before reading, unfold the page containing the illustrations and familiarise yourself with all functions of the
device.
Klappen Sie vor dem Lesen die Seite mit den Abbildungen aus und machen Sie sich anschließend mit allen
Funktionen des Gerätes vertraut.
274755_flo_Akku-Rasenmaeher_cover_GB.indd 3 18.12.15 11:07
7
4
4b
4
4a
4c
3
2
1
6
5
6
8
9
10
6a
3a
6a
11
14
13
15
17
18
16
12
1
3
6
6
2
4
8
5
2
2
3
2a
2b
14
14
15
16
2a

4
GB IE
Contents
Introduction .................................4
Intended purpose ......................... 4
General description ......................5
Extent of the delivery .........................5
Function description ..........................5
Overview ........................................5
Technical specications ................. 6
Symbols and icons .......................6
Safety precautions .......................8
General notes on safety .....................8
Assembly ................................... 14
Mounting the lower handle .............. 14
Mounting the upper handle ..............14
Mounting the grass box ................... 14
Operation ..................................15
Hanging on/removing the grass box ... 15
Level gauge ...................................15
Adjusting the cut height .................. 15
Switching On and Off ..................... 15
Charging the battery .......................16
Insert/remove rechargeable battery .. 16
Recharging the battery .................... 16
Checking the charge status of the
rechargeable battery ......................17
Used batteries ................................ 17
Working with the appliance ............. 17
Cleaning/maintenance ...............18
General cleaning and maintenance
work ............................................. 18
Changing the blade ........................ 18
Storage ......................................18
Waste Disposal/Environmental
Protection ..................................19
Spare Parts/Accessories .............20
Trouble Shooting ........................21
Guarantee .................................22
Repair Service ............................ 23
Service-Center ............................ 23
Importer ....................................23
Translation of the original
EC declaration of conformity ......45
Exploded Drawing .....................47
Introduction
Congratulations on the purchase of your
new device. With it, you have chosen a
high quality product.
During production, this equipment has
been checked for quality and subjected to
a nal inspection. The functionality of your
equipment is therefore guaranteed.
The operating instructions constitute
part of this product. They contain
important information on safety,
use and disposal.
Before using the product, familiar-
ise yourself with all of the operating
and safety instructions. Use the
product only as described and for
the applications specied.
Keep this manual safely and in the
event that the product is passed
on, hand over all documents to the
third party.
Intended purpose
The equipment is designed only for mowing domestic lawns and grass areas.
Any other use that is not expressly permitted in these instructions may result in
damage to the equipment and represent a
serious risk to the user.
The equipment is intended for use by
adults. It is not to be used by children or
people who are unfamiliar with these instructions. The use of the equipment is prohibited in the rain or a damp environment.
The manufacturer will not be liable for
damages caused by use other than for the
intended purpose or by incorrect operation.
This equipment is not suitable for commercial use.Commercial use will invalidate the
guarantee.

5
GB IE
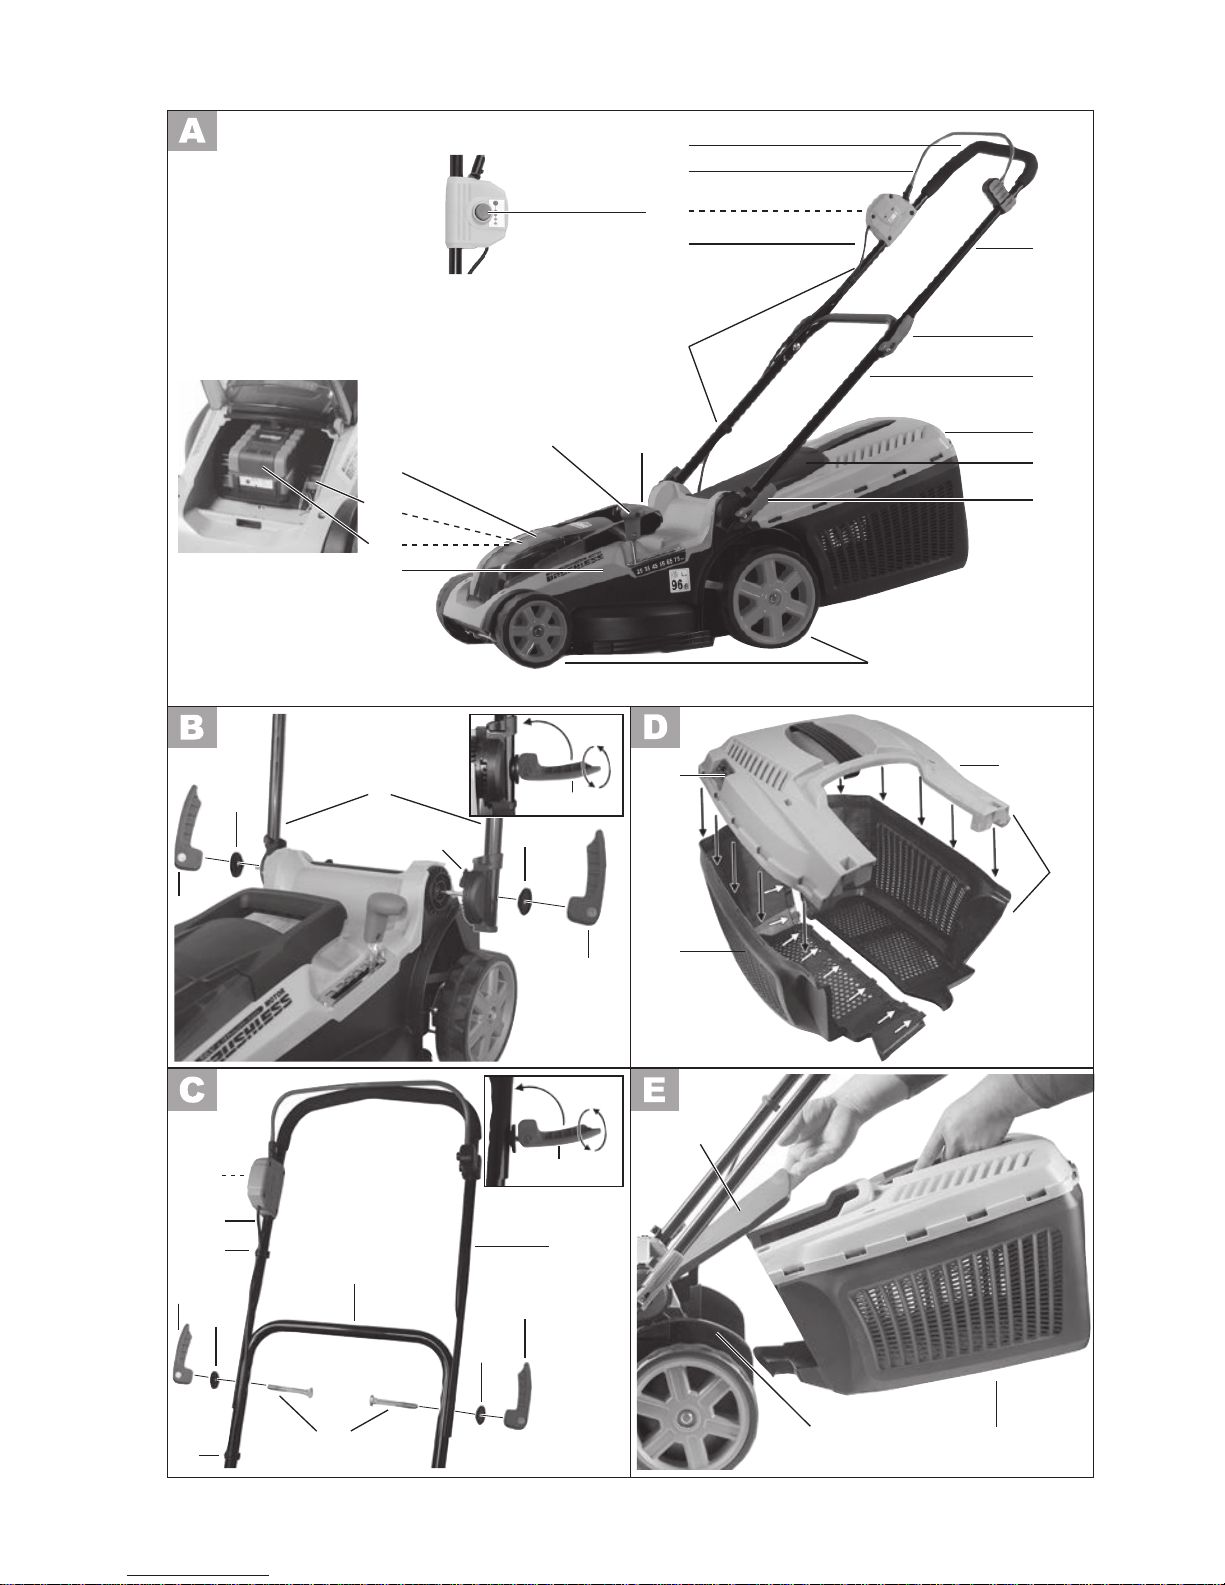
Overview
1 Upper bar
2 Tightening levers for fastening
the upper handle
3 Lower bar
4 Grass box
5 Collision guard
6 Tightening levers for fastening
the lower handle
7 Wheels
8 Housing
9 Rechargeable battery
10 Ignition key
11 Cover
12 Lever for cutting height adjust-
ment
13 Carrying handle
14 Cable holders
15 Device cable
16 Release button
17 Start lever
18 Bow-type handle
19 Charger
20 Blade
21 Blade screw
22 Motor spindle
General description
See the front fold-out pages for
illustrations.
Extent of the delivery
Carefully remove the equipment from the
packaging and check whether the following parts are complete:
- Cordless lawnmower and upper
handle
- Lower handle
- Grass box (in three parts)
- 2 cable holders
- 2 tightening levers with washers for
fastening the lower handle
- 2 tightening levers with washers and
screws for fastening the upper handle
- Rechargeable battery
- Charger
- Instruction Manual
Dispose of the packaging material correctly.
Function description
The cordless lawnmower has a cutting tool,
which turns parallel to the cutting level. It is
equipped with a high performance electric
motor, robust plastic housing, safety switch,
collision guard, and grass box. Additionally, the equipment is height adjustable to
six levels and has smooth-running wheels.
For the function of the operating parts,
please refer to the descriptions below.
6
GB IE
Technical specications
Appliance .........................36/1 A1
Motor voltage ............................ 36 V
Idling speed n
0
...................... 3100 min
-1
Cutting circle ............................ 370 mm
Cut height ......25/35/45/55/65/75 mm
Protection class ....................................III
Protection type .................................IPX1
Weight (without battery
and charger) ............................. 13.2 kg
Grass box volume ............................ 40 l
Sound pressure level
(L
PA) ........................ 82 dB(A); KPA = 3 dB
Sound power level (L
WA)
measured ....93.9 dB(A); K
WA = 1.88 dB
guaranteed ...........................96 dB(A)
Vibration (a
h) ......< 2.5 m/s
2
; Kh=1.5 m/s
2
Battery (Li-Ion) ...............PAP 36 A1
Number of battery cells.......................20
Nominal voltage ........................ 36 V
Capacity ............................... 2600 mAh
Energy .....................................93.6 Wh
Charging time ......................approx. 1 h
Charger ............................40LFC15
Voltage input .....220-240 V~, 50 Hz, 1 A
Voltage output .....................40 V
3 A
Protection class ...............................
II
Protection type .................................IPX0
Noise and vibration values have been
determined according to the standards and
regulations mentioned in the declaration of
conformity.
Technical and optical changes may be
undertaken in the course of further development without notice. All dimensions, references and information in this instruction
manual are therefore not guaranteed. Legal
claims made on the basis of the instruction
manual can therefore not be considered as
valid.
The stated vibration emission value was
measured in accordance with a standard
testing procedure and may be used to compare one power tool to another.
The stated vibration emission value may
also be used for a preliminary exposure
assessment.
Warning: The vibration emission
value may differ during actual use
of the power tool from the stated
value depending on the manner in
which the power tool is used.
Safety precautions aimed at protect-
ing the user should be based on
estimated exposure under actual
usage conditions (all parts of the operating cycle are to be considered,
including, for example, times during
which the power tool is turned off
and times when the tool is turned on
but is running idle).
Symbols and icons
Symbols in the manual:
Warning symbols with in-
formation on damage and
injury prevention.
Instruction symbols (the instruction
is explained at the place of the exclamation mark) with information on
preventing damage.
Help symbols with information on
improving tool handling.

7
GB IE
Symbols on the battery:
Li-Ion
MAX. 60°C
MAX. 60°C
Do not dispose of
batteries in household
waste, re or water.
MAX. 60°C
Do not subject the battery to strong
sunlight over long periods and do
not leave it on a heater (max. 60°C).
Take batteries to an old battery col-
lection point where they will be recycled in an environmentally friendly
manner.
Battery charge level indica-
tor
Symbols on the recharger:
Caution!
Read the operating instructions be-
fore charging.
The recharger is for indoor use only.
Do not expose the unit to rain.
T3.15A
Miniature fuse
Protection class II
Electrical appliances must not be dis-
posed of with the domestic waste.
Level gauge on the grass box:
Level gauge ap open:
Grass box empty.
Level gauge ap closed:
Grass box full.
Symbols on the equipment:
Caution!
Read the operating instructions
carefully.
Risk of injury from parts being
thrown up.
Keep nearby people away from the
appliance.
Caution – sharp cutting blade!
Keep feet and hands away. Risk of
injury!
Switch off the motor and remove
the ignition key before carrying out
adjustments or cleaning work.
Wear ear and eye protection.
Do not expose the unit to rain.
dB
L
WA
Noise level specication
L
WA
in dB.
Do not dispose of electrical equipment in domestic waste.
Cutting circle
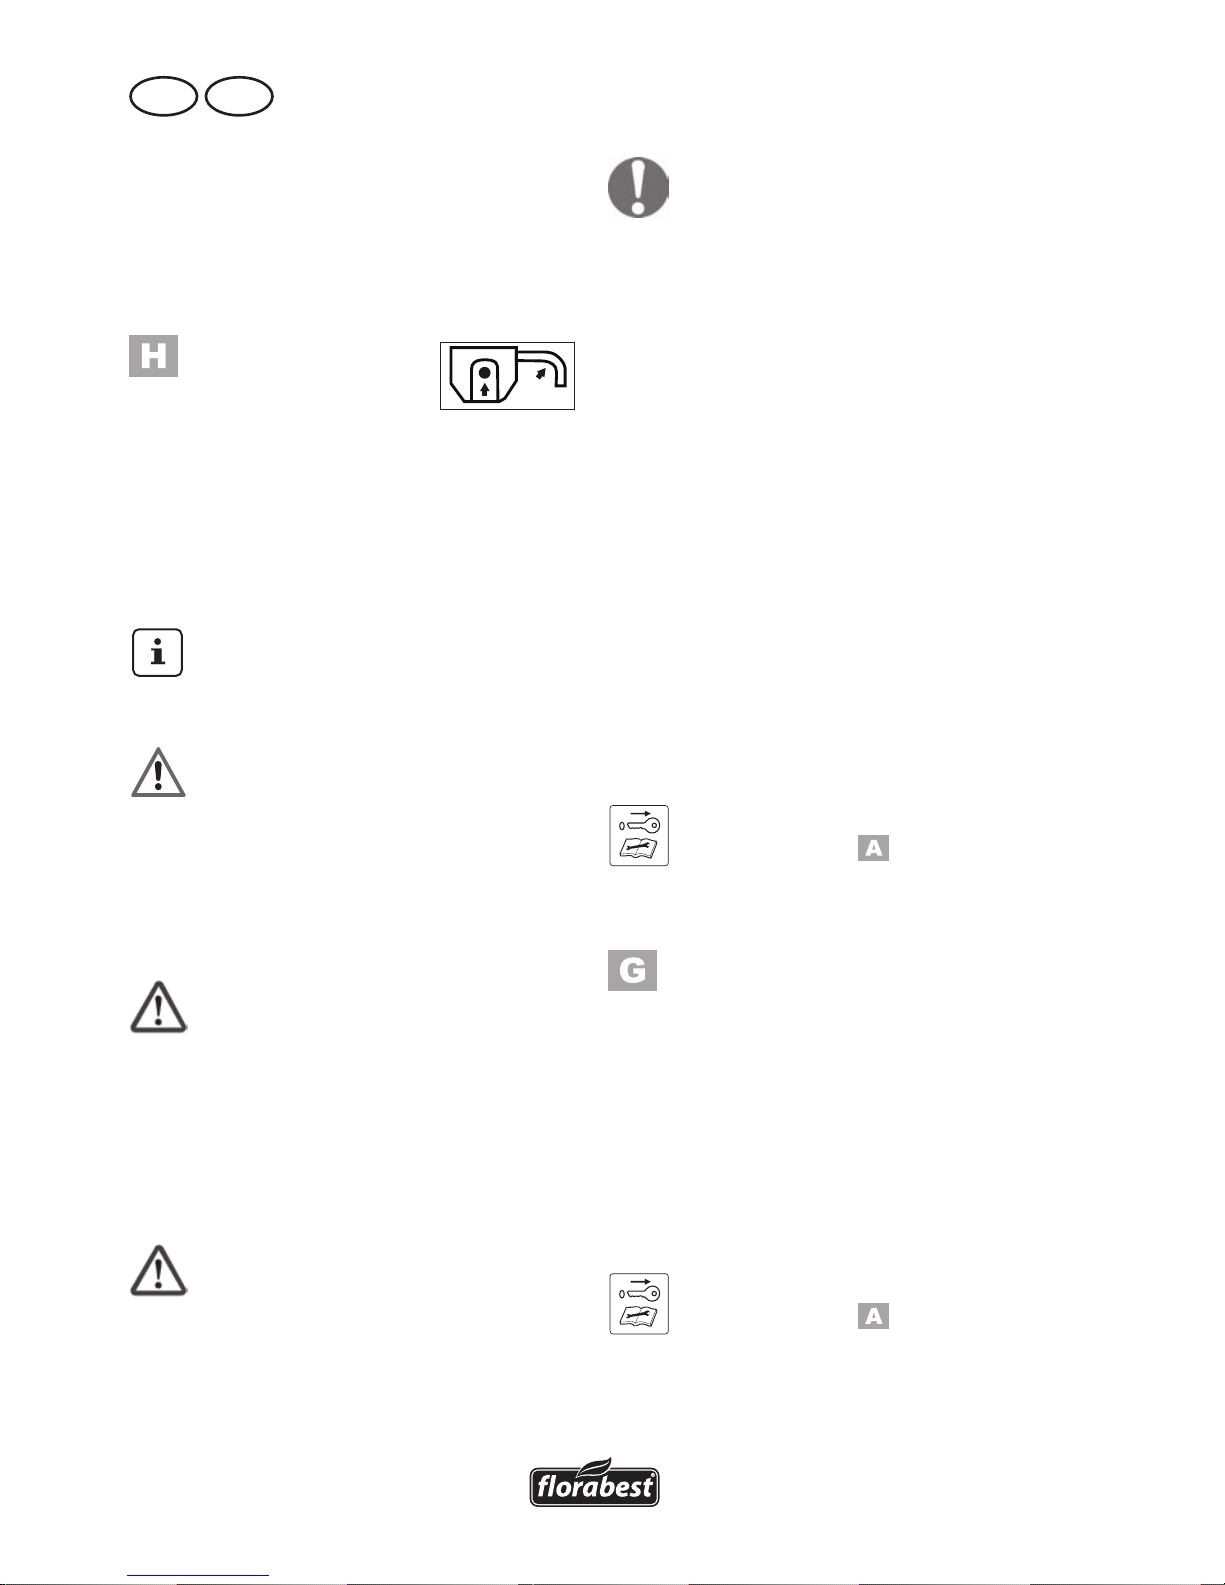
Note on the ignition key
Caution! Read the
operating manual. Insert
the plug before mowing.
Battery charge level indi-
cator

8
GB IE
Safety precautions
This section covers the basic safety
regulations when working with the
apparatus.
General notes on safety
This equipment may cause
serious injury in the case of
improper use. In order to
avoid injury to people and
damage to property, the following safety information
must be observed and users
must familiarise themselves
with all operating parts.
Preparation:
• Do not allow the use of this
equipment by children or others
who are unfamiliar with these
operating instructions. Local
regulations may specify the
minimum age of the operator.
• Do not use the equipment when
people and particularly children
or pets are nearby. Children
must not play with the device.
• The operator or user is responsible for accidents, injuries to
other people or damage to the
property of others.
• Check the terrain on which the
equipment is to be used and
remove stones, sticks, wires and
other foreign objects that could
become caught and thrown up.
• Wear suitable work clothing
such as stable shoes with nonslip soles and robust, long trousers. Do not use the equipment
when barefoot or when wearing open sandals. Avoid wearing loose clothing or clothing
with hanging cords or belts.
• Before each use, carry out a
visual inspection of the equipment. Do not use the equipment
if protective devices (e.g. collision guard or grass bag), parts
of the cutting device or bolts
are missing, worn or damaged.
To avoid imbalance, damaged
tools and bolts are to be replaced only in sets.
• Take care with equipment that
has several cutting tools, as the
movement of one blade may
result in the rotation of the other
blades.
• Use only spare parts and accessories supplied and recommended by the manufacturer.
The use of non-original parts
will immediately invalidate the
guarantee.
• Worn or damaged information
signs must be replaced.

9
GB IE
tions. Ensure sufcient distance
between feet and the rotating
blades.
• Do not tilt the equipment when
starting other than if it is necessary to do so when starting
up in long grass. In this case,
tilt the equipment by pressing
down the handle bar such that
the front wheels of the equipment are raised. Always check
that both hands are in the working position before returning the
equipment to the ground.
• Do not work without the grass
box or collision guard. Keep
away from the ejection hole at
all times.
• Do not start the motor when
standing in front of the discharge chute.
Caution! Danger! The blade
continues to run after switching off. There is a risk of injury.
• The equipment is not to be lifted
or transported while the motor
is running. Switch off the equipment if it has to be tilted in
transit, when crossing surfaces
other than grass, and when the
equipment is being transported
to and from the surfaces to be
mowed.
• Always keep the grass ejection
Working with the Equipment:
Do not place feet or hands
near or under rotating parts
when working. Risk of injury!
• Switch on the motor according to the instructions and only
when your feet are at a safe
distance from the cutting tools.
• Do not use the equipment in
the rain, in poor weather, in a
damp environment, or on wet
grass. Work only in daylight or
with good lighting.
• Do not work with the equipment
when tired, lacking concentra-
tion or under the inuence of
alcohol or drugs. Always take
breaks in good time. Take a
sensible approach to the work.
• When working, ensure a rm
stance, particularly on slopes.
Always work across the slope,
never upwards or downwards.
Take particular care when
changing the direction of travel
on the slope. Do not work on
excessively steep slopes.
• Run the equipment only at a
walking pace. Take particular
care when turning the equipment around, pulling it towards
you or going backwards.
• Switch on the equipment carefully and in accordance with
the directions in these instruc-

10
GB IE
hole clean and clear. Remove
cut material only when the
equipment is stopped.
• Do not leave the equipment unattended in the workplace.
• Do not work with equipment
that is damaged, incomplete, or
has been modied without the
authorisation of the manufacturer. Do not use the equipment
with damaged safety devices or
screens or with missing safety
equipment such as deection
and/or grass collection devices.
• Do not overload the equipment.
Work only within the speci-
ed power range and do not
change the regulator settings on
the motor. Do not use low-powered machines for heavy work.
Do not use your equipment for
purposes other than those for
which it is designed.
• Do not use the equipment near
inammable liquids or gases.
Non-observance will result in a
risk of re or explosion.
• Do not lift or carry the equipment when the motor is running.
• Switch the device off, remove
the safety key and take out the
battery. Make sure that all movable parts are stationary:
- whenever you leave the
apparatus unattended and
when it is not being used,
- before removing obstructions
or loosening blockages from
the discharge chute,
- before checking or cleaning
the apparatus or performing
any work on it,
- when a foreign object has
been hit by the apparatus.
Check for damage to the
apparatus and carry out the
necessary repairs before
switching it on again and
working with it,
- if the apparatus starts to vibrate excessively, an immediate check is required.
- make sure that all nuts, bolts
and screws are properly tightened.
- inspect the apparatus for any
damage.
- have any necessary repairs
carried out to damaged
parts.
• Do not place feet or hands near
or under rotating parts. Do not
stand in front of the grass ejection hole during sickle mowing.
• Always pull the circuit breaker/
ignition key if:
- you leave the apparatus
unattended, before clearing
blockages,
- if you check or clean the ap-
paratus or work on it,
- after a collision with a for-
eign object. Immediately
examine the device for dam-

11
GB IE
changing the cutting device.
• Regularly check the grass collection device for wear and
strains. For safety reasons, replace worn or damaged parts.
When adjusting the blades,
take particular care to avoid ngers being trapped between the
rotating blades and xed parts
of the machine.
• Check that only replacement
tools authorised by the manufacturer are used.
Electrical Safety:
• The plug of the charger must t
into the socket. The plug must
not be modied in any way.
Do not use any adapter plugs
together with electric tools that
have a protective earth. Un-
modied plugs and matching
sockets reduce the risk of electric shock.
• Avoid body contact with
earthed surfaces such as pipes,
radiators, cookers and refriger-
ators. There is an increased risk
of electric shock if your body is
earthed.
• Do not expose electric tools to
rain or wet conditions. The penetration of water into an electric
tool increases the risk of electric
shock.
age and, if necessary, have
it repaired,
- if the apparatus starts to
vibrate in an unusual way
(check immediately!).
Maintenance and Storage:
• During maintenance of the cutting blades, be aware of the
fact that even if the power supply is switched off, the cutting
blades can be set into motion.
• When servicing the cutting
blade on it that even if the voltage source is switched off, the
cutting blade can be moved.
• Ensure that all nuts, bolts and
screws are tightened rmly and
the equipment is in safe working condition.
• Do not attempt to repair the
equipment yourself unless you
have been trained to do so.
Any work not specied in these
instructions is to be carried out
only by customer service centres
that we have authorised.
• Keep the equipment in a dry
location and out of reach of
children.
• Handle the equipment with
care. Keep tools sharp and
clean, in order to facilitate better and safer work. Follow the
maintenance instructions.
• Wear protective gloves when

12
GB IE
Careful handling an use of battery
devices:
• Charge the batteries only in
chargers that are recommended
by the manufacturer. Risk of re
if a charger that is suitable for a
specic type of battery is used
with other batteries.
• In the power tools, use only the
batteries designed for the pur-
pose. The use of other batteries
may result in injuries and risk of
re.
• Keep the unused battery away
from paper clips, coins, keys,
nails, screws and other small
metal objects, which could
cause bridging of the contacts.
A short circuit between the battery contacts may cause burns
or re.
• If used incorrectly, liquid may
leak from the battery. Avoid
contact with this. In the event
of accidental contact, rinse off
with water. If the liquid gets into
eyes, seek medical assistance.
Leaking battery uid may cause
skin irritations or burns.
Special safety directions for battery-operated tools:
• Ensure that the device is
switched off before inserting the
battery. Inserting a battery into
a power tool that is switched on
may result in accidents.
• Recharge the batteries indoors
only because the battery charger is designed for indoor use
only. Risk of electric shock.
• To reduce the electric shock
hazard, unplug the battery
charger from the mains before
cleaning the charger.
• Do not subject the battery to
strong sunlight over long periods and do not leave it on a
heater. Heat damages the battery and there is a risk of explosion.
• Allow a hot battery to cool before charging.
• Do not open up the battery and
avoid mechanical damage to
the battery. Risk of short circuit
and fumes may be emitted that
irritate the respiratory tract.
Ensure fresh air and seek medical assistance in the event of
discomfort.
• Do not use non-rechargeable
batteries. This could damage
the appliance.
Correct handling of the battery
charger:
• This appliance can be used
by children aged from 8 years
and above and persons with
reduced physical, sensory or

13
GB IE
mental capabilities or lack of
experience and knowledge if
they have been given supervision or instruction concerning
use of the appliance in a safe
way and understand the hazards involved. Children shall
not play with the appliance.
Cleaning and user maintenance
shall not be made by children
without supervision.
• To charge the battery, use only
the charger supplied. Risk of
re and explosion. This ensures
that the safety of the device is
maintained.
• Before each use, check the
charger, cable and plug and
have them repaired by quali-
ed professionals and only with
original parts. Do not use a
defective charger and do not
open it up yourself. This ensures
that the safety of the device is
maintained.
• Connect the charger only to a
socket with an earth. Ensure
that the mains voltage matches
the specications on the charger rating plate. Risk of electric
shock.
• Disconnect the charger from the
mains before closing or opening connection to the battery
/ power tool / device. This
ensures that the battery and
charger are not damaged.
• Keep the charger clean and
away from wet and rain. Do
not use the charger outdoors.
Dirt and the entry of water increase the risk of electric shock.
• Operate the charger only with
the appropriate original batteries. Charging other batteries
may result in injuries and risk of
re.
• Avoid mechanical damage to
the charger. This can result in
internal short circuits.
• Do not operate the charger on
a combustible surface (e.g. pa-
per, textiles). Risk of re due to
heating during charging.
• If the power cable for this
equipment is damaged, it must
be replaced by the manufacturer, a customer service agent
of the same or a similarly quali-
ed person in order to prevent
hazards.
• Do not charge non-rechargea-
ble batteries in the charger. This
could damage the appliance.

14
GB IE
Assembly
• Only carry out work that you know you
are capable of.
• If in doubt, consult an expert or our
service centre directly.
Mounting the lower handle
1. Attach one end of the lower handle (3) to the screw thread on
the apparatus housing.
2. Pull the ends of the lower handle
(3) slightly apart and put the
other end of the screw thread on
the apparatus housing.
The lug indicating the angular
position (3a) must face inwards.
You can lock the lower
handle in 3 angular positions (steep/medium/shallow).
3. Place the enclosed washers (6a)
in position. The curved sides
face the handle.
4. Turn the lower tightening levers
(6) clockwise.
5. Lock the tightening levers (6) by
pressing them in the direction of
the lower handle (3). The tightening levers must be pulled tight
and then positioned against the
handle so that tightening can be
carried out with medium force.
If this fails, continue to turn the
tightening lever clockwise, or
loosen it by turning anti-clockwise (see small image).
Mounting the upper handle
1. Fasten the upper handle (1) with
the enclosed screws (2b), the
washers (2a) and the upper tightening levers (2) on the right and
left of the lower handle (3). The
release button (16) must be located on the right in the mowing
direction.
Two positions are possible.
2. Turn the tightening levers (2)
clockwise.
3. Lock the tightening levers (2) by
pressing them in the direction of
the handle (3). The tightening
levers must be positioned against
the handle such that tightening
can be carried out with medium
force.
If this fails, continue to turn the
tightening lever clockwise, or
loosen it by turning anti-clockwise
(see small image).
4. Clipping in the cable holders:
Clip in the cable holders (14) on
the upper (1) and lower handle
(3) and use them to x the device
cable (15) in position.
If you release the tightening levers
(2), you can fold the bow-type handle (18) downwards to store the apparatus.
Mounting the grass box
Wear gloves when mounting the
grass box (4), to avoid risk of injury.
See also the enclosed information
for installation of the grass box.
15
GB IE
1. Assemble the two parts of the
lower section (4a) of the grass
box.
2. Place the upper section (4b) of
the grass box on the lower section (4a). It then locks into place
in the recesses provided for this
purpose in the upper section.
Operation
The apparatus must only be
adjusted when the motor is
switched off and the blades
are stationary. There is a risk
of personal injury.
Switch off the apparatus, remove
the ignition key (
10) and wait
for the blades to come to a standstill.
Hanging on/removing the
grass box
1. To hang on the grass box (4), lift
the collision guard (5) and hang
on the grass box using both supports.
2. Fold the collision guard (5) onto
the grass box (4). It holds the
grass box in the correct position.
3. To remove the grass box (4),
lift the collision guard (5) and
detach the grass box. Fold the
collision guard (5) back onto the
mower housing (8).
Do not operate the appliance
without the collision guard or
the grass box. Risk of injury!
Level gauge
The level gauge ( 4c) is located on the
side of the grass box (
4).
Level gauge ap open:
Grass box empty.
Level gauge ap closed:
Grass box full.
Adjusting the cut height
The apparatus has 6 positions for adjusting
the cutting height:
35 mm/25 mm - Short cutting height
55 mm/45 mm - Medium cutting height
75 mm/65 mm - Tall cutting height
1. Take hold of the carrying handle
(13) and lift the apparatus.
2. Grip the lever (12) for adjusting
the cutting height and move it
past the ratchet mechanism to
the desired cutting height.
The correct height is around 25 – 45 mm
for a decorative lawn and around 45 –
65mm for a used lawn.
A higher cut height should be se-
lected for the rst cut of the season.
Switching On and Off
1. Place the apparatus on a level
surface.
2. Lift the cover (11) of the apparatus housing and insert the
charged battery (9) along the
guide rail into the apparatus.
You should be able to hear the
rechargeable battery lock into
place.
16
GB IE
3. Insert the ignition key (10) into
the opening provided for it next
to the battery (9).
4. Before switching the apparatus
on, make sure that it is not touching any objects.
5. To switch the
1
2
apparatus on,
press the release
button (16) and hold it down
while pressing the starting lever
(17). Let go of the release button.
6. To switch the apparatus off, let
go of the starting lever (17).
Due to the intelligent energy man-
agement system, the motor starts
after a delay.
After switching off the equip-
ment, the blade continues to
turn for several seconds. Do
not touch the moving blade.
There is a risk of injury.
Charging the battery
Do not expose the battery to
extreme conditions such as
heat or impact. Risk of injury
from escaping electrolytic solution! After eye/skin contact,
rinse the affected areas with
water or a neutraliser and
consult a doctor.
Charge the battery in a dry
room only. Prior to attaching the charger, check that
the battery’s outer surface is
clean and dry. There is a risk
of injury due to electric shock.
Only use the charger from the pack-
age to charge the battery.
• Charge the battery before the rst time
of use. Do not briey charge the bat-
tery several time in a row.
• If a fully recharged battery lasts for
considerably shorter operating times,
the battery is used up and needs to
be replaced. Only use an OEM spare
battery available from our Customer
Service.
• Always take heed of the applicable
safety instructions as well as the environmental protection regulations and
information.
• The warranty excludes all defects
caused by improper handling.
Insert/remove rechargeable
battery
Switch off the apparatus, remove
the ignition key (
10) and wait
for the blades to come to a standstill.
1. To insert the battery (9) push the
battery along the guide rail into
the appliance. It locks into place
audibly.
2. To remove the battery (9) from the
appliance, press the release button (9a) on the battery and pull
the battery out.
Recharging the battery
Switch off the apparatus, remove
the ignition key (
10) and wait
for the blades to come to a standstill.
 Loading...