

Page 1
®
TOSAERBA ELETTRICO FRM 1800 B2
TOSAERBA ELETTRICO
Traduzione delle istruzioni d’uso originali
ELEKTRO-RASENMÄHER
Originalbetriebsanleitung
ELECTRIC LAWNMOWER
Translation of original operation manual
IAN 106319
Page 2

Prima di leggere aprire la pagina con le immagini e prendere confidenza con le diverse funzioni
dell’apparecchio.
Before reading, unfold the page containing the illustrations and familiarise yourself with all
functions of the device.
Klappen Sie vor dem Lesen die Seite mit den Abbildungen aus und machen Sie sich anschließend
mit allen Funktionen des Gerätes vertraut.
IT / MT Traduzione delle istruzioni d’uso originali Pagina
GB / MT Translation of original operation manual Page
DE / AT / CH Originalbetriebsanleitung Seite
5
18
30
Page 3
15
14
13
4
3
A
6
12
7
3
2a
2a
2a
7
1
11
2b
10
9
8
7
5
B
3
Page 4
9
4
3
C
4
D
2b
1
E
21
4
21
Page 5

MTIT
Indice
Introduzione ...............................5
Utilizzo ........................................5
Descrizione generale .................... 6
Contenuto della confezione .............. 6
Sommario ...................................... 6
Descrizione del funzionamento ......... 6
Dati tecnici ..................................6
Consigli di sicurezza .....................7
Simboli sull’apparecchio ..................7
Consigli di sicurezza generali ................8
Montaggio ................................. 11
Montaggio Impugnatura ................. 11
Comando ................................... 11
Inserimento/rimozione
cesto raccoglierba .......................... 11
Svuotamento cesto raccoglierba ....... 12
Regolazione dell’altezza del taglio ... 12
Accensione e spegnimento .............. 12
Lavorare con il tagliaerba ............... 12
Pulizia/manutenzione/
stoccaggio..................................13
Lavori di pulizia e manutenzione
generali ........................................ 13
Sostituzione lama ........................... 13
Stoccaggio .................................... 14
Smaltimento/tutela
dell’ambiente ............................. 14
Pezzi di ricambio / Accessori ......14
Ricerca guasti.............................15
Garanzia ...................................16
Servizio di riparazione ...............17
Service-Center ............................17
Filiale di assistenza tecnica .........17
Traduzione della dichiarazione
di conformità CE originale ..........43
Vista esplosa .............................49
Introduzione
Congratulazioni per l’acquisto del Suo
nuovo apparecchio.
Ha scelto un prodotto altamente pregiato.
Le istruzioni per l’uso costituiscono parte
integrante di questo prodotto. Contengono
indicazioni importanti per la sicurezza,
l’uso e lo smaltimento. Prima dell’uso del
prodotto, si raccomanda di familiarizzare
con tutte le indicazioni di comando e di
sicurezza. Usare il prodotto solo come de-
scritto e per i campi d’impiego specicati.
Conservare le istruzioni in un luogo sicuro
e consegnare la documentazione in caso
di cessione del prodotto a terzi.
Utilizzo
L’apparecchio è concepito esclusivamente
per tagliare il prato e le superci erbose
nel settore domestico.
Qualsiasi altro utilizzo non espressamente
autorizzato nelle presenti istruzioni , può
causare danni all’apparecchio e rappresentare un serio pericolo per l’utilizzatore.
L’apparecchio è destinato all’uso da parte
di adulti. Bambini e persone che non hanno familiarizzato con le presenti istruzioni
non devono usare l’apparecchio. L’uso
dell’apparecchio in presenza di pioggia o
in ambienti umidi è vietato.
Il produttore declina ogni responsabilità
per danni causati da un uso improprio o
un comando errato.
5
Page 6

IT
I
A
C
E
MT
Descrizione generale
Contenuto della confezione
Rimuovere delicatamente l’apparecchio
dall’imballaggio e controllare se i seguenti
componenti sono completi:
- Tagliaerba e manico con conduttura di
allacciamento
- Braccio inferiore
- Cesto raccoglierba
- 2 viti per il ssaggio del braccio
- 2 dadi ad alette e viti per il ssaggio
dell’impugnatura
- 2 supporti per il ssaggio della conduttura di allacciamento
- Traduzione delle istruzioni per l’uso in
originale
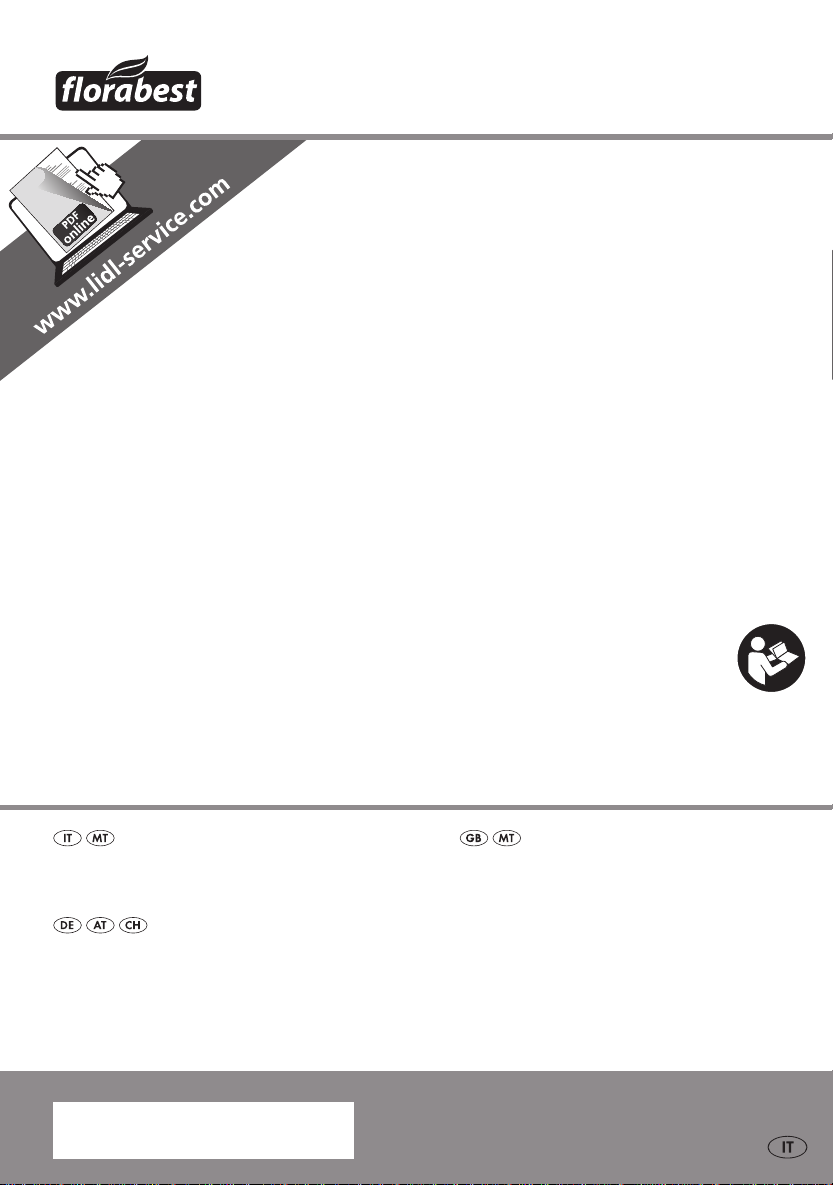
Sommario
1 Manico
2a Dadi ad alette per il ssaggio
del braccio
2b Dadi ad alette per il ssaggio
del braccio
3 Braccio inferiore
4 Cesto raccoglierba
5 Leva di regolazione dell’altezza
di taglio
6 Ruote
7 Alloggiamento tagliaerba
8 Impugnatura
9 Protezione antiurto
10 Serracavo
11 Pulsante di sbloccaggio (non a
vista)
12 Presa per cavo di rete
13 Scarico tensione cavo
14 Cavo di rete
15 Leva di avviamento
22 Bullone lama
23 Coltello
24 Motore mandrino
Descrizione del
funzionamento
Il tagliaerba elettrico possiede un utensile da taglio che gira parallelamente al
livello di taglio. E’ dotato di un elettromotore di potenza, un alloggiamento di plastica resistente, un interruttore di sicurezza,
una protezione antiurto e un cesto raccoglierba. Inoltre l’apparecchio è regolabile
in altezza a 6 livelli ed è dotato di ruote
facili da manovrare.
Il funzionamento dei componenti è riportato nelle seguenti descrizioni.
Dati tecnici
Tagliaaerba elettrico ..FRM 1800 B2
Potenza assorbita del motore ......1800 W
Tensione nominale ............ 230V~, 50 Hz
Numero di giri al minimo .........3250 min
Larghezza lama ...................ca. 440 mm
Altezza taglio ....................... 20 - 70 mm
Classe di protezione ..........................
Tipo di protezione ............................IPX4
Peso .........................................15,1 kg
Volume cesto raccoglierba................. 52 l
Livello di potenza sonora
garantito .................................. 96 dB (A)
Livello di potenza sonora
misurata (L
....................................K
Livello di pressione acustica (L
..............................................85 dB (A)
........................................K
Vibrazione sull’impugnatura (a
.......................... 1,8 m/s
) ........................94,1 dB(A)
WA
= 2,1 dB (A)
wA
)
pA
= 3 dB (A)
pA
)
h
2
; K= 1,5 m/s²
II
-1
16 Dadi ad alette
21 Indicatore di livello
6
Page 7
MTIT
Il presente apparecchio è progettato per il
funzionamento con una rete di distribuzione dell’energia elettrica con un’impedenza
di sistema Zmax al punto di trasferimento
(collegamento domestico) paria a 0,277
Ohm al massimo.
L’utente è tenuto ad accertare che l’apparecchio venga messo in funzione esclusivamente con una rete di distribuzione
dell’energia elettrica che rispetti detto
requisito.
Se necessario, le aziende di fornitura di
energia elettrica locali sono in grado di
fornire l’impedenza del sistema.
Il valore di emissione delle oscillazioni
specicato è stato misurato secondo un
metodo di prova standardizzato e può
essere usato per il confronto di un elettrodomestico con un altro.
Il valore di emissione delle oscillazioni
specicato può anche essere usato per una
valutazione introduttiva dell’interruzione.
Avvertenza:
Il valore di emissione delle oscil-
lazioni può variare dal valore
specicato durante l’uso effettivo
dell’elettrodomestico, a seconda del
tipo e del modo di utilizzo dell’elettrodomestico.
Nasce l’esigenza di determinare
misure di sicurezza per la protezione dell’operatore, che si basano
sulla valutazione dell’interruzione
in condizioni d’esercizio effettivo
(a tale proposito devono essere
considerati tutti gli elementi del
ciclo d’esercizio, come per esempio
i tempi in cui l’elettrodomestico è
spento e quelli in cui l’elettrodomestico è acceso, ma funziona senza
sollecitazione).
I valori di rumore e vibrazione sono stati
rilevati conformemente alle norme e le dis-
posizioni specicate nella dichiarazione
di conformità.
Modiche tecniche e ottiche possono
essere effettuate in seguito agli sviluppi
tecnici senza preavviso. Tutte le misure, avvertenze e indicazioni delle presenti istruzioni d’uso sono quindi senza garanzia.
Eventuali diritti legali basati sulle presenti
istruzioni d’uso, non possono quindi essere
fatti valere.
Consigli di sicurezza
Questa sezione tratta le indicazioni di sicurezza fondamentali durante il lavoro con il
tagliaerba elettrico.
Simboli sull’apparecchio
Attenzione!
Leggere attentamente le istruzioni
d’uso..
Indossare una protezione per gli
occhi e per l’udito.
Non esporre l’apparecchio all’umi-
dità. Non lavorare in presenza di
pioggia e non tagliare erba bagnata.
Pericolo di lesioni a causa di parti
catapultate.
Tenere lontane le persone dal tosa-
erba.
Attenzione – Lame da taglio aflate! Tenere lontani piedi e mani.
Pericolo di lesioni!
Spegnere il motore e staccare la
spina elettrica prima di eseguire i
lavori di regolazione o di pulizia
oppure se il cavo di rete è inceppato o danneggiato.
Pericolo a causa del cavo di rete
danneggiato.
Tenere il cavo di rete lontano
dall’apparecchio e dalla lama da
taglio!
7
Page 8

IT
MT
Attenzione!
Scia della lama del tagliaerba.
Indicazione del livello di rumore Lwa
in dB.
440
Tagliare il cerchio
Classe di protezione II
Gli apparecchi elettrici non devono
essere smaltiti insieme ai riuti domestici.
Consigli di sicurezza
generali
In caso in uso improprio questo
apparecchio può causare lesioni
gravi. Per evitare danni a persone
e cose, leggere e osservare tassativamente le seguenti indicazioni di
sicurezza e familiarizzare con tutti i
componenti di comando.
Preparazione:
• Questo apparecchio non è concepito
per essere usato da persone (compresi
bambini) con limitate capacità siche,
sensoriali o mentali o senza sufciente
esperienza e/o che non hanno le nozioni necessarie, salvo nei casi in cui siano
sorvegliati da una persona responsabile
per la loro sicurezza oppure vengano
istruiti su come usare l’apparecchio.
• Prima dell‘utilizzo vericare la presenza
di danni o usura lungo la conduttura di
collegamento e la prolunga. Se la conduttura si danneggia durante l‘utilizzo,
scollegarla immediatamente dalla rete di
alimentazione. Non toccare la conduttura prima di averla scollegata. Non utilizzare la macchina quando la conduttura è
usurata o danneggiata.
• Lasciare raffreddare il motore prima di
riporre la macchina.
• Non permettere mai a bambini o ad
altre persone, che non conoscono le
istruzioni d’uso, di usare l’apparecchio. Alcune disposizioni locali prevedono un’età minima per l’utilizzatore.
• Non usare mai l’apparecchio quando
si trovano nelle vicinanze persone, in
particolare bambini e animali domestici.
• Bambini devono essere sorvegliati, per
garantire che non giochino con l’apparecchio.
• L’operatore o utilizzatore è responsabile per infortuni o danni ad altre
persone o alla proprietà delle stesse.
• Controllare l’area nella quale viene
impiegato l’apparecchio e rimuovere
pietre, bastoni, li metallici o altri corpi
estranei che possono essere catturati e
catapultati.
• Indossare apposito abbigliamento da
lavoro come scarpe chiuse con suola
antiscivolo e un pantalone lungo resistente. Non usare l’apparecchio scalzi
o con i sandali.
• Prima di ogni uso, eseguire un controllo visivo dell’apparecchio. Non usare
l’apparecchio in caso di dispositivi di
sicurezza (p. es. protezione antiurto
o cesto raccoglierba), componenti
del dispositivo di taglio o bulloni
mancanti, usurati o danneggiati. Per
evitare uno sbilanciamento, gli utensili
e bulloni danneggiati devono essere
sostituiti nel set.
• Prestare particolare attenzione quando
si usano apparecchio con più utensili
da taglio, in quando il movimento
della lama può provocare la rotazione
delle restanti lame.
• Usare solo ricambi e accessori forniti
e consigliati dal produttore. L’impiego
di corpi estranei comporta l’immediata
esclusione del diritto di garanzia.
8
Page 9
MTIT
Lavorare con l’apparecchio:
Non tenere i piedi e le mani vicino
o sotto alle parti rotanti durante il
lavoro. Pericolo di lesioni!
Osservare la protezione antiru-
more e le disposizioni locali. L’uso
dell’apparecchio durante determinate giornate (p. es. domeniche e
festivi) può essere limitato o vietato
in determinate fasce orarie (ora
di pranzo, riposo notturno) o in determinati ambienti (p. es. luoghi di
cura, cliniche ecc..).
• Accendere il motore secondo le istruzioni e solo, quando i piedi sono posizionati ad una distanza sicura dagli
utensili da taglio.
• Non usare l’apparecchio in presenza
di pioggia o maltempo, in ambienti
umidi o sul prato bagnato. Lavorare
solo con la luce diurna o con una buona illuminazione.
• Non lavorare con l’apparecchio, se si
è stanchi o poco concentrati o dopo
l’assunzione di alcol o farmaci. Fare
una pausa ad intervalli regolari. Lavorare con raziocinio.
• Durante il lavoro, prestare attenzione
ad una posizione stabile, in particolare sui pendii. Lavorare sempre
trasversalmente al pendio, mai su è
giù. Prestare particolare attenzione,
quando si cambia la direzione di marcia sui pendii. Non lavorare su pendii
eccessivamente ripidi.
• Condurre l’apparecchio a passo d’uomo. Prestare particolare attenzione,
quando si gira o tira verso di se l’apparecchio o si cammina all’indietro.
• Accendere l’apparecchio con cautela
secondo le indicazioni contenute nelle
presenti istruzioni. Prestare attenzione
ad una sufciente distanza dei piedi
dalle lame rotanti .
• Non ribaltare l’apparecchio durante
l’avviamento, salvo nei casi in cui sia
necessario per la partenza nell’erba
alta. In questo caso, ribaltare l’apparecchio premendo l’impugnatura
in modo tale che le ruote anteriori
dell’apparecchio vengano leggermente
sollevate. Controllare sempre che le
due mani si trovano in posizione di
lavoro, prima di riappoggiare l’apparecchio sul terreno.
• Non lavorare mai senza cesto raccoglierba o protezione antiurto. Tenersi
sempre lontani dall’apertura di espulsione dell’erba.
Attenzione pericolo! La lama conti-
nua a ruotare.
Pericolo di lesioni.
• L’apparecchio non deve essere solleva-
to o trasportato, n tanto che il motore
gira. Spegnere l’apparecchio nel caso
in cui debba essere ribaltato per il
trasporto, si debbano attraversare su-
perci diverse dal prato e l’apparecchio
venga condotto verso le e lontano dalle
superci da tagliare.
• Tenere l’apertura di espulsione dell’erba sempre pulita e libera. Rimuovere
l’erba tagliata solo quando l’apparecchio è fermo.
• Non lasciare mai l’apparecchio incustodito sul posto di lavoro.
• Non lavorare con l’apparecchio danneggiato, incompleto o trasformato
senza il consenso del produttore. Non
usare mai l’apparecchio con dispositivi
di sicurezza o schermature danneggiati oppure senza i dispositivi di sicurezza
come i dispositivi di deviazione e/o di
raccolta dell’erba.
• Non sovraccaricare l’apparecchio.
Lavorare solo nel campo di potenza
specicato e non modicare le impostazioni di regolazione del motore.
9
Page 10

IT
MT
Non usare apparecchi a bassa potenza per lavori pesanti. Non usare l’apparecchio per scopi diversi da quelli
per cui è stato concepito .
• Non usare l’apparecchio nelle vicinan-
ze di liquidi o gas inammabili. La
mancata osservanza di questa indicazione comporta rischi di incendio o di
esplosione.
• Non sollevare o trasportare mai l’apparecchio mentre il motore gira.
• Spegnere l’apparecchio e staccare la
spina elettrica:
- sempre quando si abbandona la
macchina,
- prima di pulire l’apertura di espulsione dell’erba o di rimuovere i bloccaggi,
- quando l’apparecchio non viene
usato,
- prima di controllare o pulire l’apparecchio oppure effettuare lavori sul
medesimo,
- quando il cavo di rete è danneggiato o aggrovigliato,
- quando l’apparecchio incontra un
corpo estraneo durante il lavoro oppure subentrano vibrazioni insolite.
In questo caso controllare l’appa-
recchio per vericare la presenta
di eventuali danneggiamento, ed
eventualmente farlo riparare.
• Non posizionare mai le mani o i piedi
vicino o sotto le parti rotanti. In caso di
tosatura con la falce, non posizionarsi
mai davanti all’apertura di espulsione
dell’erba .
Manutenzione e stoccaggio:
• Assicurarsi che tutti i dadi, viti e bulloni
siano ben stretti e l’apparecchio sia in
condizioni di lavoro sicure.
• Non tentare di riparare autonomamente l’apparecchio, salvo nel caso in cui
si è adeguatamente istruiti. Tutti i lavori
non specicati nelle presenti istruzioni
d’uso devono essere effettuati esclusi-
vamente dai centri di assistenza clienti
da noi autorizzati.
• Conservare l’apparecchio in un luogo
asciutto e fuori dalla portata di bambini.
• Trattare l’apparecchio con cura. Tenere
gli utensili aflati e puliti, in modo
tale da garantire condizioni di lavoro
migliori e più sicure. Seguire le disposizioni di manutenzione.
• Indossare guanti di protezione , quando si sostituisce il dispositivo da taglio.
• Controllare regolarmente il dispositivo
raccoglierba per vericare l’eventuale
presenza di usura e deformazioni. Per
motivi di sicurezza, sostituire le parti
usurate o danneggiate. Prestare particolare attenzione durante la regolazione delle lame, in modo tale da evitare
che le dita non vengano schiacciate
tra le lame rotanti e le parti sse della macchina.
• Assicurarsi che vengano usati solo
utensili da taglio di ricambio autorizzati dal produttore.
Sicurezza elettrica:
• Prestare attenzione che la tensione di
rete corrisponda alle indicazioni riportate sulla targhetta dell’apparecchio.
• Collegare l’apparecchio solo a una
presa con dispositivo di protezione per
correnti di guasto (interruttore FI/ RCD)
con una corrente di intervento di massimo 30 mA an.
• Evitare il contatto del corpo con le parti messe a terra (p. es. recinzioni o pali
metallici).
• Usare solo cavi di rete ammessi del
tipo H05RN-F, con una lunghezza
massima di 75 m e concepiti per l’uso
all’esterno. Il diametro del cavo di rete
deve corrispondere minimo a 2,5
2
mm
. Prima dell’uso, srotolare sempre
completamente la bobina del cavo.
Controllare il cavo per vericare la
presenza di eventuali danneggiamenti.
10
Page 11
MTIT
B
C
D
E
• Per il ssaggio del cavo di rete usare
la spira del cavo prevista.
• Durante il lavoro, tenere il cavo di rete
lontano dall’utensile da taglio. Le lame
da taglio possono danneggiare il cavo
di rete e provocare il contatto con le
parti conduttive. In generale, condurre
il cavo di rete dietro l’utilizzatore.
• Non usare il cavo di rete per staccare la spina dalla presa. Proteggere il
cavo di rete dal calore, dall’olio e da
spigoli vivi.
• Spegnere l’apparecchio e staccare la
spina elettrica dalla presa, se il cavo
di rete è danneggiato. Se il cavo di
rete viene danneggiato, deve essere
sostituito dal produttore, dal suo centro
di assistenza clienti oppure da una
persona qualicata, al ne di evitare
pericoli.
• Non collegare un cavo di rete danneggiato alla rete di alimentazione. Non
toccare un cavo di rete danneggiato,
n tanto che è collegato alla rete di alimentazione. Un cavo di rete danneggiato può provocare il contatto con le
parti conduttive.
Montaggio
Prima di effettuare qualsiasi lavoro
all’apparecchio, staccare la spina
elettrica. Rischio di danni a persone.
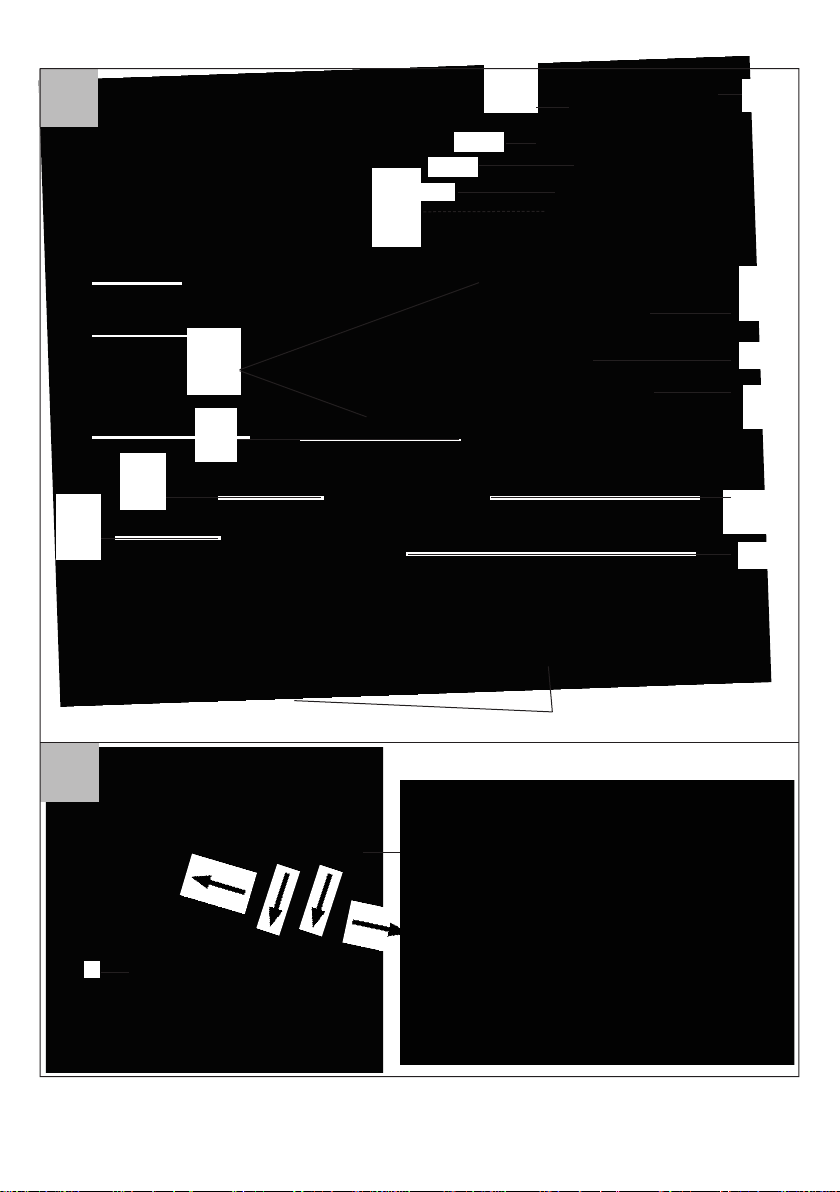
Montaggio Impugnatura
1. Rimuovere i due dadi ad aletta
(2a) premontati con le relative
viti dall’alloggiamento del tagliaerba (7). Inserire il braccio
inferiore (3) nella sede dell’alloggiamento del tagliaerba (7).
2. Fissare il montante inferiore (3)
con le due viti e i dadi ad aletta
(2a).
3. Fissare l’impugnatura (1) con le
viti fornite (17) e i dadi ad alette
(2b) sul braccio inferiore (3).
Sono possibili due posizioni.
4. Agganciare la fascetta serra-
Allentando i due dadi ad alette,
è possibile ripiegare il manico per
riporre l’apparecchio. Prestare
attenzione che il cavo di rete non
venga schiacciato.
A
cavo (
ssarvi il cavo.
10) sul braccio (3) e
Comando
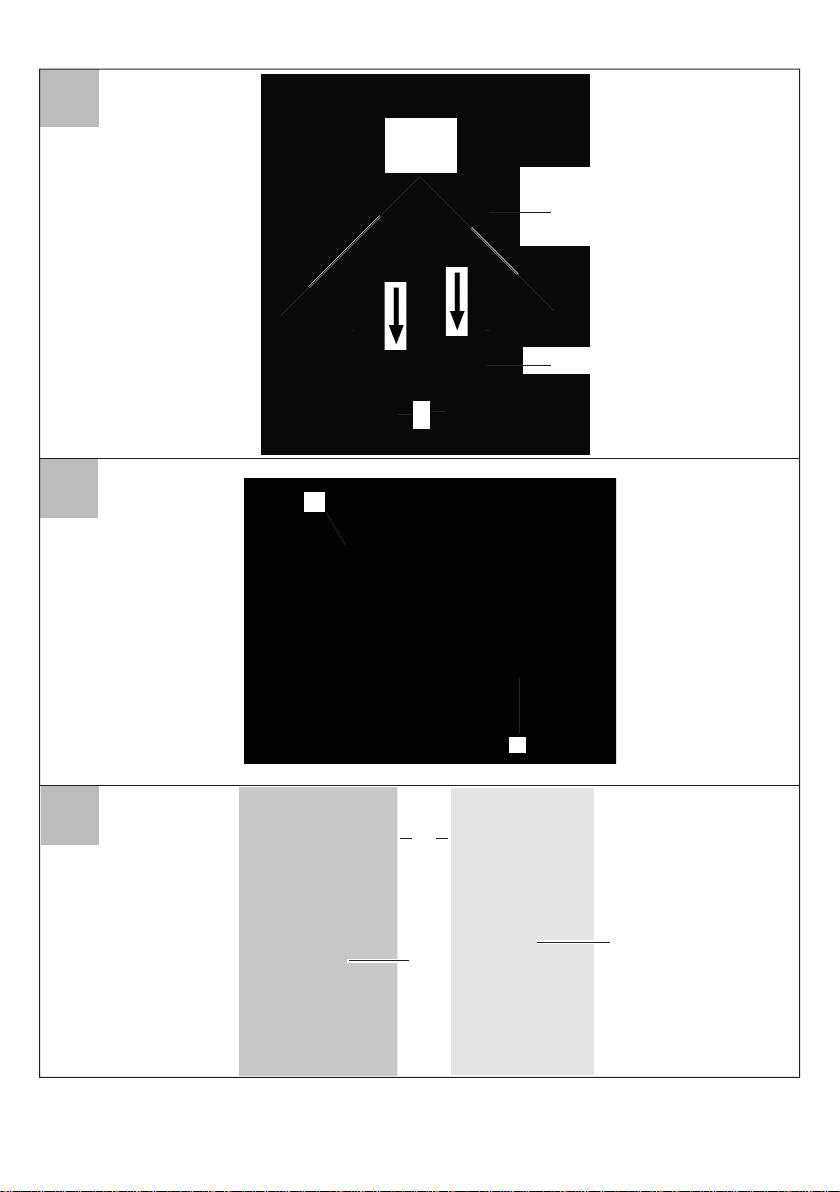
Inserimento/rimozione cesto
raccoglierba
1. Per inserire il cesto raccoglierba
(4), sollevare la protezione antiurto (9) e appendere il cesto
raccoglierba (4). Ribaltare la
protezione antiurto (9) sul cesto
raccoglierba (4). Tiene il cesto
raccoglierba nella posizione corretta.
2. Per rimuovere il cesto raccoglierba (4) , sollevare la protezione
antiurto (9) e rimuovere il cesto
raccoglierba (4). Ribaltare indietro la protezione antiurto (9)
nell’alloggiamento del tagliaerba.
E’ vietato lavorare con il ta-
gliaerba senza protezione
antiurto o cesto raccoglierba.
Pericolo di lesioni.
Lateralmente sul cesto raccoglierba è collocato (4) un indicatore del livello di riempimento (21).
Sportello (21) aperto:
Cesto raccoglierba (4) vuoto
11
Page 12

IT
G
F
MT
Sportello (21) chiuso:
Cesto raccoglierba (4) pieno
L‘indicatore di livello (21) funziona
quando il dispositivo è in funzione.
Svuotamento cesto
raccoglierba
Il cesto raccoglierba (4) è composto da
due parti, per facilitare lo svuotamento
dello stesso.
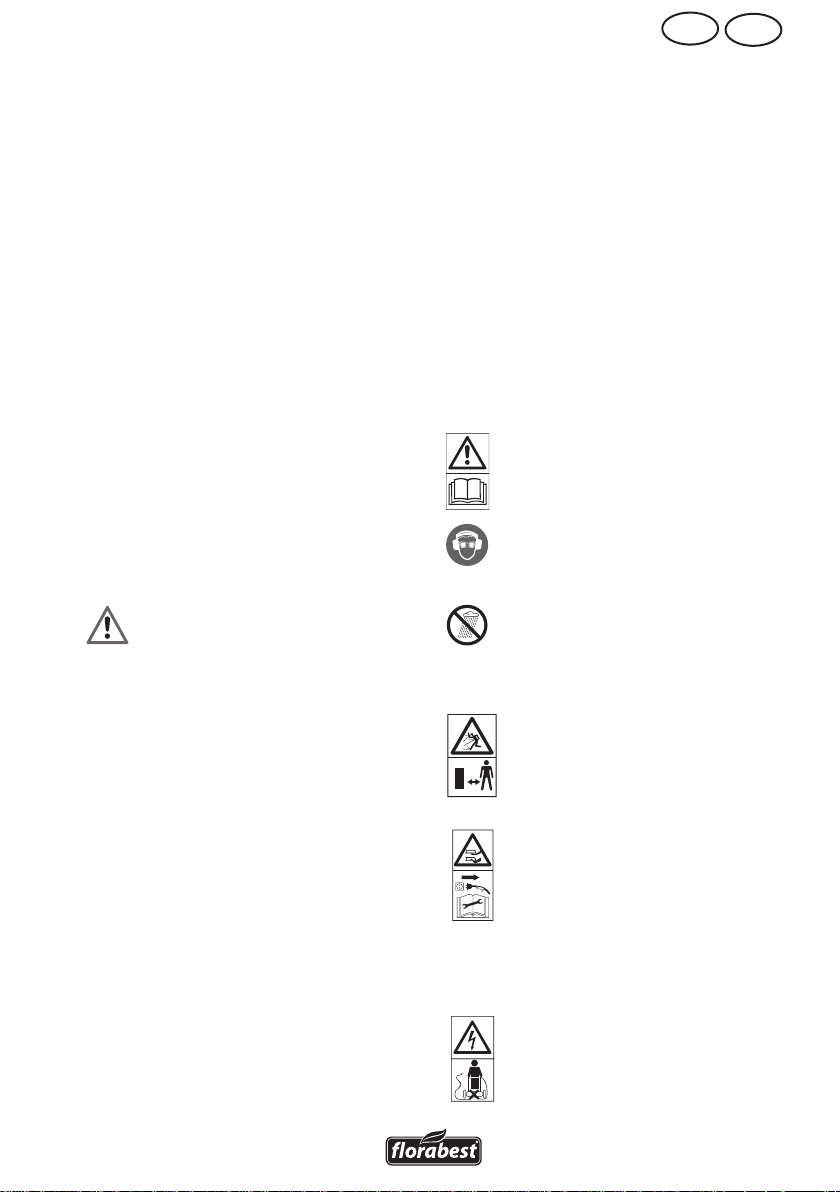
Regolazione dell’altezza del
taglio
Spegnere l’apparecchio, staccare
la spina elettrica e attendere l’arresto della lama. Rischio di danni a
persone.
1. Afferrare la leva di regolazione
dell’altezza del taglio (5) e metterlo nella posizione dell’altezza
desiderata superando lo scatto.
2. Per evitare che il tagliaerba scivoli via è possibile usare come
ausilio l’impugnatura (8).
20 mm - Position 1
30 mm - Position 2
40 mm - Position 3
50 mm - Position 4
60 mm - Position 5
70 mm - Position 6
L’altezza di taglio corretta per un prato
decorativo corrisponde a circa 25 - 40
mm, per un prato calpestabile a circa 3060 mm.
Per il primo taglio della stagione si
consiglia di scegliere un’altezza di
taglio elevata.
Osservare la protezione antirumo-
re e le disposizioni locali.
Accensione e spegnimento
1. Inserire la spina del cavo di rete
nella presa di corrente (12) sul
manico (1).
2. Per lo scarico della trazione
formare con l’estremità del cavo
di rete (14) un cappio e appenderlo nel dispositivo di scarico
della trazione (13).
Vedi gura
3. Allacciare l’apparecchio alla tensione di rete.
4. Prima di procedere all’accensione, prestare attenzione che
l’apparecchio non tocchi oggetti.
5. Per accendere l’apparecchio,
premere il pulsante di sbloccaggio (11) sull’impugnatura
e contemporaneamente tenere
premuta la leva di avviamento
(15). Rilasciare il pulsante di
sbloccaggio (11).
6. Per spegnere l’apparecchio,
rilasciare la leva di avviamento
(15).
Dopo lo spegnimento dell’appa-
recchio la lama continua a girare
per alcuni secondi. Non toccare la
lama in movimento. Rischio di danni a persone.
H
.
Lavorare con il tagliaerba
Una tosatura regolare stimola la formazione rafforzata delle foglie e al contempo
provoca la distruzione dell’erbaccia. Per
questo motivo, dopo ogni intervento di
tosatura il prato diventa più tto e omogeneo.
Il primo taglio avviene circa a partire da
aprile con un’altezza di crescita di
70 - 80 mm. Nella stagione vegetativa
principale il prato deve essere tosato minimo una volta a settimana.
12
Page 13
MTIT
I
• Iniziare a tosare nelle vicinanze della
presa e proseguire allontanandosi dalla stessa .
• Condurre la prolunga sempre dietro di
se e, dopo l’inversione, condurla sul
lato già tosato.
• Condurre l’apparecchio a passo
d’uomo eseguendo traiettoria più dritte
possibili. Per una tosatura perfetta, le
traiettorie dovrebbero sovrapporsi di
alcuni centimetri.
• Regolare la profondità del taglio in
modo tale che l’apparecchio non venga sovraccaricato. In caso contrario si
rischia di danneggiare il motore.
• Sui pendii lavorare sempre trasversalmente. Prestare particolare attenzione
durante le manovre di retromarcia e
quando si tira l’apparecchio.
• Pulire l’apparecchio dopo ogni impiego come descritto nel capitolo „Pulizia,
manutenzione, stoccaggio“.
Dopo il lavoro e per il trasporto,
spegnere l’apparecchio, staccare
la spina di rete e attendere l’arresto
della lama. Rischio di danni a persone .
Pulizia/
manutenzione/
stoccaggio
Fare effettuare i lavori non descritti
nelle presenti istruzioni d’uso da
un centro di assistenza clienti da
noi autorizzato. Usare solo ricambi
originali
.
Indossare guanti quando si maneg-
gia la lama.
Prima di effettuare qualsiasi lavoro
di manutenzione o pulizia, spegnere l’apparecchio, staccare la spina
di rete e attendere l’arresto della
lama.
Rischio di danni a persone.
Lavori di pulizia e manutenzione generali
Non spruzzare il tosaerba con ac-
qua.
• Tenere l’apparecchio sempre pulito. Per
la pulizia, usare una spazzola o un
panno senza detergenti o solventi.
• Rimuovere eventuali residui di piante
rimaste attaccate dopo la tosatura con
un pezzo di legno o di plastica dalle
ruote, dalle aperture di ventilazione,
all’apertura di espulsione dell’erba
e dalla zona della lama. Non usare
oggetti duri o appuntivi, possono danneggiare l’apparecchio.
• Lubricare di tanto in tanto le ruote.
• Controllare il tosaerba prima di ogni
uso per vericare la presenza di eventuali difetti evidenti, come parti allentate, usurate o danneggiate. Controllare
la corrette sede di tutti i dadi, bulloni e
viti.
• Controllare le coperture e i dispositivi
di sicurezza per vericare l’eventuale
presenza di danneggiamenti e la corretta sede. Eventualmente, provvedere
alla sostituzione.
Sostituzione lama
Se la lama è smussato, può essere aflata
da un’ofcina specializzata. Se la lama è
danneggiata o presenta uno sbilanciamento, deve essere sostituita (vedi capitolo
ricambi).
1. Capovolgere l’apparecchio.
2. Usare guanti resistenti e tenere
ferma la lama (23). Svitare la
vite della lama (22) in senso antiorario mediante un cacciavite
(apertura della chiave 13) dal
mandrino motore (24).
13
Page 14
IT
I
MT
3. Rimontare la nuova lama nella
sequenza invertita. Prestare
attenzione che la lama sia posizionata correttamente e la vite
sia ben stretta.
Stoccaggio
• Conservare l’apparecchio in un luo-
go asciutto e fuori dalla portata di
bambini. Allentare i dadi ad alette e
ribaltare il manico, in modo tale che
l’apparecchio occupi meno spazio.
Assicurarsi che i cavi non siano schiacciati.
• Lasciare raffreddare il motore, prima
di riporre l’apparecchio in un ambiente
chiuso.
• Non avvolgere l’apparecchio nei
sacchi di nylon, in quanto potrebbe
formarsi umidità.
Decliniamo ogni responsabilità per danni
causati dai nostri apparecchi, qualora tali
danni siano dovuti ad una riparazione
non conforme o dall’impiego di ricambi
non originali o da un uso improprio
dell’apparecchio.
Smaltimento/Tutela
dell’ambiente
Effettuare lo smaltimento dell’apparecchio,
degli accessori e della confezione nel rispetto
dell’ambiente presso un punto di raccolta per
riciclaggio.
Le apparecchiature non devono
essere smaltite insieme ai riuti domestici.
Consegnare l’apparecchiatura presso un
centro di raccolta e recupero. Le parti
plastiche e di metallo usate potranno essere
selezionate e avviate al recupero. Chiedere
informazioni a riguardo al nostro centro
assistenza clienti.
Pezzi di ricambio / Accessori
È possibile ordinare pezzi di ricambio e accessori all’indirizzo
www.grizzly-service.eu
Se non si dispone di una connessione Internet, contattare telefonicamente il centro di
assistenza (vedere “Service-Center” a pag. 17). Tenere a portata di mano i numeri
d’ordine riportati in basso.
Pos. Denominazione ..........................................................................Cod. art.
4 Cesto raccoglierba ............................................................. 91103875
23 Ferma la lama.................................................................... 13700303
14
Page 15
Ricerca guasti
Problema Possibile causa Rimedio
Controllare la presa, il cavo,
L‘apparecchio
non si accende
Tensione di rete
mancante
Leva di avviamento
A
(
15) difettoso
Spazzola di carbone
consumata
Motore difettoso
Erba troppo alta
la conduttura, la spina ed
eventualmente fare riparare da
un elettricista esperto
Riparazione da parte del centro
di assistenza clienti
Impostare un‘altezza di
taglio superiore. Sollevare
leggermente le ruote anteriori
premendo l‘impugnatura.
MTIT
Il motore si
spegne
Il risultato del
lavoro non è
soddisfacente
oppure il motore
è lento
I
La lama (
23)
non ruota
Rumori
anormali,
battito o
vibrazioni
L‘indicatore di
livello (21) non
funziona
Bloccaccio da parte di
corpi estranei
Altezza di taglio troppo
bassa
I
Lama (
23) smussata
Rimuovere il corpo estraneo
Impostare un‘altezza di taglio
inferiore
Fare arrotare o sostituire la
I
lama (
23)
Zona lama intasata Pulire l‘apparecchio
I
Lama (
23) montata in
modo errato
I
Lama (
23) bloccata
dall‘erba
Vite della lama (
allentata
Vite della lama (
I
22)
I
22)
Montare correttamente la lama
I
(
23)
Rimuovere l‘erba
Stringere la vite della lama
I
(
22)
Stringere la vite della lama (22)
allentata
I
Lama (
danneggiata
23)
Sostituire la lama (
Pulizia con spazzola morbida.
Sporcizia
L‘indicatore di livello deve
chiudersi automaticamente se è
stato aperto
23)
I
15
Page 16

IT
MT
Garanzia
Gentile cliente,
Su questo apparecchio Le viene concessa
una garanzia di 3 anni a partire dalla
data di acquisto.
In caso di difetti di questo prodotto può
avanzare diritti legali nei confronti del
venditore del prodotto. Tali diritti legali non
vengono limitati dalla nostra garanzia qui
di seguito rappresentata.
Condizioni di garanzia
Il termine di garanzia inizia con la data di
acquisto. La preghiamo di conservare in
un luogo sicuro lo scontrino scale originale. Questo documento viene richiesto come
prova d’acquisto.
Qualora subentrasse un difetto di materiale
o di fabbricazione entro tre anni a partire
dalla data di acquisto di questo prodotto,
il prodotto verrà riparato o sostituito – a
nostra discrezione - gratuitamente da noi.
Questa prestazione di garanzia presuppone che venga presentato entro il termine di
tre anni l’apparecchio difettoso e la prova
d’acquisto (scontrino scale) e descritto
brevemente per iscritto in che cosa consiste
il difetto e quando si è vericato.
Se il difetto è coperto dalla nostra garanzia, riceverà il prodotto riparato oppure
un prodotto nuovo. Con la riparazione o
la sostituzione del prodotto non inizia un
nuovo periodo di garanzia.
Tempo di garanzia e diritti legali
per vizi della cosa
Il periodo di garanzia non viene prolungato. Questo vale anche per parti sostituite
e riparate. Difetti e vizi presenti già al momento dell’acquisto devono essere segnalati
immediatamente dopo la rimozione dall’imballaggio. Riparazioni che accorrono dopo
il periodo di garanzia sono a pagamento.
Volume di garanzia
L’apparecchio è stato prodotto accuratamente secondo severe direttive di qualità
e controllato con coscienza prima della
consegna.
La prestazione di garanzia vale per difetti
di materiale o di fabbricazione. Questa
garanzia non si estende ai componenti del
prodotto che sono soggetti a normale usura e che quindi possono essere visti come
parti di usura (p. es. ltri o inserti) oppure
per danneggiamenti delle parti fragili (p.
es. interruttori, accumulatori o elementi di
vetro).
Questa garanzia decade se il prodotto è
stato danneggiato, non usato correttamente o non manutenuto. Per un uso corretto
del prodotto devono essere osservate tutte
le indicazioni riportate nelle istruzioni per
l’uso. Destinazioni d’uso e azioni sconsigliate nelle istruzioni d’uso o dalle quali
si viene avvertiti, sono tassativamente da
evitare.
Il prodotto è destinato esclusivamente all’uso commerciale. In caso di uso improprio,
esercizio della forza e interventi non effettuati dalla nostra liale di assistenza tecnica autorizzata, decade la garanzia.
Svolgimento in caso di garanzia
Per garantire una rapida elaborazione della Sua pratica, La preghiamo di seguire le
seguenti indicazioni:
• per tutte le richieste tenere a portata
di mano lo scontrino scale e il codice
articolo (IAN 106319) come prova
d’acquisto.
• I codici articolo sono riportati sulla targhetta del tipo.
• Nel caso in cui si dovessero vericare
difetti funzionali o altri vizi, La preghiamo di contattare telefonicamente o per
e-mail. Riceverà ulteriori informazioni
sullo svolgimento del Suo reclamo.
16
Page 17

MTIT
• Un prodotto rilevato come difettoso
può essere inviato con porto franco
all’indirizzo di assistenza comunicato,
previa consultazione del nostro servizio di assistenza tecnica, allegando
la prova d‘acquisto (scontrini scali)
e l’indicazione, in che cosa consiste
il difetto e quando si è vericato. Per
evitare problemi di accettazione e costi
aggiuntivi, usare tassativamente solo
l’indirizzo che Le è stato comunicato.
Assicurarsi che la spedizione non avvenga in porto assegnato, con merce
ingombrante, corriere espresso o altro
carico speciale. Spedire l’apparecchio
inclusi tutti gli accessori forniti insieme
al momento dell’acquisto e garantire
un imballaggio di trasporto sufcientemente sicuro.
Servizio di riparazione
Riparazioni non soggette alla garanzia
possono essere effettuate dietro fattura dal-
la nostra liale di assistenza tecnica previo
preventivo gratuito da parte della stessa.
Possiamo lavorare solo apparecchi che
vengono spediti sufcientemente imballati
e affrancati.
Attenzione: Spedire l’apparecchio alla
nostra liale in condizioni pulite e con l’indicazione del difetto.
Apparecchi spediti in porto assegnato con merce ingombrante, corriere espresso
o altro carico speciale - non vengono
accettati.
Lo smaltimento degli apparecchi difettosi
spediti viene effettuato da noi
gratuitamente.
Service-Center
Assistenza Italia
IT
Tel.: 02 36003201
E-Mail: grizzly@lidl.it
IAN 106319
MT
Assistenza Malta
Tel.: 80062230
E-Mail: grizzly@lidl.com.mt
IAN 106319
Importatore
Non dimenticare che il seguente indirizzo
non è un indirizzo di assistenza tecnica.
Contattare prima di tutto il centro di assistenza tecnica sopra nominato.
Grizzly Tools GmbH & Co. KG
Stockstädter Straße 20
63762 Großostheim
Germania
www.grizzly-service.eu
17
Page 18

GB MT
Contents
Introduction ...............................18
Intended purpose .......................18
General description ....................19
Scope of delivery .........................19
Overview ....................................19
Functional description ...................19
Technical specications ...............19
Safety information ..................... 20
Pictorial Diagrams on the Equipment 20
General safety information .............. 20
Assembly ...................................23
Assembling the Curved Handle ........ 23
Operation ..................................24
Hanging On / Removing
the Grass Bag ............................... 24
Emptying the Grass Bag .................. 24
Adjusting the Cut Height ................ 24
Switching On and Off .................... 24
Working with the Lawnmower ......... 25
Cleaning, Maintenance
and Storage ...............................25
General Cleaning and Maintenance
Work ............................................ 25
Trouble Shooting ........................26
Changing the Blade ....................... 27
Storage......................................... 27
Waste disposal and environmental
protection .................................. 27
Replacement parts / Accessories 27
Guarantee .................................28
Repair Service ............................29
Service-Center ............................29
Importer ....................................29
Translation of the original
EC declaration of conformity ......45
Exploded Drawing .....................49
Introduction
Congratulations on the purchase of your
new device. With it, you have chosen a
high quality product.
During production, this equipment has
been checked for quality and subjected
to a nal inspection. The functionality of
your equipment is therefore guaranteed. It
cannot be ruled out that residual quantities
of water or lubricants will remain on or in
the equipment/hose lines in isolated cases.
This is not a fault or defect and it represents no cause for concern.
The operating instructions constitute part of
this product. They contain important information on safety, use and disposal.
Before using the product, familiarise yourself with all of the operating and safety
instructions. Use the product only as de-
scribed and for the applications specied.
Keep this manual safely and in the event
that the product is passed on, hand over
all documents to the third party.
Intended purpose
The equipment is designed only for mowing domestic lawns and grass areas.
Any other use that is not expressly permitted in these instructions may result in
damage to the equipment and represent a
serious risk to the user.
The equipment is intended for use by
adults. It is not to be used by children or
people who are unfamiliar with these instructions. The use of the equipment is prohibited in the rain or a damp environment.
The manufacturer will not be liable for
damages caused by use other than for the
intended purpose or by incorrect operation.
18
Page 19

MTGB
A
C
E
I
General Description
Scope of Delivery
Carefully remove the equipment from the
packaging and check whether the following parts are complete:
- Lawnmower and curved handle with
connection cable
- Lower bar
- Lawn bag
- 2 wing nuts and screws for attaching
the curved handle
- 2 buttery nuts for attaching the curved
handle
- 2 holders to attach the
connection cable
- Translation of the original instructions
for use
Overview
1 Curved handle
2a Buttery nuts
2b Wing nuts
3 Lower bar
4 Grass bag
5 Cut height adjusting lever
6 Wheels
7 Lawnmower housing
8 Handle
9 Collision guard
10 Cable holder
11 Release button (not visible)
12 Power cable outlet
13 Cable strain relief
14 Power cable
15 Start lever
16 Screws
21 Level gauge
22 Blade screw
23 Blade
24 Motor spindle
Function Description
The electric lawnmower has a cutting tool,
which turns parallel to the cutting level. It is
equipped with a high performance electric
motor, robust plastic housing, safety switch,
collision guard, and grass bag. Additionally, the equipment is height adjustable to
six levels and has smooth-running wheels.
For the function of the operating parts,
please refer to the descriptions below.
Technical
specications
Electric Lawnmower ...FRM 1800 B2
Motor input power .....................1800 W
Mains voltage .................. 230 V~, 50 Hz
Idling speed ...........................3250 min
Blade width ...................Approx. 440 mm
Cut height ............................20 – 70 mm
Protection class .................................
Protection type .................................IPX4
Weight ......................................15.1 kg
Lawn bag volume ............................. 52 l
Sound pressure specication
(L
) .................85 dB (A); KpA = 3 dB (A)
pA
Noise level specication
measured (L
...............94.1 dB (A); K
guaranteed ....................... 96.0 dB (A)
Vibration on the handle
(a
) ....................1.8 m/s2; K= 1.5 m/s²
h
Do not exceed the maximum permitted
network impedance of 0.277 Ohms at the
electrical connection point
The stated vibration emission value was
measured in accordance with a standard
testing procedure and may be used to compare one power tool to another.
The stated vibration emission value may also
be used for a preliminary exposure assessment.
WA
)
=2.1 dB (A)
wA
-1
II
19
Page 20

GB MT
Warning: The vibration emission
value may differ during actual use of
the power tool from the stated value
depending on the manner in which
the power tool is used.
Safety precautions aimed at protecting the user should be based on estimated exposure under actual usage
conditions (all parts of the operating
cycle are to be considered, including, for example, times during which
the power tool is turned off and times
when the tool is turned on but is run-
ning idle).
The noise and vibration values have been
determined in accordance with the standards
and regulations specied in the declaration
of conformity.
Technical and visual modications may be
made without notice in the course of further
development. All dimensions, information
and specications in these operating instructions are therefore not guaranteed. As such,
no assertion of legal claims can be enforced
on the basis of the operating instructions.
Safety information
This section covers the basic safety regulations when working with the electric lawnmower.
Do not expose the equipment to the
damp. Do not work in the rain and
do not cut wet grass.
Caution – sharp cutting blade!
Keep feet and hands away.
Risk of injury!
Switch off the motor and discon-
nect the plug before adjustment or
repair work or if the power cable is
caught or damaged.
Danger of damaged power cable.
Keep the power cable away from
the cutting blade!
Caution!
The lawnmower blade continues to
run after switching off.
440
Cutting circle
Noise level specication Lwa in
dB.
Protection class II
Do not dispose of electrical
equipment in domestic waste.
General safety information
Pictorial Diagrams on the
Equipment
Caution!
Read the operating instructions
carefully.
Wear eye and ear protection.
Risk of injury from parts being
thrown up.
Keep nearby people away from the
mower.
20
This equipment may cause serious
injury in the case of improper use.
In order to avoid injury to people
and damage to property, the following safety information must be
observed and users must familiarise
themselves with all operating parts.
Preparation:
• Before using the unit, carefully read
through the instruction manual and familiarise yourself with all of its controls.
• Prior to use, always check the connecting
cable and extension cable for signs of
damage or wear and tear. If the cable
gets damaged during use, it must be
Page 21

MTGB
disconnected from the supply network immediately. Do not touch the cable before
it has been disconnected. Do not use the
machine, if the cable is worn or damaged.
• Before you shut down the machine, let
the motor cool down.
• Do not allow the use of this equipment
by children or others who are unfamiliar with these operating instructions.
Local regulations may specify the minimum age of the operator.
• Do not use the equipment when people
and particularly children or pets are
nearby.
• Children should be supervised to en-
sure that they do not play with the appliance.
• The operator or user is responsible for
accidents, injuries to other people or
damage to the property of others.
• Check the terrain on which the equipment is to be used and remove stones,
sticks, wires and other foreign objects
that could become caught and thrown
up.
• Wear suitable work clothing such as
stable shoes with non-slip soles and
robust, long trousers. Do not use the
equipment when barefoot or when
wearing open sandals.
• Before each use, carry out a visual
inspection of the equipment. Do not
use the equipment if protective devices
(e.g. collision guard or grass bag),
parts of the cutting device or bolts are
missing, worn or damaged. To avoid
imbalance, damaged tools and bolts
are to be replaced only in sets.
• Take care with equipment that has several cutting tools, as the movement of
one blade may result in the rotation of
the other blades.
• Use only spare parts and accessories
supplied and recommended by the
manufacturer. The use of non-original
parts will immediately invalidate the
guarantee.
Working with the Equipment:
Do not place feet or hands near or
under rotating parts when working.
Risk of injury!
Observe the noise protection and
local regulations. The use of the
equipment may be restricted or
prohibited on certain days (e.g.
Sundays and public holidays), at
certain times of day (lunchtimes,
nighttimes) or in certain areas (e.g.
health resorts, hospitals etc.).
• Switch on the motor according to the
instructions and only when your feet
are at a safe distance from the cutting
tools.
• Do not use the equipment in the rain,
in poor weather, in a damp environment, or on wet grass. Work only in
daylight or with good lighting.
• Do not work with the equipment when
tired, lacking concentration or under
the inuence of alcohol or drugs. Always take breaks in good time. Take a
sensible approach to the work.
• When working, ensure a rm stance,
particularly on slopes. Always work
across the slope, never upwards or
downwards. Take particular care when
changing the direction of travel on
the slope. Do not work on excessively
steep slopes.
• Run the equipment only at a walking
pace. Take particular care when turning the equipment around, pulling it
towards you or going backwards.
• Switch on the equipment carefully
and in accordance with the directions
in these instructions. Ensure sufcient
distance between feet and the rotating
blades.
21
Page 22

GB MT
• Do not tilt the equipment when starting
other than if it is necessary to do so
when starting up in long grass. In this
case, tilt the equipment by pressing
down the handle bar such that the front
wheels of the equipment are raised. Always check that both hands are in the
working position before returning the
equipment to the ground.
• Do not work without the grass bag or
collision guard. Keep away from the
ejection hole at all times.
Caution! Danger! The blade contin-
ues to run after switching off.
There is a risk of injury.
• The equipment is not to be lifted or
transported while the motor is running.
Switch off the equipment if it has to be
tilted in transit, when crossing surfaces
other than grass, and when the equipment is being transported to and from
the surfaces to be mowed.
• Always keep the grass ejection hole
clean and clear. Remove cut material
only when the equipment is stopped.
• Do not leave the equipment unattended
in the workplace.
• Do not work with equipment that is
damaged, incomplete, or has been
modied without the authorisation of the
manufacturer. Do not use the equipment
with damaged safety devices or screens
or with missing safety equipment such
as deection and/or grass collection devices.
• Do not overload the equipment. Work
only within the specied power range
and do not change the regulator settings on the motor. Do not use lowpowered machines for heavy work. Do
not use your equipment for purposes
other than those for which it is designed.
• Do not use the equipment near
inammable liquids or gases. Nonobservance will result in a risk of re
or explosion.
• Do not lift or carry the equipment when
the motor is running.
• Switch off the equipment and disconnect the plug:
- Whenever you leave the machine,
- Before cleaning the ejection hole or
removing blockages,
- When the equipment is out of use,
- Before checking, cleaning or working on the equipment,
- If the power cable is damaged or
frayed,
- If the equipment has hit a foreign
object or if strange vibrations occur
during work. In this case, check the
equipment for damage and have it
repaired if applicable.
• Do not place feet or hands near or under rotating parts. Do not stand in front
of the grass ejection hole during sickle
mowing.
Maintenance and Storage:
• Ensure that all nuts, bolts and screws
are tightened rmly and the equipment
is in safe working condition.
• Do not attempt to repair the equipment
yourself unless you have been trained
to do so. Any work not specied in
these instructions is to be carried out
only by customer service centres that
we have authorised.
• Keep the equipment in a dry location
and out of reach of children.
• Handle the equipment with care. Keep
tools sharp and clean, in order to facilitate better and safer work. Follow
the maintenance instructions.
• Wear protective gloves when changing
the cutting device.
22
Page 23

MTGB
B
C
• Regularly check the grass collection
device for wear and strains. For safety
reasons, replace worn or damaged
parts. When adjusting the blades, take
particular care to avoid ngers being
trapped between the rotating blades
and xed parts of the machine.
• Check that only replacement tools authorised by the manufacturer are used.
Electrical Safety:
• Ensure that the mains voltage matches
the specications on the rating plate.
• Connect the equipment only to a socket
that has a residual current operated device (RCD switch) with a trip current of
no more than 30 mA.
• Avoid bodily contact with earthed
parts (e.g. metal fences, metal posts).
• Use only authorised power cables of
H05RN-F, which are no more than 75
m long and suitable for outdoor use.
The power cable wire cross section
must be at least 2.5 mm
pletely unroll cable drums before use.
Check the cable for damage.
• To x on the power cable, use the
cable suspension intended for the purpose.
• Keep the power cable away from the
cutting tool when working. The cutting
blades may damage the power cable
and result in contact with live parts. Always run the power cable behind the
operator.
• Do not use the power cable to pull the
plug from the socket. Protect the power
cable from heat, oil and sharp edges.
• Switch off the equipment and disconnect the plug from the socket if the
power cable is damaged. If the power
cable is damaged, it must be replaced
by the manufacturer, the customer serv-
ices of the same, or a qualied person,
in order to avoid hazards.
2
. Always com-
• Do not connect a damaged power
cable to the mains. Do not touch a
damaged power cable when it is
connected to the mains. A damaged
power cable may result in contact with
live parts.
Assembly
Disconnect the plug before any
work on the equipment. There is a
risk of injury.
Assembling the
Curved Handle
1. Remove the two pre-installed
buttery nuts (2a) from the lawnmower housing (7). Insert the
lower bar (3) into the slot on the
lawnmower housing (7).
2. Fix the bottom bar (3) using the
two screws and buttery nuts
(2a).
3. Fix the curved handle (1) using
the enclosed screws (16) and the
wing nuts (2b) on the lower bar
(3). There are two possible positions.
4. Clip the cable hooks (
the bar (3) and the handle (1) to
fasten the cable.
When both wing nuts are loosened,
the curved handle can be folded
down for storing the equipment.
Ensure that the power cable is not
caught.
A
10) into
23
Page 24

GB MT
D
E
F
G
Operation
Hanging On / Removing the
Grass Bag
1. To hang on the grass bag (4),
lift the collision guard (9) and
hang on the grass bag. Fold the
collision guard (9) onto the grass
bag (4). It holds the grass bag in
the correct position.
2. To remove the grass bag (4),
lift the collision guard (9) and
detach the grass bag. Fold the
collision guard (9) back onto the
mower housing.
Do not work with the lawn-
mower without the collision
guard or lawn box. There is
a risk of injury.
The level gauge (21) is located on the side
of the grass catcher (4).
Flap (21) open:
grass catcher (4) empty
Flap (21) closed:
grass catcher (4) full
The level indicator (21) works
when the device is in operation.
Emptying the Grass Bag
To empty the grass collection bag, also
use the bottom bag handle (4).
Adjusting the Cut Height
Switch off the equipment, discon-
nect the plug and wait for the blade
to stop. There is a risk of injury.
1. Hold the cut height adjusting
lever (5) and guide it past the
indent to the desired cut height
setting.
2. The handle (8) may be used
to help, in order to prevent to
mower rolling away.
20 mm - Position 1
30 mm - Position 2
40 mm - Position 3
50 mm - Position 4
60 mm - Position 5
70 mm - Position 6
The correct height is around 25 – 40 mm
for a decorative lawn and around 30 – 60
mm for a used lawn.
A higher cut height should be se-
lected for the rst cut of the season.
Observe the noise protection and
local regulations.
Switching On and Off
1. Connect the equipment to the
power supply.
2. Before switching on, ensure that
the equipment is not in contact
with any objects.
3. To switch on, press the release
button (11) on the handle at the
same time as pressing the start
lever. Release the release button
(11).
4. To switch off, release the start
lever (15).
After switching off the equip-
ment, the blade continues to
turn for several seconds. Do
not touch the moving blade.
There is a risk of injury.
24
Page 25

MTGB
Working with the
Lawnmower
Regular mowing encourages increased foliation of the grass and kills off weeds at the
same time. Therefore, not only does each
mowing increase the density of the lawn, it
also produces an evenly resilient lawn.
The rst cut is to be made in around April,
at a growth height of 70 – 80 mm. In the
main vegetation period, the lawn is to be
mowed at least once a week.
• Start mowing near the socket and work
away from the socket.
• Always keep the extension cable behind you and when you turn, move it to
the side that has already been mowed.
• Run the equipment at a walking pace,
in tracks that are as even as possible.
For gap-free mowing, the tracks should
always overlap by a few centimetres.
• Adjust the cut height so the equipment
is not overloaded. Otherwise, the motor may be damaged.
• On slopes, always work across the
slope. Take particular care when going
backwards and pulling the equipment.
• Clean the equipment after each use, as
described in the chapter on “Cleaning,
Maintenance and Storage”.
Switch off the equipment after
work and in order to transport it,
disconnect the plug and wait until
the blade stops. There is a risk of
injury.
Cleaning, Maintenance
and Storage
Have work that is not de-
scribed in these instructions
carried out by a customer
service centre that we have
authorised. Use only original
parts.
Wear gloves when handling the
blade.
Switch off the equipment before all
maintenance and cleaning work,
disconnect the plug and wait until
the blade stops.
There is a risk of injury.
General Cleaning and
Maintenance Work
Do not hose down the lawn-
mower with water.
• Always keep the equipment clean. To
clean, use a brush or cloth but no detergent or solvent.
• After mowing, use a piece of wood
or plastic to remove adherent plant
remains from the wheels, ventilation
holes, ejection hole and blade area.
Do not use hard or pointed objects, as
these may damage the blade.
• Oil the wheels from time to time.
• Before each use, check the lawnmower
for obvious defects such as loose, worn
or damaged parts. Check that all nuts,
bolts and screws are sitting rmly.
• Check the covers and protective devices for damage and check that they
are sitting correctly. Replace them if
necessary.
25
Page 26

GB MT
Trouble Shooting
Problem Possible Cause Fault Fixing
Check the socket, cable, wire
Equipment does
not start
Motor stops
Power is off
Defective start lever
A
(
15)
Worn carbon brushes
Defective motor
Grass too long
Blockage by foreign
object
Cut height too low Set a higher cut height
and plug and have any repairs
carried out by an electrician
Repair by customer services
Set a greater cut height. Lift the
front wheels slightly by pressing
down on the handle bar.
Remove the foreign object
Result
unsatisfactory or
motor labours
Blade (
23)
I
fails to turn
Strange noises,
rattling or
vibrations
Level indicator
E
(
21) does not
work
Blade (
Blade (
23) blunt
I
23) area
I
blocked
Blade (
23)
I
assembled incorrectly
Blade (
I
23) blocked
by grass
Blade screw (
22)
I
loose
Blade screw (
I
22)
loose
Blade (
I
23)
damaged
Contamination
Have the blade (
I
23)
sharpened or replace it
Clean the equipment
I
Install the blade (
23) correctly
Remove the grass
23)
22)
I
I
22)
Tighten the blade screw (
Tighten the blade screw (
Replace the blade (
I
Cleaning with a soft brush. The
level indicator must close by
itself, if it was opened.
26
Page 27

MTGB
I
I
Changing the Blade
If the blade is blunt, it can be sharpened
by a specialist workshop. If the blade is
damaged or showing signs of imbalance,
it must be replaced (see chapter on “Spare
Parts”).
1. Switch off the equipment, disconnect the plug and wait until the
blade stops.
2. Turn the equipment over.
3. Use sturdy gloves and hold the
blade rmly (23). Turn the blade
screw (22) anticlockwise off of
the motor spindle (24) using a
screwdriver (A/F width13).
4. Install the new blade in the
reverse order. Ensure that the
blade is positioned correctly and
the screw tightened rmly.
Storage
• Keep the equipment dry and out of
reach of children. Loosen the wing nuts
and fold down the handle bar so the
equipment takes up less space. Ensure
that the cable is not caught.
• Allow the motor to cool before storing
the equipment in a conned space.
• Do not cover the equipment with nylon
bags as moisture could build up.
We will not be liable for damages caused
by our equipment where these are caused
by improper repair or the use of nonoriginal parts or by use other than for the
intended purpose.
Waste disposal
and environmental
protection
Do not dispose of used oil in the sewage
system or drains. Dispose of used oil in an
environmentally correct manner - bring it to
a waste disposal center.
Be environmentally friendly. Return the
tool, accessories and packaging to a
recycling centre when you have nished
with them.
Machines do not belong with do-
mestic waste.
The plastic and metal parts employed can
be separated out and thus recycled use
can be implemented. Ask our ServiceCenter for details.
Replacement parts / Accessories
Spare parts and accessories can be obtained at
www.grizzly-service.eu
If you do not have internet access, please contact the Service Centre via telephone (see
“Sercice-Center” Page 29). Please have the order number mentioned below ready.
Item Description .......................................................... Product No.
4 Grass bag ......................................................................... 91103875
23 Spare blade ......................................................................13700303
27
Page 28

GB MT
Guarantee
Dear Customer,
This equipment is provided with a 3-year
guarantee from the date of purchase.
In case of defects, you have statutory rights
against the seller of the product. These
statutory rights are not restricted by our
guarantee presented below.
Terms of Guarantee
The term of the guarantee begins on the
date of purchase. Please retain the original
receipt. This document is required as proof
of purchase.
If a material or manufacturing defect
occurs within three years of the date of
purchase of this product, we will repair or
replace – at our choice – the product for
you free of charge. This guarantee requires
the defective equipment and proof of purchase to be presented within the three-year
period with a brief written description of
what constitutes the defect and when it occurred.
If the defect is covered by our guarantee,
you will receive either the repaired product
or a new product. No new guarantee period begins on repair or replacement of the
product.
Guarantee Period and Statutory
Claims for Defects
The guarantee period is not extended by
the guarantee service. This also applies for
replaced or repaired parts. Any damages
and defects already present at the time of
purchase must be reported immediately after unpacking. Repairs arising after expiry
of the guarantee period are chargeable.
Guarantee Cover
The equipment has been carefully produced in accordance with strict quality
guidelines and conscientiously checked
prior to delivery.
The guarantee applies for all material and
manufacturing defects. This guarantee
does not extend to cover product parts that
are subject to normal wear and may therefore be considered as wearing parts (e.g.
lters or attachments) or to cover damage
to breakable parts (e.g. switches, batteries,
or parts made of glass).
This guarantee shall be invalid if the product has been damaged, used incorrectly or
not maintained. Precise adherence to all of
the instructions specied in the operating
manual is required for proper use of the
product. Intended uses and actions against
which the operating manual advises or
warns must be categorically avoided.
The product is designed only for private
and not commercial use. The guarantee
will be invalidated in case of misuse or
improper handling, use of force, or interventions not undertaken by our authorised
service branch.
Processing in Case of Guarantee
To ensure quick handling of you issue,
please follow the following directions:
• Please have the receipt and item number (IAN 106319) ready as proof of
purchase for all enquiries.
• Please nd the item number on the rating plate.
• Should functional errors or other defects occur, please initially contact the
service department specied below
by telephone or by e-mail. You will
then receive further information on the
processing of your complaint.
28
Page 29

MTGB
• After consultation with our customer
service, a product recorded as defective can be sent postage paid to the
service address communicated to you,
with the proof of purchase (receipt)
and specication of what constitutes
the defect and when it occurred. In order to avoid acceptance problems and
additional costs, please be sure to use
only the address communicated to you.
Ensure that the consignment is not sent
carriage forward or by bulky goods,
express or other special freight. Please
send the equipment inc. all accessories
supplied at the time of purchase and
ensure adequate, safe transport packaging.
Repair Service
For a charge, repairs not covered by the
guarantee can be carried out by our ser-
vice branch, which will be happy to issue
a cost estimate for you.
We can handle only equipment that has
been sent with adequate packaging and
postage.
Attention: Please send your equipment to
our service branch in clean condition and
with an indication of the defect.
Equipment sent carriage forward or by
bulky goods, express or other special
freight will not be accepted.
We will dispose of your defective devices
free of charge when you send them to us.
Service-Center
Service Great Britain
GB
Tel.: 0871 5000 720
(£ 0.10/Min.)
E-Mail: grizzly@lidl.co.uk
IAN 106319
Service Malta
MT
Tel.: 80062230
E-Mail: grizzly@lidl.com.mt
IAN 106319
Importer
Please note that the following address is
not a service address. Please initially con-
tact the service centre specied above.
Grizzly Tools GmbH & Co KG
Stockstädter Straße 20
63762 Großostheim
Germany
www.grizzly-service.eu
29
Page 30

DE
AT
CH
Inhalt
Einleitung ................................... 30
Bestimmungsgemäße
Verwendung ..............................30
Allgemeine Beschreibung ........... 31
Lieferumfang.................................. 31
Übersicht ......................................31
Funktionsbeschreibung .................... 31
Technische Daten ....................31
Sicherheitshinweise .................... 32
Bildzeichen auf dem Gerät .................. 32
Allgemeine Sicherheitshinweise .......33
Montage .................................... 36
Bügelgriff montieren ....................... 36
Bedienung .................................36
Grasfangsack einhängen/abnehmen 36
Grasfangsack entleeren .................. 37
Schnitthöhe einstellen .....................37
Ein- und Ausschalten ...................... 37
Arbeiten mit dem
Elektro-Rasenmäher ........................ 37
Reinigung/Wartung/Lagerung ... 38
Allgemeine Reinigungs- und
Wartungsarbeiten .......................... 38
Messer austauschen .......................39
Lagerung ...................................... 39
Entsorgung/Umweltschutz .......... 39
Ersatzteile / Zubehör .................39
Fehlersuche ................................ 40
Garantie .................................... 41
Reparatur-Service ...................... 42
Service-Center ............................42
Importeur ..................................42
Original-
EG-Konformitätserklärung .........47
Explosionszeichnung .................. 49
Einleitung
Herzlichen Glückwunsch zum Kauf Ihres
neuen Gerätes. Sie haben sich damit für
ein hochwertiges Gerät entschieden. Dieses Gerät wurde während der Produktion
auf Qualität geprüft und einer Endkontrolle
unterzogen. Die Funktionsfähigkeit Ihres
Gerätes ist somit sichergestellt. Es ist nicht
auszuschließen, dass sich in Einzelfällen
am, oder im Gerät bzw. in Schlauchleitungen Restmengen von Wasser oder Schmier-
stoffen benden. Dies ist kein Mangel oder
Defekt und kein Grund zur Besorgnis.
Die Betriebsanleitung ist Bestandteil
dieses Gerätes. Sie enthält wichtige
Hinweise für Sicherheit, Gebrauch
und Entsorgung. Machen Sie sich
vor der Benutzung des Gerätes mit
allen Bedien- und Sicherheitshinweisen vertraut. Benutzen Sie das
Gerät nur wie beschrieben und für
die angegebenen Einsatzbereiche.
Bewahren Sie die Betriebsanleitung
gut auf und händigen Sie alle
Unterlagen bei Weitergabe des Gerätes an Dritte mit aus.
Bestimmungsgemäße
Verwendung
Das Gerät ist nur für das Mähen von
Rasen- und Grasächen im häuslichen Bereich bestimmt.
Jede andere Verwendung, die in dieser
Betriebsanleitung nicht ausdrücklich zugelassen wird, kann zu Schäden am Gerät
führen und eine ernsthafte Gefahr für den
Benutzer darstellen.
Das Gerät ist zum Gebrauch durch Erwachsene bestimmt. Kinder sowie Personen, die mit dieser Betriebsanleitung
nicht vertraut sind, dürfen das Gerät nicht
benutzen. Die Benutzung des Gerätes bei
Regen oder feuchter Umgebung ist verboten.
30
Page 31

DE
A
C
E
I
CHAT
Der Hersteller haftet nicht für Schäden, die
durch bestimmungswidrigen Gebrauch
oder falsche Bedienung verursacht wurden.
Dieses Gerät ist nicht zur gewerblichen
Nutzung geeignet. Bei gewerblichem Einsatz erlischt die Garantie.
Allgemeine
Beschreibung
Lieferumfang
Nehmen Sie das Gerät vorsichtig aus der
Packung und prüfen Sie, ob die nachfolgenden Teile vollständig sind:
- Elektro-Rasenmäher und Bügelgriff mit
Anschlussleitung
- Unterer Holm
- Grasfangsack
- 2 Feststellhebel zur Holm-/Bügelgriffbefestigung
- 2 Flügelmuttern zur
Holm-/Bügelgriffbefestigung
- 2 Halter zur Anschlussleitungsbefestigung
- Originalbetriebsanleitung
Übersicht
1 Bügelgriff
2a Flügelmuttern zur
Holmbefestigung
2b Feststellhebel zur
Holmbefestigung
3 Unterer Holm
4 Grasfangsack
5 Schnitthöhenverstellhebel
6 Räder
7 Rasenmähergehäuse
8 Handgriff
9 Prallschutz
10 Netzkabelhalter
11 Entriegelungsknopf
(nicht sichtbar)
12 Steckdose für Netzkabel
13 Netzkabel-Zugentlastung
14 Netzkabel
15 Starthebel
16 Flügelmuttern
21 Füllstandsanzeige
22 Messerschraube
23 Messer
24 Motorspindel
Funktionsbeschreibung
Der Elektro-Rasenmäher besitzt ein parallel
zur Schnittebene sich drehendes Schneidwerkzeug. Er ist mit einem leistungsstarken
Elektromotor, einem robusten Kunststoffgehäuse, einem Sicherheitsschalter, einem
Prallschutz und einem Grasfangsack ausgestattet. Zusätzlich ist das Gerät 6-fach
höhenverstellbar und hat leichtgängige
Räder.
Die Funktion der Bedienteile entnehmen Sie
bitte den nachfolgenden Beschreibungen.
Technische Daten
Elektro-Rasenmäher ...FRM 1800 B2
Aufnahmeleistung des Motors ......1800 W
Netzspannung ................. 230 V~, 50 Hz
Leerlaufdrehzahl .....................3250 min
Messerbreite .........................ca. 440 mm
Schnitthöhe .......................... 20 - 70 mm
Schutzklasse .....................................
Schutzart.........................................IPX4
Gewicht .....................................15,1 kg
Volumen Grasfangsack ..................... 52 l
Schalldruckpegel (L
..........................85 dB (A); K
Schallleistungspegel
gemessen (L
..............94,1 dB (A); K
garantiert .......................... 96,0 dB (A)
Vibration am Handgriff
(a
) .....................1,8 m/s2; K=1,5 m/s²
h
WA
)
pA
)
= 3 dB (A)
pA
= 2,1 dB (A)
wA
-1
II
31
Page 32

DE
AT
CH
Dieses Gerät ist für den Betrieb an einem
Stromversorgungsnetz mit einer Systemnetzimpedanz Zmax am Übergabepunkt
(Hausanschluss) von maximal 0,277 Ohm
vorgesehen. Der Anwender hat sicherzustellen, dass das Gerät nur an einem
Stromversorgungsnetz betrieben wird, das
die Anforderungen erfüllt. Wenn nötig,
kann die Systemimpedanz beim lokalen
Energieversorgungsunternehmen erfragt
werden.
Der angegebene Schwingungsemissionswert ist nach einem genormten Prüfverfahren gemessen worden und kann zum Vergleich eines Elektrowerkzeugs mit einem
anderen verwendet werden.
Der angegebene Schwingungsemissionswert kann auch zu einer einleitenden
Einschätzung der Aussetzung verwendet
werden.
Warnung:
Der Schwingungsemissionswert
kann sich während der tatsächlichen Benutzung des Elektrowerkzeugs von dem Angabewert
unterscheiden, abhängig von der
Art und Weise, in der das Elektrowerkzeug verwendet wird.
Es besteht die Notwendigkeit, Si-
cherheitsmaßnahmen zum Schutz
des Bedieners festzulegen, die
auf einer Abschätzung der Aussetzung während der tatsächlichen
Benutzungsbedingungen beruhen
(hierbei sind alle Anteile des Betriebszyklus zu berücksichtigen,
beispielsweise Zeiten, in denen das
Elektrowerkzeug abgeschaltet ist,
und solche, in denen es zwar eingeschaltet ist, aber ohne Belastung
läuft).
Lärm- und Vibrationswerte wurden entsprechend den in der Konformitätserklärung
genannten Normen und Bestimmungen
ermittelt.
Technische und optische Veränderungen
können im Zuge der Weiterentwicklung
ohne Ankündigung vorgenommen werden.
Alle Maße, Hinweise und Angaben dieser
Betriebsanleitung sind deshalb ohne Gewähr. Rechtsansprüche, die aufgrund der
Betriebsanleitung gestellt werden, können
daher nicht geltend gemacht werden.
Sicherheitshinweise
Dieser Abschnitt behandelt die grundlegenden Sicherheitsvorschriften bei der Arbeit
mit dem Elektro-Rasenmäher.
Bildzeichen auf dem Gerät
Achtung!
Lesen Sie die Betriebsanleitung auf-
merksam durch.
Tragen Sie Augen- und Gehörschutz.
Setzen Sie das Gerät nicht der
Feuchtigkeit aus. Arbeiten Sie nicht
bei Regen und schneiden Sie kein
nasses Gras.
Verletzungsgefahr durch wegge-
schleuderte Teile.
Umstehende Personen von dem
Elektro-Rasenmäher fern halten.
Vorsicht - Scharfe Messer! Füße und
Hände fernhalten.
Verletzungsgefahr!
Motor ausschalten und Netzste-
cker ziehen vor Einstellungs- oder
Reinigungsarbeiten oder wenn sich
das Netzkabel verfangen hat oder
beschädigt ist.
32
Page 33

DE
CHAT
Gefahr durch beschädigtes Netzka-
bel.
Netzkabel von dem Gerät und dem
Messer fernhalten!
Achtung!
Nachlauf des Messers.
440
Schnittkreis
Angabe des Schallleistungspegels
L
in dB.
wa
Schutzklasse II
Elektrogeräte gehören nicht in den
Hausmüll.
Allgemeine
Sicherheitshinweise
Dieses Gerät kann bei unsachge-
mäßem Gebrauch ernsthafte Verletzungen verursachen. Um Personenund Sachschäden zu vermeiden,
lesen und beachten Sie unbedingt
die folgenden Sicherheitshinweise
und machen Sie sich mit allen Bedienteilen gut vertraut.
Vorbereitung:
• Lesen Sie die Gebrauchsanweisung sorgfältig. Machen Sie sich mit den Stellteilen
und dem richtigen Gebrauch der
Maschine vertraut.
• Vor dem Gebrauch sind immer Anschlussleitung und Verlängerungsleitung
auf Anzeichen von Beschädigung oder
Abnutzung zu untersuchen. Falls die Leitung im Gebrauch beschädigt wird, muss
sie sofort vom Versorgungsnetz getrennt
werden. Berühren Sie die Leitung nicht,
bevor sie getrennt ist. Benutzen Sie die
Maschine nicht, wenn die Leitung abgenutzt oder beschädigt ist.
• Lassen Sie den Motor abkühlen, bevor
Sie die Maschine abstellen.
• Kinder sollen beaufsichtigt werden, um
sicherzustellen, dass sie nicht mit dem
Gerät spielen.
• Erlauben Sie niemals Kindern oder
anderen Personen, die die Betriebsanleitung nicht kennen, das Gerät zu benutzen. Örtliche Bestimmungen können
das Mindestalter der Bedienungsperson festlegen.
• Setzen Sie das Gerät niemals ein,
während Personen, besonders Kinder
und Haustiere, in der Nähe sind.
• Der Bediener oder Nutzer ist für Unfälle oder Schäden an anderen Menschen oder deren Eigentum verantwortlich.
• Überprüfen Sie das Gelände, auf dem
das Gerät eingesetzt wird und entfernen Sie Steine, Stöcke, Drähte oder
andere Fremdkörper, die erfasst und
weggeschleudert werden können.
• Tragen Sie geeignete Arbeitskleidung
wie festes Schuhwerk mit rutschfester
Sohle und eine robuste, lange Hose.
Benutzen Sie das Gerät nicht, wenn
Sie barfuß gehen oder offene Sandalen tragen.
• Führen Sie vor jeder Benutzung eine
Sichtprüfung des Gerätes durch.
Benutzen Sie das Gerät nicht, wenn
Schutzeinrichtungen (z.B. Prallschutz
oder Grasfangsack), Teile der
Schneideinrichtung oder Bolzen fehlen,
abgenutzt oder beschädigt sind. Zur
Vermeidung einer Unwucht dürfen beschädigte Werkzeuge und Bolzen nur
satzweise ausgetauscht werden.
• Seien Sie vorsichtig bei Geräten mit
mehreren Schneidwerkzeugen, da die
Bewegung eines Messers zur Rotation
der übrigen Messer führen kann.
33
Page 34

DE
AT
CH
• Benutzen Sie nur Ersatz- und Zubehörteile, die vom Hersteller geliefert und
empfohlen werden. Der Einsatz von
Fremdteilen führt zum sofortigen Verlust
des Garantieanspruches.
Arbeiten mit dem Gerät:
Führen Sie Füße und Hände beim
Arbeiten nicht in die Nähe oder
unter rotierende Teile. Es besteht
Verletzungsgefahr!
Beachten Sie den Lärmschutz und
örtliche Vorschriften. Die Benutzung
des Gerätes kann an bestimmten
Tagen (z.B. Sonn- und Feiertagen),
während bestimmter Tageszeiten
(Mittagszeiten, Nachtruhe) oder in
besonderen Gebieten (z.B. Kurorten,
Kliniken etc.) eingeschränkt oder verboten sein.
• Schalten Sie den Motor nach Anweisung ein und nur dann, wenn Ihre Füße
in sicherem Abstand von den Schneidwerkzeugen sind.
• Benutzen Sie das Gerät nicht bei
Regen, bei schlechter Witterung, in
feuchter Umgebung oder an nassem
Rasen. Arbeiten Sie nur bei Tageslicht
oder guter Beleuchtung.
• Arbeiten Sie mit dem Gerät nicht,
wenn Sie müde oder unkonzentriert
sind oder nach der Einnahme von Alkohol oder Tabletten. Legen Sie immer
rechtzeitig eine Arbeitspause ein. Gehen Sie mit Vernunft an die Arbeit.
• Achten Sie beim Arbeiten auf einen
sicheren Stand, insbesondere an Hängen. Arbeiten Sie immer quer zum
Hang, niemals auf- oder abwärts.
Seien Sie besonders vorsichtig, wenn
Sie die Fahrtrichtung am Hang ändern.
Arbeiten Sie nicht an übermäßig steilen
Hängen.
• Führen Sie das Gerät nur im Schritttempo. Seien Sie besonders vorsichtig,
wenn Sie das Gerät umkehren, zu sich
heranziehen oder rückwärts gehen.
• Schalten Sie das Gerät mit Vorsicht entsprechend den Anweisungen in dieser
Betriebsanleitung ein. Achten Sie auf
ausreichenden Abstand der Füße zu
rotierenden Messern.
• Kippen Sie das Gerät nicht beim Starten, außer wenn dies beim Anlaufen in
hohem Gras erforderlich ist. In diesem
Fall kippen Sie das Gerät durch Drücken des Bügelgriffs so, dass die Vorderräder des Geräts leicht angehoben
werden. Überprüfen Sie immer, dass
sich beide Hände in Arbeitsstellung
benden, bevor das Gerät wieder auf
den Boden zurückgestellt wird.
• Arbeiten Sie nie ohne Grasfangsack
oder Prallschutz. Halten Sie sich immer
entfernt von der Auswurföffnung.
Achtung Gefahr! Messer läuft nach.
Es besteht Verletzungsgefahr.
• Das Gerät darf nicht angehoben oder
transportiert werden, solange der Motor läuft. Schalten Sie das Gerät ab,
wenn es zum Transport gekippt werden
muss, wenn andere Flächen als Rasen
überquert werden und wenn das Gerät
zu und von den zu mähenden Flächen
gebracht wird.
• Halten Sie die Grasauswurföffnung
stets sauber und frei. Entfernen Sie
Schnittgut nur im Stillstand des Gerätes.
• Hinterlassen Sie das Gerät nie unbeaufsichtigt am Arbeitsplatz.
• Arbeiten Sie nicht mit einem beschädigten, unvollständigen oder ohne die
Zustimmung des Herstellers umgebauten
Gerät. Verwenden Sie das Gerät nie mit
beschädigten Schutzeinrichtungen oder
Abschirmungen oder fehlenden Sicherheitseinrichtungen wie Ablenk- und/oder
Grasfangeinrichtungen.
34
Page 35

DE
CHAT
• Überlasten Sie Ihr Gerät nicht. Arbeiten
Sie nur im angegebenen Leistungsbereich
und ändern Sie nicht die Reglereinstellungen am Motor. Verwenden Sie keine
leistungsschwachen Maschinen für schwere Arbeiten. Benutzen Sie Ihr Gerät nicht
für Zwecke, für die es nicht bestimmt ist.
• Benutzen Sie das Gerät nicht in der Nähe
von entzündbaren Flüssigkeiten oder Gasen. Bei Nichtbeachtung besteht Brandoder Explo sions gefahr.
• Niemals das Gerät aufheben oder
wegtragen, wenn der Motor läuft.
• Schalten Sie das Gerät aus und ziehen
Sie den Netzstecker:
- immer, wenn Sie die Maschine verlassen,
- bevor Sie die Auswurföffnung reinigen
oder Blockierungen beseitigen,
- wenn das Gerät nicht verwendet wird,
- bevor Sie das Gerät überprüfen,
reinigen oder daran arbeiten,
- wenn das Netzkabel beschädigt oder
verheddert ist,
- wenn das Gerät beim Arbeiten einen
Fremdkörper getroffen hat oder wenn
ungewohnte Vibrationen auftreten. Untersuchen Sie in diesem Fall das Gerät
auf Beschädigungen und lassen Sie es
ggf. reparieren.
• Bringen Sie Hände oder Füße niemals in
die Nähe oder unter rotierende Teile. Bei
Sichelmähern darf sich nie vor die Grasauswurföffnung gestellt werden.
Wartung und Lagerung:
• Sorgen Sie dafür, dass alle Muttern, Bolzen und Schrauben fest angezogen sind
und das Gerät in einem sicheren Arbeitszustand ist.
• Versuchen Sie nicht, das Gerät selbst
zu reparieren, es sei denn, Sie besitzen
hierfür eine Ausbildung. Sämtliche Arbeiten, die nicht in dieser Betriebsanleitung
angegeben werden, dürfen nur von uns
ermächtigten Kundendienststellen ausgeführt werden.
• Bewahren Sie das Gerät an einem trockenen Ort und außerhalb der Reichweite
von Kindern auf.
• Behandeln Sie Ihr Gerät mit Sorgfalt.
Halten Sie die Werkzeuge scharf und
sauber, um besser und sicherer arbeiten
zu können. Befolgen Sie die Wartungsvorschriften.
• Tragen Sie Schutzhandschuhe, wenn Sie
die Schneideinrichtung wechseln.
• Überprüfen Sie die Grasfangeinrichtung
regelmäßig auf Verschleiß und Verformungen. Ersetzen Sie aus Sicherheitsgründen verschlissene oder beschädigte Teile.
Seien Sie beim Einstellen der Messer
besonders vorsichtig, damit Ihre Finger
nicht zwischen den rotierenden Messern
und fest stehenden Teilen der Maschine
eingeklemmt werden.
• Überprüfen Sie, dass nur Ersatzschneidwerkzeuge verwendet werden,
die vom Hersteller zugelassen sind.
Elektrische Sicherheit:
• Achten Sie darauf, dass die Netzspannung mit den Angaben des Typenschildes
übereinstimmt.
• Schließen Sie das Gerät nur an eine Steckdose mit Fehlerstrom-Schutzeinrichtung (FISchalter / RCD) mit einem Auslösestrom
von nicht mehr als 30 mA an.
• Vermeiden Sie Körperberührungen mit
geerdeten Teilen (z.B. Metallzäune, Metallpfosten).
• Verwenden Sie nur zugelassene Netzkabel der Bauart H05RN-F, die höchstens
75 m lang und für den Gebrauch im
Freien bestimmt sind. Der Litzenquerschnitt des Netzkabels muss mindestens
2
2,5 mm
beltrommel vor Gebrauch immer ganz
ab. Überprüfen Sie das Netzkabel auf
Schäden.
• Verwenden Sie für die Anbringung
des Netzkabels die dafür vorgesehene
Netzkabelaufhängung.
• Halten Sie das Netzkabel beim Arbeiten von dem Schneidwerkzeug fern.
betragen. Rollen Sie eine Ka-
35
Page 36

DE
B
C
D
AT
CH
Die Messer können das Netzkabel
beschädigen und zum Berühren spannungsführender Teile führen. Führen Sie
das Netzkabel grundsätzlich hinter der
Bedienungsperson.
• Benutzen Sie das Netzkabel nicht, um
den Netzstecker aus der Steckdose zu
ziehen. Schützen Sie das Netzkabel
vor Hitze, Öl und scharfen Kanten.
• Schalten Sie das Gerät aus und ziehen
Sie den Netzstecker aus der Steckdose, wenn das Netzkabel beschädigt
ist. Wenn die Anschlussleitung dieses
Gerätes beschädigt wird, muss sie
durch den Hersteller oder seinen
Kundendienst oder eine ähnliche qua-
lizierte Person ersetzt werden, um
Gefährdungen zu vermeiden.
• Verbinden Sie kein beschädigtes Netzkabel mit dem Stromnetz. Berühren Sie
kein beschädigtes Netzkabel, solange
es mit dem Stromnetz verbunden ist.
Ein beschädigtes Netzkabel kann zum
Berühren spannungsführender Teile führen.
Montage
Ziehen Sie vor allen Arbeiten an
dem Gerät den Netzstecker. Es besteht die Gefahr von Personenschäden.
Bügelgriff montieren
1. Entfernen Sie die beiden vormontierten Flügelmuttern (2a).
Setzen Sie den unteren Holm (3)
in die Aufnahme des Rasenmähergehäuses (7) ein.
2. Befestigen Sie den unteren
Holm (3) an den beiden Schrau-
ben mit den Flügelmuttern (2a).
3. Befestigen Sie den Bügelgriff (1)
mit den beiliegenden Flügelmuttern (16) und zwei Feststellhebeln zur Holmbefestigung (2b)
am unteren Holm (3).
4. Klipsen Sie die Netzkabelhalter
(
A
10) am unteren Holm (3) und
am Bügelgriff (1) ein und xieren
Sie damit die Anschlussleitung.
Wenn Sie die beiden Feststellhebel
zur Holmbefestigung lösen, können Sie den Bügelgriff zur Aufbewahrung des Gerätes nach unten
klappen. Darauf achten, dass das
Netzkabel nicht eingeklemmt ist.
Bedienung
Grasfangsack einhängen/
abnehmen
1. Zum Einhängen des Grasfangsacks (4) heben Sie den
Prallschutz (9) an und hängen
den Grasfangsack (4) ein.
Klappen Sie den Prallschutz (9)
auf den Grasfangsack (4). Er
hält den Grasfangsack an
richtiger Position.
2. Zum Abnehmen des Grasfangsacks (4) heben Sie den
Prallschutz (9) an und hängen
den Grasfangsack (4) aus. Klappen Sie den Prallschutz (9) an
das Mähergehäuse zurück.
Mit dem Elektro-Rasenmäher
darf nicht ohne Prallschutz
oder Grasfangsack gearbeitet werden. Es besteht Verletzungsgefahr.
36
Page 37

E
Seitlich am Grasfangsack (4) ist eine Füll-
F
G
standsanzeige (21) angebracht.
Füllstandsanzeige (21) geöffnet:
Grasfangsack (4) leer
Füllstandsanzeige (21) geschlossen:
Grasfangsack (4) voll
Die Füllstandsanzeige (21) funkti-
oniert, wenn das Gerät in Betrieb
ist.
Grasfangsack entleeren
Nehmen Sie auch den unteren Griff am
Grasfangsack (4) zur Hilfe, um den Grasfangsack auszuschütteln.
Schnitthöhe einstellen
Schalten Sie das Gerät aus, ziehen
Sie den Netzstecker und warten
Sie den Stillstand des Messers ab.
Es besteht die Gefahr von Personenschäden.
1. Greifen Sie den Schnitthöhenverstellhebel (5) und führen Sie
ihn an der Rastierung vorbei auf
die gewünschte Einstellung der
Schnitthöhe.
2. Sie können den Handgriff (8) zur
Hilfe nehmen, damit der ElektroRasenmäher nicht wegrollt.
20 mm - Position 1
30 mm - Position 2
40 mm - Position 3
50 mm - Position 4
60 mm - Position 5
70 mm - Position 6
Die richtige Schnitthöhe beträgt bei einem
Zierrasen etwa 25 - 40 mm, bei einem
Nutzrasen etwa 30 - 60 mm.
DE
Für den ersten Schnitt in der Saison
sollte eine hohe Schnitthöhe gewählt werden.
Beachten Sie den Lärmschutz und
örtliche Vorschriften.
Ein- und Ausschalten
1. Stecken Sie den Netzstecker des
Netzkabels in die Steckdose
(12) am Bügelgriff (1).
2. Zur Zugentlastung formen Sie
aus dem Ende des Netzkabels
(14) eine Schlaufe und hängen
diese in die Netzkabel-Zugentlastung (13) ein. Vergleichen Sie
mit der Abbildung
3. Schließen Sie das Gerät an die
Netzspannung an.
4. Achten Sie vor dem Einschalten
darauf, dass das Gerät keine
Gegenstände berührt.
5. Zum Einschalten drücken Sie
den Entriegelungsknopf (11) am
Handgriff und halten gleichzeitig
den Starthebel (15) gedrückt.
Lassen Sie den Entriegelungsknopf (11) los.
6. Zum Ausschalten lassen Sie den
Starthebel (15) los.
Nach dem Ausschalten des
Gerätes dreht sich das Messer
noch für einige Sekunden.
Berühren Sie das laufende
Messer nicht. Es besteht die
Gefahr von Personenschäden.
Arbeiten mit dem ElektroRasenmäher
Regelmäßiges Mähen regt die Graspanze
zu einer verstärkten Blattbildung an, lässt
aber gleichzeitig Unkrautpanzen absterben. Daher wird der Rasen nach jedem
CHAT
H
.
37
Page 38

DE
AT
CH
Mähvorgang dichter und es entsteht ein
gleichmäßig belastbarer Rasen.
Der erste Schnitt erfolgt ab etwa April bei
einer Aufwuchshöhe von 70 - 80 mm. In
der Hauptvegetationszeit wird der Rasen
mindestens einmal pro Woche gemäht.
• Beginnen Sie mit dem Mähen in der
Nähe der Steckdose und arbeiten Sie
von der Steckdose weg.
• Führen Sie das Netzkabel immer hinter
sich und bringen Sie es nach dem Wenden auf die schon gemähte Seite.
• Führen Sie das Gerät im Schritttempo
in möglichst geraden Bahnen. Für
ein lückenloses Mähen sollten sich die
Bahnen immer um wenige Zentimeter
überlappen.
• Stellen Sie die Schnitttiefe so ein, dass
das Gerät nicht überlastet wird. Andernfalls kann der Motor beschädigt
werden.
• Arbeiten Sie an Hängen immer quer
zum Hang. Seien Sie besonders vorsichtig beim Rückwärtsgehen und Ziehen des Gerätes.
• Reinigen Sie das Gerät nach jedem
Einsatz wie im Kapitel „Reinigung,
Wartung, Lagerung“ beschrieben.
Schalten Sie nach der Arbeit und
zum Transport das Gerät aus,
ziehen Sie den Netzstecker und
warten Sie den Stillstand des Messers ab. Es besteht die Gefahr von
Personenschäden.
Reinigung/Wartung/
Lagerung
Lassen Sie Arbeiten, die nicht
in dieser Betriebsanleitung
beschrieben sind, von einer
von uns ermächtigten Kundendienststelle durchführen.
Verwenden Sie nur Originalteile.
Tragen Sie beim Umgang mit dem
Messer Handschuhe.
Schalten Sie vor allen Wartungs-
und Reinigungsarbeiten das Gerät
aus, ziehen Sie den Netzstecker
und warten Sie den Stillstand des
Messers ab.
Es besteht die Gefahr von Personen-
schäden.
Allgemeine Reinigungs- und
Wartungsarbeiten
Spritzen Sie den Elektro-
Rasenmäher nicht mit Wasser
ab. Es besteht die Gefahr
eines elektrischen Schlages.
• Halten Sie das Gerät stets sauber. Verwenden Sie zum Reinigen eine Bürste
oder ein Tuch, aber keine Reinigungsbzw. Lösungsmittel.
• Entfernen Sie nach dem Mähen anhaf-
tende Panzenreste mit einem Holz-
oder Plastikstück von den Rädern, den
Lüftungsöffnungen, der Auswurföffnung
und dem Messerbereich. Verwenden
Sie keine harten oder spitzen Gegenstände, Sie könnten das Gerät beschädigen.
• Ölen Sie von Zeit zu Zeit die Achsen
der Räder.
• Kontrollieren Sie den Elektro-
Rasenmäher vor jedem Gebrauch auf
offensichtliche Mängel wie lose, abgenutzte oder beschädigte Teile. Prüfen
Sie den festen Sitz aller Muttern, Bolzen und Schrauben.
• Überprüfen Sie Abdeckungen und
Schutzeinrichtungen auf Beschädigungen und korrekten Sitz. Tauschen
Sie diese gegebenenfalls aus.
38
Page 39

DE
I
I
CHAT
Messer austauschen
Ist das Messer stumpf, so kann es von einer
Fachwerkstätte nachgeschliffen werden. Ist
das Messer beschädigt oder zeigt eine Unwucht, so muss es ausgewechselt werden
(siehe Kapitel Ersatzteile).
1. Ziehen Sie den Netzstecker und
warten Sie den Stillstand des
Messers ab.
2. Drehen Sie das Gerät um.
3. Benutzen Sie feste Handschuhe
und halten Sie das Messer fest
(23). Drehen Sie die Messerschraube (22) gegen den
Uhrzeigersinn mit Hilfe eines
Schraubenschlüssels (Schlüsselweite 13) von der Motorspindel
(24).
4. Bauen Sie das neue Messer in
umgekehrter Reihenfolge wieder
ein. Achten Sie darauf, dass das
Messer richtig positioniert ist und
die Schraube fest angezogen ist.
Lagerung
• Bewahren Sie das Gerät trocken und
außerhalb der Reich weite von Kindern
auf. Lösen Sie die Feststellhebel zur
Holmbefestigung und klappen Sie den
Bügelgriff zusammen, damit das Gerät
weniger Platz beansprucht. Die Netzkabel dürfen dabei nicht eingeklemmt
werden.
• Lassen Sie den Motor abkühlen, bevor
Sie das Gerät in geschlossenen Räumen abstellen.
• Umhüllen Sie das Gerät nicht mit Nylonsäcken, da sich Feuchtigkeit bilden
könnte.
Wir haften nicht für durch unsere Geräte
hervorgerufene Schäden, sofern diese
durch unsachgemäße Reparatur oder den
Einsatz von Nicht-Originalteilen bzw.
durch nicht bestimmungsgemäßen Gebrauch verursacht werden.
Entsorgung/
Umweltschutz
Führen Sie Gerät, Zubehör und Verpackung einer umweltgerechten Wiederverwertung zu.
Elektrogeräte gehören nicht in den
Hausmüll.
• Geben Sie das Gerät an einer Verwertungsstelle ab. Die verwendeten Kunststoff- und Metallteile können sortenrein
getrennt werden und so einer Wiederverwertung zugeführt werden. Fragen
Sie hierzu unser Service-Center.
• Werfen Sie geschnittenes Gras nicht in
die Mülltonne, sondern führen Sie es der
Kompostierung zu oder verteilen Sie es
als Mulchschicht unter Sträuchern und
Bäumen.
Ersatzteile / Zubehör
Ersatzteile und Zubehör erhalten Sie unter
www.grizzly-service.eu
Sollten Sie kein Internet haben, so wenden Sie sich bitte telefonisch an das ServiceCenter (siehe „Service-Center“ Seite 42). Halten Sie die unten genannten Bestellnummern
bereit.
Pos. Bezeichnung ........................................................................... Artikel-Nr.
4 Grasfangsack .................................................................... 91103875
23 Ersatzmesser ...................................................................... 13700303
39
Page 40

DE
AT
CH
Fehlersuche
Problem Mögliche Ursache Fehlerbehebung
Steckdose, Netzkabel,
Leitung, Netzstecker prüfen,
ggf. Reparatur durch
Elektrofachmann
Reparatur durch
Kundendienst
Größere Schnitthöhe
einstellen. Durch Drücken
des Bügelgriffs die
Vorderräder leicht anheben.
Fremdkörper entfernen
Größere Schnitthöhe
einstellen
Messer (
23) schleifen
I
lassen oder austauschen
I
Messer (
23) korrekt
einbauen
Gras entfernen
Messerschraube (
festziehen
Messerschraube (
festziehen
Messer (
23) austauschen
I
Reinigung mit weicher
Bürste. Die Füllstandsanzeige
muss aus eigener Kraft
zufallen, wenn sie geöffnet
wurde.
Gerät startet nicht
Motor setzt aus
Arbeitsergebnis
nicht
zufriedenstellend
oder Motor arbeitet
schwer
Messer (
I
23)
rotiert nicht
Abnorme
Geräusche,
Klappern oder
Vibrationen
Füllstandsanzeige
E
21) funktioniert
(
nicht
Netzspannung fehlt
Starthebel (
A
15) defekt
Kohlebürsten abgenutzt
Motor defekt
Gras zu lang
Blockierung durch
Fremdkörper
Schnitthöhe zu niedrig
Messer (
23) stumpf
I
Messerbereich verstopft Gerät reinigen
Messer (
23) falsch
I
montiert
I
Messer (
23) durch
Gras blockiert
Messerschraube (
I
22)
locker
Messerschraube (
I
22)
locker
Messer (
23)
I
beschädigt
Verschmutzung
22)
I
22)
I
40
Page 41

DE
CHAT
Garantie
Sehr geehrte Kundin, sehr geehrter Kunde,
Sie erhalten auf dieses Gerät 3 Jahre Garantie ab Kaufdatum.
Im Falle von Mängeln dieses Produkts
stehen Ihnen gegen den Verkäufer des
Produkts gesetzliche Rechte zu. Diese
gesetzlichen Rechte werden durch unsere
im Folgenden dargestellte Garantie nicht
eingeschränkt.
Garantiebedingungen
Die Garantiefrist beginnt mit dem Kaufdatum. Bitte bewahren Sie den OriginalKassenbon gut auf. Diese Unterlage wird
als Nachweis für den Kauf benötigt.
Tritt innerhalb von drei Jahren ab dem Kaufdatum dieses Produkts ein Material- oder
Fabrikationsfehler auf, wird das Produkt von
uns – nach unserer Wahl – für Sie kostenlos
repariert oder ersetzt. Diese Garantieleistung setzt voraus, dass innerhalb der DreiJahres-Frist das defekte Gerät und der Kaufbeleg (Kassenbon) vorgelegt und schriftlich
kurz beschrieben wird, worin der Mangel
besteht und wann er aufgetreten ist.
Wenn der Defekt von unserer Garantie
gedeckt ist, erhalten Sie das reparierte oder
ein neues Produkt zurück. Mit Reparatur
oder Austausch des Produkts beginnt kein
neuer Garantiezeitraum.
Garantiezeit und gesetzliche
Mängelansprüche
Die Garantiezeit wird durch die Gewährleistung nicht verlängert. Dies gilt auch
für ersetzte und reparierte Teile. Eventuell
schon beim Kauf vorhandene Schäden und
Mängel müssen sofort nach dem Auspacken gemeldet werden. Nach Ablauf der
Garantiezeit anfallende Reparaturen sind
kostenpichtig.
Garantieumfang
Das Gerät wurde nach strengen Qualitätsrichtlinien sorgfältig produziert und vor
Anlieferung gewissenhaft geprüft.
Die Garantieleistung gilt für Material- oder
Fabrikationsfehler. Diese Garantie erstreckt
sich nicht auf Produktteile, die normaler
Abnutzung ausgesetzt sind und daher als
Verschleißteile angesehen werden können
(z.B. Filter oder Aufsätze) oder für Beschädigungen an zerbrechlichen Teilen (z.B.
Schalter, Akkus oder die aus Glas gefertigt
sind).
Diese Garantie verfällt, wenn das Produkt
beschädigt, nicht sachgemäß benutzt oder
nicht gewartet wurde. Für eine sachgemäße
Benutzung des Produkts sind alle in der Betriebsanleitung aufgeführten Anweisungen
genau einzuhalten. Verwendungszwecke
und Handlungen, von denen in der Betriebsanleitung abgeraten oder vor denen gewarnt wird, sind unbedingt zu vermeiden.
Das Produkt ist lediglich für den privaten
und nicht für den gewerblichen Gebrauch
bestimmt. Bei missbräuchlicher und unsachgemäßer Behandlung, Gewaltanwendung
und bei Eingriffen, die nicht von unserer
autorisierten Service-Niederlassung vorgenommen wurden, erlischt die Garantie.
Abwicklung im Garantiefall
Um eine schnelle Bearbeitung Ihres Anliegens zu gewährleisten, folgen Sie bitte den
folgenden Hinweisen:
• Bitte halten Sie für alle Anfragen den
Kassenbon und die Identikationsnummer (IAN106319) als Nachweis für
den Kauf bereit.
• Die Artikelnummer entnehmen Sie bitte
dem Typenschild.
• Sollten Funktionsfehler oder sonstige
Mängel auftreten kontaktieren Sie
zunächst die nachfolgend benannte
Serviceabteilung telefonisch oder per
E-Mail. Sie erhalten dann weitere Informationen über die Abwicklung Ihrer
Reklamation.
• Ein als defekt erfasstes Produkt können
Sie, nach Rücksprache mit unserem
Kundenservice, unter Beifügung des
Kaufbelegs (Kassenbons) und der
41
Page 42

DE
AT
CH
Angabe, worin der Mangel besteht
und wann er aufgetreten ist, für Sie
portofrei an die Ihnen mitgeteilte
Service-Anschrift übersenden. Um Annahmeprobleme und Zusatzkosten zu
vermeiden, benutzen Sie unbedingt nur
die Adresse, die Ihnen mitgeteilt wird.
Stellen Sie sicher, dass der Versand
nicht unfrei, per Sperrgut, Express oder
sonstiger Sonderfracht erfolgt. Senden
Sie das Gerät bitte inkl. aller beim
Kauf mitgelieferten Zubehörteile ein
und sorgen Sie für eine ausreichend
sichere Transportverpackung.
Reparatur-Service
Sie können Reparaturen, die nicht der Garantie unterliegen, gegen Berechnung von
unserer Service-Niederlassung durchführen
lassen. Sie erstellt Ihnen gerne einen Kostenvoranschlag.
Wir können nur Geräte bearbeiten, die
ausreichend verpackt und frankiert eingesandt wurden.
Achtung: Bitte senden Sie Ihr Gerät gereinigt und mit Hinweis auf den Defekt an
unsere Service-Niederlassung.
Nicht angenommen werden unfrei - per
Sperrgut, Express oder mit sonstiger Sonderfracht - eingeschickte Geräte.
Die Entsorgung Ihrer defekten eingesendeten Geräte führen wir kostenlos durch.
Service-Center
Service Deutschland
DE
Tel.: 0800 54 35 111
E-Mail: grizzly@lidl.de
IAN 106319
Service Österreich
AT
Tel.: 0820 201 222
(0,15 EUR/Min.)
E-Mail: grizzly@lidl.at
IAN 106319
Service Schweiz
CH
Tel.: 0842 665566
(0,08 CHF/Min.,
Mobilfunk max. 0,40 CHF/Min.)
E-Mail: grizzly@lidl.ch
IAN 106319
Importeur
Bitte beachten Sie, dass die folgende
Anschrift keine Serviceanschrift ist.
Kontaktieren Sie zunächst das oben
genannte Service-Center.
Grizzly Tools GmbH & Co KG
Stockstädter Straße 20
63762 Großostheim
Germany
www.grizzly-service.eu
42
Page 43

IT
MT
Traduzione della dichiarazione di
conformità CE originale
Con la presente dichiariamo che
Tagliaerba elettrico
serie di costruzione FRM 1800 B2
Numero di serie
201410000001 - 201501039578
a partire dall’anno di costruzione 2015 corrisponde alle seguenti direttive EU in materia
nella rispettiva versione valida:
2006/42/EC • 2004/108/EC • 2000/14/EC • 2005/88/EC • 2011/65/EU*
Per garantire la conformità sono state applicate le seguenti norme armonizzate e anche
le norme e disposizioni nazionali che seguono:
EN 55014-1/A2:2011 • EN 55014-2/A1:2001+A2:2008 • EN 60335-1:2012
EN 61000-3-2:2006/A2:2009 • EN 60335-2-77:2010 • EN 61000-3-11:2000
EN 62233:2008
Si dichiara inoltre in conformità alla direttiva 2000/14/EC sull’emissione acustica
ambientale:
Livello di potenza sonora
garantita: 96 dB(A)
misurata: 94,1 dB(A)
Procedura della valutazione della conformità applicata come da allegato VI / 2000/14/EC
Autorità registrata:
TÜV Süd, NB 0036
Il produttore è il solo responsabile della stesura della presente dichiarazione di
conformità:
Grizzly Tools GmbH & Co. KG
Stockstädter Straße 20
63762 Großostheim / 28.01.2015
Germany
* L’oggetto descritto sopra è conforme alle prescrizioni della Direttiva 2011/65/EU del Parlamento Europeo e del Consiglio dell’8 giugno 2011 sulla restrizione dell’uso di determinate
sostanze pericolose nelle apparecchiature elettriche ed elettroniche.
Responsabile documentazione tecnica
Volker Lappas
43
Page 44

44
Page 45

GB
MT
Translation of the original EC declaration
of conformity
We conrm, that the
Electric Lawnmower
Design Series FRM 1800 B2
Serial number 201410000001 - 201501039578
conforms with the following applicable relevant version of the EU guidelines:
2006/42/EC • 2004/108/EC • 2000/14/EC • 2005/88/EC • 2011/65/EU*
In order to guarantee consistency, the following harmonised standards as well as
national standards and stipulations have been applied:
EN 55014-1/A2:2011 • EN 55014-2/A1:2001+A2:2008 • EN 60335-1:2012
EN 61000-3-2:2006/A2:2009 • EN 60335-2-77:2010 • EN 61000-3-11:2000
EN 62233:2008
We additionally conrm the following in accordance with the 2000/14/EC emissions
guideline:
Guaranteed sound power level: 96 dB(A)
Measured sound power level: 94.1 dB(A)
Compliance evaluation process carried out in accordance with Appendix VI, 2000/14/
EC
Registered Ofce: TÜV Süd, NB 0036
This declaration of conformity is issued under the sole responsibility of the
manufacturer:
Grizzly Tools GmbH & Co. KG
Stockstädter Straße 20
63762 Großostheim / 28.01.2015
Germany
* The object of the declaration described above satises the provisions of Directive
2011/65/EU of the European Parliament and the Council of 8 June 2011 on limiting the use
of certain harmful substances in electrical and electronic appliances.
Volker Lappas
Documentation Representative
45
Page 46

46
Page 47

DE
CH
AT
Original EG-Konformitätserklärung
Hiermit bestätigen wir, dass der
Elektro-Rasenmäher
Baureihe FRM 1800 B2
Seriennummer 201410000001 - 201501039578
folgenden einschlägigen EU-Richtlinien in ihrer jeweils gültigen Fassung entspricht:
2006/42/EG • 2004/108/EG • 2000/14/EG • 2005/88/EG • 2011/65/EU*
Um die Übereinstimmung zu gewährleisten, wurden folgende harmonisierte Normen
sowie nationale Normen und Bestimmungen angewendet:
EN 55014-1/A2:2011 • EN 55014-2/A1:2001+A2:2008 • EN 60335-1:2012
EN 61000-3-2:2006/A2:2009 • EN 60335-2-77:2010 • EN 61000-3-11:2000
EN 62233:2008
Zus ät zl ic h w ir d e nt sp re ch en d d er Ge rä us ch emissionsrichtlinie 2000/14/EG bestätigt:
Schallleistungspegel:
Garantiert: 96,0 dB(A);
Gemessen: 94,1 dB(A)
Angewendetes Konformitätsbewertungsverfa hre n e nts pr ech en d An h. VI / 2 00 0/14/EG
Gemeldete Stelle: TÜV Süd, NB 0036
Die alleinige Verantwortung für die Ausstellung dieser Konformitätserklärung trägt der
Hersteller:
Grizzly Tools GmbH & Co. KG
Stockstädter Straße 20
63762 Großostheim / 28.01.2015
Germany
* Der oben beschriebene Gegenstand der Erklärung erfüllt die Vorschriften der
Richtlinie 2011/65/EU des Europäischen Parlaments und des Rates vom 8. Juni 2011
zur Beschränkung der Verwendung bestimmter gefährlicher Stoffe in Elektro- und
Elektronikgeräten.
Volker Lappas
Dokumentationsbevollmächtigter
47
Page 48

48
2015-01-08-rev02-op
Page 49

Vista esplosa
Exploded Drawing • Explosionszeichnung
informativo, informative, informativ
FRM 1800 B2
49
Page 50

8
F
15
13
14
12
G
5
1
11
H
50
I
24
22
23
Page 51

51
Page 52

GRIZZLY TOOLS GMBH & CO. KG
Stockstädter Straße 20
D-63762 Großostheim
Versione delle informazioni · Last
Information Update · Stand der
Informationen: 10 / 2014
Ident.-No.: 72055245102014-IT
IAN 106319
 Loading...