

Page 1
®
TOSAERBA ELETTRICO FRM 1200 D3
TOSAERBA ELETTRICO
Traduzione delle istruzioni d’uso originali
ELECTRIC LAWNMOWER
Translation of original operation manual
CORTA-RELVAS ELÉTRICO
Tradução do manual de instruções original
ELEKTRO-RASENMÄHER
Originalbetriebsanleitung
IAN 102969
Page 2

Prima di leggere aprire la pagina con le immagini e prendere confidenza con le diverse funzioni
dell’apparecchio.
Antes de começar a ler abra na página com as imagens e, de seguida, familiarize-se com todas as
funções do aparelho.
Before reading, unfold the page containing the illustrations and familiarise yourself with all
functions of the device.
Klappen Sie vor dem Lesen die Seite mit den Abbildungen aus und machen Sie sich anschließend
mit allen Funktionen des Gerätes vertraut.
IT / MT Traduzione delle istruzioni d’uso originali Pagina
PT Tradução do manual de instruções original Página
GB / MT Translation of original operation manual Page
DE / AT / CH Originalbetriebsanleitung Seite
4
17
30
42
Page 3
A
10
11 12
9
8
1
2
8
7
3
4
6
5
B
13
3
6
3
13
6
5.1
5
3
Page 4

IT
MT
Indice
Introduzione ............................... 4
Utilizzo ........................................4
Descrizione generale .................... 5
Contenuto della confezione .............. 5
Sommario ...................................... 5
Descrizione del funzionamento .........5
Dati tecnici ..................................5
Consigli di sicurezza .....................6
Simboli sull’apparecchio ..................6
Consigli di sicurezza generali ................7
Montaggio .................................10
Montaggio Impugnatura .................10
Montaggio cesto raccoglierba .........10
Comando ...................................10
Inserimento/rimozione
cesto raccoglierba ..........................10
Regolazione dell’altezza del taglio ...11
Accensione e spegnimento ..............11
Lavorare con il tagliaerba ...............11
Pulizia/manutenzione/
stoccaggio..................................12
Lavori di pulizia e manutenzione
generali ........................................ 12
Sostituzione lama ........................... 12
Stoccaggio ....................................13
Smaltimento/tutela
dell’ambiente .............................13
Pezzi di ricambio / Accessori ......13
Ricerca guasti.............................14
Garanzia ...................................15
Servizio di riparazione ...............16
Service-Center ............................16
Importatore ...............................16
Traduzione della dichiarazione
di conformità CE originale ..........55
Vista esplosa .............................61
Introduzione
Congratulazioni per l’acquisto del Suo
nuovo apparecchio. Ha scelto un prodotto
altamente pregiato. Le istruzioni per l’uso
costituiscono parte integrante di questo
prodotto.
Questo apparecchio è stato sottoposto a
un controllo di qualità durante la produzione e quindi sottoposto a un controllo
nale. Quindi è garantito il funzionamento
del vostro apparecchio. Non si esclude
tuttavia che in casi singoli possano trovarsi
nell’apparecchio o nelle condutture essibili residui di acqua o lubricanti. Questo
non rappresenta un vizio o difetto e neanche un motivo di preoccupazione.
Contengono indicazioni importanti
per la sicurezza, l’uso e lo smaltimento. Prima dell’uso del prodotto,
si raccomanda di familiarizzare
con tutte le indicazioni di comando
e di sicurezza. Usare il prodotto
solo come descritto e per i campi
d’impiego specicati. Conservare
le istruzioni in un luogo sicuro e
consegnare la documentazione in
caso di cessione del prodotto a terzi.
Utilizzo
L’apparecchio è concepito esclusivamente
per tagliare il prato e le superci erbose
nel settore domestico. Questo apparecchio
non è adatto per l’uso industriale.
In caso di un impiego per uso industriale
decade la garanzia.
Qualsiasi altro utilizzo non espressamente
autorizzato nelle presenti istruzioni , può
causare danni all’apparecchio e rappresentare un serio pericolo per l’utilizzatore.
4
Page 5

MTIT
A
B
C
D
L’apparecchio è destinato all’uso da parte
di adulti. Bambini e persone che non hanno familiarizzato con le presenti istruzioni
non devono usare l’apparecchio. L’uso
dell’apparecchio in presenza di pioggia o
in ambienti umidi è vietato.
Il produttore declina ogni responsabilità
per danni causati da un uso improprio o
un comando errato.
Descrizione generale
Contenuto della confezione
Rimuovere delicatamente l’apparecchio
dall’imballaggio e controllare se i seguenti
componenti sono completi:
- Tagliaerba e manico con conduttura
di allacciamento
- Braccio inferiore
- Cesto raccoglierba (a tre parti)
- 2 viti per il ssaggio del braccio
- 2 dadi ad alette e viti per il ssaggio
dell’impugnatura
- 2 supporti per il ssaggio della conduttura di allacciamento
- Rotelle
- Istruzioni per l’uso
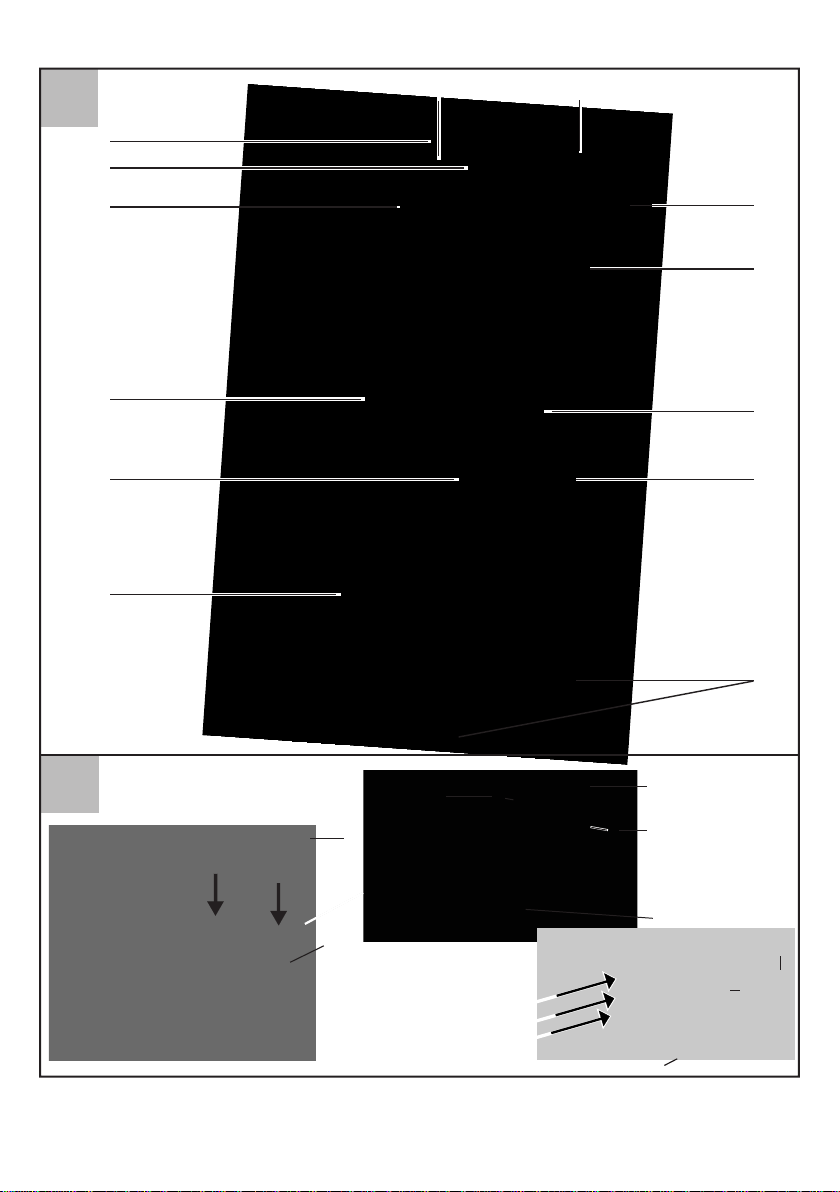
Sommario
1 Impugnatura ad arco
2 Dadi ad alette
3 Montante inferiore
4 Cestello raccoglierba
5 Rotelle
5.1 Pressacavi
6 Alloggiamento tagliaerba
7 Protezione antiurto
8 Serracavo
9 Presa per cavo di allacciamento
alla rete
10 Pulsante di sblocco
11 Scarico della trazione cavo
12 Leva di avviamento
13 Viti fornite
14 Viti
15 Manico
16 Cestello raccoglierba
20 Sportello
17 Svitare la vite della lama
I
18 Lame
19 Mandrino motore
Descrizione del
funzionamento
Il tagliaerba elettrico possiede un utensile da taglio che gira parallelamente al
livello di taglio. E’ dotato di un elettromotore di potenza, un alloggiamento di plastica resistente, un interruttore di sicurezza,
una protezione antiurto e un cesto raccoglierba. Inoltre l‘apparecchio è dotato di
una regolazione dell‘altezza a 3 livelli è di
rotelle scorrevoli.
Il funzionamento dei componenti è riportato nelle seguenti descrizioni.
Dati tecnici
Tagliaaerba elettrico . FRM 1200 D3
Potenza assorbita del motore .......1200 W
Tensione nominale
.......................220 V-240 V~, 50/60 Hz
Numero di giri al minimo ..(n
Larghezza lama ........................... 31 cm
Altezza taglio .....................20 / 40 / 60
Classe di protezione .........................
Tipo di protezione ........................... IP 24
Peso ............................................8,2 kg
Volume cesto raccoglierba..................30 l
Livello di pressione acustica .....................
................... (L
Livello di potenza acustica misurato
....................(L
garantito ..................................96 dB (A)
) 84 dB (A); KpA =3 dB (A)
pA
) 94 dB (A); KwA =2 dB (A)
WA
) 3350 min
0
-1
mm
II
5
Page 6
IT
MT
Vibrazione sull’impugnatura
(a
) ........................2,1 m/s2; K=1,5 m/s²
h
Il valore di emissione delle oscillazioni
specicato è stato misurato secondo un
metodo di prova standardizzato e può
essere usato per il confronto di un elettrodomestico con un altro.
Il valore di emissione delle oscillazioni
specicato può anche essere usato per una
valutazione introduttiva dell’interruzione.
Avvertenza:
Il valore di emissione delle oscil-
lazioni può variare dal valore
specicato durante l’uso effettivo
dell’elettrodomestico, a seconda del
tipo e del modo di utilizzo dell’elettrodomestico.
Nasce l’esigenza di determinare
misure di sicurezza per la protezione dell’operatore, che si basano
sulla valutazione dell’interruzione
in condizioni d’esercizio effettivo
(a tale proposito devono essere
considerati tutti gli elementi del
ciclo d’esercizio, come per esempio
i tempi in cui l’elettrodomestico è
spento e quelli in cui l’elettrodomestico è acceso, ma funziona senza
sollecitazione).
Consigli di sicurezza
Questa sezione tratta le indicazioni di sicurezza fondamentali durante il lavoro con il
tagliaerba elettrico.
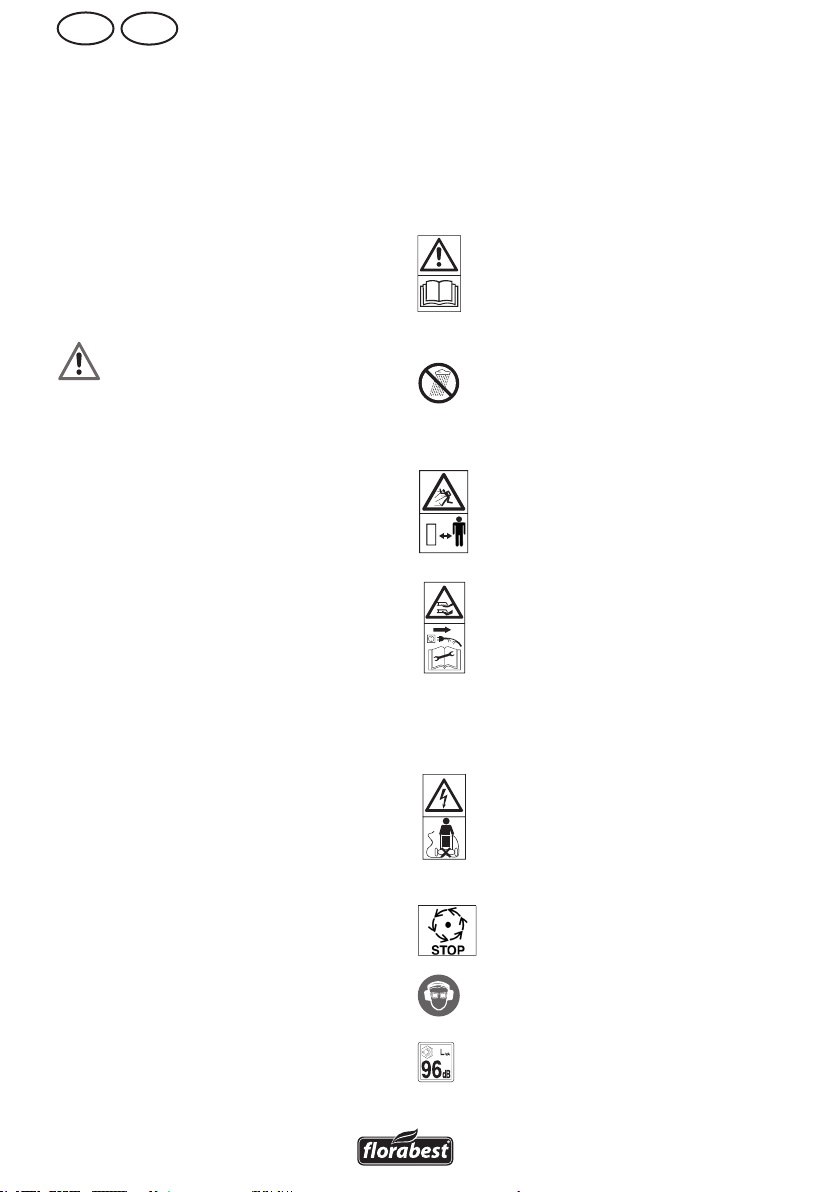
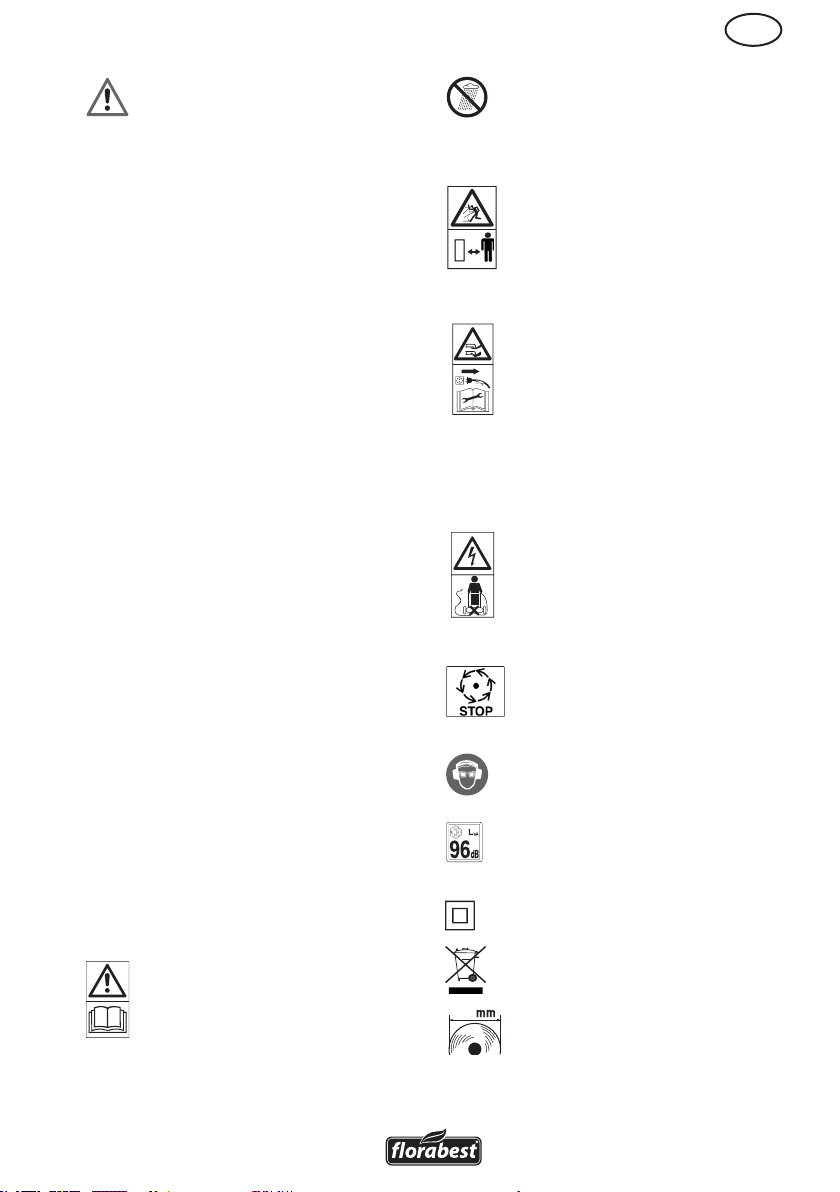
Simboli sull’apparecchio
Attenzione!
Leggere attentamente le istruzioni
d’uso.
Non esporre l’apparecchio all’umi-
dità. Non lavorare in presenza di
pioggia e non tagliare erba bagnata.
Pericolo di lesioni a causa di parti
catapultate.
Tenere lontane le persone dal tosa-
erba.
Attenzione – Lame da taglio aflate! Tenere lontani piedi e mani.
Pericolo di lesioni!
Spegnere il motore e staccare la
spina elettrica prima di eseguire i
lavori di regolazione o di pulizia
oppure se il cavo di rete è inceppato o danneggiato.
I valori di rumore e vibrazione sono stati
rilevati conformemente alle norme e le dis-
posizioni specicate nella dichiarazione
di conformità.
Modiche tecniche e ottiche possono
essere effettuate in seguito agli sviluppi
tecnici senza preavviso. Tutte le misure, avvertenze e indicazioni delle presenti istruzioni d’uso sono quindi senza garanzia.
Eventuali diritti legali basati sulle presenti
istruzioni d’uso, non possono quindi essere
fatti valere.
6
Pericolo a causa del cavo di rete
danneggiato.
Tenere il cavo di rete lontano
dall’apparecchio e dalla lama da
taglio!
Attenzione!
Scia della lama del tagliaerba.
Indossare una protezione per gli
occhi e per l’udito.
Indicazione del livello di rumore Lwa
in dB.
Page 7
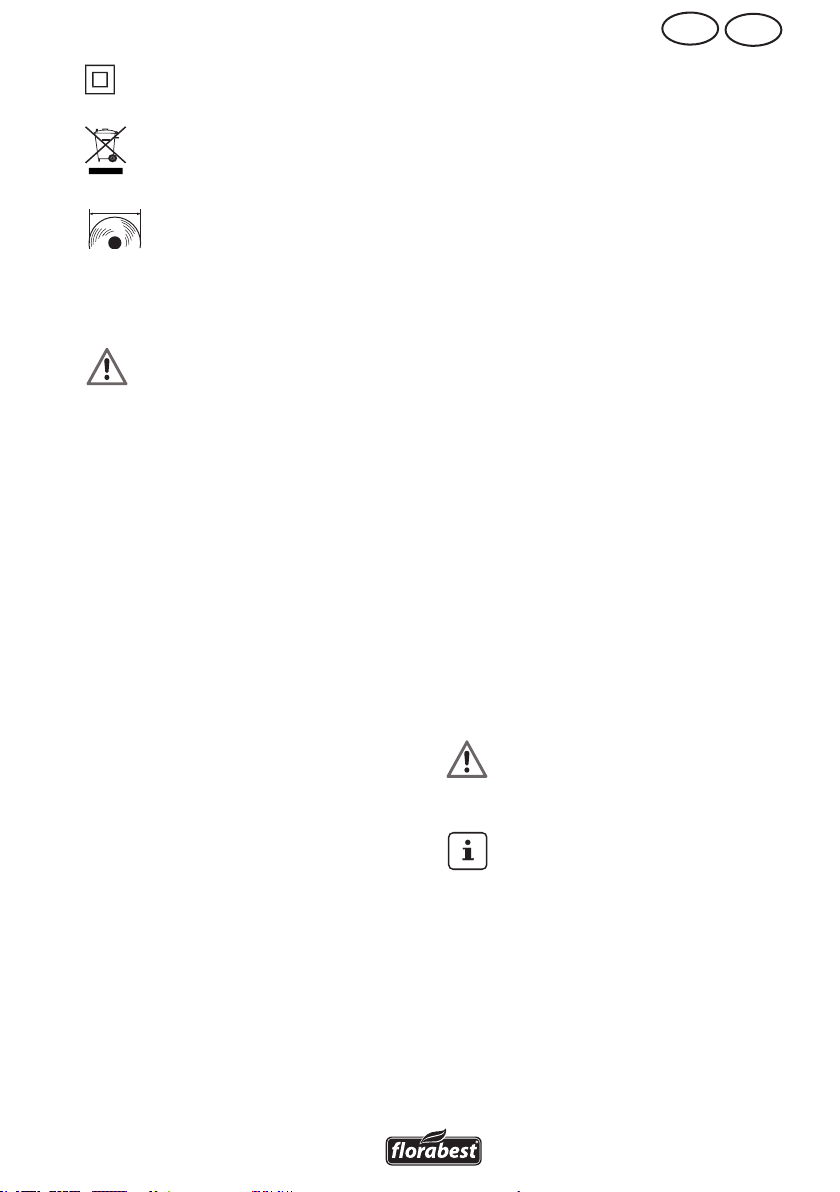
MTIT
Classe di protezione II
Gli apparecchi elettrici non devono
essere smaltiti insieme ai riuti domestici.
31
cm
Diametro di taglio
Consigli di sicurezza
generali
In caso in uso improprio questo
apparecchio può causare lesioni
gravi. Per evitare danni a persone
e cose, leggere e osservare tassativamente le seguenti indicazioni di
sicurezza e familiarizzare con tutti i
componenti di comando.
Preparazione:
• Questo apparecchio non è concepito
per essere usato da persone (compresi
bambini) con limitate capacità siche,
sensoriali o mentali o senza sufciente
esperienza e/o che non hanno le nozioni necessarie, salvo nei casi in cui siano
sorvegliati da una persona responsabile
per la loro sicurezza oppure vengano
istruiti su come usare l’apparecchio.
• Non permettere mai a bambini o ad
altre persone, che non conoscono le
istruzioni d’uso, di usare l’apparecchio. Alcune disposizioni locali prevedono un’età minima per l’utilizzatore.
• Non usare mai l’apparecchio quando
si trovano nelle vicinanze persone, in
particolare bambini e animali domestici.
• Bambini devono essere sorvegliati, per
garantire che non giochino con l’apparecchio.
• L’operatore o utilizzatore è responsabile per infortuni o danni ad altre
persone o alla proprietà delle stesse.
• Controllare l’area nella quale viene
impiegato l’apparecchio e rimuovere
pietre, bastoni, li metallici o altri corpi
estranei che possono essere catturati e
catapultati.
• Indossare apposito abbigliamento da
lavoro come scarpe chiuse con suola
antiscivolo e un pantalone lungo resistente. Non usare l’apparecchio scalzi
o con i sandali.
• Prima di ogni uso, eseguire un controllo visivo dell’apparecchio. Non usare
l’apparecchio in caso di dispositivi di
sicurezza (p. es. protezione antiurto o
cesto raccoglierba), componenti del dispositivo di taglio o bulloni mancanti,
usurati o danneggiati. Per evitare uno
sbilanciamento, gli utensili e bulloni
danneggiati devono essere sostituiti nel
set.
• Prestare particolare attenzione quando
si usano apparecchio con più utensili
da taglio, in quando il movimento
della lama può provocare la rotazione
delle restanti lame.
• Usare solo ricambi e accessori forniti
e consigliati dal produttore. L’impiego
di corpi estranei comporta l’immediata
esclusione del diritto di garanzia.
Lavorare con l’apparecchio:
Non tenere i piedi e le mani vicino
o sotto alle parti rotanti durante il
lavoro. Pericolo di lesioni!
Osservare la protezione antiru-
more e le disposizioni locali. L’uso
dell’apparecchio durante determinate giornate (p. es. domeniche e
festivi) può essere limitato o vietato
in determinate fasce orarie (ora di
pranzo, riposo notturno) o in determinati ambienti (p. es. luoghi di
cura, cliniche ecc.).
• Accendere il motore secondo le istruzioni e solo, quando i piedi sono posizionati ad una distanza sicura dagli
utensili da taglio.
7
Page 8
IT
MT
• Non usare l’apparecchio in presenza
di pioggia o maltempo, in ambienti
umidi o sul prato bagnato. Lavorare
solo con la luce diurna o con una buona illuminazione.
• Non lavorare con l’apparecchio, se si
è stanchi o poco concentrati o dopo
l’assunzione di alcol o farmaci. Fare
una pausa ad intervalli regolari. Lavorare con raziocinio.
• Durante il lavoro, prestare attenzione
ad una posizione stabile, in particolare sui pendii. Lavorare sempre
trasversalmente al pendio, mai su è
giù. Prestare particolare attenzione,
quando si cambia la direzione di marcia sui pendii. Non lavorare su pendii
eccessivamente ripidi.
• Condurre l’apparecchio a passo d’uomo. Prestare particolare attenzione,
quando si gira o tira verso di se l’apparecchio o si cammina all’indietro.
• Accendere l’apparecchio con cautela
secondo le indicazioni contenute nelle
presenti istruzioni. Prestare attenzione
ad una sufciente distanza dei piedi
dalle lame rotanti.
• Non ribaltare l’apparecchio durante
l’avviamento, salvo nei casi in cui sia
necessario per la partenza nell’erba
alta. In questo caso, ribaltare l’apparecchio premendo l’impugnatura
in modo tale che le ruote anteriori
dell’apparecchio vengano leggermente
sollevate. Controllare sempre che le
due mani si trovano in posizione di
lavoro, prima di riappoggiare l’apparecchio sul terreno.
• Non lavorare mai senza cesto raccoglierba o protezione antiurto. Tenersi
sempre lontani dall’apertura di espulsione dell’erba.
Attenzione pericolo! La lama conti-
nua a ruotare.
Pericolo di lesioni.
• L’apparecchio non deve essere solleva-
to o trasportato, n tanto che il motore
gira. Spegnere l’apparecchio nel caso
in cui debba essere ribaltato per il
trasporto, si debbano attraversare su-
perci diverse dal prato e l’apparecchio
venga condotto verso le e lontano dalle
superci da tagliare.
• Tenere l’apertura di espulsione dell’erba sempre pulita e libera. Rimuovere
l’erba tagliata solo quando l’apparecchio è fermo.
• Non lasciare mai l’apparecchio incustodito sul posto di lavoro.
• Non lavorare con l’apparecchio danneggiato, incompleto o trasformato
senza il consenso del produttore. Non
usare mai l’apparecchio con dispositivi
di sicurezza o schermature danneggiati
oppure senza i dispositivi di sicurezza
come i dispositivi di deviazione e/o di
raccolta dell’erba.
• Non sovraccaricare l’apparecchio. Lavorare solo nel campo di potenza specicato e non modicare le impostazioni di regolazione del motore. Non
usare apparecchi a bassa potenza per
lavori pesanti. Non usare l’apparecchio per scopi diversi da quelli per cui
è stato concepito .
• Non usare l’apparecchio nelle vicinan-
ze di liquidi o gas inammabili. La
mancata osservanza di questa indicazione comporta rischi di incendio o di
esplosione.
• Non sollevare o trasportare mai l’apparecchio mentre il motore gira.
• Spegnere l’apparecchio e staccare la
spina elettrica:
- sempre quando si abbandona la
macchina,
- prima di pulire l’apertura di espulsione dell’erba o di rimuovere i bloccaggi,
- quando l’apparecchio non viene
usato,
- prima di controllare o pulire l’appa-
8
Page 9

MTIT
recchio oppure effettuare lavori sul
medesimo,
- quando il cavo di rete è danneggiato o aggrovigliato,
- quando l’apparecchio incontra un
corpo estraneo durante il lavoro oppure subentrano vibrazioni insolite.
In questo caso controllare l’appa-
recchio per vericare la presenta
di eventuali danneggiamento, ed
eventualmente farlo riparare.
• Non posizionare mai le mani o i piedi
vicino o sotto le parti rotanti. In caso di
tosatura con la falce, non posizionarsi
mai davanti all’apertura di espulsione
dell’erba .
Manutenzione e stoccaggio:
• Assicurarsi che tutti i dadi, viti e bulloni
siano ben stretti e l’apparecchio sia in
condizioni di lavoro sicure.
• Non tentare di riparare autonomamente l’apparecchio, salvo nel caso in cui
si è adeguatamente istruiti. Tutti i lavori
non specicati nelle presenti istruzioni
d’uso devono essere effettuati esclusivamente dai centri di assistenza clienti
da noi autorizzati.
• Conservare l’apparecchio in un luogo
asciutto e fuori dalla portata di bambini.
• Trattare l’apparecchio con cura. Tenere
gli utensili aflati e puliti, in modo
tale da garantire condizioni di lavoro
migliori e più sicure. Seguire le disposizioni di manutenzione.
• Indossare guanti di protezione , quando si sostituisce il dispositivo da taglio.
• Controllare regolarmente il dispositivo
raccoglierba per vericare l’eventuale
presenza di usura e deformazioni. Per
motivi di sicurezza, sostituire le parti
usurate o danneggiate. Prestare particolare attenzione durante la regolazione delle lame, in modo tale da evitare
che le dita non vengano schiacciate
tra le lame rotanti e le parti sse della macchina.
• Assicurarsi che vengano usati solo
utensili da taglio di ricambio autorizzati dal produttore.
Sicurezza elettrica:
• Prestare attenzione che la tensione di
rete corrisponda alle indicazioni riportate sulla targhetta dell’apparecchio.
• Possibilmente allacciare l’apparecchio
solo ad una presa provvista di circuito
di sicurezza per correnti di guasto (interruttore FI) con una corrente di apertura di massimo 30 mA an.
• Evitare il contatto del corpo con le parti messe a terra (p. es. recinzioni o pali
metallici).
• Usare solo cavi di rete ammessi del
tipo H05RN-F, con una lunghezza
massima di 75 m e concepiti per l’uso
all’esterno. Il diametro del cavo di
rete deve corrispondere minimo a 2,5
2
mm
. Prima dell’uso, srotolare sempre
completamente la bobina del cavo.
Controllare il cavo per vericare la
presenza di eventuali danneggiamenti.
• Per il ssaggio del cavo di rete usare
la spira del cavo prevista.
• Durante il lavoro, tenere il cavo di rete
lontano dall’utensile da taglio. Le lame
da taglio possono danneggiare il cavo
di rete e provocare il contatto con le
parti conduttive. In generale, condurre
il cavo di rete dietro l’utilizzatore.
• Non usare il cavo di rete per staccare la spina dalla presa. Proteggere il
cavo di rete dal calore, dall’olio e da
spigoli vivi.
• Spegnere l’apparecchio e staccare la
spina elettrica dalla presa, se il cavo
di rete è danneggiato. Nel caso in cui
la conduttura di collegamento di questo apparecchio venga danneggiato,
deve essere sostituita da una conduttura di collegamento speciale, che può
essere fornita dal produttore o dal servizio di assistenza clienti dello stesso.
9
Page 10
IT
B
C
D
E
MT
• Non collegare un cavo di rete danneggiato alla rete di alimentazione. Non
toccare un cavo di rete danneggiato,
n tanto che è collegato alla rete di alimentazione. Un cavo di rete danneggiato può provocare il contatto con le
parti conduttive.
Montaggio
Prima di effettuare qualsiasi lavoro
all’apparecchio, staccare la spina
elettrica. Rischio di danni a persone.
Montaggio Impugnatura
1. Inserire il braccio inferiore (3)
nella sede dell’alloggiamento del
tagliaerba (6).
2. Fissare il braccio (3) con le viti
fornite (13).
3. Avvitare tutte e quattro le ruote
(5) all’alloggiamento del tagliaerba (6). Tutte le ruote devono
essere regolate sulla stessa altezza.
4. Fissare l’impugnatura (1) con le
viti fornite (14) e i dadi ad alette
(2) sul braccio inferiore (3).
Sono possibili due posizioni.
5. Agganciare la fascetta serra-
Allentando i due dadi ad alette,
è possibile ripiegare il manico per
riporre l’apparecchio. Prestare
attenzione che il cavo di rete non
venga schiacciato.
A
cavo (
ssarvi il cavo.
8) sul braccio (3) e
1. Assemblare le due parti del cestello raccoglierbe (16).
2. Inserire il manico (15) nella
parte superiore del cestello raccoglierba (16).
Il tagliaerba non deve essere azio-
nato senza protezione antiurto.
Pericolo di lesioni.
Raccomandiamo di lavorare con
il tagliaerba sempre con il sacco
raccoglierba. Altrimenti si rischia
di compromettere notevolmente il
risultato della tosatura.
Comando
Inserimento/rimozione cesto
raccoglierba
1. Per inserire il cesto raccoglierba (4), sollevare la protezione
antiurto (7) e appendere il cesto
raccoglierba (4). Ribaltare la
protezione antiurto (7) sul cesto
raccoglierba (4). Tiene il cesto
raccoglierba nella posizione corretta.
2. Per rimuovere il cesto
raccoglierba (4) , sollevare la
protezione antiurto (7) e
rimuovere il cesto raccoglierba
(4). Ribaltare indietro la protezione antiurto (7) nell’alloggiamento del tagliaerba.
Lateralmente sul cesto raccoglierba è collocato (4) un indicatore del livello di riempimento (
D
20).
Montaggio cesto
raccoglierba
Per il montaggio del cestello rac-
coglierba indossare i guanti, per
evitare lesioni.
10
Sportello (
Cesto raccoglierba (4) vuoto
Sportello (
Cesto raccoglierba (4) pieno
20) aperto:
D
20) chiuso:
D
Page 11

MTIT
F
Regolazione dell’altezza del
taglio
Spegnere l’apparecchio, staccare
la spina elettrica e attendere l’arresto della lama. Rischio di danni a
persone.
Il tagliaerba può essere regolato sulle seguenti altezze di taglio con tre variazioni
di posizione delle ruote anteriori e posteriori mediante regolazione ruota singola:
60 mm – altezza di taglio grande
40 mm – altezza di taglio media
20 mm – altezza di taglio piccola
1. Svitare le ruote (5).
2. Riavvitare le ruote (5) nella posizione desiderata. Tutte le ruote
devono essere regolate sulla
stessa altezza.
L’altezza di taglio corretta per un prato
decorativo corrisponde a circa 25 - 40
mm, per un prato calpestabile a circa 3060 mm.
Per il primo taglio della stagione si
consiglia di scegliere un’altezza di
taglio elevata.
Osservare la protezione antirumo-
re e le disposizioni locali.
Accensione e spegnimento
1. Inserire la spina del cavo di rete
nella presa di corrente (
manico (
2. Per lo scarico della trazione
formare con l’estremità del cavo
di rete un cappio e appenderlo
nel dispositivo di scarico della
trazione (11). Vedi gura .
3. Allacciare l’apparecchio alla tensione di rete.
1).
A
A
9) sul
4. Prima di procedere all’accensione, prestare attenzione che
l’apparecchio non tocchi oggetti.
5. Per accendere l’apparecchio,
premere il pulsante di sbloccaggio (10) sull’impugnatura
e contemporaneamente tenere
premuta la leva di avviamento
(12). Rilasciare il pulsante di
sbloccaggio (10).
6. Per spegnere l’apparecchio,
rilasciare la leva di avviamento
(12).
Dopo lo spegnimento dell’appa-
recchio la lama continua a girare
per alcuni secondi. Non toccare la
lama in movimento. Rischio di danni a persone.
Lavorare con il tagliaerba
Una tosatura regolare stimola la formazione rafforzata delle foglie e al contempo
provoca la distruzione dell’erbaccia. Per
questo motivo, dopo ogni intervento di
tosatura il prato diventa più tto e omogeneo.
Il primo taglio avviene circa a partire da
aprile con un’altezza di crescita di 70
- 80 mm. Nella stagione vegetativa prin-
cipale il prato deve essere tosato minimo
una volta a settimana.
• Iniziare a tosare nelle vicinanze della
presa e proseguire allontanandosi dalla stessa .
• Condurre la prolunga sempre dietro di
se e, dopo l’inversione, condurla sul
lato già tosato.
• Condurre l’apparecchio a passo
d’uomo eseguendo traiettoria più dritte
possibili. Per una tosatura perfetta, le
traiettorie dovrebbero sovrapporsi di
alcuni centimetri.
11
Page 12
IT
MT
• Regolare la profondità del taglio in
modo tale che l’apparecchio non venga sovraccaricato. In caso contrario si
rischia di danneggiare il motore.
• Sui pendii lavorare sempre trasversalmente. Prestare particolare attenzione
durante le manovre di retromarcia e
quando si tira l’apparecchio.
• Pulire l’apparecchio dopo ogni impiego come descritto nel capitolo „Pulizia,
manutenzione, stoccaggio“.
Dopo il lavoro e per il trasporto,
spegnere l’apparecchio, staccare
la spina di rete e attendere l’arresto
della lama. Rischio di danni a persone .
Pulizia/
manutenzione/
stoccaggio
Fare effettuare i lavori non descritti
nelle presenti istruzioni d’uso da
un centro di assistenza clienti da
noi autorizzato. Usare solo ricambi
originali
.
Indossare guanti quando si maneg-
gia la lama.
Prima di effettuare qualsiasi lavoro
di manutenzione o pulizia, spegnere l’apparecchio, staccare la spina
di rete e attendere l’arresto della
lama.
Rischio di danni a persone.
Lavori di pulizia e
manutenzione generali
Non spruzzare il tosaerba con ac-
qua.
• Tenere l’apparecchio sempre pulito. Per
la pulizia, usare una spazzola o un
panno senza detergenti o solventi.
• Rimuovere eventuali residui di piante
rimaste attaccate dopo la tosatura con
un pezzo di legno o di plastica dalle
ruote, dalle aperture di ventilazione,
all’apertura di espulsione dell’erba
e dalla zona della lama. Non usare
oggetti duri o appuntivi, possono danneggiare l’apparecchio.
• Controllare il tosaerba prima di ogni
uso per vericare la presenza di eventuali difetti evidenti, come parti allentate, usurate o danneggiate. Controllare
la corrette sede di tutti i dadi, bulloni e
viti.
• Controllare le coperture e i dispositivi
di sicurezza per vericare l’eventuale
presenza di danneggiamenti e la corretta sede. Eventualmente, provvedere
alla sostituzione.
Sostituzione lama
Se la lama è smussato, può essere aflata
da un’ofcina specializzata. Se la lama è
danneggiata o presenta uno sbilanciamento, deve essere sostituita (vedi capitolo
ricambi).
1. Capovolgere l’apparecchio.
I
2. Usare guanti resistenti e tenere
ferma la lama (18). Svitare la
vite della lama (17) in senso antiorario mediante un cacciavite
(apertura della chiave 13) dal
mandrino motore (19).
12
Page 13

MTIT
3. Rimontare la nuova lama nella
sequenza invertita. Prestare
attenzione che la lama sia posizionata correttamente e la vite
sia ben stretta.
Stoccaggio
• Conservare l’apparecchio in un luo-
go asciutto e fuori dalla portata di
bambini. Allentare i dadi ad alette e
ribaltare il manico, in modo tale che
l’apparecchio occupi meno spazio.
Assicurarsi che i cavi non siano schiacciati.
• Lasciare raffreddare il motore, prima
di riporre l’apparecchio in un ambiente
chiuso.
• Non avvolgere l’apparecchio nei
sacchi di nylon, in quanto potrebbe
formarsi umidità.
Decliniamo ogni responsabilità per danni
causati dai nostri apparecchi, qualora tali
danni siano dovuti ad una riparazione
non conforme o dall’impiego di ricambi
non originali o da un uso improprio
dell’apparecchio.
Smaltimento/Tutela
dell’ambiente
Effettuare lo smaltimento dell’apparecchio,
degli accessori e della confezione nel rispetto
dell’ambiente presso un punto di raccolta per
riciclaggio.
Le apparecchiature non devono
essere smaltite insieme ai riuti domestici.
Consegnare l’apparecchiatura presso un
centro di raccolta e recupero. Le parti plastiche e di metallo usate potranno essere
selezionate e avviate al recupero. Chiedere
informazioni a riguardo al nostro centro
assistenza clienti.
Pezzi di ricambio / Accessori
È possibile ordinare pezzi di ricambio e accessori all’indirizzo
www.grizzly-service.eu
Se non si dispone di una connessione Internet, contattare telefonicamente il centro di assistenza (vedere “Service-Center” a pag. 16). Tenere a portata di mano i numeri d’ordine
riportati in basso.
Lame di ricambio
Raccoglierba
I
18 ........................................................... 13700209
4 ................................................................... 91093478
A
13
Page 14
IT
MT
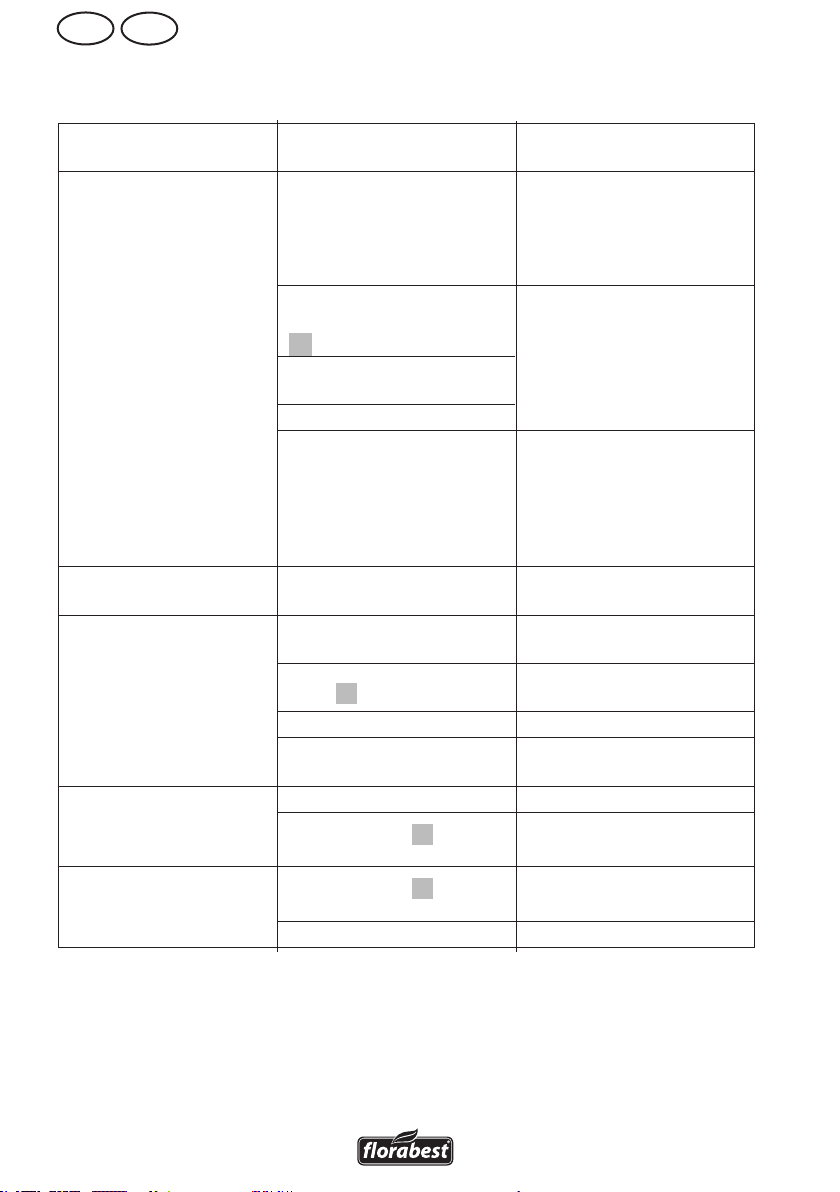
Ricerca guasti
Problema Possibile causa Rimedio
Controllare la presa, il
Tensione di rete
mancante
Interruttore di
accensione/spegnimento
A
(
L‘apparecchio non si
accende
Il motore si spegne Bloccaccio da parte di
Il risultato del lavoro
non è soddisfacente
oppure il motore è
lento
La lama non ruota
Rumori anormali,
battito o vibrazioni
12) difettoso
Spazzola di carbone
consumata
Motore difettoso
Erba troppo alta
corpi estranei
Altezza di taglio troppo
bassa
Lama (
Zona lama intasata Pulire l‘apparecchio
Lama montata in modo
errato
Lama bloccata dall‘erba Rimuovere l‘erba
Vite della lama (
allentata
Vite della lama (
allentata
Lama danneggiata Sostituire la lama
18) smussata
I
I
I
17)
17)
cavo, la conduttura, la
spina ed eventualmente
fare riparare da un
elettricista esperto
Riparazione da parte
del centro di assistenza
clienti
Impostare un‘altezza
di taglio superiore.
Sollevare leggermente
le ruote anteriori
(1) premendo
l‘impugnatura.
Rimuovere il corpo
estraneo
Impostare un‘altezza di
taglio inferiore
Fare arrotare o sostituire
la lama
Montare correttamente
la lama
Stringere la vite della
lama
Stringere la vite della
lama
14
Page 15

MTIT
Garanzia
Gentile cliente,
Su questo apparecchio Le viene concessa
una garanzia di 3 anni a partire dalla
data di acquisto.
In caso di difetti di questo prodotto può
avanzare diritti legali nei confronti del venditore del prodotto. Tali diritti legali non
vengono limitati dalla nostra garanzia qui
di seguito rappresentata.
Condizioni di garanzia
Il termine di garanzia inizia con la data
di acquisto. La preghiamo di conservare
in un luogo sicuro lo scontrino scale originale. Questo documento viene richiesto
come prova d’acquisto.
Qualora subentrasse un difetto di materiale o di fabbricazione entro tre anni a
partire dalla data di acquisto di questo
prodotto, il prodotto verrà riparato o sostituito – a nostra discrezione - gratuitamente
da noi. Questa prestazione di garanzia
presuppone che venga presentato entro il
termine di tre anni l’apparecchio difettoso
e la prova d’acquisto (scontrino scale)
e descritto brevemente per iscritto in che
cosa consiste il difetto e quando si è veri-
cato.
Se il difetto è coperto dalla nostra garanzia, riceverà il prodotto riparato oppure
un prodotto nuovo. Con la riparazione o
la sostituzione del prodotto non inizia un
nuovo periodo di garanzia.
Tempo di garanzia e diritti legali
per vizi della cosa
Il periodo di garanzia non viene prolungato. Questo vale anche per parti sostituite
e riparate. Difetti e vizi presenti già al momento dell’acquisto devono essere segnalati
immediatamente dopo la rimozione dall’imballaggio. Riparazioni che accorrono dopo
il periodo di garanzia sono a pagamento.
Volume di garanzia
L’apparecchio è stato prodotto accuratamente secondo severe direttive di qualità
e controllato con coscienza prima della
consegna.
La prestazione di garanzia vale per difetti
di materiale o di fabbricazione. Questa
garanzia non si estende ai componenti del
prodotto che sono soggetti a normale usura e che quindi possono essere visti come
parti di usura (p. es. ltri o inserti) oppure
per danneggiamenti delle parti fragili (p.
es. interruttori, accumulatori o elementi di
vetro).
Questa garanzia decade se il prodotto è
stato danneggiato, non usato correttamente o non manutenuto. Per un uso corretto
del prodotto devono essere osservate tutte
le indicazioni riportate nelle istruzioni per
l’uso. Destinazioni d’uso e azioni sconsigliate nelle istruzioni d’uso o dalle quali
si viene avvertiti, sono tassativamente da
evitare.
Il prodotto è destinato esclusivamente all’uso commerciale. In caso di uso improprio,
esercizio della forza e interventi non effettuati dalla nostra liale di assistenza tecnica autorizzata, decade la garanzia.
Svolgimento in caso di garanzia
Per garantire una rapida elaborazione della Sua pratica, La preghiamo di seguire le
seguenti indicazioni:
• per tutte le richieste tenere a portata
di mano lo scontrino scale e il codice
di identicazione (IAN 102969) come
prova d’acquisto.
• I codici articolo sono riportati sulla targhetta del tipo.
• Nel caso in cui si dovessero vericare
difetti funzionali o altri vizi, La preghiamo di contattare telefonicamente o per
e-mail. Riceverà ulteriori informazioni
sullo svolgimento del Suo reclamo.
15
Page 16

IT
MT
• Un prodotto rilevato come difettoso
può essere inviato con porto franco
all’indirizzo di assistenza comunicato,
previa consultazione del nostro servizio di assistenza tecnica, allegando
la prova d‘acquisto (scontrini scali)
e l’indicazione, in che cosa consiste
il difetto e quando si è vericato. Per
evitare problemi di accettazione e costi
aggiuntivi, usare tassativamente solo
l’indirizzo che Le è stato comunicato.
Assicurarsi che la spedizione non avvenga in porto assegnato, con merce
ingombrante, corriere espresso o altro
carico speciale. Spedire l’apparecchio
inclusi tutti gli accessori forniti insieme
al momento dell’acquisto e garantire
un imballaggio di trasporto sufcientemente sicuro.
Servizio di
riparazione
Riparazioni non soggette alla garanzia
possono essere effettuate dietro fattura dal-
la nostra liale di assistenza tecnica previo
preventivo gratuito da parte della stessa.
Possiamo lavorare solo apparecchi che
vengono spediti sufcientemente imballati
e affrancati.
Attenzione: Spedire l’apparecchio alla
nostra liale in condizioni pulite e con l’indicazione del difetto.
Apparecchi spediti in porto assegnato con merce ingombrante, corriere espresso
o altro carico speciale - non vengono
accettati.
Lo smaltimento degli apparecchi difettosi
spediti viene effettuato da noi gratuitamente.
Service-Center
Assistenza Italia
IT
Tel.: 02 36003201
E-Mail: grizzly@lidl.it
IAN 102969
Assistenza Malta
MT
Tel.: 80062230
E-Mail: grizzly@lidl.com.mt
IAN 102969
Importatore
Non dimenticare che il seguente indirizzo
non è un indirizzo di assistenza tecnica.
Contattare prima di tutto il centro di assistenza tecnica sopra nominato.
Grizzly Tools GmbH & Co. KG
Stockstädter Straße 20
63762 Großostheim
Germania
www.grizzly-service.eu
16
Page 17

PT
Índice
Introdução .................................17
Utilização ...................................17
Descrição geral ..........................18
Volume de fornecimento .................. 18
Vista de conjunto ........................... 18
Descrição de funcionamento ...........18
Dados técnicos ...........................18
Medidas de segurança ............... 19
Símbolos no aparelho ..................... 19
Medidas de segurança gerais ........ 20
Montagem .................................23
Montagem do punho em arco .........23
Montagem do saco de recolha
de relva ........................................23
Operação ...................................23
Como pôr/remover o saco de
recolha de relva .............................23
Regulação da altura de corte ..........24
Como ligar e desligar ....................24
Execução de serviços com a
máquina de cortar relva .................24
Limpeza/Manutenção/
Armazenamento ........................25
Serviços gerais de limpeza e
de manutenção .............................. 25
Substituição das lâminas .................25
Armazenamento ............................26
Eliminação/Protecção
do ambiente ..............................26
Peças sobressalentes /
Acessórios ..................................26
Localização de avarias ...............27
Garantia .................................... 28
Serviço de reparação .................29
Service-Center ............................29
Importador ................................29
Tradução do original da
Declaração de conformidade CE ... 56
Designação de explosão ................61
Introdução
Parabéns pela compra do seu novo aparelho.
Com a sua compra, decidiu-se por um
produto de alta qualidade. O manual de
instruções é uma parte integrante deste
artigo. Ele contém indicações importantes referentes à segurança, utilização e
eliminação. Familiarize-se com todas as
indicações de utilização e de segurança
do artigo. Utilize este artigo da forma que
é descrita e apenas para as nalidades
indicadas.
Guarde bem o manual e, se transmitir o
artigo a terceiros, entregue também todos
os respetivos documentos.
Utilização
O aparelho destina-se unicamente para
cortar superfícies de relva e grama em áreas domésticas.
Qualquer outra utilização não autorizada
especicamente neste manual pode causar
danos ao aparelho e representar um risco
grave para o utilizador.
O aparelho foi concebido para ser utilizado por adultos. Crianças e pessoas não
familiarizadas com este manual de serviço
não devem utilizar o aparelho. É proibido
utilizar o aparelho sob a chuva ou em ambientes húmidos.
O fabricante não se responsabiliza por
danos causados pela utilização fora das
especicações ou pelo manuseio incorrecto do aparelho.
Este aparelho não é adequado para uso
comercial.
A garantia é anulada em caso de utiliza-
ção para ns comerciais.
17
Page 18

PT
A
B
C
D
Descrição geral
Volume de fornecimento
Retirar cuidadosamente o aparelho da
embalagem e vericar a presença das seguintes peças:
- Máquina de cortar relva e punho em
arco com
cabo de ligação
- Haste inferior
- Cesto de recolha de relva (três peças)
- 2 parafusos para a xação da haste
- 2 porcas de orelhas e parafusos para
xação do punho em arco
- 2 apoios para xação do cabo de
ligação
- Rodas
Vista de conjunto
1 Punho em arco
2 Porcas de orelhas
3 Haste inferior
4 Saco de recolha de relva
5 Rodas
5.1 Prensa-cabos
6 Caixa do cortador de relva
7 Protector contra choques
8 Braçadeira para cabos
9 Tomada para cabo de rede
10 Botão de desbloqueio
11 Alavanca de arranque
13 Lidar com parafusos de xação
14 Punho de ferro parafusos de
xação
15 Aperto de mão
16 cesto recolhedor de grama da
parte superior
20 Indicador de nível
17 Parafuso da lâmina
I
18 Faca
19 Eixo do motor
Descrição do funcionamento
A máquina de cortar relva eléctrica possui
uma ferramenta de corte que gira paralelamente ao plano de corte. Ela está
equipada com um motor eléctrico de alta
potência, um invólucro plástico robusto,
um interruptor de segurança, um protector
contra choques e um saco de recolha de
relva. Para além disso, o aparelho pode
ser regulado em 3 alturas e possui rodas
de movimento fácil.
Para obter informações acerca do funcionamento das unidades de comando, é favor consultar as indicações dadas a seguir.
Dados técnicos
Máquina de cortar relva eléctrica
.................................FRM 1200 D3
Potência de entrada do motor .....1200 W
Tensão de rede 220 V-240 V~, 50/60 Hz
o
N
de rotações-marcha em vazio
(n
) .......................................3350 min
0
Largura da lâmina .............. aprox. 31 cm
Altura de corte .............20 / 40 / 60 mm
Classe de protecção ..........................
Tipo de protecção .......................... IP 24
Peso ...........................................8,2 kg
Volume do cesto de recolha de relva ..30 l
Nível de intensidade sonora
(L
) ................. 84 dB (A); KpA = 3 dB (A)
pA
Nível de potência sonora (garantida)
..............................................96 dB (A)
Nível de potência sonora (medida) .........
(L
) ................94 dB (A); KwA = 2 dB (A)
WA
Vibração no manípulo ...........................
(a
) .......................2,1 m/s2; K=1,5 m/s²
h
O valor de emissão de vibrações indicado
foi medido através de um método de ensaio normalizado e pode ser usado para
comparar uma ferramenta eléctrica com
outra.
O valor de emissão de vibrações indicado
também pode ser usado para uma primeira avaliação da exposição.
II
-1
18
Page 19
PT
Aviso:
Durante a utilização real da ferramenta
eléctrica, o valor de emissão de vibrações
pode divergir do valor indicado, dependendo da forma como a ferramenta eléctrica for utilizada.
É necessário determinar medidas de segurança para proteger o utilizador com
base numa avaliação da exposição em
condições reais de utilização (deverão
ser ponderadas todas as componentes do
ciclo de funcionamento, por exemplo, os
períodos durante os quais a ferramenta
eléctrica está desligada e também os
períodos em que está ligada, mas a trabalhar em vazio).
Os valores do ruído e das vibrações são
determinados de acordo com as normas e
as directivas indicadas na Declaração de
Conformidade.
Reservamo-nos o direito de executar alterações técnicas ou no design do aparelho ao
longo do desenvolvimento posterior sem
aviso prévio. Portanto, não nos responsabilizamos pelas dimensões, indicações e dados indicados neste manual de instruções
de serviço. Desta maneira, exceptuam-se
todos os direitos de reivindicação com
base no manual de instruções de serviço.
Medidas de segurança
Este capítulo trata das indicações básicas
de segurança a serem observadas durante
a execução de serviços com a máquina de
cortar relva eléctrica.
Símbolos no aparelho
Atenção!
Ler cuidadosamente o manual de
instruções de serviço.
Não expor o aparelho à humida-
de. Não trabalhar sob a chuva e
não cortar a relva se ela estiver
molhada.
Perigo de ferimentos causados
por objectos ejectados.
Outras pessoas presentes no local
devem ser mantidas afastadas da
máquina de cortar relva.
Cuidado - Lâminas de corte aa-
das! Manter os pés e as mãos
afastados. Perigo de lesão!
Desligar o motor e retirar a cha
da tomada de rede antes de
executar serviços de ajuste e de
limpeza ou quando o cabo de
ligação à rede estiver enroscado
ou danicado.
Perigo se o cabo de rede estiver
danicado.
Manter o cabo de rede afastado
do aparelho e da lâmina de corte!
Atenção!
Movimento das lâminas por
inércia.
Usar óculos de protecção e protec-
tor de ouvidos.
Indicação do nível de potência
sonora L
Classe de protecção II
Não deitar aparelhos eléctricos
em dB.
wa
no lixo doméstico.
310
Diâmetro de corte
19
Page 20
PT
Medidas de segurança gerais
Este aparelho pode causar ferimen-
tos graves se não for utilizado da
maneira apropriada. Para evitar
danos físicos e materiais, é favor
ler e obedecer às indicações de
segurança dadas a seguir, assim
com familiarizar-se com todas as
unidades de comando.
Preparação:
• Este aparelho não deve ser utilizado por
pessoas (inclusive crianças) com deciências físicas, sensoriais ou mentais, ou
com pouca experiência e/ou falta de
conhecimento, excepto quando for supervisionado por um encarregado pela
sua segurança ou quando receber dele
instruções especícas de como usá-lo.
• Nunca permita a crianças ou outras
pessoas que não conheçam o manual
de serviço utilizar o aparelho. Regulamentos locais podem especicar a idade mínima do operador do aparelho.
• Não utilizar o aparelho quando pesso-
as, nomeadamente crianças, e animais
estiverem próximo a ele.
• Cuidar das crianças para assegurar
que elas não brinquem com o aparelho.
• O operador ou o utilizador respon-
sabiliza-se por acidentes e danos
causados a outras pessoas ou às suas
propriedades.
• Controlar a zona onde o aparelho
será utilizado e remover pedras, pe-
daços de pau, os e outros corpos
estranhos que podem ser apanhados e
arremessados pelo aparelho.
• Usar roupa de trabalho apropriada,
como calçados resistentes com sola
antiderrapante e uma calça comprida
e robusta. Não utilizar o aparelho se
estiver descalço ou com sandálias.
• Fazer sempre uma inspecção visual no
aparelho antes de usá-lo. Não utilizar
o aparelho se houver dispositivos de
segurança (p. ex. protector contra
choques ou saco de recolha de relva),
partes do dispositivo de corte ou pinos
ausentes, gastos ou avariados. Para
evitar o desequilíbrio, as ferramentas
danicadas devem ser substituídas em
conjunto.
• Tomar cuidado especial com os aparelhos com diversos dispositivos de
corte, pois o movimento de uma lâmina pode causar a rotação das outras
lâminas.
• Utilizar unicamente peças sobressalentes e acessórios que foram fornecidos
ou recomendados pelo fabricante. O
emprego de peças de terceiros implica
a perda imediata da reivindicação de
garantia.
Execução de serviços com o aparelho:
Durante a execução dos serviços,
não pôr os pés nem as mãos perto
ou em baixo das partes giratórias.
Perigo de lesão!
Ter em atenção as regras de
protecção contra ruídos e os regulamentos locais. A utilização do
aparelho em determinados dias (p.
ex. domingos e feriados), durante
certos horários (meio-dia, à noite)
ou em certos locais (p. ex. estâncias termais, clínicas, etc.) pode
estar limitada ou proibida.
• Ligar o motor de acordo com as instruções e somente quando os seus pés
estiverem a uma distância segura dos
dispositivos de corte.
• Não utilizar o aparelho sob a chuva,
mau tempo, em sítios húmidos ou
sobre a relva molhada. Trabalhar
somente durante o dia ou sob boas
condições de iluminação.
20
Page 21

PT
• Não trabalhar com o aparelho se estiver cansado ou não concentrado no
serviço, nem após ter ingerido álcool
ou medicamentos. Fazer sempre uma
pausa de tempo apropriado durante
o serviço. Trabalhar sempre com bom
senso.
• Certicar-se de que se encontra numa
posição segura, nomeadamente se
estiver a trabalhar em declives. Trabalhar sempre transversalmente ao
declive, nunca voltado para cima nem
para baixo. Tomar cuidado especial
ao mudar de posição no declive. Não
trabalhar em declives acentuados de
mais.
• Utilizar o aparelho somente à velocidade do passo. Tomar cuidado principalmente ao virar, puxar para frente
ou recuar o aparelho.
• Ligar cuidadosamente o aparelho de
acordo com as indicações dadas neste
manual. Cuidar para que haja uma
distância suciente entre os pés e as
lâminas giratórias do aparelho.
• Não virar o aparelho ao ligá-lo, a menos que isso seja necessário quando
for arrancá-lo sobre uma relva alta.
Neste caso, erguer o aparelho pressionando a haste do manípulo de maneira que as rodas da frente do aparelho
quem levemente erguidas. Cuidar
para que as duas mãos estejam sempre na posição de trabalho antes de
abaixar o aparelho novamente ao
chão.
• Nunca trabalhar sem o saco de recolha de relva ou sem o protector contra
choques. Manter-se sempre afastado
da abertura de ejecção.
Atenção, perigo! A lâmina conti-
nua a girar.
Perigo de lesão.
• O aparelho não deve ser levantado
ou transportado enquanto o motor
estiver a funcionar. Desligar o aparelho quando tiver de virá-lo para poder
transportá-lo, quando for atravessar
outras superfícies que não sejam de
relva e quando tiver de transportar o
aparelho até ao/de volta do sítio onde
a relva tem de ser cortada.
• Manter a abertura de ejecção da relva
sempre limpa e desimpedida. Eliminar
os resíduos de corte somente com o
aparelho desligado.
• Nunca deixar o aparelho sem vigilância no local de serviço.
• Não trabalhar com um aparelho avariado, incompleto ou que tenha sido
modicado sem a autorização do
fabricante. Nunca utilizar o aparelho
se os dispositivos de segurança e as
protecções estiverem danicados ou se
os dispositivos de segurança, p. ex. os
deectores e os dispositivos de recolha
de relva estiverem ausentes.
• Não sobrecarregar o aparelho. Trabalhar somente no intervalo de potência
admitido e não alterar os ajustes
do regulador no motor. Não utilizar
máquinas de baixa potência para executar serviços pesados. Não utilizar o
aparelho para executar serviços para
os quais ele não está autorizado.
• Não utilizar o aparelho nas proximida-
des de líquidos ou gases inamáveis.
A inobservância desta regra representa riscos de incêndio ou de explosão.
• Nunca levantar nem transportar o aparelho com o motor em funcionamento.
• Desligar o aparelho e retirar a cha
da tomada:
- sempre que deixar o aparelho sem
vigilância,
- antes de limpar a abertura de ejecção ou remover bloqueios,
- quando o aparelho não for utilizado,
- antes de controlar, limpar ou executar serviços no aparelho,
- quando o cabo de ligação à rede
21
Page 22

PT
estiver danicado ou emaranhado,
- quando, durante o serviço, o aparelho tiver entrado em contacto com
objectos estranhos ou quando houver vibrações anormais. Neste caso,
inspeccionar o aparelho quanto à
presença de avarias e, se for necessário, solicitar a sua reparação.
• Nunca aproximar as mãos ou os pés
das partes móveis do aparelho, nem
colocá-los debaixo das mesmas. Nunca car em frente à abertura de ejecção da relva ao cortá-la com a foice.
Manutenção e armazenamento:
• Cuidar para que todas as porcas,
os pinos e os parafusos estejam bem
apertados e que o aparelho esteja
num estado seguro de
funcionamento.
• Não tentar reparar o aparelho por
conta própria, a menos que possua
formação especíca para tal. Todos
os serviços que não se encontram indicados neste manual de instruções só
devem ser executados por nós ou por
um centro de assistência técnica por
nós autorizado.
• Manter o aparelho num sítio seco e
fora do alcance das crianças.
• Manusear cuidadosamente o apare-
lho. Manter as ferramentas aadas e
limpas a m de poder trabalhar de
maneira melhor e mais segura. Observar os regulamentos de manutenção.
• Usar luvas de protecção quando for
substituir o dispositivo de corte.
• Controlar regularmente o dispositivo
de recolha de relva quanto à presença
de desgaste e deformações. Por motivos de segurança, substituir as peças
com desgaste ou avariadas. Tomar cuidado especial quando for substituir as
lâminas para que os seus dedos não
quem presos entre as lâminas móveis
e as partes xas da máquina.
• Certicar-se de que somente sejam
usadas ferramentas de corte sobressalentes autorizadas pelo fabricante.
Segurança eléctrica:
• Cuidar para que a tensão de rede
coincida com as indicações dadas na
placa de características do aparelho.
• Se for possível, ligar o aparelho somente numa tomada com um disjuntor
de corrente de avaria (RCD) com uma
corrente de activação não superior a
30 mA.
• Evitar o contacto do corpo com partes
ligadas à terra (p. ex. cercas de metal,
postes de metal).
• Utilizar somente cabos de rede autorizados do tipo H05VV-F ou H05RN-F,
que tenham, no máximo, 75 m de
comprimento e que estejam autorizados para uso ao ar livre. A secção
transversal do cordão do cabo de rede
deve ser de, no mínimo,
2,5 mm
tambor de cabos antes de usar o aparelho. Controlar se o cabo não apresenta avarias.
• Para xar o cabo de rede, utilizar a
suspensão do cabo prevista para isso.
• Durante a execução dos serviços,
manter o cabo de rede afastado das
ferramentas de corte. As lâminas de
corte podem danicar o cabo de rede
e causar o contacto com peças condutoras de electricidade. Segurar o cabo
de rede sempre atrás do operador do
aparelho.
• Não utilizar o cabo de rede para puxar a cha da tomada da rede. Proteger o cabo de rede contra a acção do
calor, óleo e bordas aadas.
• Desligar o aparelho e retirar a cha
da tomada quando o cabo de rede
estiver danicado. Neste caso, para
evitar riscos, ele deve ser substituído
pelo fabricante, por um serviço de as-
2
. Desenrolar totalmente o
22
Page 23

PT
B
C
D
E
sistência técnica por ele autorizado ou
por um técnico qualicado para tal.
• Não ligar nenhum cabo de rede da-
nicado à rede eléctrica. Não tocar
em cabos de rede avariados enquanto
eles estiverem ligados à rede eléctrica. Ao ser tocado, um cabo de rede
avariado pode descarregar corrente
eléctrica.
Montagem
Retirar a cha da rede eléctrica
sempre antes de executar serviços
no aparelho. Caso contrário, há
perigo de lesões físicas.
Montagem do punho em arco
1. Encaixar a haste inferior (3) no
assento da caixa do cortador de
relva (6).
2. Fixar a haste (3) com os
parafusos em anexo (13).
3. Aparafuse as quatro rodas (5)
ao chassis do corta-relva (6).
Todas as rodas deverão estar
colocadas à mesma altura.
4. Fixar o punho em arco (1) com
os parafusos em anexo (14) e
as porcas de orelha (2) na haste
inferior (3).
Duas posições são possíveis.
5. Pôr a braçadeira para cabos (8)
na haste (3) e usá-la para prender o cabo.
Se soltar as duas porcas de orelha,
poderá abaixar o punho em arco
quando for guardar o aparelho.
Durante este processo, cuidar para
que o cabo de rede não que entalado.
Montagem do saco de recolha de relva
1. Encaixar do saco de recolha
(16).
2. Encaixar do manipulo (15) o
saco de recolha (16).
Não se pode trabalhar com o cor-
ta-relva sem o para-choques montado. Existe perigo de ferimentos.
Recomendamos que trabalhe sem-
pre com o cesto de recolha da
relva montado no corta-relva. Caso
contrário, os resultados do corte
de relva poderão ser visivelmente
afetados..
Operação
Como pôr/remover o saco de
recolha de relva
1. Para pendurar o saco de recolha
de relva (4), levantar o protector
contra choques (7) e pendurar
o saco de recolha de relva (4).
Dobrar o protector contra choques (7) sobre o saco de recolha
de relva (4). Ele mantém o saco
de recolha de relva na posição
correcta.
2. Para remover o saco de recolha
de relva (4), levantar o protector
contra choques (7) e retirar o
saco de recolha de relva (4).
Dobrar novamente o protector
contra choques (7) na caixa do
cortador de relva.
23
Page 24

PT
F
Regulação da altura de corte
Desligar o aparelho, retirar a cha
da rede eléctrica e esperar as lâminas pararem de girar. Perigo de
lesões físicas.
Através das três posições ajustáveis nas
rodas dianteiras e do ajuste individual nas
rodas traseiras, o corta-relva pode ajustado para as seguintes alturas de corte:
60 mm - altura elevada de corte
40 mm - altura intermédia de corte
20 mm - altura baixa de corte
1. Desaparafuse as rodas (5)..
2. Aparafuse as rodas (5) novamente na posição desejada.
Todas as rodas deverão estar
colocadas à mesma altura.
Numa relva decorativa, a altura correcta
de corte é de aprox. 25 - 40 mm; numa
relva para outra utilidade, aprox. 30 60 mm.
Deverá seleccionar uma altura de
corte elevada aquando do primeiro
corte realizado na estação.
Ter em atenção as regras relativas
à protecção sonora e os regulamentos locais.
Como ligar e desligar
1. Enar a cha do cabo de rede
na tomada (
punho em arco (
2. Fazer um laço a partir da extre-
midade do cabo de rede a m
de aliviar a tracção e pendurá-lo
no protector de tracção do cabo
(11). Comparar com a gura
.
A
9) existente no
1).
A
3. Ligar o aparelho à tensão de
rede.
4. Antes de ligar, certicar-se de
que o aparelho não se encontre
em contacto com nenhum objecto.
5. Para ligar, premir o botão de
desbloqueio (10) existente no
manípulo e, ao mesmo tempo,
manter premida a alavanca de
arranque (12). Soltar o botão de
desbloqueio (10).
6. Para desligar, soltar a alavanca
de arranque (12).
Após desligar o aparelho, a lâmina
continua a girar durante alguns
segundos. Não tocar na lâmina em
movimento. Perigo de lesões físicas.
Execução de serviços com a
máquina de cortar relva
O corte regular da relva reforça a formação das folhas das gramíneas e, ao
mesmo tempo, denha as ervas daninhas.
Assim, a relva torna-se mais densa após
cada corte e obtém-se uma relva que
suporta cargas de maneira mais homogénea.
O primeiro corte deve ser feito por volta
de Abril quando a altura da relva tiver
atingido 70 - 80 mm. No período de crescimento principal, pode-se cortar a relva,
pelo menos, uma vez por semana.
• Iniciar o corte na zona próxima à to-
mada e trabalhar afastando-se dela.
• Levar o cabo de extensão sempre atrás
de si e colocá-lo sobre a zona já cortada ao virar.
• Conduzir o aparelho à velocidade de
passo em faixas de corte as mais rectas possíveis. Para obter um corte sem
falhas, as faixas de corte devem sempre se sobrepor alguns centímetros.
24
Page 25

PT
• Regular a profundidade de corte de
maneira a não sobrecarregar o aparelho. Caso contrário, o motor pode ser
danicado.
• Trabalhar sempre numa posição transversal em relação ao declive. Tomar
muito cuidado ao andar para trás e
quando for puxar o aparelho.
• Limpar o aparelho sempre após usá-lo
de acordo com as indicações dadas
no capítulo „Limpeza, manutenção e
armazenamento“.
Desligar o aparelho após a execu-
ção do serviço e para transportá-lo,
retirar a cha da rede eléctrica e
aguardar a parada da lâmina de
corte. Perigo de lesões físicas.
Limpeza/
Manutenção/
Armazenamento
Solicitar a execução dos serviços
não indicados neste manual de
instruções a um centro de assistência à clientela por nós autorizado.
Utilizar unicamente peças originais.
Usar luvas ao manusear a lâmina.
Desligar o aparelho antes de exe-
cutar qualquer serviço de manutenção e de limpeza no aparelho,
retirar a cha da rede eléctrica e
aguardar a parada da lâmina de
corte. Perigo de lesões físicas.
Serviços gerais de limpeza e
de manutenção
Não lavar a máquina de cortar rel-
va com uma mangueira.
• Manter o aparelho sempre limpo. Para
a limpeza, utilizar uma escova ou um
pano, mas não usar solventes nem produtos de limpeza.
• Após o corte da relva, remover os
restos de plantas retidos nas rodas,
nas aberturas de ventilação, na abertura de ejecção e na zona da lâmina
usando um objecto em plástico ou
madeira. Não utilizar objectos duros
ou pontiagudos, pois eles podem dani-
car o aparelho.
• Lubricar as rodas de vez em quando.
• Controlar a máquina de cortar relva
sempre antes de utilizá-la quanto à
presença de avarias evidentes, tais
como peças soltas, gastas ou ava-
riadas. Vericar se todas as porcas,
pinos e parafusos estão apertados.
• Vericar se as coberturas e os dispositivos de protecção se encontram
porventura danicados e estão na posição correcta. Se for necessário, fazer
a substituição dos mesmos.
Substituição das lâminas
Se a lâmina estiver romba, ela poderá ser
aada numa ocina especializada. Se a
lâmina estiver danicada ou apresentar
um desequilíbrio, ela terá de ser substituída (consultar o capítulo acerca das peças
sobressalentes).
1. Virar o aparelho.
I
2. Usar luvas resistentes e manter a
lâmina xa (18). Girar o parafuso da lâmina (17) no sentido
inverso ao dos ponteiros do relógio com a ajuda de uma chave
de parafusos (chave de abertura
13) para fora do eixo do motor
(19).
3. Montar a nova lâmina na se-
quência inversa. Ter em conta
a posição correcta da lâmina e
certicar-se de que os parafusos
estejam bem apertados.
25
Page 26

PT
Armazenamento
Eliminação/Protecção
do ambiente
• Manter o aparelho seco e fora do
alcance das crianças. Soltar as porcas
de orelha e dobrar a haste do punho
para que o aparelho ocupe menos
espaço. Neste processo, os cabos não
devem car entalados.
• Deixar o motor arrefecer antes de
guardar o aparelho num local fechado.
• Não embrulhar o aparelho num saco
de nylon, pois pode haver acumulação
de humidade.
Não nos responsabilizamos por danos
causados pelos nossos aparelhos se eles
forem devidos à reparação incorrecta ou
à utilização de peças não originais e ao
emprego do aparelho fora das especicações.
Levar aparelhos, acessórios e embalagens
a uma reciclagem que não polua com o
meio ambiente.
Aparelhos eléctricos não pertencem
ao lixo doméstico.
Entregar o aparelho para um posto
de reciclagem. As peças de material
plástico e metálicas utilizadas podem ser
separadas por tipo e, assim, entregues
para reciclagem. Consultar, quanto a isso,
o nosso Service-Center.
Peças sobressalentes / Acessórios
Pode obter as peças de reposição e os acessórios em
www.grizzly-service.eu
Caso não tenha internet entre em contacto, por telefone, com o centro de assistência
(ver “Sercice-Center “ página 29). Mantenha os números de encomenda, em baixo
mencionados, disponíveis.
Lâmina sobressalente
Saco de recolha de relva
I
18 ..................................................... 13700209
4 .................................................. 91093478
A
26
Page 27

Localização de avarias
Problema Causa possível Correcção da avaria
Vericar a tomada, o
cabo, a linha eléctrica
Não há tensão de rede.
O aparelho não
arranca.
Falha do motor. Bloqueio causado por
Resultado de corte
insatisfatório ou o
motor trabalha com
diculdade.
A lâmina não gira.
Ruídos, chocalhos ou
vibrações anormais.
Alavanca de arranque
(
12) com defeito.
A
Escovas de carvão
gastas.
Motor com defeito.
Relva longa de mais.
corpos estranhos.
Altura de corte baixa de
mais.
Lâmina (
Zona da lâmina
obstruída.
Lâmina montada de
maneira incorrecta
Lâmina bloqueada pela
relva.
Parafuso da lâmina
I
(
Parafuso da lâmina
I
(
Lâmina avariada. Substituir a lâmina.
I
18) romba.
17) frouxo.
17) frouxo.
e a cha e, se for
necessário, solicitar
a reparação a um
electricista.
Reparação pelo centro
de assistência à clientela.
Regular uma altura de
corte maior. Levantar
um pouco as rodas
dianteiras premindo a
haste do punho (1)
Remover os corpos
estranhos.
Regular uma altura de
corte.
Aar ou substituir a
lâmina.
Limpar o aparelho.
Montar correctamente a
lâmina.
Remover a relva.
Apertar o parafuso da
lâmina.
Apertar o parafuso da
lâmina.
PT
27
Page 28

PT
Garantia
Prezada cliente, prezado cliente,
Este aparelho tem uma garantia de 3 anos
a contar a partir da data da compra.
Em caso de deciências vericadas neste
produto, estão à sua disposição direitos
legais face ao vendedor. Estes direitos legais não são restritos pela nossa garantia
a seguir descrita.
Termos de garantia
O período de garantia começa a contar
da data da compra. Mantenha guardado
o talão de compra original. Esse documento é exigido como comprovativo de
compra.
Se no decorrer de três anos a partir da
data de aquisição deste produto, ocorrer
uma falha de material ou defeito de fabrico, o produto será substituído ou reparado
gratuitamente, de acordo com a nossa
escolha. Esta garantia exige que o dispositivo defeituoso e o talão de compra (recibo) sejam apresentados no decorrer de um
prazo de três anos e que seja brevemente
descrito por escrito, qual o defeito e quando é que ele ocorreu.
Se o defeito for coberto pela nossa garantia é coberta, receberá de volta o produto
reparado ou um novo produto. Com a
reparação ou substituição do produto
não é iniciado nenhum novo período de
garantia.
Período de garantia e reclamações
legais por defeitos
O período de garantia não é prolongado
pela prestação de garantia. Isto também
se aplica às peças substituídas e reparadas. Quaisquer danos e defeitos eventual-
mente existentes vericados na altura da
compra deverão ser comunicados imediatamente após se ter desembalado o produto. Após decorrido o período de garantia,
as reparações necessárias estão sujeitas a
pagamento.
Âmbito da garantia
O aparelho foi cuidadosamente produzido
de acordo com diretivas de qualidade
rigorosas e devidamente testado antes da
entrega.
A prestação de garantia aplica-se a falhas
de material ou defeitos de fabrico. Esta garantia não cobre os componentes do produto que estão sujeitos a desgaste normal
e que são portanto consideradas como
peças de desgaste (por exemplo, ltros
ou ensaios), nem os danos causados nas
partes frágeis (por exemplo, interruptores,
baterias recarregáveis ou as peças feitas
em vidro).
Esta garantia caduca, se o produto for da-
nicado ou se não for devidamente usado
ou conservado. Para uma correta utilização do produto, deverão ser cumpridas todas as indicações descritas no manual de
instruções. Deverão ser impreterivelmente
evitados os usos e as ações desaconselhados no manual de instruções, ou para os
quais são feitas advertências.
Este produto foi concebido unicamente
para uso privado e não é indicado para
uso comercial. A garantia é anulada em
caso de uso abusivo e inadequado, do
uso de força, e em caso de intervenções
que não tenham sido realizadas pela nossa estação de serviço autorizada.
Procedimento em caso de reclamação de garantia
Para assegurar um processamento rápido
da sua reclamação, siga por favor as seguintes instruções:
• Mantenha à mão o talão de compra
e o número do artigo (IAN 102969),
como comprovativo da compra.
• Pode consultar o número do artigo na
placa de identicação.
• Se ocorrerem erros na funcionalidade
ou outros defeitos, contate imediatamente por telefone ou e-mail o
departamento de serviços a seguir
28
Page 29

PT
designado. Receberá informações adicionais acerca do processamento da
sua reclamação.
• Após consulta do nosso serviço de
atendimento a clientes, pode enviarnos um produto defeituoso com despesas de envio gratuitas para si, mediante a anexação do talão de compra
(recibo) e indicando onde e quando
surgiu o defeito, para o endereço de
serviço que lhe for comunicado. Para
evitar problemas de receção e custos
adicionais, use apenas o endereço
que lhe for comunicado. Certique-se
de que o envio não foi enviado livre
de franquia, através de serviço de
transporte de mercadorias pesadas,
serviço de envio expresso, ou qualquer
outro serviço de envio especial. Envie
o aparelho incluindo todas as peças
acessórias fornecidas aquando efetuada a compra e use uma embalagem
de transporte sucientemente segura.
Serviço de reparação
As reparações que não sejam abrangidas
pela garantia podem ser efetuadas pelo
nosso centro de serviço, mediante faturação. Ele apresentar-lhe-á de bom grado
um orçamento dos custos.
Podemos reparar apenas os aparelhos que
tenham sido devidamente embalados e
enviados com franquia suciente.
Atenção: Por favor, envie o seu aparelho
limpo e mediante referência da falha ou
defeito para a nossa sucursal de serviços.
Não serão aceites máquinas ou aparelhos
não franqueados, devolvidos como mercadorias volumosas, ou através de serviços
postais por expresso ou especiais.
Efetuamos gratuitamente a eliminação das
suas máquinas defeituosas enviadas.
Service-Center
Assistência Portugal
Tel.: 70778 0005 (0,12 EUR/Min.)
E-Mail: grizzly@lidl.pt
IAN 102969
Importador
Tenha em conta que o endereço seguinte
não é nenhum endereço de serviço. Entre
em contacto com o centro de atendimento
acima referido.
Grizzly Tools GmbH & Co. KG
Stockstädter Straße 20
63762 Großostheim
Alemanha
www.grizzly-service.eu
29
Page 30

GB
MT
Contents
Introduction ...............................30
Intended purpose .......................30
General description ....................31
Scope of delivery .........................31
Overview ....................................31
Functional description ...................31
Technical specications ...............31
Safety precautions .....................32
Pictorial Diagrams on the Equipment 32
General notes on safety ................32
Assembly ...................................35
Assembling the Curved Handle ........35
Assembling the Grass Box ...............35
Operation ..................................36
Hanging On / Removing
the Grass Box ................................36
Adjusting the Cut Height .................36
Switching On and Off ....................36
Working with the Lawnmower .........36
Cleaning, Maintenance
and Storage ...............................37
General Cleaning and Maintenance
Work ............................................37
Changing the Blade .......................37
Storage.........................................38
Disposal/Environmental
Protection ..................................38
Replacement parts / Accessories 38
Trouble shooting ........................39
Guarantee .................................40
Repair Service ............................41
Service-Center ............................41
Importer ....................................41
Translation of the original
EC declaration of conformity ......57
Exploded Drawing .....................61
Introduction
Congratulations on the purchase of your
new device. With it, you have chosen a
high quality product.
During production, this equipment has
been checked for quality and subjected
to a nal inspection. The functionality of
your equipment is therefore guaranteed. It
cannot be ruled out that residual quantities
of water or lubricants will remain on or in
the equipment/hose lines in isolated cases.
This is not a fault or defect and it represents no cause for concern.
The operating instructions constitute part of
this product. They contain important information on safety, use and disposal.
Before using the product, familiarise yourself with all of the operating and safety
instructions. Use the product only as de-
scribed and for the applications specied.
Keep this manual safely and in the event
that the product is passed on, hand over
all documents to the third party.
Intended purpose
The equipment is designed only for mowing domestic lawns and grass areas.
Any other use that is not expressly permitted in these instructions may result in
damage to the equipment and represent a
serious risk to the user.
The equipment is intended for use by
adults. It is not to be used by children or
people who are unfamiliar with these instructions. The use of the equipment is prohibited in the rain or a damp environment.
The manufacturer will not be liable for
damages caused by use other than for the
intended purpose or by incorrect operation.
This equipment is not suitable for commercial use. Commercial use will invalidate the
guarantee.
30
Page 31

MTGB
A
B
C
D
General Description
Scope of Delivery
Carefully remove the equipment from the
packaging and check whether the following parts are complete:
- Lawnmower and curved handle with
connection cable
- Lower bar
- Lawn box (in three parts)
- 2 screws to attach the bar
- 2 wing nuts and screws for attaching
the curved handle
- 2 holders to attach the
connection cable
- Wheels
- Translation of the original instructions
for use
Overview
1 Curved handle
2 Wing nuts
3 Lower bar
4 Grass box
5 Wheels
5.1 Fittings
6 Lawnmower housing
7 Collision guard
8 Cable holder
9 Power cable outlet
10 Release button
11 Start lever
Function Description
The electric lawnmower has a cutting tool,
which turns parallel to the cutting level. It is
equipped with a high performance electric
motor, robust plastic housing, safety switch,
collision guard, and grass box. Additionally, the equipment is height adjustable
to three levels and has smooth-running
wheels.
For the function of the operating parts,
please refer to the descriptions below.
Technical
Specications
Electric Lawnmower .. FRM 1200 D3
Motor input power .....................1200 W
Mains voltage .. 220 V-240 V~, 50/60 Hz
Idling speed ........................... 3350min
Blade width ................................. 31 cm
Cut height ................... 20 / 40 / 60 mm
Protection class ................................
Protection type ............................... IP 24
Weight ........................... approx. 8.2 kg
Lawn box volume .............................30 l
Sound pressure specication ....................
(L
) ..................84 dB (A); KpA = 3 dB (A)
pA
Noise level specication
measured ..............................................
(L
) .................94 dB (A); KwA = 2 dB (A)
WA
guaranteed ..........................96.0 dB (A)
Vibration on the handle
(a
) ....................... 2.1 m/s2; K=1,5 m/s²
h
-1
II
13 Screws for lower bar
14 Screws for curved handle
15 Handle
16 upper part of grass box
20 Level gauge
17 Blade screw
I
18 Blade
19 Motor spindle
The stated vibration emission value was measured in accordance with a standard testing
procedure and may be used to compare one
power tool to another.
The stated vibration emission value may also
be used for a preliminary exposure assessment.
31
Page 32

GB
MT
Warning:
The vibration emission value may
differ during actual use of the
power tool from the stated value
depending on the manner in which
the power tool is used.
Safety precautions aimed at protect-
ing the user should be based on
estimated exposure under actual
usage conditions (all parts of the
operating cycle are to be considered, including, for example, times
during which the power tool is
turned off and times when the tool
is turned on but is running idle).
The noise and vibration values have
been determined in accordance with the
standards and regulations specied in the
declaration of conformity.
Technical and visual modications may be
made without notice in the course of further
development. All dimensions, information
and specications in these operating
instructions are therefore not guaranteed.
As such, no assertion of legal claims can
be enforced on the basis of the operating
instructions.
Safety precautions
Risk of injury from parts being
thrown up.
Keep nearby people away from
the mower.
Caution – sharp cutting blade!
Keep feet and hands away. Risk
of injury!
Switch off the motor and discon-
nect the plug before adjustment or
repair work or if the power cable
is caught or damaged.
Danger of damaged power cable.
Keep the power cable away from
the cutting blade!
Caution!
The lawnmower blade continues
to run after switching off.
Wear eye and ear protection.
Noise level specication Lwa in dB.
Protection class II
Do not dispose of electrical equipment in domestic waste.
31
cm
Cutting circle
This section covers the basic safety regulations when working with the electric lawnmower.
Pictorial Diagrams on the
Equipment
Caution!
Read the operating instructions
carefully.
Do not expose the equipment to the
damp. Do not work in the rain and
do not cut wet grass.
32
General notes on safety
This equipment may cause serious
injury in the case of improper use.
In order to avoid injury to people
and damage to property, the following safety information must be
observed and users must familiarise
themselves with all operating parts.
Preparation:
• This appliance is not intended for use
by persons (including children) with
reduced physical, sensory or mental
Page 33

MTGB
capabilities, or lack of experience and
knowledge, unless they have been
given supervision or instruction concerning use of the appliance by a person
responsible for their safety.
• Do not allow the use of this equipment
by children or others who are unfamiliar with these operating instructions.
Local regulations may specify the minimum age of the operator.
• Do not use the equipment when people
and particularly children or pets are
nearby.
• Children should be supervised to en-
sure that they do not play with the appliance.
• The operator or user is responsible for
accidents, injuries to other people or
damage to the property of others.
• Check the terrain on which the equipment is to be used and remove stones,
sticks, wires and other foreign objects
that could become caught and thrown
up.
• Wear suitable work clothing such as
stable shoes with non-slip soles and
robust, long trousers. Do not use the
equipment when barefoot or when
wearing open sandals.
• Before each use, carry out a visual
inspection of the equipment. Do not
use the equipment if protective devices
(e.g. collision guard or grass bag),
parts of the cutting device or bolts are
missing, worn or damaged. To avoid
imbalance, damaged tools and bolts
are to be replaced only in sets.
• Take care with equipment that has several cutting tools, as the movement of
one blade may result in the rotation of
the other blades.
• Use only spare parts and accessories
supplied and recommended by the
manufacturer. The use of non-original
parts will immediately invalidate the
guarantee.
Working with the Equipment:
Do not place feet or hands near or
under rotating parts when working.
Risk of injury!
Observe the noise protection and
local regulations. The use of the
equipment may be restricted or
prohibited on certain days (e.g.
Sundays and public holidays), at
certain times of day (lunchtimes,
nighttimes) or in certain areas (e.g.
health resorts, hospitals etc.).
• Switch on the motor according to the
instructions and only when your feet
are at a safe distance from the cutting
tools.
• Do not use the equipment in the rain,
in poor weather, in a damp environment, or on wet grass. Work only in
daylight or with good lighting.
• Do not work with the equipment when
tired, lacking concentration or under
the inuence of alcohol or drugs. Always take breaks in good time. Take a
sensible approach to the work.
• When working, ensure a rm stance,
particularly on slopes. Always work
across the slope, never upwards or
downwards. Take particular care when
changing the direction of travel on
the slope. Do not work on excessively
steep slopes.
• Run the equipment only at a walking
pace. Take particular care when turning the equipment around, pulling it
towards you or going backwards.
• Switch on the equipment carefully
and in accordance with the directions
in these instructions. Ensure sufcient
distance between feet and the rotating
blades.
• Do not tilt the equipment when starting
other than if it is necessary to do so
when starting up in long grass. In this
33
Page 34

GB
MT
case, tilt the equipment by pressing
down the handle bar such that the front
wheels of the equipment are raised. Always check that both hands are in the
working position before returning the
equipment to the ground.
• Do not work without the grass box or
collision guard. Keep away from the
ejection hole at all times.
Caution! Danger! The blade contin-
ues to run after switching off.
There is a risk of injury.
• The equipment is not to be lifted or
transported while the motor is running.
Switch off the equipment if it has to be
tilted in transit, when crossing surfaces
other than grass, and when the equipment is being transported to and from
the surfaces to be mowed.
• Always keep the grass ejection hole
clean and clear. Remove cut material
only when the equipment is stopped.
• Do not leave the equipment unattended
in the workplace.
• Do not work with equipment that is
damaged, incomplete, or has been
modied without the authorisation of the
manufacturer. Do not use the equipment
with damaged safety devices or screens
or with missing safety equipment such
as deection and/or grass collection devices.
• Do not overload the equipment. Work
only within the specied power range
and do not change the regulator settings on the motor. Do not use lowpowered machines for heavy work. Do
not use your equipment for purposes
other than those for which it is designed.
• Do not use the equipment near
inammable liquids or gases. Nonobservance will result in a risk of re
or explosion.
• Do not lift or carry the equipment when
the motor is running.
• Switch off the equipment and disconnect the plug:
- Whenever you leave the machine,
- Before cleaning the ejection hole or
removing blockages,
- When the equipment is out of use,
- Before checking, cleaning or working on the equipment,
- If the power cable is damaged or
frayed,
- If the equipment has hit a foreign
object or if strange vibrations occur
during work. In this case, check the
equipment for damage and have it
repaired if applicable.
• Do not place feet or hands near or under rotating parts. Do not stand in front
of the grass ejection hole during sickle
mowing.
Maintenance and Storage:
• Ensure that all nuts, bolts and screws
are tightened rmly and the equipment
is in safe working condition.
• Do not attempt to repair the equipment
yourself unless you have been trained
to do so. Any work not specied in
these instructions is to be carried out
only by customer service centres that
we have authorised.
• Keep the equipment in a dry location
and out of reach of children.
• Handle the equipment with care. Keep
tools sharp and clean, in order to facilitate better and safer work. Follow
the maintenance instructions.
• Wear protective gloves when changing
the cutting device.
• Regularly check the grass collection
device for wear and strains. For safety
reasons, replace worn or damaged
parts. When adjusting the blades, take
particular care to avoid ngers being
trapped between the rotating blades
and xed parts of the machine.
• Check that only replacement tools authorised by the manufacturer are used.
34
Page 35

MTGB
B
C
D
Electrical Safety:
• Ensure that the mains voltage matches
the specications on the rating plate.
• If possible, connect the equipment only
to a socked with a residual currentoperated protective device (RCD) with a
release current of more than 30 mA.
• Avoid bodily contact with earthed
parts (e.g. metal fences, metal posts).
• Use only authorised power cables of
type H05RN-F, which are no more than
75 m long and suitable for outdoor
use. The power cable wire cross section must be at least 2.5 mm
completely unroll cable drums before
use. Check the cable for damage.
• To x on the power cable, use the
cable suspension intended for the purpose.
• Keep the power cable away from the
cutting tool when working. The cutting
blades may damage the power cable
and result in contact with live parts. Always run the power cable behind the
operator.
• Do not use the power cable to pull the
plug from the socket. Protect the power
cable from heat, oil and sharp edges.
• Switch off the equipment and disconnect the plug from the socket if the
power cable is damaged. If the power
cable is damaged, it must be replaced
by the manufacturer, the customer serv-
ices of the same, or a qualied person,
in order to avoid hazards.
• Do not connect a damaged power
cable to the mains. Do not touch a
damaged power cable when it is
connected to the mains. A damaged
power cable may result in contact with
live parts.
2
. Always
Assembly
Disconnect the plug before any
work on the equipment. There is a
risk of injury.
Assembling the Curved
Handle
1. Insert the lower bar (3) into the
slot on the lawnmower housing
(6).
2. Fix the bar (3) using the enclosed screws (13).
3. Screw all four wheels (5) with
the ttings (5.1) onto the lawn
mower housing (6). The single
wheel adjustment has always to
be at least at one axis.
4. Fix the curved handle (1) using
the enclosed screws (14) and the
wing nuts (2) on the lower bar
(3). There are two possible positions.
5. Clip the cable holder (8) into the
bar (3) and thus x the cable.
When both wing nuts are loosened,
the curved handle can be folded
down for storing the equipment.
Ensure that the power cable is not
caught.
Assembling the Grass Box
1. Connect the two pieces of the
collection box (4).
2. Connect the handle (15) in one
of the two pieces of the collection box (16).
Do not work with the lawn mower
without impact protection. There is
a risk of injury.
We recommend always using the
grass box when working with the
lawn mower, otherwise the mowing result may be signicantly impaired.
35
Page 36

GB
E
F
MT
Operation
Hanging On / Removing the
Grass Box
1. To hang on the grass box (4),
lift the collision guard (7) and
hang on the grass box. Fold the
collision guard (7) onto the grass
box (4). It holds the grass box in
the correct position.
2. To remove the grass box (4),
lift the collision guard (7) and
detach the grass box. Fold the
collision guard (7) back onto the
mower housing (6).
The level gauge (
side of the grass catcher (4).
Flap (
grass catcher (4) empty
Flap (
grass catcher (4) full
20) open:
D
20) closed:
D
Adjusting the Cut Height
Switch off the equipment, discon-
nect the plug and wait for the blade
to stop. There is a risk of injury.
The lawn mower can be set to the following cut heights by means of three position
changes of the front and rear wheels, adjusting the individual wheels:
The single wheel adjustment has
always to be at least at one axis.
60 mm - Tall cutting height
40 mm - Medium cutting height
20 mm - Short cutting height
20) is located on the
D
wheel adjustment has always to
be at least at one axis
The correct height is around 25 – 40 mm
for a decorative lawn and around 30 – 60
mm for a used lawn.
A higher cut height should be se-
lected for the rst cut of the season.
Observe the noise protection and
local regulations.
Switching On and Off
1. Insert the power cable plug into
the socket (
handle (
2. Connect the equipment to the
power supply.
3. Before switching on, ensure that
the equipment is not in contact
with any objects.
4. To switch on, press the release
button (10) on the handle at the
same time as pressing the start
lever (11). Release the release
button (10).
5. To switch off, release the start
lever (11).
After switching off the equipment,
the blade continues to turn for several seconds. Do not touch the moving blade. There is a risk of injury.
A
9) on the curved
A
1).
Working with the
Lawnmower
Regular mowing encourages increased foliation of the grass and kills off weeds at the
same time. Therefore, not only does each
mowing increase the density of the lawn, it
1. Unscrew the wheels (5).
2. Screw the wheels (5) back on in
the desired position. The single
36
Page 37

MTGB
also produces an evenly resilient lawn.
The rst cut is to be made in around April,
at a growth height of 70 – 80 mm. In the
main vegetation period, the lawn is to be
mowed at least once a week.
• Start mowing near the socket and work
away from the socket.
• Always keep the extension cable behind you and when you turn, move it to
the side that has already been mowed.
• Run the equipment at a walking pace,
in tracks that are as even as possible.
For gap-free mowing, the tracks should
always overlap by a few centimetres.
• Adjust the cut height so the equipment
is not overloaded. Otherwise, the motor may be damaged.
• On slopes, always work across the
slope. Take particular care when going
backwards and pulling the equipment.
• Clean the equipment after each use, as
described in the chapter on “Cleaning,
Maintenance and Storage”.
Switch off the equipment after
work and in order to transport it,
disconnect the plug and wait until
the blade stops. There is a risk of
injury.
Cleaning,
Maintenance and
Storage
Have work that is not described
in these instructions carried out by
a customer service centre that we
have authorised. Use only original
parts.
Wear gloves when handling the
blade.
Switch off the equipment before all
maintenance and cleaning work,
disconnect the plug and wait until
the blade stops.
There is a risk of injury.
General Cleaning and Maintenance Work
Do not hose down the lawnmower
with water.
• Always keep the equipment clean. To
clean, use a brush or cloth but no detergent or solvent.
• After mowing, use a piece of wood
or plastic to remove adherent plant
remains from the wheels, ventilation
holes, ejection hole and blade area.
Do not use hard or pointed objects, as
these may damage the blade.
• Before each use, check the lawnmower
for obvious defects such as loose, worn
or damaged parts. Check that all nuts,
bolts and screws are sitting rmly.
• Check the covers and protective devices for damage and check that they
are sitting correctly. Replace them if
necessary.
Changing the Blade
If the blade is blunt, it can be sharpened
by a specialist workshop. If the blade is
damaged or showing signs of imbalance,
it must be replaced (see chapter on “Spare
Parts”).
1. Turn the equipment over.
I
2. Use sturdy gloves and hold the
blade (18) rmly. Turn the blade
screw (17) anticlockwise off of
the motor spindle (19) using a
screwdriver (A/F width13).
3. Install the new blade (18) in the
reverse order. Ensure that the
blade (18) is positioned correctly
and the screw (17) tightened
rmly.
37
Page 38

GB
MT
Storage
• Keep the equipment dry and out of
reach of children. Loosen the wing nuts
and fold down the handle bar so the
equipment takes up less space. Ensure
that the cable is not caught.
• Allow the motor to cool before storing
the equipment in a conned space.
• Do not cover the equipment with nylon
bags as moisture could build up.
We will not be liable for damages caused
by our equipment where these are caused
by improper repair or the use of nonoriginal parts or by use other than for the
intended purpose.
Disposal /
Enviromental
Protection
Do not dispose of used oil in the sewage
system or drains. Dispose of used oil in an
environmentally correct manner - bring it to
a waste disposal center.
Be environmentally friendly. Return the
tool, accessories and packaging to a
recycling centre when you have nished
with them.
Machines do not belong with do-
mestic waste.
The plastic and metal parts employed can
be separated out and thus recycled use
can be implemented. Ask our ServiceCenter for details.
Replacement parts / Accessories
Spare parts and accessories can be obtained at
www.grizzly-service.eu
If you do not have internet access, please contact the Service Centre via telephone (see
“Sercice-Center” Page 41). Please have the order number mentioned below ready.
Spare blade incl. screw
Lawn box
4 ........................................................................ 91093478
A
I
18 .................................................. 13700209
38
Page 39

Trouble Shooting
Problem Possible Cause Fault Fixing
Check the socket, cable,
Power is off
Equipment does not
start
Motor stops Blockage by foreign
Result unsatisfactory or
motor labours
Blade fails to turn
Strange noises, rattling
or vibrations
Defective on/off switch
A
(
11)
Defective motor
Grass too long
object
Cut height too low Set a higher cut height
Blade (
Blade area blocked Clean the equipment
Blade assembled
incorrectly
Blade blocked by grass Remove the grass
Blade screw (
Blade screw (
loose
Blade damaged Replace the blade
18) blunt
I
I
17)loose
I
17)
wire and plug and have
any repairs carried out
by an electrician
Repair by customer
servicesWorn carbon brushes
Set a greater cut height.
Lift the front wheels
slightly by pressing down
on the handle bar (1).
Remove the foreign
object
Have the blade
sharpened or replace it
Install the blade correctly
Tighten the blade screw
Tighten the blade screw
MTGB
39
Page 40

GB
MT
Guarantee
Dear Customer,
This equipment is provided with a 3-year
guarantee from the date of purchase.
In case of defects, you have statutory rights
against the seller of the product. These
statutory rights are not restricted by our
guarantee presented below.
Terms of Guarantee
The term of the guarantee begins on the
date of purchase. Please retain the original
receipt. This document is required as proof
of purchase.
If a material or manufacturing defect
occurs within three years of the date of
purchase of this product, we will repair or
replace – at our choice – the product for
you free of charge. This guarantee requires
the defective equipment and proof of purchase to be presented within the three-year
period with a brief written description of
what constitutes the defect and when it occurred.
If the defect is covered by our guarantee,
you will receive either the repaired product
or a new product. No new guarantee period begins on repair or replacement of the
product.
Guarantee Period and Statutory
Claims for Defects
The guarantee period is not extended by
the guarantee service. This also applies for
replaced or repaired parts. Any damages
and defects already present at the time of
purchase must be reported immediately after unpacking. Repairs arising after expiry
of the guarantee period are chargeable.
Guarantee Cover
The equipment has been carefully produced in accordance with strict quality
guidelines and conscientiously checked
prior to delivery.
The guarantee applies for all material and
manufacturing defects. This guarantee
does not extend to cover product parts that
are subject to normal wear and may therefore be considered as wearing parts (e.g.
lters or attachments) or to cover damage
to breakable parts (e.g. switches, batteries,
or parts made of glass).
This guarantee shall be invalid if the product has been damaged, used incorrectly or
not maintained. Precise adherence to all of
the instructions specied in the operating
manual is required for proper use of the
product. Intended uses and actions against
which the operating manual advises or
warns must be categorically avoided.
The product is designed only for private
and not commercial use. The guarantee
will be invalidated in case of misuse or
improper handling, use of force, or interventions not undertaken by our authorised
service branch.
Processing in Case of Guarantee
To ensure quick handling of you issue,
please follow the following directions:
• Please have the receipt and item number (e.g. IAN 102969) ready as proof
of purchase for all enquiries.
• Please nd the item number on the
rating plate.
• Should functional errors or other defects occur, please initially contact the
service department specied below
by telephone or by e-mail. You will
then receive further information on the
processing of your complaint.
• After consultation with our customer
service, a product recorded as defective can be sent postage paid to the
service address communicated to you,
with the proof of purchase (receipt)
and specication of what constitutes
the defect and when it occurred. In order to avoid acceptance problems and
additional costs, please be sure to use
only the address communicated to you.
40
Page 41

MTGB
Ensure that the consignment is not sent
carriage forward or by bulky goods,
express or other special freight. Please
send the equipment inc. all accessories
supplied at the time of purchase and
ensure adequate, safe transport packaging.
Repair Service
For a charge, repairs not covered by the
guarantee can be carried out by our ser-
vice branch, which will be happy to issue
a cost estimate for you.
We can handle only equipment that has
been sent with adequate packaging and
postage.
Attention: Please send your equipment to
our service branch in clean condition and
with an indication of the defect.
Equipment sent carriage forward or by
bulky goods, express or other special
freight will not be accepted.
We will dispose of your defective devices
free of charge when you send them to us.
Service-Center
Service Great Britain
GB
Tel.: 0871 5000 720
(£ 0.10/Min.)
E-Mail: grizzly@lidl.co.uk
IAN 102969
Service Malta
MT
Tel.: 80062230
E-Mail: grizzly@lidl.com.mt
IAN 102969
Importer
Please note that the following address is
not a service address. Please initially con-
tact the service centre specied above.
Grizzly Tools GmbH & Co. KG
Stockstädter Straße 20
63762 Großostheim
Germany
www.grizzly-service.eu
41
Page 42

DE AT CH
Inhalt
Einleitung ................................... 42
Bestimmungsgemäße
Verwendung ..............................42
Allgemeine Beschreibung ...........43
Lieferumfang.................................. 43
Übersicht ......................................43
Funktionsbeschreibung .................... 43
Technische Daten ........................43
Sicherheitshinweise .................... 44
Bildzeichen auf dem Gerät .............. 44
Allgemeine Sicherheitshinweise .......45
Montage ....................................48
Bügelgriff montieren .......................48
Grasfangkorb montieren .................48
Bedienung .................................48
Grasfangkorb einhängen/abnehmen 48
Schnitthöhe einstellen .....................49
Ein- und Ausschalten ......................49
Arbeiten mit dem Elektro-Rasenmäher49
Reinigung/Wartung/Lagerung ...50
Allgemeine Reinigungs- und
Wartungsarbeiten ..........................50
Messer austauschen .......................50
Lagerung ......................................51
Entsorgung/Umweltschutz ..........51
Ersatzteile/Zubehör ...................51
Fehlersuche ................................ 52
Garantie ....................................53
Reparatur-Service ...................... 54
Service-Center ............................54
Importeur ..................................54
Original-
EG-Konformitätserklärung .........59
Explosionszeichnung .................. 61
Einleitung
Herzlichen Glückwunsch zum Kauf Ihres
neuen Gerätes. Sie haben sich damit für
ein hochwertiges Gerät entschieden. Dieses Gerät wurde während der Produktion
auf Qualität geprüft und einer Endkontrolle
unterzogen. Die Funktionsfähigkeit Ihres
Gerätes ist somit sichergestellt. Es ist nicht
auszuschließen, dass sich in Einzelfällen
am oder im Gerät, bzw. in Schlauchleitungen Restmengen von Wasser oder
Schmierstoffen benden. Dies ist kein
Mangel oder Defekt und kein Grund zur
Besorgnis.
Die Betriebsanleitung ist Bestandteil
dieses Gerätes. Sie enthält wichtige
Hinweise für Sicherheit, Gebrauch
und Entsorgung. Machen Sie sich
vor der Benutzung des Gerätes mit
allen Bedien- und Sicherheitshinweisen vertraut. Benutzen Sie das
Gerät nur wie beschrieben und für
die angegebenen Einsatzbereiche.
Bewahren Sie die Betriebsanleitung gut auf und händigen Sie alle
Unterlagen bei Weitergabe des
Gerätes an Dritte mit aus.
Bestimmungsgemäße
Verwendung
Das Gerät ist nur für das Mähen von
Rasen- und Grasächen im häuslichen Bereich bestimmt. Dieses Gerät ist nicht zur
gewerblichen Nutzung geeignet.
Bei gewerblichem Einsatz erlischt die Garantie.
Jede andere Verwendung, die in dieser
Betriebsanleitung nicht ausdrücklich zugelassen wird, kann zu Schäden am Gerät
führen und eine ernsthafte Gefahr für den
Benutzer darstellen.
Das Gerät ist zum Gebrauch durch Erwachsene bestimmt. Kinder sowie Personen, die mit dieser Betriebsanleitung
42
Page 43

CH
B
C
D
A
ATDE
nicht vertraut sind, dürfen das Gerät nicht
benutzen. Die Benutzung des Gerätes bei
Regen oder feuchter Umgebung ist verboten.
Der Hersteller haftet nicht für Schäden, die
durch bestimmungswidrigen Gebrauch
oder falsche Bedienung verursacht wurden.
Allgemeine
Beschreibung
Lieferumfang
Nehmen Sie das Gerät vorsichtig aus der
Packung und prüfen Sie, ob die nachfolgenden Teile vollständig sind:
- Elektro-Rasenmäher und Bügelgriff mit
Anschlussleitung
- 2 untere Holme
- Grasfangkorb mit Griff (dreiteilig)
- 2 Schrauben zur Holmbefestigung
- 2 Flügelmuttern und Schrauben zur
Bügelgriffbefestigung
- 2 Halter zur Netzanschlussleitungsbefestigung
- 4 Räder mit 4 Befestigungsschrauben
- Originalbetriebsanleitung
13 Schrauben zur Holmbefestigung
14 Schrauben zur
Bügelgriffbefestigung
15 Handgriff
16 oberes Teil Grasfangkorb
20 Füllstandsanzeige
17 Messerschraube
I
18 Messer
19 Motorspindel
Funktionsbeschreibung
Der Elektro-Rasenmäher besitzt ein parallel
zur Schnittebene sich drehendes Schneidwerkzeug. Er ist mit einem leistungsstarken
Elektromotor, einem robusten Kunststoffgehäuse, einem Sicherheitsschalter, einem
Prallschutz und einem Grasfangkorb ausgestattet. Zusätzlich ist das Gerät 3-fach
höhenverstellbar und hat leichtgängige
Räder.
Die Funktion der Bedienteile entnehmen Sie
bitte den nachfolgenden Beschreibungen.
Technische Daten
Übersicht
1 Bügelgriff
2 Flügelmuttern
3 Unterer Holm
4 Grasfangkorb
5 Räder
5.1 Verschraubungen
6 Elektro-Rasenmähergehäuse
7 Prallschutz
8 Kabelhalter
9 Steckdose für
Netzanschlussleitung
10 Entriegelungsknopf
11 Starthebel
Elektro-Rasenmäher .. FRM 1200 D3
Aufnahmeleistung des Motors ......1200 W
Netzspannung..220 V-240 V~, 50/60 Hz
Leerlaufdrehzahl (n
Messerbreite ................................ 31 cm
Schnitthöhe ................. 20 / 40 / 60 mm
Schutzklasse .....................................
Schutzart........................................IP 24
Gewicht ..................................ca. 8,2 kg
Volumen Grasfangkorb ......................30 l
Schalldruckpegel (L
Schallleistungspegel
gemessen (L
garantiert ..............................96,0 dB (A)
Vibration am Handgriff
(a
) ........................2,1 m/s2; K=1,5 m/s²
h
WA
) ................3350 min
0
) .............................
pA
84 dB (A); K
) .......................................
94 dB (A); K
=3 dB (A)
pA
=2 dB (A)
wA
-1
II
43
Page 44

DE AT CH
Der angegebene Schwingungsemissionswert ist nach einem genormten Prüfverfahren gemessen worden und kann zum
Vergleich eines Elektrowerkzeugs mit
einem anderen verwendet werden.
Der angegebene Schwingungsemissionswert kann auch zu einer einleitenden
Einschätzung der Aussetzung verwendet
werden.
Warnung:
Der Schwingungsemissionswert
kann sich während der tatsächlichen Benutzung des Elektrowerkzeugs von dem Angabewert
unterscheiden, abhängig von der
Art und Weise, in der das Elektrowerkzeug verwendet wird.
Es besteht die Notwendigkeit, Si-
cherheitsmaßnahmen zum Schutz
des Bedieners festzulegen, die
auf einer Abschätzung der Aussetzung während der tatsächlichen
Benutzungsbedingungen beruhen
(hierbei sind alle Anteile des Betriebszyklus zu berücksichtigen,
beispielsweise Zeiten, in denen das
Elektrowerkzeug abgeschaltet ist,
und solche, in denen es zwar eingeschaltet ist, aber ohne Belastung
läuft).
Lärm- und Vibrationswerte wurden entsprechend den in der Konformitätserklärung
genannten Normen und Bestimmungen
ermittelt.
Technische und optische Veränderungen
können im Zuge der Weiterentwicklung
ohne Ankündigung vorgenommen werden.
Alle Maße, Hinweise und Angaben dieser
Betriebsanleitung sind deshalb ohne Gewähr. Rechtsansprüche, die aufgrund der
Betriebssanleitung gestellt werden, können
daher nicht geltend gemacht werden.
Sicherheitshinweise
Dieser Abschnitt behandelt die grundlegenden Sicherheitsvorschriften bei der
Arbeit mit dem Elektro-Rasenmäher.
Bildzeichen auf dem Gerät
Achtung!
Lesen Sie die Betriebsanleitung auf-
merksam durch.
Setzen Sie das Gerät nicht der
Feuchtigkeit aus. Arbeiten Sie nicht
bei Regen und schneiden Sie kein
nasses Gras.
Verletzungsgefahr durch wegge-
schleuderte Teile.
Umstehende Personen von dem
Elektro-Rasenmäher fern halten.
Vorsicht - Scharfe Schneidmesser!
Füße und Hände fernhalten. Verletzungsgefahr!
Motor ausschalten und Netzste-
cker ziehen vor Einstellungs- oder
Reinigungsarbeiten oder wenn sich
das Netzkabel verfangen hat oder
beschädigt ist.
Gefahr durch beschädigtes Netz-
kabel.
Netzkabel von dem Gerät und
dem Schneidmesser fernhalten!
Achtung!
Nachlauf des Rasenmäher messers.
Tragen Sie Augen- und Gehörschutz.
Angabe des Schallleistungspegels
L
WA
L
in dB.
wa
dB
44
Page 45

CH
ATDE
Schutzklasse II
Elektrogeräte gehören nicht in den
Hausmüll.
31
cm
Schnittkreis
Allgemeine
Sicherheitshinweise
Dieses Gerät kann bei unsachge-
mäßem Gebrauch ernsthafte
Verletzungen verursachen. Um
Personen- und Sachschäden zu
vermeiden, lesen und beachten Sie
unbedingt die folgenden Sicherheitshinweise und machen Sie sich
mit allen Bedienteilen gut vertraut.
Vorsicht: So vermeiden Sie Unfälle
und Verletzungen:
Vorbereitung:
• Dieses Gerät ist nicht dafür bestimmt,
durch Personen (einschließlich Kinder)
mit eingeschränkten physischen, sensorischen oder geistigen Fähigkeiten oder
mangels Erfahrung und/oder mangels
Wissen benutzt zu werden; es sei denn,
sie werden durch eine für ihre Sicherheit zuständige Person beaufsichtigt
oder erhalten von ihr Anweisungen, wie
das Gerät zu benutzen ist.
• Erlauben Sie niemals Kindern oder
anderen Personen, die die Betriebsanleitung nicht kennen, das Gerät zu benutzen. Örtliche Bestimmungen können
das Mindestalter der Bedienungsperson festlegen.
• Setzen Sie das Gerät niemals ein,
während Personen, besonders Kinder
und Haustiere, in der Nähe sind.
• Kinder sollen beaufsichtigt werden, um
sicherzustellen, dass sie nicht mit dem
Gerät spielen.
• Der Bediener oder Nutzer ist für Unfälle oder Schäden an anderen Menschen oder deren Eigentum verantwortlich.
• Überprüfen Sie das Gelände, auf dem
das Gerät eingesetzt wird und entfernen Sie Steine, Stöcke, Drähte oder
andere Fremdkörper, die erfasst und
weggeschleudert werden können.
• Tragen Sie geeignete Arbeitskleidung
wie festes Schuhwerk mit rutschfester
Sohle und eine robuste, lange Hose.
Benutzen Sie das Gerät nicht, wenn
Sie barfuß gehen oder offene Sandalen tragen.
• Führen Sie vor jeder Benutzung eine
Sichtprüfung des Gerätes durch.
Benutzen Sie das Gerät nicht, wenn
Schutzeinrichtungen (z.B. Prallschutz
oder Grasfangkorb), Teile der
Schneideinrichtung oder Bolzen fehlen, abgenutzt oder beschädigt sind.
Zur Vermeidung einer Unwucht dürfen
beschädigte Werkzeuge und Bolzen
nur satzweise ausgetauscht werden.
• Seien Sie vorsichtig bei Geräten mit
mehreren Schneidwerkzeugen, da die
Bewegung eines Messers zur Rotation
der übrigen Messer führen kann.
• Benutzen Sie nur Ersatz- und Zubehörteile, die vom Hersteller geliefert und
empfohlen werden. Der Einsatz von
Fremdteilen führt zum sofortigen Verlust
des Garantieanspruches.
Vorsicht! So vermeiden Sie Geräte-
schäden und eventuell daraus resultierende Personenschäden:
Arbeiten mit dem Gerät:
Führen Sie Füße und Hände beim
Arbeiten nicht in die Nähe oder
unter rotierende Teile. Es besteht
Verletzungsgefahr!
45
Page 46

DE AT CH
Beachten Sie den Lärmschutz und
örtliche Vorschriften. Die Benutzung
des Gerätes kann an bestimmten
Tagen (z.B. Sonn- und Feiertagen),
während bestimmter Tageszeiten
(Mittagszeiten, Nachtruhe) oder in
besonderen Gebieten (z.B. Kurorten,
Kliniken etc.) eingeschränkt oder verboten sein.
• Schalten Sie den Motor nach Anweisung ein und nur dann, wenn Ihre Füße
in sicherem Abstand von den Schneidwerkzeugen sind.
• Benutzen Sie das Gerät nicht bei
Regen, bei schlechter Witterung, in
feuchter Umgebung oder an nassem
Rasen. Arbeiten Sie nur bei Tageslicht
oder guter Beleuchtung.
• Arbeiten Sie mit dem Gerät nicht,
wenn Sie müde oder unkonzentriert
sind oder nach der Einnahme von Alkohol oder Tabletten. Legen Sie immer
rechtzeitig eine Arbeitspause ein. Gehen Sie mit Vernunft an die Arbeit.
• Achten Sie beim Arbeiten auf einen
sicheren Stand, insbesondere an Hängen. Arbeiten Sie immer quer zum
Hang, niemals auf- oder abwärts.
Seien Sie besonders vorsichtig, wenn
Sie die Fahrtrichtung am Hang ändern.
Arbeiten Sie nicht an übermäßig steilen
Hängen.
• Führen Sie das Gerät nur im Schritttempo. Seien Sie besonders vorsichtig,
wenn Sie das Gerät umkehren, zu sich
heranziehen oder rückwärts gehen.
• Schalten Sie das Gerät mit Vorsicht entsprechend den Anweisungen in dieser
Betriebsanleitung ein. Achten Sie auf
ausreichenden Abstand der Füße zu
rotierenden Messern.
• Kippen Sie das Gerät nicht beim Starten, außer wenn dies beim Anlaufen in
hohem Gras erforderlich ist. In diesem
Fall kippen Sie das Gerät durch Drücken des Griffholms so, dass die Vorderräder des Geräts leicht angehoben
werden. Überprüfen Sie immer, dass
sich beide Hände in Arbeitsstellung
benden, bevor das Gerät wieder auf
den Boden zurückgestellt wird.
• Arbeiten Sie nie ohne Grasfangkorb
oder Prallschutz. Halten Sie sich immer
entfernt von der Auswurföffnung.
Achtung Gefahr! Messer läuft nach.
Es besteht Verletzungsgefahr.
• Das Gerät darf nicht angehoben oder
transportiert werden, solange der Motor läuft. Schalten Sie das Gerät ab,
wenn es zum Transport gekippt werden
muss, wenn andere Flächen als Rasen
überquert werden und wenn das Gerät
zu und von den zu mähenden Flächen
gebracht wird.
• Halten Sie die Grasauswurföffnung
stets sauber und frei. Entfernen Sie
Schnittgut nur im Stillstand des Gerätes.
• Hinterlassen Sie das Gerät nie unbeaufsichtigt am Arbeitsplatz.
• Arbeiten Sie nicht mit einem beschädigten, unvollständigen oder ohne die
Zustimmung des Herstellers umgebauten
Gerät. Verwenden Sie das Gerät nie mit
beschädigten Schutzeinrichtungen oder
Abschirmungen oder fehlenden Sicherheitseinrichtungen wie Ablenk- und/oder
Grasfangeinrichtungen.
• Überlasten Sie Ihr Gerät nicht. Arbeiten
Sie nur im angegebenen Leistungsbereich
und ändern Sie nicht die Reglereinstellungen am Motor. Verwenden Sie keine
leistungsschwachen Maschinen für schwere Arbeiten. Benutzen Sie Ihr Gerät nicht
für Zwecke, für die es nicht bestimmt ist.
• Benutzen Sie das Gerät nicht in der Nähe
von entzündbaren Flüssigkeiten oder Gasen. Bei Nichtbeachtung besteht Brandoder Explo sions gefahr.
• Niemals das Gerät aufheben oder
wegtragen, wenn der Motor läuft.
• Schalten Sie das Gerät aus und ziehen
Sie den Netzstecker:
46
Page 47

CH
ATDE
- immer, wenn Sie die Maschine verlassen,
- bevor Sie die Auswurföffnung reinigen
oder Blockierungen beseitigen,
- wenn das Gerät nicht verwendet wird,
- bevor Sie das Gerät überprüfen, reinigen oder daran arbeiten,
- wenn das Netzkabel beschädigt oder
verheddert ist,
- wenn das Gerät beim Arbeiten einen
Fremdkörper getroffen hat oder wenn
ungewohnte Vibrationen auftreten. Untersuchen Sie in diesem Fall das Gerät auf
Beschädigungen und lassen Sie es ggf.
reparieren.
• Bringen Sie Hände oder Füße niemals in
die Nähe oder unter rotierende Teile. Bei
Sichelmähern darf sich nie vor die Grasauswurföffnung gestellt werden.
Wartung und Lagerung:
• Sorgen Sie dafür, dass alle Muttern, Bolzen und Schrauben fest angezogen sind
und das Gerät in einem sicheren Arbeitszustand ist.
• Versuchen Sie nicht, das Gerät selbst zu
reparieren, es sei denn, Sie besitzen hierfür eine Ausbildung. Sämtliche Arbeiten,
die nicht in dieser Betriebsanleitung
angegeben werden, dürfen nur von uns
ermächtigten Kundendienststellen ausgeführt werden.
• Bewahren Sie das Gerät an einem trockenen Ort und außerhalb der Reichweite
von Kindern auf.
• Behandeln Sie Ihr Gerät mit Sorgfalt.
Halten Sie die Werkzeuge scharf und
sauber, um besser und sicherer arbeiten
zu können. Befolgen Sie die Wartungsvorschriften.
• Tragen Sie Schutzhandschuhe, wenn Sie
die Schneideinrichtung wechseln.
• Überprüfen Sie die Grasfangeinrichtung
regelmäßig auf Verschleiß und Verformungen. Ersetzen Sie aus Sicherheitsgründen verschlissene oder beschädigte Teile.
Seien Sie beim Einstellen der Messer
besonders vorsichtig, damit Ihre Finger
nicht zwischen den rotierenden Messern
und fest stehenden Teilen der Maschine
eingeklemmt werden.
• Beachten Sie, dass nur Ersatzschneidwerkzeuge verwendet werden, die
vom Hersteller zugelassen sind.
Vorsicht: So vermeiden Sie Unfälle
und Verletzungen durch elektrischen
Schlag:
Elektrische Sicherheit:
• Achten Sie darauf, dass die Netzspannung mit den Angaben des Typenschildes
übereinstimmt.
• Schließen Sie das Gerät nur an eine Steckdose mit Fehlerstrom-Schutzeinrichtung
(FI-Schalter) mit einem Auslösestrom von
nicht mehr als 30 mA an.
• Vermeiden Sie Körperberührungen mit
geerdeten Teilen (z.B. Metallzäune, Metallpfosten).
• Verwenden Sie nur zugelassene Netzkabel der Bauart H05RN-F, die höchstens
75 m lang und für den Gebrauch im
Freien bestimmt sind. Der Litzenquerschnitt des Netzkabels muss mindestens
2
2,5 mm
beltrommel vor Gebrauch immer ganz
ab. Überprüfen Sie das Kabel auf
Schäden.
• Verwenden Sie für die Anbringung des
Netzkabels die dafür vorgesehene Kabelaufhängung.
• Halten Sie das Netzkabel beim Arbeiten von dem Schneidwerkzeug fern.
Die Schneidmesser können das Netzkabel beschädigen und zum Berühren
spannungsführender Teile führen. Führen Sie das Netzkabel grundsätzlich
hinter der Bedienungsperson.
• Benutzen Sie das Netzkabel nicht, um
den Netzstecker aus der Steckdose zu
ziehen. Schützen Sie das Netzkabel
vor Hitze, Öl und scharfen Kanten.
• Schalten Sie das Gerät aus und ziehen
Sie den Netzstecker aus der Steckdose, wenn das Netzkabel beschädigt
ist. Wenn die Anschlussleitung dieses
betragen. Rollen Sie eine Ka-
47
Page 48

DE AT CH
B
C
D
E
Gerätes beschädigt wird, muss sie
durch eine besondere Anschlussleitung
ersetzt werden, die vom Hersteller oder
seinem Kundendienst erhältlich ist.
• Verbinden Sie kein beschädigtes Netzkabel mit dem Stromnetz. Berühren Sie
kein beschädigtes Netzkabel, solange
es mit dem Stromnetz verbunden ist.
Ein beschädigtes Netzkabel kann zum
Berühren spannungsführender Teile führen.
Montage
Ziehen Sie vor allen Arbeiten an
dem Gerät den Netzstecker. Es besteht die Gefahr von Personenschäden.
Bügelgriff montieren
1. Setzen Sie die unteren Holme
(3) in die Aufnahme des ElektroRasenmähergehäuses (6) ein.
2. Befestigen Sie den unteren Holm
(3) mit den beiliegenden Schrauben (13).
3. Schrauben Sie alle vier Räder
(5) mit den Verschraubungen
(5.1) an das Elektro-Rasenmähergehäuse (6). Die Einzelradverstellung hat immer wenigstens
achsweise zu erfolgen.
4. Befestigen Sie den Bügelgriff (1)
mit den beiliegenden Schrauben
(14) und den Flügelmuttern (2)
am unteren Holm (3).
Es sind zwei Positionen möglich.
5. Klipsen Sie die Kabelhalter
(siehe
xieren Sie damit das Kabel.
Wenn Sie die beiden Flügelmuttern
lösen, können Sie den Bügelgriff
zur Aufbewahrung des Gerätes
A
8) am unteren Holm (3)
und am Bügelgriff (1) ein und
nach unten klappen. Darauf achten,
dass das Netzkabel nicht eingeklemmt ist.
Grasfangkorb montieren
Tragen Sie zur Montage des
Grasfangkorbes Handschuhe,
um Verletzungen zu vermeiden.
1. Stecken Sie beide Teile des Grasfangkorbs (4) zusammen.
2. Stecken Sie den Handgriff (15)
in den oberen Teil des Grasfangkorbes (16).
Mit dem Elektro-Rasenmäher darf
nicht ohne Prallschutz gearbeitet
werden. Es besteht Verletzungsgefahr.
Wir empfehlen, mit dem Elektro-Ra-
senmäher immer mit Grasfangkorb
zu arbeiten. Sonst kann es zu einer
deutlichen Beeinträchtigung des
Mähergebnisses führen.
Bedienung
Grasfangkorb einhängen/
abnehmen
1. Zum Einhängen des Grasfangkorbes (4) heben Sie den Prallschutz (7) an und hängen den
Grasfangkorb (4) ein. Klappen
Sie den Prallschutz (7) auf den
Grasfangkorb (4). Er hält den
Grasfangkorb (4) an richtiger
Position.
2. Zum Abnehmen des Grasfangkorbes (4) heben Sie den Prallschutz (7) an und hängen den
Grasfangkorb (4) aus. Klappen
Sie den Prallschutz (7) an das
Elekto-Rasenmähergehäuse (6)
zurück.
48
Page 49

CH
ATDE
Seitlich am Grasfangkorb (4) ist eine Füllstandsanzeige (
Füllstandsanzeige (
Grasfangkorb (4) leer
Füllstandsanzeige (
Grasfangkorb (4) voll
Schnitthöhe einstellen
Schalten Sie das Gerät aus, ziehen
Sie den Netzstecker und warten Sie
den Stillstand des Messers ab.Es
besteht die Gefahr von Personenschäden.
Der Elektro-Rasenmäher kann durch drei
Positionsänderungen der vorderen und hinteren Räder durch Einzelradverstellung auf
folgende Schnitthöhen eingestellt werden:
Die Einzelradverstellung hat immer
wenigstens achsweise zu erfolgen.
60 mm - große Schnitthöhe
40 mm - mittlere Schnitthöhe
20 mm - geringe Schnitthöhe
20) angebracht.
D
20) geöffnet:
D
20) geschlossen:
D
Ein- und Ausschalten
1. Stecken Sie den Netzstecker des
Netzkabels in die Steckdose (sie-
A
he
9) am Bügelgriff
(siehe
2. Schließen Sie das Gerät an die
3. Achten Sie vor dem Einschalten
4. Zum Einschalten drücken Sie
5. Zum Ausschalten lassen Sie den
Nach dem Ausschalten des Gerätes
dreht sich das Messer noch für
einige Sekunden. Berühren Sie das
laufende Messer nicht. Es besteht
die Gefahr von Personenschäden.
Arbeiten mit dem
Elektro-Rasenmäher
A
1).
Netzspannung an.
darauf, dass das Gerät keine
Gegenstände berührt.
den Entriegelungsknopf (10) am
Handgriff und halten gleichzeitig
den Starthebel (11) gedrückt.
Lassen Sie den Entriegelungsknopf (10) los.
Starthebel (11) los.
1. Schrauben Sie die Räder (5) ab.
2. Schrauben Sie die Räder (5) wieder in der gewünschten Position
fest. Die Einzelradverstellung hat
immer wenigstens achsweise zu
erfolgen.
Die richtige Schnitthöhe beträgt bei einem
Zierrasen etwa 20 - 40 mm, bei einem
Nutzrasen etwa 40 - 60 mm.
Für den ersten Schnitt in der Saison
sollte eine große Schnitthöhe gewählt werden.
Beachten Sie den Lärmschutz und
örtliche Vorschriften.
Regelmäßiges Mähen regt die Graspanze
zu einer verstärkten Blattbildung an, lässt
aber gleichzeitig Unkrautpanzen absterben. Daher wird der Rasen nach jedem
Mähvorgang dichter und es entsteht ein
gleichmäßig belastbarer Rasen.
Der erste Schnitt erfolgt ab etwa April bei
einer Aufwuchshöhe von 70 - 80 mm. In
der Hauptvegetationszeit wird der Rasen
mindestens einmal pro Woche gemäht.
49
Page 50

DE AT CH
• Beginnen Sie mit dem Mähen in der
Nähe der Steckdose und arbeiten Sie
von der Steckdose weg.
• Führen Sie das Netzkabel immer hinter
sich und bringen Sie es nach dem Wenden auf die schon gemähte Seite.
• Führen Sie das Gerät im Schritttempo
in möglichst geraden Bahnen. Für
ein lückenloses Mähen sollten sich die
Bahnen immer um wenige Zentimeter
überlappen.
• Stellen Sie die Schnitthöhe so ein,
dass das Gerät nicht überlastet wird.
Andernfalls kann der Motor beschädigt
werden.
• Arbeiten Sie an Hängen immer quer
zum Hang. Seien Sie besonders vorsichtig beim Rückwärtsgehen und Ziehen des Gerätes.
• Reinigen Sie das Gerät nach jedem
Einsatz wie im Kapitel „Reinigung,
Wartung, Lagerung“ beschrieben.
Schalten Sie nach der Arbeit und
zum Transport das Gerät aus,
ziehen Sie den Netzstecker und
warten Sie den Stillstand des Messers ab. Es besteht die Gefahr von
Personenschäden.
Reinigung/Wartung/
Lagerung
Lassen Sie Arbeiten, die nicht
in dieser Betriebsanleitung beschrieben sind, von einer von uns
ermächtigten Kundendienststelle
durchführen. Verwenden Sie nur
Originalteile.
Tragen Sie beim Umgang mit dem
Messer Handschuhe.
Schalten Sie vor allen Wartungs-
und Reinigungsarbeiten das Gerät
aus, ziehen Sie den Netzstecker
und warten Sie den Stillstand des
Messers ab. Es besteht die Gefahr
von Personenschäden.
Allgemeine Reinigungs- und
Wartungsarbeiten
Spritzen Sie den Elektro-Rasenmä-
her nicht mit Wasser ab. Es besteht
die Gefahr eines elektrischen Schlages.
• Halten Sie das Gerät stets sauber. Verwenden Sie zum Reinigen eine Bürste
oder ein Tuch, aber keine Reinigungsbzw. Lösungsmittel.
• Entfernen Sie nach dem Mähen anhaf-
tende Panzenreste mit einem Holz-
oder Plastikstück von den Rädern, den
Lüftungsöffnungen, der Auswurföffnung
und dem Messerbereich. Verwenden
Sie keine harten oder spitzen Gegenstände, Sie könnten das Gerät beschädigen.
• Kontrollieren Sie den Elektro-Rasenmäher vor jedem Gebrauch auf offensichtliche Mängel wie lose, abgenutzte
oder beschädigte Teile. Prüfen Sie den
festen Sitz aller Muttern, Bolzen und
Schrauben.
• Überprüfen Sie Abdeckungen und
Schutzeinrichtungen auf Beschädigungen und korrekten Sitz. Tauschen
Sie diese gegebenenfalls aus.
Messer austauschen
Ist das Messer stumpf, so kann es von einer
Fachwerkstätte nachgeschliffen werden. Ist
das Messer beschädigt oder zeigt eine Unwucht, so muss es ausgewechselt werden
1. Drehen Sie das Gerät um.
I
2. Benutzen Sie feste Handschuhe
und halten Sie das Messer
(18) fest. Drehen Sie die Messerschraube (17) gegen den
Uhrzeigersinn mit Hilfe eines
50
Page 51

CH
ATDE
Schraubenschlüssels (SW13) von
der Motorspindel (19).
3. Bauen Sie das neue Messer (18)
in umgekehrter Reihenfolge wieder ein. Achten Sie darauf, dass
das Messer (18) richtig positioniert ist und die Messerschraube
(17) fest angezogen ist.
Lagerung
• Bewahren Sie das Gerät trocken und
außerhalb der Reich weite von Kindern
auf. Lösen Sie die Flügelmuttern (2)
und klappen Sie den Bügelgriff (1)
zusammen, damit das Gerät weniger
Platz beansprucht. Die Kabel dürfen
dabei nicht eingeklemmt werden.
• Lassen Sie den Motor abkühlen, bevor
Sie das Gerät in geschlossenen Räumen abstellen.
• Umhüllen Sie das Gerät nicht mit Ny-
lonsäcken, da sich Feuchtigkeit bilden
könnte.
Wir haften nicht für durch unsere Geräte
hervorgerufene Schäden, sofern diese
durch unsachgemäße Reparatur oder den
Einsatz von Nicht-Originalteilen bzw.
durch nicht bestimmungsgemäßen Gebrauch verursacht werden.
Entsorgung/
Umweltschutz
Führen Sie Gerät, Zubehör und Verpackung einer umweltgerechten Wiederverwertung zu.
Elektrogeräte gehören nicht in den
Hausmüll.
• Geben Sie das Gerät an einer Verwertungsstelle ab. Die verwendeten Kunststoff- und Metallteile können sortenrein
getrennt werden und so einer Wiederverwertung zugeführt werden. Fragen
Sie hierzu unser Service-Center.
• Werfen Sie geschnittenes Gras nicht
in die Mülltonne, sondern führen Sie
es der Kompostierung zu oder verteilen Sie es als Mulchschicht unter
Sträuchern und Bäumen.
Ersatzteile/Zubehör
Ersatzteile und Zubehör erhalten Sie unter
www.grizzly-service.eu
Sollten Sie kein Internet haben, so wenden Sie sich bitte telefonisch an das ServiceCenter (siehe „Service-Center“ Seite 54). Halten Sie die unten genannten Bestellnummern
bereit.
Ersatzmesser inkl. Schraube
Grasfangkorb
4 .................................................................. 91093478
A
I
18 ............................................ 13700209
51
Page 52

DE AT CH
Fehlersuche
Problem Mögliche Ursache Fehlerbehebung
Steckdose, Kabel,
Netzspannung fehlt
Leitung, Netzstecker
prüfen, ggf. Reparatur
durch Elektrofachmann
Gerät startet nicht
Motor setzt aus
Arbeitsergebnis nicht
zufriedenstellend oder
Motor arbeitet schwer
Messer rotiert nicht
Abnorme Geräusche,
Klappern oder
Vibrationen
Starthebel (
defekt
Kohlebürsten abgenutzt
Motor defekt
Gras zu lang
Blockierung durch
Fremdkörper
Schnitthöhe zu niedrig
Messer (
Messerbereich verstopft Gerät reinigen
Messer falsch montiert Messer korrekt einbauen
Messer durch Gras
blockiert
Messerschraube
I
(
Messerschraube (
locker
Messer beschädigt Messer austauschen
A
18) stumpf
I
17) locker
11)
I
17)
Reparatur durch
Kundendienst
Größere Schnitthöhe
einstellen. Durch Drücken
des Bügelgriffs (
die Vorderräder leicht
anheben.
Fremdkörper entfernen
Größere Schnitthöhe
einstellen
Messer schleifen lassen
oder austauschen
Gras entfernen
Messerschraube
festziehen
Messerschraube
festziehen
A
1)
52
Page 53

CH
ATDE
Garantie
Sehr geehrte Kundin, sehr geehrter Kunde,
Sie erhalten auf dieses Gerät 3 Jahre Garantie ab Kaufdatum.
Im Falle von Mängeln dieses Produkts
stehen Ihnen gegen den Verkäufer des
Produkts gesetzliche Rechte zu. Diese
gesetzlichen Rechte werden durch unsere
im Folgenden dargestellte Garantie nicht
eingeschränkt.
Garantiebedingungen
Die Garantiefrist beginnt mit dem Kaufdatum. Bitte bewahren Sie den OriginalKassenbon gut auf. Diese Unterlage wird
als Nachweis für den Kauf benötigt.
Tritt innerhalb von drei Jahren ab dem Kaufdatum dieses Produkts ein Material- oder
Fabrikationsfehler auf, wird das Produkt von
uns – nach unserer Wahl – für Sie kostenlos
repariert oder ersetzt. Diese Garantieleistung setzt voraus, dass innerhalb der
Drei-Jahres-Frist das defekte Gerät und
der Kaufbeleg (Kassenbon) vorgelegt und
schriftlich kurz beschrieben wird, worin der
Mangel besteht und wann er aufgetreten ist.
Wenn der Defekt von unserer Garantie
gedeckt ist, erhalten Sie das reparierte oder
ein neues Produkt zurück. Mit Reparatur
oder Austausch des Produkts beginnt kein
neuer Garantiezeitraum.
Garantiezeit und gesetzliche
Mängelansprüche
Die Garantiezeit wird durch die Gewährleistung nicht verlängert. Dies gilt auch
für ersetzte und reparierte Teile. Eventuell
schon beim Kauf vorhandene Schäden und
Mängel müssen sofort nach dem Auspacken gemeldet werden. Nach Ablauf der
Garantiezeit anfallende Reparaturen sind
kostenpichtig.
Garantieumfang
Das Gerät wurde nach strengen Qualitätsrichtlinien sorgfältig produziert und vor
Anlieferung gewissenhaft geprüft.
Die Garantieleistung gilt für Material- oder
Fabrikationsfehler. Diese Garantie erstreckt
sich nicht auf Produktteile, die normaler
Abnutzung ausgesetzt sind und daher als
Verschleißteile angesehen werden können
(z.B. Filter oder Aufsätze) oder für Beschädigungen an zerbrechlichen Teilen (z.B.
Schalter, Akkus oder die aus Glas gefertigt
sind).
Diese Garantie verfällt, wenn das Produkt
beschädigt, nicht sachgemäß benutzt oder
nicht gewartet wurde. Für eine sachgemäße
Benutzung des Produkts sind alle in der Betriebsanleitung aufgeführten Anweisungen
genau einzuhalten. Verwendungszwecke
und Handlungen, von denen in der Betriebsanleitung abgeraten oder vor denen gewarnt wird, sind unbedingt zu vermeiden.
Das Produkt ist lediglich für den privaten
und nicht für den gewerblichen Gebrauch
bestimmt. Bei missbräuchlicher und unsachgemäßer Behandlung, Gewaltanwendung
und bei Eingriffen, die nicht von unserer
autorisierten Service-Niederlassung vorgenommen wurden, erlischt die Garantie.
Abwicklung im Garantiefall
Um eine schnelle Bearbeitung Ihres Anliegens zu gewährleisten, folgen Sie bitte den
folgenden Hinweisen:
• Bitte halten Sie für alle Anfragen den
Kassenbon und die Artikelnummer
(z.B. IAN102969) als Nachweis für
den Kauf bereit.
• Die Artikelnummer entnehmen Sie bitte
dem Typenschild.
• Sollten Funktionsfehler oder sonstige
Mängel auftreten kontaktieren Sie zunächst die nachfolgend benannte Serviceabteilung telefonisch oder per
E-Mail. Sie erhalten dann weitere
Informationen über die Abwicklung
Ihrer Reklamation.
• Ein als defekt erfasstes Produkt können
Sie, nach Rücksprache mit unserem
Kundenservice, unter Beifügung des
53
Page 54

DE AT CH
Kaufbelegs (Kassenbons) und der
Angabe, worin der Mangel besteht
und wann er aufgetreten ist, für Sie
portofrei an die Ihnen mitgeteilte
Service-Anschrift übersenden. Um Annahmeprobleme und Zusatzkosten zu
vermeiden, benutzen Sie unbedingt nur
die Adresse, die Ihnen mitgeteilt wird.
Stellen Sie sicher, dass der Versand
nicht unfrei, per Sperrgut, Express oder
sonstiger Sonderfracht erfolgt. Senden
Sie das Gerät bitte inkl. aller beim
Kauf mitgelieferten Zubehörteile ein
und sorgen Sie für eine ausreichend
sichere Transportverpackung.
Reparatur-Service
Sie können Reparaturen, die nicht der Garantie unterliegen, gegen Berechnung von
unserer Service-Niederlassung durchführen
lassen. Sie erstellt Ihnen gerne einen Kostenvoranschlag.
Wir können nur Geräte bearbeiten, die
ausreichend verpackt und frankiert eingesandt wurden.
Achtung: Bitte senden Sie Ihr Gerät gereinigt und mit Hinweis auf den Defekt an
unsere Service-Niederlassung.
Nicht angenommen werden unfrei - per
Sperrgut, Express oder mit sonstiger Sonderfracht - eingeschickte Geräte.
Die Entsorgung Ihrer defekten eingesendeten Geräte führen wir kostenlos durch.
Service-Center
Service Deutschland
DE
Tel.: 0800 54 35 111
E-Mail: grizzly@lidl.de
IAN 102969
Service Österreich
AT
Tel.: 0820 201 222
(0,15 EUR/Min.)
E-Mail: grizzly@lidl.at
IAN 102969
Service Schweiz
CH
Tel.: 0842 665566
(0,08 CHF/Min.,
Mobilfunk max. 0,40 CHF/Min.)
E-Mail: grizzly@lidl.ch
IAN 102969
Importeur
Bitte beachten Sie, dass die folgende
Anschrift keine Serviceanschrift ist.
Kontaktieren Sie zunächst das oben
genannte Service-Center.
Grizzly Tools GmbH & Co. KG
Stockstädter Straße 20
63762 Großostheim
Germany
www.grizzly-service.eu
54
Page 55

IT
MT
Traduzione della
dichiarazione
di conformità CE originale
Con la presente dichiariamo che
Tagliaerba elettrico
serie di costruzione FRM 1200 D3
Numero di serie 201409000001 - 201501063525
a partire dall’anno di costruzione 2015 corrisponde alle seguenti direttive EU in materia nella rispettiva versione valida:
2006/42/EC • 2004/108/EC • 2000/14/EC • 2005/88/EC • 2011/65/EU*
Per garantire la conformità sono state applicate le seguenti norme armonizzate e
anche le norme e disposizioni nazionali che seguono:
EN 60335-1:2012 ● EN 60335-2-77:2010
EN 55014-1/A2:2011 ● EN 55014-2/A2:2008
EN 61000-3-2/A2:2009 ● EN 61000-3-3:2013 • EN 62233:2008
Si dichiara inoltre in conformità alla direttiva 2000/14/EC sull’emissione acustica am-
bientale:
Livello di potenza sonora
garantita: 96 dB(A)
misurata: 94 dB(A)
Procedura della valutazione della conformità applicata come da allegato
VI / 2000/14/EC
Autorità registrata: TÜV Sü d , N B 0 0 3 6
Il produttore è il solo responsabile della stesura della presente dichiarazione di
conformità:
Grizzly Tools GmbH & Co. KG
Stockstädter Straße 20
63762 Großostheim / 28.01.2015
Germany
Responsabile documentazione tecnica
* L’oggetto descritto sopra è conforme alle prescrizioni della Direttiva 2011/65/EU del Parlamento Europeo e del Consiglio dell’8 giugno 2011 sulla restrizione dell’uso di determinate
sostanze pericolose nelle apparecchiature elettriche ed elettroniche.
Volker Lappas
55
Page 56

PT
Tradução do original da
Declaração de conformidade CE
Vimos, por este meio, declarar que o
Máquina de cortar relva eléctrica da série
FRM 1200 D3
Número de série 201409000001 - 201501063525
corresponde às respectivas normas da UE na sua versão em vigor:
2006/42/EC • 2004/108/EC • 2000/14/EC • 2005/88/EC • 2011/65/EU*
Para garantir a conformidade, foram aplicadas as seguintes normas harmonizadas
bem como normas e disposições nacionais:
EN 60335-1:2012 ● EN 60335-2-77:2010
EN 55014-1/A2:2011 ● EN 55014-2/A2:2008
EN 61000-3-2/A2:2009 ● EN 61000-3-3:2013 • EN 62233:2008
Adicionalmente declara-se de acordo com a Directiva de Emissões Sonoras para o
Ambiente da União Europeia 2000/14/EC:
Nível de potência acústica
garantido: 96,0 dB(A)
medido: 94 dB(A)
Foi aplicado o procedimento de avaliação de conformidade de acordo com o Anexo VI /
2000/14/EC
Registado em: TÜV Süd, NB 0036
O fabricante é o único responsável pela emissão desta declaração de conformidade:
Grizzly Tools GmbH & Co. KG
Stockstädter Straße 20
63762 Großostheim / 28.01.2015
Germany
Volker Lappas
Encarregado de documentação
* O objeto acima descrito da declaração cumpre as normas da diretiva 2011/65/UE do Parlamento Europeu e do Conselho do dia 8 de junho de 2011 sobre a restrição da utilização de
determinadas substâncias em aparelhos elétricos e eletrónicos.
56
Page 57

GB
MT
Translation of the original EC declaration
of conformity
We hereby conrm that the
Electric Lawnmower
Design Series
FRM 1200 D3
Serial number 201409000001 - 201501063525
conforms with the following applicable relevant version of the EU guidelines:
2006/42/EC • 2004/108/EC • 2000/14/EC • 2005/88/EC • 2011/65/EU*
In order to guarantee consistency, the following harmonised standards as well as national
standards and stipulations have been applied:
EN 60335-1:2012 ● EN 60335-2-77:2010
EN 55014-1/A2:2011 ● EN 55014-2/A2:2008
EN 61000-3-2/A2:2009 ● EN 61000-3-3:2013 • EN 62233:2008
We additionally conrm the following in accordance with the 2000/14/EC emissions
guideline:
Sound power level:
guaranteed: 96 dB(A)
measured: 94 dB(A)
Compliance evaluation process carried out in accordance with Appendix VI, 2000/14/EC
Registered Ofce: TÜV Süd, NB 0036
This declaration of conformity is issued under the sole responsibility of the
manufacturer:
Grizzly Tools GmbH & Co. KG
Stockstädter Straße 20
63762 Großostheim / 28.01.2015
Germany
* The object of the declaration described above satises the provisions of Directive 2011/65/EU
of the European Parliament and the Council of 8 June 2011 on limiting the use of certain harmful
substances in electrical and electronic appliances.
Volker Lappas
Documentation Representative
57
Page 58

58
Page 59

DE
AT CH
Original EG-Konformitätserklärung
Hiermit bestätigen wir,
dass der
Elektro-Rasenmäher
Baureihe FRM 1200 D3
Seriennummern 201409000001 - 201501063525
folgenden einschlägigen EU-Richtlinien in ihrer jeweils gültigen Fassung entspricht:
2006/42/EG • 2004/108/EG • 2000/14/EG • 2005/88/EG • 2011/65/EU*
Um die Übereinstimmung zu gewährleisten, wurden folgende harmonisierte Normen
sowie nationale Normen und Bestimmungen angewendet:
EN 60335-1:2012 ● EN 60335-2-77:2010
EN 55014-1/A2:2011 ● EN 55014-2/A2:2008
EN 61000-3-2/A2:2009 ● EN 61000-3-3:2013 • EN 62233:2008
Zusätzlich wird entsprechend der Geräuschemissionsrichtlinie 2000/14/EC bestätigt:
Schallleistungspegel:
Garantiert: 96 dB(A);
Gemessen: 94 dB(A)
Angewendetes Konformitätsbewertungsverfahren entsprechend
Anh. VI / 2000/14/EC
Gemeldete Stelle: TÜV Süd, NB 0036
Die alleinige Verantwortung für die Ausstellung dieser Konformitätserklärung
trägt der Hersteller:
Grizzly Tools GmbH & Co. KG
Stockstädter Straße 20
63762 Großostheim / 28.01.2015
Germany
Dokumentationsbevollmächtigter
* Der oben beschriebene Gegenstand der Erklärung erfüllt die Vorschriften der Richtlinie 2011/65/
EU des Europäischen Parlaments und des Rates vom 8. Juni 2011 zur Beschränkung der
Verwendung bestimmter gefährlicher Stoffe in Elektro- und Elektronikgeräten.
Volker Lappas
59
Page 60

60
2015-01-09-rev02-op
Page 61

Vista esplosa • Vista en corte
Exploded Drawing • Explosionszeichnung
informativo, informative, informativ
FRM 1200 D3
61
Page 62

14
1
2
3
10
11
C
15
20
20
4
4
D
E
G
H
7
6
4
F
20
40
60
mm
5
17
I
19
62
18
Page 63

63
Page 64

GRIZZLY TOOLS GMBH & CO. KG
Stockstädter Straße 20
D-63762 Großostheim
Versione delle informazioni · Estado das
informações · Last Information Update
Stand der Informationen: 10 / 2014
Ident.-No.: 72055348102014-IT/PT
IAN 102969
 Loading...