


EI23BC36IS2
Electrolux EI23BC36IS2, EI23BC36IS1, EI23BC51IW2, EI28BS36IB0, EI28BS36IB1 Owner’s Manual
...
Use Et Care Guide
French Door Bottom Freeze_/Refrige_ator
Guia de Uso y Cuidado
Refrigerador con congelador inferior de puerta doble
Guide d'utilisation et d'entretien
R_frig_rateur 5 portes fran_aises/Cong_lateur en has
:i:_i_ii_i_!_!_i_i_ii_i_!iii!i!ii_!_i_i!_i_i!!_;i_i!_!:ii!_!:ii!_!_!ii_!_ii_i!_!!_!i_ii_i!ii_iiii_i_ii_:_!_i_i_!_;!i_ii_!i_i_i_i_iii_ii
Finding information
Please read and save this guide TaMe of contents
Thank you forchoos ng E ectro ux our new prem um Fin in Inf rm i n 2
[J g 0 at 0 ..............................................
brand in home appliances.This Use & Care Guide is
part of our comm tment to customer sat sfact on and f
Sa ely ............................................................... 3
;:::: product qualitythroughoutthe service life of your new
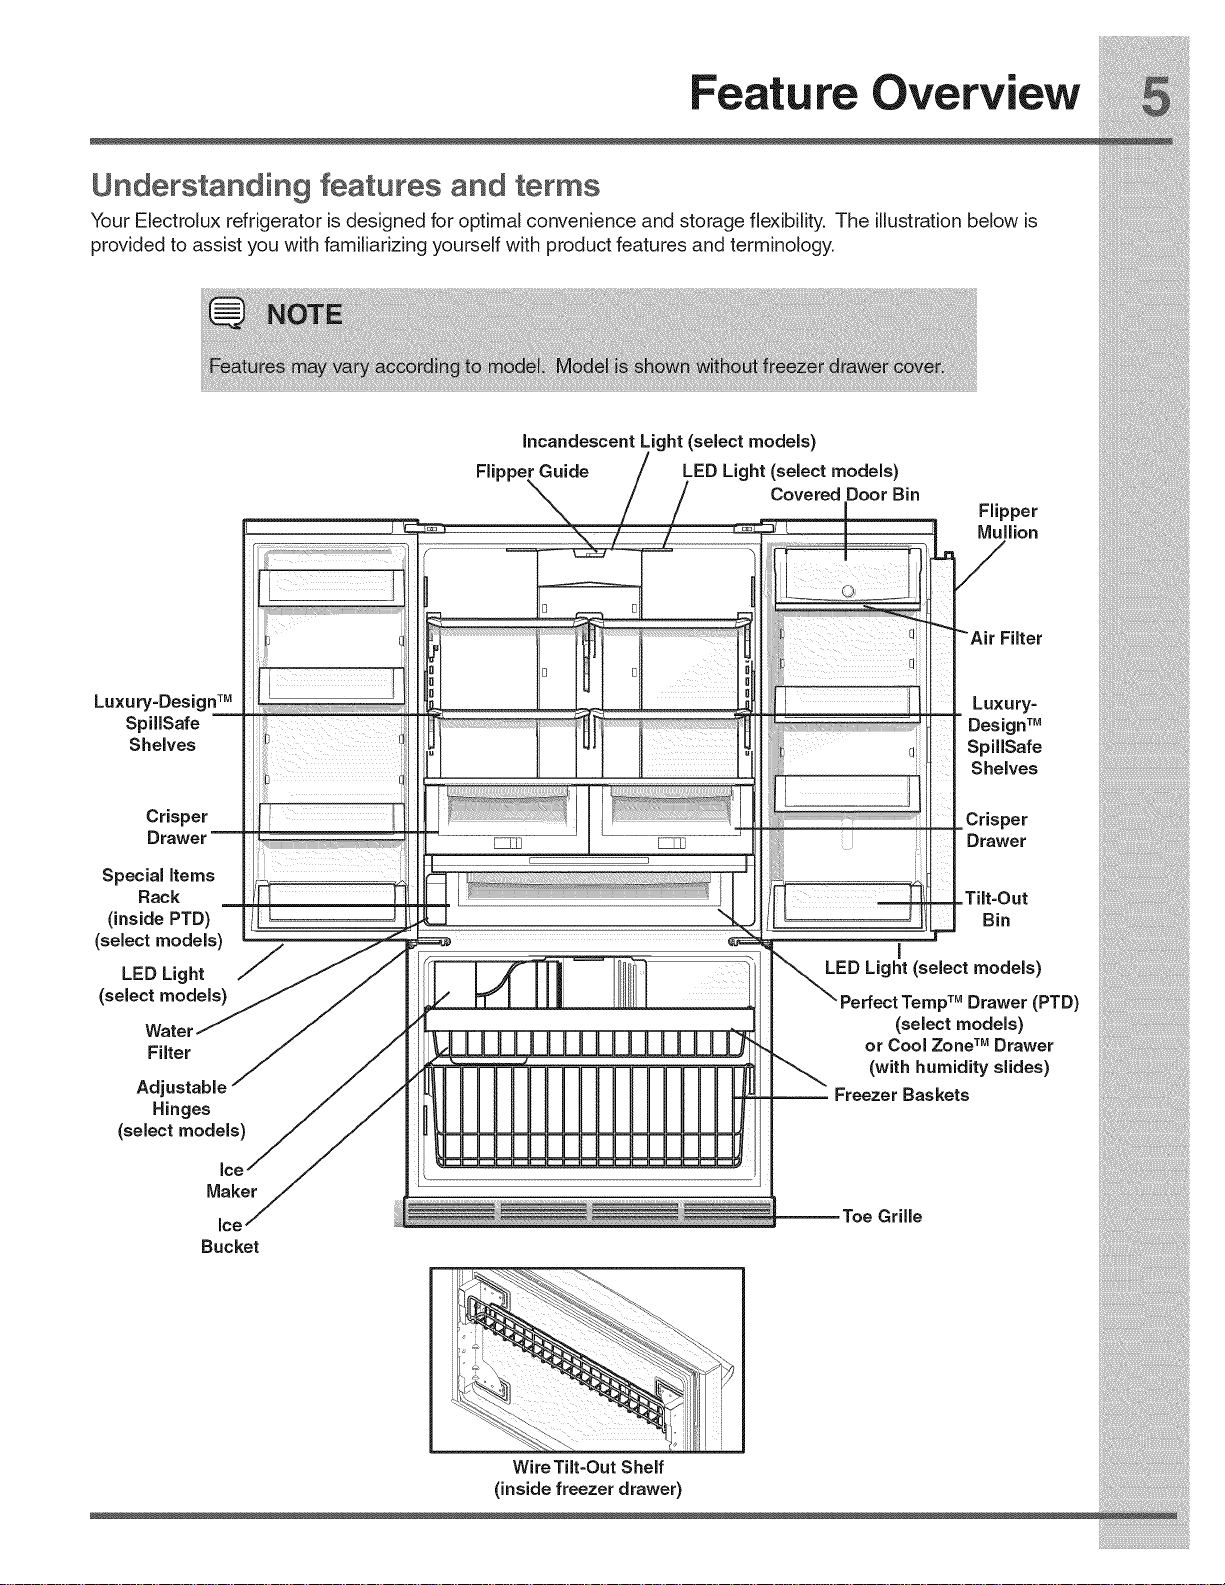
appliance. Feature Overview................................................. 5
Keep a [@COld fo[ quick Installation......................................................... 6
reference
Removingthe Doors ............................................ 18
^ nn "in "h W" r^ I 1"
t;0 ecl gle ale _uppy .................................. ,_
__ c0.tro_s..........................................................._4
Electroluxmodel number
Aut0rnaticlcelVlaker............................................ 16
__nu--_-b_er St0rageFeatures ................................................ 17
ChangingtheWater andAir FiJters........................... 24
i!_!_i!i_ii_!i!_!_i!i_ii_!i!_!_i!i_ii_!i!_!_i!i_ii_!i!_!_i!i_ii_!i!_!_i!i_ii_!i!_!_i!i_ii_!i!_!_i!i_ii_!i!_!_i!i_ii_!i!_!_ii_i
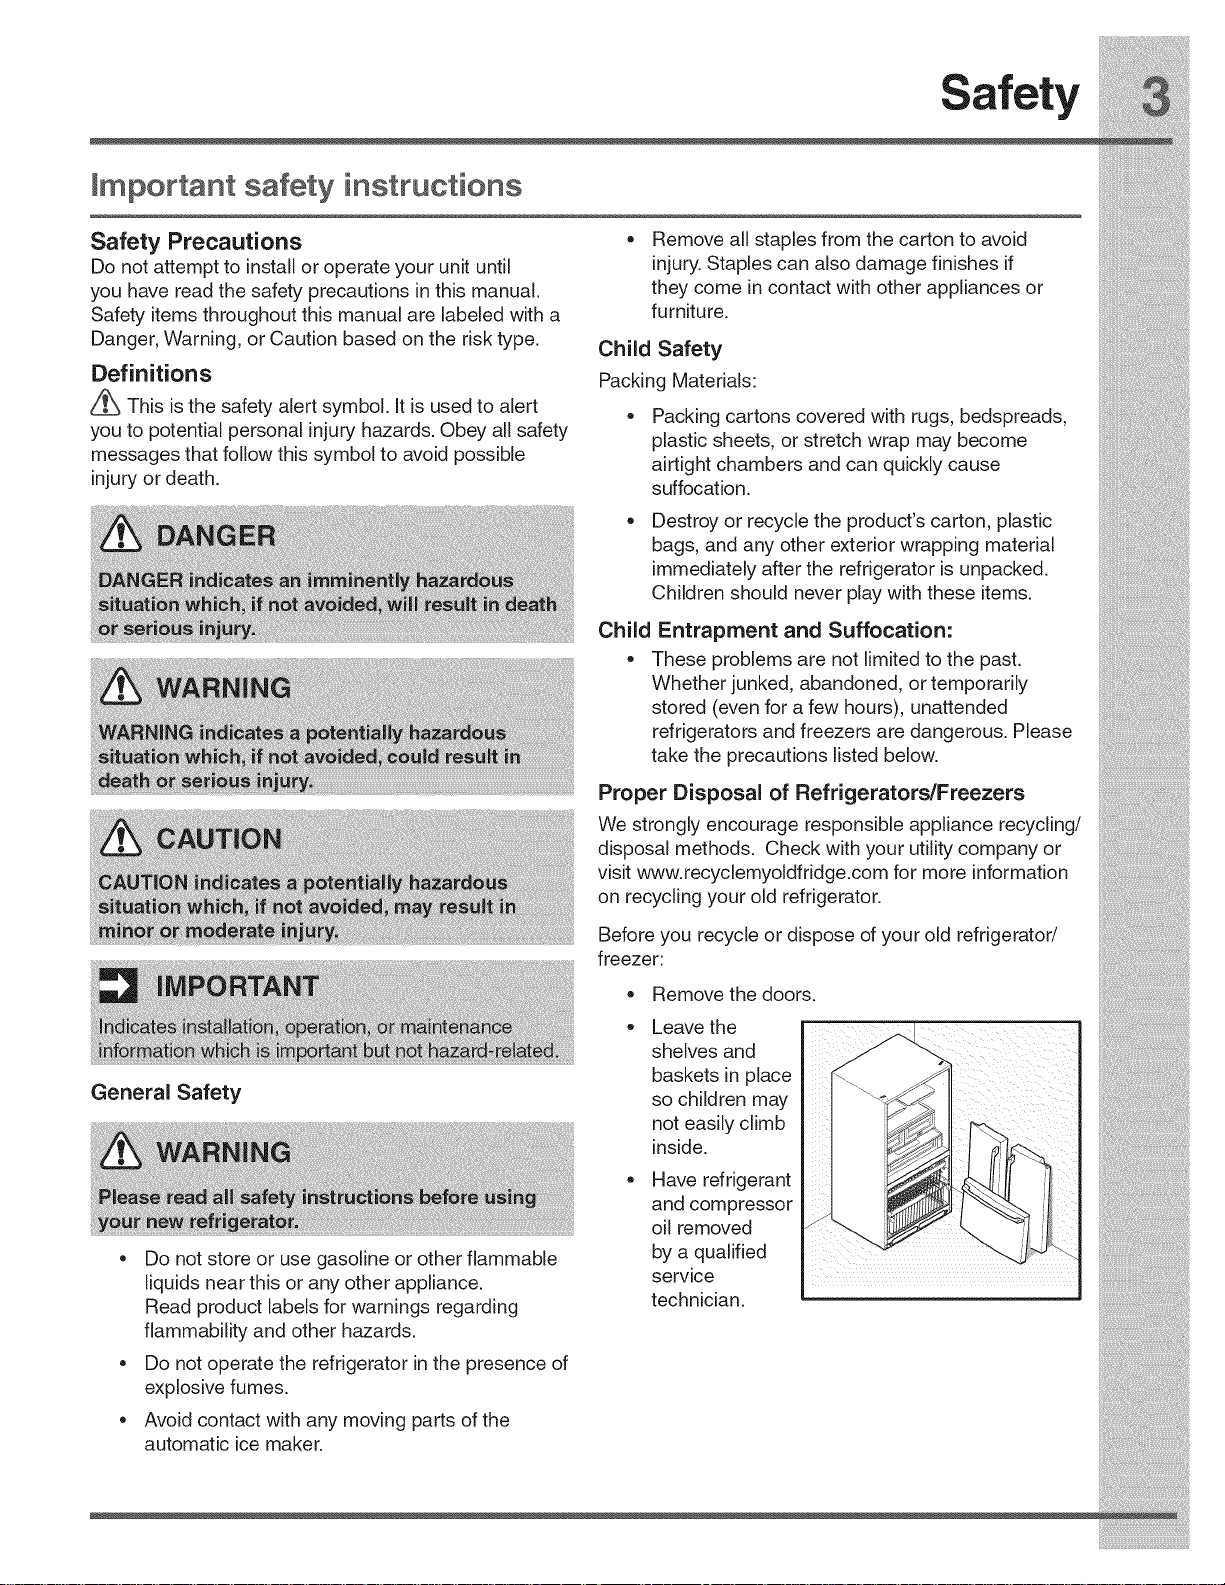
take the precautions listed below.
Proper Disposal of Refrigerators/Freezers
i_i!_!_i!i_ii_!i!_!_i!i_ii_!i!_!_i!i_ii_!i!_!_i!i_ii_!i!_!_i!i_ii_!i!_!_i!i_ii_!i!_!_i!i_ii_!i!_!_i!i_ii_!i!_!_i!i_ii_!i!_!_iii_:_
Safety
E ectrical information
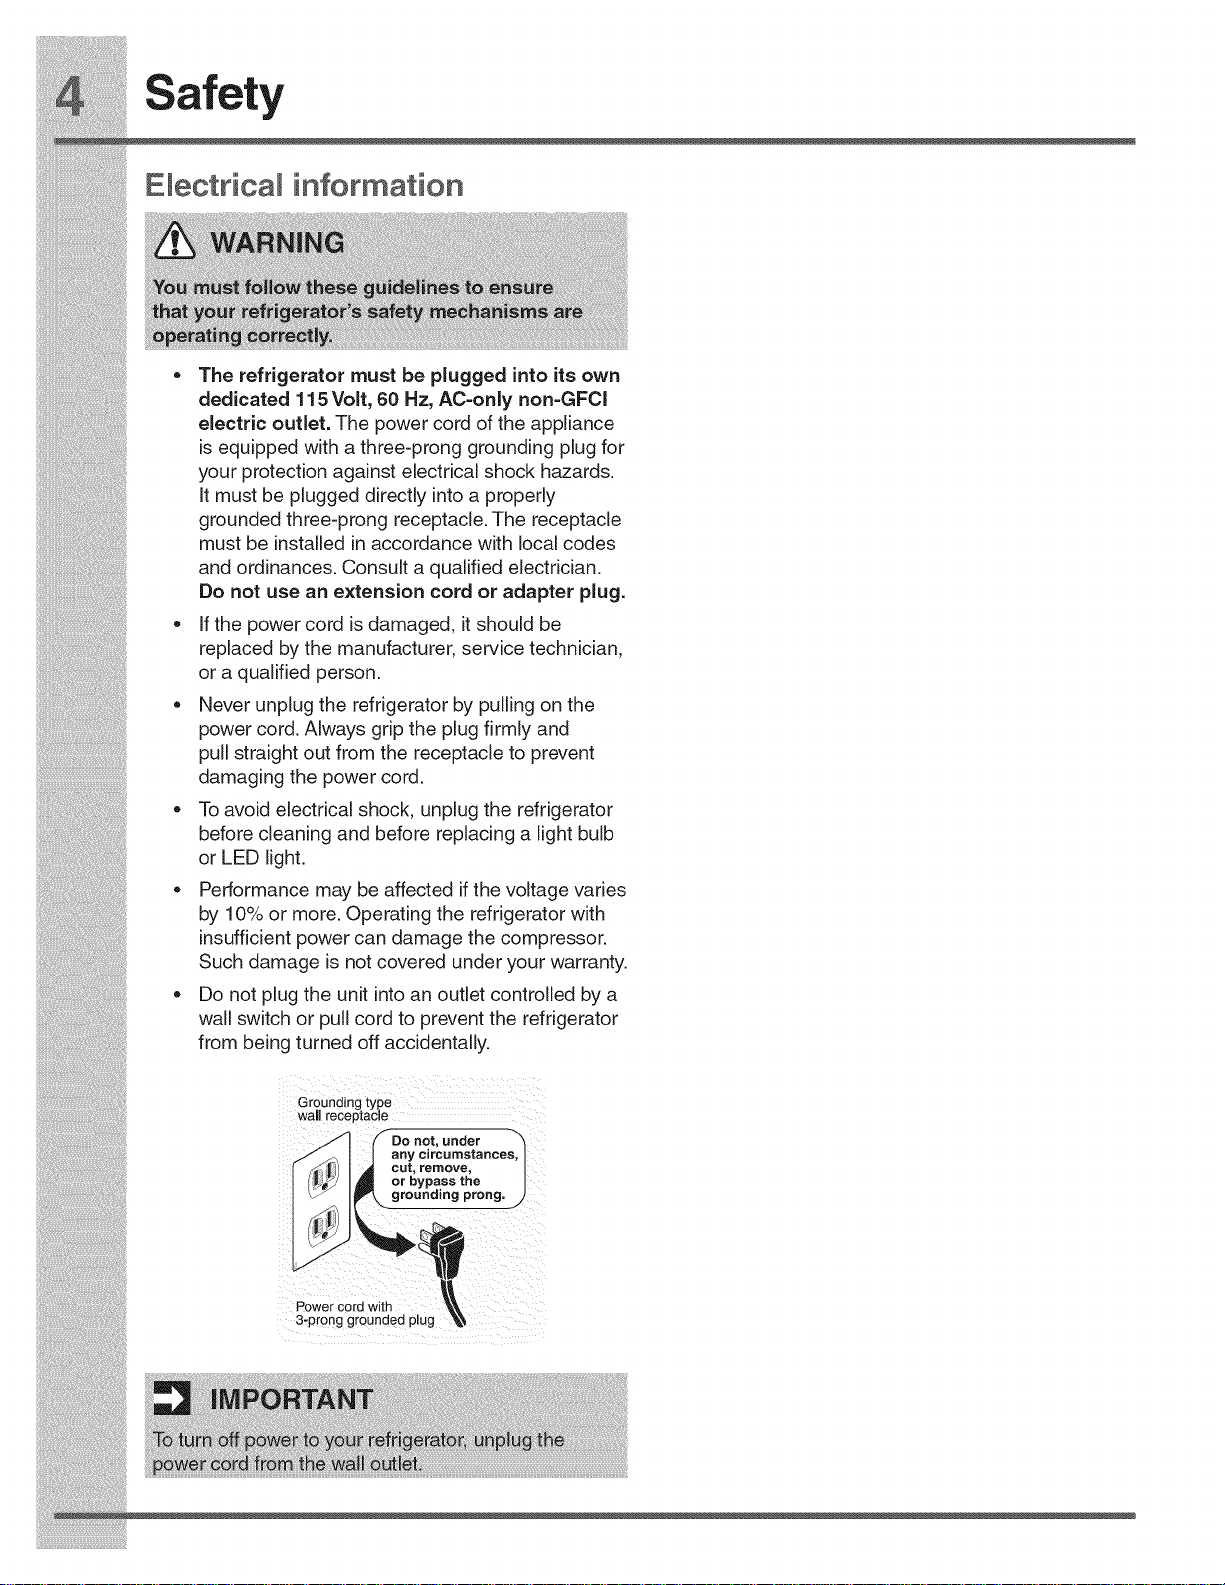
= The refrigerator must be plugged into its own
dedicated 115 Volt, 60 Hz, AC-only non-GFCl
electric outlet. The power cord of the appliance
is equipped with a three-prong grounding plug for
your protection against electrical shock hazards.
it must be plugged directly into a properly
grounded three-prong receptacle. The receptacle
must be installedin accordance with local codes
and ordinances. Consult a qualified electrician.
Do not use an extension cord or adapter plug.
• Ifthe power cord is damaged, it should be
replaced by the manufacturer, service technician,
or a qualified person.
Never unplug the refrigerator by pulling on the
power cord. Always grip the plug firmly and
pull straight out from the receptacle to prevent
damaging the power cord.
• To avoid electrical shock, unplug the refrigerator
before cleaning and before replacing a light bulb
• or LED light.
Performance may be affected if the voltage varies
by 10% or more. Operating the refrigerator with
insufficient power can damage the compressor.
Such damage is not covered under your warranty.
Do not plug the unit into an outlet controlled by a
wall switch or pull cord to prevent the refrigerator
from being turned off accidentally.
Grounding type
wwGallrnc_
3-prong groundedw= plug
;r c6rd from the Wall Outlet.
i!_!_i!i_ii_!i!_!_i!i_ii_!i!_!_i!i_ii_!i!_!_i!i_ii_!i!_!_i!i_ii_!i!_!_i!i_ii_!i!_!_i!i_ii_!i!_!_i!i_ii_!i!_!_i!i_ii_!i!_!_ii_i
Installation
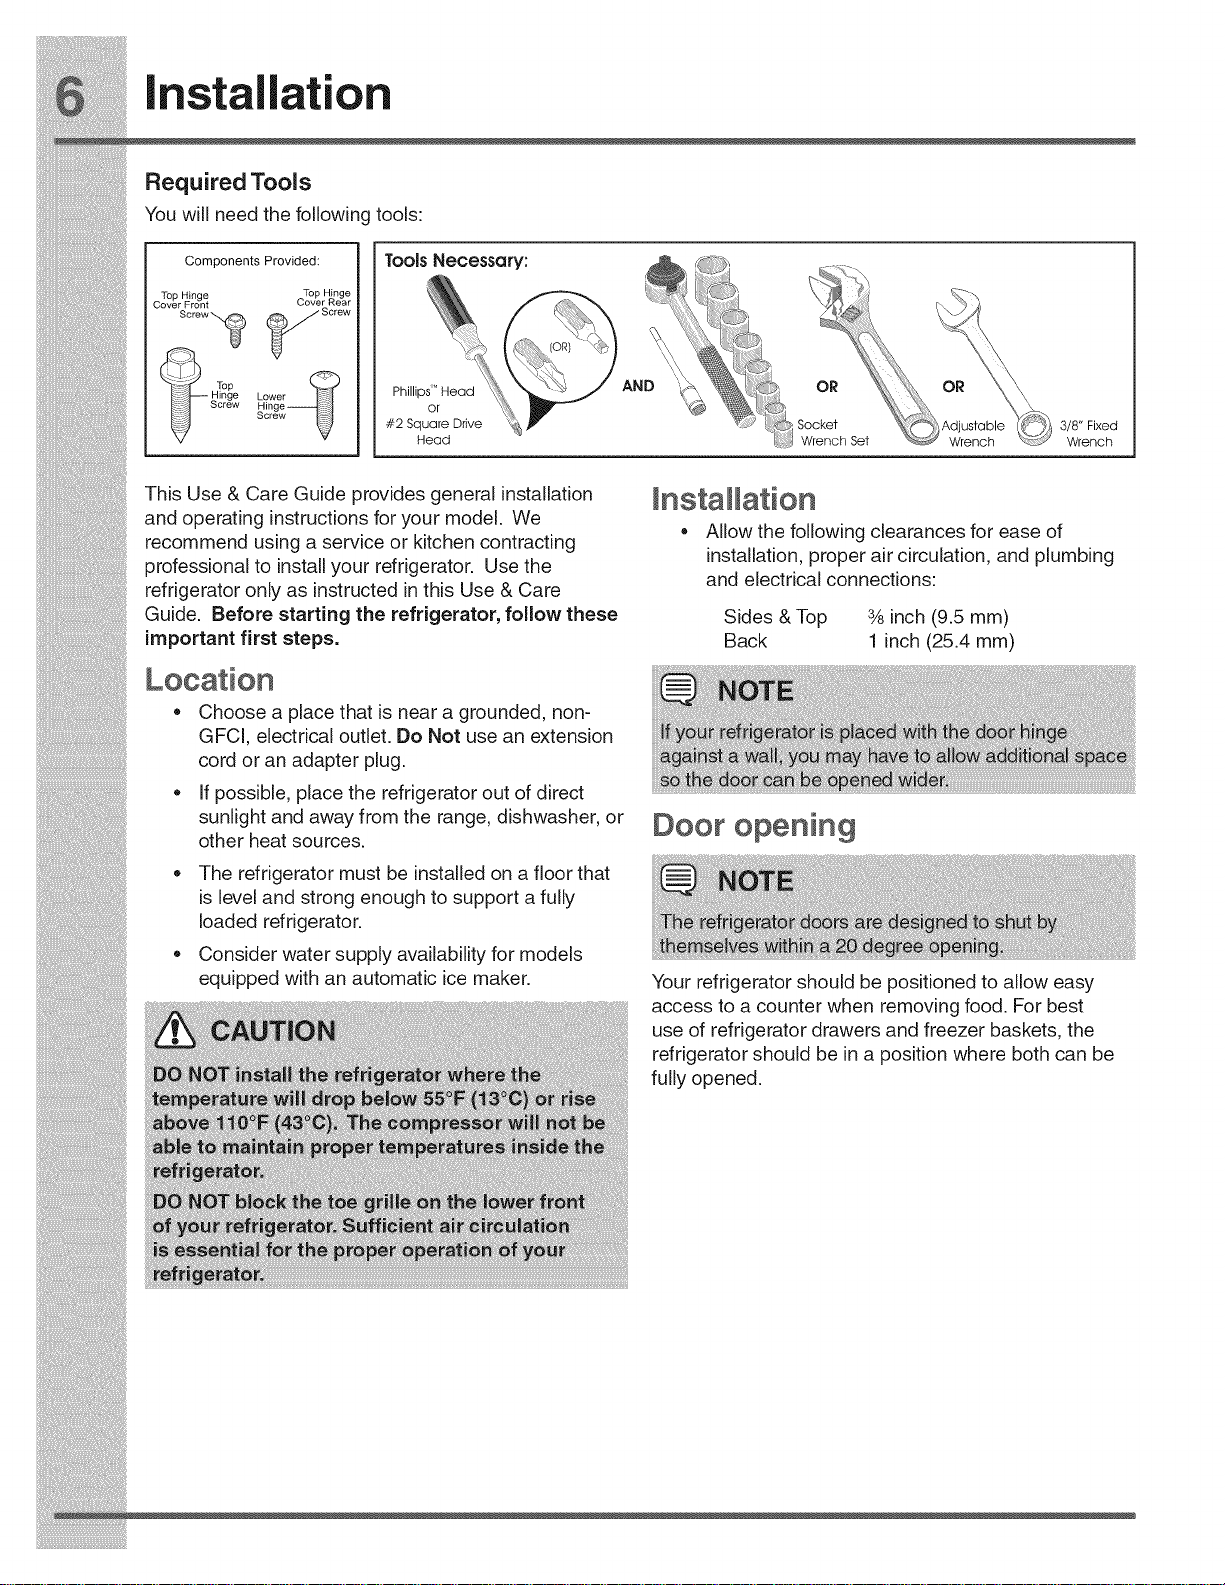
Required Tools
You will need the following tools:
Components Provided:
Top Hinge Top Hinge
Cover Front Cover Rear
S .... _ _S ....
sge_e_oow__
Screw_
Tools Necessary:
Phillips'" Head
or
#2 Square Drive
Head
AN OR
Socket 3/8" Fixed
Wrench Set Wrench
This Use & Care Guide provides general installation
and operating instructions for your model. We
recommend using a service or kitchen contracting
professional to install your refrigerator. Use the
refrigerator only as instructed in this Use & Care
Guide. Before starting the refrigerator, follow these
important first steps.
Allow the following clearances for ease of
installation, proper air circulation, and plumbing
and electrical connections:
Sides & Top % inch (9.5 mm)
Back 1 inch (25.4 mm)
Choose a place that is near a grounded, non-
GFCI, electrical outlet. Do Not use an extension
cord or an adapter plug.
i!_!_i!i_ii_!i!_!_i!i_ii_!i!_!_i!i_ii_!i!_!_i!i_ii_!i!_!_i!i_ii_!i!_!_i!i_ii_!i!_!_i!i_ii_!i!_!_i!i_ii_!i!_!_i!i_ii_!i!_!_ii_i
5
6
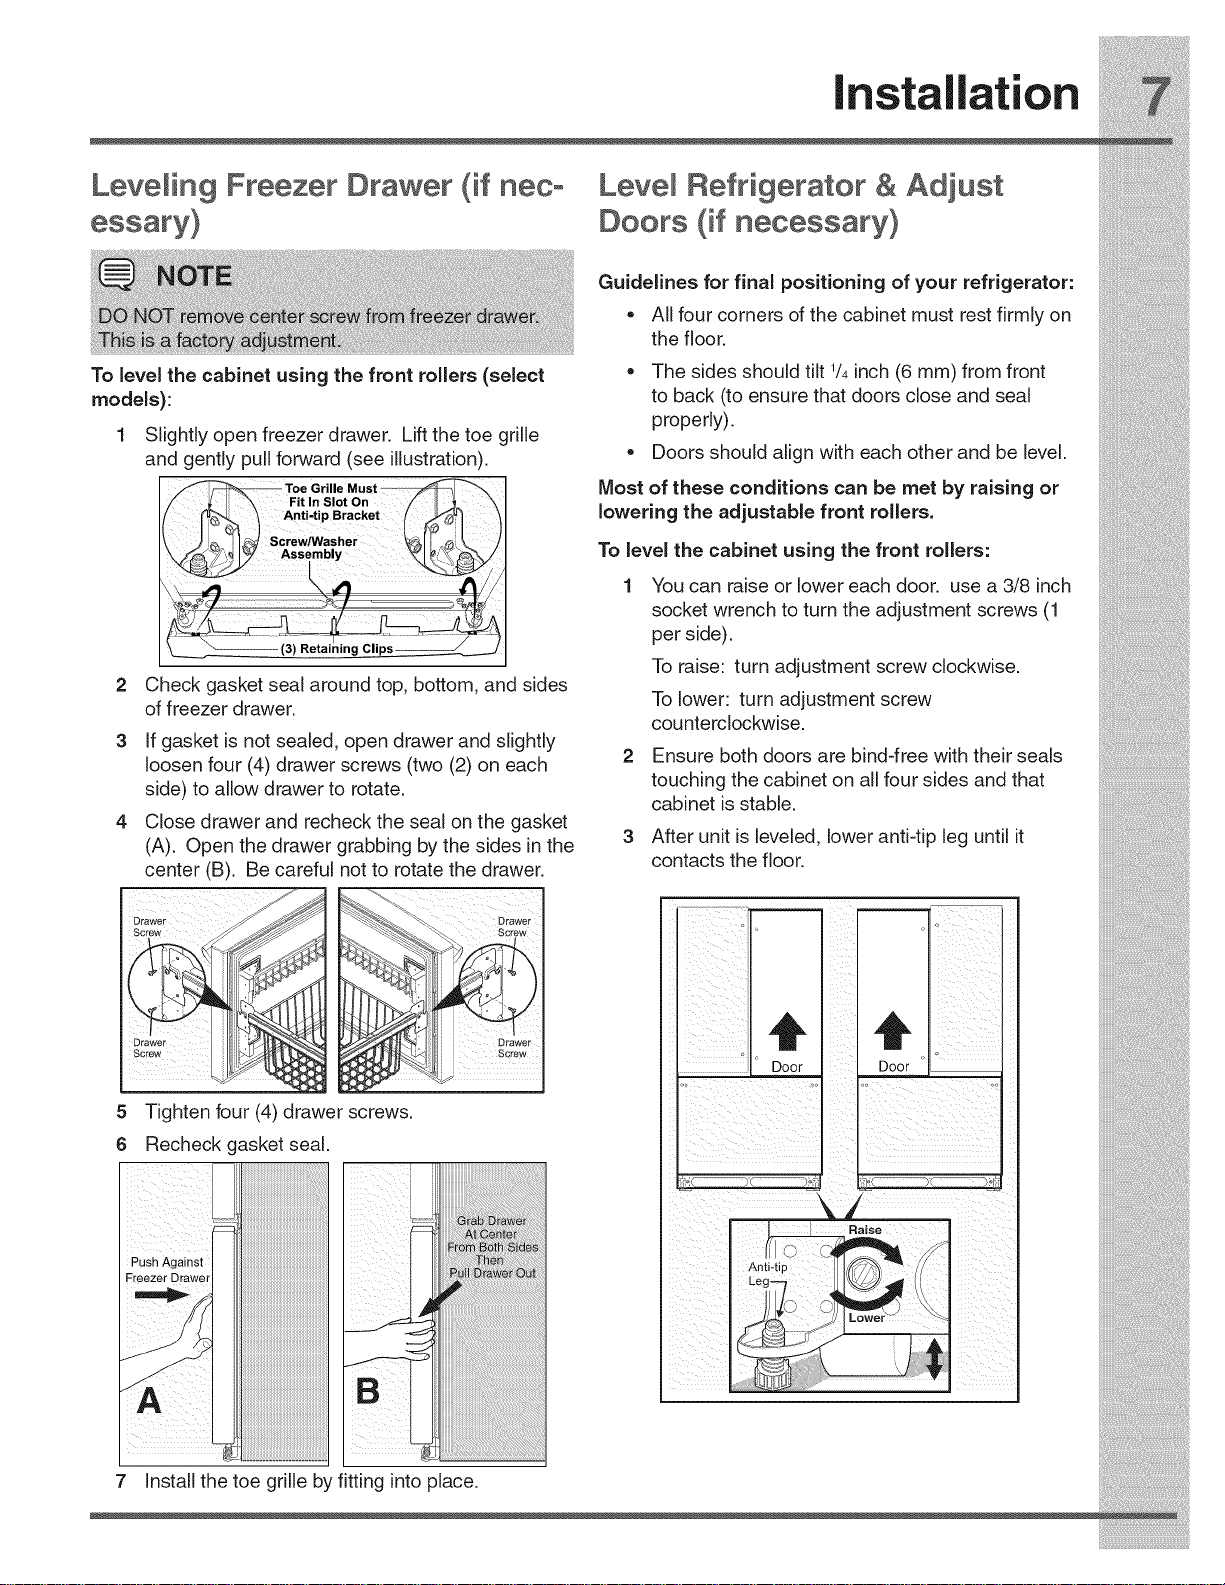
loosenfour(4)drawerscrews(two(2)oneach
side)toallowdrawertorotate.
Closedrawerandrecheckthesealonthegasket
(A).Openthedrawergrabbingbythesidesinthe
center(B). Be careful not to rotate the drawer.
Tighten four (4) drawer screws.
Recheck gasket seal.
7 Install the toe grille by fitting into place.
touching the cabinet on all four sides and that
cabinet is stable.
After unit is leveled, lower anti-tip leg until it
contacts the floor.
o
Door Door
i_i!_!_i!i_ii_!i!_!_i!i_ii_!i!_!_i!i_ii_!i!_!_i!i_ii_!i!_!_i!i_ii_!i!_!_i!i_ii_!i!_!_i!i_ii_!i!_!_i!i_ii_!i!_!_i!i_ii_!i!_!_iii_
Installation
i!_!_i!i_ii_!i!_!_i!i_ii_!i!_!_i!i_ii_!i!_!_i!i_ii_!i!_!_i!i_ii_!i!_!_i!i_ii_!i!_!_i!i_ii_!i!_!_i!i_ii_!i!_!_i!i_ii_!i!_!_ii_i
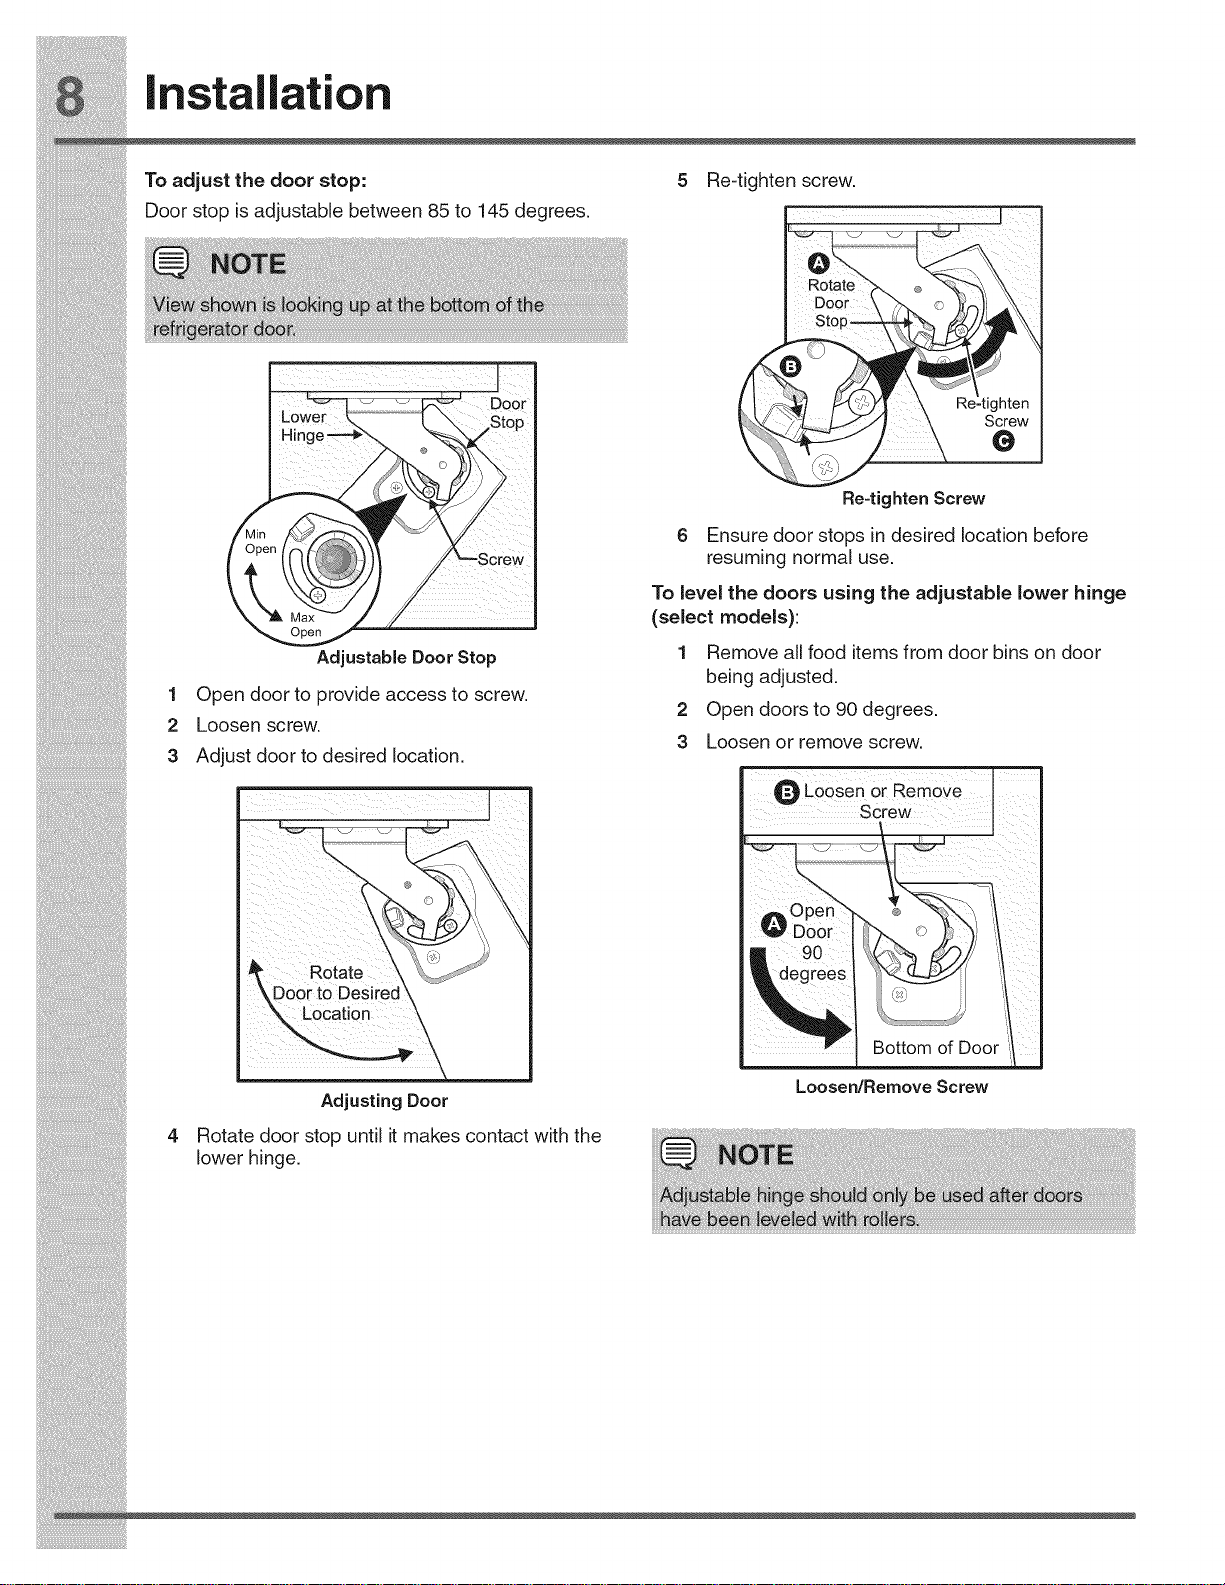
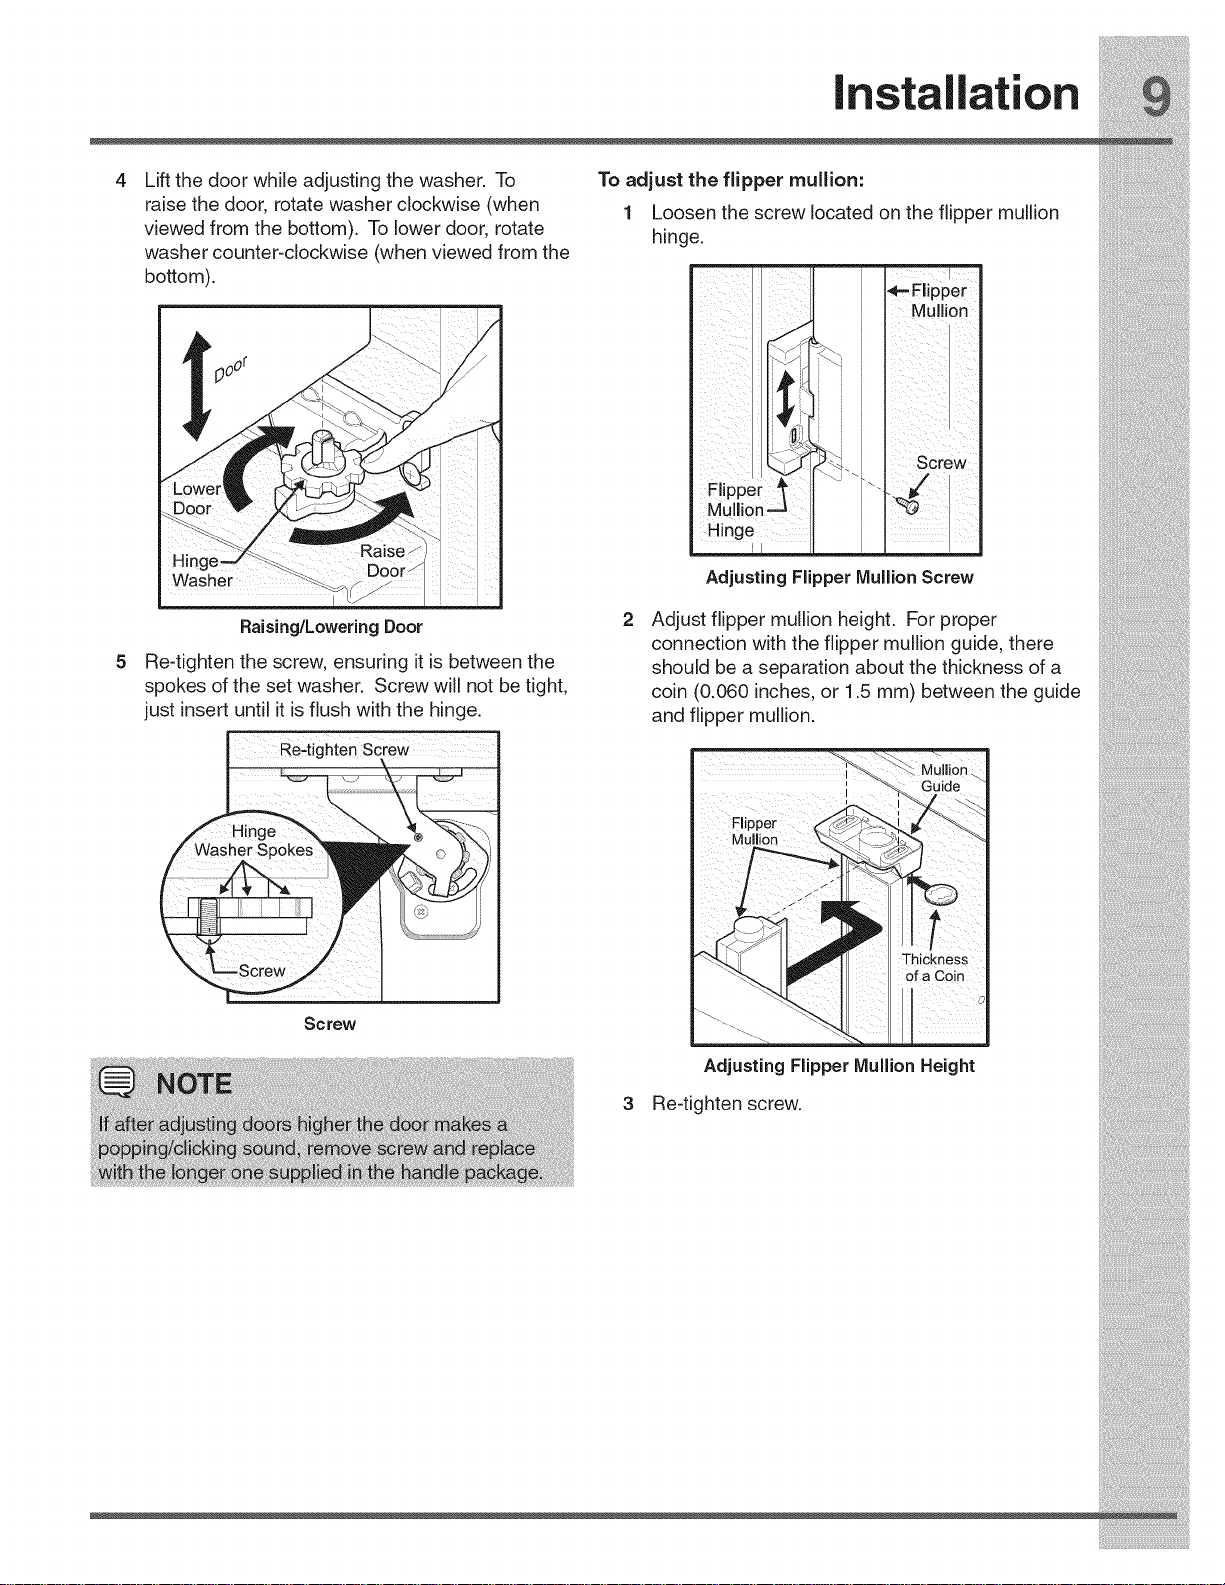
To adjust the door stop:
Door stop isadjustable between 85 to 145 degrees.
Adjustable Door Stop
1 Open door to provide access to screw.
2 Loosen screw.
3 Adjust door to desired location,
5 Re-tighten screw.
Screw
0
Re=tighten Screw
6 Ensure door stops in desired location before
resuming normal use.
To level the doors using the adjustable lower hinge
(select models):
1 Remove all food items from door bins on door
being adjusted.
2 Open doors to 90 degrees.
3 Loosen or remove screw.
i!_!_i!i_ii_!i!_!_i!i_ii_!i!_!_i!i_ii_!i!_!_i!i_ii_!i!_!_i!i_ii_!i!_!_i!i_ii_!i!_!_i!i_ii_!i!_!_i!i_ii_!i!_!_i!i_ii_!i!_!_ii_i
i_i!_!_i!i_ii_!i!_!_i!i_ii_!i!_!_i!i_ii_!i!_!_i!i_ii_!i!_!_i!i_ii_!i!_!_i!i_ii_!i!_!_i!i_ii_!i!_!_i!i_ii_!i!_!_i!i_ii_!i!_!_iii_
!_i_i_i!_!!i_!_i!i_!_i!!_!;_i_!i_i_!i!i_!!i_i!i_i!i!_!_i_ii_iiii_!_i_i_!_i_i!ii_!_!i!i_i_!!i_!!!_i_;_i!_;_i!_i_!_!;!i_;_!_!_
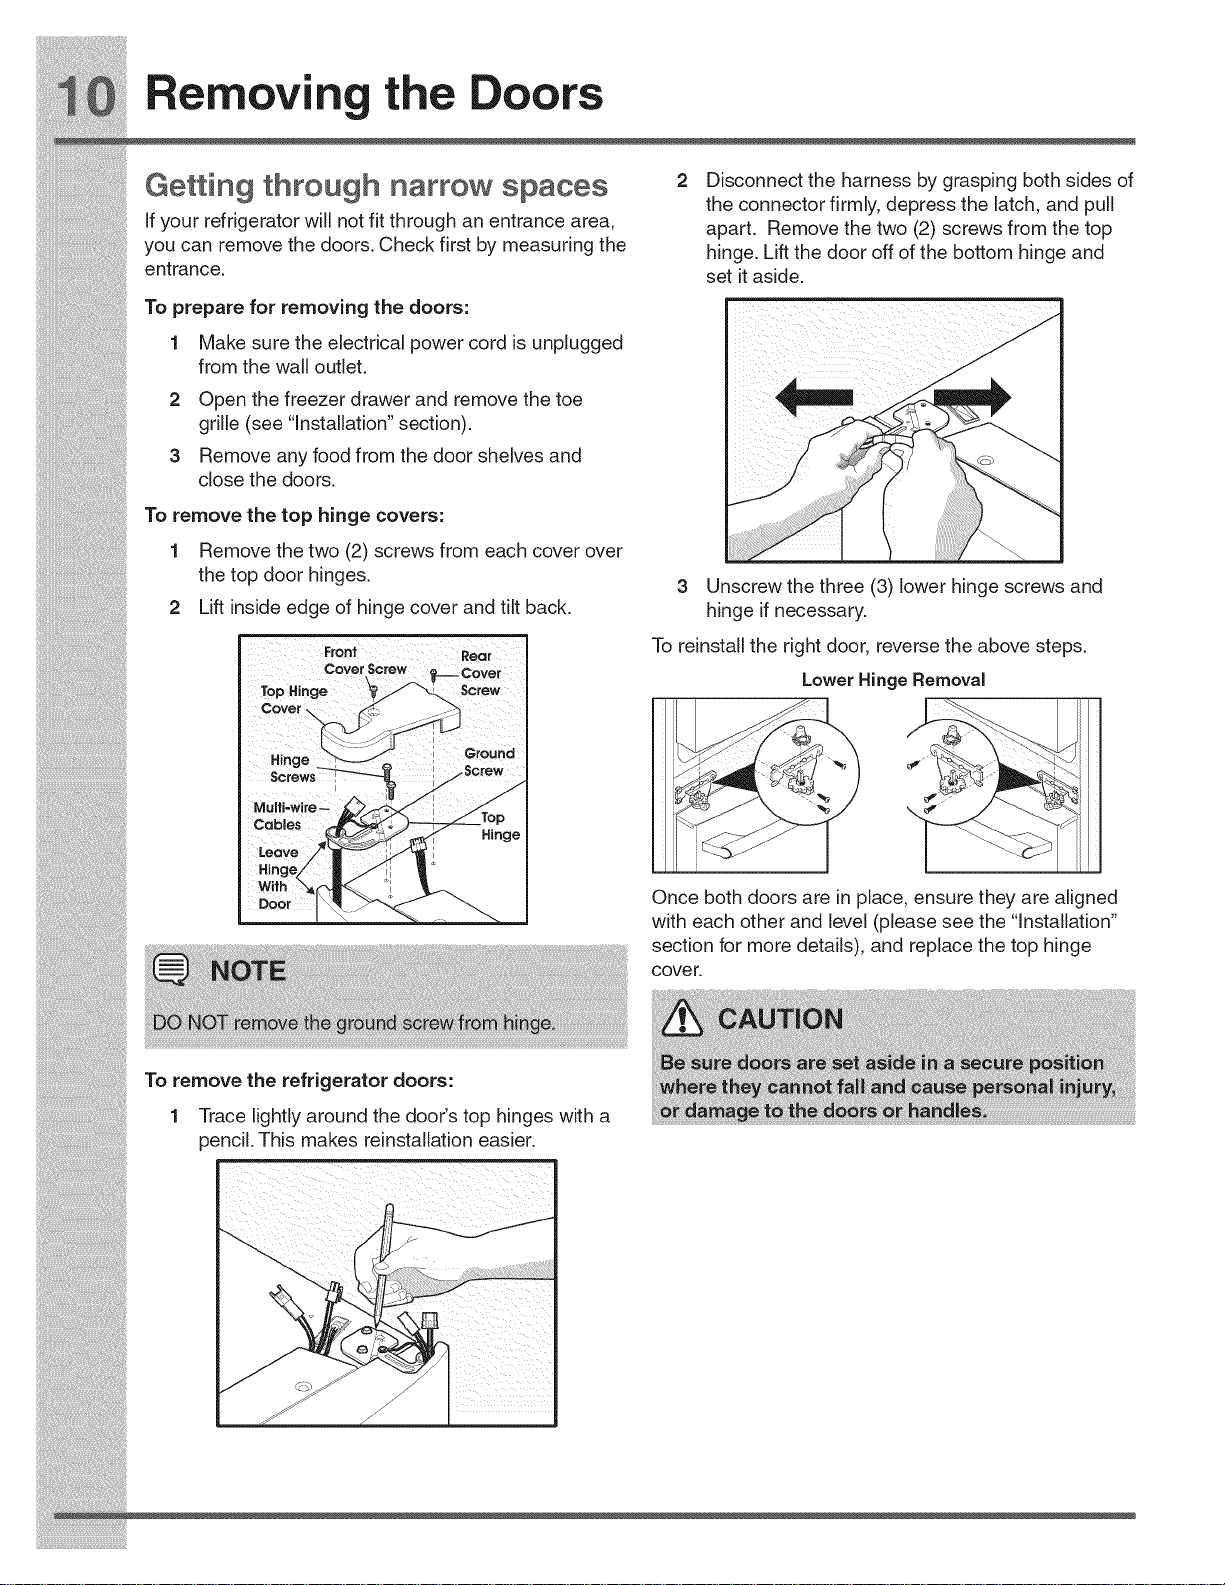
10 Removing the Doors
ttin thr h n rr w 2 Dsconnectthe harness bygraspng bothsdesof
G@ q OUq a 0 s_ao@s
, , _ . _, . the connectorfirmly depress the latch and pull
iTyour reTrigerator wht not Titthrougn an entrance area, apart Remove the two (2) screws from the top
youcanremovethedoors. Checkfirstbymeasuringthe hinge'.Liftthedooroffof'tlqebottomhingeanc!
entrance, set itaside.
To prepare for removing the doors:
1 Makesuretheelectricalpowercordisunpluggee
f,om,hew,t_o,_e_.
20penthefreezerdrawerandremovethetoe [ _ .._'_ [
grille(see"Installation section).
3 Removeanyfoodfromthedoorshelvesand
closethedoors.
1-o_o_ovothotophiogo_ovo_..
1 Removethetwo(2) screwsfromeachcoverover
the top door h nges
..... 3 Unscrew the three (3) lower hinge screws and
2 Lift insieeedgeofhingecoverandtiltback, hinge if necessary.
Toreinstalltherightdoor, reversetheabovesteps.
To_HinC°verscrew -- _ _ LowerHingeRemoval
i!_!_i!i_ii_!i!_!_i!i_ii_!i!_!_i!i_ii_!i!_!_i!i_ii_!i!_!_i!i_ii_!i!_!_i!i_ii_!i!_!_i!i_ii_!i!_!_i!i_ii_!i!_!_i!i_ii_!i!_!_ii_i
 Loading...