


|
|
|
|
|
|
|
|
|
|
|
|
|
|
|
|
|
|
|
|
|
|
|
|
|
|
|
|
|
|
|
|
|
|
|
|
|
|
|
|
|
|
|
|
|
|
|
|
|
|
|
|
|
|
|
|
................................................................ |
................................................................ |
||||||
Wall Oven |
Use and Care Guide |
||||||
139900500 Rev D December 2014

2
CONTENTS
6 |
Before Setting Oven Controls |
34 |
Care and Cleaning |
|
8 |
Setting Oven Controls |
38 |
Before You Call |
|
|
13 |
Fast Preheat |
|
38 Solutions to Common Problems |
|
14 |
Bake |
41 |
Warranty |
|
27 |
Adjusting the Oven Temperature |
|
|
PLEASE READ AND SAVE THIS GUIDE
Thank you for purchasing an Electrolux appliance. You’ve chosen a product that brings with it decades of professional experience and innovation. Ingenious and stylish, it has been designed with you in mind. So whenever you use it, you can be safe in the knowledge that you’ll get great results every time.
This Use & Care Guide is part of our commitment to customer satisfaction and product quality throughout the service life of your new appliance. We view your purchase as the beginning of a relationship. To ensure our ability to continue serving you, please use this page to record important product information.
CUSTOMER CARE AND SERVICE
Keep a Record for Quick Reference
Purchase Date
Electrolux model number
Electrolux serial number
When contacting Service, ensure that you have the following data available. The information can be found on the rating plate. Serial plate location: open oven drawer (some models) or warmer drawer (some models). We recommend the use of original spare parts. Registering your product with Electrolux enhances our ability to serve you. You can register online at www.electroluxappliances.com or by dropping your Product Registration Card in the mail. For toll-free telephone support in the U.S. and Canada:
1-877-4ELECTROLUX (1-877-435-3287).
VISIT OUR WEBSITE FOR ACCESSORIES, CONSUMABLES, AND MORE!
The Electrolux Webshop
In the Electrolux webshop. you’ll find everything you need to keep all your Electrolux appliances looking spotless and working perfectly. Electrolux offers a wide range of accessories designed and built to the high quality standards you would expect from specialist cookware to cutlery baskets, from bottle holders to delicate laundry bags.
Visit the webshop at:www.electrolux.com/shop
On the Electrolux Website
Want to learn more about your product or discover additional Electrolux appliances? If so, then check out the link below for product overviews, a list of features, photo galleries, product manuals (complete owner’s guide, installation instructions, wiring diagrams, product spec sheets), specifications, reviews, related accessories, and video guides.
For online support and Internet production information, visit http://www.electroluxappliances.com www.electrolux.com
1-877-435-3287
All Rights Reserved. Printed in U.S.A

3
Important Safety Instructions
Read all instructions before using this appliance. Save these instructions for future reference.
This manual contains important safety symbols and instructions. Please pay attention to these symbols and follow all instructions given.
Do not attempt to install or operate your appliance until you have read the safety precautions in this manual. Safety items throughout this manual are labeled with a WARNING or CAUTION statement based on the risk type.
DEFINITIONS
This is the safety alert symbol. It is used to alert you to potential personal injury hazards. Obey all safety messages that follow this symbol to avoid possible injury or death.
Indicates a potentially hazardous situation which, if not avoided, may result in death or serious injury.
Indicates a potentially hazardous situation which, if not avoided, may result in minor or moderate injury.
IMPORTANT! Indicates installation, operation, maintenance, or valuable information that is not hazard related.
General Information, Important, Hints and Tips
Indicates useful information to avoid malfunctions and is also used for hints and tips how the appliance works in the best way.Information icon followed by supporting text.
Storage In or On Appliance—Flammable materials should not be stored in an oven or near surface units. This includes paper, plastic, and cloth items, such as cookbooks, plastic ware, and towels, as well as flammable liquids. Do not store explosives, such as aerosol cans, on or near the oven.
Do Not Leave Children Alone - Children should not be left alone or unattended in the area where appliance is in use. They should never be allowed to sit or stand on any part of the appliance, including the storage drawer, lower broiler drawer, warmer drawer, or lower double oven.
Never cover any slots, holes, or passages in the oven bottom or cover an entire oven rack with materials, such as aluminum foil. Aluminum foil linings may trap heat, causing a fire hazard.
Tip Over Hazard
•A child or adult can tip the oven and be killed.
•Install the anti-tip device to oven
and/or structure per installation instructions.
•Ensure the anti-tip device is re-engaged when the oven is moved.
•Do not operate the oven without the anti-tip device in place and engaged.
•Failure to follow these instructions can result in death or serious burns to children and adults.
|
Refer to the installation |
|
instructions supplied with your |
|
appliance for proper installa- |
|
tion. |
|
Check for proper installation |
|
with a visual check that the |
|
anti-tip screws are present. |
|
Test the installation with light |
Anti-tip mounting holes |
downward pressure on the |
|
open oven door. The oven |
should not tip forward.
Stepping, leaning, or sitting on the door or drawers of an oven can result in serious injuries and also cause damage to the appliance. Do not allow children to climb or play around the oven. The weight of a child on an open over door may cause the oven to tip, resulting in serious burns or other injury.
Wear proper apparel. Loose-fitting or hanging garments should never be worn while using this appliance. Do not let clothing or other flammable materials come into contact with hot surfaces.
Do not heat unopened food containers. Build-up of pressure may cause container to burst and result in injury.
Do not use water or flour on grease fires. Smother fire or flame or use dry chemical or foam-type extinguisher. Cover the fire with a pan lid or use baking soda.

4
Important Safety Instructions
Use dry potholders. Moist or damp potholders on hot surfaces may result in burns from steam. Do not let potholders touch hot cooking areas. Do not use towels or other bulky cloths.
Do not store items of interest to children in the cabinets above a range or on the backguard of the range. Children climbing on the range to reach items could be seriously injured.
When heating fat or grease, watch it closely. Grease may catch fire if it becomes too hot.
IMPORTANT! Important Safety Notice - The California Safe Drinking Water and Toxic Enforcement
Act requires the governor of California to publish a list of substances known to cause cancer, birth defects, or other reproductive harms, and it requires businesses to warn customers of potential exposures to such substances.
Read and follow the below instructions and precautions for unpacking, installing, and servicing your appliance:
•Remove all tape and packaging before using the oven. Destroy the carton and plastic bags after unpacking the oven. Never allow children to play with packaging material.
•Proper Installation—Be sure your appliance is properly installed and grounded by a qualified technician in accordance with the National Electrical Code ANSI/NFPA No. 70 latest edition and local electrical code requirements. In Canada, install in accordance with CSA Standard C22.1, Canadian Electrical code, Part 1, and local electrical code requirements. Install only per installation instructions provided in the literature package for this oven.
•User Servicing—Do not repair or replace any part of the appliance unless specifically recommended in the manuals. All other servicing should be done only by a qualified technician. This reduces the risk of personal injury and damage to the oven.
•Ask your dealer to recommend a qualified technician and an authorized repair service. Know how to disconnect the power to the oven at the circuit breaker or fuse box in case of an emergency.
•Never modify or alter the construction of an oven by removing the leveling legs, panels, wire covers, anti-tip brackets/screws, or any other part of the oven.
•Remove the oven door from any unused oven if it is to be stored or discarded.
•Be sure to have an appropriate foam-type fire extinguisher available, visible, and easily located near the appliance.
•Do not attempt to operate the oven during a power failure. If the power fails, always turn off the oven. If the oven is not turned off and the power resumes, the oven will begin to operate again. Once the power resumes, reset the clock and oven function.
•Cold temperatures can damage the electronic control. When using this appliance for the first time, or when the appliance has not been used for an extended period of time, be sure the appliance has been in temperatures above 32ºF
(0ºC) for at least 3 hours before turning on the power to the appliance.
IMPORTANT INSTRUCTIONS FOR USING YOUR OVEN
•Never use your appliance for warming or heating the room.
•Use care when opening oven door, lower oven door, or warmer drawer (some models). Stand to the side of the oven when opening the door of a hot oven. Let hot air or steam escape before you remove or replace food in the oven.
•Keep oven vent ducts unobstructed. Touching surfaces in this area when the oven is on may cause severe burns. Do not place plastic or heatsensitive items on or near the oven vent. These items can melt or ignite.
•Placement of Oven Racks - Always place oven racks in desired location while oven is cool. If rack must be moved while oven in hot, do not let potholder contact hot heating element in oven. Use potholders and grasp the rack with both hands to reposition. Remove all bakeware and utensils before moving the rack.
•Do not use a broiler pan without its insert. Broiler pans and inserts allow dripping fat to drain away from the high heat of the broiler. Do not cover the broiler insert with aluminum foil; exposed fat and grease could ignite.
•Protective Liners - Do not use aluminum foil to line oven bottoms, except as suggested in the manual. Improper installation of these liners may result in a risk of electric shock, or fire.
•Do not cook food on the oven bottom. Always cook in proper bakeware and always use the oven racks.
Save these instructions for future reference.

5
Important Safety Instructions
IMPORTANT INSTRUCTIONS FOR CLEANING YOUR OVEN GROUNDING INSTRUCTIONS
Before manually cleaning any part of the oven, be sure all controls are turned off and the oven is cool. Cleaning a hot oven can cause burns.
Clean the oven regularly to keep all parts free of grease that could catch fire. Do not allow grease to accumulate.
Always follow the manufacturer’s recommended directions for use of kitchen cleaners and aerosols. Be aware that excess residue from cleaners and aerosols may ignite causing damage and injury.
Clean ventilating hoods frequently. Grease should not be allowed to accumulate on the hood or filter. Follow the manufacturer’s instructions for cleaning hoods.
SELF-CLEANING OVENS
•Clean only the parts listed in this manual. Before using self-clean, remove the broiler pan, any food, utensils, and bakeware from the oven. Remove oven racks unless otherwise instructed.
•Do Not Use Oven Cleaners. No commercial oven cleaner or oven liner protective coating of any kind should be used in or around any part of the oven.
•Do Not Clean Door Gasket. The door gasket is essential for a good seal. Care should be taken not to rub, damage, or move the gasket.
•Some birds are extremely sensitive to the fumes given off during the self-clean cycle of any oven. Move birds to another well-ventilated room.
Avoid fire hazard or electrical shock. Failure to follow this warning may cause serious injury, fire, or death.
This appliance must be supplied with the proper voltage and frequency, and connected to an individual, properly grounded branch circuit, protected by a circuit breaker or fuse.
It is the responsibility and obligation of the consumer to contact a qualified installer to assure that the electrical installation is adequate and is in conformance with all local codes and ordinances.
See the installation instructions packaged with this appliance for complete installation and grounding instructions.
DO NOT TOUCH HEATING ELEMENTS OR INTERIOR SURFACES OF OVEN - Heating elements may be hot even though they are dark in color. Interior surfaces of an oven become hot enough to cause burns. During and after use, do not touch, or let clothing or other flammable materials contact heating elements or interior surfaces of oven until they have had sufficient time to cool. Other surfaces of the appliance may become hot enough to cause burns - among these surfaces are (identification of surfaces - for example, oven vent openings and surfaces near these openings, oven doors, and windows of oven doors).
Save these instructions for future reference.

6 |
Before Setting Oven Controls |
BEFORE SETTING OVEN CONTROLS
Oven Vents
The oven vent is located under the control panel. When the oven is on, warm air passes through this vent. This venting is necessary for proper air circulation in the oven and good baking results. Do not block oven vent. Steam or moisture may appear near the oven vent. This is normal.
Types of Oven Racks
Flat Oven Rack
Flat oven racks (or the flat handle oven rack) may be used for most cooking needs and may be placed in most oven rack positions.
Oven Vent |
Warm Air |
Figure 1: Oven vent location
Some models are equipped with a cooling fan that runs during the cooking process to cool internal electronic components. It is normal for this fan to continue to run for an extended period of time, even when the oven is off.
Do not line the oven walls, racks, bottom, or any other part of the oven with aluminum foil. Doing so will alter heat distribution, produce poor baking results, and may cause permanent damage to the oven interior. During fresh clean temperatures, the oven will be hot enough to melt foil.
Figure 2: Flat oven rack
Figure 3: Flat handle oven rack
Offset Oven Rack (Some Models)
The offset oven rack provides additional stepdown positions from the standard flat rack design. The offset design positions the base of the rack about 1/2 of a rack position lower than the flat rack and may be used in most oven rack positions.
Always use potholders or oven mitts when removing food or adjusting the oven racks. Wait until the oven in completely cooled if possible. Oven racks may be very hot and may cause burns.
Arranging, Removing, and Replacing Flat or Offset Oven Racks
•To Arrange: Always arrange the oven racks when the oven is cool (prior to operating the oven).
•To Remove: Pull the oven rack straight forward until it reaches the stop position. Lift up front of oven rack slightly and slide out.
•To Replace: Place the oven rack on the rack guides on the oven walls. Tilt the front of the rack upward slightly and slide the oven rack back into place.
Figure 4: Offset oven rack
Luxury-Glide™ Oven Rack
The fully extendable Luxury-Glide™ oven rack allows you to effortlessly extend your food away from the oven.
LuxuryGlide oven rack
Figure 5: Luxury-Glide™ Oven Rack

Before Setting Oven Controls |
7 |
Luxury Glide™ Oven Racks
The fully extendable Luxury-Glide™ rack makes food preparation easier. This oven rack has glide tracks that allow the rack to be pulled away from the oven without rubbing the sides of the oven wall.
Removing and Replacing the Luxury-Glide™ Oven Racks:
Always use potholders or oven mitts when removing food or adjusting the oven racks. Wait until the oven in completely cooled if possible. Oven racks may be very hot and may cause burns.
Always remove/replace the oven racks before turning on the oven (when the oven is cool).
•To remove - Using one hand, reach through handle opening and lift up on the release lever located across the lower front of the rack as shown in Figure 6.
While holding up the release lever, pull the glide rack out of the oven until the stop position is reached (Figure 7). Using both hands, grasp the upper and lower portions of the glide rack. Lift up the front of the rack slightly and continue to pull the rack away from the oven (Figure 8). Be sure to grasp both upper and lower rack portions together when removing or handling the glide rack. The rack portions move independently and are difficult to handle unless held together.
•To replace - grasp both upper and lower portions of glide rack, lift and hold the rack level between the oven cavity walls. Tilt the front of the rack upward slightly and slide the rack completely into position. Some force may be necessary to make sure the oven rack has snapped completely into place.
IMPORTANT! Remove all oven racks before starting a fresh clean cycle. If oven racks are left inside the oven during a cleaning cycle, the slide ability of the Luxury-Glide™ oven racks may be damaged and all of the oven racks will lose their shiny finish.
IMPORTANT! To prevent possible damage to the oven, do not attempt to close the oven door until all the oven racks are fully positioned back inside the oven cavity.
Clean oven racks according to the instructions provided in the “Care and Cleaning” section on page 34.
upper rack  portion

 lower rack release portion
lever
Figure 6: Luxury-Glide™ extendable oven rack
Figure 7: Removing the oven rack
Figure 8: Replacing the oven rack
8 |
Setting Oven Controls |
SETTING OVEN CONTROLS
1 |
2 |
3 |
4 |
5 |
6 |
7 |
|
8 |
|
|
|
|
|
|
|
|
|
|
|
|
|
|
|
|
|
|
|
|
|
|
|
|
|
|
|
|
|
|
|
|
|
|
|
|
|
|
|
|
|
|
|
|
|
|
|
|
|
|
|
9 |
10 |
11 |
12 |
13 |
|
14 |
|
|
15 |
||||||||||||||
|
|
|
|
|
|
|
|
|
|
|
|
|
|
|
|
|
|
|
|
|
|
|
|
|
|
|
|
|
|
|
|
|
|
|
|
|
|
|
|
|
|
|
|
|
|
|
|
|
|
|
|
|
|
|
|
|
|
|
|
|
|
|
|
|
|
|
|
|
|
|
|
|
|
|
|
|
|
|
|
|
|
|
|
|
|
|
|
|
|
|
|
|
|
|
|
|
|
|
|
|
|
|
|
|
|
|
|
|
|
|
|
|
|
|
|
|
|
|
|
|
|
|
|
|
|
|
|
|
|
|
|
|
|
|
|
|
|
|
|
|
|
|
|
|
|
|
|
|
|
|
|
|
|
|
|
|
|
|
|
|
|
|
|
|
|
|
|
|
|
|
|
|
|
|
|
|
|
|
|
|
|
|
|
|
|
|
|
|
|
|
|
|
|
|
|
|
|
|
|
|
|
|
|
|
|
|
|
|
|
|
|
|
|
|
|
|
|
|
|
|
|
|
|
|
|
|
|
|
|
|
|
|
|
|
|
|
|
|
|
|
|
|
|
|
|
|
|
|
|
|
|
|
|
|
|
|
|
|
|
|
|
|
|
|
|
|
|
|
|
|
|
|
|
|
|
|
|
|
|
|
|
|
|
|
|
|
|
16 |
17 |
18 |
19 |
20 |
|
|
|
|
|
|
|
|
|
|
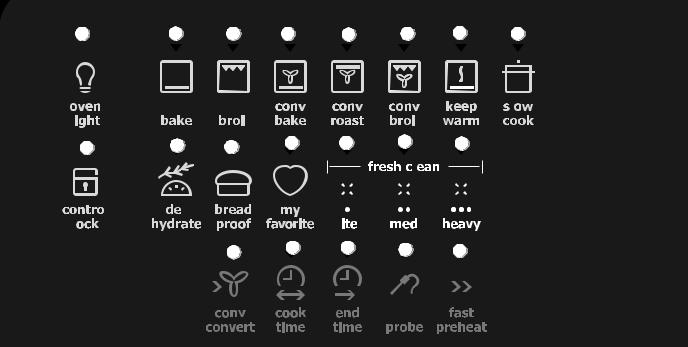
1.Oven Light1 - Use to turn the internal “theater” style oven light on and off.
2.Bake - Use to enter the normal baking mode temperature and start a normal bake function, at any temperature from 170°F to 550°F (76°C to 288°C).
3.Broil - Use to select the broil function, at any temperature from 300°F to 550°F (148°C to 288°C).
4.Conv Bake - Use to select the convection baking function, which is used to obtain the best culinary results when baking with multiple pans and racks at any temperature from 170°F to 550°F (76°C to 288°C).
5.Conv Roast - Use to select the convection roasting function, best for cooking tender cuts of beef, lamb, pork, and poultry. Use this mode when cooking speed in desired at any temperature from 170°F to 550°F (76°C to 288°C).
6.Conv Broil - Use to select the convection broil function, best for thicker cuts of meat, fish, and poultry. Uses the broil element and a fan to circulate heat evenly and continuously at any temperature from 300°F to 550°F (148°C to 288°C).
7.Keep Warm - Use to select the keep warm function, best for keeping oven cooked foods warm after cooking has finished at any temperature from 150°F to 190°F (66°C to 86°C).
8.Slow Cook - Use to select the slow cook function, which cooks food more slowly, at lower temperatures and provides cooking results much the same way as a Slow Cooker or Crock-Pot.
9.Control Lock2 - Use to disable all oven functions by locking the oven door and control panel.
10.Dehydrate - Use to select the dehydrate function, which dries foods with heat from the bake and the convection elements, circulating heat throughout the oven by the convection fan.
11.Bread Proof - Use to select the bread proof function, which prepares the dough for baking by activating the yeast.
12.My Favorite - Use the my favorite function key to save your most used and complex cooking sequences, spanning cooking mode, target temperature, and cook time (if any).
13.Lite (Fresh Clean Cycle) - Use to start a 2-hour fresh clean cycle.
14.Med (Fresh Clean Cycle) - Use to start a 3-hour fresh clean cycle.
15.Heavy (Fresh Clean Cycle) - Use to start a 4-hour fresh clean cycle.
16.Conv Convert - Use to convert a standard baking recipe temperature to a temperature for convection baking.
17.Cook Time - Use to set a cooking duration time with an auto shut off.
18.End Time - Use to select the time at which the cooking will end. It allows the oven to be set to shut off automatically at a set time of the day.
19.Probe - Use to activate the meat probe function, enabling you to test internal food temperature at any temperature from 130°F to 210°F (54°C to 98°C).
20.Fast Preheat - Use to preheat the oven quickly to any temperature from 170°F to 550°F (76°C to 288°C).
Setting Oven Controls |
9 |
23 |
26 |
21
22 |
|
|
|
|
24 |
25 |
|||
27 |
28 |
||
|
|
|
|
|
|
|
|
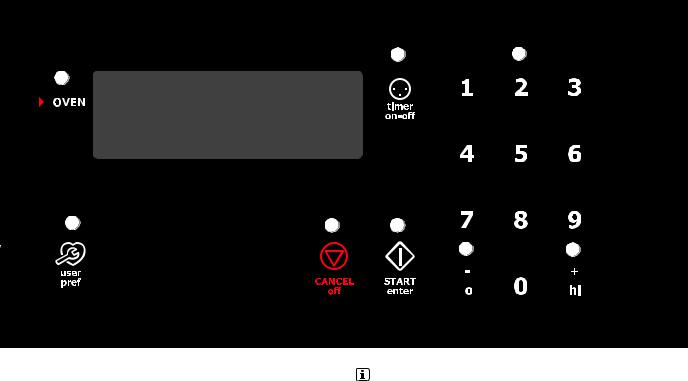
21.Oven - Use to light up the available cooking modes functions.
22.User Pref - Use to bring the user preference menu in the display. Available when the oven is not being used, use this function to set such options as time of day, audio control, and many more.
23.Timer On-Off - Use to set or cancel the minute timer. The minute timer does not start or stop cooking.
24.CANCEL Off - Use to cancel any function previously entered except the time of day and minute timer. Push the CANCEL off key to stop cooking.
25.START Enter - Use to start all oven functions.
26.0 thru 9 - Use to enter temperature and times.
27.-lo - Use to lower the temperature and times. This key is used in conjunction with the +hi key to set the Sabbath feature.
28.+hi - Use to raise the temperature and times.This key is used in conjunction with the -lo key to set the Sabbath feature.
Over Control Footnotes
1.The oven light key will appear on the left-hand side of the oven control on 30” models, and it will appear on the righthand side of the oven control on 27” models.
2.The control lock key will appear on the left-hand side of the oven control on 30” models, and it will appear on the righthand side of the oven control on 27” models.
10 |
Setting Oven Controls |
Control and Time Settings
Table 1: Minimum and maximum control settings
Feature |
Minimum Temp |
Maximum Temp |
|
|
|
Fast Preheat |
170°F (76°C) |
550°F (288°C) |
|
|
|
Bake |
170°F (76°C) |
550°F (288°C) |
|
|
|
Broil |
300°F (148°C) |
550°F (288°C) |
|
|
|
Conv Bake |
170°F (76°C) |
550°F (288°C) |
|
|
|
Conv Roast |
170°F (76°C) |
550°F (288°C) |
|
|
|
Conv Broil |
300°F (148°C) |
550°F (288°C) |
|
|
|
Keep Warm |
150°F (66°C) |
190°F (86°C) |
|
|
|
Slow Cook |
Lo 225°F (108°C) |
Hi 275°F (134°C) |
|
|
|
Table 2: Minimum and maximum time setting
Feature |
Minimum Time |
Maximum Time |
|
|
|
Timer |
1 min |
11 hr 59 min |
|
|
|
Clock 12 hour |
1:00 hr |
11 hr 59 min |
|
|
|
Clock 24 hour |
0:00 hr |
23 hr 59 min |
|
|
|
Cook time 12 hour |
1 min |
11 hr 59 min |
|
|
|
End time 12 hour |
1:00 hr |
12 hr 59 min |
|
|
|
End time 24 hour |
0:00 hr |
23 hr 59 min |
|
|
|
Clean Duration |
(2 hr) |
(4 hr) |
|
|
|
Setting the User Preferences
The User Preferences menu includes all user defined options. This feature enables you to control the various options of the electronic controls. This menu features the Time of Day, Celsius or Fahrenheit display mode, Continuous Bake or 12 Hour Energy Saving modes, Clock display or No-Clock display, 12 Hours Time of Day or 24 Hours Time of Day, Audio Control, and Adjusting the oven temperature. The User Preferences menu is only available when the oven is not on.
To browse through the User Preferences menu:
1.To bring up the User Preferences menu, press user pref.
2.Press user pref again to browse through the menu pages and select the feature you wish
to adjust.
3.Press +hi or -lo to toggle through a feature’s available choices, which can include the abil-
ity to increase or decrease the numeric values. You may also use the numeric keypad to input precise values.
4.Press START enter to accept a new option entry or press user pref to advance to the
next preference.
5.Press CANCEL off to save your entries and exit the user preferences mode.
Setting the Clock-Time of Day
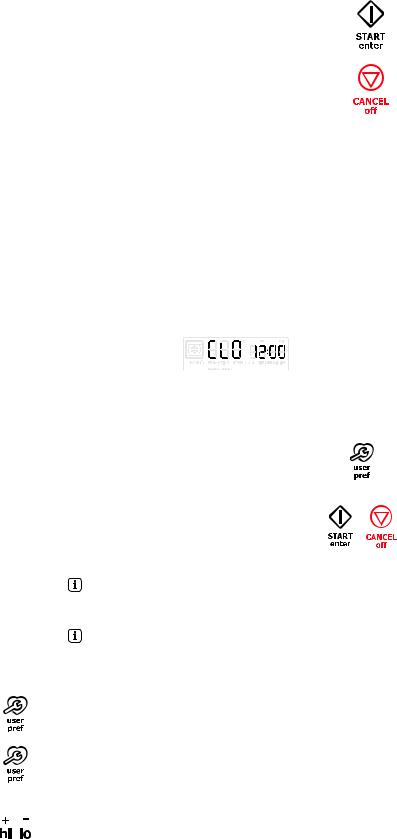
When the appliance is powered up for the first time or when the
electric supply to the appliance has been interrupted, the display will flash 12:00 (Figure 9). Before any function of the oven
can be set, CANCEL off must be pressed. This will set the clock at 12:00. To set the clock for the actual time the user pref key must first be pressed to bring the oven to the clock mode. Be sure to set the correct time on the clock before using the oven, especially if cooking with added time instructions.
.
Figure 9: 12:00 initial display
To set the clock time (example: 1:30):
1.Press user pref. CLO 1200 appears in the display.
2. |
Enter 1 3 0 using the numeric keypad. |
130 |
3. |
Press START enter to accept the new |
|
|
time. |
|
4. |
Press CANCEL off to exit the user pref- |
|
|
erences menu. |
|
The clock cannot be adjusted while the oven is cooking, the timer is active, or during a fresh clean cycle.
If an invalid time is entered, the control sounds an error tone, a chime. Re-enter a valid time and press START enter. Pressing CANCEL off automatically sets for 12:00.
Setting Oven Controls |
11 |
Setting the Clock Display-On or Off
The clock display mode allows you to turn the clock display on or off.
To set the clock display:
1.Press user pref until preset clock display mode appears (Figure 10).
2.Use +hi or -lo to toggle to the CLO
off option.
3.Press START enter to accept, then
CANCEL off to exit the preferences mode.
Figure 10: Clock on (L) or off (R) display
User preference options are not available while using any cooking function, when using the kitchen timer, or during fresh clean.
Setting 12 or 24 Hour Display Mode
The oven control is factory preset to display the time of day in the 12-hour clock setting. The display can be changed to a 24 hour clock setting or to the OFF mode.
When the clock display is turned off, it continues to run and will function based on the previously set 12 or 24-hour setting.
To change clock display modes:
1.Press user pref until the preset 12hr clock display mode appears
(Figure 11).
1.Use +hi or -lo to toggle to the 24hr
option (Figure 11).
2.Press START enter to accept, then
CANCEL off to exit the preferences mode.
Figure 11: Clock 12 hour (L) or 24 hour (R) display
You cannot change the clock display mode while the oven is active with any cooking function or during fresh clean.
Changing Oven Temperature Display-Fahrenheit (°F) or Celsius (°C)
The oven control can be programmed to display temperatures in °F or °C. The oven has been preset at the factory to display in °F
To change the temperature display mode:
1.Press user pref key until F-C F appears in display (Figure 12).
2.Use +hi or -lo to toggle between the F or C option.
3.Press START enter to accept.
4.Press CANCEL off to exit the preferences
mode.
Figure 12: F or C selection
You cannot modify the oven temperature display while oven is active with any cooking function or during fresh clean operation.
Changing Between 12-Hour Energy Saving or Continuous Bake Mode Settings
The oven control is factory preset for a 12-hour Energy Saving mode. This setting automatically turns off any oven function after 11 hours and 59 minutes of non-stop cooking. The control may be set to override this feature if there is a need for cooking beyond 12 hours.
To change between 12 Hour Energy Saving and continuous bake settings:
1.Press user pref until ES on or ES off appear in the display.
2.Press +hi or -lo again to toggle between
ES on or ES off.
3.Press START enter to accept the desired setting.
4.Press CANCEL off to exit the preferences mode.
12 |
Setting Oven Controls |
Setting Silent or Audible Control Mode
The audio control feature allows you to control the audio volume for the oven control. You may turn the audio off and later return to operating with all the normal audible sounds and alerts. A tone sounds when a key is pressed and also at the end of a cycle (timer, cook time. or end time).
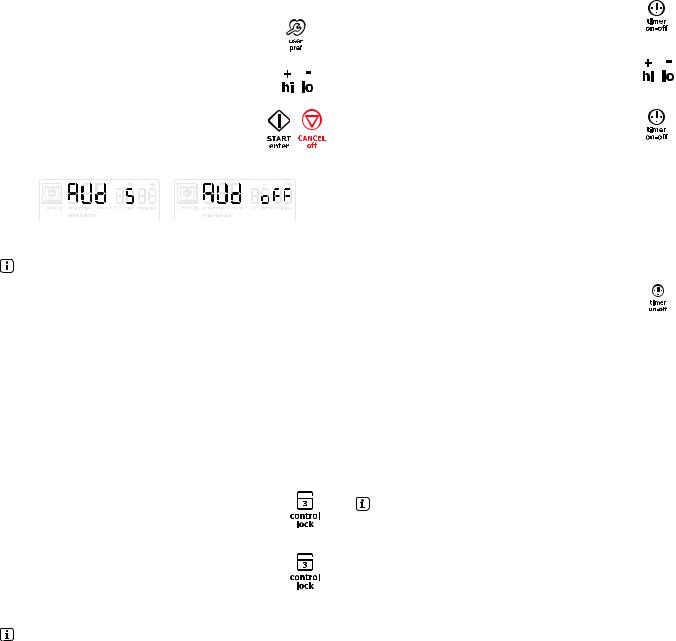
The factory audio setting is preset to level 5 (Figure 13). The volume can be adjusted for lower levels from 5 through 1, or it can be turned off for a silent control setting (Figure 13).
To adjust the audio tone level:
1.Press user pref until AUd 5 appears
(Figure 13).
2.Use +hi or -lo to toggle from 5 down to 1, or to the off option for desired level.
3.Press START enter to accept the new audio level, then press CANCEL off to
exit the preferences mode.
Figure 13: Audio level adjust on (L) or off (R)
When the control is set for AUd oFF, error tones will remain audible.
Timer
This unit is equipped with a kitchen timer which serves as an extra timer in the kitchen that will chime when the set time has run out. This timer can help timed cooking or food preparation times without interfering with any active cooking process. It does not start or stop cooking. When the time countdown reaches less than 1 minute, the display will show the time remaining in seconds. The timer feature can be used during any of the other oven control functions and cooking modes.
To set the timer for 5 minutes:
1. Press timer on-off. 0:00 will appear in the display.
2.Press 5 on the numeric keypad to set the timer to 5 minutes. The lo or hi keys may be pressed to raise or lower the actual time displayed.
3. Press timer on-off again to accept and start the countdown.
4.When the set time runs out, 0:00 will be displayed. The clock will sound a chime that will be repeated at regular intervals until timer onoff is pressed.
To cancel the timer before the set time has run out:
• Press timer on-off. The display will return to the time of day.
Oven/Control Lock
The control lock feature automatically locks the oven door and the control panel. The Control Lock is only allowed when the oven is turned off (not active). The door lock icon will flash in the display for 20 seconds or until the door has finished locking.Both doors will lock at the same time. Do not attempt to open the oven door while the door lock icon is flashing.
To activate control lock:
•Press and hold control lock for three
seconds. The time of day will be visible.
To cancel the control lock feature:
• Press and hold control lock for three seconds. Once unlocked, the door lock icon will no longer appear.
If OVEN is pressed when oven lock is active, the oven will sound an error tone (a chime) indicating the function is not available until the control lock feature is turned off.
Temperature Visual Display
Your oven is equipped with a temperature visual display for each oven. When a cooking mode is set, the actual temperature will display in the user interface window and will rise as the unit preheats. When the unit reaches the set temperature, a chime will sound to remind you to place the food in the oven. This feature is active with bake, convection bake, and convection roast.
The lowest temperature that will display is 100ºF (38ºC).
Setting Oven Controls |
13 |
Interior Oven Lights
Your wall oven is equipped with two dual left/right corner halogen lights.The interior oven lights are located on the rear wall of the oven interior and are covered with a glass shield. The glass shield protects the bulb from high temperatures and should always be in place whenever the oven is in use.
The oven lights will turn on automatically when the oven door is opened.The oven lights may be turned on when the door is closed by using the oven light key located on the control panel.
The oven light will not operate during a self-clean cycle.
To toggle the oven lights on and off:
• Press oven light.
To replace the interior oven lights, see “Replacing the Dual Left/ Right Corner Oven Lights” on page 37.
FAST PREHEAT
The oven can be programmed to preheat in the following modes: bake, convection bake, and convection roast. When activated, the oven will begin preheating quickly and PRE-HEATING will appear in the display. The minimum temperature shown is 100ºF (38ºC). A tone will sound to indicate the oven has finished preheating and PRE-HEATING will disappear from the display. Once the oven has fully preheated, the fast preheat feature will perform like bake and continue to bake until cancelled.
IMPORTANT! The fast preheat feature is for single rack only. The heat distribution with multiple rack will be uneven. Use oven rack position 2 or 3.
IMPORTANT! For batterand dough-based baked goods such as cakes, pastries, and breads, use the convection bake function.
To set fast preheat using the default oven temperature:
Always use pot holders or oven mitts when working with a hot oven. When baking, the oven interior and oven racks will become hot enough to cause burns.
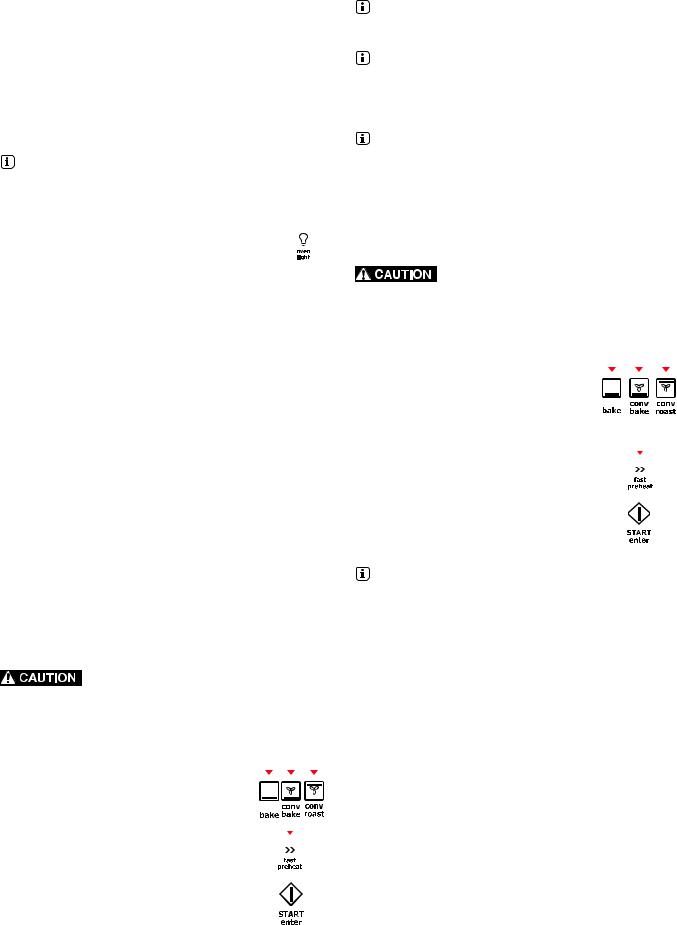
1.Press OVEN to active the cooking modes keys.
2.Press bake, conv bake, or conv
roast.
3. Press fast preheat.
4. Press START enter.
Preheating is not necessary when roasting or cooking casseroles.
The convection fan will rotate when the fast preheat is started. This is normal. If fast preheat is set with the bake feature the convection fan will turn off once the oven set temperature is reached.
To change temperature settings after fast preheat has started, press the +hi or –lo keys to increase or decrease the oven temperature. The oven temperature will change by ±5°F (±2°C) with each press of +hi or –lo.
To set fast preheat with an oven temperature of 425°F (218°C):
Always use pot holders or oven mitts when working with a hot oven. When baking, the oven interior and oven racks will become hot enough to cause burns.
1.Press OVEN to activate the cooking modes keys.
2.Press bake, conv bake, or conv roast.
3. |
Enter 4 2 5 using the numeric keypad. |
425 |
4. |
Press fast preheat. |
|
5. |
Press START enter. |
|
To stop fast preheat at any time, press CANCEL off.
14 |
Setting Oven Controls |
BAKE
Bake may be set with these options: 1) fast preheat; 2) cook time; or 3) delayed start, achieved through using the cook time and end time settings.
The meat probe can be used in this mode.
To set the oven for bake at the default oven temperature of 350°F (176°C):
Always use pot holders or oven mitts when working with a hot oven. When baking, the oven interior and oven racks will become hot enough to cause burns.
Do not bake foods directly on the oven bottom. To avoid damaging the oven interior and surfaces, always bake foods in the oven using bakeware positioned on an oven rack
1.Press OVEN to activate the cooking modes keys.
2.Press bake. The default oven temperature of 350°F (176°C) appears in the display.
3. Press START enter.
4.When Bake is active the oven begins to preheat.The display will show PRE-HEATING and the convection fan will run until preheating is complete. When the oven reaches the set temperature, the control sounds a tone to signal the oven is ready.
5.To stop bake at any time, press CANCEL off.
To set bake with oven temperature of 425°F (218°C):
1.Press OVEN to activate the cooking modes keys.
2. Press bake.
3. Enter 4 2 5 using the numeric keypad. |
425 |
4.Press START enter. To add or change
any bake settings once the oven is baking, make temperature changes using the +hi or –lo keys. Each press will adjust the temperature by ±5°F (±2°C).
5.To stop bake at any time. press CANCEL off.
The convection fan will rotate when bake first starts. This is normal. The fan will turn off once the oven reaches the set temperature.
If bake is active without a cook time setting, the oven will remain on for 12 hours before turning off automatically unless it is cancelled. To bake longer than 12 hours, see “Changing Between 12-Hour Energy Saving or Continuous Bake Mode Settings” on page 11 for instructions.
Baking Tips
•Fully preheat the oven before baking items like cookies, cakes, biscuits, or breads.
•When using a single rack for baking, position the rack so that the food is in the center of the oven.
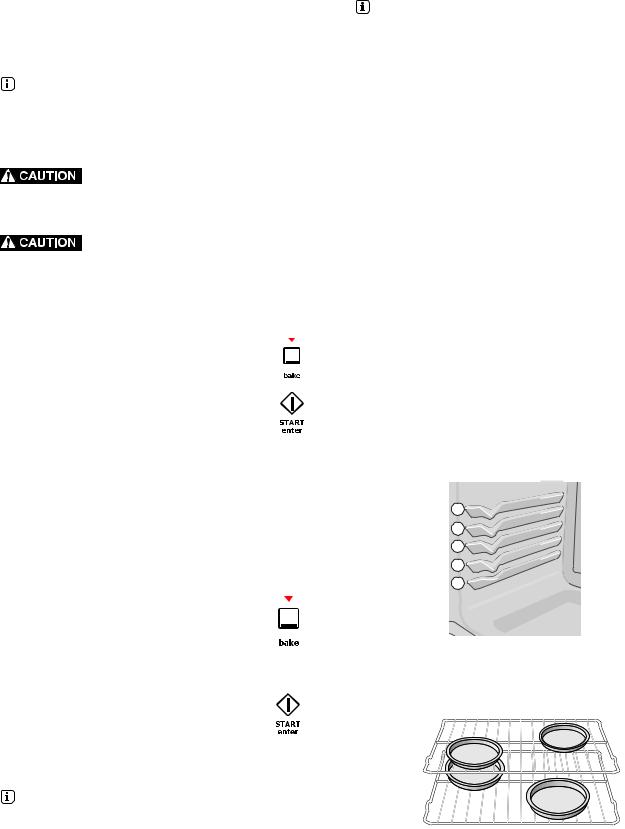
•For best results when baking cakes using two oven racks, place bakeware on oven rack positions 1 (using a glide rack) and 4 (using a flat rack) (Figure 14) and place pans as shown in Figure 15.
•Allow at least 2 inches (5 cm) of space between bakeware for proper air circulation.
•Dark or dull pans and glass absorb more heat than shiny bakeware resulting in dark or over browning of foods. To prevent this it may be necessary to reduce the oven temperature or cook time to prevent over browning of some foods. Dark pans are recommended for pies. Shiny pans are recommended for cakes, cookies and muffins.
•Do not open the oven door too often. Opening the door will reduce the temperature in the oven.
•For cakes, pastries, and breads, use the convection bake function for best results when using multiple racks.
5
4
3
2
1
Figure 14: Rack positions
Figure 15: Pan spacing
 Loading...