


 Loading...
BypYak
Assembly Manual

Table of Contents |
|
Introduction................................................................ |
2 |
Specifications............................................................. |
3 |
Contents of Kit/Parts Layout ......................................... |
3 |
Quique Somenzini’s Competition Radio Equipment......... |
4 |
Alternative Radio Equipment ........................................ |
4 |
Important Information About Motor Selection ................. |
5 |
Quique Somenzini’s Competition Outrunner Setup.......... |
5 |
Required Tools and Adhesives ...................................... |
5 |
Optional Accessories .................................................. |
5 |
Using the Manual ....................................................... |
6 |
Warning.................................................................... |
6 |
Before Starting Assembly ............................................. |
6 |
Note on Lithium Polymer Batteries................................. |
6 |
Limited Warranty Period .............................................. |
6 |
Wing Installation ...................................................... |
10 |
Stabilizer and Rudder Installation ............................... |
18 |
Motor and Speed Control Installation.......................... |
22 |
Radio Installation ...................................................... |
24 |
Landing Gear Installation........................................... |
32 |
Center of Gravity / Battery Installation........................ |
34 |
Control Throws ......................................................... |
36 |
Quique Somenzini’s Competition Radio Setup.............. |
36 |
2006 Official AMA |
|
National Model Aircraft Safety Code................. |
38 |
Introduction
Thank you for purchasing the Quique Somenzini designed Byp Yak ARF Competition Indoor 3D/Precision Aerobatic model, which is based on his popular gas-powered competitive Yak aerobatic airplanes Quique designed this model to compete at top-level events such as the E-TOC and for nationwide demos. Quique uses his own unique A-frame design on the fuselage shape, which reduces flex in the more rigid fuselage giving you more precision control.
From super slow to top airspeed, flying the Byp Yak features a great combination of smoothness and precision, helping make this foam Byp Yak an extreme 3D flying performer like no other foam airplanes of this caliber. The Byp Yak
is capable of doing all the maneuvers that you have ever dreamt of and more.
New Foam
E-flite™ is introducing a new flat foam material with this aircraft. It is much more durable than other flat foams used in the past. We believe this will bring a higher level of success and enjoyment to your Byp Yak experience.
2
Specifications
Wingspan: |
32 in (815mm) |
Length: |
31.25 in (795mm) |
Wing Area: |
490 sq in (32 sq dm) |
Weight w/o Battery: |
9.5–10 oz (270–285 g) |
Weight w/Battery: |
10.5–11.5 oz (300–325 g) |
|
|
|
|
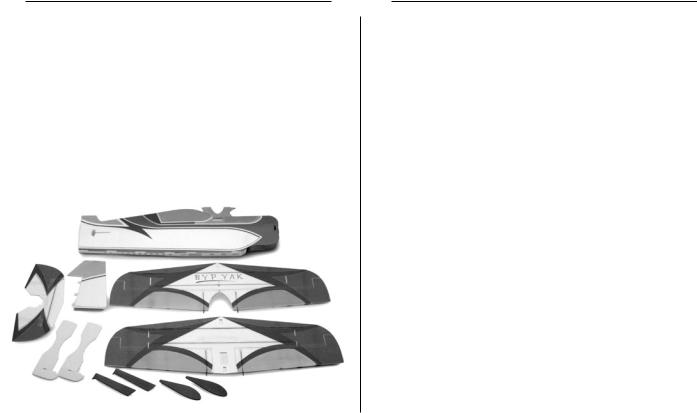
Contents of Kit/Parts Layout
Large Replacement Parts:
EFL2326 |
Wing Set w/Struts |
EFL2327 |
Fuselage |
EFL2328 |
Tail Assembly |
EFL2331 |
Wheel Pants/Landing Gear Covers |
EFL2134 |
Landing Gear |
Small Replacement Parts: |
|
EFL2329 |
Carbon Fiber Supports |
EFL2330 |
Aileron Rods |
EFL2086 |
Hook & Loop Tape, 1" x 1.375" (2) |
EFLA200 |
Micro Control Horns |
EFLA202 |
Micro Tail Skid |
EFLA203 |
Micro Control Connectors |
EFLA213 |
E-flite/JR/Horizon Decals |
EFLA214 |
Micro Pull-Pull Set |
EFLA220 |
Foam Park Wheels, 1.25" |
3

Quique Somenzini’s Competition Radio
Equipment
Listed below is the exact radio equipment that Quique Somenzini uses when flying the Byp Yak in competitions. In the back of the manual, we also provide you with his exact radio setup, listing his dual rates, exponential, and mixing programs.
Transmitter
JR 9303 XP9303 9-Channel, 30-Model Memory
Transmitter
Purchase Separately
JSP30610 6-Channel UltraLite Rx w/o Crystal,
Positive Shift JR/Air (72 MHz)
JRPXFR** |
FM Receiver Crystal |
JRPS281 |
DS281 Sub-Micro Digital (3) |
4
Alternative Radio Equipment
You will need a minimum 6-channel transmitter (for proper mixing and dual rate capabilities), crystals, micro receiver, and three sub-micro servos. You can choose to purchase a complete radio system that includes all of these items or, if you are using an existing transmitter, just purchase the other required equipment separately.
We recommend the crystal-free, interference-free Spektrum™ DX6 2.4GHz DSM™ 6-channel system, which includes a micro receiver and 4 sub-micro servos.
Complete Radio System
SPM2460 DX6 DSM 6CH Park Flyer w/4-S75
Or Purchase Separately
JSP30610 |
6-Channel UltraLite Rx w/o Crystal, |
|
Positive Shift JR/AIR (72MHz) |
JSP30615 |
6-Channel UltraLite Rx w/o Crystal, |
|
Negative Shift Fut/HRC (72MHz) |
JRPXFR** |
FM Receiver Crystal (JR only, not |
Or |
AR6000) |
|
|
SPM6000 |
AR6000 DSM 6CH Park Flyer Receiver |
And |
|
EFLRS75 |
7.5 Gram Sub-Micro Servo (3) |
JRPA092 |
Servo Extension, 3" Standard (may be |
|
needed for ESC) |

Important Information About
Motor Selection
We recommend you use the E-flite™ brushless outrunner motor Quique Somenzini uses on his Byp Yak. All of our flight tests were done using the motor listed below with the Li-Po battery listed below. Another alternative battery is to use the Thunder Power 730mAh 3-Cell 11.1V Li-Po Battery (THP7303SJPL) for extended flight time.
Quique Somenzini’s Competition
Outrunner Setup
EFLM1200 |
Park 370 Brushless Outrunner Motor, |
|
1080Kv |
CSEPHX10L |
10-Amp Brushless ESC |
APC10038SF |
10x3.8 Slow Flyer Prop |
EFLC3005 |
Celectra™ 1–3 Cell Li-Po Charger |
Recommended Battery (by E-Flite) |
|
THP4803SJPL |
480mAh 3-Cell 11.1V Li-Po, JST |
This setup is very light for slow precise indoor flying.
RequiredTools and Adhesives
Tools & Equipment |
|
EFLA257 |
Screwdriver, #0 Phillips (or included with |
|
EFLA250) |
EFLA251 |
Hex Wrench: 3/32" (or included with |
|
EFLA250) |
Hobby knife
Square
Ruler
Felt-tipped pen
String
Paper Towels/Tissue
T-Pins
Pliers
Low-Tack tape
Adhesives |
|
EFLA208 |
Foam CA 1oz/Activator 2oz Pack |
EFLA209 |
Foam Compatible Medium CA, 1oz |
Optional Accessories
EFLA110 |
Power Meter |
THP7303SJPL |
730mAh 3-Cell 11.1V Li-Po Battery (for |
|
longer flight times) |
5
Using the Manual
This manual is divided into sections to help make assembly easier to understand, and to provide breaks between each major section.
Remember to take your time and follow the directions.
Warning
An RC aircraft is not a toy! If misused, it can cause serious bodily harm and damage to property. Fly only in open areas, preferably at AMA (Academy of Model Aeronautics) approved flying sites, following all instructions included with your radio.
Keep loose items that can get entangled in the propeller away from the prop, including loose clothing, or other objects such as pencils and screwdrivers. Especially keep your hands away from the propeller.
Before Starting Assembly
Before beginning the assembly of your Byp Yak, remove each part from its bag for inspection. Closely inspect the fuselage, wing panels, rudder and stabilizer for damage. If you find any damaged or missing parts, contact the place of purchase.
Note on Lithium Polymer Batteries
Lithium Polymer batteries are significantly more volatile than alkaline or Ni-Cd/Ni-MH batteries used in RC applications. All manufacturer’s instructions and warnings must be followed closely. Mishandling of Li-Po batteries can result in fire. Always follow the manufacturer’s instructions when disposing of Lithium Polymer batteries.
Limited Warranty Period
Horizon Hobby, Inc. guarantees this product to be free from defects in both material and workmanship at the date of purchase.
6

Limited Warranty & Limits of Liability
Pursuant to this Limited Warranty, Horizon Hobby, Inc. will, at its option, (i) repair or (ii) replace, any product determined by Horizon Hobby, Inc. to be defective. In the event of a defect, these are your exclusive remedies.
This warranty does not cover cosmetic damage or damage due to acts of God, accident, misuse, abuse, negligence, commercial use, or modification of or to any part of the product. This warranty does not cover damage due to improper installation, operation, maintenance, or attempted repair by anyone other than an authorized Horizon Hobby, Inc. service center. This warranty is limited to the original purchaser and is not transferable. In no case shall Horizon Hobby’s liability exceed the original cost of the purchased product and will not cover consequential, incidental or collateral damage. Horizon Hobby, Inc. reserves the right to inspect any and all equipment involved in a warranty claim. Repair or replacement decisions are at the sole discretion of Horizon Hobby, Inc. Further, Horizon Hobby reserves the right to change or modify this warranty without notice.
REPAIR OR REPLACEMENT AS PROVIDED UNDER THIS WARRANTY IS THE EXCLUSIVE REMEDY OF THE CONSUMER. HORIZON HOBBY, INC. SHALL NOT BE LIABLE FOR ANY INCIDENTAL OR CONSEQUENTIAL DAMAGES.
As Horizon Hobby, Inc. has no control over use, setup, final assembly, modification or misuse, no liability shall be assumed nor accepted for any resulting damage or injury. By the act of use, setup or assembly, the user accepts all resulting liability.
If you as the purchaser or user are not prepared to accept the liability associated with the use of this product, you are advised to return this product immediately in new and unused condition to the place of purchase.
Safety Precautions
This is a sophisticated hobby product and not a toy. It must be operated with caution and common sense and requires some basic mechanical ability. Failure to operate this product in a safe and responsible manner could result in injury or damage to the product or other property. This product is not intended for use by children without direct adult supervision.
The product manual contains instructions for safety, operation and maintenance. It is essential to read and follow all the instructions and warnings in the manual, prior to assembly, setup or use, in order to operate correctly and avoid damage or injury.
7

Questions,Assistance, and Repairs
Your local hobby store and/or place of purchase cannot provide warranty support or repair. Once assembly, setup or use of the product has been started, you must contact Horizon Hobby, Inc. directly. This will enable Horizon to better answer your questions and service you in the event that you may need any assistance.
Questions or Assistance
For questions or assistance, please direct your email to productsupport@horizonhobby.com, or call 877.504.0233 toll free to speak to a service technician.
Inspection or Repairs
If your product needs to be inspected or repaired, please call for a Return Merchandise Authorization (RMA). Pack the product securely using a shipping carton. Please note that original boxes may be included, but are not designed to withstand the rigors of shipping without additional protection. Ship via a carrier that provides tracking and insurance for lost or damaged parcels, as Horizon Hobby, Inc. is not responsible for merchandise until it arrives and is accepted at our facility. Include your complete name, address, phone number where you can be reached during business days, RMA number, and a brief summary of the
problem. Be sure your name, address, and RMA number are clearly written on the shipping carton.
Warranty Inspection and Repairs
To receive warranty service, you must include your original sales receipt verifying the proof-of-purchase date. Providing warranty conditions have been met, your product will be repaired or replaced free of charge. Repair or replacement decisions are at the sole discretion of Horizon Hobby.
8

Non-Warranty Repairs
Should your repair not be covered by warranty and the expense exceeds 50% of the retail purchase cost, you will be provided with an estimate advising you of your options. You will be billed for any return freight for non-warranty repairs. Please advise us of your preferred method of payment. Horizon Hobby accepts money orders and cashiers checks, as well as Visa, MasterCard, American Express, and Discover cards. If you choose to pay by credit card, please include your credit card number and expiration date. Any repair left unpaid or unclaimed after 90 days will be considered abandoned and will be disposed of accordingly.
Electronics and engines requiring inspection or repair should be shipped to the following address (freight prepaid):
Horizon Service Center
4105 Fieldstone Road
Champaign, Illinois 61822
All other products requiring inspection or repair should be shipped to the following address (freight prepaid):
Horizon Product Support
4105 Fieldstone Road
Champaign, Illinois 61822
9
|
|
Wing Installation |
|
|
|
Required Parts |
|
|
• Fuselage |
• Wing strut (2) |
|
• Lower wing |
• Upper wing |
|
•Strut reinforcement disk (14)
•.045” x 6" (1.15mm x 153mm) carbon rod (6)
•.045” x 13" (1.15mm x 330mm) carbon rod (2)
•.045” x 12 5/8" (1.15mm x 320mm) carbon rod (2)
Required Tools and Adhesives
• Foam-safe CA • Hobby knife
•Square
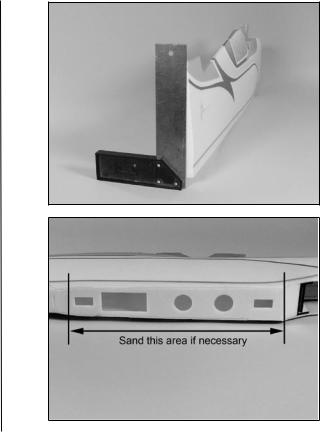
1. Place the fuselage on a flat surface. Use a square at the rudder to check that the fuse bottom and fin are square to each other. Lightly sand the bottom of the fuse where indicated if necessary.
10
2. Test fit the lower wing to the fuselage. Place the wing onto the fuse bottom, aligning the servo holes in the wing with the servo holes in the fuselage. Carefully check to make sure the lower wing is square to the fuselage by measuring from the wing tip to the fin on both sides. Use foamsafe CA to glue the lower wing to the fuselage.
Note: You can use foam-safe activator to speed up the CA cure time.
3. Locate the wing struts. Use a sharp hobby knife to remove the lower sections from the main section.
11

4. Position the wing strut in the hole closest to the aileron of the bottom wing. It may be necessary to trim the reinforcement tape from the hole before fitting the strut. Use a square and foam-safe CA to glue both the wing struts into position.
5. Place the top wing onto a flat surface. Position the wing struts and fuselage onto the wing. Hold the wing flat while gluing the fuselage and side force generators to the wing.
Note: It is recommended to use a square to check the wing strut alignment to the top wing.
Note: DO NOT glue the lower strut extension at this time.
12
Loading...