


UMX™ F4U Corsair
Instruction Manual Bedienungsanleitung Manuel d’utilisation Manuale di Istruzioni

EN
NOTICE
All instructions, warranties and other collateral documents are subject to change at the sole discretion of Horizon Hobby, LLC. For up-to-date product literature, visit www.horizonhobby.com and click on the support tab for this product.
Meaning of Special Language:
The following terms are used throughout the product literature to indicate various levels of potential harm when operating this product:
NOTICE: Procedures, which if not properly followed, create a possibility of physical property damage AND little or no possibility of injury.
CAUTION: Procedures, which if not properly followed, create the probability of physical property damage AND a possibility of serious injury.
WARNING: Procedures, which if not properly followed, create the probability of property damage, collateral damage, and serious injury OR create a high probability of superfi cial injury.
 WARNING: Read the ENTIRE instruction manual to become familiar with the features of the product before operating. Failure to operate the product correctly can result in damage to the product, personal property and cause serious injury.
This is a sophisticated hobby product. It must be operated with caution and common sense and requires some basic mechanical ability. Failure to operate this product in a safe and responsible manner could result in injury or damage to the product or other property. This product is not intended for use by children without direct adult supervision. Do not use with incompatible components or alter this product in any way outside of the instructions provided by Horizon Hobby, LLC. This manual contains instructions for safety, operation and maintenance. It is essential to read and follow all the instructions and warnings in the manual, prior to assembly, setup or use, in order to operate correctly and avoid damage or serious injury.
Age Recommendation: Not for children under 14 years. This is not a toy.
Safety Precautions and Warnings
•Always keep a safe distance in all directions around your model to avoid collisions or injury. This model is controlled by a radio signal subject to interference from many sources outside your control. Interference can cause momentary loss of control.
•Always operate your model in open spaces away from full-size vehicles, traffi c and people.
•Always carefully follow the directions and warnings for this and any optional support equipment (chargers, rechargeable battery packs, etc.).
•Always keep all chemicals, small parts and anything electrical out of the reach of children.
•Always avoid water exposure to all equipment not specifi cally designed and protected for this purpose. Moisture causes damage to electronics.
•Never place any portion of the model in your mouth as it could cause serious injury or even death.
•Never operate your model with low transmitter batteries.
•Always keep aircraft in sight and under control.
•Always use fully charged batteries.
•Always keep the transmitter powered on while aircraft is powered.
•Always remove batteries before disassembly.
•Always keep moving parts clean.
•Always keep parts dry.
•Always let parts cool after use before touching.
•Always remove batteries after use.
•Always ensure failsafe is properly set before fl ying.
•Never operate aircraft with damaged wiring.
•Never touch moving parts.
2
EN
Thank you for purchasing the E-fl ite® UMX™ F4U Corsair, featuring trim schemes from two of the most prolifi c pilots to fl y the prized Corsair, Gregory “Pappy” Boyington and Ira “Ike” Kepford. Now featuring
AS3X® technology, the Ultra Micro F4U Corsair provides the smooth, locked-in fl ight performance that makes this bent-wing warbird feel like a much larger model. True to its roots, the ultra micro F4U Corsair is capable of basic aerobatics yet is suitable for small fl ying areas thanks to its size. Before you take the
fi rst fl ight, please take time to read through this manual. It has important prefl ight information that will help ensure your fi rst fl ight and every one after is a success.
Please be sure to read through this manual carefully so that you are equipped to successfully enjoy all the benefi ts this outstanding ultra micro model has to offer.
Table of Contents
Prefl ight Checklist.................................................. |
4 |
Dual Rates........................................................... |
10 |
AS3X Stabilization Delivers |
|
Flying Tips and Repairs ........................................ |
11 |
Breakthrough Performance .................................... |
4 |
Low Voltage Cutoff (LVC) ...................................... |
11 |
Charging Warnings................................................. |
4 |
Landing Gear Removal......................................... |
12 |
Battery Charging.................................................... |
5 |
Post Flight Checklist ............................................ |
12 |
Transmitter Batteries Installation............................ |
6 |
Power Components Service ................................. |
13 |
Transmitter and Receiver Binding........................... |
6 |
Troubleshooting Guide ......................................... |
14 |
Digital Trims........................................................... |
7 |
Limited Warranty ................................................. |
15 |
Dual Rate Function ................................................ |
7 |
Warranty and Service Information ........................ |
17 |
Transmitter Control ................................................ |
7 |
Compliance Information for the European Union... |
17 |
Flight Battery Installation and ESC Arming.............. |
8 |
Replacement Parts............................................... |
67 |
Center of Gravity (CG) Adjustment ......................... |
8 |
Optional Parts and Accessories ............................ |
68 |
Control Direction Test............................................. |
9 |
Decal Application ................................................. |
69 |
Control Centering ................................................ |
10 |
|
|
Control Horn Settings........................................... |
10 |
|
|
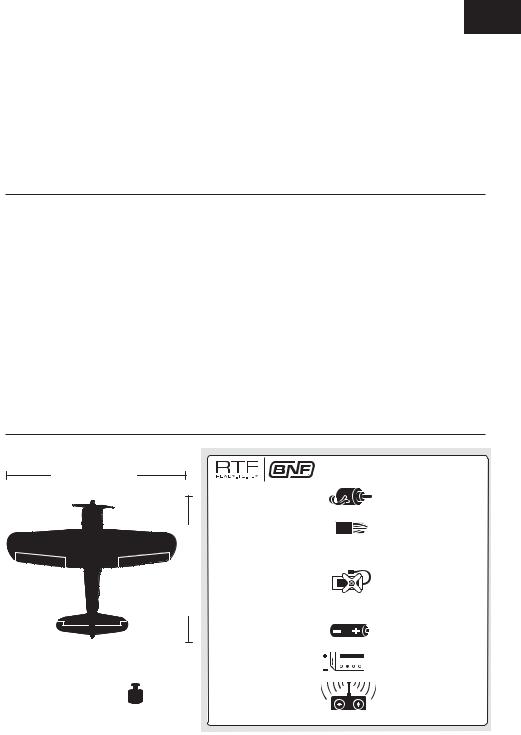
Specifications
15.9 in (405mm)


 12.8 in (326mm)
1.60 oz
(44 g)
Installed |
Installed |
8.5mm Brushed Motor |
|
|
|
|
|
Installed |
Installed |
DSM2®/DSMX® AS3X |
|
Receiver/ESC |
|||
|
|
||
|
|
(2) Servo |
|
|
|
SPMSA2030LO |
|
Installed |
Installed |
(Ailerons) |
|
(2) Servo |
|||
|
|
||
|
|
SPMSA2030L ( On the |
|
|
|
Receiver/ESC board) |
|
Included |
Included |
150mAh 3.7V 25C |
|
Li-Po battery |
|||
|
|
||
Included |
Included |
1S 3.7V Li-Po Battery |
|
Charger |
|||
|
|
||
Included |
Needed to |
DSM2/DSMX |
|
Complete |
4-Channel Transmitter |
||
|
|||
|
|
|
To register your product online, go to www.e-fl iterc.com
3

EN
Preflight Checklist
|
|
|
|
|
|
|
|
|
|
|
|
|
|
|
1. |
Charge fl ight battery. |
|
|
6. |
Set dual rates and expos. |
|
|
|
|
|
|
|
|
2. |
Install fl ight battery in aircraft (once it |
|
|
7. |
Adjust center of gravity. |
|
|
has been fully charged). |
|
|
|
|
|
|
|
|
8. |
Perform a radio system Range Check. |
|
|
3. |
Bind aircraft to transmitter. (BNF only) |
|
|
||
|
|
|
|
|
||
|
|
|
9. |
Find a safe and open area. |
||
|
|
|
|
|
||
|
4. |
Make sure linkages move freely. |
||||
|
|
|
|
|
||
|
|
|
10. Plan fl ight for fl ying fi eld conditions. |
|||
|
|
|
|
|
||
|
5. |
Perform Control Direction Test with |
||||
|
|
|
|
|
||
|
|
transmitter. |
|
|
|
|
|
|
|
|
|
|
|
AS3X Stabilization Delivers Breakthrough Performance
Horizon Hobby has always made RC sport, scale and unique aircraft with the kind of performance experts appreciate. Now the exclusive Artificial Stability – 3 aXis (AS3X) system helps take performance expectations in ultra micro aircraft a quantum leap higher.
Based on the successful use of MEMS sensor technology within the AS3X Stabilization System essential to Blade® ultra micro flybarless helicopters, the specifically tuned AS3X System for airplanes helps invisibly correct for turbulence, torque and tip stalls when encountered.
Furthermore, the outstanding control agility delivers an ultra smooth, locked-in feel that obeys your every command with performance that’s natural feeling. It’s so gratifying, in fact, that it’s as though you’re the RC pilot of an expertly tuned, giant-scale model.
AS3X will change the way you’ll want to fly now and in the future. To see what we mean, go to www.E-fliteRC.com/AS3X.
Charging Warnings
The Battery Charger (EFLC1000) included with your aircraft has been designed to safely charge the Li-Po battery.
 CAUTION: All instructions and warnings must be followed exactly. Mishandling of Li-Po batteries can result in a fi re, personal injury and/or property damage.
•By handling, charging or using the included Li-Po battery, you assume all risks associated with lithium batteries.
•If at any time the battery begins to balloon or swell, discontinue use immediately. If charging or discharging, discontinue and disconnect. Continuing to use, charge or discharge a battery that is ballooning or swelling can result in fi re.
•Always store the battery at room temperature in a dry area for best results.
•Always transport or temporarily store the battery in a temperature range of 40–120º F (5–49° C). Do not store the battery or model in a car or direct sunlight. If stored in a hot car, the battery can be damaged or even catch fi re.
•Always charge batteries away from fl ammable materials.
•Always inspect the battery before charging.
•Always disconnect the battery after charging, and let the charger cool between charges.
•Always constantly monitor the temperature of the battery pack while charging.
•ONLY USE A CHARGER SPECIFICALLY DESIGNED TO CHARGE LI-PO BATTERIES. Failure to charge the battery with a compatible charger may cause a fi re resulting in personal injury and/or property damage.
•Never discharge Li-Po cells to below 3V under load.
•Never cover warning labels with hook and loop strips.
•Never leave charging batteries unattended.
•Never charge batteries outside recommended levels.
•Never charge damaged batteries.
•Never attempt to dismantle or alter the charger.
•Never allow minors to charge battery packs.
•Never charge batteries in extremely hot or
cold places (recommended between 40–120° F or (5–49° C) or place in direct sunlight.
4
EN
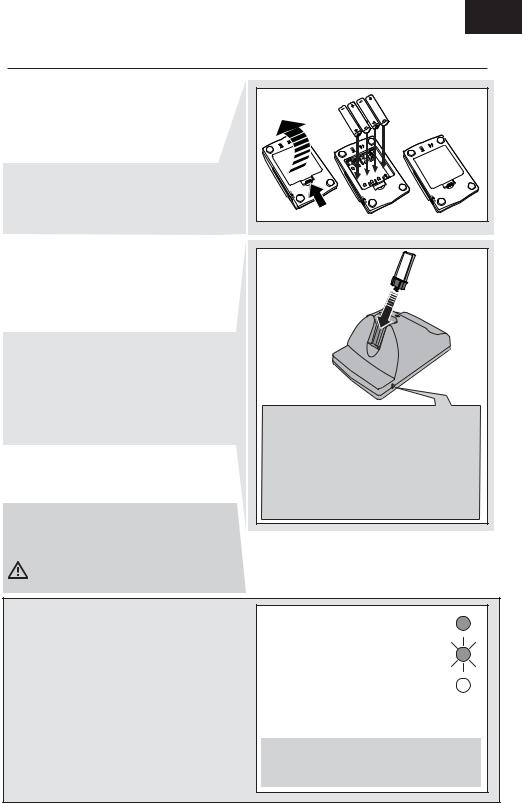
Battery Charging
Your aircraft comes with a 1S 3.7V DC Li-Po battery charger and 1S 3.7V 150mAh 25C Li-Po battery. Refer to the charging warnings. It is recommended to charge the battery pack while you are inspecting the aircraft. The fl ight battery will be required to confi rm proper aircraft operation in future steps.
Remove the cover on the bottom of the charger and install four of the included AA batteries, noting proper polarity. Replace the cover after the AA batteries are installed. Only use alkaline AA batteries.
Battery Charging Process
Notice: Charge only batteries that are cool to the touch and are not damaged. Look at the battery to make sure it is not damaged e.g., swollen, bent, broken or punctured.
1.Slide the battery into the slot on the charger and press it into the charge jack/connector located at the bottom of the slot.
The end cap of the battery is specifically designed to allow the battery to fit into the slot one way (usually with the label on the battery facing outward) to prevent reverse polarity connection. However, check for proper alignment and polarity.
2.Always disconnect the flight battery from the charger immediately upon completion of charging.
 CAUTION: Only use a charger specifi cally designed to charge a Li-Po battery. Failure to do so could result in fi re, causing injury or property damage.
CAUTION: Never exceed the recommended charge rate.
Purchase the optional AC to 6V DC 1.5 amp Power Supply (EFLC1005) to charge your battery pack without AA batteries.
 CAUTION: Only use an E-fl ite® 6V power supply (EFLC1005) with this charger. DO NOT use a 12V power supply or property damage and injury could occur.
LED Indications
When you make the connection successfully, the LED on the charger turns solid red, indicating charging has begun.
Charging a fully discharged (not over-discharged) 150mAh battery takes approximately 30–40 minutes. As the battery nears full charge, the LED begins to blink. The intervals between blinks will increase as the battery comes closer to full charge.
When the LED blinks approximately every 20 seconds, the battery is ready to be removed. However, the battery can be left charging until the LED completely goes out for a maximum charge.
CHARGING (Solid Red) ...........................
READY (Blinking 20 sec. intervals)........
MAX CHARGE (off) .................................
If the LED stays on when the fl ight battery is removed, the AA batteries in the charger are low.
 CAUTION: Once charging is complete, immediately remove the battery. Never leave a battery connected to the charger.
5

EN


 Transmitter Batteries Installation
Your E-fl ite® 4-channel DSM2®/ |
|
1 |
|
DSMX® RTF transmitter comes |
|
3 |
|
pre-bound to the aircraft. |
2 |
6 |
|
Remove the cover, install four |
|
4 |
|
|
|
||
of the included batteries (noting |
|
|
5 |
proper polarity) and reinstall the |
|
|
|
cover. |
|
|
|

 Transmitter and Receiver Binding
Binding is the process of programming the receiver to recognize the GUID (Globally Unique Identifi er) code of a single specifi c transmitter. You need to ‘bind’ your chosen Spektrum™ DSM® technology equipped aircraft transmitter to the receiver for proper operation.
For a list of compatible DSM2/DSMX transmitters, please visit www.bindnfl y.com.
 CAUTION: When using a Futaba® transmitter with a Spektrum DSM module, you must reverse the throttle channel and rebind. Refer to your Spektrum module manual for binding and failsafe instructions. Refer to your Futaba transmitter manual for instructions on reversing the throttle channel.
Binding Procedure Reference Table
1.Refer to your transmitter’s unique instructions for binding to a receiver.
2.Make sure the fl ight battery is disconnected from the aircraft.
3.Ensure the transmitter is powered OFF.
4. Connect the fl ight battery to the aircraft. The receiver LED will begin to
fl ash (typically after 5 seconds).
5.Make sure the transmitter controls are at neutral and the throttle is in the low position.
6.Put your transmitter into bind mode.
(If you are using the transmitter that is supplied with the RTF version, push the left control stick vertically into the case (until it clicks) while powering ON the transmitter).
7.After 5 to 10 seconds, the receiver status LED will become solid, indicating that the receiver is bound to the transmitter. If the LED does not turn solid, refer to the Troubleshooting Guide at the end of the manual.
5
6
For subsequent fl ights, power ON the transmitter for 5 seconds before connecting the fl ight battery.
6
EN


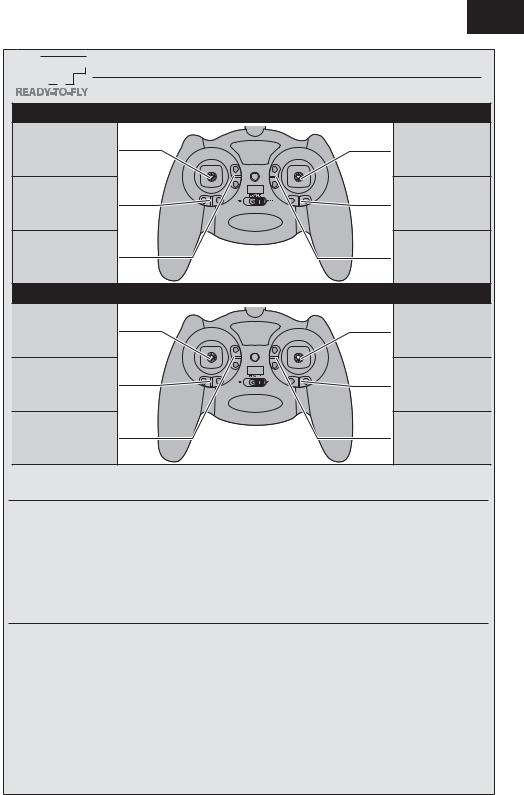
 Transmitter Control
|
Mode 2 |
|
Throttle/Rudder |
Elevator/ |
|
Aileron |
||
|
||
Rudder Trim |
Aileron Trim |
|
Throttle Trim |
Elevator Trim |
|
|
Mode 1 |
|
Elevator/Rudder |
Throttle/ |
|
Aileron |
||
|
||
Rudder Trim |
Aileron Trim |
|
Elevator Trim |
Throttle Trim |
Digital Trims
The E-fl ite® 4-channel DSM2/DSMX transmitter features digital trim buttons on all controls to make fi ne adjustments. The digital trims are used to fi ne-tune the model’s fl ight path when in fl ight.
Before the fi rst fl ight, center the control surfaces mechanically (see Control Centering).
When pressed down, trim buttons make a sound that increases or decreases in pitch at each pressing. The middle or neutral trim position is heard as a middle tone in the pitch range of the sounds. The end of the control range is sounded by a series of beeps.
Dual Rate Function
This transmitter’s dual rate feature lets you change between high and low control rates for the aileron, elevator and rudder.
•When powered ON, this transmitter is automatically set to high-rate mode.
•Change rate modes by pushing the right-hand control stick vertically into the case (until it clicks) while the transmitter is powered ON.
•High-rate mode is shown by the transmitter’s LED glowing solid red. In high-rate mode, the controls can reach their maximum values. This mode is typically preferred by experienced pilots for maximum control authority.
•Low-rate mode is shown by the transmitter’s LED blinking continuously. In low-rate mode, the controls are reduced to approximately 70% of their maximum values. This mode is typically preferred by (and best for) beginner pilots or others interested in smoother and more easily controlled fl ight.
7
 Loading...