

D-Link DGS-1100-16/ME, DGS-1100-24/ME, DGS-1100-26/ME, DGS-1100-18/ME, DGS-1100-24P/ME Reference Manual
D-Link™ DGS-1100/ME
Metro Ethernet Managed Switch
CLI Reference Guide
V1.0

Information in this document is subject to change without notice.
© 2015 D-Link Corporation. All rights reserved.
Reproduction in any manner whatsoever without the written permission of D-Link Corporation is strictly
forbidden.
Trademarks used in this text: D-Link and the D-Link logo are trademarks of D-Link Corporation;
Microsoft and Windows are registered trademarks of Microsoft Corporation.
Other trademarks and trade names may be used in this document to refer to either the entities claiming
the marks and names or their products. D-Link Corporation disclaims any proprietary interest in
trademarks and trade names other than its own.
FCC Warning
This equipment has been tested and found to comply with the limits for a Class A digital device,
pursuant to Part 15 of the FCC Rules. These limits are designed to provide reasonable protection against
harmful interference when the equipment is operated in a commercial environment. This equipment
generates, uses, and can radiate radio frequency energy and, if not installed and used in accordance
with this user’s guide, may cause harmful interference to radio communications. Operation of this
equipment in a residential area is likely to cause harmful interference in which case the user will be
required to correct the interference at hisown expense.
CE Mark Warning
This is a Class A product. In a domestic environment, this product may cause radio interference in
which case the user may be required to take adequate measures.
Warnung!
Dies ist ein Produkt der Klasse A. Im Wohnbereich kann dieses Produkt Funkstoerungen verursachen. In
diesem Fall kann vom Benutzer verlangt werden, angemessene Massnahmen zu ergreifen.
Precaución!
Este es un producto de Clase A. En un entorno doméstico, puede causar interferencias de radio, en
cuyo case, puede requerirse al usuario para que adopte las medidas adecuadas.
Attention!
Ceci est un produit de classe A. Dans un environnement domestique, ce produit pourrait causer des
interférences radio, auquel cas l`utilisateur devrait prendre les mesures adéquates.
Attenzione!
Il presente prodotto appartiene alla classe A. Se utilizzato in ambiente domestico il prodotto può causare
interferenze radio, nel cui caso è possibile che l`utente debba assumere provvedimenti adeguati.
VCCI Warning
March, 2015

Table of Contents
INTRODUCTION ...................................................................................................................................................... 1
PRODUCT INTRODUCTION ................................................................................................................................... 2
DGS-1100-16/ME ................................................................................................................................................................. 2
Front Panel ........................................................................................................................................................................ 2
Rear Panel ......................................................................................................................................................................... 2
DGS-1100-18/ME ................................................................................................................................................................. 3
Front Panel ........................................................................................................................................................................ 3
Rear Panel ......................................................................................................................................................................... 3
DGS-1100-24/ME ................................................................................................................................................................. 4
Front Panel ........................................................................................................................................................................ 4
Rear Panel ......................................................................................................................................................................... 4
DGS-1100-24P/ME ............................................................................................................................................................... 5
Front Panel ........................................................................................................................................................................ 5
Rear Panel ......................................................................................................................................................................... 5
DGS-1100-26/ME ................................................................................................................................................................. 6
Front Panel ........................................................................................................................................................................ 6
Rear Panel ......................................................................................................................................................................... 6
HARDWARE INSTALLATION ................................................................................................................................. 7
Step 1: Unpacking ................................................................................................................................................................. 7
Packing contents of DGS-1100/ME .................................................................................................................................. 7
Step 2: Switch Installation .................................................................................................................................................... 7
Desktop or Shelf Installation ............................................................................................................................................. 7
Rack Installation ............................................................................................................................................................... 8
Step 3 – Plugging in the AC Power Cord .............................................................................................................................. 9
Power Failure .................................................................................................................................................................... 9
Grounding the Switch ....................................................................................................................................................... 9
USING THE COMMAND LINE INTERFACE ......................................................................................................... 11
COMMAND SYNTAX ............................................................................................................................................. 14
BASIC SWITCH COMMANDS ............................................................................................................................... 17
clear screen ...........................................................................................................................................................................18
create account .......................................................................................................................................................................18
delete account .......................................................................................................................................................................18
config account ......................................................................................................................................................................19
show account ........................................................................................................................................................................19
show session .........................................................................................................................................................................20
show switch ..........................................................................................................................................................................20
show config ..........................................................................................................................................................................21
config jumbo_frame .............................................................................................................................................................22
show jumbo_frame ...............................................................................................................................................................23
save ......................................................................................................................................................................................24
reboot ...................................................................................................................................................................................24
reset ......................................................................................................................................................................................25
login .....................................................................................................................................................................................25
logout ...................................................................................................................................................................................26

ping ......................................................................................................................................................................................26
create time_range .................................................................................................................................................................26
delete time_range .................................................................................................................................................................27
show time_range ..................................................................................................................................................................28
config telnet auto_logout......................................................................................................................................................28
show telnet ...........................................................................................................................................................................29
config firmware ....................................................................................................................................................................29
show firmware......................................................................................................................................................................29
create iproute ........................................................................................................................................................................30
delete iproute ........................................................................................................................................................................30
config command_prompt .....................................................................................................................................................31
SWITCH PORT COMMANDS ................................................................................................................................ 32
config ports ..........................................................................................................................................................................32
show ports ............................................................................................................................................................................33
LOOPBACK DETECTION COMMANDS ............................................................................................................... 34
enable loopdetect ..................................................................................................................................................................34
disable loopdetect .................................................................................................................................................................34
config loopdetect ..................................................................................................................................................................35
show loopdetect....................................................................................................................................................................36
NETWORK MANAGEMENT (SNMP) COMMANDS ............................................................................................. 37
create snmp community .......................................................................................................................................................38
delete snmp community .......................................................................................................................................................39
show snmp community ........................................................................................................................................................39
create snmp host ...................................................................................................................................................................40
delete snmp host ...................................................................................................................................................................40
show snmp host ....................................................................................................................................................................41
enable snmp traps .................................................................................................................................................................41
disable snmp traps ................................................................................................................................................................42
show snmp traps ...................................................................................................................................................................42
enable snmp authenticate_traps ............................................................................................................................................43
disable snmp authenticate_traps ...........................................................................................................................................43
config snmp system_location ...............................................................................................................................................43
config snmp system_name ...................................................................................................................................................44
config snmp system_contact ................................................................................................................................................44
config snmp linkup_traps .....................................................................................................................................................45
config snmp linkdown_traps ................................................................................................................................................45
config snmp coldstart_traps .................................................................................................................................................46
config snmp warmstart_traps ...............................................................................................................................................46
enable snmp .........................................................................................................................................................................46
disable snmp .........................................................................................................................................................................47
show snmp ...........................................................................................................................................................................47
DOWNLOAD/UPLOAD COMMANDS ................................................................................................................... 49
download ..............................................................................................................................................................................49
upload ...................................................................................................................................................................................50
NETWORK MONITORING COMMANDS .............................................................................................................. 52
show packet ports .................................................................................................................................................................52
show error ports ...................................................................................................................................................................53

clear counters .......................................................................................................................................................................53
clear log ................................................................................................................................................................................54
show log ...............................................................................................................................................................................54
enable syslog ........................................................................................................................................................................55
disable syslog .......................................................................................................................................................................55
show syslog ..........................................................................................................................................................................56
config syslog host.................................................................................................................................................................56
show syslog host ..................................................................................................................................................................58
cable diagnostic port ............................................................................................................................................................59
FORWARDING DATABASE COMMANDS ........................................................................................................... 60
create fdb ..............................................................................................................................................................................60
create multicast_fdb .............................................................................................................................................................61
config multicast_fdb ............................................................................................................................................................61
config fdb aging_time ..........................................................................................................................................................62
delete fdb ..............................................................................................................................................................................63
show multicast_fdb ..............................................................................................................................................................63
show fdb ...............................................................................................................................................................................64
config multicast filter ...........................................................................................................................................................65
show multicast filter_mode ..................................................................................................................................................65
clear fdb ...............................................................................................................................................................................65
delete multicast_fdb .............................................................................................................................................................66
BROADCAST STORM CONTROL COMMANDS ................................................................................................. 67
config traffic control ............................................................................................................................................................67
show traffic control ..............................................................................................................................................................68
QOS COMMANDS ................................................................................................................................................. 69
config bandwidth_control ....................................................................................................................................................69
show bandwidth_control ......................................................................................................................................................70
show 802.1p user_priority ....................................................................................................................................................71
config scheduling_mechanism .............................................................................................................................................71
show scheduling_mechanism ...............................................................................................................................................72
config 802.1p default_priority .............................................................................................................................................73
show 802.1p default_priority ...............................................................................................................................................73
PORT MIRRORING COMMANDS ......................................................................................................................... 75
enable mirror ........................................................................................................................................................................75
disable mirror .......................................................................................................................................................................75
config mirror ........................................................................................................................................................................76
show mirror ..........................................................................................................................................................................77
VLAN COMMANDS ............................................................................................................................................... 78
create vlan ............................................................................................................................................................................78
delete vlan ............................................................................................................................................................................79
config vlan ...........................................................................................................................................................................79
show vlan .............................................................................................................................................................................80
enable asymmetric_vlan .......................................................................................................................................................81
disable asymmetric_vlan ......................................................................................................................................................81
show asymmetric_vlan .........................................................................................................................................................82
enable management_vlan .....................................................................................................................................................82
disable management_vlan ....................................................................................................................................................83

config management_vlan .....................................................................................................................................................83
show management_vlan .......................................................................................................................................................84
config port_vlan ...................................................................................................................................................................84
show port_vlan .....................................................................................................................................................................85
enable pvid auto_assign .......................................................................................................................................................85
disable pvid auto_assign ......................................................................................................................................................86
show pvid auto_assign .........................................................................................................................................................86
BASIC IP COMMANDS .......................................................................................................................................... 87
config ipif System ................................................................................................................................................................87
show ipif...............................................................................................................................................................................88
IGMP SNOOPING COMMANDS............................................................................................................................ 89
enable igmp_snooping .........................................................................................................................................................90
disable igmp_snooping.........................................................................................................................................................90
show igmp_snooping ...........................................................................................................................................................91
config igmp_snooping ..........................................................................................................................................................91
config igmp_snooping querier .............................................................................................................................................92
create igmp_snooping static_group ......................................................................................................................................93
config igmp_snooping static_group .....................................................................................................................................94
delete igmp_snooping static_group ......................................................................................................................................94
create igmp_snooping multicast_vlan ..................................................................................................................................95
config igmp_snooping multicast_vlan .................................................................................................................................95
delete igmp_snooping multicast_vlan ..................................................................................................................................96
config igmp_snooping multicast_vlan_group ......................................................................................................................97
enable igmp_snooping multicast_vlan .................................................................................................................................97
disable igmp_snooping multicast_vlan ................................................................................................................................98
show igmp_snooping multicast_vlan ...................................................................................................................................98
show igmp_snooping multicast_vlan_group ........................................................................................................................99
show igmp_snooping group .................................................................................................................................................99
show igmp_snooping static_group .....................................................................................................................................100
MLD SNOOPING COMMANDS ........................................................................................................................... 102
enable mld_snooping .........................................................................................................................................................103
disable mld_snooping ........................................................................................................................................................103
config mld_snooping ..........................................................................................................................................................104
config mld_snooping querier .............................................................................................................................................104
create mld_snooping static_group ......................................................................................................................................105
config mld_snooping static_group .....................................................................................................................................106
delete mld_snooping static_group ......................................................................................................................................106
create mld_snooping multicast_vlan ..................................................................................................................................107
config mld_snooping multicast_vlan .................................................................................................................................107
delete mld_snooping multicast_vlan ..................................................................................................................................108
config mld_snooping multicast_vlan_group ......................................................................................................................109
enable mld_snooping multicast_vlan .................................................................................................................................109
disable mld_snooping multicast_vlan ................................................................................................................................110
show mld_snooping multicast_vlan ...................................................................................................................................110
show mld_snooping multicast_vlan_group ........................................................................................................................111
show mld_snooping ...........................................................................................................................................................111
show mld_snooping group .................................................................................................................................................112

show mld_snooping static_group .......................................................................................................................................113
TIME AND SNTP COMMANDS ........................................................................................................................... 114
config sntp ..........................................................................................................................................................................114
show sntp ...........................................................................................................................................................................115
enable sntp .........................................................................................................................................................................116
disable sntp .........................................................................................................................................................................116
config time .........................................................................................................................................................................117
config time_zone ................................................................................................................................................................117
config dst ............................................................................................................................................................................118
show time ...........................................................................................................................................................................119
POWER SAVING COMMANDS ........................................................................................................................... 120
config power_saving global ...............................................................................................................................................120
config power_saving port ...................................................................................................................................................121
show power_saving ............................................................................................................................................................121
LLDP COMMANDS .............................................................................................................................................. 123
enable lldp ..........................................................................................................................................................................123
disable lldp .........................................................................................................................................................................123
show lldp ............................................................................................................................................................................124
show lldp remote_ports ......................................................................................................................................................124
config lldp ..........................................................................................................................................................................125
TRAFFIC SEGMENTATION COMMANDS .......................................................................................................... 126
config traffic_segmentation ...............................................................................................................................................126
show traffic_segmentation .................................................................................................................................................126
SAFEGUARD COMMANDS ................................................................................................................................ 128
config safeguard_engine ....................................................................................................................................................128
show safeguard_engine ......................................................................................................................................................128
SPANNING TREE PROTOCOL COMMANDS .................................................................................................... 130
config stp ports ...................................................................................................................................................................130
show stp ports ....................................................................................................................................................................131
config stp trap.....................................................................................................................................................................131
config stp version ...............................................................................................................................................................132
enable stp ...........................................................................................................................................................................132
disable stp ...........................................................................................................................................................................133
show stp .............................................................................................................................................................................133
ZONE DEFENSE COMMANDS ........................................................................................................................... 135
enable zone_defense ..........................................................................................................................................................135
disable zone_defense ..........................................................................................................................................................135
show zone_defense ............................................................................................................................................................136
D-LINK DISCOVERY PROTOCOL COMMANDS ............................................................................................... 137
enable ddp ..........................................................................................................................................................................137
disable ddp .........................................................................................................................................................................137
config ddp report_time .......................................................................................................................................................138
show ddp ............................................................................................................................................................................138
POE COMMANDS ................................................................................................................................................ 140
config poe system ...............................................................................................................................................................140
config poe ports ..................................................................................................................................................................141
show poe system ................................................................................................................................................................142

show poe ports ...................................................................................................................................................................142
SURVEILLANCE VLAN COMMANDS ................................................................................................................ 144
enable surveillance_vlan ....................................................................................................................................................144
disable surveillance_vlan ...................................................................................................................................................145
config surveillance_vlan priority .......................................................................................................................................145
config surveillance_vlan aging_time .................................................................................................................................146
config surveillance_vlan oui ..............................................................................................................................................147
show surveillance_vlan global ...........................................................................................................................................148
show surveillance_vlan oui ................................................................................................................................................148
show surveillance_vlan device ...........................................................................................................................................149
VOICE VLAN COMMANDS ................................................................................................................................. 151
enable voice_vlan ...............................................................................................................................................................151
disable voice_vlan ..............................................................................................................................................................152
config voice_vlan priority ..................................................................................................................................................152
config voice_vlan aging_time ............................................................................................................................................153
config voice_vlan oui .........................................................................................................................................................154
config voice_vlan ports ......................................................................................................................................................154
show voice_vlan global ......................................................................................................................................................156
show voice_vlan oui ...........................................................................................................................................................156
show voice_vlan voice_device ...........................................................................................................................................157
show voice_vlan ports ........................................................................................................................................................158
DOS ATTACK PREVENTION COMMANDS ....................................................................................................... 159
config dos_prevention ........................................................................................................................................................159
show dos_prevention ..........................................................................................................................................................160
LINK AGGREGATION COMMANDS .................................................................................................................. 161
create link_aggregation ......................................................................................................................................................161
delete link_aggregation ......................................................................................................................................................162
config link_aggregation .....................................................................................................................................................162
show link_aggregation .......................................................................................................................................................163
LACP COMMANDS ............................................................................................................................................. 164
show lacp ...........................................................................................................................................................................164
config lacp_ports ................................................................................................................................................................165
EEE ....................................................................................................................................................................... 166
config eee ...........................................................................................................................................................................166
show eee .............................................................................................................................................................................167
APPENDIX A - ETHERNET TECHNOLOGY SAMPLE COMMANDS ................................................................ 168
Gigabit Ethernet Technology .............................................................................................................................................168
Fast Ethernet Technology ..................................................................................................................................................168
Switching Technology .......................................................................................................................................................168
APPENDIX B - TECHNICAL SPECIFICATIONS ................................................................................................ 170
Hardware Specifications ....................................................................................................................................................170
Key Components / Performance ....................................................................................................................................170
Port Functions ................................................................................................................................................................170
Physical & Environment ................................................................................................................................................170
Emission (EMI) Certifications .......................................................................................................................................170
Safety Certifications .......................................................................................................................................................170
Features ..............................................................................................................................................................................170

L2 Features .....................................................................................................................................................................170
L2 Multicasting ................................................................................................................................................................. 2
VLAN ............................................................................................................................................................................... 2
QoS (Quality of Service) ................................................................................................................................................... 2
Security ............................................................................................................................................................................. 2
Management ...................................................................................................................................................................... 2
Power Saving .................................................................................................................................................................... 2
APPENDIX C – RACK MOUNT INSTRUCTIONS ................................................................................................... 2
DGS-1100/ME Metro Ethernet Managed Switch CLI Reference Guide
1
INTRODUCTION
The DGS-1100-16/ME consists of 16-ports 10/100/1000Mbps.
The DGS-1100-18/ME consists of 16-ports 10/100/1000Mbps ports + 2-ports 1000Mbps SFP
The DGS-1100-24/ME consists of 24-ports 10/100/1000Mbps.
The DGS-1100-24P/ME consists of 12-ports 10/100/1000Mbps PoE + 12-ports 10/100/1000Mbps.
The DGS-1100-26/ME consists of 24-ports 10/100/1000Mbps + 2-ports 1000Mbps SFP.
The Switch can be managed through the Telnet management agent. The Command Line Interface (CLI)
can be used to configure and manage the Switch via the Telnet interfaces.
This manual provides a reference for all of the commands contained in the CLI. Configuration and
management of the Switch via the Telnet interfaces is discussed in the Manual. For detailed information
on installing hardware please refer also to the Manual.
Setting the Switch’s IP Address
Each Switch must be assigned its own IP address, which is used for communication with an SNMP
network manager or other TCP/IP application (for example BOOTP, TFTP). The Switch’s default IP
address is 10.90.90.90. You can change the default Switch IP address to meet the specification of your
networking address scheme.
The Switch is also assigned a unique MAC address by the factory.
The Switch’s MAC address can also be found in the Telnet interfaces by entering show switch.
The IP address for the Switch must be set before it can be managed with the Telnet interfaces. The Switch IP
address can be automatically set using BOOTP or DHCP protocols, in which case the actual address assigned
to the Switch must be known.
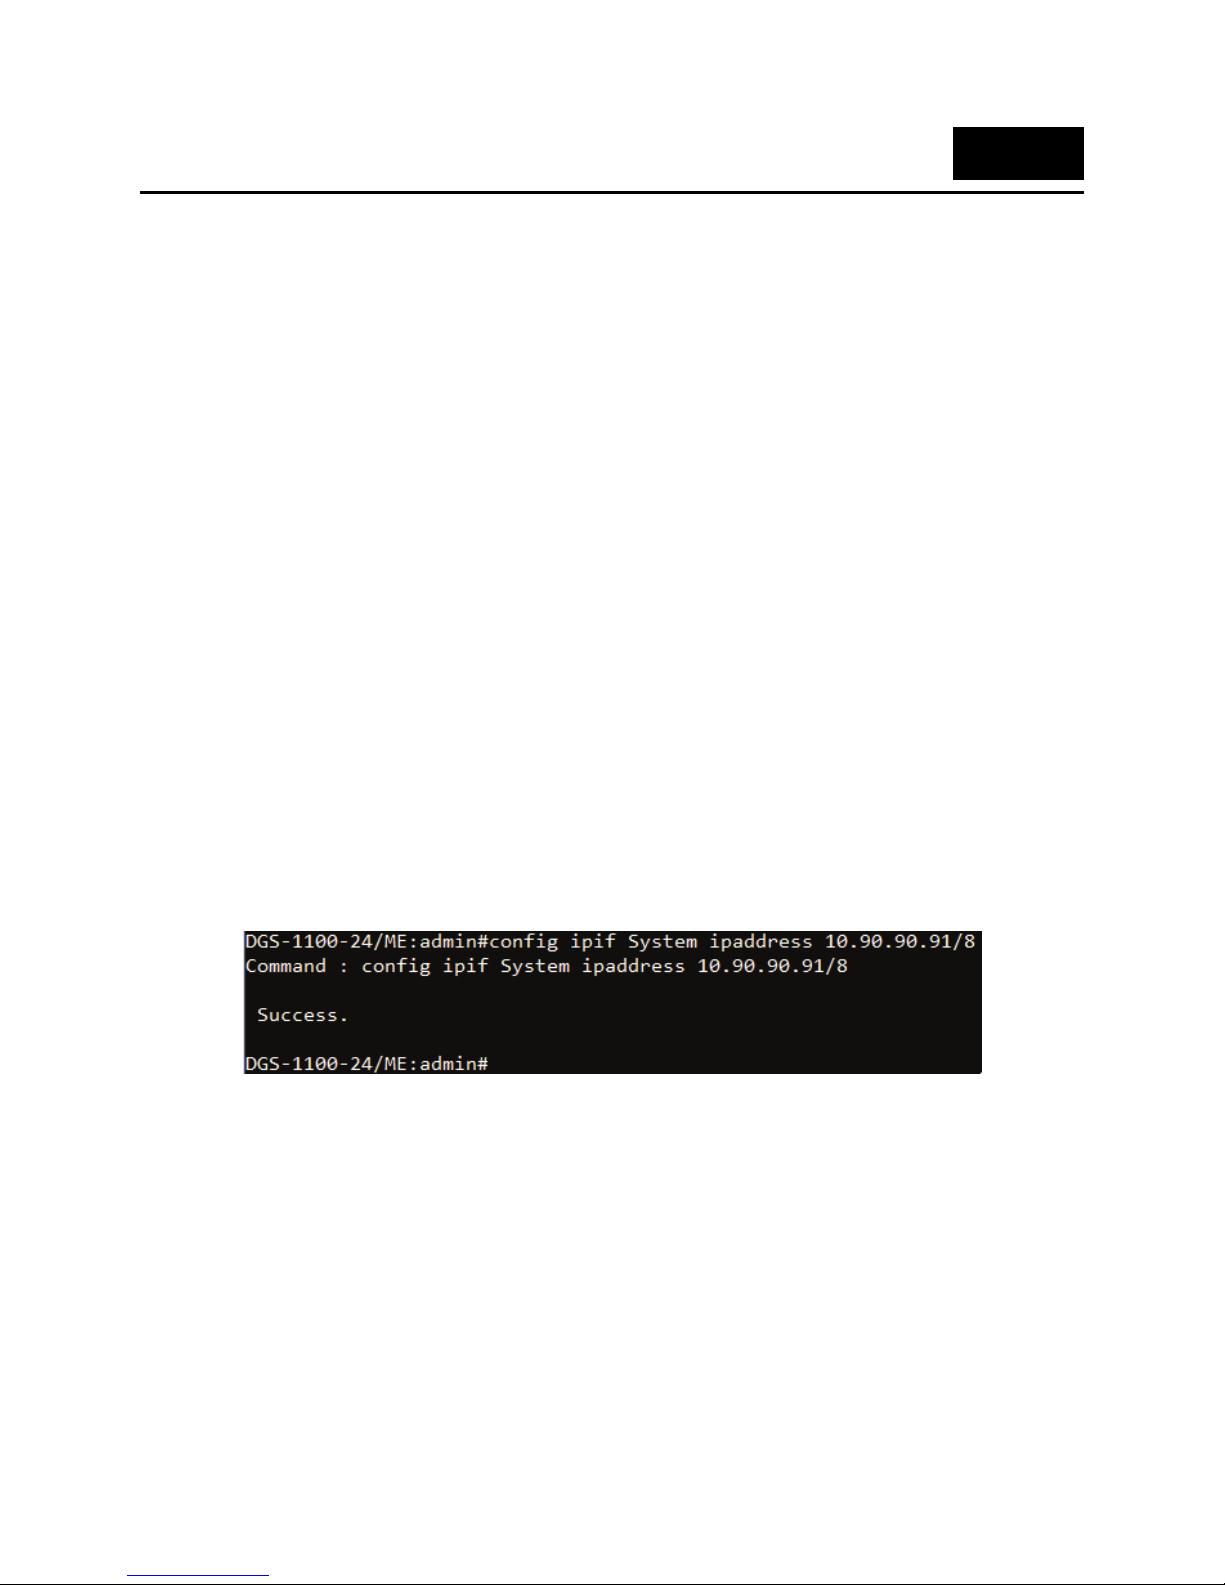
Alternatively, users can enter config ipif System ipaddress xxx.xxx.xxx.xxx/z. Where the x’s represent the IP
address to be assigned to the IP interface named System and the z represents the corresponding number of
subnets in CIDR notation.
The IP interface named System on the Switch can be assigned an IP address and subnet mask which
can then be used to connect a management station to the Switch’s Telnet management agent.
Figure 1–1 Assigning an IP Address
In the above example, the Switch was assigned an IP address of 10.90.90.91 with a subnet mask of
255.0.0.0. The system message Success indicates that the command was executed successfully. The
Switch can now be configured and managed via Telnet, SNMP MIB browser and the CLI using the above
IP address to connect to the Switch.
1
DGS-1100/ME Metro Ethernet Managed Switch CLI Reference Guide
2
PRODUCT INTRODUCTION
Thank you and congratulations on your purchase of D-Link DGS-1100/ME Series Switch Products.
D-Link's next generation DGS-1100 Series switches blend plug-and-play simplicity with exceptional
value and reliability for small and medium-sized business (SMB) networking. All models are housed in a
new style rack-mount metal case with easy-to-view front panel diagnostic LEDs.
The brand-new DGS-1100/ME series are green by design with IEEE 802.3az Energy Efficient Ethernet
compliant (abbreviated as EEE) and D-Link Green Technologies. This allows significant power saving
during periods of low data activity. In most environments, switches are idle 90% or more of the time. If
there has been no network traffic over a short period of time, ports on DGS-1100 switch will change to
power saving mode automatically. Once a packet is received, the switch wakes and works immediately,
returning to normal funcationality. By using EEE compliant devices, such as PCs and servers, the
network can save energy without compromising any performance. Even when connecting to legacy
devices which do not support IEEE 802.3az, D-Link Green Technologies can reduce power consumption
by changing the power state of the link.
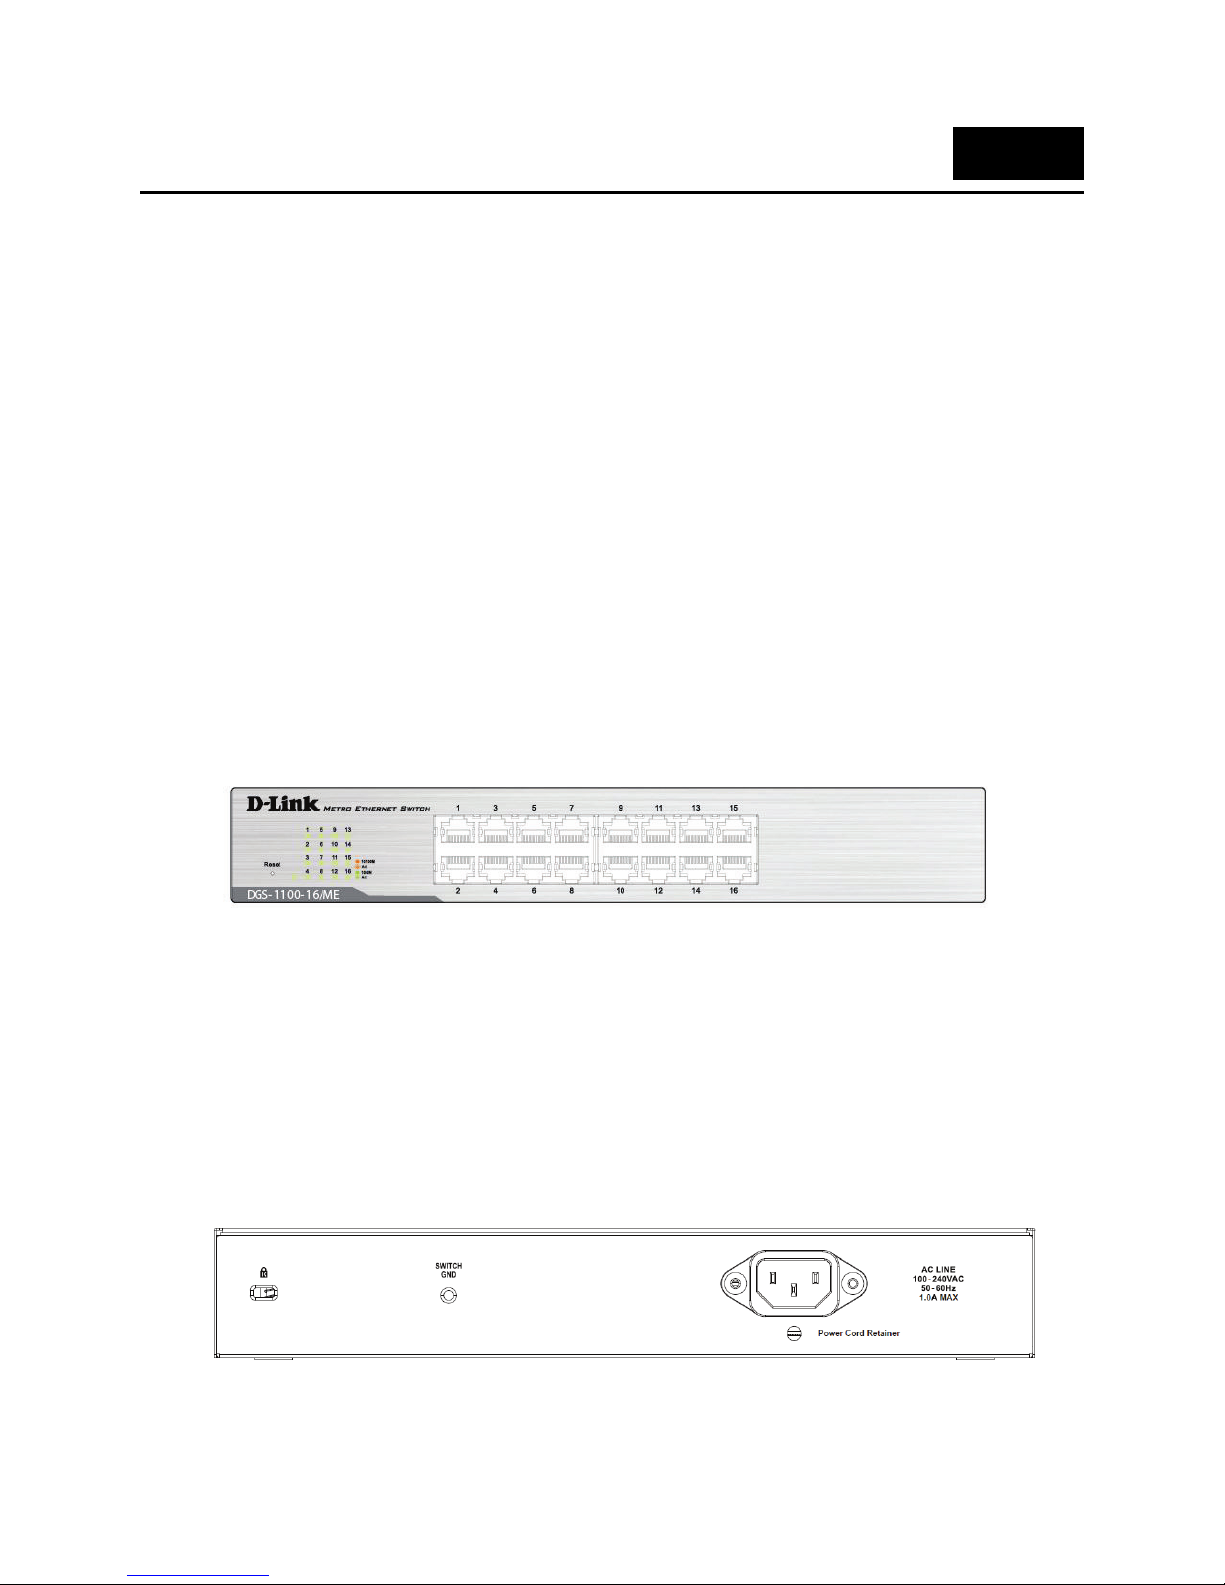
DGS-1100-16/ME
16-Port 10/100/1000Mpbs Switch
Front Panel
Figure 2-1 - DGS-1100-16/ME Front Panel
Power LED: The Power LED lights up when the Switch is connected to a power source.
Link/Act/Speed LED (Ports 1-16):
Solid Green: When there is a secure 1000Mbps connection at the port.
Blinking Green or Amber: Indicates that the Switch is either sending or receiving data to the port.
Solid Amber: Indicates that the port is running at 10/100Mbps.
Light off: No link.
Reset: By pressing the Reset button until the power LED turns amber, the Switch will change back to
the default configuration and all changes will be lost.
Rear Panel
Figure 2-2 – DGS-1100-16/ME Rear Panel
2
DGS-1100/ME Metro Ethernet Managed Switch CLI Reference Guide
Power: The power port is where to connect the AC power cord.
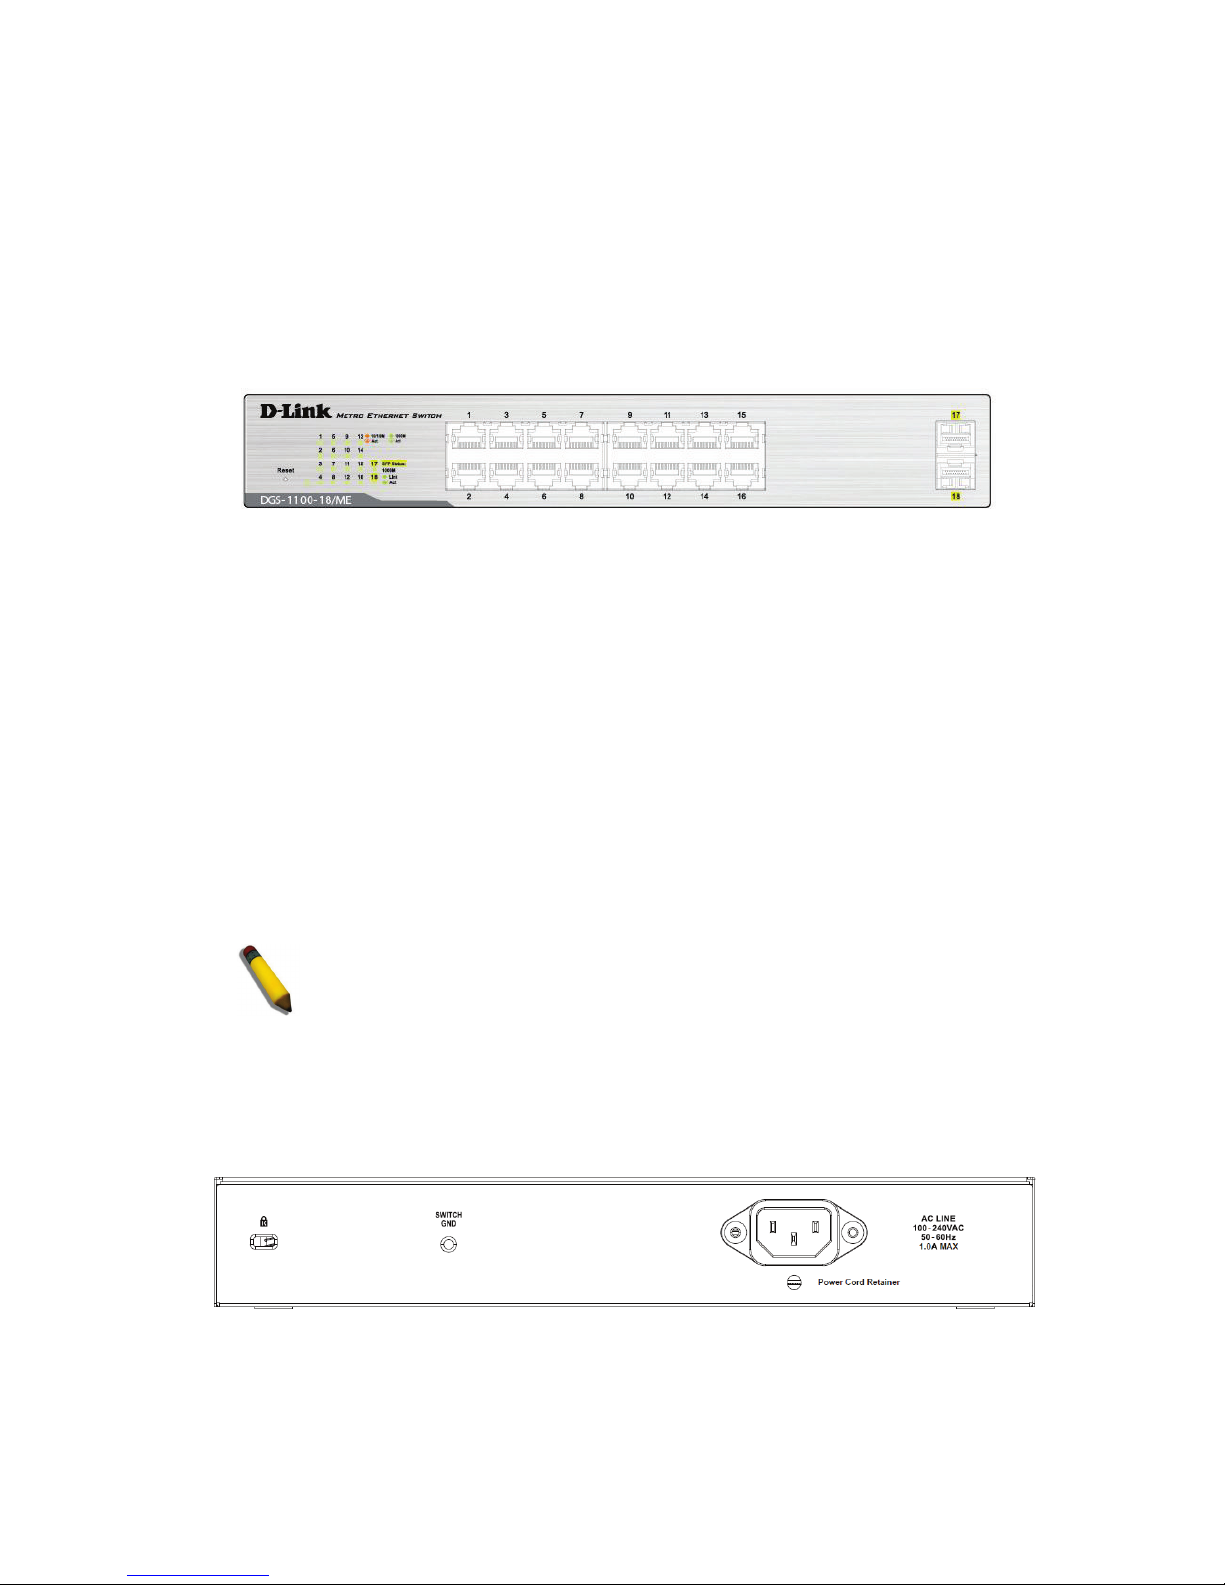
DGS-1100-18/ME
16-Port 10/100/1000Mpbs + 2 Port SFP 1000 Mbps Switch
Front Panel
Figure 2-3 - DGS-1100-18/ME Front Panel
Power LED: The Power LED lights up when the Switch is connected to a power source.
Link/Act/Speed LED (Ports 1-16):
Solid Green: When there is a secure 1000Mbps connection at the port.
Blinking Green or Amber: Indicates that the Switch is either sending or receiving data to the port.
Solid Amber: Indicates that the port is running at 10/100Mbps.
Light off: No link.
Link/Act/Speed LED (Ports 17-18):
Solid Green: There is a secure 1000Mbps connection at the port.
Blinking Green: There is reception or transmission occurring at the port.
Light off: No link.
Reset: By pressing the Reset button until the power LED turns amber, the Switch will change back to
the default configuration and all changes will be lost.
NOTE: The MiniGBIC ports should use UL listed Optical Transceiver
product, Rated Laser Class I. 3.3Vdc
Rear Panel
Figure 2-4 – DGS-1100-18/ME Rear Panel
Power: The power port is where to connect the AC power cord.
3
DGS-1100/ME Metro Ethernet Managed Switch CLI Reference Guide
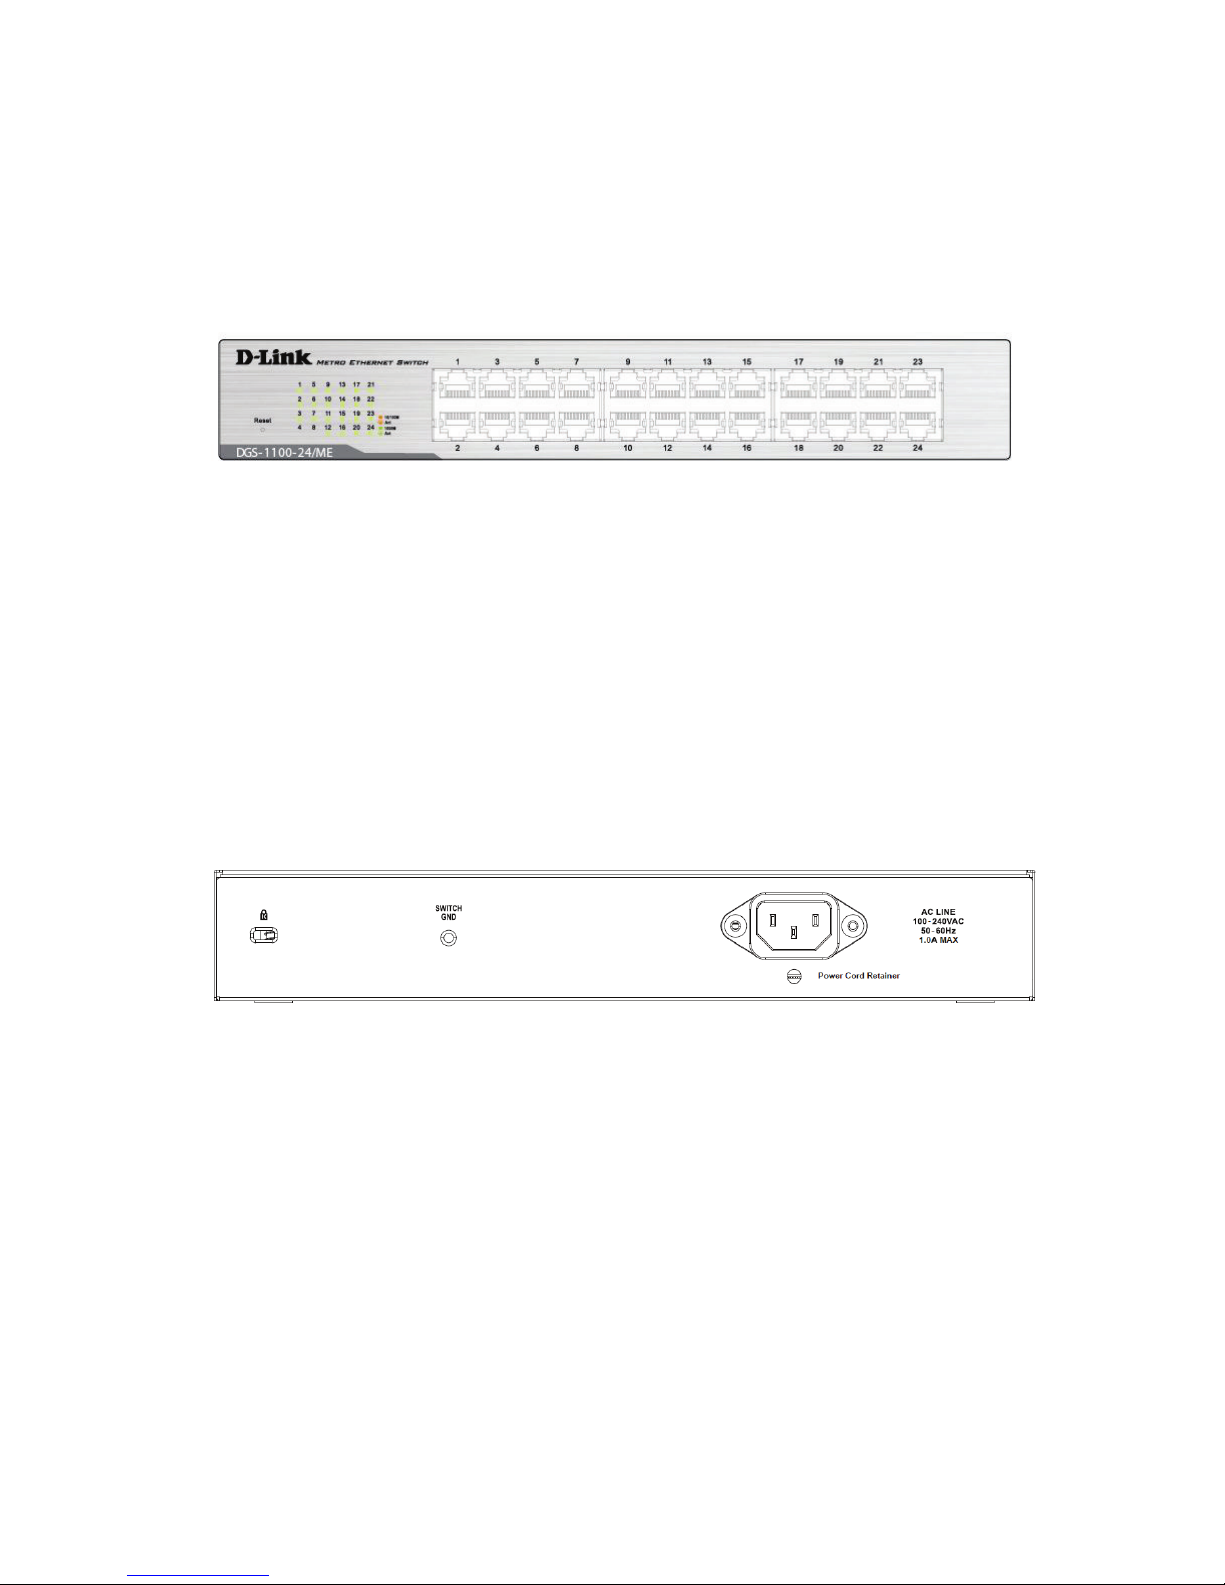
DGS-1100-24/ME
24-Port 10/100/1000Mpbs Switch
Front Panel
Figure 2-5 – DGS-1100-24/ME Front Panel
Power LED: The Power LED lights up when the Switch is connected to a power source.
Link/Act/Speed LED (Ports 1-24):
Solid Green: When there is a secure 1000Mbps connection at the port.
Blinking Green or Amber: Indicates that the Switch is either sending or receiving data to the port.
Solid Amber: Indicates that the port is running at 10/100 Mbps.
Light off: No link.
Reset: By pressing the Reset button until the power LED turns amber, the Switch will change back to
the default configuration and all changes will be lost.
Rear Panel
Figure 2-6 – DGS-1100-24/ME Rear Panel
Power: Connect the supplied AC power cable to this port.
4
DGS-1100/ME Metro Ethernet Managed Switch CLI Reference Guide
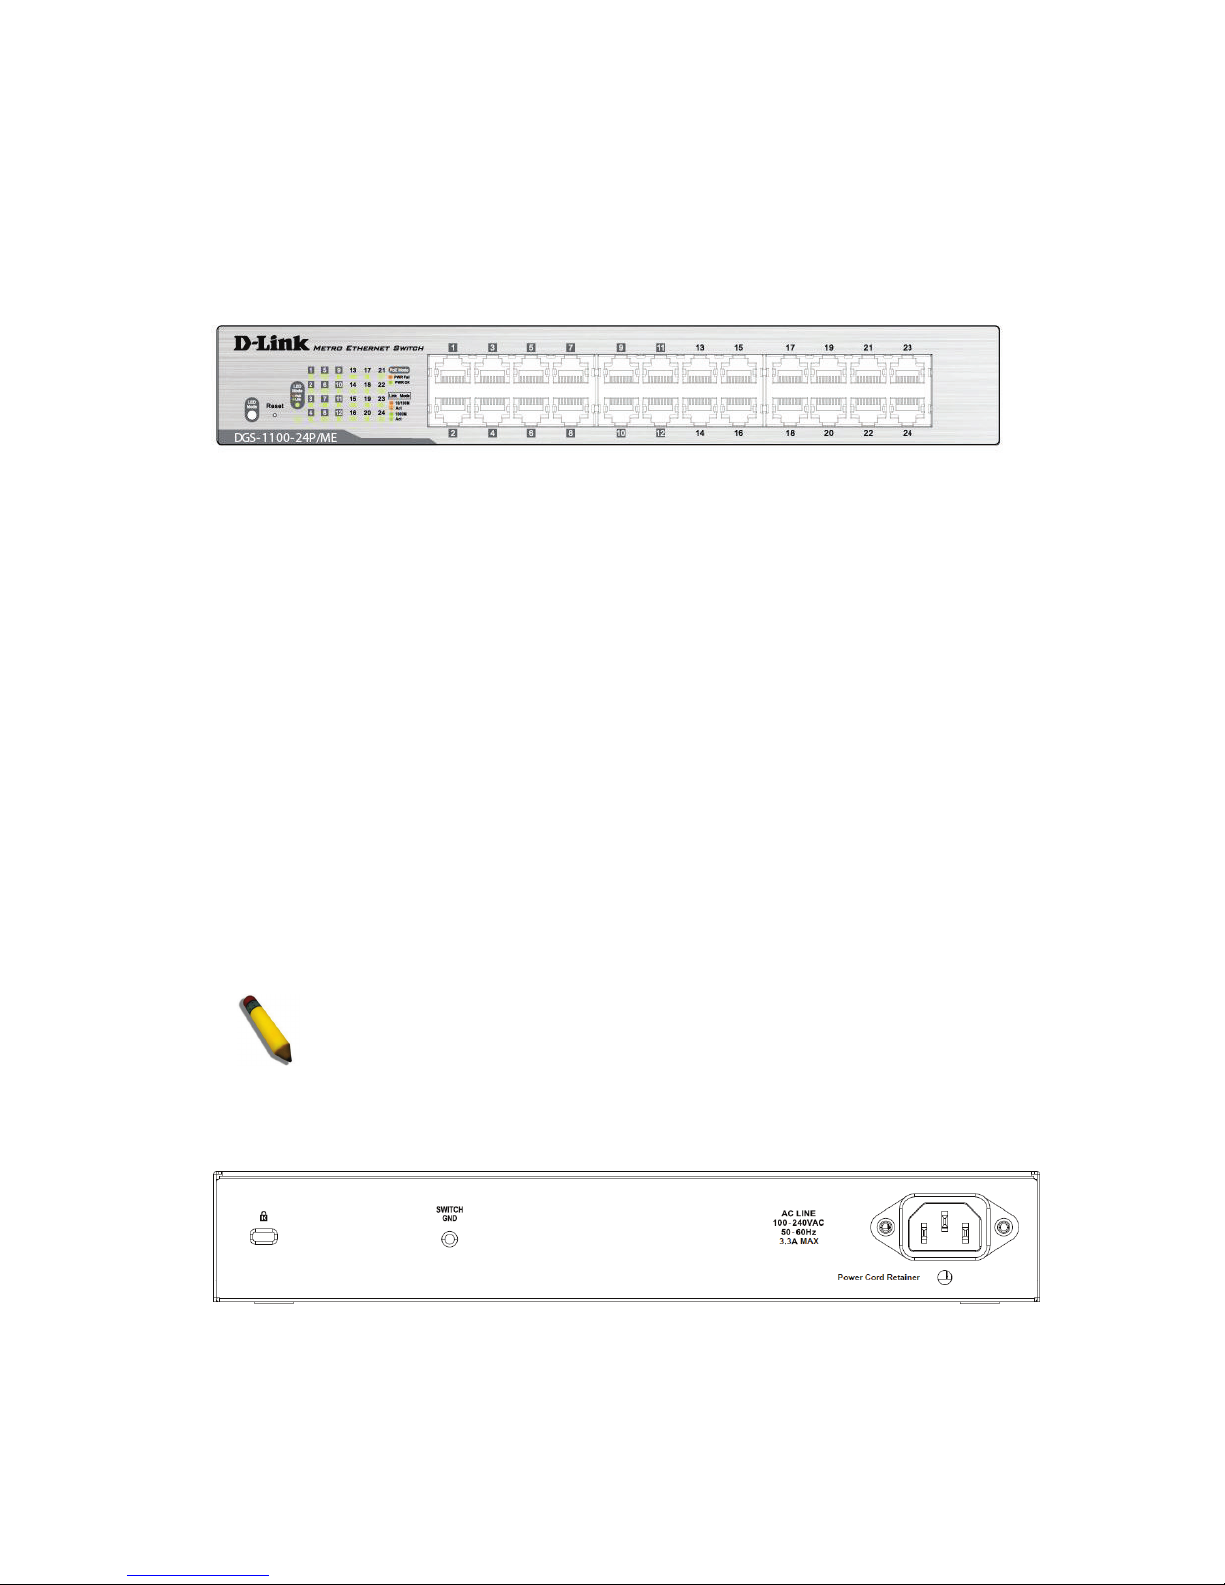
DGS-1100-24P/ME
12-Port 10/100/1000Mpbs PoE + 12-Port 10/100/1000Mpbs Switch
Front Panel
Figure 2-7 – DGS-1100-24P/ME Front Panel
Power LED: The Power LED lights up when the Switch is connected to a power source.
Link/Act/Speed LED (Ports 1-24):
Solid Green: When there is a secure 1000Mbps connection at the port.
Blinking Green or Amber: Indicates that the Switch is either sending or receiving data to the port.
Solid Amber: Indicates that the port is running at 10/100Mbps.
Light off: No link.
PoE Mode (Ports 1-12):
Green: Indicates that PoE mode is active.
Amber: Indicates that there is an issue with the PoE mode activating properly.
Light off: Indicates that PoE mode is not active.
LED Mode Button: Pressing this button will change the LED behavior from Link mode, and PoE Mode
Reset: By pressing the Reset button until the power LED turns amber, the Switch will change back to
the default configuration and all changes will be lost.
Note: The LED behavior for ports 1-12 will switch between Link mode and PoE mode when the PoE
mode is active.
NOTE: This equipment can be connected only to PoE networks without
routing to the outside plant.
Rear Panel
Figure 2-8 – DGS-1100-24P/ME Rear Panel
Power: Connect the supplied AC power cable to this port.
5
DGS-1100/ME Metro Ethernet Managed Switch CLI Reference Guide
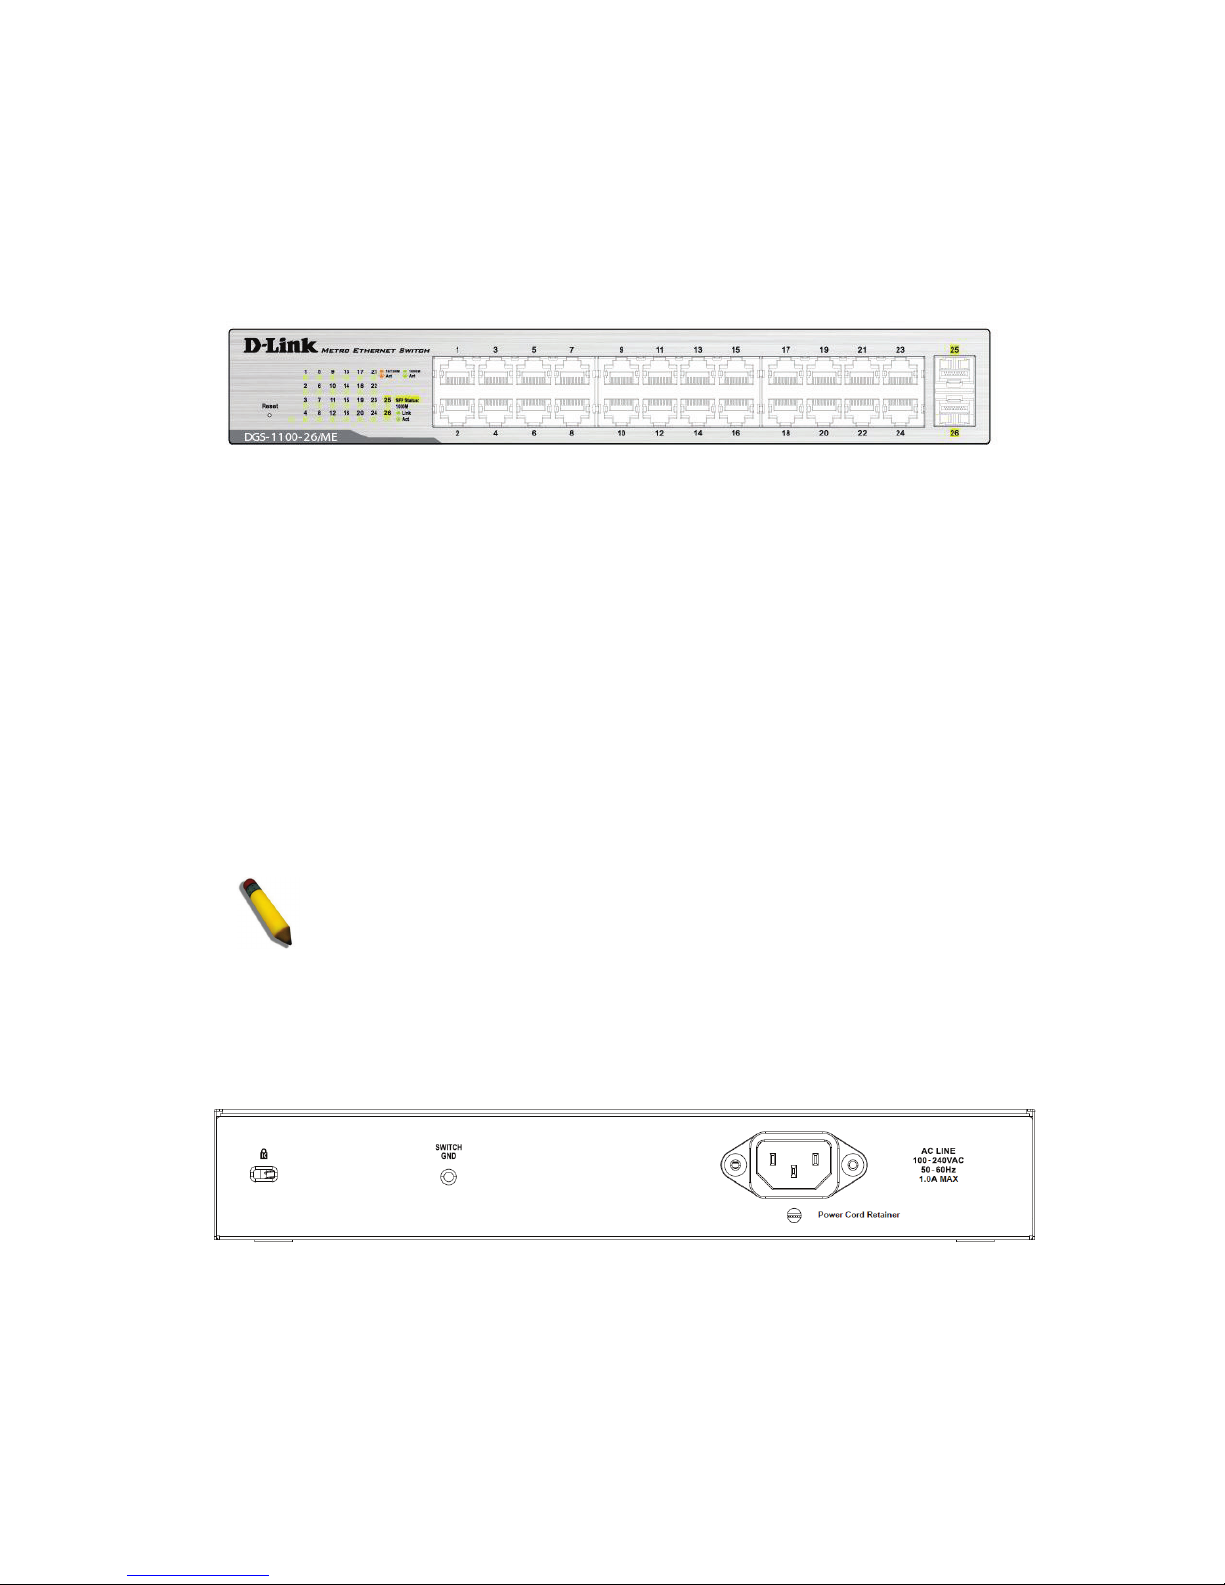
DGS-1100-26/ME
24-Port 10/100/1000Mpbs + 2-Port SFP 1000 Mbps Switch
Front Panel
Figure 2-9 – DGS-1100-26/ME Front Panel
Power LED: The Power LED lights up when the Switch is connected to a power source.
Link/Act/Speed LED (Ports 1-24):
Solid Green: When there is a secure 1000Mbps connection at the port.
Blinking Green or Amber: Indicates that the Switch is either sending or receiving data to the port.
Solid Amber: Indicates that the port is running at 10/100Mbps.
Light off: No link.
Link/Act/Speed LED (Ports 25-26):
Solid Green: There is a secure 1000Mbps connection at the port.
Blinking Green: There is reception or transmission occurring at the port.
Light off: No link.
Reset: By pressing the Reset button until the power LED turns amber, the Switch will change back to
the default configuration and all changes will be lost.
NOTE: The MiniGBIC ports should use UL listed Optical Transceiver
product, Rated Laser Class I. 3.3Vdc
Rear Panel
Figure 2-10 – DGS-1100-26/ME Rear Panel
Power: Connect the supplied AC power cable to this port.
6
DGS-1100/ME Metro Ethernet Managed Switch CLI Reference Guide
3
HARDWARE INSTALLATION
This chapter provides unpacking and installation information for the D-Link Switch.
Step 1: Unpacking
Open the shipping carton and carefully unpack its contents. Please consult the packing list located in the User
Manual to make sure all items are present and undamaged. If any item is missing or damaged, please contact
your local D-Link reseller for replacement.
Packing contents of DGS-1100/ME
• One D-Link DGS-1100/ME Series Switch
• One AC power cord
• Four rubber feet
• Screws and two mounting brackets
• One Multi-lingual Getting Started Guide
• One CD with User Manual
If any item are found missing or damaged, please contact the local reseller for replacement.
Step 2: Switch Installation
For safe switch installation and operation, it is recommended that you:
• Visually inspect the power cord to see that it is secured fully to the AC power connector.
• Make sure that there is proper heat dissipation and adequate ventilation around the switch.
• Do not place heavy objects on the switch.
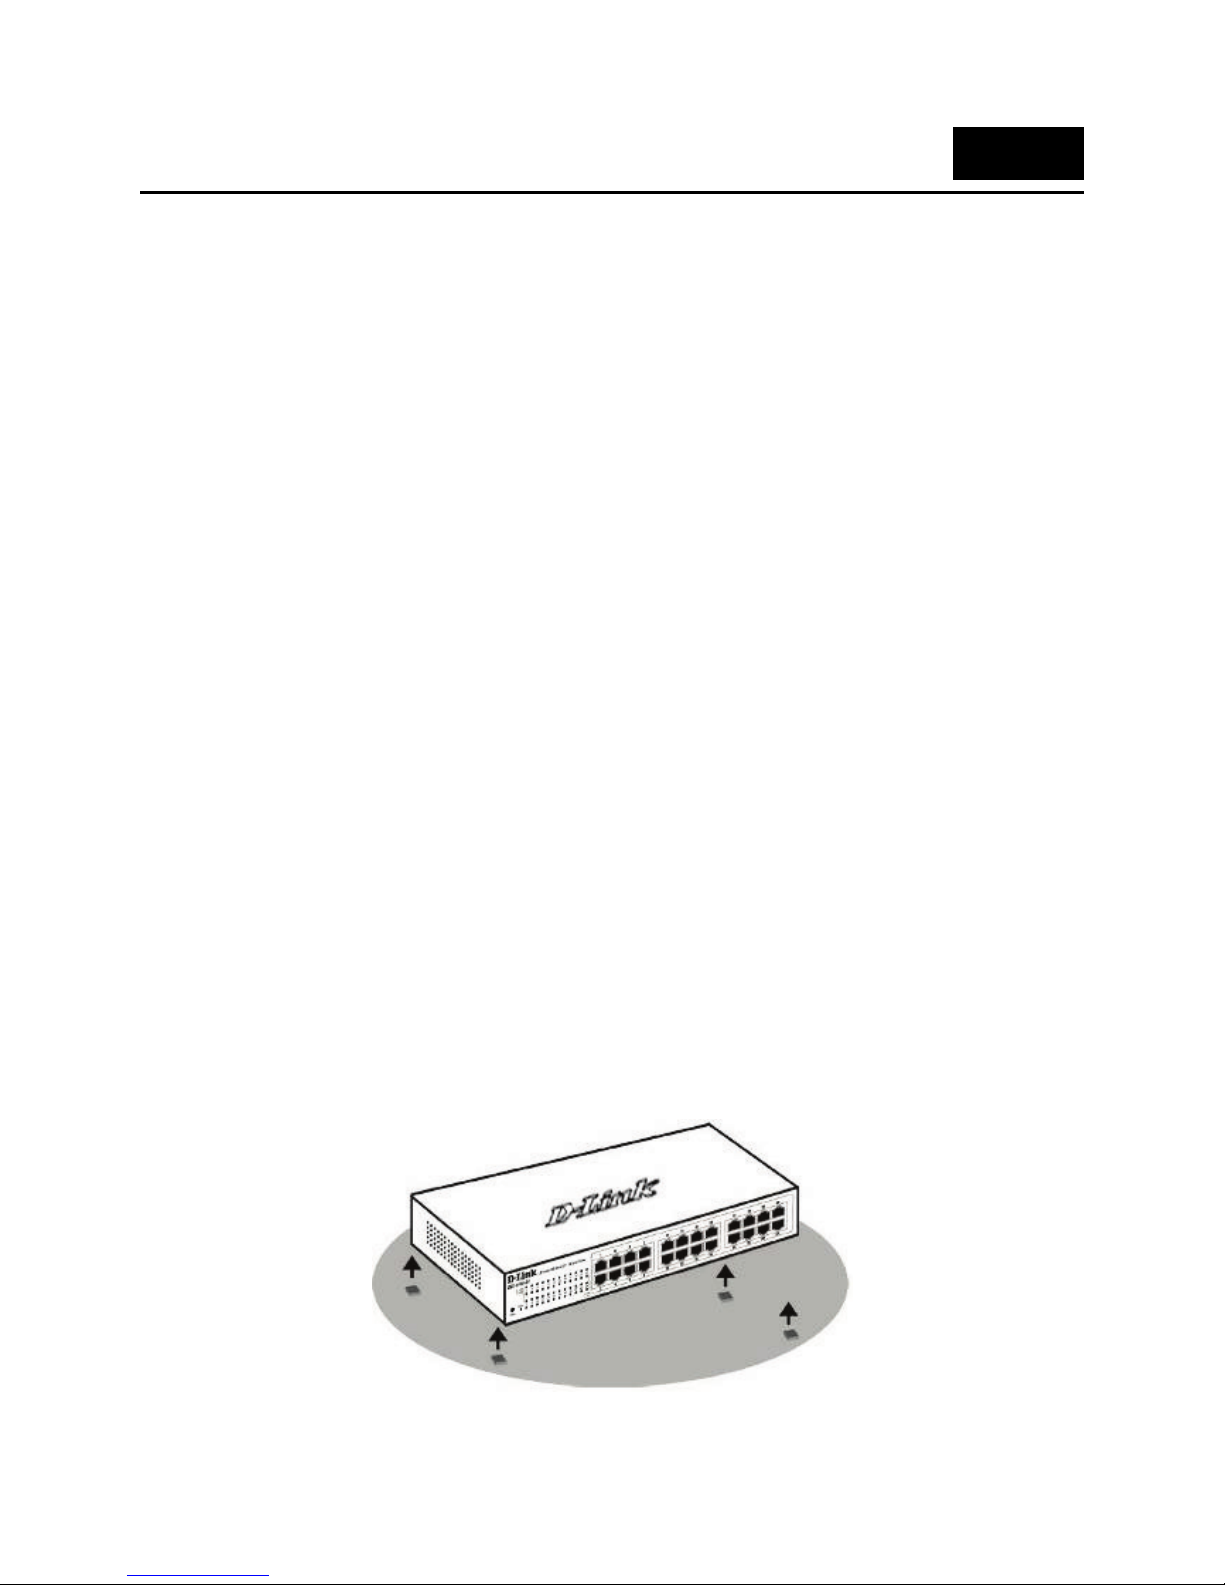
Desktop or Shelf Installation
When installing the switch on a desktop or shelf, the rubber feet included with the device must be attached on
the bottom, at each corner of the device’s base. Allow enough ventilation space between the device and the
objects around it.
7
DGS-1100/ME Metro Ethernet Managed Switch CLI Reference Guide
Figure 3-1 – Attach the adhesive rubber pads to the bottom
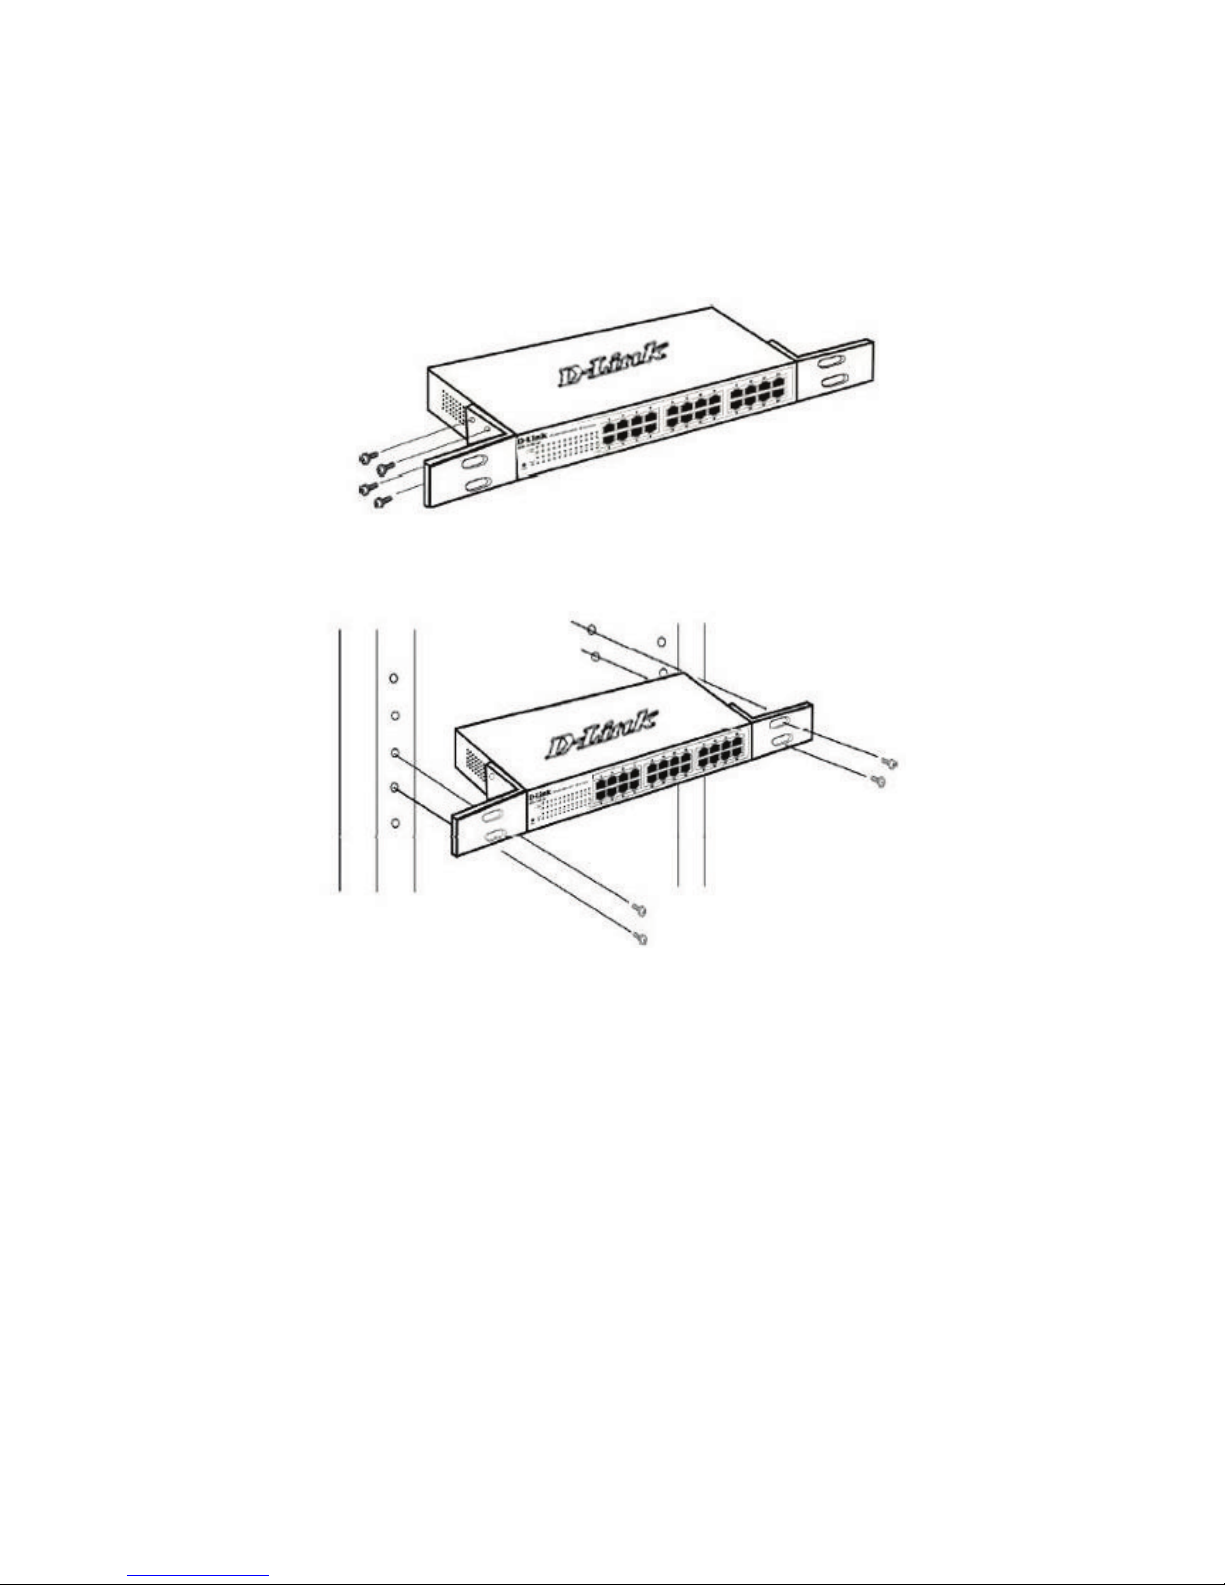
Rack Installation
The switch can be mounted in an EIA standard size 11-inch rack, which can be placed in a wiring closet with
other equipment. To install, attach the mounting brackets to the switch’s side panels (one on each side) and
secure them with the screws provided (please note that these brackets are not designed for palm size switches).
Figure 3-2 – Attach the mounting brackets to the Switch
Then, use the screws provided with the equipment rack to mount the switch in the rack.
Figure 3-3 – Mount the Switch in the rack or chassis
Please be aware of following safety Instructions when installing:
A) Elevated Operating Ambient - If installed in a closed or multi-unit rack assembly, the operating ambient
temperature of the rack environment may be greater than room temperature. Therefore, consideration should be
given to installing the equipment in an environment compatible with the maximum ambient temperature (Tma)
specified by the manufacturer.
B) Reduced Air Flow - Installation of the equipment in a rack should be such that the amount of air flow required
for safe operation of the equipment is not compromised.
C) Mechanical Loading - Mounting of the equipment in the rack should be such that a hazardous condition is not
achieved due to uneven mechanical loading.
D) Circuit Overloading - Consideration should be given to the connection of the equipment to the supply circuit
and the effect that overloading of the circuits might have on overcurrent protection and supply wiring.
Appropriate consideration of equipment nameplate ratings should be used when addressing this concern.
E) Reliable Earthing - Reliable earthing of rack-mounted equipment should be maintained. Particular attention
should be given to supply connections other than direct connections to the branch circuit (e.g. use of power
strips)."
8
DGS-1100/ME Metro Ethernet Managed Switch CLI Reference Guide
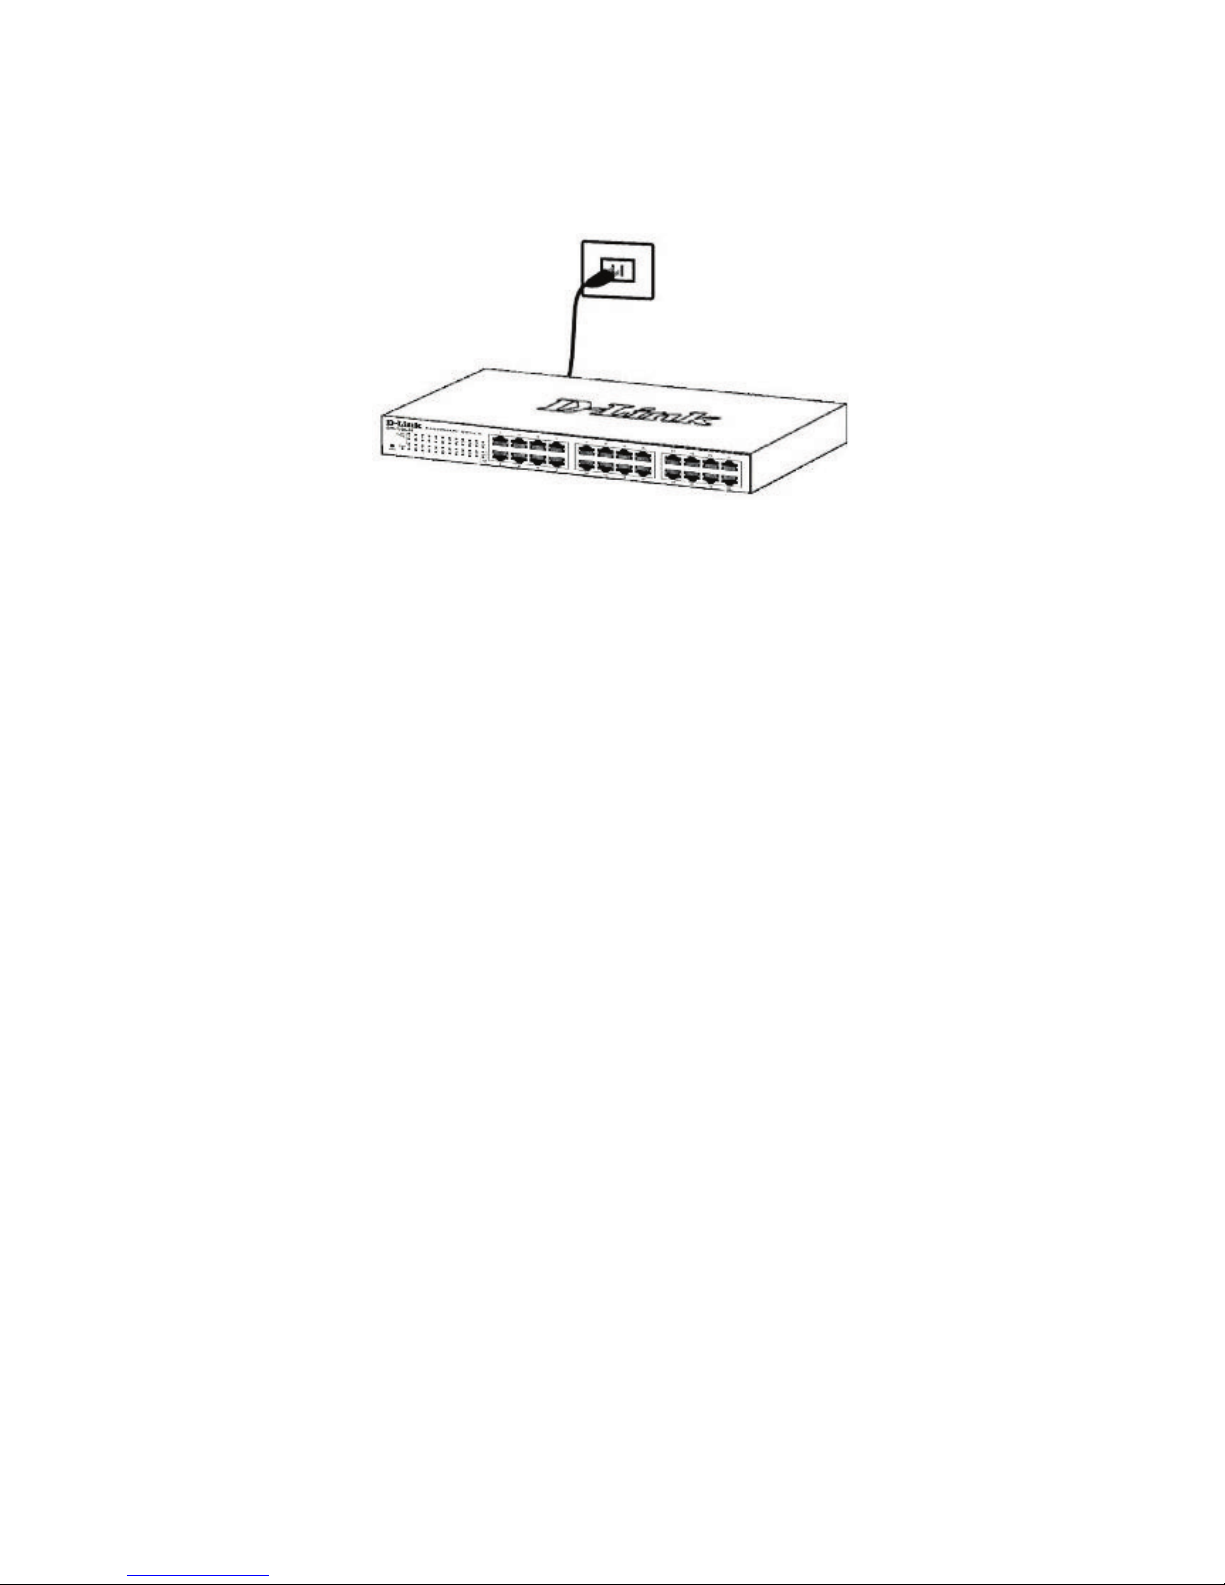
Step 3 – Plugging in the AC Power Cord
Users may now connect the AC power cord into the rear of the switch and to an electrical outlet (preferably one
that is grounded and surge protected).
Figure 3-4 – Plugging the switch into an outlet
Power Failure
As a precaution, the switch should be unplugged in case of power failure. When power is resumed, plug the
switch back in.
Grounding the Switch
This section describes how to connect the DGS-1100/ME Series Switch to ground. You must complete this
procedure before powering your switch.
Required Tools and Equipment
• Ground screws (included in the accessory kit): One M4 x 6 mm (metric) pan-head screw
• Ground cable (not included in the accessory kit): The grounding cable should be sized according to local and
national installation requirements. Depending on the power supply and system, a 12 to 6 AWG copper conductor
is required for U.S installation. Commercially available 6 AWG wire is recommended. The length of the cable
depends on the proximity of the switch to proper grounding facilities.
• A screwdriver (not included in the accessory kit)
The following steps let you connect the switch to a protective ground:
Step 1: Verify if the system power is off.
Step 2: Use the ground cable to place the #8 terminal lug ring on top of the ground-screw opening, as seen in
the figure below.
Step 3: Insert the ground screw into the ground-screw opening.
Step 4: Using a screwdriver, tighten the ground screw to secure the ground cable to the switch.
Step 5: Attach the terminal lug ring at the other end of the grounding cable to an appropriate grounding stud or
bolt on rack where the switch is installed.
Step 6: Verify if the connections at the ground connector on the switch and the rack are securely attached.
9

DGS-1100/ME Metro Ethernet Managed Switch CLI Reference Guide
Figure 3-5 – Ground cable, screw and #8 terminal lug rings
10
DGS-1100/ME Metro Ethernet Managed Switch CLI Reference Guide
4
USING THE COMMAND LINE INTERFACE
The Switch allows a computer or terminal to perform some basic monitoring and configuration tasks by
using the Command Line Interface (CLI) via TELNET protocol.
NOTE: Switch configuration settings are saved to non-volatile RAM using the save command.
The current configuration will then be retained in the Switch’s NV-RAM, and reloaded when the
Switch is rebooted. If the Switch is rebooted without using the save command, the last
configuration saved to NV-RAM is loaded.
The command line functions are accessed over a Telnet interface. Once an IP address for the Switch has
been set, A Telnet program can be used (in VT-100 compatible terminal mode) to access and control the
Switch.
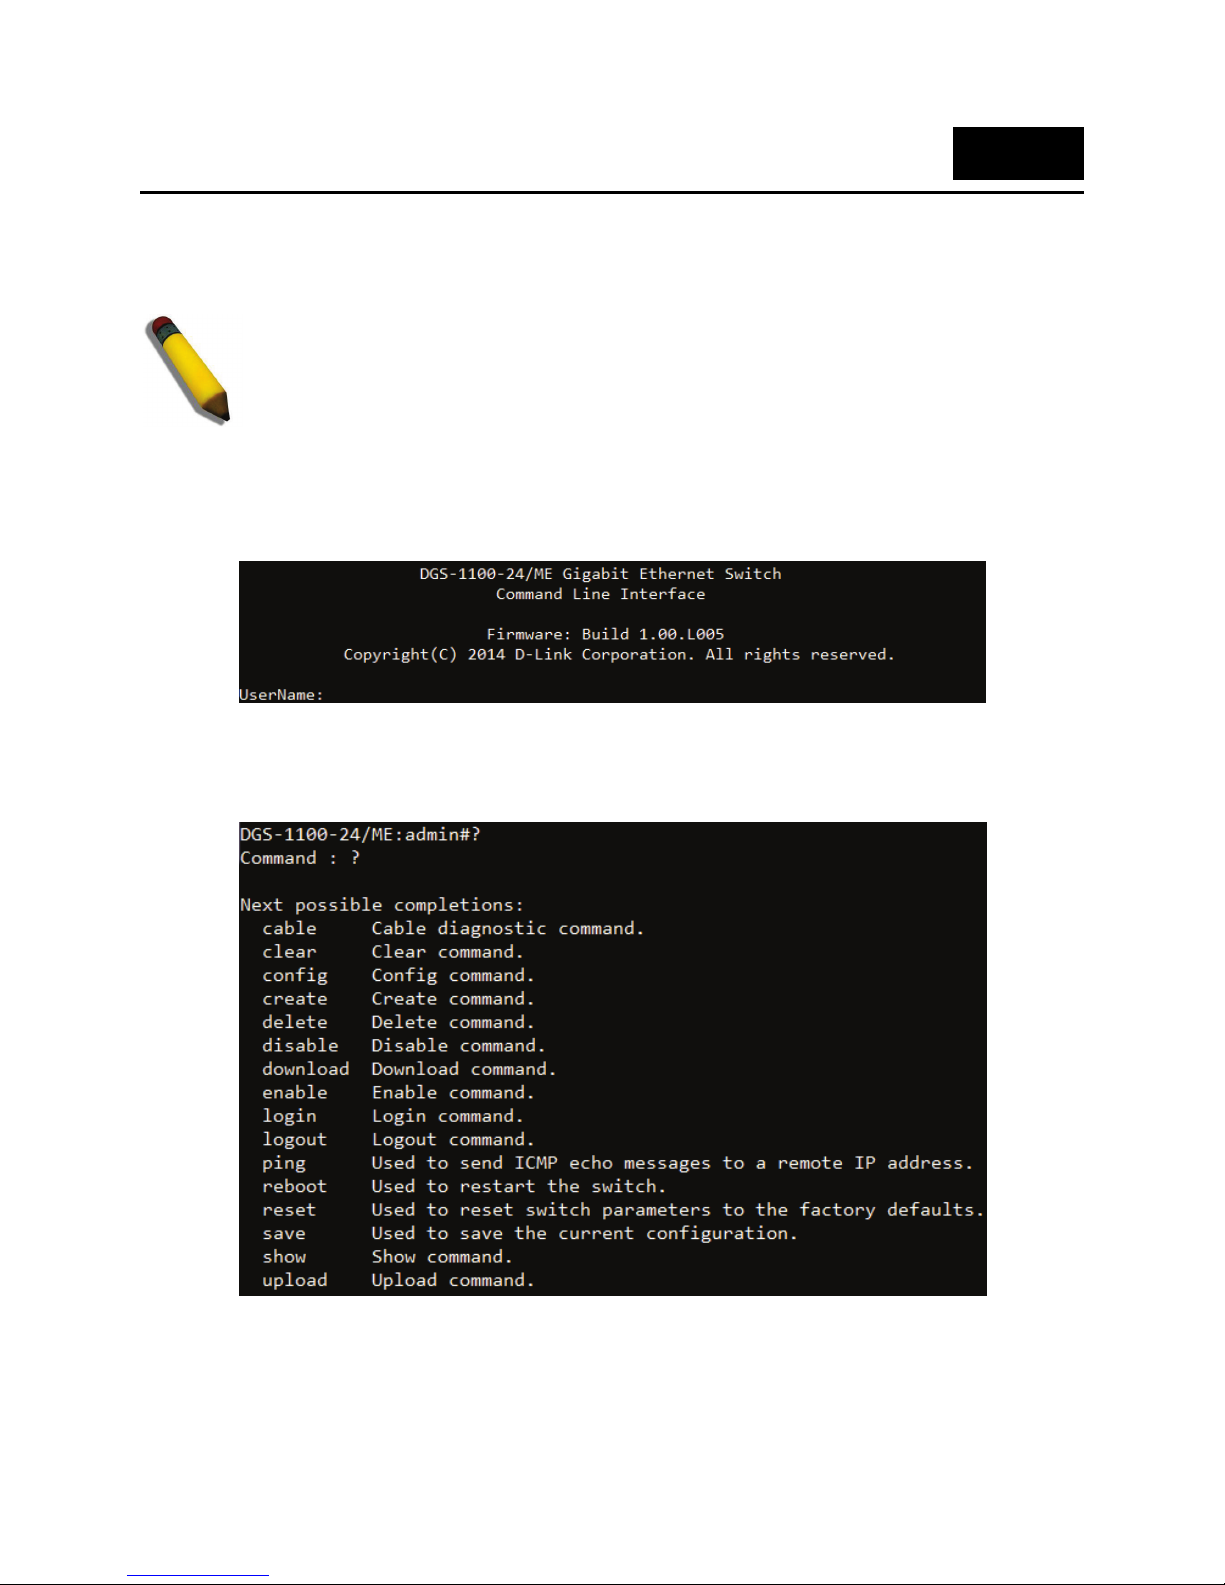
After the Switch reboots and you have to logged in, the console looks like this:
Figure 5–1 Initial Console Screen after Logging In
Commands are entered at the command prompt, DGS-1100-24P/ME:admin#
There are a number of helpful features included in the CLI. Entering the ? command displays a list of all
of the top-level commands.
Figure 5–2 The ? Command
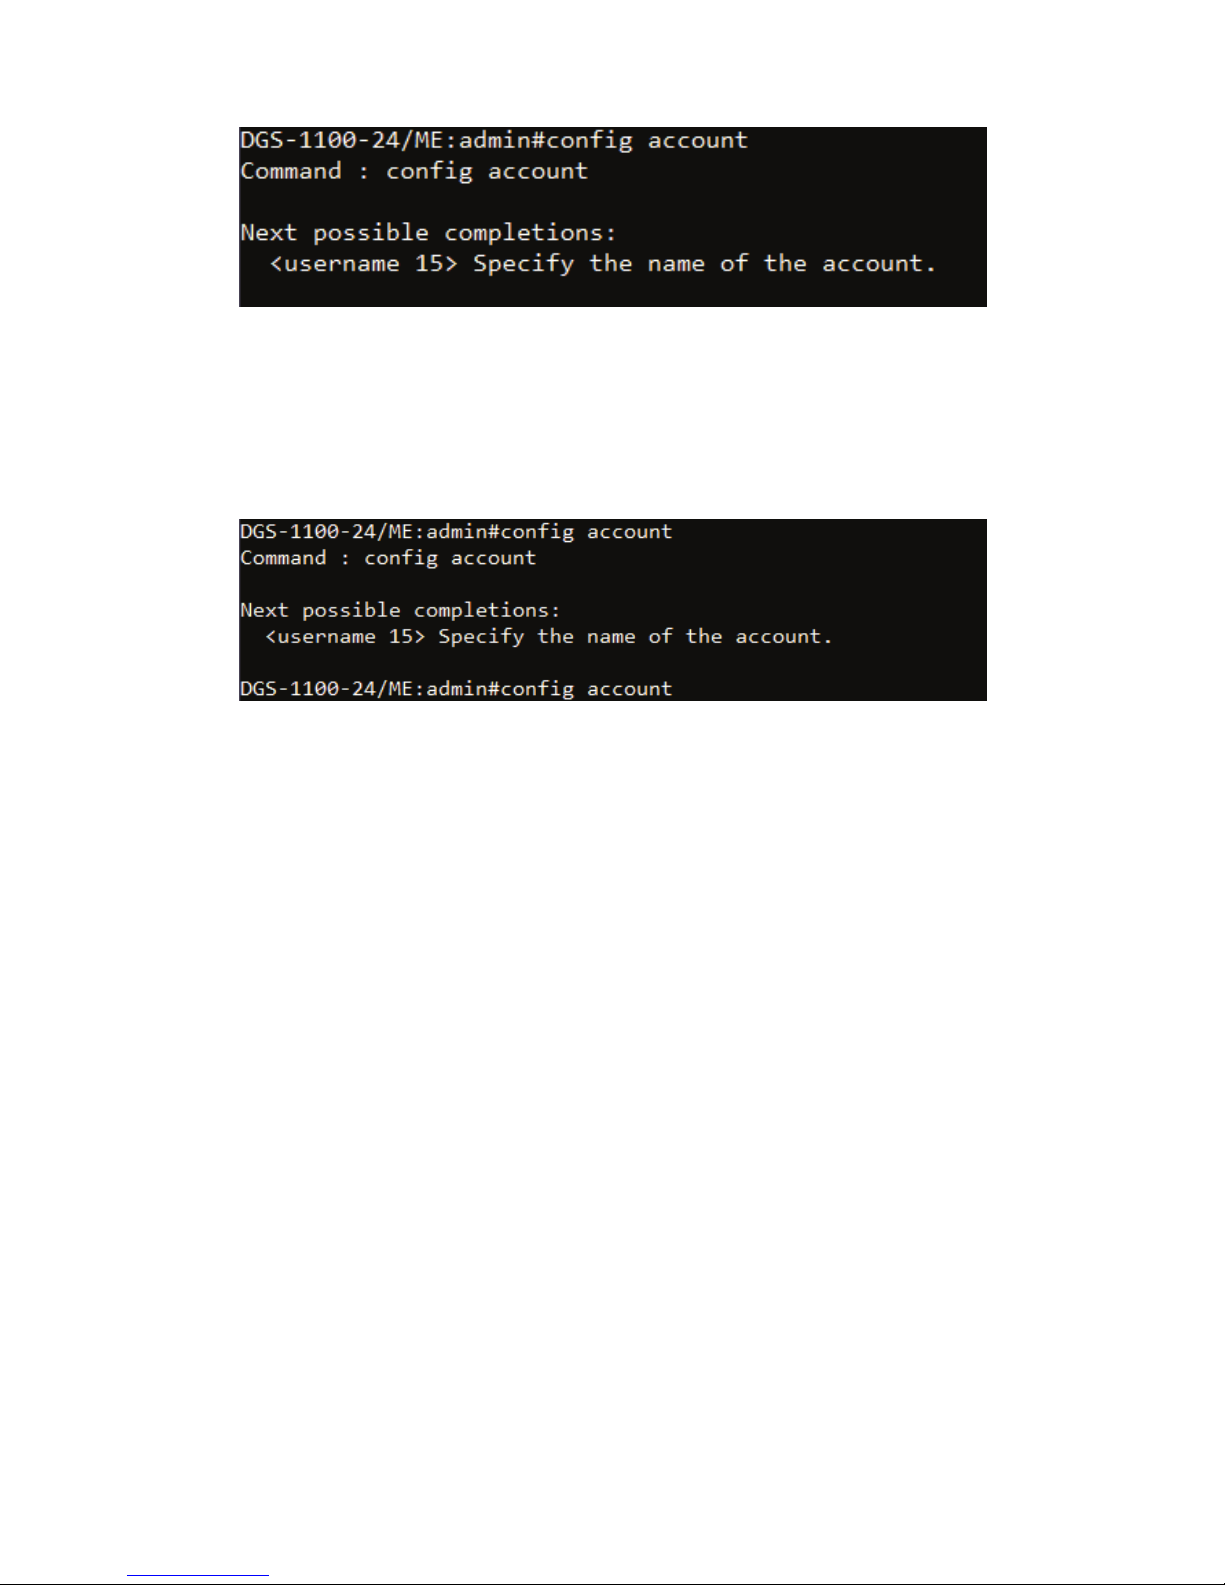
When entering a command without its required parameters, the CLI displays the prompt: command:
config account message and the options listed below.
11
DGS-1100/ME Metro Ethernet Managed Switch CLI Reference Guide
Figure 5–3 Example Command Parameter Help
In this case, the command config account was entered with the parameter <username>. The CLI will then
prompt to enter the <username> with the message, command: config account. Every command in the
CLI has this feature, and complex commands have several layers of parameter prompting.
In addition, after typing any given command plus one space, users can see all of the next possible subcommands, in sequential order, by pressing the ? key.
To re-enter the previous command at the command prompt, press the up arrow cursor key. The previous
command appears at the command prompt.
Figure 5–4 Using the Up Arrow to Re-enter a Command
In the above example, the command config account was entered without the required parameter
<username>, the CLI returned the command: config account prompt. The up arrow cursor control key
was pressed to re-enter the previous command (config account) at the command prompt. Now the
appropriate username can be entered and the config account command re-executed.
All commands in the CLI function in this way. In addition, the syntax of the help prompts are the same as
presented in this manual - angle brackets < > indicate a numerical value or character string. The < > can
also indicate a word with a number for character allowed.
If a command is entered that is unrecognized by the CLI, the top-level commands are displayed under
the Available commands: prompt.
12
DGS-1100/ME Metro Ethernet Managed Switch CLI Reference Guide
Figure 5–5 Available Commands
The top-level commands consist of commands such as show or config. Most of these commands
require one or more parameters to narrow the top-level command. This is equivalent to show what? or
config what? Where the what? is the next parameter.
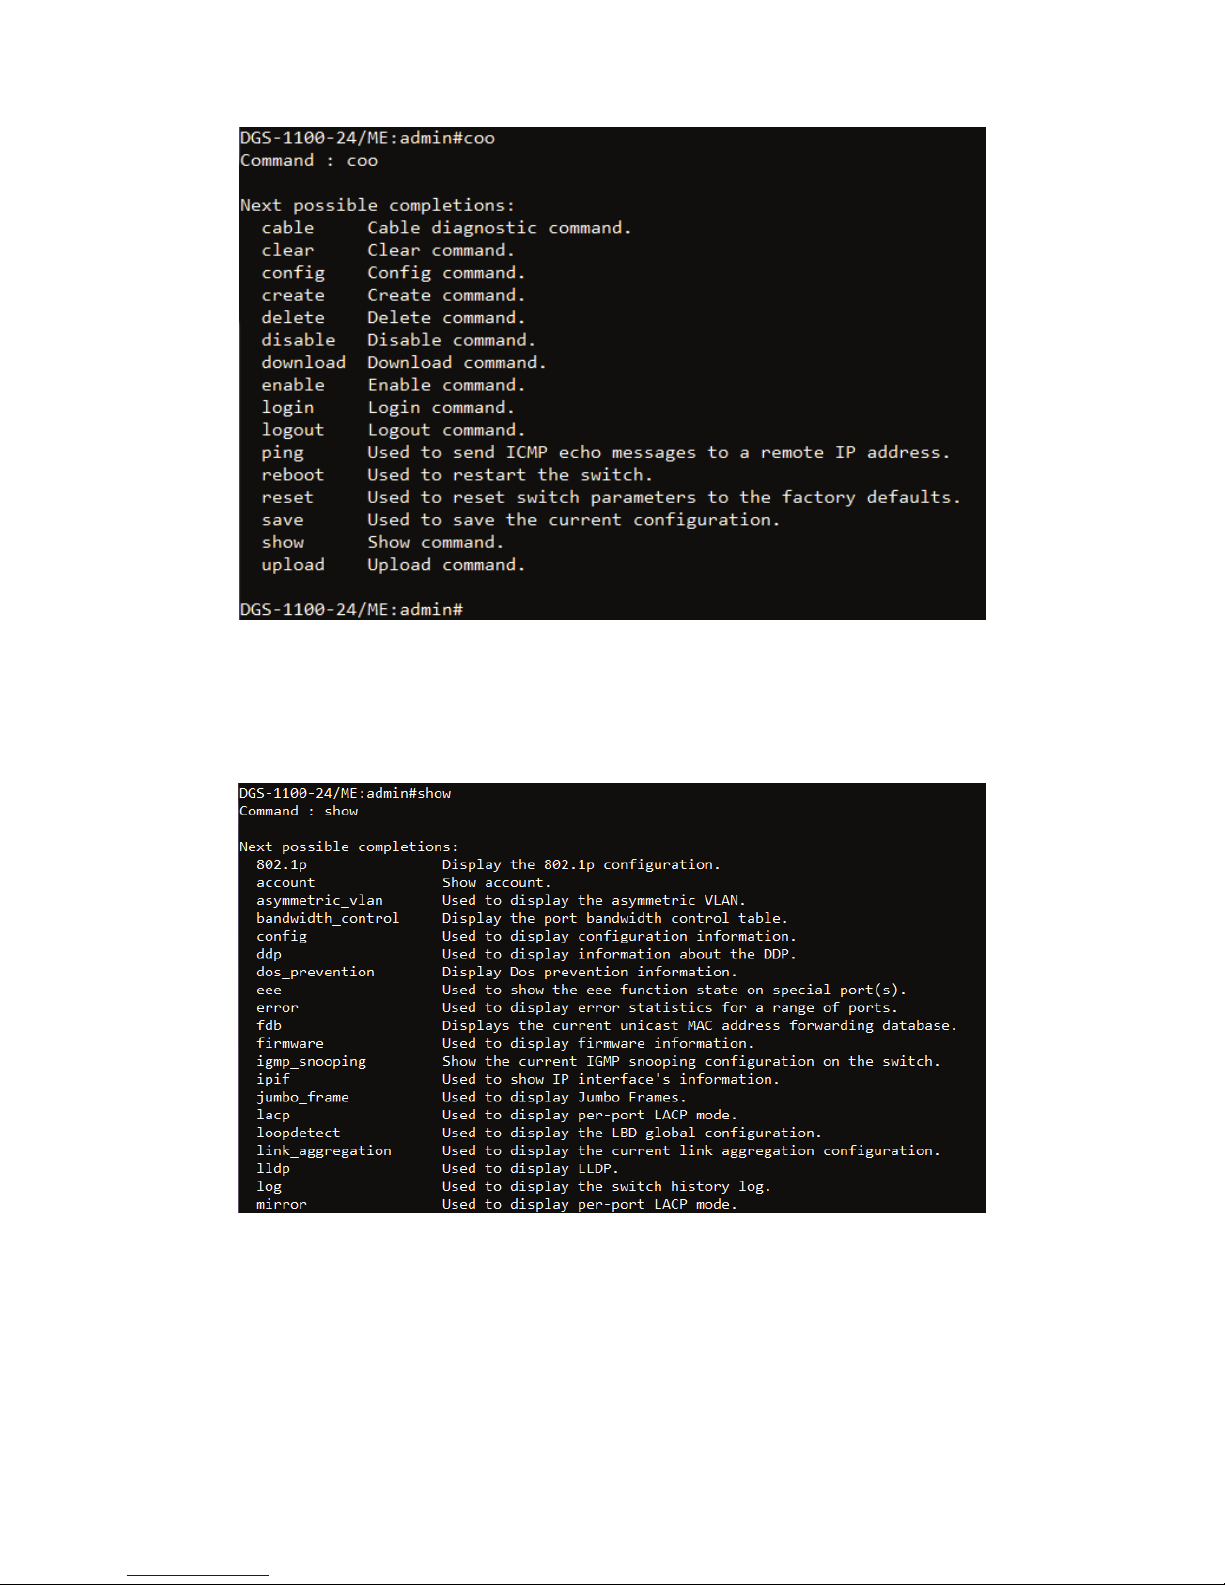
For example, entering the show command with no additional parameters, the CLI will then display all of
the possible next parameters.
Figure 5–6 Next possible completions: Show Command
In the above example, all of the possible next parameters for the show command are displayed. At the
next command prompt in the example, the up arrow was used to re-enter the show command, followed
by the account parameter. The CLI then displays the user accounts configured on the Switch.
13

DGS-1100/ME Metro Ethernet Managed Switch CLI Reference Guide
5
COMMAND SYNTAX
The following symbols are used to describe how command entries are made and values and arguments
are specified in this manual. The online help contained in the CLI and available through the Telnet uses
the same syntax.
NOTE: All commands are case-sensitive. Be sure to disable Caps Lock or any other unwanted
function that changes text case.
<angle brackets>
Purpose Encloses a variable or value that must be specified.
Syntax
create account [admin | oper |user] <username 15>
Description In the above syntax example, supply a username in the
<username> space. Do not type the angle brackets.
Example
Command
create account admin newadmin1
[square brackets]
Purpose Encloses a required value or set of required arguments. One value
or argument can be specified.
Syntax
create account [admin | oper |user] <username 15>
Description
In the above syntax example, specify admin, oper or a user level
account to be created. Do not type the square brackets.
Example
Command
create account user newuser1
| vertical bar
Purpose Separates two or more mutually exclusive items in a list, one of
which must be entered.
Syntax
create account [admin | oper | user] <username 15>
Description
In the above syntax example, specify admin, oper, or user. Do not
type the vertical bar.
Example
Command
create account user newuser1
All commands are case-sensitive. Be sure to disable Caps Lock or any other unwanted function that
changes text case.
14

DGS-1100/ME Metro Ethernet Managed Switch CLI Reference Guide
{braces}
Purpose Encloses an optional value or set of optional arguments.
Syntax
reboot {force_agree}
Description In the above syntax example, simply to execute “reboot” to reboot
the switch with confirmation. Or, to excute “reboot force_agree” to
reboot the switch without confirmation.
Example
command
reboot
Are you sure you want to proceed with the system reboot?(y/n)
Line Editing Key Usage
Delete Deletes the character under the cursor and then shifts the
remaining characters in the line to the left.
Backspace Deletes the character to the left of the cursor and then shifts the
remaining characters in the line to the left.
Insert Toggle on and off. When toggled on, inserts text and rewrite the
previous text.
Left Arrow Moves the cursor to the left.
Right Arrow Moves the cursor to the right.
Up Arrow Repeats the previously entered command. Each time the up arrow
is pressed, the command previous to that displayed appears. This
way it is possible to review the command history for the current
session. Use the down arrow to progress sequentially forward
through the command history list.
Down Arrow The down arrow displays the next command in the command
history entered in the current session. This displays each command
sequentially as it was entered. Use the up arrow to review previous
commands.
Tab To fill in the keyword if the input is recognizable.
Multiple Page Display Control Keys
Space Displays the next page.
CTRL+c Stops the display of remaining pages when multiple pages are to be
displayed.
ESC Stops the display of remaining pages when multiple pages are to be
displayed.
N Displays the next page.
P Displays the previous page.
Q Stops the display of remaining pages when multiple pages are to be
displayed.
R Refreshes the pages currently displayed.
15

DGS-1100/ME Metro Ethernet Managed Switch CLI Reference Guide
a Displays the remaining pages without pausing between pages.
Enter Displays the next line or table entry.
16

DGS-1100/ME Metro Ethernet Managed Switch CLI Reference Guide
6
BASIC SWITCH COMMANDS
The Basic Switch commands in the Command Line Interface (CLI) are listed (along with the appropriate
parameters) in the following table.
Command Parameter
clear screen
create account [admin | user] <username 15>
delete account <username 15>
config account <username 15>
show account
show session
show switch
show config current_config
config jumbo_frame ports <portlist> state [enable | disable]
show jumbo_frame
save
reboot {force_agree}
reset [config | system | default] {force_agree}
login
logout
ping <ipaddr> {times <value 1-255> | timeout <sec 1-99>}
create time_range
<string 8> [daily start_time < time hh:mm > end_time<time hh:mm > | weekly
start_weekday <weekday> start_time <time hh:mm > end_weekday <weekday>
end_time <time hh:mm> ]
delete time_range <string 8>
show time_range
config telnet
auto_logout
[2_minutes | 5_minutes | 10_minutes | 15_minutes]
show telnet
config firmware image <1,2> boot_up
show firmware information
create iproute default <ipaddr>
delete iproute default
config
command_prompt
config command_prompt [user_define <string 16> | username | default]
17

DGS-1100/ME Metro Ethernet Managed Switch CLI Reference Guide
Each command is listed in detail, as follows:
clear screen
Purpose To clear screen.
Syntax
clear screen
Description
The clear screen command clears the terminal screen.
Parameters None.
Restrictions None.
Example usage:
To create an administrator-level user account with the username ‘dlink’:
DGS-1100-24P/ME:admin#clear screen
Command : clear screen
DGS-1100-24P/ME:admin#
create account
Purpose To create a user account.
Syntax
create account [admin | user] <username 15>
Description
The create account command creates user accounts with different
priority.
After resetting to factory reset, users can press anything to login the
administrator-level user of the Switch. Users must create an adminlevel account before creating user-level account.
Parameters
admin – To create a admin-level user account.
user − To create a user-level user account.
<username 15> − the account username.
Restrictions Only administrator-level users can issue this command.
Example usage:
To create an admin-level user account named ‘dlink’:
DGS-1100-24P/ME:admin#create account admin dlink
Command : create account admin dlink
Success.
DGS-1100-24P/ME:admin#
delete account
Purpose To delete an existing user account.
18

DGS-1100/ME Metro Ethernet Managed Switch CLI Reference Guide
Syntax
delete account <username 15>
Description
The delete account command deletes an existing user account.
Users must delete a user-level account before deleting an adminlevel account.
Parameters
<username 15> − the account username.
Restrictions Only administrator-level users can issue this command.
Example usage:
To delete an account named ‘dlink’:
DGS-1100-24P/ME:admin#delete account dlink
Command : delete account dlink
Success.
DGS-1100-24P/ME:admin#
config account
Purpose To change the password for an existing user account.
Syntax
config account <username 15>
Description
The config account command changes the password for a user
account that has been created using the create account command.
The system prompts for the account’s new password, which may be
between 0 and 15 characters.
Parameters
<username 15> − the account username.
Restrictions Only administrator-level users can issue this command.
Example usage:
To configure the user password of ‘admin’ account:
DGS-1100-24P/ME:admin#config account admin
Command : config account admin
Enter an old password:***
Enter a case-sensitive new password:****
Enter the new password again for confirmation:****
Success.
DGS-1100-24P/ME:admin#
show account
Purpose To display information about all user accounts on the Switch.
Syntax
show account
Description
The show account command displays all account usernames and
19

DGS-1100/ME Metro Ethernet Managed Switch CLI Reference Guide
their access levels created on the Switch. Up to 2 user accounts can
exist on the Switch at one time.
Parameters None.
Restrictions None.
Example usage:
To display the account that has been created:
DGS-1100-24P/ME:admin#show account
Command : show account
Current Accounts:
Username Access Level
------------------ ------------------user User
admin Admin
DGS-1100-24P/ME:admin#
show session
Purpose To display information about currently logged-in users.
Syntax
show session
Description
The show session command displays a list of all the users that are
logged-
in at the time the command is issued. The information
includes the user’s IP address, the user’s access Level (user or
admin), and the account name on the Switch.
Parameters None.
Restrictions None.
Example usage:
To display the session information:
DGS-1100-24P/ME:admin#show session
Command : show session
Live Time From Level Name
-------------- ----------------------------------- ----------- ----------
00:00:08 10.90.90.100 admin admin
DGS-1100-24P/ME:admin#
show switch
Purpose To display information about the Switch.
Syntax
show switch
20

DGS-1100/ME Metro Ethernet Managed Switch CLI Reference Guide
Description
The show switch command displays information about the Switch
settings, including Device Type, MAC Address, IP configuration,
Hardware/Software version, System information, and Switch
Network configuration.
Parameters None.
Restrictions None.
Example usage:
To display the Switch information:
DGS-1100-24P/ME:admin#show switch
Command: show switch
Device Type : DGS-1100-24/ME Gigabit Metro Access Switch
MAC Address : ec-22-80-40-08-f1
IP Address : 10.90.90.90 (Manual)
VLAN Name : VLAN0001
Subnet Mask : 255.0.0.0
Default Gateway : 0.0.0.0
Boot PROM Version : Build 1.00.002
Firmware Version : Build 1.00.L001
Hardware Version : B1
System Name : SWITCH
System Location :
System Contact :
Spanning Tree : Disabled
IGMP Snooping : Disabled
MLD Snooping : Disabled
TELNET : Enabled (TCP 23)
SNMP : Disabled
SNTP : Disabled
DGS-1100-24P/ME:admin#
show config
Purpose To display the current configuration settings of the Switch.
Syntax
show config current_config
Description
The show config command is used to list the current status of the
configuration settings of the Switch.
Parameters
current_config − Display system configuration from the software
database, i.e. the current system setting.
Restrictions None.
Example usage:
To display the configuration:
21
 Loading...