

Page 1

3.1 Commissioning
3.2 Starting
3.3 Monitoring Systems
3.4 Stopping
3.5 Operating Conditions
Engine Operation
3
23 Gerade
Page 2
Engine Operation
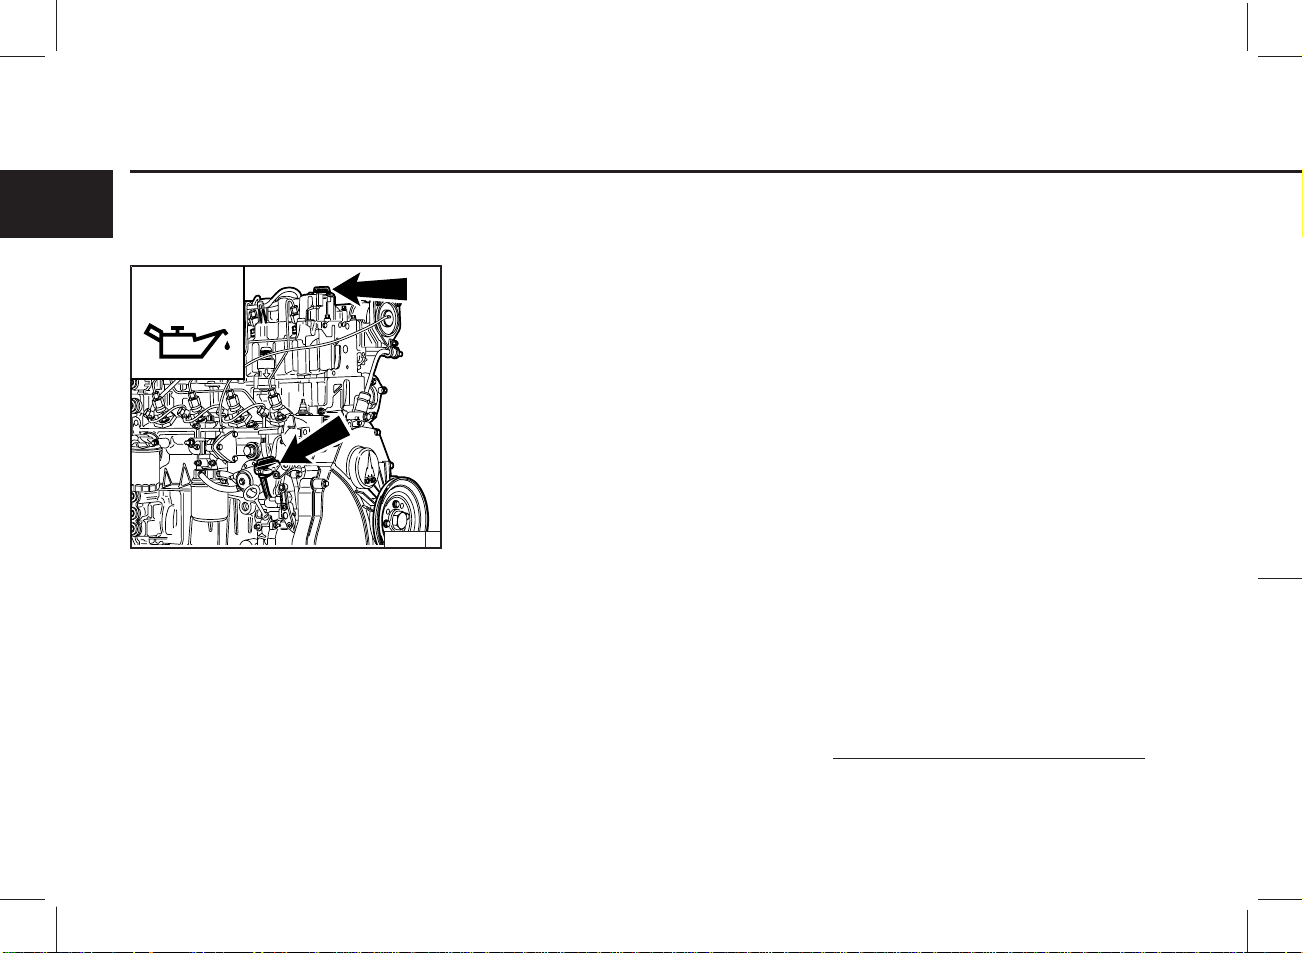
3.1.1 Adding Engine Oil
3
OIL
As a rule, engines are delivered empty of oil.
Pour lube oil into the oil filler neck (arrow).
For oil grade and viscosity, see 4.1.
26 432 0
3.1.1.1 Initial Engine Oil Fill-Up
for B/FM1011F Series
● Fill oil into the oil sump up to the “max.” mark on
the engine dip stick (for oil top-up quantity see
9.1).
● Start the engine and allow to run at a low idling
speed for approx. 2 mins.
● Switch off the engine.
● Check the oil level, if necessary, top up oil to the
„max.“ mark.
3.1 Commissioning
3.1.1.2 Initial Engine Oil Fill-up
for B/FM 1011F Series
● Fill oil into the oil sump up to the “min.” mark on
the engine dip stick.
● In addition, top up the oil quantity of the supply
hoses and of the external oil cooler (according to
manufacturer’s details).
● Allow the engine to run warm until the thermostat
opens (at approx. 95oC).
● Allow the engine to run for approx. 2 mins.
● Switch off the engine.
● Check the oil level, and if necessary, top up oil to
the „max.“ mark.
24
If the person operating the engine does not run up
the engine until the thermostat opens, the oil level
may lie above the „max“. mark on the engine dip
stick when delivered. The level can then only be
assessed after the engine has been run up.
Page 3
3.1 Commissioning
Engine Operation
3.1.1.3 Initial Engine Oil Fill-Up for
B/FM 1011F Genset Engine
● Fill oil into the oil sump up to the “max.” mark on
the engine dip stick (for oil quantity see 9.1).
● Start up the engine and allow to run at a lower
idling speed for approx. 2 mins.
● Switch off the engine.
● Check the oil level and fill up with oil up to the
upper „max.“ mark.
3.1.2 Filling Oil Bath Air Filter with
Engine Oil
24 980 2 26 398 0
Fill oil cup 1 of the oil bath air cleaner with oil up to
the arrow.
For oil grade and viscosity, see 4.1.
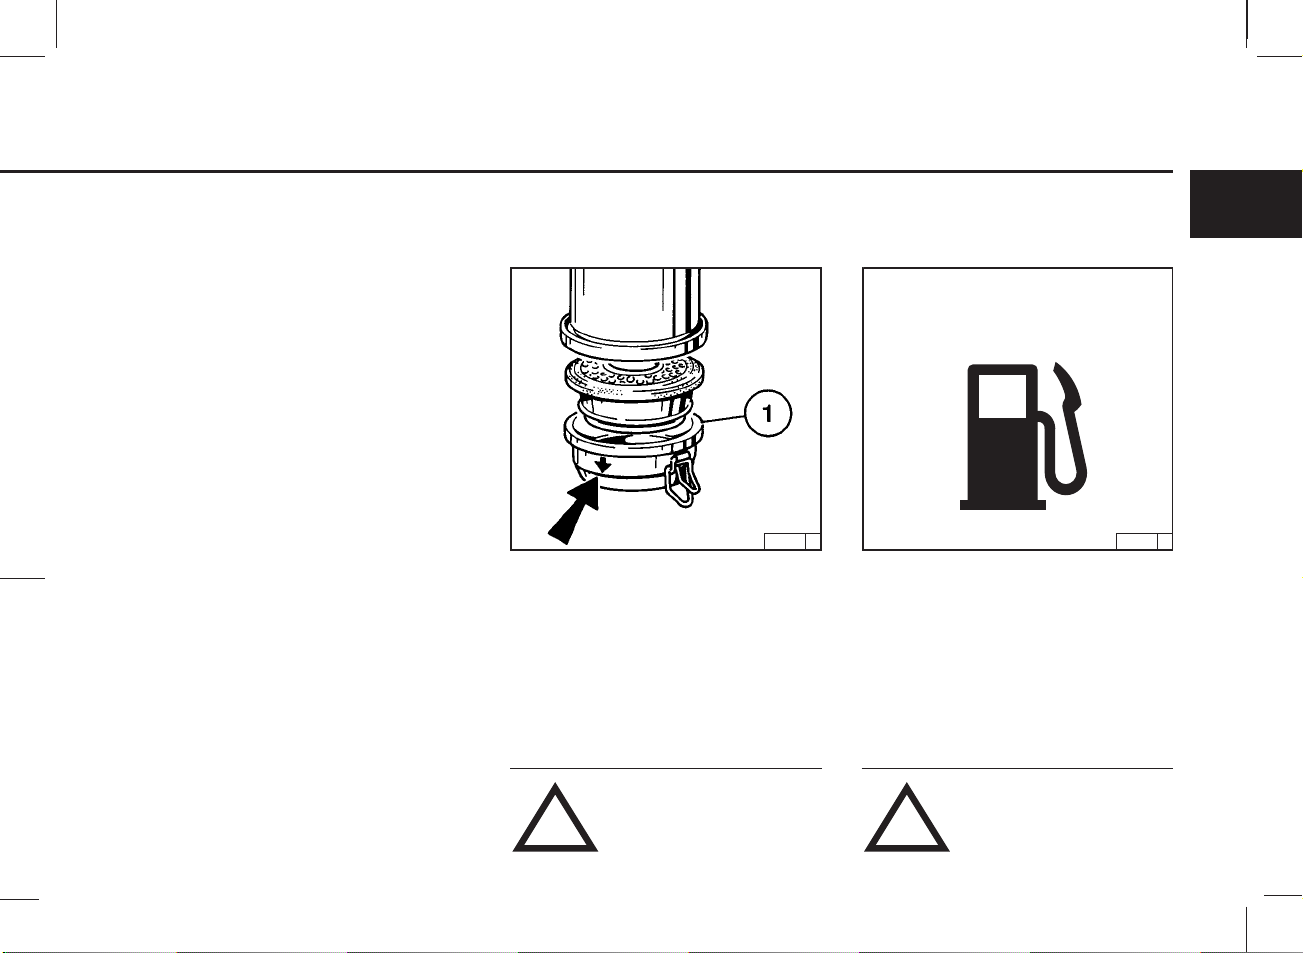
3.1.3 Adding Fuel
FUEL
Use only commercial-grade diesel fuel. For fuel
grade, see 4.2. Use summer or winter-grade fuel,
depending on the ambient temperature.
3
Do not fill the precleaner dust collector (if fitted) with oil.
! !
Never fill the tank while the engine
is running. Keep the filler cap area
clean and do not spill fuel.
25 Gerade
Page 4

Engine Operation
3.1 Commissioning
3.1.4 Other Preparations
3
● Check battery and cable connections, see 6.7.1
● Transport hooks
Remove if fitted (see 6.7.3)
● Trial run
After the engine has been prepared, let it run
for about 10 minutes without load.
During and after trial run
– Check the engine for leaks
After the engine has been turned off
– Check the oil level,
– Retension V-belts, see 6.5
● Breaking in
During the break-in phase – about 200 operating hours – check the oil level twice a day. After
the engine is broken in, checking once a day
will be sufficient.
see 6.1.2
If necessary, top up oil,
see 3.1.1
3.1.5 Additional Maintenance Work
When commissioning new and reconditioned engines, the following additional maintenance work
must be carried out:
After 50-150 OH
● Change lube oil,
see 6.1.2
● Change oil filter cartridge,
see 6.1.3
● Change fuel filter cartridge,
see 6.2.1
● Check V-belts and retension as necessary,
see 6.5.
● Check the engine for leaks
● Check the engine mount and adjust as neces-
sary, see 9.2
After 500 OH
● Check the valve clearance and adjust as neces-
sary, see 6.6.1.
26
Page 5

3
27 Gerade
Page 6

Engine Operation
3.2.1 Electric Starting
3
Before starting, make sure that nobody is standing in the immediate
vicinity of the engine or driven machine.
!
After repair work:
replaced and that all tools have been removed from
the engine.
When starting with glow plugs, do not use any other
starter substance (e.g. injection with start pilot).
Caution: If the speed regulator has been removed, the engine must not be tested under any
circumstances:
Disconnect the battery.
Check that all guards have been
3.2 Starting
Starting without Cold-Start Aid
2
1
26 423 0 25 746 2
Do not actuate the starter for more than 20 seconds. If the engine does not catch, wait a minute
then try again.
If the engine does not catch after two attempts,
refer to the Diagnosis Chart (see 7.1).
28
● Where possible, disengage the clutch to sepa-
rate the engine from any driven parts.
● Move speed control lever 1 into idle position.
● Move cut-out handle 2 into operating position.
● Insert key.
– Position 0 = no operating voltage
● Turn key clockwise
– Position 1 = operating voltage
– Pilot lights come on
● Push the key in and turn it further clockwise
against spring pressure
– Position 2 = no function
– Position 3 = start
● Release key as soon as engine fires
– Pilot lights go out
Page 7

3.2 Starting
Engine Operation
with Cold-Start Aid
– Glow Plug
25 746 2 25 746 2 25 963 0
● Insert key.
– Position 0 = no operating voltage
● Turn key clockwise
– Position 1 = operating voltage
– Pilot lights come on
● Push key in and turn further clockwise against
spring pressure
– Position 2 = Preheat, hold for approx.
1 minute.
– Preheat lamp comes on
– Position 3 = Start
● Release key as soon as engine fires
– Pilot lights go out
with Cold-Start Aid
– Ether Starting System
● Insert key
– Position 0 = no operating voltage
● Turn key clockwise
– Position 1 = operating voltage
– Pilot lights come on
● Push key in and turn further clockwise against
spring pressure
– Position 2 = no function
– Position 3 = start
● Release key as soon as engine fires
– Pilot lights go out
● Starting fluid is injected automatically in switch
position A, as long as the starter is operated.
● To assist acceleration at lower temperatures
and to avoid white fumes, briefly hold the
arctic switch in switch position H.
The switch must not be moved to
position H when the engine is
switched off and the ignition is
!
switched on.
3
29 Gerade
Page 8

Engine Operation
3.3.1 Engine Oil Pressure
3
Oil Pressure Pilot Light
Oil Pressure Indicator
25 752 1 25 754 025 753 0
3.3 Monitoring Systems
Oil Pressure Gauge
● The oil pressure pilot light comes on with oper-
ating voltage on and engine off.
● The oil pressure pilot light should go out when
the engine is running.
30
● The pointer must remain in the green sector over
the entire range.
● The pointer must indicate the minimum oil
pressure (see 9.1).
Page 9

3.3 Monitoring Systems Engine Operation
3.3.2 Coolant Temperature
Engine Temperature Gauge
24 985 0
● The engine temperature gauge pointer should
remain in the green sector most of the time. It
should rarely enter the yellow-green sector. If the
pointer enters the orange sector, the engine is
overheating. Turn off and establish the cause
from the Diagnosis Chart (see 7.1).
3
31 Gerade
Page 10

Engine Operation
3.4 Stopping
3.4.1 Mechanical Shutdown
3
2
1
● Move speed control lever 1 to low idle.
● Operate shutdown lever 2 until the engine comes
to a stop. The charge pilot light and the oil
pressure pilot light will come on when the engine
stops.
● Turn key counterclockwise (to position 0) and
remove. The pilot lights will go out.
26 424 0
3.4.2 Electrical Shutdown
(Ignition Key)
25 746 2
● Turn key counterclockwise (to position 0) and
remove. The pilot lights will go out.
32
If possible, do not suddenly switch off the engine
when under full load.
Page 11

Engine Operation3.5 Operating Conditions
3.5.1 Winter Operation
● Lube Oil Viscosity
– Select the oil viscosity (SAE grade) accord-
ing to the ambient temperature when the
engine is started, see 4.1.2.
– Increase oil change frequency when oper-
ating below -10 °C, see 6.1.1.
● Diesel Fuel
– Use winter-grade diesel fuel for operation
below 0 °C, see 4.2.2.
● Additional Maintenance Work
– Drain the sludge from the fuel tank once a
week. (Unscrew the sludge drain plug)
– If necessary, allow the oil in the oil bath air
cleaner and the engine oil to settle at the
ambient temperature.
– Below -20 °C, after removing the starter if
necessary, smear the ring gear on the fly
wheel via the pinion bore from time to time
with cold-resistant grease.
(e.g. Bosch grease FT 1 V 31).
● Cold-Start Aid
– At temperatures near or below freezing
point, use glow plugs if necessary, see
3.2.1.
This not only lowers the starting limit temperature, but provides easier starting at
temperatures normally not requiring a starting aid.
3
● Battery
– Efficient cold starting requires a healthy
battery, see 6.7.1.
– The starting limit temperatures can be low-
ered by 4-5 °C by heating the battery up to
about +20 °C . (To do so, remove the battery
and store in a warm place).
26 248 0
33 Gerade
Page 12

Engine Operation
3.5.2 High Ambient Temperatures,
3
High Altitude
● As the altitude and ambient temperature rise, the
density of air tends to decrease, which affects
the maximum power output of the engine, the
exhaust gas quality and, in extreme cases, the
starting behavior. Under transient conditions,
the engine can be used at altitudes up to 1000 m
and temperatures up to 30 °C. If the engine is to
operate under more severe conditions (at higher
altitudes or temperatures), it will be necessary to
reduce the injected fuel quantity and thus, engine power.
● If you have any doubts about engine operation
under these or similar conditions, ask your engine or equipment supplier whether the engine
has been derated in the interests of reliability,
service life and exhaust gas quality (smoke).
Otherwise contact DEUTZ SERVICE.
3.5 Operating Conditions
C F
0 32
25 901 1
34
 Loading...