


Desa TD120, TD123, TD121, TD129, TD124 User Manual
...
WARNING: For
outdoor use only.
Heat-N-Go Portable
Propane/LP Heater
Owner’s Manual
MODELS TD120, TD121, TD122, TD123, TD124, TD129
IMPORTANT: Read and understand this manual before
assembling, starting or servicing heater. Improper use
of heater can cause serious injury. Keep this manual for
future reference.
FOR YOUR SAFETY
Do not store or use gasoline or other ammable vapors
and liquids in the vicinity of this or any other appliance.
FOR YOUR SAFETY
If you smell gas:
1. Shut off gas to the appliance.
2. Extinguish any open ame.
3. If odor continues, immediately call your gas
supplier.
Save this manual for future reference.
For more information, visit www.desatech.com

WARNING: Improper installation, adjustment, altera-
tion, service or maintenance can cause injury, property
damage, or death. Read the installation, operating, and
maintenance instructions thoroughly before installing
or servicing this equipment.
Specications ...................................................... 2
Safety .................................................................. 2
Propane/LP Safety .............................................. 4
Unpacking............................................................ 4
Assembly ............................................................. 5
Operation ............................................................. 8
Storage ................................................................ 9
Servicing .............................................................. 9
Replacement Parts .............................................. 9
Technical Service................................................. 9
Parts .................................................................. 10
Warranty ............................................................ 12
SPECIFICATIONS
TABLE OF CONTENTS
• Rating: 21,000 Btu/hr (6.15 kW)
• Type of Gas: Propane/LP Only
•
Gas Supply Pressure to regulator: Maximum - 150 psi (1034.2 kPa), Minimum - 5 psi (34.5 kPa)
• Gas Supply Pressure Regulator out: 11" W.C. (2.74 kPa)
• Ignition: Piezo Ignition
• Fuel Consumption: 1.07 lbs./hr (0.49 kg/hr)
• Flame Safety: Thermocouple Operated Gas Valve
SAFETY
WARNING: This product contains and/or generates chemicals
known to the State of California
to cause cancer or birth defects,
or other reproductive harm.
WARNING: Not for home or
recreational vehicle use.
WARNING: Fire, burn, inhalation, and explosion hazard.
Keep solid combustibles, such
as building materials, paper or
cardboard, a safe distance away
from the heater as recommended
by the instructions. Never use
the heater in spaces which do or
may contain volatile or airborne
combustibles, or products such
as gasoline, solvents, paint thinner, dust particles or unknown
chemicals.
We cannot foresee every use which may be
made of our heaters. Check with your local
re safety authority if you have questions
about heater use.
Other standards govern the use of fuel gases
and heat producing products for specific
uses. Your local authorities can advise you
about these.
Carbon Monoxide Poisoning: Direct-Fired
means that all of the combustion products enter the heated space. Even though this heater
operates very close to 100 percent combus-
tion efciency, it still produces small amounts
of carbon monoxide. Some people are more
affected by carbon monoxide than others.
Early signs of carbon monoxide poisoning
resemble the u, with headaches, dizziness,
and/or nausea. If you have these signs, the
heater may not be working properly. Get fresh
air at once! Check for proper ventilation and
have heater serviced.
Propane Gas: Propane gas is odorless. An
odor-making agent is added to propane gas.
The odor helps you detect a propane gas
leak. However, the odor added to propane
gas can fade. Propane gas may be present
even though no odor exists.
www.desatech.com
120948-01A2

SAFETY
Continued
This is a propane, direct-red heater. Propane
is heavier than air. If propane leaks from a
connection or tting, it sinks to the oor, collecting there with the surrounding air, forming
a potentially explosive mixture. Obviously,
propane leaks should be avoided, so set up
the propane supply with utmost care. Read
Propane/LP Safety, page 4 for additional
information about detecting propane leaks.
Leak check new connections or reconnections
with a soap and water solution and follow all
connection instructions herein. Also, ask your
propane dealer for advice on the propane application and supply installation and ask them
to check it if there are any questions.
When the heater is to be operated in the presence of other people the user is responsible
for properly acquainting those present with
the safety precautions and instructions, and
of the hazards involved.
Make certain you read and understand all
warnings. Keep this manual for reference. It
is your guide to safe and proper operation of
this heater.
1. Check the heater thoroughly for damage.
DO NOT operate a damaged heater.
2. DO NOT modify the heater or operate a
heater which has been modied from its
original condition.
3. Use only propane/LP gas.
4. Use 20 lb. propane/LP tank or larger.
5. Use only VAPOR WITHDRAWAL propane supply. The propane cylinder must
be arranged for vapor withdrawal, in
accordance with the Compress Gas Associations, Small Propane Bottle Assembly. If there is any question about vapor
withdrawal, ask your propane dealer.
6. Always fully assemble heater before
each use. Do not use this heater without
securing fuel tank as instructed. Minimum
clearance from fuel tank to ground is 2".
7. Use only the hose and regulator assembly
provided with the heater.
8.
Inspect hose assembly before each use of the
heater. If there is excessive abrasion or wear,
or hose is cut, replace with hose assembly
listed on parts list before using heater.
9. This heater is for OUTDOOR USE ONLY,
even so, make sure that there is ample
fresh air ventilation. Do not use in build-
ings, garages or other enclosed spaces.
120948-01A 3
www.desatech.com
10. If at any time gas odor is detected, IM-
MEDIATELY DISCONTINUE operation
until the source of gas has been located
and corrected. Read Propane/LP Safety,
page 4 for additional information about
detecting propane leaks.
11. Install the heater such that it is not directly
exposed to water spray, rain and/or dripping water.
12. Maintain minimum clearance to people or
normal combustible material (like paper)
of 3.6 ft. (1,100 mm) from top and 2 ft.
(609 mm) from the reector.
13. Operate only on a stable, level surface.
14. Do not spray aerosols near the heater
during use or shortly thereafter.
15. Do not clean heater with combustible
or corrosive cleaners. Use warm, soapy
water on external surfaces only. Do not
submerge in water.
16. Check control compartment burners and
circulation air passageways for free air
passage, make sure that there are no
obstructions. These areas are a com-
mon location for spider webs, which can
present a dangerous condition, damage
the heater and render it unsafe for use.
The heater must be checked if any of the
following conditions exist:
a) Gas smell.
b) Heater does not reach temperature.
c) Uneven burner glow.
d)
Burner makes popping noises during normal use, other than during shutdown.
17. Use only soapy water (1 part liquid dish
washing detergent to 3 parts water) to
conduct leak tests whenever a propane
cylinder is connected. Bubbles indicate a
leak.
18. Do not adjust gas regulator. If you are
unsure of your appliances gas type or
pressure, call a qualied service person.
19. Always disconnect the gas supply after
the heater is turned "OFF".
20. Do not move, handle or service while hot
or burning.
21. Allow 45 minutes to cool down after use
before attempting to move heater.
22. Do not operate this appliance in windy
conditions. Maximum allowable wind
speed is 10 mph (16 Km/h).
23. Do not operate this appliance in temperature conditions below 40° F (5° C).

SAFETY
Continued
24. Keep heater away from areas where ammable liquids, vapors or solids are stored
or used.
25. If operated in salt air environments, the
unit will require more frequent cleaning;
otherwise, the longevity of the unit will
deteriorate rapidly. Use warm soapy water
to clean the unit.
26. Items or material, when stored under the
heater, will be subjected to radiant heat
and could be seriously damaged.
Any guard or other protective device
removed for servicing must be replaced prior to operating the heater.
Surface temperatures become very
hot when operating heater. Children
and adults should stay away to avoid
burns or clothing ignition.
Young children should be carefully
supervised when they are in the area
of the heater.
Clothing or other ammable materials should not be hung from the
heater, or placed on or near heater.
PROPANE/LP SAFETY
WARNING: For outdoor use
only.
ASPHYXIATION HAZARD
• Do not use this heater for heating human
or animal living quarters.
• Do not use in unventilated areas.
• The ow of combustion and ventilation
air must not be obstructed.
• Proper ventilation air must be provided
to support the combustion air requirements of the heater being used.
• Refer to the Specications, page 2, heat-
er data plate or contact DESA Heating
Products to determine combustion air
ventilation requirements of the heater.
• Lack of proper ventilation air will lead
to improper combustion.
• Improper combustion can lead to carbon
monoxide poisoning leading to serious
injury or death. Symptom of carbon monoxide poisoning can include headaches
dizziness and difculty in breathing.
UNPACKING
When assembling for the rst time, be sure to
remove all packaging from the components
prior to beginning assembly.
Installation and repair should be
done by a qualied service person.
The heater should be inspected
before use and at least annually by
a qualied service person. More
frequent cleaning may be required
as necessary. It is imperative that
control compartments, burners and
circulating air passageways of the
heater be kept clean.
CAUTION: The gas pressure
regulator provided with this appliance must be used. This regulator is set for an output pressure
of 11" W.C. (2.74 kPa).
www.desatech.com
120948-01A4
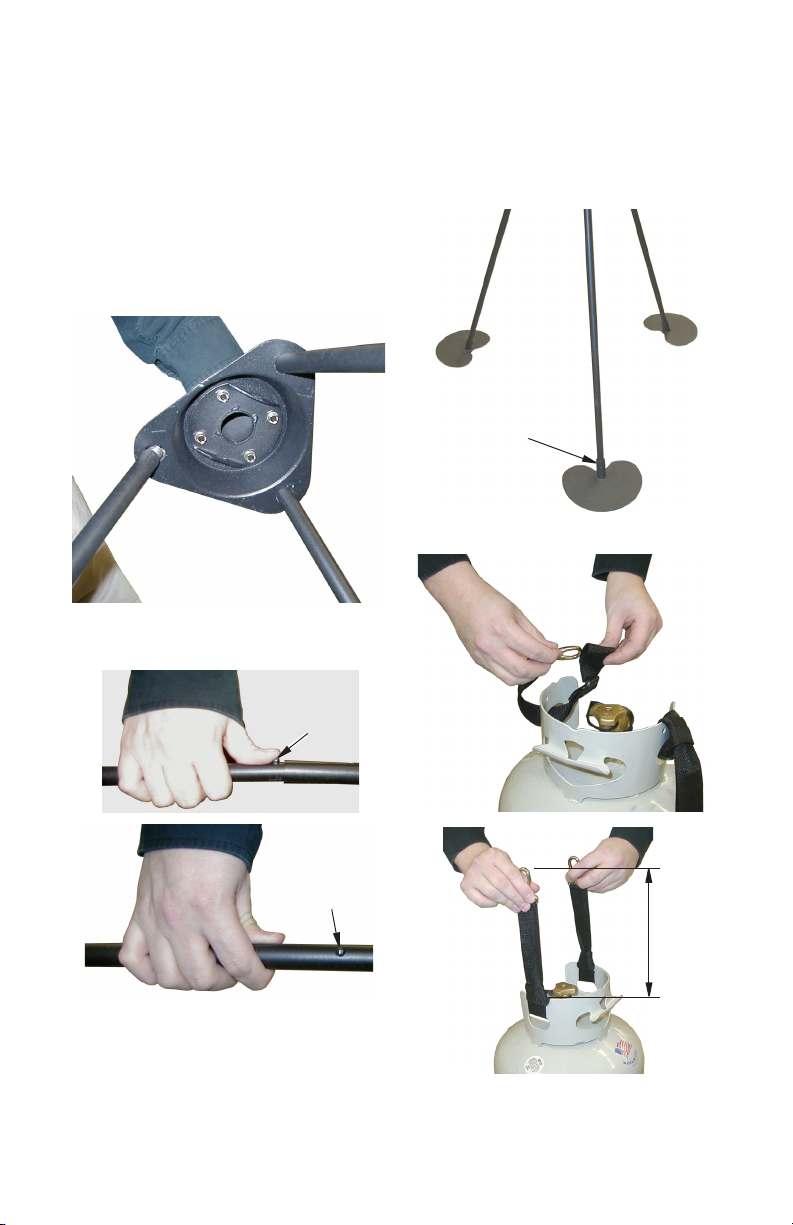
ASSEMBLY
1. Install threaded poles into triangular base
as shown in Figure 1. Be sure to seat
poles fully inside base.
2. Install lower legs by pressing push tab
release and inserting into upper pole (see
Figure 2). Be sure push button is locked
in place.
3. Install 3 feet to lower legs as shown in
Figure 3. Be sure to tighten wing bolt after
installation.
Figure 1 - Base and Pole Assembly
4. Install tank straps to propane/LP gas
cylinder as shown in Figure 4. Length of
strap from tank ange to end of clip should
be between 9" and 10" from tank ange.
This should maintain a 2" minimum clearance from bottom of propane/LP tank to
ground.
Wing Nut On
Inside of Foot
Figure 3 - Installing Feet to Lower Poles
Push Tab
Release
Push Tab
Release in Hole
of Upper Pole
9"-10"
Figure 2 - Installing Lower Legs into
120948-01A 5
Upper Poles
Figure 4 - Attaching Tank Straps
www.desatech.com

ASSEMBLY
Continued
5.
Install tank straps to base as (see Figure 5).
6. Install tank restraint to tank and fasten
restraint straps around legs as shown in
Figure 6.
7. Install the tank cover (see Figure 7).
8. Assemble reector with small wing nuts
and bolts as shown in Figure 8.
9. Install reector over post on top of burner
assembly. Install reector cap over post.
Attach reector and reector cap using
large wing nuts (see Figure 9).
Figure 7 - Tank Cover
Wing Nuts
and Bolts
Figure 8 - Reector Assembly
Min. 2" from
Tank to Ground
Figure 5 - Attaching Tank Straps to Base
Figure 6 - Tank Restraint Straps
www.desatech.com
Bolts on
Top of
Burner
Assembly
Reector
Cap
Wing
Nut
Figure 9 - Attaching Reector and
Reector Cap to Burner Assembly
120948-01A6

ASSEMBLY
Continued
10. Inspect length of gas hose on bottom of
burner assembly for any cracks, cut, holes
or excessive wear. Do not use heater if
hose is damaged.
11. Sliding hose into upper pole, install burner
and reector assembly to base (see Figure 10).
12. Align hole in burner assembly pole with
hole in upper pole (see Figure 10). Secure
burner assembly to upper pole using a
wing bolt. Be sure to tighten wing nut
completely.
13. Lift tank cover. Install regulator hose to
burner fuel line using wrenches provided
in hardware bag (see Figure 11).
14. Securely connect regulator to propane/LP
gas cylinder (see Figure 12). When connecting regulator assembly to tank valve,
hand tighten nut clockwise to a positive
stop. DO NOT use a wrench to tighten.
Use of a wrench may damage quick closing coupling nut and result in a hazardous
condition.
15. Open cylinder valve. Apply a noncorrosive
leak detection fluid to connections at
regulator. Bubbles forming show a leak.
16. If leaks exist, turn off propane/LP cylinder
valve. Disconnect leaking connection.
Check and clean connection. Reconnect
regulator and leak check again.
17. If no leaks are present, pull cover down
over tank and legs. Unit is now ready to
light.
Figure 11 - Attaching Regulator Hose to
Align Hole
in Burner
Assembly
With Hole in
Upper Pole
Figure 12 - Connecting Regulator to
Figure 10 - Burner Installation
120948-01A 7
www.desatech.com
Burner Fuel Line
Propane/LP Gas Tank

OPERATION
WARNING: If you smell gas:
• Shut off gas to the appliance.
• Extinguish any open ames.
• If odor continues, immediately
call your gas supplier.
See safety warnings and precautions starting on the front
page of this manual for more
information.
Before You Use Your Heater
1. Move heater to an open area.
2. Make sure tank valve is in its full off posi-
tion (turn clockwise to stop).
3. Check tank valve features to ensure it
has proper external mating threads. (Tank
valve marked USE WITH TYPE 1.)
4. Never attempt to use any components
that have been damaged or exposed to
an accidental re.
The connection provided with this heater
incorporates two important features: Temperature Activated Shutoff and Excess Flow
Control.
TO LIGHT
1. Open the main gas supply valve on propane cylinder.
2. Open manual valve.
3. Press and hold silver control valve button
for 3 seconds. While holding valve button,
press red igniter button until the burner is
lit (may require pushing more than once).
Continue to hold the heater control valve
for 30 seconds then release.
4. TO MATCH LIGHT: Insert ame into match
hole near burner. Press and hold control
valve button until ame is lit. Continue to
hold valve button for 30 seconds.
IMPORTANT: Smoke and odor (not a gas
odor) emission may occur in the rst 15 min-
utes of use. Run heater at high setting for at
least 15 minutes to eliminate this problem.
WARNING: If you smell gas
while in use, immediately press
and turn control knob to the OFF
position to shutdown heater.
TO SHUT DOWN
1. Shut off main gas supply.
2. Close manual valve.
3. Wait 5 minutes before relighting heater.
Match Hole
Control
Valve
Button
Ignitor
Button
Figure 13 - Control Valve and Ignitor Buttons
www.desatech.com
Manual Valve
120948-01A8
 Loading...