


Instruction Manual
Electric Food and
Cheese Grater
Mode D’emploi
Râpe Électrique
Read and Save These Instructions |
Lisez et Conservez Ces Instructions |
DFG440 Series / DFG440 Séries

 IMPORTANT
  SAFEGUARDS
When using electrical appliances, basic safety precautions should always be followed to reduce the risk of fire, electrical shock and/or personal injury.
1. Read all instructions.
2. Close supervision is necessary when any appliance is used by or near children.
3. To protect against fire, electric shock and/or personal injury, do not place cord, plugs, or appliance in water or any other liquid.
4. Turn the unit off and unplug it from the outlet when not in use, before cleaning and before installing or removing attachments.
5. Do not operate any appliance with a damaged cord or plug or after the appliance malfunctions, or has been damaged in any manner. Return appliance to an authorized De’Longhi service center for examination, repair or adjustment.
6. To disconnect, remove the plug from wall outlet. Always hold the plug, but never pull the cord.
7. Do not use outdoors.
8. Do not let cord hang over edge of table or counter, or touch hot surfaces. 9. Do not use appliance for other than intended use.
10. Do not leave machine unattended.
11. Do not use unauthorized attachments.
12. Be sure that the voltage requirements of the appliance located on the charging label match your power supply.
13. Keep appliance away from heat sources.
14. Never touch moving parts.
15. Do not grind excessively hard items, such as ice cubes.
16. Do not use a longer detachable power cord unless given authorization by a De’Longhi representative. Plug the charger directly into an electric outlet. See details in the Short Cord Instructions section of this manual.
17. The appliance operates on a rechargeable batteries. If you need to replace the batteries, take the old batteries to an authorized De’Longhi Service Center so they can be disposed of in a appropriate manner according to the law on environmental safeguards. Never discard the batteries by setting them on fire.

SAVE THESE INSTRUCTIONS
SHORT CORD INSTRUCTIONS
A short power cord is provided to reduce the risk resulting from entanglement or tripping over a longer cord. A longer detachable power supply cord may be used if authorization is given by a De’Longhi representative. If a longer detachable power cord or extension cord is used (1) the marked electrical rating of the extension cord should be at least as great as the electrical rating of the appliance, and (2) the longer cord should be arranged so that it will not drape over the countertop or table top where it can be pulled on by children or tripped over unintentionally. The electrical rating of the appliance is listed on the bottom of the unit. If the appliance is of the grounded type, the extension cord should be a grounded type 3 wire cord. This appliance has a polarized plug. One blade is wider than the other. As a safety feature this plug will fit in a polarized outlet only one way. If the plug does not fit, contact a qualified electrician. Do not attempt to defeat this safety feature.

KNOW YOUR ELECTRIC FOOD AND CHEESE GRATER
1) |
Dust Cover |
7) |
On / Off and Pulse Switch |
2) |
Stainless Steel Grater Drum |
8) |
Machine Body |
3) |
External Protector |
9) |
Charging Contact |
4) |
Food Receiver |
10) Rechargeable Base |
|
5) |
Rubber Press |
11) Charger Plug |
|
6) |
Lever |
12) Charging Indicator Light |
|
BEFORE YOUR FIRST USE
Carefully unpack your electric food and cheese grater and remove all packaging material. Remove any labels or stickers from the unit. To remove any dust that may have accumulated during packaging, clean the electric food and cheese grater and its parts thoroughly before using for the first time, according to the instructions in the “Cleaning Your Food and Cheese Grater” section of this manual.
OPERATING YOUR ELECTRIC FOOD AND CHEESE GRATER
RECHARGING:
1)Fully charge unit before use. To start the battery recharge, place the charger plug (11) into a 120V/60Hz AC only outlet.
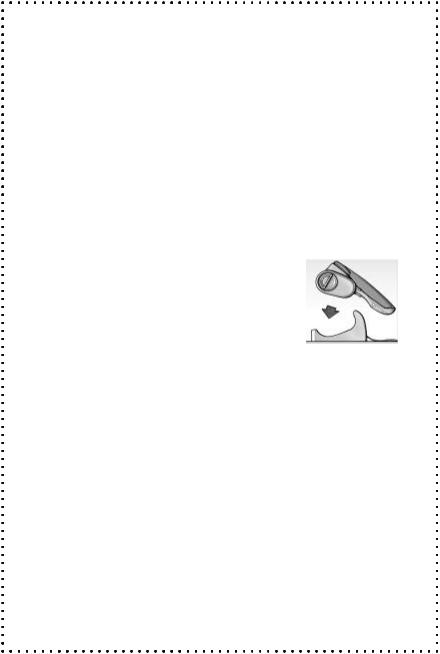
2)To place the grater into the rechargeable base (10), face the grating end of the unit downward into the rechargeable base. (Figure 1) By doing this, the handle of the grater should be facing upwards and will be easily accessible.
3)Once the unit is fitted into the rechargeable base the charging indicator light
(12)will illuminate letting you know that the unit is in the process of recharging.
4)To be sure the electric grater is fully charged, leave it in the rechargeable base for about 15 hours. This will allow the unit to operate at full power.
5)The handle will become warm during recharging. This is normal.
6)If the grater does not work, check to make sure it was properly positioned in the rechargeable base.
FIGURE 1
NOTE: If the operation time seems to have shortened, it does not mean that the electric food and cheese grater is defective. This problem may be solved by leaving the grater “on” until the stainless steel grating drum (2) stops turning. Then recharge the appliance for 15 hours. This procedure improves the battery’s recharging capacity.
If necessary, repeat this operation more than once.
WALL MOUNTABLE: The rechargeable base has an optional wall mountable feature. To mount the rechargeable base to your wall follow these directions:
1)Place the rechargeable base on a desired point on the wall.
2)Then mark the points in the two drill holes located on the bottom of the rechargeable base with a pencil.
3)Remove the rechargeable base from the wall. Drill holes into the wall according to your two pencil marks. Place the rechargeable base back onto the wall after
the holes have been drilled. Align the holes on the bottom of the rechargeable base with the holes in the wall.
4)Turn screws into the holes with a screwdriver until the rechargeable base fits tightly on the wall. Screws not included.

OPERATING YOUR ELECTRIC FOOD AND CHEESE GRATER (con’t)
1)Remove dust cover (1) from end of grater before operation. (Figure 2)
2)Cut food into small squares. If you are grating cheese, remove the skin of the cheese before grating. Place cut food into the top opening of the food
receiver (4) and push down. (Figure 3)
FIGURE 2 |
FIGURE 3 |
3)Lower the lever (6) and press the on/off and pulse switch (7) located on the lever to grate food. Be sure to have either a plate or bowl to catch the grated food. Or you can grate directly over the food being served.
4)To terminate operation discontinue pressing the on / off and pulse switch. Wait until the stainless steel grating drum (2) has stopped rotating completely. Place your finger inside the stainless steel grating drum and rotate counter-clockwise about a 1/4 turn and carefully remove it for cleaning. (Figure 4) See the “Cleaning Your Electric Food and Cheese Grater” section of this instruction manual for details.
5)To replace the stainless steel grating drum (2), slide it back into the opening and rotate clockwise by about a 1/4 turn. You will hear a click, indicating that the
stainless steel grating drum has locked into place.
6)After use, carefully dismantle detachable parts. First, remove the stainless steel grating drum (2) according to direction number 4 in the “Operating Your Electric Food and Cheese Grater” section of your instruction manual. Second, lift the lever (6) and pull out the food receiver (4). (Figure 5)
FIGURE 4 |
FIGURE 5 |
 Loading...