


V I T R O C E R A M I C C O O K I N G H O B S
I N S T R U C T I O N S F O R U S E - A D V I C E F O R T H E I N S T A L L E R
KEEP IN A SAFE PLACE
Before operating this cooking hob, please read these instructions carefully
Dear Customer,
Thank you for having purchased and given your preference to our product.
The safety precautions and recommendations reported below are for your own safety and that of others. They will also provide a means by which to make full use of the features offered by your appliance.
Please preserve this booklet carefully. It may be useful in future, either to yourself or to others in the event that doubts should arise relating to its operation.
This appliance must be used only for the task it has explicitly been designed for, that is for cooking foodstuffs. Any other form of usage is to be considered as inappropriate and therefore dangerous.
The manufacturer declines all responsibility in the event of damage caused by improper, incorrect or illogical use of the appliance.
CE Declaration of conformity
•This hob has been designed for use only as a cooking appliance. Any other use (e.g. heating rooms) should be considered incorrect and therefore dangerous.
•This hob has been designed, constructed and put on to the market in conformity with:
-Safety requirements of the "Low Voltage" Directive 73/23/EEC;
-Protection requirements of the "EMC" Directive 89/336/EEC;
-Requirements of Directive 93/68/EEC.
IMPORTANT INFORMATION FOR CORRECT DISPOSAL OF THE PRODUCT IN ACCORDANCE WITH EC DIRECTIVE 2002/96/EC.
At the end of its working life, the product must not be disposed of as urban waste. It must be taken to a special local authority differentiated waste collection centre or to a dealer providing this service.
Disposing of a household appliance separately avoids possible negative consequences for the environment and health deriving from inappropriate disposal and enables the constituent materials to be recovered to obtain significant savings in energy and resources. As a reminder of the need to dispose of household appliances separately, the product is
2 marked with a crossed-out wheeled dustbin.
BEFORE USING FOR THE FIRST TIME
•Read the instructions carefully before installing and using the appliance
•After unpacking the appliance, make sure it is not damaged. In case of doubt, do not use the appliance and contact your supplier or a qualified engineer.
•Remove all packaging and do not leave the packing material (plastic bags, polystyrene, bands etc ) in easy reach of children as they may cause serious injury. The packaging materials are recyclable.
•The appliance should be installed and all the electrical connections made by a qualified engineer in compliance with local regulations in force and following the manufacturer’s instructions.
•Do not attempt to modify the technical properties of the appliance, as it may become dangerous to use.
IMPORTANT SAFEGUARDS & RECOMMENDATIONS
•Do not carry out any cleaning or maintenance without first disconnecting the appliance from the electrical supply.
•During and after use of the hob, certain parts will become very hot. Do not touch hot parts.
•After use always ensure that the control knobs are in the OFF position.
•Young children should be supervised to ensure that they do not play with the appliance.
•Keep children away from the hob during use.
•The appliance is not intended for use by young children or infirm persons unless they have been adequately supervised by a responsible person to ensure that they can use the appliance safely.
•Do not allow young children or infirm persons to use the appliance without your supervision.
•WARNING
When correctly installed, your product meets all safety requirements laid down for this type of product category. However special care should be taken around the underneath of the appliance as this area is not designed or intended to be touched and may contain sharp or rough edges, that may cause injury.
•Fire Risk! Do not leave inflammable materials on the Hob top.
•Make sure that electrical cords connecting other appliances in the proximity cannot come in to contact with the Hob top.
•Do not allow heavy or sharp objects to drop on the glass ceramic hob. If the hob is cracked or damaged , unplug and call the after-sales service.
•Do not scratch the hob with sharp objects. Don’t use the hob as a work surface.
•Before disposing of an unwanted appliance, it is recommended that it is made inoperative and that all potentially hazardous parts are made harmless.
•Important: This appliance has been designed for domestic use only. The appliance is NOT suitable for use within a semi-commercial, commercial or communal environment.
•If the supply cord is damaged, it must be replaced by the manufacturer or its ser-
vice agent or a similarly qualified person in order to avoid a hazard. |
3 |
1 FEATURES
60 cm models
2 |
|
|
|
|
|
|
|
|
|
|
2 |
|
|
|
|
|
|
|
|
|
3 |
|||
|
|
|
|
|
|
|
|
|
|
|
|
|
|
|
|
|
|
|||||||
|
|
|
|
|
|
|
|
|
|
|
3 |
|
|
|
|
|
|
|
|
|
|
|
|
|
|
|
|
|
|
|
|
|
|
|
|
|
|
|
|
|
|
|
|
|
|
|
|||
|
|
|
|
|
|
|
|
|
|
|
1 |
|
|
|
|
|
|
|
|
|
|
|
4 |
|
1 |
|
|
|
|
|
|
|
|
|
|
|
4 |
|
|
|
|
|
|
|
|
||||
|
|
|
|
|
|
|
|
|
|
|
|
|
|
|
|
|
|
|||||||
|
|
|
|
|
|
|
|
|
|
|
|
|
|
|
|
|
|
|
|
|
|
|
||
|
|
|
|
|
|
|
|
|
|
|
|
Fig. 1.2 |
|
|
|
|
|
|
|
|
|
|
|
|
|
|
|
|
|
|
|
|
|
|
|
|
|
|
|
|
|
|
|
|
|
|
|
|
|
|
|
|
|
|
|
|
|
|
|
|
|
|
|
|
|
|
|
|
|
|
|
|
|
|
|
|
|
|
|
|
|
|
|
|
|
|
|
|
|
|
|
|
|
|
|
|
|
||
|
Fig. 1.1 |
|
|
|
|
|
|
|
|
|
|
|
|
|
|
|
|
|
|
|
|
|
||
5 |
6 |
|
7 |
|
8 |
5 |
6 |
|
7 |
|
8 |
|
|
|
||||||||||
|
|
|
|
|
|
|
|
|
|
|
|
|
|
|
|
|
|
|
|
|
|
|
|
|
|
|
|
|
9 |
|
10 |
|
|
|
|
9 |
|
|
10 |
|
|
|
|
||||||
Electrical insulation Class I |
Electrical insulation Class I |
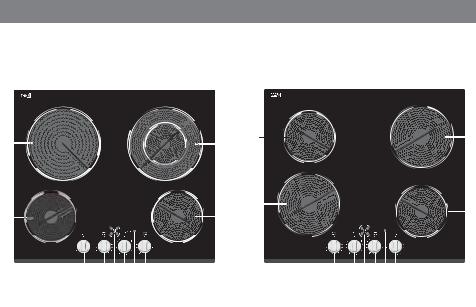
COOKING POINTS (Fig. 1.1) |
COOKING POINTS (Fig. 1.2) |
1.Hi-light cooking zone Ø 140 mm
-1200 W
2.Hi-light cooking zone Ø 210 mm
-2300 W
3.Double hi-light cooking zone Ø 210/120 mm - 2200/750 W
4.Hi-light cooking zone Ø 140 mm
-1200 W
CONTROLS DESCRIPTION
5.Left front zone (1) control knob
6.Left rear zone (2) control knob
7.Right rear zone (3) control knob
8.Right front zone (4) control knob
9.Residual heat indicators
10.Power on indicator light
1.Hi-light cooking zone Ø 180 mm
-1800 W
2.Hi-light cooking zone Ø 140 mm
-1200 W
3.Hi-light cooking zone Ø 180 mm
-1800 W
4.Hi-light cooking zone Ø 140 mm
-1200 W
CONTROLS DESCRIPTION
5.Left front zone (1) control knob
6.Left rear zone (2) control knob
7.Right rear zone (3) control knob
8.Right front zone (4) control knob
9.Residual heat indicators
10.Power on indicator light
4

80 cm models
2 |
|
|
3 |
|
|
||||
|
|
|
|
|
 4
4
1 
Fig. 1.3
5 6 7 8
9 10
Electrical insulation Class I
COOKING POINTS (Fig. 1.3)
1.Hi-light cooking zone Ø 140 mm - 1200 W
2.Oval double hi-light cooking zone Ø 180 x 260 mm - 800/2200 W
3.Hi-light cooking zone Ø 140 mm - 1200 W
4.Double hi-light cooking zone Ø 210/120 mm - 2200/750 W
CONTROLS DESCRIPTION
5.Left front zone (1) control knob
6.Left rear zone (2) control knob
7.Right rear zone (3) control knob
8.Right front zone (4) control knob
9.Residual heat indicators
10.Power on indicator light
5

90 cm models
2 
 4
4
3 |
|
1 |
5 |
|
Fig. 1.4
6 7 8 9 10
11 12
Electrical insulation Class I
COOKING POINTS (Fig. 1.4)
1.Hi-light cooking zone Ø 180 mm - 1800 W
2.Hi-light cooking zone Ø 140 mm - 1200 W
3.Oval double hi-light cooking zone Ø 180 x 260 mm - 800/2200 W
4.Double hi-light cooking zone Ø 210/120 mm - 2200/750 W
5.Hi-light cooking zone Ø 140 mm - 1200 W
CONTROLS DESCRIPTION
6.Left front zone (1) control knob
7.Left rear zone (2) control knob
8.Central zone (3) control knob
9.Right rear zone (4) control knob
10.Right front zone (5) control knob
11.Residual heat indicators
12.Power on indicator light
6

2HOW TO USE THE HOB
The ceramic surface of the hob allows a fast transmission of heat in the vertical direction, from the heating elements underneath the ceramic glass to the pans set on it.
The heat does not spread in a horizontal direction, so that the glass stays “cool” at only a few centimeters from the cooking plate.
The cooking zones are shown by painted disks on the ceramic surface. Before switching on the cooktop make sure that it is clean.
IMPORTANT NOTE:
The heating elements incorporate a thermolimiter that switches the element ON/OFF during all settings to protect the ceramic glass from overheating.
The use of incorrect pans and/or wrong pan positioning will cause the temperature limiter to operate more frequently, resulting in a reduction of cooking performance.
The temperature limiter can be seen under the glass dissecting the element. This is not a fault with the appliance.
HI-LIGHT RADIANT ZONES (Fig. 2.1)
The heating element is formed of a coil of resistant material which reaches the working temperature quickly.
These zones are controlled by a continuous energy regulator switch (figs. 2.2a - 2.2b).
The heat intensity can be regulated continuously from “0” to “12” (max).
Check that the hob is clean and then switch on by turning the control knob.
When the hob is working, the pilot light  will be on.
Hi-light cooking zone Ø 140 mm
Hi-light cooking zone Ø 180 mm
Hi-light cooking zone Ø 210 mm
Fig. 2.1
Fig. 2.2a |
Fig. 2.2b |
7
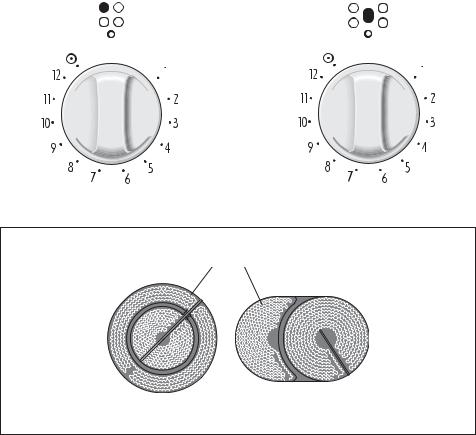
HI-LIGHT DOUBLE ZONE and HI-LIGHT OVAL ZONES
The heating element is formed of a 2 coils of resistant material which reaches the working temperature quickly.
These zones are controlled by a continuous energy regulator switch (figs. 2.3a - 2.3b). The heat intensity can be regulated continuously from “0” to “12” (max).
Check that the hob is clean and then switch on by turning the control knob. When the hob is working, the pilot light  will be on.
By switching on the second element (fig. 2.4), the surface area of the double and oval hilight zones can be extended.
For this purpose, turn the control knob (figs. 2.3a - 2.3b) fully to the right (position  ).
).
|
|
|
|
|
|
|
|
|
|
Fig. 2.3a |
|
Fig. 2.3b |
||
|
|
|
|
|
Second element
Hi-light |
Hi-light |
|
double |
||
oval double |
||
zone |
||
zone |
||
|
Fig. 2.4
8
 Loading...