


 Loading...
De’Longhi Dishwasher
Model
DEDW6012SC
USER GUIDE
Please read this user guide carefully and retain for future reference

Contents
Parts and Features . . . . . . . . . . . . . . . . . . . . . . . . . . . . . . . . . . |
03 |
|
De’Longhi Safety Precautions. . . . . . . . . . . . . . . . . . . . . . . . . . . |
04 |
|
Dishwasher Safety Precautions . . . . . . . . . . . . . . . . . . . . . . . . . |
05 |
|
Installation Safety Precautions . . . . . . . . . . . . . . . . . . . . . . . . . . |
07 |
|
Installation . . . . . . . . . . . . . . . . . . . . . . . . . . . . . . . . . . . . . . . . |
08 |
|
- Positioning the Appliance |
|
|
- Levelling |
|
|
- Cold Water Connection |
|
|
- About the Safety Supply Hose |
|
|
- How to disconnect the Safety Supply Hose |
|
|
- Drain Hose Connection |
|
|
Using your Dishwasher . . . . . . . . . . . . . . . . . . . . . . . . . . . . . . . |
10 |
|
- Quick start guide |
|
|
- Before Starting the Dishwasher |
|
|
- Prior to using for the first time |
|
|
- Rinse aid & detergent |
|
|
- Loading the Dishwasher Baskets |
|
|
- Starting a Washing Program |
|
|
- Control Panel |
|
|
- Turning on the Appliance |
|
|
- Change the Program |
|
|
- Forget to add a Dish? |
|
|
- At the end of the Wash Cycle |
|
|
Care and Cleaning. . . . . |
. . . . . . . . . . . . . . . . . . . . . . . . . . . . . . |
22 |
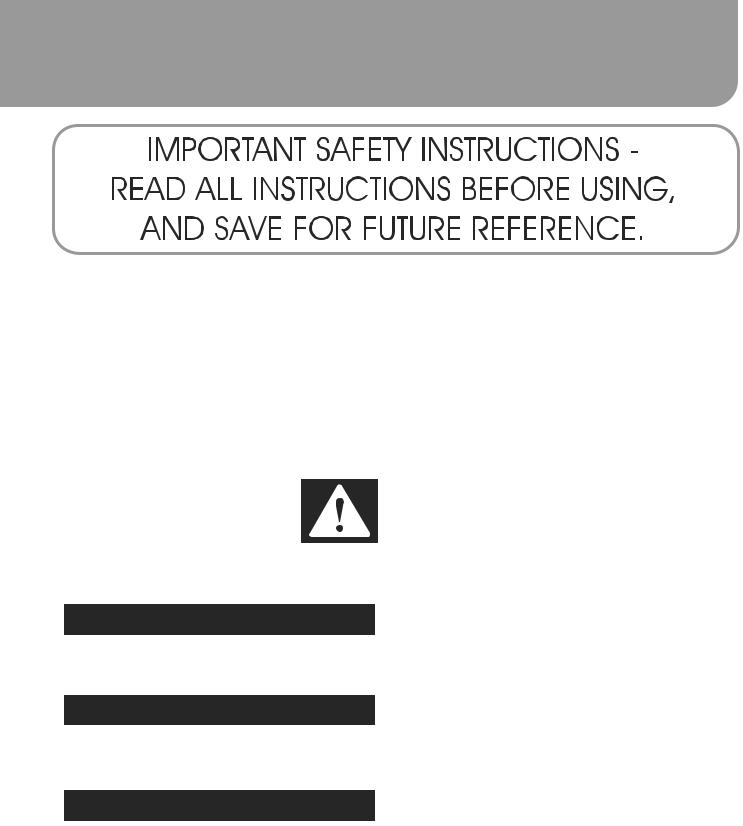
-Filtering System
-Filter Assembly
-Cleaning the Filter
-Caring for the Dishwasher
-Protect against Freezing
-Cleaning the Spray Arms
-How to keep your Dishwasher in shape
Troubleshooting |
. . . . . . |
. . . . . . . . . . . . . . . . . . . . . . . . . . . . . . |
24 |
Error Codes . . . |
. . . . . . . . . . . . . . . . . . . . . . . . . . . . . . . . . . . . |
25 |
|
Help us Help You |
. . . . . . |
. . . . . . . . . . . . . . . . . . . . . . . . . . . . . . |
26 |
Warranty Information . . . |
. . . . . . . . . . . . . . . . . . . . . . . . . . . . . . |
27 |
|
Page 2

Parts and Features
Model: DEDW6012SC
1 |
5 |
2 |
|
3 |
6 |
|
7 |
4 |
9 |
10 8
Components: |
|
|
|
1. |
Upper Basket |
6. |
Spray Arms |
2. |
Inner Pipe |
7. |
Filter Assembly |
3. |
Lower Basket |
8. |
Inlet Pipe Connector |
4. |
Detergent Dispenser |
9. |
Drain Pipe |
5. |
Cup Shelf |
10. Adjuster |
|
|
|
the |
door |
closed) |
|
(with |
|
||
600 |
|
|
||
|
|
|
||
|
|
|
|
598
Dimensions: |
|
Height |
845mm |
Width |
598mm |
845 |
600mm (with door closed) |
Depth |
|
Voltage connected Load: see rating label |
|
Water pressure: |
0.04-1.0MPa |
Power supply: |
see rating label |
Capacity: |
12 place settings |
1175
Page 3

De’Longhi’s Safety Precautions
De’Longhi pride themselves on their innovative range of the highest quality consumer products.
De’Longhi ensures all of its products are 100% safe through quality design and manufacture. All products meet or exceed stringent laboratory-tested safety requirements.
It is necessary for anyone using an electrical appliance to be safety conscious. The following precautions are essential for the safe use of an electrical appliance. Carefully read all of the instructions provided with your appliance:
ŸAlways turn the power off at the power outlet before you insert or remove a plug. Remove by grasping the plug, do not pull on the cord.
ŸDo not use your appliance with an extension cord unless this cord has been checked and tested by a qualified technician or service person. The extension cord must be a VDE-Listed, 3-wire grounding extension cord that has a grounding plug and outlet and that the electrical rating of the cord is 220-240 volts and at least 10 amperes.
ŸAlways use your appliance from a power outlet of the voltage (A.C. only) marked on the appliance.
ŸDo not use an appliance for any purpose other than its intended use.
ŸDo not attempt to repair an electrical appliance. Return a damaged or malfunctioning appliance to a qualified service centre for adjustment or repair if required.
ŸThe appliance must be positioned so the AC plug is accessible.
ŸThis appliance is designed exclusively for household use. All other uses are strictly forbidden.
ŸThe appliance is not intended for use by persons (including children) with reduced physical, sensory or mental capabilities, or lack of experience and knowledge, unless they have been given supervision or instruction concerning use of the appliance by a person responsible for their safety. Children should be supervised to ensure that they do not play with the appliance.
ŸIf the power cable is damaged, it must be replaced by the manufacturer, an authorised service centre or a qualified electrician in order to eliminate all risk.
ŸThis appliance is intended to be used in household and similar applications such as:
-staff kitchen areas in shops, offices and other working environments;
-farm houses;
-by clients in hotels, motels and other residential type environments;
-bed and breakfast type environments.
Page 4
Dishwasher Safety Precautions
Your safety and the safety of others is very important. Safety messages are displayed in this manual and on your appliance.
Read and obey these safety messages as they will alert you to potential hazards and tell you how to reduce the chance of injury.
 DANGER
Safety Alert Symbol
This symbol alerts you to potential hazards.
Danger
Danger indicates a high level of risk to yourself and others. Ensure that care is taken to avoid severe injury or even death.
 WARNING
CAUTION
Warning
Warning indicates a moderate level of risk to yourself, others and the product. Ensure that care is taken to avoid extensive product damage or serious injury.
Caution
Caution indicates a level of risk to yourself, others and the product. Ensure care is taken to avoid moderate product damage or injuries.
Page 5

Dishwasher Safety Precautions
Before the appliance is used, it must be properly positioned and installed as described in this manual, so read the manual carefully. To reduce the risk of fire, electrical shock or injury when using the appliance, follow basic precaution, including the following:
 DANGER
Grounding Instructions
ŸThis appliance must be grounded. In the event of a malfunction or breakdown, grounding will reduce the risk of an electric shock by providing a path of least resistance of electric current. This appliance is equipped with a cord having an equipmentgrounding conductor and a grounding plug. The plug must be plugged into an appropriate outlet that is installed and grounded in accordance with all local codes and ordinances.
ŸImproper connection of the equipment-grounding conductor can result in the risk of an electric shock.
ŸCheck with a qualified electrician or service representative if you are in doubt whether the appliance is properly grounded. Do not modify the plug provided with the appliance; If it does not fit the outlet. Have a proper outlet installed by a qualified electrician.
 WARNING
ŸDo not abuse, sit on, or stand on the door or dish rack of the dishwasher.
ŸDo not touch the heating element during or
immediately after use. (This instruction is only applicable to machines with a visual heating element.)
ŸDo not operate your dishwasher unless all enclosure panels are properly in place. Open the door very carefully if the dishwasher is operating, there is a risk of water squirting out.
ŸDo not place any heavy objects on or stand on the door when it is open. The appliance could tip forward.
ŸWhen loading items to be washed:
1.Locate sharp items so that they are not likely to damage the door seal;
2.Warning: Knives and other utensils with sharp points must be loaded in the basket with their points down or placed in a horizontal position.
ŸCheck that the detergent compartment is empty after completion of the wash cycle.
Page 6
 WARNING
ŸWhen using your dishwasher, you should prevent plastic items from coming into contact with the heating element (This instruction is only applicable to machines with a visual heating element).
ŸDo not wash plastic items unless they are marked dishwasher safe or the equivalent. For plastic items not so marked, check the manufacturer's recommendations.
ŸUse only detergent and rinse additives designed for an automatic dishwasher.
ŸNever use soap, laundry detergent, or hand washing detergent in your dishwasher. Keep these products out of the reach of children.
ŸKeep children away from detergent and rinse aid, keep children away from the open door of the dishwasher, there could still be some detergent left inside.
ŸThis appliance is not intended for use by persons (including children )with reduced physical, sensory or mental capabilities, or lack of experience and knowledge, unless they have been given supervision or instruction concerning use of the appliance by a person responsible for their safety.
ŸChildren should be supervised to ensure that they do not play with the appliance.
ŸDishwasher detergents are strongly alkaline, they can be extremely dangerous if swallowed. Avoid contact with skin and eyes and keep children away from the dishwasher when the door is open.
ŸThe door should not be left open, since this could increase the risk of tripping.
ŸIf the supply cord is damaged, it must be replaced by the manufacturer or its service agent or a similarly qualified person in order to avoid a hazard.
ŸRemove the door to the washing compartment when removing an old dishwasher from service or discarding it.
ŸPlease dispose of packing materials properly.
ŸUse the dishwasher only for its intended function.
ŸDuring installation, the power supply must not be excessively or dangerously bent or flattened.
ŸDo not tamper with controls.
ŸThe appliance is to be connected to the water mains using new hose sets and that old hose-sets should not be reused.
ŸThe maximum number of place settings to be washed is 12.
ŸThe maximum permissible inlet water pressure is 1Mpa.
ŸThe minimum permissible inlet water pressure is 0.04Mpa.
Installation Safety Precautions
Electrical Connection
ŸThis appliance should be properly grounded for your safety. The power cord of this appliance is equipped with a three-prong plug which mates with standard three prong wall outlets to minimise the possibility of electrical shock.
ŸDO NOT UNDER ANY CIRCUMSTANCES CUT OR REMOVE THE EARTHING CONNECTION FROM THE POWER CORD SUPPLIED. FOR PERSONAL SAFETY, THIS APPLIANCE MUST BE PROPERLY GROUNDED.
ŸPlease look at the rating label to know the rating voltage and connect the dishwasher to the appropriate power supply. Use the required fuse 10 amp, time delay fuse or circuit breaker recommended and provide separate circuit serving only this appliance.
ŸEnsure the voltage and frequency of the power being used corresponds to those on the rating plate. Only insert the plug into an electrical socket which is earthed properly. If the electrical socket to which the appliance must be connected is not appropriate for the plug , replace the socket, rather than using a adaptors or the like as they could cause overheating and burns.
ŸThe cord should be secured behind the appliance and not left exposed or dangling to prevent accidental injury.
ŸThe appliance should always be plugged into its own individual electrical outlet which has a voltage rating that matches the rating label on the appliance. This provides the best performance and also prevent overloading house wiring circuits that could cause a fire hazard from overheated. Never unplug the appliance by pulling the power cord. Always grip the plug firmly and pull straight out from the receptacle. Repair or replace immediately all power cords that have become frayed or otherwise damaged. Do not use a cord that shows cracks or abrasion damage along its length or at either end. When moving the appliance, be careful not to damage the power cord.
Extension Cord
ŸWARNING: DO NOT USE AN EXTENSION CORD OR AN ADAPTER PLUG WITH THIS APPLIANCE.
Grounding Instructions
ŸThis appliance must be earthed. In the event of a malfunction or breakdown, earthing will reduce the risk of electric shock by providing a path of least resistance for the electric current. This appliance is equipped with a cord having an equipmentearthing conductor and an earthing plug. The plug must be plugged into an appropriate outlet that is installed and earthed in accordance with all local standards and requirements.
WARNING
ŸImproper connection of the equipment earthing conductor can result in the risk of an electric shock.
ŸCheck with a qualified electrician or service representative if you are in doubt whether the appliance is properly earthed.
Ÿ Do not modify the plug provided with the appliance. If the plug does not fit properly to the outlet, please have a qualified electrician install a proper outlet.
Page 7
Installation
Positioning the Appliance
ŸPosition the appliance in the desired location. The back should rest against the wall behind it, and the sides, along the adjacent cabinets or walls. The dishwasher is equipped with water supply and drain hoses that can be positioned either to the right or the left sides to facilitate proper installation.
WARNING! Where the dishwasher has ventilation openings in the base, these openings must not be obstructed by a carpet.
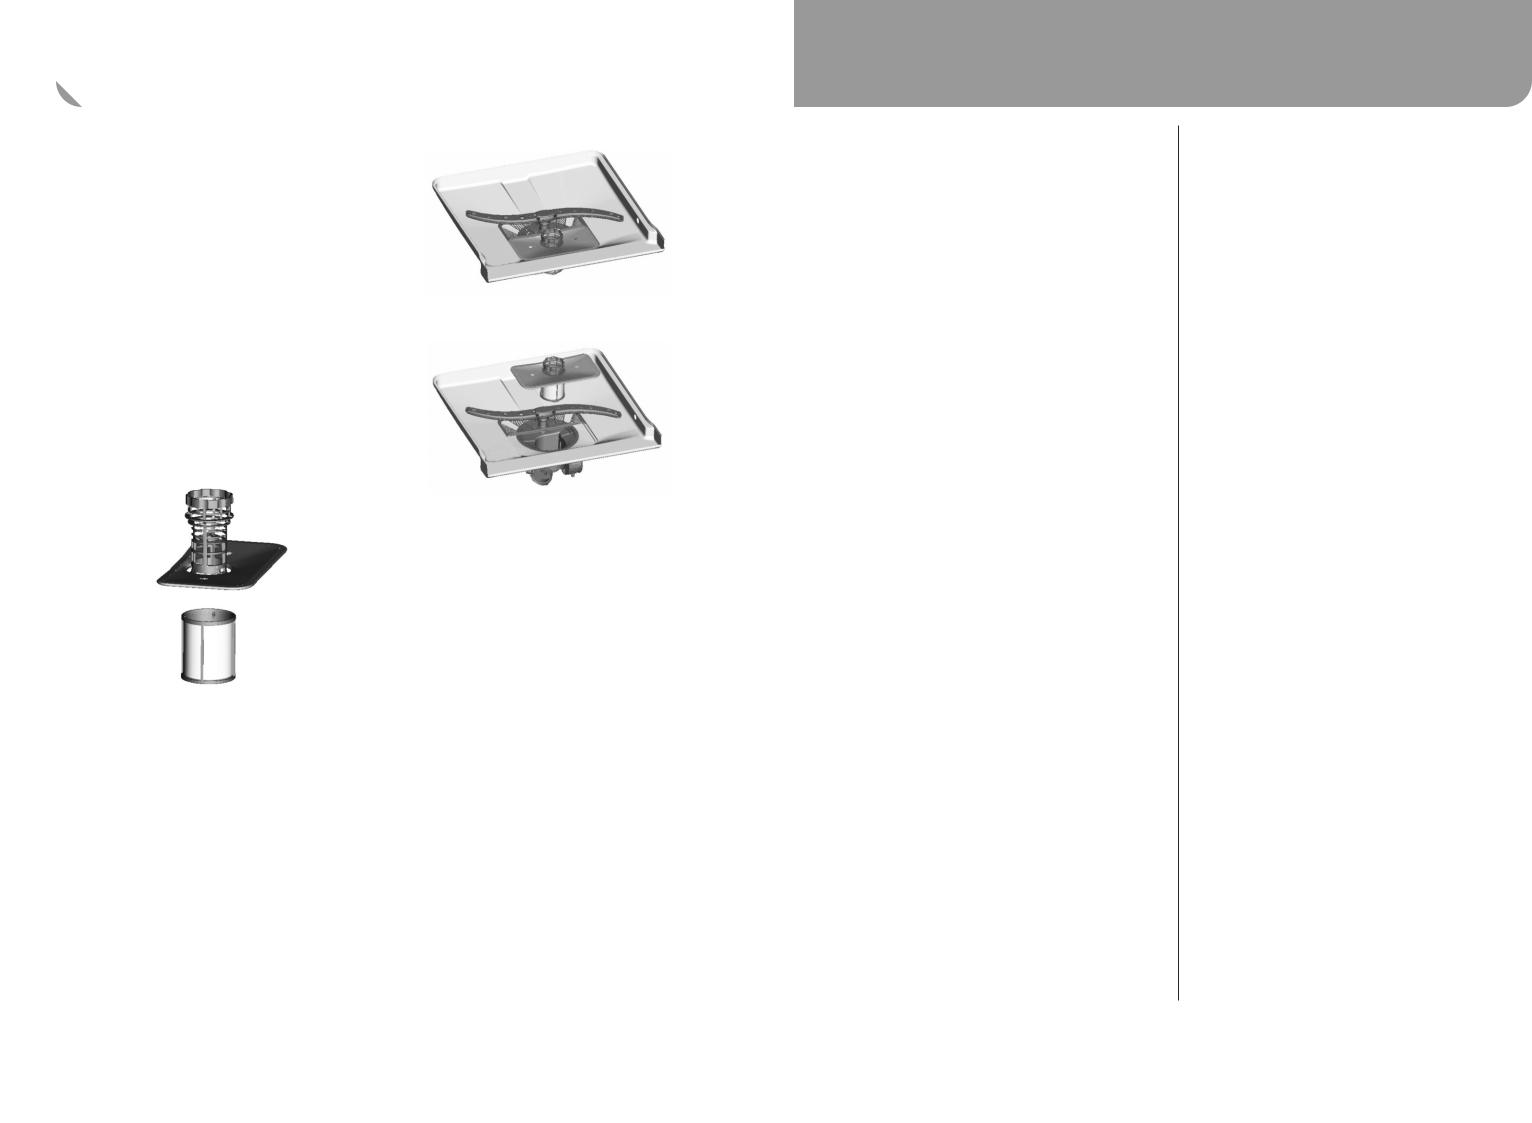
Levelling
ŸOnce the appliance is positioned for levelling, the height of the dishwasher may be altered via adjustment of the screwing level of the feet. In any case, the appliance should not be inclined more than 2 °.
ColdWater Connection
How to Connect the safety supply hose
The appliance must be connected to the water mains using new hose-sets. The old hose-sets should not be reused.
Water pressure must be between 0.04 MPa and 1 MPa. If the pressure is below the minimum, consult our Service Department for advice.
If the water pipes are new or have not been used for an extended period of time, let the water run to make sure that the water is clear. This precaution is needed to avoid the risk of the water inlet getting blocked and damaging the appliance.
1.Pull the safety supply hose completely out from the storage compartment located at the rear of dishwasher.
2.Connect the cold water supply hose to a threaded 3/4(inch) connector and make sure that it is fastened tightly in place.
3.Turn water fully on before starting the dishwasher.
About the Safety Supply Hose
The safety supply hose consists of double walls. The hose's system guarantees its intervention by blocking the flow of water in case of the supply hose breaking and when the air space between the supply hose itself and the outer corrugated hose is full of water.
WARNING! In order to avoid water staying in the inlet hose, please close the hydrant after using.
WARNING! A hose that attaches to a sink spray can burst if it is installed on the same water line as the dishwasher. If your sink has one, it is recommended that the hose be disconnected and the hole plugged.
How to disconnect the safety supply hose
1.Turn off the water.
2.Release the water pressure by depressing the pressure release button. This relieves water pressure and protects you, and the room, from severe splashing.
3.Unscrew the safety supply hose from the faucet.
Page 8
Installation
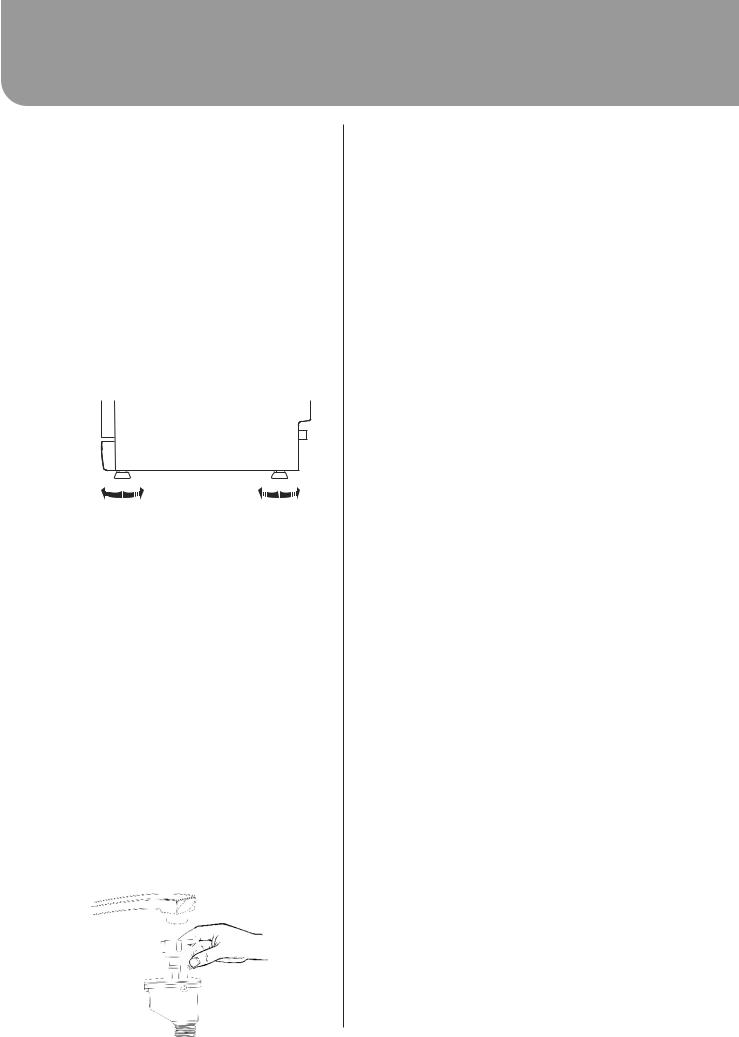
Drain Hose Connection
ŸInsert the drain hose into a drain pipe with a minimum diameter of 40mm, or let it run into the sink, making sure to avoid bending or crimping it. The top of the hose must be at a height less than 1000mm. The free end of the hose must not be immersed in water to avoid back flow.
Syphon Connection
ŸInsert the drain hose into a drain pipe with a minimum diameter of 40mm, or let it run into the sink, making sure to avoid bending or crimping it. The top of the hose must be less than 1000mm.
How to Drain Excess Water from Hoses
ŸIf the sink is more than 100cm higher than the floor, the excess water in the hose cannot be drained directly into the sink. It will be necessary to drain excess water from the hose into a bowl or suitable container that is held outside and lower than the sink.
Water Outlet
ŸConnect the water drain hose. The drain hose must be correctly fitted to avoid water leaks. Ensure that the water drain hose is not kinked or squashed.
Extension Hose
ŸIf you need a drain hose extension, make sure to use a similar drain hose.
ŸIt must be no longer than 4 metres; otherwise the cleaning effect of the dishwasher could be reduced.
Front
NOTE
The top of the hose must be less than 1000mm.
Drain pipe
A
B
Counter
 MAX 1000mm
¦40mm
Page 9
Loading...