


RT51/52 + RF
Electronic room thermostat with manual or automatic Day/Night set-back
®
Certification Mark
GB Installation Instructions
User Instructions
FInstructions d’installation Instructions d’utilisateur
DInstallationsanweisungen Inbetriebnahme-Instruktion
ES |
Instrucciones de instalación |
|
Instrucciones del usuario |
DK Instruktions vejledning Brugervejleding
NL
GR
PL
LT
I
Installatie handleiding Instructiesevoor Gebruik
ПдзгЯет егкбфЬуфбузт ПдзгЯет чсЮузт
Instrukcja instalacji Instrukcja Użytkownika
Montavimo instrukcijos Informacija Vartotojui
Istruzioni per l’uso Istruzioni per l’utente

Index
GB |
Installation Instructions |
3-7 |
|
User Instructions |
8-12 |
||
|
|||
F |
Instructions d’installation |
13-17 |
|
Instructions d’utilisateur |
18-21 |
||
|
|||
D |
Installationsanweisungen |
22-26 |
|
Inbetriebnahme-Instruktion |
27-30 |
||
|
|||
ES |
Instrucciones de instalación |
31-35 |
|
Instrucciones del usuario |
36-39 |
||
|
|||
DK |
Instruktions vejledning |
40-44 |
|
Brugervejleding |
45-48 |
||
|
|||
NL |
Installatie handleiding |
49-53 |
|
Instructiesevoor Gebruik |
54-57 |
||
|
|||
GR |
ПдзгЯет егкбфЬуфбузт |
58-62 |
|
ПдзгЯет чсЮузт |
63-66 |
||
|
|||
PL |
Instrukcja instalacji |
67-71 |
|
Instrukcja Użytkownika |
72-75 |
||
|
|||
LT |
Montavimo instrukcijos |
76-80 |
|
Informacija Vartotojui |
81-84 |
||
|
|||
I |
Istruzioni per l’uso |
85-89 |
|
Istruzioni per l’utente |
90-93 |
||
|
2

Installation Instructions
Please Note:
This product should only be installed by a qualified electrician or competent heating installer and should be in accordance with the current edition of the IEEE wiring regulations.
Product Specification
Thermostat features |
RT51/52 |
|
RT51/52-RF |
|
|
|
|
Power supply |
2 x AA/MN1500/LR alkaline cells |
||
|
|
||
Memory back-up |
1 min. for battery change |
||
|
|
|
|
Switching action of output relay |
1 x SPDT, Type 1B |
|
N/A |
|
|
|
|
Switch rating of relay contact |
3(1)A, 10-230Vac |
|
N/A |
|
|
|
|
Transmission frequency (RF model) |
N/A |
|
433.92MHz |
|
|
|
|
Transmitter range (RF model) |
N/A |
|
30m max |
|
|
|
|
Temperature range |
5-30°C |
|
|
|
|
||
Dimensions, mm |
110 wide, 88 high, 28 deep |
||
|
|
||
Design standard |
EN60730-2-9 (EN300220 for RF) |
||
|
|
|
|
Rated impulse voltage |
2.5Kv |
|
|
|
|
|
|
Ball hardness test |
75°C |
|
|
|
|
|
|
Control pollution situation |
Degree 2 |
|
|
|
|
|
|
Temperature accuracy |
±1°C |
|
|
|
|
|
|
GB
Installation Instructions
Important note RF products: Ensure that there are no large metal objects, such as boiler cases or other large appliances, in line of sight between the transmitter and receiver as these will prevent communication between thermostat and receiver.
3

GB
Installation Instructions
Installation
First, remove the wallplate from the back of the unit.
From the top left hand corner of the wallplate, there must be clearances of at least 140mm to the right, 15mm to the left, 30mm above and 100mm below in order to mount the plugin module.
4
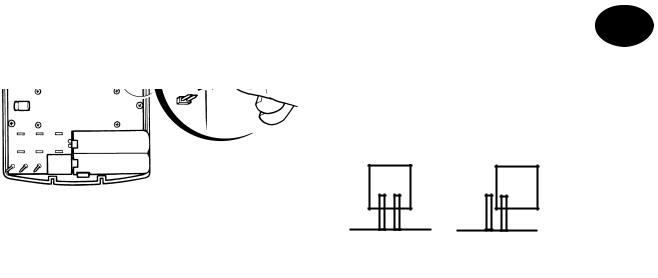
Prior to mounting the unit should be set in either ON/OFF or chrono-proportional control mode (see below).
ON/OFF CHRONO
ON/OFF - boilers switches ON when below set temperature and OFF when above.
Chrono-Proportional - energy saving feature which fires the boiler at regular intervals to maintain a set temperature, achieving a constant ambient environment for the user.
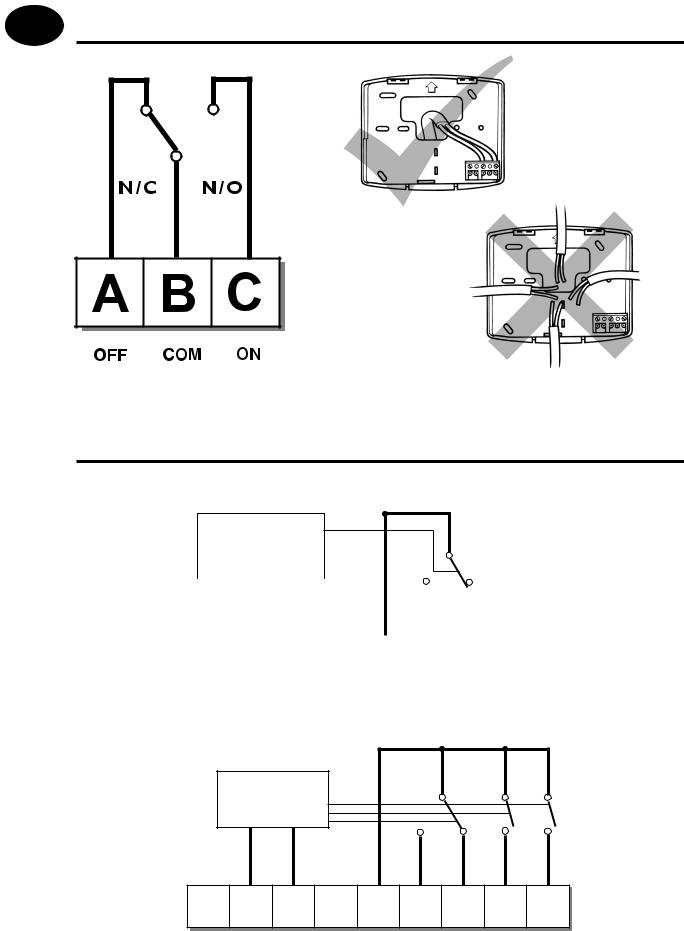
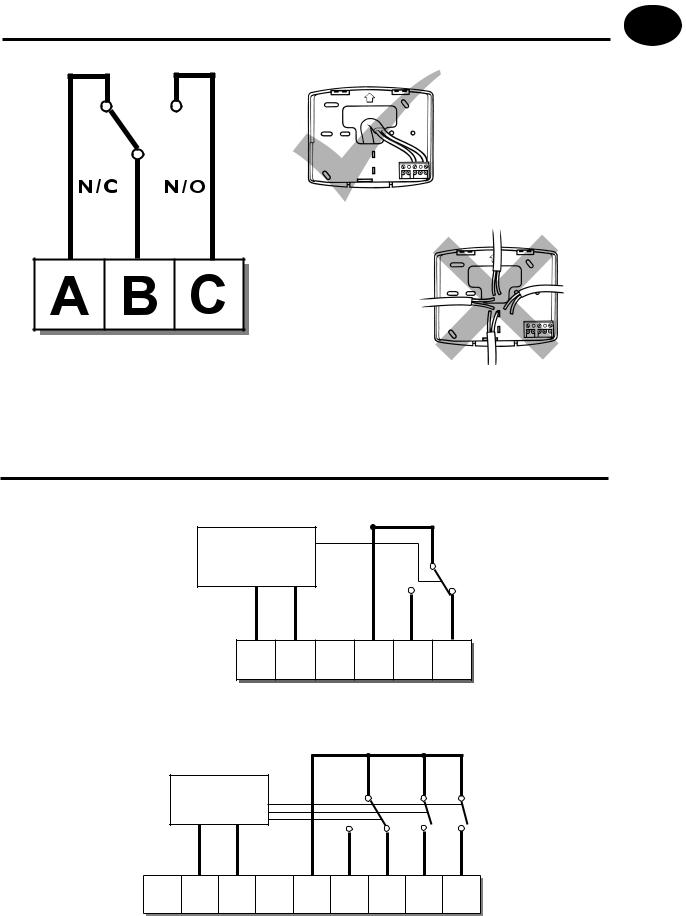
!Some existing thermostats will have a Neutral wire and/or Earth wire connected. These are not required by the RT51/52 and must NOT be connected to any RT51/52 terminals. Instead they should be made electrically safe and coiled in the recess at the back of the RT51/52.
GB
Installation Instructions
5
GB |
Thermostat Wiring (not RF models) |
Installation Instructions |
TP5000, RT51, RT52 (3061 12/01) |
RX Receiver Wiring (RF models only)
RX1
ELECTRONICS
|
|
|
|
|
|
|
|
|
|
|
|
|
|
|
|
|
|
|
|
|
|
|
|
|
|
|
|
N |
L |
1 |
2 |
3 |
4 |
|||||
|
|
|
|
|
|
|
|
|
|
|
|
|
|
|
|
|
|
|
|
|
COM |
ZONE |
ZONE |
||
|
|
|
|
|
|
|
|
|
1 ON |
1 OFF |
||
RX2 & RX3 |
ELECTRONICS |
|
|
|
|
|
|
|
|
|
|
|
|
|
|
||
|
|
|
|
|
|
|
|
TERMINAL 6 |
|
|
|
|
|
|
|
|
RX3 ONLY |
A |
B |
C |
1 |
2 |
3 |
4 |
5 |
6 |
|
N |
L |
|
COM |
ZONE |
ZONE |
ZONE |
ZONE |
|
L |
|
|
1 ON |
1 OFF |
2 ON |
3 ON |
|
|
|
|
|
|
||||
NB. For mains voltage operated systems link terminal 2 to mains live supply.
6

Commissioning (RF models only) |
GB |
If the thermostat and the receiver have been supplied together in a combined pack, the units have been paired in the factory and no commissioning is required (RX1 only).
To tune the RX receiver to the frequency of the thermostat signal, follow steps 1-5 below.
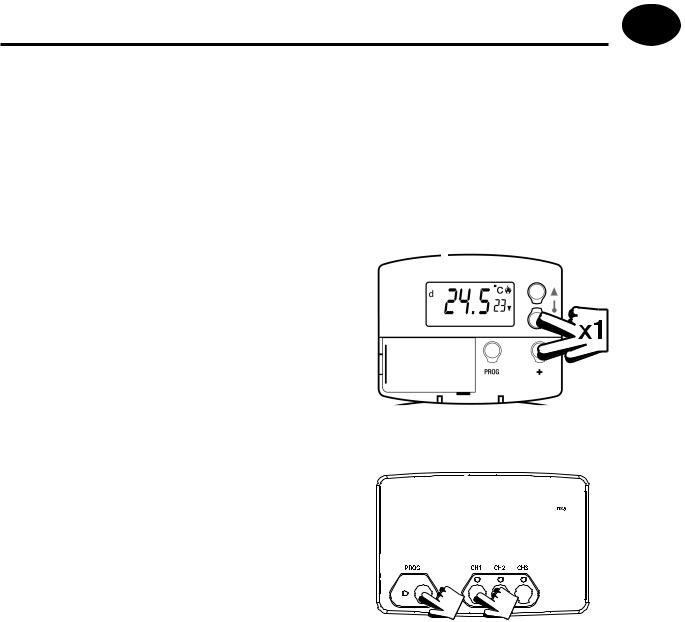
Step 1 RT51/52-RF
Reset the unit by removing the batteries for 2 minutes, then replace.
Step 2 Press and hold V and + buttons for 3 seconds (Thermostat now transmits unique signal continuously for 5 minutes).
Step 3 RX1
Press and hold buttons PROG and CH1 for 3 seconds until green light flashes once.
Step 4 RX2 (if applicable)
Stat 1 - perform steps 1-3.
Stat2-wait5mins,performsteps1-2and then press PROG and CH2 on RX2.
RX3 (if applicable)
Stat 1 - perform steps 1-3.
Stat 2 - wait 5 mins, perform steps 1-2 and then press PROG and
CH2 on RX3.
Stat 3 - wait 5 mins, perform steps 1-2 and then press PROG and
CH3 on RX3.
Step 5 RT51/52-RF
Press Λ orV to select temperature - unit will revert back to operating mode.
Installation Instructions
7

GB
User Instructions
What is a programmable room thermostat?
... an explanation for householders
A room thermostat simply switches the heating system on and off as necessary. It works by sensing the air temperature, switching on the heating when the air temperature falls below the thermostat setting, and switching it off once this set temperature has been reached.
Turning a room thermostat to a higher setting will not make the room heat up any faster. How quickly the room heats up depends on the design of the heating system, for example, the size of boiler and radiators.
Neither does the setting affect how quickly the room cools down. Turning a room thermostat to a lower setting will result in the room being controlled at a lower temperature, and saves energy.
The heating system will not work if a time switch or programmer has switched it off.
The way to set and use your room thermostat is to find the lowest temperature setting that you are comfortable with, and then leave it alone to do its job. The best way to do this is to set the room thermostat to a low temperature – say 18°C – and then turn it up by one degree each day until you are comfortable with the temperature. You won’t have to adjust the thermostat further. Any adjustment above this setting will waste energy and cost yo u more money.
If your heating system is a boiler with radiators, there will usually be only one room thermostat to control the whole house. But you can have different temperatures in individual rooms by installing thermostatic radiator valves (TRVs) on individual radiators. If you don’t have TRVs, you should choose a temperature that is reasonable for the whole house. If you do have TRVs, you can choose a slightly higher setting to make sure that even the coldest room is comfortable, then prevent any overheating in other rooms by adjusting the TRVs.
Room thermostats need a free flow of air to sense the temperature, so they must not be covered by curtains or blocked by furniture. Nearby electric fires, televisions, wall or table lamps may prevent the thermostat from working properly.
8
User Instructions
Your room thermostat
RT51
The RT51 is a simple to use room thermostat which allows you to programme a Day and a Night temperature, and to switch between the two settings simply by pressing 2 buttons.
RT52
The RT52 has the same functionality as the RT51 with the added benefit of a built-in timer, which will return the thermostat to Day temperature at a time chosen by you.
Wireless RF versions
Both models are available in wireless versions - RT51-RF and RT52RF - which offer exactly the same functions as the hard-wired models.
Each thermostat communicates with an RX receiver, which can be located up to 30m away.
GB
User Instructions
Reading your display
DAY mode |
20.0 |
C |
|
22 |
|
NIGHT mode |
20.0 |
C |
|
22 |
Actual room temperature
Required room temperature
Room temperature is lower than required temperature, therefore thermostat has switched on and is calling for heat
9

GB
User Instructions
 All models
Before you start
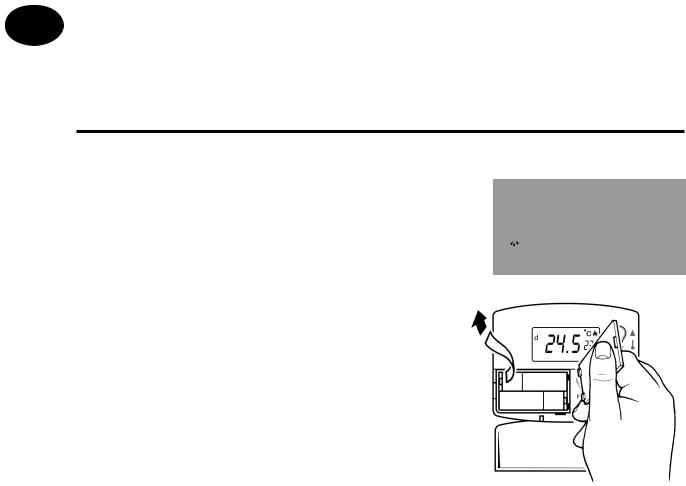
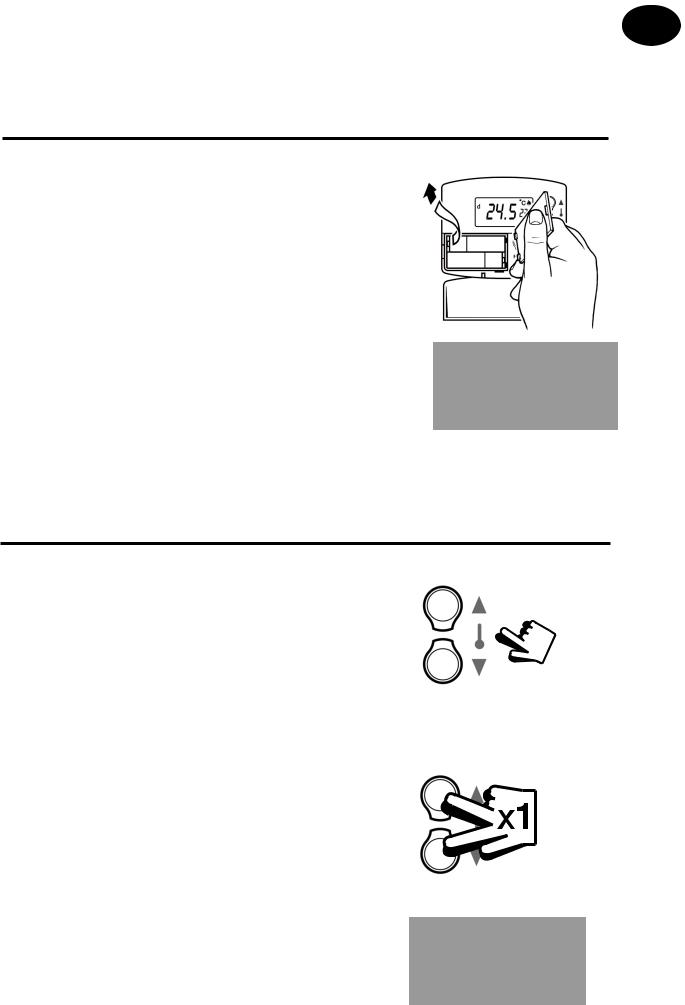
To reset the unit, open the flap on the front of the programmer. Remove the batteries for 2 minutes, then replace.
The display will automatically default to DAY mode (d shown top left of display) and show actual temperature in the large characters and required temperature in the smaller characters.
 C
C
20.0 22
Setting the DAY & NIGHT temperatures
DAY temperature
Use the and buttons until the required DAY temperature is shown.
NIGHT (set-back) temperature
Press and buttons together once to select NIGHT mode (n shown top left of display).
Use the and buttons until the requiredNIGHT(set-back)temperature is shown (between 5-30°C or Off ).
 C
C
20.022
10
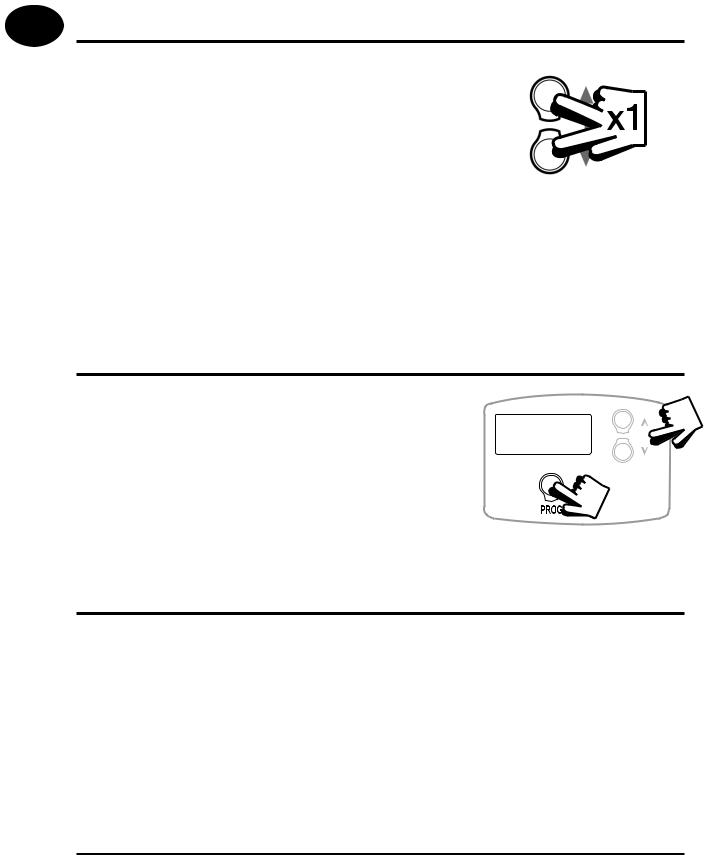
Moving between DAY and NIGHT mode
Pressing the and buttons together once allows you to toggle between DAY and NIGHT mode as required.
GB
User Instructions
RT52 / RT52-RF only
Setting the clock
Press PROG button once.
 i2
i2 00
00
Use and buttons until the correct TIME is shown.
Setting the Return to Day Time
Press PROG button again.
Use and buttons to select the time you wish the unit to return to DAY mode.
RUN Mode
Press PROG again to return to RUN mode.
The unit will now control your heating at the temperatures you have set.
11
GB All models
User Instructions
Battery Replacement
When batteries are low a battery symbol will flash in the LCD display.
You have 15 days to replace the battery before the unit will switch off.
When changing batteries, remove old batteries and insert new ones within ONE MINUTE and programming will not be lost.
 C
C
 20.0 22
IMPORTANT: always use high quality alkaline batteries.
!NB. If the display ever goes blank during normal operation, the batteries will need to be renewed, the unit reset and the time and programmes reset.
12

Instructions d’installation
Remarque:
Ce produit doit être installé exclusivement par un électricien qualifié ou un installateur de chauffage compétent et doit être conforme à la version en vigueur des réglementations de câblageIEEE.
Specifications
Caractéristiques |
RT51/52 |
|
RT51/52-RF |
|
|
|
|
Alimentation |
2 piles alcalines x AA/MN1500 |
||
|
|
||
Précision Horloge |
1 minute, pour changer les piles |
||
|
|
|
|
Type de contact |
1 x SPDT, Type 1B |
|
N/A |
|
|
|
|
Caractéristique de contact |
3(1)A, 10-230Vac |
|
N/A |
|
|
|
|
Fréquence de fonctionnement |
N/A |
|
433.92MHz |
|
|
|
|
Portée émetteur (voirremarqueci-dessous) |
N/A |
|
30mètresmax |
|
|
|
|
Plage de températures |
5-30°C |
|
|
|
|
||
Dimensions, mm |
110 largeur, 88 hauteur, 28 épaisseur |
||
|
|
||
Normes de fabrication |
EN60730-2-9 (EN300220 for RF) |
||
|
|
|
|
Tension de choc nominale |
2.5Kv |
|
|
|
|
|
|
Essai à la bille |
75°C |
|
|
|
|
|
|
Niveau de recyclage |
Degré 2 |
|
|
|
|
|
|
Précision de la température |
±1°C |
|
|
|
|
|
|
Remarque importante RF: Veiller à ce qu’aucun gros objet métallique (caisson de chaudière ou autres gros appareils domestiques) ne fasse obstacle aux communications entre le thermostat et le récepteur.
F
Instructions d’installation
13

F
Instructions d’installation
Installation
Retirez tout d’abord la plaque murale de l’arrière de l’appareil.
Par rapport au coin gauche supérieur de la plaque murale, vous devez disposer d’espacements d’au moins 140 mm à droite, 15 mm à gauche, 30 mm au-dessus et 100 mm en-dessous afin de pouvoir monter le module enfichable.
14
Avant de monter l’appareil, ce dernier doit être en mode ON/ OFF (Marche/Arrêt) ou réglage chrono-proportionnel (voir cidessous).
1) ON/OFF 2) CHRONO
ON/OFF (Marche/Arrêt) – la chaudière se met en marche lorsque la température est inférieure à la température définie et s’arrête lorsque la température est supérieure.
Chrono-proportionnel – fonction d’économie d’énergie qui déclenche la chaudière à intervalles réguliers pour maintenir une température définie, offrant un environnement ambiant constant à l’utilisateur.
F
Instructions d’installation
!Certains thermostats existants compteront un câble Neutre et/ou Terre connecté. Ces derniers ne sont pas nécessaires au modèle RT51/52 et NE doivent PAS être connectés à l’une des bornes du RT51/52. Ils doivent en revanche être isolés et enroulés dans le renfoncement à l’arrière du RT51/52.
15

FCâblage (versions câblées seulement)
Instructions d’installation
Câblage du Récepteur RX (modèles RF uniquement)
RX1 |
|
|
|
|
|
|
|
|
ELECTRONICS |
|
|
|
|
|
|
||
|
N |
L |
1 |
2 |
3 |
4 |
|
|
|
|
|
|
COM |
ZONE |
ZONE |
|
|
|
|
|
|
|
1 ON |
1 OFF |
|
|
RX2 & RX3 |
|
|
|
|
|
|
|
|
|
ELECTRONICS |
|
|
|
|
|
|
|
|
|
|
|
|
|
|
|
TERMINAL 6 |
|
|
|
|
|
|
|
|
RX3 ONLY |
A |
B |
C |
1 |
2 |
3 |
4 |
5 |
6 |
|
N |
L |
|
COM |
ZONE |
ZONE |
ZONE |
ZONE |
|
|
|
|
|
1 ON |
1 OFF |
2 ON |
3 ON |
NB. Pour les systèmes alimentés sur secteur, reliez la borne 2 à la phase du secteur.
16
Instructions (versions câblées)
Si le thermostat émetteur et le récepteur ont été fournis ensemble dans un kit, ces deux éléments peuvent communiquer directement sans manipulation particulière (Modèles RX1 uniquement).
Pour ajuster le récepteur RX à la fréquence du signal du thermostat, suivez les points 1-5 ci-dessous.
Etape 1 RT52/52-RF
Réinitialisez l’appareil en retirant les piles pendant 2 minutes, puis replacez ces dernières.
Etape 2 Appuyez sur les touches V et + en les maintenant enfoncées pendant 3 secondes. (Le thermostat transmet alors un signal unique en continu pendant 5 minutes).
Etape 3 RX1
Appuyez sur les touches PROG et CH1 en les maintenant enfoncées pendant 3 secondes jusqu’à ce que le voyant vert clignote une fois.
Etape 4 RX2 (si applicable)
Etat 1 – exécutez les points 1-3 .
Etat 2 - patientez 5 min, exécutez les points 1-2 puis appuyez sur les touches PROG et CH2 du RX2.
RX3 (si applicable)
Etat 1 – exécutez les points 1-3.
Etat 2 - patientez 5 min, exécutez les points 1-2 puis appuyez sur les touches PROG et CH2 du RX3.
Etat 3 - patientez 5 min, exécutez les points 1-2 puis appuyez sur les touches PROG et CH3 du RX3.
Etape 5 RT51/52-RF
Appuyez sur V ou Λ pour sélectionner la température – l’appareil repassera en mode de fonctionnement.
F
Instructions d’installation
17

F Instructions d’utilisateur
Instructions d’utilisateur
Votre thermostat d’ambiance
RT51
Le RT51 est un thermostat d’ambiance simple d’emploi qui vous permet de programmer une température Jour et une température Nuit, et de basculer entre les deux réglages en appuyant simplement sur 2 touches.
RT52
Le RT52 a la même fonctionnalité que le RT51, mais intègre également une minuterie, qui fera repasser le thermostat à la température Jour à l’heure que vous avez choisie.
Modèles RF sans fil
Les deux modèles sont disponibles en versions sans fil - RT51-RF et RT52-RF – qui offrent exactement les mêmes fonctions que les modèles câblés.
Chaque thermostat communique avec un récepteur RX, qui peut être placé jusqu’à 30 m du thermostat.
Lecture de l’écran
Mode JOUR
 C
C
20.0 22
Mode NUIT |
20.0 |
C |
|
22 |
Température ambiante effective
Température ambiante désirée
La température ambiante étant inférieure à la température désirée, le thermostat s’est allumé et met le chauffage en marche
18
Tous les modèles
Avant de commencer
Pour réinitialiser l’appareil, ouvrez le couvercle à l’avant du programmateur. Retirez les piles pendant 2 minutes, puis replacez ces dernières.
L’écran affichera automatiquement par défaut le mode JOUR (lettre d affichée en haut et à gauche de l’écran) et indiquera la température effective en gros caractères et la température désirée en petits caractères.
 C
C
20.0 22
Réglage des températures JOUR & NUIT
La Température de la Journée
Appuyer sur les boutons ou jusqu’à ce que la TEMPERATURE DE LA JOURNEE requise s’affiche.
La Température de la Nuit
Appuyer une fois simultanément sur les boutons et pour sélectionner le mode NUIT (n s’affiche en haut et à gauche de l’écran).
Appuyer sur les boutons ou jusqu’à ce que la TEMPERATURE DE LA NUIT (mise en réduit) requise s’affiche (entre 5-30°C ou Arrêt).
 C
C
20.022
F
Instructions d’utilisateur
19
FRéglage de l’heure du retour au mode jour
Instructions d’utilisateur
Appuyer une fois simultanément sur les boutons et pour basculer entre les modes JOURNEE (d) et NUIT (n) selon les besoins.
RT52/52-RF uniquement
Régler l’horloge
Appuyer une fois sur le bouton PROG.
 i2
i2 00
00
Appuyer sur les boutons ou jusqu’à ce que l’HEURE correcte s’affiche.
Régler l’Heure de Retour à la Température de la Journée
Appuyer une nouvelle fois sur le bouton
PROG.
Appuyer sur les boutons ou jusqu’à ce que l’HEURE correcte s’affiche.
Mode RUN (Fonctionnement)
Appuyer une nouvelle fois sur PROG pour repasser en mode FONCTIONNEMENT.
L’appareil régulera désormais votre chauffage aux températures que vous avez définies.
20
Tous les modèles |
F |
Remplacement des Piles
Lorsque les piles sont usagées, un symbole de pile clignotera sur l’écran LCD.
Vous disposez de 15 jours pour remplacer la pile avant que l’appareil ne s’éteigne.
Lorsque vous remplacez les piles, retirez les piles usées et insérez les piles neuves dans LA MINUTE qui suit pour préserver vos programmations.
 C
C
 20.0 22
Instructions d’utilisateur
IMPORTANT: toujours utiliser des piles alcalines de qualité.
!NB. Si rien ne s’affiche à l’écran pendant le fonctionnement normal de l’appareil, les piles doivent être remplacées, l’appareil réinitialisé, et l’heure et les programmes redéfinis.
21

D Installationsanweisungen
Installationsanweisungen
Bitte beachten:
Dieses Produkt darf nur von einem qualifizierten Elektriker oder Heizungsinstallateur und gemäß den aktuellen IEEE-Bestimmungen installiert werden.
Technische Daten
Technische Daten |
RT51/52 |
|
RT51/52-RF |
|
|
|
|
Stromversorgung |
2 x AA / MN1500 Batterien alkaline |
||
|
|
||
Zeitgenauigkeit |
1 Minute, für Batteriewechsel |
||
|
|
|
|
Schaltkontakt |
Umschaltkontakt, |
|
nicht zutreffend |
potentialfrei, SPDT Type 1B |
|
||
|
|
|
|
Schaltleistung |
3(1)A, 10-230Vac |
|
nicht zutreffend |
|
|
|
|
Übertragungsfrequenz |
nicht zutreffend |
|
433.92 MHz |
|
|
|
|
Reichweite des Senders (siehe |
nicht zutreffend |
|
30m max |
nachfolgenden Hinweis) |
|
||
|
|
|
|
|
|
|
|
Temperaturbereich |
5-30°C |
||
|
|
||
Abmessungen (B x H x T) |
110 x 88 x 28 mm |
||
|
|
||
Bauart |
EN60730-2-9 (EN300220 : RF) |
||
|
|
|
|
Nennimpulsspannung |
2.5Kv |
|
|
|
|
|
|
Verformbarkeit unter Druck |
75°C |
|
|
|
|
||
Emissionswerte |
Grad 2 |
||
|
|
|
|
Temperaturgenauigkeit |
±1°C |
|
|
|
|
|
|
Wichtiger Hinweis RF: Achten Sie darauf, dass sich keine größeren Metallobjekte wie Boilergehäuse oder andere große Geräte zwischen Thermostat und Empfänger befinden, da ansonsten die Kommunikation zwischen dem Thermostat und dem Empfänger der Signale gestört werden kann.
22

Installation |
D |
Entfernen Sie zuerst die Wandplatte auf der Geräterückseite.
Installationsanweisungen
Es müssen folgende Abstände eingehalten werden: Von der linken oberen Ecke der Wandplatte mindestens 140mm nach rechts, 15 mm nach links, 30 mm nach oben und 100 mm nach unten, um das Einsteckmodul einzubauen.
23
DVor dem Anbringen muss das Gerät auf EIN/AUS oder zeitproportionalen Regelmodus eingestellt sein (siehe unten).
Installationsanweisungen
1) ON/OFF 2) CHRONO
1)EIN/AUS - Heizgerät schaltet ein, wenn die tatsächliche Temperatur unter der eingestellten Temperatur liegt und AUS, wenn sie darüber liegt.
2)Zeitproportional (Chrono) – Energiesparfunktion, bei der das HeizgerätinregelmäßigenIntervallenanspricht,umeineeingestellte Temperatur zu halten und eine konstante Umgebungstemperatur für den Benutzer zu erreichen.
!Verschiedene bereits vorhandene Thermostate haben einen angeschlossenenNullleiteroderMasseleiter. DiesewerdenvomRT51/52 nicht benötigt und dürfen NICHT an eine der Anschlussklemmen des RT51/52 angeschlossen werden. Diese sollten vielmehr abisoliert und in der Aussparung auf der Rückseite des RT51/52 untergebracht werden.
24
Verdrahtung (nur bei Kabelversion)
AUS COM EIN
Verdrahtung der Empfangseinheit RX (nur RF-Modelle)
RX1
ELEKTRONIK
D
Installationsanweisungen
N L 1 2 3 4
COM ZONE ZONE 1 EIN 1 AUS
RX2 und RX3 |
|
|
|
|
|
|
|
|
|
ELEKTRONIK |
|
|
|
|
|
|
|
|
|
|
|
|
|
|
|
KLEMME 6 |
|
|
|
|
|
|
|
|
NUR BEI RX3 |
A |
B |
C |
1 |
2 |
3 |
4 |
5 |
6 |
|
N |
L |
|
COM |
ZONE |
ZONE |
ZONE |
ZONE |
|
|
|
|
|
1 EIN |
1 AUS |
2 EIN |
3 EIN |
Hinweis: Bei Systemen, die per Netzspannung betrieben werden, Anschlussklemme (2) an stromführende Leitung (L) anschließen (brücken).
25

DInbetriebnahmeInstruktion (nur RF-Modelle)
Installationsanweisungen
Wurde das Thermostat zusammen mit dem Receiver in einem kombinierten Paket geliefert ist dieses eine Einheit und die Einstellung/Programmierung erfolgte bereits im Werk (Nur RX1Modelle).
Befolgen Sie zur Frequenzabgleichung des RX-Empfängers auf das Thermostatsignal unten aufgeführte Schritte 1 bis 5.
1. RT51/52-RF
Das Gerät wird durch eine 2-minütige Entnahme der Batterien zurückgesetzt. Anschließend Batterien wieder einsetzen.
2. Die Tasten V und + für 3 Sekunden gedrückt halten (RT51/52 sendet jetzt eigenes Signal für die Dauer von 5 Minuten ohne Unterbrechung).
3. RX1 - Die Tasten PROG und CH1 3 Sekunden gedrückt halten, bis das grüne Licht einmal aufleuchtet.
4. RX2 (falls zutreffend) Stat 1 – Schritte 1-3 ausführen.
Stat 2 - 5 Minuten warten, dann Schritte 1-2 für einen weiteren Thermostaten ausführen und PROG und CH2 auf RX2 drücken.
RX3 (falls zutreffend)
Stat 1 - Schritte 1-3 ausführen.
Stat 2 - 5 Minuten warten, dann Schritte 1-2 für einen weiteren Thermostaten ausführen und PROG und CH2 auf RX3 drücken.
Stat 3 - 5 Minuten warten, dann Schritte 1-2 für einen weiteren Thermostaten für einen weiteren Thermostaten ausführen und PROG und CH3 auf RX3 drücken.
5. RT51/52-RF
Zur Auswahl der Temperatur V oder Λ drücken. Das Gerät schaltet auf Betriebsmodus um.
26
Benutzeranweisungen
Der Raumthermostat
RT51
Der RT51 ist ein einfach zu bedienender Thermostat, bei dem Temperaturen für jeweils tagsüber und nachts programmmiert werden können. Durch Drücken von 2 Tasten kann zwischen den beiden Einstellungen gewählt werden.
RT52
Der RT52 verfügt zusätzlich zu den Funktionen des RT51 über eine eingebaute Zeitschaltuhr, die den Thermostat zu einer von Ihnen vorgegebenen Zeit auf Tagestemperatur umschaltet.
Drahtlose RF-Versionen
Beide Modelle werden auch als drahtlose Versionen unter den Bezeichnungen RT51-RF und RT52-RF angeboten und verfügen über die selben Funktionen wie die Modelle mit Kabelführung.
Jeder Thermostat kommuniziert mit einem RX-Empfänger, der in einer Entfernung von bis zu 30 m positioniert werden kann.
Ablesen des Displays
TAG-Modus
 C
C
20.0 22
NACHT-Modus
 C
C
20.022
Tatsächliche Raumtemperatur
Erforderliche Raumtemperatur
Die Raumtemperatur ist niedriger als die gewünschteTemperatur. Der Thermostat schaltet deshalb ein und veranlasst den Heizmodus.
D
Benutzeranweisungen
27

DAlle Modelle
Benutzeranweisungen
Bevor Sie beginnen
Für ein Zurücksetzen des Geräts ist die Klappe auf der Vorderseite des Programmiermoduls zu öffnen. Entnehmen Sie die Batterien und setzen Sie diese nach ca. 2 Minuten wieder ein.
Das Display schaltet automatisch auf TAGModus um (d wird oben links auf dem Display angezeigt) und zeigt die tatsächliche Temperatur in grossen Zeichen und die gewünschte Temperatur in kleineren Zeichen an.
 C
C
20.0 22
Einstellen derTAGund NACHT-Temperaturen
Tagestemperatur
Verwenden Sie die Tasten und , bis die gewünschte TAGESTEMPERATUR angezeigt wird.
Nacht- (Absenk-) Temperatur
Wählen Sie durch gleichzeitiges einmaliges Drücken der Tasten und den NACHTModus (n wird auf dem Display oben links angezeigt).
Verwenden Sie die Tasten oder bis die erforderliche NACHT- (Absenk-) Temperatur angezeigt wird (zwischen 5- 30°C oder AUS).
 C
C
20.022
28

ZwischenTagund Nacht-Modus wechseln
Durch gleichzeitiges einmaliges Drücken der Tasten und kann je nach Bedarf zwischen TAG- (d) und NACHT- (n) Modus gewechselt werden.
Nur RT52/52-RF
Einstellen der Uhr
Drücken Sie einmal die Taste PROG.
Verwenden Sie die Tasten oder , bis |
i2 00 |
die korrekte UHRZEIT angezeigt wird. |
|
D
Benutzeranweisungen
Einstellen der Uhrzeit für den Wechsel auf Tagbetrieb
Drücken Sie wieder die Taste PROG.
Verwenden Sie die Tasten und , bis die korrekte UHRZEIT angezeigt wird.
RUN-Modus
Drücken Sie erneut PROG, um zum RUN-Modus zurückzukehren.
Das Gerät steuert jetzt Ihre Heizung zu den von Ihnen eingestellten Temperaturen.
29
 Loading...