


ΟΗΓΙΕΣ ΧΡΗΣΗΣ

2
REGOLE GENERALI
PER L’USO DELLA MACCHINA
Leggere attentamente il libretto di istruzioni e le limitazioni sulla garanzia.
La macchina deve essere allacciata ad una regolare presa di corrente fornita di messa a terra. La macchina deve essere mantenuta pulita lavando frequentemente la griglia,
il cassetto raccogli gocce, il porta capsula, il serbatoio, il tubo di uscita vapore.
IMPORTANTISSIMO: mai immergere la macchina in acqua o introdurla in lavastoviglie.
L’acqua contenuta nel serbatoio deve essere regolarmente sostituita. Non usare la macchina senza acqua nel serbatoio. Dopo aver cambiato l’acqua, infilare il serbatoio nella macchina, assicurandosi del completo inserimento.
Si consiglia di utilizzare almeno ogni due mesi un prodotto per la rimozione del calcare
appositamente studiato per le macchine per espresso secondo indicazioni del capitolo DECALCIFICAZIONE.
La macchina è dotata di una valvola che permette il mantenimento costante della pressione,
per questo motivo si potrà notare la perdita di gocce d’acqua dal porta capsula.
INDICE |
|
|
|
PARTI DELLA MACCHINA........................................................... |
3 |
IMPORTANTI MISURE DI SICUREZZA ......................................... |
4 |
|
|
UTILIZZO DELL’APPARECCHIO................................................................ |
4 |
|
INSTALLAZIONE DELL’APPARECCHIO ..................................................... |
4 |
|
PULIZIA DELL’APPARECCHIO.................................................................. |
4 |
|
IN CASO DI GUASTO DELL’APPARECCHIO............................................... |
4 |
|
USO IMPROPRIO DELL’APPARECCHIO .................................................... |
5 |
INSTALLAZIONE E MESSA IN FUNZIONE DELL’APPARECCHIO...... |
5 |
|
|
ACCENSIONE E SPEGNIMENTO .................................................. |
6 |
|
STAND-BY............................................................................................. |
6 |
REGOLAZIONE QUANTITÀ DI CAFFÈ IN TAZZA............................. |
6 |
|
|
PREPARAZIONE DEL CAFFÈ ....................................................... |
7 |
|
PREPARAZIONE DEL CAPPUCCINO............................................. |
7 |
PREPARAZIONE DI ACQUA CALDA ............................................. |
8 |
|
PREPARAZIONE DI UN CAFFÈ DOPO L’EROGAZIONE DI VAPORE..9
|
DECALCIFICAZIONE................................................................... |
9 |
|
PULIZIA E MANUTENZIONE ...................................................... |
11 |
|
RACCOMANDAZIONI ............................................................... |
11 |
|
RISOLUZIONI PROBLEMI .......................................................... |
12 |
|
LIMITAZIONI SULLA GARANZIA ................................................ |
13 |
DATI TECNICI
Materiale carrozzeria: PC+ABS (EU), PC (USA)
Materiale interno termo blocco: acciaio
Serbatoio acqua: 1,0 litri
Pompa: 15 bar
Pressione caffè durante l’estrazione: 15 bar
Dimensioni: 200 x 340 x 350 mm
2 elettrovalvole
Scheda elettronica con le seguenti funzioni:
-dosaggio automatico dell’erogazione di caffè
-controllo di temperatura ad alta precisione (caffè e vapore)
-indicatore intervento di decalcifi cazione
-indicatore temperatura nel termoblocco
-avvisatore acustico
-programma di decalcifi cazione automatico
-power save
Lancia vapore
Poggia tazze superiore
Peso senza imballo: 9 Kg
Voltaggio: 230 V, 50 Hz (EU); 120 V, 60 Hz (USA) Potenza: 1200W (EU), 1200W (USA)
Potenza consumata in power off : <1W
La pressione sonora ponderata è minore di 70 dB
Il produttore si riserva il diritto d’apportare modifi che o miglioramenti senza preavviso.
|
|
|
|
|
|
|
|
|
|
|
|
|
|
|
|
|
|
|
|
|
|
|
|
|
|
|
|
|
|
|
|
3 |
IT |
|
|
|
|||
|
|
|
|
|
|
|
|
|
|
|
|
|
|
|
|
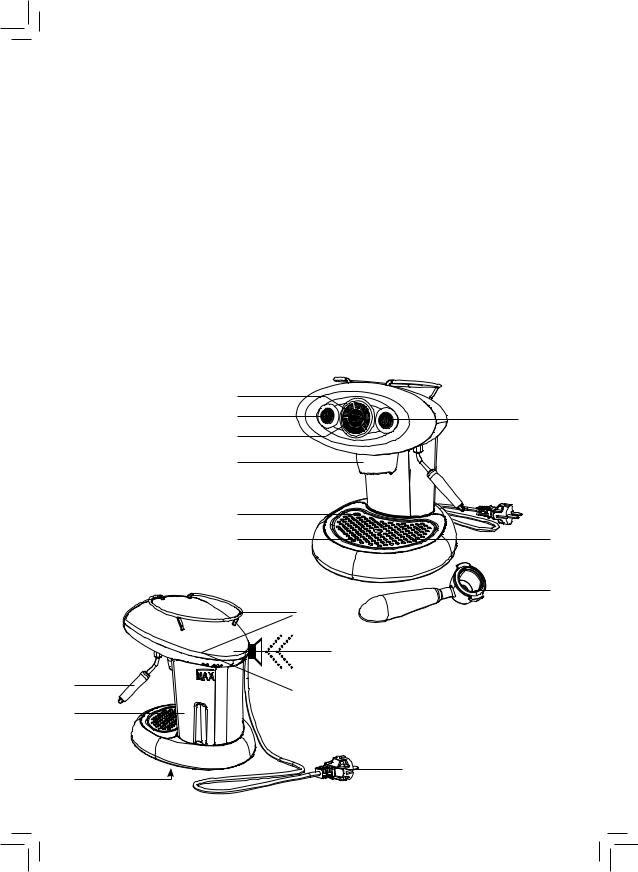
PARTI DELLA MACCHINA
AFASCIA LUMINOSA TEMPERATURA (indica gli stati della macchina)
BINTERRUTTORE GENERALE
CPULSANTE EROGAZIONE CAFFÈ (avvia e ferma l’erogazione del caffè)
DGRUPPO EROGAZIONE CAFFÈ
EGALLEGGIANTE VASCHETTA PIENA
FGRIGLIA APPOGGIO TAZZA
IPORTA CAPSULA (Metodo Iperespresso)
LREGGI TAZZE
MCICALINO INTERNO
(fornisce un segnale acustico per avvisare l’utente)
NCAVO ALIMENTAZIONE
OLANCIA EROGAZIONE VAPORE
G |
PULSANTE VAPORE |
P |
SERBATOIO ACQUA |
|
H |
VASCHETTA RACCOGLI GOCCE |
|||
Q TARGA DATI (sotto la base) |
||||
|
(posta sotto la griglia appoggio tazza) |
|||
|
|
|
||
|
A |
|
|
|
|
B |
|
G |
|
|
C |
|
|
|
|
D |
|
|
|
|
E |
|
|
|
|
F |
|
H |
|
I
L
M
O
P
N
Q
4
IMPORTANTI MISURE DI SICUREZZA
Nell’utilizzo di apparecchiature elettriche devono essere sempre osservate le seguenti misure di sicurezza.
Utilizzo dell’apparecchio
-Quest’apparecchio deve essere impiegato solo per uso domestico. Ogni altro uso è da considerarsi improprio e quindi pericoloso.
-Disinserire la spina dall’impianto elettrico quando l’apparecchio non viene utilizzato.
-Non toccare mai una superfi cie calda. Usare manici e pulsanti.
-Questa macchina è costruita per “fare il caffè espresso” e per “riscaldare bevande”: fare attenzione a non scottarsi con getti d’acqua o di vapore o con uso improprio della stessa.
-L’apparecchio non è destinato ad essere utilizzato da persone (compresi i bambini) con ridotte capacità fi siche, mentali o sensoriali o con esperienza e/o competenze insuffi cienti, a meno che non siano sotto la supervisione di una persona responsabile della loro sicurezza o non vengano da essa istruite sull’uso dell’apparecchio.
-Tenere i bambini sotto supervisione, per evitare che giochino con l’apparecchio.
-Utilizzare l’apparecchio esclusivamente in luoghi chiusi e protetti da agenti atmosferici esterni.
-Per proteggersi dal fuoco, scosse elettriche o lesioni non immergere il cavo, la spina ed il corpo della macchina o in acqua o altro liquido.
-Non utilizzare l’apparecchio per scopi diversi da quelli previsti.
-Non appoggiare l’apparecchio su fornelli elettrici o a gas, o dentro un forno caldo.
-L’apparecchio va acceso esclusivamente per il solo tempo necessario al suo utilizzo, dopodiché va spento premendo il
pulsante d’accensione  e la spina va staccata dalla presa di corrente.
- Prima di disinserire la spina accertarsi che il pulsante d’accensione  sia spento, ovvero non illuminato.
-L’utilizzo di accessori non raccomandati dal produttore può provocare incendi, scosse elettriche o lesioni alle persone.
-Non lasciare penzolare il cavo da tavoli o banconi.
-La macchina deve essere collocata in posizione orizzontale.
-La macchina deve essere installata solo in luoghi in cui possa essere controllata da personale addestrato.
Installazione dell’apparecchio
-Leggere attentamente le istruzioni.
-Non installare mai la macchina in un ambiente che può raggiungere una temperatura inferiore o uguale a 0°C (se l’acqua si ghiaccia, l’apparecchio può danneggiarsi) o superiore a 40°C.
-Verifi care che la tensione della rete elettrica corrisponda a quella indicata nella targa dati dell’apparecchio. Collegare l’apparecchio solo ad una presa di corrente avente una portata minima di 6 A se alimentata a 230 Vac, e 12 A se alimentata a 120 Vac e dotata di un’effi ciente messa a terra.
-In caso di incompatibilità tra la presa e la spina dell’apparecchio, fare sostituire la spina con un’altra di tipo adatto, da un centro assistenza autorizzato
-Posizionare l’apparecchio sopra un piano di lavoro lontano da rubinetti dell’acqua e lavelli.
-Dopo aver tolto l’imballaggio, assicurarsi dell’integrità dell’apparecchio prima della sua installazione.
-Non lasciare alla portata dei bambini i materiali utilizzati per imballare la macchina.
Pulizia dell’apparecchio
-Accertarsi che la macchina sia spenta; il pulsante d’accensione  deve essere spento.
-Disinserire la spina dall’impianto elettrico.
-Lasciare raffreddare l’apparecchio prima della pulizia.
-Pulire la carrozzeria e gli accessori con un panno umido ed asciugare successivamente con un panno secco non abrasivo. È sconsigliato l’uso di detergenti.
-Non sottoporre l’apparecchio ad abbondanti getti d’acqua o ad immersioni parziali o totali.
In caso di guasto dell’apparecchio
Non utilizzare l’apparecchio se il cavo o la spina sono danneggiati o se l’apparecchio mostra segni di cattivo funzionamento oppure se ha subito qualche danno. Riportare l’apparecchio al centro di assistenza tecnica autorizzato più vicino per controlli o riparazioni.
Se il cavo d’alimentazione è danneggiato, deve essere cambiato dal produttore o dal suo servizio assistenza.
ATTENZIONE: CONSERVARE QUESTE ISTRUZIONI.
In caso di guasto o di cattivo funzionamento dell’apparecchio, spegnerlo e non manometterlo. Per eventuali riparazioni, rivolgersi solamente ad un centro di assistenza tecnica autorizzato dal costruttore e richiedere l’utilizzo di ricambi originali. Il mancato rispetto di quanto sopra può compromettere la sicurezza dell’apparecchio e fare perdere il diritto alla garanzia.
Uso improprio dell’apparecchio
-Quest’apparecchio deve essere impiegato solo per uso domestico. Ogni altro uso è da considerarsi improprio e quindi pericoloso.
-Il costruttore non può essere considerato responsabile per eventuali incidenti causati dalla mancanza o dalla non conformità alle leggi vigenti dell’impianto di messa a terra.
-Il costruttore non può essere considerato responsabile per eventuali danni derivanti da usi impropri, erronei ed irragionevoli.
INSTALLAZIONE E MESSA IN FUNZIONE DELL’APPARECCHIO
Prima di collegare la macchina alla rete elettrica, leggere con attenzione le norme di sicurezza riportate nel capitolo IMPORTANTI MISURE DI SICUREZZA.
Accertarsi che la macchina sia scollegata dalla rete elettrica.
5 |
IT |
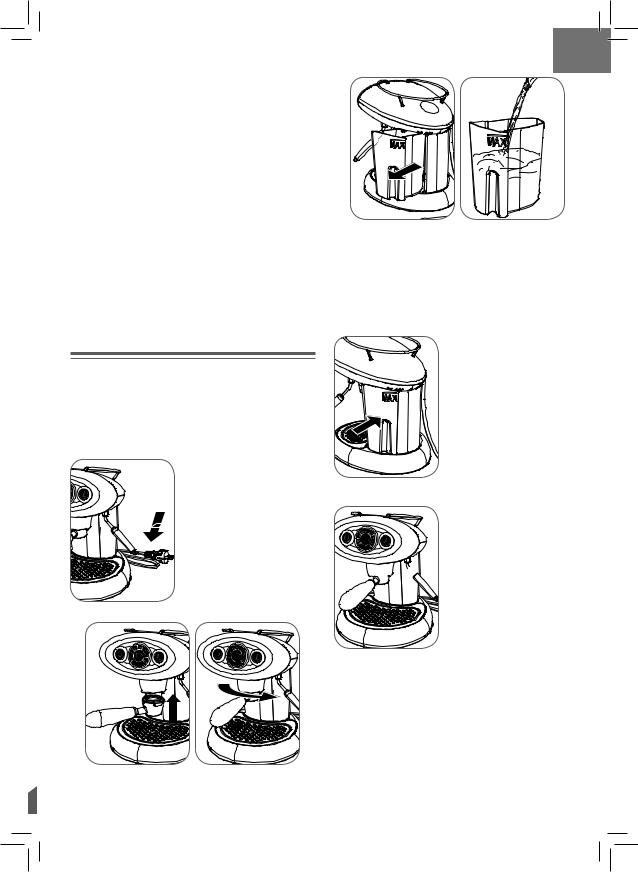
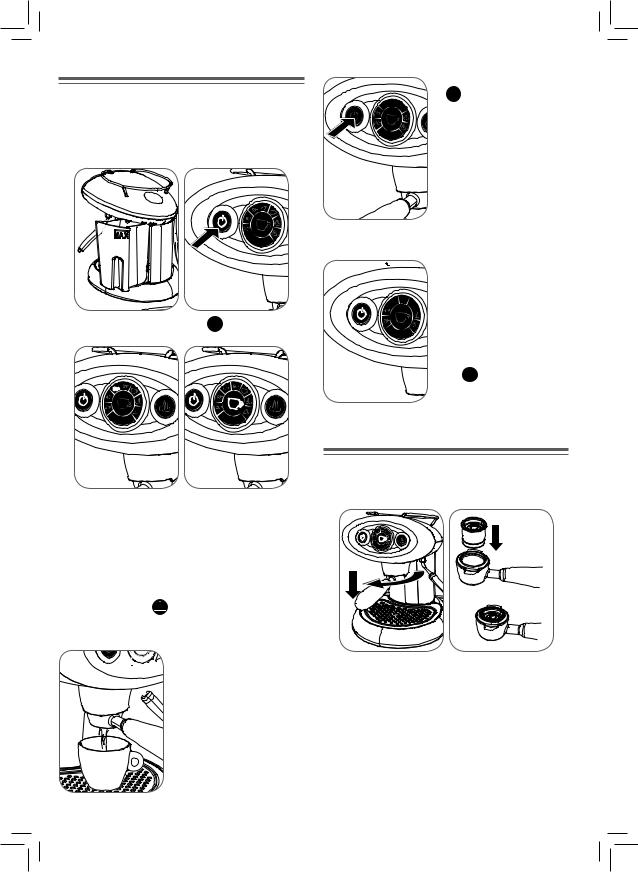
Estrarre il serbatoio dell’acqua tirandolo verso l’esterno e riempirlo con acqua fresca potabile fi no al riferimento MAX.
Attenzione: immettere nel serbatoio sempre e soltanto acqua fresca potabile non gassata. Acqua calda nonchè altri liquidi possono danneggiare il serbatoio. Non mettere in funzione la macchina senza acqua.
Inserire il serbatoio nella macchina; assicurarsi che sia completamente inserito.
Inserire la spina nella presa. Consultare il capitolo successivo per l’accensione.
Nota: si consiglia di conservare
l’imballo originale (almeno per il
periodo di garanzia) per l’invio della
macchina ai centri di assistenza
autorizzati per la riparazione.
D 


 O I
O I
Attenzione.
Quando la macchina è in funzione, il contatto con il gruppo caffè D, la lancia vapore O e la parte metallica del porta capsula I può produrre ustioni.
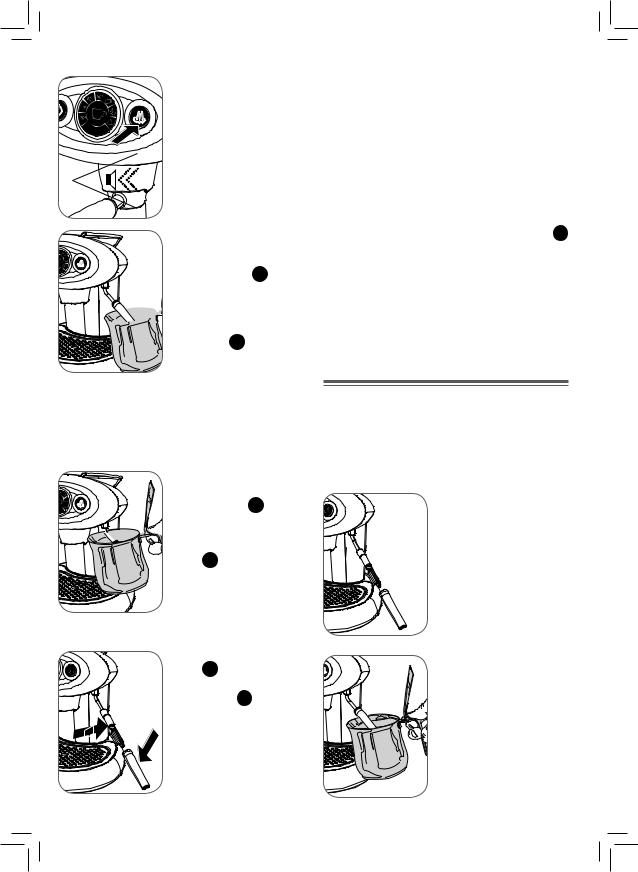
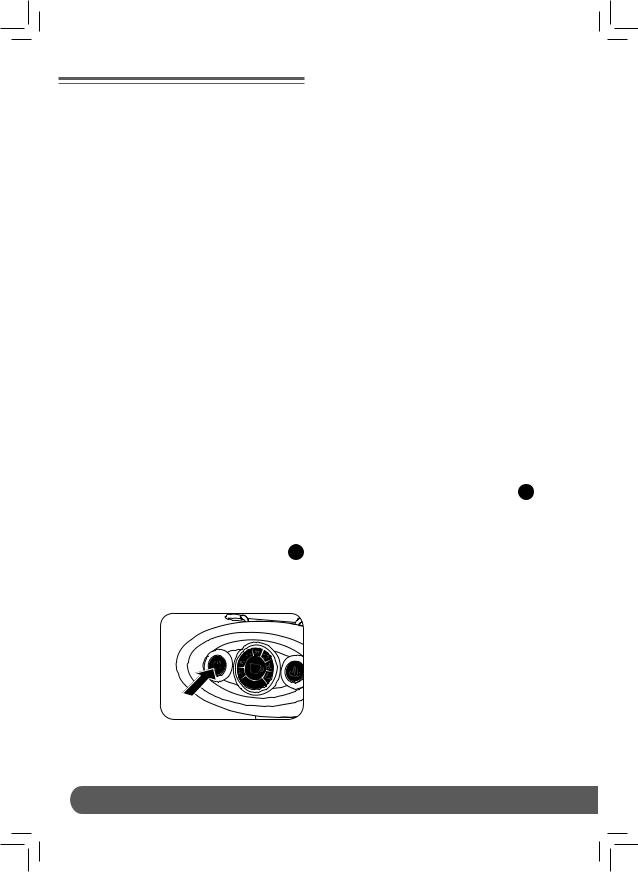
Inserire dal basso il porta capsula e ruotarlo verso destra fi no alla posizione di blocco.

6
ACCENSIONE E SPEGNIMENTO
Prima d’accendere la macchina verifi care il livello dell’acqua nel serbatoio; se necessario aggiungere acqua come descritto. Svuotare e risciacquare il cassetto raccogli gocce ogni volta che viene riempito il serbatoio dell’acqua.
Per spegnere la macchina tenere premuto il pulsante  fi no allo


 spegnimento del pannello frontale;
si raccomanda di non staccare mai il cavo di alimentazione dalla presa di corrente a macchina accesa.
Stand-by
|
|
La macchina è stata programmata |
|
|
per rispettare l’ambiente e ridurre i |
|
|
consumi quando non viene utilizzata. |
Per accendere la macchina premere il pulsante |
fi no a |
Dopo 30 minuti di inutilizzo la mac- |
quando si illumina. |
|
china si spegne automaticamente. |
|
|
5 minuti prima dello spegnimen- |
|
|
to automatico il pulsante |
|
|
lampeggia. Se desiderate che la |
|
|
macchina resti accesa premete il |
|
|
pulsante. |
Le icone poste sulla corona circolare si illuminano progressivamente indicando l’aumento della temperatura nel termoblocco.
Dopo alcuni minuti la macchina segnala il raggiungimento della temperatura di funzionamento illuminando il simbolo del pulsante di erogazione ed emettendo un breve segnale acustico.
In caso di accensione del simbolo triangolare  e del segnale acustico intermittente, consultare il capitolo PROBLEMI E SOLUZIONI.
 Nota: in caso di primo utilizzo o dopo un prolungato periodo di inat-


 tività si suggerisce di erogare alcu-
ne tazze d’acqua senza capsula.
PREPARAZIONE DEL CAFFÈ
La macchina X7.1 è stata concepita per utilizzare esclusivamente capsule illy Metodo Iperespresso.
Per la preparazione del caffè procedere come segue:
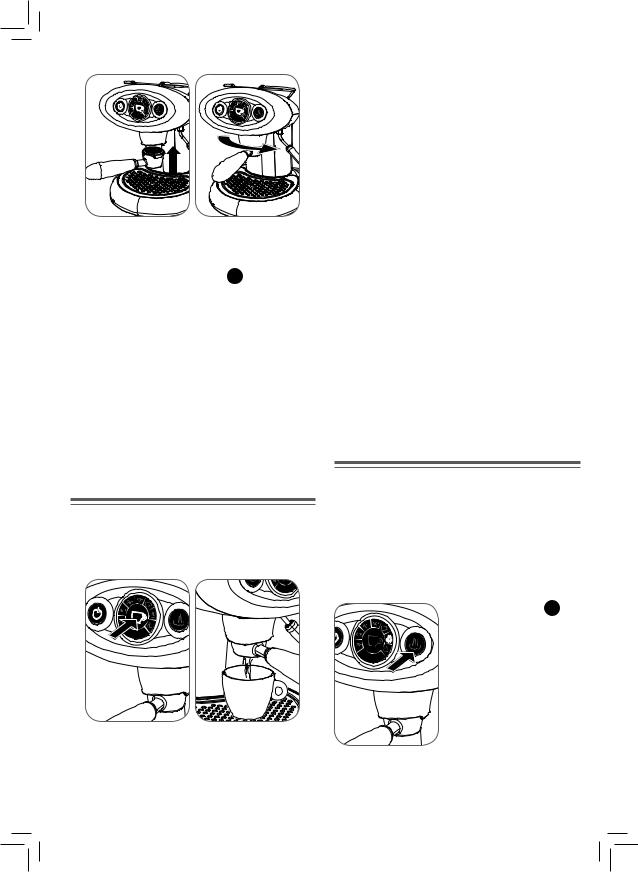
-Ruotare verso sinistra il porta capsula e rimuoverlo dal gruppo di erogazione.
-Inserire la capsula come mostrato in fi gura.
Nota: la capsula deve entrare facilmente; in caso contrario estrarla e riposizionarla correttamente.
Nota: l’erogazione del caffè viene eseguita circa un paio di secondi dopo la pressione del tasto; questo è normale per il funzionamento della macchina.
-Inserire il porta capsula nel gruppo di erogazione ; ruotare il manico verso destra fi no alla posizione di blocco .
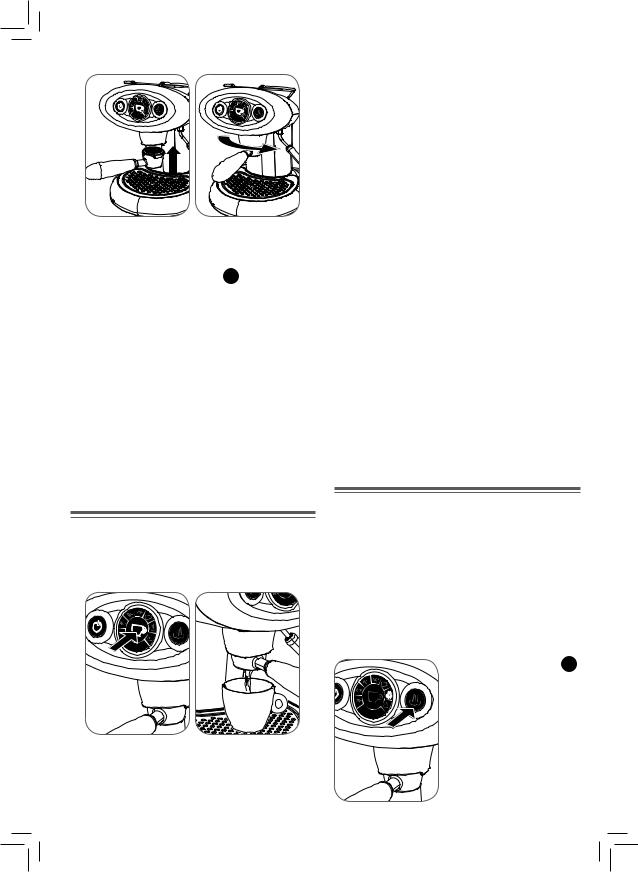
-Verifi care che il pulsante caffè sia illuminato.
-Premere e rilasciare il pulsante caffè  ; la macchina eroga la quantità di caffè programmata. Per interrompere in anticipo l’erogazione premere nuovamente il pulsante.
|
|
|
|
|
|
|
|
|
|
|
|
|
|
|
|
|
|
|
|
|
|
|
|
|
|
|
|
7 |
IT |
|
|
|
||
-Premere il pulsante caffè e mantenerlo premuto fi no al raggiungimento della quantità di caffè desiderato. Al termine rilasciare il pulsante. La macchina ora è programmata.
MODO MANUALE - per predisporre la macchina a funzionare in modo manuale, procedere come segue:
-Inserire una capsula nel porta capsula e agganciare quest’ultimo al gruppo di erogazione.
-Posizionare una tazzina sotto il porta capsula.
- Premere il |
pulsante caffè e |
mantenerlo premuto fi no |
a quando |
la macchina non |
bloccherà automaticamen- |
te l’erogazione del caffè. Al termine rilasciare il pulsante. In questo caso la programmazione è stata cancellata.
Nota: nella modalità automatica è possibile preparare un caffè con procedura manuale:
- Premere il pulsante caffè per circa 3 secondi;
Per preparare altri caffè, rimuovere la capsula usata e ripetere le operazioni appena descritte.
Attenzione:
-Le capsule sono monodose e non devono essere utilizzate per erogare due caffè.
-Per maggior sicurezza d’uso, la macchina interrompe automaticamente l’erogazione dopo circa un minuto
-Ricordarsi di vuotare e pulire frequentemente il cassetto raccogli gocce.
-Premere nuovamente il pulsante caffè per arrestare l’erogazione;
-In questo modo non si modifi ca la quantità di caffè inizialmente programmata.
Nota: con la regolazione della quantità di caffè in MODO MANUALE, dopo aver avviato l’erogazione, al raggiungimento della quantità desiderata di caffè, sarà necessario premere nuovamente il pulsante caffè per fermare l’erogazione.
REGOLAZIONE QUANTITÀ DI CAFFÈ IN TAZZA
La macchina X7.1 consente di erogare la quantità di caffè in due modalità: automatico e manuale.
MODO AUTOMATICO - per regolare e memorizzare la quantità di caffè da erogare, procedere come segue:
-Inserire una capsula nel porta capsula e agganciare quest’ultimo al gruppo di erogazione.
-Posizionare una tazzina sotto il porta capsula.
PREPARAZIONE DEL CAPPUCCINO
La lancia vapore di cui è provvista la macchina, consente la preparazione del latte montato necessario per preparare una o più tazze di cappuccino.
Preparare una o più tazze di caffè secondo le istruzioni del paragrafo precedente.
Preparare il latte montato come segue:
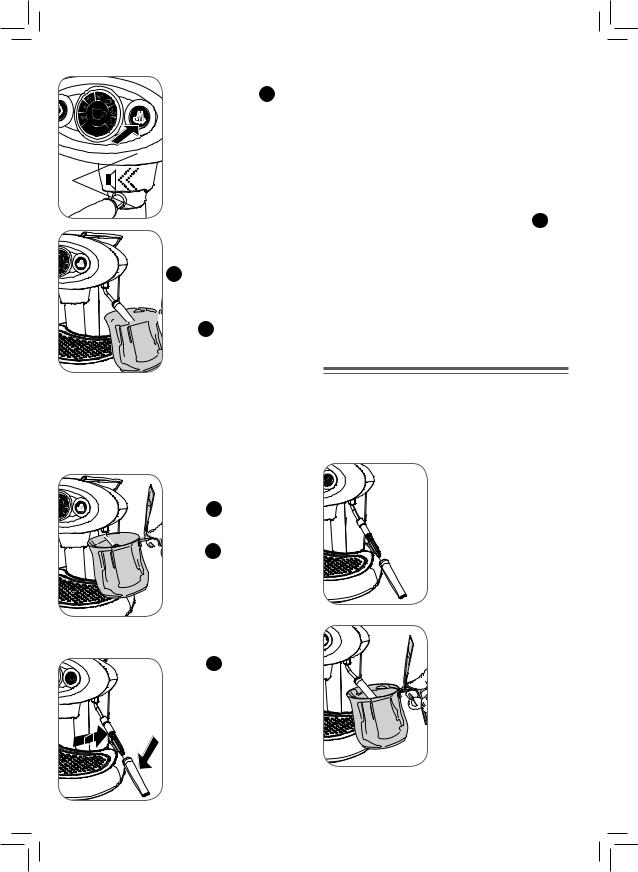
Premere il pulsante vapore  ; l’icona vapore posta sulla corona centrale si illumina per indicare che la macchina si sta predisponendo per la funzione vapore.
Quando la macchina raggiunge la temperatura di funzionamento, il pulsante si accende.
In questa fase la macchina emette un segnale sonoro.
Inserire un contenitore idoneo (pre-
feribilmente metallico) vuoto sotto
alla lancia di erogazione vapore e
premere il pulsante  per far
uscire l’acqua residua; quando
esce solo vapore premere nuova-


 mente il pulsante.
Nota: Durante l’erogazione del vapore il pulsante  lampeggia.
-Versare il latte fresco da frigorifero in un contenitore idoneo (preferibilmente metallico).
Nota: Per un risultato ottimale: versare 75ml di latte freddo intero prelevato dal frigorifero in un contenitore (preferibilmente metallico) e tenere immersa la lancia vapore nel latte per un tempo massimo di 25 secondi.
Immergere completamente la lan-
cia vapore nel latte.
Premere il pulsante  ed atten-
 dere la formazione della schiuma.


 Quando si è raggiunto il risultato


 richiesto, premere nuovamente il
  pulsante
  .
.
8
Nota: Le due componenti del terminale vapore si possono lavare anche in lavastoviglie, in questo caso sfi lare anche la parte interna dal tubo metallico. Dopo la pulizia, inserire la parte interna X sul tubo vapore fi no a fi ne corsa, successivamente inserire il tubo esterno Z.
Attenzione:
-Il contatto con il vapore e con la lancia vapore provoca gravi ustioni.
-Dopo circa 5 minuti di mancato utilizzo del vapore, la
macchina si riporta automaticamente in posizione caf-
fè; un minuto prima di questo passaggio il pulsante  lampeggia. Nel caso si voglia erogare ancora vapore, premere il pulsante.
-Durante la fase di riscaldamento e di permanenza in stato vapore, la macchina effettua riscaldamenti nel termoblocco che possono generare lievi fuoriuscite di vapore dal porta capsula inferiore: evitare quindi di mantenere gli arti o altre parti del corpo in prossimità della zona di erogazione caffè onde prevenire possibili scottature.
PREPARAZIONE DI ACQUA CALDA
La lancia vapore di cui è provvista la macchina, consente anche di erogare l’acqua per la preparazione di te e tisane.
Verifi care che il pulsante caffè sia illuminato. Procedere come segue:
Pulire la lancia di erogazione vapore da eventuali residui di latte.
-Dopo ogni utilizzo, si consiglia di pulire accuratamente la lancia vapore dai residui di latte:
Premere per qualche secondo il pulsante  .
.
Successivamente premere nuovamente il pulsante  .
.
X |
|
Attendere qualche minuto che si |
|
Z |
raffreddi. |
||
|
|||
|
|
Sfi lare la parte esterna Z e lavarla con acqua corrente.
Pulire la parte interna X con un panno umido.
Posizionare un recipiente metallico sotto la lancia vapore.
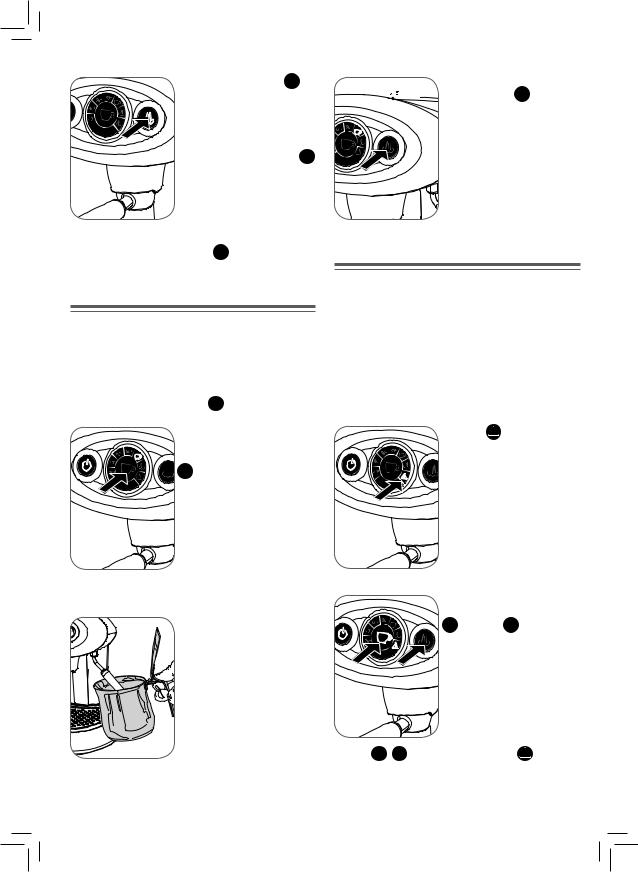
Premere il pulsante vapore  per almeno 3 secondi.
La macchina inizia ad erogare acqua calda, il pulsante vapore  lampeggia velocemente.
Premere nuovamente il tasto vapore  una volta raggiunta la quantità di acqua desiderata.
|
|
|
|
|
|
|
|
|
|
|
|
|
|
|
|
|
|
|
|
|
|
|
|
|
|
|
|
9 |
IT |
|
|
|
||
Mantenere premuto per 3 secondi 


 il pulsante vapore
  .
.
Viene erogata una quantità di acqua calda programmata; al termine l’erogazione si ferma automaticamente.
PREPARAZIONE DI UN CAFFÈ DOPO L’EROGAZIONE DI VAPORE
É molto importante evitare di preparare un espresso subito dopo aver erogato vapore perchè l’acqua generata dal termoblocco è troppo calda e compromette il gusto del caffè.
Per questo motivo il pulsante caffè  è disattivato quando la temperatura del termoblocco è troppo alta.
Per tornare alla modalità caffè, premere il pulsante erogazione caffè ed attendere l’accensione del tasto 

 ; durante questa fase di raffreddamento (circa 10 minuti), l’i- cona della tazzina sulla corona
centrale lampeggia.
Per riportare più velocemente la macchina alla modalità caffè (circa 1 minuto) procedere come segue:
Posizionare un recipiente metallico sotto la lancia vapore.
DECALCIFICAZIONE
La formazione di calcare è la naturale conseguenza dell’utilizzo della macchina.
La macchina è dotata di un programma automatico che consente di ottimizzare la pulizia e di rimuovere i residui di calcare dal suo interno.
Nota: usare solo prodotti decalcifi canti per macchine da caffè. Seguire la procedura indicata di seguito, non le istruzioni specifi cate sulla confezione del decalcifi cante.
Se l’icona  posta sulla corona circolare lampeggia (1 lampeggio ogni due secondi) procedere come segue:
Avvio della procedura:
 Tenere premuti contemporaneamente il pulsante erogazione caffè
  e vapore
  per almeno 5 secondi.
I pulsanti  ,
, e l’icona posta sulla corona
  lampeggiano contemporaneamente per segnalare che il ciclo automatico di decalcifi cazione è stato selezionato.

10
-Estrarre e riempire il serbatoio con 1 litro di acqua (fi no al livello MAX) .
-Versare nel serbatoio pieno d’acqua il prodotto per la decalcifi cazione fornito con la macchina; attendere che si sciolga.
-Togliere capsula e porta capsula.


 1
1
 Litro
Litro


La macchina cioè deve essere sottoposta ad un ciclo di risciacquo, procedendo come segue:
-Sfi lare e pulire accuratamente il serbatoio; riempirlo con 1 litro di acqua fresca (fi no al livello MAX).


 1
1
 Litro
Litro


-Inserire sotto il gruppo di erogazione un recipiente vuoto della capacità di almeno 1 litro.
-Ruotare la lancia vapore verso il recipiente, uscirà acqua dal gruppo caffè che dalla lancia vapore.
-Premere il pulsante  .
.
In questa fase il pulsante  e l’icona posta sulla corona
  lampeggiano contemporaneamente per indicare l’inizio del ciclo di risciacquo dei circuiti interni della macchina.
-Inserire sotto il gruppo di erogazione un recipiente vuoto della capacità di almeno 1 litro.
-Ruotare la lancia vapore verso il recipiente, uscirà acqua dal gruppo caffè che dalla lancia vapore.
-Premere il pulsante  .
.
In questa fase il pulsante  e l’icona posta sulla corona
  lampeggiano contemporaneamente per indicare l’inizio del ciclo di decalcifi cazione della durata di circa 30 minuti.
-Al termine del ciclo la macchina emette un segnale acustico.
Il pulsante  e l’icona posta sulla corona
  iniziano a lampeggiare insieme gli altri segnali già presenti.
A questo punto è necessario pulire i circuiti interni della macchina da eventuali residui di decalcifi cante.
-Al termine del ciclo di risciacquo tutte le segnalazioni lampeggianti si spengono e viene emesso un segnale sonoro.
-Rimuovere il contenitore dell’acqua raccolta sotto il gruppo erogazione e lavarlo accuratamente.
-Riempire nuovamente il serbatoio dell’acqua.
-Da questo momento la macchina è pronta all’uso.
ATTENZIONE:
-Se durante la procedura di decalcificazione dovesse mancare tensione di rete, sarà necessario ripetere il ciclo dall’inizio.
-Se le procedure di decalcificazione non vengono eseguite il calcare può provocare difetti di funzionamento non coperti da garanzia. Si consiglia di usare il prodotto per la decalcificazione fornito con la macchina.
-Non usare aceto, lisciva, sale, acido formico poiché danneggiano la macchina.
|
|
|
|
|
|
|
|
|
|
|
|
|
|
|
|
|
|
|
|
|
|
|
|
|
|
|
|
11 |
IT |
|
|
|
||
La soluzione decalcificante deve essere smaltita secondo quanto previsto dalle norme in vigore.
PULIZIA E MANUTENZIONE
La pulizia della macchina e dei suoi componenti deve essere eseguita almeno una volta alla settimana.
Non utilizzare l’acqua rimasta nel serbatoio per alcuni giorni; lavarlo e riempirlo giornalmente con acqua fresca potabile.
Non utilizzare alcool etilico, solventi, spugne abrasive e/o agenti chimici aggressivi.
Attenzione: non asciugare la macchina e/o i suoi componenti in un forno a microonde e/o un forno convenzionale.
Per la pulizia della macchina procedere come segue:
Spegnere la macchina e scollegare la spina dalla presa di corrente.
Estrarre il serbatoio ed il coperchio 
 e lavarli con acqua corrente.
Vuotare il porta capsula e lavarlo con acqua corrente.
-Estrarre la griglia e lavarla con acqua tiepida .
-Estrarre il cassetto raccogli gocce e lavarlo con acqua tiepida.
-Estrarre la parte terminale esterna della lancia erogazione vapore.
-Estrarre la parte interna della lancia erogazione vapore dal tubo metallico.
-Dopo aver separato i due componenti, lavarli separatamente con acqua tiepida.
-Dopo aver lavato i componenti inserire la parte interna sul tubo metallico e successivamente inserire la parte esterna.
Nota: quando si riposizionano la parte terminale interna ed esterna della lancia vapore, inserirle fi no a fi ne corsa.
|
12 |
PROBLEMA |
SOLUZIONE |
|
|
Premo sul tasto ma non si |
Verifi care la connessione elettrica alla rete; verifi care lo stato degli interruttori di protezione della rete do- |
illumina. |
mestica. |
|
|
La macchina non eroga caffè.
Eseguire le seguenti operazioni:
-Riempire il serbatoio d’acqua; assicurarsi del suo completo inserimento.
-Togliere il porta capsula dal gruppo erogazione caffè.
-Attendere che il pulsante  sia acceso (macchina pronta ad erogare).
-Mettere un recipiente sotto il gruppo caffè e premere il pulsante d’erogazione caffè.
-Erogare acqua per alcuni secondi.
-Interrompere l’erogazione
-Inserire una nuova capsula nel porta capsula e agganciare all’erogatore; procedere con l’erogazione del caffè.
Premo il pulsante  e la macchina non eroga vapore.
Il vapore esce, ma il latte non viene montato.
Caso a) Se è accesa l’icona vapore sulla corona circolare attendere l’accensione del pulsante vapore.
Caso b)
Se non è accesa l’icona vapore sulla corona circolare, premere il pulsante vapore ed attendere l’accensione del pulsante vapore (riscaldamento).
Caso c)
Possibile ostruzioni dell’erogatore: spegnere la macchina; attendere che sia fredda (almeno un’ora); rimuovere eventuali ostruzioni dai fori di uscita della lancia vapore.
Perdita acqua dal gruppo durante l’erogazione
Inserire una nuova capsula nel porta capsula; agganciare ruotando il manico fi no alla posizione d’arresto e procedere con l’erogazione del caffè.
|
|
|
Eseguire le seguenti operazioni: |
|
|
|
Impulsi |
acustici |
veloci e icona |
- Spegnere la macchina. |
|
|
|
- Riempire il serbatoio dell’acqua. |
|
|
||||
trialgolare lampeggiante |
|
|
||||
- Mettere un recipiente in corrispondenza della lancia vapore e premere il tasto |
. |
|||||
|
|
|
||||
|
|
|
- Accendere la macchina ed attendere circa 10 secondi che il tasto |
si accenda. |
|
|
|
|
|
|
|
|
|
Icona |
triangolare |
lampeggiante |
Effettuare il ciclo ci decalcifi cazione |
|
|
|
velocemente |
|
|
|
|||
|
|
|
|
|||
|
|
|
|
|
|
|
Fuoriuscita di acqua dall’interno
Spegnere la macchina e disinserire la spina dalla presa di corrente.
della macchina
Fuoriuscita di acqua dal serbatoio dopo averlo riempito
Vuotare il serbatoio, premere sulla guarnizione in gomma trasparente della valvola di innesto all’interno del serbatoio.
Escono gocce di caffè dalla cap-
sula durante i primi istanti di ero- L’eventuale sgocciolamento durante i primi secondi di erogazione sono da considerarsi normali. gazione
N.B. Se il problema persiste, contattare un centro assistenza autorizzato.
13
RACCOMANDAZIONI
Per gustare un espresso di elevata qualità ricordare di:
IT
-Cambiare l’acqua nel serbatoio e vuotare la vasca raccogli gocce almeno una volta alla settimana
-Usare possibilmente acqua a basso tenore di calcare per Smaltimento di apparecchiature elettriche ed elettroniche usa-
ridurre i depositi all’interno della macchina
-Utilizzare tazzine calde.
L’apparecchiatura è intesa per uso domestico e per applicazioni simili, quali
-cucine per il personale di negozi, uffi ci ed altri ambienti lavorativi;
-agriturismo
-clienti in alberghi, motel ed altri alloggi di tipo residenziale;
-ambienti tipo bed & breakfast.
LIMITAZIONI SULLA GARANZIA
La garanzia non copre guasti causati da:
te, da parte di privati nell’Unione Europea.
Il simbolo RAEE utilizzato per questo prodotto indica che quest’ultimo non deve essere smaltito assieme agli altri rifi u- ti domestici, ma deve essere oggetto di “raccolta separata”. L’utente privato ha la possibilità di riconsegnare gratuitamente al distributore, in ragione di uno contro uno, l’apparecchiatura usata all’atto dell’acquisto di una nuova.
Per ulteriori informazioni sui punti di raccolta delle apparecchiature da rottamare, si consiglia di contattare il proprio comune di residenza, il servizio di smaltimento dei rifi uti locale o il negozio presso il quale è stato acquistato il prodotto. È responsabilità dell’utente provvedere allo smaltimento secondo le normative vigenti, ed il non rispetto delle disposizioni di legge può essere sanzionato.
Lo smaltimento corretto di questo prodotto contribuirà a proteggere l’ambiente, le risorse naturali e la salute umana.
-una non periodica decalcifi cazione.
-funzionamento con voltaggio diverso da quello prescritto sulla targhetta dati (vedi capitolo PARTI DELLA MACCHINA).
-uso improprio o non conforme alle istruzioni
-modifi che apportate internamente
La garanzia non copre i costi di riparazione su macchine manipolate da centri d’assistenza non autorizzati.
Tali costi saranno totalmente a carico del cliente.
Si consiglia di:
-non mettere la vasca raccogli gocce in lavastoviglie
-mantenere il fondo dell’interno della colonnna porta serbatoio sempre asciutto.
La mancata osservazione di questi punti potrebbe creare dei problemi alla carrozzeria non coperti da garanzia.
ATTENZIONE:
Si consiglia di conservare l’imballo originale (almeno per il periodo di garanzia ) per eventuale invio della macchina a centri di assistenza autorizzati.
Gli eventuali danni dovuti ad un trasporto senza imballo adeguato non sono coperti da garanzia.

14
GENERAL OPERATING
INSTRUCTIONS
Carefully read the instruction manual and warranty limitations.
The machine must be connected to a grounded power outlet.
The machine must be kept clean by frequently washing the grill, the drip tray, the capsule holder, the tank and the steam wand.
EXTREMELY IMPORTANT: never immerse
the machine in water or put it in the dishwasher. The water contained in the
tank must be replaced regularly.
Do not use the machine if the tank is empty. After changing the water, place the tank back in the machine, making sure it is inserted
all the way.
We recommend descaling the machine at least every 2 months using a descaling
agent made especially for espresso machines. See instructions in the DESCALING chapter. The machine is outfitted with a valve that maintains constant pressure, for this
reason some water may drip from the capsule holder.
INDEX |
|
|
|
MACHINE PARTS .................................................................... |
15 |
|
IMPORTANT SAFEGUARDS ..................................................... |
16 |
|
USING THE ESPRESSO MACHINE.......................................................... |
16 |
|
INSTALLATION OF THE ESPRESSO MACHINE ........................................ |
16 |
|
CLEANING THE ESPRESSO MACHINE.................................................... |
16 |
|
TROUBLESHOOTING ............................................................................ |
16 |
|
IMPROPER USE OF THE APPLIANCE...................................................... |
17 |
INSTALLATION AND START-UP OF ESPRESSO MACHINE........... |
17 |
|
|
TURNING ON/OFF.................................................................... |
18 |
|
STAND-BY........................................................................................... |
18 |
|
MAKING COFFEE..................................................................... |
18 |
SETTING THE QUANTITY OF COFFEE IN A CUP.......................... |
19 |
|
|
PREPARING CAPPUCCINO........................................................ |
19 |
|
PREPARING HOT WATER ......................................................... |
20 |
PREPARING COFFEE AFTER GENERATING STEAM ..................... |
21 |
|
|
DESCALING ............................................................................ |
21 |
|
CLEANING AND MAINTENANCE................................................ |
23 |
|
RECOMMENDATIONS .............................................................. |
25 |
|
TROUBLESHOOTING................................................................ |
24 |
|
WARRANTY LIMITATIONS ........................................................ |
25 |
TECHNICAL DATA
Casing: PC+ABS (EU), PC (USA)
Internal thermo block: steel
Water tank: 1.0 liters (33.8 ounces)
Pump: 15 bar
Coffee pressure during extraction: 15 bar
Size: 200 x 340 x 350 mm (7.9 w x 13.4 d x 13.8 h”) 2 solenoid valves
Electronic card with the following functions:
-automatic coffee shut off (volume programmable)
-high-precision temperature control (coffee and steam)
-descaling treatment indicator
-boiler temperature indicator
-beeper
-automatic descaling program
-power save
Steam wand
Cup warmer rail
Weight without packaging: 9 Kg
Voltage: 230 V, 50 Hz (EU); 120 V, 60 Hz (USA)
Power: 1200W (EU), 1200W (USA)
Power consumed in power off mode: <1W
The A-weighted sound pressure level is below 70 dB
The manufacturer reserves the right to make changes or improvements without notice.

|
|
|
|
|
|
|
|
|
|
|
|
|
|
|
|
|
|
|
|
|
|
|
|
|
|
|
|
|
|
|
|
|
|
|
|
|
|
|
|
|
|
|
|
|
15 |
|
|
EN |
|
|
|
|||
|
|
|
|
|
|
|
|
|
|
|
|
|
|
|
|
|
|
|
|
|
|
MACHINE PARTS |
|
|
|
|
|
|
|
|
|
|
A |
TEMPERATURE INDICATOR LIGHT |
I |
CAPSULE HOLDER |
|
|
|
||||
|
(indicates the machine status) |
|
(for “Metodo Iperespresso” capsules) |
|
|
|
||||
B |
MAIN ON/OFF SWITCH |
L |
CUP HOLDER |
|
|
|
||||
C |
COFFEE BREW BUTTON |
M |
INTERNAL BEEPER |
|
|
|
||||
|
(starts and stops coffee fl ow) |
|
(emits an audible signal to the user) |
|
|
|
||||
D |
COFFEE BREW HEAD |
N |
POWER CORD |
|
|
|
||||
E |
TRAY FULL FLOAT |
O |
STEAM WAND |
|
|
|
||||
F |
CUP GRILL |
P |
WATER TANK |
|
|
|
||||
G |
STEAM BUTTON |
Q |
DATA PLATE (on bottom) |
|
|
|
||||
HDRIP TRAY (placed beneath cup grill)
A |
|
B |
G |
C |
|
D |
|
E |
|
F |
H |
|
I |
|
L |
|
M |
O
P
N
Q
16
IMPORTANT SAFEGUARDS
When using electrical appliances always follow the safety precautions below.
-The appliance is only to be installed in locations where it can be overseen by trained personnel.
-To reduce the risk of injury, do not drape cord over the counter top or table top where it can be pulled on by children or tripped over unintentionally.
Using the espresso machine
-Read all Instructions.
-This machine is intended for household use only. Any other use is considered improper and therefore dangerous.
-Unplug the power cord from the electrical socket when the machine is not in use.
-Do not touch hot surfaces. Use handles and knobs.
-This machine is manufactured to “make espresso coffee” and “prepare hot beverages”: use care to prevent scalding due to water spray or any improper use of the machine.
-The machine is not designed to be used by people (including children) with limited physical, mental or sensory abilities or insuffi cient experience and/or skills, unless they are supervised by a person responsible for their safety, who provides instructions on how to use the appliance.
-Children must be kept under supervision to prevent them from playing with the appliance.
-Use the machine indoors only and away from atmospheric agents.
-To protect against fi re, electric shock or personal injury do not immerse the cord, plug or body of the machine in water or any other liquid.
-Do not use the machine for purposes other than those for which it was designed.
-Do not place the machine on, or near, electrical or gas burners or inside a hot oven.
-The machine must be turned on only when being used. After use it must be turned off by pressing the on/off button  and unplugged from the power outlet.
-Before unplugging the machine make sure that the on/off button is off (unlit).
-Using attachments
not recommended by the manufacturer may result in fi re, electric shock or personal injury.
- Do not let the cord hang over tables or countertops or touch hot surfaces.
- The appliance has to be placed in a horizontal position.
Installation of the espresso machine
-Read the instructions carefully.
-Do not install the machine in an area where the temperature may reach 0°C/30°F or lower (if water freezes, the appliance may be damaged) or higher than 40°C/140°F.
-Check that the electrical voltage used corresponds to the requirements indicated on the machine data plate. Connect the machine only to a properly grounded power outlet with a minimum rating of 6 A for models powered at 230 Vac, and 12 A for models powered at 120 Vac.
-If the plug and the outlet are not compatible, have the plug replaced with a proper one by an authorized service center (applies to 208 volt machines ).
-Place the machine on a countertop away from water taps and sinks.
-After removing the packaging, check that the appliance is in perfect condition before installation.
-Do not leave the packaging materials the machine within children’s reach.
Cleaning the espresso machine
-Make sure the machine is off; the on/off button  must be unlit.
-Unplug the machine.
-Wait until the machine is cool before cleaning.
-Clean the body and attachments with a wet cloth and then wipe with a non-abrasive dry cloth. It is recommended not to use detergents.
-Do not expose the machine to water spray or immerse it in water, partially or fully.
Troubleshooting
Do not use the appliance if the cord or plug are damaged, if the appliance shows signs of malfunctioning or has been damaged in any way. Take the machine to the nearest authorised service center for checks or repairs.
If the power cord is damaged it must be replaced by the manufacturer or an authorised service center.
IMPORTANT: SAVE THESE INSTRUCTIONS.

17 |
EN |
In case of damage or malfunction, turn off the appliance and do not tamper with it. For repairs contact a service center authorised by the manufacturer and request the use of original spare parts only. Failure to comply with these instructions may compromise safe operation of the machine and will result in the forfeiture of warranty rights.
Improper use of the appliance
-This appliance is intended for household use only. Any other use is to be regarded as improper and therefore dangerous.
-The manufacturer is not liable for accidents caused by noncompliance with existing legislation on electrical grounding systems.
-The manufacturer is not liable for possible damage caused by improper, incorrect or unreasonable use.
INSTALLATION AND START-UP OF ESPRESSO MACHINE
Before connecting the machine to a power supply, carefully read the safety instructions given in the chapter: “IMPORTANT SAFEGUARDS”.
Make sure that the machine is unplugged.
Pull the water tank out of the machine and fi ll it with fresh drinking water until the MAX mark is reached.
Caution: always fill the tank with fresh, still drinking water only. Hot water or other liquids may damage
the tank. Do not use the machine without water.
Fit the tank to the machine, making sure it is fully inserted in place.
Insert the plug into the outlet. Consult the following chapter to switch on the appliance.
|
|
Note: it is advisable to keep the ori- |
|
|
|
ginal packaging (at least for the |
|
|
|
duration of the warranty period) in |
|
|
|
order to ship the machine to an au- |
|
D |
|
thorised service center for repair if |
|
O |
necessary. |
||
|
|||
|
I |
|
Caution.
While the machine is operating, contact with the brew head D, the steam wand O or the metal part of the capsule holder may cause burns.
Insert the capsule holder from below and turn it to the right until it locks into place.
18
TURNING ON/OFF
Before switching on the machine check the water level in the tank; if necessary add water as described previously.
Empty and rinse out the drip tray every time you fi ll the water tank.
To switch the machine on, press the  button until it lights up.
The icons in the circle will light up progressively to indicate the increase in the boiler temperature.
After a few minutes, when the machine reaches the operating temperature, the brew button symbol will light up and a brief beep will be emitted.
If the triangular symbol  lights up and an intermittent beep is emitted, please consult the chapter: “PROBLEMS AND SOLUTIONS”.
 Note: When using the machine for the fi rst time or after a long period


 of disuse, we suggest dispensing a few cups of water without capsule.
To switch the machine off, press the  button until the front panel


 goes off; never disconnect the plug
from the power outlet when the machine is switched on.
Stand-by

 The machine has been programmed to respect the environment and reduce consumption when it is


 not being used.
When it is not in use, after 30 minutes the machine will switch off automatically.
 5 minutes before automatic switch off, the
  button will fl ash. If you want to machine to stay on, press
  the button.
MAKING COFFEE
The X7.1 machine is designed to function exclusively with illy “Metodo Iperespresso” capsules.
To make coffee, carry out the following steps:
-Turn the capsule holder to the left and remove it from the brew head.
-Insert the capsule as shown in the fi gure.
Note: the capsule should slide easily into place; if this is not the case take it out and reposition it correctly.
Note: coffee will start fl owing out a couple of seconds after you press the button; this is normal for the operation of the machine.
|
|
|
|
|
|
|
|
|
|
|
|
|
|
|
|
|
|
|
|
|
|
|
|
|
|
|
|
19 |
EN |
|
|
|
||
-Insert the capsule holder in the brew head; turn the handle to the right until it locks into place.
-Check that the coffee button is lit.
-Press and release the coffee button  ; the machine will brew the programmed quantity of coffee. To stop the fl ow in advance, press the button again.
To make other coffees, remove the used capsule and repeat the above steps.
Warning:
-The capsules are single-dose and cannot be used to make two coffees.
-To ensure greater safety, the machine automatically stops flow after approximately one minute.
-Remember to empty and clean the drip tray frequently.
-Press the coffee button and keep it pressed until the coffee has reached the desired level. Release the button. The machine is now programmed.
MANUAL MODE - to set the machine to work in the manual mode, carry out the following steps:
-Insert a capsule into the capsule holder and then fi t the latter to the brew head.
-Place a cup beneath the capsule holder.
-Press the coffee button and keep it pressed until the machine automatically stops dispensing coffee. Release the button. In this case the programming has been cancelled.
Note: in the automatic mode it is also possible to make coffee using the manual procedure.
-Press the coffee button for about 3 seconds;
-Press the coffee button again to stop the fl ow;
-In this manner you will not change the quantity of coffee initially programmed.
Note: when the machine is set for MANUAL MODE of the quantity of coffee, after you start brewing it will be necessary to press the coffee button again when the coffee has reached the desired level in the cup in order to stop the fl ow.
SETTING THE QUANTITY OF COFFEE IN A CUP
The X7.1 machine allows you to brew the desired quantity of coffee in two modes: automatic and manual.
AUTOMATIC MODE - to set and memorise the quantity of coffee to be brewed, carry out the following steps:
-Insert a capsule into the capsule holder and then fi t the latter to the brew head.
-Place a cup beneath the capsule holder.
PREPARING CAPPUCCINO
The machine features a steam wand for frothing the amount of milk necessary to prepare one or more cappuccinos.
Prepare one or more cups of coffee following the instructions in the previous section.
Froth the milk as follows:
Press the steam button  ; the steam icon in the central circle will light up to signal that the machine is getting ready to dispense steam.
20
When the machine reaches the right temperature, the  button will light up.
At this point the machine will emit a brief beep.
Place a suitable empty container
(preferably a metal pitcher) bene-
ath the steam wand and press the
 button to discharge any resi-
dual water; when only steam co-
mes out press the button again.


 Note: while steam is being dispen-


 sed the
  button will fl ash.
Note: The two end parts of the steam wand can also be washed in a dishwasher; in this case also remove the inside part from the metal tube. After cleaning, fi t the inside part X all the way onto the steam wand; then fi t the outer part Z.
Warning:
-Contact with steam and with the steam wand may cause severe burns.
-If no steam is dispensed, after about 5 minutes the
machine will automatically switch back to the coffee
brewing mode; a minute before this occurs the  button will flash. If you want to dispense more steam, press the button.
-While the machine is warming up and as long as it remains in the steam mode, it carries out heating cycles in the boiler which may cause small amounts of steam to be discharged from the capsule holder: therefore, keep limbs and other parts of the body away from the coffee brew zone in order to avoid scalding.
-Pour refrigerated milk into a suitable container (preferably a metal pitcher).
Note: For an optimal result: pour 75ml of cold whole milk taken directly from the fridge into a container (preferably a metal pitcher) and keep the steam wand submerged in the milk for a maximum of 25 seconds.
Submerge the steam wand com-
pletely into the milk.
Press the  button and wait for
 the milk to froth.


 On reaching the desired result,


 press the
  button again.
-After each use, you should thoroughly clean the steam wand of milk residue:
Press the  button for a few seconds.
Then press the button again.
|
Wait a few minutes for the wand to |
X |
cool down. |
|
Z Remove the outer part Z and wash it under running water.
Wipe the inside part X clean with a wet cloth.
PREPARING HOT WATER
The steam wand of the machine can also be used to dispense hot water for making tea and infusions.
Check that the coffee button is lit. Carry out the following steps:
Clean the steam wand of any milk residues.
Place a metal pitcher beneath the steam wand.
|
21 |
|
EN |
Press the steam button |
for at |
Keep the steam button |
pres- |
least 3 seconds. |
|
sed down for 3 seconds. |
|
The machine will start dispensing hot water; the steam button  ”will fl ash rapidly.
A programmed quantity of hot water will be dispensed; the fl ow will stop automatically.
Press the steam button  again on reaching the desired quantity of water.
PREPARING COFFEE AFTER GENERATING STEAM
It is very important to avoid making coffee right after dispensing steam because the water generated by the thermo block is too hot and will impair the fl avor of the coffee.
For this reason the coffee button  is disabled when the thermo block temperature is too high.
To switch the machine back to the coffee mode, press the coffee button and wait until the  button lights up; during this cooling down phase (approximately 10 minutes), the cup icon in the central circle will fl ash.
DESCALING
The formation of limescale is a natural consequence of using of the machine.
The machine features an automatic program designed to optimise cleaning and remove limescale residues from inside the machine.
Note: use only descaling products intended for coffee machines.Please follow the procedure described below, not the instructions on the label of the descaling product.
If the  icon in the central circle fl ashes (1 fl ash every two seconds) proceed as follows:
To switch the machine back to the coffee mode quickly (approximately 1 minute), carry out the following steps:
Place a metal pitcher beneath the steam wand.
Starting the procedure:
 Keep the coffee button
  and steam button
  pressed down together for at least 5 seconds.
The  and
and  buttons and the
  icon in the circle will fl ash simultaneously to signal that the automatic descaling cycle has been selected.
22
-Take out and fi ll the tank with 1 litre of water (up to the MAX level).
-Introduce the descaling product supplied with the machine into the tank full of water; wait for it to dissolve.
-Remove the capsule and capsule holder.


 1
1
 Liter
Liter


-Place an empty container with a capacity of at least 1 litre beneath the brew head.
-Turn the steam wand toward the container; water will fl ow out both from the brew head and the steam wand.
-Press the button.
The  button and the
  icon in the circle will fl ash simultaneously to signal the beginning of the descaling cycle, which lasts about 30 minutes.
-At the end of the cycle the machine will emit a beep The
 button and the
  icon in the circle will start fl ashing together with the other signals already present.
At this point it is necessary to clean the internal water circuit of the machine of any residues of the descaling agent.
That is, the machine must be run through a rinse cycle; carry out the following steps:
-Remove the tank and clean it thoroughly; fi ll it with 1 litre of fresh water (up to the MAX level).


 1
1
 Liter
Liter


-Place an empty container with a capacity of at least 1 litre beneath the brew head.
-Turn the steam wand toward the container; water will fl ow out both from the brew head and the steam wand.
-Press the button.
The  button and the
  icon in the circle will fl ash simultaneously to signal the beginning of the cycle for rinsing the internal water circuit of the machine.
-At the end of the rinse cycle all the fl ashing signals will go off and a beep will be emitted.
-Remove the water collection container from beneath the brew head and wash it thoroughly.
-Refi ll the water tank again.
-Now the machine is ready for use.
WARNING:
-Should a mains power failure occur during the descaling procedure, it will be necessary to repeat the cycle from the start.
-If descaling is not performed as needed, scale build-up may cause malfunctioning not covered by the warranty. It is advisable to use the descaling agent supplied with the machine.
-Do not use vinegar, lye, salt or formic acid because they may damage the machine.
|
|
|
|
|
|
|
|
|
|
|
|
|
|
|
|
|
|
|
|
|
|
|
|
|
|
|
|
23 |
EN |
|
|
|
||
The descaling solution must be disposed of in accordance with the applicable laws and regulations.
CLEANING AND MAINTENANCE
The machine and its components must be cleaned at least once a week.
Keep the water in the tank fresh; wash the tank and fi ll it daily with fresh drinking water.
Do not use ethyl alcohol, solvents, abrasive sponges and/or aggressive chemicals.
Caution: do not dry the machine and/or it components in a microwave or conventional oven.
To clean the machine, carry out the following steps:
Switch the machine off and disconnect the plug from the power  outlet.
Remove the water tank and wash it 
 under running water.
Empty out the capsule holder and wash it under running water.
-Remove the grill and wash it with warm water.
-Remove the drip tray and wash it with warm water.
-Remove the outer end part of the steam wand.
-Remove the inside part of the steam wand from the metal tube.
-After separating the two components, wash them separately with warm water.
-After washing the components fi t the inside part on the metal tube and then fi t the outer part.
Note: when you refi t the inside and outer end parts of the steam wand, make sure to push them up all the way.

|
24 |
TROUBLESHOOTING |
|
|
|
You press the |
button but it does not Check the mains electrical connection; check the status of the circuit breakers protecting the home |
light up. |
electrical system. |
|
|
The machine does not make coffee.
Carry out the following operations:
-Fill the water tank; make sure it is fi tted completely into place.
-Remove the capsule holder from the coffee brew head.
-Wait until the  button lights up (machine ready to brew).
-Place a container underneath the brew head and press the coffee button.
-Dispense water for a few seconds.
-Stop the fl ow.
-Insert a new capsule in the capsule holder and fi t it to the brew head; proceed with making coffee.
You press the  button and the machine does not dispense steam.
Steam comes out but it does not froth the milk.
Case a) If the steam icon in the circle is lit, wait until the steam button lights up.
Case b)
If the steam icon in the circle is not lit, press the steam button and wait until the steam button lights up (machine warming up).
Case c)
Possible clogging of the steam wand: switch off the machine; wait for it to cool down (at least an hour); remove any obstructions from the outlet holes of the steam wand.
Water leaks out of the brew head during
Insert a new capsule in the capsule holder and fi t it to the brew head; proceed with making coffee.
brewing.
|
Carry out the following operations: |
|
|
- Switch off the machine. |
|
Fast beeps and fl ashing triangular icon. |
- Fill the tank. |
|
|
- Place a container under the steam wand and press the |
button. |
|
- Switch on the machine and wait about 10 seconds for the |
button to light up. |
|
|
|
Triangular icon fl ashing rapidly. |
Carry out a descaling cycle. |
|
|
|
|
Water leaks from the inside of the ma-
Switch off the machine and unplug it.
chine.
Water leaks from the tank after you have
Empty the tank; press on the transparent rubber gasket of the coupling valve inside the tank.
fi lled it.
Some drops of coffee come out of the
capsule during the fi rst seconds of Any dripping that occurs during the fi rst seconds of brewing is to be considered normal. brewing.
Note: If the problem persists, contact an authorised service center.

25
RECOMMENDATIONS
EN
To enjoy a high quality espresso, remember to:
-Change the water in the tank at least once a week.
-If possible use water with a low calcium content to reduce scale build-up inside the machine.
-Used warmed cups.
This appliance is intended to be used in household and similar applications such as:
-staff kitchen areas in shops, offi ces and other working environments;
-farm houses;
-by client in hotels, motels and other residential type environments;
-bed and breakfast type environments.
WARRANTY LIMITATIONS
The warranty does not cover damage or malfunctions caused by:
Disposal of end-of-life electric and electronic equipment by private households in the European Union.
The WEEE symbol used on this product means that it must not be disposed of together with other domestic waste and should be collected separately. Consumers have the opportunity to hand in their used appliance to distributors free of charge on a 1:1 basis when they purchase a new product..
For further information about the collection of appliances to be scrapped, please contact the local authority in your town of residence, the local waste disposal service or the retailer where the product was purchased. Consumers are responsible for disposing of end-of-life appliances in accordance with the current provisions of law and non-compliance therewith may be subject to fi nes and criminal sanctions.
The correct disposal of this product will contribute to protecting the environment, natural resources and human health.
-failure to carry out periodic descaling.
-operation with a voltage that differs from the rating shown on the data plate (see chapter MACHINE PARTS).
-improper use or use that is not compliant with the instructions.
-internal modifi cations.
The warranty does not cover the costs of repairing machines that have been handled by non-authorised service centers.
Such costs shall be completely borne by the customer.
It is recommended:
-not to place the drip tray in a dishwasher
-to always keep the bottom of the inside of the column supporting the tank dry.
Failure to follow these recommendations may cause damage to the machine body which is not covered by the warranty.
WARNING:
It is advisable to keep the original packaging (at least for the duration of the warranty period) in order to ship the machine to a service center for repair if necessary.
Any damage caused by transport without adequate packaging will not be covered by the warranty.

26
RÈGLES GÉNÉRALES POUR L’UTILISATION DE LA MACHINE
Lire attentivement le manuel d’instructions et les limitations de la garantie.
La machine doit être branchée à une prise de courant dotée d’un dispositif de mise à la terre. Maintenir la machine bien propre en lavant fréquemment la grille, le bac de récupération, le porte-capsule, le réservoir, le tuyau de débit vapeur. TRÈS IMPORTANT: ne jamais plonger la machine dans l’eau ni l’introduire dans le lave-vaisselle. L’eau contenue dans le réservoir doit être régulièrement changée. Ne pas utiliser la machine sans eau dans le réservoir. Après avoir changé l’eau, insérer le réservoir dans la machine, en s’assurant qu’il est bien encastré.
On conseille d’utiliser au moins tous les deux mois un produit de détartrage spécialement étudié pour les machines à café espresso selon les indications du chapitre DÉTARTRAGE.
La machine est dotée d’une soupape qui permet de maintenir la pression constante; voilà pourquoi on pourra remarquer la perte de gouttes d’eau du porte-capsule.
SOMMAIRE |
|
|
PIÈCES COMPOSANT LA MACHINE .......................................... |
27 |
|
MESURES DE SÉCURITÉ IMPORTANTES ................................... |
28 |
|
|
UTILISATION DE L’APPAREIL ................................................................ |
28 |
|
INSTALLATION DE L’APPAREIL ............................................................. |
28 |
|
NETTOYAGE DE L’APPAREIL................................................................. |
28 |
|
EN CAS DE PANNE DE L’APPAREIL ....................................................... |
28 |
|
UTILISATION INAPPROPRIÉE DE L’APPAREIL ......................................... |
29 |
INSTALLATION ET MISE EN SERVICE DE L’APPAREIL................. |
29 |
|
|
ALLUMAGE ET ARRET ............................................................. |
30 |
|
VEILLE ................................................................................................ |
30 |
|
PREPARATION DU CAFE .......................................................... |
30 |
REGLAGE DE LA QUANTITE DE CAFE DANS LA TASSE............... |
31 |
|
|
PREPARATION DU CAPPUCCINO .............................................. |
31 |
PREPARATION DE L‘EAU CHAUDE............................................ |
32 |
|
PREPARATION D’UN CAFE APRES LE DEBIT DE LA VAPEUR....... |
33 |
|
|
DETARTRAGE.......................................................................... |
33 |
|
NETTOYAGE ET ENTRETIEN ..................................................... |
35 |
|
PROBLEME - SOLUTION .......................................................... |
36 |
|
RECOMMANDATIONS.............................................................. |
37 |
LIMITATIONS DE LA GARANTIE ................................................ |
37 |
|
CARACTERISTIQUES TECHNIQUES
Carrosserie: PC+ABS (EU), PC (USA)
Partie interne du thermobloc : acier
Réservoir d’eau: 1,0 liter
Pompe: 15 bars
Pression café pendant l’extraction: 15 bars
Dimensions: 200 x 340 x 350 mm
2 électrovalves
Platine électronique avec les fonctions suivantes:
-dosage automatique de l’écoulement de café
-contrôle de la température à haute précision (café et vapeur)
-indicateur détartrage
-indicateur température thermobloc
-avertisseur sonore
-programme de détartrage automatique
-fonction économie d’énergie
Buse-vapeur
Porte-tasses supérieur
Poids sans emballage: 9 Kg
Voltage: 230 V, 50 Hz (EU); 120 V, 60 Hz (USA)
Puissance: 1200W (EU), 1200W (USA)
Puissance consommée en hors tension: <1W
Le niveau de pression acoustique pondéré est inférieur à 70 dB
Le fabricant se réserve le droit d’apporter sans préavis toutes modifi cations ou améliorations.

|
|
|
|
|
|
|
|
|
|
|
|
|
|
|
|
|
|
|
|
|
|
|
|
|
|
|
|
|
|
|
|
|
|
|
|
|
|
|
|
|
|
|
|
|
27 |
|
|
FR |
|
|
|
|||
|
|
|
|
|
|
|
|
|
|
|
|
|
|
|
|
|
|
|
|
|
|
PIÈCES COMPOSANT LA MACHINE |
|
|
|
|
|
|
|
|
|
|
A |
PLAGE LUMINEUSE TEMPERATURE |
I |
PORTE-CAPSULE |
|
|
|
||||
|
(indique les états de l’appareil) |
|
(Metodo Iperespresso) |
|
|
|
||||
B |
INTERRUPTEUR GENERAL |
L |
PORTE-TASSES |
|
|
|
||||
C |
BOUTON CAFE |
M |
ELEMENT SONORE INTERNE |
|
|
|
||||
|
(active et désactive le débit de café) |
|
(émet un signal sonore pour avertir l’utilisateur) |
|
|
|
||||
D |
GROUPE CAFE |
N |
CABLE D’ALIMENTATION |
|
|
|
||||
E |
FLOTTEUR BAC PLEIN |
O |
BUSE-VAPEUR |
|
|
|
||||
F |
GRILLE SUPPORT TASSE |
P |
RESERVOIR D’EAU |
|
|
|
||||
G |
BOUTON VAPEUR |
Q |
PLAQUE SIGNALETIQUE (sous la base) |
|
|
|
||||
HBAC DE RECUPERATION EAU
(placé sous la grille de support tasse)
A |
|
B |
G |
C |
|
D |
|
E |
|
F |
H |
|
I |
|
L |
|
M |
O
P
N
Q

28
MESURES DE SÉCURITÉ IMPORTANTES
Lors de l’utilisation d’appareils électriques, il est nécessaire de toujours respecter les mesures de sécurité suivantes.
Utilisation de l’appareil
- Lire intégralement les instructions.
des lésions aux personnes.
-Ne pas laisser pendre le câble de la table ou du comptoir.
-La machine doit être placée en position horizontale.
-La machine doit être installée seulement dans des lieux qui puissent permettre le contrôle de la part de personnel expert.
-Pour prévenir le risque de blessures, ne pas laisser tomber le câble du plan de travail ou de la table car les enfants pourraient le tirer ou trébucher involontairement.
-Cet appareil n’est destiné qu’à un usage domestique. Tout autre usage est considéré comme inapproprié et par conséquent dangereux.
-Débrancher la fi che de la prise de courant quand l’appareil n’est pas utilisé.
-Ne jamais toucher une surface chaude. Utiliser les manettes et les touches.
-Cette machine est conçue pour “faire du café espresso” et pour “chauffer des boissons”: faire attention à ne pas se brûler avec les jets d’eau ou de vapeur, ou en utilisant la machine de façon inappropriée.
-Cet appareil ne doit pas être utilisé par des personnes (y compris les enfants) aux capacités physiques, sensorielles ou mentales réduites ou par des personnes sans expérience et/ou sans les compétences nécessaires, à moins qu’elles ne soient surveillées par une personne responsable de leur sécurité qui leur apprenne à utiliser l’appareil.
-Surveiller les enfants afin d’éviter qu’ils jouent avec l’appareil.
-Cet appareil ne doit être utilisé que dans des endroits fermés et à l’abri d’agents atmosphériques externes.
-Pour se protéger du feu, de toutes décharges électriques ou lésions, ne pas plonger le câble, la fi che et le corps de la machine dans l’eau ou tout autre liquide.
-Ne pas utiliser l’appareil pour des usages différents de ceux prévus.
-Ne pas poser l’appareil sur des réchauds électriques ou à gaz, ou dans un four chaud.
-L’appareil ne doit être allumé que lors de l’utilisation après
quoi il doit être éteint en appuyant sur le bouton d’allumage  et la fi che doit être retirée de la prise de courant.
- Avant de retirer la fi - che, veiller à ce que le bouton d’allumage  soit éteint, au-
trement dit non illuminé.
-L’utilisation d’accessoires non recommandés par le fabricant peut provoquer des incendies, des décharges électriques ou
Installation de l’appareil
-Lire attentivement les instructions.
-Ne jamais installer la machine dans un milieu pouvant atteindre une température inférieure ou égale à 0°C (si l’eau gèle, l’appareil peut s’endommager) ou supérieure à 40°C.
-S’assurer que la tension du réseau électrique correspond bien à celle indiquée sur la plaquette des caractéristiques de l’appareil. Ne brancher l’appareil qu’à une prise de courant ayant un débit minimal de 6A si alimentée à 230V et 12A si alimentée à 120V et dotée d’un dispositif effi cace de mise à la terre.
-En cas d’incompatibilité entre la prise et la fi che de l’appareil, s’adresser à un centre d’assistance autorisé pour remplacer la fi che avec une autre de modèle approprié.
-Placer l’appareil sur un plan de travail loin de robinets d’eau et éviers.
-Après avoir ôter l’emballage, s’assurer que l’appareil est intact avant de l’installer.
-Ne pas laisser à la portée des enfants les matériaux d’emballage de la machine.
Nettoyage de l’appareil
-Veiller à ce que l’appareil soit éteint. Le bouton d’allumage
 doit être éteint.
-Débrancher la fi che de la prise de courant.
-Laisser refroidir l’appareil avant d’effectuer le nettoyage.
-Nettoyer la carrosserie et les accessoires à l’aide d’un chiffon humide puis sécher soigneusement à l’aide d’un chiffon sec. Ne pas utiliser de produits détergents.
-Ne pas exposer l’appareil à des jets d’eau abondants ni le plonger totalement ou partiellement dans l’eau.
En cas de panne de l’appareil
Ne pas utiliser l’appareil si le câble ou la fi che sont endommagés ou si l’appareil ne fonctionne pas correctement ou s’il a subi un quelconque dommage. Rapporter l’appareil au centre de service après-vente agréé le plus proche pour le faire contrôler ou réparer.
Si le câble d’alimentation est endommagé, il doit être changé
ATTENTION: CONSERVER CES INSTRUCTIONS
29 |
FR |
par le fabricant ou par son centre de service après-vente.
En cas de panne ou de mauvais fonctionnement de l’appareil, l’éteindre et ne pas le manipuler. En cas d’éventuelles réparations, s’adresser exclusivement à un centre de service aprèsvente agréé par le fabricant et exiger les pièces détachées d’origine. Le non-respect de ce qui est indiqué ci-dessus peut compromettre la sécurité de l’appareil et faire perdre le droit à la garantie.
Utilisation inappropriée de l’appareil
-Cet appareil n’est destiné qu’à un usage domestique. Tout autre usage est considéré comme inapproprié et par conséquent dangereux.
-Le fabricant ne peut être considéré comme responsable en cas d’éventuels accidents provoqués par la non présence de l’installation électrique de la mise à la terre ou de sa non conformité aux normes en vigueur.
-Le fabricant ne peut être considéré comme responsable en cas d’éventuels dommages dérivant d’usages inappropriés, erronés et non raisonnables.
INSTALLATION ET MISE EN SERVICE DE L’APPAREIL
Avant de brancher l’appareil au réseau électrique, lire avec attention les normes de sécurité du chapitre MESURES DE SECURITE IMPORTANTES.
S’assurer que l’appareil est débranché du réseau électrique.
Extraire le réservoir d’eau en le tirant vers l’extérieur et le remplir d’eau fraîche potable jusqu’au repère MAX.
Attention : ne verser dans le réservoir que de l’eau fraîche potable non gazeuse. L’eau chaude ainsi que d’autres liquides pourraient endommager le réservoir. Ne pas mettre en service l’appareil s’il ne contient pas d’eau.
Introduire le réservoir dans l’appareil en veillant à ce qu’il soit complètement inséré.
Brancher la fi che dans la prise de courant. Consulter le chapitre suivant pour l’allumage.
|
|
Remarque : il est conseillé de gar- |
|
|
|
der l’emballage d’origine (du moins |
|
|
|
pendant la période de garantie) |
|
|
|
pour envoyer l’appareil aux centres |
|
D |
|
de service après-vente agréés en |
|
O |
cas de réparation. |
||
|
|||
|
I |
|
Attention :
Quand l’appareil est en service, le contact avec le groupe Café D, la buse-vapeur O et la partie métallique du portecapsule I peut causer des brûlures.
Insérer par le bas le porte-capsule et le tourner vers la droite jusqu’à la position d’arrêt.
30
ALLUMAGE ET ARRET
Avant d’allumer l’appareil, vérifi er le niveau de l’eau dans le réservoir, faire l’appoint si nécessaire comme illustré précédemment. Vider et rincer le bac de récupération d’eau à chaque remplissage du réservoir.
Pour allumer l’appareil, appuyer sur le bouton  jusqu’à ce qu’il s’allume.
Pour éteindre |
l’appareil, appuyer |
sur le bouton |
jusqu’à ce que le |


 panneau frontal s’éteigne. Il est re-
commandé de ne jamais débrancher la fi che de la prise de courant lorsque l’appareil est en service.
Veille

 L’appareil a été programmé dans le respect l’environnement et pour réduire la consommation d’énergie


 lorsqu’il n’est pas utilisé.
Après 30 minutes d’inactivité, l’appareil s’éteint automatiquement.
5 minutes avant de s’éteindre  automatiquement, le bouton
clignote. Si vous souhaitez que l’appareil reste allumé, appuyez 
 sur le bouton.
PREPARATION DU CAFE
Les icônes se trouvant sur la couronne circulaire s’allument progressivement pour indiquer l’augmentation de la température de l’eau dans le thermobloc.
Après quelques minutes, l’appareil signale que la température de service est atteinte en allumant le symbole du bouton Café et en émettant un bref signal sonore.
En cas d’activation du symbole triangulaire  et du signal sonore intermittent, consulter le chapitre PROBLEMES ET SOLUTIONS.
 Remarque : en cas de première utilisation ou d’inactivité pro-


 longée, il est conseillé de faire couler quelques tasses d’eau sans
capsule.
L’appareil X7.1 est conçu pour fonctionner exclusivement avec les capsules Metodo Iperespresso illy.
Pour préparer le café, procéder comme suit :
-Tourner vers la gauche le porte-capsule et le retirer du groupe Café.
-Placer la capsule comme illustré.
Remarque : la capsule doit entrer facilement, si cela n’est pas le cas, retirer la capsule et la replacer correctement.
Remarque : l’écoulement du café commence environ 2 secondes après avoir appuyé sur le bouton. Ceci est normal.
 Loading...