


W O R T H |
Please keep the video's guarantee sheet and receipt for your video in a safe |
place. |
k n o w i n g
Precautions
Read this booklet carefully.
Make sure the rating of your household electricity supply matches that shown on the back of the video recorder.
Read this page and the chapter and the "Setting up your video" to help you set up and adjust your video recorder.
Do not put the video recorder in a hot or humid place (to avoid the risk of fire and electric shock).
Do not open the video recorder. Get a qualified technician to carry out any repairs.
Do not connect the video recorder to the power supply if you have just moved it from a cold environment to a warm room. This can lead to condensation inside the video which can seriously damage the video and cassettes. Wait around two hours to allow it to reach room temperature.
Make sure the video is placed at least 10cm apart from other home appliances or obstacles to get sufficient ventilation.
This apparatus shall not be exposed to dripping or splashing and no objects filled with liquids, such as vases, shall be placed on top of the video.
Put the video on a steady, flat surface.
Only clean the video with a soft, lint-free cloth. Do not use harsh or alcoholbased cleaning agents.
Disposal of Used Electrical & Electronic Equipment
The meaning of the symbol on the product, its accessory or packaging indicates that this product shall not be treated as household waste. Please, dispose of this equipment at your applicable collection point for the recycling of electrical & electronic equipments waste. In the European Union and Other European countries which there are separate collection systems for used electrical and electronic product. By ensuring the correct disposal of this product, you will help prevent potentially hazardous to the environment and to human health, which could otherwise be caused by unsuitable waste handling of this product. The recycling of materials will help conserve natural resources. Please do not therefore dispose of your old electrical and electronic equipment with your household waste. For more detailed information about recycling of this product, please contact your local city office, your household waste disposal service or the shop where you purchased the product.
For your own safety!
There are no components in this video recorder you can service or repair yourself.
Do not open the case of the video recorder. Only allow a qualified engineer to repair or service your video.
This video recorder is designed to work continuously. Switching it off (onto stand-by) does not disconnect it from the mains. To disconnect it from the mains, you have to unplug it.
Batteries contain chemical substances, so they should be disposed properly. Please observe the local regulations regarding the disposal of packaging materials, exhausted batteries and old equipment.
Before you do anything with the video, please read the chapter "Setting up the video". |
|
Contents |
|
Setting up the video |
|
Connecting your video through RF lead, Connecting your video through a scart lead ......................... |
2 |
Connecting your video to the satellite system or DVB receiver, Connecting your video to the hi-fi |
|
system (Option 1), Connecting your video to the hi-fi system (Option 2)............................................... |
3 |
How to connect your video to another video, How to connect your video to a camcorder .................. |
4 |
Tuning your video to the TV using an antenna cable (RF cable) ............................................................. |
5 |
What to do if you get picture interference when using RF lead ........................................................... |
6 |
Tuning your video recorder to the television .......................................................................................... |
7 |
2nd scart socket...................................................................................................................................... |
8 |
Tuning in new stations |
|
Manual tuning.......................................................................................................................................... |
9 |
Station names........................................................................................................................................ |
10 |
Sorting programme locations, Clearing programme locations ............................................................ |
11 |
Front panel controls .............................................................................................................................. |
12 |
Playing cassettes |
|
Play ........................................................................................................................................................ |
13 |
Still, Variable picture search, Variable slow motion, |
|
Finding new recordings (index scan) ................................................................................................... |
14 |
16:9 Wide Screen format....................................................................................................................... |
15 |
CM skip (commercial skip), Auto Repeat, Child lock............................................................................ |
16 |
OSD (On Screen Display) On/Off, Setting time and date ..................................................................... |
17 |
Recording cassettes |
|
Recording cassettes, Simple recording, One touch recording-OTR .................................................... |
18 |
Timer recording using ShowView ....................................................................................................... |
19 |
Normal timer recording ....................................................................................................................... |
20 |
Timer review – changing and erasing record settings......................................................................... |
22 |
More functions |
|
Clock and counter display, Remaining time and cassette length, |
|
Finding the counter zero position .......................................................................................................... |
23 |
Resetting the counter to zero, Cassettes, Power-saving features, Language select ........................ |
24 |
The hi-fi system ..................................................................................................................................... |
25 |
Appendix |
|
Index, Technical information ................................................................................................................. |
26 |
Problem-solving guide ......................................................................................................................... |
28 |
QUICK START GUIDE FOR SORTING CHANNELS ON THE VCR ............................................................ |
29 |
Quick-start guide ..................................................................................................................... |
back cover |
On the following pages, the pictures show the buttons you need to press on the remote |
|
control and what you should see on the television screen or video display. |
|
|
1 |

|
The type of aerial you |
|
|
should use, depends on |
|
|
local interference and how |
|
Back view of your VCR |
far you are from the |
|
transmitter. You should |
||
|
||
|
contact a local retailer if |
|
AUDIO |
you have any questions |
|
about your aerial. |
||
L |
||
R |
||
|
This lead is supplied in your accessory kit.
If you have connected your video as shown in option 1, turn to page 6.
Setting up your video (Option 2) - Connecting your video through a scart lead
|
Television |
Aerial or cable TV |
2 |
|
|
200V-240V~, |
|
|
|
50/60 Hz |
|
|
|
Scart lead |
|
|
(not supplied) |
AUDIO
 L
L
 R
R
You will get better pictures and sound quality if you connect your video with a scart lead.
If you have connected your video as shown in option 2, turn to page 8.
2
Connecting your video through extra equipment
Connecting your video to the satellite system or DVB receiver
3 |
Television |
Aerial |
|
||
|
|
|
|
200V-240V~, |
|
|
50/60 Hz |
|
|
|
Video |
|
|
AUDIO |
|
|
L |
|
|
R |
You can use this connection if your video has two scart sockets. This will improve sound and picture quality when you are recording from satellite.
To use this function, see page 10.
|
AUDIO |
Satellite |
L |
R |
Connecting your video to the hi-fi system - Option 1
4 |
Television |
|
|
|
200V-240V~, |
|
50/60 Hz |
Aerial
Hi-Fi
Video
AUDIO
 L
L
 R
R
Plug a phono cable into the ‘Audio L/R’ sockets on the back panel and into the audio sockets on any audio amplifier, if needed. If your video does not have this connection, see belows (Option 2).
Two scart connection or Audio L/R-output is only available on some models.
3
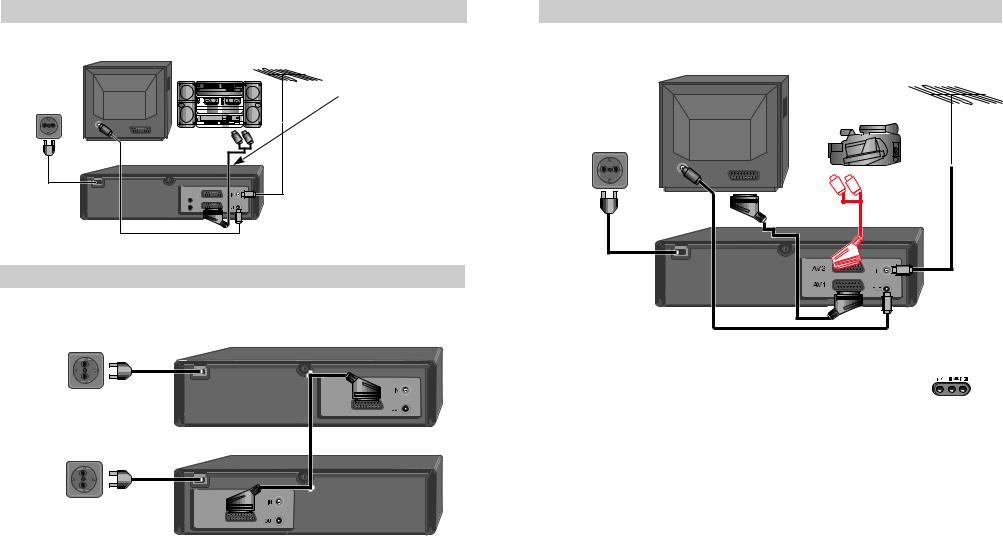
Connecting your video to the hi-fi system - Option 2
5 |
Television |
Aerial |
|
Hi-Fi |
|
|
200V-240V~, |
|
|
50/60 Hz |
|
|
|
Video |
|
|
AUDIO |
|
|
L |
|
|
R |
Plug a scart to phono cable into the ‘AV1’ socket on the back panel and into the audio socket on any audio amplifier, if needed.
How to connect your video to another video
Before you start, unplug all the equipment from the mains supply.
6 |
First video |
|
200V-240V~, 50/60 Hz
Second video
200V-240V~, 50/60 Hz
1)Insert the tape you wish to record on into the first video and press AV until ‘AV1’ appears on the front display.
2)Insert the tape you wish to copy from into the second video. Press the play button on the second video.
3)Press the record button on the first video
The video will start recording.
If your video has two scart sockets, you can use the other socket ‘AV2’ to connect other equipment.
How to connect your video to a camcorder
Before you start, unplug all the equipment from the mains supply.
7 |
Television |
|
|
|
200V-240V~, |
|
50/60 Hz |
Aerial
Camcorder
Scart |
Plug to |
TV |
Video |
to |
camcorder |
If you have connected your camcorder in this way, you can also connect a scart lead from
‘AV1’ on the back panel of the video to the television. To use this function, see page 10.
You can also connect the camcorder by using a phono cable if your video has front input sockets. Check the front of your video for this connection, see page 10.
4 |
5 |
Tuning your video to the TV using an antenna cable (RF cable)
If you have connected your video through the scart connection (diagram 2 on page 2), go to page 7.
Use the following method to tune your video in if you have connected it through RF cable (as shown in diagram 1 on page 2)
Once you have carried out the steps in ‘Setting up your video’ (diagram 1 on page 2), switch on your TV.
1
2
LANGUAGE SET
 ENGLISH DEUTSCH ITALIANO ESPAÑOL FRANÇAIS NEDERLANDS SVENSKA
SUOMI
PR+/-:SELECT
OK:CONFIRM MENU:END
|
COUNTRY SET |
B |
N |
D |
NL |
DK |
S |
E |
SF |
GR |
CH |
I |
TR |
LUX |
OTHERS |
PR+/-:SELECT
OK:CONFIRM MENU:END
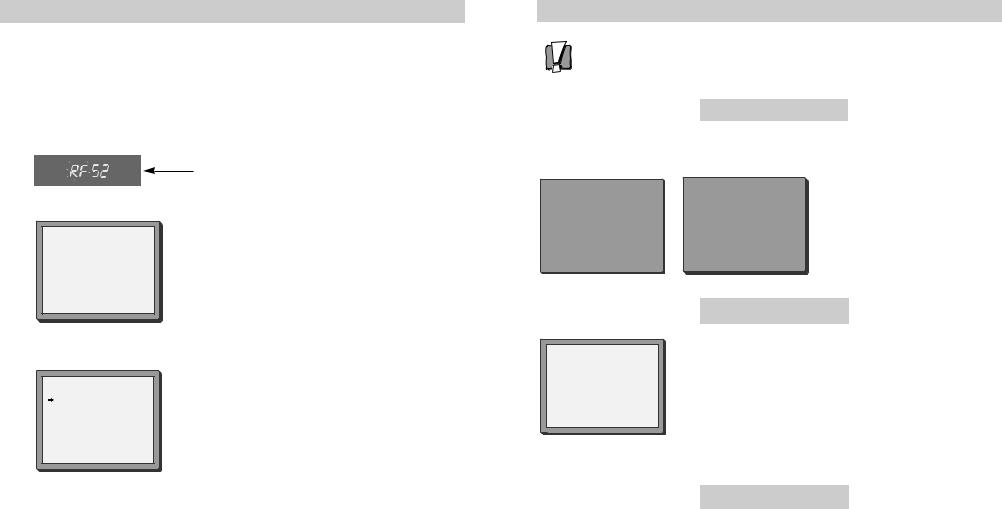
Press  on the remote control and RF52 will be displayed on the front of your video.
Select the wanted language and country with PR+ or PR- button. Press OK to confirm. Tune the TV, using the pre-set functions on your TV as described in its manual, until you see a blue CH search screen. Store this setting on the TV and go to page 8.
For selecting the country, refer to the followings.
B: Belgium |
N: Norway |
D: Germany |
NL: Netherlands |
DK: Denmark |
S: Sweden |
E: Spain |
SF: Finland |
GR: Greece |
CH: Switzerland |
I: Italy |
TR: Turkey |
LUX: Luxembourg |
|
You can also call a test-picture in the Videorecorder : press OK on the remote control more than 5 seconds. Please search the test-picture of videorecorders with the broadcasting-setting of your TV. Refer to operation manual. When you find the testpicture, memorise it on the program place. Press OK on the remote control more than
5 seconds to exit the test-picture.
What to do if you get picture interference when using RF lead
The RF output can be adjusted from 21 to 69, this video is defaulted to RF52. If other broadcasts are close to RF 52 they may cause picture interference, you can change the RF output until your television has a noise-free channel for your video.
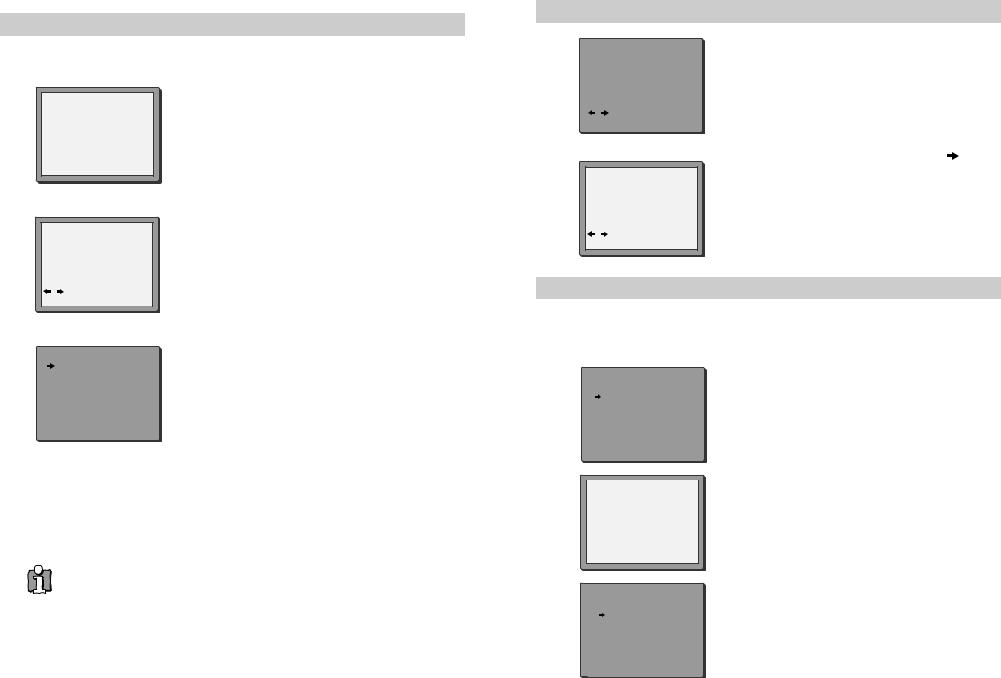
Option 1
If other stations are positioned on or near the current RF OUTPUT CH, the following guide message appears automatically.
RF OUTPUT SET |
|
|
|
|
Press OK to confirm. |
|
|
|
|
|
|
|
|
|
|
|
|
IMPORTANT! |
|
|
|
|
|
|
|
Press MENU to end. |
|
CURRENT |
CH 52 |
|
PLEASE CHANGE THE TV |
|||
RECOMMENDED CH 54 |
|
CH TO 54. |
|
|||
OK:CONFIRM |
MENU:END |
|
|
|
|
|
|
|
|
|
|
|
|
Option 2
Change the RF output from 52 using the remote control.
RF OUTPUT SET
CH |
52 |
Press MENU. Select ‘VCR Set Up’ by pressing PR- twice then OK. |
|
Select ‘RF Output Set Up’ by pressing PR- twice then OK. |
|||
|
|
||
|
|
Change the channel number using buttons 0-9. |
|
0-9:SET UP (21-69) |
Press OK to confirm. Press MENU to end. |
||
OK:CONFIRM |
MENU:END |
||
|
|||
If there is still picture interference repeat option2.
Option 3
Buy a scart lead from your local electrical shop. Connect the scart lead as shown on page 2, diagram 2.
If you want to change the RF output in the future due to new broadcasting stations or equipment and so on, press and hold the OK button on the remote control until RF 52 is displayed on the front of the video. Then go to option 2 above.
6 |
7 |
Tuning your video recorder to the television
If you already set the language and country set, you can see the followings.
1
2
3
CH 25
PLEASE WAIT...
MENU:END
CLOCK SET
TIME - - : - -
DATE - -/- -/- - - -
0-9:SETUP (HOUR)
|
/ |
|
|
OK:CONFIRM |
MENU:END |
|
|
|
|
MANUAL SET |
|
|
PR02 P-02 |
PR09 P-09 |
|
PR03 P-03 |
PR10 P-10 |
|
PR04 P-04 |
PR11 P-11 |
|
PR05 P-05 |
PR12 P-12 |
|
PR06 P-06 |
PR13 P-13 |
|
PR07 P-07 |
PR14 ---- |
|
PR+/-:SELECT |
|
|
OK:CONFIRM |
MENU:END |
If you do not see this picture, check that the video is connected properly.
Press OK for ‘Auto Set’ or ‘Auto Search’.
Unless you are living in an area with poor reception, ‘Auto Set’ or ‘ Auto Search’ tunes in all the stations you can receive in your country .
See page 12, 13 and page 29 if you need to change any of the automatic settings. You should finish the auto set before you go to page 12, 13 or page 29.
The clock is also set automatically. If the clock has not been set, the clock setting screen will appear.
Please see “ Setting time and date” on page 9.
If you want to change the station names, see page 12.
If you want to change the programme locations see page 13.
Press MENU to end.
Important: If you switch the video off at the mains supply overnight, you do not have to retune the video. Simply press  and then MENU on the remote control to restore all the program settings. See page 9 to set the time and date.
8
Setting time and date
|
|
|
|
|
1 |
|
CLOCK SET |
|
|
|
TIME - - : - - |
|
||
|
|
|
||
|
|
DATE - -/- - |
/- - - - |
|
|
|
0-9:SETUP (HOUR) |
|
|
|
|
/ :CORRECT |
|
|
|
|
OK:CONFIRM |
MENU:END |
|
|
|
|
|
|
If the ‘CLOCK SET’ display is not already on the screen press MENU.
Choose ‘VCR SET UP’ by pressing PR- twice, then OK.
Choose ‘CLOCK SET’ then press OK.
2 |
|
CLOCK SET |
|
TIME |
11:41 |
||
|
|||
|
DATE |
12/09/2005(MON) |
|
|
0-9:SETUP (HOUR) |
||
|
/ :CORRECT |
||
|
OK:CONFIRM MENU:END |
||
Once the ‘CLOCK SET’ display is on the screen, move to the position you want to change by pressing  or .
or .
Use the number buttons 0 to 9 on the remote control to enter the correct time and date.
Press OK to confirm the settings, and press MENU to end.
OSD (On Screen Display) ON & OFF
This VCR is set to “OSD (On Screen Display) ON” mode at the factory, but you can change it to OFF mode. When a function is changed at the front display or remote control the change will be displayed on the screen.
1 |
MAIN MENU |
Press MENU. |
TIMER PROGRAM |
||
|
PR PRESET |
Choose “VCR SETUP” |
|
VCR SETUP |
|
|
TAPE CONTROL |
And press OK. |
|
PR+/-:SELECT |
|
|
|
|
|
OK:CONFIRM MENU:END |
|
2 |
|
|
VCR SETUP |
|
CLOCK SET
LANGUAGE SET
RF OUTPUT SET Choose “OSD ON/OFF”.
16:9 SET
 OSD ON/OFF
PR+/-:SELECT
OK:CONFIRM MENU:END
3 |
OSD ON/OFF |
If you want OSD OFF mode, press PR- and press OK. |
|
ON |
|
||
|
OFF |
|
OSD characters will not be displayed in the normal picture |
|
|
|
|
|
PR+/-:SELECT |
|
at the start of each mode change. |
|
|
|
|
|
OK:CONFIRM |
MENU:END |
9 |
|
|
|
|
2nd scart socket
If your video has the AV2 output, shown in the diagram below, you can connect other equipment as seen on pages 3, 4 and 5.
|
2nd scart |
INPUT ONLY |
|
|
|
|
|
|
INPUT+OUTPUT
When connecting other equipment please refer to their manuals for further information. This video manual recommends the set up as shown on page 3 diagram 3. When connected by this method if the equipment is turned off the video behaves as normal, but if the equipment is turned on the video will automatically switch over to AV2 mode and displays the channel of the other equipment, channel selection can only be performed by the other equipment, the video PR+/PR- buttons have no effect.
To return to normal video use the other equipment must be turned off.
When the program is encoded (and you have a decoder connected to socket EURO AV2), you must set in OSD menu (PR PRESET/MANUAL
SET) with  or
or  „DECODER“ to „ON“.
Recording from other Equipment.
Simple recording can be performed (refer to page 18), ensure the equipment is turned on and is displaying the correct channel.
Timer recording (refer to page 19), set the video to perform a timed recording ensuring AV1 is selected as the channel to be recorded. Some equipment may have a timer which allows it to be powered on to the correct channel, if this feature is not available the other equipment should be left powered on.
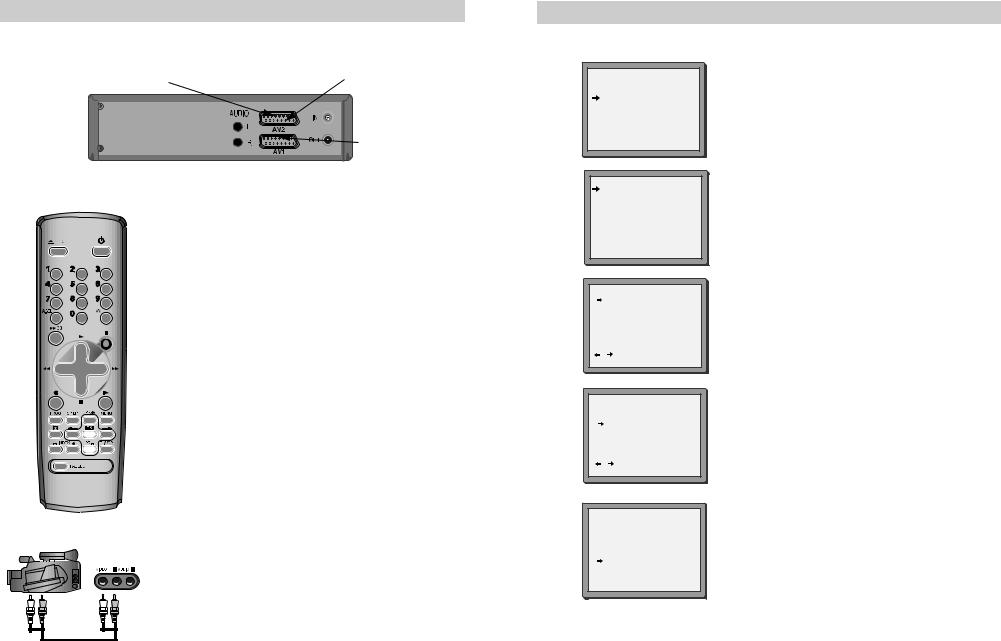
Front AV
If the video has front input sockets, it is possible to connect devices such as a camcorder to the video. To watch a camcorder tape the video must be in AVF mode. Recordings of this input are the same as described on page 5.
Manual tuning
Manual tuning allows you to tune in new stations or equipment such as a satellite receiver and so on.
1
2
PR PRESET
AUTO SET
PR ERASE
PR ALIGN
PR+/-:SELECT
OK:CONFIRM MENU:END
MANUAL SET
PR01 ARD |
PR08 P-08 |
PR02 ZDF |
PR09 P-09 |
PR03 P-03 |
PR10 P-10 |
PR04 P-04 |
PR11 P-11 |
PR05 MTV |
PR12 ---- |
PR06 P-06 |
PR13 ---- |
PR07 P-07 |
PR14 ---- |
-:SELECT
MENU:END
Press MENU.
Choose ‘PR Preset’ by pressing PR- then OK. Choose ‘Manual Set’ by pressing PR- then OK.
Press PR+ or PR- to select any programme number that is not being used, for example ‘----’ or ‘P-xx’.
Press OK to confirm.
3
4
5
MANUAL SET
PR |
04 |
|
|
|
|
RECEPTION |
AERIAL |
||||
AUTOSEARCH |
CH_ _ |
||||
FINE TUNING |
|
|
|
|
|
DECODER |
ON |
||||
NAME |
_ _ _ _ |
|
|||
PR+/-: UP/DOWN |
|
|
|
|
|
/ : SELECT |
|
|
|
|
|
OK:CONFIRM |
MENU:END |
||||
MANUAL SET
PR |
03 |
|
|
|
|
RECEPTION |
|
AERIAL |
|||
AUTOSEARCH |
|
CH 03 |
|||
FINE TUNING |
|
|
|
|
|
DECODER |
|
ON |
|
|
|
NAME |
_ _ _ _ |
|
|||
PR+/-: UP/DOWN |
|
|
|
|
|
/ : SELECT |
|
|
|
|
|
OK:CONFIRM |
MENU:END |
||||
MANUAL SET
PR |
03 |
|
|
|
RECEPTION |
AERIAL |
|||
AUTOSEARCH |
CH_ _ |
|||
FINE TUNING |
|
|
|
|
DECODER |
ON |
|
|
|
NAME |
_ _ _ _ |
|||
PR+/-: UP/DOWN 0/1: CHANGE/CREATE
OK:CONFIRM MENU:END
Set the station you want:
the programme location number,
the broadcast system you want (Aerial(CH) or
Cable(CC)),
You can directly enter the real channel number with the 0 to 9 buttons, or search by pressing  /
/ ,
,
The fine tuning you can adjust, by pressing  /
/ ,
,
When the program is encoded (and you have a decoder connected to socket EURO AV2), press the
 or
or  to select ON or OFF,
If DECODER mode does not appear on the screen, it is not available on your video.
Change or create the station name. Refer to page 10.
Press OK to store the picture you want.
Tune in other stations (by following step 3 onwards) or press MENU to leave the tuning mode.
Your video has 99 available channel slots. It will only store programmes that are available in your area. You can tune in other stations in any channel slot that is not already being used.
10 |
11 |
 Loading...