


 Loading...
Introduction
Congratulations on your purchase of Creative’s latest audio revolution, Sound Blaster® Recon3D PCIe! With cutting edge technology from the leaders in PC audio, Sound Blaster Recon3D PCIe will give you years of reliable entertainment on your PCI Express (PCIe®) enabled personal computer.
This User's Guide contains software installation and usage information for your audio card.
System Requirements
Minimum Requirements
Intel® CoreTM2 Duo or AMD® processor equivalent (CoreTM2 2.0 GHz, AMD processor equivalent or faster recommended)
Intel or AMD compatible motherboard
Microsoft® Windows® 7 64-bit, Windows 7 32-bit
1 GB RAM
>600 MB of free hard disk space
Available PCI Express slot*
CD or DVD drive for software installation
High quality headphones or powered amplified speakers (available separately)
Additional Requirements (where applicable)
DVD-Video
6x or faster DVD drive
DVD player software such as InterVideo® WinDVD® or CyberLink® PowerDVD® (latest version recommended) installed
5.1 speakers for optimal listening experience
Notes
•*Some motherboards reserve the PCI Express x16 slots for video cards only. Use a x1 or x4 slot instead. For more information, consult the documentation of your motherboard.
•Other applications may have higher system requirements. For more information, consult the documentation of your application.
Introduction 1
More Help
For the latest news and products for Sound Blaster, visit www.soundblaster.com. The site also includes information on making purchases, technical help, and the latest driver updates.
Using Creative Software AutoUpdate
Locating, downloading, and installing updates for your Creative products is now simpler and faster with the web-based Creative Software AutoUpdate system.
When you connect to Creative Software AutoUpdate via the Internet, the web site will analyze your computer system to determine what operating system (OS), language, and Creative products are installed in your system.
After the online analysis, you will be able to select from a list of only the most relevant software and driver updates. The files will then be retrieved and installed on your system for you.
To learn more about Creative Software AutoUpdate, visit www.soundblaster.com/support.
Notes
•First-time users of Creative Software AutoUpdate may be prompted to authorize the download of a browser component required for system inspection. Ensure that the content is signed by Creative Labs, Inc., then click the Yes button.
•Ensure that all your Creative products are connected and installed on the same computer running Creative Software AutoUpdate.
Introduction 2

About Your Hardware
For instructions on installing your Sound Blaster Recon3D PCIe, and any additional accessories, consult the Quick Start leaflet.
To learn more about your product, consult the following sections:
Your Sound Blaster Recon3D PCIe Audio Card
Your Sound Blaster I/O Drive*
Notes
•*Available for selected models of your audio device in some regions.
•Actual products may differ slightly from those shown in this chapter.
Your Sound Blaster Recon3D PCIe Audio Card
Your Sound Blaster Recon3D PCIe audio card has the jacks and connectors below to enable the attachment of a wide variety of devices.
About Your Hardware 3

SB1350:
8
7
6
5
4
3
2
1
SB1354
|
8 |
7 |
|
6 |
9 |
5 |
|
4 |
|
3 |
|
2 |
10 |
|
|
1 |
|
SB1356:
8
7
6
5
4
3
2
1
About Your Hardware 4

SB1358:
8
7
6
5
4
3
2
1
|
|
|
|
|
|
|
|
|
|
|
|
|
|
|
|
|
|
|
|
|
|
|
|
|
|
|
|
Jack or Connector |
|
|
|
|
Description |
||
|
|
|
|
|
|
|
|
|
|
|
|
|
|
|
|
|
|
|
|
|
|
|
Connects to playback devices with optical connectors |
|||
1. |
Optical S/PDIF In jack |
|
(for example, Digital Audio Tape players, MiniDisc |
|||||
|
|
|
|
|
players or DVD players). |
|||
|
|
|
|
|
|
|
|
|
|
|
|
|
|
Connects to recording devices with optical |
|||
2. |
Optical S/PDIF Out |
|
connectors (for example, Digital Audio Tape |
|||||
jack |
|
recorders, MiniDisc recorders or external hard disk |
||||||
|
|
|||||||
|
|
|
|
|
recorders). |
|||
|
|
|
|
|
|
|
|
|
3. |
Line Out 3 jack |
|
Connects to the Front Center and Subwoofer inputs |
|||||
|
on powered analog speakers or an A/V receiver. |
|||||||
|
|
|
|
|
||||
|
|
|
|
|
|
|
|
|
4. |
Line Out 2 jack |
|
Connects to the Rear Left and Rear Right inputs on |
|||||
|
powered analog speakers or an A/V receiver. |
|||||||
|
|
|
|
|
||||
|
|
|
|
|
|
|
|
|
5. |
Line Out 1 jack |
|
Connects to the Front Left and Front Right inputs on |
|||||
|
powered analog speakers or an A/V receiver. |
|||||||
|
|
|
|
|
||||
|
|
|
|
|
|
|
|
|
6. |
Headphone jack |
|
Connects to stereo headphones with a 3.50 mm (1/ |
|||||
|
8-inch) plug. |
|||||||
|
|
|
|
|
||||
|
|
|
|
|
|
|
|
|
|
Line In/Microphone In |
|
Connects to line-level sources (for example, MP3 |
|||||
7. |
|
players) or microphones with a 3.50 mm (1/8-inch) |
||||||
jack |
|
|||||||
|
|
plug. |
||||||
|
|
|
|
|
||||
|
|
|
|
|
|
|
|
|
|
Front Panel Header |
|
Connects to one end of the Intel Front Panel Audio |
|||||
8. |
|
cable (available separately). See Front Panel Header |
||||||
Audio connector |
|
|||||||
|
|
Audio Connector for specifications. |
||||||
|
|
|
|
|
||||
|
|
|
|
|
|
|
|
|
|
Creative proprietary |
|
Connects to one end of the analog cable. Connect |
|||||
9. |
|
the other end to the AND_EXT connector |
||||||
AND_EXT connector |
|
|||||||
|
|
on the Sound Blaster I/O Drive. |
||||||
|
|
|
|
|
||||
|
|
|
|
|
|
|
|
|
|
Creative proprietary |
|
Connects to one end of the digital cable. Connect the |
|||||
10. |
|
other end to the DID_EXT connector on |
||||||
DID_EXT connector |
|
|||||||
|
|
the Sound Blaster I/O Drive. |
||||||
|
|
|
|
|
||||
|
|
|
|
|
|
|
|
|
About Your Hardware 5

Your Sound Blaster I/O Drive*
Your Sound Blaster I/O Drive connects with your Sound Blaster Recon3D Fatal1ty Champion audio card, and provides additional connectivity for a number of other devices.
Front:
1 |
2 |
3 |
4 |
5 |
6 |
7 |
8 |
Back:
9 |
10 |
11 |
About Your Hardware 6
|
Jack, Connector, |
Description |
|
|
Knob or Button |
||
|
|
||
|
|
|
|
|
|
|
|
1. |
Auxiliary Line In jacks |
Connects to playback devices using an RCA |
|
cable. |
|||
|
|
||
|
|
|
|
2. |
THX Trustudio Pro LED |
Indicates the current mode THX Trustudio mode. |
|
button |
|||
|
|
||
|
|
|
|
3. |
Headphones button |
Turns on the headphone as output device. |
|
|
|
|
|
4. |
Speakers button |
Turns on the speakers as output device. |
|
|
|
|
|
|
|
Controls the volume output on your headphone |
|
5. |
Master Volume knob |
or headset. Turn the knob clockwise to increase |
|
the volume and anti-clockwise to decrease the |
|||
|
|
||
|
|
volume. |
|
|
|
|
|
|
|
Connects to stereo headphones with a 3.50 mm |
|
6. |
Headphone jack |
(1/8-inch) plug or the headphone plug of your |
|
|
|
headset. |
|
|
|
|
|
|
|
Connects to microphones with a 3.50 mm (1/8- |
|
7. |
Microphone In jack |
inch) plug or the microphone plug of your |
|
|
|
headset. |
|
|
|
|
|
|
|
Controls the microphone gain. Turn the knob |
|
8. |
Microphone Volume knob |
clockwise to increase the microphone gain and |
|
|
|
anti-clockwise to decrease the microphone gain. |
|
|
|
|
|
|
|
Connects to one end of the analog cable. |
|
|
Creative proprietary |
Connect the other end to the AND_EXT |
|
9. |
connector on the Sound Blaster |
||
AND_EXT connector |
|||
|
Recon3D Fatal1ty Champion |
||
|
|
||
|
|
audio card. |
|
|
|
|
|
10. |
Creative proprietary |
Connects to the auxiliary cable on the 5¼-inch |
|
AUX_EXT connector |
drive bay adapter. |
||
|
|||
|
|
|
|
|
|
Connects to one end of the digital cable. |
|
|
Creative proprietary |
Connect the other end to the DID_EXT |
|
11. |
connector on the Sound Blaster |
||
DID_EXT connector |
|||
|
Recon3D Fatal1ty Champion |
||
|
|
||
|
|
audio card. |
|
|
|
|
Notes
•*Available for selected models of your audio device in some regions.
•Your Sound Blaster I/O Drive comes attached to a 5¼-inch drive bay adapter. For instructions on removing the drive bay adapter and installing into a 3½-inch drive bay, consult your Quick Start leaflet.
•Not compatible with the PCI Sound Blaster series of audio cards.
About Your Hardware 7

Installing and Uninstalling Software
To take full advantage of your Sound Blaster Recon3D PCIe audio card, you need to install device drivers and applications. At times, you may also need to uninstall some or all of the device drivers and applications to correct problems, change configurations, or to upgrade outdated drivers or applications. To learn how to do so in all supported Windows operating systems, consult the following sections:
Installing Drivers and Applications
Uninstalling Drivers and Applications
Installing Drivers and Applications
Ensure that your audio card is installed before proceeding. For instructions on installing your audio card, consult your Quick Start leaflet.
After you have installed your audio card, turn on your computer. Windows automatically detects your audio card and searches for device drivers.
For Windows 7
1.Insert the Installation CD into your CD or DVD drive.
Your CD should start automatically. If it does not, follow the steps below:
i.Click Start  Computer.
ii.Right-click the CD or DVD drive icon, and then click Open AutoPlay.
2.To complete the installation, follow the instructions on the screen.
3.When prompted, restart your computer.
Uninstalling Drivers and Applications
Before you begin, close all running audio applications. Applications that are still running during uninstallation will not be removed.
For Windows 7
1.Click Start  Control Panel
  Uninstall a program.
2.Select the Sound Blaster Recon3D PCIe entry.
3.Click the Uninstall button.
If the User Account Control dialog box appears, click the Continue button.
4.Click the Yes button.
5.When prompted, restart your computer.
After you have completed the steps above, you can install the original or updated device drivers and applications for Sound Blaster Recon3D PCIe. For instructions on installing the software, consult Installing Drivers and Applications.
Installing and Uninstalling Software 7

Connecting Speakers and Headphones
The connectors and associated components shown here may be different from that of your speaker system. Consult the documentation of your speaker system to identify similar input connectors. You can upmix your stereo sources (for example, CD Audio, MP3, WMA, MIDI, and Wave) to enjoy multichannel sound on your speakers or headphones.
To learn how to connect different types of speaker systems to your audio card, consult the following sections:
Connecting Analog Speaker Systems
Connecting Digital Speaker Systems
Connecting Home Theater Systems
Connecting Headphones and Headsets
For tips on how to arrange your speakers, consult Positioning Your Speakers.
For a list of supported Creative speaker systems or interactive help on speaker connectivity, visit www.soundblaster.com.
Notes
•Actual products may differ slightly from those shown in this chapter.
•Select the correct speaker setup or headphone option in Sound Blaster Recon3D PCIe Control Panel, to get the best experience. For more information, refer to their respective online Help.
•The cables shown in this chapter may be bundled with your peripheral or are available separately from www.creative.com.
•For more information on the Creative peripherals mentioned in this chapter, visit www.creative.com.
Connecting Speakers and Headphones 8

Positioning Your Speakers
Good speaker placement is crucial to getting optimal performance from your audio system and achieving an enhanced listening experience. Below are our recommendation for 5.1 channel speakers.
For detailed speaker placement tips, consult the documentation of your speaker system.
For 5.1 channel speakers:
1
3
2 |
4 |
6 5
|
Speaker component |
|
|
|
|
1. |
Subwoofer |
|
|
2. |
Front Left |
|
|
3. |
Front Center |
|
|
4. |
Front Right |
|
|
5. |
Rear Right |
|
|
6. |
Rear Left |
|
|
Connecting Speakers and Headphones 9
Connecting Analog Speaker Systems
Your audio card supports analog speaker systems of up to 5.1 channels. To learn more about connecting different channel speaker systems, consult the following sections:
2.1 channel analog speakers
5.1 channel analog speakers
2.1 channel analog speakers
2
1
3
audio inputs
audio inputs
speakers
Jack, Connector or Cable
1.Line Out 1 jack
2.2 channel audio cable (available separately)
3.Audio Input jack
Connecting Speakers and Headphones 10
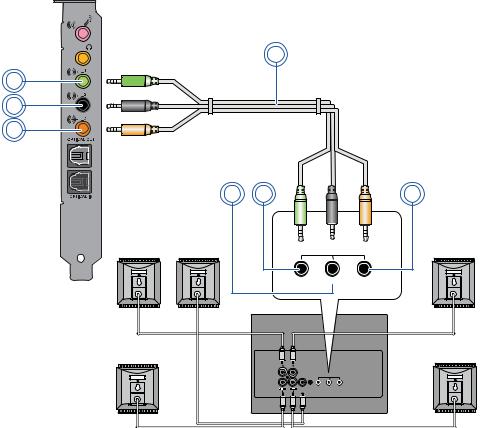
5.1 channel analog speakers
4
3
2
1
7 |
6 |
|
5 |
|
|
audio |
|
|
|
inputs |
|
|
front |
rear |
center/ |
|
|
|
subwoofer |
front |
speakers |
audio center inputs speaker
front rear center/ subwoofer
rear speakers
|
Jack, Connector or Cable |
|
|
|
|
1. |
Line Out 3 jack |
|
|
2. |
Line Out 2 jack |
|
|
3. |
Line Out 1 jack |
|
|
4. |
5.1 channel audio cable (available separately) |
|
|
5. |
Center/Subwoofer (Audio Input) jack |
|
|
6. |
Front (Audio Input) jack |
|
|
7. |
Rear (Audio Input) jack |
|
|
Connecting Speakers and Headphones 11
Loading...