


 Loading...
PUB. DIE-0535-000
4K Camcorder
Instruction Manual
NTSC

Highlights of the Camcorder
The Canon VIXIA HF G60 4K Camcorder is a high-performance camcorder whose compact size makes it ideal in a variety of situations. The following are just some of the many functions featured in the camcorder.
2
4K Recording
Advanced sensor and image processor
At the heart of the camcorder is the 1.0 in. single plate CMOS sensor with an 8,290,000 effective pixel count, and the DIGIC DV 6 imaging platform. Thanks to its advanced high-sensitivity and noise reduction technology, the camcorder can shoot nuanced images with little noise even in low-light situations.
Wide zoom lens
The camcorder features a 15x optical zoom lens with a focal length at full wide angle of 25.5 mm* (35 mm equivalent), offering superb wide-angle shooting capability.
* Except when using Dynamic IS.
Convenience and Functionality
Emphasis on versatility
This camcorder has features to make it usable as a main camera but is also small enough to be very portable. The advanced image stabilization (A53) will let you shoot in a variety of situations in the field.
Manual controls at your fingertips
The focus/zoom ring helps you achieve the focus you are looking for. You can easily change the ring's functionality so that you can operate the zoom. You can also assign certain frequently used functions to a customizable button and adjust those functions with the accompanying dial (A83). Additionally, the camcorder also features 5 assignable buttons on the camcorder and one onscreen assignable touch button to which you can assign a variety of functions to access them with ease (A84).
SD card recording options
The camcorder can record 4K video in MP4 format on an SD card. It is equipped with 2 SD card slots, allowing you to use dual recording to record the same clip on two SD cards, or relay recording to automatically switch to the other SD card when the one being used is full (A33).
Time code options (A66)
The time code generated by the camcorder can be output from the HDMI OUT terminal in order to synchronize it with other external devices. A user bit code (A68) can also be output with the output signal.
Dual Pixel CMOS AF
The camcorder features Dual Pixel CMOS AF technology for improved autofocus functions
(A42). In addition to continuous AF, AF-boosted MF lets you focus manually most of the way and let the camcorder finish focusing automatically. With AF-boosted MF the camcorder does not perform unreliable focus adjustments, resulting in a more stable focusing operation than with continuous AF. The camcorder can also focus automatically on people's faces and track moving subjects while keeping them in focus (A47). Furthermore, the camcorder can be in manual focus but switch to autofocus when a face is detected (face-only AF), ensuring that important subjects are in focus
(A48).
Dual Pixel Focus Guide (A44)
The focus guide serves as a visual, intuitive guide that you can use to check if the image is in focus and the required adjustment, if it is not. This can be very helpful to ensure you always get amazingly sharp 4K video.
MP4 Join Tool
MP4 Join Tool (A99) is a small application that lets you join MP4 clips that were split into multiple files.
Creativity and Artistic Expression
Special recording modes
When you make recordings, you can change the recording frame rate to achieve a fast or slow motion effect (A41). Alternatively, you can use prerecording to record 3 seconds before you press the button, helping you capture those hard-to-catch opportunities (A78).
Looks (A65)
You can adjust various aspects of the picture, such as the color depth, sharpness and brightness, to create a desired "look". If you prefer, you can use one of the preset looks offered. The [ Neutral] look for example produces a more natural perceived resolution, while the [
 Wide DR] look applies a gamma curve with a very wide dynamic range and an appropriate color matrix.

Other Features
•Battery packs compatible with Intelligent System for better remaining usage time information.
•Compatibility with the optional GP-E2 GPS Receiver to geotag your recordings (A80).
•Compatibility with the optional RC-V100 Remote
Controller when you need a professional level of |
3 |
remote operation (A79). |

4

Table of Contents
1. Introduction 7
About this Manual 7
Conventions Used in this Manual 7 Before Using the Camcorder 8
Supplied Accessories 9
Names of Parts 10
Camcorder 10
WL-D89 Wireless Controller 15
2. Preparations 17
Preparing the Power Supply 17 |
|
|
|||
Attaching the Ferrite Core |
17 |
|
|
||
Charging a Battery Pack |
17 |
|
|
||
Preparing the Camcorder |
20 |
|
|
||
Attaching the Lens Hood |
20 |
|
|
||
Using the LCD Screen |
21 |
|
|
||
Using the Viewfinder |
21 |
|
|
|
|
Adjusting the Grip Belt and Using Straps 22 |
|||||
Wireless Controller 23 |
|
|
|
||
Basic Operation of the Camcorder |
24 |
|
|||
Turning the Camcorder On and Off |
24 |
||||
Changing the Camcorder's Operating Mode 25 |
|||||
Date, Time and Language Settings |
26 |
||||
Setting the Date and Time 26 |
|
|
|||
Changing the Language |
27 |
|
|
||
Changing the Time Zone |
27 |
|
|
||
Using the Menus 28 |
|
|
|
|
|
Setup Menus |
28 |
|
|
|
|
FUNC Menu |
29 |
|
|
|
|
Using SD Cards 31 |
|
|
|
|
|
Compatible SD Cards |
31 |
|
|
||
Inserting and Removing an SD Card |
32 |
||||
Initializing an SD Card |
32 |
|
|
||
Selecting the SD Card for Recordings |
33 |
||||
Dual Recording and Relay Recording |
33 |
||||
Recovering Clips 34 |
|
|
|
|
|
3. Recording 35
Recording Video and Photos 35
Recording 35
Reviewing the Latest Clip Recorded 37
Onscreen Displays 37
5
Video Configuration: Resolution, Bit Rate and
Frame Rate 40 |
|
|
|
|
||
Selecting the Resolution and Bit Rate 40 |
|
|||||
Selecting the Frame Rate |
40 |
|
|
|||
Slow & Fast Motion Recording |
41 |
|
||||
Adjusting the Focus 42 |
|
|
|
|||
Manual Focus |
42 |
|
|
|
|
|
AF-Boosted MF |
45 |
|
|
|
|
|
Continuous AF |
46 |
|
|
|
|
|
Changing the AF Frame Size |
46 |
|
||||
Face Detection & Tracking |
47 |
|
||||
Zooming 49 |
|
|
|
|
|
|
Using the Focus/Zoom Ring |
49 |
|
||||
Using the Grip Zoom Rocker |
49 |
|
||||
Using the Supplied Wireless Controller or an |
||||||
Optional Remote Controller 51 |
|
|||||
Using the Touch Screen’s Zoom Controls |
51 |
|||||
Digital Tele-Converter |
52 |
|
|
|
||
Image Stabilization 53 |
|
|
|
|
||
Dynamic IS or Standard IS |
53 |
|
||||
Powered IS 53 |
|
|
|
|
|
|
Automatic Gain Control (AGC) Limit 54 |
|
|||||
Shooting Modes |
55 |
|
|
|
|
|
Special Scene Modes |
55 |
|
|
|
||
Adjusting the Exposure |
57 |
|
|
|
||
Manual Exposure (n) |
57 |
|
|
|
||
Automatic Exposure: Programmed AE (’) |
58 |
|||||
Automatic Exposure: Shutter Priority (‚) |
58 |
|||||
Automatic Exposure: Aperture Priority (“) |
58 |
|||||
Touch Exposure |
59 |
|
|
|
|
|
Exposure Lock (AE Lock) |
59 |
|
|
|||
Exposure Compensation |
60 |
|
|
|||
Backlight Correction |
60 |
|
|
|
||
Zebra Pattern |
61 |
|
|
|
|
|
ND Filter 62 |
|
|
|
|
|
|
White Balance |
63 |
|
|
|
|
|
Using Looks 65 |
|
|
|
|
|
|
Setting the Time Code |
66 |
|
|
|
||
Selecting the Time Code Mode 66 |
|
|||||
Selecting Drop Frame or Non-Drop Frame |
67 |
|||||
Setting the User Bit 68 |
|
|
|
|||
Using the Mini Advanced Shoe |
69 |
|
||||

6
Recording Audio 70
Connecting an External Microphone to the
Camcorder 70
Audio Scenes 70
Adjusting the Audio Recording Level 72
Advanced Audio Input Settings 72
Using Headphones 76
Color Bars/Audio Reference Signal 77
Color Bars 77
Audio Reference Signal 77
Pre-Recording 78
Using the Optional RC-V100 Remote
Controller 79
Using the Optional GP-E2 GPS Receiver 80
4. Customization 83
CUSTOM Dial and Button 83
Assignable Buttons 84
Assignable functions 85
Saving and Loading Menu Settings 86
Saving Menu Settings 86
Loading Menu Settings 86
5. Playback 87
Playback 87
The Playback Index Screen 87
Changing the Index Screen 87
Playing Back Recordings 88
Playback Controls 89
Adjusting the Volume 89
Displaying Clip Information 90
Clip and Photo Operations 91
Deleting Clips and Photos 91
Trimming Clips 92
Copying Clips and Photos 93
6. External Connections 95
Video Output Configuration 95
Video Output Configuration (Recording) 95
Video Output Configuration (Playback) 96
Connecting to an External Monitor 97
Connection Diagram 97
Using the HDMI OUT Terminal 97
Selecting the Video Output’s Scan Mode 98
7. Saving Clips 99
Working with Clips on a Computer 99
8. Additional Information 101
Menu Options 101 |
|
|
|
|
FUNC menu in |
|
mode |
101 |
|
FUNC menu in |
|
mode |
102 |
|
Setup Menus |
102 |
|
|
|
Troubleshooting |
108 |
|
|
|
List of Messages 111 |
|
|
||
Safety Instructions and Handling Precautions |
113 |
|||
Maintenance/Others |
117 |
|
|
|
Optional Accessories |
118 |
|
|
|
Specifications 120 |
|
|
|
|
Reference Tables 123 |
|
|
||
Approximate Recording Time on an SD Card |
123 |
|||
Charging Times 123
Approximate Usage Times with a Fully Charged Battery Pack 123
Index 124
1 |
Introduction |
|
7
About this Manual
Thank you for purchasing the Canon VIXIA HF G60. Please read this manual carefully before you use the camcorder and retain it for future reference. Should the camcorder fail to operate correctly, refer to
Troubleshooting (A108).
Conventions Used in this Manual
• IMPORTANT: Precautions related to the camcorder’s operation.
• NOTES: Additional topics that complement the basic operating procedures.
•A: Reference page number within this manual.
•The following terms are used in this manual:
“Screen” refers to the LCD screen and the viewfinder screen. “Card” refers to an SD, SDHC or SDXC card.
“Clip” refers to a single movie unit recorded with a single recording operation (for example, from the point when the REC button is pressed to start recording until it is pressed again to stop).
•Photographs in the manual are simulated pictures taken with a still camera.
•Some screenshots in this manual have been simplified to make them easier to read.
•Operating mode icons: A shaded icon (like  ) indicates that the function described can be used in the operating mode shown; a non-shaded icon (like
  ) indicates that the function cannot be used.
Position of the power switch: shooting (CAMERA) or playback (MEDIA) mode.
For details, refer to Turning the Camcorder On and Off (A24).
Operating modes: 


Position of the mode switch. For details refer to Changing the Camcorder's
Operating Mode (A25).
About this Manual
•The following style is used to represent menu selections. For a detailed explanation on how to use the menus, refer to Using the Menus (A28). For a summary of all available menu options and settings, refer to Menu Options (A101).
8 |
The menu page number is given |
|
|
|
only for main procedures. |
|
|
|
1 Select [Initialize] for the desired SD card.
This indicates to press 

 >[3"Recording Setup] >[Initialize 8] >[6Mem. Card A]
the MENU button.
2 Select [Yes].
Brackets [ ] indicate text as it appears on the |
This arrow indicates a deeper |
camcorder's screen (menu options, onscreen |
level in the menu hierarchy or |
buttons, messages, etc.). |
the next step in a procedure. |
Before Using the Camcorder
•Before making important recordings for the first time, make test recordings using the video configuration(s) you plan to use to check that the camcorder operates correctly. Should the camcorder fail to operate correctly, refer to Troubleshooting (A108).
•Copyright notice: Unauthorized recording of copyrighted materials may infringe on the rights of copyright owners and be contrary to copyright laws.
•About the LCD and viewfinder screens: The screens are produced using extremely high-precision manufacturing techniques, with more than 99.99% of the pixels operating to specification. Very rarely, pixels may misfire or light up permanently. This has no effect on the recorded image and does not constitute a malfunction.
 IMPORTANT
•Observe the following precautions while the ACCESS indicator (A12) is illuminated or flashing in red. Failing to do so may result in permanent data loss.
-Do not disconnect the power source or turn off the camcorder.
-Do not open the card compartment cover.
-Do not change the camcorder’s operating mode.
-When a USB cable is connected to the camcorder, do not disconnect the USB cable.
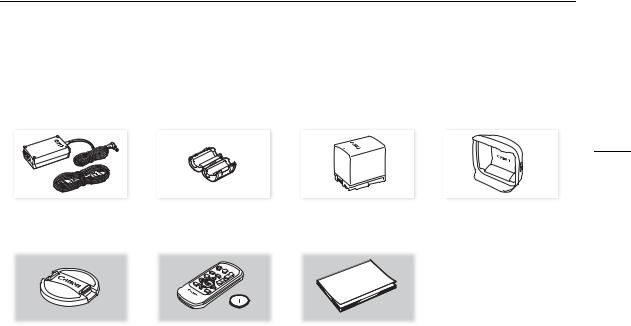
Supplied Accessories
Supplied Accessories
The following accessories are supplied with the camcorder:
9
CA-570 Compact Power Adapter |
Ferrite Core |
|
BP-820 Battery Pack |
Lens hood with lens barrier |
||||
|
(incl. power cord) |
|
|
|
|
|
|
|
|
|
|
|
|
|
|
|
|
|
|
|
|
|
|
|
|
|
|
|
|
|
|
|
|
|
|
Lens cap |
WL-D89 Wireless Controller |
Quick Guide |
|
(incl. CR2025 lithium button |
|
|
battery) |
|
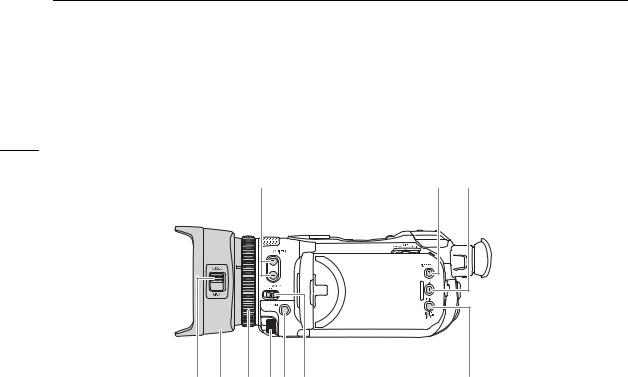
Names of Parts
Names of Parts
Camcorder
10
1 |
2 |
3 |
|
4 |
5 |
6 |
7 |
8 |
9 |
|
10 |
1 |
ND FILTER +/– buttons (A62) |
|
|
|
|
6 |
Focus/Zoom ring (A42, 49) |
|
2 |
PRE REC (pre-recording) button (A78)/ |
|
7 |
CUSTOM (customizable) dial (A83) |
||||
|
Assignable button 3 (A84) |
|
|
|
|
8 |
CUSTOM (customizable) button (A83) |
|
3 |
u (review recording) button (A37)/ |
|
|
9 |
Focus/Zoom ring switch (A42, 49) |
|||
|
Assignable button 4 (A84) |
|
|
|
|
10 |
DISP (onscreen display) button (A37)/ |
|
4 |
Lens barrier switch (A35) |
|
|
|
|
|
BATT. INFO (battery information) button (A19) |
|
5 |
Lens hood (A20) |
|
|
|
|
|
|
|
Names of Parts
1 |
3 |
11 |
2 |
4 |
|
|
|
|
|
6 |
5 |
7 |
|
|
|
8 |
|
|
9 |
1 |
DC IN terminal (A17) |
4 |
Lens hood release button (A20) |
2 |
REMOTE terminal |
5 |
Grip belt (A22) |
|
For connecting the optional RC-V100 Remote |
6 |
USB terminal (A80) |
|
Controller (A79) or commercially available |
7 |
HDMI OUT terminal (A97) |
|
remote controllers. |
8 |
×(headphones) terminal (A76) |
3 |
Built-in speaker (A89) |
9 |
MIC terminal (A70) |
Names of Parts
12 |
1 |
8 |
|
||
|
|
|
|
2 |
9 |
|
3 |
|
|
10 |
|
|
|
|
|
4 |
11 |
|
5 |
12 |
|
|
|
|
6 |
13 |
|
|
|
|
7 |
14 |
|
|
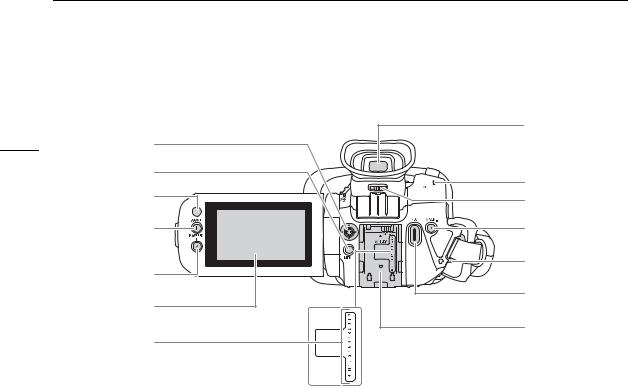
1 |
Joystick/SET button (A28) |
8 |
Viewfinder (A21) |
2 |
MENU button (A28) |
9 |
ACCESS (card access) indicator (A8, 35) |
3 |
Remote sensor (A23) |
10 |
Dioptric adjustment lever (A21) |
4 |
AF/MF button (A42)/ |
11 |
MAGN. (magnification) button (A45)/ |
|
Assignable button 1 (A84) |
|
Assignable button 5 (A84) |
5 |
POWERED IS button (A53)/ |
12 |
Strap mount (A22) |
|
Assignable button 2 (A84) |
13 |
REC (start/stop recording video) button (A35) |
6 |
LCD touch screen (A21) |
14 |
Battery attachment unit (A17) |
7 |
Serial number |
|
|
Names of Parts
13
1 |
2 |
3 |
4 |
5 |
|
6 |
7 |
8 |
|
|
|
|
|
|
|
9 |
10 |
11 |
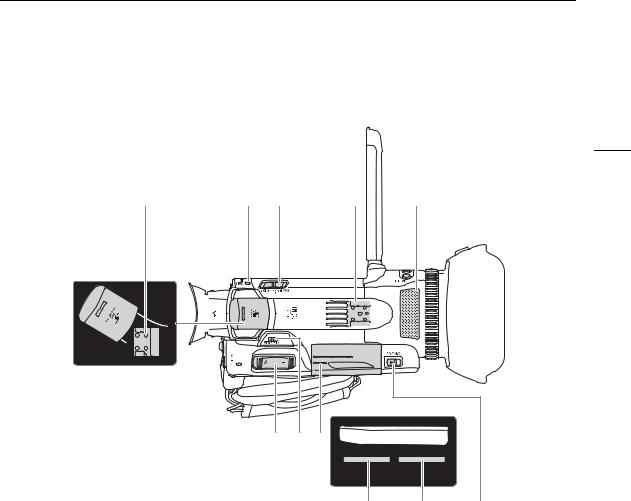
1 |
Mini advanced shoe (A69) |
|
7 |
Mode switch (A25) |
|
|
2 |
POWER/CHG (battery charging) indicator |
|
8 |
Card compartment cover (A32) |
||
|
(A17) |
|
9 |
SD card slot 2 |
|
|
3 |
Power switch (A24) |
|
10 |
SD card slot 3 |
|
|
4 |
Cold shoe |
|
11 |
SD CARD (open the card compartment cover) |
||
5 |
Built-in stereo microphone (A70) |
|
|
switch (A32) |
|
|
6 |
Grip zoom rocker (A49) |
|
|
|
|
|
Names of Parts
14
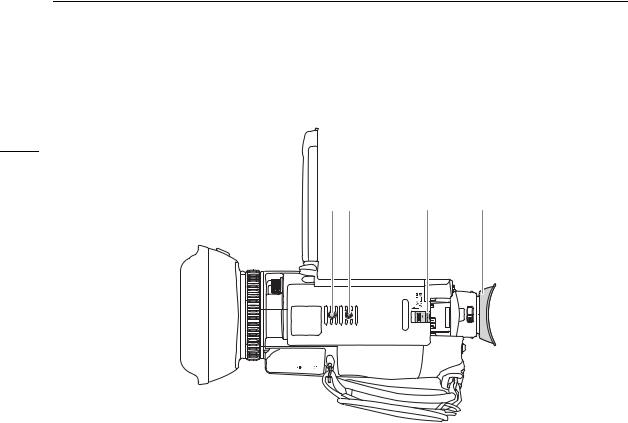
1 |
2 |
3 |
4 |
1Socket for tripod's anti-rotation pin
2Tripod socket
For use with tripods with a mounting screw up to 6 mm (0.24 in.) long
3BATTERY RELEASE switch (A18)
4Eye cup (A21)
Names of Parts
WL-D89 Wireless Controller
|
7 |
15 |
|
|
|
1 |
|
|
2 |
8 |
|
3 |
|
|
|
|
|
4 |
9 |
|
|
|
|
5 |
10 |
|
|
|
|
6 |
|
|
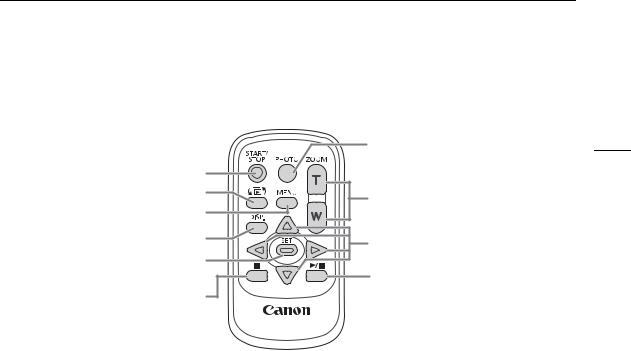
1 |
START/STOP button (A35) |
6 |
Ñ (stop) button (A88) |
|
Same as the REC button on the camcorder, |
7 |
PHOTO button (A36) |
|
used to start/stop recording video. |
8 |
Zoom buttons (A51) |
2 |
G(open the index selection screen) button |
9 |
Navigation buttons (Í/Î/Ï/Ð) |
|
(A87) |
10 |
Ò(play/pause) button (A88) |
3MENU button (A28)
4DISP. (onscreen display) button (A37)
5SET button (A28)

Names of Parts
16
2 |
Preparations |
|
17
Preparing the Power Supply
You can power the camcorder using a battery pack or directly using the supplied compact power adapter. If you connect the compact power adapter to the camcorder while a battery pack is attached, the camcorder will draw power from the power outlet.
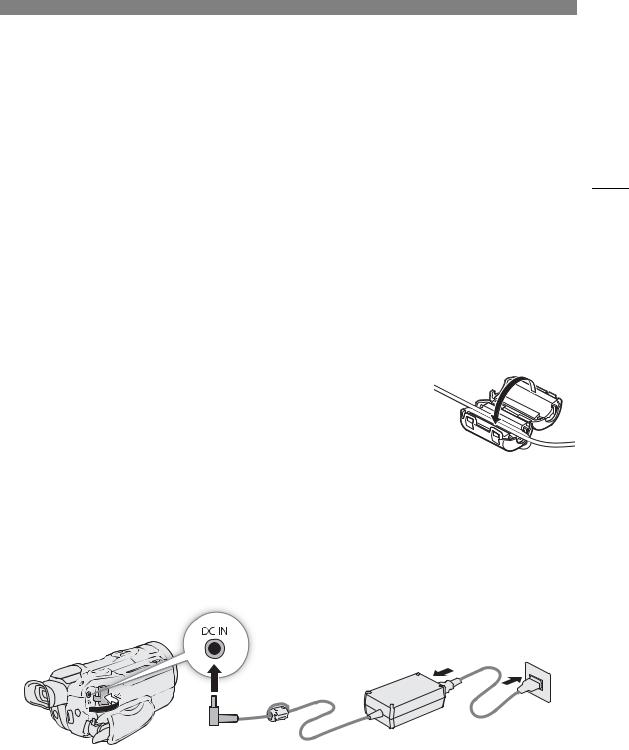
Attaching the Ferrite Core
Attach the enclosed ferrite core before you connect the compact power adapter to the camcorder. Attaching the ferrite core to the compact power adapter cable is necessary to suppress RF interference.
1 Attach the ferrite core to the cable about 6 cm (2.4 in.) from the DC plug (the plug to be connected to the DC IN terminal).
2 Pass the cable through the center of the core and wrap it around the core (as shown in the illustration), then close the unit until it clicks shut.
Charging a Battery Pack
You can power the camcorder using the supplied BP-820 Battery Pack or the optional BP-828 Battery Pack. Both battery packs are compatible with Intelligent System so you can check the approximate remaining battery usage time (in minutes) on the screen. For more accurate readings, when using a battery pack for the first time, charge it fully and then use the camcorder until the battery pack is completely depleted.
1 Connect the compact power adapter to the camcorder and plug the power cord into a power outlet.
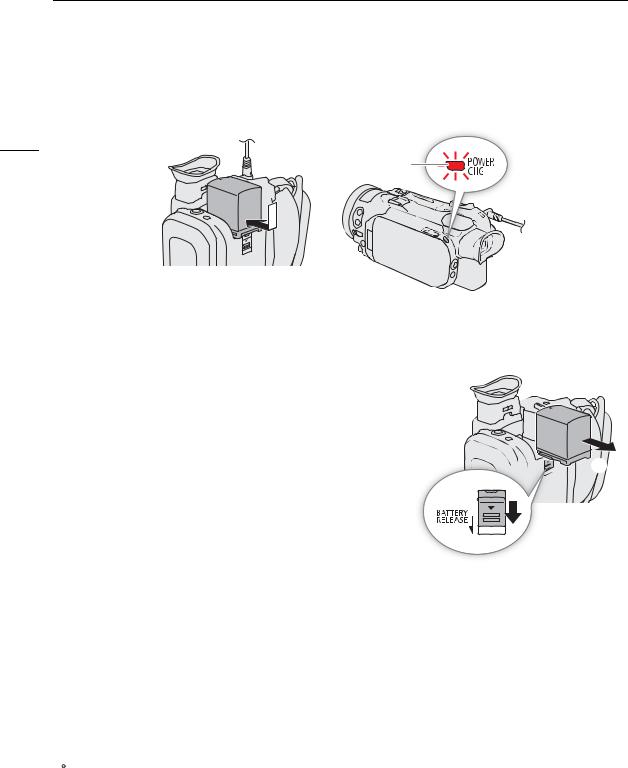
2 Attach the battery pack to the camcorder.
Preparing the Power Supply
3Charging will start when the camcorder is turned off.
•The POWER/CHG (charge) indicator will illuminate in red while the battery is charging. If the POWER/CHG indicator starts flashing, refer to Troubleshooting (A109).
18
Illuminated in red while the battery is charging
4When the POWER/CHG indicator goes out, the battery is fully charged.
• Disconnect the compact power adapter from the camcorder and unplug the power cord.
To remove the battery pack
1 Slide the BATTERY RELEASE switch in the direction of the arrow and hold it pressed down.
2 Slide the battery pack down and then pull it out.


 IMPORTANT
•Do not connect to the compact power adapter any product that is not expressly recommended for use with this camcorder.
•Turn off the camcorder before connecting or disconnecting the compact power adapter. After you turn off the camcorder, important data is updated on the SD card. Be sure to wait until the green POWER/CHG indicator goes out.
•When using the compact power adapter, do not fix it permanently to one place as this may cause a malfunction.
•To prevent equipment breakdowns and excessive heating, do not connect the supplied compact power adapter to voltage converters for overseas travels or special power sources such as those on aircraft and ships, DC-AC inverters, etc.
 NOTES
NOTES
•We recommend charging the battery pack in temperatures between 10 °C and 30 °C (50 °F and 86 °F). If either the ambient temperature or the battery pack’s temperature is outside the range of approx. 0 °C to 40 °C (32 °F to 104 °F), charging will not start.
•The battery pack will be charged only when the camcorder is off.
•If the power supply was disconnected while charging a battery pack, make sure the POWER/CHG indicator has gone out before restoring the power supply.
Preparing the Power Supply
•If remaining battery time is an issue, you can power the camcorder using the compact power adapter so the battery pack will not be consumed.
•Charged battery packs continue to discharge naturally. Therefore, charge them on the day of use, or the day before, to ensure a full charge.
• We recommend that you prepare battery packs to last 2 to 3 times longer than you think you might need. |
19 |
|
•For handling precautions regarding the battery pack, refer to Safety Instructions and Handling Precautions (A113). For charging times and approximate usage times, refer to Reference Tables (A123).
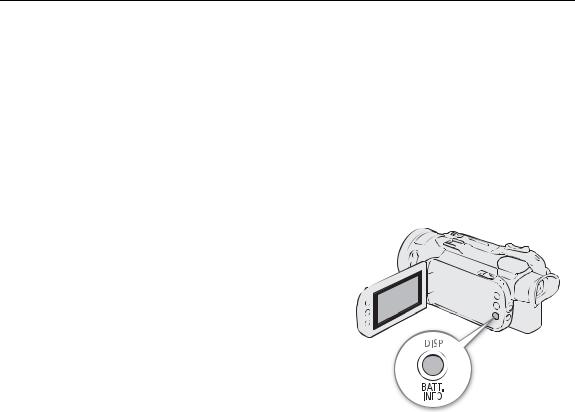
Checking the Remaining Battery Charge
With the camcorder turned off, press the BATT. INFO button to display for about 5 seconds a screen showing the approximate battery charge level. Note that if the battery charge is too low, the battery information screen may not appear.
Preparing the Camcorder
Preparing the Camcorder
This section covers basic preparations for the camcorder such as attaching the lens hood, adjusting the
viewfinder and LCD screen, and adjusting the grip belt.
20
 IMPORTANT
•Be careful not to drop the camcorder when attaching, removing or adjusting the various accessories. Using a table or other stable surface is recommended.
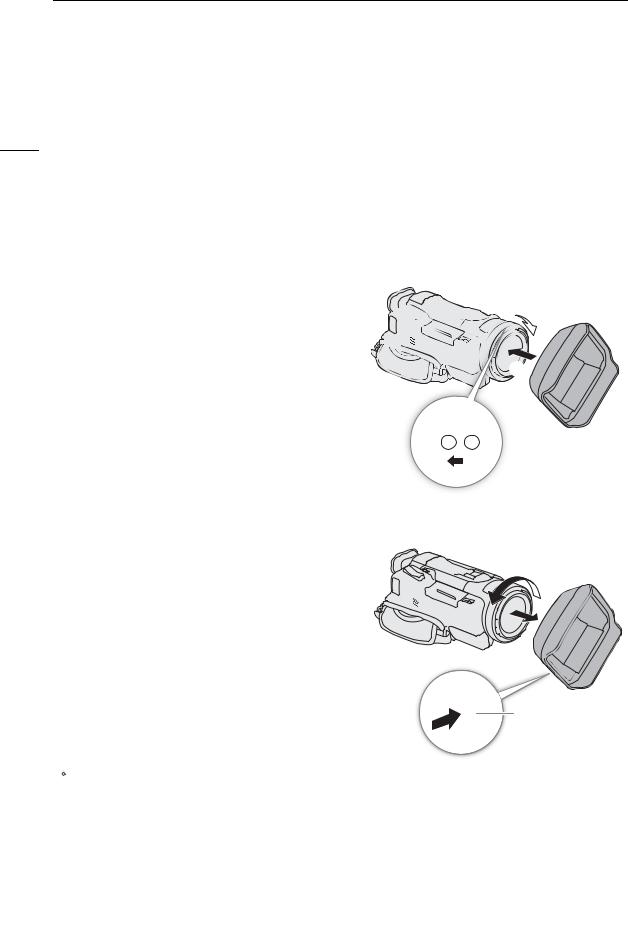
Attaching the Lens Hood
While recording, the supplied lens hood with lens barrier is effective for reducing stray light that can be the cause of lens flare and ghost images. Additionally, closing the lens barrier can help prevent fingerprints and dirt accumulation on the lens.
1Remove the lens cap.
2Align the groove on the lens hood with the index mark on the top of the lens ( ), and then turn the lens hood clockwise until it stops with a click ( ).
•Be careful not to deform the lens hood.
•Make sure that the lens hood is aligned with the thread.
To remove the lens hood
1Press and hold the lens hood release button and turn the lens hood counterclockwise.
2Place the lens cap back on the lens.


Lens hood release button
 NOTES
NOTES
About the lens cap:
•Use the supplied lens cap when carrying the camcorder or storing it after use.
•The lens cap and lens hood cannot be used simultaneously. To attach the lens hood, remove the lens cap in advance.
Preparing the Camcorder
Using the LCD Screen
Open the LCD panel 90 degrees and adjust the viewing angle.
 NOTES
NOTES
21


•You can adjust the brightness of the LCD screen with the 
 >[£Display Setup] >[LCD Brightness] and [LCD Backlight] settings. When the camcorder is on, you can also press and hold the DISP button for more than 2 seconds to change the [LCD Backlight] setting between bright and normal or from dim to normal.
•Adjusting the brightness does not affect the brightness of recordings.
•Using a brighter setting will shorten the effective usage time of the battery pack.
•When the LCD panel is rotated 180 degrees toward the subject, you can use the 
 >[£Display Setup] >[LCD Mirror Image] setting to flip the screen's image horizontally so it shows a mirror image of the subject.
•For details about how to take care of the LCD screen, refer to Safety Instructions and Handling Precautions (A113), Cleaning (A117).
Using the Viewfinder
Adjust the position of the viewfinder to a comfortable angle. You can also adjust the diopter, if necessary.
1 Turn on the camcorder (A24) and close the LCD panel. 2 Pull out the viewfinder and adjust the viewing angle.
3 Adjust the viewfinder using the dioptric adjustment lever.


Dioptric adjustment lever

Preparing the Camcorder
 NOTES
NOTES
•The viewfinder and LCD screen cannot be used simultaneously. To use the viewfinder, make sure to close the LCD panel and pull out the viewfinder.
22• You can adjust the brightness of the viewfinder with the 
 >[£Display Setup] >[Viewfinder Backlight] setting.
• Make sure you keep the eye cup attached when using the camcorder.
If you wear glasses, you may find the viewfinder easier to use if you flip back the outer edge of the eye cup toward the camcorder body.
Adjusting the Grip Belt and Using Straps
Fasten the grip belt.
• Adjust the grip belt so that you can reach the grip zoom rocker with your index finger, and the REC button with your thumb.
To attach an optional WS-20 Wrist Strap |
To attach an optional SS-600/SS-650 Shoulder Strap |

Preparing the Camcorder
Wireless Controller
First, insert the supplied CR2025 lithium button battery into the |
|
|
||
wireless controller. |
|
|
||
1 |
Press the tab in the direction of the arrow ( ) and pull out |
|
23 |
|
|
the battery holder ( ). |
|
||
|
|
|
||
2 |
Place the lithium button battery with the + side facing up |
|
|
|
|
( ). |
|
||
|
|
|
||
3 |
Insert the battery holder ( ). |
|
||
|
||||
To use the wireless controller
Point the wireless controller at the camcorder’s remote sensor when you press the buttons.
• You can rotate the LCD panel 180 degrees to use the wireless controller from the front of the camcorder.
 NOTES
NOTES
•When the camcorder cannot be operated with the wireless controller,
or when it can only be operated at very close range, replace the battery.
•The wireless controller may not work properly when the remote sensor is situated under strong light sources or direct sunlight.

Basic Operation of the Camcorder
Basic Operation of the Camcorder
Turning the Camcorder On and Off
24The camcorder has two operating modes: CAMERA ( ) mode for making recordings or MEDIA (
 ) mode for playing back recordings. Select the operating mode using the power switch.
To turn on the camcorder
Set the power switch to CAMERA for  mode (A35) or
MEDIA for  mode (A87).
mode |
mode |
To turn off the camcorder
Set the power switch to OFF.
 NOTES
NOTES
•When you turn on the camcorder, the POWER/CHG indicator will illuminate in green. You can set 
 > [BSystem Setup] >[POWER LED] to [jOff] so the power indicator does not illuminate.
Basic Operation of the Camcorder
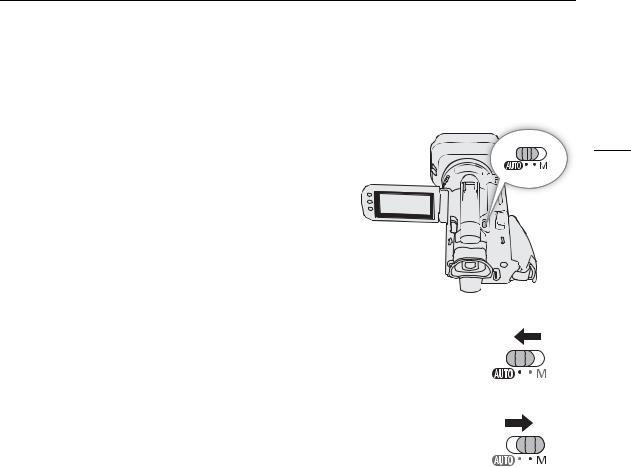
Changing the Camcorder's Operating Mode
When making recordings, you can change the camera mode to match your shooting style (A35).
25
 (Auto) mode
Set the mode switch to N. With this mode, the camcorder takes care of all the settings while you concentrate on recording. This operating mode is suitable if you just prefer not to bother with detailed camcorder settings.
 (Manual) mode
Set the mode switch to n. With this mode, you can enjoy full access to menus, settings and advanced functions.

Date, Time and Language Settings
Date, Time and Language Settings
Setting the Date and Time
26You will need to set the date and time of the camcorder before you can start using it. The [Date/Time] screen will appear automatically when the camcorder’s clock is not set.
Operating modes: 


1 Turn on the camcorder.
• The [Date/Time] screen will appear.
2Touch a field you want to change (year, month, day, hours or minutes).
•You can also push the joystick (ÏÐ) to move between the fields.
3Touch [Í] or [Î] to change the field as necessary.
•You can also push the joystick (Ý) to change the field.
4Set the correct date and time by changing all the fields in the same way.
5Touch [Y.M.D], [M.D,Y] or [D.M.Y] to select the date format you prefer.
•You can also push the joystick to select the desired button and press SET to confirm. The same is true for the rest of the steps in this procedure.
•In some screens, the date will be displayed in short form (numbers instead of month names or only the day and month), but it will still follow the order you selected.
6Touch [24H] to use 24-hour clock or leave it unselected to use 12-hour clock (AM/PM).
7Touch [OK] to start the clock and close the setup screen.
 NOTES
NOTES
•With the following settings, you can change the time zone, date and time also after the initial setup. You can also change the date format and clock format (12 or 24 hours).
-
 >[
>[ System Setup] >[Time Zone/DST]
-
 >[
>[ System Setup] >[Date/Time]
•When you do not use the camcorder for about 3 months, the built-in backup battery may be depleted completely and the date and time setting may be lost. In such case, recharge the built-in backup battery (A115) and set the time zone, date and time again.
•Using the optional GP-E2 GPS Receiver, you can have the camcorder adjust settings automatically according to the UTC date/time information received from the GPS signal (A80).
Date, Time and Language Settings
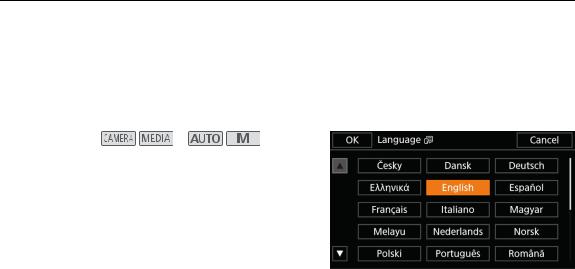
Changing the Language
The default language of the camcorder is English. You can set it to one of 27 languages.
Refer to Setup Menus (A28) for details on how to navigate the menu to complete this procedure.
Operating modes: |
27 |
|
|
|
|
1 Select [Language H].

 >[B!System Setup] >[Language H]
2Select the desired language and then select [OK].
3Select [X] to close the menu.
Changing the Time Zone
Change the time zone to match your location. The default setting is New York. In addition, the camcorder is able to retain the date and time of an additional location. This is convenient when you travel so that you can set the camcorder to match the time of your home location or that of your travel destination.
Refer to Setup Menus (A28) for details on how to navigate the menu to complete this procedure.
Operating modes: 


1Select [Time Zone/DST].

 >[B!System Setup] >[Time Zone/DST]
2Select ["] to set the home time zone, or [#] to set the time zone of your destination when you are traveling.
3Select [Ï] or [Ð] to set the desired time zone. If necessary, select [$] to adjust for daylight saving time.
4Select [X] to close the menu.
Using the Menus
Using the Menus
The camcorder's functions can be adjusted from the setup menus, accessed by pressing the MENU button, or from the FUNC menu, accessed by touching or selecting the onscreen [FUNC] button. For details about the
28available menu options and settings, refer to Menu Options (A101). Operating modes: 


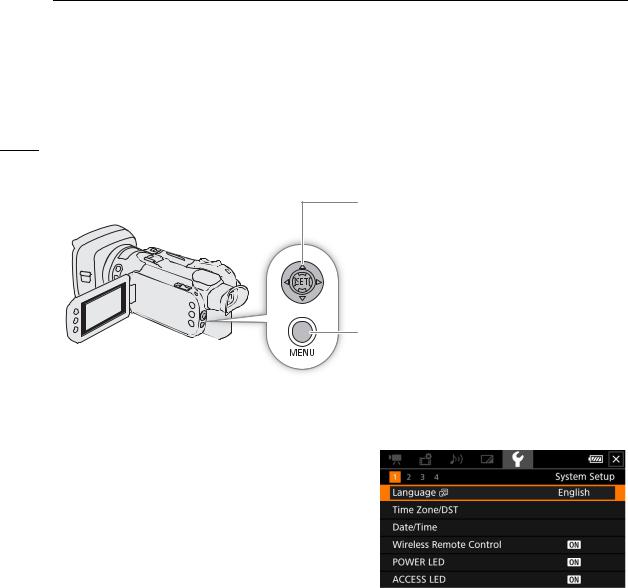
Joystick/SET button
When making a menu selection, push the joystick to move the orange selection frame in the menu. Then, press the joystick itself (in the manual, "press SET") to select the menu item indicated by the orange selection frame.
MENU button
Press the button to open the setup menus and then press again to close the menu after adjusting desired settings.
Setup Menus
Following is a step-by-step explanation of how to select a typical option from the setup menus. Some menu items may require additional steps. Such operations will be explained in the respective section of the manual.
For brevity's sake, references to menu settings throughout the manual may be abbreviated as follows:

 >[B!System Setup] >[Language H] > Desired option
To use the touch panel
1Press the MENU button.
2Touch the icon of the desired setup menu from the top row.
•In the example, the Bicon, corresponding to the [System Setup] menu.
3Touch the desired menu item ([Language H], in the example).
•If the desired menu item does not appear in the menu page displayed, drag your finger left/right to scroll through other menu pages.
•For main procedures, the page number may be given in the manual (!, in the example). If you know the page number, you can touch the number icon at the top left of the screen to open directly the desired menu page.
•The page number may differ depending on the camcorder’s operating mode. Throughout the manual, procedures for functions that can be used in both modes give the page number in  mode.
mode.
4Touch the desired setting option and then touch [X] to close the menu.
•You can touch [L] to return to the previous menu page.
Using the Menus
To use the joystick
1Press the MENU button.
2Push the joystick (Þ) to select the icon of the desired setup menu.
• In the example, the Bicon, corresponding to the [System Setup] menu. |
29 |
•If one of the icons in the top row is not selected when you open the menu, first push the joystick (Ý) to move the orange selection frame to one of the icons.
3Push the joystick (Ý) to select the desired menu item ([Language H], in the example) and then press SET.
•If the desired menu item does not appear in the menu page displayed, push the joystick (Þ) to scroll through other menu pages.
•For main procedures, the page number may be given in the manual (!, in the example), making it easier to find the desired menu page.
4Push the joystick (Ý) to select the desired setting option and then press SET.
5Press the MENU button to close the menu.
•You can push the joystick to highlight the [L] button and press SET to return to the previous menu page. You can also highlight the [X] button and press SET to close the menu.
 NOTES
NOTES
•You can press the MENU button on the supplied wireless controller to display the setup menus.
•Touching [X] or pressing the MENU button at any time closes the menu.
•Unavailable items may appear grayed out.
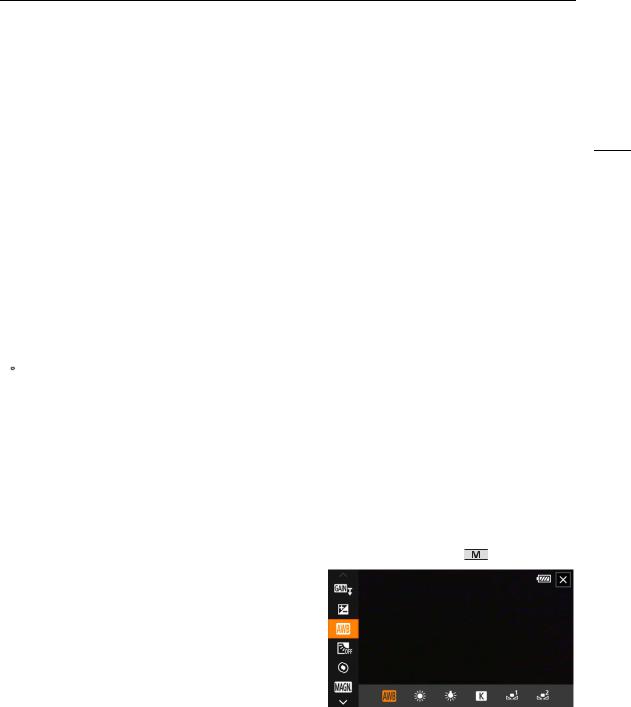
FUNC Menu
In  mode, the FUNC menu offers a quick way to control various shooting related functions such as white balance, exposure, focus, etc. Available functions are more limited in
  mode.
mode.
To use the touch panel |
FUNC menu in |
mode |
1Touch [FUNC] on the shooting screen.
2Touch the icon of the desired function on the left column.
• If necessary, touch [ ]/[
]/[ ] to scroll up/down.
3Touch the icon of the desired setting on the bottom row.
4Touch [X] to close the FUNC menu or [L] to return to the left column.
To use the joystick
1On the shooting screen, push the joystick to select [FUNC] and then press SET.
2Push the joystick (Ý) to select the desired icon from the left column and then press SET.
3Push the joystick (Þ) to select the desired icon from the bottom row and then press SET.
•To select a value from an adjustment dial, first push the joystick (Î) to highlight the dial in orange and then (Þ) to select the desired value.
4Select [X] to close the FUNC menu or [L] to return to the left column.

Using the Menus
 NOTES
NOTES
•Depending on the selected function, other buttons, adjustment dials, and other controls may appear on the screen. These are explained in the respective section of the manual.
30
Loading...